HP LaserJet Enterprise MFP M630 - Hewlett Packard · HP LaserJet Enterprise MFP M630. ENWW 1. 2...
40
HP LaserJet Enterprise MFP M630 On-site Support Installation and Setup Guide
Transcript of HP LaserJet Enterprise MFP M630 - Hewlett Packard · HP LaserJet Enterprise MFP M630. ENWW 1. 2...

HP LaserJet Enterprise MFP M630
On-site Support Installation and Setup Guide

Copyright and License
© 2014 Copyright Hewlett-PackardDevelopment Company, L.P.
Reproduction, adaptation, or translationwithout prior written permission isprohibited, except as allowed under thecopyright laws.
The information contained herein is subjectto change without notice.
The only warranties for HP products andservices are set forth in the expresswarranty statements accompanying suchproducts and services. Nothing hereinshould be construed as constituting anadditional warranty. HP shall not be liablefor technical or editorial errors or omissionscontained herein.
Edition 1, 9/2014
Trademark Credits
Microsoft®, Windows®, Windows® XP, andWindows Vista® are U.S. registeredtrademarks of Microsoft Corporation.
Table of contents
1 Introduction ....................................................................................................................................................... 1
2 Customer responsibilities .................................................................................................................................. 2
3 Pre-installation steps ......................................................................................................................................... 3
4 Installation steps ............................................................................................................................................... 5Verify the location ................................................................................................................................. 6
M630dn, M630h dimensions ................................................................................................ 6M630f dimensions ................................................................................................................ 7M630z dimensions ............................................................................................................... 7
Unpack the product .............................................................................................................................. 8M630dn, M630h ................................................................................................................... 8M630f ................................................................................................................................... 8M630z .................................................................................................................................. 8
Remove the protective packaging ........................................................................................................ 9Install the output tray (M630dn, M630h, M630f) ................................................................................. 11Install the stapling mailbox accessory (M630z) .................................................................................. 12Load the paper ................................................................................................................................... 13Connect the product to the network ................................................................................................... 14Connect the fax .................................................................................................................................. 15Connect the power cable .................................................................................................................... 16Connect the USB cable ...................................................................................................................... 17Complete the initial setup from the control panel ............................................................................... 18Determine the firmware version on the product ................................................................................. 19Determine if a more current version of the firmware is available ....................................................... 22Upgrade the firmware ......................................................................................................................... 23
5 Product hardware setup and software installation .......................................................................................... 28
ENWW iii

6 Customer walkaround ..................................................................................................................................... 29Product front view ............................................................................................................................... 30Product back view .............................................................................................................................. 31Interface ports .................................................................................................................................... 32Serial number and product number location ...................................................................................... 33Control-panel view .............................................................................................................................. 34
7 Customer support ........................................................................................................................................... 36
iv ENWW
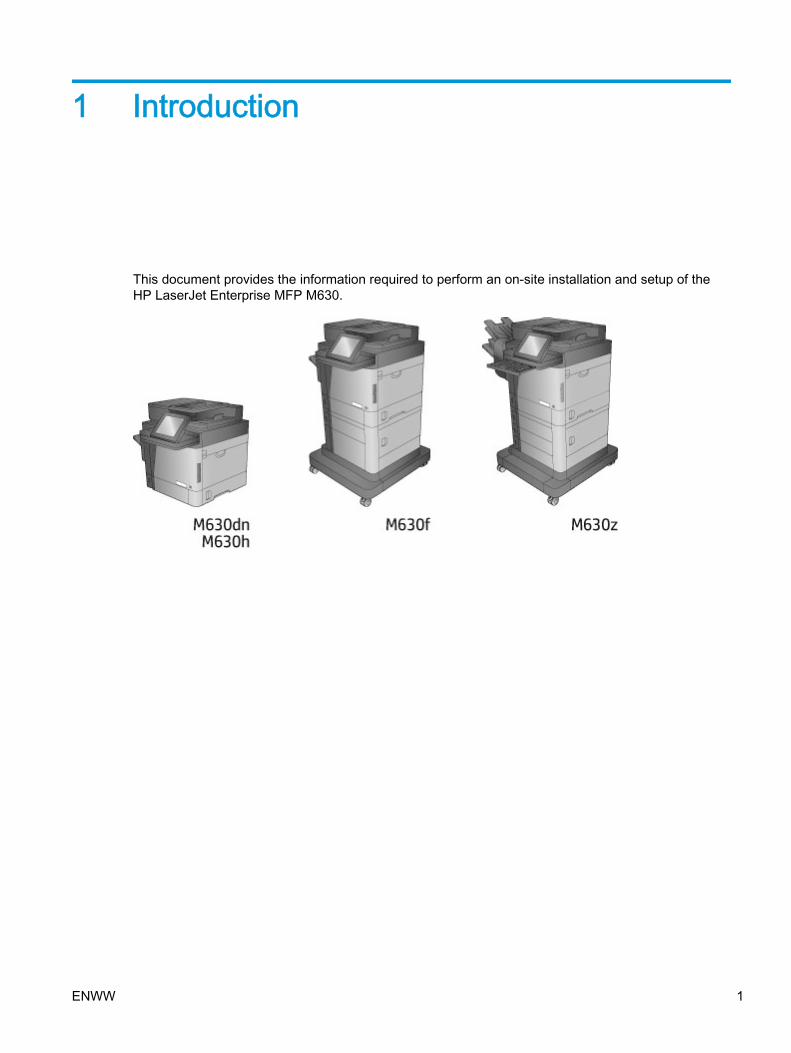
1 Introduction
This document provides the information required to perform an on-site installation and setup of theHP LaserJet Enterprise MFP M630.
ENWW 1
2 Customer responsibilities
The customer is responsible for the following tasks:
● Place the product in the location where it will be installed.
● Provide additional people to help move and unpack the product.
● Dispose of the packaging materials.
● Provide a network connection for each product.
● Provide the appropriate electrical power source at the installation location.
● Ensure that the people who are responsible for managing the network environment are availablewhen the product is being installed.
2 Chapter 2 Customer responsibilities ENWW
3 Pre-installation steps
1. Before going to the customer site, download the current firmware for the product to a USB flashdrive.
NOTE: Check SAW and CSN for any mandatory firmware upgrades for the HP LaserJetEnterprise MFP M630.
2. Go to www.hp.com/support.
3. Select the country/region.
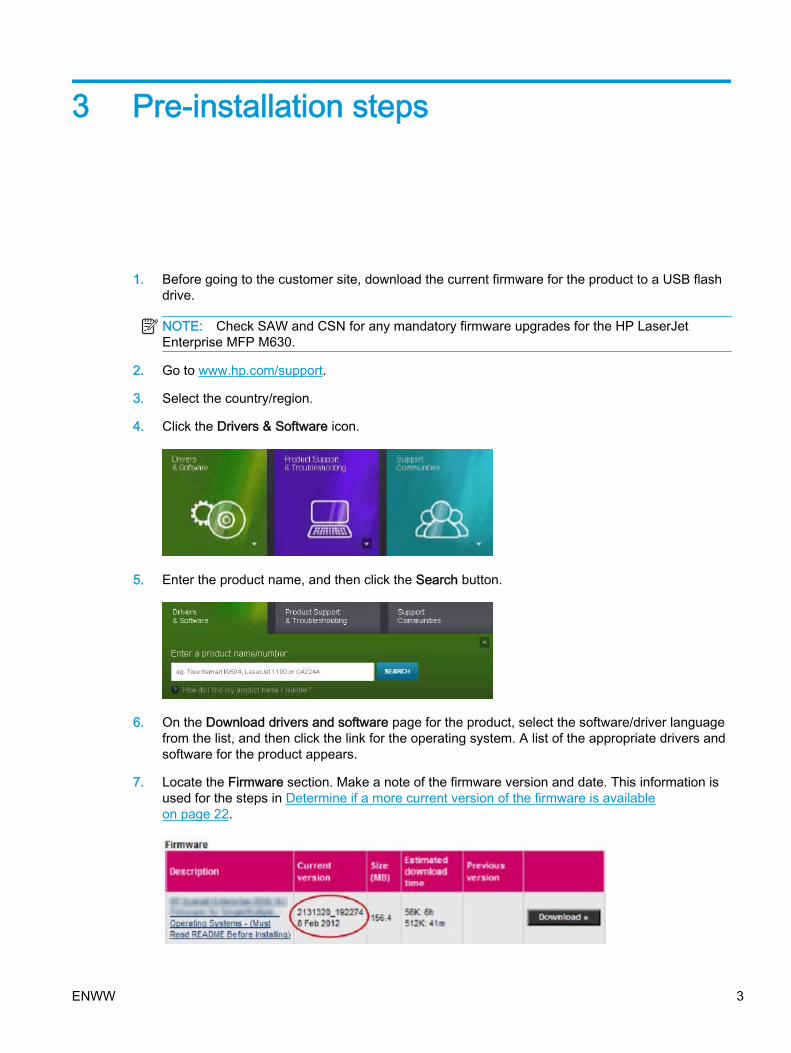
4. Click the Drivers & Software icon.
5. Enter the product name, and then click the Search button.
6. On the Download drivers and software page for the product, select the software/driver languagefrom the list, and then click the link for the operating system. A list of the appropriate drivers andsoftware for the product appears.
7. Locate the Firmware section. Make a note of the firmware version and date. This information isused for the steps in Determine if a more current version of the firmware is availableon page 22.
ENWW 3

8. Click the Download button, and then save the firmware upgrade file to a USB flash drive.
CAUTION: Respond appropriately to any Service Advisories for the selected firmwaredownload.
9. Open the downloaded firmware upgrade file, and then extract the firmware bundle file to theUSB flash drive.
4 Chapter 3 Pre-installation steps ENWW
4 Installation steps
● Verify the location
● Unpack the product
● Remove the protective packaging
● Install the output tray (M630dn, M630h, M630f)
● Install the stapling mailbox accessory (M630z)
● Load the paper
● Connect the product to the network
● Connect the fax
● Connect the power cable
● Connect the USB cable
● Complete the initial setup from the control panel
● Determine the firmware version on the product
● Determine if a more current version of the firmware is available
● Upgrade the firmware
ENWW 5
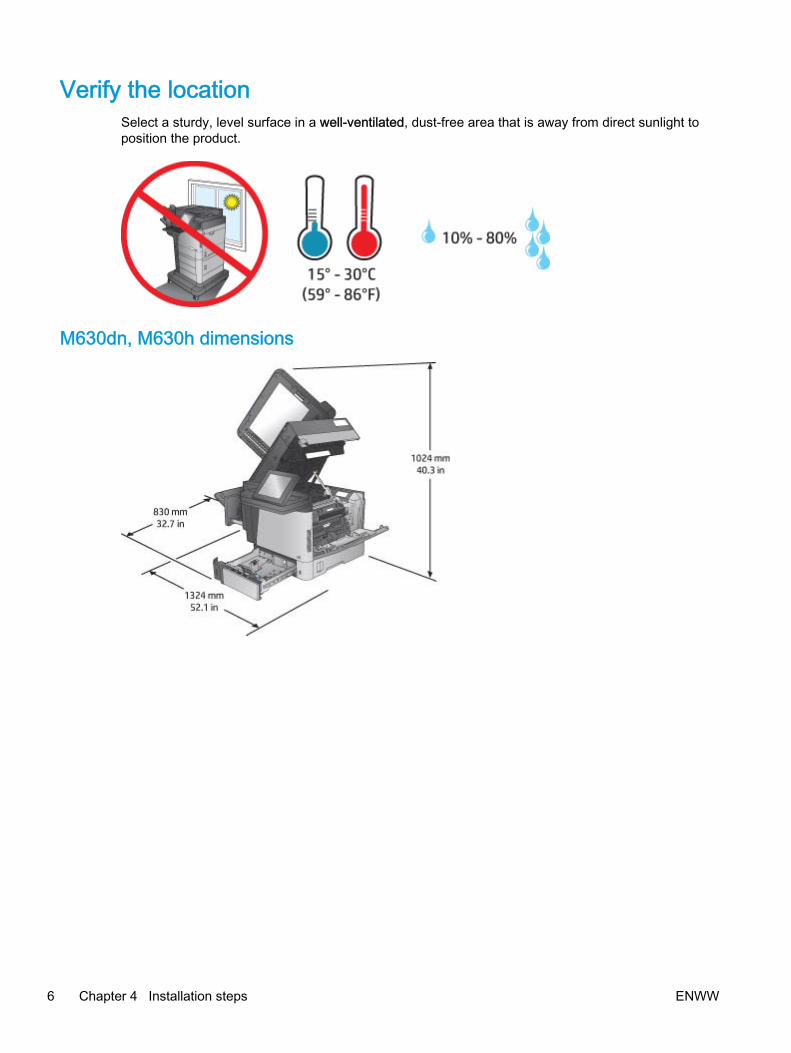
Verify the locationSelect a sturdy, level surface in a well-ventilated, dust-free area that is away from direct sunlight toposition the product.
M630dn, M630h dimensions
6 Chapter 4 Installation steps ENWW
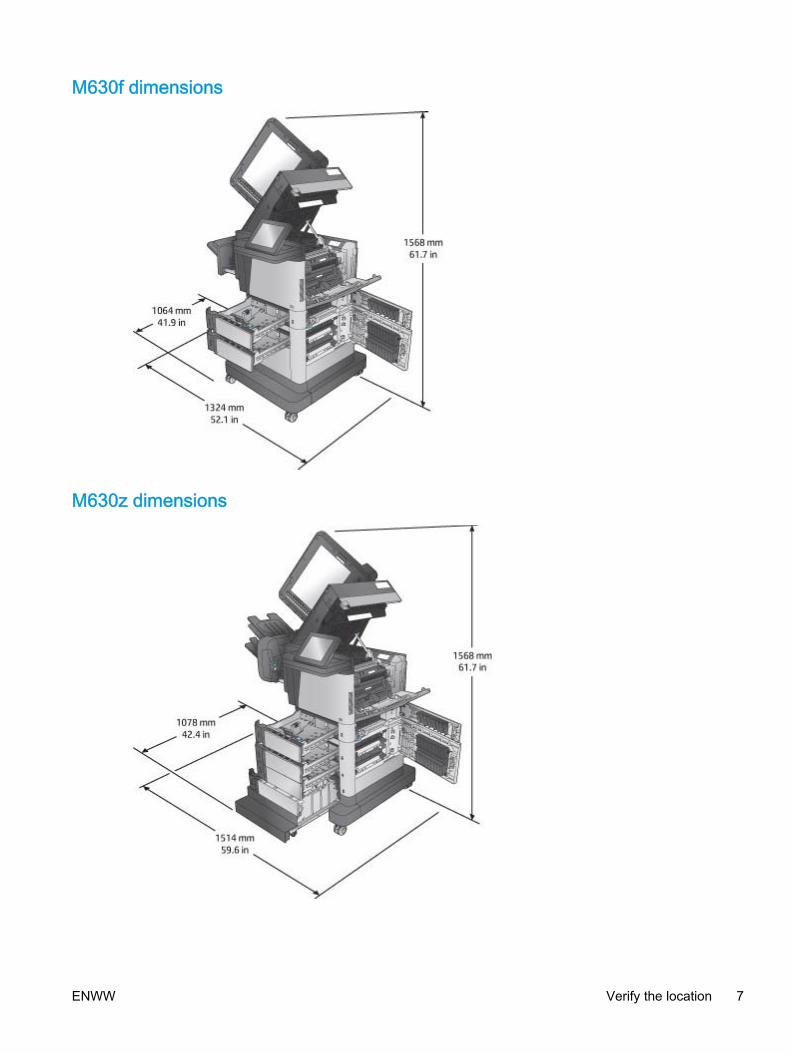
M630f dimensions
M630z dimensions
ENWW Verify the location 7
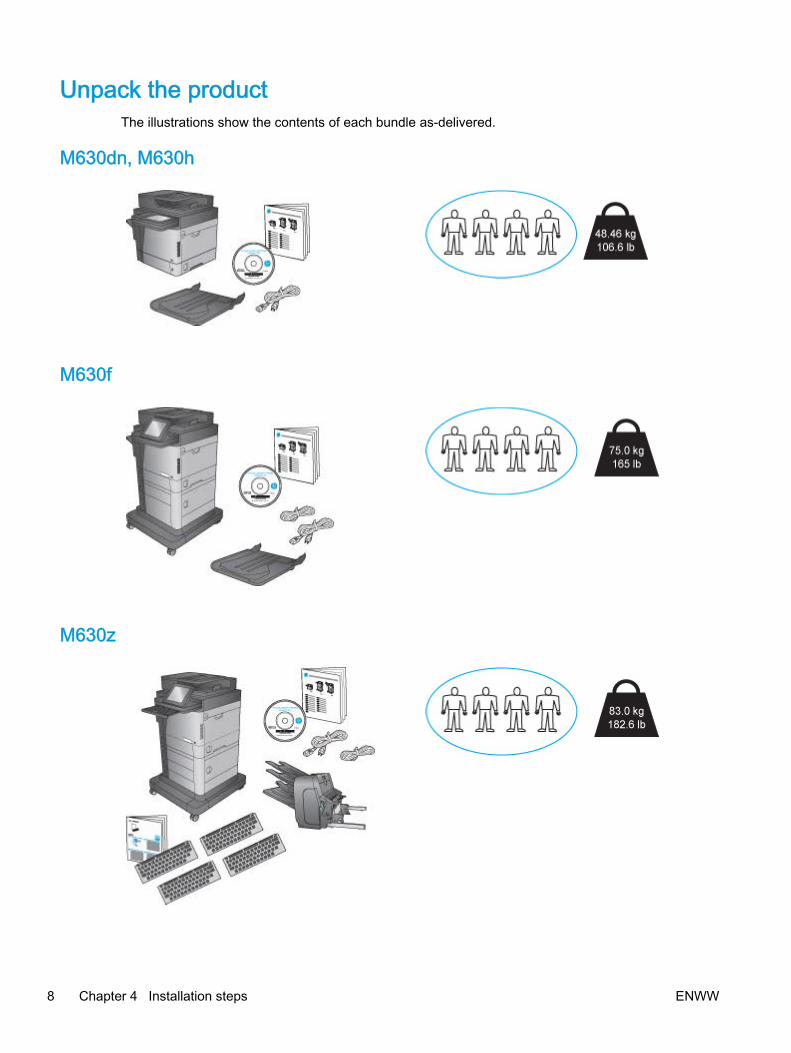
Unpack the productThe illustrations show the contents of each bundle as-delivered.
M630dn, M630h
M630f
M630z
8 Chapter 4 Installation steps ENWW
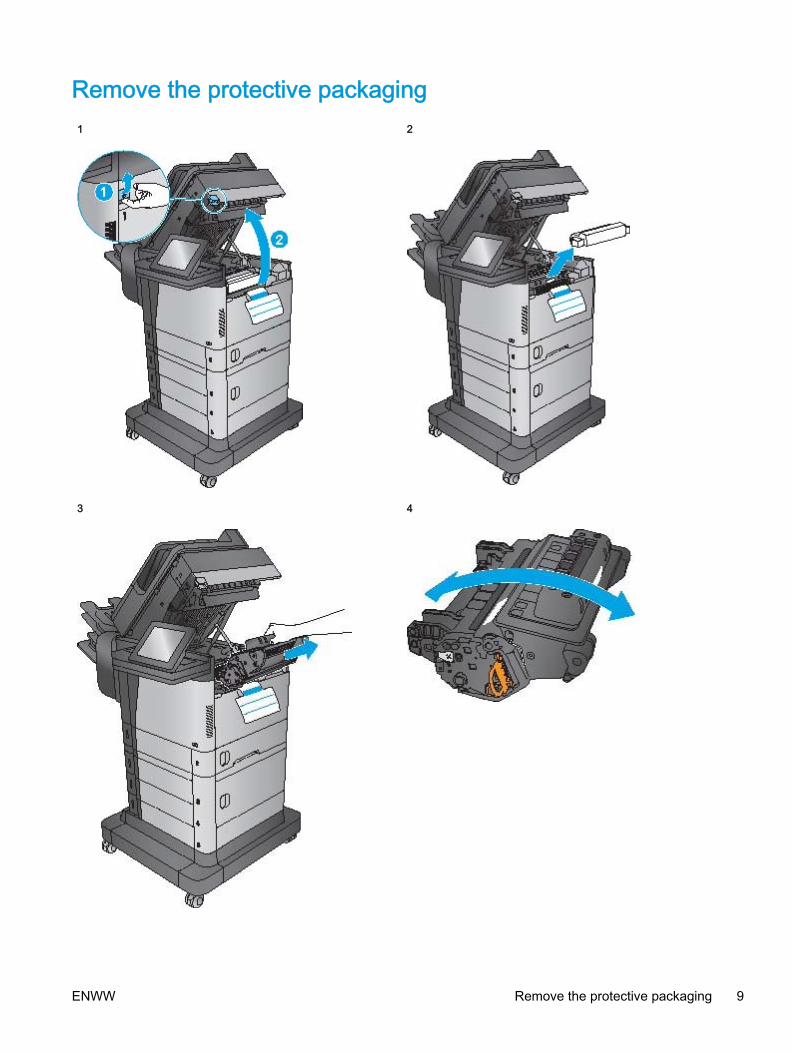
Remove the protective packaging1 2
3 4
ENWW Remove the protective packaging 9
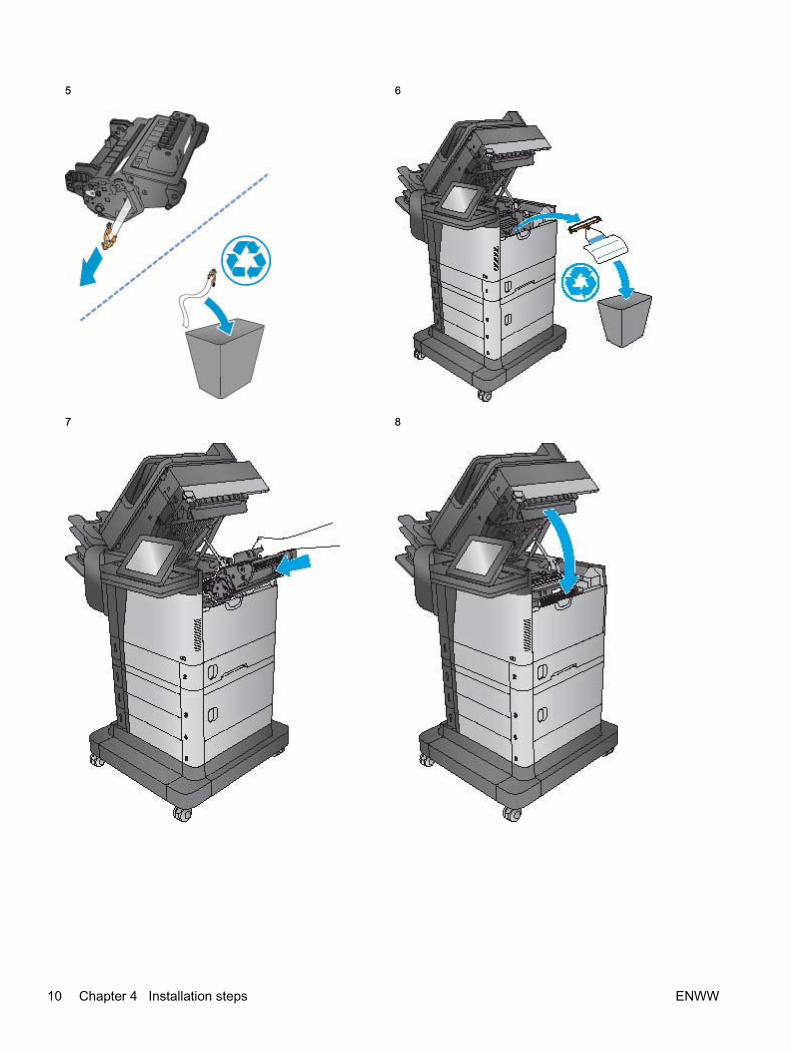
5 6
7 8
10 Chapter 4 Installation steps ENWW
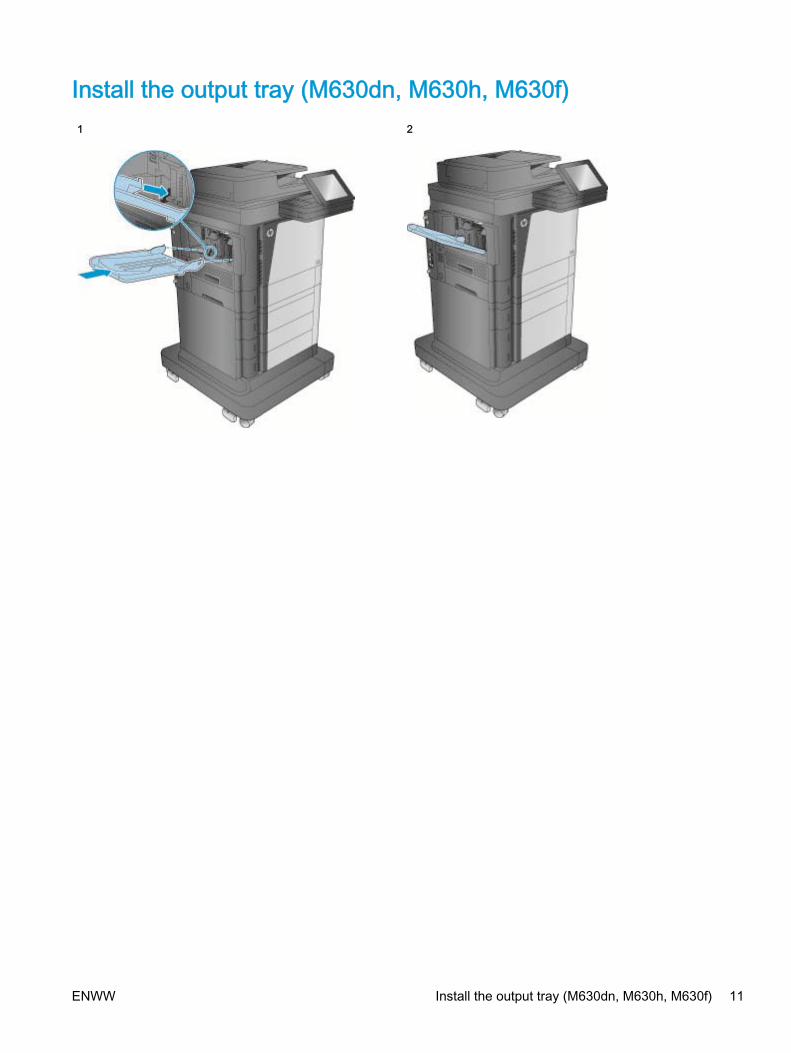
Install the output tray (M630dn, M630h, M630f)1 2
ENWW Install the output tray (M630dn, M630h, M630f) 11
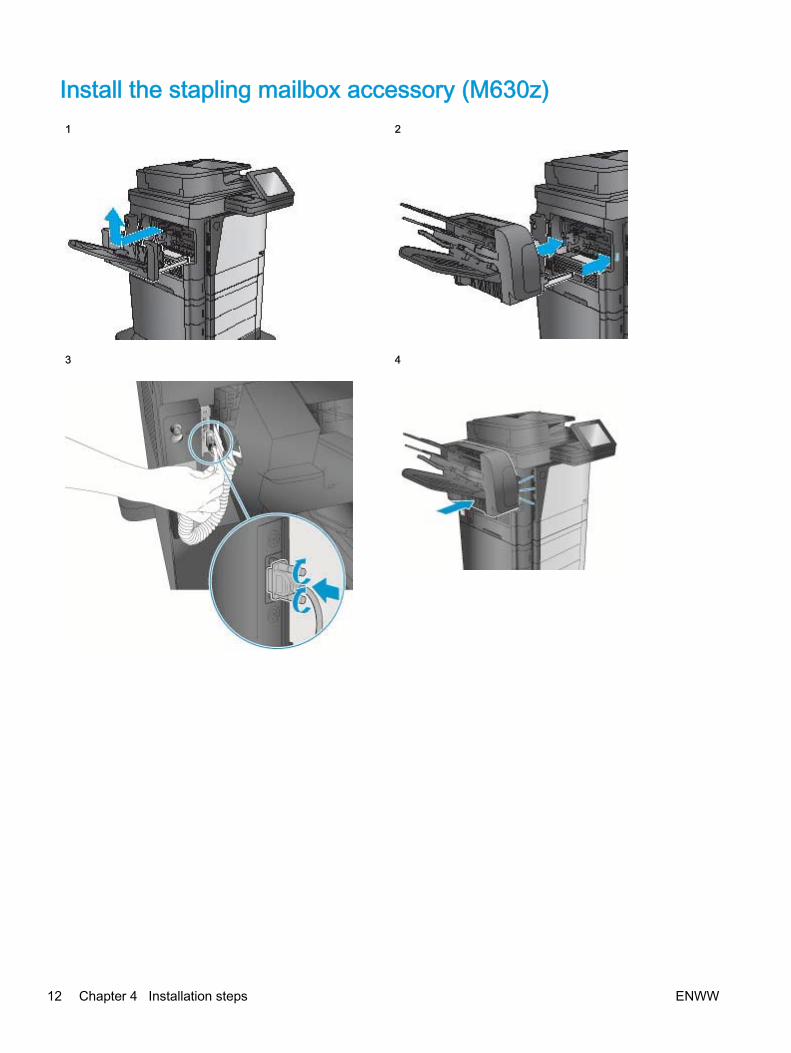
Install the stapling mailbox accessory (M630z)1 2
3 4
12 Chapter 4 Installation steps ENWW
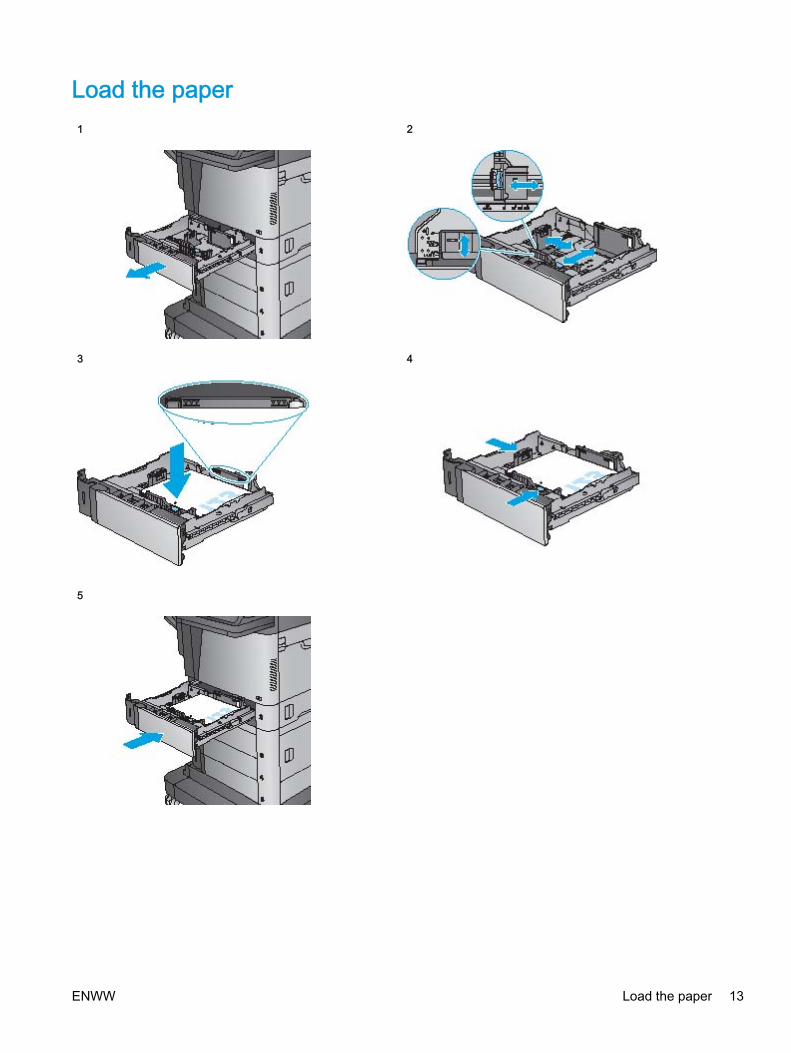
Load the paper1 2
3 4
5
ENWW Load the paper 13
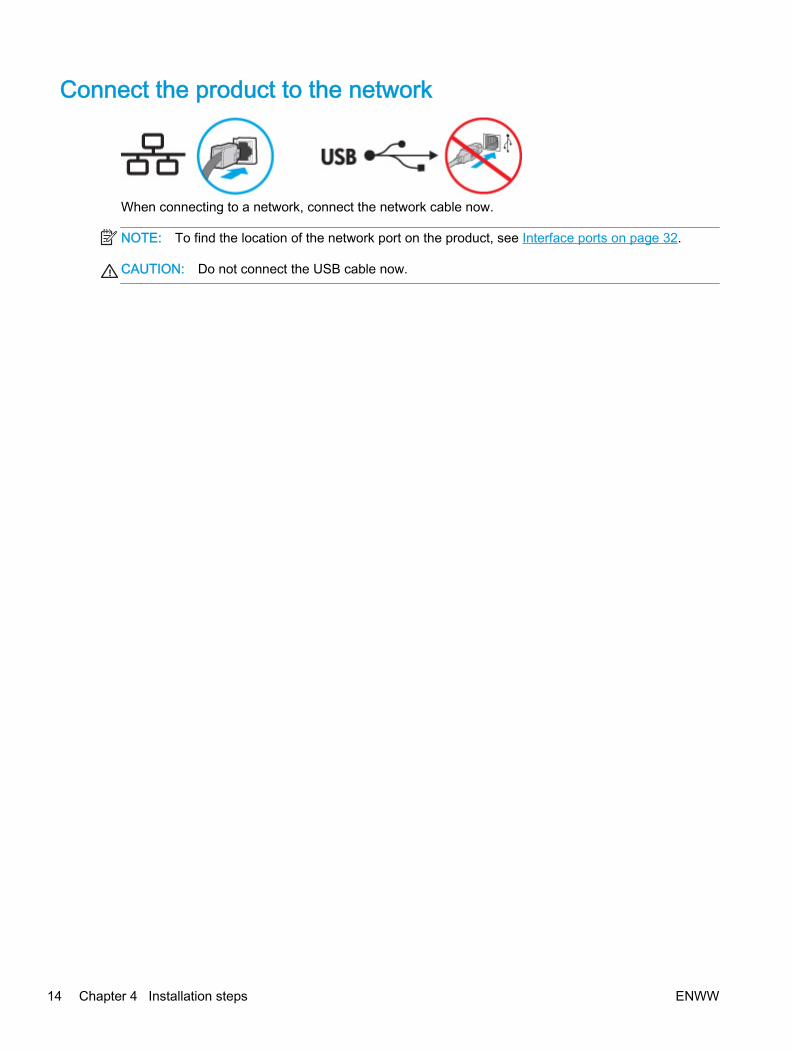
Connect the product to the network
When connecting to a network, connect the network cable now.
NOTE: To find the location of the network port on the product, see Interface ports on page 32.
CAUTION: Do not connect the USB cable now.
14 Chapter 4 Installation steps ENWW

Connect the faxConnect the phone cord for fax. A country/region specific adapter for the RJ11 telephone cord maybe required to connect to the telephone jack.
To find the location of the fax port on the product, see Interface ports on page 32.
ENWW Connect the fax 15
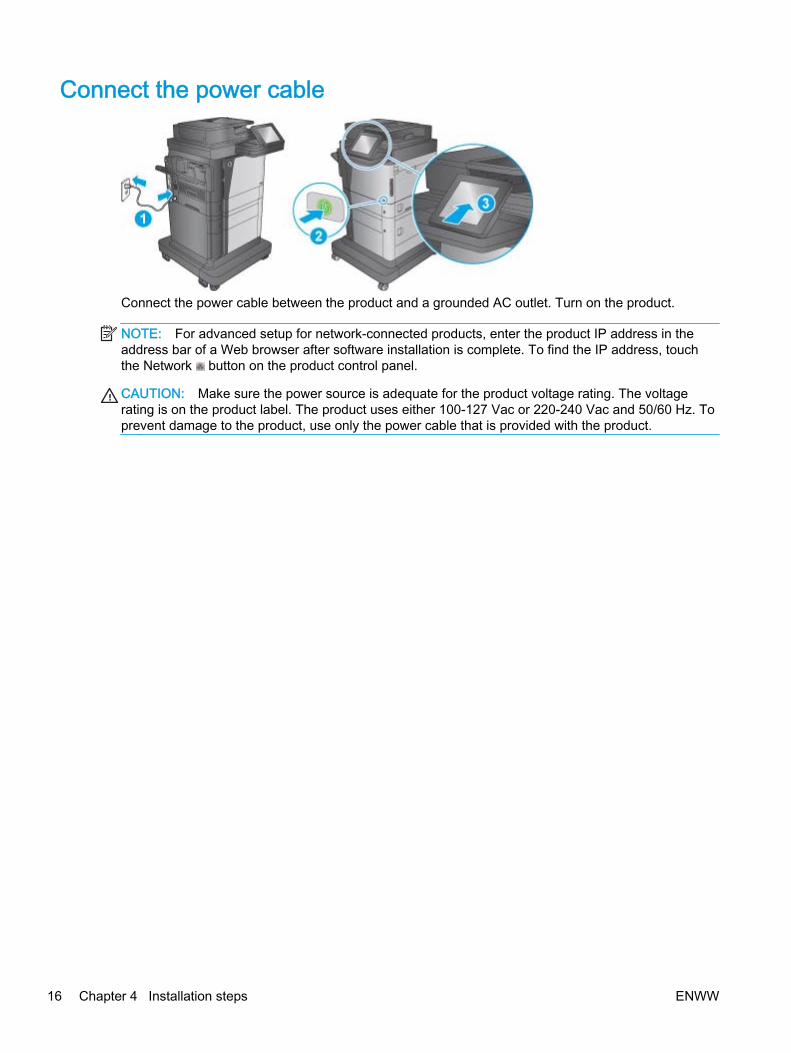
Connect the power cable
Connect the power cable between the product and a grounded AC outlet. Turn on the product.
NOTE: For advanced setup for network-connected products, enter the product IP address in theaddress bar of a Web browser after software installation is complete. To find the IP address, touchthe Network button on the product control panel.
CAUTION: Make sure the power source is adequate for the product voltage rating. The voltagerating is on the product label. The product uses either 100-127 Vac or 220-240 Vac and 50/60 Hz. Toprevent damage to the product, use only the power cable that is provided with the product.
16 Chapter 4 Installation steps ENWW

Connect the USB cable
Windows: Do not connect the USB cable until prompted during the software installation in Producthardware setup and software installation on page 28.
Mac: Connect the USB cable now.
To find the location of the USB port on the product, see Interface ports on page 32.
ENWW Connect the USB cable 17
Complete the initial setup from the control panelWhen the Home screen appears on the control panel, touch the Initial Setup button to configure thefollowing basic functions:
● Language Settings
● Date/Time Format
● Date/Time
● Select the Show "Initial Setup" on Home Screen checkbox to display the Initial Setup icon on theHome screen of the control panel. Touch the OK button.
CAUTION: Make sure that the Show "Initial Setup" on Home Screen checkbox is selected toretain the Initial Setup icon on the Home screen of the control panel. The customer can clear thecheckbox after the initial setup is complete.
18 Chapter 4 Installation steps ENWW
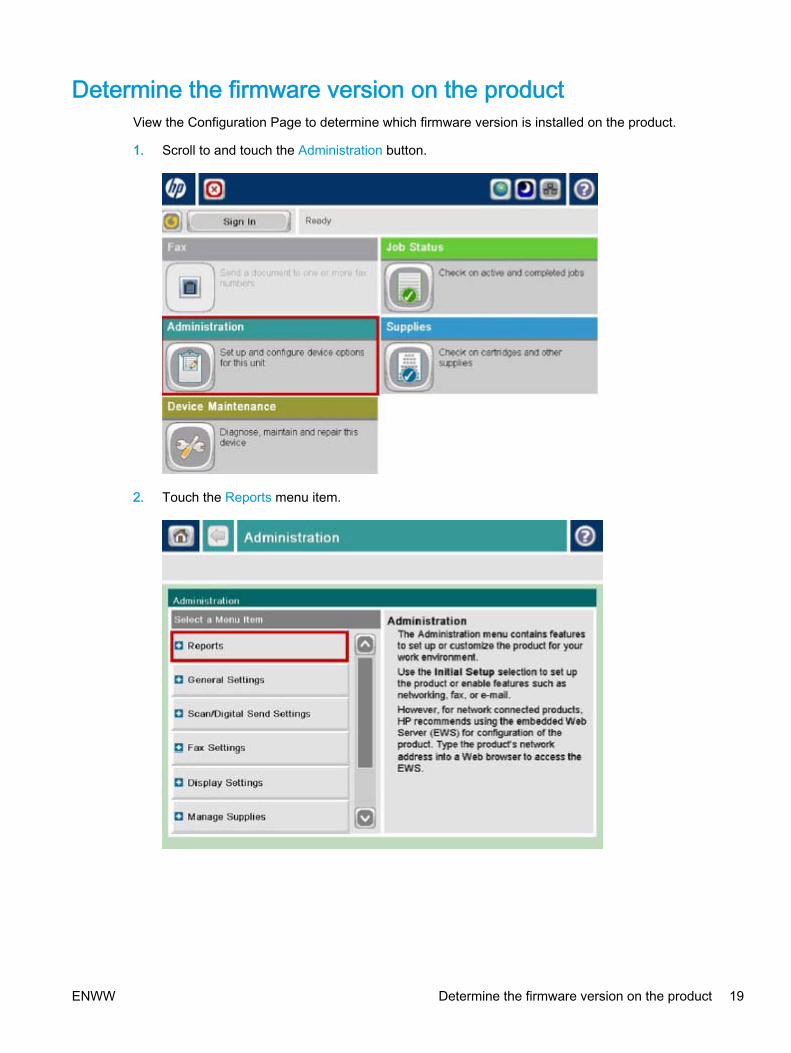
Determine the firmware version on the productView the Configuration Page to determine which firmware version is installed on the product.
1. Scroll to and touch the Administration button.
2. Touch the Reports menu item.
ENWW Determine the firmware version on the product 19
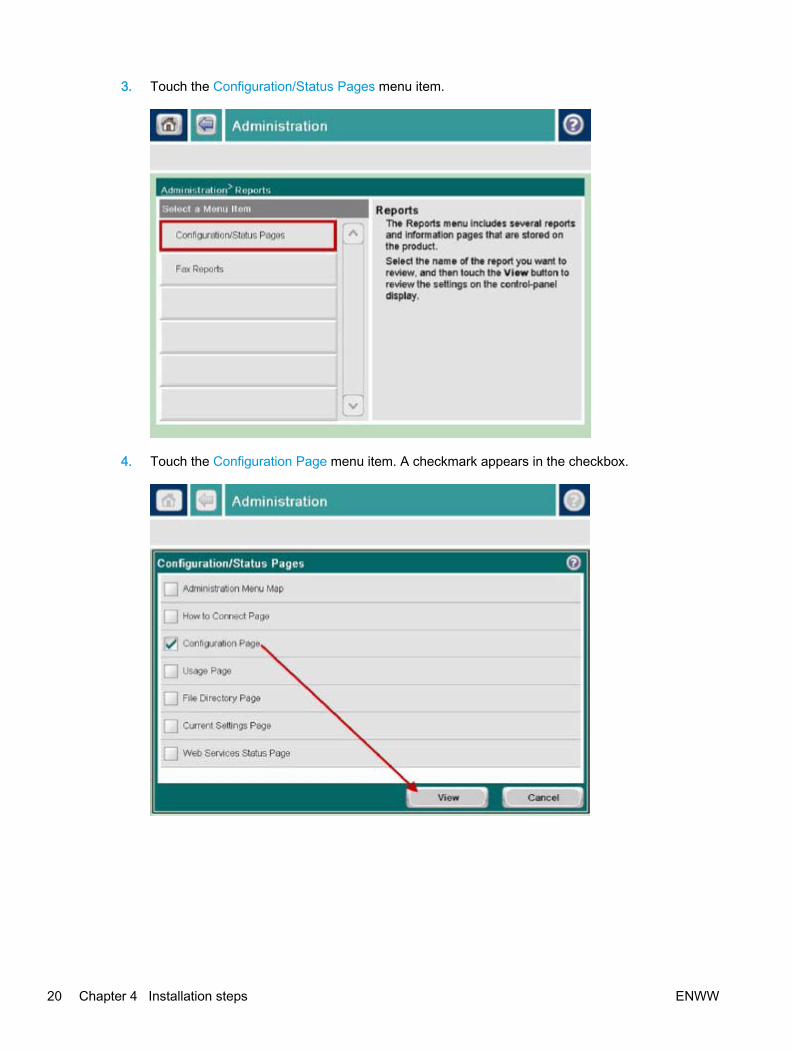
3. Touch the Configuration/Status Pages menu item.
4. Touch the Configuration Page menu item. A checkmark appears in the checkbox.
20 Chapter 4 Installation steps ENWW
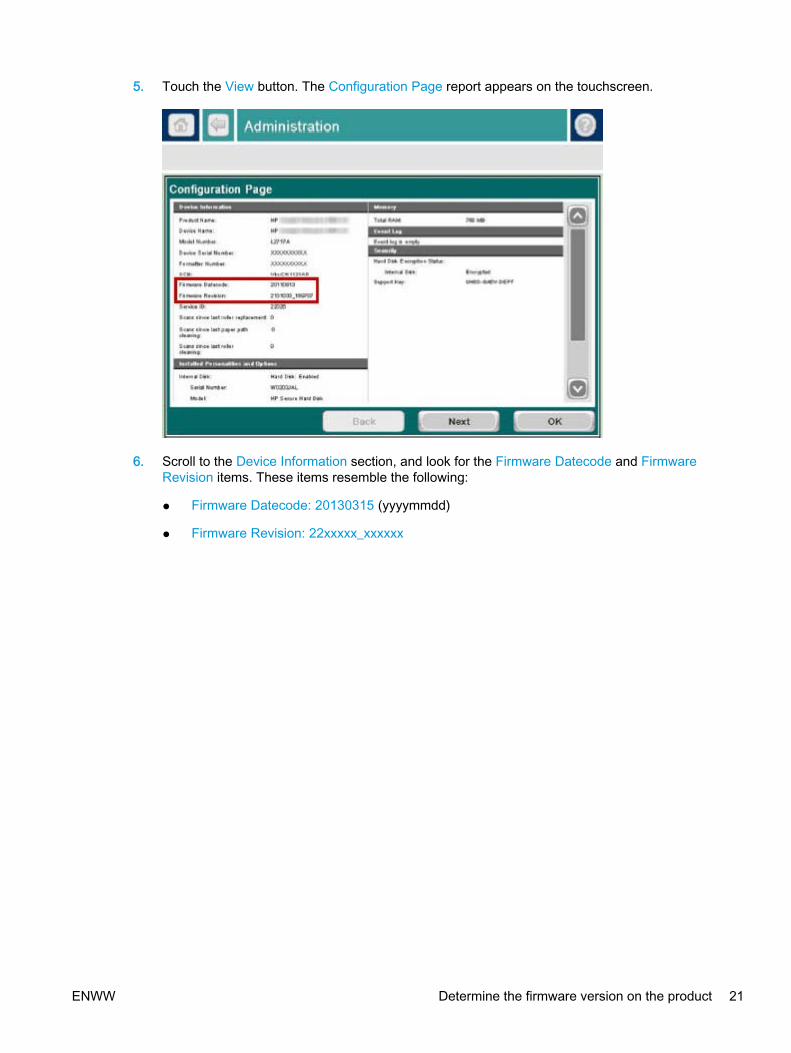
5. Touch the View button. The Configuration Page report appears on the touchscreen.
6. Scroll to the Device Information section, and look for the Firmware Datecode and FirmwareRevision items. These items resemble the following:
● Firmware Datecode: 20130315 (yyyymmdd)
● Firmware Revision: 22xxxxx_xxxxxx
ENWW Determine the firmware version on the product 21

Determine if a more current version of the firmware isavailable
Compare the date and version of the firmware listed on the Configuration Page to the date andversion of the firmware downloaded to the USB flash drive during the steps in Pre-installation stepson page 3.
● If a firmware upgrade is available, go to Upgrade the firmware on page 23, and continue.
● If a firmware upgrade is not needed, go to Product hardware setup and software installationon page 28, and continue.
22 Chapter 4 Installation steps ENWW
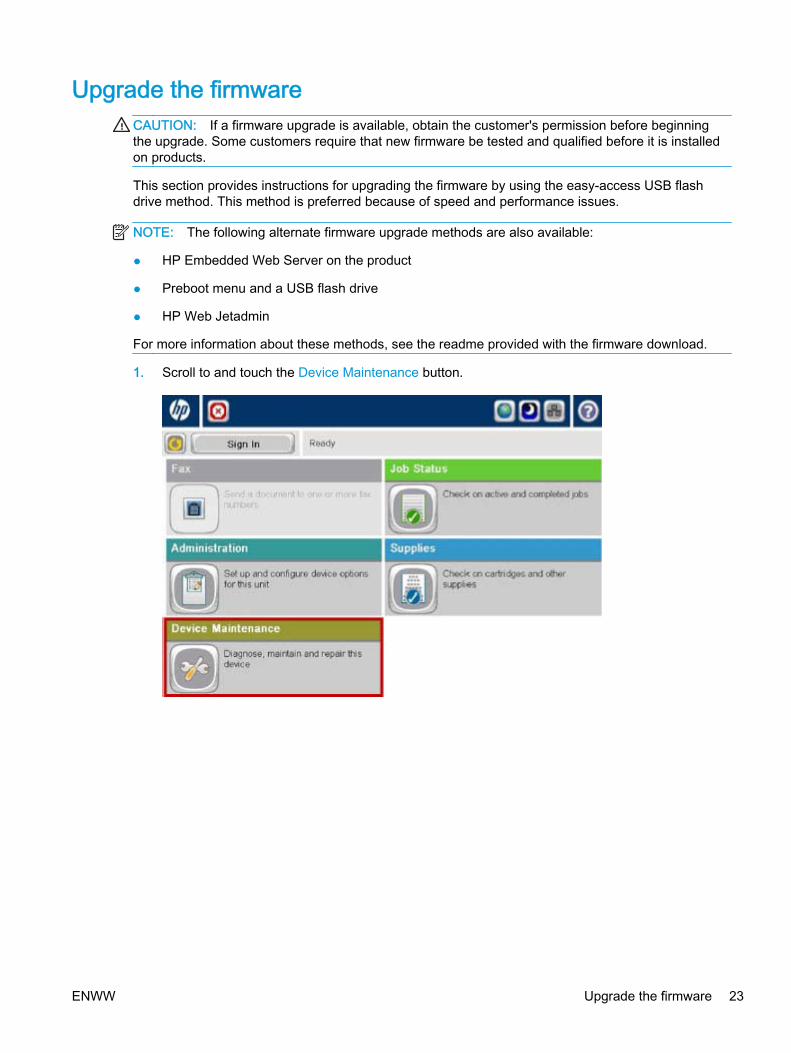
Upgrade the firmwareCAUTION: If a firmware upgrade is available, obtain the customer's permission before beginningthe upgrade. Some customers require that new firmware be tested and qualified before it is installedon products.
This section provides instructions for upgrading the firmware by using the easy-access USB flashdrive method. This method is preferred because of speed and performance issues.
NOTE: The following alternate firmware upgrade methods are also available:
● HP Embedded Web Server on the product
● Preboot menu and a USB flash drive
● HP Web Jetadmin
For more information about these methods, see the readme provided with the firmware download.
1. Scroll to and touch the Device Maintenance button.
ENWW Upgrade the firmware 23
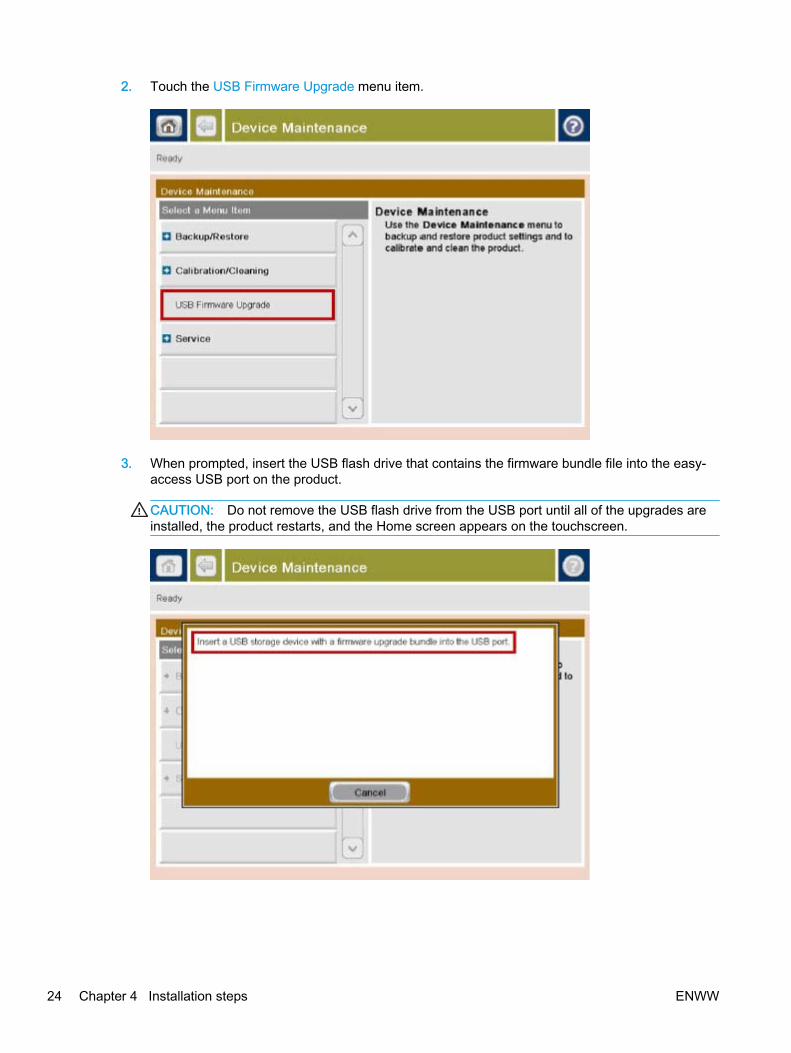
2. Touch the USB Firmware Upgrade menu item.
3. When prompted, insert the USB flash drive that contains the firmware bundle file into the easy-access USB port on the product.
CAUTION: Do not remove the USB flash drive from the USB port until all of the upgrades areinstalled, the product restarts, and the Home screen appears on the touchscreen.
24 Chapter 4 Installation steps ENWW
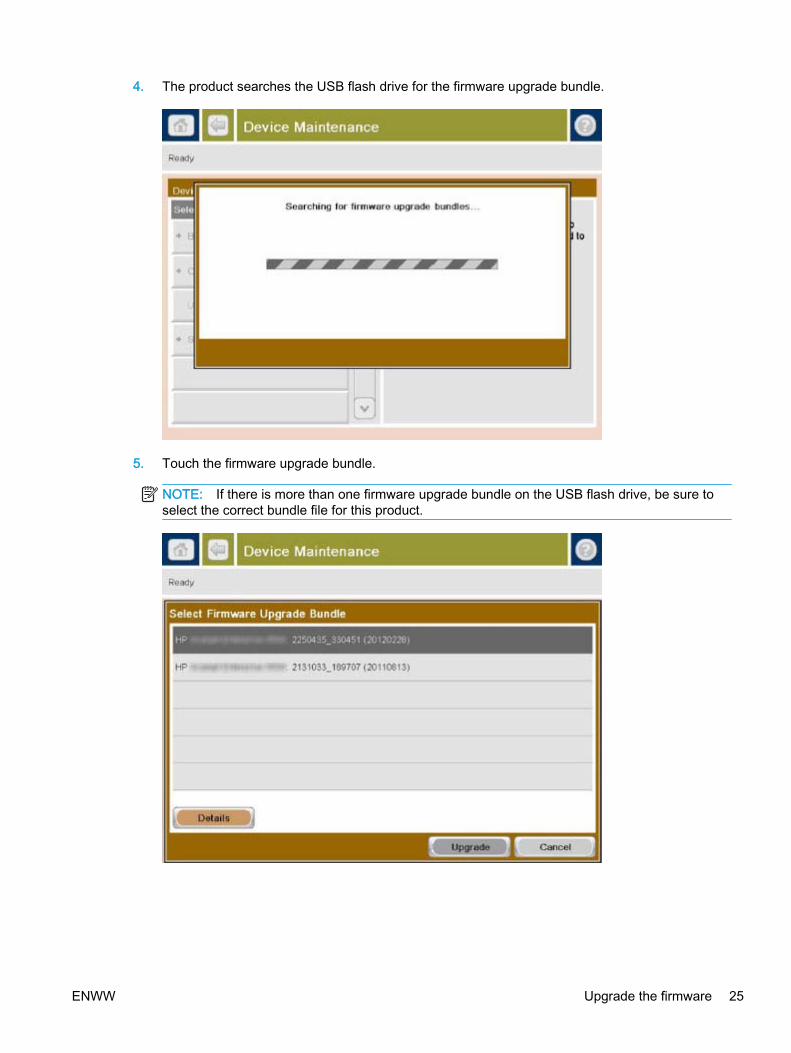
4. The product searches the USB flash drive for the firmware upgrade bundle.
5. Touch the firmware upgrade bundle.
NOTE: If there is more than one firmware upgrade bundle on the USB flash drive, be sure toselect the correct bundle file for this product.
ENWW Upgrade the firmware 25
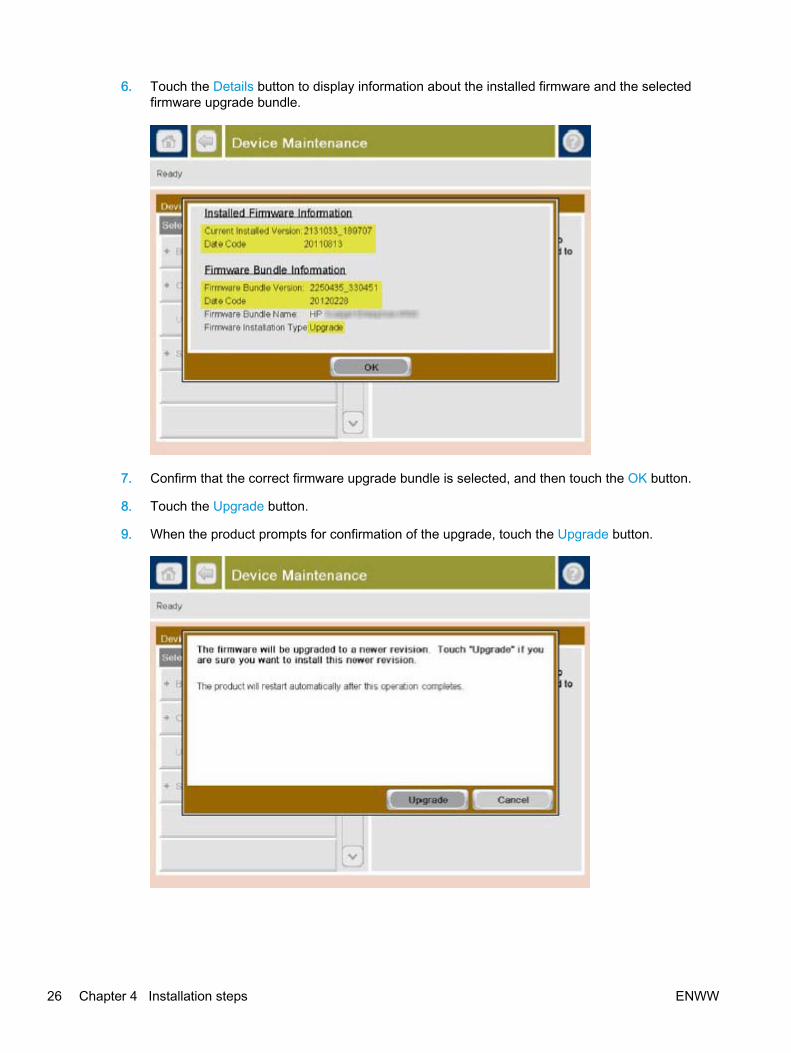
6. Touch the Details button to display information about the installed firmware and the selectedfirmware upgrade bundle.
7. Confirm that the correct firmware upgrade bundle is selected, and then touch the OK button.
8. Touch the Upgrade button.
9. When the product prompts for confirmation of the upgrade, touch the Upgrade button.
26 Chapter 4 Installation steps ENWW
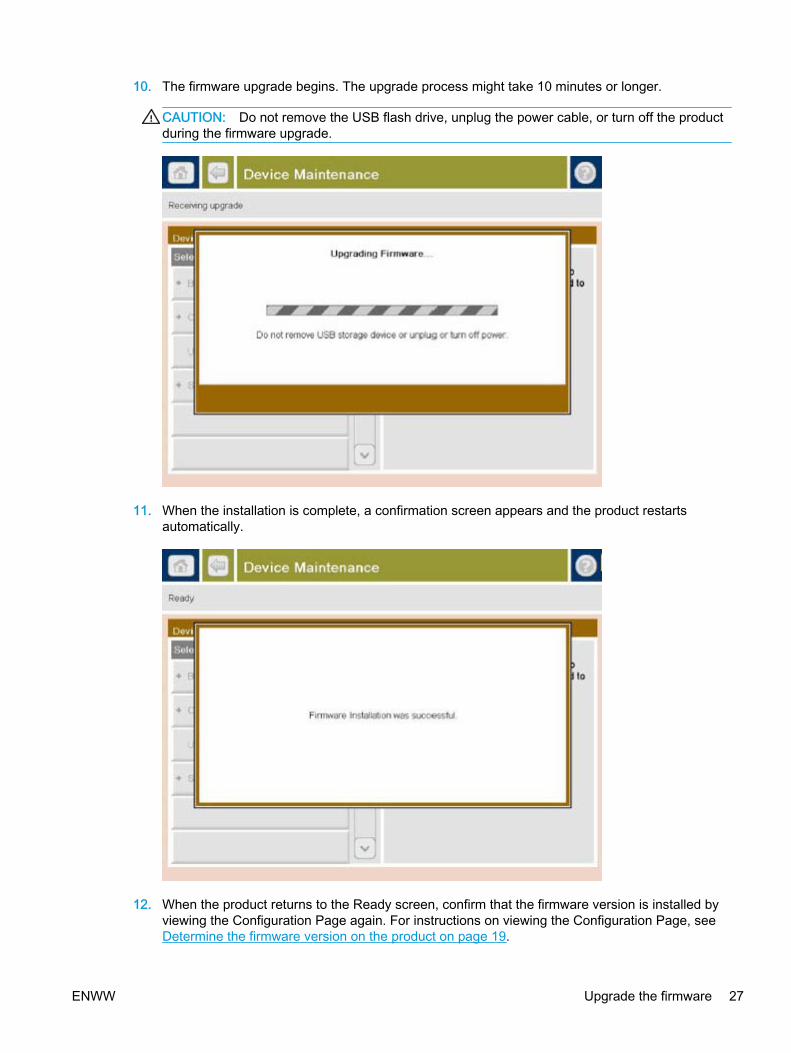
10. The firmware upgrade begins. The upgrade process might take 10 minutes or longer.
CAUTION: Do not remove the USB flash drive, unplug the power cable, or turn off the productduring the firmware upgrade.
11. When the installation is complete, a confirmation screen appears and the product restartsautomatically.
12. When the product returns to the Ready screen, confirm that the firmware version is installed byviewing the Configuration Page again. For instructions on viewing the Configuration Page, seeDetermine the firmware version on the product on page 19.
ENWW Upgrade the firmware 27
5 Product hardware setup and softwareinstallation
For basic setup instructions, see the Hardware Installation Guide that came with the product. Foradditional instructions, go to HP support on the Web.
In the US, go to www.hp.com/support/ljMFPM630.
Outside the US, follow these steps:
1. Go to www.hp.com/support.
2. Select the country/region.
3. Click Product Support & Troubleshooting.
4. Enter the product name, and then click Search.
5. Click the product.
HP's all-inclusive help for the product includes the following:
● Install and configure
● Learn and use
● Solve problems
● Download software updates
● Join support forums
● Find warranty and regulatory information
28 Chapter 5 Product hardware setup and software installation ENWW

6 Customer walkaround
Review the following features with the customer:
● Product front view
● Product back view
● Interface ports
● Serial number and product number location
● Control-panel view
ENWW 29
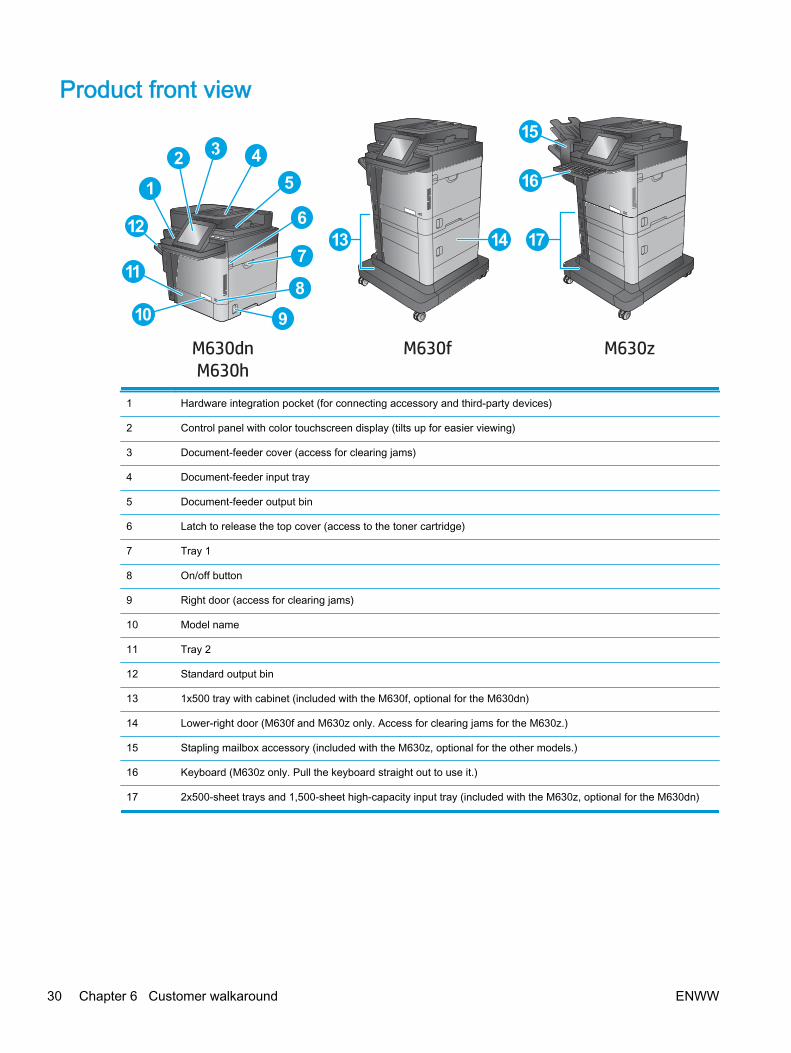
Product front view
M630zM630fM630dnM630h
7
61 5
2 43
1413 17
16
15
12
118
910
1 Hardware integration pocket (for connecting accessory and third-party devices)
2 Control panel with color touchscreen display (tilts up for easier viewing)
3 Document-feeder cover (access for clearing jams)
4 Document-feeder input tray
5 Document-feeder output bin
6 Latch to release the top cover (access to the toner cartridge)
7 Tray 1
8 On/off button
9 Right door (access for clearing jams)
10 Model name
11 Tray 2
12 Standard output bin
13 1x500 tray with cabinet (included with the M630f, optional for the M630dn)
14 Lower-right door (M630f and M630z only. Access for clearing jams for the M630z.)
15 Stapling mailbox accessory (included with the M630z, optional for the other models.)
16 Keyboard (M630z only. Pull the keyboard straight out to use it.)
17 2x500-sheet trays and 1,500-sheet high-capacity input tray (included with the M630z, optional for the M630dn)
30 Chapter 6 Customer walkaround ENWW
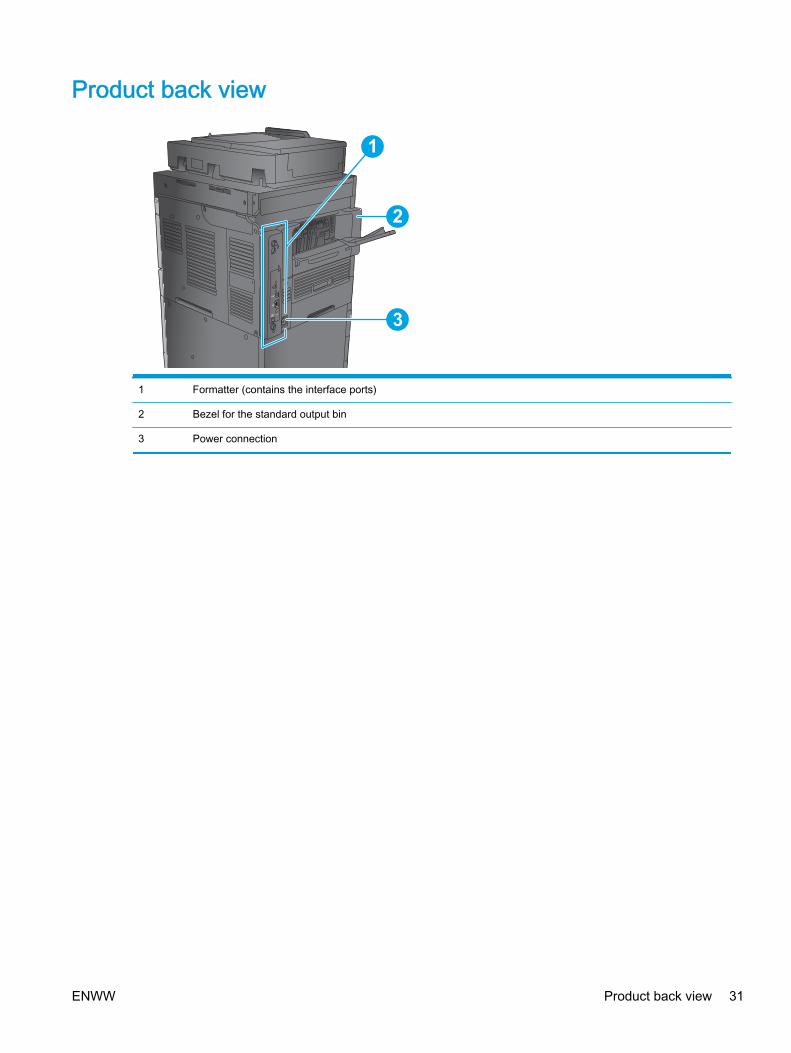
Product back view
1
2
3
1 Formatter (contains the interface ports)
2 Bezel for the standard output bin
3 Power connection
ENWW Product back view 31
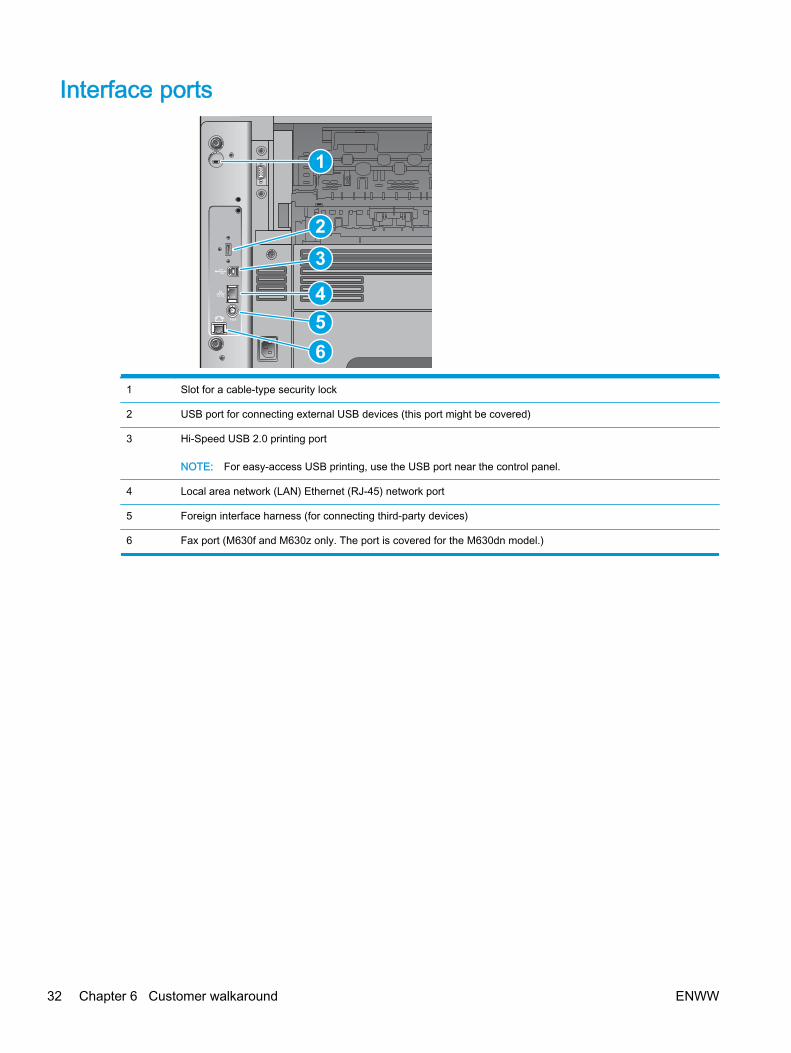
Interface ports
1
23
456
1 Slot for a cable-type security lock
2 USB port for connecting external USB devices (this port might be covered)
3 Hi-Speed USB 2.0 printing port
NOTE: For easy-access USB printing, use the USB port near the control panel.
4 Local area network (LAN) Ethernet (RJ-45) network port
5 Foreign interface harness (for connecting third-party devices)
6 Fax port (M630f and M630z only. The port is covered for the M630dn model.)
32 Chapter 6 Customer walkaround ENWW
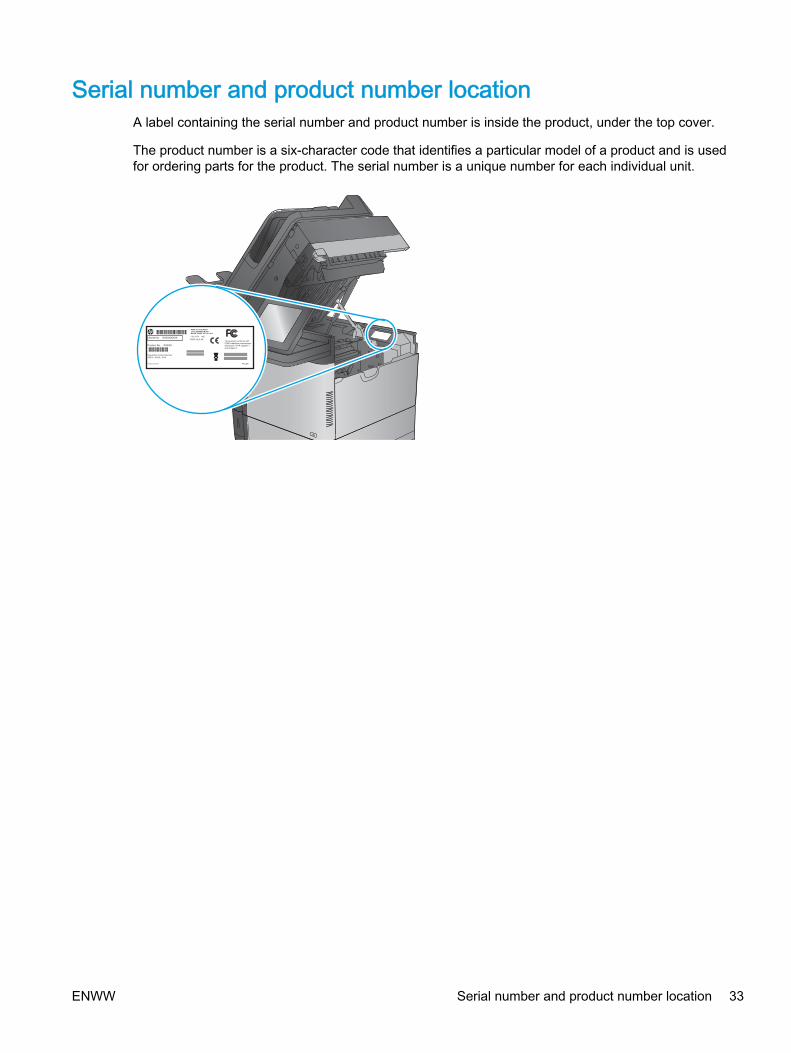
Serial number and product number locationA label containing the serial number and product number is inside the product, under the top cover.
The product number is a six-character code that identifies a particular model of a product and is usedfor ordering parts for the product. The serial number is a unique number for each individual unit.
ENWW Serial number and product number location 33
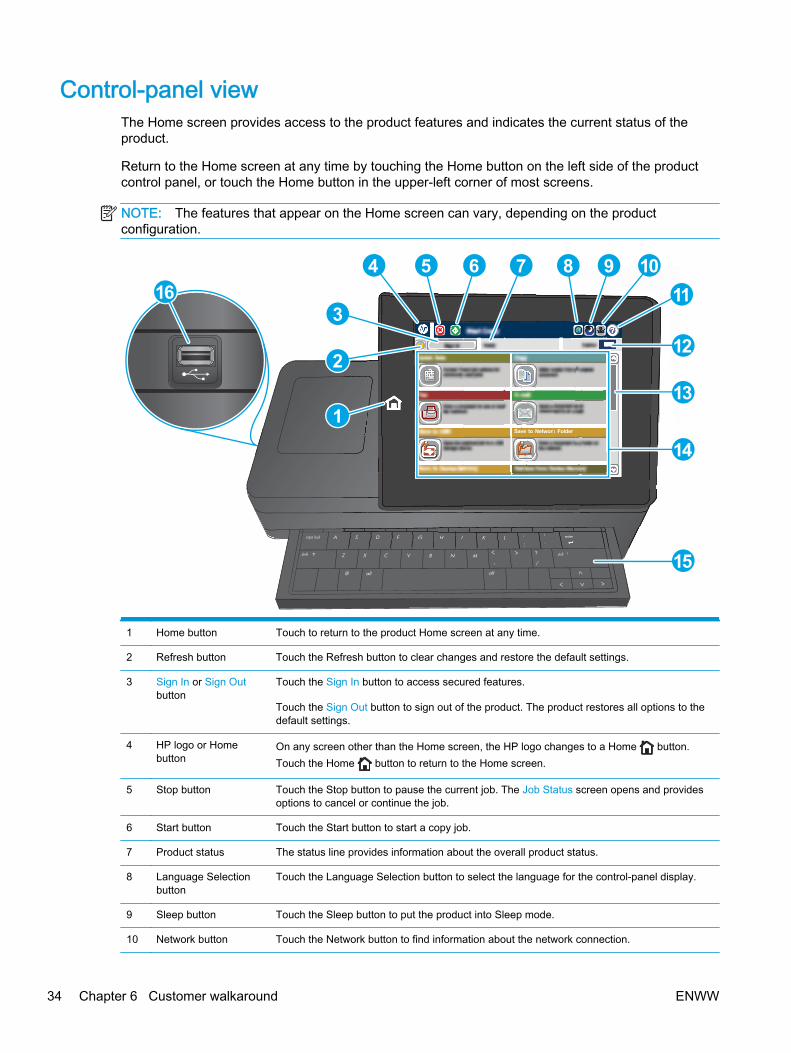
Control-panel viewThe Home screen provides access to the product features and indicates the current status of theproduct.
Return to the Home screen at any time by touching the Home button on the left side of the productcontrol panel, or touch the Home button in the upper-left corner of most screens.
NOTE: The features that appear on the Home screen can vary, depending on the productconfiguration.
caps lock
shift
A S D F G H J K L
Z X C V B N M
@ alt alt
shift
enter
, .
?
/
:
;“
‘
Save to Network Folder
S D F G enter
k Folder
H J K L :
;“
‘
veSav to Network
4
3
2
1
5 6 7 8 9 10 11
12
13
14
15
16
1 Home button Touch to return to the product Home screen at any time.
2 Refresh button Touch the Refresh button to clear changes and restore the default settings.
3 Sign In or Sign Outbutton
Touch the Sign In button to access secured features.
Touch the Sign Out button to sign out of the product. The product restores all options to thedefault settings.
4 HP logo or Homebutton
On any screen other than the Home screen, the HP logo changes to a Home button.Touch the Home button to return to the Home screen.
5 Stop button Touch the Stop button to pause the current job. The Job Status screen opens and providesoptions to cancel or continue the job.
6 Start button Touch the Start button to start a copy job.
7 Product status The status line provides information about the overall product status.
8 Language Selectionbutton
Touch the Language Selection button to select the language for the control-panel display.
9 Sleep button Touch the Sleep button to put the product into Sleep mode.
10 Network button Touch the Network button to find information about the network connection.
34 Chapter 6 Customer walkaround ENWW
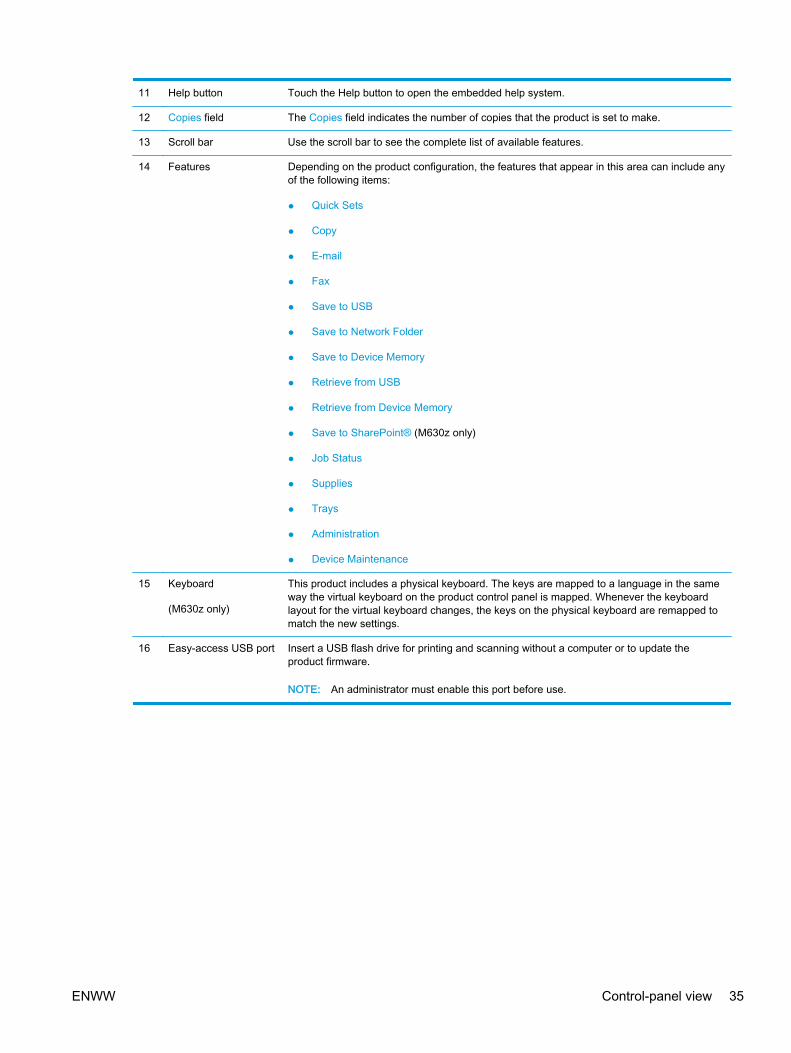
11 Help button Touch the Help button to open the embedded help system.
12 Copies field The Copies field indicates the number of copies that the product is set to make.
13 Scroll bar Use the scroll bar to see the complete list of available features.
14 Features Depending on the product configuration, the features that appear in this area can include anyof the following items:
● Quick Sets
● Copy
● Fax
● Save to USB
● Save to Network Folder
● Save to Device Memory
● Retrieve from USB
● Retrieve from Device Memory
● Save to SharePoint® (M630z only)
● Job Status
● Supplies
● Trays
● Administration
● Device Maintenance
15 Keyboard
(M630z only)
This product includes a physical keyboard. The keys are mapped to a language in the sameway the virtual keyboard on the product control panel is mapped. Whenever the keyboardlayout for the virtual keyboard changes, the keys on the physical keyboard are remapped tomatch the new settings.
16 Easy-access USB port Insert a USB flash drive for printing and scanning without a computer or to update theproduct firmware.
NOTE: An administrator must enable this port before use.
ENWW Control-panel view 35

7 Customer support
For more information:
● In the US, go to www.hp.com/support/ljMFPM630.
● Outside the US, follow these steps:
a. Go to www.hp.com/support.
b. Select the country/region.
c. Click Product Support & Troubleshooting.
d. Enter the product name, and then click Search.
e. Click the product.
HP's all-inclusive help for the product includes the following information:
● Install and configure
● Learn and use
● Solve problems
● Download software updates
● Join support forums
● Find warranty and regulatory information
To find videos and animations of procedures and tasks that demonstrate how to set up, configure,use, and maintain the product, go to www.hp.com/go/sml (HP Customer Self Repair Services MediaLibrary).
36 Chapter 7 Customer support ENWW