HP LASERJET 4100 - Uninet Imaging Inc
15
HP ® LASERJET 4100 TONER CARTRIDGE REMANUFACTURING INSTRUCTIONS HP 4100 TONER CARTRIDGE © 2011 UniNet Imaging Inc. All trademark names and artwork are property of their respective owners. Product brand names mentioned are intended to show compatibility only. UniNet Imaging does not warrant downloaded information. Unauthorized sale, reproduction or distribution of this article is prohibited. For additional support, please contact [email protected] www. uninet imaging.com
Transcript of HP LASERJET 4100 - Uninet Imaging Inc

HP® LASERJET 4100TONER CARTRIDGE REMANUFACTURING INSTRUCTIONS
HP 4100 TONER CARTRIDGE
© 2011 UniNet Imaging Inc. All trademark names and artwork are property of their respective owners. Product brand names mentioned are intended to show compatibility only.UniNet Imaging does not warrant downloaded information. Unauthorized sale, reproduction or distribution of this article is prohibited. For additional support, please contact [email protected]
www.uninetimaging.com

HP LASERJET 4100 TONER CARTRIDGE REMANUFACTURING INSTRUCTIONS
REMANUFACTURING THEHP LASERJET 4100 TONER CARTRIDGE
By Mike Josiah and the Technical Staff at UniNet
© 2011 UniNet Imaging Inc. All trademark names and artwork are property of their respective owners. Product brand names mentioned are intended to show compatibility only.UniNet Imaging does not warrant downloaded information. Unauthorized sale, reproduction or distribution of this article is prohibited. For additional support, please contact [email protected]
www.uninetimaging.com
CHIP LOCATION
NOTE: These instructions were first written in 2003. As this was the first HP monochrome cartridge to use a chip, we includedquite a bit of information on them and their functions. This information is still current and we invite you to read through all of it.
The HP 4100 series printers are HP’s latest and greatest mid level machines to date. They are packed with new features and areextremely fast. With a street price less than the 4000 series, they are going to become very popular.
This article is going to throw a lot of information at you. Since these cartridges, as well as the new technology used in both thecartridges and the machines are sure to be with us a while, we have tried to fill it with as much information as we could.
The HP 4100 series of printers are based on a Canon 25 ppm, 1200 dpi engine. This engine uses the HP PCL-6 language, has afirst page out in under 15 seconds, and is able notify anyone you select when the toner is low, or if there is a problem if givendirect access to a TCP/IP network. There are two cartridges available for the 4100 series: the C8061A (6,000 page yield) and theC8061X (10,000 pages). Although these new cartridges look like the 27A/X cartridges, they are different. As explained in moredetail later in this article, only a few 27x parts will work in these cartridges.
The 61A/X cartridges also have the distinction of being the first HP toner cartridges to use a chip. The chip on these cartridgesdoes not lock out the cartridge from being used; it monitors the toner usage. For example, once the machine sends a “toner out”signal to the cartridge, the chip is set for “yes” for “toner out” as indicated on the supplies status page (more on that later).When the cartridge is refilled, the display will show a “non-HP cartridge” message. The toner gauge will still work, but will no longerbe accurate, and the “toner low stop” will no longer function. In other words, the printer will continue to print even if there is notoner left. The “toner low/out” warning on the display will not go out until a new HP cartridge is installed. It will be very importantto let your customers know this before they use your cartridges. Even when “new” HP cartridges are installed, it may take as manyas 20 pages before the new cartridge is acknowledged. If the chip is removed, the “toner low/out” warning will not show on thedisplay, but the machine will not recognize a “toner low” condition again until a new “HP” cartridge is installed. As per the HPuser’s guide, “When you use a non-HP cartridge, the printer is unable to report on the number of pages that can be printed withthe amount of toner left in the cartridge. The toner level estimate will only be an approximate percentage.” Also according to HP,the “toner out” message will only come on when there is less than 1% of the toner left in the cartridge. This is much moreaccurate than any previous system. Replacement chips are currently available, that should enable the “toner low” and usagefunctions to work again.

One interesting note: we have tested so far, two new HP C8061X cartridges to ASTM standards. On both cartridges we ran out oftoner at approximately 8,800 pages. We are using a 5% page set up for the HP 4000, so we weren’t surprised at the low pagecount (it is not exactly 5% on the 4100). The surprise came when we ran the supplies status page. It listed our overall pagecoverage at 5%, with less than 100 pages left in the cartridge! So much for a 10,000 page yield at 5% coverage! We arecontinuing to run tests and will keep you posted...
HP LASERJET 4100 TONER CARTRIDGE REMANUFACTURING INSTRUCTIONS
© 2011 UniNet Imaging Inc. All trademark names and artwork are property of their respective owners. Product brand names mentioned are intended to show compatibility only.UniNet Imaging does not warrant downloaded information. Unauthorized sale, reproduction or distribution of this article is prohibited. For additional support, please contact [email protected]
www.uninetimaging.com

If you already own an HP 4000, you CAN test the 4100 cartridges in it. The 4100 cartridges are backwards compatible.However If you are going to test your cartridges to ASTM standards, you must test in a 4100. The electronic components in the4100 are different enough to cause a large difference in results. The HP 4000 large drum gear has 60 teeth, where the 4100has 62. The 4000 machines are tolerant of the extra teeth, but damage will occur to the printer if you use a 4000 drum in the4100. This backward compatibility is listed the HP service manual.
If you test your cartridges with Anacom smart boxes in a 4100, the boxes will not work with the current version Eprom installed.The printer has a "hot" interface that watches both the USB port and the parallel port. This allows you to have two computershooked up to it at the same time. One of them can even be a Mac computer! Unfortunately, it also seems to need specializedinformation from the new driver before it will accept the print job. We have been assured that new Eproms are being worked onfor the Anacom boxes that will work for both the 4100, and the 1200 series (the 1200 series of printers have the same type ofinterface).
Splitting these cartridges will not be easy as there are new contacts that sit directly between the two halves. The cartridge canbe split by hand, but is definitely not a fast process. Splitter manufacturers are working on solutions now and may be availableas you read this.
According to the HP manual, a cleaning page should be generated and run each time a cartridge is replaced, or if small dots startappearing on the page. The cleaning page can also be set up to run automatically. For more information on how to generate anduse this page, see the end of this document.
HP 4100 PRINTER INFONormally we don’t go into much detail on a machine, but in this case, there are so many new features, and changes to oldfeatures we felt it necessary.
The chip in the cartridge is an EEPROM that is located on the front edge of the cartridge (shown here) and is called the “Elabel”by HP. It is accessed by what HP calls the “Antenna Unit”. This antenna unit reads and writes to and from the chip. There are nophysical electrical connections on the chip. It communicates by what I believe is RF (Radio Frequency) signals. The HP servicemanual is curiously silent on this. The antenna unit is controlled by the “memory controller PCB,” which in turn is controlled bythe “engine controller board.” The engine controller board seems to be the new name for what we all know as the DC controller.If you also do printer service, there are a few new PCB’s to contend with. A diagram at the end of our cartridge theory sectionillustrates this process.
Another change in these machines is the way in which the cartridge is detected. Older cartridges have an antenna bar thatreceives a signal through the toner from the magnetic roller. The 4100 machines put a signal out on the primary charge roller(PCR). A feedback signal is returned that tells the printer if the cartridge is present or not. Since the PCR is the first part accessedin the print cycle, this actually makes more sense than using the magnetic roller system. The power supply never has to put outany voltages under a “no-load” condition. If you forget to re-install the PCR, or have a bad PCR connection, this will probably causea “no cartridge” message.
The fuser assembly is of the “instant on” variety and heats up to 383°F during normal printing. The fuser temperature is variablethrough the menu for different types of paper/transparencies.
The 4100 series also have a new sensor for the fuser that actually measures the ambient room temperature! The sensor is calledan “environment temperature sensor” or TH3, and is located on the left side of the printer. Its purpose is to measure thetemperature of the ambient environment and adjust the fuser temperature accordingly. There are three conditions that thesensor detects:
1. Low Temperature: Air temperature is 63°F (17°C) or lower2. Normal Temperature: Air temperature is 63 to 88°F (17 to 31°C)3. High Temperature: Air temperature is 88°F (31°C) or higher.
This feature presumably will allow for the machine to operate in somewhat extreme environments with better results. If thissensor fails, you will get a 58.2 printer error.
HP LASERJET 4100 TONER CARTRIDGE REMANUFACTURING INSTRUCTIONS
© 2011 UniNet Imaging Inc. All trademark names and artwork are property of their respective owners. Product brand names mentioned are intended to show compatibility only.UniNet Imaging does not warrant downloaded information. Unauthorized sale, reproduction or distribution of this article is prohibited. For additional support, please contact [email protected]
www.uninetimaging.com

While we are on the topic of error messages, 54.1 tells the user to remove the sealing tape from the cartridge! This is sure to bea favorite of your customer service people. The service manual only briefly mentions this feature and does not discuss thetheory at all. We are guessing that there is still a circuit similar to the old style cartridge detection where the printer can sensebetween an interior contact (possibly the new contacts in the seam of the hopper), and the magnetic roller. When no toner ispresent, and the cartridge is new (probably determined by the chip) this message will come up.
The Supplies Status Page (shown on page 3) is also one of the new features on these machines. It can be printed by pressingthe “Menu Button 1x,” the “Item button 7x,” and “Select 1x.” The page itself has a visible gauge of the estimated toner left. Inaddition it shows two categories: “Toner Low Reached - Yes/No” and “Toner Out Reached - Yes/No.” These settings are written tothe chip. On HP cartridges, it will also show the actual pages printed, the estimated toner use per page, and the estimated pagesleft at that usage. The engine controller board actually tracks the toner usage per page, and calculates the estimated life left inthe cartridge! This is a really nice feature and one that I hope the replacement chips will enable again.
CARTRIDGE PRINTING THEORYThere are two diagrams shown on the next page, that will give a visual look at this process. The printing theory of these cartridgesis basically the same as the 4000 machines. In this article I have discussed some of the various changes and the theory behindthem. In this section, we will run though the printing process from start to finish in order of the events.
The first thing the printer does is make sure a cartridge is installed. This is done by placing a signal on the PCR. A feedback sig-nal is returned to the printer telling it that a cartridge is present. The chip detection and toner low sensing all took place whenthe printer was turned on. After all this has taken place, the actual printing can start.
The cartridge printing process is best explained as a series of steps or stages. In the first stage, the primary charge roller (PCR)places a uniform negative DC bias voltage on the OPC drum surface. The amount of the negative DC bias placed on the drum iscontrolled by the printer’s density setting. This process is called “conditioning.”
In the second stage, (also called the “imaging section”), the laser beam will discharge this DC voltage to ground wherever it strikesthe OPC’s surface, leaving a latent electrostatic image on the drum. The OPC drum’s circumference is 3.66 inches, or approxi-mately 1/3 of a page and therefore makes three revolutions for each 11-inch printed page.
The fourth stage is where the OPC drum is cleaned. On average, approximately 95% of the toner is transferred to the paper dur-ing the print cycle. The remaining 5% remains on the OPC drum and is cleaned off the Drum by the wiper blade, guided into thewaste chamber by the recovery blade, and stored in the waste chamber.
Once the print cycle has been completed, the primary charge roller will then place an AC voltage across the drum surface thaterases any residual charges left on the drum surface. The OPC drum is now ready to be conditioned by the primary charge rollerusing the negative DC bias voltage, and start the print cycle again. The AC and DC signals on the PCR are actually done at thesame time. We have split them up to show the actual pattern of events.
All during the printing process the engine controller board has been monitoring the actual amount of toner used per page, andcalculates the estimated life left in the toner cartridge. This is shown on the supplies status page.
HP LASERJET 4100 TONER CARTRIDGE REMANUFACTURING INSTRUCTIONS
© 2011 UniNet Imaging Inc. All trademark names and artwork are property of their respective owners. Product brand names mentioned are intended to show compatibility only.UniNet Imaging does not warrant downloaded information. Unauthorized sale, reproduction or distribution of this article is prohibited. For additional support, please contact [email protected]
www.uninetimaging.com
REQUIRED TOOLS1. Toner approved vacuum (Atrix HCTV shop vac style, or Atrix AAA/OmegaS portable toner vacuum recommended)2. Dremel tool with grinding bit3. A small common screwdriver4. Small L-shaped Allen wrench5. A Phillips head screwdriver6. Needle nose pliers
REQUIRED SUPPLIES1. Graphic black toner for use in HP 41002. Magnetic roller sleeve3. Doctor blade for use in HP 40004. OPC drum5. Wiper blade6. PCR for use in HP 40007. 99% isopropyl alcohol8. Magnetic roller cleaner9. Kynar padding powder10. Can of compressed clean air11. Lint Free cotton pads12. Nu-Finish car polish13. Conductive grease

1. Place the cartridge with the drum side up. Note on each endof the cartridge, there are small silver pins similar in size andlocation to the HP 4000 pins. To separate the two halves thesepins must be removed. Unlike the 27A/X cartridges these pinsare sealed off on the inside of the cartridge. The methods youuse for the 4000 will not work. This is obviously an attempt tomake our lives more difficult, but with the proper tools,is easily overcome.
Remove the two Phillips head screws, and the metal axle pinlocated on the right side of the cartridge.
2. Remove the two screws and the plastic drum end cap fromthe left side of the cartridge.
3. Remove the OPC drum, being extremely careful not toscratch it. If the drum is in good shape and you plan to re-useit, vacuum any toner and debris from drum being careful not tolet the vacuum hose come in contact with the drum surface.
4. Carefully remove the primary charge roller (PCR) by gentlyprying it out of the clips on either end. The PCR holders comeloose easily; be very careful with this. Place the PCR aside.
HP LASERJET 4100 TONER CARTRIDGE REMANUFACTURING INSTRUCTIONS
© 2011 UniNet Imaging Inc. All trademark names and artwork are property of their respective owners. Product brand names mentioned are intended to show compatibility only.UniNet Imaging does not warrant downloaded information. Unauthorized sale, reproduction or distribution of this article is prohibited. For additional support, please contact [email protected]
www.uninetimaging.com
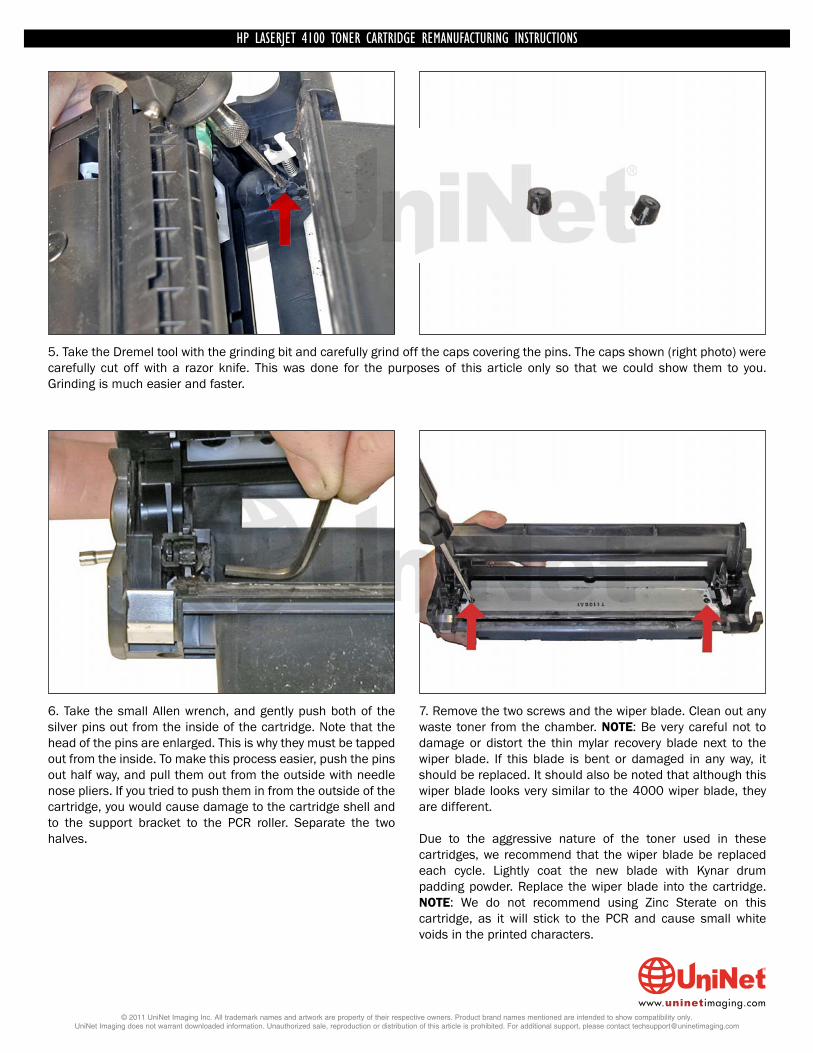
5. Take the Dremel tool with the grinding bit and carefully grind off the caps covering the pins. The caps shown (right photo) werecarefully cut off with a razor knife. This was done for the purposes of this article only so that we could show them to you.Grinding is much easier and faster.
6. Take the small Allen wrench, and gently push both of thesilver pins out from the inside of the cartridge. Note that thehead of the pins are enlarged. This is why they must be tappedout from the inside. To make this process easier, push the pinsout half way, and pull them out from the outside with needlenose pliers. If you tried to push them in from the outside of thecartridge, you would cause damage to the cartridge shell andto the support bracket to the PCR roller. Separate the twohalves.
7. Remove the two screws and the wiper blade. Clean out anywaste toner from the chamber. NOTE: Be very careful not todamage or distort the thin mylar recovery blade next to thewiper blade. If this blade is bent or damaged in any way, itshould be replaced. It should also be noted that although thiswiper blade looks very similar to the 4000 wiper blade, theyare different.
Due to the aggressive nature of the toner used in thesecartridges, we recommend that the wiper blade be replacedeach cycle. Lightly coat the new blade with Kynar drumpadding powder. Replace the wiper blade into the cartridge.NOTE: We do not recommend using Zinc Sterate on thiscartridge, as it will stick to the PCR and cause small whitevoids in the printed characters.
HP LASERJET 4100 TONER CARTRIDGE REMANUFACTURING INSTRUCTIONS
© 2011 UniNet Imaging Inc. All trademark names and artwork are property of their respective owners. Product brand names mentioned are intended to show compatibility only.UniNet Imaging does not warrant downloaded information. Unauthorized sale, reproduction or distribution of this article is prohibited. For additional support, please contact [email protected]
www.uninetimaging.com

8. Open the drum cover fully and remove the metal arm asshown. Although it is fairly easy to remove the entire cover it isnot necessary. Either hold the cover open with your hand,or tape the cover open with a small piece of tape.
9. Remove the two screws that hold the gear housing cover on the right side of the cartridge. There is a plastic tab on the top thatmust be pressed down to release the cover. Be very careful not to damage any of the pins on this cover when it is being removed.Note that they are similar to the 4000, but again slightly different. They are attached to the cover, and can only be removed if youpress in the tabs.
HP LASERJET 4100 TONER CARTRIDGE REMANUFACTURING INSTRUCTIONS
© 2011 UniNet Imaging Inc. All trademark names and artwork are property of their respective owners. Product brand names mentioned are intended to show compatibility only.UniNet Imaging does not warrant downloaded information. Unauthorized sale, reproduction or distribution of this article is prohibited. For additional support, please contact [email protected]
www.uninetimaging.com
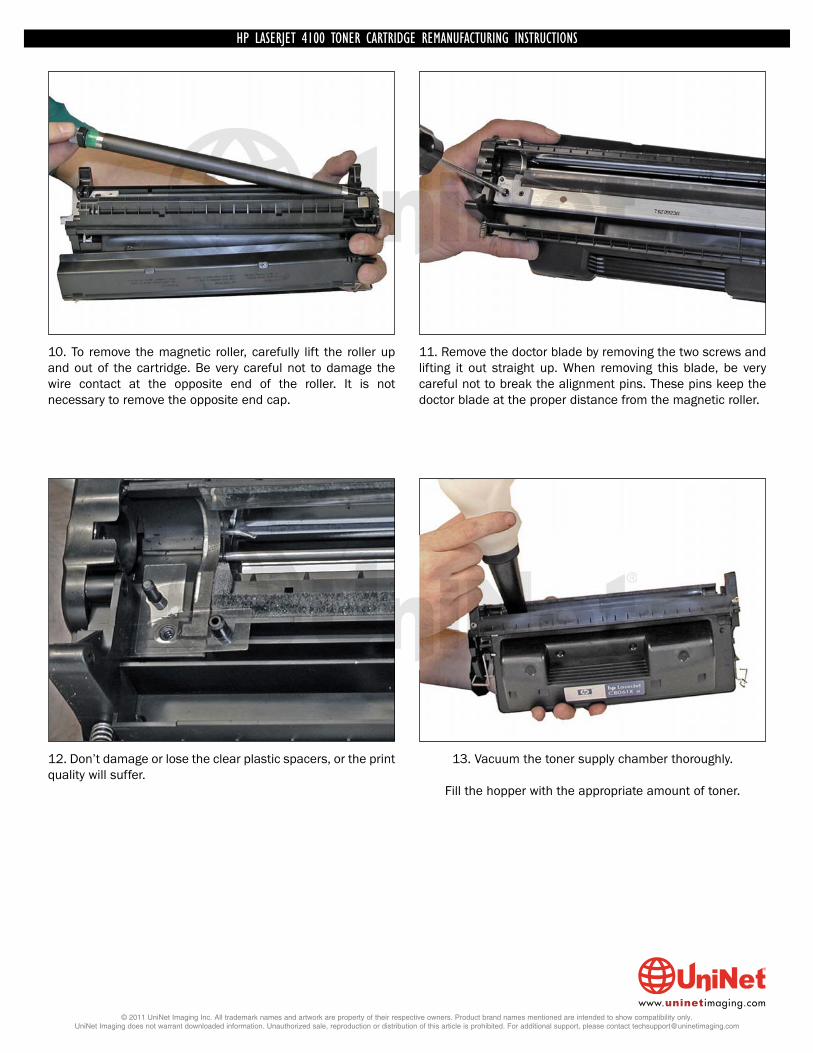
10. To remove the magnetic roller, carefully lift the roller upand out of the cartridge. Be very careful not to damage thewire contact at the opposite end of the roller. It is notnecessary to remove the opposite end cap.
11. Remove the doctor blade by removing the two screws andlifting it out straight up. When removing this blade, be verycareful not to break the alignment pins. These pins keep thedoctor blade at the proper distance from the magnetic roller.
12. Don’t damage or lose the clear plastic spacers, or the printquality will suffer.
13. Vacuum the toner supply chamber thoroughly.
Fill the hopper with the appropriate amount of toner.
HP LASERJET 4100 TONER CARTRIDGE REMANUFACTURING INSTRUCTIONS
© 2011 UniNet Imaging Inc. All trademark names and artwork are property of their respective owners. Product brand names mentioned are intended to show compatibility only.UniNet Imaging does not warrant downloaded information. Unauthorized sale, reproduction or distribution of this article is prohibited. For additional support, please contact [email protected]
www.uninetimaging.com

14. Clean the small end cap contacts with a cotton swaband alcohol.
15. Inspect the end caps on the magnetic roller sleeve.Make sure they are not cracked. If so, they will tear the coatingoff of the OPC drum. Note that these cartridges do not usemagnetic roller felts, they have small curved magnets tocontain any toner that may try to migrate past.
16. To change the magnetic roller sleeve, press the magnetfrom the gear side until the white bushing pops out from theother side. Slide the stationary magnet out from the old sleeveand into the new.
Place the two magnetic roller end caps, (black on the contactside, green on the gear side), bushing, and gear on the newsleeve. Clean the contact spring of the magnetic roller, and thecontact-side end cap with the alcohol. Coat the contact sideend cap with a small amount of conductive grease. Install thenew doctor blade (don’t forget to take the plastic spacers offthe old blade and put them on the new), magnetic rollerassembly, assembly end caps, and gears. Spin the roller a fewtimes to make sure everything is aligned properly.
HP LASERJET 4100 TONER CARTRIDGE REMANUFACTURING INSTRUCTIONS
© 2011 UniNet Imaging Inc. All trademark names and artwork are property of their respective owners. Product brand names mentioned are intended to show compatibility only.UniNet Imaging does not warrant downloaded information. Unauthorized sale, reproduction or distribution of this article is prohibited. For additional support, please contact [email protected]
www.uninetimaging.com

NOTE: The only way to seal this cartridge is to either split or replace the hopper. This is an issue with this cartridge because ofthe contacts that are now in the way of a splitter. Splitter manufacturers are actively working on this problem and may havesomething ready at the time of this publication. Check with your vendor for more info.
17. Shown here are two of the new side contacts. 18. Shown here is the new fill plug. At least by going to a roundfill plug, those of you that use filling machines will have aneasier time of it.
HP LASERJET 4100 TONER CARTRIDGE REMANUFACTURING INSTRUCTIONS
© 2011 UniNet Imaging Inc. All trademark names and artwork are property of their respective owners. Product brand names mentioned are intended to show compatibility only.UniNet Imaging does not warrant downloaded information. Unauthorized sale, reproduction or distribution of this article is prohibited. For additional support, please contact [email protected]
www.uninetimaging.com

19. Coat the OPC drum with the Kynar, and replace the OPC drum and axle pin. Do not install the screws yet. Manually spin theOPC drum in the proper direction (towards the edge of the wiper blade) to make sure everything is properly lubricated. If the drumbinds, remove it and coat the wiper blade and drum with Kynar again. Remove the OPC drum, and place aside.
Clean the PCR silver contact ends along with the U-shaped contacts with the isopropyl alcohol. These are electrical contacts andmust be clean in order for the cartridge to print correctly. Be very careful not to get the alcohol on the rubber part of the PCR asthis will remove the conductive coating, ruining the PCR. Clean and replace the PCR.
WARNING: Do not clean the PCR with alcohol as this will remove the conductive coating on the roller. If the PCR is anaftermarket, follow the cleaning methods recommended by the manufacturer. If the PCR is an OEM, we recommended that it becleaned with a PCR cleaner. We have been using Nu-Finish car polish on our OEM PCR’s for years with no problems. To clean theroller with the Nu-Finish car polish, apply a small amount and buff with a clean lint free cloth until the roller is clean and shines.For best results, we recommend that the roller be allowed to dry overnight before using. If the roller is damaged or worn out, itshould be replaced with a new roller.
Re-install the OPC drum, drum axle pin, drum end caps, and screws. This is done in this order to prevent the PCR from beingcontaminated with the Kynar padding powder. Make sure you align the small plastic pin in the center on the oblong slot on thedrum axle pin. If this is not set right, banding will occur. Place the two halves together, and insert the two silver pins.
PRINTER MAINTENANCEEven though the 4100 machines look similar to the 4000, there are differences. The following information consists of basicHP printer information, as well as items specific to the HP 4100 series.
Transfer Charge Roller: In the base of the printer, there is a transfer charge roller. This is a foam roller that must be kept clean.Be very careful not to touch this roller with any part of your skin. The oils naturally present in your skin, paper dust, or toner dustcan contaminate the roller, causing light print and/or small white voids in the text.
Anti-Static Teeth Blade: Located just behind the transfer charge roller assembly is the anti-static teeth blade. This bladedissipates the static charge applied by the transfer charge roller from the paper. This helps prevent the paper from sticking to anyof the rollers and causing a paper jam.
Fuser Assembly: Designed to be self-cleaning and does not use a felt wand. There seems to be a little known fact that the newerfusers (those that do not use a felt wand), have a “fuser bias” signal placed on the upper roller/sleeve. This signal helps keep theroller/sleeve clean by repelling the toner off and onto the page. The fuser assembly, transfer charge roller, separation pad, andthe paper feed rollers, are designed to be replaced every 200,000 pages.
HP LASERJET 4100 TONER CARTRIDGE REMANUFACTURING INSTRUCTIONS
© 2011 UniNet Imaging Inc. All trademark names and artwork are property of their respective owners. Product brand names mentioned are intended to show compatibility only.UniNet Imaging does not warrant downloaded information. Unauthorized sale, reproduction or distribution of this article is prohibited. For additional support, please contact [email protected]
www.uninetimaging.com

CHANGING PRINTER DENSITY SETTING1. To set the intensity, first turn the printer offline (press the GO button).2. Press the menu button four times until PRINT QUALITY appears on the display.3. Press the Item button four times until DENSITY= appears on the display.4. Press the +/- key until the density = 5.5. Press the SELECT key and the GO key.
Having the intensity set to the darkest setting will help to show up any OPC drum flaws that may not show up with the intensityset to the normal setting of 3.
TAKING TEST PRINTSTo run a test print, verify that the printer is still offline, and press the MENU button one time until INFORMATION MENU appearson the display. At this point you have a few options as to which test print to select.
1. If you press the ITEM button 1 time, MENU MAP will appear on the display.This is a text and graphic printout that lists all of the menu options. This is the test we recommend for testing the cartridge.
2. If you press the ITEM button 2 times, PRINT CONFIGURATION will appear.This is a text page that lists the current configuration.
3. If you press the ITEM button 3 times, PRINT PCL FONT LIST will appear.This is also a text page.
4. By pressing the ITEM button 4 times, PRINT PS FONT LIST will appear.This is also a text page of all the postscript fonts.
5. Pressing the ITEM button 5 times will print the event log.
6. Pressing the ITEM button 6 times will show the event log.
7. Pressing the ITEM button 7 times will print the supplies status page.This page should be printed to make sure that the new chip is working correctly.
8. Pressing the ITEM button 8 times will print out the paper path test.
Once you have decided which test print you want, press the SELECT button one time, and the printer will print the test page(s)you selected. As stated above, we recommend that the menu map page and the supplies status page be printed.This combination will give you text and graphics, as well as the chip status.
HP LASERJET 4100 TONER CARTRIDGE REMANUFACTURING INSTRUCTIONS
© 2011 UniNet Imaging Inc. All trademark names and artwork are property of their respective owners. Product brand names mentioned are intended to show compatibility only.UniNet Imaging does not warrant downloaded information. Unauthorized sale, reproduction or distribution of this article is prohibited. For additional support, please contact [email protected]
www.uninetimaging.com

PRINTER CLEANING PAGEAccording to HP, the printer cleaning page should be run every time a cartridge is changed or when the print quality deteriorates.This printer can also run the cleaning page automatically at a page count that you set.
To run the page manually:1. Press the menu button four times until PRINT QUALITY MENU appears on the display.2. Press the ITEM button six times until CREATE CLEANING PAGE appears.3. Press the SELECT button.
To run the cleaning page through a machine to clean it:1. Press the ITEM button six times until PROCESS CLEANING PAGE appears.2. Follow the instructions listed on the cleaning page you have already printed.
To run the page automatically:1. Press the menu button four times until PRINT QUALITY MENU appears on the display.2. Press the ITEM Button five times until AUTO CLEANING PAGE appears.3. Press the VALUE+ button until =ON appears, then press the SELECT button.4. Press the ITEM button one time so that FREQUENCY= appears.5. Press the VALUE+ to select the frequency, and press SELECT.6. Press the ITEM button until CLEANING PAGE SIZE=LETTER appears, and press the VALUE+ button to select.7. The cleaning page will now run at the frequency you selected. The auto cleaning process takes about 2.5 minutes to process.
The frequency’s that can be selected are every 1000, 2000, 5000, 10,000, or 20,000 pages.
CARTRIDGE TROUBLESHOOTINGThe following is a list of possible cartridge problems and symptoms. If you run into a problem, this list should help.
Dirty/Bad Primary Charge Roller (PCR): Located Inside the cartridge, this will show on the test print as vertical gray streaks downthe page, as a gray background throughout the page, or as “ghosting” where part of a previously printed area is repeated.
Dirty PCR Connection: This will show as horizontal dark black bars across the page, or as shading throughout the page. This canalso cause the printer to give a “No EP cartridge” message.
Scratched Drum: This is shown by a very thin, perfectly straight line that runs from the top to the bottom of the test page.
Chipped Drum: This will show as a dot or series of dots that repeat three times per page. Any drum defects will repeat three timesper page based on the drum circumference of 3.66 inches.
Light Damaged Drum: This will show up as a shaded area on the test print that should be white. Again this will repeat three timesper page.
Worn-Out Drum: This will usually show up as shading on the right side of the page. It will usually start right from the edge of thepage, and work in towards the center.
Bad Wiper Blade: This will show as either a gray line approximately 1/8 inches thick, or as shading across the entire page.In either case there will be a film of toner on the drum surface.
Alternating Light/Dark Bands Across Page: This cartridge has the same problem as the 27X. If the drum axle pin is not alignedcorrectly, the drum will move up and down causing this defect (see Step 19 image).
“NO EP Cartridge” Message: This is caused by either a missing PCR, or a bad PCR contact. A signal is placed on the PCR thattell the printer if a cartridge is present or not.
HP LASERJET 4100 TONER CARTRIDGE REMANUFACTURING INSTRUCTIONS
© 2011 UniNet Imaging Inc. All trademark names and artwork are property of their respective owners. Product brand names mentioned are intended to show compatibility only.UniNet Imaging does not warrant downloaded information. Unauthorized sale, reproduction or distribution of this article is prohibited. For additional support, please contact [email protected]
www.uninetimaging.com