HP Advanced Wireless Docking Station · PDF fileThis chapter identifies the visible hardware...
26
HP Advanced Wireless Docking Station User Guide
Transcript of HP Advanced Wireless Docking Station · PDF fileThis chapter identifies the visible hardware...

HP Advanced Wireless Docking Station
User Guide

© Copyright 2014 Hewlett-Packard Development Company, L.P.
Intel is a trademark of Intel Corporation in the U.S. and other countries. Windows and Windows Vista are trademarks of the Microsoft Group of companies.
The information contained herein is subject to change without notice. The only warranties for HP products and services are set forth in the express warranty statements accompanying such products and services. Nothing herein should be construed as constituting an additional warranty. HP shall not be liable for technical or editorial errors or omissions contained herein.
First Edition: October 2014
Document Part Number: 796829-001

Table of contents
1 Getting started ............................................................................................................................................. 1
Identifying components ........................................................................................................................................ 1Top and front components ................................................................................................................. 1Rear components ................................................................................................................................ 2Left components ................................................................................................................................. 3Right components ............................................................................................................................... 4Labels .................................................................................................................................................. 5
Setting up the wireless dock ................................................................................................................................. 6Step 1: Connecting to AC power .......................................................................................................... 6Step 2: Connecting to an external display device ............................................................................... 7Step 3: Pairing with the wireless dock ................................................................................................ 8
Configuring the external display device ................................................................................................................ 9
2 Using the wireless dock ................................................................................................................................ 11
Wireless dock guidelines ..................................................................................................................................... 11Connecting to a network ..................................................................................................................................... 11Connecting USB devices ...................................................................................................................................... 11Connecting to a DisplayPort device .................................................................................................................... 11Connecting to a VGA display device .................................................................................................................... 11Connecting audio ................................................................................................................................................. 12
Connecting analog audio devices ..................................................................................................... 12Connecting a microphone .................................................................................................................................... 12Connecting an optional security cable ................................................................................................................ 13
3 Dock Management ....................................................................................................................................... 14
Information .......................................................................................................................................................... 14Permissions ......................................................................................................................................................... 14Signal Preferences ............................................................................................................................................... 14Security ................................................................................................................................................................ 15
4 Connection procedures ................................................................................................................................ 16
Automatic connection ......................................................................................................................................... 16Active device ...................................................................................................................................... 16Device in standby mode .................................................................................................................... 16
Reconnections without manual confirmation .................................................................................................... 17Reconnections with manual confirmation .......................................................................................................... 17
iii

Mandatory updates ............................................................................................................................................. 18
5 Troubleshooting .......................................................................................................................................... 19
Solving common problems .................................................................................................................................. 19General use and connection problems ............................................................................................. 19Audio problems ................................................................................................................................. 19Video problems ................................................................................................................................. 20
Contacting support .............................................................................................................................................. 21
Index ............................................................................................................................................................. 22
iv
1 Getting started
Identifying componentsThis chapter identifies the visible hardware features of the HP Advanced Wireless Docking Station and provides setup instructions for the wireless dock.
NOTE: Some features of the HP Advanced Wireless Docking Station may not be available on your computer.
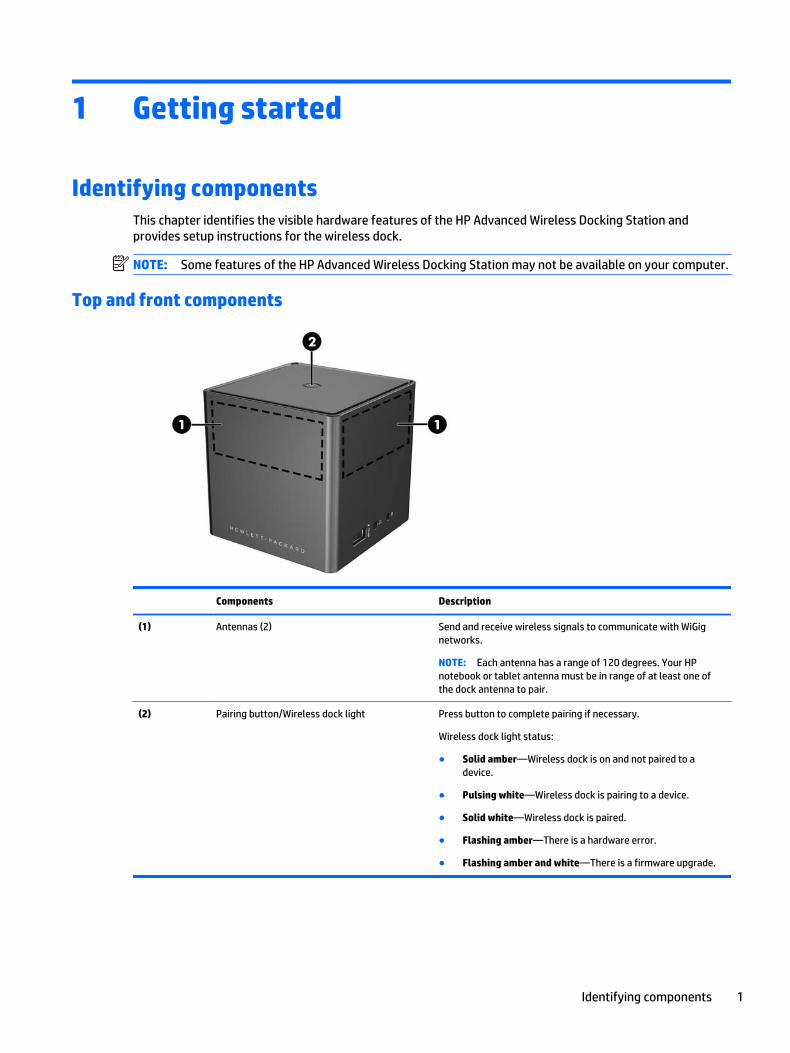
Top and front components
Components Description
(1) Antennas (2) Send and receive wireless signals to communicate with WiGig networks.
NOTE: Each antenna has a range of 120 degrees. Your HP notebook or tablet antenna must be in range of at least one of the dock antenna to pair.
(2) Pairing button/Wireless dock light Press button to complete pairing if necessary.
Wireless dock light status:
● Solid amber—Wireless dock is on and not paired to a device.
● Pulsing white—Wireless dock is pairing to a device.
● Solid white—Wireless dock is paired.
● Flashing amber—There is a hardware error.
● Flashing amber and white—There is a firmware upgrade.
Identifying components 1
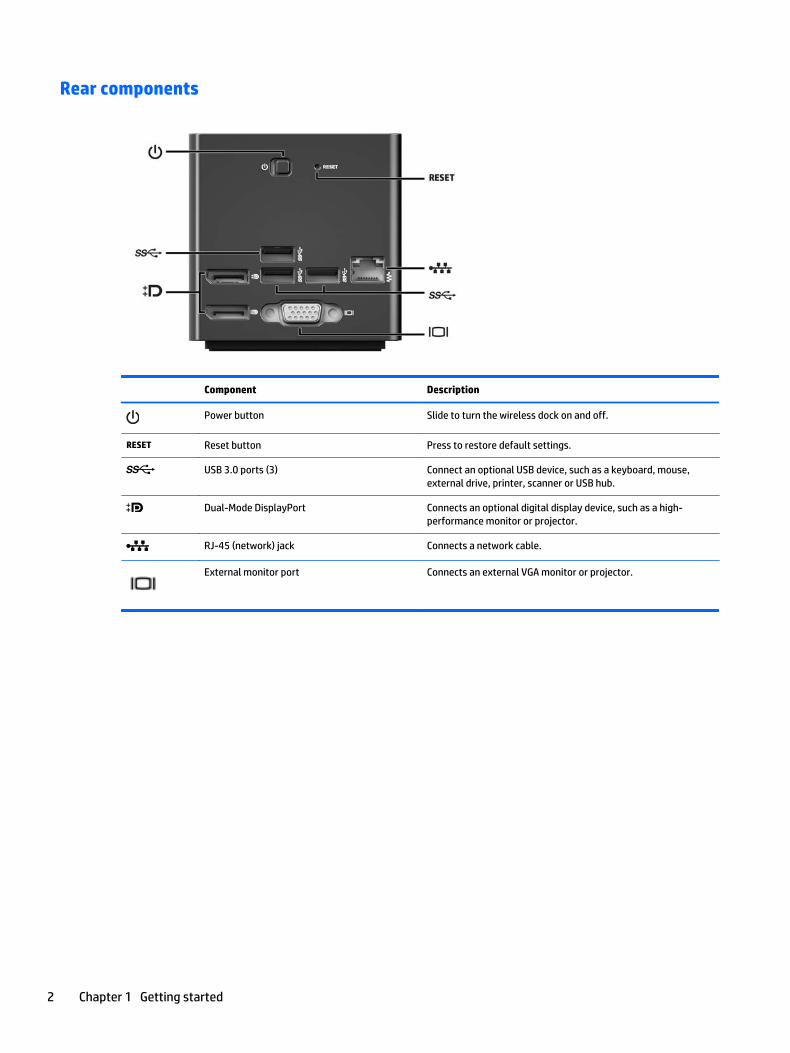
Rear components
Component Description
Power button Slide to turn the wireless dock on and off.
Reset button Press to restore default settings.
USB 3.0 ports (3) Connect an optional USB device, such as a keyboard, mouse, external drive, printer, scanner or USB hub.
Dual-Mode DisplayPort Connects an optional digital display device, such as a high-performance monitor or projector.
RJ-45 (network) jack Connects a network cable.
External monitor port Connects an external VGA monitor or projector.
2 Chapter 1 Getting started

Left components
Component Description
Power connector Connects an AC adapter.
Security cable slot Attaches an optional security cable to the wireless dock.
NOTE: The security cable is designed to act as a deterrent, but it may not prevent the wireless dock from being mishandled or stolen.
Identifying components 3
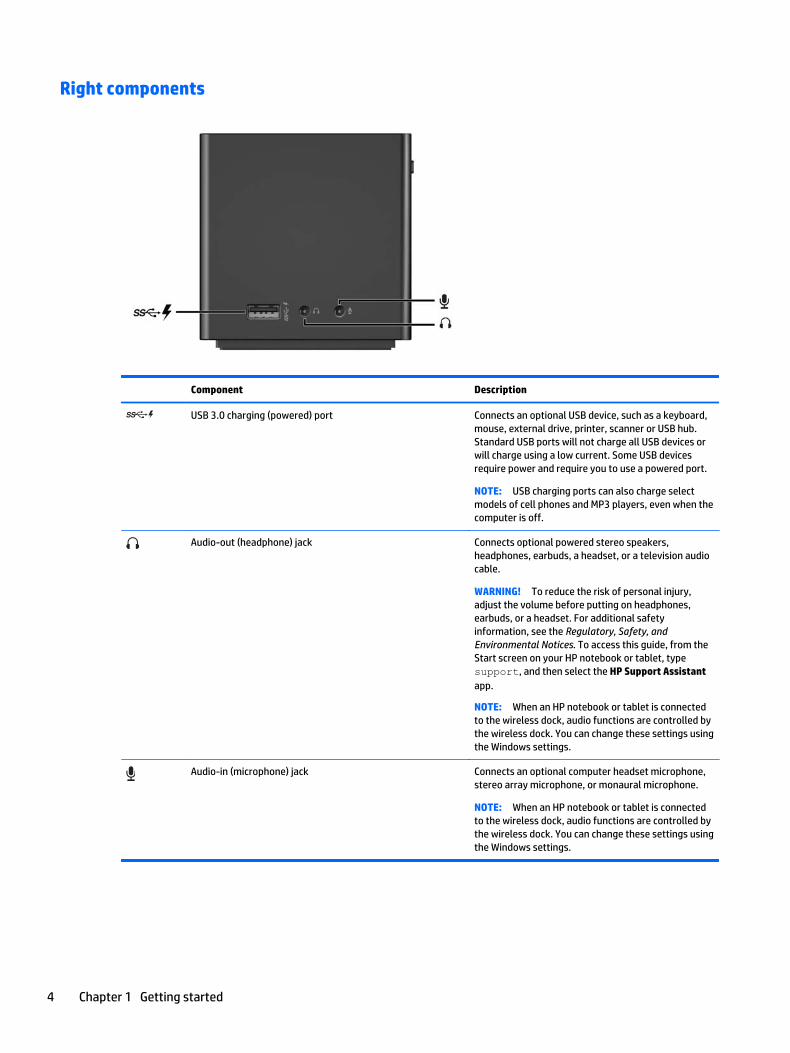
Right components
Component Description
USB 3.0 charging (powered) port Connects an optional USB device, such as a keyboard, mouse, external drive, printer, scanner or USB hub. Standard USB ports will not charge all USB devices or will charge using a low current. Some USB devices require power and require you to use a powered port.
NOTE: USB charging ports can also charge select models of cell phones and MP3 players, even when the computer is off.
Audio-out (headphone) jack Connects optional powered stereo speakers, headphones, earbuds, a headset, or a television audio cable.
WARNING! To reduce the risk of personal injury, adjust the volume before putting on headphones, earbuds, or a headset. For additional safety information, see the Regulatory, Safety, and Environmental Notices. To access this guide, from the Start screen on your HP notebook or tablet, type support, and then select the HP Support Assistant app.
NOTE: When an HP notebook or tablet is connected to the wireless dock, audio functions are controlled by the wireless dock. You can change these settings using the Windows settings.
Audio-in (microphone) jack Connects an optional computer headset microphone, stereo array microphone, or monaural microphone.
NOTE: When an HP notebook or tablet is connected to the wireless dock, audio functions are controlled by the wireless dock. You can change these settings using the Windows settings.
4 Chapter 1 Getting started

LabelsThere will be a label resembling the following example on the bottom of your wireless dock. This label provides information you might need when you troubleshoot system problems or pair to the wireless dock for the first time.
Component
(1) MAC address
(2) Serial number
(3) Product number
(4) Warranty period
Identifying components 5

Setting up the wireless dockStep 1: Connecting to AC power
WARNING! To reduce the risk of electric shock or damage to your equipment:
Plug the power cord into a grounded (earthed) outlet that is easily accessible at all times.
Disconnect power from the equipment by unplugging the power cord from the electrical outlet.
Do not disable the power cord grounding plug. The grounding plug is an important safety feature.
To ensure the correct performance of all wireless dock features, connect the wireless dock to an AC power source using the wireless dock power cord.
1. Connect the AC adapter to the power-in connector on the wireless dock (1).
2. Connect one end of the power cord to the AC adapter (2), and connect the other end of the power cord to an electrical outlet (3).
3. Turn the dock on (4).
The wireless dock light is solid amber when the dock is on but no notebooks or tablets are connected to it.
6 Chapter 1 Getting started
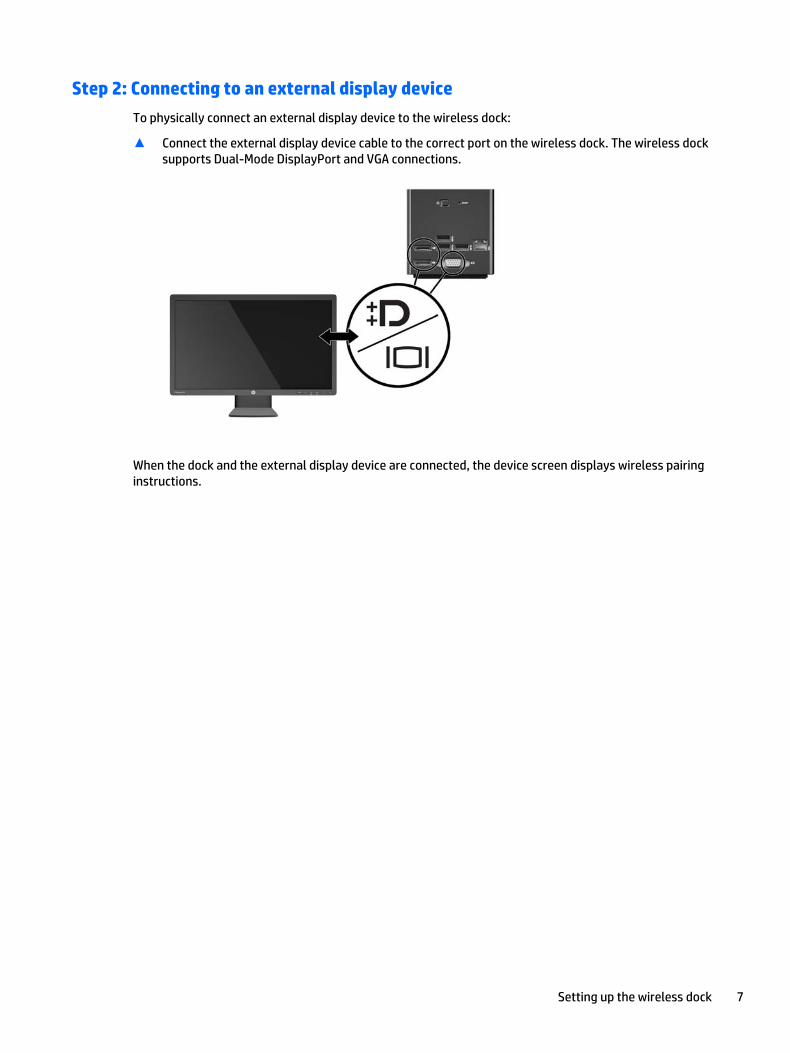
Step 2: Connecting to an external display deviceTo physically connect an external display device to the wireless dock:
▲ Connect the external display device cable to the correct port on the wireless dock. The wireless dock supports Dual-Mode DisplayPort and VGA connections.
When the dock and the external display device are connected, the device screen displays wireless pairing instructions.
Setting up the wireless dock 7
Step 3: Pairing with the wireless dock
NOTE: The following procedure is used to pair your HP notebook or tablet with the dock for the first time. See Connection procedures on page 16 for other connection procedures.
To pair your HP notebook or tablet with the wireless dock:
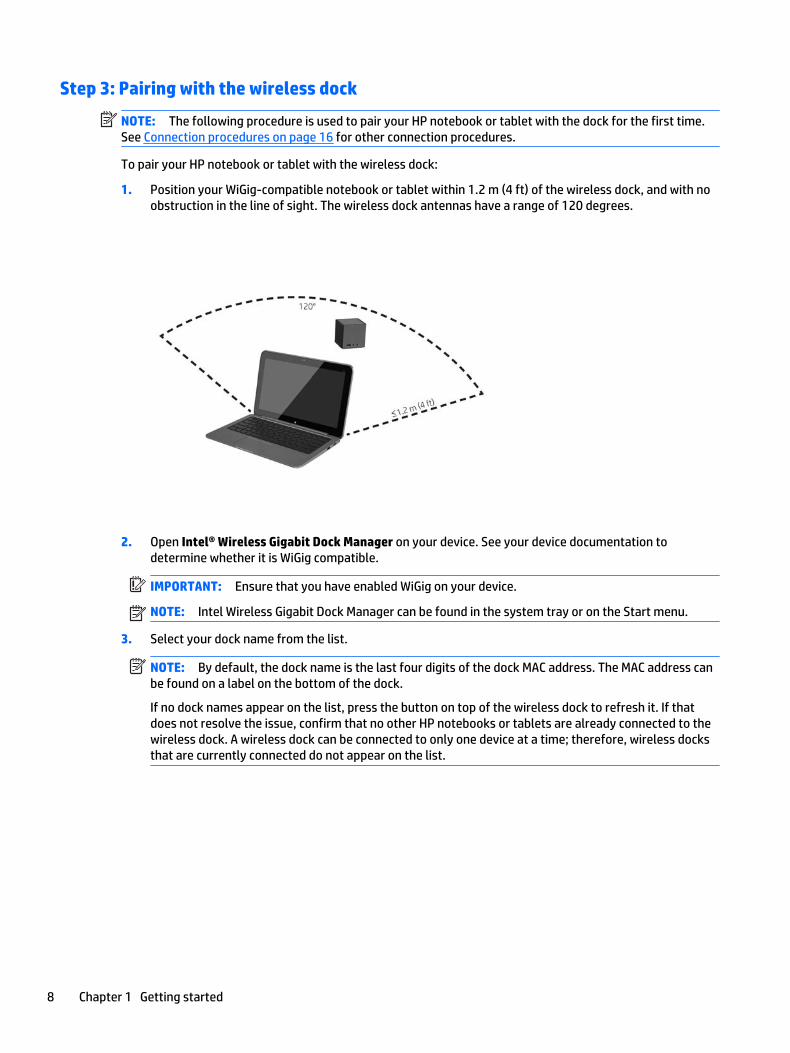
1. Position your WiGig-compatible notebook or tablet within 1.2 m (4 ft) of the wireless dock, and with no obstruction in the line of sight. The wireless dock antennas have a range of 120 degrees.
2. Open Intel® Wireless Gigabit Dock Manager on your device. See your device documentation to determine whether it is WiGig compatible.
IMPORTANT: Ensure that you have enabled WiGig on your device.
NOTE: Intel Wireless Gigabit Dock Manager can be found in the system tray or on the Start menu.
3. Select your dock name from the list.
NOTE: By default, the dock name is the last four digits of the dock MAC address. The MAC address can be found on a label on the bottom of the dock.
If no dock names appear on the list, press the button on top of the wireless dock to refresh it. If that does not resolve the issue, confirm that no other HP notebooks or tablets are already connected to the wireless dock. A wireless dock can be connected to only one device at a time; therefore, wireless docks that are currently connected do not appear on the list.
8 Chapter 1 Getting started

4. Press the button on top of the dock.
The wireless dock light pulses white while the dock is pairing. It turns solid white when the pairing is successful.
After the pairing is complete, you can select Dock Management to configure options for future connections. See Dock Management on page 14. Select Disconnect to disconnect manually. To disconnect automatically, move your device out of the wireless dock range.
Configuring the external display deviceNOTE: By default, the external display device is in duplicate mode after the initial pairing.
To configure the display of an external monitor connected to the wireless dock, first open the configuration settings.
▲ On Windows® 8.1, swipe from the upper-right corner of the screen, and then select Devices.
On Windows 8, press Windows logo.
On Windows 7, right-click on the desktop.
On Windows Vista®, right-click on the desktop, and then select Personalize.
You can then configure the display resolution, set the external monitor as an extension of the primary monitor, or set the external monitor as a copy of the primary monitor.
To configure the display resolution:
▲ On Windows 8.1, select Second screen.
On Windows 8, press p.
On Windows 7, select Screen Resolution.
On Windows Vista®, select Display Settings.
Configuring the external display device 9
To set the external monitor as the primary monitor:
▲ On Windows 8 or 8.1, select Second screen only.
On Windows 7, select Make this my main display.
On Windows Vista, select This is my main monitor.
To set the external monitor as an extension of the primary monitor:
▲ On Windows 8 or 8.1, select Extend.
On Windows 7, select Extend these displays.
On Windows Vista, select Extend the desktop onto this monitor.
To set the external monitor as a copy of the primary monitor:
▲ On Windows 8 or 8.1, select Duplicate.
On Windows 7, select Duplicate these displays.
On Windows Vista, select This is my main monitor.
In addition to the display properties described above, Windows operating systems starting with Windows 7 allow you to configure some additional display settings. Press Windows logo+p on the keyboard to configure settings that allow display on the computer only, duplicate display, or extended display.
10 Chapter 1 Getting started
2 Using the wireless dock
Wireless dock guidelines● Operating systems—For optimal performance, pair the wireless dock with an HP notebook or tablet
running Windows 8.1, Windows 8, Windows 7, or Windows Vista operating systems. See your device documentation to determine whether your device supports Intel WiGig.
NOTE: HP Advanced Wireless Docking is compatible with the HP Elite x2 1011 G1 with an optional installed Intel Tri Band Wireless AC with WiGig Combo card.
● Power—To use the wireless dock features, AC power must be connected to the wireless dock.
● External devices—When the wireless dock is paired with a device, external devices can be connected to the ports on the wireless dock or to the ports on the HP notebook or tablet.
Connecting to a networkYou can connect your HP notebook or tablet to a network through the wireless dock. This requires an Ethernet cable (purchased separately).
1. Pair the device with the wireless dock.
2. Connect one end of the Ethernet cable to the RJ-45 (network) jack on the wireless dock and connect the other end to an RJ-45 wall jack or router.
Connecting USB devicesThe wireless dock has four USB 3.0 ports: three USB ports on the rear panel and one USB port on the right panel. Use the USB ports to connect optional external USB devices, such as a keyboard and mouse.
NOTE: Be sure that the external device is compliant with the wireless dock power specifications. Using a noncompliant device might disable the port to which the device is attached. To reset the port, see Troubleshooting on page 19.
Connecting to a DisplayPort deviceThe wireless dock can also be connected to an external DisplayPort device, such as a monitor or a projector, through either of the two DisplayPorts on the rear panel. The wireless dock supports video connections to both of the Dual-Mode DisplayPorts and the VGA port at the same time.
NOTE: DisplayPorts do not support audio.
Connecting to a VGA display deviceThe wireless dock can also be connected to an external VGA display device, such as a monitor or a projector, through the VGA port on the rear panel.
Wireless dock guidelines 11
To connect an external VGA display device:
1. Connect the VGA device cable to the VGA port on the rear panel of the wireless dock.
2. If you are using Windows 7, press fn+f4 or f4, depending on your computer, one or more times to switch the screen image to the external display device.
NOTE: If you are not using Windows 7, the computer will automatically detect the external device. See Help and Support for more information.
NOTE: To use extended display, see the operating system display settings of the computer.
NOTE: If your computer lid switch is set to initiate Sleep when the display is closed, do not close the computer display while the computer is connected to an external display device. You can modify lid switch settings through the Power Options page.
NOTE: The wireless dock does not support viewing Blu-ray or other protected content on a display device connected to the VGA port on the wireless dock.
Connecting audioYou can connect headphones or speakers directly into the headphone jack on the wireless dock. You can also connect analog audio devices.
NOTE: Do not connect more than one audio device to the wireless dock.
NOTE: When an HP notebook or tablet is connected to the wireless dock, audio functions are controlled by the wireless dock. You can change these settings using the Windows settings.
Connecting analog audio devicesTo connect analog audio:
1. Using an audio Y-cable (purchased separately), connect the single-connector end of the cable to the headphone jack on the wireless dock.
2. Connect the red and white connectors on the other end of the cable to the matching audio-in jacks on your television or stereo equipment. See your television or stereo equipment user guide for the jack names and locations.
Connecting a microphoneYou can connect a microphone directly to the microphone jack on the wireless dock.
NOTE: When an HP notebook or tablet is connected to the wireless dock, audio functions are controlled by the wireless dock. You can change these settings using the Windows settings.
12 Chapter 2 Using the wireless dock
Connecting an optional security cableNOTE: The security cable is designed to act as a deterrent, but it might not prevent the wireless dock from being mishandled or stolen.
To install a security cable:
1. Loop the security cable around a secured object.
2. Insert the key into the cable lock.
3. Insert the cable lock into the security cable slot on the wireless dock, and then turn the key.
4. Remove the key.
Connecting an optional security cable 13

3 Dock Management
After pairing a HP notebook or tablet to the wireless dock, in the Intel Wireless Gigabit Dock Manager, select Dock Management to configure the dock name, permissions, signal preferences, and security.
InformationThe Information section lists the dock name and software version number.
To change the dock name:
1. Enter the desired name in the Name box.
2. Select Save Changes.
To update the software manually:
1. Select the version number. It links to a manual update.
TIP: The version number can also be used for troubleshooting.
2. Select Save Changes.
PermissionsThe Permissions section provides the following configuration options:
● Allow automatic connections—Enables the wireless dock to save previously paired HP notebook or tablets and auto-connect when the device is in range.
NOTE: The wireless dock can connect to only one device at a time. If two devices enter the wireless dock range at the same time, the dock connects to the first device that attempts to connect.
● Allow reconnections without manual confirmation—Enables the wireless dock to save previously paired HP notebook or tablets, but requires you to press the button on top of the wireless dock to complete a reconnection.
● Force reconnections to use manual confirmation—Disables the wireless dock from remembering previously paired HP notebook or tablets.
To change the Permissions setting:
1. Select the desired setting.
2. Select Save Changes.
Signal PreferencesSelect your Preferred Radio Channel and optimize the signal strength for the number of wireless docks in your area.
NOTE: Selections might vary depending on your deployment. HP recommends using the default Preferred Radio Channel.
14 Chapter 3 Dock Management

SecurityThe Security section enables you to require the entry of a password before a device can pair with the wireless dock.
To set a password:
1. Next to Require a password to manage this dock, select YES.
2. Enter a password in the Password box.
3. Enter the same password in the Verify box.
4. Select Save Changes.
Security 15

4 Connection procedures
Automatic connectionActive device
To connect a previously paired, active HP notebook or tablet to a wireless dock that allows automatic connections:
▲ Move the previously paired device into the wireless dock range, with the device antenna facing at least one of the wireless dock antennas.
NOTE: If two devices are configured to automatically connect to the same wireless dock and move into range at the same time, the wireless dock connects to the first device that attempts to connect.
When the device connects successfully, the Intel Wireless Gigabit Dock Manager icon in the system tray displays a connection notification, the wireless dock light is solid white, and the external display device wakes up.
NOTE: If you manually disconnect your device, it does not attempt to connect to the wireless dock again until you remove it from the wireless dock range and then bring it back into range. If another previously paired device is configured to connect to the wireless dock and is in range, it connects to the dock when you manually disconnect the first device.
Device in standby modeStandby mode is enabled by default in Windows 8.1. Using standby mode when connected to the wireless dock saves power.
To connect a previously paired HP notebook or tablet in standby mode to a wireless dock that allows automatic connections:
1. Move the previously paired device into the wireless dock range, with the device antenna facing at least one of the wireless dock antennas.
NOTE: If two devices are configured to automatically connect to the same wireless dock and move into range at the same time, the wireless dock connects to the first device that attempts to connect.
2. Press the button on top of the wireless dock to wake your device.
When the device connects successfully, the Intel Wireless Gigabit Dock Manager icon in the system tray displays a connection notification, the wireless dock light is solid white, and the external display device wakes up.
NOTE: If you manually disconnect your device, it does not attempt to connect to the wireless dock again until you remove it from the wireless dock range and then bring it back into range. If another previously paired device is configured to connect to the wireless dock and is in range, it connects to the dock when you manually disconnect the first device.
16 Chapter 4 Connection procedures

Reconnections without manual confirmationTo connect a previously paired HP notebook or tablet to a wireless dock that allows reconnections without manual confimation:
1. Move the previously paired device into the wireless dock range, with the device antenna facing at least one of the wireless dock antennas.
NOTE: If two devices are configured to automatically connect to the same wireless dock and move into range at the same time, the wireless dock connects to the first device that attempts to connect.
2. Press the button on top of the wireless dock.
When the device connects successfully, the Intel Wireless Gigabit Dock Manager icon in the system tray displays a connection notification, the wireless dock light is solid white, and the external display device wakes up.
NOTE: If you manually disconnect your device, it does not attempt to connect to the wireless dock again until you remove it from the wireless dock range and then bring it back into range. If another previously paired device is configured to connect to the wireless dock and is in range, it connects to the dock when you manually disconnect the first device.
Reconnections with manual confirmationTo connect a previously paired HP notebook or tablet to a wireless dock that requires manual confirmation:
1. Move the previously paired device into the wireless dock range, with the device antenna facing at least one of the wireless dock antennas.
2. Open Intel Wireless Gigabit Dock Manager, and select your dock number from the list.
NOTE: Previously paired dock numbers appear on the list in a dark blue font.
If no dock names appear on the list, press the button on top of the wireless dock to refresh it. If that does not resolve the issue, confirm that no other HP notebooks or tablets are already connected to the wireless dock. A wireless dock can be connected to only one device at a time; therefore, wireless docks that are currently connected do not appear on the list.
– or –
Right-click the Intel Wireless Gigabit Dock Manager icon in the system tray, and then select Connect to Dock XXXX or View available docks.
3. Press the button on top of the wireless dock to wake your device.
When the device connects successfully, the Intel Wireless Gigabit Dock Manager icon in the system tray displays a connection notification, the wireless dock light is solid white, and the external display device wakes up.
NOTE: If you manually disconnect your device, it does not attempt to connect to the wireless dock again until you remove it from the wireless dock range and then bring it back into range. If another previously paired device is configured to connect to the wireless dock and is in range, it connects to the dock when you manually disconnect the first device.
Reconnections without manual confirmation 17

Mandatory updatesIf there is a mandatory update to the wireless dock, Intel Wireless Gigabit Dock Manager opens and displays a message after your HP notebook or tablet successfully pairs with the wireless dock.
▲ To update the wireless dock, select Yes.
NOTE: You cannot connect to the wireless dock until you update it.
The device connects to the wireless dock automatically after the update is complete.
18 Chapter 4 Connection procedures
5 Troubleshooting
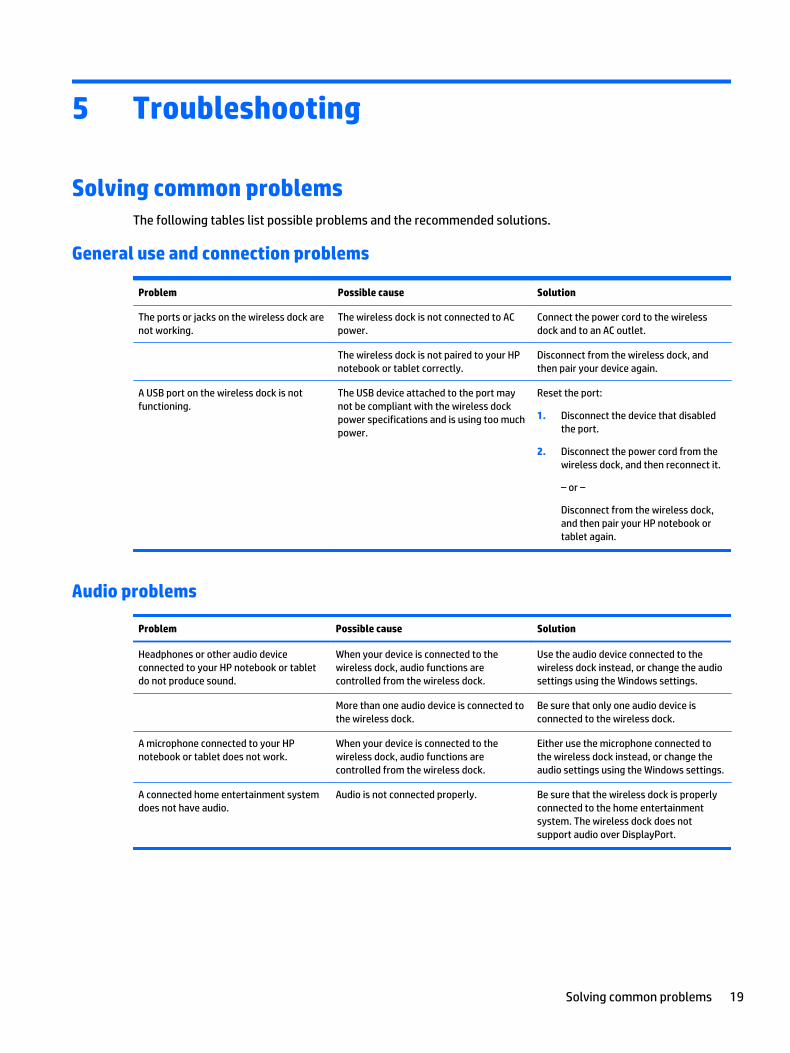
Solving common problemsThe following tables list possible problems and the recommended solutions.
General use and connection problems
Problem Possible cause Solution
The ports or jacks on the wireless dock are not working.
The wireless dock is not connected to AC power.
Connect the power cord to the wireless dock and to an AC outlet.
The wireless dock is not paired to your HP notebook or tablet correctly.
Disconnect from the wireless dock, and then pair your device again.
A USB port on the wireless dock is not functioning.
The USB device attached to the port may not be compliant with the wireless dock power specifications and is using too much power.
Reset the port:
1. Disconnect the device that disabled the port.
2. Disconnect the power cord from the wireless dock, and then reconnect it.
– or –
Disconnect from the wireless dock, and then pair your HP notebook or tablet again.
Audio problems
Problem Possible cause Solution
Headphones or other audio device connected to your HP notebook or tablet do not produce sound.
When your device is connected to the wireless dock, audio functions are controlled from the wireless dock.
Use the audio device connected to the wireless dock instead, or change the audio settings using the Windows settings.
More than one audio device is connected to the wireless dock.
Be sure that only one audio device is connected to the wireless dock.
A microphone connected to your HP notebook or tablet does not work.
When your device is connected to the wireless dock, audio functions are controlled from the wireless dock.
Either use the microphone connected to the wireless dock instead, or change the audio settings using the Windows settings.
A connected home entertainment system does not have audio.
Audio is not connected properly. Be sure that the wireless dock is properly connected to the home entertainment system. The wireless dock does not support audio over DisplayPort.
Solving common problems 19
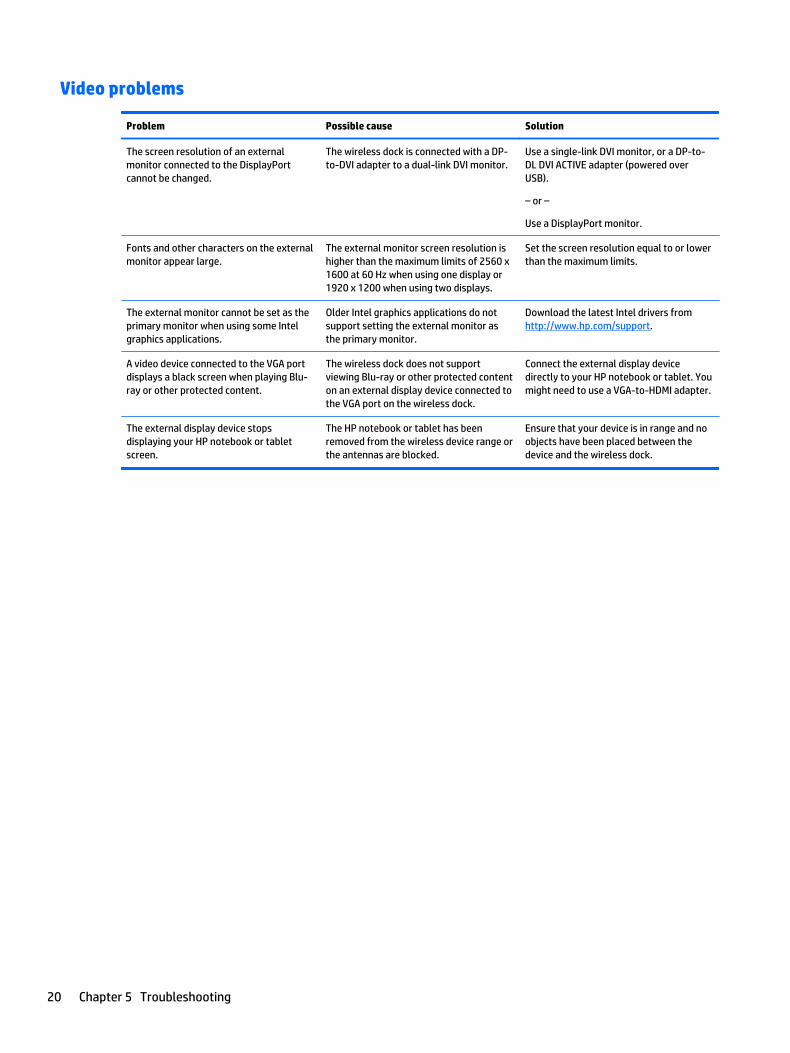
Video problems
Problem Possible cause Solution
The screen resolution of an external monitor connected to the DisplayPort cannot be changed.
The wireless dock is connected with a DP-to-DVI adapter to a dual-link DVI monitor.
Use a single-link DVI monitor, or a DP-to-DL DVI ACTIVE adapter (powered over USB).
– or –
Use a DisplayPort monitor.
Fonts and other characters on the external monitor appear large.
The external monitor screen resolution is higher than the maximum limits of 2560 x 1600 at 60 Hz when using one display or 1920 x 1200 when using two displays.
Set the screen resolution equal to or lower than the maximum limits.
The external monitor cannot be set as the primary monitor when using some Intel graphics applications.
Older Intel graphics applications do not support setting the external monitor as the primary monitor.
Download the latest Intel drivers from http://www.hp.com/support.
A video device connected to the VGA port displays a black screen when playing Blu-ray or other protected content.
The wireless dock does not support viewing Blu-ray or other protected content on an external display device connected to the VGA port on the wireless dock.
Connect the external display device directly to your HP notebook or tablet. You might need to use a VGA-to-HDMI adapter.
The external display device stops displaying your HP notebook or tablet screen.
The HP notebook or tablet has been removed from the wireless device range or the antennas are blocked.
Ensure that your device is in range and no objects have been placed between the device and the wireless dock.
20 Chapter 5 Troubleshooting
Contacting supportIf you cannot solve a problem using the troubleshooting tips in this chapter, you might need to contact support.
For the fastest possible resolution of your problem, have the following information available when you contact support:
NOTE: The serial number and other information for the wireless dock can be found on the service label located on the bottom of the wireless dock.
● Model name and number for your HP notebook or tablet and for the wireless dock
● Serial numbers for the your HP notebook or tablet and for the wireless dock
● Dates your HP notebook or tablet and the wireless dock were purchased
● Conditions under which the problem occurred
● Error messages that have been displayed
● Hardware and software you are using
● The manufacturer and model of components connected to your HP notebook or tablet and the wireless dock
To contact support using your HP computer, select Start and then select Help and Support. Click Contact support to start a chat session with a support specialist.
For U.S. support, go to http://www.hp.com/go/contactHP. For worldwide support, go to http://welcome.hp.com/country/us/en/wwcontact_us.html.
Choose from the following types of support:
● Chat online with an HP technician.
NOTE: When chat is not available in a particular language, it is available in English.
● Find HP support worldwide telephone numbers.
● Locate an HP service center.
Contacting support 21
Index
Aanalog audio 12audio connection, analog 12audio, connecting 12audio-in (microphone) jack 12audio-out (headphone) jack 12
Bbuttons
pairing 1power 2reset 2
Cconnector, power 3
DDisplayPort device, connecting 11DisplayPort, identifying 2
Eexternal devices 11external display device, connecting
7external monitor port 2
Hheadphone (audio-out) jack 4
Jjacks
audio-in (microphone) 4, 12audio-out (headphone) 4, 12RJ-45 (network) 2, 11
Llabels 5lock, security cable 13
Mmicrophone (audio-in) jack,
identifying 4
Nnetwork (RJ-45) jack 2, 11
Ooperating systems supported 11
Ppairing 8ports
DisplayPort 2external monitor 2USB 11USB 3.0 charging (powered) 4
powerguidelines 11wireless dock, connecting 6
power button, identifying 2power connector 6power connector, identifying 3
RRJ-45 (network) jack 2, 11
Ssecurity cable slot 3, 13security cable, connecting 13slots, security cable 3support, contacting 21
TTroubleshooting 19
UUSB 3.0 charging (powered),
identifying 4USB 3.0 port 2USB devices, connecting 11USB ports, identifying 2
VVGA display device, connecting 11
22 Index