How to work with captions - Weebly
5
Adobe Premiere Pro CC Guide © 2017 Adobe Systems Incorporated. is document requires Adobe Premiere Pro CC 2017. Technical instructions may differ depending on your version. 1 How to work with captions Premiere Pro Guide How to work with captions Captioning is a method of displaying text on a television, video screen, or other visual display to provide additional or interpretive information ( Figure 1 ). Captions come in two formats: closed or open. Closed Captions can be turned on and off by the viewer, whereas Open Captions are always visible. Premiere Pro provides a full set of features that let you create and edit captions, and export them for display for all supported formats. You can import and display captions and edit the text, color, background, and the timing quickly and easily. Once you’re done editing, you can export the captions as a separate sidecar file for Closed Captions, or burn the captions directly into the video to create Open Caption subtitles. In this guide, you’ll learn how to create and edit both closed and open captions, and export videos with external caption files and with burned-in captions. Use your own files, or download the assets used in this tutorial here. Figure 1 Example of captioning
Transcript of How to work with captions - Weebly

Adobe Premiere Pro CC Guide
© 2017 Adobe Systems Incorporated. This document requires Adobe Premiere Pro CC 2017. Technical instructions may differ depending on your version.
1How to work with captions Premiere Pro Guide
How to work with captions Captioning is a method of displaying text on a television, video screen, or other visual display to provide additional or interpretive information (Figure 1). Captions come in two formats: closed or open. Closed Captions can be turned on and off by the viewer, whereas Open Captions are always visible.
Premiere Pro provides a full set of features that let you create and edit captions, and export them for display for all supported formats. You can import and display captions and edit the text, color, background, and the timing quickly and easily. Once you’re done editing, you can export the captions as a separate sidecar file for Closed Captions, or burn the captions directly into the video to create Open Caption subtitles.
In this guide, you’ll learn how to create and edit both closed and open captions, and export videos with external caption files and with burned-in captions. Use your own files, or download the assets used in this tutorial here.
Figure 1 Example of captioning
2How to work with captions Premiere Pro Guide© 2017 Adobe Systems Incorporated. This document requires Adobe Premiere Pro CC 2017. Technical instructions may differ depending on your version.
Create or edit captions
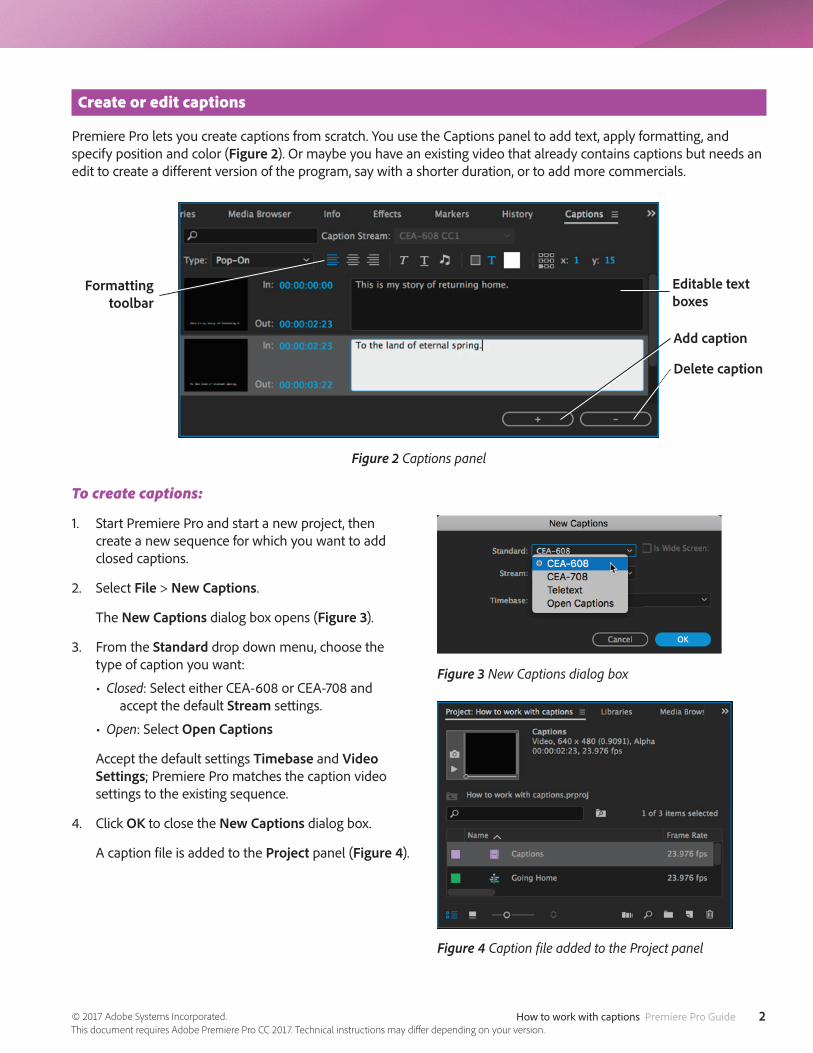
Premiere Pro lets you create captions from scratch. You use the Captions panel to add text, apply formatting, and specify position and color (Figure 2). Or maybe you have an existing video that already contains captions but needs an edit to create a different version of the program, say with a shorter duration, or to add more commercials.
To create captions:
1. Start Premiere Pro and start a new project, then create a new sequence for which you want to add closed captions.
2. Select File > New Captions.
The New Captions dialog box opens (Figure 3).
3. From the Standard drop down menu, choose the type of caption you want:
• Closed: Select either CEA-608 or CEA-708 and accept the default Stream settings.
• Open: Select Open Captions
Accept the default settings Timebase and Video Settings; Premiere Pro matches the caption video settings to the existing sequence.
4. Click OK to close the New Captions dialog box.
A caption file is added to the Project panel (Figure 4).
Figure 3 New Captions dialog box
Figure 4 Caption file added to the Project panel
Figure 2 Captions panel
Add caption
Delete caption
Formatting toolbar
Editable text boxes
3How to work with captions Premiere Pro Guide© 2017 Adobe Systems Incorporated. This document requires Adobe Premiere Pro CC 2017. Technical instructions may differ depending on your version.
5. If you selected Closed Captions you need to make a few quick adjustments to make sure captions display properly:
• In the Program Monitor panel, click the Wrench icon to view the pop-up menu and select Closed Captions Display > Enable.
• Click the Wrench icon again and select Closed Captions Display > Settings and confirm the Standard showing is the same you set in step 3. Click OK to close the Closed Captions Display Settings dialog box.
6. To add text to the caption file, double-click the caption file in the Project panel.
The Captions panel opens (Figure 2).
7. In the Captions panel, type the caption text in the text box as desired.
8. Use the formatting tools to specify the caption type, position, change the text color and background color for the caption. You can also apply formatting effects such as underlining and italicizing.
Note: The formatting options differ depending on whether you have chosen closed or open captions. Closed Captions use a limited set of standards to control playback on televisions. Open Captions offer a wider variety of options for layout, fonts, and colors.
9. To add more caption blocks, click Add Caption (+) in the bottom right-side of the Captions panel. To delete a caption block, select the caption block and click Delete Caption (-).
10. When you’ve finished typing your captions, select Window > Project to return to the Project panel.
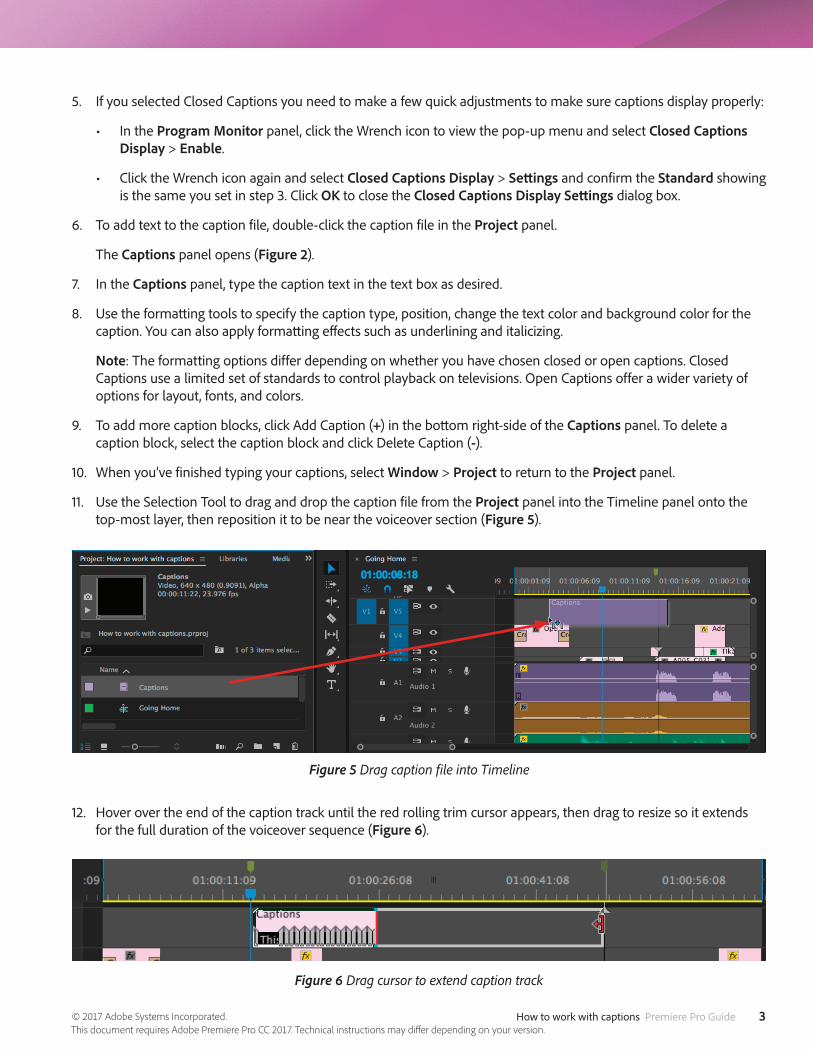
11. Use the Selection Tool to drag and drop the caption file from the Project panel into the Timeline panel onto the top-most layer, then reposition it to be near the voiceover section (Figure 5).
12. Hover over the end of the caption track until the red rolling trim cursor appears, then drag to resize so it extends for the full duration of the voiceover sequence (Figure 6).
Figure 5 Drag caption file into Timeline
Figure 6 Drag cursor to extend caption track
4How to work with captions Premiere Pro Guide© 2017 Adobe Systems Incorporated. This document requires Adobe Premiere Pro CC 2017. Technical instructions may differ depending on your version.
13. In the Program Monitor, click the play button to preview your captions, and use on-screen tools to adjust and drag each individual caption segment to be in proper sync with the voiceover (Figure 7).
Note: Dragging on the Timeline Zoom tools helps you magnify the caption track details and move the handles.
To edit captions:
1. Select the caption file to edit in the Timeline panel.
2. Select Window > Captions to display the Captions panel.
3. In the Captions panel, you can make word-level edits of existing caption clips. You can also change the timing and formatting, like, text alignment and color, from an intuitive user interface.
4. The text clips are also visible from the Timeline. From there, you can adjust the captions to be in proper sync with the media after any trims, ripple deletes, and rearranging of segments.
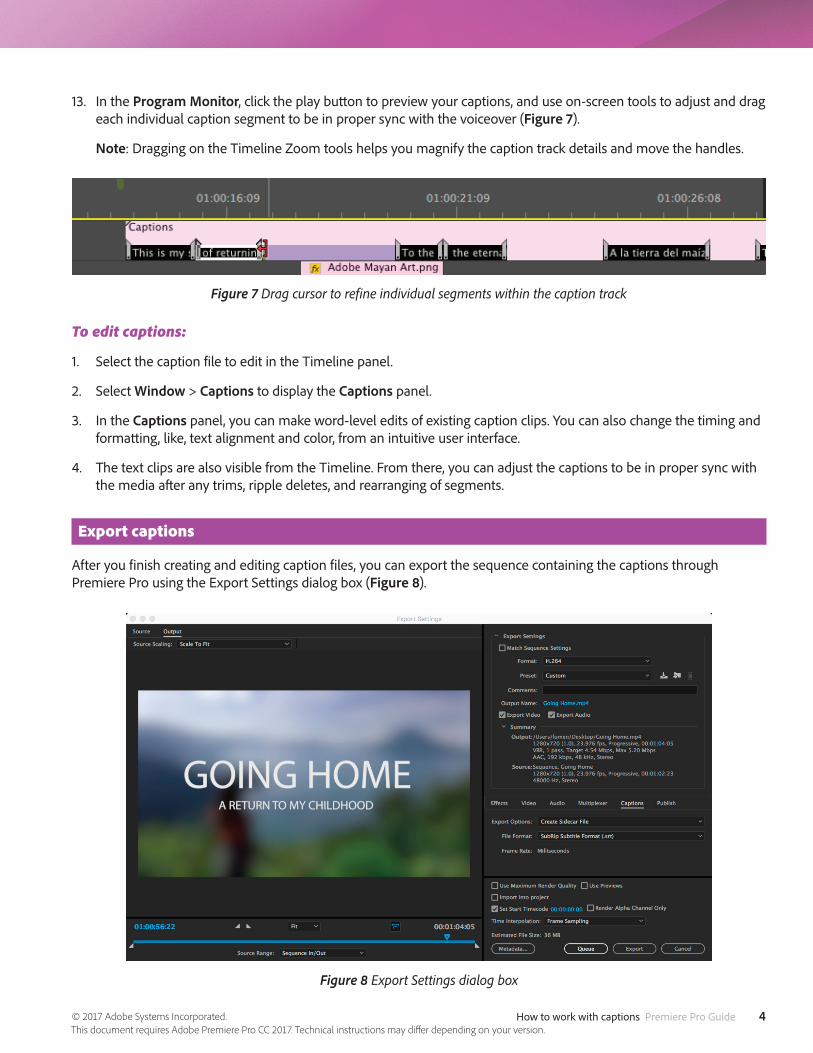
Export captions
After you finish creating and editing caption files, you can export the sequence containing the captions through Premiere Pro using the Export Settings dialog box (Figure 8).
Figure 7 Drag cursor to refine individual segments within the caption track
Figure 8 Export Settings dialog box

5
For more informationGet instant access to free courses, workshops, & teaching materials and connect with the creative education community on the Adobe Education Exchange: https://edex.adobe.com/.
Adobe Systems Incorporated 345 Park Avenue San Jose, CA 95110-2704 USA www.adobe.com
Adobe and the Adobe logo are either registered trademarks or trademarks of Adobe Systems Incorporated in the United States and/or other countries. All other trademarks are the property of their respective owners.
© 2017 Adobe Systems Incorporated. All rights reserved.
This work is licensed under a Creative Commons Attribution-Noncommercial-Share Alike 3.0 Unported License.
To export Closed Captions:
1. Click in the Timeline panel to activate the sequence.
2. Select File > Export > Media.
The Export Settings dialog box opens (Figure 8).
3. In the Export Settings dialog box, click the Captions tab.
4. Select Create Sidecar File from the Export Options drop-down menu (Figure 9).
5. Select one of the following file formats from the File Format menu to export the closed caption data:
• Scenarist Closed Caption File (.scc)
• MacCaption VANC File (.mcc)
• SMPTE Timed Text (.xml)
• SubRip Subtitle Format (.srt)
Depending on the format that you select, a list of supported Frame Rate is displayed in the pop-up menu. Accept the default frame rate is based on the known frame rate of the sequence that you are exporting.
6. Click Export to export the video.
The video is exported along with its external caption data. (Figure 10).
To export Open Captions:
1. Click in the Timeline panel to activate the sequence.
2. Select File > Export > Media.
The Export Settings dialog box opens (Figure 8).
3. In the Export Settings dialog box, specify the follow-ing options under the Captions tab.
4. Select Burn Captions Into Video from the Export Options drop-down menu (Figure 11).
5. Click Export to export the video.
The video is exported with its burned-in caption data.
Figure 9 Export Settings dialog box, Captions tab
Figure 11 Export Settings dialog box, Captions tab
Figure 10 Exported video and caption files