How to use the End of Year Assistant - · PDF fileHow to use the End of Year Assistant ......
16
1 ©ParentPay Ltd 2016 How to use the End of Year Assistant The End of Year Assistant has been designed to help complete essential end of academic year and new academic year tasks. By ensuring these tasks are completed early, the school’s ParentPay site will be prepared for the start of the new year, reducing the tasks to be completed during that busy period. The End of Year Assistant will be made available to schools early in the Summer term. While it will be available for completion, initially, you are able to postpone completing it until a more convenient time if needed. Approximately one month before the end of the Summer term, it will become mandatory to complete any critical items. This should take no more than 10 minutes and as a minimum requires you to have the following to hand: • Term dates for the new academic year • Closing dates for the new academic year (may be updated if changes occur) • Meal prices for the new academic year (where appropriate) • Free school meal allowance for the new academic year (where appropriate) NOTE: We strongly encourage you to complete all critical tasks as soon as you are able to. Viewing the End of Year Assistant Once the End of Year Assistant has been enabled by ParentPay, a new icon will appear on the home screen when the school’s ParentPay manager logs into the system. When the End of Year Assistant icon is selected, a list of tasks to complete will be displayed. NOTE: Only the tasks relevant to the school will be shown.
-
Upload
hoangquynh -
Category
Documents
-
view
218 -
download
2
Transcript of How to use the End of Year Assistant - · PDF fileHow to use the End of Year Assistant ......

1
©ParentPay Ltd 2016
How to use the End of Year Assistant
The End of Year Assistant has been designed to help complete essential end of academic year and new academic year tasks. By ensuring these tasks are completed early, the school’s ParentPay site will be prepared for the start of the new year, reducing the tasks to be completed during that busy period. The End of Year Assistant will be made available to schools early in the Summer term. While it will be available for completion, initially, you are able to postpone completing it until a more convenient time if needed. Approximately one month before the end of the Summer term, it will become mandatory to complete any critical items. This should take no more than 10 minutes and as a minimum requires you to have the following to hand:
• Term dates for the new academic year
• Closing dates for the new academic year (may be updated if changes occur)
• Meal prices for the new academic year (where appropriate)
• Free school meal allowance for the new academic year (where appropriate) NOTE: We strongly encourage you to complete all critical tasks as soon as you are able to.
Viewing the End of Year Assistant
Once the End of Year Assistant has been enabled by ParentPay, a new icon will appear on the home screen when the school’s ParentPay manager logs into the system.
When the End of Year Assistant icon is selected, a list of tasks to complete will be displayed. NOTE: Only the tasks relevant to the school will be shown.

2
©ParentPay Ltd 2016
Postponing the End of Year Assistant
The End of Year Assistant can initially be dismissed until a later date. School managers can enter any date prior to the mandatory deadline, and the End of Year Assistant will re-appear on the date selected.
If the End of Year Assistant is not completed by the deadline, the list of tasks to complete will automatically appear on screen the next time the school’s ParentPay manager logs into the system. At that point, it will not be possible to navigate away from the End of Year Assistant until the mandatory tasks have been completed.
3
©ParentPay Ltd 2016
Tasks
When the End of Year Assistant is accessed, the dashboard will be displayed containing the tasks to be completed. The number of tasks will vary depending on how the school uses ParentPay. There are potentially nine tasks to complete:
• Update application settings – term dates and closure dates
• Update contact details – update or add new contact details
• Update meal/session prices – meal or session costs and FSM Allowance
• Managing debt and credit balances – enabling the school to manage any debts or credits
• Update meal patterns – adding, amending or ending meal patterns
• Update menus – adding or extending menus
• Update new pupils – uploading new pupils and producing activation letters
• Record upcoming changes – prompting the user to state if they are about to change MIS systems, cashless till providers, school name and/or DfE/SEED number
• Final considerations – prompting the user to update site data settings Some tasks will need to be completed before the end of the summer term. Other tasks, such as pupil uploads, will not need to be completed until the school returns at the beginning of the autumn term. The status of the task will update once a task has been fully or partially completed:
Task is complete
Task is partially complete
Task has not yet been completed
Not a task that requires any action, the page contains useful information only
The mandatory tasks will need to be completed in the order they are listed, for example, a user will not be able to update meal prices until the term dates and school closure dates have been entered in the Update application settings task. Once the mandatory tasks have been completed the user will be able to access the remaining tasks in any order. Once a task has been marked as completed, it cannot be accessed to make additional changes. If further changes are required, or the school’s ParentPay manager made a mistake when completing the task, the details can be amended from within the main ParentPay site.

4
©ParentPay Ltd 2016
Application settings
The first task within the wizard is updating the application settings. This will require the school’s ParentPay manager to add new term dates and closure dates. The user will not be able to move forward to the next task within the End of Year Assistant until the term dates have been entered and saved.
New academic year term dates
The term periods will need to be added for the Autumn, Spring and Summer Term.
1. Select Update application settings 2. Enter the Start Date for the Autumn Term by either typing the date in, or using the
calendar icon to select the correct date. 3. The End Date will then be made available. Type the required date into the box, or use
the calendar icon to select the correct date. 4. If required, select the Add a half term holiday
check-box and enter the first and last dates of the holiday.
5. Repeat the process as required for the rest of the terms. 6. Select Save and continue or Save and close.

5
©ParentPay Ltd 2016
Scheduled closure dates
Closure days will then need to be entered. These usually include INSET/Teacher training/In
service days, and bank holidays that fall during the school terms.
The closure days can be set by selecting the appropriate dates from the calendar displayed.
A maximum of 15 closure dates can be entered. Any weekends and school holidays will be greyed out and cannot be selected. Once all the closure dates have been entered, select the I have entered all my Closure dates check box, and select Save and close.
NOTE: Once term and closure dates have been saved no further changes can be made via the End of
Year Assistant. If changes need to be made, or additional closure dates need to be added, this can be
completed in the main ParentPay site in Settings > Manage calendar.
Update contact details

6
©ParentPay Ltd 2016
Update contact details will allow the school to update any contact information for the
person or department who deals with queries regarding ParentPay.
If the school provides meals, and any queries regarding meals should be directed to someone other than the main contact, select Yes in answer to Should parents contact someone different if the enquiry is meal related? If yes is selected, additional text boxes requesting contact information will be displayed.
NOTE: This information cannot currently be edited within the main ParentPay site.
Meal/session prices
The End of Year Assistant will display the current meal or session price for any live lunchtime
event types. Any new prices/charges can be entered if any meal/session costs are due to
change at the start of the new academic year.
A link to a guidance document will be displayed, and provides further information on entering
price changes.
Select either Save and continue or Save and close to lock in the lunchtime meal type
prices.

7
©ParentPay Ltd 2016
If the page is saved without any adjustments to meal prices being made, a message will be displayed. If the price is correct, select Yes.
If changes to the meal prices have been entered and the page is saved, a message will be displayed asking to confirm the changes are correct. Select Yes to continue, or No to make further changes.
The End of Year Assistant will display the current FSM allowances on screen for any relevant groups. If any of the allowances are due to increase at the start of the new academic year, the School Manager will be able to update the prices on screen.
The system will either extend the allowance dates to retain the current value, or will create new FSM allowances to reflect any increase inputted by the School Manager.
The School Manager will either leave the allowance values as they appear on screen or will update the values depending on the new prices inputted into the Daily FSM value field.
The School Manager will need to select Save and close to lock in the FSM allowance values.
If there is an increase in price a new FSM allowance will automatically be created for the start of the new academic year displaying the new daily FSM value.
8
©ParentPay Ltd 2016
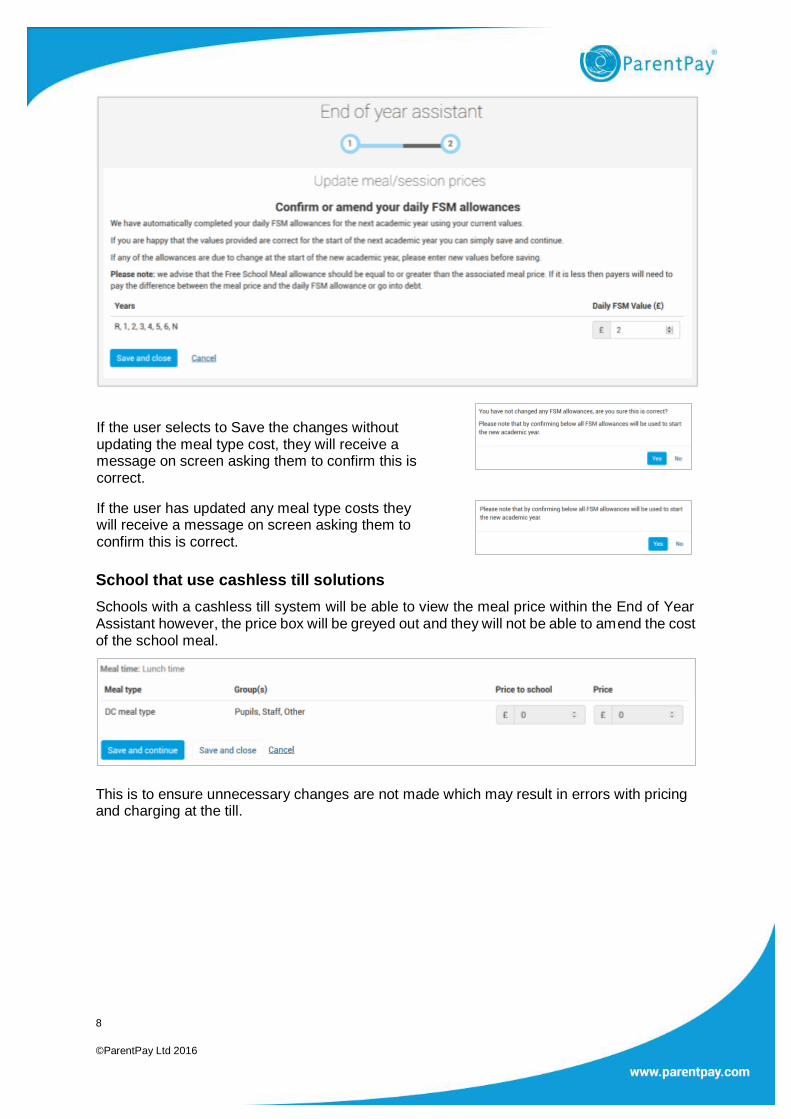
If the user selects to Save the changes without updating the meal type cost, they will receive a message on screen asking them to confirm this is correct.
If the user has updated any meal type costs they will receive a message on screen asking them to confirm this is correct.
School that use cashless till solutions
Schools with a cashless till system will be able to view the meal price within the End of Year Assistant however, the price box will be greyed out and they will not be able to amend the cost of the school meal.
This is to ensure unnecessary changes are not made which may result in errors with pricing and charging at the till.

9
©ParentPay Ltd 2016
Debt and credit balances
The End of Year Assistant provides information on managing debt and credits within the ParentPay site.
The option to Download debt balance list can be selected, and a list of all pupils with a debt against their account will be provided. This can then be used to reclaim the outstanding debt.
Guidance on the best practise for chasing debt can be accessed by using the link, How do I chase a debt? Selecting Create debt letters now will redirect the page to the ParentPay Communication Centre, where a variety of debt letter templates can be accessed and used as required.
Some schools may find that some school leavers have meal balances remaining on their
account. Also, some schools, caterers, or Local Authorities may require all pupils to end the
year with a £0.00 balance. As with the debt option, a link will be displayed enabling a list of
credit balances to be downloaded. This link is titled Download a credit balance list. Selecting
How do I record an adjustment will open a supporting guidance document.
Selecting Record adjustments now will redirect to the Record Adjustment tab within the
ParentPay site to enable them to make any adjustments required to the accounts with a credit.
Guidance on completing an electronic refund can be found here.

10
©ParentPay Ltd 2016
NOTE: Some local authorities and caterers do not allow schools to make electronic refunds. If a
refund is required, and cannot be made by the school please contact the owner of the bank account
to process a refund.
Meal patterns
Meal patterns may not apply to all schools, and as such may not be displayed on all school’s
ParentPay sites.
A link is displayed providing guidance on How to extend and add meal patterns.
To update the meal patterns, select Extend or add meal patterns now. The page will
navigate to People > Groups. Follow the guidance document to update the patterns as
required.
Select the Please choose from the options below before continuing drop down menu.
Depending on whether the task has been actioned, select of the following choices:
I will come back to this later – this will leave
the task outstanding on the dashboard and
enable users to return and complete the task
later.
My school does not need to complete this
task – this will mark the task as completed on
the dashboard.
I have completed this task – this again will
mark the task as completed on the dashboard.

11
©ParentPay Ltd 2016
Make the required selection, and select Save
and close
Menus
Menus applies to any schools that allow payers to book or select meals via the ParentPay
system.
The menu task will not display to any schools who do not use menus currently.
Select the link How do I extend or add menus? to open a document providing information
on updating the menu.
Select the Please choose from the options below before continuing drop down menu.
Depending on whether the task has been actioned, select of the following choices:
I will come back to this later – this will leave
the task outstanding on the dashboard and
enable users to return and complete the task
later.
My school does not need to complete this
task – this will mark the task as completed on
the dashboard.
I have completed this task – this again will
mark the task as completed on the dashboard.

12
©ParentPay Ltd 2016
Make the required selection, and select Save
and close
New pupils and activation letters
This task is provided to highlight the need to complete an upload of new intake pupils for the
new academic year. Completing this section is dependent on the MIS system you use as this
will dictate when pupils are moved into their new year groups. There are three sections
provided to guide you through this task, one for manual uploads through the ParentPay
managers screen, one for integrated upload solutions such as Scholarpack, CMIS, RM
Integris or SEEMIS, and one for all other uploads using the MIS: Sync application.
NOTE: if you have permanent UPN’s available for each new starter, it is possible to complete a ‘pre-admission’
upload. If this is something you are interested in and are unsure of how to do this, please contact the support
team.
Select the Please choose from the options below before continuing drop down menu.
Depending on whether the task has been actioned, select of the following choices:
13
©ParentPay Ltd 2016
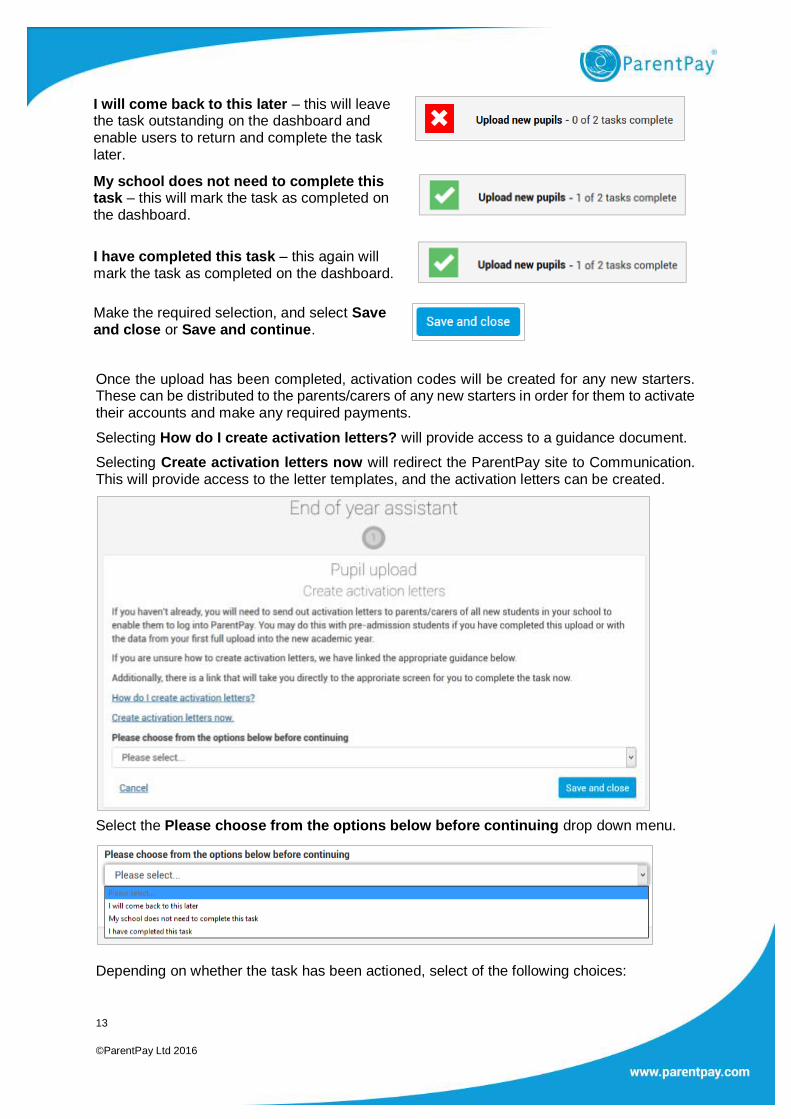
I will come back to this later – this will leave the task outstanding on the dashboard and enable users to return and complete the task later.
My school does not need to complete this task – this will mark the task as completed on the dashboard.
I have completed this task – this again will mark the task as completed on the dashboard.
Make the required selection, and select Save and close or Save and continue.
Once the upload has been completed, activation codes will be created for any new starters. These can be distributed to the parents/carers of any new starters in order for them to activate their accounts and make any required payments.
Selecting How do I create activation letters? will provide access to a guidance document.
Selecting Create activation letters now will redirect the ParentPay site to Communication. This will provide access to the letter templates, and the activation letters can be created.
Select the Please choose from the options below before continuing drop down menu.
Depending on whether the task has been actioned, select of the following choices:

14
©ParentPay Ltd 2016
I will come back to this later – this will leave the task outstanding on the dashboard and enable users to return and complete the task later.
My school does not need to complete this task – this will mark the task as completed on the dashboard.
I have completed this task – this again will mark the task as completed on the dashboard.
Make the required selection, and select Save and close
Record upcoming changes
It is vitally important you inform us if you are intending on changing any solution that integrates with ParentPay. This task enables you to inform the ParentPay support teams of upcoming changes, allowing us to contact you to help avoid potential migration issues.
MIS system
1. If the school is changing the provider of their MIS system or pupil database, select the MIS system check box.
2. Select the new MIS provider from the drop-down menu.
3. If the provider is not listed, select Other and enter the name of the new provider into the text box.
4. Enter the date that the school will switch from the old MIS system to the new system. 5. The ParentPay support team will contact the school with further details on tasks to
complete and factors to consider prior to the MIS switch being made.
Cashless system
1. If the school is changing the cashless till provider, or will be starting to use a

15
©ParentPay Ltd 2016
cashless system for the first time, select the Cashless till provider check box.
2. Select the new cashless provider from the New cashless provider drop-down menu. 3. If the new provider is not listed, select Other and enter the name of the new provider into
the text box. 4. Enter the date that the cashless tills will be switched from the old provider to the new. 5. The ParentPay support team will contact the school with further details on tasks to
complete and factors to consider prior to the MIS switch being made.
DfE/SEED number and/or school name change
1. If the school is changing the DfE/SEED number or the school name, select the DfE/SEED number and/or school name change check box.
2. Enter the new DfE/SEED number (if required)
3. Enter the new school name (if required)
4. Enter the date that the name or DfE/SEED number will be changing
New service integrations
If the school will be making any other changes that may affect the usage of ParentPay, select the New service integrations check box. Enter details of the new systems into the text box. This may be the introduction of an integration with Pebble or Private Fund Manager.
Final considerations
Final considerations contains a list of items that a school may want to be aware of. These include advice on reviewing school information visible to payers, and reviewing the notifications displayed on the manager home screen.

16
©ParentPay Ltd 2016
Completion of the End of Year Assistant
Ideally, all tasks within the End of Year Assistant will be completed. This ensures the ParentPay site is set up correctly and ready for the start of the new academic year.
The End of Year Assistant dashboard will display a set of green ticks against each task to confirm it has been completed.
NOTE: if you have any concerns or queries as you complete the assistant at your school, please contact the service team who will assist you with any concerns or queries that you may have.