How to use Launch Creader 619 Code Reader Full?
29
Diagnostic Cable (To connect the vehicle’s DLC and the tool.) Quick Start Guide Creader 619 LAUNCH LCD Screen (Indicates test results.) OK Button (Confirms the current operation.) Creader 619 Handset Selection Button ESC Button (To return to the previous screen.) Memory Card Slot (To insert the memory card to update your tool.) USB Port (To update your tool via USB cable.) DTC Button*1 (To read the diagnostic trouble codes.) Erase Button*1 (To clear the diagnostic trouble codes.) I/M Button*1 (Quick access to I/M readiness function.) DB15 Connector (To connect to the vehicle with OBD2 DLC.) Help Button*1 (Provides detailed descriptions/tips for diagnostics.) Notes: The buttons marked with * indicate the function hot keys(namely, F1, F2, F3 and F4) and only apply to Diagnostics. ( : To select different items. : To return /advance to the previous/next page.) Up/Down Left/Right EN All pictures illustrated herein are only for reference. This Quick Start Guide is subject to change without prior written notice.
-
Upload
buyobdtoolshop -
Category
Automotive
-
view
110 -
download
1
Transcript of How to use Launch Creader 619 Code Reader Full?

Diagnostic Cable(To connect the vehicle’s DLC and the tool.)
Quick Start GuideCreader 619 LAUNCH
LCD Screen(Indicates test results.)
OK Button(Confirms the current operation.)
Creader 619 Handset
Selection Button
ESC Button(To return to the previous screen.)
Memory Card Slot(To insert the memory card to update your tool.)
USB Port(To update your tool via USB cable.)
DTC Button*1(To read the diagnostic trouble codes.)
Erase Button*1(To clear the diagnostic trouble codes.)
I/M Button*1(Quick access to I/M readiness function.)
DB15 Connector(To connect to the vehicle with OBD2 DLC.)
Help Button*1(Provides detailed descriptions/tips for diagnostics.)
Notes: The buttons marked with * indicate the function hot keys(namely, F1, F2, F3 and F4) and only apply to Diagnostics.
( : To select different items.: To return /advance to the previous/next page.)
Up/DownLeft/Right
ENAll pictures illustrated herein are only for reference. This Quick Start Guide is subject to change without prior written notice.

2. Register & Update
Note: To make sure the tool is running the latest available software, it is advisable to check for updates on a frequent basis. Refer to Section 2 “Register & Update” for details.
1. Preparation
2. Vehicle Connection
Turn the vehicle ignition on.Vehicle battery voltage range should be 9-14Volts.Throttle should be in a closed position.
1. Locate vehicle's DLC socket: The DLC (Diagnostic Link Connector) is typically a standard 16-pin connector where diagnostic code readers interface with a vehicle's on-board computer. It is usually located 12 inches from the center of the steering wheel, under or around the driver's side for most vehicles. If the DLC cannot be found, refer to the vehicle's service manual for the location.
2. Connect the diagnostic cable into the vehicle's DLC socket.3. Plug the other end of diagnostic cable into the diagnostic
socket of the handset and tighten the captive screws.
1. Preparation & Connections
DLC Location
Prerequisite conditions:1. Go to http://www.dbscar.com to download the update tool and install
it on the computer.2. System requirements: Windows XP, 7, 8 or Windows 10. There are 2 methods available to update your tool. You may choose one of the following to proceed.
1. Launch the update tool, a screen similar to Fig. 1 will appear:
2. In Fig. 1, type in the Product Serial Number (located at the back of the tool).
3. Click [Device Upgrade] to enter the sign-up page. Enter the information and click [Submit] (refer to Fig. 2).
Method 1: Via Memory Card (recommended)
Note: Once the S/N is entered, “Restore System” becomes activated, which is used to restore system if a new menory card is replaced.
(If you need the Register Code, please refer to steps 4~7.)
(If you have the Register Code, directly proceed to step 8.)
Product Serial Number
Device Upgrade
Select Language English1
Your E-mail address:
Confirm E-mail:
Register Code:
ExitSubmitCancel
2
Quick Start GuideCreader 619 LAUNCH

Boot Version: V10.02Serial Number: 974990000001Register Code: 4d001e001151
Check for new version?Note: Internet connection is required for PC.
Yes – OKAY No – ESC
4
7 8
Boot Version: V10.02Serial Number:
Register Code:
DO NOT disconnect USB while downloading.
The unit should be re-powered after download new version.
974990000001
4d001e001151
Caution:
2. Register & Update (Cont’d) 2. Register & Update (Cont’d)
4. The Register Code can be found in your tool. Connect one end of the USB cable to your tool, and the other end on the computer.
5. After the tool has powered up and entered the main menu screen, move the highlight bar on the icon and press [OK].
6. Highlight the “Tool Information” in Fig. 4 and press [OK].
7. The Register Code shown in Fig. 5 is the Register Code needed in step 3.
8. Install the memory card from the tool into the supplied USB memory card adaptor and insert into the USB port of the computer.
9. Reopen the update tool, select the updates you would like to perform or click " ", and then click [Download] to start downloading.
10.Once all steps are complete, reinsert the memory card into the tool and power the tool via USB cable or via OBD II cable. A dialog box
“Help”
Select All
(Return to step 3 and input the Register Code and then proceed)
(Note:
If only diagnostic software is updated and no firmware package is downloaded,
this box will not appear) prompting you to update will pop up on the screen (See Fig. 6), select [OK].
11. The registration process is complete, your tool is now ready for use.
Help
DLC Location Information
DTC Library
Abbreviation
Tool Information
About OBD
3/5
4
Tool Information Boot version:
Display program version:
Diagnostic program version:
Diagnostic library version:
Serial Number:
974990000001
Register Code:
.
.
V02.01
V02.00
V11 23
V11 28
4d001e001151
-Exit
Register Code:
4d001e001151
5
System upgrade
Sure upgrade?
6
Method 2: Via USB CableNote: Make sure the computer has an Internet connection.
(Note: The and shown in this figure are needed for inputting in Steps 4-6.)
1. Connect one end of the USB cable to the USB port of computer, and the other end to the tool.
2. If a newer version is found, a screen similar to Fig. 7 appears.3. Press [OK] to configure this tool as a USB device. See Fig. 8.
4. Launch the update tool, a screen similar to Fig. 9 will appear.5. Type in the Serial Number. Click [Device Upgrade] to input the
information and click [Submit] to enter the update page.
Serial Number Register Code
Quick Start GuideCreader 619 LAUNCH
EN

6. Select the updates you would like to perform or click " ", and then click [Download] to start downloading.
7. Once all steps are complete, restart your tool. It will prompt you to upgrade, click [OK] to start updating. It may take several minutes to finish the update.
8. The update process is complete, your tool is now ready for use.
Select All
The tool supports multiple languages. To change the language, select “Settings” -> “Language”, choose the desired one from the list and press [OK].
Once the tool is powered, it will enters the main menu screen, it mainly includes the following functions:
: It mainly consists of OBD/EOBD diagnosing and Reset/System Scanning(varies with product models).
: To review the recorded DTC, datastream etc.: To configure the system language, measurement
units, turn on/off beeper and recording mode.: Includes DLC location, DTC lookup and tool information
etc.
Diagnose
ReviewSettings
Help
2. Register & Update (Cont’d)
4. Change Language
3. Main Menu Screen
5. Start Diagnostics
Diagnosis Flowchart of Vehicle System
Product Serial Number
Device Upgrade
Select Language English9
Select “Diagnose”
Select VehicleManufacturer
Select Vehicle Model Select test system
Select test function
Automatic(Note: This mode allows your
tool to scan the vehicle testsystem automatically)
Manual Select(Note: In this case, you need to
choose the desired systemmanually. Just follow the on-
screen instructions to proceed.)
Read fault code
Clear fault code
Read data stream
Select “Scan”
Quick Start GuideCreader 619 LAUNCH

Câble de diagnostic
Guide de démarrage rapide LAUNCH
Écran LCD(Indique les résultats de test.)
Bouton OK(Confirme l'opération en cours.)
Combiné de Creader 619
Bouton Sélection
Bouton ESC(Pour revenir à l'écran précédent ).
Fente pour carte de mémoire
Port USB
Bouton DTC*1(Pour lire les codes défauts de diagnostic.)
Bouton d'effacement*1(Pour effacer les codes défauts de diagnostic.)
Bouton I/M*1(Accès rapide à la fonction de préparation I/M.)
Connecteur DB15(Pour brancher sur le véhicule avec DLC OBD2.)
Bouton d'aide*1(Fournit des descriptions détaillées/conseils pour les diagnostics.)
Remarques: Les boutons marqués avec * indiquent les touches de raccourci (à savoir, F1, F2, F3 et F4) s'appliquent uniquement aux Diagnostics.
( : Pour sélectionner les éléments différents.: Pour retourner/avancer à la page précédente/suivante.)
Haut/BasGauche/Droite
FR Toutes les images illustrées ici sont seulement pour référence. Ce guide de démarrage rapide est sujet à changement sans préavis écrit.
(Pour insérer la carte de mémoire pour mettre à jour votre outil.)
(Pour mettre à jour votre outil via un câble USB.)
(Pour connecter le DLC (Connecteur de liaison de données) et l'outil du véhicule.)
Creader 619
Numéro de série du produit
Mise à niveau du dispositif
Choisir les langues French
2. Register & Update
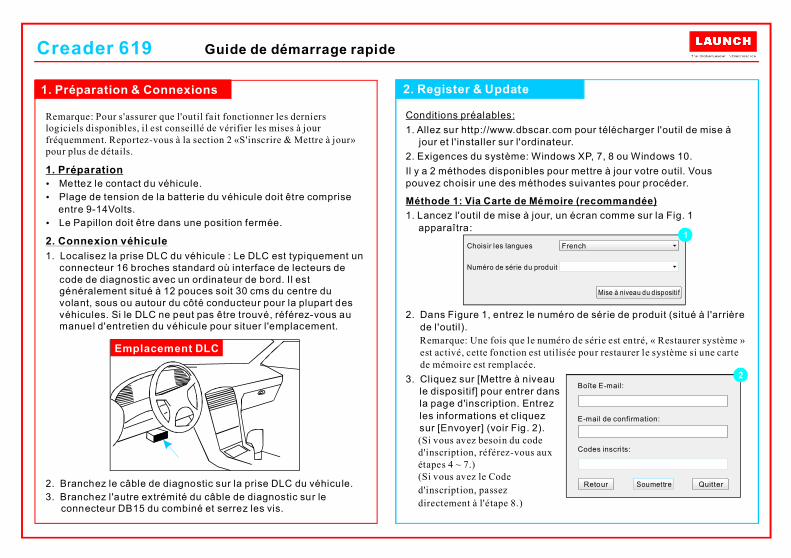
Remarque: Pour s'assurer que l'outil fait fonctionner les derniers logiciels disponibles, il est conseillé de vérifier les mises à jour fréquemment. Reportez-vous à la section 2 «S'inscrire & Mettre à jour» pour plus de détails.
1. Préparation
2. Connexion véhicule
Mettez le contact du véhicule. Plage de tension de la batterie du véhicule doit être comprise entre 9-14Volts.Le Papillon doit être dans une position fermée.
1. Localisez la prise DLC du véhicule : Le DLC est typiquement un connecteur 16 broches standard où interface de lecteurs de code de diagnostic avec un ordinateur de bord. Il est généralement situé à 12 pouces soit 30 cms du centre du volant, sous ou autour du côté conducteur pour la plupart des véhicules. Si le DLC ne peut pas être trouvé, référez-vous au manuel d'entretien du véhicule pour situer l'emplacement.
2. Branchez le câble de diagnostic sur la prise DLC du véhicule.3. Branchez l'autre extrémité du câble de diagnostic sur le
connecteur DB15 du combiné et serrez les vis.
1. Préparation & Connexions
Emplacement DLC
Conditions préalables:1. Allez sur http://www.dbscar.com pour télécharger l'outil de mise à
jour et l'installer sur l'ordinateur.2. Exigences du système: Windows XP, 7, 8 ou Windows 10. Il y a 2 méthodes disponibles pour mettre à jour votre outil. Vous pouvez choisir une des méthodes suivantes pour procéder.
1. Lancez l'outil de mise à jour, un écran comme sur la Fig. 1 apparaîtra:
2. Dans Figure 1, entrez le numéro de série de produit (situé à l'arrière de l'outil).
3. Cliquez sur [Mettre à niveau le dispositif] pour entrer dans la page d'inscription. Entrez les informations et cliquez sur [Envoyer] (voir Fig. 2).
Méthode 1: Via Carte de Mémoire (recommandée)
Remarque: Une fois que le numéro de série est entré, « Restaurer système » est activé, cette fonction est utilisée pour restaurer le système si une carte de mémoire est remplacée.
(Si vous avez besoin du code d'inscription, référez-vous aux étapes 4 ~ 7.) (Si vous avez le Code d'inscription, passez directement à l'étape 8.)
1
Boîte E-mail:
E-mail de confirmation:
Codes inscrits:
QuitterSoumettreRetour
2
LAUNCHGuide de démarrage rapideCreader 619

Boot Version: V10.02Serial Number: 974990000001Register Code: 4d001e001151
Check for new version?Note: Internet connection is required for PC.
Yes – OKAY No – ESC
4
7 8
Boot Version: V10.02Serial Number:
Register Code:
DO NOT disconnect USB while downloading.
The unit should be re-powered after download new version.
974990000001
4d001e001151
Caution:
2. S'inscrire & Mettre à jour
4. Le Code d'inscription se trouve dans votre outil. Branchez une extrémité du câble USB sur votre outil, et l'autre extrémité sur l'ordinateur.
5. Après que l'outil ai été mis sous tension et est affiché l'écran du menu principal, déplacez le surligneur sur l'icône «Aide» et appuyez sur [OK].
6. Mettre en évidence «informations d'outil» sur la Fig. 4, puis appuyez sur [OK].
7. Le Code d'inscription illustré à la Fig. 5 est le Code d'inscription nécessaire à l'étape 3.
8. Installez la carte de mémoire de l'outil dans l'adaptateur decarte de mémoire USB fourni et insérez le dans le port USB de l'ordinateur.
9. Ré-ouvrez l'outil de mise à jour, sélectionnez les mises à jour que vous souhaitez exécuter ou cliquez sur «Sélectionner tout» puis cliquez sur [Télécharger] pour démarrer le téléchargement.
10.Une fois que toutes les étapes sont terminées, réinsérez la carte de mémoire dans l'outil et alimentez l'outil via câble USB ou via câble OBD II. Une boîte de
(Retournez à l'étape 3 et entrez le Code d'inscription)
(Remarque: Si seulement le logiciel de diagnostic est mis à jour et aucun firmware est téléchargé, cette boîte n'apparaîtra pas)
dialogue
vous invite à mettre à jour et apparaîtra comme à l'écran (Voir Fig.6), sélectionnez [OK].
11. Le processus d'inscription est terminé; votre outil est maintenant prêt à l'emploi.
Aide
Informations sur l’emplacement DLC
Bibl ioth DTC
Abr v iation
Information sur l’outil
A propos OBD
èque
é
3/5
4
Information de l’outil
Version de :
Affiche la version du programme:
diagnostic:
la biblioth :
: 974990000001
d
Num
émarrage
èque de
éo de série
.
.
V02.01
V02.00
Programme de V11 23
diagnostic
V11 28
-Quit.
Code d’inscription:
4d001e001151
5
System upgrade
Sure upgrade?
5
Méthode 2: Via Câble USBRemarque: Assurez-vous que l'ordinateur dispose d'une connexion Internet.
(Remarque: Le numéro de série et le code d'inscription illustrés dans cette figure sont nécessaires pour la saisie dans les étapes 4-6.)
1. Connectez votre câble USB au port USB de l'ordinateur, et l'autre extrémité à l'outil.
2. Si une version plus récente est trouvée, un écran semblable à la Figure 7 s'affichera.
3. Appuyez sur [OK] pour configurer cet outil comme un périphérique USB. Voire Figure 8.
4. Démarrez l'outil de mise à jour, un écran qui ressemble à la Fig. 9 apparaîtra.
5. Entrez le numéro de série. Cliquez sur [Mise à niveau du dispositif]
LAUNCH
FR
Guide de démarrage rapideCreader 619
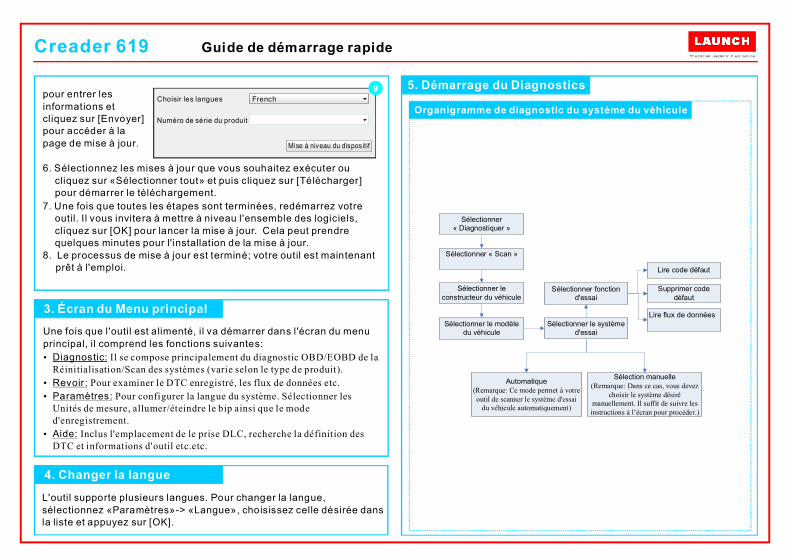
6. Sélectionnez les mises à jour que vous souhaitez exécuter ou cliquez sur «Sélectionner tout» et puis cliquez sur [Télécharger] pour démarrer le téléchargement.
7. Une fois que toutes les étapes sont terminées, redémarrez votre outil. I l vous invitera à mettre à niveau l'ensemble des logiciels, cliquez sur [OK] pour lancer la mise à jour. Cela peut prendre quelques minutes pour l'installation de la mise à jour.
8. Le processus de mise à jour est terminé; votre outil est maintenant prêt à l'emploi.
L'outil supporte plusieurs langues. Pour changer la langue, sélectionnez «Paramètres»-> «Langue», choisissez celle désirée dans la liste et appuyez sur [OK].
Une fois que l'outil est alimenté, il va démarrer dans l'écran du menu principal, il comprend les fonctions suivantes:
Diagnostic:
Revoir:Paramètres:
Aide:
Il se compose principalement du diagnostic OBD/EOBD de la Réinitialisation/Scan des systèmes (varie selon le type de produit).
Pour examiner le DTC enregistré, les flux de données etc.Pour configurer la langue du système. Sélectionner les
Unités de mesure, allumer/éteindre le bip ainsi que le mode d'enregistrement.
Inclus l'emplacement de le prise DLC, recherche la définition des DTC et informations d'outil etc.etc.
4. Changer la langue
3. Écran du Menu principal
5. Démarrage du Diagnostics
Organigramme de diagnostic du système du véhiculeNuméro de série du produit
Mise à niveau du dispositif
Choisir les langues French9
LAUNCHGuide de démarrage rapide
pour entrer les informations et cliquez sur [Envoyer] pour accéder à la page de mise à jour.
Sélectionner« Diagnostiquer »
Sélectionner leconstructeur du véhicule
Sélectionner le modèledu véhicule
Sélectionner le systèmed'essai
Sélectionner fonctiond'essai
Automatique(Remarque: Ce mode permet à votreoutil de scanner le système d'essai
du véhicule automatiquement)
Sélection manuelle(Remarque: Dans ce cas, vous devez
choisir le système désirémanuellement. Il suffit de suivre lesinstructions à l’écran pour procéder.)
Lire code défaut
Supprimer codedéfaut
Lire flux de données
Sélectionner « Scan »
Creader 619

Cable de Diagnóstico(Para conectar a la toma del vehículo y al equipo.)
Guía de Inicio RápidoCreader 619 LAUNCH
Pantalla de LCD(Indica resultados de las pruebas.)
OK(Confirme la operación actual.)
Selección
ESC(Para volver a la pantalla anterior.)
Ranura de tarjeta de memoria
Puerto de USB
DTC*1(Lectura de códigos.)
Borrar*1(Borrado de códigos.)
I /M*1(Acceso rápido a la función de preparación de I/M.)
Conector DB15(Para conectar al vehículo con OBD2 DLC.)
Ayuda*1(Proporcionan detalladas descripciones/consejos para el diagnóstico.)
Notas: Los botones marcados con * indican las teclas rápidas de función (es decir, F1, F2, F3 y F4) y sólo se aplica al Diagnóstico.
( : Para desplazarse por los menús.: Para volver/avanzar a la página anterior/siguiente.)
Arriba/AbajoIzquierda/Derecha
ESTodas las imagenes mostradas en el presente documento son sólo para referencia.Esta Guía puede ser modificada sin previo aviso.
(Para actualizar su equipo a través del cable USB.)
(Para insertar la tarjeta de memoria para actualizar su equipo.)
Configuración de CReader 619

2. Registro Actualización
Nota: Para asegurarse de que se equipo está ejecutando el software disponible más reciente, es recomendable comprobar si hay actualizaciones frecuentemente. Acuda la Sección 2 "Registro y Actualización" para más detalles.
1. Preparación
2. Conexión de Vehículo
Dé el contacto en el vehículo.El rango de voltaje de la batería del vehículo debe estar entre 9-14V.El acelerador no debe estar pisado.
1. Localice la toma de diagnosis del vehículo: El DLC (Conector de Enlace de Diagnóstico) es típicamente un conector estándar de 16-pin. Está localizado generalmente 30 centímetros desde el centro del volante en la mayoría de vehículos. Si no encuentra la toma, busque en el manual de servicio del vehículo para su localización.
2. Conecte el cable de diagnóstico en la toma de diagnosis del vehículo.
3. Enchufe el otro extremo del cable de diagnóstico en el conector DB15 del equipo y apriete los tornillos.
1. Preparación & Conexiones
Localización de DLC
Condiciones previas:1. Acceda a http://www.dbscar.com para descargar la herramienta de
actualización e instalarlo en el ordenador.2. Requisitos del sistema: Windows XP, 7, 8 o Windows 10. Existen 2 métodos para actualizar su equipo. Puede elegir una de las siguientes opciones para continuar.
1. Inicie la herramienta de actualización, aparecerá una pantalla similar a la Figura 1:
2. En la Figura 1, escriba el Número de Serie de Producto (situado en la parte posterior de la herramienta).
3. Haga clic en [Actualización de Dispositivo] para entrar en la página de registro. Introduzca la información y haga clic en [Enviar] (Figura 2).
Método 1: A través de Tarjeta de Memoria (recomendada)
Nota: Una vez entrado el l S/N, se activa "Recuperar Sistema", podrá utilizar si se sustituye por una nueva tarjeta de memoria.
(Si necesita el Código de Registro, por favor, vaya a los pasos 4-7.) (Si tiene el Código de Registro, continúe con el paso 8 directamente.)
Número de serie del producto
Actualización equipo
Seleccionar idioma Spanish1
Su direcci :ón de correo electrónico
Confirmaci :ón de correo
C digo de registro:ó
SalirEnviarRegresar
2
LAUNCHCreader 619
Boot Version: V10.02Serial Number: 974990000001Register Code: 4d001e001151
Check for new version?Note: Internet connection is required for PC.
Yes – OKAY No – ESC
4
7 8
Boot Version: V10.02Serial Number:
Register Code:
DO NOT disconnect USB while downloading.
The unit should be re-powered after download new version.
974990000001
4d001e001151
Caution:
2. Registro & Actualización (Continuación)
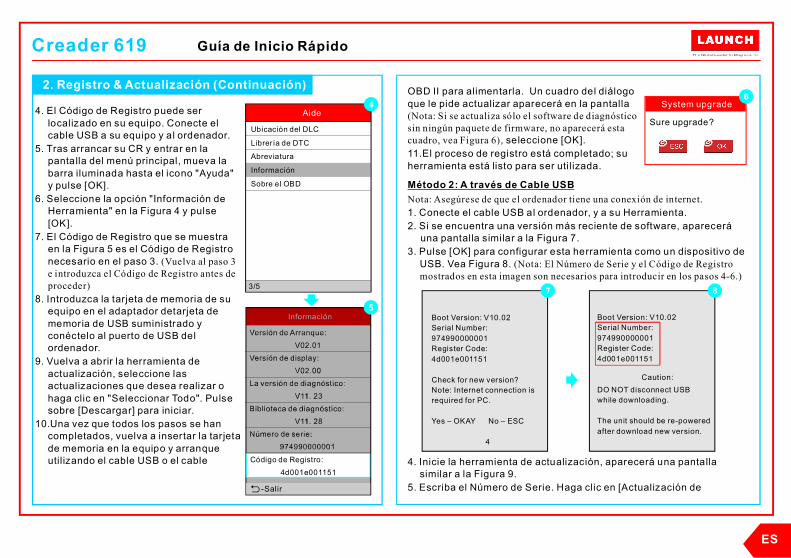
4. El Código de Registro puede ser localizado en su equipo. Conecte el cable USB a su equipo y al ordenador.
5. Tras arrancar su CR y entrar en la pantalla del menú principal, mueva la barra iluminada hasta el icono "Ayuda" y pulse [OK].
6. Seleccione la opción "Información de Herramienta" en la Figura 4 y pulse [OK].
7. El Código de Registro que se muestra en la Figura 5 es el Código de Registro necesario en el paso 3.
8. Introduzca la tarjeta de memoria de su equipo en el adaptador detarjeta de memoria de USB suministrado y conéctelo al puerto de USB del ordenador.
9. Vuelva a abrir la herramienta de actualización, seleccione las actualizaciones que desea realizar o haga clic en "Seleccionar Todo". Pulse sobre [Descargar] para iniciar.
10.Una vez que todos los pasos se han completados, vuelva a insertar la tarjeta de memoria en la equipo y arranque utilizando el cable USB o el cable
(Vuelva al paso 3 e introduzca el Código de Registro antes de proceder)
OBD II para alimentarla. Un cuadro del diálogo que le pide actualizar aparecerá en la pantalla
, seleccione [OK].11.El proceso de registro está completado; su herramienta está listo para ser utilizada.
(Nota: Si se actualiza sólo el software de diagnóstico sin ningún paquete de firmware, no aparecerá esta cuadro, vea Figura 6)
Aide
Ubicaci
DTC
Abreviatura
Informaci n
Sobre el OBD
ón del DLC
ía de
ó
Librer
3/5
4
Informaci nó
Versi n de Arranque:
display:
La diagn stico:
Biblioteca de :
: 974990000001
:
ó
ó
ó ó
ó
ó
.
.
V02.01Versi n de
V02.00
versi n de
V11 23diagn stico
V11 28
Número de serie
4d001e001151
-Salir
C :
ódigo de Registro
4d001e001151
5
System upgrade
Sure upgrade?
6
Método 2: A través de Cable USBNota: Asegúrese de que el ordenador tiene una conexión de internet.
(Nota: El Número de Serie y el Código de Registro mostrados en esta imagen son necesarios para introducir en los pasos 4-6.)
1. Conecte el cable USB al ordenador, y a su Herramienta.2. Si se encuentra una versión más reciente de software, aparecerá
una pantalla similar a la Figura 7.3. Pulse [OK] para configurar esta herramienta como un dispositivo de
USB. Vea Figura 8.
4. Inicie la herramienta de actualización, aparecerá una pantalla similar a la Figura 9.
5. Escriba el Número de Serie. Haga clic en [Actualización de
LAUNCH
ES
Guía de Inicio RápidoCreader 619

6. Seleccione las actualizaciones que desea realizar o haga clic en "Seleccionar Todo", y luego haga clic en [Descargar] para iniciar el proceso.
7. Una vez que todos los pasos se han completados, reinicie su equip. Se le pedirá actualizar, haga clic en [OK] para iniciar. Puede tardar varios minutos hasta finalizar la actualización.
8. El proceso de registro está completo; su equipo ahora ya está listo para ser utilizado.
Su equipo puede ser configurado en distintos idiomas. Para cambiarlo, seleccione "Ajustes" -> "Idioma", elija el deseado de la lista y pulse [OK].
Una vez encendido el equipo, entrará en la pantalla del menú principal, que incluye principalmente las siguientes funciones:
: Diagnóstico de OBD/EOBD y Reajuste/Escaneo de Sistema .
: Para revisar el DTC registrado, flujo de datos, etc.: Para configurar el idioma del sistema, unidades de
medición, encender/apagar el zumbador y el modo de grabación.: Incluye la localización de la toma de diagnosis, la
búsqueda de DTC y información general del equipo, etc.
Diagnosticar
RevisiónAjustes
Ayuda
(varía según los modelos)
4. Cambiar Idioma
3. Pantalla de Menú Principal
5. Iniciar Diagnóstico
Diagrama de Flujo de Diagnóstico de Sistemas del Vehículo
Seleccione“Diagnosticar”
Seleccione elFabricante del Vehículo
Seleccione el Modelodel Vehículo
Seleccione el sistemaa comprobar
Seleccione la prueba
Automático(Nota: Este modo permite que suequipo escanee el sistema para la
prueba del vehículo de formaautomática)
Selección Manual(Nota: En este caso, necesita elegirel sistema deseado manualmente.
Siga las instrucciones en lapantalla para continuar.)
Leer códigos deerror
Borrar códigos deerror
Leer flujo de datos
Seleccione “Escaneo”
LAUNCHGuía de Inicio RápidoCreader 619
Dispositivos] para introducir la información y haga clic en [Enviar] para entrar en la página de actualización.
Número de serie del producto
Actualización equipo
Seleccionar idioma Spanish9

DiagnoseleitungLCD Bildschirm
(Zeigt die Testergebnisse an.)
OK-Taste(Bestätigt den aktuellen Vorgang.)
Creader 619 Hörer
Auswahltaste
ESC-Taste(Um zum vorherigen Bildschirm zurückzukehren.)
Speicherkarte Einbauschlitz
USB-Anschluss
DTC-Taste*1(Zum Lesen des Diagnosefehlercodes.)
Löschtaste*1(Zum Löschen des Fehlercodes.)
I /M-Taste*1(Schnellzugriff auf I/M-Bereitschaftsfunktion.)
DB15 Anschluss(Zum Anschluss an das Fahrzeug mit OBD2 DLC.)
Hilfe-Taste*1(Bietet detaillierte Beschreibungen / Tipps für die Diagnose.)
Hinweis: Die mit * gekennzeichnete Tasten kennzeichnen die Funktionstasten (F1, F2, F3 und F4) und gelten nur für Diagnose.
( Um verschiedene Elemente auszuwählen.Um zur vorherigen / nächsten Seite zurückzukehren.)
Auf / Ab: Links/Rechts:
DEAlle Abbildungen, die hier dargestellt werden, sind nur als Referenz. Diese Kurzanleitung kann ohne vorherige schriftliche Mitteilung geändert werden.
(Um Ihr Werkzeug über USB-Kabel zu aktualisieren.)
(So fügen Sie die speicherkarte ein, um Ihr Werkzeug zu aktualisieren.)
LAUNCHCreader 619 Schnellstartanleitung
(Zum Verbinden DLC des Fahrzeugs und des Werkzeugs.)

2. Registrieren & Aktualisieren
Hinweis: Um sicherzustellen, dass das Werkzeug die aktuellste verfügbare Software ausführt, empfiehlt es sich, regelmäßig nach Updates zu suchen. Für weitere Informationen finden Sie in Abschnitt 2 "Registrieren & Aktualisieren".
1. Vorbereitung
2. Fahrzeuganschluss
Die Fahrzeugzündung einschalten.Der Batteriespannungsbereich der Batterie soll 9-14 Volt betragen.Die Drosselklappe soll sich in einer geschlossenen Stellung befinden.
1. DLC-Steckplatz des Fahrzeugs finden: Der DLC (Diagnostic Link Connector) ist typischerweise ein 16-poliger Standardstecker, bei dem Diagnosecodeleser mit dem Bordrechner eines Fahrzeugs verbunden ist. Es ist in der Regel 12 Zolls von der Mitte des Lenkrads, unter oder um die Fahrerseite für die meisten Fahrzeuge. Wenn das DLC nicht gefunden werden kann, nachschlagen Sie in der Bedienungsanleitung des Fahrzeugs.
2. Schließen Sie das Diagnosekabel an die DLC-Buchse des Fahrzeugs an.
3. Stecken Sie das andere Ende des Diagnosekabels in die Diagnosebuchse des Hörers und ziehen Sie die unverlierbaren Schrauben fest.
1. Vorbereitung & Anschlüsse
DLC Position
Voraussetzungen:1. Besuchen Sie http://www.dbscar.com, um das Update-Tool
herunterzuladen und auf dem Computer zu installieren.2. System Anforderungen: Windows XP, 7, 8 oder Windows 10.Es gibt zwei Methoden, um Ihr Tool zu aktualisieren. Sie können eine der folgenden Optionen wählen, um fortzusetzen.
1. Starten Sie das Update-Tool auf Ihrem PC, wird ein Bildschirm ähnlich wie. . 1 erscheint:
2. In . 1 geben Sie die Produkt-Seriennummer (befindet sich auf der Rückseite des Werkzeugs) ein.
3. Klicken Sie auf [Device Upgrade], um die Anmeldeseite aufzurufen. Geben Sie die Informationen ein und klicken Sie auf [Submit] (siehe Abb. 2).
Methode 1: Via Speicherkarte (empfohlen)
Abb
Abb
Hinweis: Sobald das S / N eingegeben ist, wird "Restore System" aktiviert, das verwendet wird, um das System wiederherzustellen, wenn eine neue speicherkarte ersetzt ist.
(Wenn Sie den Registrierungscode benötigen, beachten Sie bitte die Schritte 4 ~ 7.)
(Wenn Sie den Registrierungscode haben, fahren Sie mit Schritt 8 fort.)
Su direcci :ón de correo electrónico
Confirmaci :ón de correo
C digo de registro:ó
SalirEnviarRegresar
2
LAUNCHCreader 619 Schnellstartanleitung
Produkt Seriennummer
Wählen Sie die Sprache German1
Gerät aktual isieren

Boot Version: V10.02Serial Number: 974990000001Register Code: 4d001e001151
Check for new version?Note: Internet connection is required for PC.
Yes – OKAY No – ESC
7 8
Boot Version: V10.02Serial Number:
Register Code:
DO NOT disconnect USB while downloading.
The unit should be re-powered after download new version.
974990000001
4d001e001151
Caution:
2. Registrieren & Aktualisieren (Fortsetzung)
4. Den Registrierungscode f inden Sie in Ihrem Tool. Verbinden Sie ein Ende des USB-Kabels mit dem Gerät und das andere Ende mit dem Computer.
5. Nachdem das Gerät eingeschaltet und das Hauptmenü eingeblendet ist, bewegen Sie die Markierungsleiste auf das Symbol "Hilfe" und drücken Sie [OK].
6. Markieren Sie die "Tool-Information" in Abb. 4 und drücken Sie [OK].
7. Der Registercode in Abb.5 ist der in Schritt 3 benötigte Registercode.
8. Install ieren Sie die speicherkarte aus dem Werkzeug in den mitgelieferten USB speicherkarte adapter und stecken Sie sie in den USB-Port des Computers ein.
9. Öffnen Sie das Update-Tool erneut, wählen Sie die gewünschte Updates aus oder klicken Sie auf "Alle auswählen" und klicken Sie dann auf [Unterladen], um den Unterladen zu starten.
10.Sobald alle Schritte abgeschlossen sind, legen Sie die speicherkarte wieder in das Werkzeug ein und schalten dasWerkzeug über USB-Kabel oder überOBD II-Kabel ein. Ein Dialogfenster
, das Sie
(Kehren Sie zu Schritt 3 zurück und geben Sie den Registrierungscode ein und setzen Sie fort)
(Hinweis:Wenn nur Diagnosesoftware aktualisiert und kein Firmware-Paket heruntergeladen ist, wird dieses Feld nicht angezeigt)
auffordert, auf dem Bildschirm zu aktualisieren (siehe Abb. 6), wählen Sie [OK].
11.Der Registrierungsprozess ist abgeschlossen; Ihr Werkzeug ist nun betriebsbereit.
Aide
Ubicaci
DTC
Abreviatura
Informaci n
Sobre el OBD
ón del DLC
ía de
ó
Librer
3/5
4
Informaci nó
Versi n de Arranque:
display:
La diagn stico:
Biblioteca de :
: 974990000001
:
ó
ó
ó ó
ó
ó
.
.
V02.01Versi n de
V02.00
versi n de
V11 23diagn stico
V11 28
Número de serie
4d001e001151
-Salir
C :
ódigo de Registro
4d001e001151
5
System upgrade
Sure upgrade?
6
Methode 2: Über USB-KabelHinweis: Stellen Sie sicher, dass der Computer über eine Internetverbindung verfügt.
(Hinweis: Die in dieser Abbildung gezeigte Seriennummern und Registercodes werden für die Eingabe in den Schritten 4-6 benötigt.)
1. Verbinden Sie ein Ende des USB-Kabels mit dem USB-Anschluss des Computers und das andere Ende mit dem Werkzeug.
2. Wenn es eine neuere Version gefunden wird, wird ein Bildschirm ähnlich Abb. 7 erscheinen.
3. Drücken Sie [OK], um dieses Tool als USB-Gerät zu konfigurieren. Siehe Abb. 8.
4. Starten Sie das Update-Tool auf Ihrem PC, wird ein Bildschirm ähnlich wie. Fig. 9 erscheinen.
5. Geben Sie die Seriennummer ein. Klicken Sie auf [Device Upgrade], um die Informationen einzugeben und klicken Sie auf [Submit], um die Update-Seite aufzurufen.
DE
LAUNCHCreader 619 Schnellstartanleitung

6. Wählen Sie die gewünschte Updates aus oder klicken Sie auf "Alle auswählen" und klicken Sie dann auf [Unterladen], um Herunterladen zu starten.
7. Wenn alle Schritte abgeschlossen sind, starten Sie das Tool neu. Sie werden aufgefordert, Upgrade durchzuführen, klicken Sie auf [OK], um die Aktualisierung zu starten. Es kann einige Minuten dauern, bis Upgrade abgeschlossen ist.
8. Der Aktualisierungsvorgang ist abgeschlossen. Ihr Werkzeug ist nun betriebsbereit.
Das Tool unterstützt mehrere Sprachen. Um die Sprache zu ändern, wählen Sie "Einstellungen" -> "Sprache", wählen Sie aus der Liste die gewünschte Sprache aus und drücken Sie [OK].
Sobald das Gerät mit Strom versorgt ist, gelangt es in den Hauptmenü-Bildschirm, es umfasst im Wesentlichen folgende Funktionen:
: Es besteht hauptsächlich aus OBD/EOBD Diagnose und Reset / System Scanning
. : So überprüfen Sie den aufgezeichneten DTC, den
Datenstrom usw. : So konfigurieren Sie die Systemsprache, die
Maßeinheiten, den Ein- / Ausschalter und den Aufnahmemodus. : Einschließlich DLC-Speicherort, DTC-Lookup und
Werkzeuginformationen etc.
Diagnostizieren
Überprüfung
Einstellungen
Hilfe
(variiert mit Produktmodellen)
4. Sprache ändern
3. Hauptmenü-Bildschirm
5. Diagnose Starten
Diagnose Flussdiagramm des Fahrzeugsystems
Wählen Sie "Diagnose"
Wählen SieFahrzeughersteller
Wählen SieFahrzeugmodell Wählen Sie Prüfsystem
Wählen Sie Testfunktion
Automatisch(Hinweis: Dieser Modus
ermöglicht Ihrem Werkzeug, dasFahrzeugtestsystem automatisch
zu scannen)
Manuelle Auswahl(Hinweis: In diesem Fall müssen Sie
das gewünschte System manuellauswählen. Folgen Sie einfach denAnweisungen auf dem Bildschirm.)
Fehlercode lesen
Fehlercode löschen
Datenstrom lesen
Wählen Sie "Scan"
LAUNCH
Produkt Seriennummer
Gerät aktual isieren
Wählen Sie die Sprache German9
LAUNCHCreader 619 Schnellstartanleitung

Диагностический кабель (
)Чтобы подключить прибор кдиагностическому разъему
Краткое руководство пользователя C eader 619r LAUNCH
LCD дисплей( )Отображает результаты испытаний
Кнопка OK( ) Для подтверждения текущей операции
Creader 619
Кнопка выбора
Кнопка ESC( )Для возврата к предыдущему экрану
Слот для карта памяти(
)Для обновления устройства после
вставки карта памяти в слот
Порт USB(
, ) Пользователь может подключить устройство к компьютеру
через USB-кабель чтобы выполнить обновление
Кнопка DTC*1( )Чтобы считать коды неисправностей
Кнопка Удалить ' '*1(
)Чтобы очистить диагностические
коды неисправностей
Кнопка I/M*1( I/M)Быстрый доступ к функции готовности
Разъём DB15( DB
OBD II) .)Разъём 15, предназначен для подключения к
диагностическому разъему ОБД2 ( автомобиля
Кнопка Помощь « »*1(
, )Если у Вас возникли какие либо вопросыдля диагностики вам поможет кнопка
ПримечанияКнопки отмеченные означают функциональные клавиши То есть кнопки и они только используются для диагностики
: , * ( F1, F2, F3 F4), .
( – . / )
Кнопки Вверх ВнизВправо Влево
/ : / :
используются для выбора желаемого элементаЧтобы перейти на предыдущую следующую страницу
RUВсе показанные здесь изображения приведены только для справки Информация содержащаяся в данномруководстве пользователя может быть изменена без предварительного уведомления
. , , .

2. Регистрация и обновлениеПримечание Убедитесь что у вас установлена последняя версияпрограммного обеспечения Рекомендуем Вам проверить наличиеобновлений программного обеспечения Для дополнительнойинформации обратитесь к разделу 2 'Регистрация и обновление
: , .
. '.
1.
2.
Подготовка к работе
Подключение к автомобилю
.
9 14 . .
1. : DLC ( )
16- . DLC 12 .
DLC , , .
2. DLC.
3. ,
.
Включите зажигание автомобиляНормальное напряжение аккумулятора автомобиля должнобыть от до ВДроссельная заслонка двигателя должна быть закрыта
Найдите диагностическое гнездо Разъём дляпередачи диагностических данных зачастую представляетсобой стандартный контактный разъем На большинствеавтомобилей обычно установлен в дюймах отцентральной части приборной панели в водительской зонеЕсли не обнаружен обратитесь к Инструкции поремонту автомобиля чтобы найти его местоположение
Подключите один конец диагностического кабеля кдиагностическому разъемуВставьте другой конец кабеля в диагностический разъемустройства и Затяните невыпадающие винты затянитеневыпадающие винты крепления
1. Подготовка и подключение
Предварительные условия :1. - http://www.dbscar.com,
.2. : Windows XP, 7, 8 Windows 10.
, . .
1. , , 1:
2. 1, ( ).
3. [ ],
.
[ ] ( . 2). (
Посетите интернет сайт чтобы загрузитьсредство обновления и установить его на компьютерРежим совместимости С или
Вы можете использовать два способа чтобы обновить устройствоВы можете выбрать один из следующих способов
Запустите средство обновления на экране появится окнопоказанное на рисунке
На рисунке введите серийный номер продукта расположен взадней части устройства
Нажмите Обновление устройств чтобы войти на страницу регистрации Введите информацию и нажмите
Отправить см рис
Способ С помощью карта памяти Рекомендуем 1: ( )
Примечание После ввода серийного номера функция Сброс системыактивирована которая может использоваться для сброса системыпосле замены новой карта памяти
Если нужно ввести регистрационный код Пожалуйста обратитесь к следующим шагам Если регистрационный код существует Вы
можете перейти прямо к шагу
: , ' ' ,
.
, ,
4-7). ( , 8).
Product Serial Number
Device Upgrade
Select Language Russian1
Your E-mail address:
Confirm E-mail:
Register Code:
ExitSubmitCancel
2
Краткое руководство пользователя C eader 619r LAUNCH
Местоположение DLC

Boot Version: V10.02Serial Number: 974990000001Register Code: 4d001e001151
Check for new version?Note: Internet connection is required for PC.
Yes – OKAY No – ESC
4
7 8
Boot Version: V10.02Serial Number:
Register Code:
DO NOT disconnect USB while downloading.
The unit should be re-powered after download new version.
974990000001
4d001e001151
Caution:
2. ( )Регистрация и обновление продолжение 2. ( )Регистрация и обновление продолжение4.
. , - .
5. , , ' '
[OK].6. «
» ( . 4 ) OK].7. ( .
. (
8.
, USB- .
9. ,
' ', [ ],
.10.
USB
. ( . 6)
Регистрационный код может бытьнайден в устройстве Подключите одинконец кабеля USB к устройству адругой к компьютеруПодключите устройство затем войдитев Главное меню выберите Помощь инажмитеВыберите Информация обустройстве см рис и нажмитеРегистрационный код показан см рис 5)
Вытащите карта памяти из устройстваи вставьте карта памяти в считыватель карта памяти а затем подключитесчитыватель к порту ПКСнова запустите средствообновления выберите нужные опцииили нажмите Выделить все а затемнажмите кнопку Загрузить чтобыначать загрузкуПосле завершения всех шагов
вставьте снова карта памяти вустройство и включите устройство иповторно подключите его к компьютерус помощью кабеля илиподключите устройство кдиагностическому разъемуавтомобиля В это время на экранесм рис появится диалоговое окно с
информацией об обновлении
вернитесь к шагу 3 и введите этотрегистрационный код а затем продолжитевыполнение
Примечание если только
,
).
( :
диагностическое программноеобеспечение обновлено и не загружаетсяни один пакет прошивки это окно непоявится выберитеПроцесс регистрации завершен данноеустройство может использоваться
, ), [ ]OK .
11. , .
Help
DLC Location Information
DTC Library
Abbreviation
Tool Information
About OBD
3/5
4
Tool Information Boot version:
Display program version:
Diagnostic program version:
Diagnostic library version:
Serial Number:
974990000001
Register Code:
.
.
V02.01
V02.00
V11 23
V11 28
4d001e001151
-Exit
Register Code:
4d001e001151
5
System upgrade
Sure upgrade?
6
Способ С помощью кабеля 2: USBПримечание Убедитесь что компьютер подключен к Интернету
Примечание Серийный номер и регистрационный код показанына этом рисунке которые должны быть введены в шагах
: , .
( : , 4-6 ).
1. USB , - .
2. , , 7.3. [OK], usb . .
. 8.
4. , , 9.
5. . [ ], , ,
[ ], .
Подключите один конец кабеля к устройству а другой ккомпьютеруЕсли новая версия найдена на экране появится окно как рисунокНажмите чтобы настроить устройство как устройство смрис
Запустите средство обновления на экране появится окнопоказанное на рисункеВведите серийный номер Нажмите Обновление устройств чтобывойти на страницу регистрации а затем введите информациюнажмите Отправить чтобы войти на страницу обновления
Краткое руководство пользователя C eader 619r LAUNCH
RU

6. ' ', [ ], .
7. , . ,
[OK], . .
8. , .
Выберите нужные опции или нажмите Выделить все а затемнажмите кнопку Загрузить чтобы начать загрузкуЕсли все шаги завершены перезагрузите ваше устройствоПеред вами появиться окошко в котором предложит обновитьсянажмите кнопку чтобы начать обновление Процессобновления может занять несколько минутПроцесс обновления завершен данное устройство можетиспользоваться
Прибор поддерживает несколько языков Чтобы изменить языквыберите Настройки Язык выделите нужный язык в списке инажмите
. , ' ' -> ' '
[OK].
Подключите устройство затем войдите в Главное меню это включаетследующие функции
Это содержит диагностику исброс сканирование системы варьируется в зависимости от конкретноймодели
Чтобы просмотреть записанные коды неисправности потоки данных и т д
Чтобы настроить язык системы единицы измерениявключите выключение зуммера и режим записи
Включает расположение справку кодов ошибок иинформацию о устройстве и т д
, , :
: OBD/EOBD / (
). : ,
. . : , ,
/ . : DLC,
. .
Диагностика
Просмотреть
Настройки
Помощь
2. ( )Регистрация и обновление продолжение
4. Изменить язык
3. Главное меню
5. Начать диагностику
Диагностический процесс системы а м /
Выбрать'Диагностика'
Выбрать макру
автомобиля
Выбрать модель
а/мВыбрать систему
проверки
Выбор тестовых
функций
Автоматическоесканирование(Примечани
е: Данный режим
позволяет устройству
автоматически
сканировать систему
испытания автомобилей)
Ручной выбор(Примечание:В таком случае, Вам нужно
вручную выбрать нужную
систему. Следуйте
инструкциям на экране,чтобы продолжить)
Чтение коданеисправности
Удалить код
неисправности
Считать поток
данных
Выбрать 'Сканировать'
Краткое руководство пользователя C eader 619r LAUNCH
Product Serial Number
Device Upgrade
Select Language Russian9

診断ケーブル
車両 をデバイスに接続する( DLC )
取扱説明書Creader 619 LAUNCH
LCDスクリーン
テスト結果表示用( )
OKボタン
現在の操作を確認する( )
Creader 619 端末
選択ボタン
ESCボタン
前の画面に戻り( )
メモリカードスロット
()
メモリカードを挿入し、ファームウェア ソフ
トウェアをアップデートする
/
USBポート
()
USBケーブルを通じてデバイ
スをアップデートする
DTC 1ボタン*
(DTC )読取用
消去ボタン*1(DTC )消去用
I M 1/ ボタン*
(I M )/ レディネス機能にアクセスする
DB15コネクタ
( OBD2 LC )車両 接続用D
ヘルプボタン*1( )詳細説明 診断ヒントを提供する/
注意
付きボタンは機能ホットキー(すなわち )を指し、診断しか使いません。
: F1 F2 F3 F4 「*」 、 、 、
( : : )
アップ ダウン 異なる項目を選択する。
左 右 前のページに戻る 次のページに進む
/
/ /
JPここに表示されている画像は参照用です。この取扱説明書は予告なしに変更する場合がございます。

2. 登録&アップデート
注意:デバイスが最新のソフトウェアを利用するため、頻繁に更新をチェックすることをお勧めします。詳しくはセクショ
ン 登録&アップデート」を参照してください。
準備
車両接続
2
「
1.
2.
イグニッションを にします。車両バッテリーの電圧範囲は - です。スロットルが閉位置です。
車両 ソケットの位置を見つけます: (診断リンクコネクタ)は通常、標準的な ピンコネクタです。それは診断デバイスが車載コンピューターと整合させるコネクタです。ほとんどの車両では、 がステアリングホイールの中央から インチの位置にあります。
を見つけない場合、車両のサービスマニュアルを参照してください。
診断ケーブルの一方の端を車両 ソケットに接続します。
もう一方の端をハンドセットの診断ソケットに差込、固定ねじを締めます。
ON9 14V
DLC
1.
2. 3.
DLC DLC16
DLC12
DLC
1. 準備&接続
DLC位置
前提条件
方法 :メモリカードを通じて(推薦)
:
1
1.
2.
1.
2.
3.
http ww bscar om
Windows XP 7 8 Windows 10
: // . .w d c に入りアップデートツールをダウンロー
ドし、コンピューターにインストールします。
システム要求: または
デバイスのアップデートには、二つの方法があります。次の方法の一つを選択し実行してください。
アップデートツールを作動させ、画像 のような画面が表示されます:
画像 で製品のシリアル番号(デバイスの後ろにあり)を入力
します。
注意:シリアル番号を入力した後、「システムリセット」が有
効になります。この項目はメモリカード交換後のシステムリセットに使われます。
デバイスアップグレード」
をクリックし、登録ページ
に入ります。情報を入力し、
「提出」をクリックします
(画像 を参照)。 登録コー
ドが必要な場合は、ステッ
プ ~ を参照してください
登録コードをお持ちの場合
は、直接ステップ に進んで
ください 。
、 、
「
1
1
2
4 7
8
)
(
)(
Product Serial Number
Device Upgrade
Select Language Japanese1
Your E-mai l address:
Confirm E-mail:
Register Code:
ExitSubmitCancel
2
取扱説明書Creader 619 LAUNCH

Boot Version: V10.02Serial Number: 974990000001Register Code: 4d001e001151
Check for new version?Note: Internet connection is required for PC.
Yes – OKAY No – ESC
4
7 8
Boot Version: V10.02Serial Number:
Register Code:
DO NOT disconnect USB while downloading.
The unit should be re-powered after download new version.
974990000001
4d001e001151
Caution:
2. 登録&アップデート(連載) 2. 登録&アップデート(連載)
4.
5.
6.
7.
8.
9.
10.
USB
OK
4
OK
53
3
USB
(
登録コードはデバイスで見つかります。 ケーブルの一方の端をデバイスに接続し、もう一方の端をコンピューターに接続します。デバイスの電源を入れメインメニュー画面に入ったら、「ヘル
プ」を選択し、「 を押します。
画像 で「デバイス情報」を選択し
「 を押します。
画像 に表示されている登録コードはステップ で必要なものです(ステップ に戻り登録コードを入力し実行します)。デバイスのメモリカードを取り外し提供したメモリカードリーダーに差込、それからカードリーダーをコンピューターの ポートに差し込みます。アップデートデバイスをリスタートし、アップデートする項目を選択するかまたは「すべて選択」をクリックし、「ダウンロード」をクリックしてダウンロードを開始します。上述のステップを完了した後、メモリカードを再度デバイスに差込、デバイスの電源を入れます 注意:ファームウェアの代わりに、診断ソフトウェアのみがアップデートされる場合、この対話ボ
」
」
6 OK
ックスは表示されません この時、アップデートを提示する対話ボックスがポップ
アップされ(画像 を参照)、「 をクリックしアップデートしてください。それからアップデートプロセスが完了し、デバイスが使用可能になります。
)
」
11.
Help
DLC Location Information
DTC Library
Abbreviation
Tool Information
About OBD
3/5
4
Tool Information Boot version:
Display program version:
Diagnostic program version:
Diagnostic library version:
Serial Number:
974990000001
Register Code:
.
.
V02.01
V02.00
V11 23
V11 28
4d001e001151
-Exit
Register Code:
4d001e001151
5
System upgrade
Sure upgrade?
6
方法 : ケーブルを通じて2 USB
注意:コンピューターがインターネットに接続されていることを確認してください。
ケーブルの一方の端をコンピューターに接続し、もう一方の端をデバイスに接続します。新しいバージョンが見つかった場合、画像 のような画面が表示されます。
を押しこのデバイスを デバイスに設定されます。画像 に示すように。 注意:この画像に示すシリアル番号と登録コードはステップ - で必要なものです)。
アップデートツールを作動させ、画像 のような画面が表示されます。シリアル番号を入力します。「デバイスアップデート」をクリックし登録ページに入ります。それから情報を入力して「提出」をクリックしアップデートページに入ります。
1.
2.
3.
4.
5.
USB
7
OK USB8
4 6
9
「 」(
取扱説明書Creader 619 LAUNCH
JP

6.
7.
8.
アップデートする項目を選択するかまたは「すべて選択」をクリックし、「ダウンロード」をクリックしてダウンロードを開始します。
上述のステップを完了した際に、デバイスをリスタートします。
アップグレードヒントが表示され、「 をクリックしてアップデートを開始します。完了するまで数分かかります。それからアップデートプロセスが完了し、デバイスが使用可能になります。
OK」
このデバイスは複数の言語をサポートします。言語を変更する場合に、「設定」 「言語」を選択しリストから希望の言語を選択して「 を押します。
->」OK
デバイスの電源が入れた後、メインメニュー画面に入り、それは以下の機能を含みます:
診断:主に / 診断、リセット機能 システムスキャンを含みます(製品モデルによって異なります)。履歴:記録した データストリームなどを再検討します。
設定:システム言語、測定単位、警報器 / 切替、記録モードを設定します。ヘルプ: 位置、 検索とデバイス情報を含みます。
OBD EOBD
DTC
ON OFF
DLC DTC
/
、
2. 登録&アップデート(連載)
4. 言語変更
3. メインメニュース画面
5. 診断を開始
車両システム診断手順
Product Serial Number
Device Upgrade
Select Language Japanese9
「診断」を選択する
メーカーを選択する
車種を選択する テストシステムを選択する
テスト機能を選択
自動選択(注意:このモードでは、車両テストシステムを自動的にスキャンす
ることはできる)
手動選択(注意:この場合、手動で希望のシステムを選択し、画面上の指示に
よって実行してください。)
DTCを読み取り
DTCを消去
データストリームを読取り
「スキャン」を選択する
取扱説明書Creader 619 LAUNCH

Cabo de diagnóstico(Para conectar o DLC do veículo á ferramenta.)
Guia de Início RápidoCreader 619 LAUNCH
Ecrã LCD(Indica os resultados do teste.)
Botão OK(Confirma a operação atual.)
Aparelho Creader 619
Botão Seleção
Botão ESC(Para retornar à página anteriora.)
Tomada para Cartão de memória(Para inserir o cartão de memória para atualizar a
sua ferramenta.)
Porta USB(Para atualizar sua ferramenta
via cabo USB.)
Botão DTC*1(Para ler os códigos de problemas de
diagnóstico.)
Botão Apagar *1(Para limpar os códigos de problemas
de diagnóstico.)
Botão I/M*1(Acesso rápido à função de preparação
de I / M.)
Conector DB15 (Para conectar ao veículo com OBD2 DLC.)
Botão Ajuda*1(Fornece descrições/dicas detalhadas para diagnósticos.)
Notas: Os botões marcados com * indicam as teclas de atalho da função (ou seja, F1, F2, F3 e F4) e só se aplicam aos Diagnósticos.
( Para selecionar itens diferentes.Para retornar/avançar para a página
anteriora/seguinte.)
Para cima / para baixo: Esquerda / Direita:
PUAll pictures illustrated herein are only for reference. This Quick Start Guide is subject to change without prior written notice.

2. Inscrição e Atualização
Nota: Para se certificar de que o software mais recente disponível é utilizado, é recomentado a buscar atualizações com freqüência. Consulte a Seção 2 "Inscrição e Atualização" para obter detalhes.
1.Preparação
2. Conexão do Veículo
Ligue a ignição do veículo. A faixa de tensão da bateria do veículo deve ser de 9-14Volts. O acelerador deve estar em posição fechada.
1. Localize o tomada de DLC do veículo: Nos maiora dos casos, o DLC (Conector de Diagnóstico) é um conector standard de 16 pinos onde os leitores de código de diagnóstico interagem com o computador de bordo no veículo. O DLC é geralmente localizado a 12 polegadas do centro do volante, sob ou ao redor do lado do motorista para a maioria dos veículos.
Se o DLC não for encontrado, consulte o manual de serviço do veículo para a localização.
2. Ligue o cabo de diagnóstico à tomada do DLC do veículo.3. Conecte a outra extremidade do cabo de diagnóstico à tomada
de diagnóstico do aparelho e aperte os parafusos prisioneiros.
1. Preparação e Conexão
Localizaçãode DLC
Condições prévias:
Método 1º: Via cartão de memória: (recomendado)
1. Vá para http://www.dbscar.com para baixar a ferramenta de atualização e instalá-la no computador.
2. Requisitos do sistema: Windows XP, 7, 8 ou Windows 10. Há dois métodos disponíveis para atualizar sua ferramenta. Você pode escolher um dos seguintes para prosseguir.
1. Inície a ferramenta de atualização, um interface semelhante à Fig. 1ª aparecerá:
2. Na Fig. 1ª, digite o Número de Série do Produto(localizado na parte traseira da ferramenta).
3. Clique em [Actualização] para entrar na página de inscrição. Insira as informações e clique em [Enviar] (consulte a Fig. 2ª). (Se precisar do Código de Registo, consulte os passos 4º a 7º). (Se tiver o Código de Registo, prossiga directamente para o passo 8º).
Nota: Uma vez introduzido o S/N, "Restauração do Sistema" é activado, que é utilizado para restaurar o sistema se um novo cartão de memória tiver sido substituído.
Product Serial Number
Device Upgrade
Select Language Portuguese1
Your E-mail address:
Confirm E-mail:
Register Code:
ExitSubmitCancel
2
Guia de Início RápidoCreader 619 LAUNCH

Boot Version: V10.02Serial Number: 974990000001Register Code: 4d001e001151
Check for new version?Note: Internet connection is required for PC.
Yes – OKAY No – ESC
4
7 8
Boot Version: V10.02Serial Number:
Register Code:
DO NOT disconnect USB while downloading.
The unit should be re-powered after download new version.
974990000001
4d001e001151
Caution:
2. Inscrrição e Atualização(Cont.) 2. Inscrrição e Atualização(Cont.)4.
5.
6. Relace a "Informação da Ferramenta" na Fig. 4ª e pressione [OK].
7. O Código de Registo mostrado na Fig. 5ª é o código necessário no posso 3º . (Voltar para o pssso 3º e inserir o código de registro para continuar).
8. Instale o cartão de memória da ferramenta no adaptador de cartão de memória de USB fornecido e insira-o na porta USB do computador.
9. Reinície a ferramenta de atualização, selecione as atualizações que você deseja executar ou clique em "Selecione Tudo" e clique em [Download] para baixar.
10.Uma vez concluídos todos os passos, reinsira o cartão de memória na ferramenta e ligue a ferramenta através do cabo USB ou através do cabo OBD II. Uma caixa de diálogo (Nota: Se o software de diagnóstico seja atualizado e nenhum pacote de firmware seja baixado,
O Código de Registro pode ser encontrado em sua ferramenta. Conecte uma extremidade do cabo USB à sua ferramenta e a outra extremidade ao computador.Quando a ferramenta esteja ligada e entrada na página do menu principal, coloque a barra de realce no ícone "Ajuda" e pressione [OK].
esta caixa não aparecerá) lhe solicitando a atualizar aparecerá na interface (veja Fig. 6 ) e selecione [OK].
11. Inscrição está comcluida. Sua ferramenta está pronta para uso.
ªHelp
DLC Location Information
DTC Library
Abbreviation
Tool Information
About OBD
3/5
4
Tool Information Boot version:
Display program version:
Diagnostic program version:
Diagnostic library version:
Serial Number:
974990000001
Register Code:
.
.
V02.01
V02.00
V11 23
V11 28
4d001e001151
-Exit
Register Code:
4d001e001151
5
System upgrade
Sure upgrade?
6
Método 2º: Via Cabo USBNota: Certifique-se de que o computador tenha uma ligação à Internet.
(Nota: O número de série e o código de registro mostrados nesta figura são necessários para inserir os passos 4-6.)
1. Conecte uma extremidade do cabo USB à porta USB do computador e a outra extremidade à ferramenta.
2. Se uma versão mais recente for encontrada, uma tela semelhante à Fig. 7 aparece.
3. Pressione [OK] para configurar esta ferramenta como um dispositivo USB. Veja Fig. 8.
4. Inicie a ferramenta de atualização, uma tela semelhante à da Fig. 9 será exibido.
5. Digite o número de série. Clique em [Actualização da Ferramenta] para inserir as informações e clique em [Enviar] para entrar na página de atualização.
Guia de Início RápidoCreader 619 LAUNCH
PU

6. Selecione as atualizações que deseja executar ou clique em "Selecione tudo" e clique em [Download] para iniciar o download.
7. Uma vez concluídas todas as etapas, reinicie a ferramenta. Ele solicitará que você atualize, clique em [OK] para iniciar a atualização. Pode demorar vários minutos para concluir a atualização.
8. O processo de atualização está completo; Sua ferramenta está pronta para uso.
Vários idiomas são disponíveis nesta ferramenta. Para alterar o idioma, selecione "Configurações" -> "Idioma", escolhe o desejado na lista e pressione [OK].
Uma vez que a ferramenta é ligada, ele entrará na página do menu principal, que inclui principalmente as seguintes opções:
Consiste principalmente em diagnostica de forma OBD/EOBD e Redefinição/Escaneamentodo Sistema (varia com modelos do produto).
Para rever o DTC gravado, o fluxo de dados etc.Para definir o idioma do sistema, as unidades
de medida, modo de gravação, e ligar ou desligar o sinal sonoro. Inclui localização DLC, pesquisa DTC e informações da
ferramenta, etc.
Diagnóstico:
Revisão: Configurações:
Ajuda:
2.Inscrrição e Atualização(Cont.)
4. Mudar Idioma
3. Página do Menu Principal
5. Início do Diagnóstico
Fluxograma de Diagnóst ico do Sistema de VeículosProduct Serial Number
Device Upgrade
Select Language Portuguese9
Guia de Início RápidoCreader 619 LAUNCH
Selecione Diagnóstico
Selecione o Fabricantedo Veículo
Selecione o Modelo doVeículo
Selecione o sitema deteste
Seleccione a função deteste
Automático(Nota:Neste modo, a sua
ferramente possa escanear osistema de teste do veículo
automaticamente)
SelecçãoManual(Nota: neste modo, você deveescolher o sistema desejadode forma manual, siguindo asinstruções exibidas na ecrã.)
Ler o código deerro
Eliminar o códigode erro
Ler a fluxo dedada
SelecioneEscaneamento

制作要求:
装订方式: 原始为 横向纸张大小,按 比例输出
印刷要求:彩色印刷, 书写纸
210mmx148mm1:1
80g
骑马钉装订,