
How To Troubleshoot A Virtual Private Network (VPN) · Troubleshoot a Virtual Private Network (VPN)...
25
C613-16102-00 REV C www.alliedtelesis.com AlliedWare TM OS How To | This How To Note describes how to test and troubleshoot an IPsec configuration, using the CLI and the GUI. What information will you find in this document? This How To Note contains the following information: z " Related How To Notes" on page 2 z " Which products and software versions does it apply to?" on page 2 z " An example network" on page 3. This network is used to illustrate some of the testing and troubleshooting suggestions. z " How to test a tunnel" on page 4 z " How to troubleshoot a tunnel" on page 5: z "1. Check the WAN to WAN connectivity" on page 6 z "2. Confirm VPN establishment" on page 7 z "3. Check debugging information" on page 11 z "4. Check the router configuration" on page 13 z "5. Fix and prevent SA out-of-step problems" on page 17 z "6. Check Microsoft Windows XP SP2 client configuration" on page 17 z "7. Reset ISAKMP and IPsec" on page 18 z " How to make the router select the right ISAKMP policy during incoming Phase 1 ISAKMP proposals" on page 19 z " What to do if the remote VPN peer sets up multiple ISAKMP SAs when responding to your router" on page 22 Troubleshoot a Virtual Private Network (VPN)
Transcript of How To Troubleshoot A Virtual Private Network (VPN) · Troubleshoot a Virtual Private Network (VPN)...

AlliedWareTM OS
How To | Troubleshoot a Virtual Private Network (VPN)
This How To Note describes how to test and troubleshoot an IPsec configuration, using the CLI and the GUI.
What information will you find in this document?This How To Note contains the following information:
" Related How To Notes" on page 2
" Which products and software versions does it apply to?" on page 2
" An example network" on page 3. This network is used to illustrate some of the testing and troubleshooting suggestions.
" How to test a tunnel" on page 4
" How to troubleshoot a tunnel" on page 5:
"1. Check the WAN to WAN connectivity" on page 6
"2. Confirm VPN establishment" on page 7
"3. Check debugging information" on page 11
"4. Check the router configuration" on page 13
"5. Fix and prevent SA out-of-step problems" on page 17
"6. Check Microsoft Windows XP SP2 client configuration" on page 17
"7. Reset ISAKMP and IPsec" on page 18
" How to make the router select the right ISAKMP policy during incoming Phase 1 ISAKMP proposals" on page 19
" What to do if the remote VPN peer sets up multiple ISAKMP SAs when responding to your router" on page 22
C613-16102-00 REV C www.alliedtelesis.com
Related How To Notes
Allied Telesis offers How To Notes with a wide range of VPN solutions, from quick and simple solutions for connecting home and remote offices, to advanced multi-feature setups. Notes also describe how to create a VPN between an Allied Telesis router and equipment from a number of other vendors.
For a complete list of VPN How To Notes, see the Overview of VPN Solutions in How To Notes in the How To Library at www.alliedtelesis.com/resources/literature/howto.aspx.
Which products and software versions does it apply to?IPsec is available on the following routers and switches:
AR400 Series routers
AR700 Series routers
Rapier i Series switches
AT-8800 Series switches
Most of the troubleshooting tips apply to all Software Versions that support the above products, except for the following features that are available on Software Version 2.9.1 or later:
VPN Wizards within the GUI, which simplify VPN configuration. These are available on AR415S and AR44xS routers.
the command show debug ipsec
Page 2 | AlliedWare™ OS How To Note: Troubleshooting VPNs
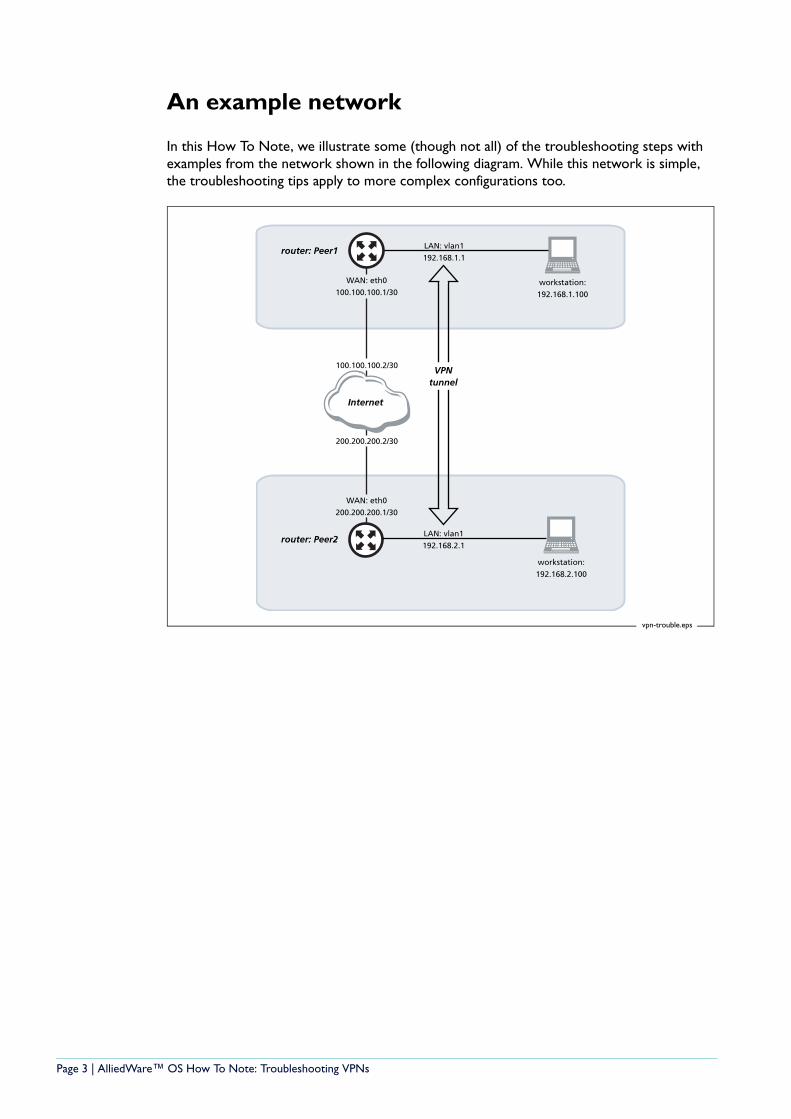
An example network
In this How To Note, we illustrate some (though not all) of the troubleshooting steps with examples from the network shown in the following diagram. While this network is simple, the troubleshooting tips apply to more complex configurations too.
LAN: vlan1
192.168.1.1
WAN: eth0
100.100.100.1/30
router: Peer1
router: Peer2
Internet
WAN: eth0
200.200.200.1/30
workstation:
192.168.1.100
LAN: vlan1
192.168.2.1
workstation:
192.168.2.100
VPNtunnel
200.200.200.2/30
100.100.100.2/30
vpn-trouble.eps
Page 3 | AlliedWare™ OS How To Note: Troubleshooting VPNs
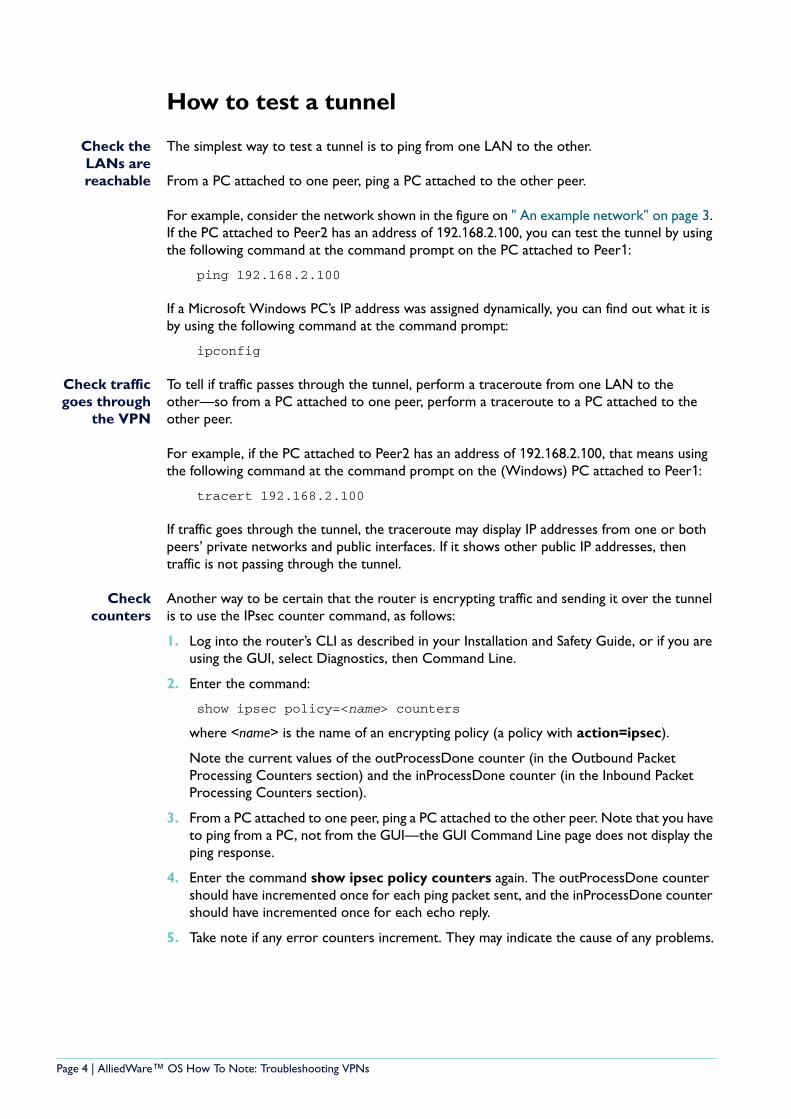
How to test a tunnel
Check theLANs arereachable
The simplest way to test a tunnel is to ping from one LAN to the other.
From a PC attached to one peer, ping a PC attached to the other peer.
For example, consider the network shown in the figure on " An example network" on page 3. If the PC attached to Peer2 has an address of 192.168.2.100, you can test the tunnel by using the following command at the command prompt on the PC attached to Peer1:
ping 192.168.2.100
If a Microsoft Windows PC’s IP address was assigned dynamically, you can find out what it is by using the following command at the command prompt:
ipconfig
Check trafficgoes through
the VPN
To tell if traffic passes through the tunnel, perform a traceroute from one LAN to the other—so from a PC attached to one peer, perform a traceroute to a PC attached to the other peer.
For example, if the PC attached to Peer2 has an address of 192.168.2.100, that means using the following command at the command prompt on the (Windows) PC attached to Peer1:
tracert 192.168.2.100
If traffic goes through the tunnel, the traceroute may display IP addresses from one or both peers’ private networks and public interfaces. If it shows other public IP addresses, then traffic is not passing through the tunnel.
Checkcounters
Another way to be certain that the router is encrypting traffic and sending it over the tunnel is to use the IPsec counter command, as follows:
1. Log into the router’s CLI as described in your Installation and Safety Guide, or if you are using the GUI, select Diagnostics, then Command Line.
2. Enter the command:
show ipsec policy=<name> counters
where <name> is the name of an encrypting policy (a policy with action=ipsec).
Note the current values of the outProcessDone counter (in the Outbound Packet Processing Counters section) and the inProcessDone counter (in the Inbound Packet Processing Counters section).
3. From a PC attached to one peer, ping a PC attached to the other peer. Note that you have to ping from a PC, not from the GUI—the GUI Command Line page does not display the ping response.
4. Enter the command show ipsec policy counters again. The outProcessDone counter should have incremented once for each ping packet sent, and the inProcessDone counter should have incremented once for each echo reply.
5. Take note if any error counters increment. They may indicate the cause of any problems.
Page 4 | AlliedWare™ OS How To Note: Troubleshooting VPNs
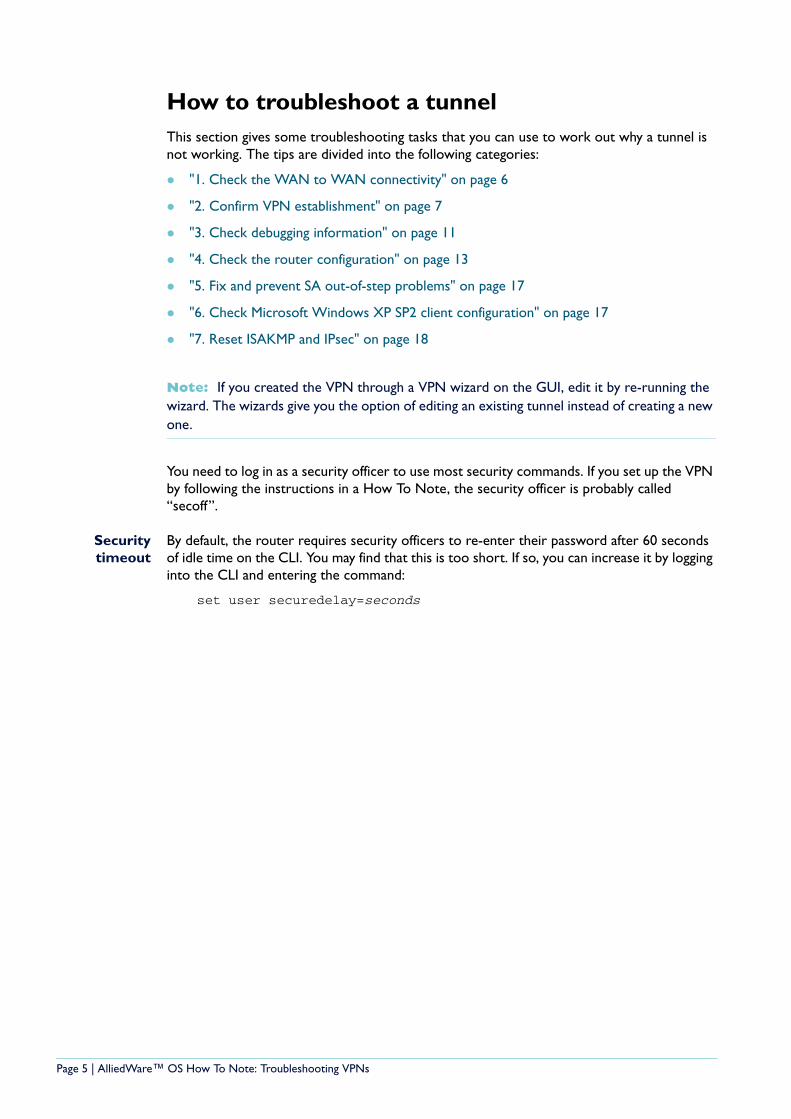
How to troubleshoot a tunnelThis section gives some troubleshooting tasks that you can use to work out why a tunnel is not working. The tips are divided into the following categories:
"1. Check the WAN to WAN connectivity" on page 6
"2. Confirm VPN establishment" on page 7
"3. Check debugging information" on page 11
"4. Check the router configuration" on page 13
"5. Fix and prevent SA out-of-step problems" on page 17
"6. Check Microsoft Windows XP SP2 client configuration" on page 17
"7. Reset ISAKMP and IPsec" on page 18
Note: If you created the VPN through a VPN wizard on the GUI, edit it by re-running the wizard. The wizards give you the option of editing an existing tunnel instead of creating a new one.
You need to log in as a security officer to use most security commands. If you set up the VPN by following the instructions in a How To Note, the security officer is probably called “secoff”.
Securitytimeout
By default, the router requires security officers to re-enter their password after 60 seconds of idle time on the CLI. You may find that this is too short. If so, you can increase it by logging into the CLI and entering the command:
set user securedelay=seconds
Page 5 | AlliedWare™ OS How To Note: Troubleshooting VPNs

1. Check the WAN to WAN connectivityBefore your VPN can work, you obviously need connectivity between the WANs on each peer router. This step describes how to test this.
To check that the IPsec peers can connect through the intermediary network or Internet, perform a ping or traceroute from one peer router to the other peer’s public interface. Note that this is not a payload (LAN to LAN) check.
Note that both ping and traceroute may not work if you have a firewall enabled on either peer. Firewalls are more likely to allow pings, so start with ping. If you suspect that the firewall is blocking pings, move to "2. Confirm VPN establishment" on page 7—those tests are not affected by the firewall.
To perform a ping or traceroute on an Allied Telesis router peer, log into the router’s command line interface (CLI), as described in your Installation and Safety Guide. Then enter the commands:
ping destination-ipadd
trace destination-ipadd
For the example in the figure on page 3, to ping from Peer1 to the public interface of Peer2, enter the following command on Peer1:
ping 200.200.200.1
To send a traceroute from Peer1 to the public interface of Peer2, enter the following command on Peer1:
trace 200.200.200.1
Note that:
this step does not attempt to send the ping or traceroute packets through the (non-working) VPN tunnel. It sends them directly through the Internet to check whether the error is in the underlying IP connection instead of the tunnel configuration.
you cannot use the GUI to perform a ping or traceroute (even on the Diagnostics > Command Line page).
Page 6 | AlliedWare™ OS How To Note: Troubleshooting VPNs
2. Confirm VPN establishmentVPNs are made up of ISAKMP and IPsec SAs. This step checks how far the ISAKMP and IPsec processing has progressed, and whether the SAs have established. This may tell you the cause of a failing VPN. This section describes how to check whether:
the two phases of ISAKMP negotiation were successful, and if not, at what stage the process failed
ISAKMP SAs were created
IPsec SAs were created
IPsec SAs are staying up
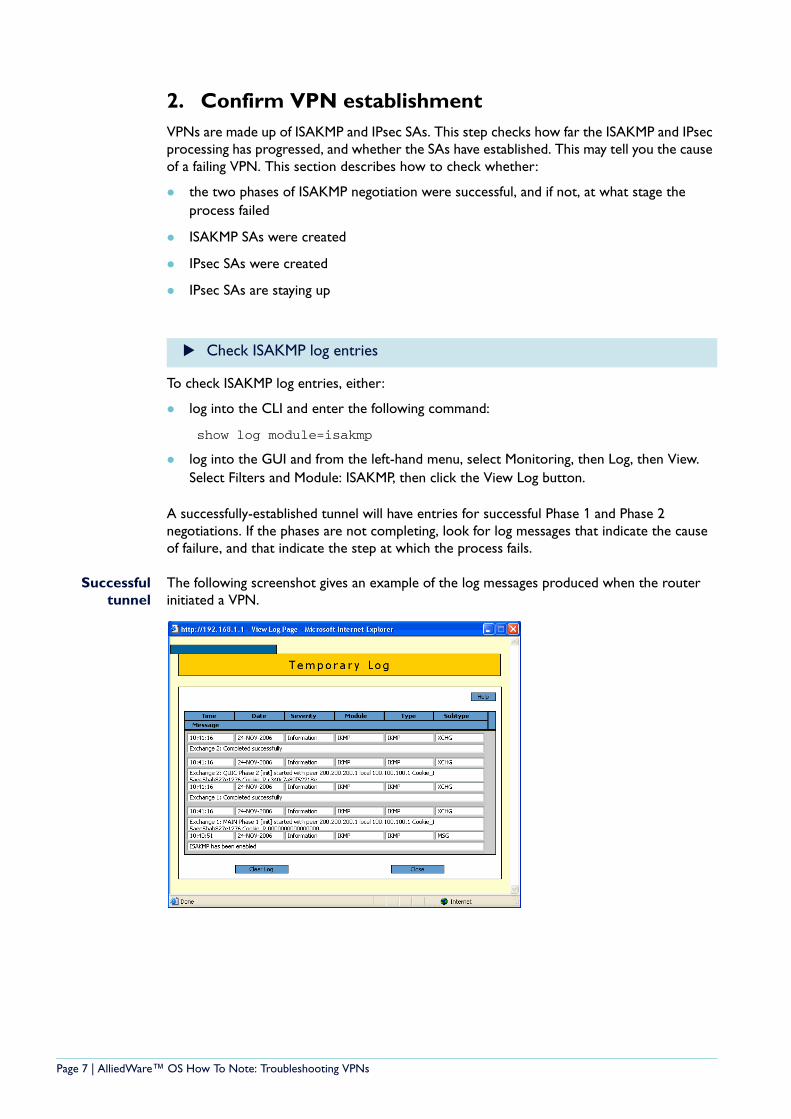
To check ISAKMP log entries, either:
log into the CLI and enter the following command:
show log module=isakmp
log into the GUI and from the left-hand menu, select Monitoring, then Log, then View. Select Filters and Module: ISAKMP, then click the View Log button.
A successfully-established tunnel will have entries for successful Phase 1 and Phase 2 negotiations. If the phases are not completing, look for log messages that indicate the cause of failure, and that indicate the step at which the process fails.
Successfultunnel
The following screenshot gives an example of the log messages produced when the router initiated a VPN.
Check ISAKMP log entries
Page 7 | AlliedWare™ OS How To Note: Troubleshooting VPNs
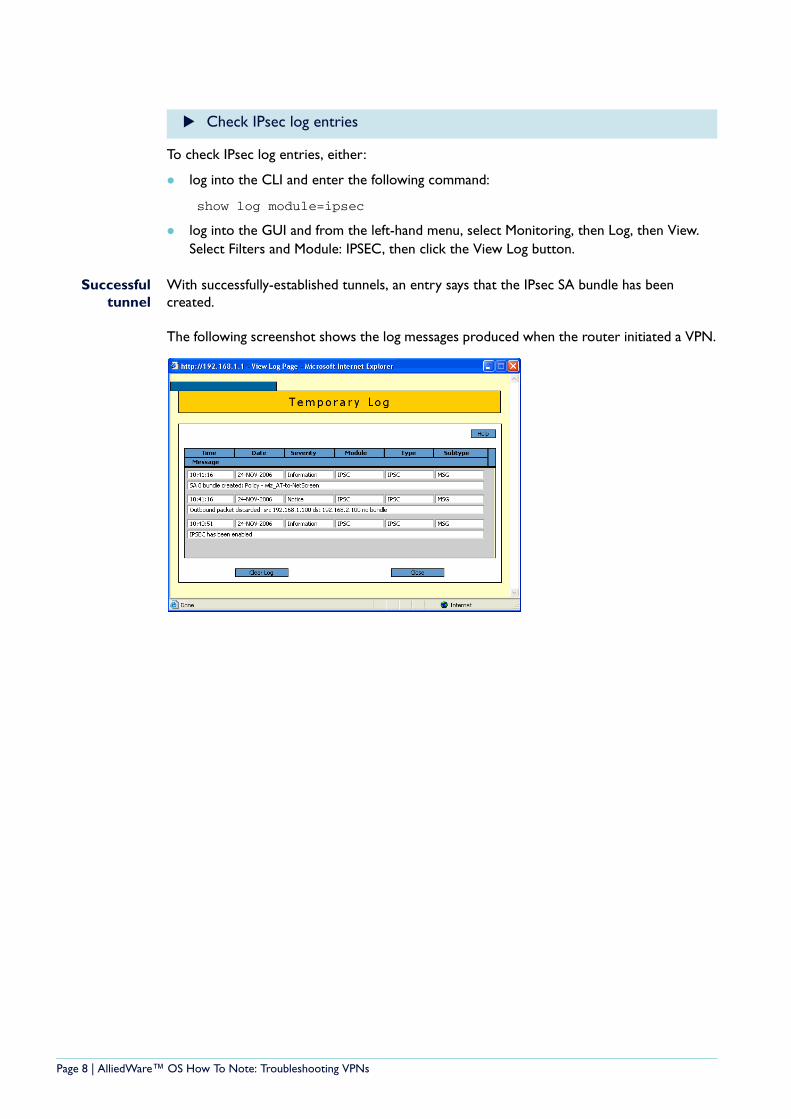
To check IPsec log entries, either:
log into the CLI and enter the following command:
show log module=ipsec
log into the GUI and from the left-hand menu, select Monitoring, then Log, then View. Select Filters and Module: IPSEC, then click the View Log button.
Successfultunnel
With successfully-established tunnels, an entry says that the IPsec SA bundle has been created.
The following screenshot shows the log messages produced when the router initiated a VPN.
Check IPsec log entries
Page 8 | AlliedWare™ OS How To Note: Troubleshooting VPNs
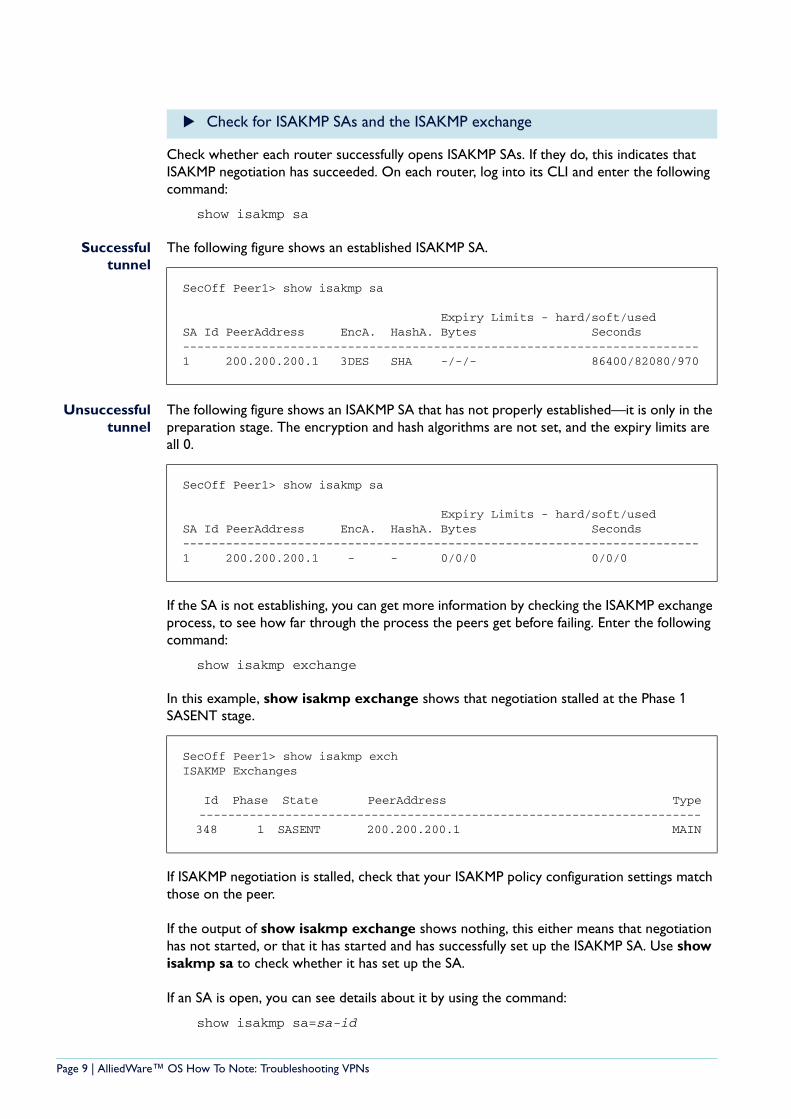
Check whether each router successfully opens ISAKMP SAs. If they do, this indicates that ISAKMP negotiation has succeeded. On each router, log into its CLI and enter the following command:
show isakmp sa
Successfultunnel
The following figure shows an established ISAKMP SA.
Unsuccessfultunnel
The following figure shows an ISAKMP SA that has not properly established—it is only in the preparation stage. The encryption and hash algorithms are not set, and the expiry limits are all 0.
If the SA is not establishing, you can get more information by checking the ISAKMP exchange process, to see how far through the process the peers get before failing. Enter the following command:
show isakmp exchange
In this example, show isakmp exchange shows that negotiation stalled at the Phase 1 SASENT stage.
If ISAKMP negotiation is stalled, check that your ISAKMP policy configuration settings match those on the peer.
If the output of show isakmp exchange shows nothing, this either means that negotiation has not started, or that it has started and has successfully set up the ISAKMP SA. Use show isakmp sa to check whether it has set up the SA.
If an SA is open, you can see details about it by using the command:
show isakmp sa=sa-id
Check for ISAKMP SAs and the ISAKMP exchange
SecOff Peer1> show isakmp sa
Expiry Limits - hard/soft/usedSA Id PeerAddress EncA. HashA. Bytes Seconds------------------------------------------------------------------------1 200.200.200.1 3DES SHA -/-/- 86400/82080/970
SecOff Peer1> show isakmp sa
Expiry Limits - hard/soft/usedSA Id PeerAddress EncA. HashA. Bytes Seconds------------------------------------------------------------------------1 200.200.200.1 - - 0/0/0 0/0/0
SecOff Peer1> show isakmp exchISAKMP Exchanges Id Phase State PeerAddress Type ---------------------------------------------------------------------- 348 1 SASENT 200.200.200.1 MAIN
Page 9 | AlliedWare™ OS How To Note: Troubleshooting VPNs
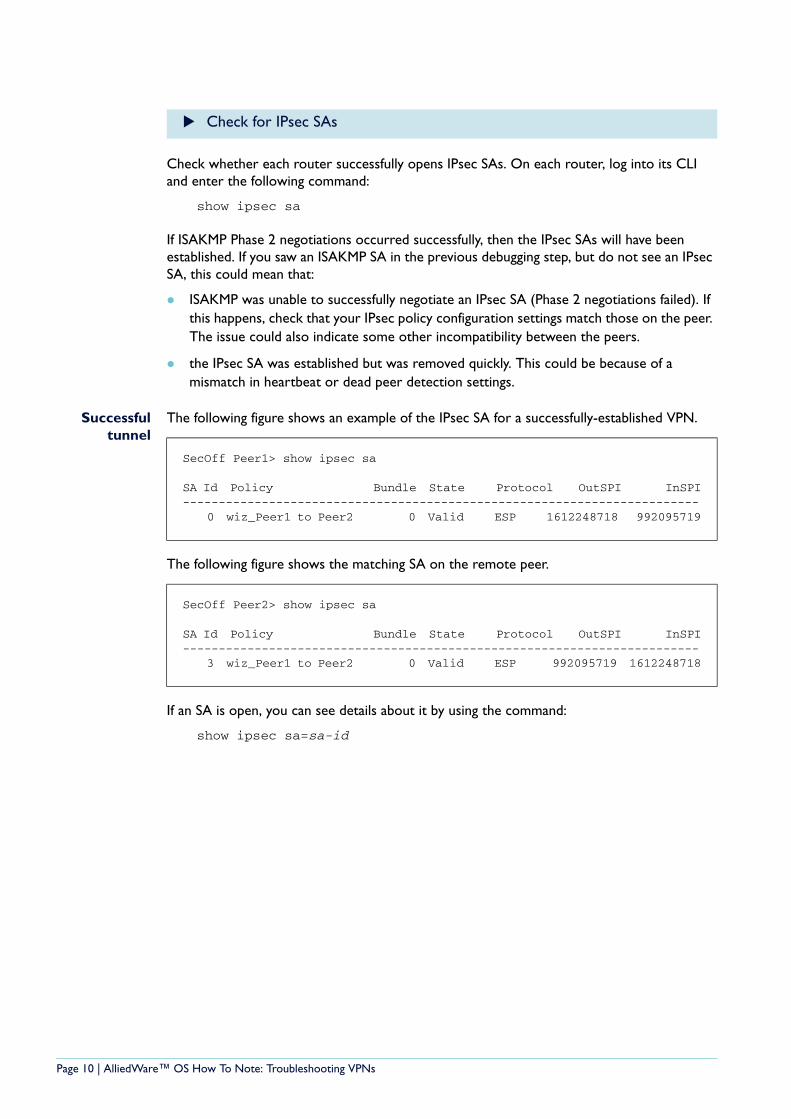
Check whether each router successfully opens IPsec SAs. On each router, log into its CLI and enter the following command:
show ipsec sa
If ISAKMP Phase 2 negotiations occurred successfully, then the IPsec SAs will have been established. If you saw an ISAKMP SA in the previous debugging step, but do not see an IPsec SA, this could mean that:
ISAKMP was unable to successfully negotiate an IPsec SA (Phase 2 negotiations failed). If this happens, check that your IPsec policy configuration settings match those on the peer. The issue could also indicate some other incompatibility between the peers.
the IPsec SA was established but was removed quickly. This could be because of a mismatch in heartbeat or dead peer detection settings.
Successfultunnel
The following figure shows an example of the IPsec SA for a successfully-established VPN.
The following figure shows the matching SA on the remote peer.
If an SA is open, you can see details about it by using the command:
show ipsec sa=sa-id
Check for IPsec SAs
SecOff Peer1> show ipsec sa
SA Id Policy Bundle State Protocol OutSPI InSPI------------------------------------------------------------------------ 0 wiz_Peer1 to Peer2 0 Valid ESP 1612248718 992095719
SecOff Peer2> show ipsec sa
SA Id Policy Bundle State Protocol OutSPI InSPI------------------------------------------------------------------------ 3 wiz_Peer1 to Peer2 0 Valid ESP 992095719 1612248718
Page 10 | AlliedWare™ OS How To Note: Troubleshooting VPNs

3. Check debugging informationThis section describes how to collect:
debugging messages, which the router outputs at each step of ISAKMP processing
output of all commands that are relevant for VPNs.
ISAKMP debuggings lets you examine the ISAKMP processes for information about the point of failure.
On each router, log into its CLI and enter the following command:
enable isakmp debug
As ISAKMP processes occur, information about them is displayed onscreen. Look for messages that indicate:
which peer fails to respond, and why it did not respond
phase 1 completion and phase 2 completion. If the phases are not completing, note the step at which a router fails to get a response from the peer, and why.
For even more detailed output, use the command:
enable isakmp debug=all
If the debugging output indicates a problem but you cannot clearly determine the order of events, it may be helpful to reset ISAKMP and IPsec on each router before debugging. This makes sure that you see the debugging from a clean start. See "7. Reset ISAKMP and IPsec" on page 18 for instructions.
For examples of ISAKMP debugging output from functional VPNs, see the How To Note How To Create Concurrent VPNs with Remote Routers, Microsoft Windows Vista Clients and XP Clients, over NAT-T.
If necessary, contact your Allied Telesis representative for help with interpreting this information. If sending debugging output to your representative, please use enable isakmp debug=all.
To stop the debug display, enter one of the following commands:
disable isakmp debug
disable isakmp debug=all
Use ISAKMP debugging
Page 11 | AlliedWare™ OS How To Note: Troubleshooting VPNs
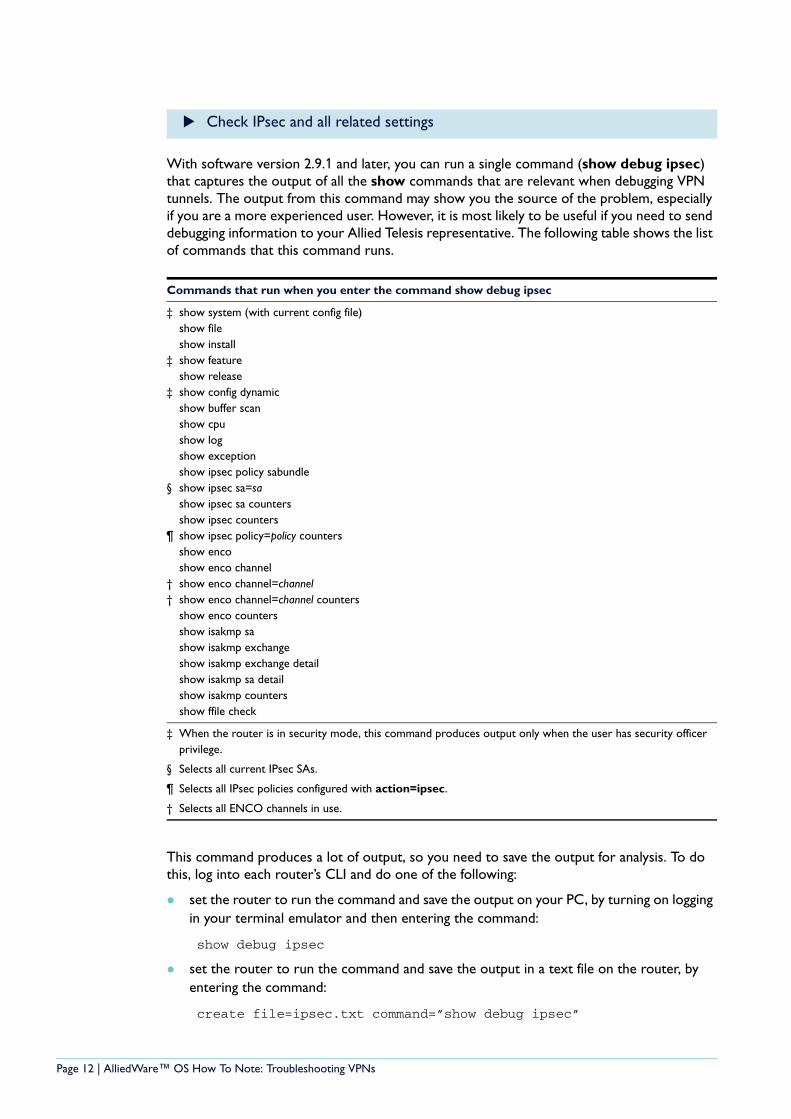
With software version 2.9.1 and later, you can run a single command (show debug ipsec) that captures the output of all the show commands that are relevant when debugging VPN tunnels. The output from this command may show you the source of the problem, especially if you are a more experienced user. However, it is most likely to be useful if you need to send debugging information to your Allied Telesis representative. The following table shows the list of commands that this command runs.
This command produces a lot of output, so you need to save the output for analysis. To do this, log into each router’s CLI and do one of the following:
set the router to run the command and save the output on your PC, by turning on logging in your terminal emulator and then entering the command:
show debug ipsec
set the router to run the command and save the output in a text file on the router, by entering the command:
create file=ipsec.txt command=”show debug ipsec”
Check IPsec and all related settings
Commands that run when you enter the command show debug ipsec
‡ show system (with current config file)show file show install
‡ show featureshow release
‡ show config dynamicshow buffer scan show cpushow logshow exceptionshow ipsec policy sabundle
§ show ipsec sa=sashow ipsec sa countersshow ipsec counters
¶ show ipsec policy=policy countersshow encoshow enco channel
† show enco channel=channel† show enco channel=channel counters
show enco countersshow isakmp sashow isakmp exchangeshow isakmp exchange detailshow isakmp sa detailshow isakmp countersshow ffile check
‡ When the router is in security mode, this command produces output only when the user has security officer privilege.
§ Selects all current IPsec SAs.
¶ Selects all IPsec policies configured with action=ipsec.
† Selects all ENCO channels in use.
Page 12 | AlliedWare™ OS How To Note: Troubleshooting VPNs
4. Check the router configurationOnce the previous steps have indicated where the VPN is failing, you should check your configuration. This section lists a number of common configuration issues that may cause VPNs to fail.
Check that you have used the correct IP addresses and masks in the IPsec policy settings on each peer.
In particular, check that you have not swapped local and remote settings. For example, the local address at one end should be the remote address at the other end. To check this, log into the CLI and use the command:
show config dynam=ipsec
You can only create VPNs between LANs that have different subnet addresses. This can be an issue for roaming clients, who may try to connect from a remote network that (by coincidence) has the same subnet address as the local LAN. This is especially likely if you are using a very common private subnet such as 192.168.1.0.
Therefore, if a roaming VPN client cannot access your local LAN, check that the remote LAN uses a different IP subnet to the local LAN.
You can reduce the probability of this issue by choosing a relatively unusual addressing scheme for your local LAN.
Check the address settings
Check that the remote and local LAN IP addresses are different
Page 13 | AlliedWare™ OS How To Note: Troubleshooting VPNs
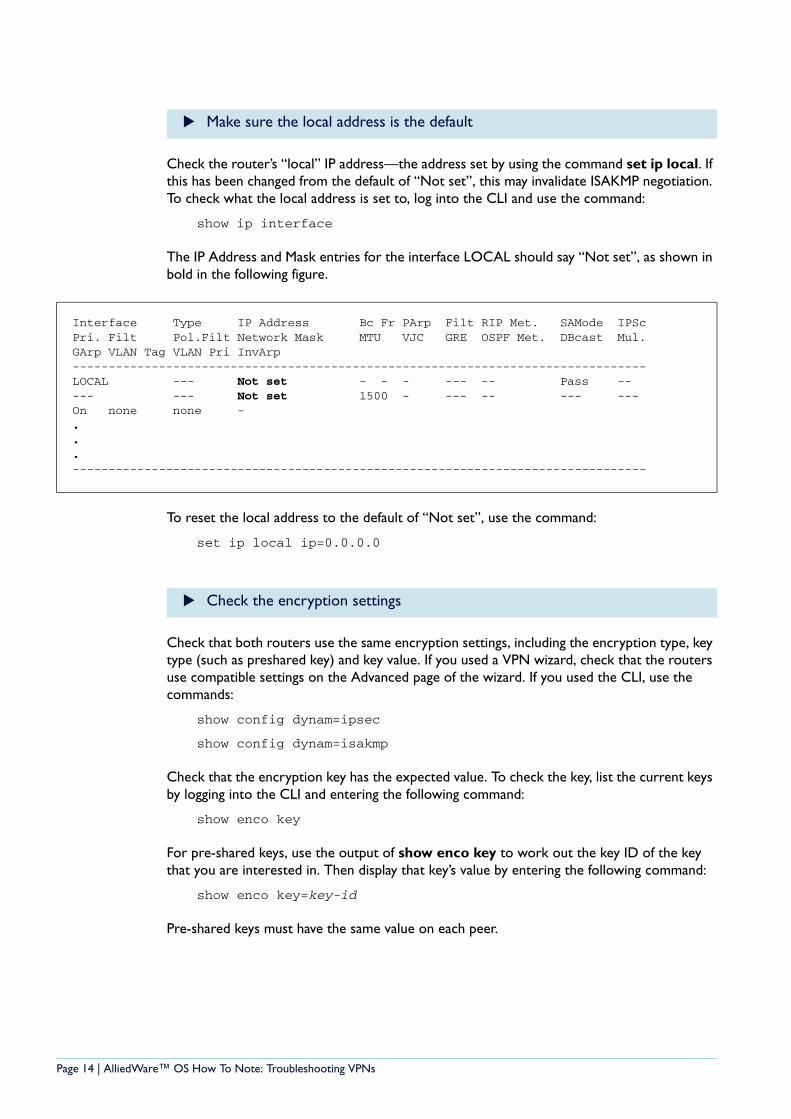
Check the router’s “local” IP address—the address set by using the command set ip local. If this has been changed from the default of “Not set”, this may invalidate ISAKMP negotiation. To check what the local address is set to, log into the CLI and use the command:
show ip interface
The IP Address and Mask entries for the interface LOCAL should say “Not set”, as shown in bold in the following figure.
To reset the local address to the default of “Not set”, use the command:
set ip local ip=0.0.0.0
Check that both routers use the same encryption settings, including the encryption type, key type (such as preshared key) and key value. If you used a VPN wizard, check that the routers use compatible settings on the Advanced page of the wizard. If you used the CLI, use the commands:
show config dynam=ipsec
show config dynam=isakmp
Check that the encryption key has the expected value. To check the key, list the current keys by logging into the CLI and entering the following command:
show enco key
For pre-shared keys, use the output of show enco key to work out the key ID of the key that you are interested in. Then display that key’s value by entering the following command:
show enco key=key-id
Pre-shared keys must have the same value on each peer.
Make sure the local address is the default
Interface Type IP Address Bc Fr PArp Filt RIP Met. SAMode IPScPri. Filt Pol.Filt Network Mask MTU VJC GRE OSPF Met. DBcast Mul.GArp VLAN Tag VLAN Pri InvArp--------------------------------------------------------------------------------LOCAL --- Not set - - - --- -- Pass ----- --- Not set 1500 - --- -- --- ---On none none -...--------------------------------------------------------------------------------
Check the encryption settings
Page 14 | AlliedWare™ OS How To Note: Troubleshooting VPNs

Check the configuration in detail, by logging into the CLI and entering the following command:
show config dynamic
In particular, check the ISAKMP, IPsec and firewall sections. You can display these sections one at a time by using the commands:
show config dynamic=ipsec
show config dynamic=isakmp
show config dynamic=firewall
If you followed an example from a How To Note, that Note may list the commands for the full router configuration. If so, compare your configuration with the example’s configuration.
If you are using NAT-T, it needs to be enabled. To check this, log into the CLI and enter the following command:
show config dynamic=isakmp
and check that the ISAKMP policy includes the parameter natt=true.
Make sure that the firewall is allowing the traffic it needs to allow.
To check the firewall configuration, log into the CLI and enter one or both of the following commands:
show firewall policy=name
show config dynamic=firewall
In particular:
check that all interfaces are attached to the firewall and have been appropriately set as private or public interfaces
check that a rule exists to allow traffic to UDP port 500 on the public interface
if NAT-T is used, check that a rule exists to allow traffic to UDP port 4500 on the public interface
Check details of the configuration
Check that NAT-T is enabled
Check the firewall rules
Page 15 | AlliedWare™ OS How To Note: Troubleshooting VPNs

for site-to-site VPNs, check that a pair of rules exist to allow the VPN traffic to pass. These rules must achieve the following effect:
on the public interface, allow decrypted VPN traffic to pass through the firewall. This rule uses the parameters action=nonat or allow, and encapsulation=ipsec
on the private interface, allow packets to pass through the firewall if they are from the private LAN and should go through the VPN to the remote private LAN. This rule uses the parameters action=nonat or allow, and selects traffic using ip=local-lan-address-range and remoteip=remote-lan-address-range
Use action=nonat if the firewall has a NAT relationship defined between the interfaces that the VPN will traverse. Use action=allow if the firewall does not use NAT between these interfaces.
for roaming clients, check that a rule exists on the public interface to allow the L2TP/VPN traffic to pass through the firewall. This rule for L2TP needs to use the parameters action=nonat or allow, and to select traffic using gblport=1701 and encapsulation=ipsec
check that the rule order achieves the effect you want. The firewall performs the action of the first rule that matches a packet.
If you want users on the LAN to use the Internet without going through the VPN tunnel, check that an IPsec policy for this exists on the public interface. For example, the policy could use the following command if eth0 is the public interface:
create ipsec pol=internet int=eth0 ac=permit
The policy needs to allow all traffic and must come last in the list of IPsec policies.
Check the IPsec policies
Page 16 | AlliedWare™ OS How To Note: Troubleshooting VPNs

5. Fix and prevent SA out-of-step problemsSA out-of-step occurs when one IPsec peer believes an IPsec SA is still up and sends data down it, while the other IPsec peer has removed the same SA. This can occur after a power cut, or after a dial-up modem has dropped off.
Fix If the SAs are out of step, you can recover by disabling and re-enabling ISAKMP and IPsec on each peer, as described in "7. Reset ISAKMP and IPsec" on page 18.
You should also look at the following suggestions to prevent the problem from recurring.
Prevent You can prevent SAs from getting out of step by using one of the following options, depending on the type of peer:
ISAKMP heartbeats—use these whenever both peers are Allied Telesis routers or managed layer 3 switches
PPP over L2TP echo request monitoring—use this with Windows VPN clients
The following options may also help prevent SA out-of-step problems and apply to a wider range of peers:
senddeletes=true in the ISAKMP policy. When the router deletes SAs, this ensures that it sends Delete notifications to the peer. When the peer receives a Delete notification, it deletes the applicable SA.
You can use this option for all VPN types. However, peers cannot send Delete notifications if a power cut occurs.
respondbadspi=true in the IPsec policy and sendnotify=true in the ISAKMP policy. When the SAs are out of step, the router may receive ESP packets with unknown Security Parameter Index (SPI) values. When the router detects an unknown SPI, these settings force the router and the peer to renegotiate the tunnel.
You can use this option with site-to-site VPNs that use main mode, when both peers have fixed IP addresses. This option does not work in aggressive mode.
For more information about SA issues, see " What to do if the remote VPN peer sets up multiple ISAKMP SAs when responding to your router" on page 22.
6. Check Microsoft Windows XP SP2 client configuration
If your router is behind a NAT gateway and accepts incoming connections (is a VPN responder) then you may need to modify VPN clients that run Windows XP Service Pack 2. Service Pack 2 introduced a change that restricts NAT gateways at the responder end.
For more information, see the Microsoft Knowledge Base article The default behavior of IPsec NAT traversal (NAT-T) is changed in Windows XP Service Pack 2 at:support.microsoft.com/default.aspx?kbid=885407.
Page 17 | AlliedWare™ OS How To Note: Troubleshooting VPNs
7. Reset ISAKMP and IPsec
Unless it will interrupt other functioning VPNs, you can reset ISAKMP and IPsec by disabling and re-enabling them on each router. You may want to leave this step until after you have used the previous steps to try and find the cause of the problem, so you can fix it and prevent a recurrence.
Resetting IPsec fixes some problems by forcing the peers to renegotiate the VPN. It also means you can start checking log messages and debug output (see earlier steps) from the beginning of negotiations.
To disable IPsec and ISAKMP, log into the router’s CLI and use the following commands (in this order):
disable ipsec
disable isakmp
To re-enable ISAKMP and IPsec, use the following commands (in this order):
enable isakmp
enable ipsec
If possible, re-enable IPsec at the same time on each router.
Page 18 | AlliedWare™ OS How To Note: Troubleshooting VPNs
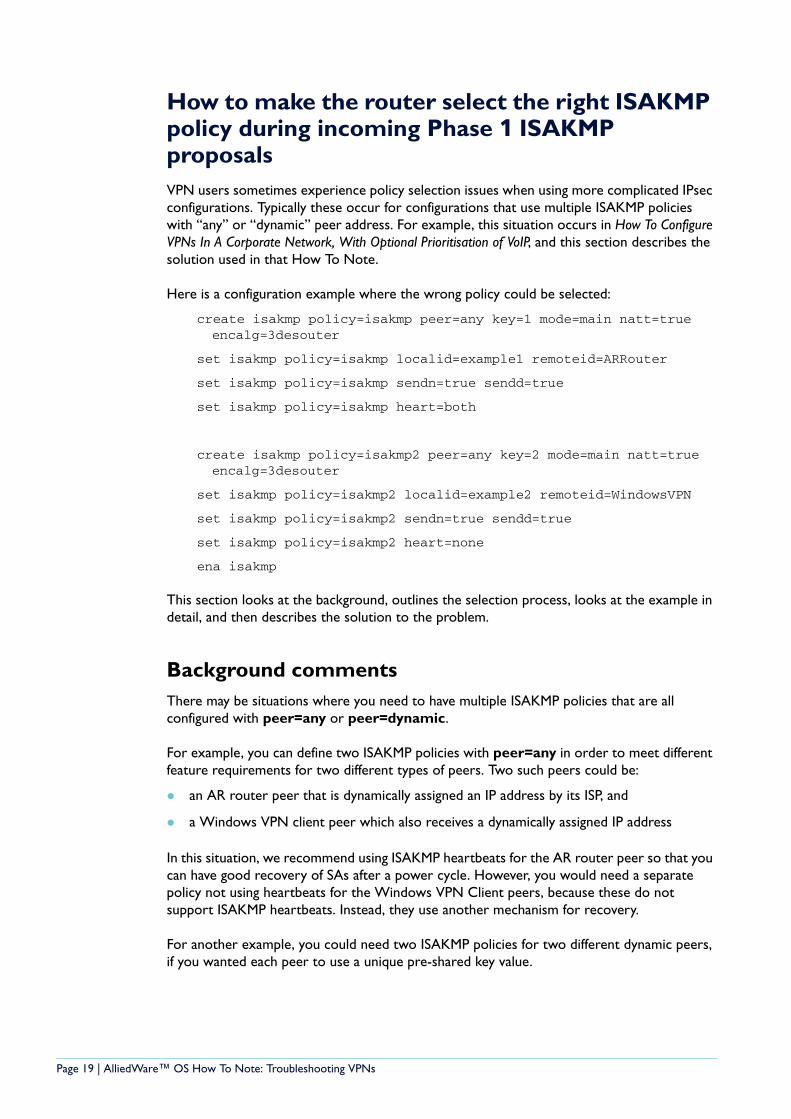
How to make the router select the right ISAKMP policy during incoming Phase 1 ISAKMP proposalsVPN users sometimes experience policy selection issues when using more complicated IPsec configurations. Typically these occur for configurations that use multiple ISAKMP policies with “any” or “dynamic” peer address. For example, this situation occurs in How To Configure VPNs In A Corporate Network, With Optional Prioritisation of VoIP, and this section describes the solution used in that How To Note.
Here is a configuration example where the wrong policy could be selected:
create isakmp policy=isakmp peer=any key=1 mode=main natt=true encalg=3desouter
set isakmp policy=isakmp localid=example1 remoteid=ARRouter
set isakmp policy=isakmp sendn=true sendd=true
set isakmp policy=isakmp heart=both
create isakmp policy=isakmp2 peer=any key=2 mode=main natt=true encalg=3desouter
set isakmp policy=isakmp2 localid=example2 remoteid=WindowsVPN
set isakmp policy=isakmp2 sendn=true sendd=true
set isakmp policy=isakmp2 heart=none
ena isakmp
This section looks at the background, outlines the selection process, looks at the example in detail, and then describes the solution to the problem.
Background commentsThere may be situations where you need to have multiple ISAKMP policies that are all configured with peer=any or peer=dynamic.
For example, you can define two ISAKMP policies with peer=any in order to meet different feature requirements for two different types of peers. Two such peers could be:
an AR router peer that is dynamically assigned an IP address by its ISP, and
a Windows VPN client peer which also receives a dynamically assigned IP address
In this situation, we recommend using ISAKMP heartbeats for the AR router peer so that you can have good recovery of SAs after a power cycle. However, you would need a separate policy not using heartbeats for the Windows VPN Client peers, because these do not support ISAKMP heartbeats. Instead, they use another mechanism for recovery.
For another example, you could need two ISAKMP policies for two different dynamic peers, if you wanted each peer to use a unique pre-shared key value.
Page 19 | AlliedWare™ OS How To Note: Troubleshooting VPNs

Understanding selectionIn these situations, it is important to appreciate which ISAKMP policy will be selected during an incoming ISAKMP phase 1 proposal.
The router works out which policy to select by checking the following items, in order:
1. peer address
2. remote ID (in aggressive mode only)
3. SA proposal values (encryption algorithm, hashing algorithm, etc).
It selects the policy on the basis of the first item that gives a unique match. For example, in aggressive mode, if two policies have the same peer address (or both have peer=any), then the router next inspects their remote IDs.
The selection steps for ISAKMP main mode are the same as for aggressive mode, except that the remote ID field cannot be used as part of ISAKMP policy selection. This means that if you have multiple ISAKMP policies configured to the same peer address (or with peer=any) and the only difference between the policies is the remote ID, then ISAKMP main mode cannot select a policy on this difference alone. It selects the first matching ISAKMP policy by policy name order instead.
Example problemLet’s look again at the configuration example that suffered a selection problem:
create isakmp pol=isakmp peer=any key=1 mode=main natt=true encalg=3desouter
set isakmp pol=isakmp localid=example1 remoteid=ARRouter
set isakmp pol=isakmp sendn=true sendd=true
set isakmp pol=isakmp heart=both
create isakmp pol=isakmp2 peer=any key=2 mode=main natt=true encalg=3desouter
set isakmp pol=isakmp2 localid=example2 remoteid=WindowsVPN
set isakmp pol=isakmp2 sendn=true sendd=true
set isakmp pol=isakmp2 heart=none
ena isakmp
There are a number of points of difference between these two policies. However, the following fields cannot not be used as selection points, because this information is not received in the phase 1 exchange:
These policies have different keys, but the pre-shared key is obviously not sent during exchanges, so this cannot be used as a selection point.
These policies have different heartbeat modes, but the incoming proposal does not indicate preference for heartbeat.
These policies have different ID fields, but when using ISAKMP main mode, the incoming phase 1 proposal does not define IDs.
Page 20 | AlliedWare™ OS How To Note: Troubleshooting VPNs

These policies at present use the same hash algorithm and encryption algorithm: hashalg=sha and encalg=3desouter. These details are proposed in the incoming phase 1 proposal and could be used for selection, but in this example they are the same.
The end result of this problem is that all incoming proposals are being matched against the first policy only. This policy uses heartbeat mode. This might be good for some peers, but those that don't support heartbeat mode (Windows VPN) will find themselves being disconnected (VPN dropped) after a short period.
SolutionThe solution is to configure the policies so that they have a point of difference for phase 1 selection. There are two approaches for this.
Differentiation by encryption algorithmOne approach would be to make the encryption algorithms unique. For example, you could make the AR router peer propose encalg=3des2key and adjust the local configuration to suit. 3des2key is a unique encryption algorithm that Windows will not propose. Windows does support the more standard 3desouter, so this becomes a convenient point of distinction, as shown in the following commands:
set isakmp pol=isakmp encalg=3des2key
set isakmp pol=isakmp2 encalg=3desouter
Differentiation by ISAKMP modeThe other approach would be to set ISAKMP aggressive mode. This way the ID fields will be listed as part of the incoming phase 1 proposal and we can select on a unique Remote ID field.
However, note that Windows VPN clients do not support ISAKMP aggressive mode, but only main mode. This does not have to matter—making one ISAKMP policy use aggressive mode and the other use main mode serves as a point of distinction in itself.
Because Windows clients use main mode, the ID fields are proposed during phase 2 exchange. Phase 2 exchange is too late to serve for policy selection, but because the ID fields are quoted in Phase 2 exchange, the remote ID in your selected policy must match the local ID of the Windows client (or your policy can use remoteid=any). The local ID of a Windows client is the Windows “Full computer name”, which you can see on the Computer Name tab of the Properties dialog box for My Computer.
To use the mode to differentiate, use the following command for the policy for the AR router peer:
set isakmp pol=isakmp mode=aggressive
and the following command for the policy for the Windows peer, configured second:
set isakmp pol=isakmp2 mode=main
Page 21 | AlliedWare™ OS How To Note: Troubleshooting VPNs

What to do if the remote VPN peer sets up multiple ISAKMP SAs when responding to your routerThis section describes how to troubleshoot configurations if they result in many ISAKMP SAs on the peer. If the peer router has a large number of ISAKMP SAs, it is probably because of one of the following causes:
power failure, which stops the router from sending ISAKMP Delete messages
misconfiguration or non-support of heartbeat messages
This section first describes these causes, then the solutions. Then it lists other less-common possible causes.
Cause 1: Power failureIf the power fails on your router, or it restarts, the router and its peer negotiate for new VPN SAs when they next need to exchange traffic. If your router initiates the negotiation and is using ISAKMP aggressive mode, the previous SAs will not be deleted on the peer. This is because:
aggressive mode does not reset the peer’s SAs by sending Initial Contact messages, and
a power failure prevents your router from sending Delete messages to the peer
If a succession of power cycles occurs, the peer may end up with many ISAKMP SAs.
See " Preventing multiple SAs on the peer" on page 23 for solutions in this situation.
Cause 2: Mismatched heartbeat configurationA large number of SAs may be created when one peer sends and expects to receive ISAKMP heartbeat messages while the other peer does not send ISAKMP heartbeat messages (either through misconfiguration or because it does not support ISAKMP heartbeats). In this situation, the router that expects to receive heartbeats deletes the associated SAs, but the peer does not.
Example configuration with misconfigured heartbeatsLet’s look in more detail at two routers with misconfigured ISAKMP heartbeats. The configuration of Router 1 is:
create isakmp pol=isakmp peer=ipadd key=1 mode=aggressive natt=true
set isakmp pol=isakmp localid=ARRouter1 remoteid=ARRouter2
set isakmp pol=isakmp sendnotify=true senddeletes=false
set isakmp pol=isakmp heart=both
The configuration of Router 2 is:
create isakmp pol=isakmp peer=any key=1 mode=aggressive natt=true
set isakmp pol=isakmp localid=ARRouter2 remoteid=ARRouter1
Page 22 | AlliedWare™ OS How To Note: Troubleshooting VPNs
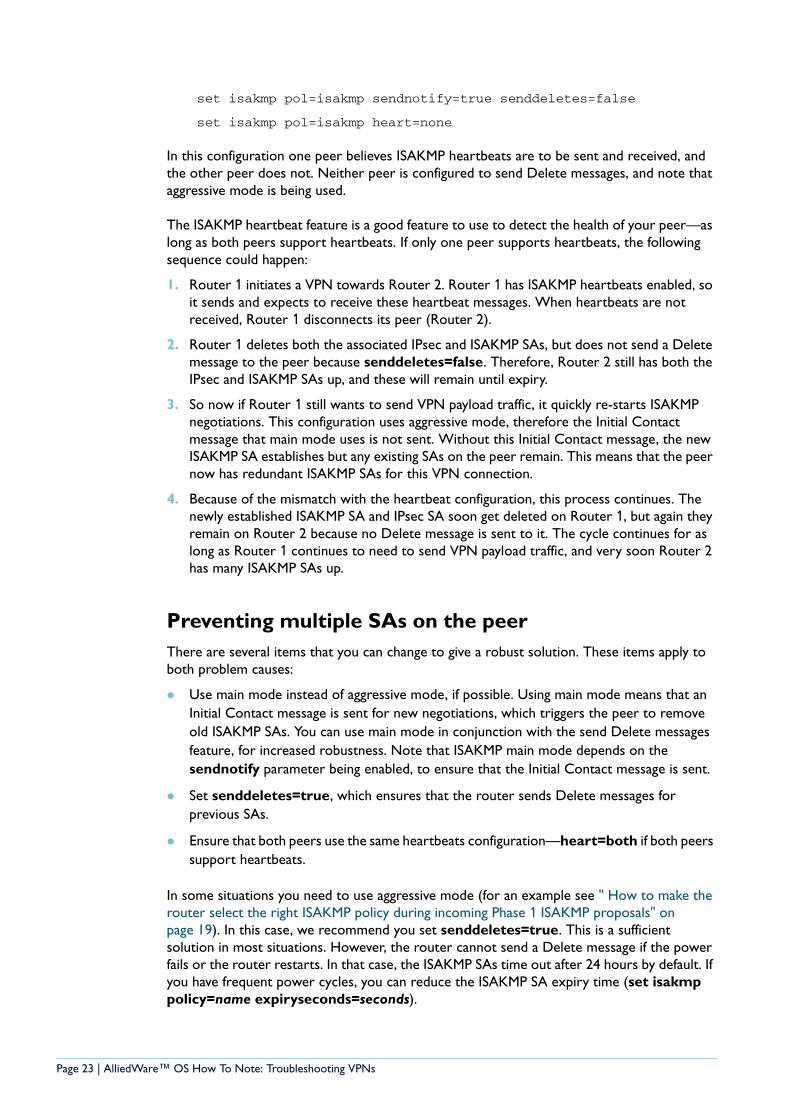
set isakmp pol=isakmp sendnotify=true senddeletes=false
set isakmp pol=isakmp heart=none
In this configuration one peer believes ISAKMP heartbeats are to be sent and received, and the other peer does not. Neither peer is configured to send Delete messages, and note that aggressive mode is being used.
The ISAKMP heartbeat feature is a good feature to use to detect the health of your peer—as long as both peers support heartbeats. If only one peer supports heartbeats, the following sequence could happen:
1. Router 1 initiates a VPN towards Router 2. Router 1 has ISAKMP heartbeats enabled, so it sends and expects to receive these heartbeat messages. When heartbeats are not received, Router 1 disconnects its peer (Router 2).
2. Router 1 deletes both the associated IPsec and ISAKMP SAs, but does not send a Delete message to the peer because senddeletes=false. Therefore, Router 2 still has both the IPsec and ISAKMP SAs up, and these will remain until expiry.
3. So now if Router 1 still wants to send VPN payload traffic, it quickly re-starts ISAKMP negotiations. This configuration uses aggressive mode, therefore the Initial Contact message that main mode uses is not sent. Without this Initial Contact message, the new ISAKMP SA establishes but any existing SAs on the peer remain. This means that the peer now has redundant ISAKMP SAs for this VPN connection.
4. Because of the mismatch with the heartbeat configuration, this process continues. The newly established ISAKMP SA and IPsec SA soon get deleted on Router 1, but again they remain on Router 2 because no Delete message is sent to it. The cycle continues for as long as Router 1 continues to need to send VPN payload traffic, and very soon Router 2 has many ISAKMP SAs up.
Preventing multiple SAs on the peerThere are several items that you can change to give a robust solution. These items apply to both problem causes:
Use main mode instead of aggressive mode, if possible. Using main mode means that an Initial Contact message is sent for new negotiations, which triggers the peer to remove old ISAKMP SAs. You can use main mode in conjunction with the send Delete messages feature, for increased robustness. Note that ISAKMP main mode depends on the sendnotify parameter being enabled, to ensure that the Initial Contact message is sent.
Set senddeletes=true, which ensures that the router sends Delete messages for previous SAs.
Ensure that both peers use the same heartbeats configuration—heart=both if both peers support heartbeats.
In some situations you need to use aggressive mode (for an example see " How to make the router select the right ISAKMP policy during incoming Phase 1 ISAKMP proposals" on page 19). In this case, we recommend you set senddeletes=true. This is a sufficient solution in most situations. However, the router cannot send a Delete message if the power fails or the router restarts. In that case, the ISAKMP SAs time out after 24 hours by default. If you have frequent power cycles, you can reduce the ISAKMP SA expiry time (set isakmp policy=name expiryseconds=seconds).
Page 23 | AlliedWare™ OS How To Note: Troubleshooting VPNs

Example configuration that avoids excess SAsThe following configuration is a robust example that avoids excess SAs from both causes.
Router 1 (with changes in bold):
create isakmp pol=isakmp peer=ipadd key=1 mode=main natt=true
set isakmp pol=isakmp localid=ARRouter1 remoteid=ARRouter2
set isakmp pol=isakmp sendnotify=true senddeletes=true
set isakmp pol=isakmp heart=both
Router 2:
create isakmp pol=isakmp peer=any key=1 mode=main natt=true
set isakmp pol=isakmp localid=ARRouter2 remoteid=ARRouter1
set isakmp pol=isakmp sendnotify=true senddeletes=true
set isakmp pol=isakmp heart=both
Other reasons for accumulation of SAsISAKMP SAs might also accumulate in the following situations (although probably only if sending of Delete messages is also disabled):
if the expirykbytes parameter is set for the ISAKMP policy, and the expirykbytes soft-expiry threshold is reached much more quickly than the expiryseconds limit. When the expirykbytes limit is reached, the router negotiates a new ISAKMP SA, but the old SA remains until the expiryseconds limit is reached.
if the phase2xchglimit parameter is configured and phase 2 re-negotiations occur frequently. However, this is not a commonly used configuration option.
if the peer uses a different heartbeat mechanism. Other vendors’ equipment may be configured to use proprietary heartbeats, or Dead Peer Detection (RFC 3706), which is not available on Allied Telesis Labs routers. This may cause the peer to detect the VPN connection as failing, in which case the peer would delete the ISAKMP SAs.
if the lower-layer link is dynamic and the link is reset. For example, Allied Telesis Labs routers will remove the IPsec SAs if the link has a dynamic IP address that is reset. Similar behaviour might happen for Windows L2TP/VPN if the L2TP or PPP connection is reset.
Also, in the following situations, the peer may not receive ISAKMP Delete messages:
if the Delete message was lost or dropped. Informational Delete messages are not reliably transported, so if the message is dropped enroute, then a retransmission will not be sent.
if you disable the ISAKMP module (by using the command disable isakmp). In this case, the peer may be left with one ISAKMP SA remaining. This is because the Delete message cannot be sent if no suitable SA exists.
When you have multiple policies to the same peer, you also need to consider the following points:
As described above, ISAKMP main mode uses Initial Contact messages when a connection is first established with a peer. The Initial Contact message means that any existing SAs on the peer are removed when the first SA for the peer is established. So, if only one policy
Page 24 | AlliedWare™ OS How To Note: Troubleshooting VPNs

existed for the peer and heartbeats failed, the redundant ISAKMP SAs would be removed on the peer by the Initial Contact message. With multiple policies, this might not happen because another SA might exist for the peer for another policy.
The respondbadspi IPsec policy parameter may not work in all cases with multiple policies to the same peer. It only works if no other ISAKMP SAs exist for the peer. So it works correctly if the router restarts (which is what it is primarily designed for). However, it does not work if multiple SAs to the same peer exist, then one policy’s ISAKMP/IPsec SAs are removed, and then IPsec messages with bad SPIs are received.
USA Headquar ters | 19800 Nor th Cr eek Parkwa y | Suite 200 | Bothell | WA 98011 | USA | T: +1 800 424 4284 | F: +1 425 481 3895 Eur opean Headquar ters | Via Motta 24 | 6830 Chiasso | Switzerland | T: +41 91 69769.00 | F: +41 91 69769.11 Asia-Pacific Headquar ters | 11 T ai Seng Link | Singapor e | 534182 | T: +65 6383 3832 | F: +65 6383 3830
www .alliedtelesis.com
© 2007 Allied Tel esis, Inc. All rights reserved. Information in this document is subject to change without notice.
All company names, logos, and product designs that are trademarks or registered trademarks are the property of their respective owners.
Allied Telesis is a trademark or registered trademark of Allied Telesis, Inc. in the United States and other countries.
C613-16102-00 REV C


