How To Submit Invoice via the Portal - Teradata
22
July 8, 2013 How To Submit Invoice via the Portal
Transcript of How To Submit Invoice via the Portal - Teradata

July 8, 2013
How To Submit Invoice via the Portal

2 >
HIGHLIGHTS & Important Reminder
The Supplier Portal has changed significantly and it is very important that you review this New Training material step by step. Below are areas that may affect submitting your Invoices.
• Invoice Action Form – The first form after clicking on the Finance tab is used to View Invoices already submitted. To Create an Invoice you must click on the Create Invoice/Credit Memo button in the upper right corner.
• Remit To – When you get to this field enter % and click on the magnifying glass next to the field and select your remit to address.
• Customer Tax Payer ID – When you get to this field enter % and click on any other field on the form (i.e. Invoice Number).
• Tax – Your PO will probably default a Tax Amount. If this Tax will not be on your Invoice, enter a 0 or the total applicable Tax in the Tax Amount Field, then click Calculate, then click Recalculate Total. Do not click in any of the other fields.

3 >
How to create an invoice
• From the iSupplier Home page, click on the Finance tab
• Do Not Enter PO Number here if you are trying to submit a new Invoice, see next page….this page only used to search for submitted invoices.

4 >
Creating an Invoice via the Portal
• Then click Create Invoice/Credit Memo.

5 >
Enter PO Number
• You Must have a Teradata Purchase Order Number (PO) in order to submit an Invoice.
• Enter the PO Number and click on Go.
6 >
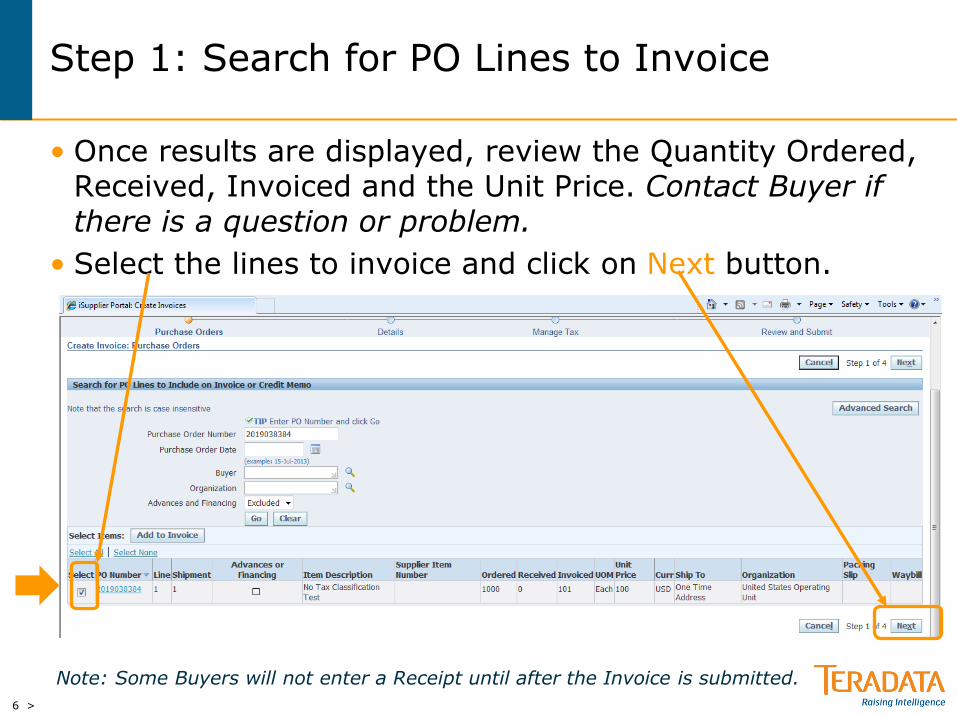
Step 1: Search for PO Lines to Invoice
• Once results are displayed, review the Quantity Ordered, Received, Invoiced and the Unit Price. Contact Buyer if there is a question or problem.
• Select the lines to invoice and click on Next button.
Note: Some Buyers will not enter a Receipt until after the Invoice is submitted.

7 >
Step 2: Enter Invoicing Information
IMPORTANT: Follow These Steps In this Order, do not try to enter anything in the Customer Tax Payer ID Field except a %.
1. Select Remit To Address (Enter a %, then click on Magnifying Glass Icon next to the field). This is your payment address.
2. Click on Customer Tax Payer ID Field, enter %.
3. Click in the Invoice Number Field, enter your Invoice Number.
4. Click in the Invoice Date Field to select an alternate Invoice Date if applicable.
5. Click Add Attachment.
Note: Remit To Bank Account is not required as the payment method used will be the one you have on file. You can change if you want payment sent to another account you already have on file. This field will show something like EDI820 BANK if you are set-up for paper check. Contact Buyer if you have no Remit to Address defined or need to make changes to the Remit to on file.

8 >
Step 2: Enter Invoicing Information

9 >
Step 2: Attaching Copy of Your Invoice
1. Click on the Browse Button
2. Select your file containing the Invoice you would like to attach, depending on your browser you will need to click save or open.
3. If Adding Multiple Invoices click “Add Another”, otherwise
4. Click Apply
1 2
3 4

10 >
Step 2: Invoice Attachment Confirmation
You Will Receive Confirmation that you Invoices are attached.

11 >
Step 2: Entering Invoice Quantities & Amounts
1. On this screen you will enter the Price and Quantity you are invoicing. Your quantity must be less than or equal to the Available Quantity. Your Unit Price must be less than or equal to the Unit Price. For some Invoices for Services, you will not be able to change the price (Price will say 1). For this type of PO line you will enter your invoice amount in the quantity field.
2. Note: Make Sure the calculated Quantity times the Unit Price matches the value on your Invoice minus Taxes, Freight & Miscellaneous charges.

12 >
• Click on the Add Row Button & Select Charge Type
• Enter Charge Amount & Description
•If you entered freight or miscellaneous charges, your invoice will be put on Hold until the buyer approves the charge.
Step 2: Entering Freight & Miscellaneous Charges

13 >
• Enter the Tax Amount applicable to you Invoice or the Tax summary line indicated. If no Tax enter 0 in the Tax Amount field. Do Not click any other field.
• Then click on the Calculate button to review the total.
Step 3: Entering Tax Information
B A

14 >
• Click Recalculate Total button. The Total should match your Invoice. What you see here will be the basis of your payment. Invoices submitted with Taxes that should not include Taxes will be cancelled. If you do not have the option to include Tax contact the Buyer.
Step 3: Review Invoice Summary
C

15 >
Step 3: Review Invoice Information
•If corrections are needed, click on the Back button until you get to the step to edit your Invoice information. Avoid using the browser’s back button as it may cause application error messages to appear.
•When you are satisfied with the Invoice information click on Submit
button and your invoice will flow directly into Teradata’s AP System.

16 >
Step 4: Invoice Submitted
•You will see a confirmation that the invoice was successfully submitted.
•Once you have submitted your invoice, it will display in Accounts Payable. As long as you had the confirmation page, you DO NOT need to resubmit your invoice. An Invoice number can only be used once. Entering Multiple Invoices for the same purchase can result in your invoice being put on hold and payment may be delayed.

17 >
Summarized Steps On Submitting an Invoice
• Click on Finance Tab • Click on Create Invoice/Credit Memo next to Create Invoice Field • Enter the PO number and click Go • Select the PO line(s) you would like to invoice • Click Next • For Remit to, enter % and click on Magnifying Glass and select Remit to address. • Click Customer Tax Payer ID Field, enter % • Click in Invoice Number Field, enter your Invoice Number, Invoice date • Click Add Attachment, • Enter an Invoice Description, click Browse, select your Invoice copy from your PC file, • Click Apply • Enter the Quantity (The amount of the Invoice minus Tax, Freight or other Charges), • Enter the Unit Price (Not Applicable for some Services and must be less than Unit Price
displayed). • For Freight or Miscellaneous Charges click Add Row. Select Charge Type, enter amount &
description. • Click Next • Review Tax Information, update if necessary (Tax Amount, Calculate, Recalculate) • Click Next • Review Invoice, if correct, click SUBMIT
The steps below summarizes without detail, the steps needed to submit an invoice. Use this page when you become comfortable submitting invoices and do not need detailed instruction.

July 8, 2013
How Submit a Credit Memo

19 >
Information Regarding Credit Memos
The steps for submitting a Credit Memo are the same as those for submitting an Invoice with 2 Exceptions.
1. When you get to step 2 of 4, change the Invoice Type from Invoice to Credit Memo.

20 >
Information Regarding Credit Memos
Once You have selected Credit Memo as your Invoice Type, the values you enter for Quantity & Tax Amount must be entered as a Negative value.

21 >
Credit Memo Scenarios
Scenario 1 - The Supplier Originally Invoiced a quantity of 100 at $10, this was $1 more than what it should have been. Now the supplier will credit $1 for each of the 100 units previously billed. So supplier would enter -100 in the Quantity field and $1 in the Unit Price Field (As pictured Above).
Scenario 2 - The Supplier Originally Invoiced a quantity of 100 at $10, this was 5 units more than what it should have been. Now the supplier will credit 5 units at $10. In iSP, the supplier would enter -5 in the quantity field.

22 >
Credit Memo Tax Scenario
Scenario 3 – Same as Scenario 1 regarding Taxes. Verify that the value in the Tax Amount field is valid. If not enter the correct amount as a negative number, click Calculate on the left then Recalculate Total at the bottom. When finished click Submit.
1
2
3