How to Setup E-mail on an Android Smartphone (Samsung Galaxy ...
7
How to Setup E-mail on an Android Smartphone (Samsung Galaxy S5) The following instructions will configure an Android smartphone as an IMAP client. This configuration will require: Username This is the same as your e-mail address (i.e. [email protected]) Password This is the same password used to access your e-mail account. Incoming Server imap.domainname.com (insert your domain where it is highlighted) If you prefer to use POP, please see step 8 on page 5. Outgoing Server (SMTP) smtp.domainname.com (insert your domain name where it is highlighted) 1. Touch the E-Mail icon to configure your e-mail settings. This is located either on your home screen or customized screens or in the Apps icon which shows all of your apps in one place. Note: Not all Android screens look the same. This tutorial will utilize the stock e-mail app that comes with Android.
Transcript of How to Setup E-mail on an Android Smartphone (Samsung Galaxy ...

How to Setup E-mail on an Android Smartphone (Samsung Galaxy S5)
The following instructions will configure an Android smartphone as an IMAP client.
This configuration will require:
Username This is the same as your e-mail address (i.e. [email protected])
Password This is the same password used to access your e-mail account.
Incoming Server imap.domainname.com (insert your domain where it is highlighted) If you prefer to use POP, please see step 8 on page 5.
Outgoing Server (SMTP) smtp.domainname.com (insert your domain name where it is highlighted)
1. Touch the E-Mail icon to configure your e-mail settings. This is located either on
your home screen or customized screens or in the Apps icon which shows all of
your apps in one place. Note: Not all Android screens look the same. This tutorial
will utilize the stock e-mail app that comes with Android.

2. Select the three vertical dots at the top-right of
the screen. This will bring down the drop-down
menu. Then choose Settings.
3. Select Manage accounts.

4. Click the “+” icon located to the left of the trash
icon.
5. Select Others.

6. Type in your e-mail address and the password
associated with it.
7. Choose IMAP account.
If you would like to use POP3, choose POP3
account.

8. Input your e-mail address in both the Email
address and Username fields. Input the password
associated with your e-mail address.
For IMAP server, input imap.domainname.com,
where the highlighted portion is your own domain
name.
Security type should automatically be set to None.
Port should automatically be set to 143.
IMAP path prefix is not necessary.
If you chose POP3 account in the previous step,
input pop.domainname.com. In the POP server
field, the port will automatically be set to 110.
Select Next.
9. For SMTP server, input
smtp.domainname.com, where the highlighted
portion is your own domain name.
Port should be set to 587.
Require sign-in is checked.
Username is your e-mail address.
Password is the password associated with the e-
mail address.
Select Next.
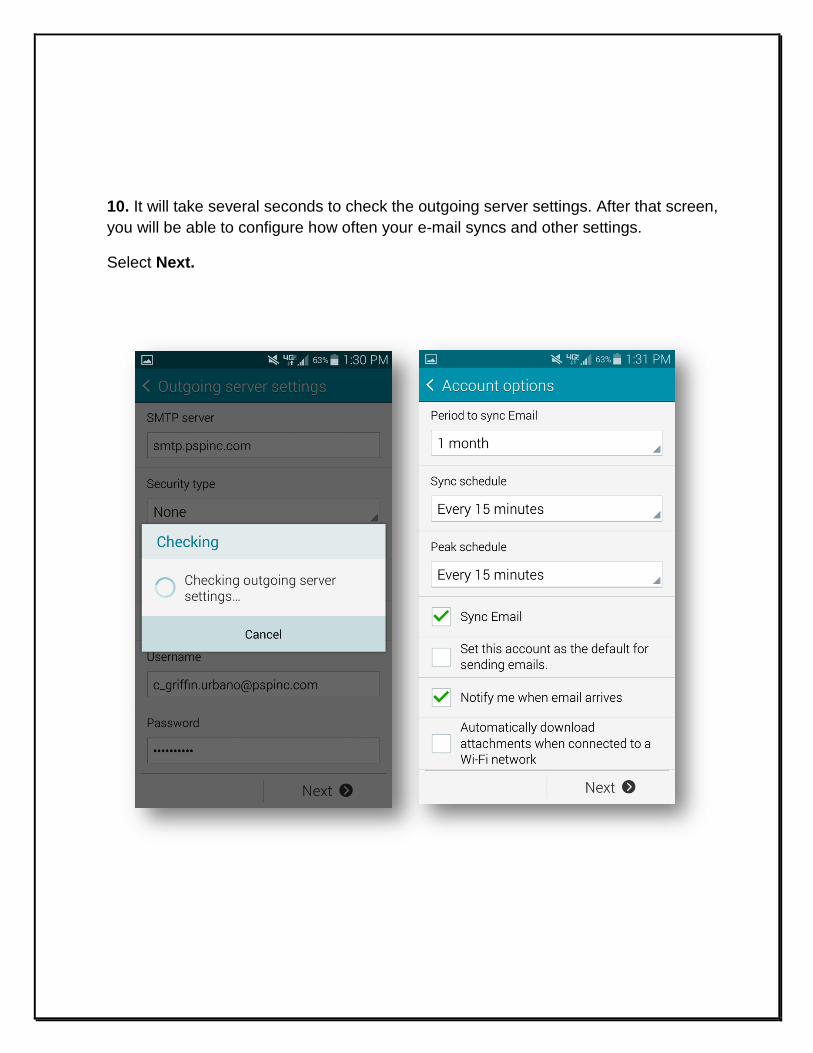
10. It will take several seconds to check the outgoing server settings. After that screen,
you will be able to configure how often your e-mail syncs and other settings.
Select Next.
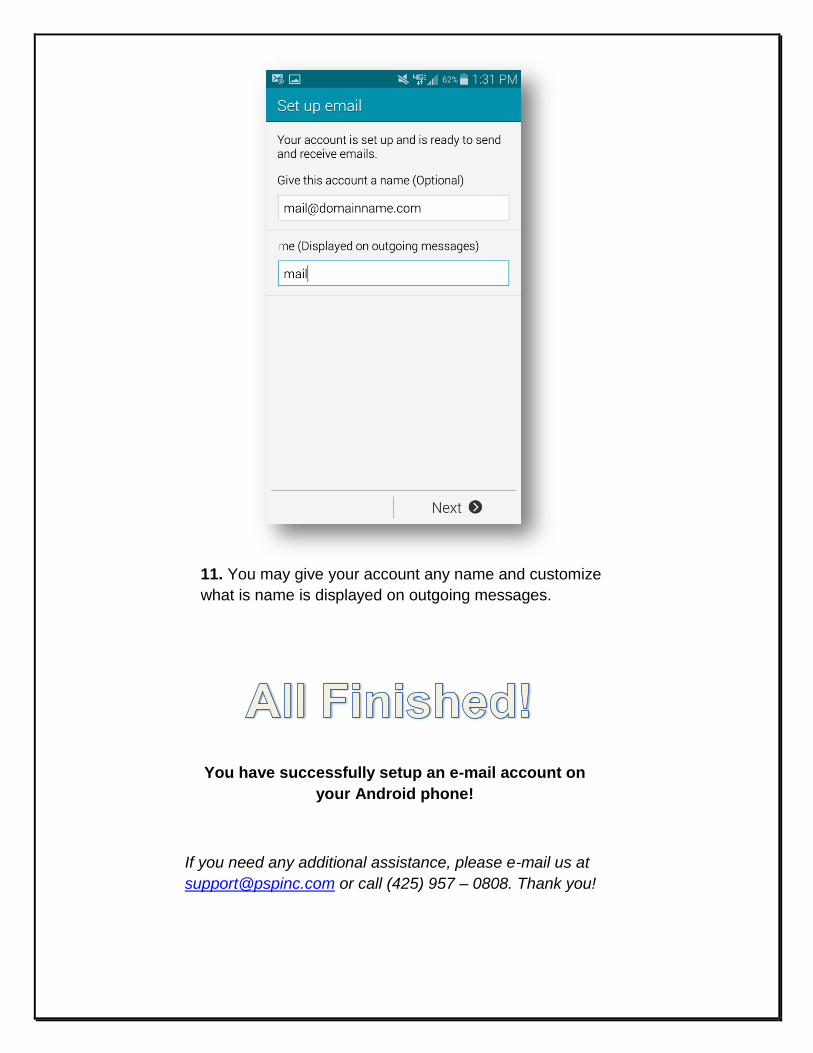
11. You may give your account any name and customize
what is name is displayed on outgoing messages.
You have successfully setup an e-mail account on
your Android phone!
If you need any additional assistance, please e-mail us at
[email protected] or call (425) 957 – 0808. Thank you!