How to set up and use secure file transfer protocol (SFTP) · 2018-08-31 · SFTP (secure file...
22
V3 How to set up and use secure file transfer protocol (SFTP) Guidance for employers
Transcript of How to set up and use secure file transfer protocol (SFTP) · 2018-08-31 · SFTP (secure file...
V3
How to set up and use secure file transfer protocol (SFTP) Guidance for employers
2
Contents
Background page 3
How to set up secure file transfer protocol page 4
How to send and collect files page 13
3.1 Process description 13
3.2 Processing times 15
3.3 Access rights 18
3.4 NEST file gateway — file hierarchy 19
3.5 How to change your SFTP password 19
About this version page 20
01
02
03
04
3
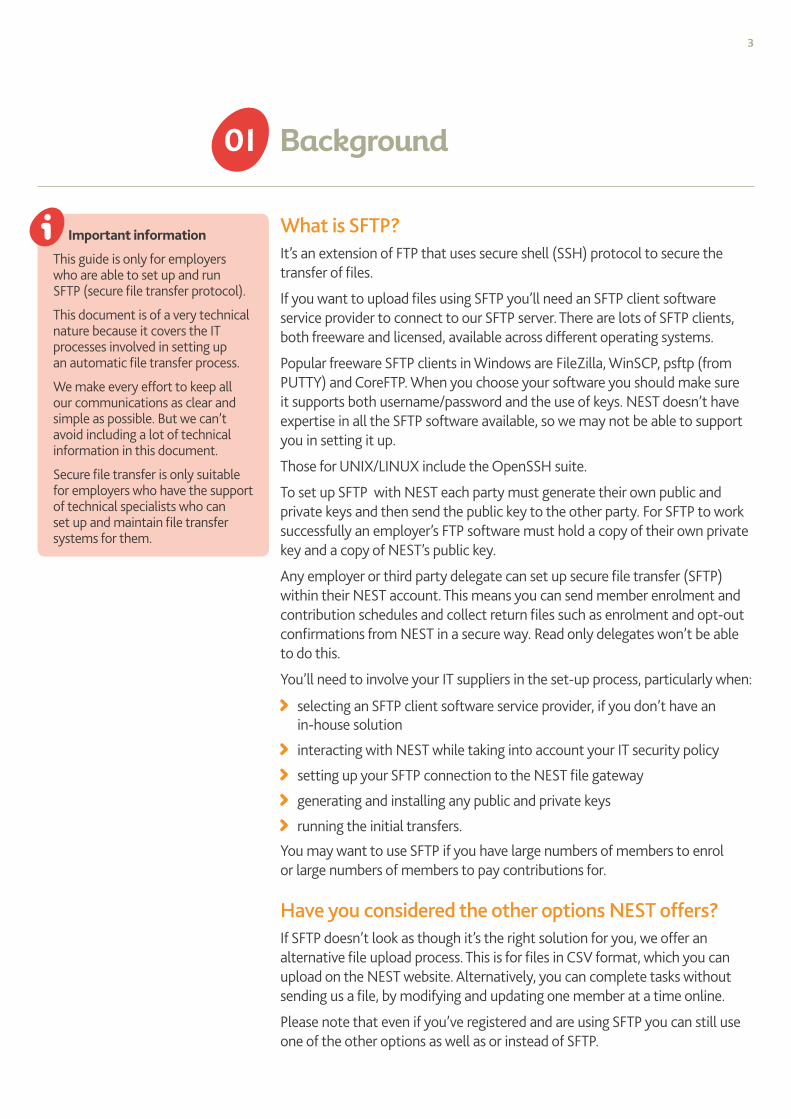
Background01
What is SFTP?It’s an extension of FTP that uses secure shell (SSH) protocol to secure the transfer of files.
If you want to upload files using SFTP you’ll need an SFTP client software service provider to connect to our SFTP server. There are lots of SFTP clients, both freeware and licensed, available across different operating systems.
Popular freeware SFTP clients in Windows are FileZilla, WinSCP, psftp (from PUTTY) and CoreFTP. When you choose your software you should make sure it supports both username/password and the use of keys. NEST doesn’t have expertise in all the SFTP software available, so we may not be able to support you in setting it up.
Those for UNIX/LINUX include the OpenSSH suite.
To set up SFTP with NEST each party must generate their own public and private keys and then send the public key to the other party. For SFTP to work successfully an employer’s FTP software must hold a copy of their own private key and a copy of NEST’s public key.
Any employer or third party delegate can set up secure file transfer (SFTP) within their NEST account. This means you can send member enrolment and contribution schedules and collect return files such as enrolment and opt-out confirmations from NEST in a secure way. Read only delegates won’t be able to do this.
You’ll need to involve your IT suppliers in the set-up process, particularly when:
selecting an SFTP client software service provider, if you don’t have an in-house solution
interacting with NEST while taking into account your IT security policy
setting up your SFTP connection to the NEST file gateway
generating and installing any public and private keys
running the initial transfers.
You may want to use SFTP if you have large numbers of members to enrol or large numbers of members to pay contributions for.
Have you considered the other options NEST offers?If SFTP doesn’t look as though it’s the right solution for you, we offer an alternative file upload process. This is for files in CSV format, which you can upload on the NEST website. Alternatively, you can complete tasks without sending us a file, by modifying and updating one member at a time online.
Please note that even if you’ve registered and are using SFTP you can still use one of the other options as well as or instead of SFTP.
Important information
This guide is only for employers who are able to set up and run SFTP (secure file transfer protocol).
This document is of a very technical nature because it covers the IT processes involved in setting up an automatic file transfer process.
We make every effort to keep all our communications as clear and simple as possible. But we can’t avoid including a lot of technical information in this document.
Secure file transfer is only suitable for employers who have the support of technical specialists who can set up and maintain file transfer systems for them.
4
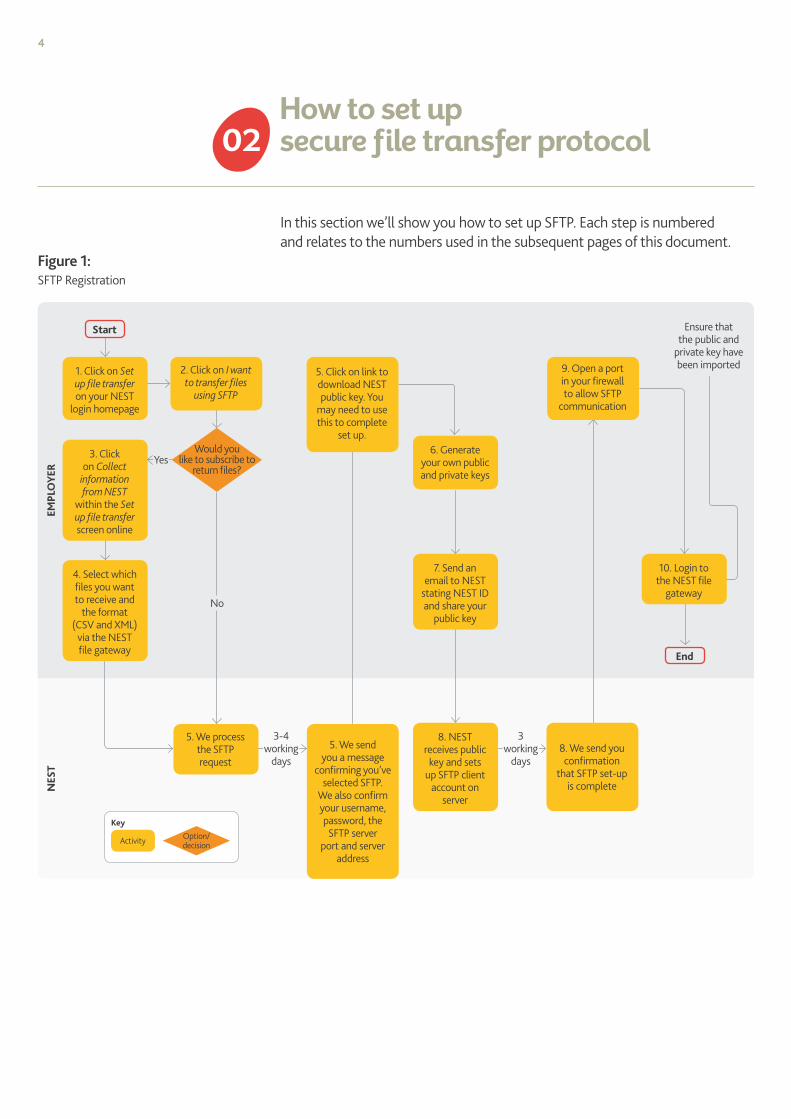
In this section we’ll show you how to set up SFTP. Each step is numbered and relates to the numbers used in the subsequent pages of this document.
How to set up secure file transfer protocol02
Key
Activity Option/ decision
Start
1. Click on Set up file transfer on your NEST
login homepage
3. Click on Collect
information from NEST
within the Set up file transfer screen online
5. We process the SFTP request
5. We send you a message
confirming you’ve selected SFTP.
We also confirm your username, password, the SFTP server
port and server address
8. We send you confirmation
that SFTP set-up is complete
6. Generate your own public and private keys
10. Login to the NEST file
gateway
Ensure that the public and
private key have been imported
Would you like to subscribe to
return files?Yes
No
3-4 working
days
3 working
days
2. Click on I want to transfer files
using SFTP
5. Click on link to download NEST public key. You
may need to use this to complete
set up.
4. Select which files you want to receive and
the format (CSV and XML)
via the NEST file gateway
NES
TEm
plo
yEr
End
8. NEST receives public key and sets
up SFTP client account on
server
7. Send an email to NEST
stating NEST ID and share your
public key
9. Open a port in your firewall to allow SFTP
communication
Figure 1:SFTP Registration

5
Please note that the screenshots in this section may be subject to minor changes.
1 Select Manage secure file transfer on the Welcome to your NEST homepage.
1
If an employer is using delegates to manage their account, each delegate will need to set up SFTP for their personal delegate account.
If a delegate acts for two or more employers and they’ve merged these employer accounts, they only need to set up SFTP once.
Only one delegate needs to click on Collect information from NEST on behalf of the employer.
6
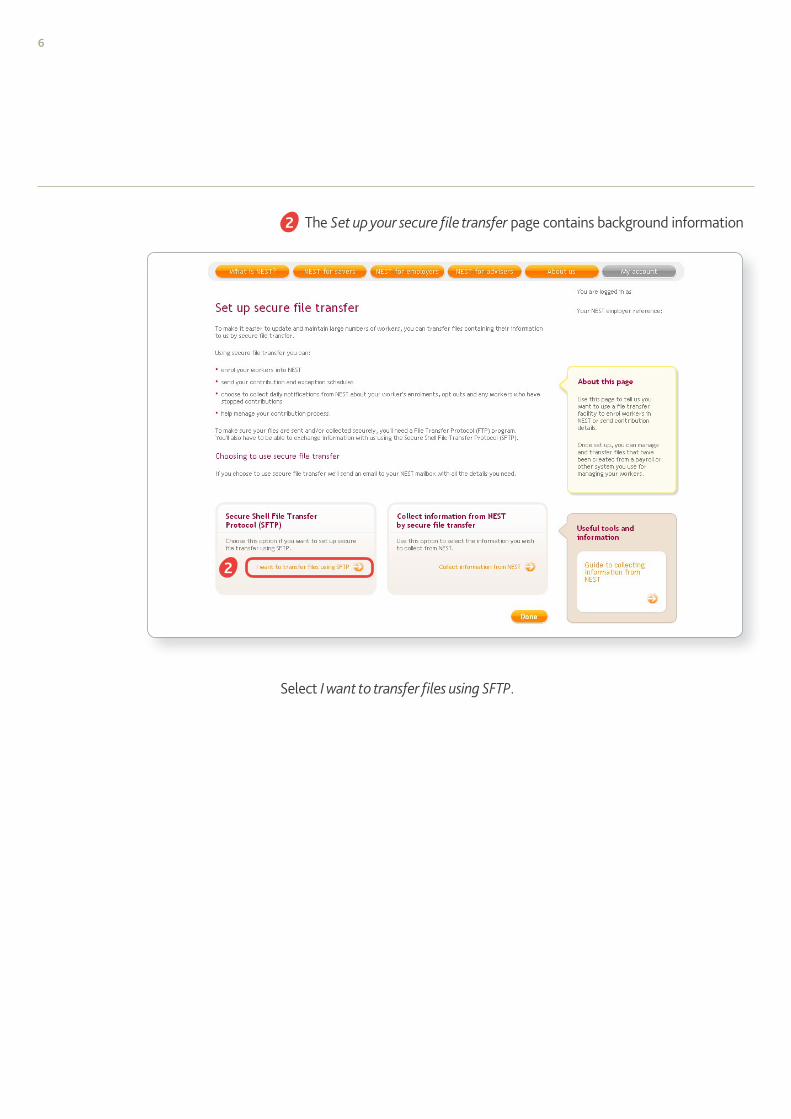
The Set up your secure file transfer page contains background information
2
Select I want to transfer files using SFTP.
2
7
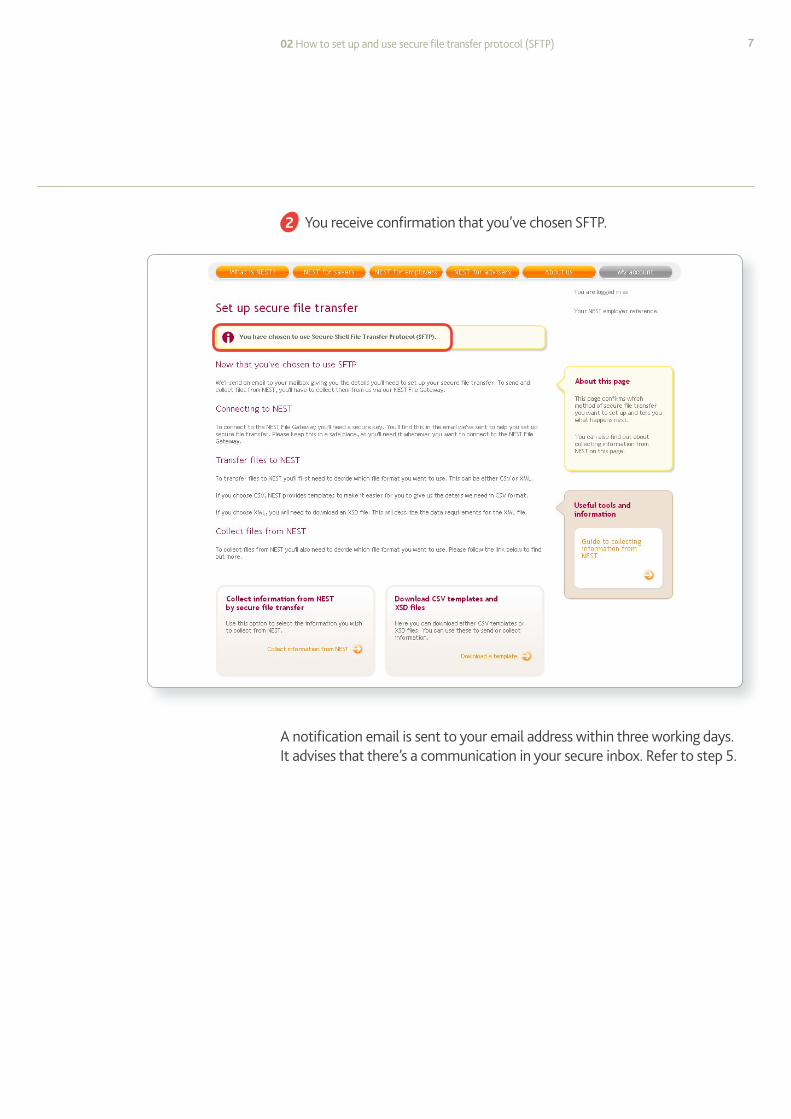
You receive confirmation that you’ve chosen SFTP.
A notification email is sent to your email address within three working days. It advises that there’s a communication in your secure inbox. Refer to step 5.
02 How to set up and use secure file transfer protocol (SFTP)
2

8
You’ll be able to select Collect information from NEST in the Set up your secure file transfer screen to register for SFTP updates. This allows you to collect files from NEST telling you the results from any files you sent for processing the day before. They’ll also let you know of any members who’ve opted out or stopped contributions the day before.
3
3

9
In the Collect information from NEST by secure file transfer screen select Edit to update your preferences.
In this example the delegate is registering to receive contribution and exception schedule updates by clicking on Edit next to Help manage your contribution and exception schedules?
02 How to set up and use secure file transfer protocol (SFTP)
4
4
10
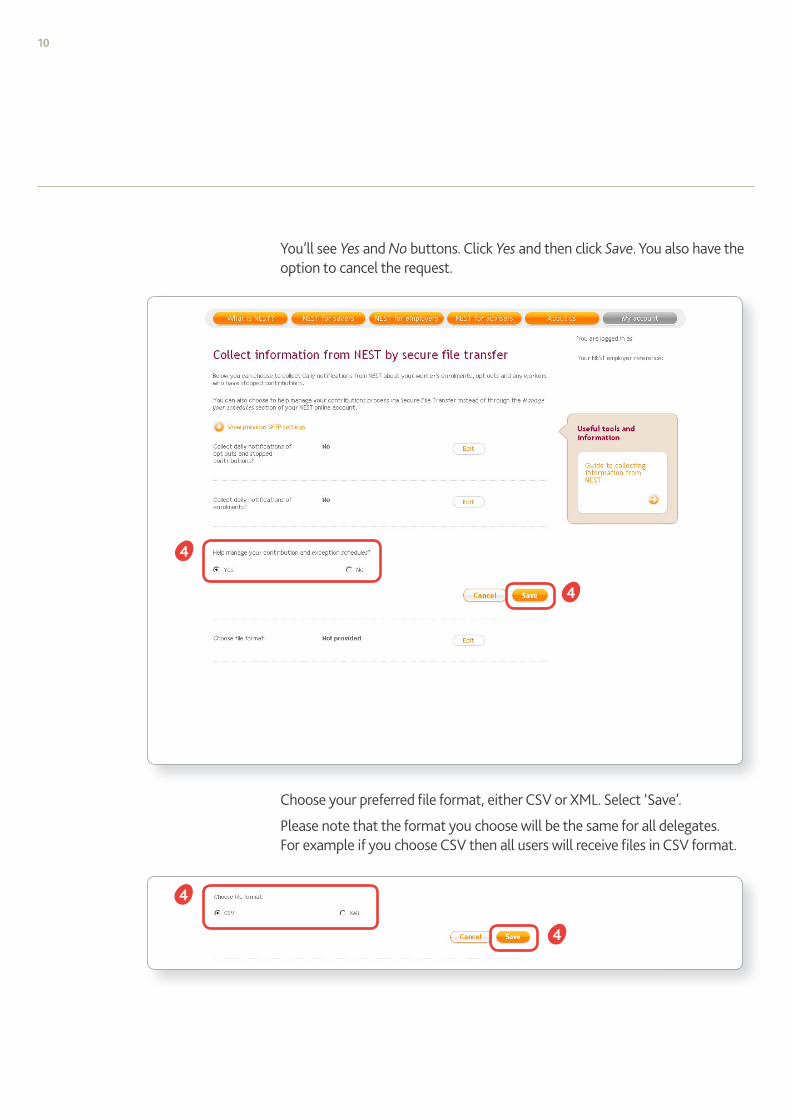
You’ll see Yes and No buttons. Click Yes and then click Save. You also have the option to cancel the request.
Choose your preferred file format, either CSV or XML. Select ‘Save’.
Please note that the format you choose will be the same for all delegates. For example if you choose CSV then all users will receive files in CSV format.
4
4
4
4

11
Following on from step 3, a message is sent to your secure NEST mailbox. We’ll also send an email to your own email address telling you there’s a message waiting for you in your NEST mailbox. This can take up to three working days. If you choose to receive return files from NEST at the same time as you set up file transfer, then the return files will take an extra working day to set up.
The message contains important information such as your username, password, the NEST file gateway server address and server port. It also includes a link that you need to click on to download the NEST public key. There’s a chance you might not need to use the NEST public key as not all SFTP software requires it. .
You’ll also need two of your own keys - a public key and a private key. There are online utilities that can generate public and private keys for you. You’ll need to generate these using RSA or DSA algorithms and they can be 1024 or 2048 bits.
You must generate a new pair of keys. You can’t re-use a pair you’ve used previously.
Please note that because this is a process you can manage outside your NEST account, there’s no onscreen assistance provided by NEST for this.
Send an email from your NEST-registered email address to [email protected]. You’ll need to attach your public key and provide your NEST ID. This is the 12-digit reference beginning EMP at the top of the Welcome to NEST letter we send you when you register. It’s also shown on each screen in your secure area of the NEST website.
If you’re unable to send an email from your registered email address we’ll also need you to include your registered email address in the body of the email. This email must come from the person requesting the access. This will help us to confirm that the public key is from your organisation.
Once we receive your public key we’ll check it’s in the correct format. If it is, we’ll set up your account on the NEST file gateway server. This can take up to three working days. If the public key isn’t in the correct format we’ll contact you.
The password, but not the username, will be the same as the one you use to log in to your NEST online account. Please note the username provided won’t contain any apostrophes, so O’Neill will be ONeill. The SFTP server address and port number are also confirmed.
02 How to set up and use secure file transfer protocol (SFTP)
5
6
7
8
12
You or your IT department/supplier will need to set the appropriate IT security settings. A port in your firewall must be opened to connect to the NEST file gateway.
Finally, log in to the NEST file gateway using the SFTP username and SFTP password provided by the communication in step 8.
9
10
You won’t be given a separate IP address. All you need to do is use the website address, which already includes the IP address.

13
3.1 Process descriptionThis section of the document describes the process for sending and collecting files. To use this process you’ll need to follow the specific instructions from your chosen SFTP client software.
You can send these types of files to us by SFTP. They must be in either a CSV or XML format:
member enrolment XML
member enrolment CSV
contribution schedule XML
contribution schedule CSV.
You can collect confirmation files back from us after you’ve sent us a file. You can request the following files:
If you’ve selected Collect daily notifications of enrolments?
successful enrolments file
unsuccessful enrolments file
enrolment error log file.
If you’ve selected Help manage your contribution and exception schedules?
successful contributions/payment submission file
unsuccessful contributions file
contributions error log file
payment submission outcome file
payment submission rejection file.
If you’ve selected Collect daily notifications of opt-outs and stopped contributions?
opt-out file
opt-out contributions expected file
contributions stopped files.
For more information on these files see our Employer payroll guide.
The files returned by us will be zipped and either in CSV or XML format, depending on your preference. They’ll normally be available the next morning after the appropriate information has been processed but if the file processing is complicated it could take until 6pm that day to produce.
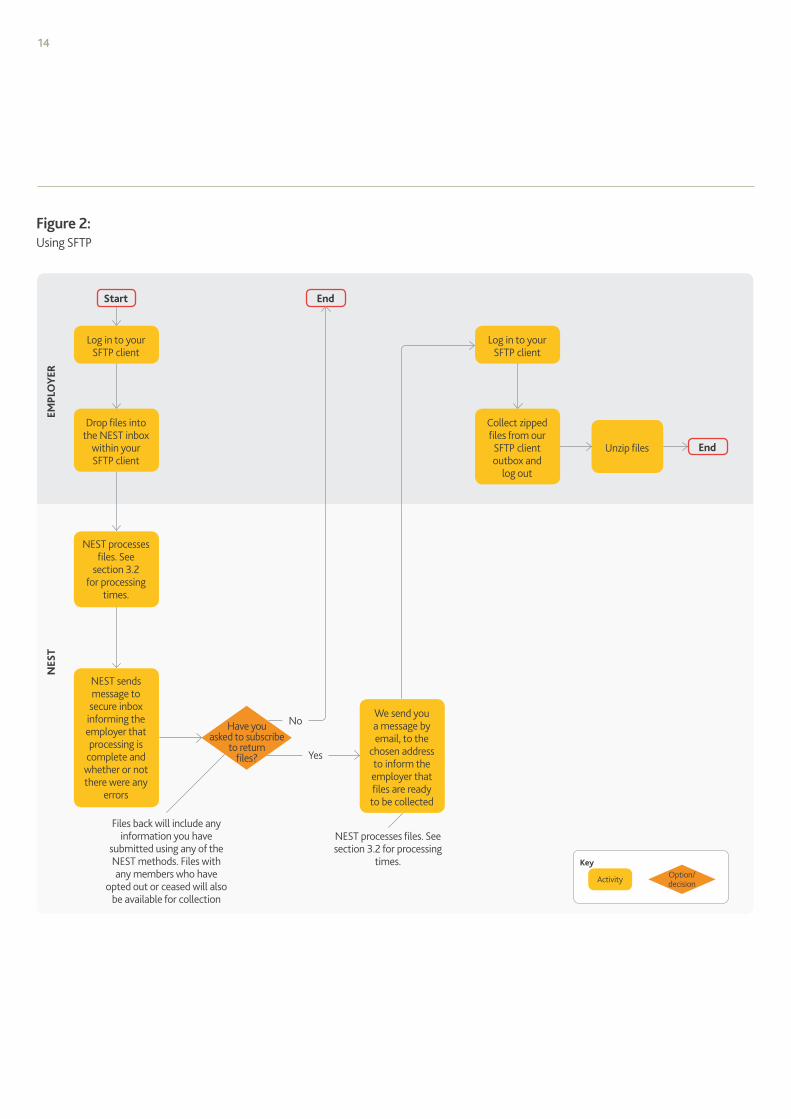
See the following page for the process map.
How to send and collect files03
14
Key
Activity Option/ decision
Log in to your SFTP client
Log in to your SFTP client
Drop files into the NEST inbox
within your SFTP client
Unzip files
NEST sends message to secure inbox informing the employer that processing is
complete and whether or not there were any
errors
Files back will include any information you have
submitted using any of the NEST methods. Files with any members who have
opted out or ceased will also be available for collection
NEST processes files. See section 3.2 for processing
times.
We send you a message by email, to the
chosen address to inform the employer that files are ready to be collected
Start
NEST processes files. See
section 3.2 for processing
times.
NES
TEm
plo
yEr
End
End
Yes
Collect zipped files from our SFTP client outbox and
log out
Have you asked to subscribe
to return files?
Figure 2:Using SFTP
No
15
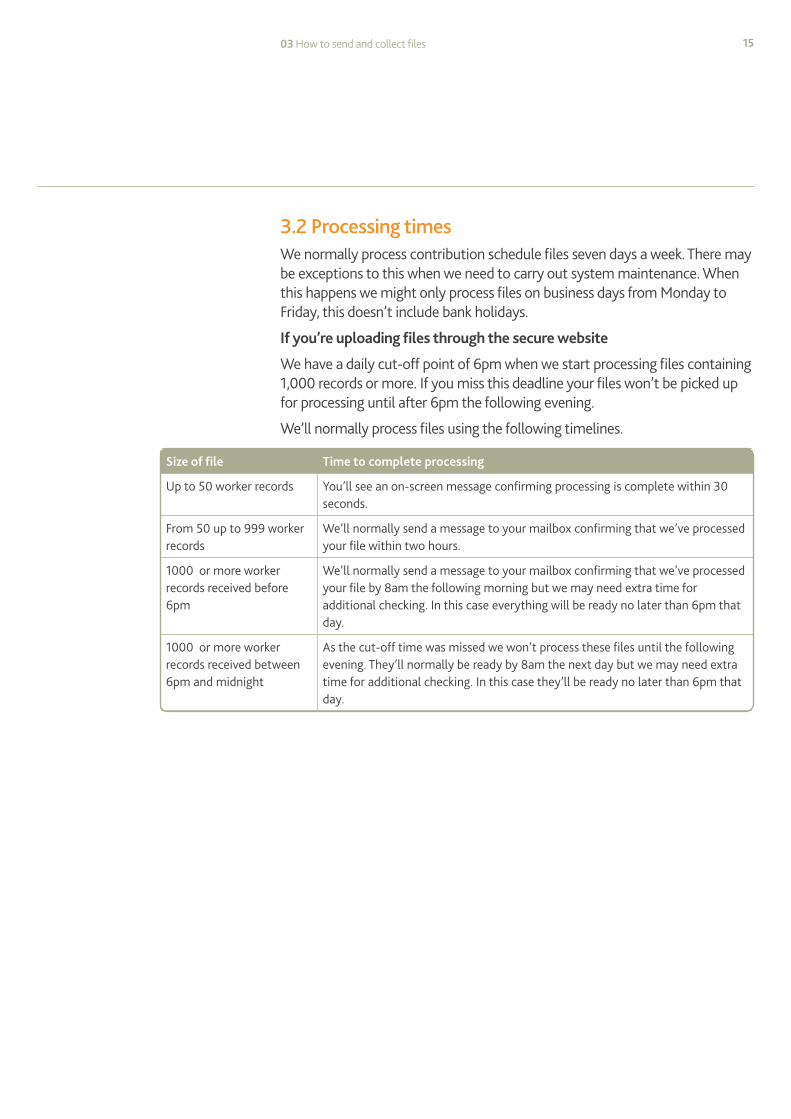
3.2 Processing timesWe normally process contribution schedule files seven days a week. There may be exceptions to this when we need to carry out system maintenance. When this happens we might only process files on business days from Monday to Friday, this doesn’t include bank holidays.
If you’re uploading files through the secure website
We have a daily cut-off point of 6pm when we start processing files containing 1,000 records or more. If you miss this deadline your files won’t be picked up for processing until after 6pm the following evening.
We’ll normally process files using the following timelines.
03 How to send and collect files
Size of file Time to complete processing
Up to 50 worker records You’ll see an on-screen message confirming processing is complete within 30 seconds.
From 50 up to 999 worker records
We’ll normally send a message to your mailbox confirming that we’ve processed your file within two hours.
1000 or more worker records received before 6pm
We’ll normally send a message to your mailbox confirming that we’ve processed your file by 8am the following morning but we may need extra time for additional checking. In this case everything will be ready no later than 6pm that day.
1000 or more worker records received between 6pm and midnight
As the cut-off time was missed we won’t process these files until the following evening. They’ll normally be ready by 8am the next day but we may need extra time for additional checking. In this case they’ll be ready no later than 6pm that day.
16
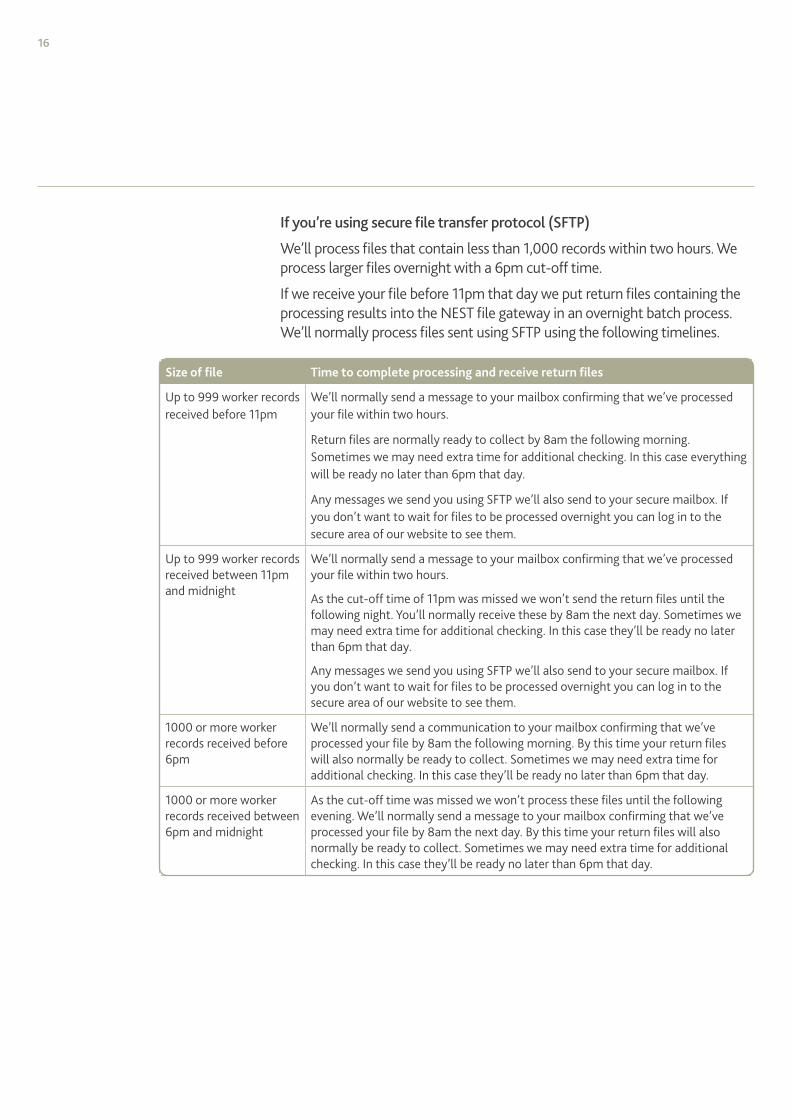
If you’re using secure file transfer protocol (SFTP)
We’ll process files that contain less than 1,000 records within two hours. We process larger files overnight with a 6pm cut-off time.
If we receive your file before 11pm that day we put return files containing the processing results into the NEST file gateway in an overnight batch process. We’ll normally process files sent using SFTP using the following timelines.
Size of file Time to complete processing and receive return files
Up to 999 worker records received before 11pm
We’ll normally send a message to your mailbox confirming that we’ve processed your file within two hours.
Return files are normally ready to collect by 8am the following morning. Sometimes we may need extra time for additional checking. In this case everything will be ready no later than 6pm that day.
Any messages we send you using SFTP we’ll also send to your secure mailbox. If you don’t want to wait for files to be processed overnight you can log in to the secure area of our website to see them.
Up to 999 worker records received between 11pm and midnight
We’ll normally send a message to your mailbox confirming that we’ve processed your file within two hours.
As the cut-off time of 11pm was missed we won’t send the return files until the following night. You’ll normally receive these by 8am the next day. Sometimes we may need extra time for additional checking. In this case they’ll be ready no later than 6pm that day.
Any messages we send you using SFTP we’ll also send to your secure mailbox. If you don’t want to wait for files to be processed overnight you can log in to the secure area of our website to see them.
1000 or more worker records received before 6pm
We’ll normally send a communication to your mailbox confirming that we’ve processed your file by 8am the following morning. By this time your return files will also normally be ready to collect. Sometimes we may need extra time for additional checking. In this case they’ll be ready no later than 6pm that day.
1000 or more worker records received between 6pm and midnight
As the cut-off time was missed we won’t process these files until the following evening. We’ll normally send a message to your mailbox confirming that we’ve processed your file by 8am the next day. By this time your return files will also normally be ready to collect. Sometimes we may need extra time for additional checking. In this case they’ll be ready no later than 6pm that day.
17
Once we process a file, we’ll send you an email. The message will tell you if the file transfer has been successful or if errors have been found in the file.
Files returned to you will be in a subfolder in the NEST file gateway outbox the following day. There’ll be different subfolders for files that relate to:
member enrolment
contribution schedules
daily notifications on members who’ve opted out or ceased contributions.
Please note: if we are still setting up your return file facility when you complete a member enrolment or update a contribution schedule you could find there are already several days’s worth of files when you log in for the first time.
18
3.3 Access rightsAll delegates except ‘read only’ delegates can set up secure file transfer.
We validate files as soon as we receive them. If an enrolment delegate with an FTP account transferred a contribution schedule to NEST the file would be rejected. A message would be sent to that delegate telling them they don’t have the appropriate levels of access to submit this file.
If you’re managing NEST for several employers, we will split your file gateway outbox into separate employer sub-folders. You can access all these sub-folders using the same login details.
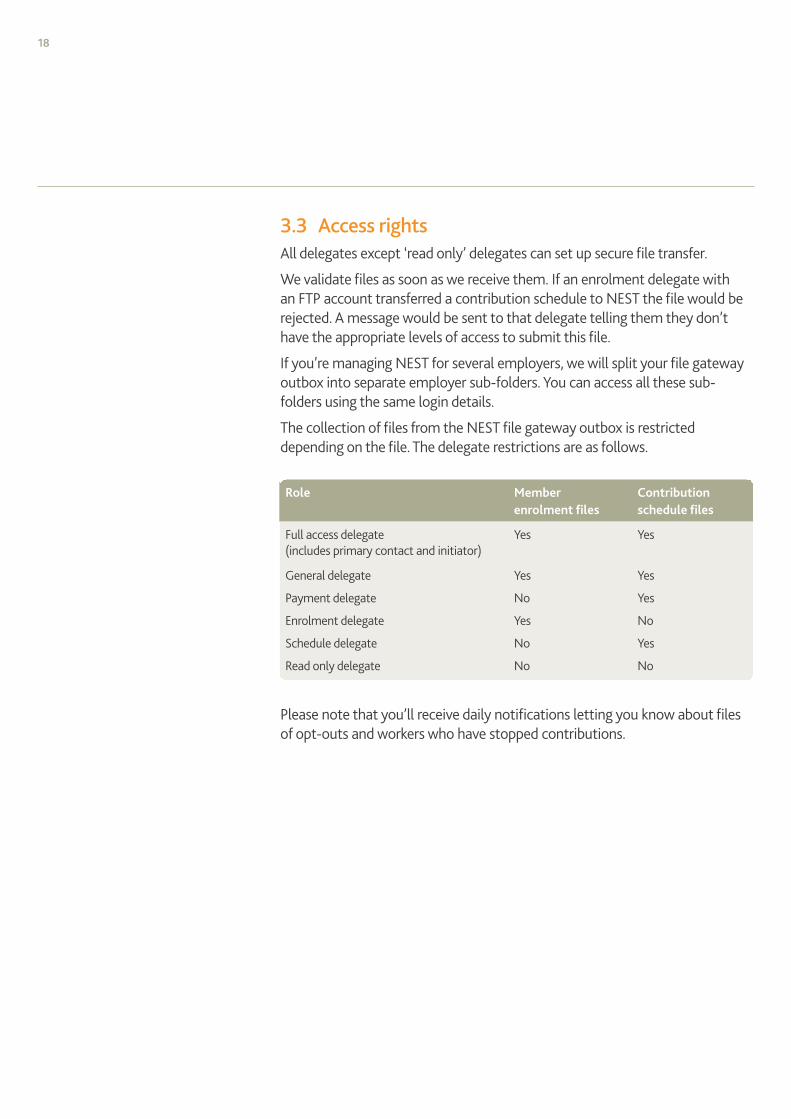
The collection of files from the NEST file gateway outbox is restricted depending on the file. The delegate restrictions are as follows.
Role Member enrolment files
Contribution schedule files
Full access delegate (includes primary contact and initiator)
Yes Yes
General delegate Yes Yes
Payment delegate No Yes
Enrolment delegate Yes No
Schedule delegate No Yes
Read only delegate No No
Please note that you’ll receive daily notifications letting you know about files of opt-outs and workers who have stopped contributions.
19
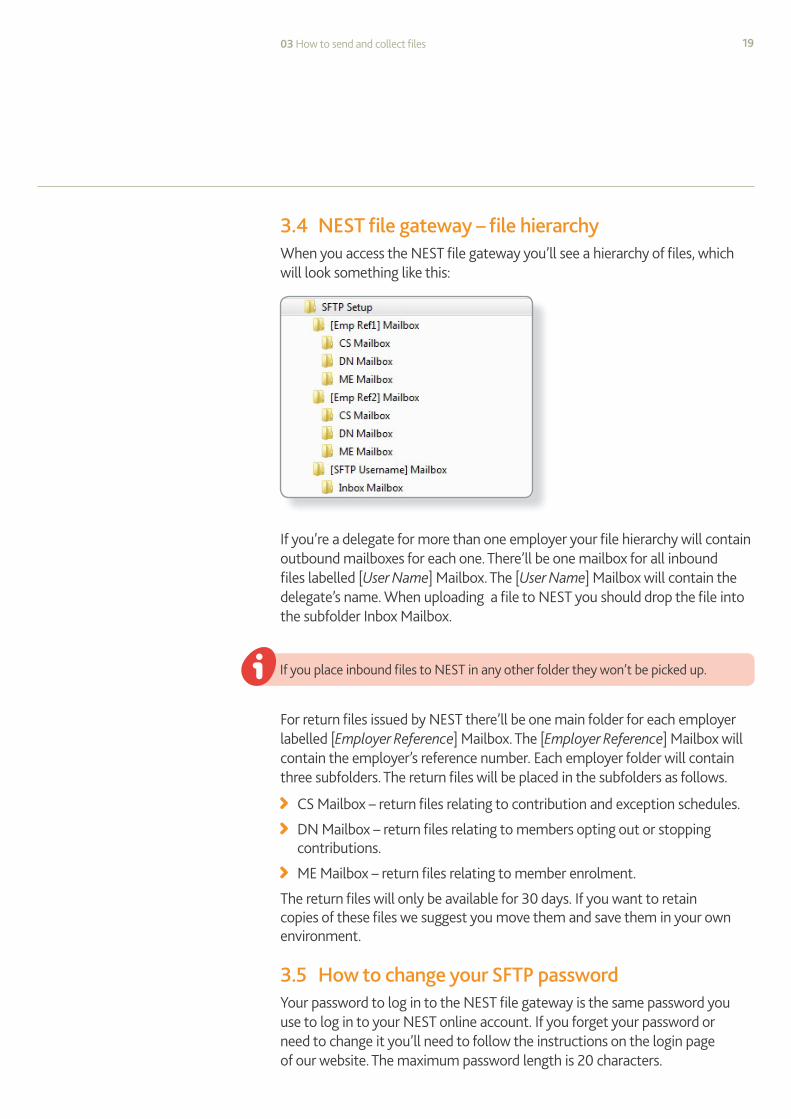
3.4 NEST file gateway – file hierarchy When you access the NEST file gateway you’ll see a hierarchy of files, which will look something like this:
If you’re a delegate for more than one employer your file hierarchy will contain outbound mailboxes for each one. There’ll be one mailbox for all inbound files labelled [User Name] Mailbox. The [User Name] Mailbox will contain the delegate’s name. When uploading a file to NEST you should drop the file into the subfolder Inbox Mailbox.
For return files issued by NEST there’ll be one main folder for each employer labelled [Employer Reference] Mailbox. The [Employer Reference] Mailbox will contain the employer’s reference number. Each employer folder will contain three subfolders. The return files will be placed in the subfolders as follows.
CS Mailbox – return files relating to contribution and exception schedules.
DN Mailbox – return files relating to members opting out or stopping contributions.
ME Mailbox – return files relating to member enrolment.
The return files will only be available for 30 days. If you want to retain copies of these files we suggest you move them and save them in your own environment.
3.5 How to change your SFTP passwordYour password to log in to the NEST file gateway is the same password you use to log in to your NEST online account. If you forget your password or need to change it you’ll need to follow the instructions on the login page of our website. The maximum password length is 20 characters.
03 How to send and collect files
If you place inbound files to NEST in any other folder they won’t be picked up.

20
About this version04
Version historyVersion Date What’s changed?
0.3 31 January 2013 Still a pre-design early release version
Changed title to reflect SFTP
Removal of red text relating to features planned for release by February 2013 as these are already delivered.
Clarified that return file format is per employer not per delegate
Clarification on username format
Clarified that an IP address isn’t provided in production
Return file hierarchy picture provided with supporting text
1 26 April 2013 Language improved and content put into new design template
General usability tips added to each section
2 04 April 2014 New opt-out return files added to section 3.1
Updated processing times added to section 3.2
3 09 September 2014 Updated following NEST’s September service update release.
We’ve made the description of the processing times for enrolments and contributions clearer.
Updated to include guidance for NEST’s new delegate organisation functionality.
We’ve removed the Refunded Direct Debit/debit card contributions files from the list of files you can collect if you choose to collect daily notifications of opt-outs and stopped contributions.
We’ve added a screenshot showing an example of the NEST file gateway with two employer accounts.

We keep changes to a minimumNEST’s online accounts mean you and your delegates can do almost everything you need to online. We’ll make regular updates so we can ensure you have the best possible experience of using NEST. We know you need NEST to work with your HR and payroll systems so we’ll try to avoid changes that affect existing processes.
Sometimes we’ll need to make changes to our file templates because of things outside our control, such as regulatory changes. If that happens we’ll make sure we minimise disruption and we’ll give you plenty of time to start using the new templates.
Future service releasesFuture service releases will include new functionality for both you and your members. The changes will usually be introduced in two or three service releases each year. You shouldn’t need to change anything but we’ll let you know in advance if you do.

© NEST Corporation 2014 All rights reserved. This information is indicative only and may be subject to change. We don’t give any undertaking or make any representation or warranty that this document is complete or error free. We don’t accept responsibility for any loss caused as a result of reliance on the information contained in this document, which is intended to be for guidance only, nor do we accept responsibility for loss caused due to any error, inaccuracy or incompleteness. Reproduction of all or any part of this document or the information contained in it is not allowed.
NS104 SFTP 09/2014
To find out more visit our website nestpensions.org.uk
NEST Nene Hall Lynch Wood Business Park Peterborough PE2 6FY
nestpensions.org.uk/contactus


![[MS-ASHTTP]: Exchange ActiveSync: HTTP Protocol... · Hypertext Transfer Protocol (HTTP) Hypertext Transfer Protocol over Secure Sockets Layer (HTTPS) Secure Sockets Layer (SSL) XML](https://static.fdocuments.in/doc/165x107/5fc28633cc0d714b7a690f25/ms-ashttp-exchange-activesync-http-protocol-hypertext-transfer-protocol.jpg)