How to Ply Yarn - Interweave
22
How to Ply Yarn From Plying on a Drop Spindle to Creating Plied Yarn on a Wheel presents
Transcript of How to Ply Yarn - Interweave

How to Ply Yarn From Plying on a Drop Spindle
to Creating Plied Yarn on a Wheel
presents

2 I Spin.Off ■ spinningdaily.com Copyright Spin.Off ® magazine, Interweave Press LLC. Not to be reprinted. All rights reserved.
You’ve mastered spinning a singles yarn, and now it is time to ply it. The concept is simple enough; just take two (or three, or four, or more) singles, hold them together, and ply them by twisting them in the opposite direction they were originally spun. Simple, but the
possibilities are endless—how much twist do you insert? How many plies do you include? What about novelty yarns? What if you’re using different fibers or colors in each ply? This is why plying is an art: you get to choose the composition of your yarn and each of these decisions, whether made consciously or unconsciously, will determine the outcome of your yarn and eventually the outcome of your finished piece.
If that sounds daunting, don’t worry, you’ve got the likes of Maggie Casey, Judith MacKenzie, Rita Buchanan, and other spinning masters within these pages to guide you through the process.
One of the oldest of Interweave’s publications, Spin.Off is a quarterly magazine that has been around since 1977 inspiring spinners new and old to make beautiful yarn and finding enchanting ways to use it. We also host the spinning community, spinningdaily.com complete with blogs, forums, and free patterns; Spin.Off Autumn Retreat (SOAR), an intense and inspirational week with like-minded spinners; and our series of workshop videos where the living treasures of the spinning world share their knowledge with you. We’re devoted to bringing you the best spinning teachers, the newest spinning ideas, and the most inspirational creativity right to your mailbox, computer, and ultimately fingertips.
We hope you enjoy your spinning journey—come tell us about it at spinningdaily.com.
Happy spinning,
Amy Clarke Moore [email protected]
Spin.Off brings you:• The best teachers teaching the best spinning tricks
and techniques
• The newest information: fibers, tools, books, events, people, and places
• The warmest, fullest stories of spinning history and tradition
• The coolest handspun projects that you can make
Call (800) 767-9638 or go to spinoffmagazine.com
Indulge your passion for fiber with Spin.Off magazine
Subscribe Now!

Copyright Spin.Off® magazine, Interweave Press LLC. Not to be reprinted. All rights reserved. Spin.Off ■ spinningdaily.com I 3
A Closer LookB y R i t a B u c h a n a n
Psychological motivesCulture, habit, and personal pref-erence are powerful forces, in spin-ning as with the rest of life. Most of us learn from teachers who ply, so we ply. Guild members encourage each other to ply. We ply because plying is part of our spinning routine. We’ve grown accustomed to seeing, han-dling, and using plied yarns (both handspun and millspun).
Plying is so prevalent that any spinner who makes a point of using singles gains recognition. Singles stands out, and specializing in singles is a sure way to call attention to your yarns and proj ects. There are untapped opportunities here, both for using colorful or dramatic singles and also for projects made with subtle singles.
But personally, while my words say that singles is good yarn, my actions tell a different story. Oh, I do a singles project now and then, but rarely two in a row, because using singles seems like dieting to me and leaves me feel-ing deprived. I enjoy the easy, rhyth-mic process of plying and miss that step when I skip it. Bobbins of singles strike me as raw ingredients, while skeins of plied yarn bestow the satis-faction of a carefully prepared, fully cooked meal. Mmm, good. It’s irratio-nal, but that pleasure is reason enough for me to ply.
Practical benefitsI think of the following benefits as practical reasons for plying because they relate to using yarn, not just admiring it. But there are psycholog-ical issues here, too, that explain why some spinners are motivated to ply while others say, Why bother?
Plying to make yarn more man-ageable. I almost always make plied yarns with balanced twist for knit-ting. That’s partly to avoid slanting or skewing of the fabric caused by active twist, and also to prevent aggrava-tion. A balanced plied yarn is calm and unwinds from the ball without
any snarls. I like to eliminate need-less interruptions while I’m knitting so I can focus on coordinating colors, following stitch repeats, and making up a design as I go. Likewise, if you spin white fiber and dye the yarn afterwards, you find that skeins of plied yarn tangle less than singles do when you’re soaking, dyeing, and rinsing them. Another point is that sometimes dye doesn’t penetrate into a firmly twisted singles; it just colors the surface, and the pale interior may peek out later wherever the yarn gets folded around a selvedge or curved into a stitch.
W hen we invited you to describe “the kind of yarn you usually spin” in a recent Spin.Oƒƒ survey, 87 percent checked “plied.” Why are spinners today so committed to plied yarns? It hasn’t always been this way. Plying is optional, and the alternative—using unplied or singles yarn—saves precious time. Efficiency and productivity were urgent
concerns when everything was made from handspun, which explains why, traditionally, most handspun textiles were made from singles. Those legendary fine Egyptian linens and Indian cottons, along with rustic English tweeds and colorful Turkish socks, are just a few examples. There are countless others from around the world. Well-spun singles is versatile yarn with a venerable history.
Yet some traditional textiles were made from two-ply yarns, and now we usually ply. Why spend the extra time? There are many good reasons. I’ll talk about psychological motives, practical benefits, and design opportunities. These factors often coincide, and for some skeins or projects plying serves many purposes at once.
Copyright Spin.Off® magazine, Interweave Press LLC. Not to be reprinted. All rights reserved. Spin.Off ■ spinningdaily.com I 4
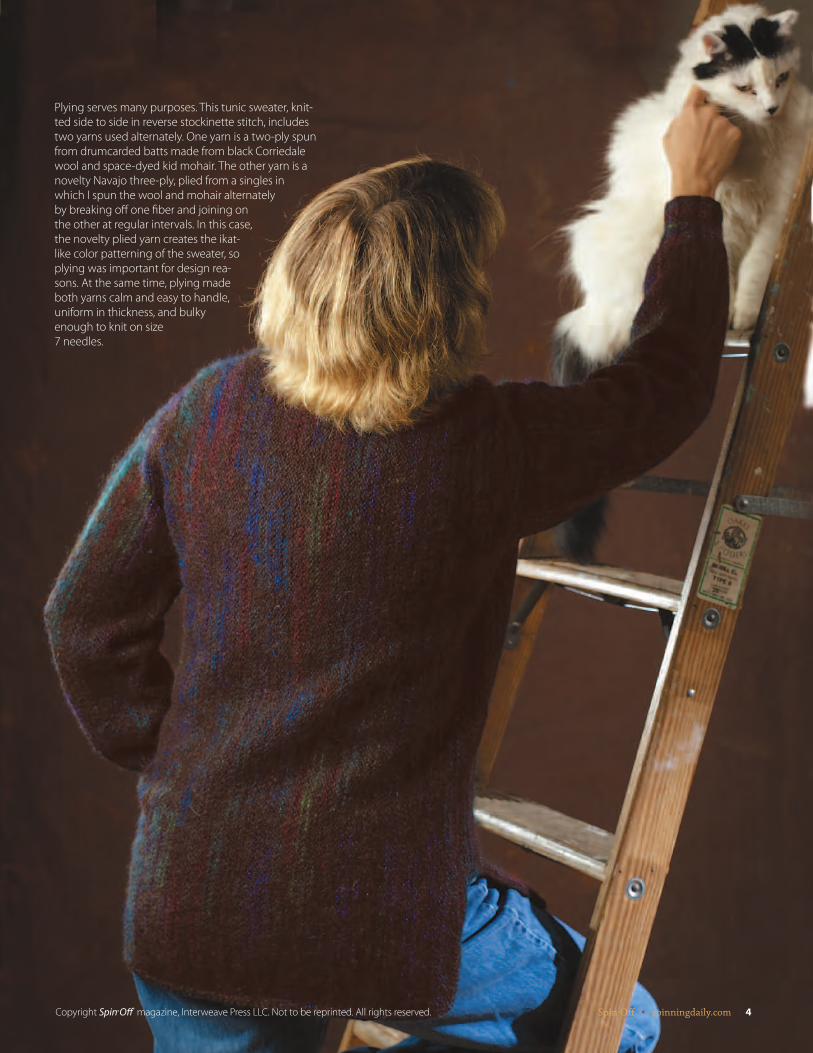
Plying serves many purposes. This tunic sweater, knit-ted side to side in reverse stockinette stitch, includes two yarns used alternately. One yarn is a two-ply spun from drumcarded batts made from black Corriedale wool and space-dyed kid mohair. The other yarn is a novelty Navajo three-ply, plied from a singles in which I spun the wool and mohair alternately by breaking off one fiber and joining on the other at regular intervals. In this case, the novelty plied yarn creates the ikat-like color patterning of the sweater, so plying was important for design rea-sons. At the same time, plying made both yarns calm and easy to handle, uniform in thickness, and bulky enough to knit on size 7 needles.

Plying for evenness. Very few spinners produce a perfectly consis-tent singles. Almost always there are thick and thin spots, varying from inch to inch and also from bobbin to bobbin. A major reason for plying is that it cancels out these differences; the more plies, the greater the evening out. Three- ply yarns are more uni-form in thickness than two-ply yarns, and four- or five-ply yarns have even less variation. This uniformity often appeals to knitters, because it enhances the clarity of textured stitch patterns.
Plying for trouble-free weaving. I know some weavers routinely use singles for warps, but I’m wary. I’ve had, and heard about, too many disasters with singles warps that frayed, fell apart, stuck together, or broke repeatedly. Why ask for trouble? The weaving process puts a lot of stress on the warp. With every shed, the warp gets jerked up and down by the heddles and rubbed back and forth by the beater. Such tension and abrasion are sure to reveal every weak spot in the yarn. I’ve found that two-ply warps virtual-ly eliminate such problems, so I almost always use them now. Once in while, mostly for rugs, I use three or more plies.
Plying for fat yarn. People who have gotten in the habit of spinning very thin singles sometimes talk about using more and more plies to achieve the thickness they want. Using more plies can make an excel-lent yarn, but as a way of achieving
Above: Plying for balanced twist prevents snarls as you knit. That means one less challenge to cope with as you juggle several colors and develop a design. The nine colors used in this “patchwork” sweater are all two-ply yarns that I spun from a Lincoln/Corriedale fleece. The sample skein includes a few strands of each color.Below: Plying compensates for irregularities and weak spots in a singles and makes a strong warp yarn. A two-ply warp usually withstands all the tension and abrasion of weaving without fraying or breaking. This work in progress is a table runner. The warp is a two-ply spun from a rayon/linen/hemp blend. The wefts here are both two-ply cottons, one thin and one thick, used alternately to create a subtle rib effect.
Ph
ot
os
by
Rit
a B
uc
ha
na
n
Copyright Spin.Off® magazine, Interweave Press LLC. Not to be reprinted. All rights reserved. Spin.Off ■ spinningdaily.com I 5

Copyright Spin.Off® magazine, Interweave Press LLC. Not to be reprinted. All rights reserved. Spin.Off ■ spinningdaily.com I 6
thickness, it’s very time-consuming. How long do you want to spend spinning thin singles? What’s your schedule and atten-tion span? The problem with this approach is that life isn’t fair. Using more plies to make a fat yarn works best when you start with a thick singles— that way, each ply adds significant bulk. If you start with a wee skinny singles, each ply adds only a little bit more fiber, and it may take six, eight, or more plies before you have anything you can knit a sweater with. If what you want is fat yarn, the efficient way to make it is by starting with a thicker singles. That’s not easy to do— it takes practice to spin a good thick sin-gles. But you can learn how in less time than it takes to spin all those plies.
Plying for strength. If you take equal batches of fiber and spin one batch into a thick singles and the other batch into a plied yarn, will the plied yarn be stronger and more durable than the singles? Yes, but plying isn’t a panacea. Yarn perfor-mance also depends on the quality of the fiber, how carefully it was drafted, how much it was twisted, and how the yarn is finished and used.
Design opportunitiesCombining different singles is the cre-ative aspect of plying. There are countless possibilities here and few rules or guide-lines other than sample, sample, sample. Try a combination, then wash the yarn to see what happens, and knit or weave swatches to see what kind of fabric that combination makes. You’ll often be sur-prised. A color or texture effect that looks bold in a skein may turn subtle when the yarn is worked into fabric, while a subtle combination may add just the right touch to a project. If you don’t like what happens with one combination, try another.
Combining colors. Try related or contrasting colors, using the same or different fibers. I especially like combin-ing solid- with multi-color singles to tone down variation and randomness and create a more unified look. Another trick I often use is combining colors for custom trims. For example, if I weave plaid fabric from blue and green yarns, I may ply some of the blue and green together to knit a trim for that project.
Above: Here are a merino singles and four yarns plied from it. Many plies thicken yarn, but progress is slow if you start with a skinny singles. From left to right, the singles mea-sures about 45 wraps per inch; the two-ply has 31 wraps; the three-ply has 26 wraps; the four-ply has 23 wraps; and the five-ply has 20 wraps. Even the five-ply is fairly thin for a knitting yarn, suitable for about size #2 needles.Below: Starting with strong fiber and using many plies produces a sturdy rope. This rope is made from the coarse outer hair of a camel, and it includes four 4-ply strands for a total of 16 plies. A side effect of using so many plies is that the rope is as evenly cylindrical as a garden hose.
If you want to end up with a thick yarn, the fast way to get there is by spinning a thick sin-gles, not by using many plies. These are both two-ply yarns, spun from the same Corrie-dale top. The fat yarn measures about 6 wraps per inch, and the skinny yarn has about 36 wraps. It takes a lot of practice, though, to master spinning a thick yarn. This fat yarn is uneven—can you see the thick and thin spots in it? Fortunately, plying helps even out those differences in thickness.

Copyright Spin.Off® magazine, Interweave Press LLC. Not to be reprinted. All rights reserved. Spin.Off ■ spinningdaily.com I 7
Combining fibers. These combi-nations are tricky, so be sure to make a sample and wash it before plying a bobbin full. If the fibers react differ-ently to washing and one draws in more than the other(s), the yarn will develop an irregular or loopy texture. Sometimes you’ll love the result, but you may be disappointed if differen-tial shrinkage takes you by surprise.
Creating texture effects and novelty yarns. Many novelty effects result from special plying techniques. The singles used may be quite ordi-
nary-looking; it’s how you put them together that creates striking results. My favorite is simply plying thick and thin singles—the results look sort of like a string of beads, and sort of like rickrack. I don’t have much use for such yarn, but it sure is fun to make and looks cute in a basket. As I said before, enjoyment is a good reason to do some plying. z
Rita Buchanan already has a houseful of handspun yarns and projects, but can't stop making more.
This four-ply yarn combines three plies of cotton in flowery pastel colors with one ply of deep leaf-green flax. Plying was an easy way to distribute the color and texture of the flax evenly throughout the yarn and fabric. I used the yarn to knit a pair of shorts that are as comfortable and sturdy as denim.
This loopy yarn has one ply of blue merino wool and one ply of purple kid mohair. Washing the yarn in hot water made the merino draw in and the mohair pop out. This is one of many novelty effects that you can create accidentally or deliberately by plying.
These three swatches are all knitted on U.S. size 4 needles in a seed rib pattern, using yarns that measured about 18 wraps per inch. I made them to illustrate the difference between singles (top), two-ply (center), and three-ply (bottom) yarns, all spun from the same Columbia wool. In fact, the difference is subtle and which swatch people like best depends on personal preference. I expected there would be a difference in durability, but all three swatches have been handled and washed repeatedly and they have held up equally well.

Copyright Spin.Off® magazine, Interweave Press LLC. Not to be reprinted. All rights reserved. Spin.Off ■ spinningdaily.com I 8
Have you been perplexed in a spinning class when the teacher recommends letting the singles “self-ply” or “ply back on itself” to
test the yarn size? It’s a simple technique that one often sees in classes but isn’t usually described in spinning books. All you do is take some yarn from the bobbin (usually back out through the orifice), hold the yarn taut, fold it in half, and release the folded end held by the back hand (the hand closest to you) so that the yarn twists together. Usually the self-plied yarn has less ply twist than separate singles plied on the wheel or spindle, but this quick method will give you a basic idea of what the finished yarn will look like. For a woolen yarn, it’s always fun to see how much bounce appears in the plied yarn. A worsted yarn with a lovely line of “beads” or “pearls” (the bumps created as the singles ply upon each other) makes one proud of the spinning.
If the self-ply is very tightly twisted, you might have too much twist in the singles, and, if it is slack and barely plied, then the singles needs more twist. Once you’ve added the right amount of twist, you can cut off this sample and tape it to a piece of mat board or folded index card as a refer-ence while spinning. You might want to add a little extra twist by hand to get a better idea of the final yarn or to experiment with how much twist you’d like the finished yarn to have.
The process for a two-ply yarn is straightfor-ward, but self-plying for a three-ply yarn takes an extra step. If you pull the singles out and make a reverse Z, two strands twist together while the third wraps around the two-ply. The way to test a true three-ply yarn came to me in a dream (really!). Form the Z and then either drop the top strand be-tween the lower two or move the bottom strand up between the top two. The three strands can then be released to twist together evenly. z
Carol Huebscher Rhoades lives in Madison, Wiscon-sin, and doesn’t really dream much about knitting or spinning when she’s asleep. It’s a totally different story when she’s awake.
To test the twist for a 2-ply yarn, pull the singles out from bobbin, hold it taut, and place your back hand at the center point, so you can fold the strand in half. Pinch the ends together near orifice while holding the other end with back hand.
Release the back-hand end (keep hold on the ends near the orifice) and watch the strands self-ply.
Smooth out the yarn and admire it.
To test the twist for a 3-ply yarn, pull the singles out from bobbin, hold them taut, and form a reverse Z (note magenta strand on the bottom).
Move the bottom strand between the other two strands (note that the magenta strand is now between the darker strands).
Release the back-hand end (keep hold on the ends near the orifice) and watch the strands make an even 3-ply.
If you don’t move the top or bottom strand to the center, two strands twist together and the third strand wraps around the 2-ply.
Self-Plyb y C a r o l H u e b s c h e r R h o a d e s
1 2
3
4
5 6
7

Copyright Spin.Off® magazine, Interweave Press LLC. Not to be reprinted. All rights reserved. Spin.Off ■ spinningdaily.com I 9
P lying on a spindle is easy! In fact, there are many ways to do it: Andean plying, mul-tiple spindles, center-pull ball, etc. I’ve
tried them all and find that I make my best yarn when I transfer the yarn from my spindle to a storage device before plying. Small balls and clay flowerpots work well; the balls hold the yarn and the pots hold the ball. It is a trick Rita Buchanan taught at Spin.Off Autumn Retreat (SOAR) one year. You can also use weaving bobbins and a lazy kate to hold your singles, just as you would for plying on a wheel.
To transfer the yarn from my spindle, I use a shoe box with a hole punched in the side as a spindle holder. The box keeps my spindle steady so I have both hands for winding.
Flowerpot plyingWind the singles from your spindle firmly
and evenly around small felt or rubber balls. Keeping the yarn under tension makes plying easier and helps even out the twist. Spin more yarn and wrap another ball. To keep the balls from running amuck, place each one under its own upside-down flowerpot. Thread the yarn through the drainage holes of the pots, and you are ready to ply.
Plying with a lazy kateIf you are a weaver or have a friend who is—
try this method. Put a boat shuttle bobbin on a bobbin winder and wind the singles from your spindle (secured in the shoe box) onto the bob-bin just as if you were winding a bobbin for weaving. A smoothly wound bobbin makes ply-ing a breeze. Fill a second bobbin, put the bob-bins on a lazy kate, and you are ready to go.
Plying on your spindleTie your two singles to the leader of your
spindle with an overhand knot. Hold the yarns in your fiber hand with a finger between them so they won’t twist together until you are ready. With your twist hand, turn the spindle counter-clockwise or opposite to the direction your sin-gles were spun. After the spindle starts turning, slide the twist hand up and pull down lengths of yarn, letting the plying twist run into this
Plying on a SpindleB y M a g g i e C a s e y
Wind yarn from spindle to ball.
Place each ball of yarn under its own flowerpot and pass the end of the yarn through the drainage hole.
1
2
Copyright Spin.Off® magazine, Interweave Press LLC. Not to be reprinted. All rights reserved. Spin.Off ■ spinningdaily.com I 10
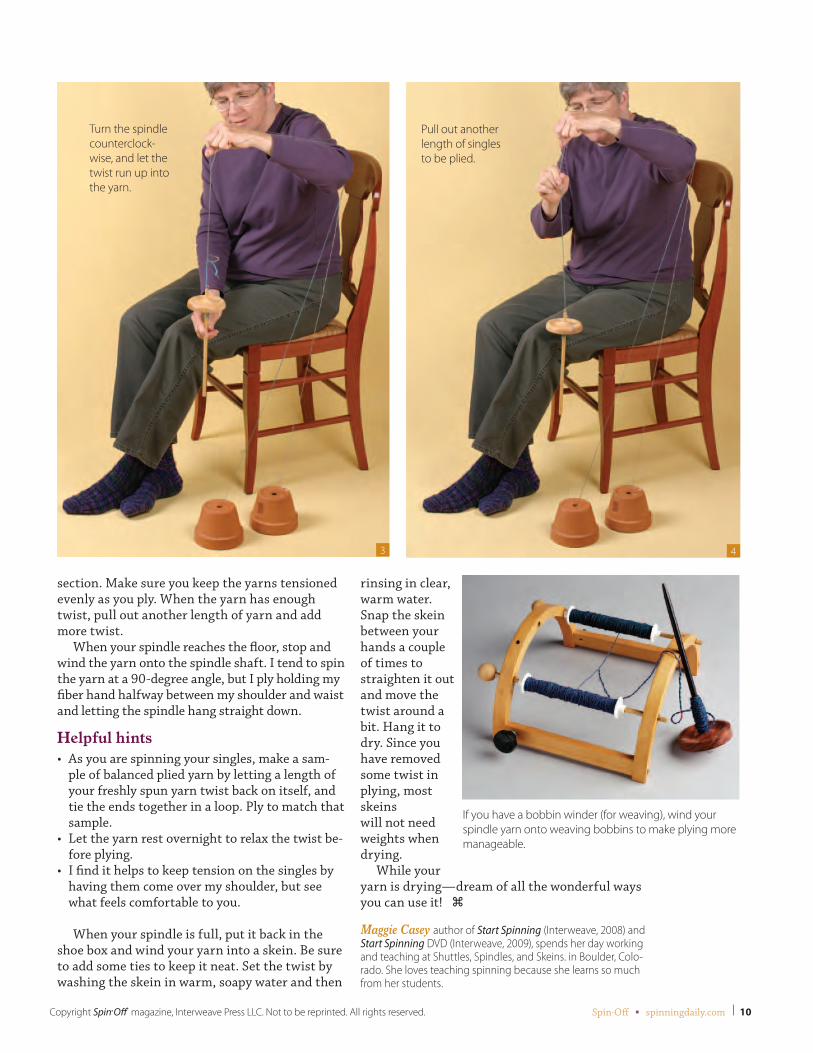
section. Make sure you keep the yarns tensioned evenly as you ply. When the yarn has enough twist, pull out another length of yarn and add more twist.
When your spindle reaches the floor, stop and wind the yarn onto the spindle shaft. I tend to spin the yarn at a 90-degree angle, but I ply holding my fiber hand halfway between my shoulder and waist and letting the spindle hang straight down.
Helpful hints• As you are spinning your singles, make a sam-
ple of balanced plied yarn by letting a length of your freshly spun yarn twist back on itself, and tie the ends together in a loop. Ply to match that sample.
• Let the yarn rest overnight to relax the twist be-fore plying.
• I find it helps to keep tension on the singles by having them come over my shoulder, but see what feels comfortable to you.
When your spindle is full, put it back in the shoe box and wind your yarn into a skein. Be sure to add some ties to keep it neat. Set the twist by washing the skein in warm, soapy water and then
rinsing in clear, warm water. Snap the skein between your hands a couple of times to straighten it out and move the twist around a bit. Hang it to dry. Since you have removed some twist in plying, most skeins will not need weights when drying.
While your yarn is drying—dream of all the wonderful ways you can use it! z
Maggie Casey author of Start Spinning (Interweave, 2008) and Start Spinning DVD (Interweave, 2009), spends her day working and teaching at Shuttles, Spindles, and Skeins. in Boulder, Colo-rado. She loves teaching spinning because she learns so much from her students.
Turn the spindle counterclock-wise, and let the twist run up into the yarn.
Pull out another length of singles to be plied.
If you have a bobbin winder (for weaving), wind your spindle yarn onto weaving bobbins to make plying more manageable.
3 4
Copyright Spin.Off® magazine, Interweave Press LLC. Not to be reprinted. All rights reserved. Spin.Off ■ spinningdaily.com I 11
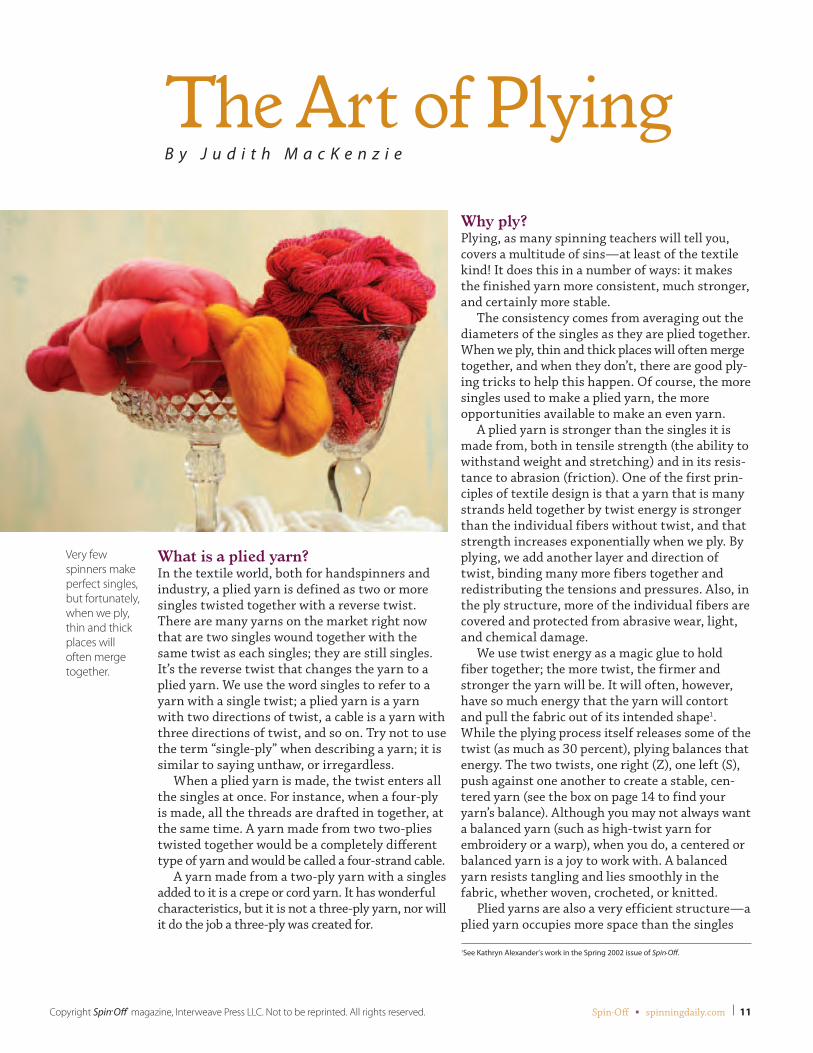
What is a plied yarn?In the textile world, both for handspinners and industry, a plied yarn is defined as two or more singles twisted together with a reverse twist. There are many yarns on the market right now that are two singles wound together with the same twist as each singles; they are still singles. It’s the reverse twist that changes the yarn to a plied yarn. We use the word singles to refer to a yarn with a single twist; a plied yarn is a yarn with two directions of twist, a cable is a yarn with three directions of twist, and so on. Try not to use the term “single-ply” when describing a yarn; it is similar to saying unthaw, or irregardless.
When a plied yarn is made, the twist enters all the singles at once. For instance, when a four-ply is made, all the threads are drafted in together, at the same time. A yarn made from two two-plies twisted together would be a completely different type of yarn and would be called a four-strand cable.
A yarn made from a two-ply yarn with a singles added to it is a crepe or cord yarn. It has wonderful characteristics, but it is not a three-ply yarn, nor will it do the job a three-ply was created for.
Why ply?Plying, as many spinning teachers will tell you, covers a multitude of sins—at least of the textile kind! It does this in a number of ways: it makes the finished yarn more consistent, much stronger, and certainly more stable.
The consistency comes from averaging out the diameters of the singles as they are plied together. When we ply, thin and thick places will often merge together, and when they don’t, there are good ply-ing tricks to help this happen. Of course, the more singles used to make a plied yarn, the more opportunities available to make an even yarn.
A plied yarn is stronger than the singles it is made from, both in tensile strength (the ability to withstand weight and stretching) and in its resis-tance to abrasion (friction). One of the first prin-ciples of textile design is that a yarn that is many strands held together by twist energy is stronger than the individual fibers without twist, and that strength increases exponentially when we ply. By plying, we add another layer and direction of twist, binding many more fibers together and redistributing the tensions and pressures. Also, in the ply structure, more of the individual fibers are covered and protected from abrasive wear, light, and chemical damage.
We use twist energy as a magic glue to hold fiber together; the more twist, the firmer and stronger the yarn will be. It will often, however, have so much energy that the yarn will contort and pull the fabric out of its intended shape1. While the plying process itself releases some of the twist (as much as 30 percent), plying balances that energy. The two twists, one right (Z), one left (S), push against one another to create a stable, cen-tered yarn (see the box on page 14 to find your yarn’s balance). Although you may not always want a balanced yarn (such as high-twist yarn for embroidery or a warp), when you do, a centered or balanced yarn is a joy to work with. A balanced yarn resists tangling and lies smoothly in the fabric, whether woven, crocheted, or knitted.
Plied yarns are also a very efficient structure—a plied yarn occupies more space than the singles
The Art of PlyingB y J u d i t h M a c K e n z i e
Very few spinners make perfect singles, but fortunately, when we ply, thin and thick places will often merge together.
1See Kathryn Alexander’s work in the Spring 2002 issue of Spin.Off.

Copyright Spin.Off® magazine, Interweave Press LLC. Not to be reprinted. All rights reserved. Spin.Off ■ spinningdaily.com I 12
that made it. This has to do with the pressure of the opposing twists allowing the yarn to open up without losing its strength. That means that when you knit or weave with a plied yarn, it will take less yardage to make the fabric.
How to plyWhen we ply with a wheel, we take whatever num-ber of singles we wish to ply together and we use a wheel to both apply twist and to draft the yarn on to the bobbin. This allows us to have a wonderfully consistent twist throughout and allows us to create much greater lengths of yarn. Plying takes only about a third of the time it took to spin the original singles. And as discussed earlier, that plied yarn will make much more fabric than the singles will. Spin as much of the singles as you can bear to before you start to ply and try to mix all the bobbins up to improve the consistency of your plied yarn. Find as many bobbins as you can or use cheaper storage bob-bins and a bobbin winder. If you have a bobbin on which the singles yarn is off diameter or has a slight-ly different twist, add a bit of it into every skein. It will be spread evenly throughout your whole project, and you won’t notice it at all.
Hand holdingThe way I hold my hands when I ply is an old British style of plying. I like this method because it gives me amazing control over the singles, but there really isn’t a right way or a wrong way to hold your hands. If you have a method that feels com-fortable, allows you to keep consistent tension on all the singles, and keeps the twist entering all of them at the same time, there is no need to change.
To get ready to ply, you need to organize your singles. Take your drafting hand and place your middle finger under the threads, pushing it through the “V” that they form as they enter the orifice, the palm of your hand facing you. This finger will make sure that the twist enters the threads at the same time. This leaves your thumb and forefinger free to pinch and draft as they would normally do when you are spinning with a short draw. If you need to let go, let go with this hand, the drafting hand. The tensioning hand is the one that keeps everything in order and pre-vents chaos. Pretend it is glued in place—don’t move it back and forth. Not keeping tension steady with this hand is the major cause of tangles and will cause the bobbins to lash back on themselves.
Create a color palette by plying. Here, I’ve used four colors from Ash-land Bay’s beautiful selection of dyed Merino top. By using a 3-ply yarn structure, I can pro-duce ten yarns that allow the colors to flow seamlessly from one hue to the next simply by gradually transi-tioning colors in the plies.

Copyright Spin.Off® magazine, Interweave Press LLC. Not to be reprinted. All rights reserved. Spin.Off ■ spinningdaily.com I 13
Start your wheel and remember to go in the direction opposite the one the singles were spun. Place your fingers back in the plying position and, using your thumb and forefinger, grasp the sin-gles and pull forward toward the wheel’s orifice. Keep that back hand steady! When your fingers reach the orifice, draw them smoothly back toward the tensioning hand. The twist will follow your fingers back like a puppy. The faster you move your fingers, the less ply twist you’ll have in your yarn. The slower you move your hands, the more ply twist you’ll have. When you reach your back hand, clamp your thumb and forefinger so that the twist can’t go any farther and let all the plied yarn feed forward, onto the wheel. In tradi-
tional spinning, you feed it onto the wheel in half the time that it took you to draft it out. Keep that back hand steady and the next length to be plied will be drawn out evenly.
CountingTo count or not to count? When you count, you pull the same length of singles forward every time and add the same amount of twist. What you are counting are your foot beats; each time you trea-dle the wheel, you put in a given number of twists over the same length of yarn, depending on your wheel and the pulley you are using (see the box on page 14). Counting is really just a plying aid, not a necessity. I’m not likely to count every foot beat in
Left: These samples are all spun from a springy Columbia fleece with European twist—a singles to the left (S), plied to the right (Z). This technique makes a wonderful traditional knitting yarn but a poor weaving yarn. (1) Singles, (2) 2-ply, (3) 3-ply, (4) 4-ply, (5) 5-ply, and (6) 6-ply.
Right: Plying is a simple way to create a wide variety of tex-tures: the first three samples use a commercially spun yarn and the Columbia singles to give three very different surfaces. Again, these are all spun with a reverse (left [S] in the singles, right [Z] in the ply) twist. They’ll make great knitting yarns. (7) Columbia singles and millspun mohair softly plied togeth-er; (8) Columbia singles and a cabled fine wool loop plied together; (9) Columbia singles and rayon novelty yarn plied together; (10) Holding one of the Columbia singles at a right angle to the other while they were plied made this textured surface; (11) A Turkish knot based on a sim-ple plying error—unequal tension on one of the Columbia singles allows it to fold back on itself; (12) Encasement: silk chiffon has been caught between the Columbia singles as they were plied.
31 2
4
56 7
8
9
10
11 12

Copyright Spin.Off® magazine, Interweave Press LLC. Not to be reprinted. All rights reserved. Spin.Off ■ spinningdaily.com I 14
Choosing the proper pulley (or whorl) for plying depends on the type of singles you’ve spun and the type of ply twist you want. In classic spinning,
for a worsted yarn, use a bigger pulley than the one used to spin the singles; for a woolen yarn, use a smaller pulley. This works because a worsted yarn’s structure is in the singles; it only needs the ply to balance the twist. The bigger pulley puts in less twist. A classic woolen yarn, however, has next to no structure in the singles; it depends on the ply twist to give it structure and stability, so we use a smaller high-twist pulley. If your yarn, as is most, is a variation on these two types of spinning, then think of the fabric you want to produce. A sock yarn, even though it is spun worsted, might need a higher twist, so use the same or a smaller pulley than the one you used to spin the singles. A good blanket weft yarn will need a softer twist, even though you have likely spun it woolen, so try a bigger pulley. If your wheel doesn’t have any choice in pulleys, just apply a bit more pressure on the drive band for worsted and a little less for woolen.
The two sections of yarn will twist together to give you an idea of how the balanced plied yarn will look and feel.
Draw out a length of your singles yarn from the bobbin—place your threading hook in the middle of the yarn and let the two halves fold together, allowing the threading hook to weigh down the yarn.
Use your threading hook to test what a balanced yarn looks and feels like. If
this is what you want, spin the rest of the yarn with a similar number of twists per inch. If the yarn isn’t what you want, either too much twist or too little twist when it is plied, change the singles. You can add or reduce twist by running it back through the wheel—in the direction it was spun to increase the twist or opposite to release twist. It’s the twist in the singles that sets how a yarn will balance when it is plied, not the ply twist. If you’re not sure what is causing your yarn
to be unbalanced, take a look at the direction of the twist in the skein—that twist is trying to counteract the extra twist in your yarn. It is twisting in the opposite direction of the overtwist. If it’s the ply twist that has caused the problem, you can correct it just as you corrected the twist in the singles by running it through the wheel to either tighten or release twist.
Compared to learning to spin, learning to ply is a snap—
and a very satisfying snap at that! The first step is to find some method of supporting your bob-bins of singles. Many wheels have storage racks or rods for bobbins on the wheel, and it is pretty tempting to use them to ply. With the exception of the Louet and Schacht Ladybug wheels, which really do have a vertical plying frame, try to resist, as the storage racks hold the bobbins at a very awkward angle, making it difficult to do a good job.Kates come in a wide variety of
styles and price ranges, some very basic and others examples
of a great woodworker’s art. What I look for in a kate is stability; I want it to stay where I put it and not tip over or drag along the floor. I have a Bluster Bay kate that weighs 15 pounds, and it does stay put! Schacht makes one that can be clamped in place to keep it steady, and I’ve found that a C-clamp or a furniture clamp will hold most other kates in place as well.If you don’t have a kate, they
are simple to make—poke holes through both sides of a shoe box with knitting needles and suspend your bobbins on the needles. To add stability, cut some pieces of foam rubber to
insert on the needle on either side of the bobbin. Making your own has one huge advantage over most that you buy; you can have as many bobbins as you need. Most traditional kates limit you to three or four plies. You can arrange your shoe-box kate to do wonderful five-ply gansey yarns or ten-ply cashmere.When you put your bobbins on
the kate, make sure the singles are all pulling off in the same direction. If you don’t, it will create a dreadful tangle. I’m sure it does make a difference if you pull them off over the top or underneath, because everything
we do in spinning has an effect on the yarn, but I have not noticed the difference—yet! To be on the safe side, just be consistent.
Kates
Pulley Balanced Yarn
unbalanced balanced
Judith MacKenzie

Copyright Spin.Off® magazine, Interweave Press LLC. Not to be reprinted. All rights reserved. Spin.Off ■ spinningdaily.com I 15
2 pounds of yarn. But counting helps me establish a rhythm when I start a new type of yarn. Also, it’s a good practice to check now and then to see if I am still on track, especially when I start a new bobbin. Remember—one of the aims of plying is to produce a consistent twist throughout all the skeins in your project.
Two-ply, three-ply, four-ply, or five-ply?What makes the difference between a two-ply and a three-ply is the surface of the yarn and how it reacts in different fabric structures. In knitting,
when you make the loop to form a stitch, a two-ply yarn moves away from the center of the stitch; a three-ply, on the other hand, folds into the center of the stitch, filling it up. In knitting, this is called “blooming” in the stitch. In weaving, a two-ply locks the fabric in place, while a three-ply, having a much rounder surface, will allow the warp and weft yarns to slip by one another. The basic rule for knitting yarns is to always use a yarn with three or more plies unless you have a good reason not to, such as in lace knitting in which a two-ply yarn moves away from the stitch to make a more pro-nounced hole. In weaving, always use a two-ply unless you have a good reason not to, such as when a rounder multiple-ply in a rug weft is needed to cover the warp more easily.
All the tools we use—bobbin winders, looms, ball winders, nøstepinnes, knitting needles, and crochet hooks—add or remove twist as we use them. Pay close attention to how the yarn reacts to what you do. Yarn in our hands is always trans-formed. Our jobs as yarn and fabric designers are to understand how this happens and how to use it to our benefit and our great pleasure. z
Judith MacKenzie of Forks, Washington, has been a textile artist for over thirty years. Her love of textiles has led to many fascinating jobs, including leading a National Research Council grant to investigate industrial silk dyes and the repair of the king of Afghanistan’s carpet. A teacher in the United States and Canada, her work appears in private and public collections. Judith is the author of The Intentional Spinner (Interweave, 2009) and a number of Interweave instructional videos.
Right: Two skeins made from the same four singles spun from a Merino/silk blend from Chasing Rain-bows Dyeworks. The first sample is a 4-ply—the twist entered the singles at the same time. The second sample is a 4-strand cable. Here the singles have been made into two 2-plies, that have been twist-ed together.
(1) Place the singles on your leg—choose the side that feels natural to you. (2) Start with a simple 2-ply. First, using the hand that would normally hold the fiber, from above the singles, slip your first finger in between the two singles—your thumb will be on the outside of the threads, toward the inside of your leg. (3) Rotate your hand toward the outside of your leg—your thumb will slip under the first thread. Pick your hand up and tilt it back. (4) When I do multiple plies, I use this same method, adding in another finger for each extra ply. Doing this, I can spin a comfortable five-ply.
1 2
3 4

Copyright Spin.Off® magazine, Interweave Press LLC. Not to be reprinted. All rights reserved. Spin.Off ■ spinningdaily.com I 16
Commonly known among spinners as “Navajo-plying,” plying
chained singles produces a three-ply yarn from a bobbin of singles yarn and is accomplished by “chaining” loops; each new loop is drawn through the previous loop.1 With this technique, you can create three-ply yarn from one bobbin of singles instead of three. You may be familiar with chaining a warp for weaving, creating a crochet chain, or making a chain stitch in embroidery, but you can’t make a stable yarn just chaining a strand of spun singles. The chained singles need sufficient twist in the opposite direction to balance the twist of the singles.
If you’ve spun a singles yarn from a variegated roving or batt, you can preserve solid sections of color in the plied yarn or gradually move from one color to the next. Plying chained singles reduces the length of a color section of singles yarn to one-third of the original length. For example, to ply 5 inches of color, you will need to spin 15 inches of singles in that color.
If you are trying this technique for the first time, you may want to practice with waste yarn—a weaving or knitting millspun yarn or crochet cotton—before using your precious handspun. First determine whether the yarn has been spun S, the wheel turning to the left (counterclockwise), or Z, the wheel turning to the right (clockwise), and then ply in the opposite direction.
A previewYour forward hand will pinch off the twist, guide it into the chained singles, and roll the bumps created where the loops join. Your back hand will form the loops.
Start by tying a yard-long leader to the bobbin on the flyer spindle. Thread the leader over the hooks and through the
orifice. Double back the end of the leader to form a 5-inch loop and tie a knot. Select a large whorl to give you a low twist ratio. This allows more control as you practice the motions. Hold the leader and begin to treadle slowly. Check the pull on the leader as it is drawn through the orifice and winds onto the bobbin. Adjust the tension for a slightly faster draw-in than you used when spinning the singles.
Put the yarn bobbin onto a lazy kate. I like to place the kate on the floor between my feet. Draw the end of the yarn up from the kate and fold it to form an 8-inch loop. Pass the yarn loop through the leader loop (Fig. 1). Pull the yarn loop toward your body with your back hand, centering it over the yarn coming from the kate. Pinch the juncture of the loops with the fingers of your forward hand, folding back 4 or 5 inches of the beginning of the loop (Fig. 2). There are four strands of yarn at the pinch, counting the tail from the loop.
Use the thumb and little finger of your back hand to spread and tension the two sides of the loop (Fig. 3). Pick up the strand coming from the kate (the third ply) with your index finger (Fig. 4).
Begin to treadle slowly in the direction opposite to which the singles yarn was spun. Maintain equal tension
on all three plies with your spread fingers. As twist builds up between the orifice and the fingers pinching at the end of the leader, slide the pinch along the three strands without allowing any one strand to twist around another (Fig. 5). Stop sliding the pinch when 3 or 4 inches of loop remain (Fig. 6). Move your hands forward toward the
Plying Chained SinglesB y D o d i e R u s h
CARy RUSH
1Though plying chained singles is normally referred to as “Navajo-plying,” questions have been raised about the origins of the term and whether or not it is accurate. Plying chained singles is a descriptive term for making a three-ply yarn from a singles yarn.

Copyright Spin.Off® magazine, Interweave Press LLC. Not to be reprinted. All rights reserved. Spin.Off ■ spinningdaily.com I 17
orifice to let the plied yarn wind onto the flyer bobbin, and then stop treadling (Fig.7). With the back hand, pull the strand coming from the kate through the loop to form the next loop (Fig. 8). Pick up the yarn coming from the kate (third ply) with your index finger (Fig. 9). Resume treadling and guide the twist along the strands (Fig. 10). Repeat these motions. With practice you will be able to increase speed.
To tighten the bump formed where the loops overlap, roll the join back and forth between the thumb and index finger of your forward hand. Rolling the join lets in extra twist, minimizing the size of the bump.
A three-ply yarn needs about three-fourths of
the twists per inch that were put in the singles. If the singles yarn has not been resting on the bobbin before plying, you can test the twist by letting 12 to 15 inches of plied yarn hang without tension between your hand and the orifice. You want a relaxed yarn that doesn’t twist in either direction. However, some of the twist energy has been set if the singles yarn has been stored on the bobbin for several hours or more. If so, to test for the amount of twist, take about 3 feet of the singles and fold the yarn to make 1 foot of three-ply, knot both ends, and put it into water to allow the twist energies to balance. Match the ply twist to this sample. Or, save a three-ply sample for comparison when spinning the singles.
3 4
5 6
1 2

Copyright Spin.Off® magazine, Interweave Press LLC. Not to be reprinted. All rights reserved. Spin.Off ■ spinningdaily.com I 18
Loops can be large or small. If you are plying yarn with color sequences, watch for the color changes. Adjust the loop size to place colors where you would like them to appear; pull more yarn from the kate to lengthen loops, or pull less to make shorter loops.
Treadle slowly to give your hands time to form loops or adjust colors. As you form loops, you may see thick or thin sections. Compensate by altering the loop length; place a thick section between two thin strands, or let three thin strands meet at the bump of joining loops.
If your back hand finds manipulating the loops awkward, reversing hands may help. As you become comfortable with the motions, you’ll develop a smooth, faster treadling rhythm. To pause while plying, keep the working loop open by placing the sides of the loop around the hooks on the flyer, or put the loop over a knob. Wind the plied yarn onto a niddy-noddy and cut it free at the leader loop. Pull out any unattached strands and tie a knot to prevent raveling. z
Dodie Rush learned to spin on a rented wheel when she attended her first SOAR (Spin.Off Autumn Retreat) in 1990. She lives in Philadelphia, Pennsylvania, with her husband, Cary, who took the photos for this article.
ResourcesFournier, Nola, and Jane Fournier. In Sheep’s
Clothing. Loveland, Colorado: Interweave Press, 1995.
Irwin, Bobbie. The Spinner’s Companion. Loveland, Colorado: Interweave Press, 2001.
7 8
9 10

Copyright Spin.Off® magazine, Interweave Press LLC. Not to be reprinted. All rights reserved. Spin.Off ■ spinningdaily.com I 19
I was a beginner spinner when my Summer 1992 issue of Spin.Oƒƒ ar-rived in the mail. It had a one-page
article describing how Andean spinners prepare the singles spun on their hand-spindles for plying.
Ed Franquemont reported that “. . . people fill two spindles with yarn, and then wind off both to make a ball of doubled yarn that will be twisted. Since the two spindles hold different amounts of yarn, one spindle is emptied before the other. The spinner then winds the remainder on her wrist in a patterned way to find the end; this she teases open and splices with the end from the emp-tied spindle to make a continuous, knot-less, doubled strand that can be wound onto the ball. She plies directly from this ball of doubled yarn . . . ” (page 106). At the suggestion of the article, I tried this
Andean PlyingB y R u d y A m a n n
I like to wrap on the back of my hand rather than the palm of my hand as some folks do because it makes the circumference of the bracelet larger. When you move the yarn from your wrist up to your palm to release the tension, there is more ease to pull the loops off the middle finger. Also, the larger circumference allows the spinner to com-fortably wrap slightly more yarn. And in case of an interruption while doing the hand wrap, the front of the hand is avail-able for holding a spindle or grasping something. I suspect that this is the reason the Andean spinners wrap the yarn on the backs of their hands as described by Ed Franquemont.Wrapping the yarn on the back of the hand does require some practice and patience. You must keep just enough tension on the yarn so that it does not start plying back on itself as you use your orifice hand to guide
the yarn around your fiber hand. As you wrap the yarn, you must guide the yarn across the front of your wrist below your hand. If you wrap on the palm of the hand, keep-ing the tension loose is not as much of a concern. But the circumference of the bracelet is smaller and you end up with a bigger fistful of yarn and a thicker bracelet.Spinners should remember that the hand wrap is for plying relatively small amounts of yarn. The technique is suitable for the amount of yarn on a handspindle or the yarn spun for a small sample—not a whole bob-bin full of yarn. When plying from the hand wrap, it is not easy to keep the tension of the two ends even and spin an evenly plied yarn. Try to tension the yarn between your fingers as evenly as possible while plying. Larger amounts of fiber should be divided in half and spun on two bobbins, or the yarn on a
bobbin can be rewound and divided between two bobbins.
Front of the hand versus back of the hand
Right-hand wrapping1
Copyright Spin.Off® magazine, Interweave Press LLC. Not to be reprinted. All rights reserved. Spin.Off ■ spinningdaily.com I 20
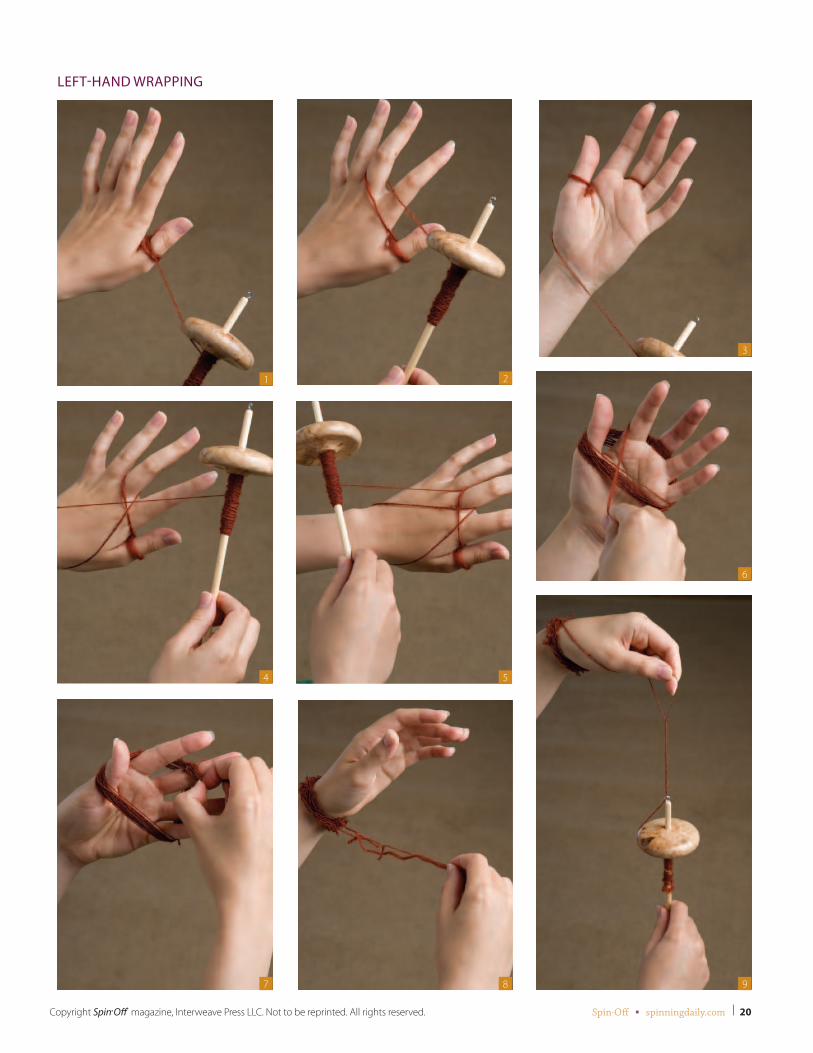
LEFT-hAND WrAPPINg
1 2
3
6
987
4 5

Copyright Spin.Off® magazine, Interweave Press LLC. Not to be reprinted. All rights reserved. Spin.Off ■ spinningdaily.com I 21
rIghT-hAND WrAPPINg (Figure 1 is on page 19)
2
5
8 9
6
3
4
7
10

Copyright Spin.Off® magazine, Interweave Press LLC. Not to be reprinted. All rights reserved. Spin.Off ■ spinningdaily.com I 22
technique to salvage the short end of yarn that is inevitably left over when I ply from two bobbins, and I have been using it ever since.
For spinners using handspindles, the Andean hand wrap is an easy way to ply the yarn from a spin-dle. It is also a great way to ply small samples—a spinner’s equivalent to a knitter’s swatch. I spin a singles for about twenty minutes and then use the Andean hand wrap to prepare the yarn for plying. If I want to sample the singles as a four-ply cabled yarn using the hand wrap, I first overply the singles, mak-ing a two-ply yarn with extra twist, then use the hand wrap again to ply the two-ply yarn in the same direction in which the singles were spun.
Although you can move the yarn from one hand to the other after you have completed the hand wrap, it is not easy. Therefore, you need to wrap the yarn around the hand that usually holds the singles when you ply them (fiber hand) and use your other hand for wrapping the yarn (orifice hand).
To avoid wrapping the yarn too tightly around your hand and middle finger, use your orifice hand to guide the yarn around your fiber hand, keeping just enough tension on the yarn so that it does not start plying back on itself. The only movement of your fiber hand should be turning it from the palm facing away from you to the palm facing you, and again to the palm facing away from you. If your mid-dle finger begins to turn purple, then you are wrap-ping too tightly—remove the yarn immediately. Also, remember that the hand wrap is only suitable for plying small amounts of yarn. When you’ve fin-ished wrapping the yarn, ease it off the finger and store it on your wrist as a bracelet.
Start with the back of your fiber hand facing you. Wind the end of the yarn once or twice around the thumb to hold it while you begin. Guide the yarn across the back of your hand, between the ring and middle fingers, around the middle finger, between the middle and index fingers, and back down to the side of your hand.
As you turn your fiber hand so that its palm is facing you, guide the yarn across your wrist.
Reach behind your fiber hand and guide the yarn between the index and middle fingers, around the middle finger, between the middle and ring fingers, and back to the side of your wrist below the little finger.
Guide the yarn across your wrist as you turn your fiber hand so that the palm is facing away from you again. You have now completed one round of the hand wrap.
Continue to loosely wrap the yarn following the pattern you established on the first wrap. There should not be any yarn passing over your palm. The yarn should be on the back of your hand, looped around the middle finger, and passing over your wrist below the palm.
When you come to the end of the yarn, hold it against the palm of your orifice hand with just the ring and little fingers. Then use your free fingers to move the yarn that crosses over your wrist up to the middle of your palm to release the tension.
As you continue to hold the end of the yarn, pull the loops off your middle finger, keeping them intact, and move them to the back of your hand.
Move the big loop of yarn that is around your hand down to your wrist. Unwind the original end of yarn that is around your thumb and join it with the end that you are holding in your orifice hand.
Join the two ends to a leader and ply them. To keep even tension on the two yarns while plying them, I hold one between my thumb and index fin-ger, and the other between my middle and index fin-ger of my fiber hand. I use my orifice hand to draft the yarns from the bracelet out of my fiber hand and then to guide the plying twist back toward my fiber hand. If you have wound a large bracelet, sometimes the yarn does not unwind smoothly. You may have to wiggle your fiber hand a bit to keep the yarn flow-ing. If one yarn stops unwinding from the bracelet, stop treadling, pinch the plied yarn where the twist enters it, wiggle your fiber hand, gently pull until the yarn starts unwinding again, and resume treadling and plying.
When you ply from two bobbins, they usually do not have exactly matching lengths of singles. When one bobbin is empty, if you want to salvage the remaining singles that is left on the other bobbin, do not break off the yarn. Instead, wind the last few inches of the plied yarn around your fiber hand thumb and then wrap the yarn from the remaining bobbin around your hand as outlined above. Unwind the end of the plied yarn from your thumb and splice the end of the yarn from the last bobbin to the end of the yarn from the first bobbin and then continue plying. z
Rudy Amann of Brunswick, Maine, is a retired high school mathematics teacher and assistant principal. When he was learning to spin, Priscilla Gibson-Roberts was his mentor. He teaches and demonstrates spinning and nålbinding.