How to Manual for LTL Division - Waggoners Trucking
120
System Builder (SBXA) How to Manual for LTL Division Booking Dispatching Rating Release 1 September 2017 No part of this manual may be disclosed to third parties or reproduced, stored in a retrieval system, or transmitted in any form or by any means, electronic, mechanical, photocopying, recording or otherwise, without prior written permission from The Waggoners Trucking.
Transcript of How to Manual for LTL Division - Waggoners Trucking

System Builder (SBXA)
How to Manual for LTL Division
Booking Dispatching
Rating
Release 1 September 2017 No part of this manual may be disclosed to third parties or reproduced, stored in a retrieval system, or transmitted in any form or by any means, electronic, mechanical, photocopying, recording or otherwise, without prior written permission from The Waggoners Trucking.

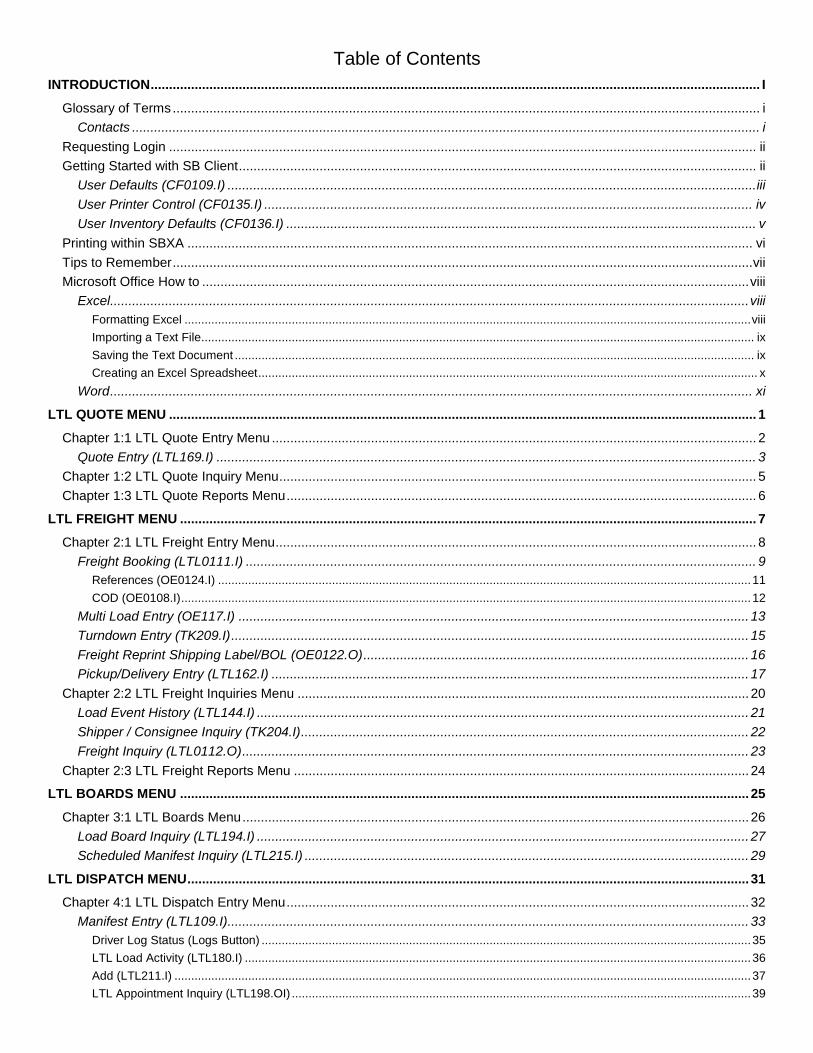
Table of Contents
INTRODUCTION ...................................................................................................................................................................... I
Glossary of Terms ................................................................................................................................................................ i
Contacts ........................................................................................................................................................................... i
Requesting Login ................................................................................................................................................................ ii
Getting Started with SB Client ............................................................................................................................................. ii
User Defaults (CF0109.I) ................................................................................................................................................ iii
User Printer Control (CF0135.I) ..................................................................................................................................... iv
User Inventory Defaults (CF0136.I) ................................................................................................................................ v
Printing within SBXA .......................................................................................................................................................... vi
Tips to Remember .............................................................................................................................................................. vii
Microsoft Office How to ..................................................................................................................................................... viii
Excel.............................................................................................................................................................................. viii Formatting Excel ......................................................................................................................................................................... viii Importing a Text File..................................................................................................................................................................... ix Saving the Text Document ........................................................................................................................................................... ix Creating an Excel Spreadsheet ..................................................................................................................................................... x
Word ............................................................................................................................................................................... xi
LTL QUOTE MENU ................................................................................................................................................................ 1
Chapter 1:1 LTL Quote Entry Menu .................................................................................................................................... 2
Quote Entry (LTL169.I) ................................................................................................................................................... 3
Chapter 1:2 LTL Quote Inquiry Menu .................................................................................................................................. 5
Chapter 1:3 LTL Quote Reports Menu ................................................................................................................................ 6
LTL FREIGHT MENU ............................................................................................................................................................. 7
Chapter 2:1 LTL Freight Entry Menu ................................................................................................................................... 8
Freight Booking (LTL0111.I) ........................................................................................................................................... 9 References (OE0124.I) ............................................................................................................................................................... 11 COD (OE0108.I) .......................................................................................................................................................................... 12
Multi Load Entry (OE117.I) ........................................................................................................................................... 13
Turndown Entry (TK209.I) ............................................................................................................................................. 15
Freight Reprint Shipping Label/BOL (OE0122.O) ......................................................................................................... 16
Pickup/Delivery Entry (LTL162.I) .................................................................................................................................. 17
Chapter 2:2 LTL Freight Inquiries Menu ........................................................................................................................... 20
Load Event History (LTL144.I) ...................................................................................................................................... 21
Shipper / Consignee Inquiry (TK204.I) .......................................................................................................................... 22
Freight Inquiry (LTL0112.O) .......................................................................................................................................... 23
Chapter 2:3 LTL Freight Reports Menu ............................................................................................................................ 24
LTL BOARDS MENU ........................................................................................................................................................... 25
Chapter 3:1 LTL Boards Menu .......................................................................................................................................... 26
Load Board Inquiry (LTL194.I) ...................................................................................................................................... 27
Scheduled Manifest Inquiry (LTL215.I) ......................................................................................................................... 29
LTL DISPATCH MENU ......................................................................................................................................................... 31
Chapter 4:1 LTL Dispatch Entry Menu .............................................................................................................................. 32
Manifest Entry (LTL109.I).............................................................................................................................................. 33 Driver Log Status (Logs Button) .................................................................................................................................................. 35 LTL Load Activity (LTL180.I) ....................................................................................................................................................... 36 Add (LTL211.I) ............................................................................................................................................................................ 37 LTL Appointment Inquiry (LTL198.OI) ......................................................................................................................................... 39

LTL Manifest Dep/Arr (LTL184.I) ................................................................................................................................................. 40 LTL Flat Bed Pay (LTL185.I) ....................................................................................................................................................... 40 Checking in PD trips (LTL187.I) .................................................................................................................................................. 41 Hourly Pay (LTL186.I) ................................................................................................................................................................. 41 LTL Manifest Comment Screen (LTL142.I) ................................................................................................................................. 42
Pre Plan Entry (LTL214.I) ............................................................................................................................................. 43
Chapter 4:2 LTL Dispatch Inquiries Menu......................................................................................................................... 45
LTL Manifest Daily Inquiry (TK107.I) ............................................................................................................................ 46
LTL Manifest History – Driver (LTL171.I) ...................................................................................................................... 46
LTL Manifest History – Tractor (LTL172.I) .................................................................................................................... 46
Chapter 4:3 LTL Dispatch Reports Menu.......................................................................................................................... 47
LTL RATING MENU ............................................................................................................................................................. 49
Chapter 5:1 LTL Rating Entry Menu ................................................................................................................................. 50
LTL Rating Entry (LTL0100.I) ....................................................................................................................................... 51
Chapter 5:2 LTL Rating Inquiries Menu ............................................................................................................................ 53
Rate Inquiry Truckload (LTL191.I) ................................................................................................................................ 54
Rate Inquiry LTL (LTL192.I) .......................................................................................................................................... 54
Chapter 5:3 LTL Rating Reports Menu ............................................................................................................................. 56
ADDITIONAL RESOURCES AND TOOLS .......................................................................................................................... 57
I - Customers ................................................................................................................................................................... 59
Customer Entry ............................................................................................................................................................. 60 Customer Directory (CUS107.I) ................................................................................................................................................. 61
Customer Inquiries ........................................................................................................................................................ 62 LTL/UV Directions Inquiry (CUS110.I) ....................................................................................................................................... 63
Customer Reports ......................................................................................................................................................... 64
II - COS (Change of Status - Equipment & Drivers) Menu ........................................................................................... 65
COS Entry Menu ........................................................................................................................................................... 66 DCS - Entry (COS100.I) ............................................................................................................................................................. 67 ECS - Entry (COS101.I) ............................................................................................................................................................. 69
COS Inquiries Menu ...................................................................................................................................................... 71 DCS Inquiry (COS104.I) ............................................................................................................................................................. 72 ECS Inquiry (COS105.I) ............................................................................................................................................................. 72
COS Reporting Menu .................................................................................................................................................... 73
III - Drivers ........................................................................................................................................................................ 75
Driver Inquiry (CD104.IO) .............................................................................................................................................. 76
Driver Timeoff Entry (TK122.I) ...................................................................................................................................... 77
Claims By Driver Inquiry (CS113.I) ............................................................................................................................... 78
Qualcomm Position History (QC0109.O) ...................................................................................................................... 78
Driver Exceptions Summary Screen (CD106.I) ............................................................................................................. 78
Driver Exception Entry (CD107.I) .................................................................................................................................. 79
IV - MGR Menu ................................................................................................................................................................. 81
Excessive Idle Inquiry (DA102.I) ................................................................................................................................... 82
V - Miles ............................................................................................................................................................................ 83
HHG Mileage Inquiry (RM0101.1I) ................................................................................................................................ 84
HHG Single Origin (RM101.2I) ...................................................................................................................................... 85
HHG Rules Audit Route (RM0101.3I) ........................................................................................................................... 85
HHG State Breakdown (RM0101.4I) ............................................................................................................................. 85
HHG Route – States (RM0101.5I) ................................................................................................................................ 86
Practical Route Inquiry (RM0101.6I) ............................................................................................................................. 86

Practical State Breakdown (RM0101.7I) ....................................................................................................................... 87
Practical Route - States (RM0101.8I) ........................................................................................................................... 87
VI - Miscellaneous Screens/Prompts ............................................................................................................................ 89
Searching for Drivers ..................................................................................................................................................... 90
Searching for Customer Codes ..................................................................................................................................... 90
Searching for Bill to Customers (LTL0111.I) ................................................................................................................. 91
Cancelling a Load Number (LTL0111.I) ........................................................................................................................ 91
Using a Temporary Customer (LTL0111.I) ................................................................................................................... 92
Load Tracking ................................................................................................................................................................ 93
VII - Qualcomm Messages .............................................................................................................................................. 95
Macro #5 & #11 (LTL Local Pickup) .............................................................................................................................. 96
Macro #6 & #12 (LTL Local Delivery) ............................................................................................................................ 96
Qualcomm Position History (QC109.O) ........................................................................................................................ 97
Qualcomm Free Form Message Entry .......................................................................................................................... 97
APPENDICES ....................................................................................................................................................................... 99
Accessorial Charge Codes ................................................................................................................................................ 99
Comment Types ................................................................................................................................................................ 99
Change of Status Types .................................................................................................................................................... 99
Deadhead Types ............................................................................................................................................................... 99
Division Codes ................................................................................................................................................................ 100
Event Codes – LTL .......................................................................................................................................................... 100
Product (Commodity) Codes ........................................................................................................................................... 100
Region/Zone Codes (LTL/TL) ......................................................................................................................................... 101
Terminal Codes ............................................................................................................................................................... 101
Trailer Types ................................................................................................................................................................... 101
Trip Types ....................................................................................................................................................................... 101
Turndown Freight Reason Codes ................................................................................................................................... 102

i
Introduction This manual will go over each section relating to booking, dispatching and rating LTL shipments. It will attempt to explain each screen and its function. The items available on the menu system can and will change without notice, but every attempt will be made to keep this manual up-to-date. Used in conjunction with additional work instructions provided by your supervisor, we hope to develop a comprehensive training tool. As we move forward, if you have any comments or suggestions, please don’t hesitate to contact the Information Systems Department either by phone or by email. We welcome your suggestions because, ultimately, you are the end user and you know your responsibilities and would which enhancements would work better for you than we do. I wish to take this time to give a big THANK YOU to Roni Moye, Corporate Administrative LTL Support (Houston Terminal) for her valuable insight and assistance in the collaboration of this manual.
Glossary of Terms
Term Description
ASN Term for electronic data – Advanced Shipping Notice.
Function Key The row of keys above the numbers row (F1, F2, F3, etc).
EDI Electronic Data
Form The area that data is displayed or entered. Also, may be referred to as a “screen”.
Parent Each Customer is grouped into a Parent; Bill to Codes, Shipper/Consignee Codes and Dealer Codes are then assigned to a Parent.
Screen The area that data is displayed or entered. Also, may be referred to as a “form”.
Region A pickup or delivery area assigned to Terminal.
Load / Freight Term assigned to a booked order.
Manifest A group of loads assigned to an over the road driver.
Local P/D A group of loads assigned to a local driver. Most P/D trips are within 150 miles of terminal.
Group Groups are assigned by inventory location. This allows quick viewing of inventory that has been released for shipment. (Car Haul use only)
Contacts
Every once in a while there are issues with the system or data. The following people can assist you in correcting these issues or can offer further explanations on screen functions.
Name Extension Email Address Area
Patrick Colarchik Billings x 1084 [email protected] Networking/Software issues
Ronna Green Billings x 1085 [email protected] Help Desk
Trisha Langford Billings x 1017 [email protected] Accounting
Mary Ann Beran Billings x 1070 [email protected] LTL Department / Billing
Roni Moye Houston x 3042 [email protected] LTL Terminal Manager
ii
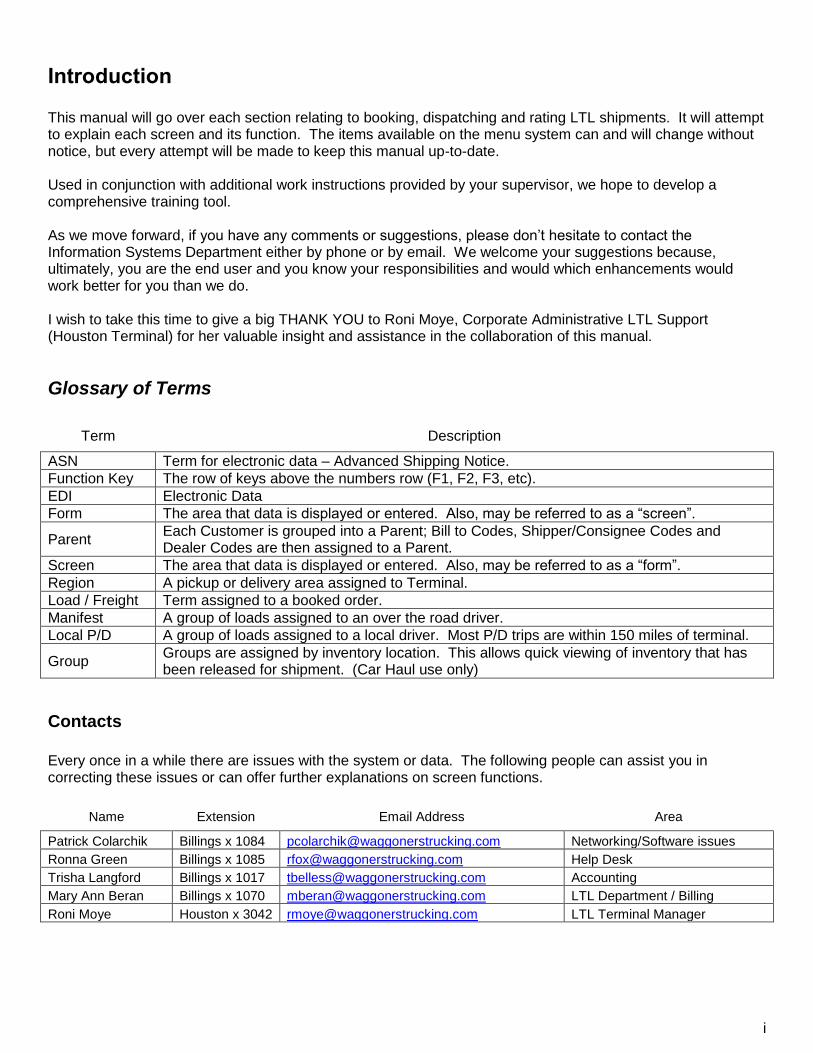
Requesting Login Before we get started, you should have your new SB login credentials already on hand. If you haven’t been assigned a username or password, please let your immediate supervisor know so they can request one from the Information Systems Department. All new requests should include the full name of the user, their position and a list of all features that you may need, including whether or not you need to send data to Customs. If you have a password preference, please let us know at that time.
Getting Started with SB Client Double-click on the SB+ Icon, which is normally found on your Desktop. Make sure your caps lock is off. Logging into the system must be done in lowercase. If you are having problems at this point, please contact the Information Systems department for assistance. After clicking on the icon, the Connect to Application window will prompt you for the Application Name. If this is your first time entering the system, the box may be empty. Click on the down arrow and select “WAGGONERS SYSTEM”. Click Connect.
Once you are done with SB, hitting the ESC key or clicking the “X” found at the top right corner will disconnect the session.
SB should now be started and you are presented with this work area. You are ready to begin!
Handy Note: If you double click the light blue area between “Trucking Operations System and the Date, your work area should minimize; repeat clicks and work area is returned to full size.
iii
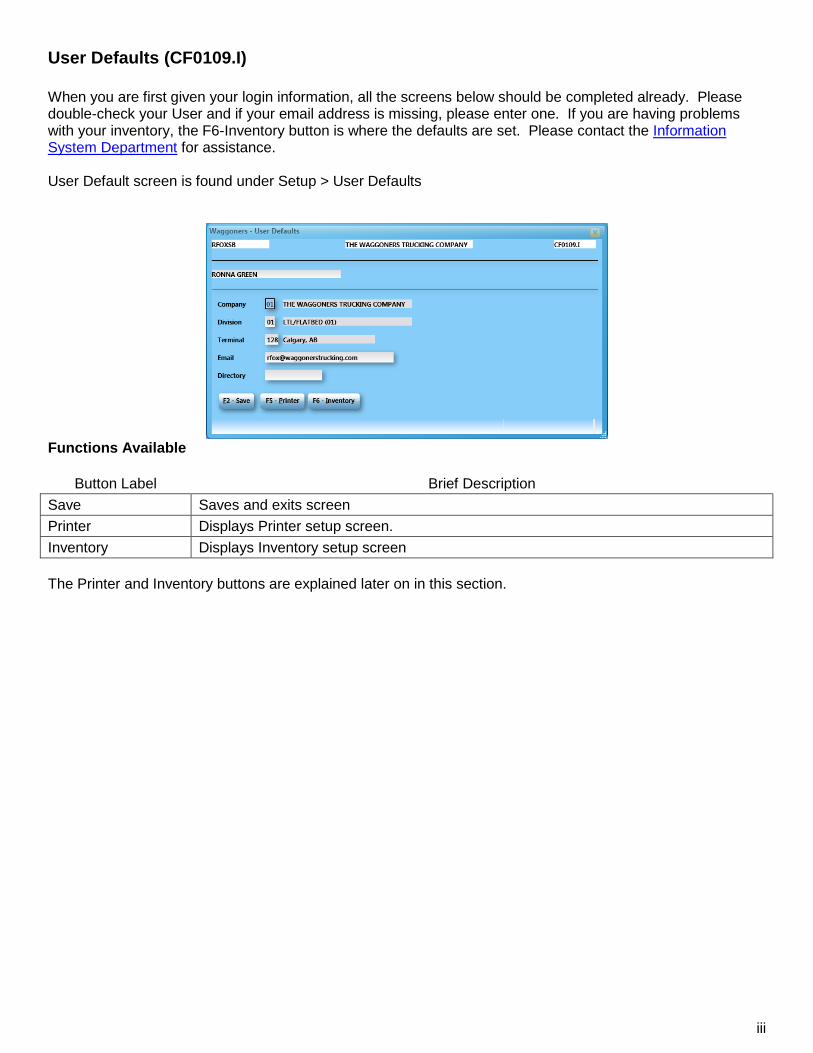
User Defaults (CF0109.I)
When you are first given your login information, all the screens below should be completed already. Please double-check your User and if your email address is missing, please enter one. If you are having problems with your inventory, the F6-Inventory button is where the defaults are set. Please contact the Information System Department for assistance. User Default screen is found under Setup > User Defaults
Functions Available
Button Label Brief Description
Save Saves and exits screen
Printer Displays Printer setup screen.
Inventory Displays Inventory setup screen
The Printer and Inventory buttons are explained later on in this section.
iv
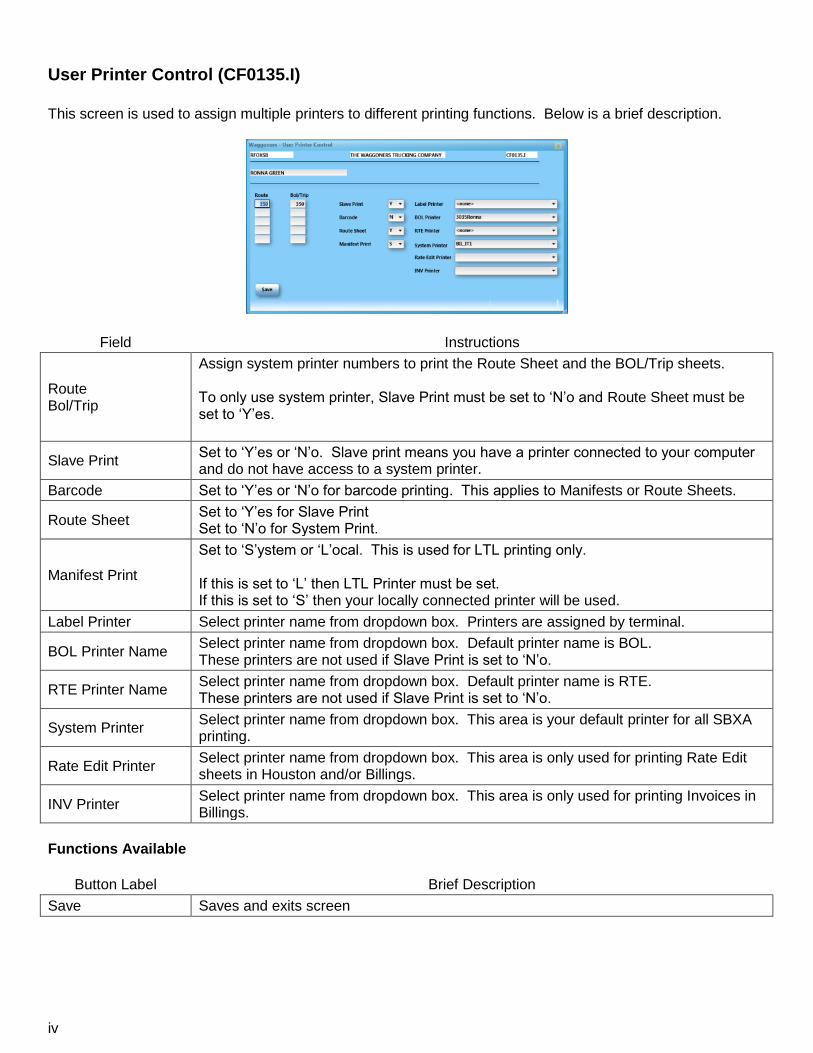
User Printer Control (CF0135.I)
This screen is used to assign multiple printers to different printing functions. Below is a brief description.
Field Instructions
Route Bol/Trip
Assign system printer numbers to print the Route Sheet and the BOL/Trip sheets. To only use system printer, Slave Print must be set to ‘N’o and Route Sheet must be set to ‘Y’es.
Slave Print Set to ‘Y’es or ‘N’o. Slave print means you have a printer connected to your computer and do not have access to a system printer.
Barcode Set to ‘Y’es or ‘N’o for barcode printing. This applies to Manifests or Route Sheets.
Route Sheet Set to ‘Y’es for Slave Print Set to ‘N’o for System Print.
Manifest Print
Set to ‘S’ystem or ‘L’ocal. This is used for LTL printing only. If this is set to ‘L’ then LTL Printer must be set. If this is set to ‘S’ then your locally connected printer will be used.
Label Printer Select printer name from dropdown box. Printers are assigned by terminal.
BOL Printer Name Select printer name from dropdown box. Default printer name is BOL. These printers are not used if Slave Print is set to ‘N’o.
RTE Printer Name Select printer name from dropdown box. Default printer name is RTE. These printers are not used if Slave Print is set to ‘N’o.
System Printer Select printer name from dropdown box. This area is your default printer for all SBXA printing.
Rate Edit Printer Select printer name from dropdown box. This area is only used for printing Rate Edit sheets in Houston and/or Billings.
INV Printer Select printer name from dropdown box. This area is only used for printing Invoices in Billings.
Functions Available
Button Label Brief Description
Save Saves and exits screen
v
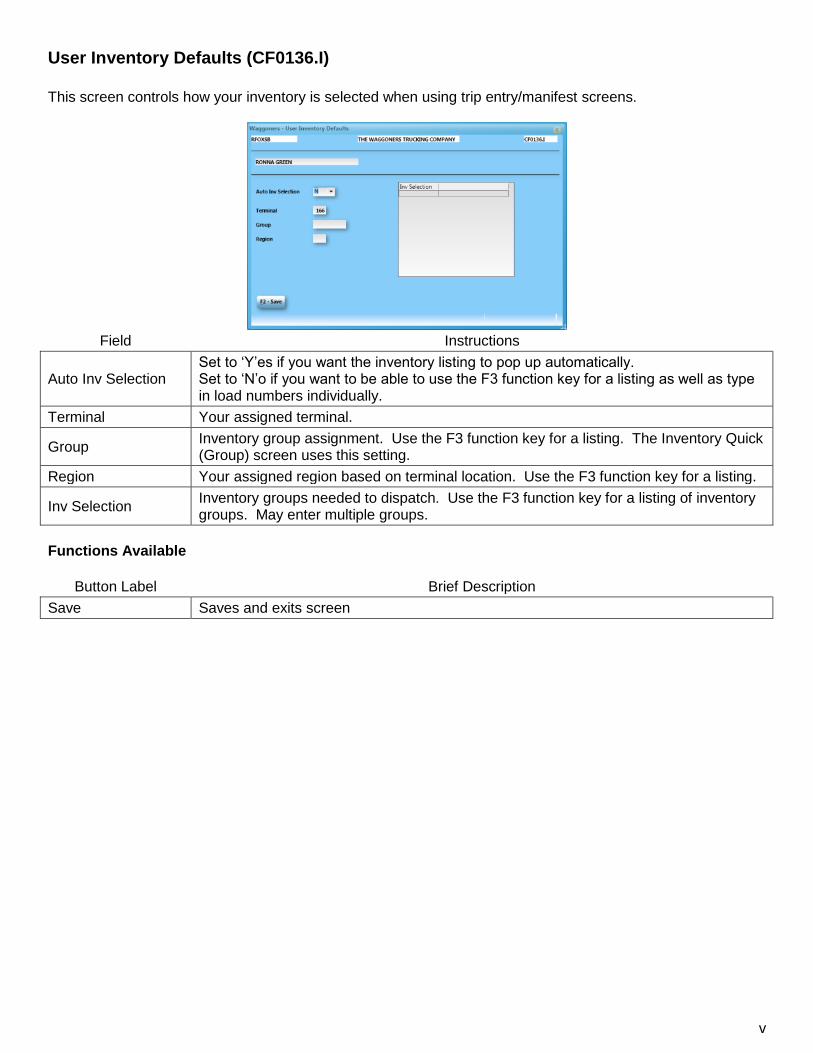
User Inventory Defaults (CF0136.I)
This screen controls how your inventory is selected when using trip entry/manifest screens.
Field Instructions
Auto Inv Selection Set to ‘Y’es if you want the inventory listing to pop up automatically. Set to ‘N’o if you want to be able to use the F3 function key for a listing as well as type in load numbers individually.
Terminal Your assigned terminal.
Group Inventory group assignment. Use the F3 function key for a listing. The Inventory Quick (Group) screen uses this setting.
Region Your assigned region based on terminal location. Use the F3 function key for a listing.
Inv Selection Inventory groups needed to dispatch. Use the F3 function key for a listing of inventory groups. May enter multiple groups.
Functions Available
Button Label Brief Description
Save Saves and exits screen

vi
Printing within SBXA On most computers, in order to send the screen shot to the printer, your computer must have a third-party application installed (Greenshot). To determine if your computer has the application, locate the green G icon
which should load when you start up your computer. (lower right hand corner of the task bar) If you cannot locate this icon, please contact the Information System Department for assistance. Once the application is installed, to print a screen shot, press the Alt + Prt Scr buttons and mouse over Send to Printer then select the printer to print to. If this is the first time Greenshot has been used, a print options box will open up. Select your settings and then click the Save options as default and do not ask again box. Greenshot has other abilities such as Copy to Clipboard and Save as. SBXA uses the XPS viewer for viewing and printing our reports. Reports can also be downloaded to Word or Excel. To find those options, click on the File menu. If you come across a report that is not behaving correctly, inform us immediately and we will assist. Note that some reports are set up to download automatically to Excel. To close this window, select File > Exit or click the “X” found in the upper right hand corner of window To exit this menu without choosing to print, you may click on the “X” to close the dialog box or hit the ESC key.

vii
Tips to Remember Below you will find helpful tips to smooth your way through each of your tasks.
Action Tip
F2 Will always save a record.
F3 Lookup
When in doubt, hitting the F3 function while your cursor in a field will bring up additional information. Recently, we began adding a “Lookup” button to further assist in searching for information.
Esc Used to leave a screen or log off SBXA.
Finding a City
Alternately, when trying to find a city – if you type in the first 3 characters of city followed by a comma and the state abbreviation (No Spaces) then hit the F3 function key, a cross reference of all cities in that state with those first 3 characters will pop up for easy selection. For example: BIL,MT will display Billings Bench, MT ; Billings Heights, MT ; Billings, MT.
Date Format
Dates may be entered in the following way: Entering through prompt will default date to current date. . If you use the F3 key here, a calendar will pop up to select from. Format Data Entered Result DD 03 Will give you the third day of the current month/year MMDD 0318 Will give you March 18 of the current year MMDDYY 031815 Will give you March 18, 2015 Please remember if you do not type in a year, the system will default your entry to the current year. If you do not type in a month, the system will default to the current month.
Time Format
Times may be entered in the following way: Time displays on a 24-hr clock or military time. Entering through prompt will default time to current time. Format Time Entered Result H 2 02:00 or 14:00 (if entered AM/PM) HP 2P 14:00 HA 2A 02:00 HH:MM 2:15 02:15 or 14:15 HH:MMP 2:15P 14:15 HH:MMA 2:15A 02:15
Delete entries
To remove a load number from a Car Haul trip, you must first highlight the load number and then press CTRL + Del keys together. Otherwise, if you press the Del button on your keyboard, you will be left with an empty space where the load number was but the description field, etc will still be there. If you press the Del button on any field from within a screen, you will delete the item from the system and it cannot be replaced.
Data Entry All data is entered in UPPERCASE.
Load
There is a “Lookup” button next to this field. You can easily find all LTL loads that meet one of many search criteria that you enter.
Resizing You can adjust the size of any screen by dragging the lower right corner.

viii
Microsoft Office How to
Excel
Formatting Excel
Before choosing to print a report to Excel, you must first make sure that you don’t have a worksheet already open. This ensures that SBXA has a clean workspace to export to. If you decide to have a worksheet already open, it is important to not have any cells highlighted. SBXA will give you a macro error and you will have to start the report process over again. The examples below are used mainly for car haul functions, but may be useful for you. The current version of SBXA does not like the newer file extension (.xlsx) and will give you a warning to allow the user to back out of allowing the report to populate in Excel. When this happens, click ‘Yes’ to allow the report to create. When the report is finished, SB will give you a DDE Macro Error. Click ‘OK’. This is normal. 1) After choosing to print a report to Excel, the following dialog box will pop up. Choose your option, the default ‘Excel’ is the typical selection. Hit Enter. If Excel is not already opened, SB will open the software for its use.
3) Then, go up to your Format menu option in Excel and choose Cells. From this screen, choose the “Alignment” tab and click once or twice on the ‘Wrap Text’ option found under Text Control; we want the box to be completely empty. Then hit OK.
(Excel 2007 or greater) Then, go up to the Home Ribbon and click on Format (in the Cells section) menu option and then choose Format Cells. From the Format Cells screen, click on “Alignment” tab and click once or twice on the ‘Wrap Text’ option found under Text Control; we want the box to be completely empty. Then hit OK.
2) If there are items to report, they will appear in the worksheet. You will notice the first row will be a little tall; this is due to a text-wrap. To fix this, highlight the worksheet by selecting the ‘box’ between Row 1 and Column A.
ix
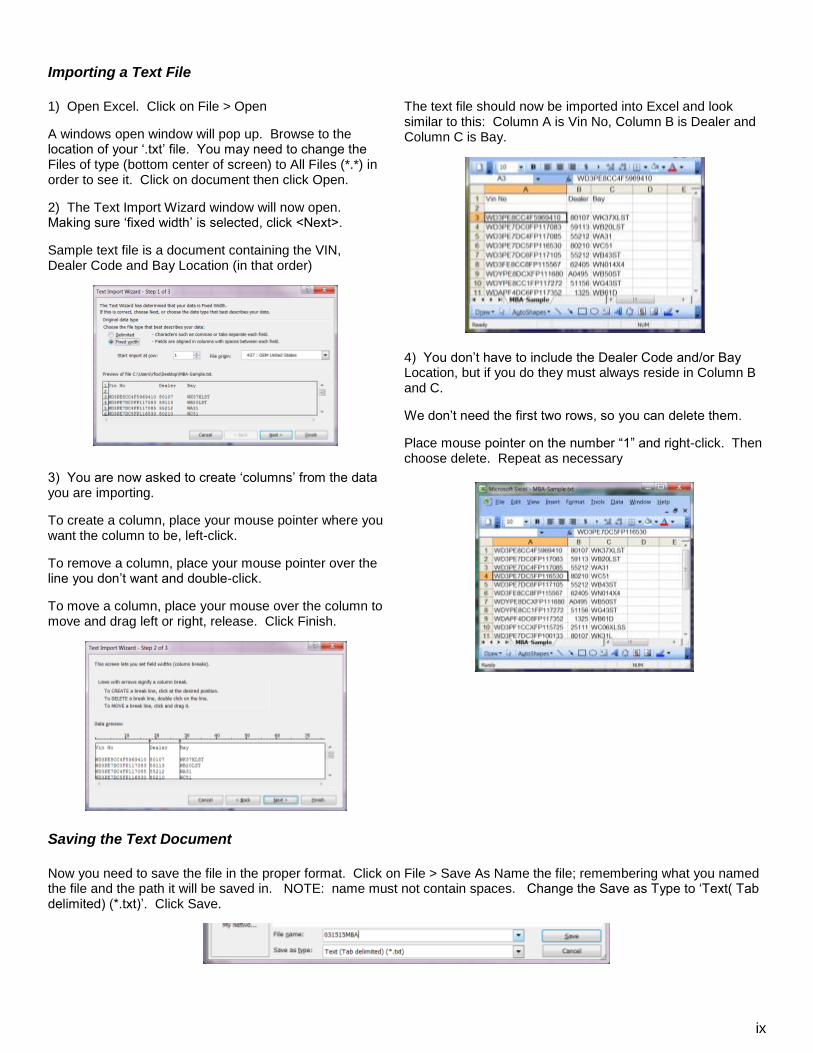
Importing a Text File
1) Open Excel. Click on File > Open
A windows open window will pop up. Browse to the location of your ‘.txt’ file. You may need to change the Files of type (bottom center of screen) to All Files (*.*) in order to see it. Click on document then click Open.
2) The Text Import Wizard window will now open. Making sure ‘fixed width’ is selected, click <Next>.
Sample text file is a document containing the VIN, Dealer Code and Bay Location (in that order)
The text file should now be imported into Excel and look similar to this: Column A is Vin No, Column B is Dealer and Column C is Bay.
4) You don’t have to include the Dealer Code and/or Bay Location, but if you do they must always reside in Column B and C.
We don’t need the first two rows, so you can delete them.
Place mouse pointer on the number “1” and right-click. Then choose delete. Repeat as necessary
3) You are now asked to create ‘columns’ from the data you are importing.
To create a column, place your mouse pointer where you want the column to be, left-click.
To remove a column, place your mouse pointer over the line you don’t want and double-click.
To move a column, place your mouse over the column to move and drag left or right, release. Click Finish.
Saving the Text Document
Now you need to save the file in the proper format. Click on File > Save As Name the file; remembering what you named the file and the path it will be saved in. NOTE: name must not contain spaces. Change the Save as Type to ‘Text( Tab delimited) (*.txt)’. Click Save.

x
Creating an Excel Spreadsheet
Sometimes you may need to create your own list of VINs from an email or from another document that is not easily imported. Below are two examples of how to make your own file. If you have other situations and need guidance, please notify your IT department for assistance.
This example shows a list of only VINS. 1) Open Excel. If a worksheet didn’t open automatically, click File > New
Copy VINs and paste into Column A. Click on first cell in Column A then right-click mouse. Choose Paste.
Now you need to save the file in the proper format, refer to ‘Saving the text document’ for instructions.
This example shows a list of VINs + Dealer on same line 1) Open Excel. If a worksheet didn’t open automatically, click File > New Copy VINs and paste into Column A. Click on first cell in Column A then right-click mouse. Choose Paste. Now click on the first cell (A1). You will notice that the cell contains both the VIN and Dealer information. We need the data in two separate columns. To accomplish this, select all the data we need to break-out
Go up to Data > Text to Columns and then follow the instructions from Importing a list of VINs from a text file, Text Import Wizard. Now you need to save the file in the proper format, refer to ‘Saving the text document’ for instructions.

xi
Word
When a report is exporting to Microsoft Word, it automatically opens up the software and exports the data to a table. You will find the rows/columns are ‘wrapped’ just as they were in the Excel export. Sometimes, you will need to change the paper orientation from Portrait to Landscape and change your margin dimensions. These options are found under File > Page Setup. Other times, you will also need to change the table dimensions. Because of this hassle, if the report is too wide; Word is not a good option for viewing.

1
LTL Quote Menu
Chapter Contents Chapter 1:1 LTL Quote Entry Menu .................................................................................................................................... 2
Quote Entry (LTL169.I) ................................................................................................................................................... 3
Chapter 1:2 LTL Quote Inquiry Menu .................................................................................................................................. 5
Chapter 1:3 LTL Quote Reports Menu ................................................................................................................................ 6

2
Chapter 1:1 LTL Quote Entry Menu This chapter will focus on creating and emailing quotes. After quotes are created they can then be used to rate a shipment that is later booked. The menu options in this chapter are found here: Quote > Entry

3
Quote Entry (LTL169.I)
This screen is used to enter customer quotes when they call in and has useful functions that will allow for accurate rating and easy communication with the potential customer. The quote number created can be used in the quote field found in LTL Freight Booking. This process currently does not work as outlined here. All rates will need to entered with manually with the rate override button clicked.
Field Instructions
Unit Quote # ‘N’ ew – Press the F3 function key to find quotes already in the system.
Expire Date By default, quote will expire in 7 days. Enter a new date, if desired.
Customer Enter customer name.
Contact Enter contact name for customer.
Phone Number Enter phone number of contact.
Fax Number Enter fax number of contact.
Email Address Enter email address for contact.
Comment1 Comment2 Comment3
This section allows you to add details about the shipment and/or any notes you find that could be helpful.
Shipping Information
The following 4 drop down boxes are linked to the LTL rate tables. If the city/state combination is not found within these tables, the system will warn you that a call needs to be made to calculate the correct rate.
Ship From St Choose from drop down list the state from which the load is originating.
Ship City Choose from drop down list the city from which the load is originating. You will see only those pickup locations that we normally ship from. If a city isn’t in the list then you pick the closest in the list and type the actual city name in the Alt Pickup section.
Ship To St Choose from the drop down list the state from which the load is delivering.
Dest City Choose from the drop down list the city from which the load is delivering. . You will see only those pickup locations that we normally ship from. If a city isn’t in the list then you pick the closest in the list and type the actual city name in the Alt Delivery section.
Alt Pickup Alt Delivery
Enter an alternate location from which the load is originating and/or delivering. If applicable. When the load is booked and rated, this information will be needed to calculate Advance and/or Furtherance charges.

4
Product Enter description of quoted freight. Be very clear on dimensions of shipment.
Package Select from drop down list the appropriate package type.
Hazmat Enter ‘Y’es or ‘N’o for hazardous materials.
Weight Length Width Height
Enter the measurements of the freight. If there is a Ship From - Ship To record in the system, the rate will calculate once the weight is entered. If not, you will be notified that Rate is missing and you must calculate rate manually.
Pieces Enter total number of pieces.
Override Rate Click box if rate is to overridden. If this box is checked, you must manually enter all the data in the quoted charges section.
Quoted Charges Section
Rate Type Enter rate type.
Charge Desc System will display the description of charge.
Rate Enter the rate associated with rate type.
CWT Rate Enter rate per hundred pounds.
Linehaul Enter line haul total amount.
Other Enter the total amount not associated with line haul and fuel surcharge.
Total Quoted Enter total of quote.
Functions Available
Button Label Brief Description
F2 - Save Saves record.
F4 – Delete Deletes quote from system.
F5 – Email Will send an email to contact’s email address, if entered.
F6 – Calc Rate When pressed, will auto-calculate the rate. Does not work if Override Rate is selected.

5
Chapter 1:2 LTL Quote Inquiry Menu Section saved for future use

6
Chapter 1:3 LTL Quote Reports Menu Section saved for future use.

7
LTL Freight Menu
Chapter Contents
Chapter 2:1 LTL Freight Entry Menu ................................................................................................................................... 8
Freight Booking (LTL0111.I) ........................................................................................................................................... 9
References (OE0124.I) ............................................................................................................................................................... 11 COD (OE0108.I) .......................................................................................................................................................................... 12
Multi Load Entry (OE117.I) ........................................................................................................................................... 13
Turndown Entry (TK209.I) ............................................................................................................................................. 15
Freight Reprint Shipping Label/BOL (OE0122.O) ......................................................................................................... 16
Pickup/Delivery Entry (LTL162.I) .................................................................................................................................. 17
Chapter 2:2 LTL Freight Inquiries Menu ........................................................................................................................... 20
Load Event History (LTL144.I) ...................................................................................................................................... 21
Shipper / Consignee Inquiry (TK204.I) .......................................................................................................................... 22
Freight Inquiry (LTL0112.O) .......................................................................................................................................... 23
Chapter 2:3 LTL Freight Reports Menu ............................................................................................................................ 24

8
Chapter 2:1 LTL Freight Entry Menu This chapter will focus on entering loads or freight into the inventory system. The screen used for entry is determined by the division you are assigned to. Please ask your supervisor for your division information or look at the Setup > User Defaults menu. The menu options in this chapter are found here: Freight > Entry

9
Freight Booking (LTL0111.I)
This is the screen used to book freight. The information contained within this chapter is meant to explain the functions of each field and button. It is meant to be used in conjunction with your terminal’s work instructions.
Field Instructions
Load “N” ew, type in an existing load number or press F3 function key to activate a search of loads by Received Date. This is also based on the region set in your User Defaults. Use “Lookup” button to search.
O(rig) Zone D(est) Zone
O Zone will default to the region entered in your User Setup screen. D Zone will default back to the zone set for the ‘C’ type customer. Using the F3 function key will display a list of available zones.
Cus Dir This feature allows you to choose a shipper and consignee from the custom built Customer Directory that is set up for your terminal or individual user. For instructions on how to set up this directory, refer to Chapter 6:1 Customers section of this manual.
Call in By Enter First and Last name of person calling in order
Call in Phone Enter phone number of person calling in order
Hold Until Enter date. This feature works with the Load Board. It will allow you to hold a shipment on yard until customer wants it shipped. If you put something in this field, then the 7 day ship breakdown on the Load Board will use this date instead of the pick up date.
Shipper/Consignee Section
Type First entry should always be a ‘S’hipper. This defaults to either ‘S’hipper, ’C’onsignee. To delete an entered shipper or consignee, click on the “DEL” button located at the end of the line for each type entry.
Customer
Enter customer number. Use F3 function key for a customer search by name, address, city or state. To use a temporary number, please see Miscellaneous Section. Type DIR in this area to pull up your Customer Directory - if you’ve entered your customer number in the “Customer No” field. In Care of Customers require a Final Destination to be declared. Enter this location if prompted by system.
Location Enter City,State: field will display city/state of customer number entered by default.
Zip Enter ZIP;field will display ZIP of customer number entered by default.

10
After entering the Consignee information, if this shipment is going to Canada, you will be prompted for the PARS number. This number is the same as the Load Number press enter and continue.
Scheduled If not today’s date, enter date of scheduled pickup for ‘S’hip customer. If not today’s date, enter date of scheduled delivery for ‘C’onsignee Customer.
Pu/Del Enter time load is ready to be picked up from Customer.
Closes Enter time load will be ready for pickup or time business closes.
Del Deletes individual customer type entry
Shipment Pre Planning Section
Wgt Destination If applicable, enter valid region code. Use the F3 function key for a listing.
P/U Area If applicable, select area from dropdown box. Used to help group together shipments for pickup.
Long/Short Information entered here is used in conjunction with the Load Board. Select applicable route from drop down box. The weight of this shipment will be included in the Terminal Weight Summary screens for Longhaul or Shorthaul.
Pre Plan Manifest #
Once a pre plan manifest is created, loads can be assigned to the record from here. Select pre plan manifest from drop down box. Once selected, the Cur Wgt, Max Wgt and Full indicators will populate to help plan. Each load can be placed on a maximum of two pre plan shipments at a time.
Transfer Pnt If applicable, select transfer point from drop down box.
View If a pre plan manifest is selected, this button will open the record.
Shipment Contact Section
Pickup & Delivery Contact
Information defaults to Contact information entered in the Customer Entry screen. Enter contact name if blank.
Phone Information should default to contact information entered in the Customer Entry screen. Enter phone number if blank.
Remarks Enter remarks.
Email Information should default to email address entered in the LTL/UV Sales Inquiry or Customer Entry screens. You may type in any email address in this area.
BOL To send an electronic version of the Bill of Lading to the email address listed, click this button. This email sends a link to the customer for Load Tracking. To printer a paper copy of this form, click the BOL button located on bottom of screen.
CONFIRM To send a pickup or delivery confirmation email to the email address listed, click this button.
Billing Section
Once this is all completed, press the “References” button to complete customer requirements.
PPD/COL
Enter type of billing. Use the F3 function key for valid types.
‘P’repaid if the shipper is paying the freight charge. ‘C’ollect if the consignee is paying the freight charge. ‘B’ill to a 3rd party ‘COD’ if this shipment is to paid by credit card or money order prior to delivery.
Miles Should automatically calculate based on the locations entered.
Quote Quoted Amt
If applicable, enter quote number. If applicable, enter quoted amount.
Bill To
Defaulted to value based on PPD/COL type and Customer information. If above is ‘P’ or ‘C’, the correct bill to should populate. If ‘B’, you will be required to enter the 3rd Party customer code.

11
The customer’s available credit will now pop up. You need to verify whether or not the customer has enough to proceed with the shipment. Contact the Accounts Receivable Department in Billings and they will advise, if you have questions or concerns. Once available credit has been verified, the system will then tell you what this customer requires when billing. Make note of this information. You will need it later when you click on the “References” button. Click “OK” to proceed.
Broker If this is a Canadian shipment, type in the name of the customs broker that will be clearing the load. If unknown, leave blank and return later to complete. If this is a stateside shipment, skip.
Wgt Enter estimated weight given by customer.
Pcs Enter estimated pieces given by customer.
Description Enter detailed description of order.
Dimensions Enter detailed dimensions.
Additional BOL Desc
Used in conjunction with the electronic BOL when one shipment has multiple pieces and/or descriptions.
Cancelled If shipment is cancelled, will display cancelled date.
Functions Available
Button Label Brief Description
Save Saves record. Will be prompted to print Load and Freight labels the first time load is saved.
Calc If pressed, will recalculate miles between cities.
Events Provides a listing of Events associated with order.
References Additional billing information entered here.
Changes Provides a listing of changes made to order.
Cancel Use to cancel an order.
UnCancel Used to un-cancel an order
Label Used to print a thermal label for order. Will print a label for each piece.
Comments Used to enter additional comments pertaining to load.
Dates Opens the Pickup/Delivery Entry screen.
ACE Transmits load information to Customs Electronic System.
COD Used to enter COD information
BOL Prints Bill Of Lading directly to your printer.
References (OE0124.I)
If a customer requires their reference numbers to be attached to our booking order, the information is entered here.
12
Select the appropriate reference type from the dropdown box and then enter the customer supplied reference number. If the customer cannot provide you with this information at the time the order is placed, proceed with selecting the correct requirements and type an “N” in the field beside it for each one. This allows you to proceed with the order and then come back later to fill it in. The “Exception” button is used by the Billing Department.
COD (OE0108.I)
If a shipment is Cash on Delivery, the information needs to be entered here. Contact the Accounts Receivable or Billing Department if there are questions.
13
Multi Load Entry (OE117.I)
This screen is used when a customer has multiple shipments originating from the same shipping location. This screen also allows us to consolidate the charges into a single Freight Bill.
Field Instructions
Order No “N” ew; F3 function will show orders already in the system.
Shipper Enter Shipper code or use F3 function key to search for customers by city. For instructions on how to use the search function, click here.
Called In By Enter name of person calling in order.
Phone Enter phone number of person calling in order.
Pickup Date Enter date order is to be picked up.
Ready Enter time order will be available for pickup.
Closes Enter time business will be closed.
Consignee Section * Repeat as many times as necessary
Consignee Enter Customer Number. Use F3 function key for a customer search by name, address, city or state
Dest This is the destination zone. Use the F3 function key for a list of available zones.
PCB
Enter type of billing. Use the F3 function key for valid types. ‘P’repaid if the shipper is paying the freight charge. ‘C’ollect if the consignee is paying the freight charge. ‘B’ill to a 3rd party.
Bill To Enter customer number associated with PCB entry.
Weight Enter weight.
Pieces Enter pieces
Description Enter detailed description of pieces
Delivery Enter estimated delivery date.
Time Enter estimated delivery time.

14
Consolidated Billing Entry
Consolidated Billing Enter ‘Y’es or ‘N’o. Leaving blank means ‘No’
LH (CWT) Enter consolidated billing rate.
FSC Enter consolidated fuel surcharge rate.
Drop Chg Enter consolidated drop charge rate.
Functions Available
Button Label Brief Description
Save Saves record.
Cancel Cancels record.
Book Creates load numbers. Once load numbers are created, shipping labels will print.
Breakdown Displays breakdown of charges for each load number based on consolidated rates that were entered.
15
Turndown Entry (TK209.I)
This screen is used to keep track of the reasons freight is turned down.
Field Instructions
Turndown No. “N” ew; F3 function finds turndown entries already in the system..
Origin Enter origin city/state of turned down freight.
Destination Enter destination city/state of turned down freight.
Customer Enter customer name.
Reason Enter reason for turning down freight. Use F3 function key for a list of codes.
Contact Enter name of person calling.
Phone Enter phone number of person calling.
Shipments Enter number of shipments
Freight Desc Enter abbreviated freight description.
Comments Enter any applicable comments associated with turndown.
Functions Available
Button Label Brief Description
F2 - Save Saves record.
F4 – Delete Deletes entry from system.

16
Freight Reprint Shipping Label/BOL (OE0122.O)
It allows the user to re-print shipping labels and Bill of Lading.
Field Instructions
Load No Type in existing Load Number; F3 function allows you to search for the order.
Functions Available
Button Label Brief Description
OK Clears entry. When pressed twice, will close screen.
Shipping Label When pressed will start the reprinting of labels. Will also ask if you want Freight Labels printed.
BOL When pressed will reprint the BOL.
17
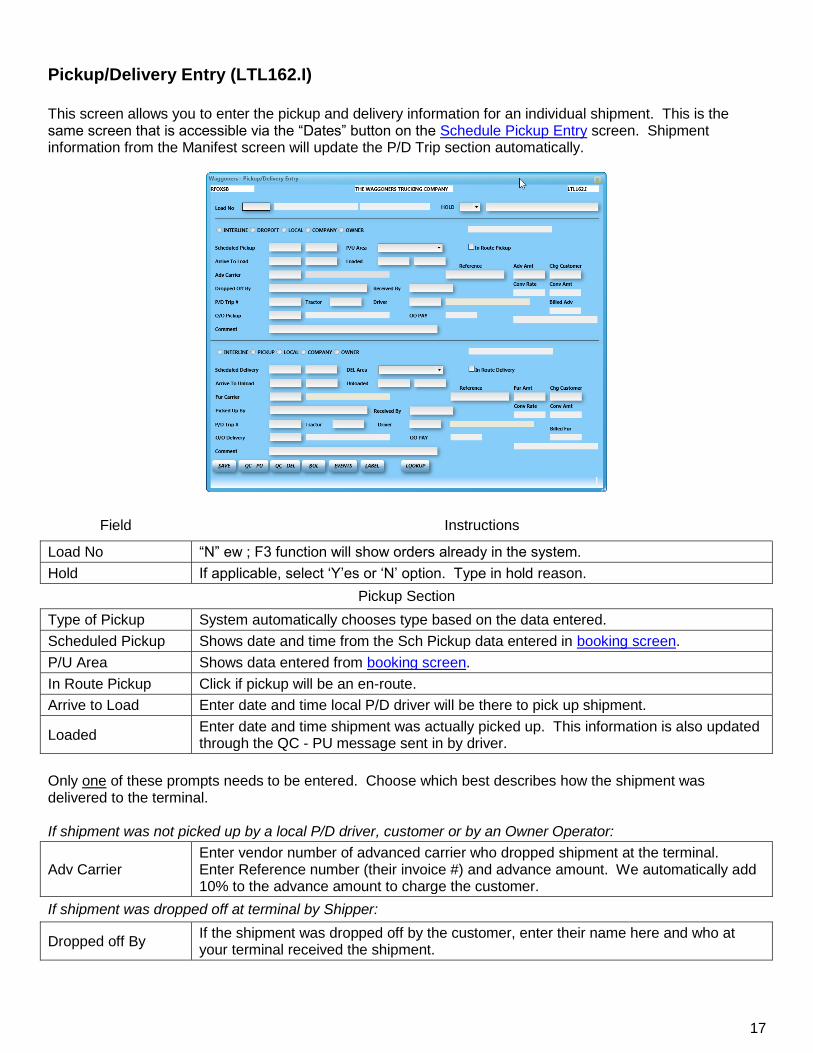
Pickup/Delivery Entry (LTL162.I)
This screen allows you to enter the pickup and delivery information for an individual shipment. This is the same screen that is accessible via the “Dates” button on the Schedule Pickup Entry screen. Shipment information from the Manifest screen will update the P/D Trip section automatically.
Field Instructions
Load No “N” ew ; F3 function will show orders already in the system.
Hold If applicable, select ‘Y’es or ‘N’ option. Type in hold reason.
Pickup Section
Type of Pickup System automatically chooses type based on the data entered.
Scheduled Pickup Shows date and time from the Sch Pickup data entered in booking screen.
P/U Area Shows data entered from booking screen.
In Route Pickup Click if pickup will be an en-route.
Arrive to Load Enter date and time local P/D driver will be there to pick up shipment.
Loaded Enter date and time shipment was actually picked up. This information is also updated through the QC - PU message sent in by driver.
Only one of these prompts needs to be entered. Choose which best describes how the shipment was delivered to the terminal. If shipment was not picked up by a local P/D driver, customer or by an Owner Operator:
Adv Carrier Enter vendor number of advanced carrier who dropped shipment at the terminal. Enter Reference number (their invoice #) and advance amount. We automatically add 10% to the advance amount to charge the customer.
If shipment was dropped off at terminal by Shipper:
Dropped off By If the shipment was dropped off by the customer, enter their name here and who at your terminal received the shipment.

18
If shipment was picked up by a local P/D driver:
P/D Trip # Tractor Driver
Enter P/D trip number, Tractor and Driver. This information is also updated from the manifest screen.
If Owner Operator picked up shipment and then dropped at terminal (did not haul shipment over the road):
O/O Pickup & Pay Enter driver number of owner operator. The pickup pay calculates automatically based on the line haul rate entered.
Comment Enter comments. Use this area as dispatch notes. Do not use any other field to make notes.
Delivery Section
Type of Delivery System automatically chooses type based on the data entered.
Scheduled Delivery Shows date and time from the Sch Delivery data entered in booking screen.
DEL Area Shows data entered from booking screen.
In Route Delivery Click if delivery will be an en-route.
Arrive to Unload Enter date and time local P/D driver will be there to deliver shipment.
Unloaded Enter date and time shipment was actually delivered. This information is also updated through the QC - DEL message sent in by driver.
Only one of these prompts needs to be entered. Choose which best describes how the shipment was delivered to the customer. If shipment was not delivered by a local P/D driver, customer or by an Owner Operator:
Fur Carrier Enter vendor number of furtherance carrier who delivered shipment to customer. Enter Reference number (their invoice #) and furtherance amount. We automatically add 10% to the furtherance amount to charge the customer.
If shipment was delivered to customer by the consignee:
Picked Up By If the final delivery was handled by the consignee, enter their name here and who at your terminal released the shipment.
If shipment was delivered by a local P/D driver:
P/D Trip # Tractor Driver
Enter P/D trip number, Tractor and Driver. This information is also updated from the manifest screen.
If Owner Operator delivered shipment and was not the one who dropped shipment at terminal:
O/O Delivery & Pay Enter driver number of owner operator. The delivery pay calculates automatically based on the line haul rate entered.
Comment Enter comments. Use this area as dispatch notes. Do not use any other field to make notes.
Functions Available
Button Label Brief Description
Save Saves record.
Lookup Use this feature to locate load number, vendor numbers or trip numbers. Button will not be accessible if the field your cursor is in cannot be searched. Replaces the F3 function key.
QC-PU Sends a qc message to driver informing him/her of the scheduled pickup. Driver then has the ability to reply with the actual pickup date/time. Example of messages here.
19
QC-DEL Sends a qc message to driver informing him/her of the scheduled delivery. Driver then has the ability to reply with the actual delivery date/time. Example of messages here.
BOL Prints the Bill of Lading to your printer.
Events Opens LTL Events associated with this shipment.
Label Prints shipment labels.

20
Chapter 2:2 LTL Freight Inquiries Menu The inquiries offered in this menu are the Load Event History, Shipper/Consignee Inquiry and Freight Inquiry. This chapter will go over each screen and explain its features. The menu options in this chapter are here: Freight > Inquiries.
21
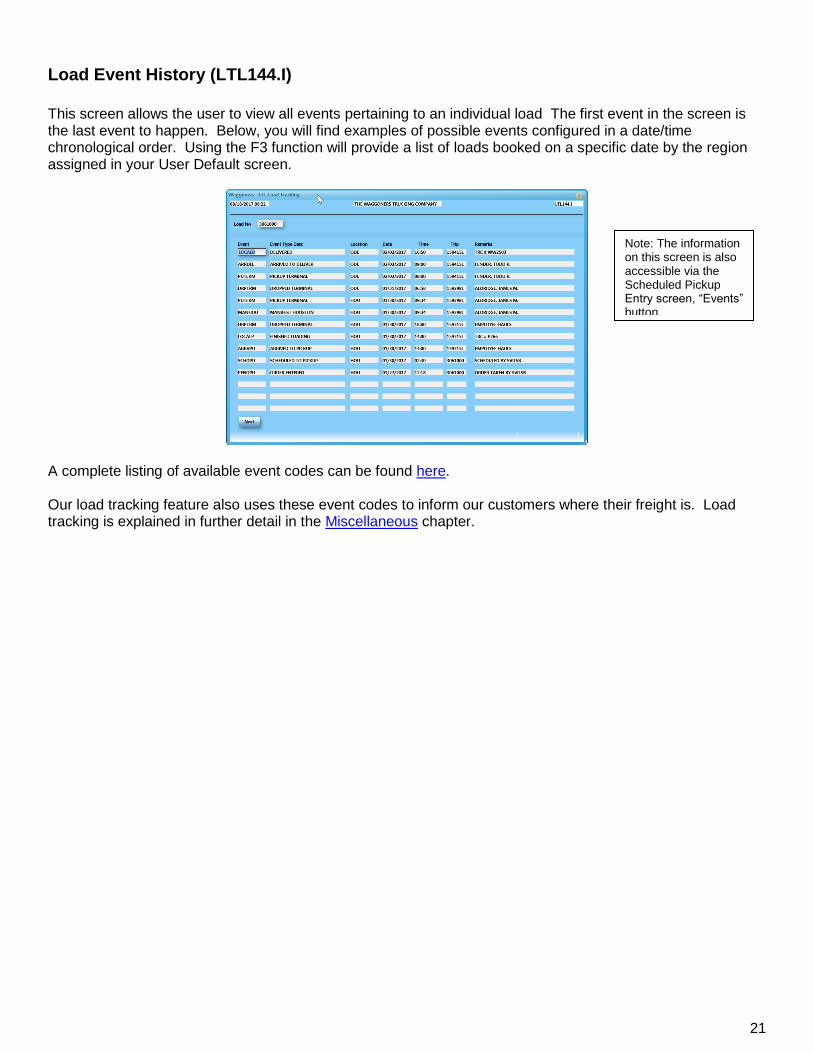
Load Event History (LTL144.I)
This screen allows the user to view all events pertaining to an individual load The first event in the screen is the last event to happen. Below, you will find examples of possible events configured in a date/time chronological order. Using the F3 function will provide a list of loads booked on a specific date by the region assigned in your User Default screen.
A complete listing of available event codes can be found here. Our load tracking feature also uses these event codes to inform our customers where their freight is. Load tracking is explained in further detail in the Miscellaneous chapter.
Note: The information on this screen is also accessible via the Scheduled Pickup Entry screen, “Events” button.

22
Shipper / Consignee Inquiry (TK204.I)
This screen is very similar to the Load Board Inquiry except that it allows the user to pull all the booked loads associated with a particular Shipper or Consignee. This screen will show you all the shipments booked for a particular shipper/consignee since January 2015. From here, you can view the booked order and the customer record.
Functions Available
Button Label Brief Description
Next Clears the screen for a new inquiry.
Lookup Use this feature to locate a customer. May also use the F3 function key.
Order Pulls up the Scheduled Pickup Entry screen or the Rating Screen based on your permissions.
Customer Pulls up the Customer Entry screen.

23
Freight Inquiry (LTL0112.O)
This screen allows the user to view the booking and rating information related to the order. From this screen, you can also view Events, References, Changes, Description, Local Pickup & Del information, COD, Comments and Revenue Split. Changes to the order cannot be made here nor will it be saved.
Functions Available
Button Label Brief Description
F3 Allows searching of Load Number with a Customer PO number.
Next Clears the screen for a new inquiry.
Events Pulls up the Events screen.
Ref Displays the Reference Entry screen.
Changes Displays modifications made to order after it was booked.
Desc Displays the description of shipment.
PU/DEL Displays the “Dates” screen.
COD Displays the COD Entry screen.
Com Displays the Comments Entry screen.
Split Displays the Load Trip Activity screen.

24
Chapter 2:3 LTL Freight Reports Menu The LTL reporting menu offers a variety of reports to meet your daily reporting needs. These reports allow the user to view the terminals to manage their inventory. To review your printing options, please refer to the Printing within SB section of this manual. The menu options in this chapter are here: Freight > Reports.

25
LTL Boards Menu
Chapter Contents
Chapter 3:1 LTL Boards Menu .......................................................................................................................................... 26
Load Board Inquiry (LTL194.I) ...................................................................................................................................... 27
Scheduled Manifest Inquiry (LTL215.I) ......................................................................................................................... 29

26
Chapter 3:1 LTL Boards Menu This chapter will focus on ways to monitor shipments leaving or entering your terminal. The menu options in this chapter are found here: Boards.
27
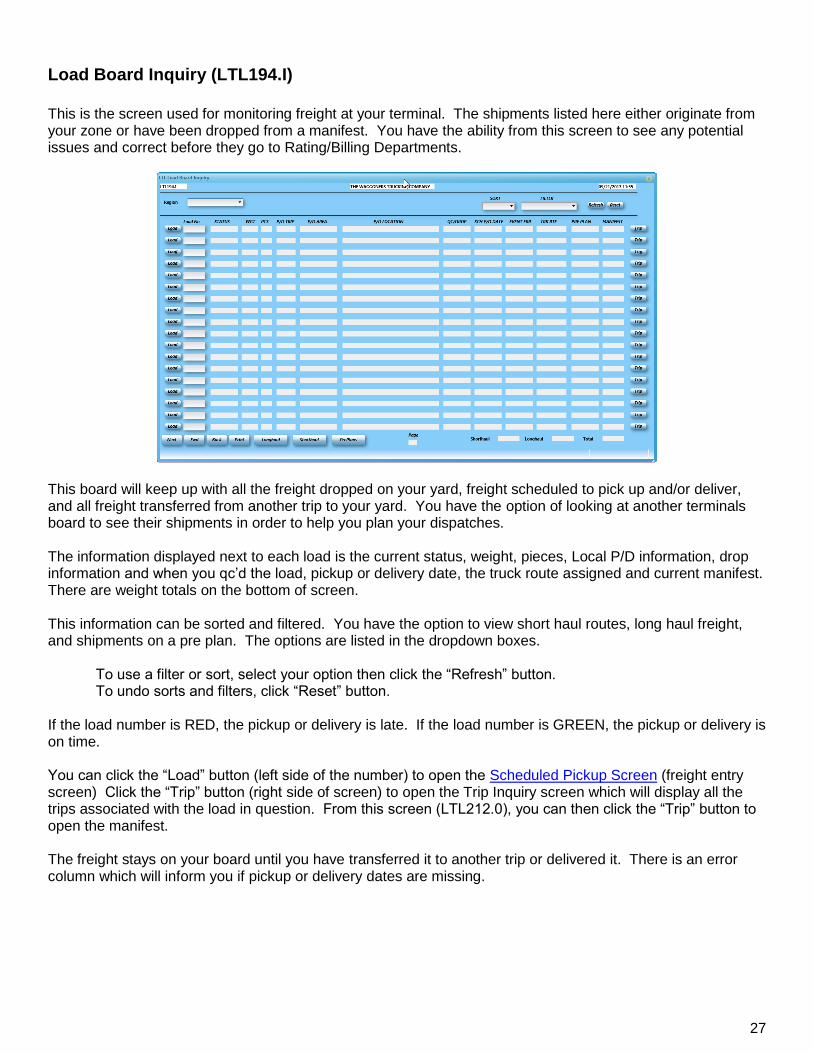
Load Board Inquiry (LTL194.I)
This is the screen used for monitoring freight at your terminal. The shipments listed here either originate from your zone or have been dropped from a manifest. You have the ability from this screen to see any potential issues and correct before they go to Rating/Billing Departments.
This board will keep up with all the freight dropped on your yard, freight scheduled to pick up and/or deliver, and all freight transferred from another trip to your yard. You have the option of looking at another terminals board to see their shipments in order to help you plan your dispatches. The information displayed next to each load is the current status, weight, pieces, Local P/D information, drop information and when you qc’d the load, pickup or delivery date, the truck route assigned and current manifest. There are weight totals on the bottom of screen. This information can be sorted and filtered. You have the option to view short haul routes, long haul freight, and shipments on a pre plan. The options are listed in the dropdown boxes.
To use a filter or sort, select your option then click the “Refresh” button. To undo sorts and filters, click “Reset” button.
If the load number is RED, the pickup or delivery is late. If the load number is GREEN, the pickup or delivery is on time. You can click the “Load” button (left side of the number) to open the Scheduled Pickup Screen (freight entry screen) Click the “Trip” button (right side of screen) to open the Trip Inquiry screen which will display all the trips associated with the load in question. From this screen (LTL212.0), you can then click the “Trip” button to open the manifest. The freight stays on your board until you have transferred it to another trip or delivered it. There is an error column which will inform you if pickup or delivery dates are missing.
28
Functions Available
Button Label Brief Description
Next Closes screen
Fwd Pages Forward
Back Pages Backward
Print Prints load board detail to the XPS viewer.
Longhaul Shorthaul
Will breakdown all freight to ship in the next 7 days. It uses the scheduled pickup date unless you use the new “Hold Until” field that is on the freight entry screen. The shipments included in the weight tally is marked on the Schedule Pickup Entry screen > Long/Short field.
PrePlans Opens Scheduled Manifest Inquiry screen (LTL215.I).
29
Scheduled Manifest Inquiry (LTL215.I)
This screen will help manage the pre plan manifests currently created for your zone.
Field Instructions
Orig Zone Type in zone or press the F3 key for a listing.
Pre Plan Manifest Section
Pre Plan Ship Date Route Description Max Wgt Cur Wgt Full Tractor Driver
System displays pre plan information automatically from the entry created.
View Opens the Pre Plan Manifest Entry screen (LTL214.I)
Manifest Once clicked, will transfer the pre plan information to a live manifest.
Functions Available
Button Label Brief Description
Return Clears screen.
Fwd Pages Forward.
Backward Pages Backward.

30
31
LTL Dispatch Menu
Chapter Contents
Chapter 4:1 LTL Dispatch Entry Menu .............................................................................................................................. 32
Manifest Entry (LTL109.I).............................................................................................................................................. 33 Driver Log Status (Logs Button) .................................................................................................................................................. 35 LTL Load Activity (LTL180.I) ....................................................................................................................................................... 36 Add (LTL211.I) ............................................................................................................................................................................ 37 LTL Appointment Inquiry (LTL198.OI) ......................................................................................................................................... 39 LTL Manifest Dep/Arr (LTL184.I) ................................................................................................................................................. 40 LTL Flat Bed Pay (LTL185.I) ....................................................................................................................................................... 40 Checking in PD trips (LTL187.I) .................................................................................................................................................. 41 Hourly Pay (LTL186.I) ................................................................................................................................................................. 41 LTL Manifest Comment Screen (LTL142.I) ................................................................................................................................. 42
Pre Plan Entry (LTL214.I) ............................................................................................................................................. 43
Chapter 4:2 LTL Dispatch Inquiries Menu......................................................................................................................... 45
LTL Manifest Daily Inquiry (TK107.I) ............................................................................................................................ 46
LTL Manifest History – Driver (LTL171.I) ...................................................................................................................... 46
LTL Manifest History – Tractor (LTL172.I) .................................................................................................................... 46
Chapter 4:3 LTL Dispatch Reports Menu.......................................................................................................................... 47

32
Chapter 4:1 LTL Dispatch Entry Menu This chapter will focus on all things related to manifests and Local P/D trips. Manifests are created for over-the-road drivers. The paperwork provided tells the driver the route the freight needs to take in order to reach its destination The menu options in this chapter are here: Dispatch > Entry > Manifest Entry - Beta.

33
Manifest Entry (LTL109.I)
After orders are booked, they need to be placed on a manifest for delivery. This is where we place the load numbers; assign the driver, tractor, trailer and route code. This front screen will also keep track of the weight and pieces currently on the manifest.
Field Instructions
Trip/Trc ‘N’ ew, enter Manifest Number or Tractor Number; F3 or Lookup for a listing based on terminal.
Trip Type Select type from drop-down box. You will mostly work with LTL or P&D.
Route Pick a route that encompasses all the Orig/Dest zones for the shipments you will assign. All P/D trips will end in “- P&D”; example: HOU - P&D.
Tractor Enter tractor code. May also use F3 function key for a list assigned to your terminal. The Tractor Wgt is now displayed.
Trl
Enter Trailer code – if this is the first time tractor/trailer has been used together, you must type in both Tractor and Trailer. If not, the system will populate this field for you May also use F3 function key for a list assigned to your terminal. The Trailer Wgt is now displayed.
Trailer Weight Resources Assigned Current Location Contractor
The system automatically fills in this information if it is available.
DH Type Enter deadhead type. The deadhead type is the terminal where the deadhead is originating from. Use the F3 function key for a listing.
DH Origin DH Dest Miles
Enter the Origin and Destination of deadhead miles. Format is City,State. Note there isn’t a space after the comma. The system will calculate the miles between Origin and Destination.
Driver 1 Driver 2
Once the tractor is entered into screen, this field should populate. If this is the first time the driver has been dispatched with this tractor, you MUST type in the driver code. You may also use F3 function key to search for driver. If the driver has scheduled Time Off, the date will display here. The drivers Hazmat status will display here.
Est Loading Time Enter the estimated loading date and time.
Est Unloading Time Enter the estimated unloading date and time.
Dispatched Miles DH
The system will calculate the miles based on loads assigned and DH information entered.
34
Rolling Weight System keeps track of all weight coming off and going on to the trailer by route.
Currently on Truck System keeps track of weight, pieces and AS weight.
QCTrip Sends trip information to driver’s qc unit.
Logs Displays the current Hours of Service for the driver selected.
Functions Available
Button Label Brief Description
Save Saves record.
Del Removes record (Manifest) from system. Please refer to Tips to Remember for removing loads
Activity Displays detail of loads assigned to the manifest.
Quick Access the “Add” screen without needing to display the Activity screen.
Print Prints driver paperwork.
Email Emails driver paperwork to the person who has pressed the button in PDF format.
Pay Displays driver trip pay. Further instructions are here.
Miles Forces the system to recalculate dispatch miles.
Comments Opens LTL Manifest Comments (LTL142.I) screen. Comments entered here will be printed on the manifest.
DepArr Displays Manifest Dep/Arr (LTL184.I) screen showing departs and arrivals associated with manifest. Each time a truck enters or leaves a terminal, the entry is recorded here.
ACE Sends electronic record of manifest to Border Control.
Close Closes trip for payroll processing. P&D trips must be closed daily by the terminal. All other types of trips are closed by the Payroll Department.
Open Re-opens trip if payroll has not been processed.
Appt(s) Opens Appointment Inquiry (LTL198.O) screen. This screen displays all loads assigned to manifest. Screen is explained in further detail here.

35
Driver Log Status (Logs Button)
This screen will inform you of the drivers current Hours of Service.
Field Instructions
Driver Type in a driver code. Driver name and the date/time information were last updated.
Time Started Shows date and time of last duty status.
Next Break The remaining hours before the driver is required to take a 30 minute rest break.
Available Driving Displays the amount of time a driver has available to drive before he/she is out of hours for their duty cycle.
On Duty Hours Displays the remaining on duty hours.
Cumulative On Duty
Displays the hours a driver has remaining in the current 7- or 8- day cycle. The 7- day rule states that drivers cannot drive if they have been on duty for more than 60 hours within 7 days. The 8-day rule states that drivers cannot drive if they have been on duty for more than 70 hours within 8 days.
Time before off duty (CAN)
The number of hours before the driver must begin a mandatory 24 hour off duty period.
Shift Remaining (CAN)
The duration of this driver’s shift.
Functions Available
Button Label Brief Description
OK Clears screen.

36
LTL Load Activity (LTL180.I)
Here is where the loads are assigned to the manifest. From this screen, dispatchers route the freight from its origin to its final destination through the use of the activity codes.
Field Instructions
Load Number Type in load number or if using the Auto-Inventory Selection feature, select load number from the list. May also press the F3 function key for a listing of loads currently at your terminal.
Loaded on Truck Section
Orig System displays the origin region from the Freight Booking screen.
Act Displays the activity associated with shipment.
Date Time
Displays the date and time activity took place.
Location Displays the location that the activity happened.
Unloaded off Truck Section
Act Displays the Activity associated with shipment.
Date Time
Displays the date and time activity took place.
Location Displays the location that the activity happened.
Dest System displays the dest region from the Freight Booking screen.
Weight As Weight Pcs
System displays the information from the Freight Booking screen. You may also update this information. It will at that point, update the booking screen.
Buttons Available on far right of screen
Quick Button Brief Description
QC Sends the QC PU or QC DEL message to tractor.
View Displays the LTL Scheduled Pickup Entry or LTL Rating Screen based on your permissions.
Edit Opens up the Load Activity screen (Add button)
Del Removes load from manifest/trip.
37
Functions Available
Button Label Brief Description
Save Saves record.
Top Returns the view back to the page.
Fwd Advances one page forward.
Back Returns to previous page.
Last Goes to the last page.
Add Used to add shipments to manifest.
Unload Trk Opens a Transfer Freight prompt which allows a dispatcher to mass drop the loads that are to be unloaded off truck. This function only works for the DT activity type code.
Add (LTL211.I)
You will add load numbers to the manifest using the “Add” button as well as update activity information. Shipper and Consignee addresses, weight and number of pieces are also displayed here.
Field Instructions
Load Number Type in load number to be added.
Loading Activity
Act
Select from drop down list the appropriate activity code. Code Description Code Description PC Pickup at Customer PT Pickup at Terminal PE Pickup En route
Date Time
Enter date and time of activity code chosen above. To use today’s date, press <enter>.
Location System defaults to the current location based on the activity code used.
Unloading Activity
Act
Select from drop down list the appropriate activity code. Code Description Code Description DC Deliver at Customer via Terminal DT Drop at Terminal DE Deliver En route TR Transfer at Terminal SD Scheduled Drop (will print load in the Drop @ Terminal section on manifest paperwork)
Date Time
Enter date and time of activity code chosen above. To use today’s date, press <enter>.
Location System defaults the location based on the activity code chosen.

38
Functions Available
Button Label Brief Description
Save Saves record and closes screen.
Save and Add Saves current record and keeps window open for new entry.
Events Displays the Load Tracking (Events) screen.
QC Truck Sends shipment detail to the driver’s qc unit.

39
LTL Appointment Inquiry (LTL198.OI)
This screen simply allows the user to view the shipping details of all the loads currently assigned to the manifest that is pulled up. The information displayed here was entered from the Scheduled Pickup Entry screen.
Field Instructions
Load No Lists the load numbers assigned to manifest.
View Opens the order entry screen.
Shipper Lists the shipper name assigned to load numbers.
Ship City,St Lists the location of the shipper.
Consignee Lists the name of the consignee.
Consignee City, St Lists the location of the consignee.
Pars No Lists the Pars Number, if applicable.
Broker Lists the broker code, if applicable.
Weight Lists the weight associated with shipment.
Pieces Lists the number of pieces associated with shipment.
Functions Available
Button Label Brief Description
OK Closes screen.
Next Page Advances screen forward.
40
LTL Manifest Dep/Arr (LTL184.I)
This screen keeps track of the Departs and Arrivals of the freight through the Qualcomm Geo-Fencing and/or the scanning features through the Workflow Menu
Field Instructions
Location Lists the ‘DEP’ or the ‘ARR’ for each route leg assigned to the trip.
Date Time
Displays the date of each event listed in location field. If tractor is Qualcomm enabled, the geo-fencing feature automatically updates information when entering or leaving facility. If tractor is not Qualcomm enabled or the Qualcomm unit is currently broken, these fields can be updated manually.
Entered By Displays how the information entered the system.
LTL Flat Bed Pay (LTL185.I)
This screen is used by our Payroll Department to check in the Over the Road trips as well as the terminals to enter the Local P/D driver hours and odometer readings for the day. Only two buttons are needed to properly close a Local P/D trip. This screen is accessed by pressing the “Pay” button from the manifest screen. Be sure to click the Zero Load Pay, Zero Unload Pay and Zero Mileage boxes.
Functions Available
Button Label Brief Description
Check Displays the Check In PD entry screen.
Hours Displays the Hourly Entry Screen.

41
Checking in PD trips (LTL187.I)
This screen displays fuel purchased on this trip as well as allow you to enter the Beginning Odometer and Ending Odometer for the Local P/D truck. State and miles are automatically calculated. This information must be entered before you can close the trip which will allow the driver to be paid.
Functions Available
Button Label Brief Description
Save Saves record
Hours Displays the Hourly Entry screen, explained below.
Hourly Pay (LTL186.I)
Drivers are required to send in their Beginning of Day and End of Day messages. To import this information, click on the QC Hours button. If you agree with the hours, click the Accept QC button. If you need to make adjustments, make them; but do not hit the Accept QC button.
Field Instructions
Pay Date System automatically populates based on the date of P/D trip.
Pay Type Select appropriate description of activity from drop down box.
Driver Select 1 for 1st driver on trip; select 2 for second driver on trip.
Start Time Enter Starting time.
End Time Enter ending time.
42
Functions Available
Button Label Brief Description
Save Saves record
QC Hours Imports BOD and EOD messages from driver.
Accept QC Posts the hours that have been imported.
LTL Manifest Comment Screen (LTL142.I)
This sub-screen allows the dispatcher to type in comments that will print out on the manifest paperwork that is printed out and given to the driver. Do not use special characters (!@#$%^&*) as this will warp the message during printing. When finished with this screen, press the <enter> key to return back to main screen.

43
Pre Plan Entry (LTL214.I)
This screen allows you to plan your shipments.
Field Instructions
Pre Plan # Enter existing pre plan number, use the F3 key or ‘LookUp’ button for a listing of pre plan entries, or enter ‘N’ew for a new entry.
Ship Date Enter date of proposed shipment.
Description System generated once a route is chosen.
Tractor Enter tractor or leave blank.
Trailer Enter trailer or leave blank.
Driver1 Enter driver number or leave blank.
Driver 2 Enter second driver number or leave blank.
Max Weight Enter maximum weight for manifest.
Truck Full Default is ‘N’o. Change to ‘Y’ when this manifest can no longer be added to.
Load Information Section
Load No Description Dimensions Orig Dest Status Location Weight
System automatically fills in this information based on the entries from the Scheduled Pickup Entry screen.
View Opens the LTL Schedule Pickup entry screen (LTL0111.I)
Del Removes individual load from pre plan manifest record.

44
Functions Available
Button Label Brief Description
Save Saves record.
Del Deletes pre plan record.
Forward Advances forward one page.
Backward Goes back one page.
Add Load
Opens Pre Plan Load Entry screen (LTL216.I). Use this to manually add a load number to Pre Plan.
Print Prints out Pre Plan paperwork.

45
Chapter 4:2 LTL Dispatch Inquiries Menu This chapter will focus on all things related to manifest management. The menu options in this chapter are found here: Dispatch > Inquiries

46
LTL Manifest Daily Inquiry (TK107.I)
This inquiry screen allows the user to view all manifests that had been shipped out of a particular region. This screen will show you total weight, number of en route pickups or deliveries, number of shipments, stops, as well as the driver information.
LTL Manifest History – Driver (LTL171.I)
This inquiry screen will show you a rolling 365 days of trip activity by driver. This screen is useful in that it shows total miles (Loaded and Empty), when it was assigned, deadhead origin and destination, as well as trip origination and destination. To find a driver by name, press the F3 function key. You can also view driver details (CD102.O), Trip or Manifest records and QC Tracking (QC109.O) from here.
LTL Manifest History – Tractor (LTL172.I)
This inquiry screen will show you 1 year of trip activity by tractor. This screen is useful in that is shows trips current Qualcomm position, first load number assigned, out/del? Loaded and empty miles, assigned date, deadhead origin and destination, as well as, trip origination and destination. When you highlight a trip number and use the Current Trip button, the Manifest Entry screen will open. If you wish to create a new trip with this tractor, press the ‘New Trip’ button. If you wish to send a Free Form Qualcomm message to the tractor, press the QC button.

47
Chapter 4:3 LTL Dispatch Reports Menu The LTL reporting menu offers a variety of reports to meet your daily reporting needs. These reports allow the user to view the terminals to manage their inventory. To review your printing options, please refer to the Printing within SB section of this manual. The menu options in this chapter are found here: Dispatch > Reports

48

49
LTL Rating Menu
Chapter Contents
Chapter 5:1 LTL Rating Entry Menu ................................................................................................................................. 50
LTL Rating Entry (LTL0100.I) ....................................................................................................................................... 51
Chapter 5:2 LTL Rating Inquiries Menu ............................................................................................................................ 53
Rate Inquiry Truckload (LTL191.I) ................................................................................................................................ 54
Rate Inquiry LTL (LTL192.I) .......................................................................................................................................... 54
Chapter 5:3 LTL Rating Reports Menu ............................................................................................................................. 56
50
Chapter 5:1 LTL Rating Entry Menu This chapter will focus on all things related rating your orders. The screen used for entry is determined by the division you are assigned to and whether you have permissions to rate. See your supervisor if you have trouble accessing this screen. The menu options in this chapter are found here: Rating > Entry

51
LTL Rating Entry (LTL0100.I)
Here is where all rating of orders is accomplished. You may or may not have access to this screen. If you require access, please notify supervisor.
Field Instructions
Load (V)in Enter load number or press F3 function key to search ‘waiting to rate list’ by terminal. The booking information will populate all the necessary fields.
Rate Entry Section * Repeat until all charges are entered.
Charge Select charge code from drop down box. First charge code is always ‘CWT’ for hundred-weight or ‘FLAT’. If Canadian shipment, ‘GST’ will automatically enter.
Product Select product type from drop down box.
Rate Enter rate. If quote is used, this information populates automatically.
Calc Enter calculation – Options are ‘F’lat, ‘P’ercentage and ‘C’wt, ‘M’ile, ‘H’ourly. Should fill in automatically based on the charge code entered.
Wgt Enter Weight; should fill in automatically based on entry in Scheduled Pickup Entry..
As Wgt Enter AS Weight.
Miles Enter Miles; should fill in automatically based on Shipper/Consignee locations.
Hours Enter hours, if applicable.
Pcs Enter Pieces; should fill in automatically based on entry in Scheduled Pickup Entry.
Charges Calculated automatically based on above entries.
Additional Buttons Available
Button Label Brief Description
Del/Delete Removes complete line from record.
BOL Will email electronic BOL to email address listed.
Merge Fuel Merges fuel charge with line haul charge.
Additional Chgs Opens a second page for entry of additional charges, if needed.

52
Functions Available
Button Label Brief Description
Save Saves record.
Calc Miles?
Events Shows events related to load number.
Ref Accesses the Reference Entry (OE124.I) screen. Here you enter additional information if customer requires it. Click drop-down arrow for a listing of codes.
Changes Accesses screen to show any changes made to load.
Cancel UnCancel
Cancels and Un-cancels load.
Desc Displays Dimension Entry screen; enter additional dimensions, as applicable.
Com
To view or enter comments. Comment Types Types Desc Definition A All Comment will print out on manifest and Freight Bill. D Driver Comment will print out on manifest. B Billing Comment will print out on Freight Bill. I Informational Only - will not print out. If you want the customer to see the comments, use A or B. Be sure to check any additional boxes the customer may require.
Dates Access the Local Pickup and Delivery screen.
Split To view resources allocated to load number. Not used by terminals
Verify Not used by terminals.
COD If applicable, enter COD information.
COD Inv Will generate a COD invoice for those customers that need it in order to submit payment. Invoice will be emailed in PDF format to the person creating invoice.

53
Chapter 5:2 LTL Rating Inquiries Menu This chapter will focus on all things related rating your orders. Screen access is determined by your supervisor. The menu options in this chapter are found here: Rating > Inquiries
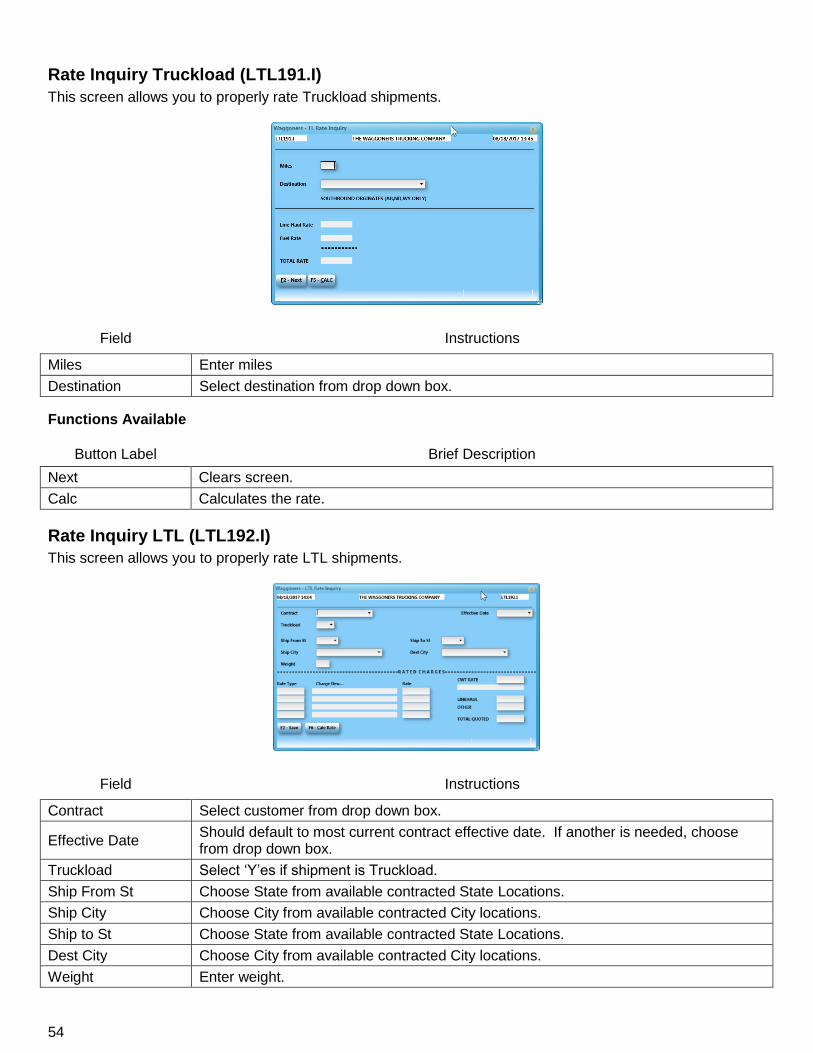
54
Rate Inquiry Truckload (LTL191.I)
This screen allows you to properly rate Truckload shipments.
Field Instructions
Miles Enter miles
Destination Select destination from drop down box.
Functions Available
Button Label Brief Description
Next Clears screen.
Calc Calculates the rate.
Rate Inquiry LTL (LTL192.I)
This screen allows you to properly rate LTL shipments.
Field Instructions
Contract Select customer from drop down box.
Effective Date Should default to most current contract effective date. If another is needed, choose from drop down box.
Truckload Select ‘Y’es if shipment is Truckload.
Ship From St Choose State from available contracted State Locations.
Ship City Choose City from available contracted City locations.
Ship to St Choose State from available contracted State Locations.
Dest City Choose City from available contracted City locations.
Weight Enter weight.

55
Functions Available
Button Label Brief Description
Save Clears screen.
Calc Rate Calculates the rate based on entries from above that we are contracted for.

56
Chapter 5:3 LTL Rating Reports Menu The LTL Rating Reports Menu offers a variety of reports to meet your daily reporting needs. These reports allow the user to view the terminals to manage their inventory. To review your printing options, please refer to the Printing within SB section of this manual. The menu options in this chapter are found here: Rating > Reports

57
Additional Resources and Tools This section will explain other menus not related to booking, dispatching or rating but are just as important in order to maintain records and assist in your day to day management.

58
59
I - Customers This section is going to only go over the few areas relating to Customers that will affect your ability to book and dispatch trips.
60
Customer Entry
This section will briefly go over the customer screens that may affect your ability to book a shipment. Only a few people have access to create customers. If you need a customer created, please notify the Accounts Receivable Department or your immediate supervisor for instructions on how to submit the proper paperwork. The menu options in this chapter are found here: Customers > Entry

61
Customer Directory (CUS107.I)
This screen is used to create a custom list of most used Shipper/Consignee codes. To remove individual customer codes from the list, use Ctrl + Del. The directory built here can be used to quickly find most used customer numbers when booking. The resulting list of codes will be sorted by name.
Field Instructions
Customer F3 to find a valid customer. Contact IT Department to create a new record, if needed.
Name Enter description of directory
City Address State Contact Telephone Email Fax No
optional
Terminal Enter terminal code.
Remarks Enter any remarks.
Ship/Cons Use F3 to find customer or type in a customer code.
Functions Available
Button Label Brief Description
Save Saves record.
Delete Deletes record
Below is a sample of how to use this feature in the Scheduled Pickup Entry screen. Type “HOU” in Customer No field, type DIR in Customer field and press enter.
62
Customer Inquiries
Most of these screens will not be used by you. But, you may need to use the Directions Inquiry screen to send updated directions to a driver when asked. The menu options in this chapter are found here: Customer > Inquiries
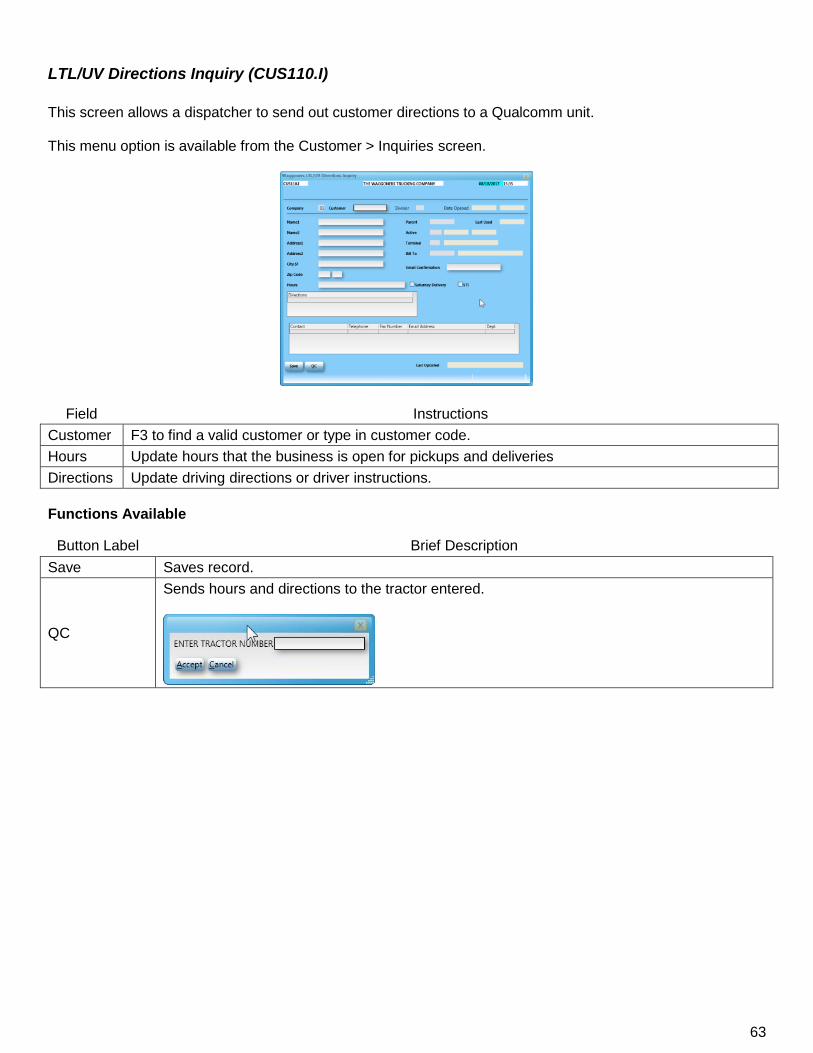
63
LTL/UV Directions Inquiry (CUS110.I)
This screen allows a dispatcher to send out customer directions to a Qualcomm unit. This menu option is available from the Customer > Inquiries screen.
Field Instructions
Customer F3 to find a valid customer or type in customer code.
Hours Update hours that the business is open for pickups and deliveries
Directions Update driving directions or driver instructions.
Functions Available
Button Label Brief Description
Save Saves record.
QC
Sends hours and directions to the tractor entered.

64
Customer Reports
The Customer reporting menu offers a variety of reports to meet your daily reporting needs. These reports allow the user to see their customer base. To review your printing options, please refer to the Printing within SB section of this manual. The menu options in this chapter are here: Customer > Reports > Freight Customers.

65
II - COS (Change of Status - Equipment & Drivers) Menu This chapter will go describe how to submit Change of Status paperwork for both equipment and drivers. The menu options in this chapter are found here: COS > Entry.

66
COS Entry Menu
In order to assist you in keeping track of our equipment and drivers so that you don’t have too much trouble dispatching, we have developed an electronic version of the Change of Status procedures. This chapter will go over how to fill out the forms and email them to people that need to know of the changes. Listed below are the most commonly used change of status types. The Equip or Driver column will help you choose the correct screen to use.
Code Description Screen Code Description Screen
1 New Driver DCS 8 PD to LTL OTR DCS
2 Driver Status Change DCS 9 Address Change DCS
3 Driver Class Change DCS 10 Card Change DCS
4 Driver Terminated DCS 11 Equipment Only ECS
5 LTL to Car DCS 12 Two Man Team ECS
6 Car to LTL DCS 13 Three Man Team ECS
7 LTL OTR to PD DCS 14 Solo Driver ECS
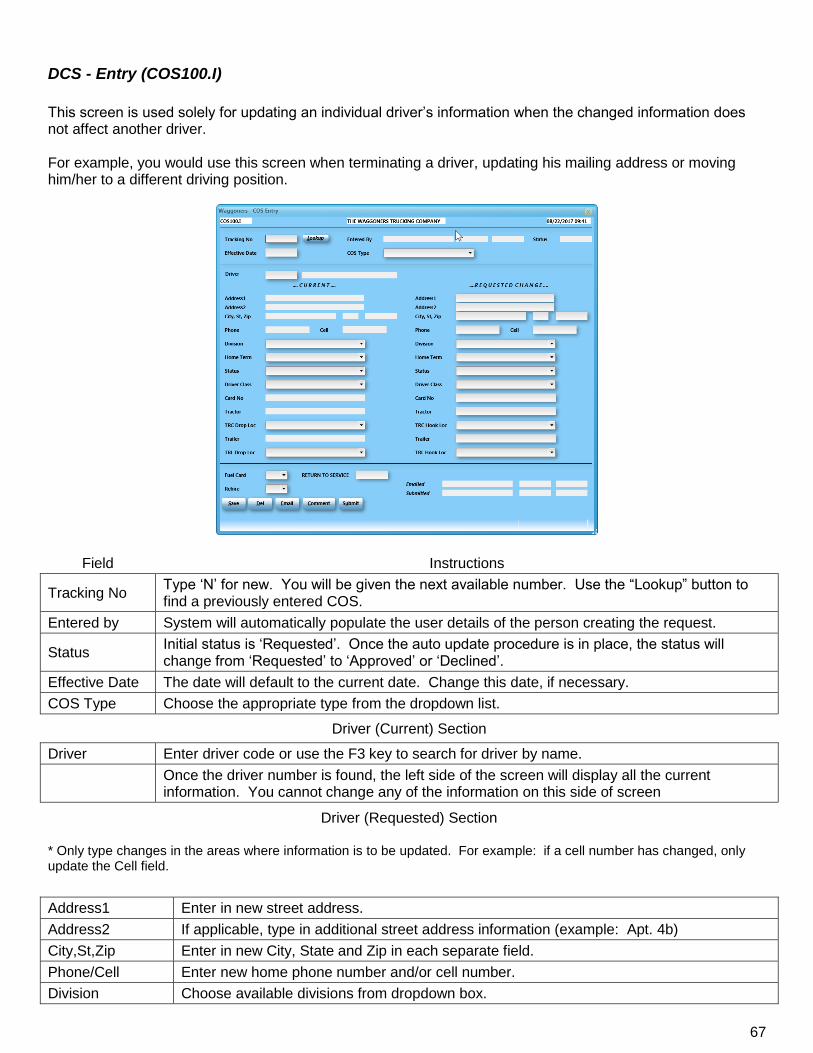
67
DCS - Entry (COS100.I)
This screen is used solely for updating an individual driver’s information when the changed information does not affect another driver. For example, you would use this screen when terminating a driver, updating his mailing address or moving him/her to a different driving position.
Field Instructions
Tracking No Type ‘N’ for new. You will be given the next available number. Use the “Lookup” button to find a previously entered COS.
Entered by System will automatically populate the user details of the person creating the request.
Status Initial status is ‘Requested’. Once the auto update procedure is in place, the status will change from ‘Requested’ to ‘Approved’ or ‘Declined’.
Effective Date The date will default to the current date. Change this date, if necessary.
COS Type Choose the appropriate type from the dropdown list.
Driver (Current) Section
Driver Enter driver code or use the F3 key to search for driver by name.
Once the driver number is found, the left side of the screen will display all the current information. You cannot change any of the information on this side of screen
Driver (Requested) Section
* Only type changes in the areas where information is to be updated. For example: if a cell number has changed, only update the Cell field.
Address1 Enter in new street address.
Address2 If applicable, type in additional street address information (example: Apt. 4b)
City,St,Zip Enter in new City, State and Zip in each separate field.
Phone/Cell Enter new home phone number and/or cell number.
Division Choose available divisions from dropdown box.

68
Home Term Choose available terminals from dropdown box.
Status Choose available status codes from dropdown box.
Driver Class Choose available class codes from dropdown box.
Card No If assigning a new fuel card to driver, enter new fuel card number.
Tractor Single or Solo Driver only: Enter new tractor. Use the F3 function key to search for available equipment.
TRC Hook Loc Enter location of where tractor is currently.
Trailer Single of Solo Driver only: Enter new trailer. Use the F3 function key to search for available equipment.
TRL Hook Loc Enter location of where trailer is currently.
Footer Section
Fuel Card Select ‘ON’ or ‘OFF’. If ‘ON’, remember to mark card number in the Card No field if assigning a new card. If selection is ‘OFF’ do nothing but change this field to ‘OFF’.
Rehire Can only be used if cos type is Driver Terminated. Choices are ‘Y’es, ‘N’o or ‘R’eview.
Return to Service Enter a return to service date when a driver is on vacation. In the future, an email will go out automatically the day before this date to inform the Fuel Desk to turn fuel cards back on.
Emailed Will display who and when form was emailed to the appropriate parties.
Submitted Part of soon to be available approval process. Will display who and when form was approved.
Functions Available
Button Label Brief Description
Save Saves record.
Del Deletes record as long as it is in “Request” status.
Email Once pushed, will go through edit checks and email document to the appropriate parties. The user submitting the paperwork will also be included on the email.
Comment Opens a screen where a comment may be entered. This will print on the form.
Submit Part of soon to be available approval process.
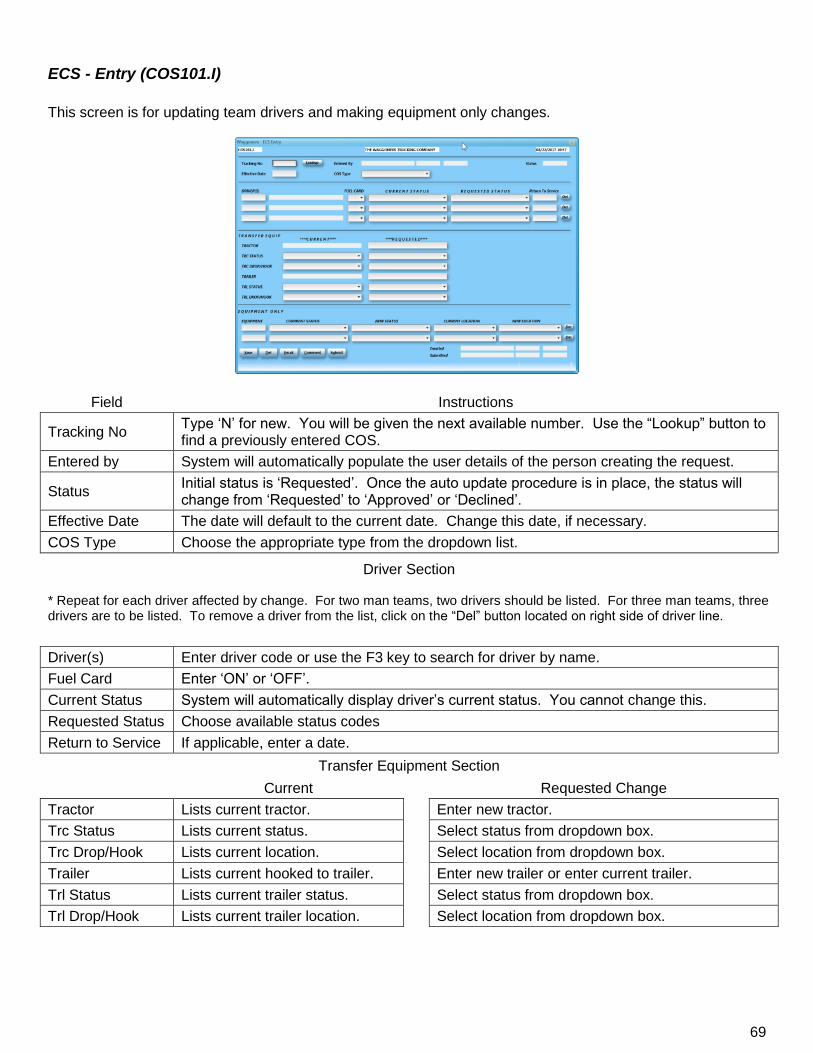
69
ECS - Entry (COS101.I)
This screen is for updating team drivers and making equipment only changes.
Field Instructions
Tracking No Type ‘N’ for new. You will be given the next available number. Use the “Lookup” button to find a previously entered COS.
Entered by System will automatically populate the user details of the person creating the request.
Status Initial status is ‘Requested’. Once the auto update procedure is in place, the status will change from ‘Requested’ to ‘Approved’ or ‘Declined’.
Effective Date The date will default to the current date. Change this date, if necessary.
COS Type Choose the appropriate type from the dropdown list.
Driver Section
* Repeat for each driver affected by change. For two man teams, two drivers should be listed. For three man teams, three drivers are to be listed. To remove a driver from the list, click on the “Del” button located on right side of driver line.
Driver(s) Enter driver code or use the F3 key to search for driver by name.
Fuel Card Enter ‘ON’ or ‘OFF’.
Current Status System will automatically display driver’s current status. You cannot change this.
Requested Status Choose available status codes
Return to Service If applicable, enter a date.
Transfer Equipment Section
Current Requested Change
Tractor Lists current tractor. Enter new tractor.
Trc Status Lists current status. Select status from dropdown box.
Trc Drop/Hook Lists current location. Select location from dropdown box.
Trailer Lists current hooked to trailer. Enter new trailer or enter current trailer.
Trl Status Lists current trailer status. Select status from dropdown box.
Trl Drop/Hook Lists current trailer location. Select location from dropdown box.
70
Equipment Only
* This section is used only when changing location or status of equipment that is NOT assigned to a driver. To remove an equipment line, press the “Del” button located to the right of line.
Equipment Enter equipment number
Current Status System displays the current status of equipment
New Status Enter the new status of equipment.
Current Location System displays the current location of equipment.
New Location Enter the new physical location of equipment.
Emailed Will display who and when form was emailed to the appropriate parties.
Submitted Part of soon to be available approval process. Will display who and when form was approved.
Functions Available
Button Label Brief Description
Save Saves record.
Del Deletes record as long as it is in “Request” status.
Email Once pushed, will go through edit checks and email document to the appropriate parties. The user submitting the paperwork will also be included on the email.
Comment Opens a screen where a comment may be entered. This will print on the form.
Submit Part of soon to be available approval process.

71
COS Inquiries Menu
This chapter will go over the inquiry screens available to you. The menu options in this chapter are found here: COS > Inquiries.

72
DCS Inquiry (COS104.I)
After entering a valid driver code, the screen will populate with all the DCS requests/changes made. You have the option of displaying (“View” button) the actual record.
ECS Inquiry (COS105.I)
After entering a valid equipment code, the screen will populate with all the ECS requests/changes made. You have the option of displaying (“View” button) the actual record.

73
COS Reporting Menu
The COS reporting menu offers two reports to list DCS or ECS requests by date. To review your printing options, please refer to the Printing within SB section of this manual. The menu options in this chapter are found here: COS > Reporting.

74

75
III - Drivers This menu has many choices available but you should only ever need to use the Driver Inquiry screen. We will go over the information available to you. The menu options in this chapter are found here: Drivers > Inquiries

76
Driver Inquiry (CD104.IO)
This screen displays driver details as well as allows you quick 1 button access to other driver related screens. This screen is currently going through some upgrades, so options may change. The screens and options described in this section are due to change.
Field Instructions
Driver Type in driver code or use Lookup button to search for driver by name.
All fields in this screen are read only. You may use the control buttons listed below. Functions Available
Button Label Brief Description
Save Clears screen. Press twice to close screen.
Additional Opens screen showing additional information.
TimeOff Opens Driver Timeoff Entry (TK122.I) screen.
Claims Opens Claims by Driver Inquiry (CS113.I) screen that shows claim history.
QC Tracking Opens Qualcomm Position History (QC109.O) screen.
Exceptions Opens Driver Exceptions (CD106.I) screen.
Settlements If you have access, will open Driver Settlement folder so pdf files can be viewed.

77
Driver Timeoff Entry (TK122.I)
This screen helps keep track of a driver’s time off requests.
Field Instructions
Requested Enter beginning date.
Thru Enter ending date.
Location Type appropriate location (example: terminal name)
Actual Enter actual beginning date
Thru Enter actual ending date
Functions Available
Button Label Brief Description
Save Saves record.
History Displays previous time off requests.
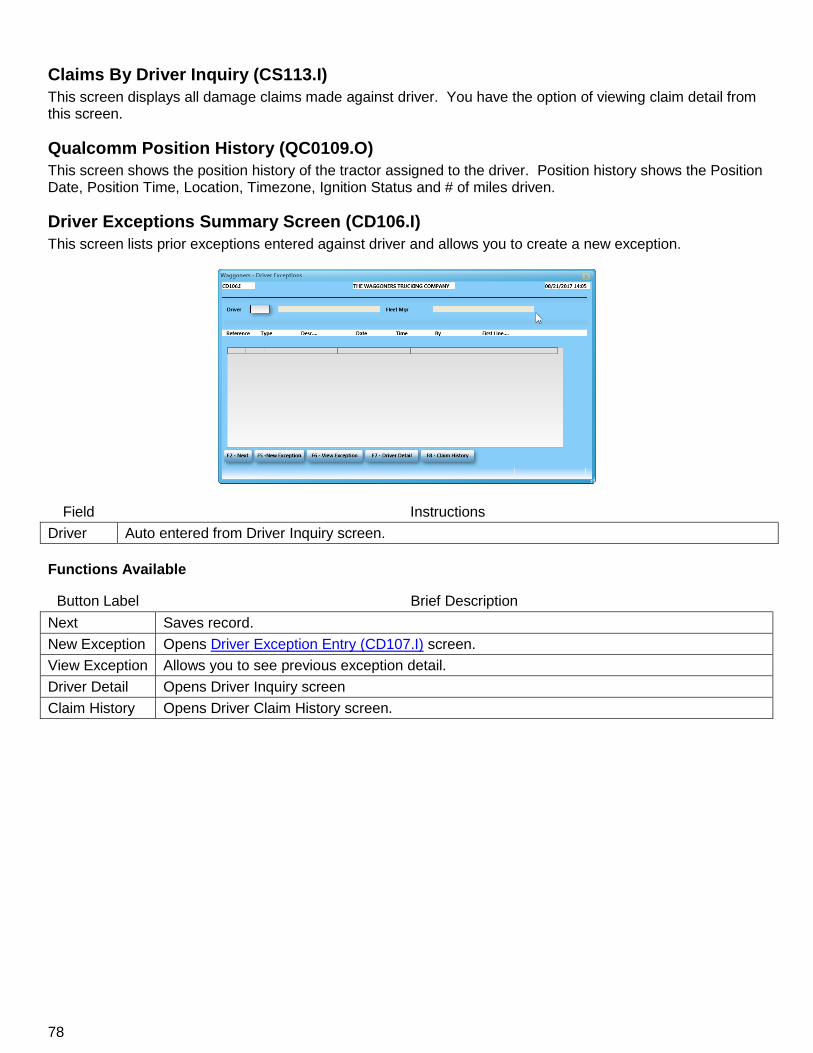
78
Claims By Driver Inquiry (CS113.I)
This screen displays all damage claims made against driver. You have the option of viewing claim detail from this screen.
Qualcomm Position History (QC0109.O)
This screen shows the position history of the tractor assigned to the driver. Position history shows the Position Date, Position Time, Location, Timezone, Ignition Status and # of miles driven.
Driver Exceptions Summary Screen (CD106.I)
This screen lists prior exceptions entered against driver and allows you to create a new exception.
Field Instructions
Driver Auto entered from Driver Inquiry screen.
Functions Available
Button Label Brief Description
Next Saves record.
New Exception Opens Driver Exception Entry (CD107.I) screen.
View Exception Allows you to see previous exception detail.
Driver Detail Opens Driver Inquiry screen
Claim History Opens Driver Claim History screen.

79
Driver Exception Entry (CD107.I)
Accessed from the previously mentioned New Exception button.
Field Instructions
Exception Type ‘N’ for new. You will be given a new exception number.
Type Choose exception type from dropdown box.
Date Enter date of exception.
Time Enter time of exception.
Drv Fault Enter ‘Y’es or ‘N’o.
Exception Comment
Enter all pertaining information regarding exception.
Action Taken Enter all pertaining information regarding correction action.
Functions Available
Button Label Brief Description
Save Saves record.

80

81
IV - MGR Menu We are slowly adding features to this menu so Managers have a quick and easy way to monitor their terminal equipment and dispatches. The menu options in this chapter are found here: MGR.

82
Excessive Idle Inquiry (DA102.I)
The purpose of this screen is to identify drivers that are idling for a large period of time. We received positioning data from our Qualcomm units as well as when the ignition is in the off or on position. Everything is calculated in a 24 hour period. We have tools available that allow you to make a determination on whether or not the idle time is acceptable or if a manager needs to be contacted.
Field Instructions
Filter Default filter is set to “ALL”. Select a filter and then hit the ‘Refresh’ button. To reset your filter, use the ‘Reset’ button.
Equipment/Driver Information
The tractor/driver, current location, current trip assignment is displayed. This also shows you if the tractor is moving, if there was an error in the GPS record received and the number of miles driven in 24 hour period as well as the idle time within a 24 hour period.
QC Opens the Qualcomm Position History screen (QC0109.O). Use this screen to scroll through the GPS positions we have received. This is a useful tool to determine if their Qualcomm unit needs to be serviced (the ignition is always in ON position).
EML Sends an email to a list of recipients based on whether the tractor is assigned to Car Haul or LTL.
DRV Opens the Driver Inquiry screen (CD104.O) to help you determine if driver is idling outside their residence.
Functions Available
Button Label Brief Description
OK Clears screen.
View Log Displays a log of all users that have looked at this information.
FWD Click this button to move forward one page.
BACK Click this button to go back a page.

83
V - Miles This chapter will go over the Milemaker System. We use a 3rd party software to calculate miles between origin and destination locations. At Waggoners, miles are figured using Household Good Miles or HHG. All the entry screens are the same; the answer screens will be different. Only the calculated inquiry result will be shown in the following pages. The menu options in this chapter are found here: Miles > Entry.
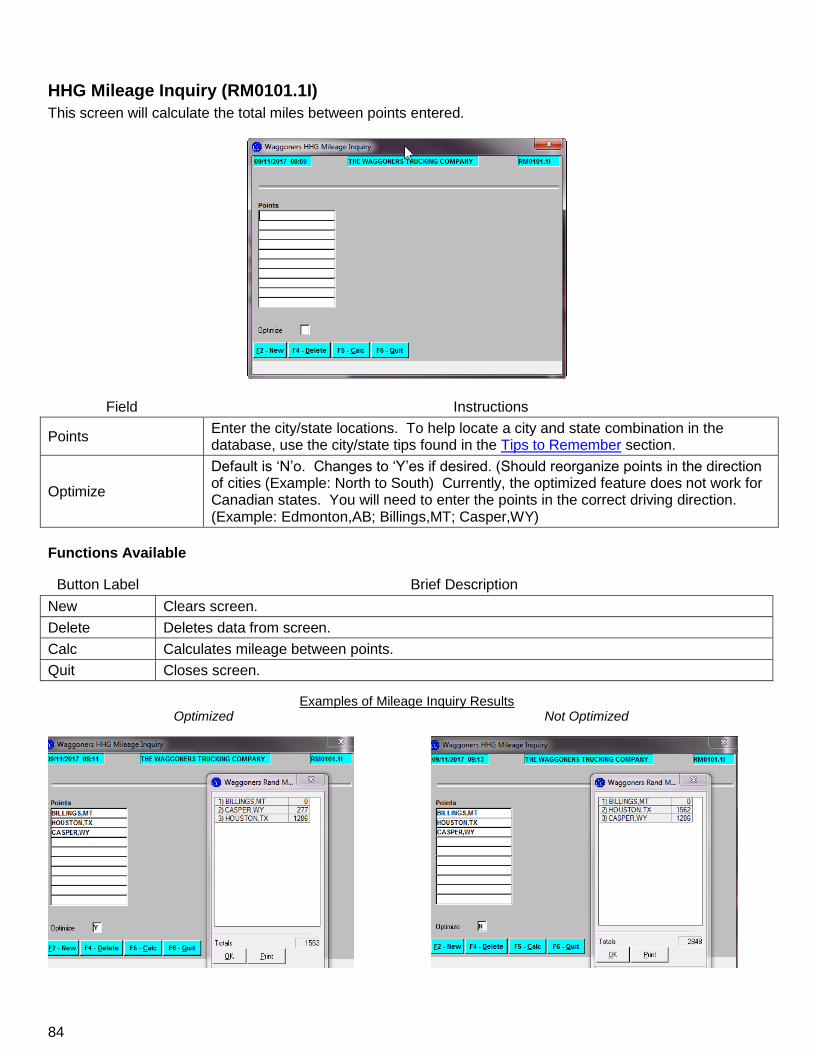
84
HHG Mileage Inquiry (RM0101.1I)
This screen will calculate the total miles between points entered.
Field Instructions
Points Enter the city/state locations. To help locate a city and state combination in the database, use the city/state tips found in the Tips to Remember section.
Optimize
Default is ‘N’o. Changes to ‘Y’es if desired. (Should reorganize points in the direction of cities (Example: North to South) Currently, the optimized feature does not work for Canadian states. You will need to enter the points in the correct driving direction. (Example: Edmonton,AB; Billings,MT; Casper,WY)
Functions Available
Button Label Brief Description
New Clears screen.
Delete Deletes data from screen.
Calc Calculates mileage between points.
Quit Closes screen.
Examples of Mileage Inquiry Results Optimized Not Optimized

85
HHG Single Origin (RM101.2I)
This screen will not total miles from point to point. Below is the result of inquiry.
HHG Rules Audit Route (RM0101.3I)
This screen will give you the highway directions between each point. Below is the screen and result of inquiry.
HHG State Breakdown (RM0101.4I)
This screen will give you the state breakdown between points.
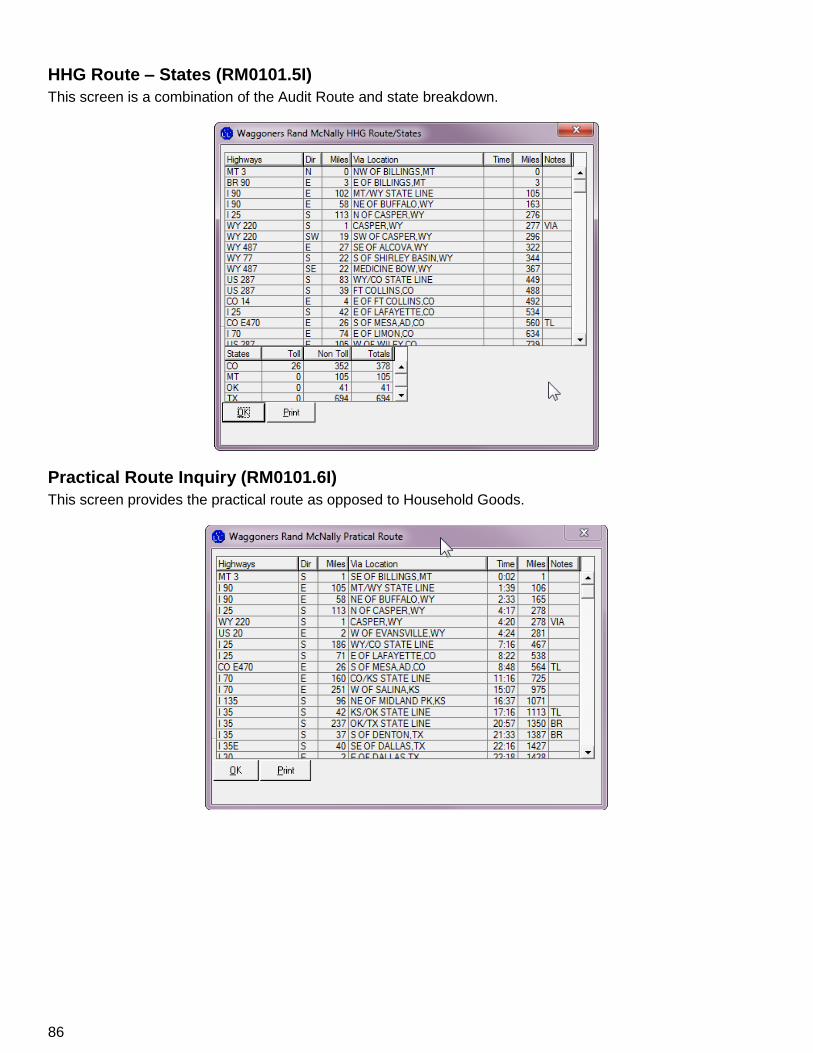
86
HHG Route – States (RM0101.5I)
This screen is a combination of the Audit Route and state breakdown.
Practical Route Inquiry (RM0101.6I)
This screen provides the practical route as opposed to Household Goods.

87
Practical State Breakdown (RM0101.7I)
This screen provides the practical state breakdown.
Practical Route - States (RM0101.8I)
This screen combines the practical route and state breakdown between points.

88

89
VI - Miscellaneous Screens/Prompts
Some screens have prompts or additional sub-screens that are not covered in detail. Those types of prompts or screens will be captured here.

90
Searching for Drivers
To access this search function use the “Lookup” button or F3 function key when your cursor is in a driver field. Below is the search prompt and the results of a search for “SMITH”.
Searching for Customer Codes
To access the search function, press the F3 function key in the field where you must enter a customer number or dealer code. A screen similar to this will open, allowing you to type in search parameters.
Field Instructions
Name1 Type in name of customer.
Address1 Type in address of customer.
City Type in city of customer
State Type in state abbreviation of customer.
Dealer Type in dealer code associated with customer.
Functions Available
Button Label Brief Description
Accept Press to begin search.
Cancel Press to close screen.
A directory listing will pop up with all customers that may match the information you requested. Verify the one you are looking for is in that box and click on it, you can either click accept or double click the address to continue.
NOTE: It is usually easier to find what you are looking for when you enter less info into this section. (e.g. Address number only and city name or First name of company and city name.)

91
Searching for Bill to Customers (LTL0111.I)
When using the ‘B’ option in the PPD/COL field of the Schedule Pickup Entry screen, you are prompted to enter the correct Bill to for freight charges. If this information is not handy, you have the option of hitting the F3 key and using the below search function to locate the correct code.
Being as frugile as you can, type in the Name of the customer (example: SIGMA) and click on ‘Accept’. A directory listing will pop up with all the customers that match the information you requested. Find the customer you are looking for and double click. If the customer does not have a bill to account, this shipment will have to move to COD. The customer can then request we set up a bill to account for them. Refer to your supervisor or the Accounts Receivable Department.
Cancelling a Load Number (LTL0111.I)
At times, you may need to cancel a load that you have already dispatched on a Local P/D trip. If the Local P/D trip is already closed, you will need to reach out to the IT Department asking them to remove load from trip so you can then cancel load using the LTL Schedule Pickup Entry screen. First you need to remove the load from the trip. To do this, locate the trip that the load is currently on by using either the LTL Schedule Pickup Entry screen then pressing the “Events” button (look for LOCALP) or by using the Pickup/Delivery Entry screen (look for P/D Trip # on the top half). Make note of trip number. Then, using the Manifest Entry - Beta screen; type in the trip number. From here, click on “Activity” button, locate the load number and click the ‘Del’ button to the right of the load. Save trip.
Now, go back to the LTL Schedule Pickup Entry screen and click the “Cancel” button.
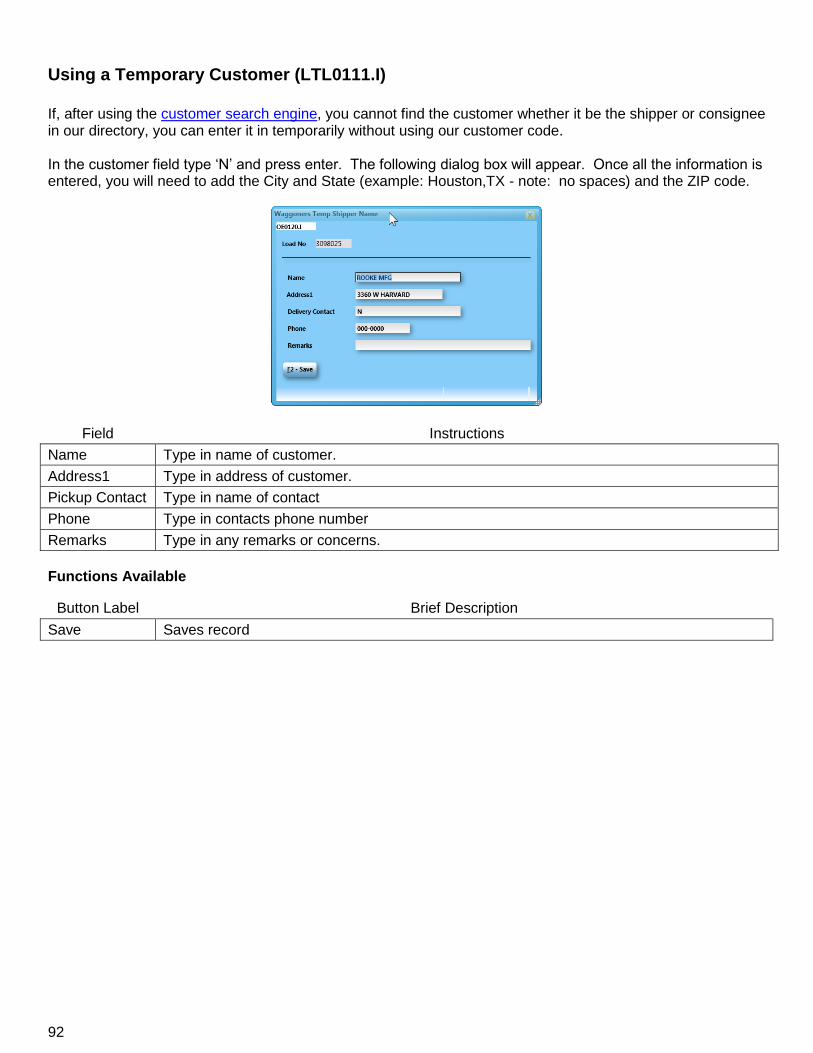
92
Using a Temporary Customer (LTL0111.I)
If, after using the customer search engine, you cannot find the customer whether it be the shipper or consignee in our directory, you can enter it in temporarily without using our customer code. In the customer field type ‘N’ and press enter. The following dialog box will appear. Once all the information is entered, you will need to add the City and State (example: Houston,TX - note: no spaces) and the ZIP code.
Field Instructions
Name Type in name of customer.
Address1 Type in address of customer.
Pickup Contact Type in name of contact
Phone Type in contacts phone number
Remarks Type in any remarks or concerns.
Functions Available
Button Label Brief Description
Save Saves record

93
Load Tracking
Beginning in 2017, we launched our Load Tracking feature through our www.waggonerstrucking.com website. While you can access this same information via the “Events” screens, our customers couldn’t. They now have their own area to view the status of their shipments. For each customer that we send an electronic BOL email to will contain an attachment of their BOL paperwork and a link that will take them directly to their shipments event status. If you need to direct a customer to this page, tell them to browse to www.waggonerstrucking.com, mouse over “Our Services” and click on Load Tracking. From here, they can type in their tracking number (our load number) and press enter.
For those terminals that are able, a scanned image of their signed and completed BOL will also be found here.

94

95
VII - Qualcomm Messages Many of our booking and dispatch functions now allow us to communicate directly with the drivers. This is possible through the Qualcomm units installed in each of our company driver tractors. This chapter will go over the messages sent to the tractors so the drivers can communicate with us thus providing us correct and accurate data. The menu options in this chapter are found here: QC > Entry unless noted otherwise.

96
Macro #5 & #11 (LTL Local Pickup)
This macro is available from the “Dates” button found from the LTL Scheduled Pickup Entry screen, the “Activity” button from the Manifest Entry screens (QC) and the Pickup/Delivery Entry screen found under the Freight > Entry menu option. After dispatching your load, you have the option of sending the load information to the driver/tractor assigned. Below is a screen shot of the information sent. The driver then replies to your message with the actual date and time that the shipment was picked up. This information is then fed into the system and all appropriate fields are updated.
Macro #6 & #12 (LTL Local Delivery)
This macro is available from the “Dates” button found from the LTL Scheduled Pickup Entry screen, the “Activity” button from the Manifest Entry screens (QC) and the Pickup/Delivery Entry screen found under the Freight > Entry menu option. After dispatching your load, you have the option of sending the load information to the driver/tractor assigned. Below is a screen shot of the information sent. The driver then replies to your message with the actual date and time that the shipment was delivered. This information is then fed into the system and all appropriate fields are updated.

97
Qualcomm Position History (QC109.O)
This screen shows the position history as tracked by the Qualcomm unit installed on the tractor. It was explained in the Chapter 8 Drivers section. The alternative location for this option is found from menu QC > Inquiries.
Qualcomm Free Form Message Entry
This screen allows a free form message to be sent to the tractor you are viewing. Type in the message and hit Send Msg to send. Use the Cancel button to not send.

98
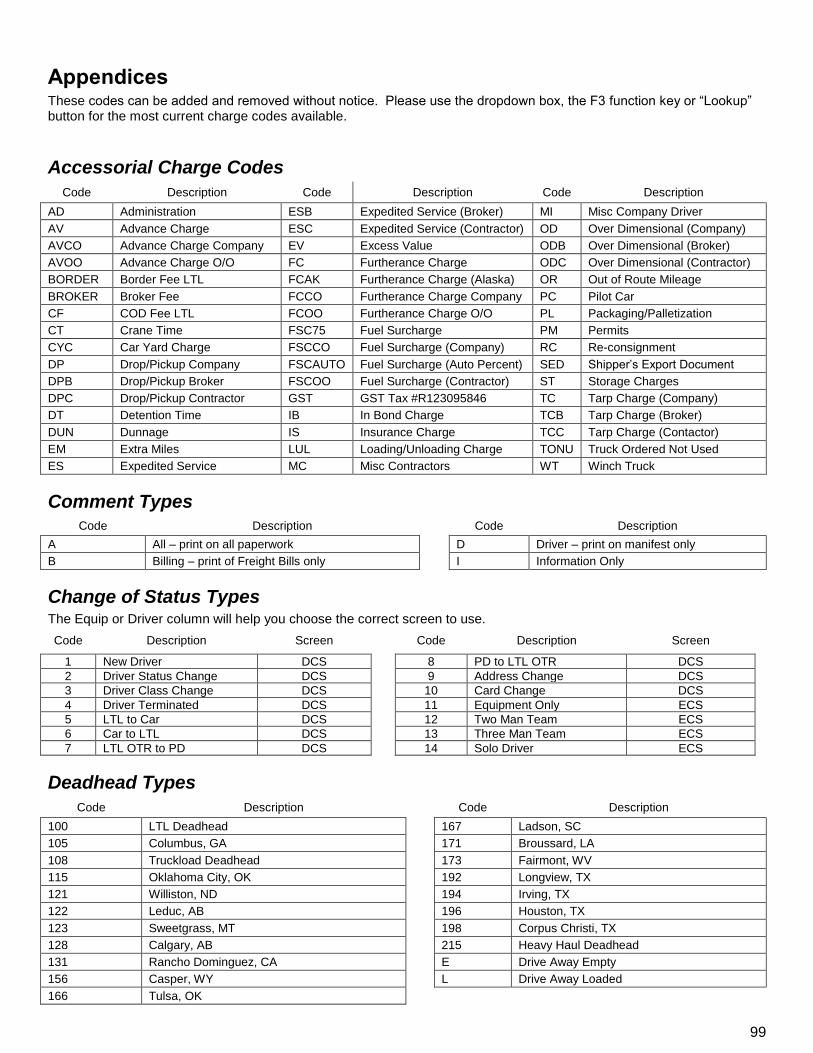
99
Appendices These codes can be added and removed without notice. Please use the dropdown box, the F3 function key or “Lookup” button for the most current charge codes available.
Accessorial Charge Codes
Code Description Code Description Code Description
AD Administration ESB Expedited Service (Broker) MI Misc Company Driver
AV Advance Charge ESC Expedited Service (Contractor) OD Over Dimensional (Company)
AVCO Advance Charge Company EV Excess Value ODB Over Dimensional (Broker)
AVOO Advance Charge O/O FC Furtherance Charge ODC Over Dimensional (Contractor)
BORDER Border Fee LTL FCAK Furtherance Charge (Alaska) OR Out of Route Mileage
BROKER Broker Fee FCCO Furtherance Charge Company PC Pilot Car
CF COD Fee LTL FCOO Furtherance Charge O/O PL Packaging/Palletization
CT Crane Time FSC75 Fuel Surcharge PM Permits
CYC Car Yard Charge FSCCO Fuel Surcharge (Company) RC Re-consignment
DP Drop/Pickup Company FSCAUTO Fuel Surcharge (Auto Percent) SED Shipper’s Export Document
DPB Drop/Pickup Broker FSCOO Fuel Surcharge (Contractor) ST Storage Charges
DPC Drop/Pickup Contractor GST GST Tax #R123095846 TC Tarp Charge (Company)
DT Detention Time IB In Bond Charge TCB Tarp Charge (Broker)
DUN Dunnage IS Insurance Charge TCC Tarp Charge (Contactor)
EM Extra Miles LUL Loading/Unloading Charge TONU Truck Ordered Not Used
ES Expedited Service MC Misc Contractors WT Winch Truck
Comment Types
Code Description Code Description
A All – print on all paperwork D Driver – print on manifest only
B Billing – print of Freight Bills only I Information Only
Change of Status Types The Equip or Driver column will help you choose the correct screen to use.
Code Description Screen Code Description Screen
1 New Driver DCS 8 PD to LTL OTR DCS
2 Driver Status Change DCS 9 Address Change DCS
3 Driver Class Change DCS 10 Card Change DCS
4 Driver Terminated DCS 11 Equipment Only ECS
5 LTL to Car DCS 12 Two Man Team ECS
6 Car to LTL DCS 13 Three Man Team ECS
7 LTL OTR to PD DCS 14 Solo Driver ECS
Deadhead Types
Code Description Code Description
100 LTL Deadhead 167 Ladson, SC
105 Columbus, GA 171 Broussard, LA
108 Truckload Deadhead 173 Fairmont, WV
115 Oklahoma City, OK 192 Longview, TX
121 Williston, ND 194 Irving, TX
122 Leduc, AB 196 Houston, TX
123 Sweetgrass, MT 198 Corpus Christi, TX
128 Calgary, AB 215 Heavy Haul Deadhead
131 Rancho Dominguez, CA E Drive Away Empty
156 Casper, WY L Drive Away Loaded
166 Tulsa, OK

100
Division Codes Code Description Code Description
00 Corporate 04 Shop
01 LTL 05 Car Haul
02 Heavy Haul 07 Flatbed
Event Codes – LTL
Event Description Event Description Event Description
ADVCAR Advanced Carrier DEPCAL Depart Calgary MANLON Manifest Longview
ARRBAK Arrive Bakersfield DEPCAS Depart Casper MANNIS Manifest Nisku
ARRBIL Arrive Billings DEPDEN Depart Denver MANODE Manifest Odessa
ARRBRO Arrive Broussard DEPFAI Depart Fairmont MANOKC Manifest OKC
ARRCAL Arrive Calgary DEPHOU Depart Houston MANRAN Manifest Rancho
ARRCAS Arrive Casper DEPIRV Depart Irving MANTUL Manifest Tulsa
ARRDEN Arrive Denver DEPNIS Depart Nisku MANWIL Manifest Williston
ARRFAI Arrive Fairmont DEPODE Depart Odessa PENDPU Order Entered
ARRHOU Arrive Houston DEPOKC Depart OKC OODELV Owner Operator Delivery
ARRIRV Arrive Irving DEPRAN Depart Rancho OOPICK Owner Operator Pickup
ARRNIS Arrive Nisku DEPTUL Depart Tulsa PUTERM Pickup Terminal
ARRODE Arrive Odessa DEPVEN Depart Ventura SCHDPU Scheduled To Pickup
ARROKC Arrive OKC DEPWIL Depart Williston TRNBAK Transfer Bakersfield
ARRRAN Arrive Rancho DRPTRM Dropped Terminal TRNBIL Transfer Billings
ARRTUL Arrive Tulsa ENRTDE Enroute Delivery TRNBRO Transfer Brossard
ARRVEN Arrive Ventura ENRTPU Enroute Pickup TRNCAL Transfer Calgary
ARRWIL Arrive Williston LOCALP Finished Loading TRNCAS Transfer Casper
ARRDEL Arrived To Deliver FURCAR Furtherance Carrier TRNDEN Transfer Denver
ARRVPU Arrived To Pickup MANBAK Manifest Bakersfield TRNFAI Transfer Fairmont
CUSDROP Customer Dropoff MANBRO Manifest Broussard TRNHOU Transfer Houston
CUSPICK Customer Pickup MANCAL Manifest Calgary TRNIRV Transfer Irving
LOCALD Delivered MANCAS Manifest Casper TRNNIS Transfer Nisku
DETERM Delivery Terminal MANDEN Manifest Denver TRNODE Transfer Odessa
DEPBAK Depart Bakersfield MANFAI Manifest Fairmont TRNOKC Transfer OKC
DEPBIL Depart Billings MANHOU Manifest Houston TRNRAN Transfer Rancho
DEPBRO Depart Broussard MANIRV Manifest Irving TRNVEN Transfer Ventura
Product (Commodity) Codes
Code Description Code Description Code Description
1 Advertising/Printed Matter 22 Limestone Products 42 Pipe/Tubing
2 Agricultural Equipment 23 Lumber (Canadian Export) 43 1.4 Explosive
3 Automobiles 24 Lumber (US Wood Products) 44 Radioactive
4 Beverages (Alcoholic) 25 Machinery or Equipment 45 1.1 Explosive
5 Beverages (Non-Alcoholic) 26 Miscellaneous 46 Hazardous Material
6 Building Materials 27 Non Ferrous Metals/Aluminum 47 Batteries
7 Chemicals 28 Oil Well Drilling Equipment 48 Pallets
8 Clay Products 29 Oil Well Drilling Tools 49 Geophysical/Seismic Equipment
9 Empty Drums/Containers 30 Ores & Minerals 50 Fittings/Couplings
10 Toys 31 Paper/Paper Products 51 Drilling Mud Additives
11 Pallets 32 Peat Moss 52 Compressors/Parts
12 Auto Parts 33 Petroleum Products 53 Bolts/Nuts
13 Compound, Clng/Scouring 34 Plastic/Rubber Goods 54 Bucket Teeth
14 Compound, Oil/Gas Well Trtg 35 Produce 55 Wire Cloth
15 Compound, Tool Joint 36 Reels/Cables 56 FAK
16 Compound, Well Drilling 37 Salt

101
Code Description Code Description Code Description
17 Compound, Crude Trtg 38 Soap & Sundries
18 Towaway 39 Stone/Sand Products
19 1.3 Explosive 40 Transportation Equipment
21 Iron/Steel Products 41 Unprocessed Grain/Seed
Region/Zone Codes (LTL/TL)
TL/LTL Region/Zone Codes
BAK Bakersfield FAI Fairmont RAN Rancho Dominguez
BIL Billings FAR Farmington ROC Rocky Mountain Area
BRO Broussard HOU Houston SWE Sweetgrass
CAL Calgary IRV Irving TUL Tulsa
CAS Casper LON Longview VEN Ventura
CLA Clarksburg NIS Nisku WIL Williston
COR Corpus Christi ODE Odessa TL Truckload
DEN Denver OKC Oklahoma City
Terminal Codes
Code Terminal Code Terminal
100 Billings 156 Casper, WY
105 Columbus 165 Tulsa, OK
115 Oklahoma City 166 Odessa, TX
121 Williston, ND 167 Ladson, SC
122 Leduc, AB 171 Broussard, LA
123 Sweetgrass, MT 173 Mount Clare, WV
128 Calgary, AB 177 Commerce City, CO (Denver)
131 Rancho Dominguez, CA 194 Irving, TX
136 Duncan, SC (Greer) 196 Houston, TX
Trailer Types
Type Description Type Description
114 Trailer (LTL P/D) 220 Trailer (Drive Away)
200 Trailer (Flatbed) 222 O/O Trailer (Car Haul)
201 Trailer Lease (LTL) 223 Trailer (Lease)
202 O/O Trailer (LTL) 224 Trailer (Lease) Enclosed
203 O/O Trailer (Enclosed) 299 Trailer (Wind)
204 Trailer (Broker) 450 Trailer (Enclosed)
205 O/O Trailer (Open) 500 Trailer
209 Trailer (Truckload)
Trip Types
Code Description Code Description
CAR Car Haul Moves TRK Truck Load
LTL LTL Moves RIG Rig Moves
FLT Flat Bed HVY Heavy Haul
WND Wind DAW Drive Away
SND Sand P&D Local P/D
HST Hot Shot
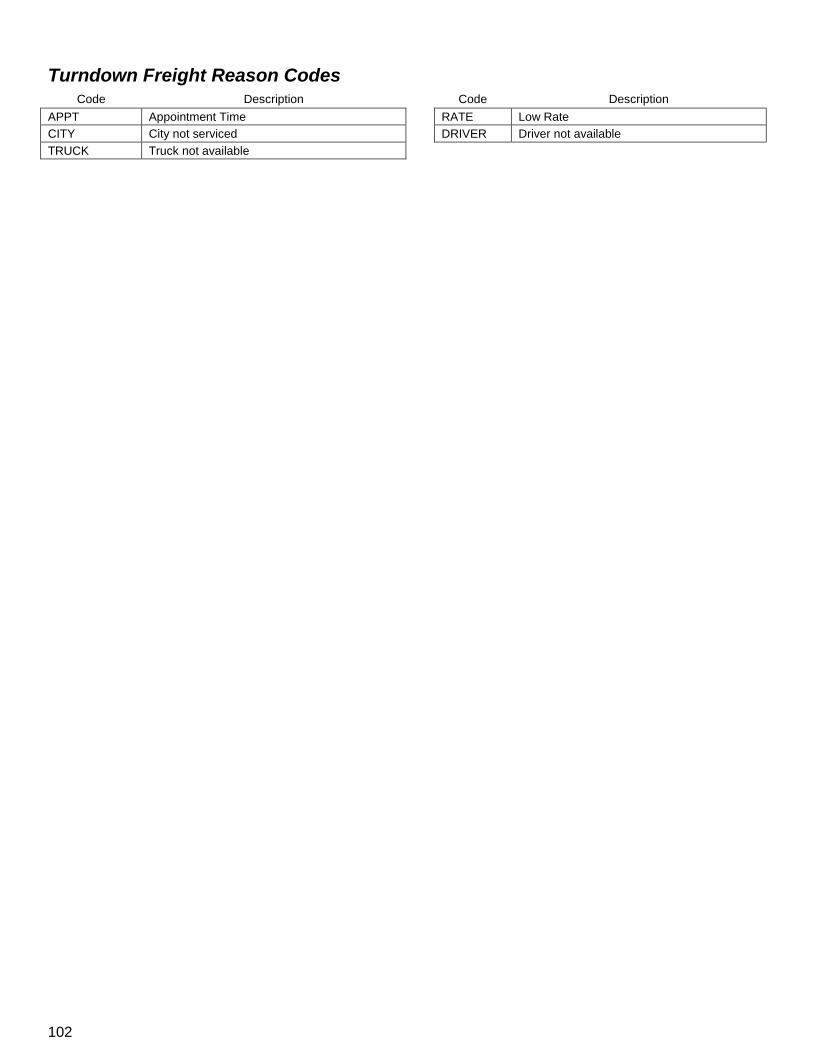
102
Turndown Freight Reason Codes Code Description Code Description
APPT Appointment Time RATE Low Rate
CITY City not serviced DRIVER Driver not available
TRUCK Truck not available