How to Manage the ESXi Server
41
How to manage the ESXi Server
-
Upload
thibaut-leger -
Category
Documents
-
view
113 -
download
6
description
Aims of this document are to provide a basic knowledge on how to create and manage Datastore, Virtual Switch and Virtual Machine the ESXi Machine.
Transcript of How to Manage the ESXi Server

How to manage the ESXi Server

Table of contents
1 General................................................................................................41.1 Document Objectives..................................................................................................41.2 Reference....................................................................................................................4
2 Connect to the ESXi Server:...................................................................52.1 Which tool to use to manage ESXi Server...................................................................52.2 Start with Vsphere Client............................................................................................52.3 First things to do after ESXi installation......................................................................6
2.3.1 Manage Virtual Switch.................................................................................62.3.2 Adding a new Vswitch................................................................................112.3.3 Changing properties of a virtual switch.....................................................122.3.4 Datastorage Management..........................................................................14
2.3.4.1 Create the datastore...................................................................14
3 Managing ISO files containing OS or Application on Datastore:.............183.1 Uploading ISO File on Datastore:..............................................................................183.2 Downloading ISO file from the Datastore:.................................................................21
4 Maintenance:......................................................................................234.1 How to put Server in Maintenance mode:.................................................................234.2 How to Exit from Maintenance mode:.......................................................................244.3 How to Reboot the Server:........................................................................................254.4 How to Shutdown the Server:...................................................................................25
5 Create / delete a Virtual Machine:........................................................265.1 How to create a new Virtual Machine:......................................................................26 To create a new virtual machine, from the left panel control, click with the
right mouse button to have the pop up menu and then select “New Virtual Machine”...................................................................................................................26
A new popup window will appear. On this window, select custom and then click on Next Button..................................................................................................26
Provide a name to your virtual machine (it’s recommended to use the GINI Name) and then click on Next button.......................................................................27
In case where there is different Storage, select the 1 where you want to install your virtual machine. If like on the below screenshot, there is only 1 storage, click directly on Next button.....................................................................................27
Depend on the version of the ESXi that you have but it’s strongly recommended to select the most upper version of virtual machine. (For ESXi 4, upper version is 7 and for ESXi 5, the upper version is 8)....................................28
Select the correct OS Environment between Microsoft, Linux and Other (The available choice will depend on the ESXi Version that you have). In our sample, we will select Microsoft Windows Server 2008R2 (64-bit)...........................28
In the next window, provide the number of virtual CPU Socket and number of cores per virtual CPU Socket then click on Next button............................................29
On this screen, define the Virtual memory that you need........................................29 On the next screen, you will have to select the Virtual Network interface
(Select, in case where different network switch has been created, the needed 1). For the Adapter the most recommended is the VMXNET3 but in some case the E1000 will have to be choice). Tick the check box connect at power on and then click on Next button...................................................................................30
Exclude if there is some specific reason for this, keep the default setting on the next screen and click on next button directly.....................................................30
On the next screen, keep the default settings and then click on Next button..........31 On the next screen, provide the needed disk drive capacity, default setting is
40GB, (Possible limit is the available capacity of the Datastorage disk where you install the virtual machine.) Keep defaults setting all of the other option and then click on next button...................................................................................31
Keep the default setting for the Virtual Device Node but tick the “Independent” checkbox in Mode area, and be sure that independent is selected as well. Click on Next button......................................................................32
On the last wizard screen, tick the checkbox Edit the virtual machine settings before completion and then click on Continue button..............................................32
On the virtual machine properties window, select New CD/DVD on the left, and then on right part, tick the Connect on power checkbox, select after Datastore ISO File in Device type area and click on browse button..........................33
A pop-up explorer window will appear, go to the place where your OS iso file is installed to select it and click on Ok button...........................................................33
When done, select on the left panel the Video Card Option and on the right panel, select “Auto-detect setting”...........................................................................33
When Done, Click on Options Tab, select Boot Options on the left panel, then in the right panel, Tick on the Force Bios Setup check-box. Click on Finish button when all is done.............................................................................................34
The virtual machine setting is done. Click on start button to start the virtual machine OS installation............................................................................................34
5.2 How to delete a Virtual Machine...............................................................................355.3 How to remove a virtual machine from the inventory..............................................35

1 General
1.1 Document Objectives
Aims of this document are to provide a basic knowledge on how to create and manage Datastore, Virtual Switch and Virtual Machine the ESXi Machine.
1.2 Reference
Vmware Support

2 Connect to the ESXi Server:
2.1 Which tool to use to manage ESXi Server
To manage the ESXi Server, you have to use Vsphere client software. You could download it or from the Vmware website (see Reference for the URL) and look for the Vsphere client in the ESXi 4.1 support download link if you have an internet access, or from the ESXi server itself. For the second solution, open a web browser like Mozilla or internet explorer and go on the ESXi IP@. For example it’s could be like the following: https://172.16.41.100. You will have after certificate confirmation request a page where you will see a link to download Vsphere Client.
2.2 Start with Vsphere Client
Launch the Vsphere client from your windows menu. You will have the following login popup window:
You will obtain the following management windows:

2.3 First things to do after ESXi installation
2.3.1 Manage Virtual Switch
To access to the Virtual Switch settings, click on the “Configuration” tab. And Select Network Adapter first to check that you are able to see all of the physical installed network board.
After this, select Networking to access on the Virtual Switch view and settings.
Depend on the number of physical NIC Board you have you could create or a simple virtual switch or more complex virtual switch.
The example show before is coming from the lab ESXI Server. There is 2 Physical Nic board. + Nic board is used for the internet access vmnic0 and connected only to the Proxy server, and another NIC vmnic1 shared for ESXi remote console administration and all virtual machine.
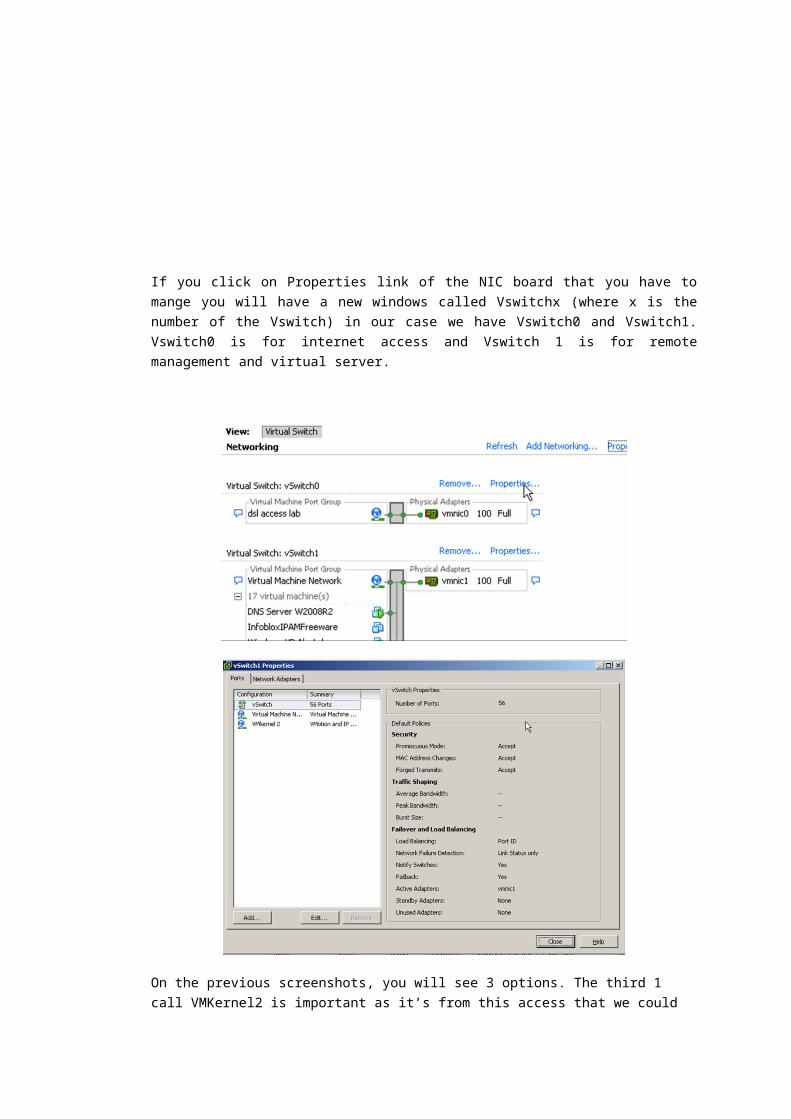
If you click on Properties link of the NIC board that you have to mange you will have a new windows called Vswitchx (where x is the number of the Vswitch) in our case we have Vswitch0 and Vswitch1. Vswitch0 is for internet access and Vswitch 1 is for remote management and virtual server.
On the previous screenshots, you will see 3 options. The third 1 call VMKernel2 is important as it’s from this access that we could manage remotely with Vsphere the ESXi. This interface will have an IP@ set who is the 1 provide during the ESXi installation. Never delete this configuration if there is no other 1 or you will lose the remote managed access (Fig 2.3.1.A to 2.3.1.E). The second option is the Virtual Machine port Group (Figure 2.3.1.F to 2.3.1.I). These allow managing Nat for all Virtual Machine. No setting is really needed on this part. The first option concerns the Vswitch (Fig 2.3.1.J to 2.3.1.M). This Vswitch is a virtual switch and have the same usage than a physical switch.
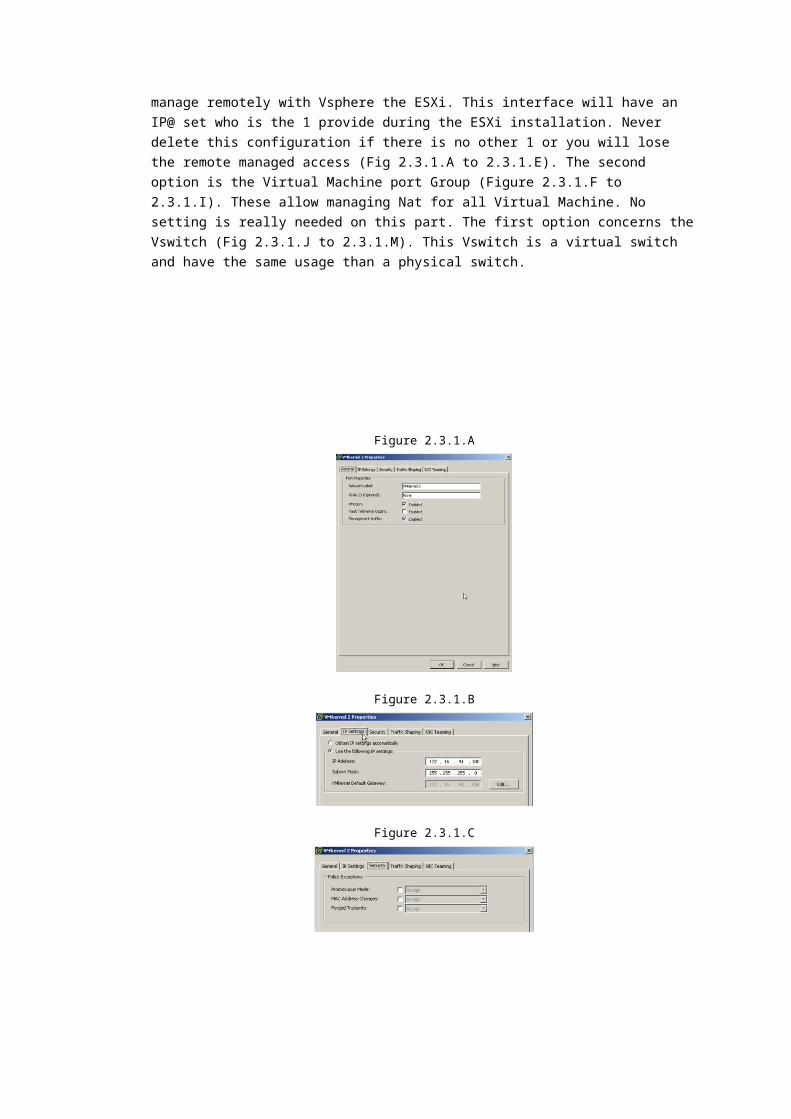
Figure 2.3.1.A
Figure 2.3.1.B
Figure 2.3.1.C
Figure 2.3.1.D

Figure 2.3.1.E
Figure 2.3.1.F
Figure 2.3.1.G
Figure 2.3.1.H

Figure 2.3.1.I
Figure 2.3.1.J
Figure 2.3.1.K
Figure 2.3.1.L
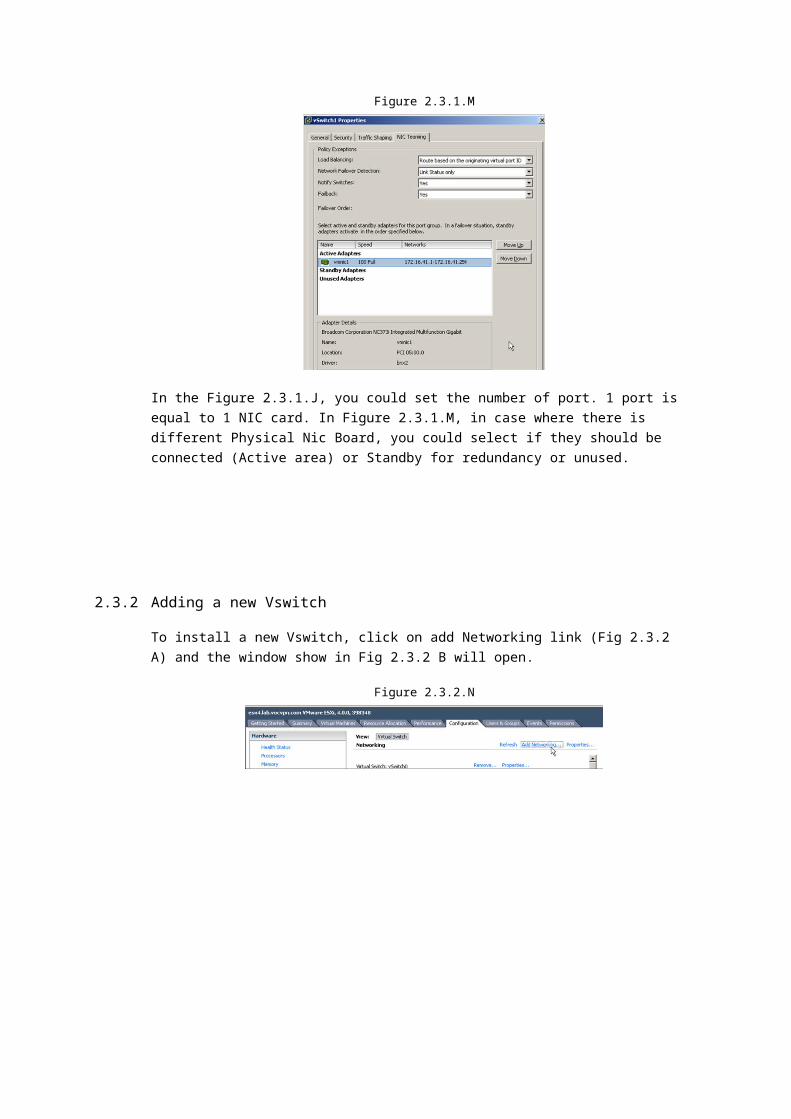
Figure 2.3.1.M
In the Figure 2.3.1.J, you could set the number of port. 1 port is equal to 1 NIC card. In Figure 2.3.1.M, in case where there is different Physical Nic Board, you could select if they should be connected (Active area) or Standby for redundancy or unused.
2.3.2 Adding a new Vswitch
To install a new Vswitch, click on add Networking link (Fig 2.3.2 A) and the window show in Fig 2.3.2 B will open.
Figure 2.3.2.N
Figure 2.3.2.O

The first Selection will depend on which usage you will have for the Vswitch and depend of course of the complexity of your design. In general on Stand alone design, the Vswitch is quite simple. Also, if you need the both option, this could be add later via the properties setting of the added Vswitch, selecting the missing option and as it will be show on the next windows (Fig. 2.3.2.C) you will have the possibility or to create a new Vswitch, or select an existing Vswitch. For now, Select create a new switch and click next.
Figure 2.3.2.P
Provide the best description name for the new Virtual Network, Provide VLAN ID if necessary and click on next button. (Fig. 2.3.2D)
Figure 2.3.2.Q
Click on the finish button to confirm the creation.

Figure 2.3.2.R
2.3.3 Changing properties of a virtual switch
To change a Vswitch setting, go on the desired Vswitch (Vswitch2 in our example) and click on the properties button as shown in figure 2.3.3.A
Figure 2.3.3.S
The following windows will appear (Fig 2.3.3.B). Click on Add button for example if you need to add the VMkernel option, select VMkernel and click on Next button.
Figure 2.3.3.T
Provide the most appropriated name for the label; check Vmotion and management Traffic case (Fig 2.3.3.C) then click Next.

Figure 2.3.3.U
Select the way on how to receiver the IP@ for this virtual Vswitch, DHCP or Manually. If manual, provide correct information. Then click on next. (Fig. 2.3.3.D) and finish by clicking on Finish Button.
Figure 2.3.3.V
2.3.4 Datastorage Management
2.3.4.1 Create the datastore
Rq:For this part as there is no available hard disk drive on the server a Freenas server has to be installed to allow to add an iSCSI connector with the ESXi Server to have a new hard disk drive found like a local disk same if it’s a remote 1 connected via the network. As this part is not the topic of this doc, but in case where it’s need go to link 1 for downloading and installing Freenas OS (recommended to install it on a 2Gb min USB key) and go to link 2 for the setting of the iSCSI device on the Freenas and connection with the ESXi Server.
Link1:http://www.freenas.org/Link2:http://www.vladan.fr/how-to-configure-freenas-8-for-iscsi-and-connect-to-esxi/

To proceed on the Datastore creation, in configuration Tab, click on Storage link. From this page, click on “Add Storage” as shown in Fig 2.3.4.A
Figure 2.3.4.W
Following window will open:
Figure 2.3.4.X
Let’s default selection and click on next button. Select the desired drive and click next (Fig. 2.3.4.C)

Figure 2.3.4.Y
Disk information will appear. Click next to confirm the creation. This process will destroy al data present on the disk if there is. (Fig: 2.3.4.D)
Figure 2.3.4.Z
Provide an explicit Datastore name and click on Next. (Fig: 2.3.4.E)

Figure 2.3.4.AA
Depend on the size of the disk, select the correct block size to optimize the capacity and let’s by default the Maximize Capacity check. (Fig: 2.3.4.F and 2.3.4.G) then click next.
Figure 2.3.4.AB
Figure 2.3.4.AC

The last step is a resume of the previous setting. Click on Finish to confirm final creation. If there is some mistake, just click on Back until needed page to be fix. (Fig: 2.3.4.H).
Figure 2.3.4.AD
Your Datastore is created and ready to be used. (Fig: 2.3.4.I)
Figure 2.3.4.AE
From this point, Virtual machine creation could be start.

3 Managing ISO files containing OS or Application on Datastore:
3.1 Uploading ISO File on Datastore:
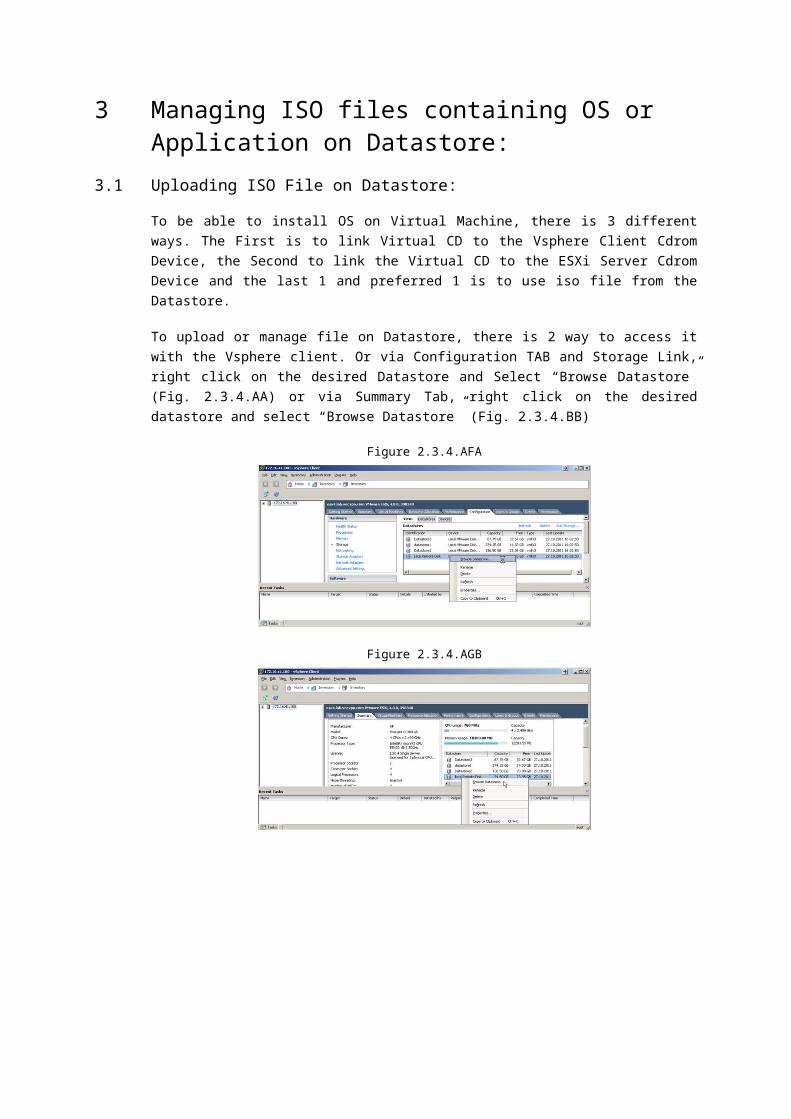
To be able to install OS on Virtual Machine, there is 3 different ways. The First is to link Virtual CD to the Vsphere Client Cdrom Device, the Second to link the Virtual CD to the ESXi Server Cdrom Device and the last 1 and preferred 1 is to use iso file from the Datastore.
To upload or manage file on Datastore, there is 2 way to access it with the Vsphere client. Or via Configuration TAB and Storage Link, right click on the desired Datastore and Select “Browse Datastore” (Fig. 2.3.4.AA) or via Summary Tab, right click on the desired datastore and select “Browse Datastore” (Fig. 2.3.4.BB)
Figure 2.3.4.AFA
Figure 2.3.4.AGB
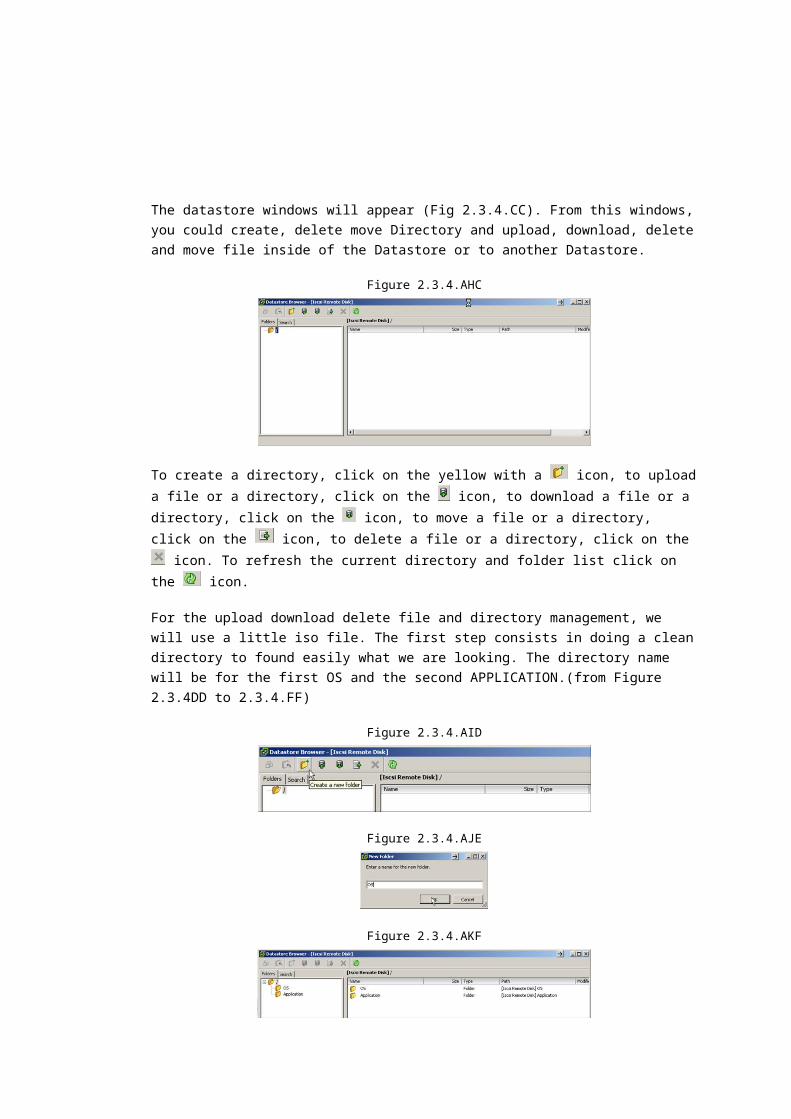
The datastore windows will appear (Fig 2.3.4.CC). From this windows, you could create, delete move Directory and upload, download, delete and move file inside of the Datastore or to another Datastore.
Figure 2.3.4.AHC
To create a directory, click on the yellow with a icon, to upload a file or a
directory, click on the icon, to download a file or a directory, click on the
icon, to move a file or a directory, click on the icon, to delete a file or a
directory, click on the icon. To refresh the current directory and folder list click
on the icon.
For the upload download delete file and directory management, we will use a little iso file. The first step consists in doing a clean directory to found easily what we are looking. The directory name will be for the first OS and the second APPLICATION.(from Figure 2.3.4DD to 2.3.4.FF)
Figure 2.3.4.AID
Figure 2.3.4.AJE
Figure 2.3.4.AKF
Now we will upload a file into the directory OS and move it after from OS to APPLICATION.
The first step is to select the desired directory (OS). And then click on the upload button (Fig )
Figure 2.3.4.ALG
The second step consist of selecting file to upload and then click on Open button. The upload will start. (Fig. from 2.3.4.HH to 2.3.4.JJ)
Figure 2.3.4.AMH
Figure 2.3.4.ANI
Figure 2.3.4.AOJ
As the ISO file is an application, we will move it from OS to APPLICATION Directory. Select the file and then click on yes button to confirm as it’s not a VM and the file is not link to a VM.
Figure 2.3.4.APK
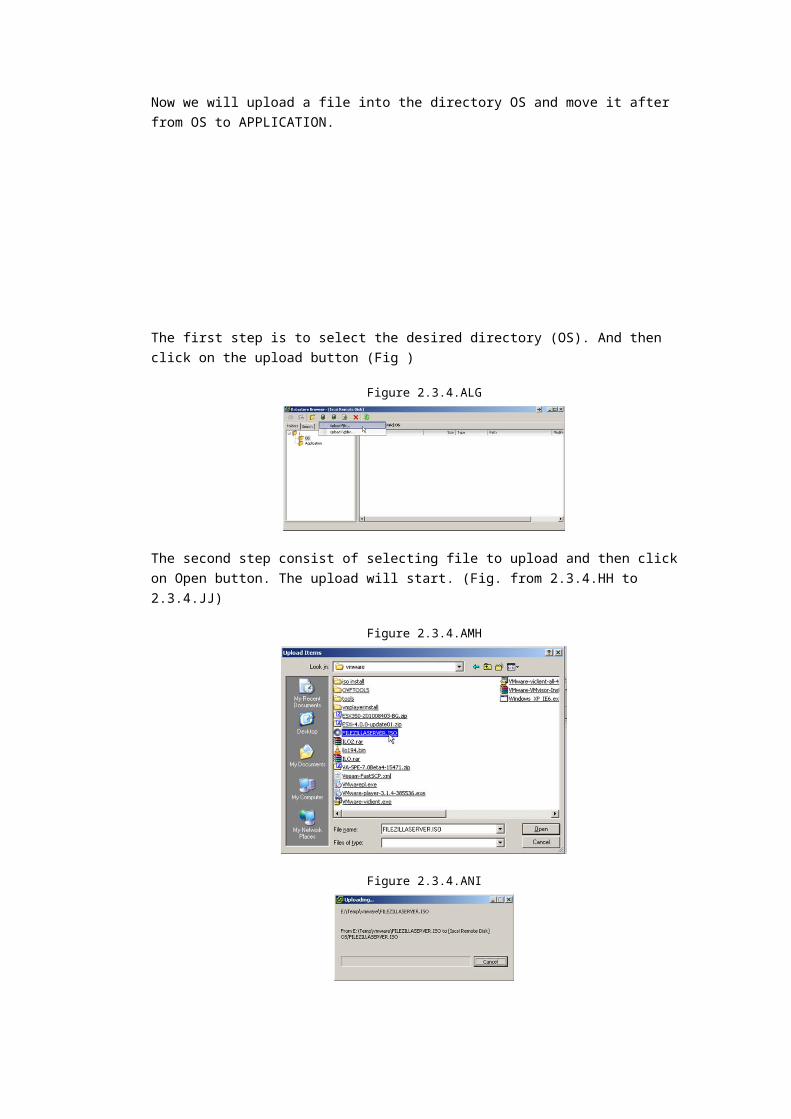
Figure 2.3.4.AQL
Select the Datastore where the file has to be move and the correct directory inside of the selected Datastore and click on move button to finish (Fig. 2.3.4.MM to 2.3.4.NN).
Figure 2.3.4.ARM
Figure 2.3.4.ASN
The file was move from a directory to another inside of the same Datastore. To move a file or directory from a Datastore to another Datastore, follow same process but select the Datastore where you want to put the file or directory that has to be moved.
3.2 Downloading ISO file from the Datastore:
From the Datastore windows, go in the correct Directory and select the file or directory that you want to download. Then click on the download button.
Figure 2.3.4.ATA
Figure 2.3.4.AUB

Figure 2.3.4.AVC
Figure 2.3.4.AWD
Figure 2.3.4.AXE

4 Maintenance:
4.1 How to put Server in Maintenance mode:
To put the server in Maintenance mode you have to go on Vsphere Client, and select Summary as show below:
From this Screen, go to the bottom of the summary windows and click on Maintenance Mode link:
A confirmation pop-up window will appear after you have click on “Enter Maintenance Mode” link

When confirmed, in the left panel, the Server line will change to indicate “Maintenance Mode), and in the Central panel, the link “Enter in Maintenance Mode” as change by “Exit Maintenance Mode”.
4.2 How to Exit from Maintenance mode:
To exit from the Maintenance mode, click in the Central Panel on the link “Exit Maintenance Mode”
After having click on the link, the status of the server will no more indicate “Maintenance Mode” in the left panel. You can restart all Virtual Machine.

4.3 How to Reboot the Server:
To reboot the server, go on the Summary tab and click on Reboot link in the bottom page. A popup window will appear for restart confirmation. Click on Ok button.
Check if all the Virtual machines are in restarting mode via the vsphere client. If not, restart all of them 1 by 1.
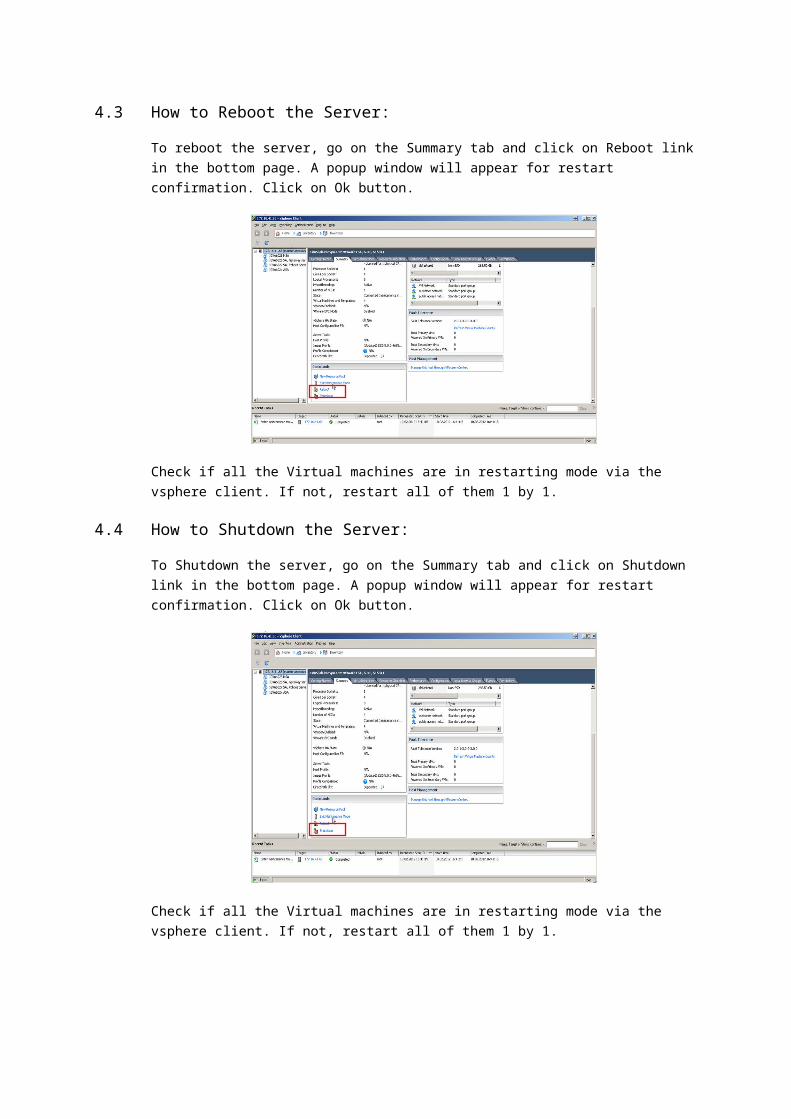
4.4 How to Shutdown the Server:
To Shutdown the server, go on the Summary tab and click on Shutdown link in the bottom page. A popup window will appear for restart confirmation. Click on Ok button.
Check if all the Virtual machines are in restarting mode via the vsphere client. If not, restart all of them 1 by 1.

5 Create / delete a Virtual Machine:
5.1 How to create a new Virtual Machine:
To create a new virtual machine, from the left panel control, click with the right mouse button to have the pop up menu and then select “New Virtual Machine”
A new popup window will appear. On this window, select custom and then click on Next Button
1
2

Provide a name to your virtual machine (it’s recommended to use the GINI Name) and then click on Next button
In case where there is different Storage, select the 1 where you want to install your virtual machine. If like on the below screenshot, there is only 1 storage, click directly on Next button
2
1
Depend on the version of the ESXi that you have but it’s strongly recommended to select the most upper version of virtual machine. (For ESXi 4, upper version is 7 and for ESXi 5, the upper version is 8).
Select the correct OS Environment between Microsoft, Linux and Other (The available choice will depend on the ESXi Version that you have). In our sample, we will select Microsoft Windows Server 2008R2 (64-bit)

In the next window, provide the number of virtual CPU Socket and number of cores per virtual CPU Socket then click on Next button
On this screen, define the Virtual memory that you need.

On the next screen, you will have to select the Virtual Network interface (Select, in case where different network switch has been created, the needed 1). For the Adapter the most recommended is the VMXNET3 but in some case the E1000 will have to be choice). Tick the check box connect at power on and then click on Next button.
Exclude if there is some specific reason for this, keep the default setting on the next screen and click on next button directly.

On the next screen, keep the default settings and then click on Next button.
On the next screen, provide the needed disk drive capacity, default setting is 40GB, (Possible limit is the available capacity of the Datastorage disk where you install the virtual machine.) Keep defaults setting all of the other option and then click on next button.

Keep the default setting for the Virtual Device Node but tick the “Independent” checkbox in Mode area, and be sure that independent is selected as well. Click on Next button
On the last wizard screen, tick the checkbox Edit the virtual machine settings before completion and then click on Continue button.

On the virtual machine properties window, select New CD/DVD on the left, and then on right part, tick the Connect on power checkbox, select after Datastore ISO File in Device type area and click on browse button.
A pop-up explorer window will appear, go to the place where your OS iso file is installed to select it and click on Ok button.
When done, select on the left panel the Video Card Option and on the right panel, select “Auto-detect setting”.

When Done, Click on Options Tab, select Boot Options on the left panel, then in the right panel, Tick on the Force Bios Setup check-box. Click on Finish button when all is done.
The virtual machine setting is done. Click on start button to start the virtual machine OS installation.

5.2 How to delete a Virtual Machine
To delete completely a virtual machine including file on the Datastorage, select the virtual machine from the left panel, right click and select Delete from Disk.
Confirm by clicking on the yes button that you want to delete the virtual machine.
5.3 How to remove a virtual machine from the inventory
To remove the virtual machine from the inventory, select the virtual machine from the left panel, right click and select Remove from Inventory.
Confirm by clicking on the yes button that you want to remove the virtual machine from the Inventory.