How to make the most of Google Classroom - RSC Education
28
How to make the most of 1 Read the full article at rsc.li/3aOv8uM
Transcript of How to make the most of Google Classroom - RSC Education
Contents
1. Organising your classwork into topics2. Creating an assignment3. Scheduling assignments and posts4. Creating a quiz assignment 5. How to screen capture with PowerPoint6. How to record your voice over a PowerPoint
2

1. Organising your classwork into topics
3

Select the three dots to rename, delete, or move topics up or down.
You can also click and drag the topic to where you want it.
4

2. Creating assignments
Click here to create your assignment.
You can create Google Quizzes here.
You can just post material such as links to lectures, news stories, etc.
You can reuse assignments/ posts from other classes by selecting this feature.
5

Type in your title/ any instructions.
You can assign to more than one class. Note: this disables the ability to schedule the assignment.
You can also send the assignment to certain pupils
Choose the topic the assignment belongs to here.
You can select a date and specific time the assignment is due.
6
Add instructions and due date

Click here to add resources such as YouTube links, PowerPoints, etc.
7
Add extra resources

Click here to create Google docs, slides, etc that pupils can edit and submit.
8

Select ‘Make a copy for each student’ so that pupils can turn in their own work.
9

Once finished, click ‘Assign’. If you want to schedule when the assignment is released, select the drop down arrow.
10
3. Scheduling assignments and posts

You can now schedule the assignment to be released at a specific date and time.
11

4. Creating a quiz assignment
Click here to create your assignment.
You can create Google Quizzes here.
You can just post material such as links to lectures/ news stories etc.
You can reuse assignments/ posts from other classes by selecting this feature.
12
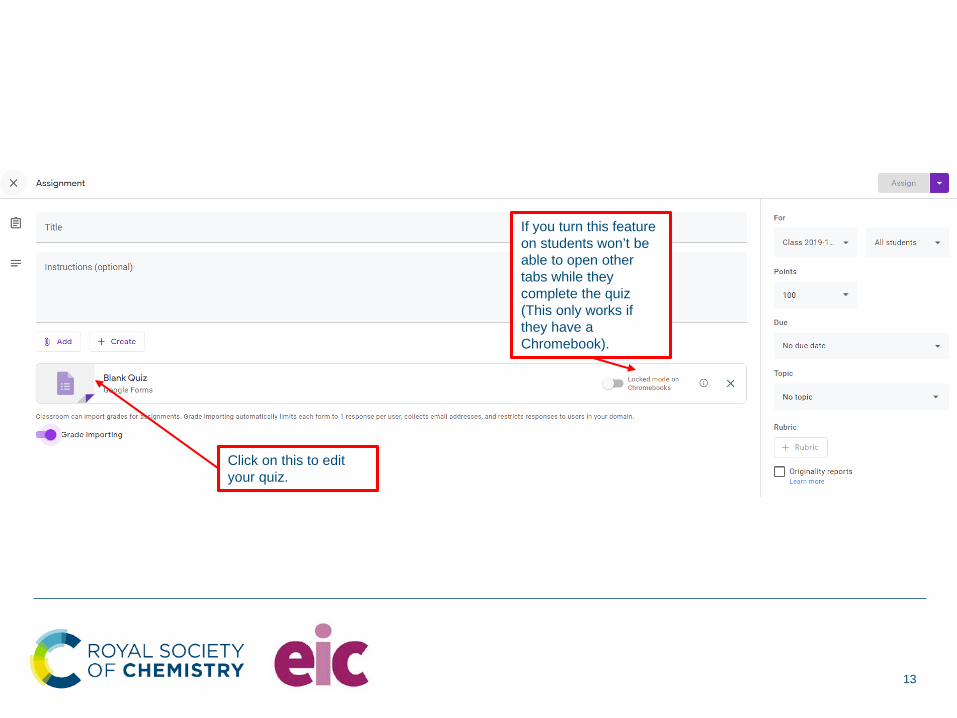
If you turn this feature on students won’t be able to open other tabs while they complete the quiz (This only works if they have a Chromebook).
Click on this to edit your quiz.
13

Here you can choose how many points the question is worth and select the correct answer(s) to give automatic feedback on (in)correct answers.
Add more questions to your quiz.
Add images/ video clips.
Select the question type here.
14
Creating questions

You can add specific links for pupils to click on, eg a YouTube clip or BBC bitesize link, etc.
Select how many points the question is worth.
Select the correct answer.
15
Add feedback for answers

16
5. How to screen capture with PowerPoint

This panel will appear. Select the area you want to record (whether in your internet browser or a word doc) and it will count you down. Note down how to stop the recording (eg press Windows, shift, Q). Your students will be able to see what you are doing on the screen. Once finished, it will appear in your PowerPoint file. Save this as a file and upload to Google Classroom to share with your students.
17
Let students see where your mouse pointer is on the screen.
Let students hear you speak as you record.

18
6. How to record your voice over a PowerPoint
Here is a PowerPoint presentation for 1st year Junior Cycle science.

19
Click on the ‘Slide Show’ tab and you will see the following choices. Click on ‘Record Slide Show’.

20
One you have clicked on ‘Record Slide Show’, this window will appear on your screen. As you can see from the bottom right hand corner of the image, I have muted the camera so students can only hear my voice. The red button on the top left-hand corner must be clicked to start recording.

21
Note: if you have MS Office 2016, your screen may look slightly different as the controls are more limited. A dialogue box will appear once you click ‘Record slide show’ and you must click on ‘Start recording’ to commence recording. There is no video option, only audio, so this does not need to be deactivated. The controls are found in the bottom left of the screen and the recording tools in a floating box, where you can also pause the recording.

22
Once you click on the record button you can move the slides on by clicking the arrow to the right of the screen (found at the bottom in MS 2016). You can also pause the recording. Remember that while recording, you cannot go backwards in your presentation – ie you cannot go from slide 3 back to slide 2.

23
If you make a mistake while recording your voice over a particular slide, don’t panic. You can delete the recording for that slide and record your voice again. To re-record on a slide, press ‘stop’ in the top left-hand corner. Then click on the little arrow beside CLEAR. You can see a drop-down menu with 2 options. Clear the recordings for the current slide or clear recordings on all slides. Once you’ve made your decision and the recording has been deleted, you can press record again and off you go.

24
When you finish your recording, press stop. You can replay your presentation before saving. Once you are happy with your recording, exit the recording window. (In MS 2016 you cannot replay: click the ‘close’ button on the recording controls and it will return you to the normal screen where you can listen back.)

25
Export the document as a video file. To do this, click ‘File’. Once you click on ‘File’ you will see the window below. Click ‘Export’.

26
Click on ‘Create a Video’. Your recording will now be converted to an mp4 file. You will be asked where you want to save the recording. You may like to change the definition from Full HD to SD.

27
Notice, the recording is saving as an MPEG-4 Video. When you are happy the file name and where it is saved, click on ‘Save’.

28
You can see at the bottom of the main slide that the recording being created to the mp4. Once saved, you can share the mp4 file with students using Google Classroom.