How to make the Dome School Biochar Stove
7
How to Make the Dome School Biochar Stove April 23, 2010 By Kelpie Wilson [email protected] www.greenyourhead.com. http://dome-school-biochar.wikispaces.com/ This stove is a Top-Lit Updraft gasifier (TLUD). That means you light it from the top. The stove will burn a little bit of the fuel on top but the rest of it will gasify and turn to charcoal. The flame is clean with little smoke because it is mostly a gas flame. These stoves were constructed by 12 students at the Dome School in Takilma, Oregon from March-May 2010. Only 3 band aids were used. Materials Needed: 1 large 46 oz juice can 1 33 oz can (tomato sauce, pumpkin come in this size) 1 Progresso soup can – 18.5 oz size 1 standard 15 oz can (very common) 1 - 8x1 sheet metal screw 4 - 7x3/8 sheet metal screws About 2 feet of 16 gauge rebar tie wire Tools Needed: Hammer and a big, sharp nail Tin snips File Can opener and can punch Compass, pencil, sharpie marker, ruler and tracing paper Screwdriver Pliers – regular and needlenose Wood blocks and shims The stove has 4 parts: !" Inner can (Progresso soup can), !" Outer can (33 oz can) !" Lid (46 oz can) !" Pot rest (15 oz can) Preparation: Clean all the cans and sanitize if possible. That way if you cut yourself you are less likely to get an infection. BE CAREFUL! Tiny slivers of tin are very sharp.
Transcript of How to make the Dome School Biochar Stove
7/29/2019 How to make the Dome School Biochar Stove
http://slidepdf.com/reader/full/how-to-make-the-dome-school-biochar-stove 1/6
How to Make the Dome School Biochar Stove
April 23, 2010
By Kelpie Wilson
http://dome-school-biochar.wikispaces.com/
This stove is a Top-Lit Updraft gasifier (TLUD). That means you light
it from the top. The stove will burn a little bit of the fuel on top but the
rest of it will gasify and turn to charcoal. The flame is clean with littlesmoke because it is mostly a gas flame.
These stoves were constructed by 12 students at the Dome School in
Takilma, Oregon from March-May 2010. Only 3 band aids were used.
Materials Needed:
1 large 46 oz juice can1 33 oz can (tomato sauce, pumpkin come in this size)
1 Progresso soup can – 18.5 oz size1 standard 15 oz can (very common)
1 - 8x1 sheet metal screw
4 - 7x3/8 sheet metal screws
About 2 feet of 16 gauge rebar tie wire
Tools Needed:
Hammer and a big, sharp nailTin snips
FileCan opener and can punchCompass, pencil, sharpie marker, ruler
and tracing paper
Screwdriver
Pliers – regular and needlenoseWood blocks and shims
The stove has 4 parts:
!" Inner can (Progresso soup can),
!" Outer can (33 oz can)
!" Lid (46 oz can)
!" Pot rest (15 oz can)
Preparation:
Clean all the cans and sanitize if
possible. That way if you cut yourself you are less likely to get an infection.
BE CAREFUL! Tiny slivers of tin are
very sharp.
7/29/2019 How to make the Dome School Biochar Stove
http://slidepdf.com/reader/full/how-to-make-the-dome-school-biochar-stove 2/6
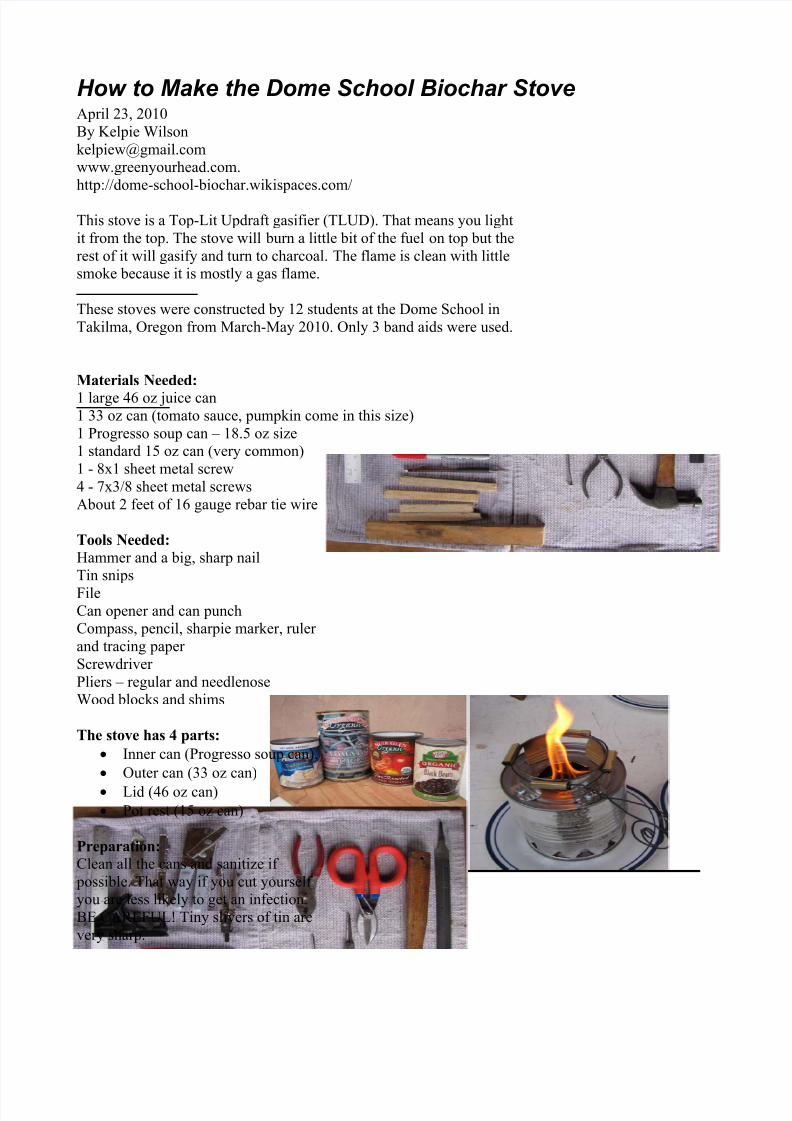
Step 1: center and align inner and outer cans
We are going to punch a hole through the center of both cans so we can fix them together with a screw
and they will be centered. Place the inner can inside the outer can. Find 4 pieces of wood the same size
that fit in the gap between the two cans and arrange them evenly so the cans are centered. Find a block of wood that fits inside the inner can that is about 8 inches long. You need the block to have something
to hammer against. Turn the 2 cans with the wood shims and block upside down. Find the center of the
bottom of the large can and mark it. Take your sharp nail and hammer a hole through both cans.Remove the wood shims and separate the cans
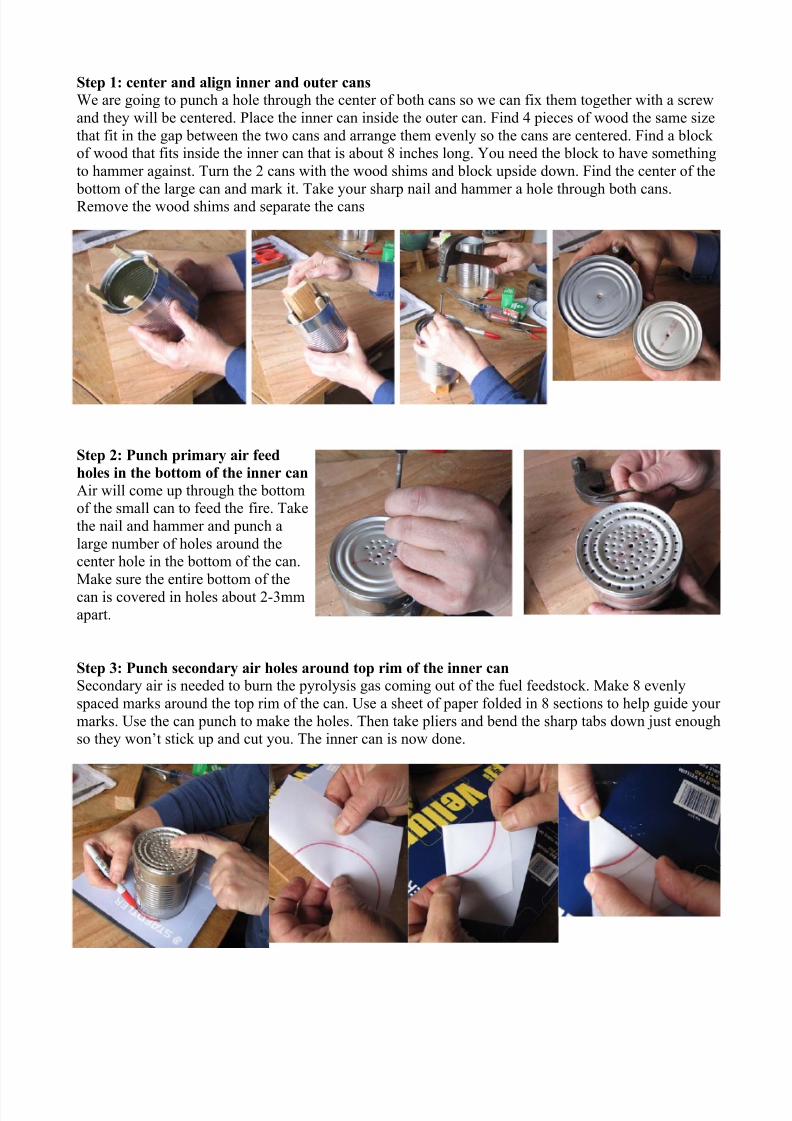
Step 2: Punch primary air feed
holes in the bottom of the inner can
Air will come up through the bottomof the small can to feed the fire. Take
the nail and hammer and punch a
large number of holes around thecenter hole in the bottom of the can.
Make sure the entire bottom of the
can is covered in holes about 2-3mmapart.
Step 3: Punch secondary air holes around top rim of the inner can
Secondary air is needed to burn the pyrolysis gas coming out of the fuel feedstock. Make 8 evenly
spaced marks around the top rim of the can. Use a sheet of paper folded in 8 sections to help guide your
marks. Use the can punch to make the holes. Then take pliers and bend the sharp tabs down just enoughso they won’t stick up and cut you. The inner can is now done.
7/29/2019 How to make the Dome School Biochar Stove
http://slidepdf.com/reader/full/how-to-make-the-dome-school-biochar-stove 3/6
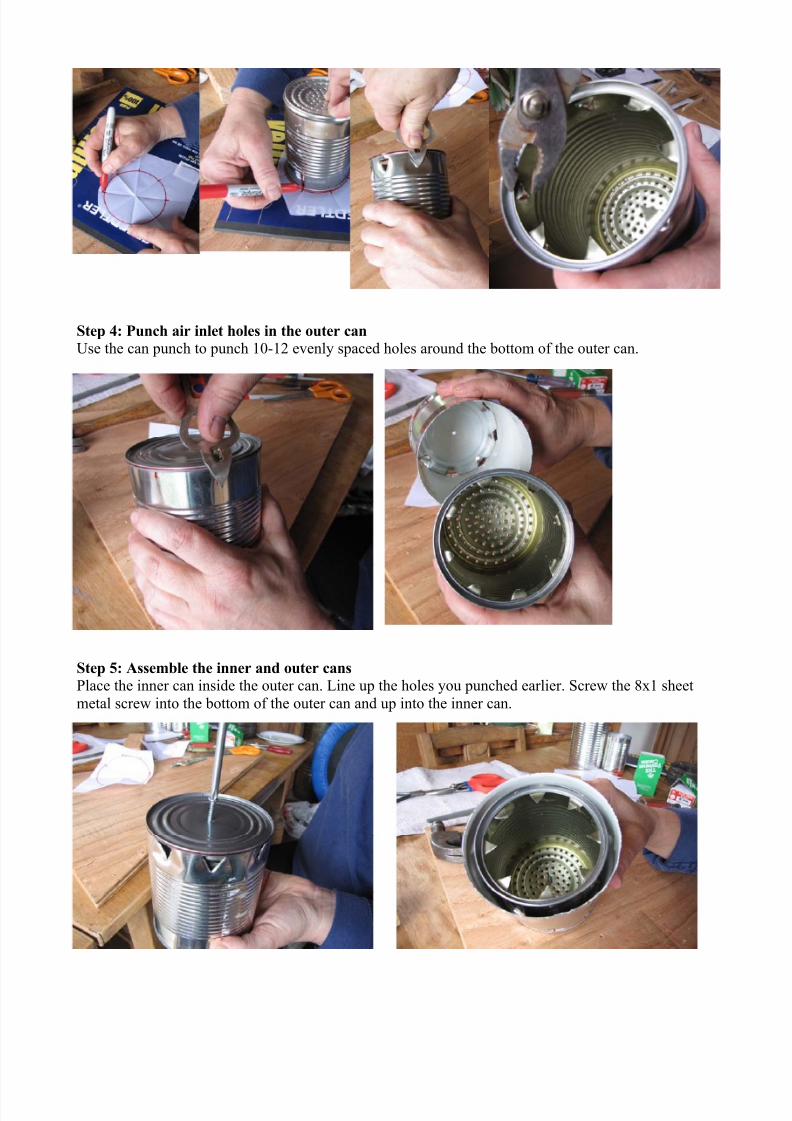
Step 4: Punch air inlet holes in the outer can
Use the can punch to punch 10-12 evenly spaced holes around the bottom of the outer can.
Step 5: Assemble the inner and outer cans
Place the inner can inside the outer can. Line up the holes you punched earlier. Screw the 8x1 sheet
metal screw into the bottom of the outer can and up into the inner can.
7/29/2019 How to make the Dome School Biochar Stove
http://slidepdf.com/reader/full/how-to-make-the-dome-school-biochar-stove 4/6
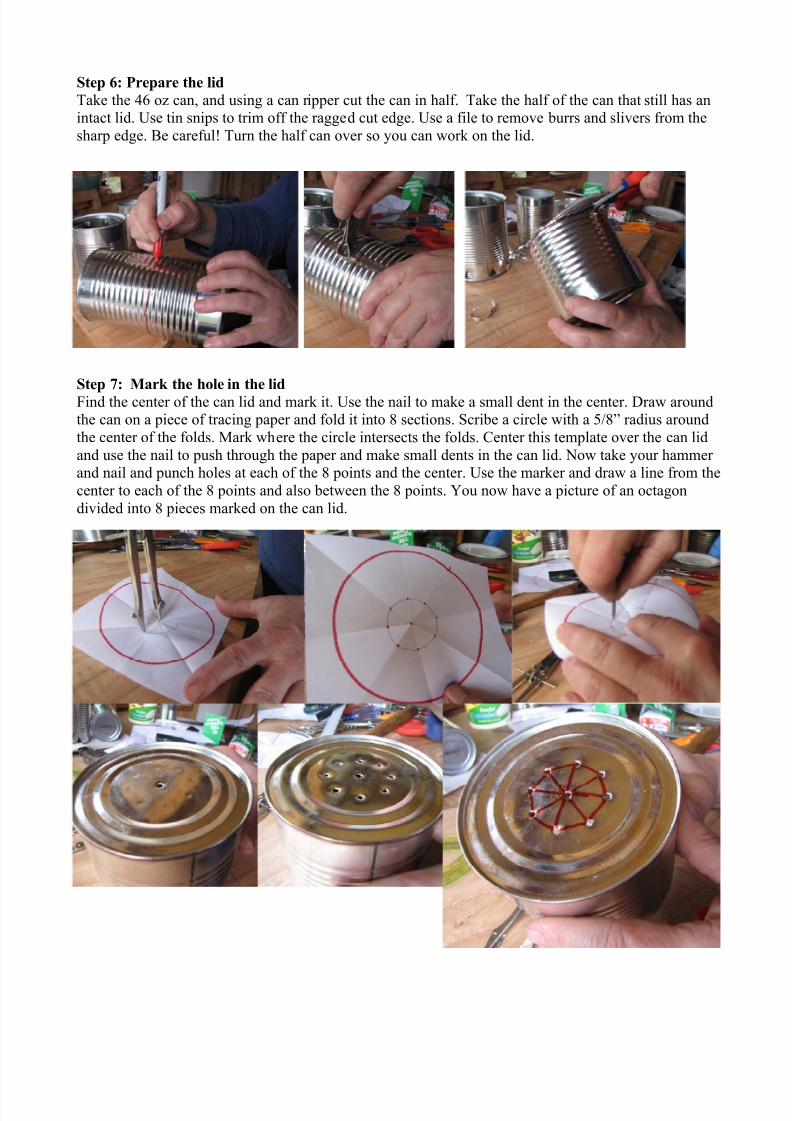
Step 6: Prepare the lid
Take the 46 oz can, and using a can ripper cut the can in half. Take the half of the can that still has anintact lid. Use tin snips to trim off the ragged cut edge. Use a file to remove burrs and slivers from the
sharp edge. Be careful! Turn the half can over so you can work on the lid.
Step 7: Mark the hole in the lid
Find the center of the can lid and mark it. Use the nail to make a small dent in the center. Draw aroundthe can on a piece of tracing paper and fold it into 8 sections. Scribe a circle with a 5/8” radius around
the center of the folds. Mark where the circle intersects the folds. Center this template over the can lid
and use the nail to push through the paper and make small dents in the can lid. Now take your hammer and nail and punch holes at each of the 8 points and the center. Use the marker and draw a line from the
center to each of the 8 points and also between the 8 points. You now have a picture of an octagon
divided into 8 pieces marked on the can lid.

7/29/2019 How to make the Dome School Biochar Stove
http://slidepdf.com/reader/full/how-to-make-the-dome-school-biochar-stove 5/6
Step 8. Cut the hole in the lid
You need sharp tin snips for this. Press the blade of the tin snips into the center nail hole and start a cutup one of the lines. Cut each of the 8 lines so you have 8 pie-shaped pieces. Take the pliers and bend
each of the pie pieces down and back under the can lid. You now have an octagonal hole in the can.
Step 9. Prepare the pot rest
Take the 15 oz can and cut it in half. You want the half without a lid. Use the file to deburr the edge.
Take a piece of paper and trace around the solid rim of the half can. Fold the paper into 8 sections.
Place the half can on the paper and mark 8 spots around the rim. Use a ruler to draw 8 lines up the sideof the half can. Using the tin snips, cut from the cut end of the can along each line up to the rim of the
can. Do not cut the rim! You now have a can rim with 8 tin legs hanging from it. Use the needle nose
pliers to roll every other leg up to the rim. On the legs that remain, bend the bottom half inch of the legout to form a foot.
Step 10. Attach the pot rest to the lid.
Punch a hole in each of the 4 feet. Mark a cross on the lid and punch 4 holes in the lid for screws. Thentake a 7x1/4 sheet metal screw and attach each foot to the lid.
7/29/2019 How to make the Dome School Biochar Stove
http://slidepdf.com/reader/full/how-to-make-the-dome-school-biochar-stove 6/6
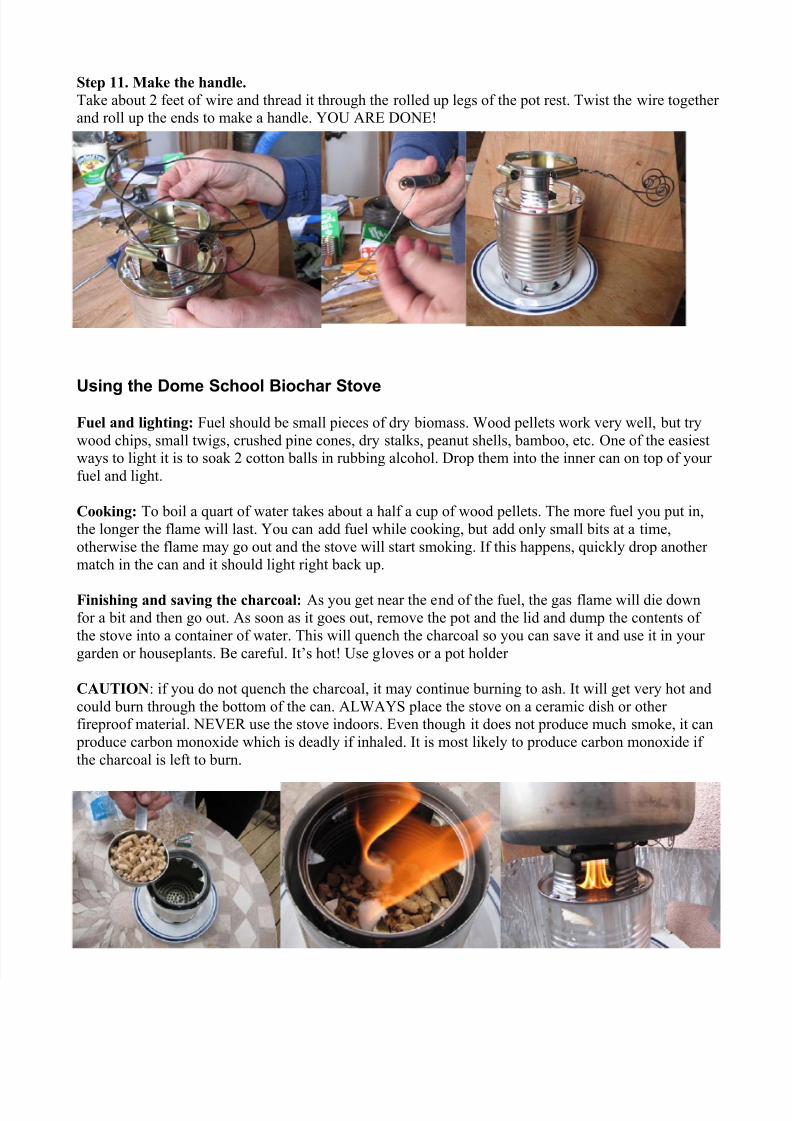
Step 11. Make the handle.
Take about 2 feet of wire and thread it through the rolled up legs of the pot rest. Twist the wire together and roll up the ends to make a handle. YOU ARE DONE!
Using the Dome School Biochar Stove
Fuel and lighting: Fuel should be small pieces of dry biomass. Wood pellets work very well, but try
wood chips, small twigs, crushed pine cones, dry stalks, peanut shells, bamboo, etc. One of the easiestways to light it is to soak 2 cotton balls in rubbing alcohol. Drop them into the inner can on top of your
fuel and light.
Cooking: To boil a quart of water takes about a half a cup of wood pellets. The more fuel you put in,
the longer the flame will last. You can add fuel while cooking, but add only small bits at a time,
otherwise the flame may go out and the stove will start smoking. If this happens, quickly drop another match in the can and it should light right back up.
Finishing and saving the charcoal: As you get near the end of the fuel, the gas flame will die down
for a bit and then go out. As soon as it goes out, remove the pot and the lid and dump the contents of
the stove into a container of water. This will quench the charcoal so you can save it and use it in your
garden or houseplants. Be careful. It’s hot! Use gloves or a pot holder
CAUTION: if you do not quench the charcoal, it may continue burning to ash. It will get very hot and
could burn through the bottom of the can. ALWAYS place the stove on a ceramic dish or other fireproof material. NEVER use the stove indoors. Even though it does not produce much smoke, it can
produce carbon monoxide which is deadly if inhaled. It is most likely to produce carbon monoxide if
the charcoal is left to burn.