How to Make a Two-Part Silicone Mold - Cooper...
5
ME155 Spring 2014 The Cooper Union How to Make a Two-Part Silicone Mold Jackie Song Abstract This guide will show you how to make a small two-part silicone mold from the object of your choice. You can use the mold for ice, chocolate, plastic, butter, or any material you can think of that plays nicely with the silicone you’re using. For the Spring 2014 ME155 course, you will be required to cast your object in chocolate.To make this mold, you will make or obtain a mold positive (the object that you want to replicate) and pour a two-part liquid silicone rubber over it, once for each mold half. Contents 1 The mold positive 1 1.1 Size and shape considerations ............... 1 1.2 Sprue design ........................... 2 1.3 Making the pattern ....................... 2 Existing object • Modeling clay • 3D printing 1.4 Preparing the pattern ...................... 3 2 Making the mold box 3 2.1 Dimensions ............................ 3 2.2 Materials .............................. 3 2.3 Assembly ............................. 3 3 Preparing the mold box for pouring 3 3.1 Positioning the positive .................... 3 3.2 Alignment features ....................... 3 3.3 Mold release ........................... 3 4 Creating the first half of the mold 3 4.1 Measuring ............................. 3 Volume needed • Weight needed 4.2 Mixing ............................... 4 4.3 Degassing ............................. 4 4.4 Pouring ............................... 4 4.5 Curing ............................... 4 5 Preparing the mold box (again) 4 5.1 Exposing the other half .................... 4 5.2 Mold release ........................... 4 6 Creating the second half of the mold 4 7 Finishing the mold 4 8 Cleanup 5 8.1 Silicone .............................. 5 8.2 Clay ................................. 5 8.3 Acrylic ............................... 5 1. The mold positive The mold positive is the object you use to shape the silicone into the negative. If all goes well, all casts will be exact copies of the original positive. 1.1 Size and shape considerations Silicone is forgiving and holds detail well, so your mold positive can be almost any shape or object you want. However, there are some important limitations you need to consider: • For the Spring 2014 ME155 course, you will be limited to [this much volume of] silicone, which means your object should be relatively self-contained (which will also make it easier to mold). A good rule of thumb is to keep the object within a box of [these dimensions]. • Avoid undercuts (see Figure 1), which will make it difficult or impossible for you to remove your positive from the silicone. Depending on the thickness of your Figure 1. An example of an undercut in a part. mold wall, the silicone can accomodate some stretch. Take a look at last year’s molds (some of which are available in the lab), and use your good judgment. • Every two-part mold has a parting line (see Figure 2). The parting line can extend into a flat plane (for simple objects) or follow the shape of your object if necessary. Make sure you choose an object that lends itself to molding. Symmetrical, convex objects present the least difficulty. • You need to choose one or more locations for a sprue and/or vents (see Figure 4). You will be relying on gravity to fill your mold, so choose wisely. Vents will probably not be necessary for this project. • Consider how liquid will flow into your mold and harden later. Thin features might not fill properly. Air bubbles can get stuck in concave spots. Some materials expand or contract as they cool or harden. • Consider the material you’ll be casting from. Chocolate
Transcript of How to Make a Two-Part Silicone Mold - Cooper...

ME155 Spring 2014The Cooper Union
How to Make a Two-Part Silicone MoldJackie Song
AbstractThis guide will show you how to make a small two-part silicone mold from the object of your choice. You can use the mold forice, chocolate, plastic, butter, or any material you can think of that plays nicely with the silicone you’re using. For the Spring2014 ME155 course, you will be required to cast your object in chocolate.To make this mold, you will make or obtain a moldpositive (the object that you want to replicate) and pour a two-part liquid silicone rubber over it, once for each mold half.
Contents
1 The mold positive 11.1 Size and shape considerations . . . . . . . . . . . . . . . 11.2 Sprue design . . . . . . . . . . . . . . . . . . . . . . . . . . . 21.3 Making the pattern . . . . . . . . . . . . . . . . . . . . . . . 2
Existing object • Modeling clay • 3D printing
1.4 Preparing the pattern . . . . . . . . . . . . . . . . . . . . . . 3
2 Making the mold box 32.1 Dimensions . . . . . . . . . . . . . . . . . . . . . . . . . . . . 32.2 Materials . . . . . . . . . . . . . . . . . . . . . . . . . . . . . . 32.3 Assembly . . . . . . . . . . . . . . . . . . . . . . . . . . . . . 3
3 Preparing the mold box for pouring 33.1 Positioning the positive . . . . . . . . . . . . . . . . . . . . 33.2 Alignment features . . . . . . . . . . . . . . . . . . . . . . . 33.3 Mold release . . . . . . . . . . . . . . . . . . . . . . . . . . . 3
4 Creating the first half of the mold 34.1 Measuring . . . . . . . . . . . . . . . . . . . . . . . . . . . . . 3
Volume needed • Weight needed
4.2 Mixing . . . . . . . . . . . . . . . . . . . . . . . . . . . . . . . 44.3 Degassing . . . . . . . . . . . . . . . . . . . . . . . . . . . . . 44.4 Pouring . . . . . . . . . . . . . . . . . . . . . . . . . . . . . . . 44.5 Curing . . . . . . . . . . . . . . . . . . . . . . . . . . . . . . . 4
5 Preparing the mold box (again) 45.1 Exposing the other half . . . . . . . . . . . . . . . . . . . . 45.2 Mold release . . . . . . . . . . . . . . . . . . . . . . . . . . . 4
6 Creating the second half of the mold 4
7 Finishing the mold 4
8 Cleanup 58.1 Silicone . . . . . . . . . . . . . . . . . . . . . . . . . . . . . . 58.2 Clay . . . . . . . . . . . . . . . . . . . . . . . . . . . . . . . . . 58.3 Acrylic . . . . . . . . . . . . . . . . . . . . . . . . . . . . . . . 5
1. The mold positiveThe mold positive is the object you use to shape the siliconeinto the negative. If all goes well, all casts will be exact copiesof the original positive.
1.1 Size and shape considerationsSilicone is forgiving and holds detail well, so your moldpositive can be almost any shape or object you want. However,there are some important limitations you need to consider:
• For the Spring 2014 ME155 course, you will be limitedto [this much volume of] silicone, which means yourobject should be relatively self-contained (which willalso make it easier to mold). A good rule of thumb isto keep the object within a box of [these dimensions].
• Avoid undercuts (see Figure 1), which will make itdifficult or impossible for you to remove your positivefrom the silicone. Depending on the thickness of your
Figure 1. An example of an undercut in a part.
mold wall, the silicone can accomodate some stretch.Take a look at last year’s molds (some of which areavailable in the lab), and use your good judgment.
• Every two-part mold has a parting line (see Figure 2).The parting line can extend into a flat plane (for simpleobjects) or follow the shape of your object if necessary.Make sure you choose an object that lends itself tomolding. Symmetrical, convex objects present the leastdifficulty.
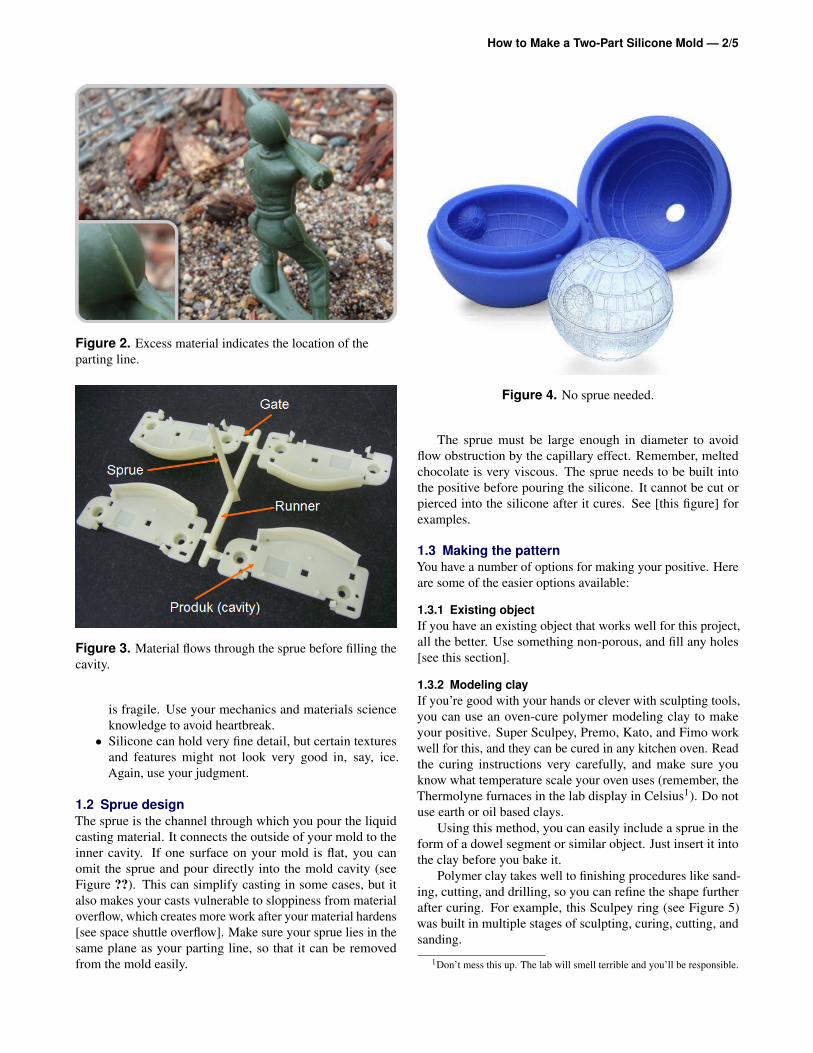
• You need to choose one or more locations for a sprueand/or vents (see Figure 4). You will be relying ongravity to fill your mold, so choose wisely. Vents willprobably not be necessary for this project.
• Consider how liquid will flow into your mold and hardenlater. Thin features might not fill properly. Air bubblescan get stuck in concave spots. Some materials expandor contract as they cool or harden.
• Consider the material you’ll be casting from. Chocolate
How to Make a Two-Part Silicone Mold — 2/5
Figure 2. Excess material indicates the location of theparting line.
Figure 3. Material flows through the sprue before filling thecavity.
is fragile. Use your mechanics and materials scienceknowledge to avoid heartbreak.
• Silicone can hold very fine detail, but certain texturesand features might not look very good in, say, ice.Again, use your judgment.
1.2 Sprue designThe sprue is the channel through which you pour the liquidcasting material. It connects the outside of your mold to theinner cavity. If one surface on your mold is flat, you canomit the sprue and pour directly into the mold cavity (seeFigure ??). This can simplify casting in some cases, but italso makes your casts vulnerable to sloppiness from materialoverflow, which creates more work after your material hardens[see space shuttle overflow]. Make sure your sprue lies in thesame plane as your parting line, so that it can be removedfrom the mold easily.
Figure 4. No sprue needed.
The sprue must be large enough in diameter to avoidflow obstruction by the capillary effect. Remember, meltedchocolate is very viscous. The sprue needs to be built intothe positive before pouring the silicone. It cannot be cut orpierced into the silicone after it cures. See [this figure] forexamples.
1.3 Making the patternYou have a number of options for making your positive. Hereare some of the easier options available:
1.3.1 Existing objectIf you have an existing object that works well for this project,all the better. Use something non-porous, and fill any holes[see this section].
1.3.2 Modeling clayIf you’re good with your hands or clever with sculpting tools,you can use an oven-cure polymer modeling clay to makeyour positive. Super Sculpey, Premo, Kato, and Fimo workwell for this, and they can be cured in any kitchen oven. Readthe curing instructions very carefully, and make sure youknow what temperature scale your oven uses (remember, theThermolyne furnaces in the lab display in Celsius1). Do notuse earth or oil based clays.
Using this method, you can easily include a sprue in theform of a dowel segment or similar object. Just insert it intothe clay before you bake it.
Polymer clay takes well to finishing procedures like sand-ing, cutting, and drilling, so you can refine the shape furtherafter curing. For example, this Sculpey ring (see Figure 5)was built in multiple stages of sculpting, curing, cutting, andsanding.
1Don’t mess this up. The lab will smell terrible and you’ll be responsible.

How to Make a Two-Part Silicone Mold — 3/5
Figure 5. Sculpey engagement ring.
1.3.3 3D printingModel your object in SolidWorks, Rhino, Inventor, or anysoftware that can output .stl files. Include all sprues, soyou won’t have to glue them on later. See [this section] forguidance on sprue design. Keep in mind that the rough textureof the 3D printed piece will show up in your casts later, unlessyou smooth it out using sandpaper. 3D printed parts also tendto be slightly porous (between extruded lines), which canaffect the texture of the mold.
1.4 Preparing the patternIf you haven’t already added a sprue to your positive, add itnow. Then, make a final decision on where the parting linewill be on your positive. If you want, draw it on in marker orpen; this will make the next steps easier. Try to keep it in oneplane as much as possible.
2. Making the mold boxOnce you have finalized the dimensions of your positive, youneed to make a box in wihch to pour the mold itself. The boxwill have 5 sides, leaving one open so that you can pour thefirst half of the mold. Later, you will remove the opposite sideof the box so that you can pour the other half.
2.1 DimensionsFirst, determine the dimensions needed for your mold. If youcan, avoid making thin outer walls in your final mold. To dothis, design a mold box that leaves about .25in around theobject on all 6 sides.
2.2 MaterialsAcrylic pieces are a good choice for the mold box becausethey are easy to assemble and disassemble, and the curedsilicone peels off easily. You can reuse mold box pieces fromprevious projects if you arrange them properly. You will needone piece for the base and four for the sides.
2.3 AssemblyIf you’re using old mold box pieces, and they’re larger thanyou need, arrange them in a pinwheel pattern [see this fig-ure] with the correct dimensions enclosed. Use hot glue toassemble the box. The mold box needs to be watertight at alljoints, so run a bead of hot glue along the outside of everyjoint. Check that your box is watertight by filling it with water.Fix any leaks with more hot glue.
3. Preparing the mold box for pouring
3.1 Positioning the positiveIn order to pour the mold in two separate sections, you need toposition the positive in the box and block off all of the spacepast the parting line. Use an oil-based (non-drying) modelingclay to build up a wall on your positive on one side of theparting line (see Figure 6). Press the clay and your positive
Figure 6. Oil clay built up to the parting line.
into the bottom of the mold box, leaving equal space on thesides and bottom of the model. Make the surface of the clayas flat and even as possible, using clay tools to push it around.There should be no gaps between the clay and the positive orbetween the clay and the mold box walls.
3.2 Alignment featuresAlignment features are needed to reassemble the mold halvesaccurately later. Use a blunt tool end (or your fingertip) topress registration keys into the surface of the clay (see Fig-ure 7). Make several, wherever there is space. To be effective,they should be at least 1/4 in wide and 1/4 in deep; as before,avoid making undercuts in the clay, which will make the moldhalves impossible to separate.
3.3 Mold releaseUsing a mold release agent is very important if you ever wantto retrieve your positive from the silicone. Use a mold releasemade for silicone. Following the manufacturer’s instructions,apply it to the entire explosed surface of the clay and positive.

How to Make a Two-Part Silicone Mold — 4/5
Figure 7. Registration keys pressed into the surface of theclay.
4. Creating the first half of the mold
You’re finally ready to pour some silicone!
4.1 Measuring4.1.1 Volume neededUse the dimensions of your mold box and the approximatedimensions of your positive (and some math) to determine thevolume of silicone you need. You can also pour water into themold and then measure its volume with a graduated cylinder.You may need different volumes of silicone for each half ofthe mold, so measure carefully.
4.1.2 Weight neededTo make things a little more complicated, the two parts of thesilicone mix need to be measured by a particular weight ratio.Check the packaging to find this value. You’ll need a scale,a mixing container, and a mixing tool. The mixing containershould be at least [this many times] larger than the volume ofsilicone, because it will expand in the vacuum chamber later.
Put the mixing container on the scale, then zero the scale.If your container is volumetric, use it to pour out the volumeof silicone base you need. If it’s not, determine the of siliconeyou need from its density. Now, note the weight of the siliconeon the scale and calculate how much curing agent you’ll need.Add the curing agent to the mixing container until the totalweight reading is corrent. There is no need to measure eachmaterial in separate containers.
4.2 MixingThe silicone needs to be mixed very well to cure properly.Follow the manufacturer’s instructions on mixing time. Makesure you scrape the bottom of the mixing container. See [thisvideo] to get an idea of the technique.
4.3 DegassingAt this point, if you have mixed the silicone thoroughly, itshould be full of tiny air bubbles. Since the silicone has ashort working time, there is no time to wait for the bubbles torise to the surface. Degas the silicone, mixing container andall, in a vacuum chamber for [this amount of time]. Not all ofthe bubbles will pop; this is acceptable.
4.4 PouringLay the mold box on a flat surface. Holding the mixingcontainer a few inches above the mold box, pour a thin streamof silicone into a corner of the mold. Don’t move the streamaround; the silicone will settle into the mold features on itsown.
4.5 CuringThe silicone will need at least [this much time] to cure com-pletely. Leave it in the pressure chamber while it cures; thiswill minimize the size of any remaining air bubbles. Multi-ple mold boxes can be stacked in the pressure chamber withcardboard dividers between layers.
5. Preparing the mold box (again)
5.1 Exposing the other halfPeel off the base of the mold box to reveal the packed clay.Be careful not to damage the rest of the box. Remove all theclay from the mold box, leaving the mold positive embeddedin the silicone (see Figure 8). Make sure to thoroughly cleanthe clay from the mold box.
Figure 8. Peeling back the clay to reveal the first pouring ofsilicone.
5.2 Mold releaseIt is absolutely necessary to use mold release this time around;otherwise, the two silicone pieces will be nearly impossibleto separate, except with a blade. Don’t forget it!

How to Make a Two-Part Silicone Mold — 5/5
6. Creating the second half of the moldRepeat the procedure for measuring, preparing, pouring, andcuring the silicone for the second half.
7. Finishing the moldPeel the remaining sides of the mold box away from thesilicone. Carefully separate the two mold halves from eachother (see Figure 9). Be careful not to tear the silicone if any
Figure 9. If all goes well, your mold should look somethinglike this in the end.
parts have stuck together. Also be careful removing the moldpositive from the silicone, and note any parts of the positivethat are particularly difficult to remove; this will be useful forremoving casts later.
8. CleanupDon’t be a jerk! Clean up after yourself.
8.1 SiliconeCured silicone should be peeled off of tools and thrown away.Uncured silicone can be cleaned with acetone nail polishremover. All mixing containers and tools should be cleaned.
8.2 ClayClay can be reused for future molding projects. Press it backinto the original packaging.
8.3 AcrylicUsed acrylic pieces should be reused for future moldingprojects or reserved as scrap material. Clean them with soapand water and peel off any hot glue.