How to install OLIMEX drivers on a Windows 10 computerhowtoinstallolimexdrivers.pdf · This is an...
12
How to install OLIMEX drivers on a Windows 10 computer V. 0.9 – March 1st, 2016
Transcript of How to install OLIMEX drivers on a Windows 10 computerhowtoinstallolimexdrivers.pdf · This is an...

How to install OLIMEX drivers on a Windows 10computer
V. 0.9 – March 1st, 2016

Introduction
This is an English tutorial (for non-francophone users) about how to install the OLIMEX drivers in a computer, to help whoever will work on the robot in the future. If following this tutorial doesn't help you, ask first at most experimented members of the club, to understand what went wrong. If nothing works, you can send a mail at this address : [email protected] I wrote this tutorial thanks to its help, so it can helpyou if something changes (i.e. a new Windows version).
FAGAN Patrick
2015-2016 Secretary

SummaryTo-Do List.................................................................................................................... 4
Download the Olimex drivers................................................................................... 5
Device Manager.......................................................................................................... 7
Disable the driver signature enforcement..............................................................10
Code Compiler Studio.............................................................................................. 12

To-Do List
1- Download the OLIMEX drivers.
2- Plug the OLIMEX JTAG to your computer and go to “Device Manager”.
3- Try to update the drivers.
3bis- If it doesn't work, disable the driver signature enforcement.
4- Open Code Compiler Code Studio to test if everything works well.
5- Work on the robot.

Download the Olimex driversSwitch on your computer and open a web browser, like Edge or Google Chrome. Then, go to the Olimex website (a Google search should give it at the first results).
Go to the “MSP430” link (in the left), then choose “JTAG”. The site shows all the JTAG models that you can buy. Click on the club's model image (it was the MSP430-JTAG-TINY-V2 when this tutorial was made).
Illustration 1: Olimex main page at February 20th, 2016.

In the device page, find the “Software” section and download the latest drivers. You should get a .zip folder to unzip at the end.
Illustration 2: How to go to the JTAG section. Click on the highlighted links.

Device ManagerNow, open the Device Manager. Go to the “Settings” menu (in the “Start” bar),then “Devices” and scroll down until you find “Related settings” and the “Device manager” link. Otherwise, open the Control Panel (« All Apps » →« Windows System » «→ Control Panel »), click on “Hardware and Sound” and on “Device Manager”. A password may be required.
Illustration 3: Device page with the latest drivers download link highlighted.

If you've plugged the JTAG in an USB port of your computer, you should see a« Serial USB Peripheral » in the « Ports (COM and LPT) » section. Then, left-click this item and choice « Update driver software... ». A wizard should open. Select « Browse my computer for driver software », then « Let me pick from a list of device drivers in my computer », «Have Disk» and « Browse ». Go to thefolder where you unzipped the drivers and choose the « Driver_for_OS/olimex_jtags » file. Then, click on « OK ». It should stop the updating, saying that drivers aren't digitally signed. This means that you have to disable the driver signature enforcement and redo this part's instruction. If you've done that, a window should appear, warning you about the fact that
Illustration 4: How to open Device Manager with the Setting menu.
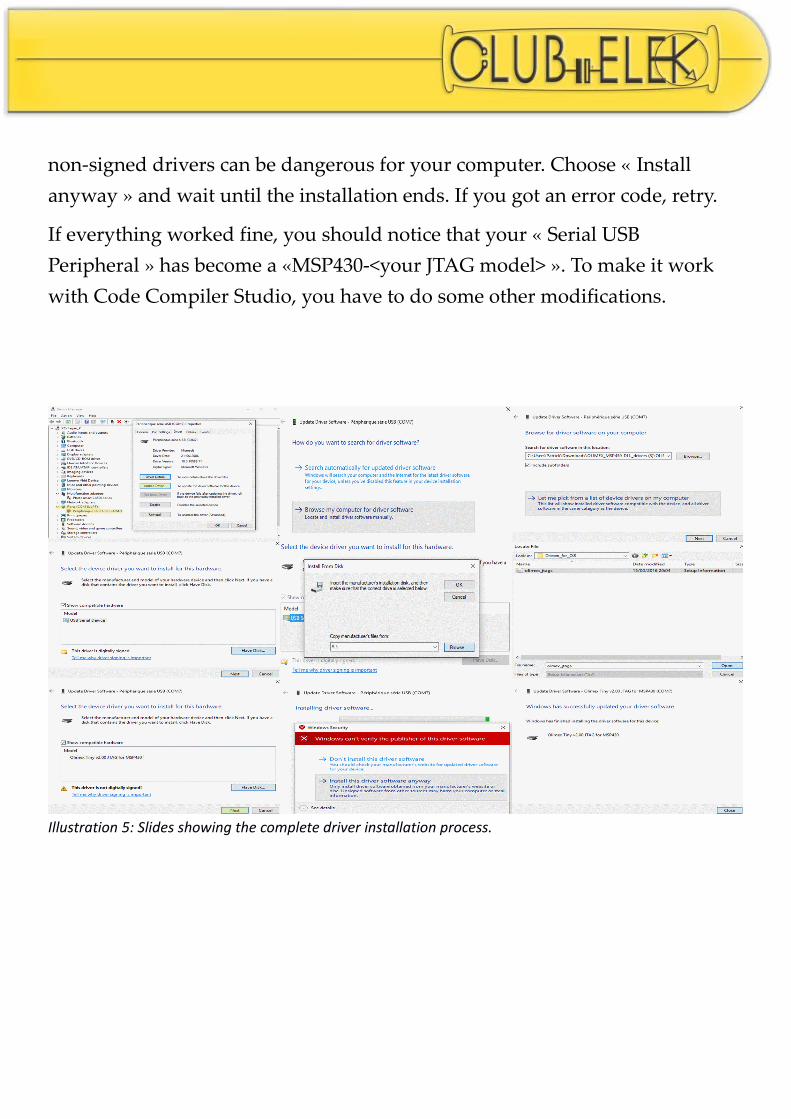
non-signed drivers can be dangerous for your computer. Choose « Install anyway » and wait until the installation ends. If you got an error code, retry.
If everything worked fine, you should notice that your « Serial USB Peripheral » has become a «MSP430-<your JTAG model> ». To make it work with Code Compiler Studio, you have to do some other modifications.
Illustration 5: Slides showing the complete driver installation process.

Now, Code Compiler Studio must have OLIMEX files to work properly. Go in the folder where you have drivers, copy everything is inside “IDE_dlls” and paste them in C:\ti\ccsv6\ccs_base\DebugServer\drivers . This will overwrite some files, that you can save in another folder if you wish.
Disable the driver signature enforcementN.B. : save your work before you restart the computer !
Open the « Start » menu, then go to «Settings » «Update & Security→ » →« Recovery » «→ Restart now » (under « Advanced startup »). This will reboot the computer. After a little time, you should see a blue screen. Click on
Illustration 6: Device Manager with properly installed drivers.

« Troubleshoot », « Advanced Options », « Startup Settings » , « Restart ». Yourcomputer should switch off and on, showing then a list of options. Tape the combination needed for « Disable the driver signature enforcement » (usually F7). Now your computer will reboot and everything seems to be normal, but you will be able to install properly drivers.
N.B. : the driver signature enforcement will be enabled again at the next switch down or reboot of the system, so you have to install drivers quickly after the computer reboots to avoid repeating this procedure.
Illustration 7: Images showing how to disable the driver signature enforcement. The line in the middle of some photos is due at a hardware problem in my computer. The last frame is in French, but you should obtain something similar in the appearance.

Code Compiler Studio
N.B. : this section requires having already installed Code Compiler Studio. If you haven't done it yet, ask at the members of the club.
Plug the JTAG at the specified port in the card you wish to work for, and connect a power source at the micro-controller. Open Code Compiler Studio by clicking its icon. When it's launched, go to the project for the micro-controller you wish to test, on create a new one with a « Blink the LED » template. Then, click on the « Debug » button and wait for the debug process to achieve. If some error message appears, check everything to see where is theproblem or ask for help at other members of the club. Otherwise, if everything seems to be OK, click on the « Play » button and see if something happens. If everything works well, then the installation process is achieved and you will be able to test your codes for the robot.
Illustration 8: How to debug your CCS project.