How to Create a 3D Model from Scanned Data in 5 Easy Steps · How to Create a 3D Model from Scanned...
8
How to Create a 3D Model from Scanned Data in 5 Easy Steps Richard Hagen NASA/JSC/ES2 [email protected] In-Space Inspection Workshop 2017 1/31/2017 R. Hagen, NASA/JSC/ES2 1 https://ntrs.nasa.gov/search.jsp?R=20170001332 2018-07-17T11:32:19+00:00Z
Transcript of How to Create a 3D Model from Scanned Data in 5 Easy Steps · How to Create a 3D Model from Scanned...

How to Create a 3D Model from
Scanned Data in 5 Easy Steps
Richard HagenNASA/JSC/ES2
In-Space Inspection Workshop
2017
1/31/2017 R. Hagen, NASA/JSC/ES2 1
https://ntrs.nasa.gov/search.jsp?R=20170001332 2018-07-17T11:32:19+00:00Z
Abstract
Additive manufacturing is a cost effective way
to generate copies of damaged parts for
demonstrations. Integrating scanned data of
a damaged area into an existing model may
be challenging. However, using the relatively
inexpensive Nettfab software (from one can
generate a “watertight” model that is easy to
print.
1/31/2017 R. Hagen, NASA/JSC/ES2 2
1/31/2017 R. Hagen, NASA/JSC/ES2 3
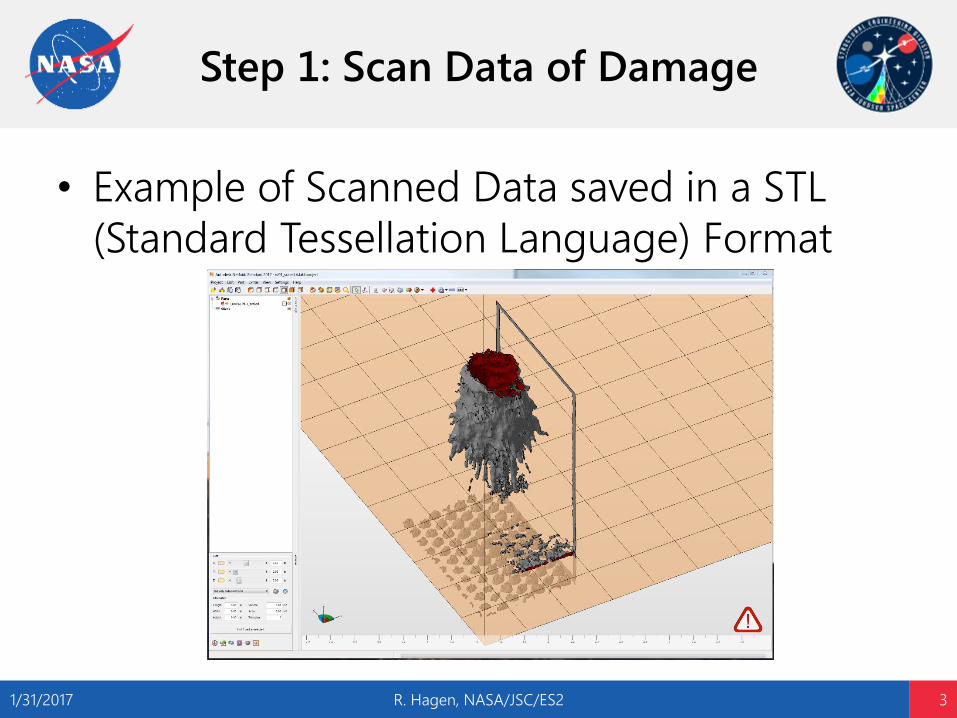
Step 1: Scan Data of Damage
• Example of Scanned Data saved in a STL
(Standard Tessellation Language) Format

1/31/2017 R. Hagen, NASA/JSC/ES2 4
Step 2: Import Data into Nettfab
and Make Repairs
Imported data is cleaned up and holes
filled in so that the damaged area is now
one solid model or “watertight”.
1/31/2017 R. Hagen, NASA/JSC/ES2 5
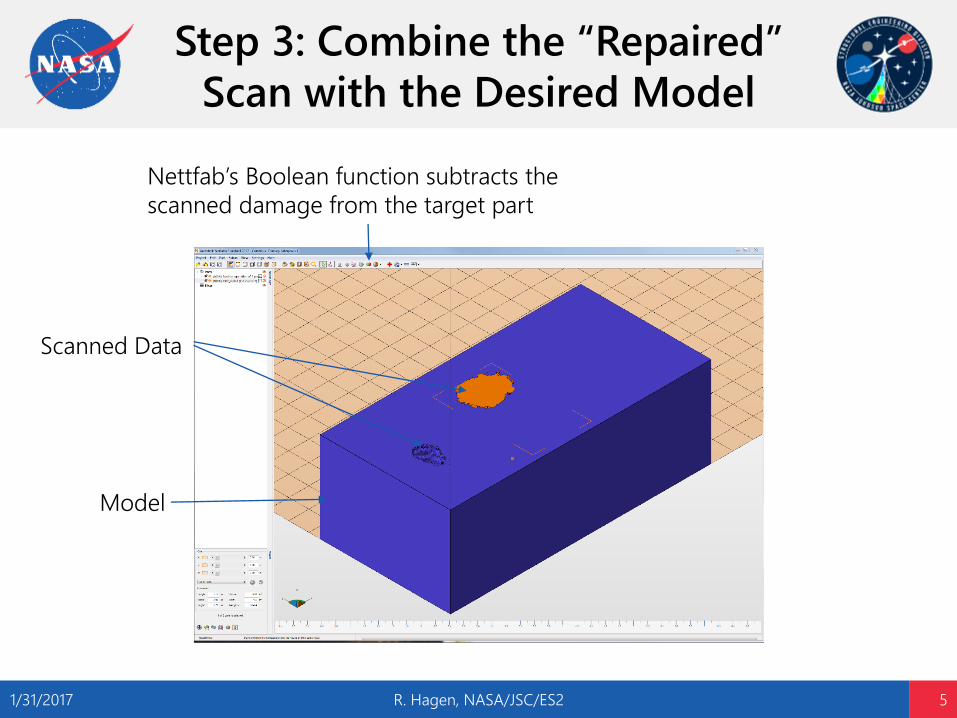
Step 3: Combine the “Repaired”
Scan with the Desired Model
Model
Scanned Data
Nettfab’s Boolean function subtracts the
scanned damage from the target part

1/31/2017 R. Hagen, NASA/JSC/ES2 6
Step 4: Generate a New STL File
Export a new stl model file of the damaged part
Nettfab also
allows one
to add text

1/31/2017 R. Hagen, NASA/JSC/ES2 7
Step 5: Print the Part
Example Prints from a Stratasys Fortus 400mc
Slice height of .005” Model Material - ASA
Processed STL Model in Insight Software
Questions?
Richard HagenNASA/JSC/ES2
(281) 244-0355
1/31/2017 R. Hagen, NASA/JSC/ES2 8