HOW TO BEND A PIECE OF TUBING INTO I THE SHAPE · PDF fileHOW TO BEND A PIECE OF TUBING INTO I...
7
HOW TO BEND A PIECE OF TUBING INTO I THE SHAPE THAT YOU WMB Did you ever wonder how professional shops bend tubing so that it fits perfectly? Here's how they do it and you can do it too. by Doug Gore photography by Robin Hartford S UPPOSE you want to bend a piece of 1Y4" tubing into a "U" shape like you might use fora rear bumper or for a nerf bar. Lets say that you have two start of bend # ' whatever angle of bend you want by chosing the appropriate die set. sockets on your car that are sepa- - - - - - - - - - - - - - - - - - rcted by 60". center to center, and that you want the tube to stick out 12" overall. How do you go about bend- ing this piece of metal? The first step is to draw a sketch of The next step is to figure out how long a piece of tubing will be re- quired. There are many ways to do this but I have found that one easy way is to first figure out how long the tube would need to be if the corners were perfectly $quare and you meas- ured along the centerline.In our case that measurement = 11 '/8" + 60" + 11 '/8", or 82%". Since the corners on our finished tube will not be square, but round, we will actually need slightly less tubing than 82Y4". If you don't mind wasting a little tubing you could start with an 82%" piece and cut the ends off later (this is often the easiest thing to do) or you could figure out the correct length to start with. TO figure Oui how much shorter the unbent tubing should be, realize that the circumference of 3y~ circle inscribed within a square is T times the circumference of the square. We can round this figure off to Y4. The the finished piece on a sheet of paper and appropriately dimension 2 2" ------ curved part of our tube will have an 8" centerline radius, and if the corner was square that radius would have required 8 + 8 = 16 inches of tubing. But since it iscurved only Y4 of the 16". or 12". will be required for the actual bend. Wswill save 4" of tubing with each of these two bends, so the unbent piece of tube only needs to be 82 l/4 - 8 = 74Y4 inches long. It is usually good to start with a little extra length until you get used to bending tubing, so I cut the tube to be one inch longer at 75l/4". 80 STOCK CAR RACING & (not to scale) After cutting the tube to rough We are now ready to prepare for length, mark its center and mark the our first bend. I used one of the beginning of each bend out from popular ram type tubing benders there. In our case, each bend starts and placed the tube in the bender 22 inches from the center of the such that the mark indicating the tube. start of the bend aligns with where the bendingdie begins to curve. The 2x3 helps to hold the ends of the tube up and a small "V" block has been clamped to the tube at an angle of zero degrees on a universal protractor. 1%- j the drawing. I know the centerline 3 0 % " ~ - radius of the bending die that I am 60" going to use is 8" and I have shown that in the drawing. You can chose TUBE TO BE BENT
Transcript of HOW TO BEND A PIECE OF TUBING INTO I THE SHAPE · PDF fileHOW TO BEND A PIECE OF TUBING INTO I...

HOW TO BEND A PIECE OF TUBING INTO I THE SHAPE THAT YOU WMB
Did you ever wonder how professional shops bend tubing so that it fits perfectly?
Here's how they do it and you can do it too.
by Doug Gore photography by Robin Hartford
S UPPOSE you want to bend a piece of 1Y4" tubing into a "U" shape like
you might use fora rear bumper or for a nerf bar. Lets say that you have two
start of bend
#'
whatever angle of bend you want by chosing the appropriate die set.
sockets on your car that are sepa- - - - - - - - - - - - - - - - - - rcted by 60". center to center, and that you want the tube to stick out 12" overall. How do you go about bend- ing this piece of metal?
The first step is to draw a sketch of
The next step is to figure out how long a piece of tubing will be re- quired. There are many ways to do this but I have found that one easy way is to first figure out how long the tube would need to be if the corners were perfectly $quare and you meas- ured along the centerline. In our case that measurement = 11 '/8" + 60" + 11 '/8", or 82%". Since the corners on our finished tube will not be square, but round, we will actually need slightly less tubing than 82Y4". If you don't mind wasting a little tubing you could start with an 82%" piece and cut the ends off later (this is often the easiest thing to do) or you could figure out the correct length to start with. TO figure Oui how much shorter the unbent tubing should be, realize that the circumference of 3 y ~ circle inscribed within a square is T times the circumference of the square. We can round this figure off to Y4. The
the finished piece on a sheet of paper and appropriately dimension 2 2" ------
curved part of our tube will have an 8" centerline radius, and if the corner was square that radius would have required 8 + 8 = 16 inches of tubing. But since it iscurved only Y4 of the 16". or 12". will be required for the actual bend. Wswill save 4" of tubing with each of these two bends, so the unbent piece of tube only needs to be 82 l/4 - 8 = 74Y4 inches long. It is usually good to start with a little extra length until you get used to bending tubing, so I cut the tube to be one inch longer at 75l/4". 80 STOCK CAR RACING
&
(not to scale)
After cutting the tube to rough We are now ready to prepare for length, mark its center and mark the our first bend. I used one of the beginning of each bend out from popular ram type tubing benders there. In our case, each bend starts and placed the tube in the bender 22 inches from the center of the such that the mark indicating the
tube. start of the bend aligns with where the bending die begins to curve. The 2x3 helps to hold the ends of the tube up and a small "V" block has been clamped to the tube at an angle of zero degrees on a universal
protractor.
1%- j the drawing. I know the centerline 3 0 % " ~
- radius of the bending die that I am 60" going to use is 8" and I have shown that in the drawing. You can chose TUBE TO BE BENT
This photo shows the alignment of the 22" mark on the tube with the beginning of the bend point on the die. This beginning of the bend point was determined by me by bending a piece of scrap tubing earlier and will change
from bender to bender.
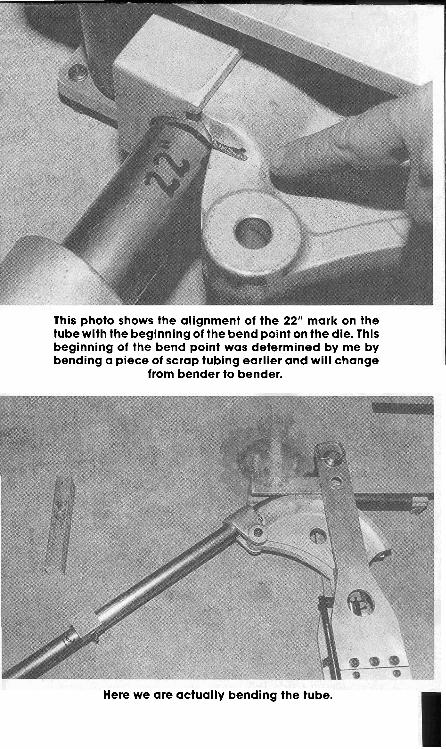
Here we are actually bending the tube.

In this photo we are using a carpenters square to check the angle of the bend. Notice that we have over bent the tubeslightly to allow for the springback. If you over bend the tube a little, i t can easily be straightened in a vise since the steel has some memory. If on the other hand the tube is not bent enough, i t will be necessary to put it back
in the bender.
After we removed the first bend from the bender, we measured what we actually had done. Our drawing indicated that there should be 30%" from the centerline to the outside edge of the bend, but the actual measure- ment was 31%". We had gained %"due to radius growth and springback. If we bent the other end of this tube at the existing mark, i t to would be %" too long, and the
finished piece would be Y4" too long.
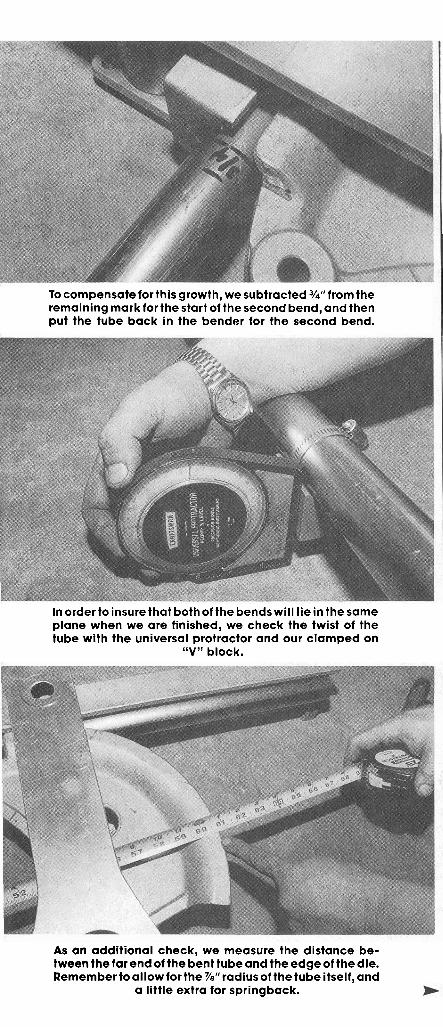
To compensate forthisgrowth, we subtracted Y4"from the remaining mark for the start of the second bend, and then put the tube back in the bender for the second bend.
In orderto insure that both of the bendswill lie in the same plane when we are finished, we check the twist of the tube with the universal protractor and our clamped on
"V" block.
As an additional check, we measure the distance be- tween the far endof the bent tubeand theedgeof thedie. Remembertoallow forthe %" radiusof thetube itself, and
a little extra for springback.

After completing the second bend we measured the width of the finished bent tube, centerline to centerline,
and found it to be nearly perfect.
.. -. - .- ...- art ready for installation on the car. If your drivers are like mine have been, best make several
of these at once. You'll need 'em! p

EXAMPLE BEND:
Suppose you have a piece of tublng and you want to make the maln hoop for the rollcage In yourracecar. You measured between the door posts and have determined you need a rdlbar with a total width of 48" and a helght of 40". You've chosen 1 3/4" tubing. Here's the procedure:
A) Measure the radius of the bendlng shoe you are uslng. If already Installed in the bender, uslng a ruler, measure the distance from the 1" center pin to the outside edge of the shoe and ad a 112". Remember the radius of a shoe Is from the center of the pin sleeve welded to the shoe to the outside edge of the shoe, hence the additional 1/2" added when the center 1" pln.ls W l e d .
B) Using formula 1 below determine how much tublng wlll be requlred for the degree of bend needed.
R x D x ,0175 - Length of tubing In bend. (Formula 1)
Where R = Radlus of bendlng shoe In Inches. D - Number of degrees In bend.
Example: Your 1 314" shoe radius Is 7 112" and you are bending 90 degrees. Therefore R = 7.5 and D = 90. So 7.5 * 90 .0175 = 11.8 Inches. Thls Is how much tublng will be used in the bend Itself. No problem so far.
C) You figured earlier that the height of the rollbar was golng to be 40". Using formula 2 determine how much total tublng Is requlred from the start of the bend. The start of the bend Is labeled polnt "A" In figure 8.
L - R - TR + HGT - Total tubing needed. (Formula 2)
Where: L - Length of tubing In bed from formula 1 above. R - Radlus of shoe In Inches.
TR - Radlus of tublng (half of diameter). HGT - Tdal helght of rdlbar in inches.
In our example L- 11.8, as obtained from formula 1 above. R =7.5", TR = .875 (7/8", half of our 1 314" tubing dlameter) and HGT=4OW, as measured In the car. Plugging these numbers Into our calculator we arrived at 43.425". Round this off to 43 318" (43.375") and we're In buslness. If we now set the distance from point " A in diagram 1 to the end of the tublng to our calculated 43 318, after completing our 90 degree bend our rollbar should be 40" tall. (Actually It will be .050 taller due to our rounding off of numbers). It is generally a good Idea to leave a little tublng on the end in case of an error. It's alot easier to remove tublng then it is to add it.
Figure 8

D) After maklng our flrst 90 degree bend but before removing the tublng from the bender it Is necessary to measure the amount of sprlng back that occurs when you pull the fdlowbar free from the tubing. You can see the tubing spring away from the shoe. Measure thls spring back at point "B" (See figure 9). if you look closely at the top of the tubing and the edge of the shoe you wUI see a mark left by the spring back on the tubing Itself. The width of this mark Is the amount of spring back. Thls mark Is easily removed from the tubing wtth a swipe of medlum sand paper. Once painted the mark Ls invisible.
E) Now remove the tubing from the bender and reposition It In the bender as shown In flgure 9. Make sure once locked lnto place that the bend already in the tubing Is lined up In the same plane as the bending shoe or else the two bends will be crooked. If your bender Is mounted on a flat table a simple method exists to In- sure that both bends are on the same plane. Measure from the bottom of the groove in the bending shoe to the top of the table and cut wood blocks to this slze. Now when you place your tublng in the bender simply position the wood blocks as tubing supports and your bends wUI always be lnline with each other.
Figure 9
F) Now using formula 3 determine the distance needed from point "BU to point "C' as illustrated In flgure 9.
W - SB - TR - Distance needed "B' to *C. (Formula 3)
Where: W = Total width of rdlbar. SB = Measured spring back. TR - Radius d tublng.
Once again In our example, the width desired Is 48". Therefore W =48", and say we measured 118 spring back, so SB - 118" and flnally TR-718" (half the radius of the tubing which in this case is 1 314"). Plugging these numbers into formula 3 and we have, 48 - 118 - 718 1 47'. This is the distance needed between "8" and "C'. Measure off 47' and lock tubing lnto placeand make the final 90 degree bend. i f done correctly you should have at the most a 118" TOTAL error. Now if you lnfthlly leave yourself an ample amount of tubing for the flrst bend you could have skipped everything except stepME. You would of course had to cut off the excess tubing on both sides instead of just one. If done thls way (step E only) In time you will be fabricating rdlbars In under 10 minutes with no more than 118" TOTAL enor.
The above 3 formulas may be used to determine the bend setups for all common bending requirements. In the example, a rollbar fabrlcatlon for a racecar was used simply because It Is a job requiring multiple bends and close tolerances.