HOTKEYS/ FUNCTION KEYS - Starr Labs · guitarist’s picking techniques, or KeyTriggers, pressure-...
55
MT48DD 4 x 12 FloorPad Array In this manual the individual Pads are referred to both as “Pads” and generically as “Sensors”. “Sensors” also includes the Joystick, Pedals and other hardware that may be mentioned but may not be installed on your instrument. The SENSOR controllers on-board the ZTAR encompass all of the performance devices other than the fingerboard. Included are six Triggers for strumming and picking and which have special setup software to tailor their operation. The Triggers may be installed either as String Triggers, real strings that capture a guitarist’s picking techniques, or KeyTriggers, pressure- and velocity-sensing bars that may be used to create new, expression techniques for controlling synthesizers and other MIDI controlled devices. There is a wealth of controllable features in modern synths that lies untapped and the various new touch-surfaces of the Ztar attempt to open that door for you. There may also be installed on your Ztar a bank of Expression Pads, usually 6 or 12 on most instruments. Two pedal inputs, Sustain and Volume, are fully programmable. Any of the SENSOR controllers may be assigned to control any two MIDI effects or Continuous Controller assignments to four channels each. They may also be used to capture and play back up to eight MIDI notes across one or more channels, control external sequences and looped-samples, and other special functions. The term “NOTE” is often used to refer to any MIDI event. User Interface We hope you enjoy this new user-interface and that you find the menu system easy to navigate, considering the size of the display and the amount of information that is available to be viewed and programmed. The ZTAR is supported by a Programming/Display system with a 2 line by 40- character backlit LCD and a ’softkey’ based User Interface. What this means is that the eight keys that surround the display are used in varying ways to select different items depending on the particular menu screen showing. Where necessary numeric values are scrolled up and down using the Up and Down arrow (^ v) keys or the joystick. Most menus are entered with the softkeys. The menu-system is a tree-like structure. The Ztar has quite a few programmable parameters but every effort has been made to keep the nesting of menus to a minimum and the navigation of the system as simple as possible. The EDIT key is used both to enter an edit-screen in some menus and more often to exit from a menu-screen when you’re finished programming. In general, pressing
Transcript of HOTKEYS/ FUNCTION KEYS - Starr Labs · guitarist’s picking techniques, or KeyTriggers, pressure-...

MT48DD 4 x 12 FloorPad Array In this manual the individual Pads are referred to both as “Pads” and generically as “Sensors”. “Sensors” also includes the Joystick, Pedals and other hardware that may be mentioned but may not be installed on your instrument. The SENSOR controllers on-board the ZTAR encompass all of the performance devices other than the fingerboard. Included are six Triggers for strumming and picking and which have special setup software to tailor their operation. The Triggers may be installed either as String Triggers, real strings that capture a guitarist’s picking techniques, or KeyTriggers, pressure- and velocity-sensing bars that may be used to create new, expression techniques for controlling synthesizers and other MIDI controlled devices. There is a wealth of controllable features in modern synths that lies untapped and the various new touch-surfaces of the Ztar attempt to open that door for you. There may also be installed on your Ztar a bank of Expression Pads, usually 6 or 12 on most instruments. Two pedal inputs, Sustain and Volume, are fully programmable. Any of the SENSOR controllers may be assigned to control any two MIDI effects or Continuous Controller assignments to four channels each. They may also be used to capture and play back up to eight MIDI notes across one or more channels, control external sequences and looped-samples, and other special functions. The term “NOTE” is often used to refer to any MIDI event. User Interface We hope you enjoy this new user-interface and that you find the menu system easy to navigate, considering the size of the display and the amount of information that is available to be viewed and programmed. The ZTAR is supported by a Programming/Display system with a 2 line by 40-character backlit LCD and a ’softkey’ based User Interface. What this means is that the eight keys that surround the display are used in varying ways to select different items depending on the particular menu screen showing. Where necessary numeric values are scrolled up and down using the Up and Down arrow (^ v) keys or the joystick. Most menus are entered with the softkeys. The menu-system is a tree-like structure. The Ztar has quite a few programmable parameters but every effort has been made to keep the nesting of menus to a minimum and the navigation of the system as simple as possible. The EDIT key is used both to enter an edit-screen in some menus and more often to exit from a menu-screen when you’re finished programming. In general, pressing

EDIT several times will back you out of a series of menus and bring you back to the top-level LIVE-mode screen. The Ztar Operating System has a LIVE mode and an EDIT mode. Pressing the EDIT key from the LIVE-MENU enters the top-level SONG-EDIT screen to alter the various setup parameters of the fingerboard, pads, triggers, joystick and pedals. The ZTAR will continue to play while in the EDIT mode. Make sure to exit back to the LIVE mode after completing an edit, however, as you may accidentally change one of your setups by hitting the joystick or another programming key. Also, the instrument will play a bit faster in the LIVE mode, as there it isn’t the necessity to update any Edit screens Programming, Mode Selection and Data Entry: Many of the programming features on the ZTAR have been implemented in the screen/menu system and also in shorthand fashion on the front-panel “hot-keys”. In the screen/menu system the eight “soft” keys surrounding the display will be physically near their selections on the screen. Use of the hot-keys will save a number of keystrokes. Also, the joystick is used both as a performance tool and a data entry device in conjunction with the data Up/Down buttons when programming the system. “Chase” features: In several of the menus a String, or a Key, or other Sensor may be selected by simply touching it, in addition to using the Display keys A little more Terminology In an effort to make the ZTAR as fully user-programmable as possible some existing MIDI concepts have been expanded and are slightly re-defined: Patches for the ZTAR are called SONGS. A Song stores the complete configuration for the instrument. This includes all of the fingerboard splits/zones, transpositions, patches, tunings, and all of the MIDI control assignments for the SENSORS, including any recorded Notes, Chords or Drums, Continuous Control EFX, and a list of other parameters. SONGS may be thought of as ‘Kits’ in the sense used in an electronic percussion device, a set of assignments of hardware Triggers to MIDI output functions and the player’s response setups for all of the hardware. There is no analogous term in guitar playing so we chose ‘SONGS’ as you might use a different configuration for each song in a set, different voices, etc. HOTKEYS/ FUNCTION KEYS Most of the function keys are intended to serve the Ztar Fingerboard which is not installed in this instrument. However, due to the low-volume nature of the FloorPads we re-used our existing hardware in the Y-10 controller rather than
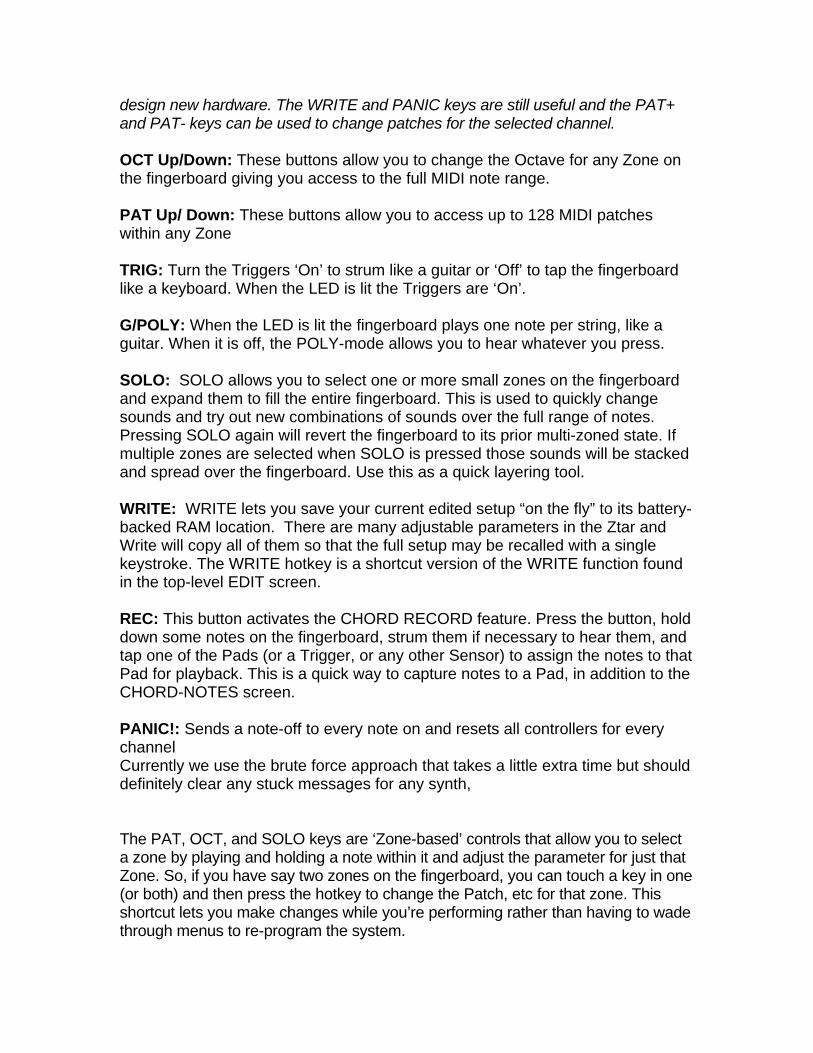
design new hardware. The WRITE and PANIC keys are still useful and the PAT+ and PAT- keys can be used to change patches for the selected channel. OCT Up/Down: These buttons allow you to change the Octave for any Zone on the fingerboard giving you access to the full MIDI note range. PAT Up/ Down: These buttons allow you to access up to 128 MIDI patches within any Zone TRIG: Turn the Triggers ‘On’ to strum like a guitar or ‘Off’ to tap the fingerboard like a keyboard. When the LED is lit the Triggers are ‘On’. G/POLY: When the LED is lit the fingerboard plays one note per string, like a guitar. When it is off, the POLY-mode allows you to hear whatever you press. SOLO: SOLO allows you to select one or more small zones on the fingerboard and expand them to fill the entire fingerboard. This is used to quickly change sounds and try out new combinations of sounds over the full range of notes. Pressing SOLO again will revert the fingerboard to its prior multi-zoned state. If multiple zones are selected when SOLO is pressed those sounds will be stacked and spread over the fingerboard. Use this as a quick layering tool. WRITE: WRITE lets you save your current edited setup “on the fly” to its battery-backed RAM location. There are many adjustable parameters in the Ztar and Write will copy all of them so that the full setup may be recalled with a single keystroke. The WRITE hotkey is a shortcut version of the WRITE function found in the top-level EDIT screen. REC: This button activates the CHORD RECORD feature. Press the button, hold down some notes on the fingerboard, strum them if necessary to hear them, and tap one of the Pads (or a Trigger, or any other Sensor) to assign the notes to that Pad for playback. This is a quick way to capture notes to a Pad, in addition to the CHORD-NOTES screen. PANIC!: Sends a note-off to every note on and resets all controllers for every channel Currently we use the brute force approach that takes a little extra time but should definitely clear any stuck messages for any synth, The PAT, OCT, and SOLO keys are ‘Zone-based’ controls that allow you to select a zone by playing and holding a note within it and adjust the parameter for just that Zone. So, if you have say two zones on the fingerboard, you can touch a key in one (or both) and then press the hotkey to change the Patch, etc for that zone. This shortcut lets you make changes while you’re performing rather than having to wade through menus to re-program the system.

MENU TREE TOP LEVEL LIVE-SCREEN SONG-MENU NAME-EDIT WRITE UTILITIES LIBRARIAN SONGNAME SAVE COPY DELETE SWAP COPY-PAD (s/b SENSOR) INITIALIZE MIDI TUNING BULK-DUMPS CLOCKS METRONOME ENABLE METRONOME CHANNEL NOTE# TempoPad Enable CLOCK: INTERNAL/EXTERNAL MIDI CLOCK OUTPUT ENABLE BPM SETTING TIME SIGNATURE CURVES (8) FORCE:VELOCITY POINTS SEQUENCES INSERT-EVENT DELETE-EVENT PROGRAMMING-LOCK FRETBOARD NOTES ON/OFF BOUNDARIES KEY/TRANSPOSITION AFTERPRESSURE UNISON TRANSPOSITION SOLO VELOCITY: TOUCH/FIXED VELOCITY INVERSION ON/OFF

CURVE# MIDI Patch/Velocity Send ON/OFF Channel#: RIGHT/LEFT SEND PROGRAM CHANGE PATCH# BANK# VOLUME SCAN-MODE TRIGGERS: ON/OFF TRIGGER CAPTURE ON/OFF ZONE-SOLO (Audition) Scan-Mode: GUITAR/POLYPHONIC HAMMER-MENU HAMMER-ON/PULLOFF ENABLE HAMMER-THRESHOLD LEVEL OPEN STRING PULLOFF ENABLE HAMMER-PICK-DELAY FINGERBOARD AUTO-SUSTAIN: ON/OFF SENSORS SENSOR-MODE FINGERBOARD STRING LINK 6-TRIGGER, GUITAR SETUP MACRO TIMING MENU EVENTS MENU PLAY FUNCTION VELOCITY-WINDOW (8) EVENT-SETTINGS EVENT-TYPE MIDI CHANNEL/NOTE, OTHER DATA FIXED VELOCITY-VALUE or SENSOR-TRACKING NOTE-DURATION MACROS CHORD-GENERATOR OUTPUT SETTINGS CURVE ASSIGNMENT MODULATING SENSOR (PEDAL#) MIDI OUT 1, 2 ROUTING LINK ASSIGNMENTS TRIGGER-FUNCTIONS FINGERBOARD TRIGGER LINK DUAL MODE Aftertouch Threshold Aftertouch CURVE RESPONSE GAIN

RESPONSE BARGRAPH SCAN-TIME MASK-TIME THRESHOLD CHASE ON/OFF TRAIN SENSOR LOW POINT/ HIGH POINT SHOWALL SONGS PADS (s/b SENSORS) EVENTS GATES LINKS CHAINS PATCHES

MENU SYSTEM – DATA ENTRY The menu system uses eight “soft” keys around the perimeter of the display to select various functions as indicated by the messages on the screen. Press the button nearest to your desired selection in order to activate it. An UP and a Down key are provided for data entry. The joystick, when installed, may also be used for data entry. Use the EDIT key to enter and exit the programming menus. The soft-keys are numbered here for reference in this manual.
Up Softkey#1 Softkey#2 Softkey#3 Softkey#4 Down EDIT Softkey#5 Softkey#6 Softkey#7 Softkey#8 LIVE-MODE MENU Up Softkey#1 Softkey#2 Softkey#3 Softkey#4 Down
ZTAR CHORDS DRUMS ORCHESTRA LEFTY JAZZ_COMBO ROCK_COMBO STICK TUNING
EDIT Softkey#5 Softkey#6 Softkey#7 Softkey#8 This is the top-level menu, which appears when the ZTAR is in LIVE-mode. The Ztar is in LIVE-MODE when you first power-up. It displays the names of the various system configurations that have been saved as “SONGS”. A drummer would refer to these as “KITS”; A SONG is a collection of hardware with all of our computer-assigned options and setups. The first eight songs are provided from the factory as templates for your use. These are saved in ROM and may not be overwritten. The following twenty-four song locations are provided to store your own setups. These are saved in a battery-backed RAM so that your changes will remain after you remove power from the ZTAR. The Song banks may also be stored off-line via the MIDI Bulk-Dump utility.

Use the EDIT key to leave the LIVE mode and enter the EDIT mode. After editing, use the EDIT key again the return to the LIVE mode. SONG MENU, the Top-Level SONG-EDIT screen Up Softkey#1 Softkey#2 Softkey#3 Softkey#4 Down SONG: #01 ZTAR WRITE UTILITIES
FRETBOARD SENSORS RESPONSE EDIT Softkey#5 Softkey#6 Softkey#7 Softkey#8 This is the top-level edit screen, which displays sub-menus for the various programmable features for each Song. A Song consists of: 1) One or more Zones with all of their programmed settings. 2) Assignments for the Sensors. 2) Physical response settings for the Sensors. 3) A Tuning for the fingerboard keys and Open-Strings, and settings for Triggering
modes. 4) A setup for the metronome. SONG-MENU sub-menus: Name-Edit: Press the name of the SONG to enter the Name-Edit screen. Write: Takes you to the Write screen so that you may save your current setup. Utility: enters the Utility menu to edit a variety of objects. Zone: enters the Zone menu to set up the fingerboard. All of your settings can be made into 32 independent fingerboard Zones.

Sensor: enters the Sensor menu to set up the Pads/Triggers/Joystick configuration. Scan-Mode: enters the Scan-Mode menu. Tuning: enters the Tuning menu. The top-left of the screen shows the Song number followed by its name. By placing the cursor over the song number and using the joystick or Up/Down buttons you may scroll through the Song Banks without going back to the LIVE menu to make your selection. SONG-MENU\ NAME-EDIT screen To enter a new Song name: Place the cursor over the name field using the softkey#2 button above the name. Use the Joystick or Up/Down buttons to enter a character, then use the soft keys to the left and right of the “CURSOR” message to move the cursor over to the next character position. Up Softkey#1 Softkey#2 Softkey#3 Softkey#4 SONG:#01 ZTAR
CURSOR
Down EDIT Softkey#5 Softkey#6 Softkey#7 Softkey#8

WRITE MENU [ available at the Top-level Edit menu] This shows the temporary SCRATCH buffer on the left that is now holding all of your current changes to the configuration you’re playing right now. To the right side of the arrow you are prompted for the location number of the song you wish to save your changes into. The ZPC version of the Ztar OS allows you to overwrite all of your Song-locations including those programmed from the factory. To re-initialize the first four SONGS back to their factory-settings go to the UTILITIES\ LIBRARIAN\ INITIALIZE menu. Use Softkey# 8 to select a destination location for the SCRATCH buffer, and press the EXECUTE soft-key to complete the WRITE operation. You may also make changes to the Song setup at any time from the LIVE mode and save your changes via the WRITE hot-key on the front panel. Up Softkey#1 Softkey#2 Softkey#3 Softkey#4
<WRITE SCRATCH KIT> EXECUTE Scratch #01 ZTAR #01 ZTAR
Down EDIT Softkey#5 Softkey#6 Softkey#7 Softkey#8

SENSORS MENU
The word PAD is often used interchangeably with the word SENSOR. The word Note is often used interchangeably with the word EVENT.
Sensors screen #1
Up Softkey#1 Softkey#2 Softkey#3 Softkey#4 TRIG 1 Mode: Strum String# 0 6-TRIGS
TIMING EVENTS OUTPUT
Down EDIT Softkey#5 Softkey#6 Softkey#7 Softkey#8 The Sensor-name is shown in the upper-left corner of the screen. Use softkey#1 and the Up/Dn keys to select a Sensor to edit. (PLAY) MODE: There are three Play-modes for a Sensor; Events, Strum, and Dual. In the Events-mode, the Sensor will play its own programmed set of events. In the Strum-mode the Sensor will trigger notes from the fingerboard according to the fingerboard’s Scan-Mode. The Ztar’s Triggers are normally set to Strum-mode. When the TRIG front-panel hotkey is used to turn off the Triggers and put the fingerboard into Tapping Mode, the Triggers will revert to playing their assigned MIDI events. In the DUAL-mode the Sensor will both trigger fingerboard-notes and its own programmed set of events. The Dual-Mode will apply to and Sensor. This can have some interesting effects and allow the simulation of various acoustic instruments. Consider setting up the Breath with the Dual-mode to initiate a note and apply volume-changes, as does a real wind instrument. Or a Pad in Dual-Mode with pitchbend applied to act like a conga-head or tympani. STRING#: Use softkey#3 to select a Fingerboard-String for the Sensor to trigger when in Strum-Mode.

6-TRIGS: Press softkey#4 to automatically set the Ztar’s six triggers to Strum-mode, assign them to their corresponding fingerboard-strings, and set the Hit-Mode to “TOUCH”. (See the TIMING menu for this.) You’ll still need to set the fingerboard’s active zones’ Trigger-mode to TRIGGERS-ON to set up the Ztar as a guitar. Who would’ve thought a guitar could be so complicated! TIMING: selects the TIMING menu, which sets up several options to determine how a Sensor’s events will be played. EVENTS: enters the Events menu to assign MIDI functions to a Sensor. OUTPUT: sets up several parameters that route the Sensor’s MIDI output.

[SENSORS, cont.]
EVENTS menu Up Softkey#1 Softkey#2 Softkey#3 Softkey#4 TRIG 1 PlayFunc: All Velocity:: 0 / 127 MACRO
Evt1: Note Channel 3: 48 / C3 PAD Gate: 250Down EDIT Softkey#5 Softkey#6 Softkey#7 Softkey#8 The Events menu programs the various notes and other events that the Sensor will perform. Some fields in the EVENTS menu will change depending on the SensorMode or the EventType selected. The Sensor-Name appears in the upper-left corner of the screen. Use softkey#1 and the Up/Dn keys to select a Sensor to edit. PlayFunction: use the softkey and the UP/Dn keys to set the type of function the Sensor will play out. See the Play-Function List for descriptions of the various choices.
Vel: [0-127/ 0-127] Each Event has a velocity-range or “window” within which it will respond. The upper and lower limits for this range may be set in this field. By careful setting of these limits a variety of musical effects may be achieved, such as velocity-switching, velocity-shifting, velocity-adding, etc. All of the velocity-response settings of the Ztar still effect the note that appears within a narrow response window; that is, To set a velocity-window: Press softkey#3 to toggle between the Lower and Upper Velocity fields. Use the Up/Dn keys to set the value. See the section, “VELOCITY CURVES” for more details. For clarity’s sake we will refer to these two settings as “Input Velocity-Low” and “Input Velocity-High” InputVel_L: The lowest velocity value that will trigger this event. This value has already been processed by the velocity curve. (See the Velocity processing Flowchart)

InputVel_H: The highest velocity that will trigger this event. Event-number: Event-Type Softkey #5 will toggle between the Event-number and its assigned Event-type. Use the UP and DOWN arrow-keys to change the Event-number and Event-Type. Use the Up/Down keys to adjust the type.

Event Type List: Off Note Control Change Program Change Channel Pressure PitchBend Song Select Start Sequence Continue Sequence Stop Sequence System Reset When the PlayFunction is set to Control Change these are the available Event-types: Off BendUp Bend Down Volume Up Volume Down Velocity Up Velocity Down Mod Wheel Sustain Expression Channel Pressure Polyphonic Key Pressure User-entered ControlChange number UserUp Control-number for center-detented effects UserDown Control-number for center-detented effect MIDI Channel number: Use softkey#6 and the UP/Dn keys to select and set the MIDI Channel for this Note. Event-Data/ Note-number/ Velocity-source: Use softkey#7 to toggle between the Note-number and the Velocity-source fields. The Note-number reads both as a decimal number and in standard musical notation. Use the Up/Dn keys to set the values.

The velocity-source may be set to follow the touch, position, or pressure of the Sensor by setting the screen-value to “PAD” or you may assign a Fixed velocity- or data-value for this Note by assigning a number.

Gate: This sets the programmed note-duration. Press softkey#8 to toggle time between “absolute” (milliseconds) and “scaled” (MIDI clocks). MIDI clocks are displayed as nnn#, range 0-999. These events will play out according to the Tsig and BPM (if INT clock is selected), or the external MIDI clock (if A or B is selected). Note for internal clock: there are 96 MIDI clocks per whole note, so if the Tsig is x/4, each beat is 24 clocks, but if Tsig is x/8, each beat is 12 clocks – remember that BPM is beats, but events are programmed in clocks. If you’re using external MIDI clock, the Ztar’s Tsig doesn’t affect the event timing. To see the Metronome change the timing for a sequence, program a pad in Sequential mode with the “Loop” turned ‘On’. Program each event with a Gate time of 24# (i.e., 24 MIDI clocks). Hit the pad, then go into UTILITIES/CLOCKS menu and change the BPM. To change the sequence timing from the MIDI Input ports, switch the MIDI clock to an external source, and then change the BPM in your external unit. .

Sensor Play-Function List: Off
Basic All Seqntl NtShft AltUp AltDn AltUpDown AltRandom Slice ContinuousControl SequencePlay Sequence RePlay Sequence StopPlay Sequence Record Sequence RecordNext Sequence Undo SongIncrement SongDecrement ChainIncrement MuteAll ReferencePad HiHatPedal1 HiHatPedal2 HatPad Detailed descriptions of the Play Functions are given at the end of this section.

[EVENTS, cont.] MACRO screen Up Softkey#1 Softkey#2 Softkey#3 Softkey#4 S01/Trigger1 NotesAll VelocityShift Velocity Add
Velocity = Pad CHORDS Down EDIT Softkey#5 Softkey#6 Softkey#7 Softkey#8 Each event has a pair of numbers that define a velocity-range where the event will respond. By setting the velocity-ranges for the various events assigned to a pad, several unique effects or pad-modes can be created. Rather than defining set modes in the PlayFunction List, we chose to provide macro settings that initialize the events’ velocity-ranges to default values. These values may then be modified in the SENSOR/EVENTS menu to more accurately create the desired result The Velocity-related MACROS here are just conveniences that set the velocity windows for all 8 events in a Sensor’s buffer to default values. You’ll want to adjust these values in the EVENTS screen to dial in your touch. NotesAll All of the Sensor’s events will play simultaneously as a chord. This holds true for ControlChange events as well. VelSw Velocity Switch The complete MIDI velocity range is split equally between the 8 events so that none of the ranges overlap. Each event then responds within its own unique range. (This may not be present in your version of software and you’ll have to set it up manually in the EVENTS menu.) In this way it’s possible to play up to eight different sounds from a single Pad just by varying the force of your hit. VelShf (Velocity Shift) Velocity ranges are set for each event so that the ranges of adjacent events overlap, playing both events together. This allows note-events to blend together, usually in pairs, with varying velocity of a pad-hit. This is useful for controlling multiple samples of real acoustic sounds, which tend to vary subtly in timbre according to the input velocity to the patch. Or you can blend samples from completely different instruments for an endless variety of effects. VelAdd (Velocity Add) Each event has its velocity-range set with a lower-limit of zero and an upper limit at successively higher points in the MIDI velocity range of 0-127. This way the softest

hit will play event #1, a slightly harder hit will add Event#2, a somewhat harder hit event#3, and so on. This is an interesting way to build up chords with velocity.
Vel=PAD This is a handy shortcut that sets all of a Pad’s events to track the Pad’s hit-velocity rather than output a fixed value. You can otherwise set each event one-by-one in the SENSORS/EVENTS screen Chords: This selects the CHORDS screen that allows automatic generation of chord-notes into the 8-event buffer for the selected pad. This is a handy shortcut for many chord types. To generate inversions of these chords, go into the SENSORS/ EVENTS screen, shuffle the notes into a different order, change octaves for individual notes, and add notes to un-assigned events for chordal extensions, or remove notes if there are too many. When a Sensor’s Chords are used with velocity-switching/adding/etc, the notes may be changed by varying the force of your touch. Curve#: The applied afterpressure will follow this assigned curve. You can therefore setup separate curves for the Trigger-velocity and the Trigger-Aftertouch SENSOR PLAY FUNCTIONS Basic Only the first event is played from the Pad’s 8-event block. Also, only the first event is displayed in the EVENTS screen. This mode is normally used in the common situations where only one note or event is required. All [All-Notes] When the Pad is struck, all of the events programmed into the Pad’s 8-Event buffer will play together as a group according to the response settings for the Pad and the individual event velocity-settings. The various events’ durations will time out according their programmed gate-times. Chords or note-“stacks” may be played in this mode. Seqntl [Sequential-Notes]. The 8-note pattern sequencer. When the pad is struck once, each of the events programmed into the Pad’s 8-Event buffer will play automatically in sequence, according to the programmed gate-times for each event. The sequence may be looped by setting the loop

switch in the TIMING menu. (see LOOP). Most importantly: you can only hear the Sequential-Notes if the Hit-Mode is set to ‘TIMED’ in the TIMING menu. NtsShft: [Shift Notes] When a single note is assigned to a Sensor, it’s pitch, or MIDI note-number, may be changed by varying the velocity, or force of your touch.

ALTERNATING MODES The pad’s programmed events are played back one by one on each successive hit. These modes will operate on either the fixed 8-event buffer or the variable-length MIDISequence buffer. The order of event–list playback is different depending on the AltMode selected. AltUp: (Alternating Up) Events are played starting with Event#1 stepping up to the highest numbered event. AltDn: (Alternating Down) Events are played starting with the highest numbered event stepping down to Event#1 AltUpDn: (Alternating Up/Down) Events are played starting with Event#1 stepping up to the highest numbered event where the direction changes and events are stepped back to Event#1. AltRnd (Alternating Random) The order of events is selected randomly. Slice: Slice mode is enabled to operate with variable-length sequences. Each hit plays the next time slice of the sequence. The time slice is specified in MIDI clocks in the EVENTS screen. Note that a MIDI clock may be either 1/24 or 1/12 of a beat, depending on the metronome time signature. After the last slice is played, the next hit will restart from the beginning of the sequence. CntCtl (Continuous Control): This mode is used to issue MIDI Continuous Control messages from an input device, usually a pedal or pressure-pad. SEQUENCER MODES: Play - starts the sequence ‘n’ assigned to the pad. A second hit will stop the sequence. RePlay – each hit re-starts the assigned sequence from the beginning. StpPly – stops recording, stores the result as the sequence# ‘n’ assigned to this Pad, and then starts playing the sequence. Successive hits will stop the sequence then re-start from the beginning. Record – (Records a variable-length sequence) first press starts record, second press stops recording and stores it sequence ‘n’ associated with this pad. To set up a Record Pad: 5) assign this mode to a pad or input trigger and 2) select a MIDI sequence number to store the recorded MIDI events.

6) Strike the pad once to start recording. Strike it again to stop recording. The sequence is automatically stored.
RecNxt – first press starts Record and increments the sequence number ‘n’. Second press stops the record & stores it. Undo - decrements the sequence number on the last pad that did a RecNxt. ReTrig: When a Sensor is set to ReTrig, striking it will re-trigger any notes that are fretted on the assigned String-number on the fingerboard. Use this when you want to tap notes from the fingerboard and then re-trigger them with the Key- or String-Triggers. Set the String# to ALL-STRG to have this sensor re-trigger the entire fingerboard. The Re-Trigger function will follow the fingerboard mode, so that in Guitar-mode you’ll still get hammer-ons and in Poly-mode you’ll get multiple notes-per-string. Note: In Guitar-Mode, to eliminate triggering unwanted open-strings, set the fingerboard Zone to have its lower boundary at the first fret instead of the ”zero” fret. KitInc: Increment the Kit number by one KitDec: Decrement the Kit-number by one. ChainI: Set the Kit-number to the next Kit in a Chain. MutAll: Mute all Sensors. A global version of the LINKS/MUTE function. RefPad: When set as a Reference Pad the Pad will be used to set a noise threshold to silence crosstalk from impacts that affect the entire guitar. The following three modes relate to setups where the pressure from one sensor affects the playback of another sensor. The simplest description of this is a drummer’s High Hat where the depression of a foot pedal changes the sound of the stick hitting the cymbals. HHPed1: (HiHat Pedal#1, part of a 2-sensor setup) This mode is assigned to any continuously variable Sensor in combination with an assigned ‘HiHat Pad’ to create the effects of a drummer’s Hi Hat. In this mode, the varying Sensor’s position or pressure is used to select from the ordered-list of Notes programmed into the HatPad’s event-buffer. In this way the Sensor is used for instance, to select OpenHat, MidHat, and Closed Hat sounds, or any set of different sounds, or ControlChange settings or Program Changes, for that matter. The HatPad likewise has a Sensor location assigned for its

companion pedal that controls its events. This is assigned in the “PEDAL” slot in the OUTPUT menu. Also, the HiHatPedal1 will play its own programmed event at the fully depressed pedal position, programmed as Event#1. This is normally used to create the FootHat or “chick” sound that can be heard whenever a real HiHat is closed. The pedal-position for this sound (note-event) may be adjusted with the lower velocity-threshold for Event#1. The complete HiHat effect is created by adding a LINK to the Sensor setup for the HiHat pedal. This LINK is assigned to MUTE the HatPad. For example: If the HHPed1 is on Rim15 and the HatPad is on Pad4, then Rim15 is assigned a LINK to MUTE Pad4 when Rim15 is activated. HHPed2: (HiHatPedal#2) This mode is similar to HHPed1 with the addition of a programmable ContinuousControl message-stream that tracks the pedal position. HatPad: The second half of the HiHat setup HatPad’s programmed events are selected by the position of a HHPedal. Velocity for the events will issue from the HatPad.

THE SEQUENCERS In discussing the sequencers we use the word “NOTE” to refer to any MIDI event whether it’s a note, Control Change, ProgramChange, any outgoing message. A Sensor or Pad must be set with its Sensor-Mode to “EVENTS” (Sensors menu) and its HIT-mode (Sensors>TIMING menu) set to TIMED in order for it to fire a sequence. There are actually two separate but similar sequencers in the Ztar: one that uses a fixed-length 8-note buffer that allows special control over the individual notes and playback modes, and a variable-length sequencer that can record performances on the fly with a number of special looping modes. The Fixed Length 8-note sequencer is setup by step-entry in the EVENTS screen. The Variable Length sequencer is best recorded live but you can enter and edit these sequences via the Sequence-Edit menu with a lot of patience. Also you may download a sequence from an external MIDI sequencer or computer. You set up whether to use a Fixed length sequence in the EVENTS screen when a Pad is assigned to a NotesSequential (SEQNTL) or Alternating (AltUp/Dn/UD/Rnd by assigned the Sequence to FIXED, the 8-note buffer. Also, the NOTES_ALL function will play all of the notes in the buffer together as a chord. You set a Sensor to a Variable length sequence in the EVENTS menu by assigning the Play Function to MIDISq and the Sequence# to one of the V.L. sequence numbers 1-255 NOTE: In order for the sequence to play out automatically, you must set the HitMode for the Pad or Sensor that triggers it to TIMED. If it’s set to TOUCH you’ll only hear the first note. 5-sequence rotating buffer: The RecordNext feature uses a 5 sequence circulating buffer. So if you start at sequence #3 and start loading up consecutive sequences, after you Record #7 the next Record will wrap around to #3 again. You could say that all increments and decrements are ‘modulo 5’ So another example of a block of sequences

would record to numbers 21,22,23,24,25.. then wrap back to.21,22,23,24,25. A future version will make this sequence buffer size a programmable value. NOTE: The variable-length ‘live’ sequencer records everything that goes to the MIDI Out port. This means that if you’re recording while listening to an existing track, the original track will be recorded with your live performance onto the new track, an implicit overdub. A future release will include features to isolate tracks.

[SENSORS, cont.]
SENSORS/OUTPUT menu Up Softkey#1 Softkey#2 Softkey#3 Softkey#4 TRIG 1 Curve: 5 Pedal: TR1 MIDI: L
Link Off off off off off Down EDIT Softkey#5 Softkey#6 Softkey#7 Softkey#8 Several important parameters for the Sensor’s MIDI output are set up here. Sensor#: use softkey#1 and the Up/Dn keys to select the sensor. Curve: selects and sets the Curve number assigned to this sensor. Pedal: sets a continuous controller in the system to control this sensor when acting in a HiHat setup. MIDI: set the MIDI output port; Left, Right, or Both, None for 32 channel systems. Link: Link the activity of this sensor to trigger other sensors’ events. NotesOn: triggers the linked-sensors from a Note-On message. NotesOff: triggers the linked-sensors from a Note-Off message. Off: no links enabled LINKS: use softkeys# 6 and #7 to select up to four Links for this sensor. Use the Up/Dn keys to create your links.

RESPONSE menu screens Up Softkey#1 Softkey#2 Softkey#3 Softkey#4 TRIG 1 Gain: 100%
0% 32% MORE>Down EDIT Softkey#5 Softkey#6 Softkey#7 Softkey#8 The Response screens allow setups to the GAIN and several other parameters for the individual hardware Sensors on the Ztar. These settings will be saved globally and will apply to every SONG configuration. The response for the same Sensor may be varied from Song to Song by applying different curves in the SENSORS/ OUTPUT menu. GAIN: softkey#2 and the UP/Dn keys may be used to set the basic gain for a Sensor. 100% is usually the best setting but use other settings if needed. The bottom line of this screen shows a response bar-graph that will move to show the raw output of the Sensor. The level of the last hit will also read as a percentage of full-scale within the Ztar’s processing range. Use this Gain bar-graph to check the response or to find something that’s active when it shouldn’t be. RESPONSE menu, Screen #2 Up Softkey#1 Softkey#2 Softkey#3 Softkey#4 ORE>Down TRIG 1 Scan: 0 Mask: 0 Threshold: 0
Chase: On MORE> EDIT Softkey#5 Softkey#6 Softkey#7 Softkey#8 Scan: by increasing the number stored in this setting the onboard processor will wait additional scan-cycles before finishing its determination of a peak-velocity. This can be used to eliminate ghost triggering in some situations. The ‘0’ setting has the fastest response. Mask: by increasing the number stored in this setting the onboard processor will wait the specified number of scan-cycles before accepting another hit in order to help eliminate ghost-triggering in some situations. Again, the ‘0’ setting has the fastest response.

Threshold: This setting stores the lowest raw force-data from the Sensor that will give a MIDI response. Hits below this value will be ignored. Use this setting to help eliminate certain types of ghost-triggering. Chase: When Chase is enabled, touching a Sensor will bring up its profile in the selected menu-screen as a convenience for editing purposes.

RESPONSE menu, Screen #3 Up Softkey#1 Softkey#2 Softkey#3 Softkey#4 ORE>Down TRIG 1
TRAIN LoPoint: 0 HiPoint: 100 MORE> EDIT Softkey#5 Softkey#6 Softkey#7 Softkey#8 TRAIN>: Press the “TRAIN” softkey and strike pad softly four times to enter the average of your softest hit. Then four times again to record the average of your hardest hit. Use this to quickly set the useful range of force required for your touch with this Sensor. LOW POINT: This directly sets the force-value for the beginning, or lowest point of your currently selected curve. The full curve will be scaled, compressed or expanded, depending on the settings for the high and low points. HIGH POINT: This directly sets the high-force endpoint of the currently selected curve.
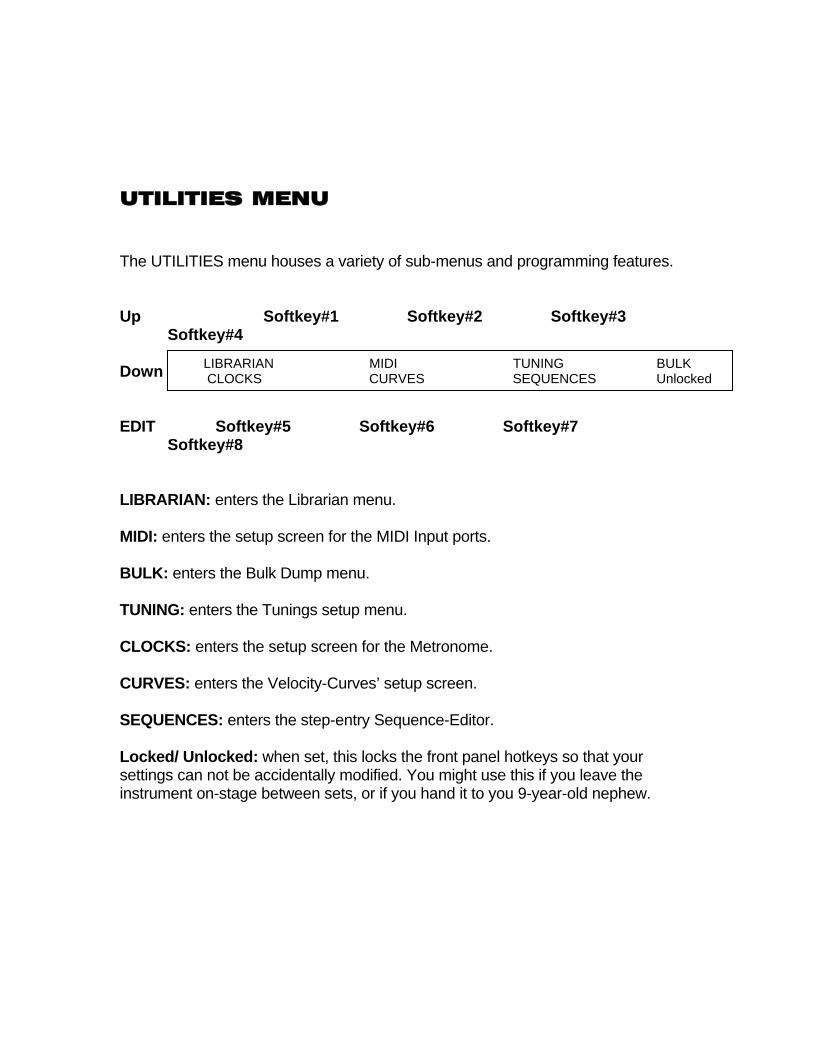
UTILITIES MENU The UTILITIES menu houses a variety of sub-menus and programming features. Up Softkey#1 Softkey#2 Softkey#3 Softkey#4 Down LIBRARIAN MIDI TUNING BULK
CLOCKS CURVES SEQUENCES Unlocked EDIT Softkey#5 Softkey#6 Softkey#7 Softkey#8 LIBRARIAN: enters the Librarian menu. MIDI: enters the setup screen for the MIDI Input ports. BULK: enters the Bulk Dump menu. TUNING: enters the Tunings setup menu. CLOCKS: enters the setup screen for the Metronome. CURVES: enters the Velocity-Curves’ setup screen. SEQUENCES: enters the step-entry Sequence-Editor. Locked/ Unlocked: when set, this locks the front panel hotkeys so that your settings can not be accidentally modified. You might use this if you leave the instrument on-stage between sets, or if you hand it to you 9-year-old nephew.

[UTILITIES, cont.]
LIBRARIAN menu Up Softkey#1 Softkey#2 Softkey#3 Softkey#4 Down SONGNAME SAVE COPY DELETE
SWAP COPY-PAD INITIALIZE EDIT Softkey#5 Softkey#6 Softkey#7 Softkey#8 SONGNAME: enters the Songname-Edit screen, which may also be reached, from the top-level SONG-EDIT-mode screen. Use the softkeys for your CursorRight/Left controls and the Up/Dn arrow keys or joystick to change text-values. Up Softkey#1 Softkey#2 Softkey#3 Softkey#4
SONG:#01 ZTAR CURSOR
Down EDIT Softkey#5 Softkey#6 Softkey#7 Softkey#8 Save: Writes the Scratch Kit Buffer to a Song-Location. This is the same screen that you enter from the WRITE softkey. Copy: Copies any song location to any other Song location. Delete: Restores the selected Song from Song#1. Swap: Exchanges any two song locations. COPY-PAD: allows you to copy all the settings from one Sensor to another Sensor for convenience. INITIALIZE: enters the Initialize screen where you can choose to reset groups of objects to their original factory settings.

[UTILITIES, cont.] LIBRARIAN\ SAVE To SAVE a song: Up Softkey#1 Softkey#2 Softkey#3 Softkey#4 <WRITE SCRATCH KIT> EXECUTE
Scratch #01 ZTAR #01 ZTAR
Down EDIT Softkey#5 Softkey#6 Softkey#7 Softkey#8 Press softkey#8 and use the arrow Up/Dn keys to set the destination Song-location. Press EXECUTE when you’re ready. The words “Song Saved! Will appear briefly. LIBRARIAN\ COPY Up Softkey#1 Softkey#2 Softkey#3 Softkey#4 <UTILITY\LIBRARIAN\COPY> EXECUTE
#01 ZTAR #01 ZTAR
Down EDIT Softkey#5 Softkey#6 Softkey#7 Softkey#8 Softkey5 to select the Source-Song, Softkey #8 to select the Destination Song, Up/Dn keys of joystick to set the values, and EXECUTE to complete the operation. The words ‘Song Saved!’ will appear briefly. DELETE and SWAP work in a similar fashion. COPY-PAD works in a similar fashion that allows you to copy the settings for an individual Sensor to any other Sensor. Use the softkeys to select the Source and Destination Sensors fields, the Up/Dn arrows and joystick to set the numbers, and EXECUTE to complete the operation.
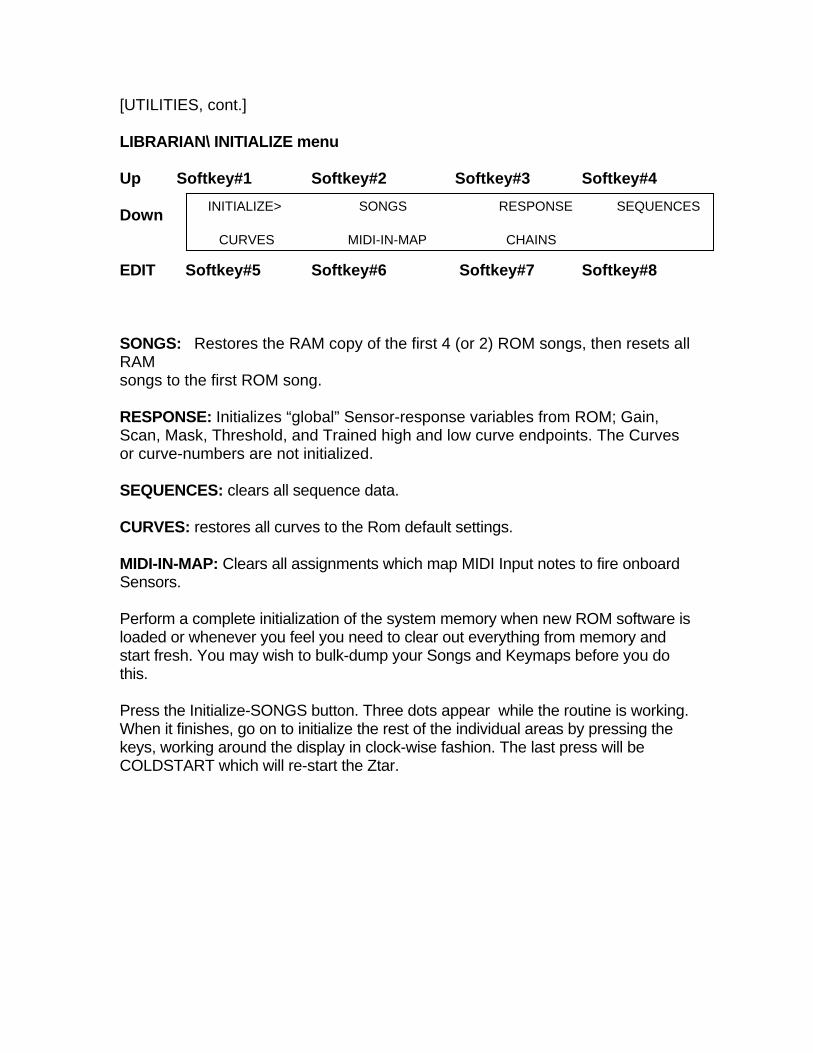
[UTILITIES, cont.] LIBRARIAN\ INITIALIZE menu Up Softkey#1 Softkey#2 Softkey#3 Softkey#4 INITIALIZE> SONGS RESPONSE SEQUENCES
CURVES MIDI-IN-MAP CHAINS
Down EDIT Softkey#5 Softkey#6 Softkey#7 Softkey#8 SONGS: Restores the RAM copy of the first 4 (or 2) ROM songs, then resets all RAM songs to the first ROM song. RESPONSE: Initializes “global” Sensor-response variables from ROM; Gain, Scan, Mask, Threshold, and Trained high and low curve endpoints. The Curves or curve-numbers are not initialized. SEQUENCES: clears all sequence data. CURVES: restores all curves to the Rom default settings. MIDI-IN-MAP: Clears all assignments which map MIDI Input notes to fire onboard Sensors. Perform a complete initialization of the system memory when new ROM software is loaded or whenever you feel you need to clear out everything from memory and start fresh. You may wish to bulk-dump your Songs and Keymaps before you do this. Press the Initialize-SONGS button. Three dots appear while the routine is working. When it finishes, go on to initialize the rest of the individual areas by pressing the keys, working around the display in clock-wise fashion. The last press will be COLDSTART which will re-start the Ztar.
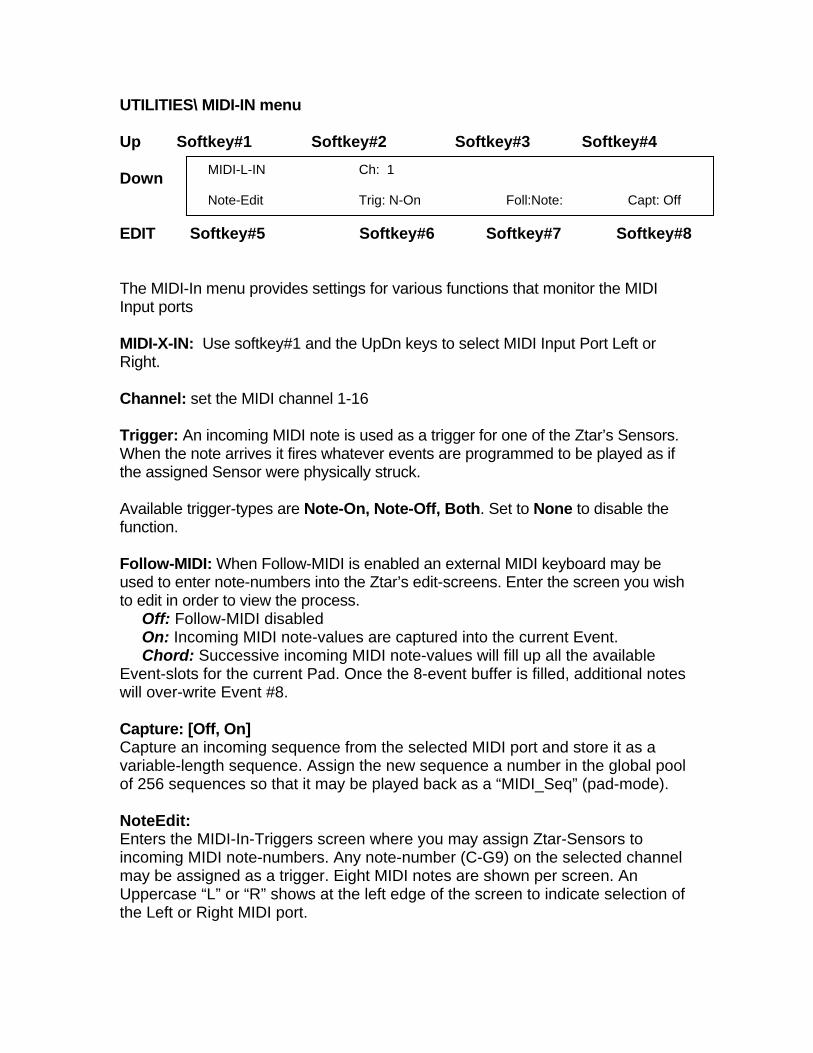
UTILITIES\ MIDI-IN menu Up Softkey#1 Softkey#2 Softkey#3 Softkey#4 MIDI-L-IN Ch: 1
Note-Edit Trig: N-On Foll:Note: Capt: Off
Down EDIT Softkey#5 Softkey#6 Softkey#7 Softkey#8 The MIDI-In menu provides settings for various functions that monitor the MIDI Input ports MIDI-X-IN: Use softkey#1 and the UpDn keys to select MIDI Input Port Left or Right. Channel: set the MIDI channel 1-16 Trigger: An incoming MIDI note is used as a trigger for one of the Ztar’s Sensors. When the note arrives it fires whatever events are programmed to be played as if the assigned Sensor were physically struck. Available trigger-types are Note-On, Note-Off, Both. Set to None to disable the function. Follow-MIDI: When Follow-MIDI is enabled an external MIDI keyboard may be used to enter note-numbers into the Ztar’s edit-screens. Enter the screen you wish to edit in order to view the process. Off: Follow-MIDI disabled On: Incoming MIDI note-values are captured into the current Event. Chord: Successive incoming MIDI note-values will fill up all the available Event-slots for the current Pad. Once the 8-event buffer is filled, additional notes will over-write Event #8.
Capture: [Off, On] Capture an incoming sequence from the selected MIDI port and store it as a variable-length sequence. Assign the new sequence a number in the global pool of 256 sequences so that it may be played back as a “MIDI_Seq” (pad-mode). NoteEdit: Enters the MIDI-In-Triggers screen where you may assign Ztar-Sensors to incoming MIDI note-numbers. Any note-number (C-G9) on the selected channel may be assigned as a trigger. Eight MIDI notes are shown per screen. An Uppercase “L” or “R” shows at the left edge of the screen to indicate selection of the Left or Right MIDI port.

UTILITIES\ MIDI-IN\ NoteEdit menu Up Softkey#1 Softkey#2 Softkey#3 Softkey#4 Down EDIT Softkey#5 Softkey#6 Softkey#7 Softkey#8
L C -> TR6 C# -> off D -> off D# -> off E -> off F -> off ` F# -> off G -> P d3
Use the softkeys and the UpDn keys to select a MIDI-IN Note and assign a Ztar-sensor.

[UTILITIES, cont.]
TUNING Menu Up Softkey#1 Softkey#2 Softkey#3 Softkey#4
EDIT Preset: Guitar RIGHT/LEFT E2 / A2 / D3 / G3 / B3 E4
Down EDIT Softkey#5 Softkey#6 Softkey#7 Softkey#8 This menu allows programming the Open-String tunings for the fingerboard. The pitches for the Open-Strings are shown along the bottom of the screen. To change an open-string tuning: Press the soft-key nearest the String number you want to change. Each soft-key controls two string numbers. Alternate between the two strings by pressing the key again. Alternatively, you can tap the fingerboard string in the TRIGGERS-OFF modes and the cursor will ‘chase’ to the string you’re touching. Or, in the TRIGGERS-ON modes, you can pluck a Trigger to select the string. Now simply use the Data Up/Down keys or the joystick to adjust the open-string note anywhere within the entire MIDI note-range. If you hold a note while you’re doing this you can hear it change. Presets: Press the PRESET key to scroll through a list of common tunings. If none of these suit you, use the open-string tuning fields to enter your own tunings. RIGHT/LEFT: Press this button to change the instrument’s tuning for Right-hand or Left-hand players. EDIT: Enters the KEYMAP-EDIT sub-menu screen. Each key on the Ztar fingerboard may now be individually tuned to a MIDI channel and Note-number. A Key-Note map is saved for each Song preset. These maps default to standard tunings when you select a Tuning Preset and they adjust automatically when you change an Open String Tuning. Make adjustments to individual keys to create new scales or separate instruments in areas of the fingerboard.

KEYMAP-EDIT screen Up Softkey#1 Softkey#2 Softkey#3 Softkey#4 FRET i: 35/ B1 ii: 40/ E2 iii: 45/ A2
OPEN iv: 5-/ D3 v: 55/ G3 vi: 60/ C4
Down EDIT Softkey#5 Softkey#6 Softkey#7 Softkey#8 The display shows one fret at a time for all six strings. The fret-number is shown in the bottom-left corner of the screen. Use softkey#5 and the UP/Dn keys to select frets 0 (Open-string) through 24. Use the softkeys to select a string-number for this fret so that you can set the MIDI channel and note-number. Press the softkey to toggle between the Channel and Note fields.

[UTILITIES, cont.]
BULK-DUMP MENU Up Softkey#1 Softkey#2 Softkey#3 Softkey#4 BULK SEND RECEIVE
SONG #01 ZTAR
Down EDIT Softkey#5 Softkey#6 Softkey#7 Softkey#8 Send: Press softkey#2 to dump the selected Song Memory from the ZTAR to a receiving device. Use the Up/Dn keys or the joystick to select a Song. Song ‘#0’ will select ALL Songs. When “ALL” is selected a Bulk-dump will also send all 16 of the global Response Curves and all Keymaps. Receive: Prepares the ZTAR to receive a Bulk-dump to its Song-Memory. To Save the Ztar Songs to an external MIDI system: 7) Connect the MIDI Out port from the Ztar to the computer or sequencer’s MIDI IN
port. 2) Set up your computer to receive a Sysex data dump. You can use most MIDI sequencer programs or MIDI monitor programs to do this. 8) When the computer is ready and waiting for data press the SEND soft-key on
the Ztar keypad. The words “Sending data...” will appear while the process is running. The Ztar display will indicate when the operation is finished saying, “Function Complete”.
To Restore the Ztar Songs from an external MIDI system: 9) Connect the MIDI IN port from the Ztar to the computer or sequencer’s MIDI
OUT port. 2) Press the RECEIVE soft-key on the Ztar first, then start the transmission from your computer. The ZTAR gives you about 20 seconds to start the transmission before it flags an error.

BULK DUMP ERROR MESSAGES --- CONDITION --- --- MESSAGE --- 1) 20 seconds elapse before any data received “timeout” 2) MIDI cable unplugged / too few data bytes “timeout” • Check your cables and connections • Make sure the MIDI device in your computer is set up correctly and the sending
program is configured to use it. 3) Wrong SysEx dump / Bad MIDI data “Data corrupt” • Possible faulty cable or loose connection • Corrupted file stored in computer 4) Wrong checksum / no EOX (End of Transmission) “Bad Checksum” • Corrupted transmission. Retry the procedure. 5) CRC/Framing or Receive buffer overrun “MIDI off line” • Corrupted transmission. Retry the procedure. • Possible faulty cable
[UTILITIES, cont.]
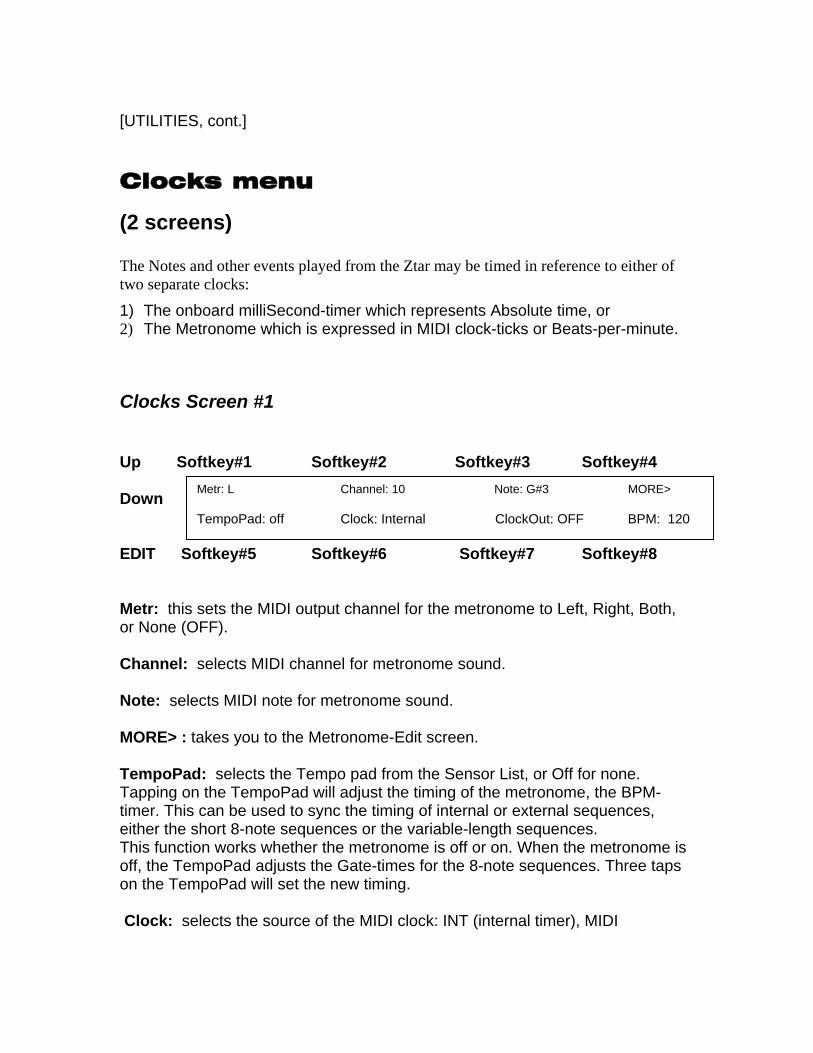
Clocks menu
(2 screens) The Notes and other events played from the Ztar may be timed in reference to either of two separate clocks:
1) The onboard milliSecond-timer which represents Absolute time, or 2) The Metronome which is expressed in MIDI clock-ticks or Beats-per-minute.
Clocks Screen #1 Up Softkey#1 Softkey#2 Softkey#3 Softkey#4 Metr: L Channel: 10 Note: G#3 MORE>
TempoPad: off Clock: Internal ClockOut: OFF BPM: 120
Down EDIT Softkey#5 Softkey#6 Softkey#7 Softkey#8 Metr: this sets the MIDI output channel for the metronome to Left, Right, Both, or None (OFF). Channel: selects MIDI channel for metronome sound. Note: selects MIDI note for metronome sound. MORE> : takes you to the Metronome-Edit screen. TempoPad: selects the Tempo pad from the Sensor List, or Off for none. Tapping on the TempoPad will adjust the timing of the metronome, the BPM-timer. This can be used to sync the timing of internal or external sequences, either the short 8-note sequences or the variable-length sequences. This function works whether the metronome is off or on. When the metronome is off, the TempoPad adjusts the Gate-times for the 8-note sequences. Three taps on the TempoPad will set the new timing. Clock: selects the source of the MIDI clock: INT (internal timer), MIDI

IN LEFT, or MIDI IN RIGHT. Note that if you select an external clock, and you don’t have one connected, the metronome will stop. Clock Out: Select this and use the Up/Dn keys to enable or disable MIDI clock output over the normally assigned MIDI Output port. BPM: sets beats per minute for the INTERNAL MIDI clock. Range 6-600.

Clocks Screen #2: Up Softkey#1 Softkey#2 Softkey#3 Softkey#4 TSig: 4/4 Preset BPM: 120 MORE>
< >
Down EDIT Softkey#5 Softkey#6 Softkey#7 Softkey#8 This is the Metronome-Edit screen where you can create custom time-signatures up to 32
beats per measure with multiple accent beats.
Tsig: sets the time signature. Press the softkey once to select the number of beats in a measure, in the range 2-32. Press a second time to select the unit-beat which can be either 4 or 8 (1/4 note or 1/8 note). Use the Up/Dn keys or Joystick to set the number of beats per measure. Preset: scrolls through four preset signatures in rotation: 2/4, ¾, 4/4, 6/8.
BPM: selected and set the same as on screen #1. Bargraph: shows the Time Signature graphically in groups of eight beats. As you change the time signature you’ll see the length of this bargraph change to match. Each beat may be given an accent by setting its relative volume as shown on the bar graph. SoftKeys #5 or #6: move the cursor left to select a beat; The selected beat is indicated by a flashing cursor (except if the beat is at full volume, obscuring the cursor). When a beat is selected, you can press Up and Down to increase or decrease the volume in eight steps from zero to full. Use the zero-setting for a rest. SoftKeys #7 or #8: move the cursor right to select a beat. NOTES: • The Preset signatures will also reset all the beats’ velocity levels! • A unique Time Signature may be saved for each Song in the Ztar.

{UTILITIES, cont.] CURVES Edit screen Up Softkey#1 Softkey#2 Softkey#3 Softkey#4 # 1-4: 3- 4 30- 15 50- 20 76- 30
1 5-8: 84- 40 90- 60 95- 95 100-127 Down EDIT Softkey#5 Softkey#6 Softkey#7 Softkey#8 There are 16 programmable curves stored globally in the Ztar that may be applied to individual Sensors or Zones on the fingerboard. Use these curves to adapt your touch to the Ztar and the synth and patch you’re using. If one Sensor in a group seems to have a different response than the rest you may give it a special curve to balance its response. Each curve is drafted using eight programmable points and may be thought of as a graph relating physical force and MIDI velocity. The curves also affect the way that Continuous Controllers such as pedals respond. You can assign and save a curve-number with each Sensor for every Song in the Ztar, so a Sensor may have different response as you select new Songs. The left-hand side of the menu-screen shows the Curve-number. When you first enter the menu, use the Up/Dn keys to select a new Curve-number for editing. If you press any other key first, you’ll have to exit the menu and re-enter it to select a different curve. When you make your edits to a curve you’re changing the MIDI Velocity output to match the Force of your touch or the travel of a pedal-type sensor. Each of eight points on a curve is described by a pair of numbers. Each pair has the Force-value on the left and the Velocity-value on the right. The Ztar’s computer draws a smooth curve between these eight points to create the velocity-response for the selected curve-number. For the curve shown here, you might read Point#3 as “having a Force of 50% and a MIDI Velocity 20”. This particular curve is skewed to give more response in the lower force-range with full volume only coming with maximum force. Use the softkeys to select a point and toggle between the Force-field and the Velocity-field. Use the Up/Dn keys and the Joystick to set the values.

0 1 0 0F o rce
V e lo c ity
1 2 7
(3 ,4 )(3 0 ,1 5 )
(5 0 ,2 0 )(7 6 ,3 0 )
(8 4 ,4 0 )
(9 0 ,6 0 )
(9 5 ,9 5 )
(1 0 0 ,12 7 )
\

Troubleshooting response problems: If you notice that a sensor responds late, then comes on too strong when it does fire, probably the threshold, the lowest point of the curve is set too high. If a sensor seems too “Hot” you may notice that it’s showing a MIDI 127 at a force level much lower than you’d like, say 50%. Try to match the MIDI velocity to the relative force you feel when you play.
Ztar ZPC Curves Tutorial Describing how to set the response curve for a Sensor using the Curve-edit menu. We’re going to draw a response curve that gives a Sensor a smooth response to your touch using 8 programmable points, in the way you might enter them on a piece of graph paper. Find the hardware’s endpoints: Go to the first RESPONSE menu screen that shows the GAIN bargraph. When you hit a pad or string, the bargraph will show the relative strength of the hit. Try to see what the lowest and highest levels are for the pad you’re hitting. Set the response endpoints: Now go to the UTILITIES/ CURVES edit screen for the CURVE number that’s assigned to the Pad. Or go to an un-used curve-number and edit a new one for saving. Set the FORCE value, the left-hand number, for Pont#1 to the LOWEST force value from the GAIN screen. Now set the FORCE value for Point#8 to the highest force value you took from the GAIN screen. These are your physical performance limits. Now go to the MIDI value, the right-hand number, for Point#1 and set it to a low MIDI velocity like 10. Now go to the MIDI value for Point #8 and enter a 127, the highest MIDI velocity value. Go to Points#2-7 and enter values that ascend evenly from point #1 to Point#8 for both the FORCE and MIDI-output values. If the actual response of the entire system is skewed in some way (“non-linear”) even though you’ve drawn a fairly straight line with your choice of numbers, then you can adjust either the FORCE line of numbers or the MIDI-output line of numbers to make your response smooth for that sensor. The easiest way to create new curves is to set all of the right-hand numbers in equal increments from Point#1=0 to Point#8=127. The you can adjust the left-hand (FORCE) numbers anywhere you want to scale the curve to the dynamic range of your touch. You’ll always want a MIDI output

of 0-127 but the force requirements will vary with for a number of reasons.
UTILITIES\ ARPEGGIATOR MENU Up Softkey#1 Softkey#2 Softkey#3 Softkey#4 ARPEG:ON Ch: 2 Port:L Time: 2/16 Down
Clk: INT ALL NONE Loop: On EDIT Softkey#5 Softkey#6 Softkey#7 Softkey#8 ARPEG: [on/ off] Toggles the Arpeggiator ON or OFF Channel: [1-16] Select MIDI channels to respond to the Ztarpeggiator. Pick the Channel-number and direct its arpeggiator output in the PORT-settings under Softkey#3.
Port: [ None, L, R, Both] Select the “Left” or “Right” MIDI Output ports for each MIDI channel. Instruments that have only a single MIDI Out jack will only respond to the LEFT port. Time: [ 0-9999msec or 1/16- 16/16] Set the duration for each note played by the arpeggiator. This can be expressed either in milliseconds or in 1/16 notes. Press the TIME softkey (#4) repeatedly to toggle between Milliseconds and 1/16 notes. When you are using the Internal clock in the Ztar, you may set either Milliseconds or 1/16 notes, and you then adjust the clock-rate using the BPM setting in the UTILITIES/ CLOCKS menu. To use an External MIDI clock source the setting must be in 1/16 notes. 24 MIDI clocks per ¼ note is the standard. Clk: [L, R, INT] Press again to scroll through the settings. External clock from the Left or Right MIDI Input port, or use the Internal Ztar clock source. Most ztars are equipped with only a single MIDI In and MIDI Out. You can switch easily between an External clock and the internal clock source this way. ALL Enable the Arpeggiator on all MIDI channels. NONE Disable the Arpeggiator on all MIDI channels.

Loop: [ On, Off 2-16] Notes may be set to arpeggiate any number of times when they are held on the fretboard. ON will arpeggiate for as long as notes are held. Other numeric-settings will loop the programmed number of times while still fingered, and then stop. [UTILITIES, cont.] SEQUENCE EDIT screen Up Softkey#1 Softkey#2 Softkey#3 Softkey#4 Sequence: #1 INSERT DELETE
1: Note Channel 1: 45 / A2 127 GATE: 100#
Down EDIT Softkey#5 Softkey#6 Softkey#7 Softkey#8 Sequence: press the softkey and use the Up/Dn keys or the joystick to select the Sequence number to edit. INSERT: press the softkey to insert a MIDI event. DELETE: press the softkey to delete a MIDI event. The bottom line of this sample screen reads this way:
“ Event #1 is a Note, Channel# 1, MIDI Note 45 (decimal) or standard pitch A2, velocity is 127 and the note-duration is 100 MIDI clocks.” Press softkey#1 to toggle between the Event-number and the event-type fields. Use the UP/Dn keys and joystick to set the values. You’ll notice that events may be types other than notes. Press softkey#2 to toggle between the Channel and note-number fields. Press softkey#3 to select and set the velocity for a note or data-value for a fixed ControlChange command. Press softkey#4 to select the Note (event’s) duration in either Milliseconds or MIDI Clocks. Press the softkey to toggle between the two types. A “#” will appear after the number when MIDI Clocks are selected.

SHOWALL screens You can view entire groups of things here and jump into the appropriate editor for the selected objects. When first entering one of the SHOWALL screens, using the UP/Dn keys will scroll the banks of objects. After an object has been selected however, the Up/Dn keys will alter its values Top-level SHOWALL screen: Up Softkey#1 Softkey#2 Softkey#3 Softkey#4 SONGS PADS EVENTS GATES
LINKS CHAINS PATCHES
Down EDIT Softkey#5 Softkey#6 Softkey#7 Softkey#8 Songs: jumps to the LIVE menu showing the first bank of eight Songs. Pads: shows a bank of eight Sensors, including the MIDI Channel and Note or ControlChange assignments for their first event-slots. Events: shows the eight events for the selected Sensor. Gates: shows the eight gate-times for the selected Pad’s events, whether or not they are active. Links: shows the first of four possible Links for the selected Pad. Chains: quick selection of eight Chains for editing purposes. Patches: jumps to the Patch-send editor for the selected Song.

Showall SONGS View all the Songs in your Ztar. Each menu-screen will display 8 Songs .
Up Softkey#1 Softkey#2 Softkey#3 Softkey#4 ZTAR CHORDS CHORDS#2 CHORDS#4
ZTAR 05 ZTAR 06 ZTAR 07 ZTAR 08
Down EDIT Softkey#5 Softkey#6 Softkey#7 Softkey#8 Press a softkey to select a Song.
Showall PADS Up Softkey#1 Softkey#2 Softkey#3 Softkey#4 TR1 10:35 10:37 1: 90 10:CtlChg
TR51:PgmChg 1:ChPres 1: 93 3:93
Down EDIT Softkey#5 Softkey#6 Softkey#7 Softkey#8 View all of the Pad-assignments in the currently selected Kit. Each screen shows the first event-assignment for each Pad in a bank of eight Pads. If the first event for a Pad is a Note message, the channel and note-number will appear. If the first event for that pad is another type of message the message-type will be displayed. Use the softkeys to toggle between a Pad’s MIDI Channel and Note# or function-type. Use the Up/Dn keys to change values. If a Pad has been selected, pressing the EDIT key will jump the Sensor-edit screen for that Pad. If a Pad has not been selected, pressing the EDIT key will exit back to the SHOWALL menu.

Showall Events Up Softkey#1 Softkey#2 Softkey#3 Softkey#4 PAD1 10:PgmChg 1: PgmChg 1: Off 1: Off
1: Off 1: Off 1: Off 1: Off
Down EDIT Softkey#5 Softkey#6 Softkey#7 Softkey#8 View all of the Events for the currently selected Pad.
Use the Up/Dn keys to select a Sensor to edit.
Use the softkeys to toggle the channel and note number or MIDI function for one of the eight Events and the Up/Dn keys to adjust the values. The EDIT Key jumps to the full EDIT screen for that sensor. If you had not pressed one of the softkeys when entering this menu, pressing the EDIT key will take you back to the SHOWALL screen.
Showall Gates
Up Softkey#1 Softkey#2 Softkey#3 Softkey#4 TR2 900 ms 260 clk 999 clk 1000 ms
100 ms 200 ms 200 ms 5500 ms
Down EDIT Softkey#5 Softkey#6 Softkey#7 Softkey#8
View the Gate-times assigned to the Events in the current Pad.
The softkeys select the gate-time for an Event and toggle the timing reference between the Absolute-timer expressed in milliseconds and the Metronome expressed in MIDI clock-ticks. This is discussed in further detail in the CLOCKS section of this manual.

Showall Links Up Softkey#1 Softkey#2 Softkey#3 Softkey#4 SONG TR1:P3 TR2: off TR3: off TR4: off
#0 TR5: off TR6: off Pt1: off Pt2: off
Down EDIT Softkey#5 Softkey#6 Softkey#7 Softkey#8 Display, select, and edit the Links assigned to each Sensor in the current Kit. The Song-number is identified at the left of the Screen. Each value-pair shows a sensor-name on the left and its first link (if any) on the right. If a Pad has been selected, hitting the EDIT key will enter the Links-edit screen for that Pad.
Showall Chains Up Softkey#1 Softkey#2 Softkey#3 Softkey#4 Chain#1 Chain#2 Chain#3 Chain#4
Chain#5 Chain#6 Chain#7 Chain#8
Down EDIT Softkey#5 Softkey#6 Softkey#7 Softkey#8 A CHAIN is an ordered grouping of up to 8 Ztar-Songs that you step through by incrementing the Chain-pointer number with a “Chain-Up’ command. You can use this for quick changes in a set-list format. The Showall-Chains screen shows the 8 Chains available in the Ztar. Each Chain may contain up to 8 Kits. Use the softkeys to select a Chain# and jump to the Chain-Edit screen for that chain.

Chain-Edit Screen Up Softkey#1 Softkey#2 Softkey#3 Softkey#4 Chain 1: K1 2: K5 3: K2 4: K1
#3 5: K2 6: K21 7: K9 8: K4
Down EDIT Softkey#5 Softkey#6 Softkey#7 Softkey#8 This screen displays the Kits assigned to the 8 slots in the current chain. Select a Slot-number and adjust the Kit-assignment with UP/Dn keys. Showall Patches Up Softkey#1 Softkey#2 Softkey#3 Softkey#4 Sng:02 PatchSel:1 Vol: 0 SEND
Ch: 3--Left Program Change: 121 CC#0: 0 CC#32: 1
Down EDIT Softkey#5 Softkey#6 Softkey#7 Softkey#8 Each Song can store up to 32 Patch-Select commands that are issued whenever the Kit is selected. Each Patch-Select command is a group of data including Channel, ProgramNumber, and two Bank-Select bytes. You can also set up individual PatchChange commands and SEND them directly from this window. The Song number is shown in the Upper left corner.
PatchSel: Select one of 32 PatchSelect commands. Volume: select a master volume base-level to send to this channel Ch: Press the softkey to set the MIDI channel-number for the current Patch Select.
Press the softkey again to toggle to the MIDI Out port port field on the right. The available values are (N)one, ( L)eft, (R)ight, and (B)oth.

Pgm: Set the Program number. CC0: Set the Most Significant Byte of the BankSelect message. Refer to your synth manual for the correct Bank-Select numbers. CC32: Set the Least Significant Byte of the BankSelect message. SEND: Immediately Send the current PatchSelect command with both Program-number and BankSelect information. EDIT: Backs out to the top Showall screen. To set up Patch-selects for a Kit: Enter the SHOWALL/PATCHES menu.
At the top-left you’ll see the current Kit# to hold all of the patch-selects you’d like. You may adjust this to work in a different Kit. Go to the Patch-select field and pick a number 1-32. The first available number without any patch-data will be the best one to use. Now enter into this Patch-Select data-group the Channel, ProgramChange number and the bank-select numbers from your synth-manual. You can send this directly using the SEND command or SAVE your settings to this KIT so that you can issue them on a KitChange. To do this, either use the WRITE hotkey, (the second one down in the bank of four on the right), or go to the UTILITIES/LIBRARIAN/SAVE screen.

Maintenance The Data-retention battery is located on the main CPU card. Suitable replacements are Duracell DL 1/3N or Panasonic CR-1/3N