Home-Dzine online · 2015-12-28 · Home-Dzineonline 2 Home-Dzine Online is written and compiled by...
31
Home-Dzine online It’s all about caring for and improving your home also in this issue spread on texture - texture for effect makeover magic - recycling projects seal it once - exterior repairs - eggs-ellent easter eggs April 2009 DIY Divas now in the Cape! The DIY issue packed full of projects and great ideas! Make this Designer TV Unit
Transcript of Home-Dzine online · 2015-12-28 · Home-Dzineonline 2 Home-Dzine Online is written and compiled by...

Home-Dzineonline
It’s all about caring for and improving your home
also in this issuespread on texture - texture for effectmakeover magic - recycling projects
seal it once - exterior repairs - eggs-ellent easter eggs
April 2009
DIY Divas now in the Cape!
The DIY issuepacked full of projects and great ideas!
Make this Designer TV Unit

Home-Dzineonline 2
Home-Dzine Online is written and compiled by Janice Anderssen. All projects in this issue, or any other issue, remain the property of Home-Dzine and Janice Anderssen, or the respective copyright holders, and may not be copied or reproduced in any manner whatsoever without written permission.
Image and content credits:meredith publishing - good homes - chicago home - family handyman - sunset publishing - popular mechanic - house & home - georgia pacific - expert village
Hello all you beautiful Divas and Guys!
This issue is dedicated to DIY. Whilst not everyone wants to get involved in doing-it-themselves, with prices on the up and up and customer service on the down and down, it makes sense to know how to - even if you don’t want to!
And some very good news this month - DIY Divas have launched in the Cape. Colleen and Bonnie have joined the DIY Divas team and will be hitting the road in the very near future. Expect to see them in East London, Port Elizabeth, the Garden Route and, of course, Cape Town. See in this issue for more details.
Until next month!
Janice & Nancy
a word or two CONTENTSLast days of summerThinking of redecorating in warm colours for a cold winter?
spread on rich texturegive flat walls a rustic texture and richcolour
texture for effectStencilled relief builds on the basic stencilling techniques.
Luminous lampsEnhance plain lamps by adding a design
eggs-ellent easterKeep the kids occupied during the holidays
DIY Divas Furniture Workshops
DIY Divas Advanced Courses
Designer TV unitDon’t spend a fortune when you can make your own
Makeover MagicSome of the recent makeover projects that we have tackled
Seal it onceFinally - a sealer that really works!
Gloriously recycledA couple of easy projects for you to try
HerbieIndoor herb garden
DIY Divasfill outdoor cracks
Q-zone
Directory
PAGE
3
4
5
6
7
8
9
11
15
19
22
24
27
28
29

Home-Dzineonline 3
last days of summer
Thinking of redecorating in warm colours for a cold winter? Then you need to get yourself a copy of the new Dulux Interior Colour Guide. The Colour Guide encourages you to change the way you think about colour choice and to be bold enough to consider something new. Small and handy to carry, the Dulux Interior Colour Guide packs a lot of content. The combination of exquisite visuals, clear and practical advise and universally respected knowledge, makes this guide a must have for any home décor enthusiast.
Visit any Makro, Mica, Builders Warehouse or Paint ‘n Paper countrywide to obtain your Dulux Interior Colour Guide, absolutely free!

Home-Dzineonline 4
spread on rich texture and give flat walls a rustic texture and rich
colour
The technique looks especially attractive on arched architectural features, such as entryways, passages, and wall niches.
To achieve an appropriate level of contrast, select three shades of warm gray, golden beige, or rusty orange that appear at the same level on three neighbouring paint strips. Also, select fairly dark colours on the paint strips (probably the second-from-the-bottom colour options), because mixing paint and Rhinolite compound creates a lighter colour.
You will need:Drywall knife, of plaster spatulaContainer, stir stick, foam roller and trayPolyurethane mattRhinoliteProminent Satin - in 3 colours
Here’s how:1. Paint the wall beforehand and leave to dry.
2. Mix the Rhinolite according to the manufacturer’s directions. Fill a suitable container with approximately three parts wet Rhinolite. Pour in one part each of three different colours of emulsion paint. The ratio of total paint to compound is approx. 1:1.
3. Lightly mix the paint and Rhinolite, stirring with a paint stick. Mix three separate batches of compound and paint in the tray. Avoid overblending colours; after mixing you should still see three distinct colours within the container.
4. Starting high and in a corner, spread on tinted paste with a drywall knife or plaster spatula. Apply the paste in a downward motion. As you drag the knife down, occasionally flick your wrist to each side, creatingjagged edges. Allow colours to blend, but don’t overblend. Continue spreading on compound in vertical strips to the side and below the completed area.
5. Step back and evaluate coverage and mix of paint and Rhinolite. While the paste is still wet, spread on small amounts of tinted compound to areas that need more colour and/or texture.
6. Allow to dry overnight; open windows and doors to increase ventilation. Use a small foam roller to roll on a coat of matte polyurethane to seal and protect the surface.
This technique requires only onethin coat of Rhinolite mixed with
three colours of paint. The finished technique is dramatic and rustic. Apply it to large spaces or as an
accent for a single focal wall.

Home-Dzineonline 5
Stencilled relief builds on the basic stencilling techniques. However, rather than applying paint within a stencil you apply a thin layer of Rhinolite. Glaze over the relief adds contrast for an effect combines the crispness of stencilling with depth and texture.
You will need:Rhinolite or finishing plasterGlaze coatFoam roller and trayStencilCraft knifeMasking tapeSmall putty knifeSpirit levelContainersClean clothsPencil and tape measure.
Here’s how:1. Plan where and how to apply the stencil. Use
a spirit level, tape measure, and pencil to lightly mark any necessary guidelines. If it is not precut, cut out the stencil design with a craft knife.
2. Position the stencil on the surface and secure it in place with repositionable spray adhesive or masking tape.
texture for effect
3. Using a small putty knife, apply a 4-6mm thick layer of Rhinolite over the entire stencil. Be careful not to push compound under the stencil while applying it.
4. Remove the stencil from the wall, pulling slowly and making sure compound adheres to the surface, rather than pulling away with the stencil. Touch up heavy or misshapen areas using a damp cloth. Allow compound to dry.
5. Form a cloth into a soft pom-pom and load with glaze; blot off excess. Lightly rub glaze onto the surface in a loose, overlapping circular motion, allowing glaze to collect around relief edges.

Luminous Lamps
Stamping is an easy and efficient way to enhance aplain lampshade by adding a design.
Another easy design alternative is to cut your design out of acetate sheeting, use spray adhesive to hold the sheet to the shade, and lightly spray with Rust-Oleum Matt spray.
QUICK &
EASY
Home-Dzineonline 6
Home-Dzineonline 7
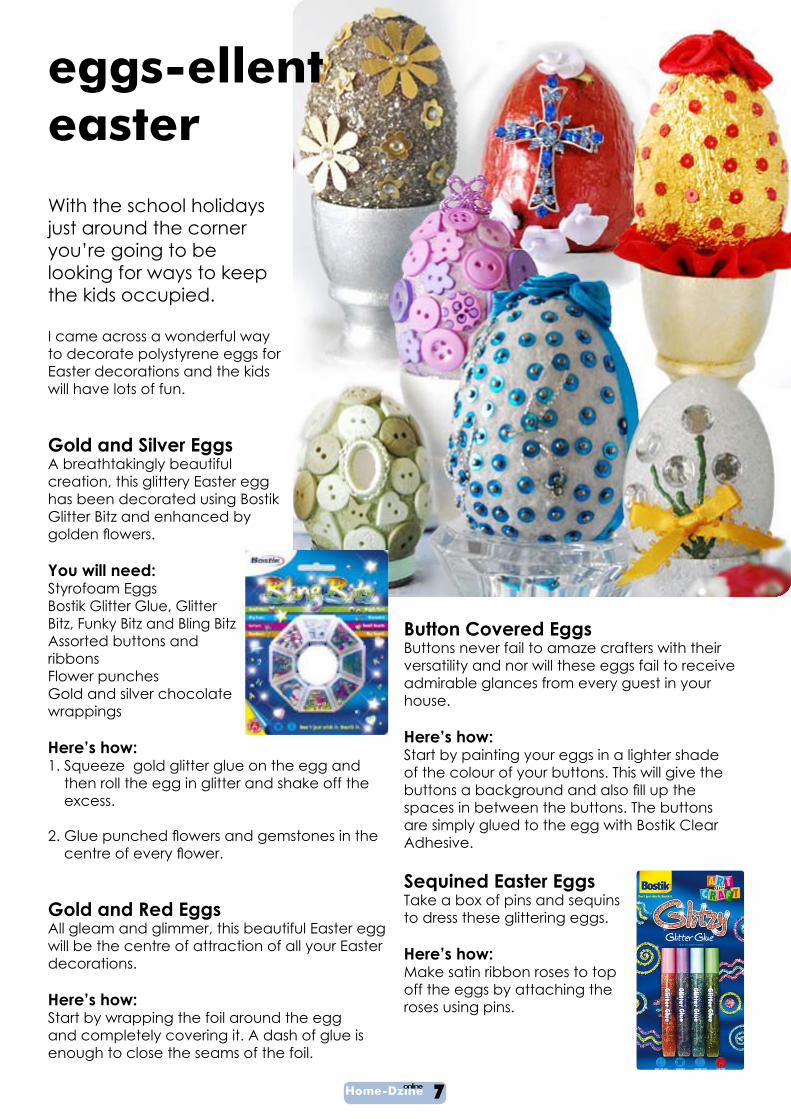
eggs-ellent easter
With the school holidays just around the corner you’re going to be looking for ways to keep the kids occupied.
I came across a wonderful way to decorate polystyrene eggs for Easter decorations and the kids will have lots of fun.
Gold and Silver EggsA breathtakingly beautiful creation, this glittery Easter egg has been decorated using Bostik Glitter Bitz and enhanced by golden flowers.
You will need:Styrofoam EggsBostik Glitter Glue, Glitter Bitz, Funky Bitz and Bling BitzAssorted buttons and ribbonsFlower punchesGold and silver chocolate wrappings
Here’s how:1. Squeeze gold glitter glue on the egg and
then roll the egg in glitter and shake off the excess.
2. Glue punched flowers and gemstones in thecentre of every flower.
Gold and Red Eggs All gleam and glimmer, this beautiful Easter egg will be the centre of attraction of all your Easter decorations.
Here’s how:Start by wrapping the foil around the egg and completely covering it. A dash of glue is enough to close the seams of the foil.
Button Covered EggsButtons never fail to amaze crafters with their versatility and nor will these eggs fail to receive admirable glances from every guest in your house.
Here’s how:Start by painting your eggs in a lighter shade of the colour of your buttons. This will give the buttons a background and also fill up thespaces in between the buttons. The buttons are simply glued to the egg with Bostik Clear Adhesive.
Sequined Easter EggsTake a box of pins and sequins to dress these glittering eggs.
Here’s how:Make satin ribbon roses to top off the eggs by attaching the roses using pins.

Home-Dzineonline 8
don’t spend a fortune on furniture
Let the DIY Divas show you how easy and affordable it is to make your own!
Looking for bedroom furniture or need extra storage space? During July we’ll show you how to make your own double bed and in August you can make a matching wardrobe or linen cupboard.
25 JulyDouble Bed
15 AugustWardrobe orLinen Cupboard
11 JulyRace Car Bed
The perfect ‘first bed’ for a little boy.Make your own car bed and your little one will want out of the cot before you know it!
27 JuneTV unitWith plenty of space for your CDs and DVDs, this stylish storage unit allows you to stand or hang your LCD or Plasma TV.
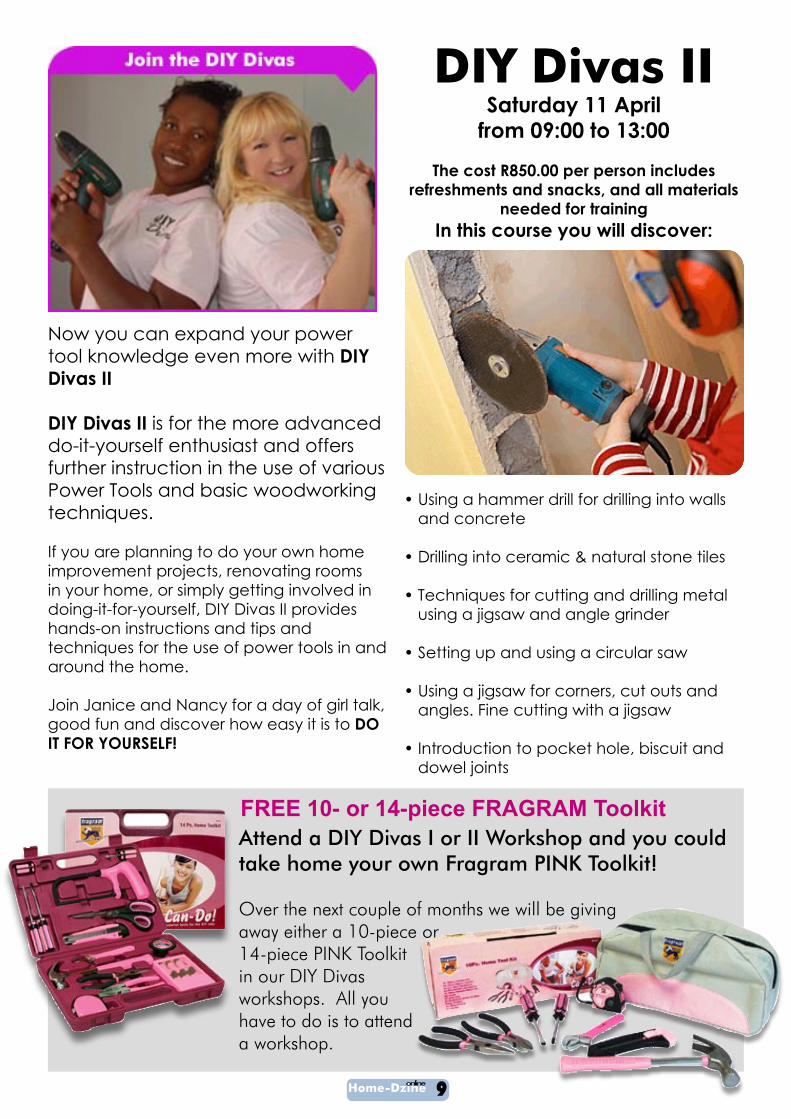
Saturday 11 April from 09:00 to 13:00
The cost R850.00 per person includes refreshments and snacks, and all materials
needed for trainingIn this course you will discover:
• Using a hammer drill for drilling into walls and concrete
• Drilling into ceramic & natural stone tiles
• Techniques for cutting and drilling metal using a jigsaw and angle grinder
• Setting up and using a circular saw
• Using a jigsaw for corners, cut outs and angles. Fine cutting with a jigsaw
• Introduction to pocket hole, biscuit and dowel joints
Home-Dzineonline 9
DIY Divas II
Now you can expand your power tool knowledge even more with DIY Divas II
DIY Divas II is for the more advanced do-it-yourself enthusiast and offers further instruction in the use of various Power Tools and basic woodworking techniques.
If you are planning to do your own home improvement projects, renovating rooms in your home, or simply getting involved in doing-it-for-yourself, DIY Divas II provides hands-on instructions and tips and techniques for the use of power tools in and around the home.
Join Janice and Nancy for a day of girl talk, good fun and discover how easy it is to DO IT FOR YOURSELF!
FREE 10- or 14-piece FRAGRAM ToolkitAttend a DIY Divas I or II Workshop and you could take home your own Fragram PINK Toolkit!
Over the next couple of months we will be giving away either a 10-piece or 14-piece PINK Toolkit in our DIY Divas workshops. All you have to do is to attend a workshop.

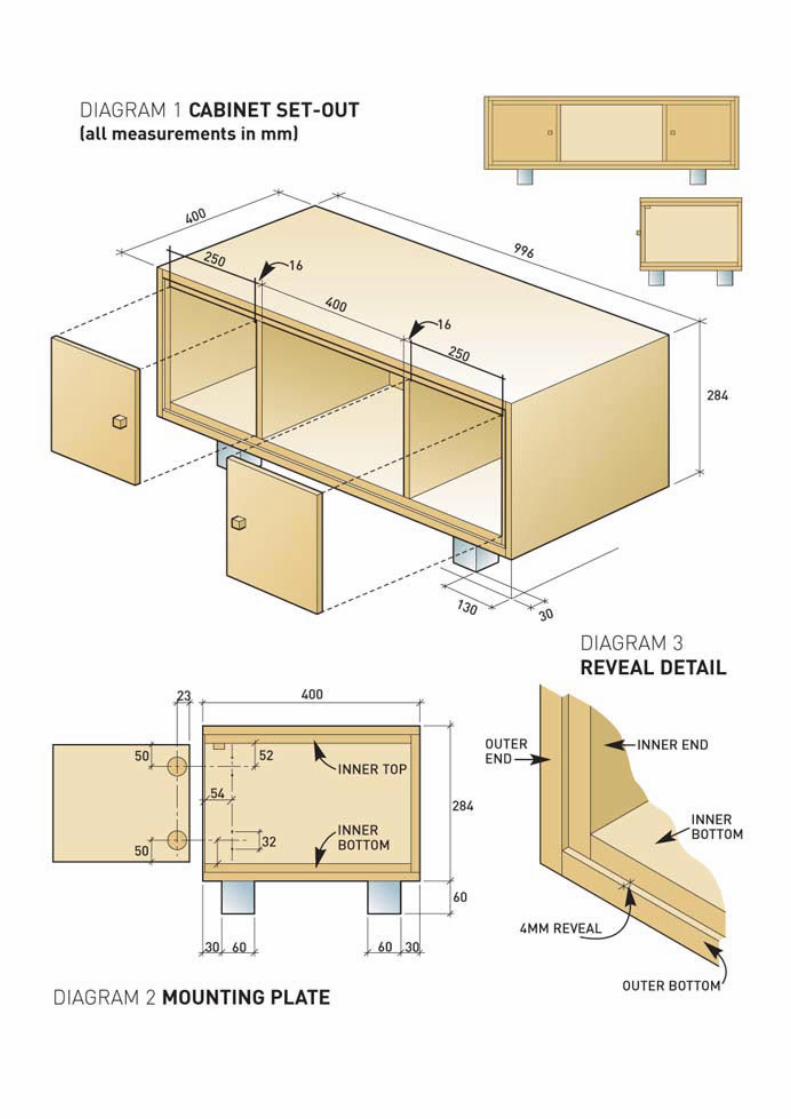
make a designer tv unitFor a contemporary look without a designer price, this simple TV unit was constructed from PG Bison MelaWood - African Wenge.
Home-Dzineonline11Home-Dzineonline11
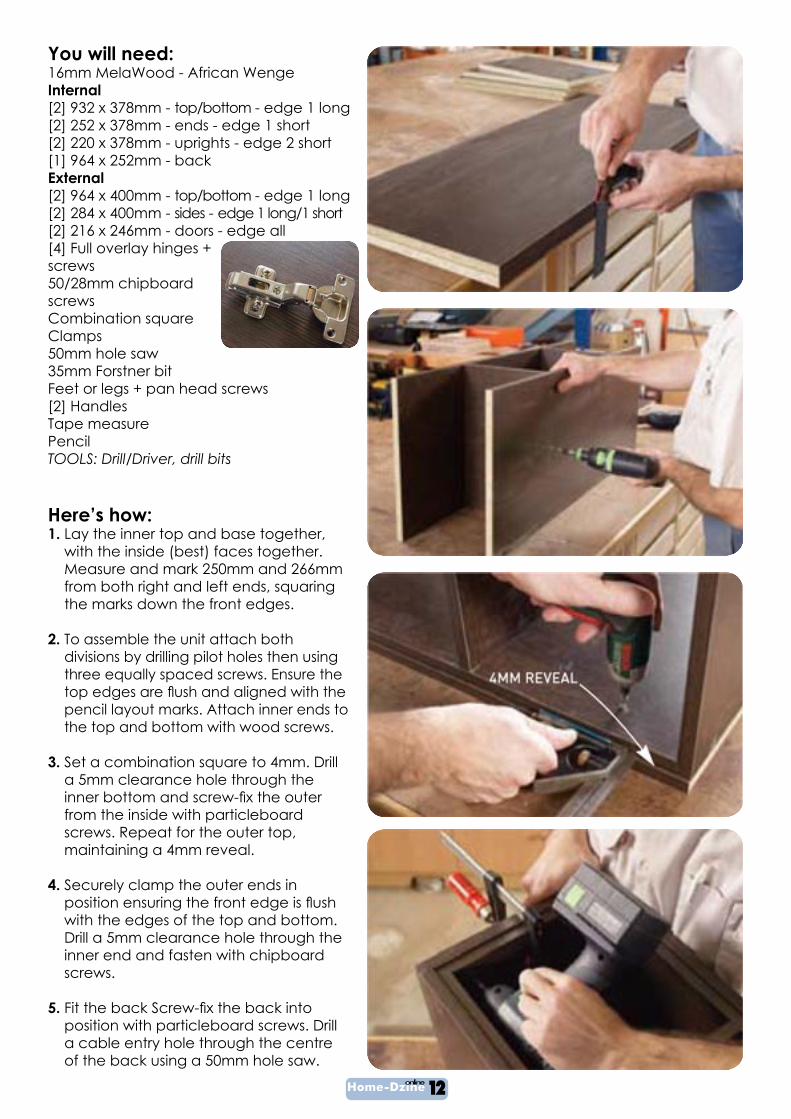
You will need:16mm MelaWood - African WengeInternal[2] 932 x 378mm - top/bottom - edge 1 long[2] 252 x 378mm - ends - edge 1 short[2] 220 x 378mm - uprights - edge 2 short[1] 964 x 252mm - backExternal[2] 964 x 400mm - top/bottom - edge 1 long[2] 284 x 400mm - sides - edge 1 long/1 short[2] 216 x 246mm - doors - edge all[4] Full overlay hinges + screws50/28mm chipboard screwsCombination squareClamps50mm hole saw35mm Forstner bitFeet or legs + pan head screws[2] HandlesTape measurePencilTOOLS: Drill/Driver, drill bits
Here’s how:1. Lay the inner top and base together,
with the inside (best) faces together. Measure and mark 250mm and 266mm from both right and left ends, squaring the marks down the front edges.
2. To assemble the unit attach both divisions by drilling pilot holes then using three equally spaced screws. Ensure the top edges are flush and aligned with thepencil layout marks. Attach inner ends to the top and bottom with wood screws.
3. Set a combination square to 4mm. Drill a 5mm clearance hole through the inner bottom and screw-fix the outerfrom the inside with particleboard screws. Repeat for the outer top, maintaining a 4mm reveal.
4. Securely clamp the outer ends in position ensuring the front edge is flushwith the edges of the top and bottom. Drill a 5mm clearance hole through the inner end and fasten with chipboard screws.
5. Fit the back Screw-fix the back intoposition with particleboard screws. Drill a cable entry hole through the centre of the back using a 50mm hole saw.
Home-Dzineonline12

Home-Dzineonline13
Don’t let DIY be a chore... Bosch Power Tools are designed to make DIY fun!
These powerful tools are always ready when you need them and make doing it yourself so easy.
BOSCH PSR-12 or PSR-18 DRILL/DRIVERThe portable Bosch Drill/Driver delivers enough screwing and drilling power for any DIY project. This combination screwdriver/drill is lightweight and easy to use with built-in light, screw-chuck for simple attachment insertion, forward and reverse, and ion-lithium battery pack.
Visit www.Bosch.co.za for more information on the Bosch range of power tools
DIY Tip:Drill from both sides to avoid chipping the opposite face.
6. Securely clamp the door to the bench with face (best) down. Measure 50mm from top and bottom edges and square across a line. Measure in 23mm and mark intersecting point. Use the Forstner bit to drill a 35mm diameter hole to a depth of 12mm.
7. Use a small straightedge or a steel rule to align the full overlay hinges parallel with the edge of the door. Secure the hinges with screws.
8. The hinge mounting plates are positioned 52mm from the inner top and bottom and 54mm in from the front edge of the inner end.
9. Position the feet on the underside of the cabinet 130mm in from the ends and 30mm from the front and back. Attach with pan head screws. Fix the door stops and handles in position.
BOSCH IMPACT DRILL PSB 500 RECompact design with softgrip and light working weight of 1.5 kg . Twin-sleeve keyless chuck for fast and easy tool changes Electronic speed control.

Home-Dzineonline14
Have you ever tried to find acontractor for a small job, call someone out to fix a broken tile,replace or add tiles to a small area, or what about reupholstering a chair or two?
Anyone who has tried will know how difficult- or expensive - it is. Like many other countries in the world today learning to do it for yourself is becoming a necessity rather than an occasional pastime.
Sure, if you have lots of money, paying exorbitant fees to get a small job done is not a problem. But the average homeowner is already pulling in their belt to make ends meet at the end of each month, how much tighter can you go should you need to get something repaired?
DIY is not difficult, it’s simply a matter of knowingwhere to start, the right tools and materials to use, and some knowledge of the basic techniques involved. You won’t even break a fingernail!
I’ve been doing DIY for the past thirty or so years, and believe me when I say that DIY today is easier than ever. We have plenty of power tools to choose from, there is a wide selection of products that make DIY easier and faster, the only thing you may need to do is to attend a course or two (www.DIY-Divas.co.za) to gain the confidence and know how for usingpower tools.
And we know that DIY is not everyone’s cup of tea and that’s where DIY Guys (www.DIY-Guys.co.za) come in extremely ‘handy’ when it comes to fixing things around the home or office.
The DIY Guys (Marius and Brett) have plenty of experience when it comes to DIY. As our resident DIY Guy, Brett has been assisting us with some of our larger projects - because every DIY Diva needs at least one guy in her workshop!
www.DIY-Guys.co.za CALL US ON 011 475 6096

Home-Dzineonline15
With a little imagination and know how you can
transform almost any boring pine furniture. For this project we used
strips of Meranti moulding and some PG Bison SupaWood to completely makeover the style of this pedestal.
Here’s how:1. The first step was to
sand down the pedestal to remove all the varnish. Pine left unfinished can be nice, but varnished pinetends to be very yellow. I started with an 80-grit sanding pad and finished up with a 240-grit sandingpad - and my Bosch PEX220A Random Orbit Sander.
2. After sanding, wipe down with a clean cloth lightly dipped in mineral turpentine to remove all the dust.
3. The louvres were removed and a piece of pine cut to size and glued into the opening.
4. The next step was to fill cut outs in the sides. Iused Alcolin Wood Filler. Remember to slightly dampen the wood before applying wood filler, as this prevents thewood filler from drying too fast and cracking.
5. Now it’s time to apply Woodoc 10. To get the colour right I used a bottle of Oak stain with a few drops of Teak stain added to make it a more darker oak colour to match the existing furniture. Three coats were applied to the entire pedestal. After the first coathas dried, use Woodoc SteelWool to wipe down the surface and remove any build up of sealer. Allow each coat to dry completely before applying the next coat.
6. For the drawer front and door I used strips of Meranti moulding that were glued to the surface with Alcolin Wood Glue. I then finished offthe design with Suapwood cut to fit.
makeover magic!
LEFT: Gaynor wanted to match this pine,
louvre door pedestal with existing dark oak
furniture in the guest bedroom.
RIGHT: With Woodoc and a few pieces of
moulding - voila!
Home-Dzineonline16
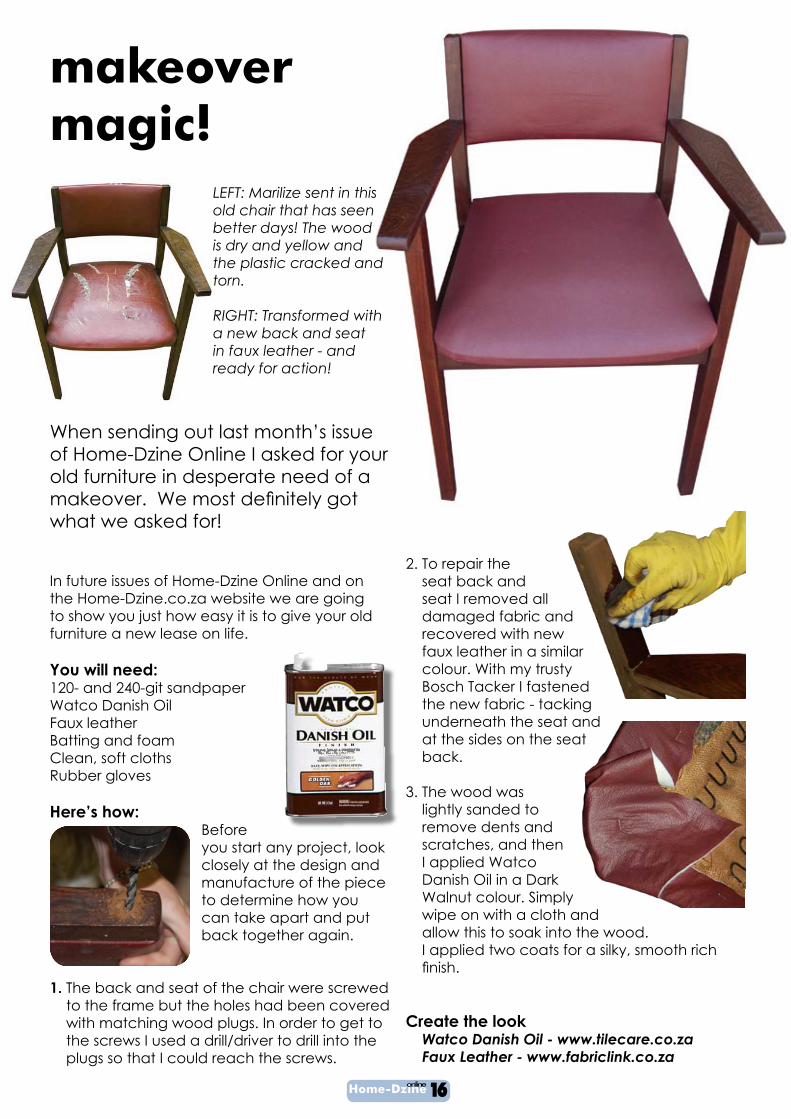
2. To repair the seat back and seat I removed all damaged fabric and recovered with new faux leather in a similar colour. With my trusty Bosch Tacker I fastened the new fabric - tacking underneath the seat and at the sides on the seat back.
3. The wood was lightly sanded to remove dents and scratches, and then I applied Watco Danish Oil in a Dark Walnut colour. Simply wipe on with a cloth and allow this to soak into the wood. I applied two coats for a silky, smooth rich finish.
Create the look Watco Danish Oil - www.tilecare.co.za Faux Leather - www.fabriclink.co.za
In future issues of Home-Dzine Online and on the Home-Dzine.co.za website we are going to show you just how easy it is to give your old furniture a new lease on life.
You will need:120- and 240-git sandpaperWatco Danish OilFaux leatherBatting and foamClean, soft clothsRubber gloves
Here’s how:Before you start any project, look closely at the design and manufacture of the piece to determine how you can take apart and put back together again.
1. The back and seat of the chair were screwed to the frame but the holes had been covered with matching wood plugs. In order to get to the screws I used a drill/driver to drill into the plugs so that I could reach the screws.
makeover magic!
When sending out last month’s issue of Home-Dzine Online I asked for your old furniture in desperate need of a makeover. We most definitely gotwhat we asked for!
LEFT: Marilize sent in this old chair that has seen better days! The wood is dry and yellow and the plastic cracked and torn.
RIGHT: Transformed with a new back and seat in faux leather - and ready for action!

Home-Dzineonline17
4. To add a girlie touch to the desk I cut a top for the desk out of 16mm BisonBord, which was painted in the same way.
5. To decorate the desk top, back and drawer fronts, I used Rust-Oleum Paint Pens.
6. For the knobs I used a 45mm hole saw to cut two holes from a 22mm piece of pine. This was sanded and painted in a matching green colour.
7. The stickers were done on my PC and glued to the top-back of the desk and the drawer handles, which were then screwed to the drawers.
8. Once completely dry, everything
was put back together again and all the painted surfaces given a coat of Rust-Oleum Polyurethane Spray Varnish for an ultra-glossy shine and hard wearing finish.
Create the look Rust-Oleum - www.tilecare.co.za PG Bison SupaWood - www.pgbison.co.za
Here’s how:1. I started by taking
the desk apart and trashing the top , shelf and drawer fronts, which had been edged in a tacky fake metallic trim. To replace these I cut new pieces of 18mm PG Bison SupaWood.
2. The metal frame was sanded down to remove the old paint and apply two coats of Rust-Oleum American Accents - Seaside Green.
3. The new cut parts were painted using Prominent Sheen with our Bosch PFS Spray System.
makeover magic!
ABOVE: Rina inherited a steel and wood office desk
which was handed down after being used for needlework and study. Now its in her daughter’s room. She sent the desk to me
for a makeover to match her daughter’s pink and green room.
Previously an officedesk, this piece has served as a
needlework table and a study desk.

Home-Dzineonline18
makeover magic!
All this fire screen needed someTLC, Woodoc 5 Polywax Sealer and QuikWood to fix up chipped areas.
LEFT: Cecily wanted to restore an old fire screenthat she found at the side of the road. She will eventually apply a mosaic panel to the centre.
Beautifully restored!
Here’s how:1. I sanded down the fire screen to
remove dents and scratches, and patched up all the damaged areas and larger cracks with Alcolin QuikWood. QuikWood is perfect for rebuilding damaged wood and sets rock hard.
2. Woodoc 5 Polywax Sealer was applied to the entire surface and left to soak in. The wood was extremely dry and I needed to apply two additional coats for a satin sheen.
Woodoc 5 creates a natural looking surface that is nevertheless totally stain, water, alcohol and mark resistant. You can apply to previously waxed or oiled wood simply by cleaning previously oiled or waxed surfaces with Woodoc SteelWool and mineral turpentine.
3. To finish off I used Alcolin Genkem (spray)to affix the faux leather to the frontand back of the centre panel. This will eventually be replaced with a mosaic panel.

Home-Dzineonline19
seal it once!I have sealed my bath and sink so many times that I have actually lost count! Silicone sealer and sealing strips just do not work. It peels off, it comes unstuck and it collects dirt, and you end up with a dingy looking bathroom.
Finally, a South African company has designed the perfect solution: ElBi Decoseal and ElBi FlexiSeal.
1 x Decoseal White only
R199.95 (excluding Postage. Normal selling price R319.90) Unit Includes:3,5m White Decoseal3,5m Backing strips2 End Caps2 Corner Caps200ml Teleseal Sealant
This revolutionary new product not only seals around baths and sinks (whether oval, circular or square), but also in showers and wet rooms, around kitchen countertops, at the base of cabinets for a waterproof seal, as a sealing strip where tiles meet, and even around window frames for weatherproofing. And because it is resistant to mould andmildew, your surfaces always look in good condition.
By now many of you will know that I do not endorse a prod-uct unless it has been tried and tested! The guys at ElbI came out to reseal around my bath tub, which I must admit was looking a bit grotty - I may be a DIY Diva but I still have to findthe time to do my own home maintenance and repairs!
You will need:Stanley or craft knifeElBi Decoseal KitSide cuttersLoctite Superglue
Here’s how:Before you start remove all the existing silicone sealer from around the bath, basin or countertop. The easiest way to do this is to use a Stanley or craft knife. Angle the knife when scraping close to the countertop in order to avoid scratching.
LEFT: The bath before. The silicone
sealer around the bath has peeled
off. ABOVE: Newly restored and
looking brand new.
SPECIAL OFFERLet the DIY Guys supply and install ElBi Decoseal in your home R450.00 (regret Joburg only)

Home-Dzineonline20
1. Apply a blob of adhesive to the corner. Don’t worry about messing at this stage, clean up is easy later on.
2. Place one of the supplied corners onto the adhesive and press down.
3. Place a bead of adhesive around the edge of the bath, basin or countertop.
4. Position the supplied backing strip in place over the adhesive, nudging up against any corner pieces.
5. Use side cutters to trim the backing strip to length. Trim to the exact length of the bath or basin. For a countertop, allow for the end cap.
6. Allow adhesive to cure for 12 hours. Starting at a corner (or end if no corners) clip the decoseal onto the backing strip.
8. The decoseal will make an audible ‘click’ as you go along. Be sure to press down firmly along the full length ofthe strip for a snug fit.
9. Use side cutters to trim the decoseal strip to length. Trim to the exact length of the bath or basin. For a countertop, allow for the end cap.
10. Apply a small bead of superglue to each end cap and pop onto the end of the decoseal.

Home-Dzineonline21
Welcome to Colleen and Bonnie - our newest DIY Divas.
Based in the heart of the Garden Route, Colleen and Bonnie will soon be hitting the road to present courses in East London, Port Elizabeth, the Garden Route and Cape Town.
Although we haven’t yet set down the schedule, please feel free to contact our new DIY Divas if you are interested in learning:
• How to use power tools for home repairs and improvements
• Basic woodworking techniques
• Furniture making workshops
• Decorating and Interior Design, including wood finishing and paint techniques.
join the DIY Divas at GardenexMeet and greet the DIY Divas at Gardenex 2009 from Friday 27 to Sunday 29 March. Pop in for coffee, or catch us doing one of our makeover garden projects. We’ve been busy recycling and will be creating stunning designs for garden pots.
Charlie Dimmock (of BBC Prime fame), and our very own Tanya Visser (the Home Channel), will be presenting a selection of workshops for the garden enthusiast.
For more information CLICK HERE visit the Gardenex & Green Living Fair website.
DIY DIVAS COURSES INCLUDE:
Power Tool Classes
Basic Woodworking Techniques
DesignTime Furniture Workshops
Decorating and Design
Wood Finishing
Paint Techniques
Tiling
Basic Building
Take a friend - Have a girl’s day - Do the Team Building - Or just have FUN!

Michelle Brand custom builds chandeliers from
plastic bottle petal bases, linking their modules
together with a simple tag. The original design was launched in 2007,
and it seems that the Manchester based designer
is developing the design to appeal to the retail &
interiors market, although the idea of reutilizing
something that has been perfectly designed for one
purpose remains intact. Brand states: “Once a plastic drinks bottle is
empty, it is perceived as redundant and then thrown away. I wanted to challenge
this wasteful paradigm.”
Home-Dzineonline22

Home-Dzineonline23
Inspired by Michelle Branch’s use of cold drink bottle bases for her chandelier, I decided to look at different ways we
could use petal bases for other home projects. The petal curtain is a great way to close off – or hide – a room or add a decorative effect between
rooms.
With my Dremel tools in hand, and a truck load of empty bottles donated by friends, the project was easy and quick
to complete.
You will need:Empty 2l cold drink bottlesDremel Multitool with cutting wheel and 125 high speed cutterDremel Glue GunHeavy-weight nylon (fishing) lineCurtain pole to hang onPrestikCraft knife
Here’s how:1. Use the Dremel Multitool and cutting wheel
to take off the bottom of each bottle. Use a craft knife to cut to a smaller size (bottom left).
2. Insert the cutting bit into the Dremel Multitool and make a small hole at the top and bottom of each petal.
3. Thread nylon line through the top and bottom of approximately 20 petals. Use a blob of Prestik at the bottom of each petal to press them into the desired position ready for gluing.
4. Heat up the Dremel Glue Gun. I used the gun on low heat to avoid melting the nylon
line and keeping the flowof glue as slow as possible. Fasten the last petal in position by folding the nylon line back over and into the blob of glue.
5. Once the glue has set you can remove the Prestik.
petal power

Here’s another great project that uses empty 2l cold drink bottles - tops and bottoms!
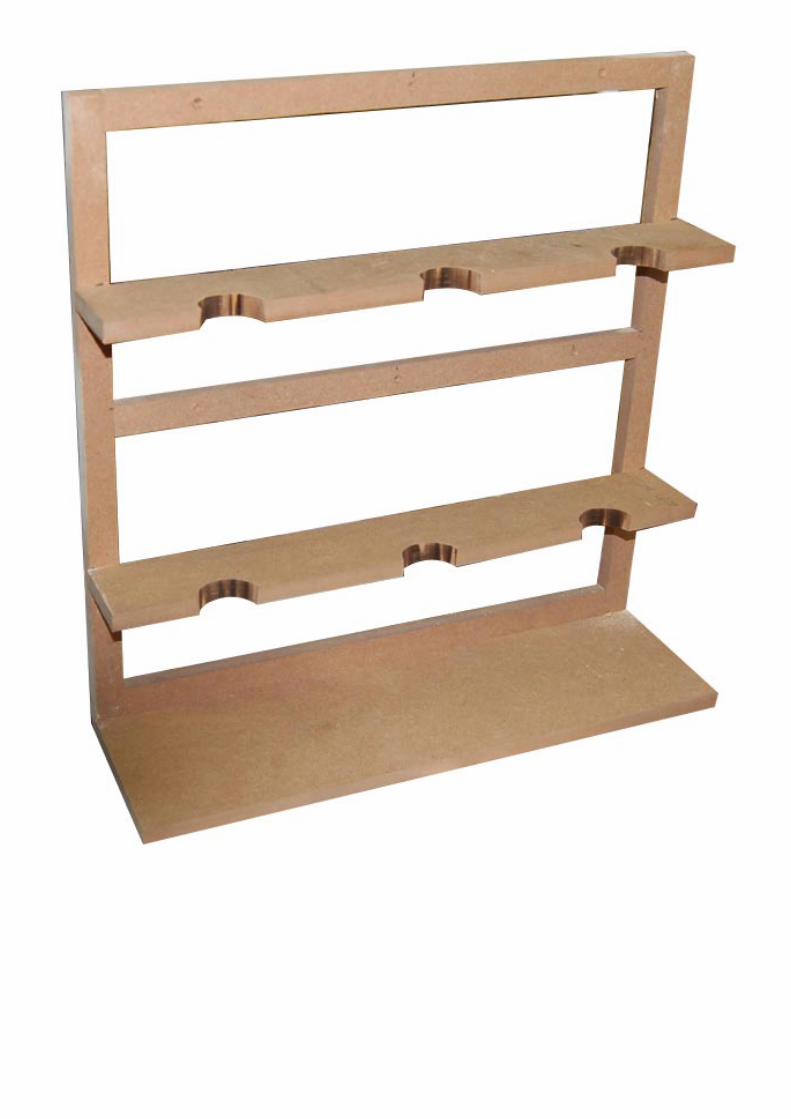
Design the herbie stand so that it sits nicely on a kitchen windowsill, preferably one that gets a little morning or afternoon sunshine. The top row of con-tainers drip into the second row, and finally into thedrip trays at the bottom.
We made the frame using 12mm Supawood but you could make this project from almost any scrap tim-ber or board that you have. See the back pages for a larger view of the frame.
You will need:Empty 2l cold drink bottlesTimber or board offcutsWood screws and screwdriverRust-Oleum American Accents spray paintRust-Oleum Paint Pens (for decorative detail)Rust-Oleum Polyurethane spray varnishCraft Knife and scissorsPC labels
Here’s how:1. The frame is made by cutting out the required lengths and
screwing together at the back.
2. Once you have made the frame you can use Rust-Oleum spray paint in your colour choice to paint the frame.
3. Use a craft knife to cut off the bottle tops (see images right). For the bottom containers we used green bottles.
4. You can add decorative details to Herbie using Rust-Oleum Paint Pens. Finish of by spraying the entire frame with Rust-Oleum polyurethane spray varnish.
5. Screw upside down bottle tops to the frame with a small wood screw. Our project has two rows of three containers with three bottom containers for water drips.
Home-Dzineonline24
herbie
parsley - sage - rosemary - thyme

Home-Dzineonline25
holiday recycling project
food for birds
Here’s a great project that the kids can do over the holidays. We used empty squash and fruit juice bottles to make these bird feeders.
You will need:Empty plastic bottlesDremel Multitool and cutting wheelWooden skewersRust-Oleum Paint PensHooks for hanging in the trees
Here’s how:1. Wash and dry the bottles thoroughly.
2. Use your Dremel Multitool to cut out openings in the sides, back and front. In the squash bottles we followed the shapes in the sides of the bottle and left the back and front closed.
3. Leave a small flap of plastic atthe bottom of the openings for the birds to rest on.
4. Make a hole in the front and back for the wooden skewer. You can put fresh fruit on these for the birds.
5. Paint attractive designs onto the bottles with Rust-Oleum Paint Pens and leave to dry.
6. Insert a hook into the cap and hang from a tree in the garden. Ooops! Don’t forget to add bird seed so that plenty of feathered friends will come to visit.
Safety First If you haven’t used the Dremel Multitool
before, please let mom or dad help you with this project.

Home-Dzineonline26
scoop it!
Don’t throw away empty plastic milk containers, use them to make scoops for dog food, compost, cat litter, and even as a poop scoop!
Here’s how:1. Wash and dry the containers.
2. Use a permanent marker to draw a curved line on the side of the container, and then use a craft knife to cut along the line. Neaten up the edges with scissors.
3. Use Rust-Oleum American Accents to spray your scoops any colour you like - or leave them plain.
Home-Dzineonline27
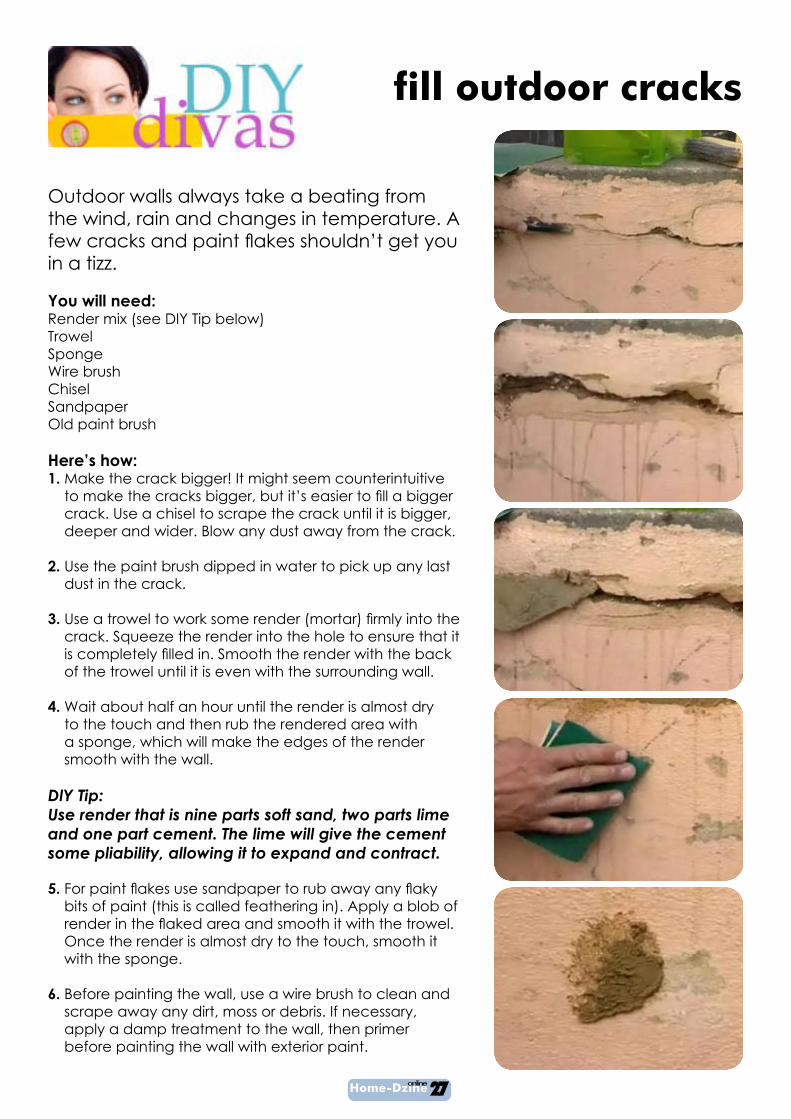
fill outdoor cracks
Outdoor walls always take a beating from the wind, rain and changes in temperature. A few cracks and paint flakes shouldn’t get youin a tizz.
You will need:Render mix (see DIY Tip below)TrowelSpongeWire brushChiselSandpaperOld paint brush
Here’s how:1. Make the crack bigger! It might seem counterintuitive
to make the cracks bigger, but it’s easier to fill a biggercrack. Use a chisel to scrape the crack until it is bigger, deeper and wider. Blow any dust away from the crack.
2. Use the paint brush dipped in water to pick up any last dust in the crack.
3. Use a trowel to work some render (mortar) firmly into thecrack. Squeeze the render into the hole to ensure that it is completely filled in. Smooth the render with the backof the trowel until it is even with the surrounding wall.
4. Wait about half an hour until the render is almost dry to the touch and then rub the rendered area with a sponge, which will make the edges of the render smooth with the wall.
DIY Tip: Use render that is nine parts soft sand, two parts lime and one part cement. The lime will give the cement some pliability, allowing it to expand and contract.
5. For paint flakes use sandpaper to rub away any flakybits of paint (this is called feathering in). Apply a blob of render in the flaked area and smooth it with the trowel.Once the render is almost dry to the touch, smooth it with the sponge.
6. Before painting the wall, use a wire brush to clean and scrape away any dirt, moss or debris. If necessary, apply a damp treatment to the wall, then primer before painting the wall with exterior paint.

Home-Dzineonline28
Q zoneSend your Q & A for decor, decorating and DIY dilemmas to [email protected].
Q. MaleboI have frameless glass doors on my built in wardrobes installed. But, they didn’t put handles on. Now I bought steel handle knobs and glued them on the glass doors. It worked for a while, but due to pulling this knobs got detached and left a dried greyed glue on the glass. How do remove that dried glue? What else can be used for gluing these knobs as I desperately need handles on my built-ins?
A. JaniceIt is difficult for me to advise how to remove the gluewithout knowing what glue you used. If it is epoxy-based glue, such as Pratley, you are going to have a hard time removing without sanding it off, which may also scratch the glass. Try using acetone (nail polish removed) and see what happens. Gluing the handles on is your only option unless you are willing to arrange for a glass company to come out and put holes in the glass so that you can attach handles of your choice - make sure that you already have the handles so that they can measure up correctly for the holes.
Q. LesleyDue to all the rain we have had, our bedroom wall which receives the onslaught of the water has what looks like mould or damp leaking through. Is there any type of paint we could put on that one wall to prevent this.
A. JaniceBefore you attempt to cover up, make sure that you take a look at the problem so that it does not happen again. It could result in more serious damage later on. Remove any flaking paint andwash the area with a mild solution of bleach and warm water and a soft scrubbing brush. This will get rid of the mould stains and the smell. Now you can easily apply Prominent Paints Damp Cure to the area and finish off with standard wallpaint.
Q. SharonPlease can you assist me with a few questions I am struggling with in the South African retailers market, I am surely hoping you can help. Let me explain, my husband refurbishes piano’s. Very hard work!
We are battling to find :-1. An industrial sander – the ones in Makro, Builders
Ware House etc break too easily. We cannot seem to find such an item in normal shops.
2. Where can we buy a pot gun for a spray gun. No one has any clue what I am talking about, the pot sits on the floor with the paint in whilst the personcontinues to spray. The normal cup on the spray gun is just too small and he keeps having to re-fill it.
3. When my husband does the high gloss finish, isthere a wonder product that he can use to shine it, like a polish or buffing compound?
A. Janice1. For an industrial sander I would suggest that you
get in touch with Bosch. For projects of this nature you definitely need a power tool that you can trust,and that won’t pack up in a short period of time. I use Bosch power tools for all our projects and they really do work hard, so I have no problem whatsoever recommending their range.
2. I know that you can purchase a syphon-pump
system for a spray gun that works with a large paint container. Suggest you get in touch with Surface Coating Technologies (www.sct.co.za). If they don’t have they will definitely be able torecommend a supplier.
3. You are referring to a polishing technique that
would be similar to French Polishing. On my side I use my random orbit sander and 320-grit sandpaper, and then work up until I finish with800-grit hand sanding. Finally polishing with a sheepskin pad. Don’t know of any wonder products, but please let me know if you manage to find them!

Home-Dzineonline29
directory
DIY DIVAS now has a new venue!plenty of parking - airconditioned
training room - can accommodate up to 30 divas in a group booking
Links for this issue
Alcolin
Bosch Power Tools for DIY
Decorating Centre
Dremel MultiTools
Garden Shop
Home Comforts
PG Bison
Prominent Paints
Rust-Oleum
Shop Online at Hippo
Woodoc
Need a back-issue of Home-Dzine Online?CLICK HERE
Need to send us an email?CLICK HERE