Home Care Ventilators - California Thoracic Society · What Is A Home Ventilator? ... Setting Up...
47
Home Care | Ventilators
Transcript of Home Care Ventilators - California Thoracic Society · What Is A Home Ventilator? ... Setting Up...
Home Care | Ventilators

Graphic design and images courtesy of Pulmonetic Systems, a CareFusion company.
California Thoracic Society, ©2010
Home Care of Children on Ventilators: A Parent’s Guide

Table of Content
Letter to Parents, Guardians ..................................................................... 5
Introduction ................................................................................................... 7What Is A Home Ventilator? ..........................................................................7Commonly Used Portable Pediatric Ventilators: ................................................................................7Why Does My Child Need A Home Ventilator? ..........................................8
Preparing to Take Your Child Home ....................................................... 9
Going Home .................................................................................................11Checklist for Discharge ...............................................................................................................................................................13
Home Medical Equipment Company Services ........................................15Checklist for Home Medical Equipment ..............................................................................................................................17Checklist for Home Medical Equipment (Contd) ..............................................................................................................18Checklist for Home Medical Equipment (Contd) ..............................................................................................................19
Home Health Nursing Services ..................................................................21Home Care Program .........................................................................................................................21Setting Up The Home ...................................................................................22Environmental Factors ......................................................................................................................22
Ventilator Maintenance ............................................................................25Setting Up the Circuit ..................................................................................25Establishing A Home Care Routine ...........................................................25Daily Activities .................................................................................................................................25Weekly Activities ..............................................................................................................................26Monthly Activities ............................................................................................................................27Ventilator Safety Checks .............................................................................27Cleaning and Disinfecting ..........................................................................28Helpful Hints for Cleaning Ventilator Circuits .................................................................................28Trouble-Shooting Volume-Cycled Ventilators ........................................29Common Causes of Alarm Signals ...................................................................................................29
TOC
3California Thoracic Society, ©2010
Home Care of Children on Ventilators: A Parent’s Guide
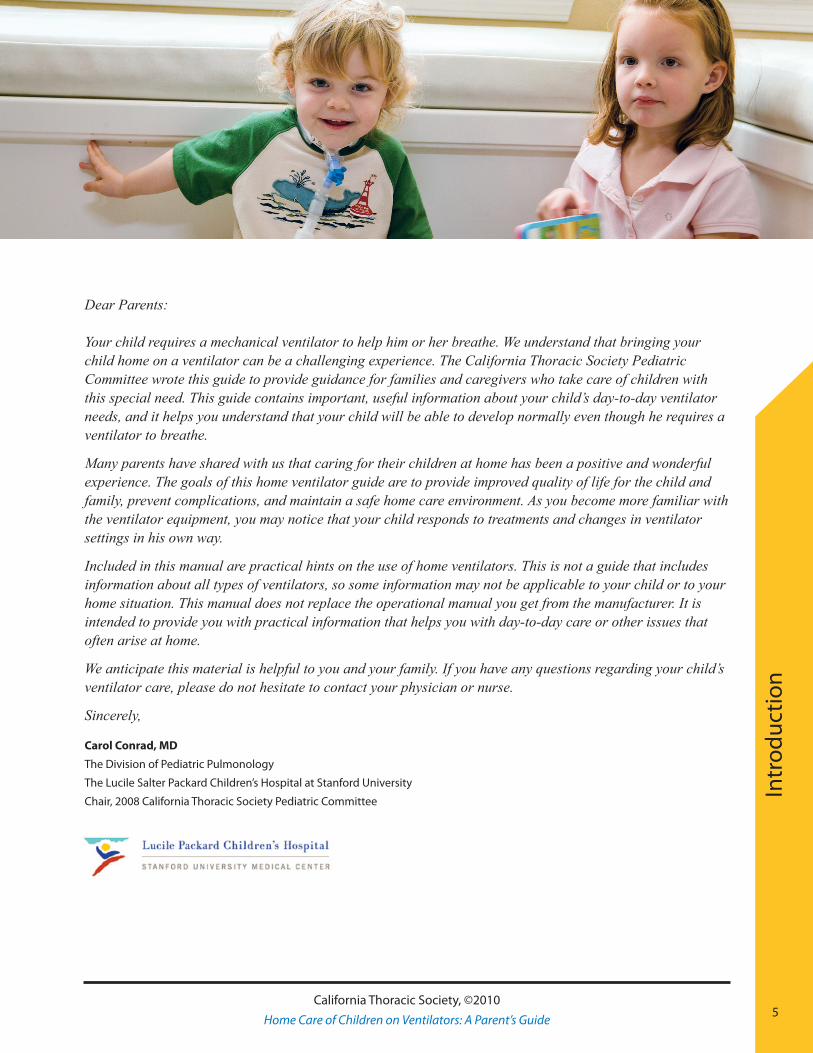
Dear Parents:
Your child requires a mechanical ventilator to help him or her breathe. We understand that bringing your child home on a ventilator can be a challenging experience. The California Thoracic Society Pediatric Committee wrote this guide to provide guidance for families and caregivers who take care of children with this special need. This guide contains important, useful information about your child’s day-to-day ventilator needs, and it helps you understand that your child will be able to develop normally even though he requires a ventilator to breathe.
Many parents have shared with us that caring for their children at home has been a positive and wonderful experience. The goals of this home ventilator guide are to provide improved quality of life for the child and family, prevent complications, and maintain a safe home care environment. As you become more familiar with the ventilator equipment, you may notice that your child responds to treatments and changes in ventilator settings in his own way.
Included in this manual are practical hints on the use of home ventilators. This is not a guide that includes information about all types of ventilators, so some information may not be applicable to your child or to your home situation. This manual does not replace the operational manual you get from the manufacturer. It is intended to provide you with practical information that helps you with day-to-day care or other issues that often arise at home.
We anticipate this material is helpful to you and your family. If you have any questions regarding your child’s ventilator care, please do not hesitate to contact your physician or nurse.
Sincerely,
Carol Conrad, MD
The Division of Pediatric Pulmonology
The Lucile Salter Packard Children’s Hospital at Stanford University
Chair, 2008 California Thoracic Society Pediatric Committee
Intr
oduc
tion
5California Thoracic Society, ©2010
Home Care of Children on Ventilators: A Parent’s Guide

6California Thoracic Society, ©2010
Home Care of Children on Ventilators: A Parent’s Guide
Committee members:
Colleen H. Richardson, CAE, CTS Executive Dir.
Ronald Ferdman, MD
Childrens Hospital Los Angeles, Los Angeles
Heidi Flori, MD
Pediatric Intensive Care,
Children’s Hospital and Research Center, Oakland
Albin Leong, MD
Pediatric Pulmonary and Cystic Fibrosis Center,
Kaiser, Sacramento
Tom Newton, RRT, RCP
Miller Children’s Hospital at Long Beach Memorial Medical Center, California
(Many thanks to Shiela Kun, RN, M.S. Nurse Care Manager, Pediatric Pulmonology at Childrens Hospital Los
Angeles, who provided the painstaking literary groundwork and concept for the booklet.)
Deborah J. Kaley, RN, MSN, AE-C
Pediatric Pulmonary Division,
Children’s Hospital and Research Center, Oakland
7California Thoracic Society, ©2010
Home Care of Children on Ventilators: A Parent’s Guide
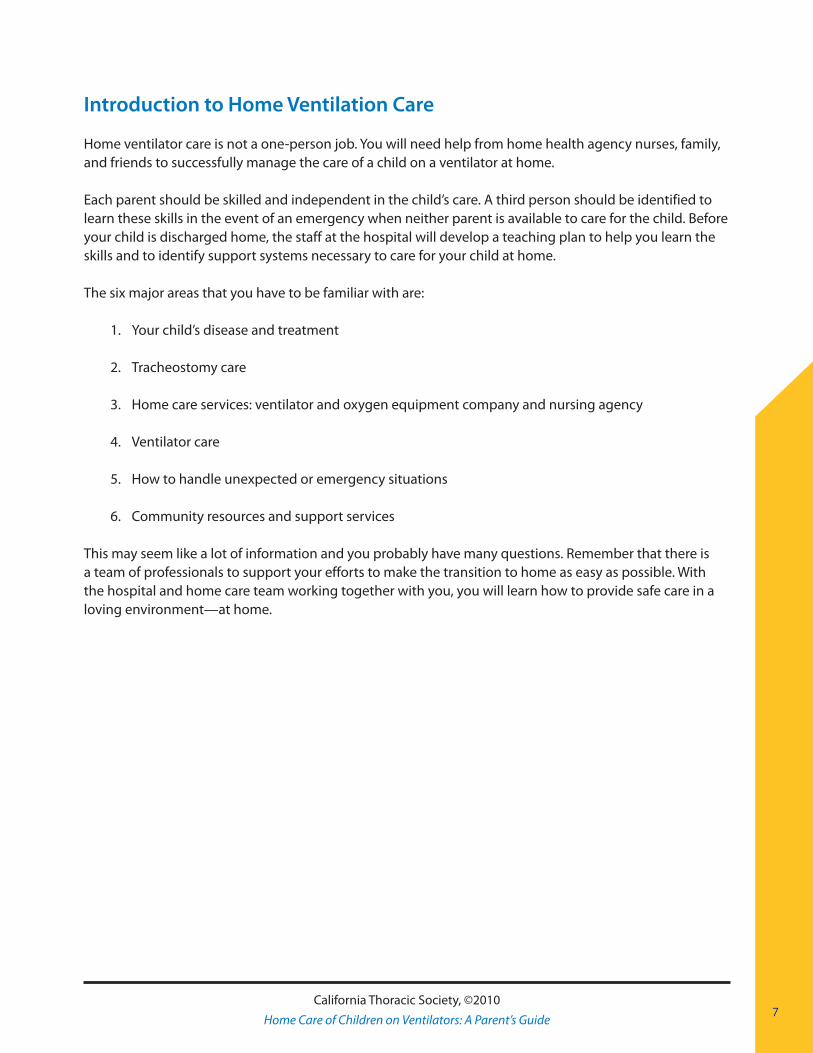
Introduction to Home Ventilation Care
Home ventilator care is not a one-person job. You will need help from home health agency nurses, family, and friends to successfully manage the care of a child on a ventilator at home.
Each parent should be skilled and independent in the child’s care. A third person should be identified to learn these skills in the event of an emergency when neither parent is available to care for the child. Before your child is discharged home, the staff at the hospital will develop a teaching plan to help you learn the skills and to identify support systems necessary to care for your child at home.
The six major areas that you have to be familiar with are:
1. Your child’s disease and treatment
2. Tracheostomy care
3. Home care services: ventilator and oxygen equipment company and nursing agency
4. Ventilator care
5. How to handle unexpected or emergency situations
6. Community resources and support services
This may seem like a lot of information and you probably have many questions. Remember that there is a team of professionals to support your efforts to make the transition to home as easy as possible. With the hospital and home care team working together with you, you will learn how to provide safe care in a loving environment—at home.
77
8California Thoracic Society, ©2010
Home Care of Children on Ventilators: A Parent’s Guide
What Is A Home Ventilator?
A home ventilator is a machine that provides continuous breathing support for your child. The ventilator does not change the underlying clinical condition of your child. Its function is simply to provide air to the lungs and to remove waste gas (carbon dioxide).
Some children require ventilator support 24 hours a day, while some need support for shorter times or only for sleep. Home ventilators are generally small, relatively light and portable. Most of the time, the ventilator is powered from electrical outlets, but most of them have internal built-in batteries for use for short trips outside of the home. Many ventilators can be used with an external battery, or powered with an electrical cord adapter used in the vehicle cigarette lighter adapter.
The ventilator settings that assist your child’s needs best have been set by your doctor and programmed into the ventilator. You need to know what the settings are. Changes are made most often in the clinic setting, or after 12- or 24-hour studies. Changes to the ventilator settings will be made by the home care company at your home, only with written doctor’s orders and recommendations. You are not expected to adjust the settings on your own at home.
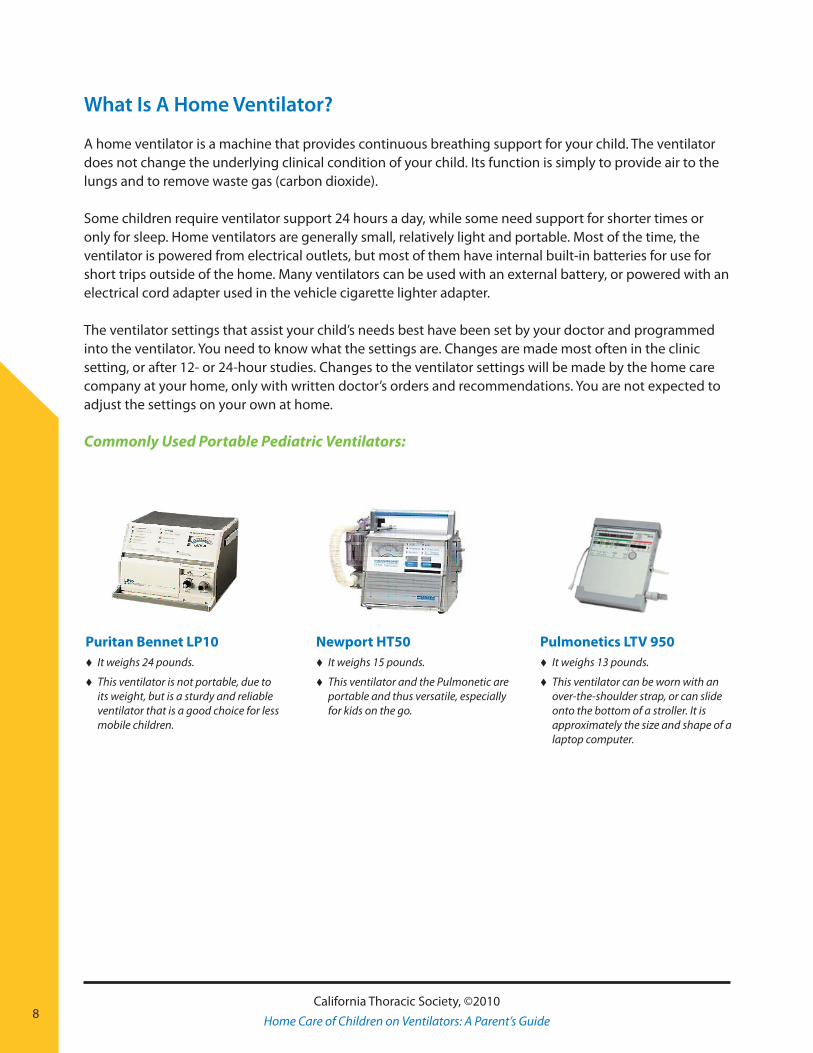
Commonly Used Portable Pediatric Ventilators:
Puritan Bennet LP10 � It weighs 24 pounds.
� This ventilator is not portable, due to its weight, but is a sturdy and reliable ventilator that is a good choice for less mobile children.
Newport HT50 � It weighs 15 pounds.
� This ventilator and the Pulmonetic are portable and thus versatile, especially for kids on the go.
Pulmonetics LTV 950 � It weighs 13 pounds.
� This ventilator can be worn with an over-the-shoulder strap, or can slide onto the bottom of a stroller. It is approximately the size and shape of a laptop computer.
9California Thoracic Society, ©2010
Home Care of Children on Ventilators: A Parent’s Guide
Why Does My Child Need A Home Ventilator?
Children who have difficulty breathing, have high carbon dioxide and low oxygen levels, and who have not responded to other treatment options can benefit from using a home ventilator. It is important that you understand why your child needs the machine’s help with breathing.
The ability to breathe requires the proper functioning of three main body systems:
The brain: the respiratory center in the brain sends messages to the muscles of the chest and to the lungs to increase or decrease breathing. A body requires different amounts of oxygen during different activities, such as sleep, rest, and exercise. The brain must work properly to adjust breathing for these various activity levels.
The muscles: the respiratory muscles in the chest expand and contract the lungs to pull air in and push air out. The respiratory muscles must have enough strength and endurance to maintain a good breathing pattern.
The lung tissue: the lungs allow the exchange of oxygen and carbon dioxide. As we breathe in, oxygen is taken from the air and enters the blood, which delivers it throughout the body. Carbon dioxide is removed from the blood as we breathe out. The lung tissue has to be healthy to maintain normal oxygen and carbon dioxide levels in the blood.
A child who is determined to require a ventilator has problems with one or more of the systems above. Your child’s condition will determine the ventilator settings. There may be times when settings need to be changed, for example during colds or other illnesses.
My child’s diagnosis is
My child is on assisted ventilation because
Befo
re G
oing
Hom
e
11California Thoracic Society, ©2010
Home Care of Children on Ventilators: A Parent’s Guide
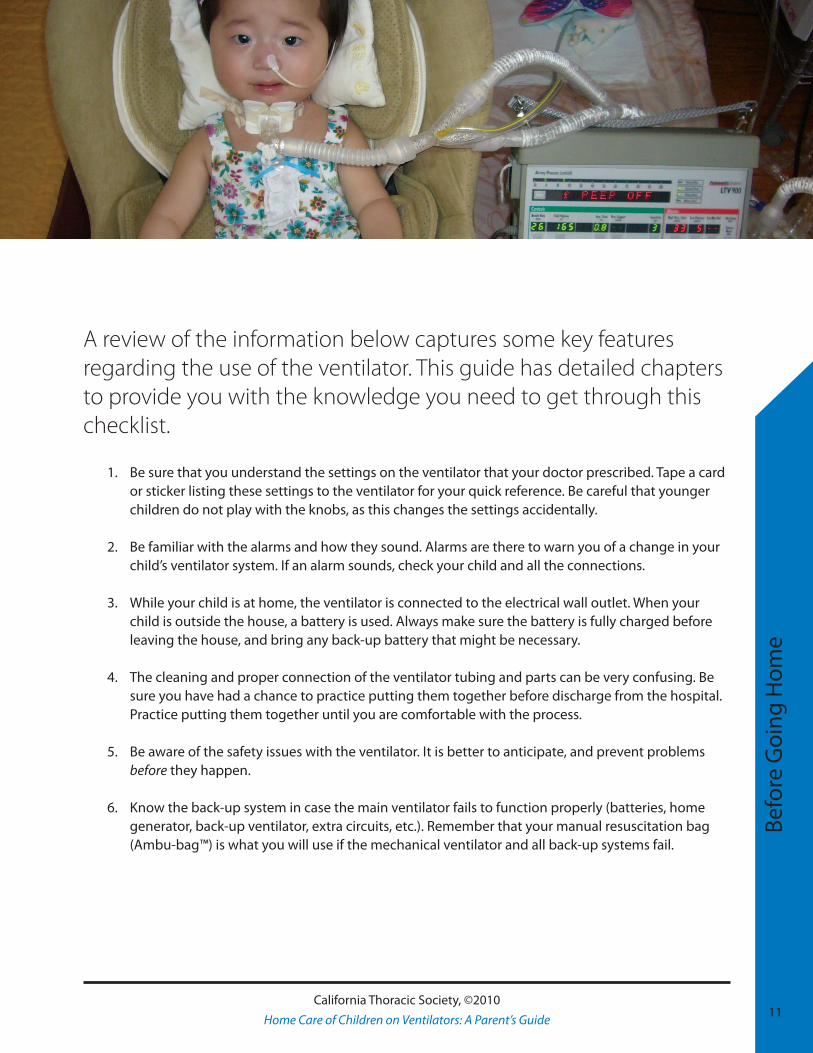
A review of the information below captures some key features regarding the use of the ventilator. This guide has detailed chapters to provide you with the knowledge you need to get through this checklist.
1. Be sure that you understand the settings on the ventilator that your doctor prescribed. Tape a card or sticker listing these settings to the ventilator for your quick reference. Be careful that younger children do not play with the knobs, as this changes the settings accidentally.
2. Be familiar with the alarms and how they sound. Alarms are there to warn you of a change in your child’s ventilator system. If an alarm sounds, check your child and all the connections.
3. While your child is at home, the ventilator is connected to the electrical wall outlet. When your child is outside the house, a battery is used. Always make sure the battery is fully charged before leaving the house, and bring any back-up battery that might be necessary.
4. The cleaning and proper connection of the ventilator tubing and parts can be very confusing. Be sure you have had a chance to practice putting them together before discharge from the hospital. Practice putting them together until you are comfortable with the process.
5. Be aware of the safety issues with the ventilator. It is better to anticipate, and prevent problems before they happen.
6. Know the back-up system in case the main ventilator fails to function properly (batteries, home generator, back-up ventilator, extra circuits, etc.). Remember that your manual resuscitation bag (Ambu-bag™) is what you will use if the mechanical ventilator and all back-up systems fail.
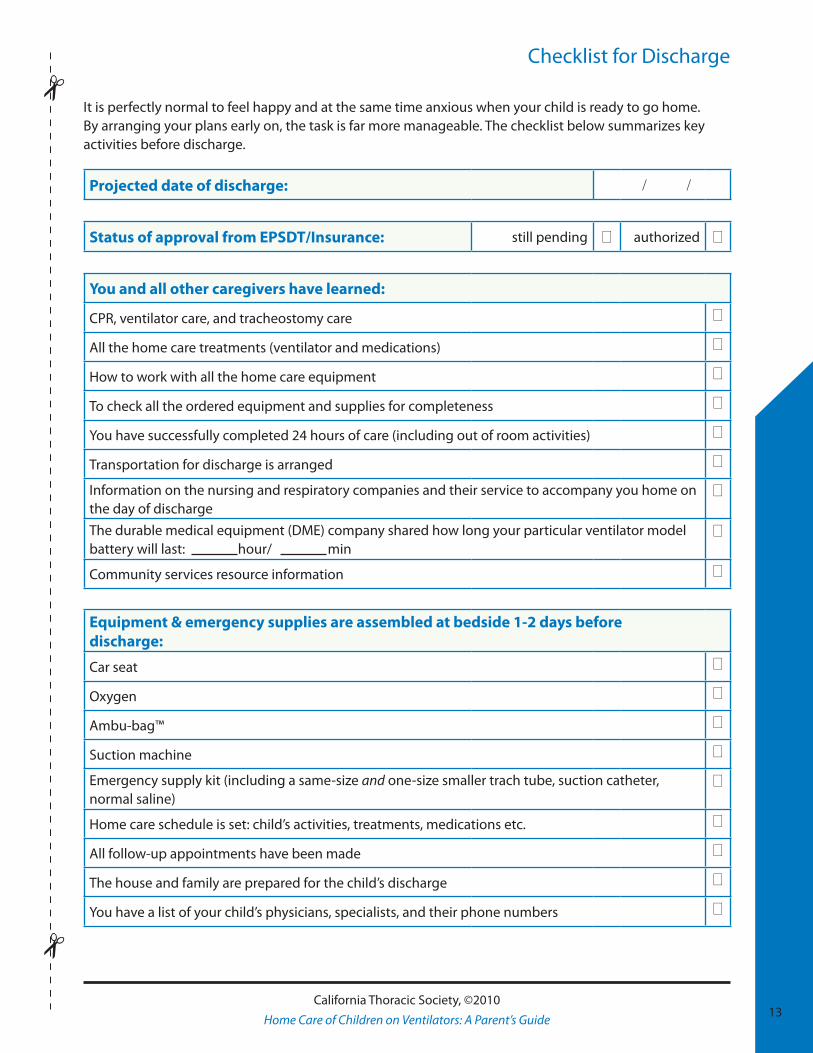
Checklist for Discharge
It is perfectly normal to feel happy and at the same time anxious when your child is ready to go home. By arranging your plans early on, the task is far more manageable. The checklist below summarizes key activities before discharge.
Projected date of discharge: / /
Status of approval from EPSDT/Insurance: still pending 0 authorized 0
You and all other caregivers have learned:
CPR, ventilator care, and tracheostomy care 0
All the home care treatments (ventilator and medications) 0
How to work with all the home care equipment 0
To check all the ordered equipment and supplies for completeness 0
You have successfully completed 24 hours of care (including out of room activities) 0
Transportation for discharge is arranged 0
Information on the nursing and respiratory companies and their service to accompany you home on the day of discharge
0
The durable medical equipment (DME) company shared how long your particular ventilator model battery will last: hour/ min
0
Community services resource information 0
Equipment & emergency supplies are assembled at bedside 1-2 days before discharge:
Car seat 0
Oxygen 0
Ambu-bag™ 0
Suction machine 0
Emergency supply kit (including a same-size and one-size smaller trach tube, suction catheter, normal saline)
0
Home care schedule is set: child’s activities, treatments, medications etc. 0
All follow-up appointments have been made 0
The house and family are prepared for the child’s discharge 0
You have a list of your child’s physicians, specialists, and their phone numbers 0
13California Thoracic Society, ©2010
Home Care of Children on Ventilators: A Parent’s Guide
Home Medical Equipment Company Services Before going home, the home medical equipment vendor will provide you with your child’s ventilator and needed home supplies. The company also has a Respiratory Therapist (RT)—licensed as a Respiratory Care Practitioner (RCP) in California—who has the knowledge and skills needed to assist you once you are home. They are available to you by phone on a 24-hour basis. You can expect a prompt response to your phone calls regarding ventilator concerns or questions.
The RT will assist you in the following ways:
• The RT will make an initial home evaluation prior to your child’s hospital discharge and assist in setting up the home ventilator. He/she will assist you to develop a home safety plan that includes items such as smoke detectors, proper grounding of electrical outlets, and emergency escape routes. See the section Environmental Factors, page 18, to know what the RT will want to see.
• At least two weeks before your child is scheduled to be discharged to home, an RT should begin to teach you how to use and maintain your child’s equipment. Assure that you have enough hands-on training with the equipment.
• The RT should make regular home visits to check and monitor the ventilator. Check with the RT to find out how often she will be at your house for these visits.
• A home RT is a great resource to learn practical tips for routine use and maintenance of your respiratory equipment and supplies, and to describe how long your particular ventilator battery lasts until you need to recharge it for outside activities.
15California Thoracic Society, ©2010
Home Care of Children on Ventilators: A Parent’s Guide
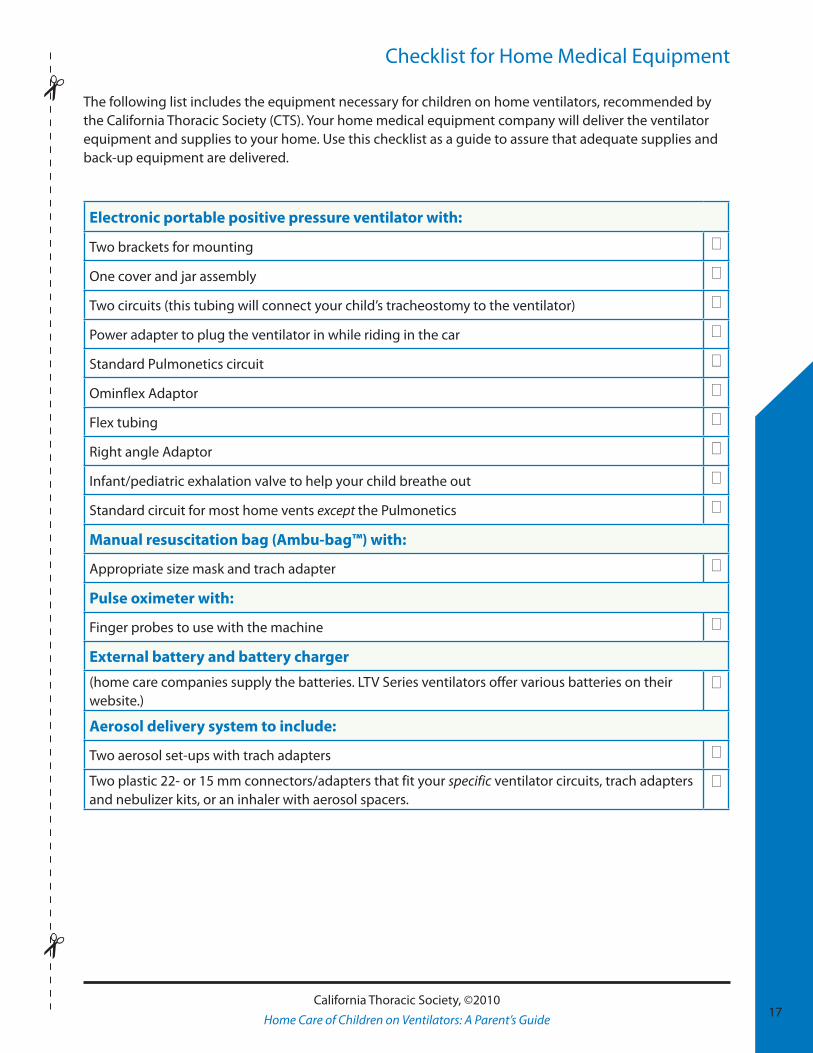
Checklist for Home Medical Equipment
The following list includes the equipment necessary for children on home ventilators, recommended by the California Thoracic Society (CTS). Your home medical equipment company will deliver the ventilator equipment and supplies to your home. Use this checklist as a guide to assure that adequate supplies and back-up equipment are delivered.
Electronic portable positive pressure ventilator with:
Two brackets for mounting 0
One cover and jar assembly 0
Two circuits (this tubing will connect your child’s tracheostomy to the ventilator) 0
Power adapter to plug the ventilator in while riding in the car 0
Standard Pulmonetics circuit 0
Ominflex Adaptor 0
Flex tubing 0
Right angle Adaptor 0
Infant/pediatric exhalation valve to help your child breathe out 0
Standard circuit for most home vents except the Pulmonetics 0
Manual resuscitation bag (Ambu-bag™) with:
Appropriate size mask and trach adapter 0
Pulse oximeter with:
Finger probes to use with the machine 0
External battery and battery charger
(home care companies supply the batteries. LTV Series ventilators offer various batteries on their website.)
0
Aerosol delivery system to include:
Two aerosol set-ups with trach adapters 0
Two plastic 22- or 15 mm connectors/adapters that fit your specific ventilator circuits, trach adapters and nebulizer kits, or an inhaler with aerosol spacers.
0
17California Thoracic Society, ©2010
Home Care of Children on Ventilators: A Parent’s Guide
Checklist for Home Medical Equipment (Contd)
18California Thoracic Society, ©2010
Home Care of Children on Ventilators: A Parent’s Guide
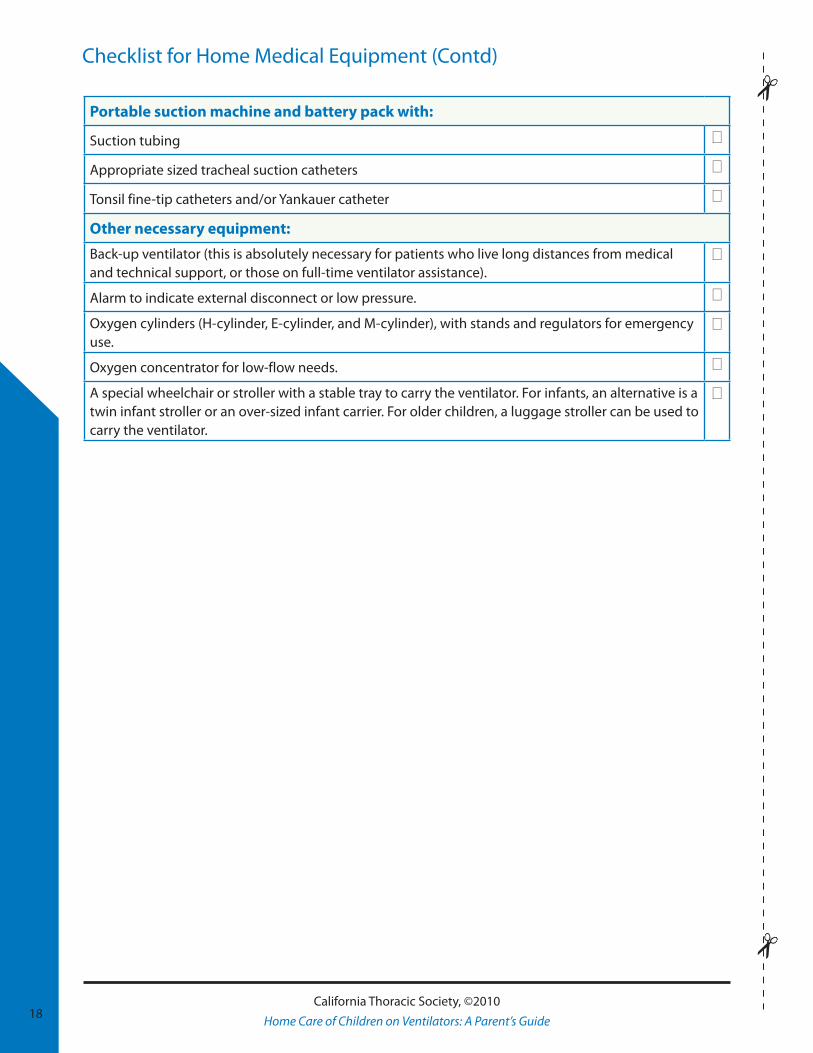
Portable suction machine and battery pack with:
Suction tubing 0
Appropriate sized tracheal suction catheters 0
Tonsil fine-tip catheters and/or Yankauer catheter 0
Other necessary equipment:
Back-up ventilator (this is absolutely necessary for patients who live long distances from medical and technical support, or those on full-time ventilator assistance).
0
Alarm to indicate external disconnect or low pressure. 0
Oxygen cylinders (H-cylinder, E-cylinder, and M-cylinder), with stands and regulators for emergency use.
0
Oxygen concentrator for low-flow needs. 0
A special wheelchair or stroller with a stable tray to carry the ventilator. For infants, an alternative is a twin infant stroller or an over-sized infant carrier. For older children, a luggage stroller can be used to carry the ventilator.
0

Home Health Nursing Services
Depending on your health care coverage, the availability of local community resources, your child’s condition, and the doctor’s recommendations, your child will most likely qualify for skilled nursing care in the home. Your hospital team will assist in initiating a home care program for your child.
Home Care Program
A successful home care program begins with the child’s clinical stability, followed by the dedication and support of its home care team. Here are some suggestions for working with your home health care team.
• Have the home health nurses practice tracheostomy tube changes while the child is still in the hospital (if allowed by the individual institution). Special note: All RNs can change trachs, however California LVNs are not licensed to change trachs.
• Assign care and cleaning tasks to those who will be responsible for home care. Make sure that you discuss your plan with the nurses well before the day of discharge. This will promote mutual trust and respect between your home care team and you.
• Map out the home care nursing schedule with the agency personnel responsible for your child’s care. It is better to negotiate the time before discharge. Most agencies usually provide eight-hour shifts.
• Discuss with the home nurse how you would like to be involved with your child’s care. If you want more help at the beginning, and then want to become more independent with the procedures for tracheostomy and ventilator care, let the nurses know.
• Let the nurses know what works best for your child.
• Be open about your preferences for your child’s care and how you prefer to carry out your routines.
• Practice CPR and emergency procedures.
19
Car
egiv
er T
rain
ing
19California Thoracic Society, ©2010
Home Care of Children on Ventilators: A Parent’s Guide

• Several nursing shifts are likely to be missed in the event of illness or other emergencies. Be prepared to take the shift yourself, and ask others to help you. Always report the nurse’s absence to the nursing agency.
• The nurse’s time should be scheduled to allow doctor’s appointments or activities for the family. Do not ask the home health nurses to be responsible for the care of other children in your home.
Setting Up The Home
Environmental Factors
With multiple pieces of equipment in the house, it is necessary to ensure electrical safety and to eliminate environmental hazards. There should be enough space in the room where your child will sleep so that treatments can occur easily. Your child should have his or her own bed. The home health nurses will need space and good lighting to do their work. Place a comfortable chair at the bedside so that you or the nurse can sit close by while your child is sleeping. Nighttime nurses are expected to be awake for the entire shift to closely monitor your child.
Organize the equipment in the room. The ventilator and all the machines (compressor, suction machine, etc.) that you use should be easy to reach and use quickly. The RT and the nurse can help you arrange them in your child’s room.
• Keep the ventilator out of direct sunlight (away from windows).
• Do not place the ventilator or oxygen near any fire hazards (e.g., stove, open flame, heaters, cigarettes or lighters) where it might overheat or catch on fire (oxygen is flammable).
• Do not block the inlet filter on the ventilator or the nebulizer. If a filter becomes damp by exposure to moisture, it should be replaced.
• There should be space between the ventilator and the external battery (see equipment manual) so that they are not touching. The battery might heat up and be damaged.
• The humidifier should be placed below the head of the child’s bed.
• Emergency equipment and supplies should be readily available.
• A working phone is essential. You might have to make an emergency call. Post emergency numbers near the phone for easy access.
• Prepare an emergency travel bag that you can take with you immediately in an emergency.
• Oxygen is flammable and can create a fire hazard if it leaks. Secure the oxygen tanks so that they won’t tip over.
20California Thoracic Society, ©2010
Home Care of Children on Ventilators: A Parent’s Guide

• Organize your drawers and storage area to allow easy access. Place medications and treatment supplies in a cabinet, arranged so that you and the nurses can easily read the labels. It is essential to provide good lighting so that the correct dosage and medications are given to your child. Circle the expiration date on the medications so you know when the medication needs to be reordered. Call for refills at least one week ahead.
• Stock monthly supplies separately from your daily supplies. Supplies that need refills monthly should be stored separately from supplies you use every day.
Protect your child from infection. Your child can catch colds or infections more easily, and can get much sicker than your other children. A slight cold can lead to another hospitalization. The best way to keep infection under control is to keep the environment, equipment and supplies clean. Use good hand hygiene. Place soap at all household sinks. Alcohol-based gel hand sanitizers are a quick and waterless way to provide safe home care. If family members are sick, try to avoid any contact from them with your child. Ask visitors who are sick to return to visit after their cold is gone.
21California Thoracic Society, ©2010
Home Care of Children on Ventilators: A Parent’s Guide
Vent
ilato
r Car
e an
d M
aint
enan
ce
23California Thoracic Society, ©2010
Home Care of Children on Ventilators: A Parent’s Guide
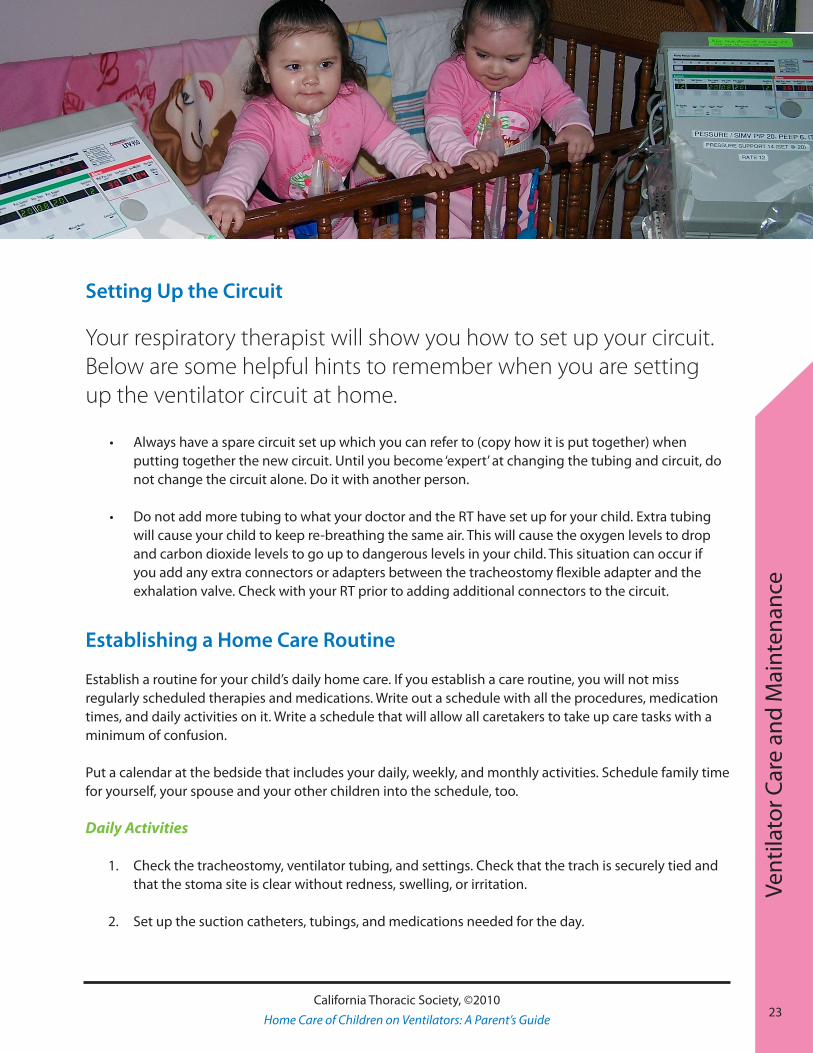
Setting Up the Circuit
Your respiratory therapist will show you how to set up your circuit. Below are some helpful hints to remember when you are setting up the ventilator circuit at home.
• Always have a spare circuit set up which you can refer to (copy how it is put together) when putting together the new circuit. Until you become ‘expert’ at changing the tubing and circuit, do not change the circuit alone. Do it with another person.
• Do not add more tubing to what your doctor and the RT have set up for your child. Extra tubing will cause your child to keep re-breathing the same air. This will cause the oxygen levels to drop and carbon dioxide levels to go up to dangerous levels in your child. This situation can occur if you add any extra connectors or adapters between the tracheostomy flexible adapter and the exhalation valve. Check with your RT prior to adding additional connectors to the circuit.
Establishing a Home Care Routine
Establish a routine for your child’s daily home care. If you establish a care routine, you will not miss regularly scheduled therapies and medications. Write out a schedule with all the procedures, medication times, and daily activities on it. Write a schedule that will allow all caretakers to take up care tasks with a minimum of confusion.
Put a calendar at the bedside that includes your daily, weekly, and monthly activities. Schedule family time for yourself, your spouse and your other children into the schedule, too.
Daily Activities
1. Check the tracheostomy, ventilator tubing, and settings. Check that the trach is securely tied and that the stoma site is clear without redness, swelling, or irritation.
2. Set up the suction catheters, tubings, and medications needed for the day.
24California Thoracic Society, ©2010
Home Care of Children on Ventilators: A Parent’s Guide
3. Throw away used catheters, empty and clean suction bottles and other equipment.
4. Change and disinfect the humidifier/cascade, and refill with sterile water.
5. Test the alarm and battery to make sure they are functioning properly. You may want to schedule your daily charging for the same time each day.
6. Check that you have enough oxygen for at least two more days.
7. Check the medications and supplies for needed refills. The pharmacy and equipment company may be able to mail medications and supplies to you. Allow at least three working days for refills. Refill services are not readily available over weekends or holidays.
8. Clean your working area. Keep the area free of dust, moisture, and mold.
9. Change the “artificial nose” (a device that keeps moisture in the trachea) daily, or as frequently as needed. If it becomes too wet or dirty with secretions, it can get plugged, making it difficult for your child to breathe through. If a dirty or wet artificial nose is used in line with the ventilator circuit, the ventilator might set off a high-pressure alarm because a lot of backpressure has been created. Additionally, if the artificial nose is plugged, the ventilator will not be able to detect when a low-pressure situation has occurred if your child’s trach cannula should fall out. This would cause your child’s oxygen levels to drop too low, or carbon dioxide levels to go too high. Situations like this can lead to a person’s cardiac arrest and death.
Weekly Activities
Change the ventilator tubing/circuit on a weekday. That way, if anything goes wrong, you will be able to contact your home health equipment company during normal business hours. For example, use Monday as your weekly activity day.
Things that should occur once a week include:
1. Give the ventilator and your child’s working area a good cleaning to start the week.
2. Soak plastic, rubber, glass containers, and tubing in a large bucket and clean them thoroughly.
3. Thoroughly clean the dirty circuits.
4. Change your filters.
5. Put your clean ventilator circuit together.
6. Check your calendar for the next week’s appointments to anticipate “Things to Do.”
Monthly Activities
1. Run the internal battery of the ventilator down (unplug the ventilator from the electricity, and use the battery to power the ventilator). Don’t leave your home without a second battery as backup during this time. Once the battery is low, reconnect it to the electricity so it can get a full re-charge.
2. Inspect all your equipment, electrical wires and supplies for proper functioning. Find and replace any broken or exposed wires.
3. Check to make sure that you have follow-up appointments with your care providers, assure you have a nurse scheduled to go to the clinic with you, make sure you ask your employer for time off that day, and arrange transportation.
4. Prepare paper work and make the needed phone calls to your insurance company to ensure you have obtained full authorization for home care and clinic follow-up services.
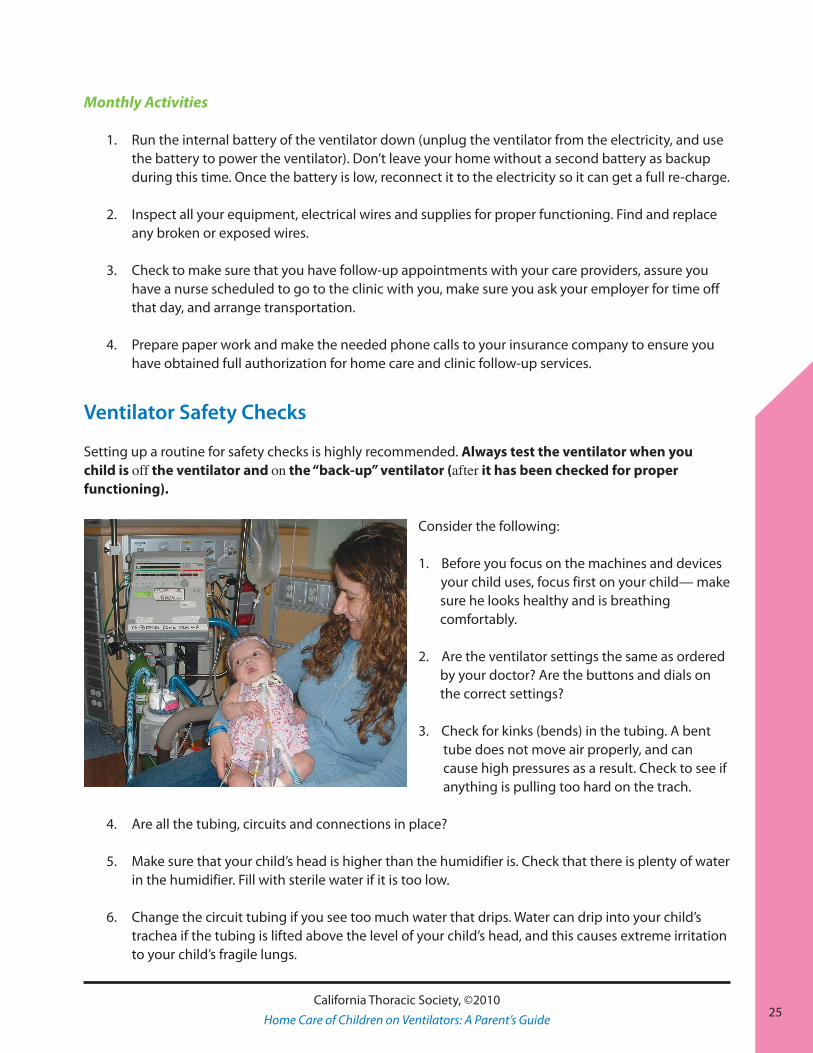
Ventilator Safety Checks
Setting up a routine for safety checks is highly recommended. Always test the ventilator when you child is off the ventilator and on the “back-up” ventilator (after it has been checked for proper functioning).
Consider the following:
1. Before you focus on the machines and devices your child uses, focus first on your child— make sure he looks healthy and is breathing comfortably.
2. Are the ventilator settings the same as ordered by your doctor? Are the buttons and dials on the correct settings?
3. Check for kinks (bends) in the tubing. A bent tube does not move air properly, and can cause high pressures as a result. Check to see if anything is pulling too hard on the trach.
4. Are all the tubing, circuits and connections in place?
5. Make sure that your child’s head is higher than the humidifier is. Check that there is plenty of water in the humidifier. Fill with sterile water if it is too low.
6. Change the circuit tubing if you see too much water that drips. Water can drip into your child’s trachea if the tubing is lifted above the level of your child’s head, and this causes extreme irritation to your child’s fragile lungs.
25California Thoracic Society, ©2010
Home Care of Children on Ventilators: A Parent’s Guide
26
7. Test the internal battery life after fully charging it at home by plugging it in. Then run the ventilator off of the electrical outlet and on the battery. Time how long it can support your child’s breathing.
• Depending on the ventilator brand and model, the internal battery will last anywhere from one to eight hours; check the instructions that come with your ventilator.
• The battery life depends on the ventilator settings, and on how old the battery is. On an older battery, the battery may only last ½ hour instead of one hour, or two hours instead of eight. Do a time test at home.
8. Store the external battery away from the ventilator.
9. Make sure that the ventilator is plugged into an electrical outlet that has no other devices plugged into it. This may avoid a short circuit from occurring.
10. Keep the ventilator in a shady, cool place.
11. Keep the back-up ventilator ready to use, with a circuit already set up.
12. Obtain at least two battery chargers: one for the ventilator and one for a wheelchair.
Cleaning and Disinfecting
Helpful Hints for Cleaning Ventilator Circuits
You can prevent infection if you keep the home care supplies and the equipment clean. Here are some tips to make your cleaning work easier.
1. Use a big plastic bucket or a container that holds about ten gallons. This bucket should ONLY be used to clean the ventilator and its parts. Do not use it for other cleaning purposes, and do not put any other cleaning solution in the bucket than what is approved for cleaning the ventilator parts.
2. Use soap that does not contain additives, such as perfume, lotion, or preservatives.
3. Some solutions will last for about two weeks after they have been diluted. Follow the dilution instructions provided in the ventilator manual, and also check the manufacturer’s suggestions for the length of time that a diluted solution will last.
4. Do not soak parts for more than 15 minutes. If the soak lasts too long, the plastic parts can dissolve or crack upon drying.
5. Do not soak the diaphragm of the exhalation manifold in the cleansing solution. It will ruin the valve. Instead, clean these with the solutions the manufacturer recommends.
26California Thoracic Society, ©2010
Home Care of Children on Ventilators: A Parent’s Guide
27
6. Keep the tubing and containers dry. Twirl the tubing (spin it around—carefully!) to shake off excessive moisture, or hang the tubing in a cabinet or closet to air-dry it. Do not use mechanical pressure or a blow-drier to dry the tubing, as this causes cracks to develop.
7. Always use a sample circuit to refer to as an example when you are changing the circuit, or have a picture of the properly connected tubing and refer to it.
8. Mark the connectors with stickers or tape so that you know what they are supposed to hook up to. This will help avoid making the mistake of hooking up connections incorrectly.
9. To prevent bacteria and mold from growing in the humidifier, disinfect the humidifier/cascade daily even if the circuit is not due to be cleaned.
Trouble-Shooting Volume-Cycled Ventilators
Common Causes of Alarm Signals
Alarms are important! The ventilator alarms are designed to make you aware of possible changes occurring with your child’s breathing or airway pressures, or a sign of changes in the ventilator function.
1. Know which indicator light shows you if an external source of electricity is being used, or if it is running on its own internal battery.
2. Low pressure alarms These are commonly caused by:
• The ventilator tubing is not connected to the tracheostomy tube.• There may be a loose connection somewhere in the tubing circuit (check the pressure line,
exhalation line, oxygen connector).• Leaks in the diaphragm (exhalation valve) can be caused by tiny holes or tears. • The humidification jar is not tightly closed.• The exhalation and pressure tubing have been accidentally switched. This can happen after
you have just changed the circuit and put the tubes on the wrong places.• Cracks, tears, or holes exist in the circuit tubes.
3. High pressure alarms These are commonly caused by:
• Coughing—this can briefly cause “back pressure” in the circuit tubing.• Airway obstruction—this can be caused by a mucous plug in the trach tube, or in your child’s
trachea.• Bent tubing.• Excessive water in the tubing.• A new piston seal may be somewhat tight.• Changes in your child’s breathing (breathing hard and fast, for example).
27California Thoracic Society, ©2010
Home Care of Children on Ventilators: A Parent’s Guide
28
4. For patients who need high settings, alarms may go off if the ventilator cannot do the type of breathing that it was programmed to do. Typical alarm readings that indicate this might be: low minute ventilation or low tidal volume. It can also happen when you switch from the AC mode (plugged into the wall) to the external battery. Other causes for this type of alarm could be that you need to replace an old battery. You are not expected to fix the problem independently: always call the equipment company first. The RT should help you fix the problem by phone, or they may need to come to your house to show you how to correct the problem.
5. Low Power Alarm signals that there is an inadequate source of power. Check the electrical outlet
for any malfunction of the power system. Make sure the electrical cord is completely plugged in to the back of the ventilator.
6. Other noises: a popping sound from the ventilator could mean that a valve is sticking and not smoothly opening or closing. This may be caused by dirt building up near the internal pressure control valve.
28California Thoracic Society, ©2010
Home Care of Children on Ventilators: A Parent’s Guide
Rela
ted
Car
e an
d Tr
eatm
ents
29California Thoracic Society, ©2010
Home Care of Children on Ventilators: A Parent’s Guide
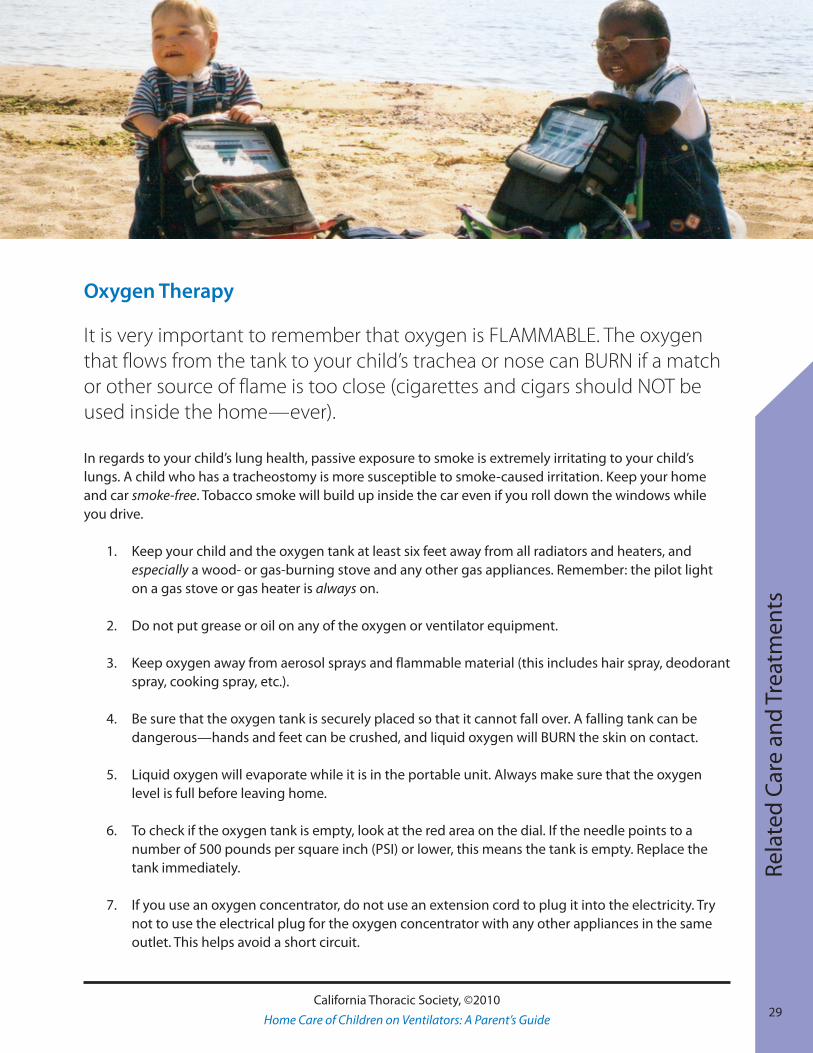
Oxygen Therapy
It is very important to remember that oxygen is FLAMMABLE. The oxygen that flows from the tank to your child’s trachea or nose can BURN if a match or other source of flame is too close (cigarettes and cigars should NOT be used inside the home—ever).
In regards to your child’s lung health, passive exposure to smoke is extremely irritating to your child’s lungs. A child who has a tracheostomy is more susceptible to smoke-caused irritation. Keep your home and car smoke-free. Tobacco smoke will build up inside the car even if you roll down the windows while you drive.
1. Keep your child and the oxygen tank at least six feet away from all radiators and heaters, and especially a wood- or gas-burning stove and any other gas appliances. Remember: the pilot light on a gas stove or gas heater is always on.
2. Do not put grease or oil on any of the oxygen or ventilator equipment.
3. Keep oxygen away from aerosol sprays and flammable material (this includes hair spray, deodorant spray, cooking spray, etc.).
4. Be sure that the oxygen tank is securely placed so that it cannot fall over. A falling tank can be dangerous—hands and feet can be crushed, and liquid oxygen will BURN the skin on contact.
5. Liquid oxygen will evaporate while it is in the portable unit. Always make sure that the oxygen level is full before leaving home.
6. To check if the oxygen tank is empty, look at the red area on the dial. If the needle points to a number of 500 pounds per square inch (PSI) or lower, this means the tank is empty. Replace the tank immediately.
7. If you use an oxygen concentrator, do not use an extension cord to plug it into the electricity. Try not to use the electrical plug for the oxygen concentrator with any other appliances in the same outlet. This helps avoid a short circuit.
30California Thoracic Society, ©2010
Home Care of Children on Ventilators: A Parent’s Guide
• An oxygen concentrator has only 20 minutes in the reserve battery. In case of a power outage, always have a back-up oxygen tank available for use.
• The highest flow of oxygen that an oxygen concentrator can provide is five liters per minute.
Aerosol Treatments
1. Practice how to connect the aerosol treatment unit to the ventilator.
2. If your child is not on full time ventilator support, you need to have the proper connections when your child is off the ventilator to give the aerosol treatment (a nebulizer cup, an adaptor that can connect to the trach, or a trach mask that blows the solution over the open tracheostomy).
3. The best to time to give puffs of medicine from an inhaler is at the same time that the ventilator is giving your child a breath. This is easiest to do if you count or say “in” and “out” in time with the ventilator breaths.
4. Keep all units clean: rinse and dry the nebulizer cup and its parts after each treatment.
5. To check how much medicine is left in an inhaler (NOT a dry powder inhaler, but the HFA “pump” device that delivers puffs of medication), put it in a bowl of clean water. If it floats on its side, it is empty. If it sinks to the bottom, it is full. If it is somewhere in between there is medicine in it. Some devices have indicators to alert you when you need to refill your medicine.
6. Circle the method that you use to give inhaled medicine to your child:
Medication Treatments
You doctor may have prescribed medications to help your child breathe easier. Not all children use these additional medications, but many do. There are several types of medications commonly used to assist with breathing.
Bronchodilators - Airway Openers
Bronchodilators open the airways in the lungs by relaxing the muscles around the airway. The most popular way to give these medications is by inhalation (aerosol treatments). Fast-acting rescue bronchodilators take effect within minutes, and effects last for four to six hours. You should see a treatment response in your child within 30 minutes. Examples of bronchodilators are:
• Fast-acting: Albuterol (Proventil™, Ventolin™, Xopenex™)—this can help your child to breathe easier.
• Slow-acting: Ipratropium (Atrovent™)—this can help your child breathe easier, though it can take up to an hour to take effect.
31California Thoracic Society, ©2010
Home Care of Children on Ventilators: A Parent’s Guide
Anti-Inflammatory Medication—Reduce Irritation in the Airways
Anti-inflammatory medicines are used for long-term prevention of wheezing in the lungs. They do not open up the lungs as albuterol does. It is important to remember that, although they do not reverse an acute wheezing attack, they should not be stopped if your child experiences an attack. They are given the same way albuterol is (usually by inhalation through a nebulizer or an inhaler).
Examples are:• Budesonide (Pulmicort™ DPI, nebulized liquid)• Beclomethasone (QVAR™ HFA)• Fluticasone (Flovent™ HFA) • Methylprednisone, Prednisone, Prednisolone—liquid or pill forms of corticosteroids taken by
mouth or given through a G tube, if your child has one (Pediapred™, Prednisone™, Orapred™) For convenience, some of the liquid inhaled medications for use in the nebulizer can be mixed together. Discuss this with your doctor before you mix any medications. Medicines that are delivered by using metered dose inhalers or dry powder inhalers can be taken one right after the other.
Other Medications—(not given through the nebulizer or inhaler)
Diuretics (oral medication)
Some children with chronic lung disease retain water in their lungs. Diuretics help eliminate the extra fluid from the lungs by increasing urine production. With less fluid in them, the lungs can work better.
Examples are:• Spironalactone (Aldactone™) • Chlorothiazide (Diuril™) • Furosemide (Lasix™)
When diuretics are used, your doctor occasionally will check the electrolytes (salt composition in the body) with a blood test.
Electrolyte (salt) Supplements
If the doctor finds your child’s electrolyte level is low, a supplement can be given. Typically, the salts used are:
• Sodium Chloride (NaCl)• Potassium Chloride (KCl)
Antibiotics
Antibiotics are used to help the body fight new infections. They are only used when an infection is present.
32California Thoracic Society, ©2010
Home Care of Children on Ventilators: A Parent’s Guide
They should not be used unless prescribed by your doctor. Be sure to tell your doctor of any known allergies that your child may have, and report any side effects such as diarrhea, vomiting, or rash.
Some antibiotics can be inhaled, such as TOBI™ (liquid inhaled form of tobramycin). This can be used for infections of the trachea, which can occur easily in children who have tracheostomies.
Changes In Your Child’s Health
When your child becomes sick, you should call the doctor to let her know about it. These questions will help you describe the changes you see.
1. Is your child less alert, more tired, or sleepier than usual?2. How has his breathing has changed (for example, is it more difficult, is his color changed, is he
wheezing or coughing)? 3. Have his secretions changed in color, thickness, amount, or smell?4. Does he have a fever (temperature higher than 38.5º C or 101º F)?5. What are your child’s breathing rate, heart rate, ventilator settings? Have you made any changes
(giving him more oxygen, increased the rate)?6. When did your child start to get sick? 7. Describe your child’s usual breathing treatments (for example, aerosol treatment(s), medications,
and amount of oxygen), and what additional treatments or medications have you tried? Did it help?
8. Tell the doctor what other changes have happened since he’s been sick. If he has diarrhea, tell the doctor about the type of stool and how frequently it is occurring. It is important to tell the doctor if your child is treated with diuretics (lasix, aldactone, spironolactone, etc.).
9. If a feeding tube is present, is there any leakage, redness or signs of infection at the site?10. Let the doctor know if anyone else in your home is sick.11. Tell the doctor about any other unusual signs that you have noticed.
Prep
arin
g Fo
r Em
erge
ncie
s
33California Thoracic Society, ©2010
Home Care of Children on Ventilators: A Parent’s Guide
Utility Letters
A standard letter alerting the electric company of your child’s dependency on electrical medical equipment at home is completed before discharge. It is signed by a physician and given to you. Parents are responsible for sending this letter to their electric company.
For Priority Electrical Power
Upon receiving the letter, the company will place your home on a high priority list for emergency service when there is a power failure in your area. The family is still responsible for paying the bill on time, to avoid interruption in service.
You qualify to apply for a discounted rate from your electric company. Request an application from the company. A physician’s signature is needed to prove medical necessity.
For Priority Telephone Service
A standard letter alerting the telephone company of your child’s need to have a functioning communication system with his treatment team is completed before discharge. It is signed by a physician and given to you. Parents are responsible for sending the letter to their telephone company.
Upon receiving the letter, the company will place your home on a high priority list for emergency service when there is a telephone failure in that area. The family is still responsible for paying the bill on time, to avoid interruption in service.
Emergency Room Letter
Your physician will prepare a letter to inform the Emergency Room health providers of your child’s ventilator need. Have this letter with you at all times. It also includes information regarding what to do in the Emergency Room, and how to contact your primary physician.
35
Emergency Kit Checklist
Portable suction machine 0
Adequate supply of catheters and gloves for suctioning 0
Sterile water in a container for cleaning the suction catheter 0
Normal saline for irrigation 0
Manual resuscitation device (Ambu-bag™) 0
Facemask for the Ambu-bag™ in case of an emergency 0
Spare tracheostomy tube and ties, in case the tube accidentally comes out 0
Tracheostomy tube one size smaller if your physician recommends 0
Water based lubrication (K-Y Jelly™) for emergency tracheostomy tube insertion 0
Scissors for cutting non Velcro™ tracheostomy ties in an emergency 0
Emergency telephone numbers in case of sudden illness or if the ventilator malfunctions
0
Medical record with ventilator settings, medications, and treatments 0
Oxygen 0
A vehicle cigarette lighter adapter if a suction machine or ventilator is used 0
Additional Helpful Items:
Three-prong electrical adapter 0
Duct tape 0
Ventilator power supply and AC adapter 0
35California Thoracic Society, ©2010
Home Care of Children on Ventilators: A Parent’s Guide
36California Thoracic Society, ©2010
Home Care of Children on Ventilators: A Parent’s Guide
Emergency Telephone Numbers
Phone Numbers
1. Primary Pulmonologist: Dr.
during office hours Mondays - Fridays( )
2. Off hours, reach your pulmonary doctor by the hospital’s main number Ask for the on-call pulmonary doctor 24 hours a day. ( )
3. Pediatrician: Dr. ( )
4. Specialist: Dr. ( )
5. Specialist: Dr. ( )
6. Hospital Emergency Room: ( )
7. Local Emergency Room: ( )
8. Pharmacy: ( )
9. DME Home Equipment Co./Respiratory: ( )
10. Home Health Agency (Nursing): ( )
11. EMERGENCY: 9-1-1
( )
( )
( )
Other Important Numbers
Occupational Therapist: ( )
Physical Therapist: ( )
Medical Social Worker: ( )
Regional Center: ( )
School: ( )
Case Manager: ( )
37
Emergency Telephone Numbers (Contd)
Phone Numbers
Insurance/Health Care Coverage contact: ( )
Local Fire Department: ( )
Electric Company: ( )
Phone Company: ( )
Back-up Caregiver Name: Emergency #
( )
Spiritual Counselor:
(chaplain/imam/minister/monk/priest/rabbi/etc.)( )
Father at Work: Emergency #
( )
Mother at Work Emergency #
( )
Other key ventilator care resources: ( )( )
( )
( )
( )
37California Thoracic Society, ©2010
Home Care of Children on Ventilators: A Parent’s Guide
38California Thoracic Society, ©2010
Home Care of Children on Ventilators: A Parent’s Guide
Emergency Preparedness Checklist
Where is your emergency set-up bag (Ambu-bag™, etc.)? 0
Is your suction machine working and available to be used at all times? 0
Do you have the telephone number of the primary physician? 0
Do you know the telephone number of the respiratory DME company? 0
Do you have the health plan/insurance card with you? 0
Do you have all your usual medications? 0
Do you have a transportation plan to send your child to the doctor’s office? 0
Do you have an urgent ride to the Emergency Room? 0
Do you have extra supplies and connectors if the tubing breaks or leaks? 0
Do you have a back-up caregiver in case of emergency? 0
Did you turn in your Lifeline letters to the electric and telephone companies? 0
Do you have the Emergency Service letter ready to hand to the Emergency Room Staff? 0
Do you have your discharge instructions (or medical information) detailing your child’s medical condition and treatment plan?
0
Do you know your child’s medication regimen and allergies? 0
Do you have oxygen for emergency use? 0
Do you know how to hook up your oxygen to the ventilator or Ambu-bag™? 0
Do you know how long the ventilator battery should last before recharging? (Call your DME company if the battery charge lasts less than hour/ mins)
0

Hea
lth
Cha
nges
and
Em
erge
ncie
s
39California Thoracic Society, ©2010
Home Care of Children on Ventilators: A Parent’s Guide
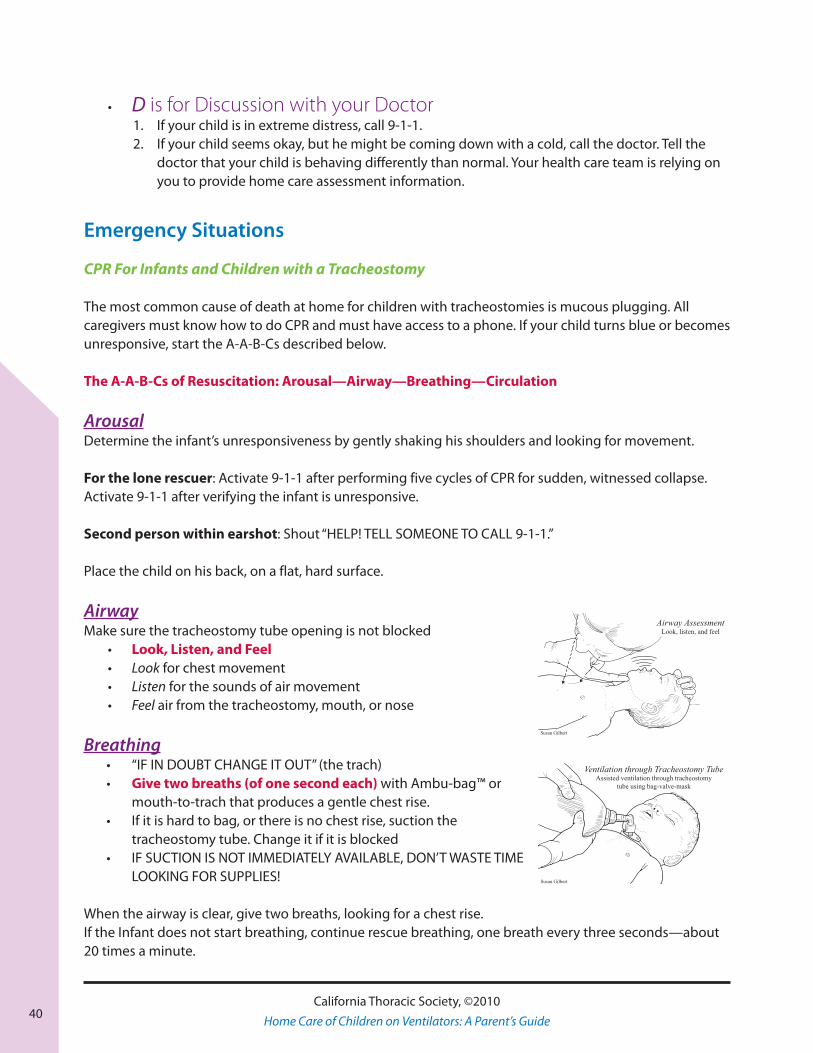
The first signs of a change in your child’s breathing may be non-specific. Most parents report “my child is not breathing well.” “A-B-C-D” is a good way to remember what to check first in an emergency.
• A is for Airway 1. Check the tracheostomy tube is in place. Ventilator alarms might not go off even if a
tracheostomy tube has fallen partly—or all of the way—out. 2. Suctioning the trach and make sure that air is moving through it. 3. When in doubt, change the tracheostomy tube. 4. If none of these steps help, then start CPR following the guidelines in this Chapter, Page 38.
• B is for Breathing Machine (i.e., mechanical ventilator) 1. If the trach isn’t plugged and it is in the right place, then check the ventilator. 2. Are the settings right? 3. Which alarm is going off? 4. Is the ventilator working at all? Make sure the electrical cord is plugged all the way in to the
back of the ventilator and into the wall outlet. 5. Check to make sure that the ventilator tubing is free of excess moisture.6. Check the battery. 7. When in doubt—and if your child looks blue or lethargic—use the Ambu-bag™ to
resuscitate by hand, and then switch to the back-up ventilator. Use oxygen with the Ambu-bag™.
• C is for Child 1. Once you are sure that there is no problem with either the airway or the breathing machine,
look at your child from head to toe. Is he coming down with an illness? Is your child irritable or less alert? Does your child interact with caregivers? Notice if a fever, an increase or change in secretions, sweating, or fast heartbeat are present.
40California Thoracic Society, ©2010
Home Care of Children on Ventilators: A Parent’s Guide
• D is for Discussion with your Doctor 1. If your child is in extreme distress, call 9-1-1.2. If your child seems okay, but he might be coming down with a cold, call the doctor. Tell the
doctor that your child is behaving differently than normal. Your health care team is relying on you to provide home care assessment information.
Emergency Situations
CPR For Infants and Children with a Tracheostomy
The most common cause of death at home for children with tracheostomies is mucous plugging. All caregivers must know how to do CPR and must have access to a phone. If your child turns blue or becomes unresponsive, start the A-A-B-Cs described below.
The A-A-B-Cs of Resuscitation: Arousal—Airway—Breathing—Circulation
ArousalDetermine the infant’s unresponsiveness by gently shaking his shoulders and looking for movement.
For the lone rescuer: Activate 9-1-1 after performing five cycles of CPR for sudden, witnessed collapse. Activate 9-1-1 after verifying the infant is unresponsive.
Second person within earshot: Shout “HELP! TELL SOMEONE TO CALL 9-1-1.”
Place the child on his back, on a flat, hard surface.
AirwayMake sure the tracheostomy tube opening is not blocked
• Look, Listen, and Feel • Look for chest movement• Listen for the sounds of air movement• Feel air from the tracheostomy, mouth, or nose
Breathing• “IF IN DOUBT CHANGE IT OUT” (the trach)• Give two breaths (of one second each) with Ambu-bag™ or
mouth-to-trach that produces a gentle chest rise. • If it is hard to bag, or there is no chest rise, suction the
tracheostomy tube. Change it if it is blocked• IF SUCTION IS NOT IMMEDIATELY AVAILABLE, DON’T WASTE TIME
LOOKING FOR SUPPLIES!
When the airway is clear, give two breaths, looking for a chest rise.If the Infant does not start breathing, continue rescue breathing, one breath every three seconds—about 20 times a minute.
Airway AssessmentLook, listen, and feel
Susan Gilbert
Ventilation through Tracheostomy TubeAssisted ventilation through tracheostomy
tube using bag-valve-mask
Susan Gilbert
41California Thoracic Society, ©2010
Home Care of Children on Ventilators: A Parent’s Guide
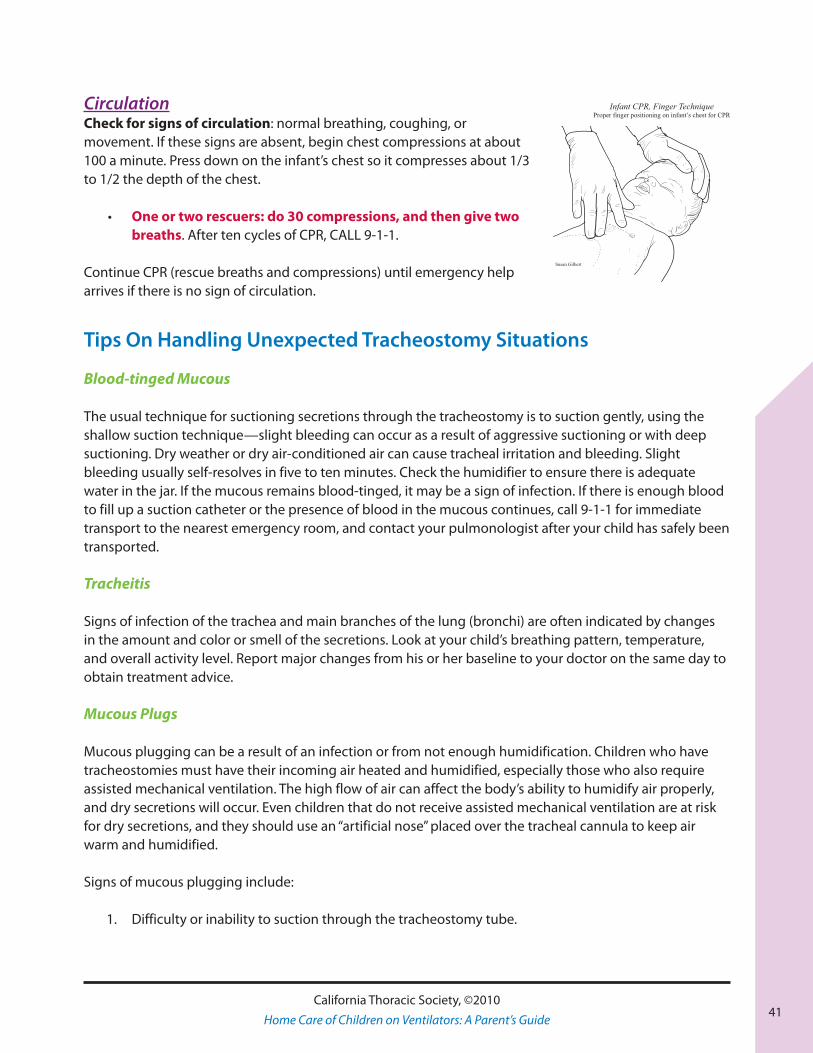
CirculationCheck for signs of circulation: normal breathing, coughing, or movement. If these signs are absent, begin chest compressions at about 100 a minute. Press down on the infant’s chest so it compresses about 1/3 to 1/2 the depth of the chest.
• One or two rescuers: do 30 compressions, and then give two breaths. After ten cycles of CPR, CALL 9-1-1.
Continue CPR (rescue breaths and compressions) until emergency help arrives if there is no sign of circulation.
Tips On Handling Unexpected Tracheostomy Situations
Blood-tinged Mucous
The usual technique for suctioning secretions through the tracheostomy is to suction gently, using the shallow suction technique—slight bleeding can occur as a result of aggressive suctioning or with deep suctioning. Dry weather or dry air-conditioned air can cause tracheal irritation and bleeding. Slight bleeding usually self-resolves in five to ten minutes. Check the humidifier to ensure there is adequate water in the jar. If the mucous remains blood-tinged, it may be a sign of infection. If there is enough blood to fill up a suction catheter or the presence of blood in the mucous continues, call 9-1-1 for immediate transport to the nearest emergency room, and contact your pulmonologist after your child has safely been transported.
Tracheitis
Signs of infection of the trachea and main branches of the lung (bronchi) are often indicated by changes in the amount and color or smell of the secretions. Look at your child’s breathing pattern, temperature, and overall activity level. Report major changes from his or her baseline to your doctor on the same day to obtain treatment advice.
Mucous Plugs
Mucous plugging can be a result of an infection or from not enough humidification. Children who have tracheostomies must have their incoming air heated and humidified, especially those who also require assisted mechanical ventilation. The high flow of air can affect the body’s ability to humidify air properly, and dry secretions will occur. Even children that do not receive assisted mechanical ventilation are at risk for dry secretions, and they should use an “artificial nose” placed over the tracheal cannula to keep air warm and humidified.
Signs of mucous plugging include:
1. Difficulty or inability to suction through the tracheostomy tube.
Infant CPR, Finger TechniqueProper finger positioning on infant’s chest for CPR
Susan Gilbert
42California Thoracic Society, ©2010
Home Care of Children on Ventilators: A Parent’s Guide
2. The child may be irritable or show breathing difficulty, and appear to fight for air. You may see retractions of the chest or flaring of the nostrils. Infants might stop breathing completely if the airway is entirely obstructed.
3. Assisted breathing with the Ambu-bag™ does not result in good chest rise.
4. A whistling sound (wheezing) during breaths can indicate the presence of a dry mucous plug.
5. Making sounds from their mouth that you can hear and that they normally don’t make.
6. High-pressure alarms from the ventilator.
If this happens, suction right away with 2-3 cc of normal saline drops, and repeat once if ineffective. If suctioning is not effective, change the tracheostomy tube to a clean one. If these maneuvers don’t help, immediately call 9-1-1 for emergency help.
Bleeding
Steady bleeding from the tracheostomy tube is a life-threatening event. Call 9-1-1 and access emergency care immediately. Suction frequently to maintain an open airway until help arrives.
Accidental Decannulation
If the tracheostomy tube falls out or is coughed out accidentally, you need to re-insert it immediately. Prevent this from happening by making sure the tracheostomy tie is secured at all times (barely one finger technique). This happens frequently, and you should always carry two spare trachs: a same-sized and one-size smaller and ties with your supplies at all times.
Trips To The Emergency Room
Your child has very little reserve to fight infection. A cold could progress very quickly to severe pneumonia. Therefore, an occasional trip to the emergency room is almost unavoidable. You are encouraged to get ready as you would for your regular doctor visit. Remember to take your:
• Emergency bag• Medical information sheet • Medical records • Insurance card • Key telephone numbers
If your child is breathing hard, it may not be a good idea for you to drive. Arranging urgent transport might be a better option. Call 9-1-1.
In the emergency room, try to stay calm. Describe your child’s illness in the same way you would describe it to your regular doctor. The emergency room doctor is not familiar with your child’s history, so you
43California Thoracic Society, ©2010
Home Care of Children on Ventilators: A Parent’s Guide
might have to briefly summarize the over-all history. Show the doctor the Medically Fragile Pediatric Pulmonary Patient Record letter and any other medical records that describe your child’s condition—such as discharge instructions—to facilitate the service. When the emergency situation is under control, the emergency room doctor will discuss what to do next with your primary physician. Together, they will decide the best course of action and discuss it with you.
Tell the emergency doctor that you are trained in your child’s care, and that your child does better with your presence. As you can see, the more knowledgeable you are, the easier it is for the health care team to provide continuity of care. Having your “emergency bag” ready is a definite advantage. You may be surprised to discover that many emergency rooms do not have the right size suction catheter or tracheostomy tube for your child.
Re-admission To The Hospital
Your doctor probably has prepared you to hear that, given the best circumstances at home, re-admission to the hospital is expected. For short re-admissions, your home ventilator might be used. Please remember to bring in a new home circuit, humidifier, external battery, and power cord. Before discharge, all home circuits and equipment are tested for proper functioning. It is a good time to check if home oxygen, medication, or other supplies need to be refilled.
Tran
spor
tatio
n an
d Tr
avel
45California Thoracic Society, ©2010
Home Care of Children on Ventilators: A Parent’s Guide
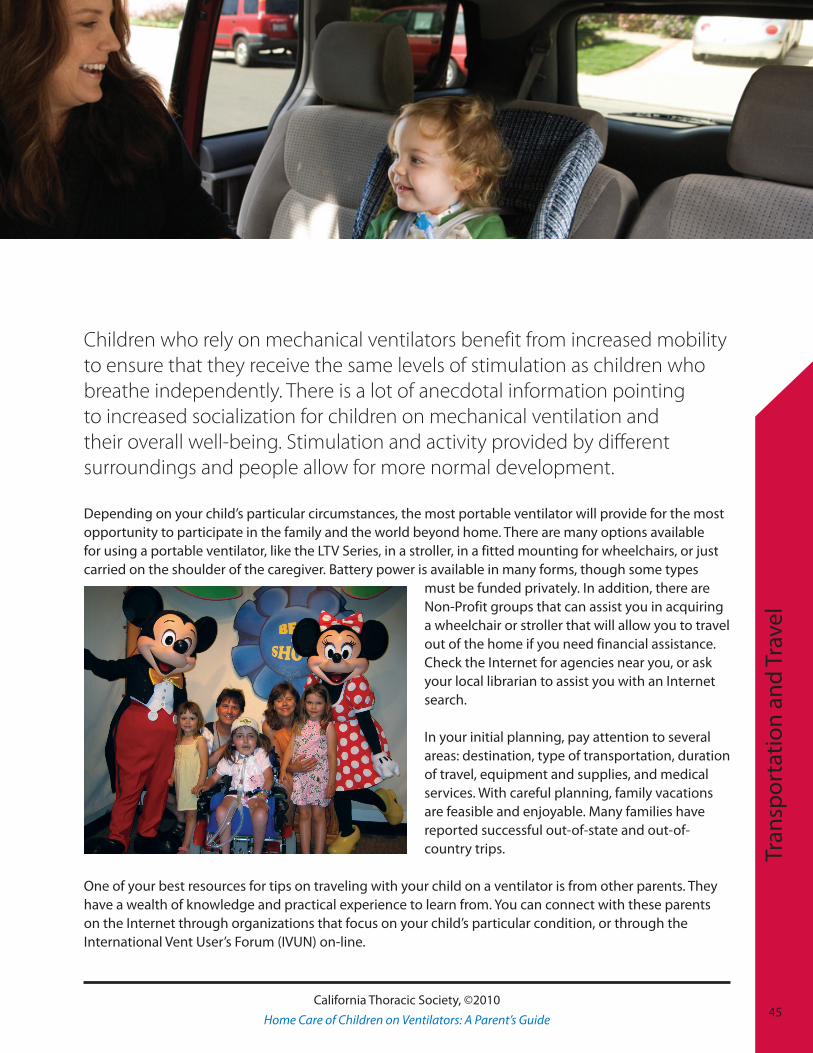
Children who rely on mechanical ventilators benefit from increased mobility to ensure that they receive the same levels of stimulation as children who breathe independently. There is a lot of anecdotal information pointing to increased socialization for children on mechanical ventilation and their overall well-being. Stimulation and activity provided by different surroundings and people allow for more normal development.
Depending on your child’s particular circumstances, the most portable ventilator will provide for the most opportunity to participate in the family and the world beyond home. There are many options available for using a portable ventilator, like the LTV Series, in a stroller, in a fitted mounting for wheelchairs, or just carried on the shoulder of the caregiver. Battery power is available in many forms, though some types
must be funded privately. In addition, there are Non-Profit groups that can assist you in acquiring a wheelchair or stroller that will allow you to travel out of the home if you need financial assistance. Check the Internet for agencies near you, or ask your local librarian to assist you with an Internet search.
In your initial planning, pay attention to several areas: destination, type of transportation, duration of travel, equipment and supplies, and medical services. With careful planning, family vacations are feasible and enjoyable. Many families have reported successful out-of-state and out-of-country trips.
One of your best resources for tips on traveling with your child on a ventilator is from other parents. They have a wealth of knowledge and practical experience to learn from. You can connect with these parents on the Internet through organizations that focus on your child’s particular condition, or through the International Vent User’s Forum (IVUN) on-line.
46California Thoracic Society, ©2010
Home Care of Children on Ventilators: A Parent’s Guide
Day Trip
Use your experience from your clinic visits to prepare for all the necessary equipment, supplies, medications, and food. You are perhaps looking at a longer duration outing. Bring extra supplies and back-up equipment with you. A small roll of duct tape could be handy if there is a tear or leak in your circuit. Again, think of electric power and adequate battery support to last the entire trip. Your first out-of-home trip could be a trip to a grandparent’s house, a friend’s party, or a recreation area where all support services are available. After a successful short trip, you could try a longer vacation with different scenery.
By Car
If you are able to make clinic trips without problems, then traveling by car will pose no special issue. Get all your medical essentials handy to provide suctioning needs. Exit at rest areas or gas stations to provide other treatment needs. No one should smoke in the car, or around your child at any time.
By Plane Many ventilator dependent children have traveled by air. This is possible with meticulous advance planning. Detailed information on air travel with ventilator dependant children can be found on the website : www.pulmonetic.com, including preparation and in-flight information.
Att
endi
ng S
choo
l
47California Thoracic Society, ©2010
Home Care of Children on Ventilators: A Parent’s Guide
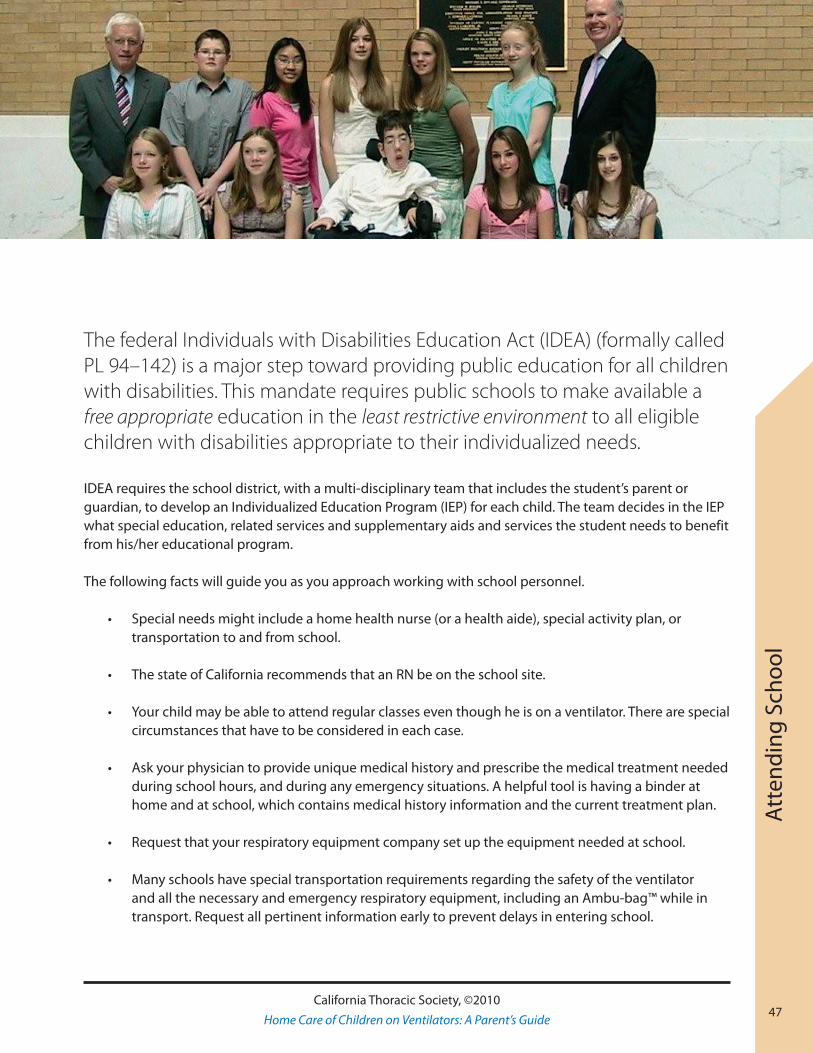
The federal Individuals with Disabilities Education Act (IDEA) (formally called PL 94–142) is a major step toward providing public education for all children with disabilities. This mandate requires public schools to make available a free appropriate education in the least restrictive environment to all eligible children with disabilities appropriate to their individualized needs.
IDEA requires the school district, with a multi-disciplinary team that includes the student’s parent or guardian, to develop an Individualized Education Program (IEP) for each child. The team decides in the IEP what special education, related services and supplementary aids and services the student needs to benefit from his/her educational program.
The following facts will guide you as you approach working with school personnel.
• Special needs might include a home health nurse (or a health aide), special activity plan, or transportation to and from school.
• The state of California recommends that an RN be on the school site.
• Your child may be able to attend regular classes even though he is on a ventilator. There are special circumstances that have to be considered in each case.
• Ask your physician to provide unique medical history and prescribe the medical treatment needed during school hours, and during any emergency situations. A helpful tool is having a binder at home and at school, which contains medical history information and the current treatment plan.
• Request that your respiratory equipment company set up the equipment needed at school.
• Many schools have special transportation requirements regarding the safety of the ventilator and all the necessary and emergency respiratory equipment, including an Ambu-bag™ while in transport. Request all pertinent information early to prevent delays in entering school.
48California Thoracic Society, ©2010
Home Care of Children on Ventilators: A Parent’s Guide
• Maximize your child’s learning experience by paying attention to his or her fatigue, endurance and integration issues.
• Your health care team is available to assist you in this exciting part of your child’s life.
• You will play a key role in preparing the school district and the school system in the total support of your child’s positive experience in school.
• The school bus driver, school nurse, and the teachers need to have knowledge of your child’s medical condition. Safety, normalization of activities, and appropriate socialization are points to consider when school integration is planned.
A home tutor, occupational, physical and speech services also may be available at home for smaller children or those who are homebound.
Sup
por
t Gro
ups
and
Reso
urce
s
49California Thoracic Society, ©2010
Home Care of Children on Ventilators: A Parent’s Guide
When faced with the challenge of caring for your child on a ventilator, support groups are invaluable. From emotional support to practical tips, a support group is an excellent resource. Ask your clinic for information on local support groups, or connect to a national group. Listed below are a few places to start.
Muscular Dystrophy Association
The MDA offers support groups for various types of the Muscular Dystrophy disease spectrum. Contact them at the link below to let them help you find a group appropriate for you or your loved one.
http://www.mda.org/supportgroups.html
Spinal Muscular Atrophy Support
We are an all-volunteer, non-profit, organization dedicated to providing information and support to family, friends, individuals and caregivers on all aspects regarding the devastating genetic disease called Spinal Muscular Atrophy.
http://www.smasupport.com
NICHCY
NICHCY is very pleased to offer you a wealth of information on disabilities! NICHCY stands for the National Dissemination Center for Children with Disabilities. We serve the nation as a central source of information on:
• Disabilities in infants, toddlers, children, and youth, • IDEA, which is the law authorizing special education, • No Child Left Behind (as it relates to children with disabilities), and • Research-based information on effective educational practices.
http://www.nichcy.org

50California Thoracic Society, ©2010
Home Care of Children on Ventilators: A Parent’s Guide
IVUN
International Vent Users Network is the premier source of information about living independently with a ventilator.
www.ventusers.org
Imp
orta
nt F
orm
s
51California Thoracic Society, ©2010
Home Care of Children on Ventilators: A Parent’s Guide
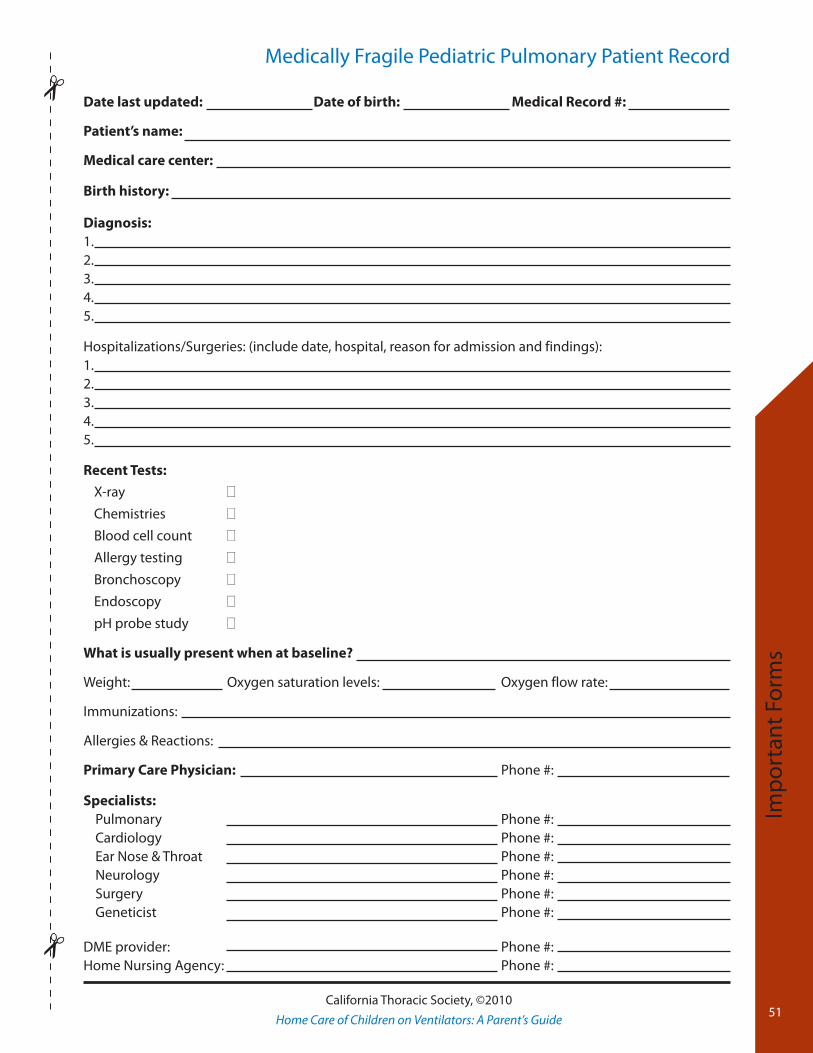
Medically Fragile Pediatric Pulmonary Patient Record
Date last updated: Date of birth: Medical Record #:
Patient’s name:
Medical care center:
Birth history:
Diagnosis:1.2.3.4.5.
Hospitalizations/Surgeries: (include date, hospital, reason for admission and findings):1.2.3.4.5.
Recent Tests:
X-ray 0
Chemistries 0
Blood cell count 0
Allergy testing 0
Bronchoscopy 0
Endoscopy 0
pH probe study 0
What is usually present when at baseline?
Weight: Oxygen saturation levels: Oxygen flow rate:
Immunizations:
Allergies & Reactions:
Primary Care Physician: Phone #:
Specialists: Pulmonary Phone #: Cardiology Phone #: Ear Nose & Throat Phone #: Neurology Phone #: Surgery Phone #: Geneticist Phone #:
DME provider: Phone #:Home Nursing Agency: Phone #:
52California Thoracic Society, ©2010
Home Care of Children on Ventilators: A Parent’s Guide
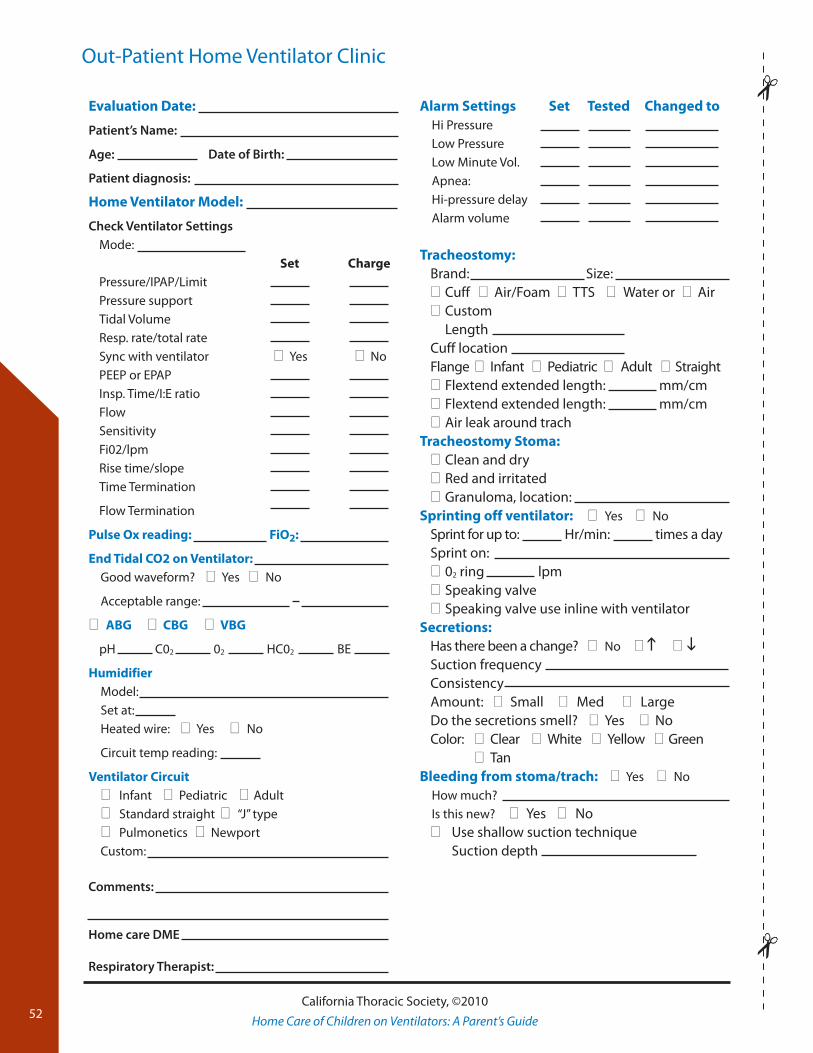
Out-Patient Home Ventilator Clinic
Evaluation Date:
Patient’s Name:
Age: Date of Birth:
Patient diagnosis:
Home Ventilator Model:
Check Ventilator SettingsMode: Set ChargePressure/IPAP/LimitPressure supportTidal VolumeResp. rate/total rateSync with ventilator 0Yes 0NoPEEP or EPAPInsp. Time/I:E ratioFlowSensitivityFi02/lpmRise time/slopeTime Termination
Flow Termination
Pulse Ox reading: FiO2:
End Tidal CO2 on Ventilator:Good waveform? 0Yes 0No
Acceptable range:
0ABG 0CBG 0VBG
pH C02 02 HC02 BE
HumidifierModel:Set at:Heated wire: 0Yes 0No
Circuit temp reading:
Ventilator Circuit0Infant 0Pediatric 0Adult0Standard straight 0 “J” type0Pulmonetics 0NewportCustom:
Alarm Settings Set Tested Changed toHi PressureLow PressureLow Minute Vol.Apnea:Hi-pressure delayAlarm volume
Tracheostomy:Brand: Size:0Cuff 0Air/Foam 0TTS 0Water or 0Air0CustomLengthCuff locationFlange 0Infant 0Pediatric 0Adult 0Straight0Flextend extended length: mm/cm0Flextend extended length: mm/cm0Air leak around trach
Tracheostomy Stoma:0Clean and dry0Red and irritated0Granuloma, location:
Sprinting off ventilator: 0Yes 0NoSprint for up to: Hr/min: times a daySprint on:002 ring lpm0Speaking valve0Speaking valve use inline with ventilator
Secretions: Has there been a change? 0No 0h0iSuction frequencyConsistencyAmount:0Small0Med 0Large Do the secretions smell?0Yes0NoColor: 0Clear 0White 0Yellow 0Green 0Tan
Bleeding from stoma/trach: 0Yes 0NoHow much?Is this new? 0Yes 0No0Use shallow suction technique Suction depth
Comments:
Home care DME
Respiratory Therapist:
53California Thoracic Society, ©2010
Home Care of Children on Ventilators: A Parent’s Guide
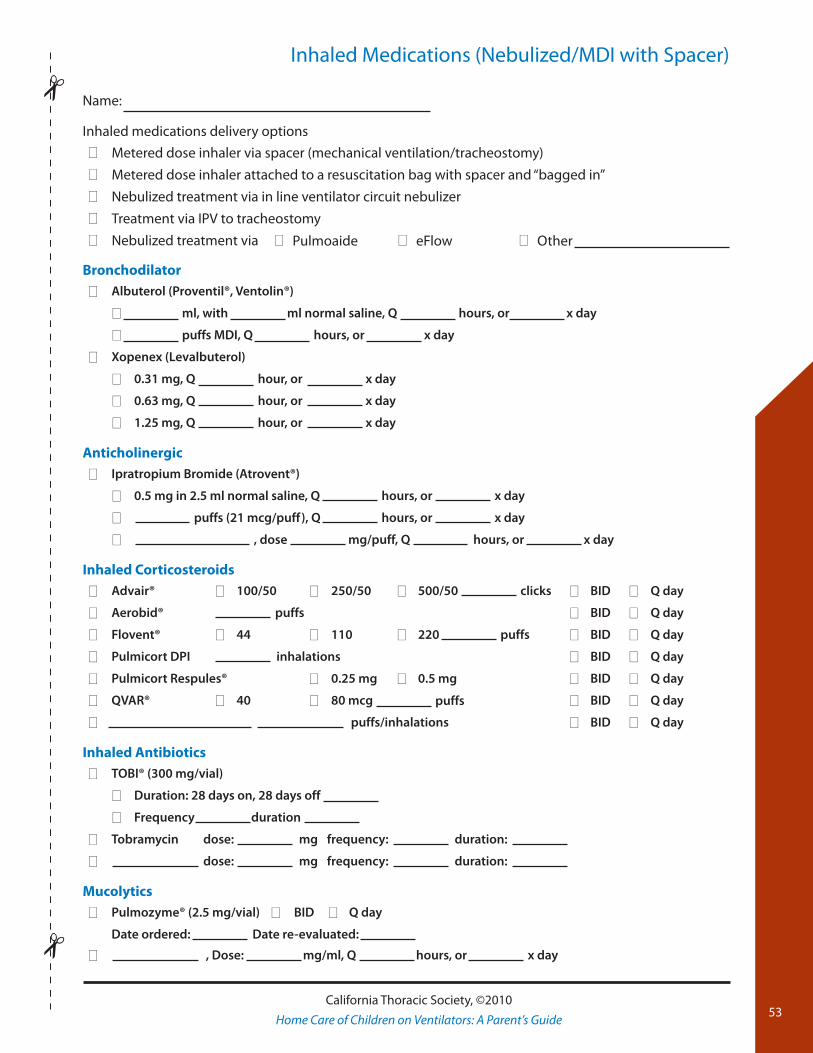
Inhaled Medications (Nebulized/MDI with Spacer)
Name:
Inhaled medications delivery options
0 Metered dose inhaler via spacer (mechanical ventilation/tracheostomy)
0 Metered dose inhaler attached to a resuscitation bag with spacer and “bagged in”
0 Nebulized treatment via in line ventilator circuit nebulizer
0 Treatment via IPV to tracheostomy
0 Nebulized treatment via 0Pulmoaide 0eFlow 0Other
Bronchodilator
0 Albuterol (Proventil®, Ventolin®)
0 ml, with ml normal saline, Q hours, or x day
0 puffs MDI, Q hours, or x day
0 Xopenex (Levalbuterol)
0 0.31 mg, Q hour, or x day
0 0.63 mg, Q hour, or x day
0 1.25 mg, Q hour, or x day
Anticholinergic
0 Ipratropium Bromide (Atrovent®)
0 0.5 mg in 2.5 ml normal saline, Q hours, or x day
0 puffs (21 mcg/puff), Q hours, or x day
0 , dose mg/puff, Q hours, or x day
Inhaled Corticosteroids
0 Advair® 0 100/50 0 250/50 0 500/50 clicks 0 BID 0 Q day
0 Aerobid® puffs 0 BID 0 Q day
0 Flovent® 0 44 0 110 0 220 puffs 0 BID 0 Q day
0 Pulmicort DPI inhalations 0 BID 0 Q day
0 Pulmicort Respules® 0 0.25 mg 0 0.5 mg 0 BID 0 Q day
0 QVAR® 0 40 0 80 mcg puffs 0 BID 0 Q day
0 puffs/inhalations 0 BID 0 Q day
Inhaled Antibiotics
0 TOBI® (300 mg/vial)
0 Duration: 28 days on, 28 days off
0 Frequency duration
0 Tobramycin dose: mg frequency: duration:
0 dose: mg frequency: duration:
Mucolytics
0 Pulmozyme® (2.5 mg/vial) 0 BID 0 Q day
Date ordered: Date re-evaluated:
0 , Dose: mg/ml, Q hours, or x day
54California Thoracic Society, ©2010
Home Care of Children on Ventilators: A Parent’s Guide
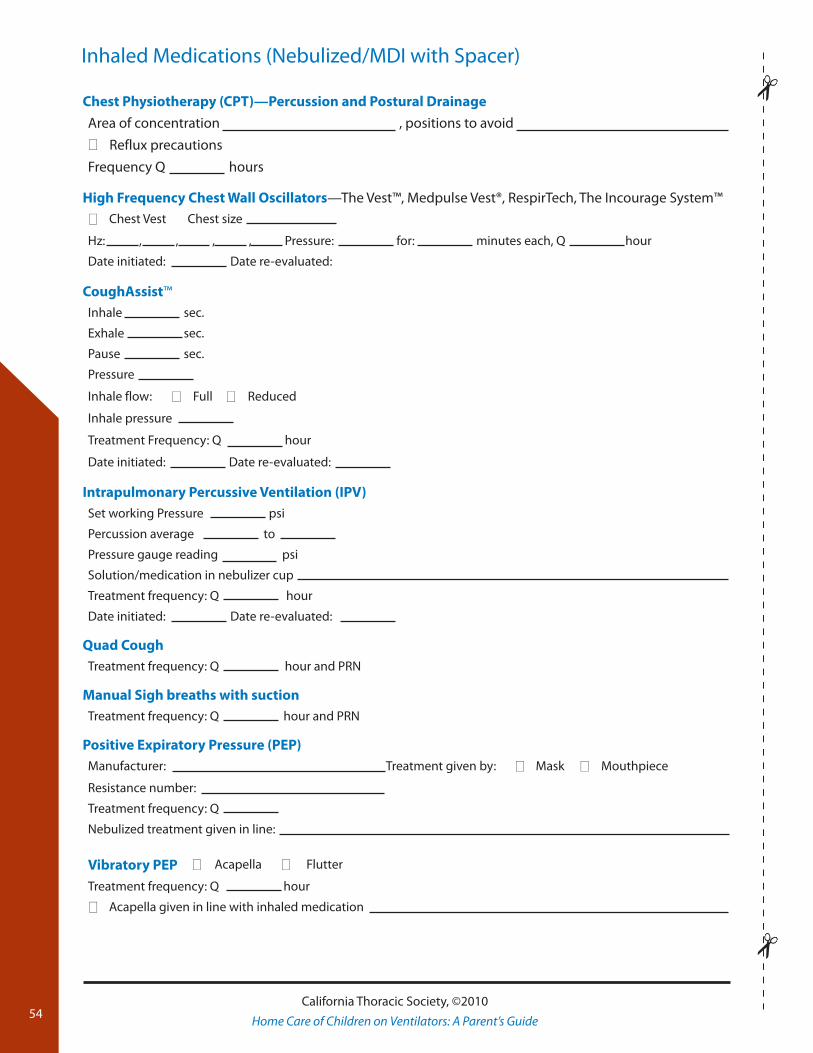
Inhaled Medications (Nebulized/MDI with Spacer)
Chest Physiotherapy (CPT)—Percussion and Postural Drainage
Area of concentration , positions to avoid
0 Reflux precautions
Frequency Q hours
High Frequency Chest Wall Oscillators—The Vest™, Medpulse Vest®, RespirTech, The Incourage System™
0 Chest Vest Chest size
Hz: , , , , Pressure: for: minutes each, Q hour
Date initiated: Date re-evaluated:
CoughAssist™Inhale sec.
Exhale sec.
Pause sec.
Pressure
Inhale flow: 0 Full 0 Reduced
Inhale pressure
Treatment Frequency: Q hour
Date initiated: Date re-evaluated:
Intrapulmonary Percussive Ventilation (IPV)Set working Pressure psi
Percussion average to
Pressure gauge reading psi
Solution/medication in nebulizer cup
Treatment frequency: Q hour
Date initiated: Date re-evaluated:
Quad CoughTreatment frequency: Q hour and PRN
Manual Sigh breaths with suctionTreatment frequency: Q hour and PRN
Positive Expiratory Pressure (PEP)Manufacturer: Treatment given by: 0 Mask 0 Mouthpiece
Resistance number:
Treatment frequency: Q
Nebulized treatment given in line:
Vibratory PEP 0 Acapella 0 Flutter
Treatment frequency: Q hour
0 Acapella given in line with inhaled medication

Graphic design and images courtesy of Pulmonetic Systems, a CareFusion company.