HMS 2017 MATE Ms. Maureen Barrett SeaBots: … Competition/2017... · Harrington Middle School ......
25
HMS SeaBots: Ranger Team 2017 MATE Technical Documentation Harrington Middle School Mount Laurel, NJ USA 08054 Advisors: Ms. Maureen Barrett [email protected] Ms. Christina Paterno [email protected] Cherian Abraham Electrical Engineer CFO Areeba Wani Electrical Engineer CTO Jonathan Yao Software Engineer COO Aarushi Aloni Software Engineer Job Safety Sabrina Jamil Mechanical Engineer Job Safety Chris Bauer Software Engineer CEO Abhishek Kotgire Mechanical Engineer Dayyan Imran Shaikh Software Engineer Krisha Mahajan Electrical Engineer Saajan Shah Mechanical Engineer
Transcript of HMS 2017 MATE Ms. Maureen Barrett SeaBots: … Competition/2017... · Harrington Middle School ......

HMS SeaBots: Ranger Team
2017 MATE Technical Documentation
Harrington Middle SchoolMount Laurel, NJ USA 08054
Advisors:Ms. Maureen Barrett
Ms. Christina [email protected]
Cherian AbrahamElectrical Engineer
CFO
Areeba WaniElectrical Engineer
CTO
Jonathan YaoSoftware Engineer
COO
Aarushi AloniSoftware Engineer
Job Safety
Sabrina JamilMechanical Engineer
Job Safety
Chris BauerSoftware Engineer
CEO
Abhishek KotgireMechanical Engineer
Dayyan Imran ShaikhSoftware Engineer
Krisha MahajanElectrical Engineer
Saajan ShahMechanical Engineer

Section Page
1. Introduction
1.1 Abstract 3
2. Project Management
2.1 Company Schedule 4
2.2 Company Assignments 4-5
2.3 Company Contract 5
3. Port of Long Beach Task Descriptions 5
3.1 Task Descriptions 5
3.2 Mission Related Photos 6
4. Design Methodology 6
5. Engineering Principles 7
6. Design Rationale
6.1 Frame 8
6.2 Buoyancy Tubes 9
6.3 Propulsion System 9
6.4 Control System 10
6.4.a SID 11
6.4.b Camera 12
6.4.c. Software 13
6.4.d. Software Flowchart 13
6.5 Special Features 14
Table of Contents 7. Safety
7.1 Safety Checklist 15
7.2 Safety Protocol 15
7.3 Safety Features 15
7.4 Job Safety Analysis 16
8. Critical Analysis
8.1 Testing and Troubleshooting 17
8.2 Challenges 18
8.3 Lessons Learned
8.3.a Technical 19
8.3.b. Interpersonal 19-20
9. Future Improvements 20
9.1 Reflections 20-21
10. Budget/Cost Accounting
10.1 Funding 21
10.2 Project Costing 22
10.3 General Expenses 23
11. Community Service 24
12. Acknowledgements 25
12.1 References 25
12.2 List of Figures and Tables 25
12.3 Sponsors 25
HMS SeaBots: Ranger Team
2

Figure 1: HMS SeaBots: Ranger Company PhotoPhoto Credit: Jessica Ashman
1.1 Abstract
Company members pictured from left to right:Back row: C. Bauer, S. Shah, J. Yao, A. Aloni, K. Mahajan, A. Wani
Front row: C. Abraham, D. Imran Shaikh, S. Jamil, A. Kotgire
HMS SeaBots: Ranger Team
We are the HMS SeaBots Ranger Team, representing Harrington Middle School in Mt. Laurel, New Jersey. Our company is composed of ten highly skilled Mechanical, Electrical, and Software Engineers. All of our engineers are new to the MATE program except for our CEO, who was on our school’s Scout Team last year.
Our company is proud of its ability to design, build, and operate highly specialized remotely operated vehicles (ROVs). This year our goal was to create an ROV that can complete the various challenges presented in the 2017 MATE Competition. We followed the engineering design process to create a unique ROV that will efficiently accomplish the commerce, entertainment, health, and safety tasks for the Port of Long Beach in California.
Our ROV is equipped with a variety of components that aid in completing this year’s missions. One of the most vital components of our ROV is the gripper. Our Standard Gripper Kit A is controlled by a HiTec Analog Servo which receives commands from an Arduino Uno microcontroller mounted inside our control box. When fully open, the gripper can pick up objects up to 14.5 centimeters in width. Our ROV also has a neutrally buoyant tether that aids in maneuvering the ROV. Our control box also features a motor simulator board, two Sabertooth motor controllers, and two joysticks to pilot the ROV. These features, along with our small, lightweight frame design, will allow us to operate our ROV at an optimum level of performance while completing the four Port of Long Beach tasks.
3
1. Introduction

2. Project Management 2.1 Company Schedule
Figure 2: Company ScheduleCreated by D. Imran Shaikh
When the company was in its infancy, a work schedule was created to efficiently organize our time. The company schedule below illustrates the work that needed to be completed on the ROV. In addition to designing and building the ROV, all of the engineers had to work on the technical document and marketing display throughout the year. All of the work completed was monitored by our CEO, COO, CFO, CTO and to ensure that work was being completed properly and on time. Checklists were created so that goals were set and reached.
HMS SeaBots: Ranger Team
Control Box
ROV Frame
Camera
Light
Tether Wiring
Arduino Programming and Gripper
Shrouds
November December
2016
January February March April May June
2017
2.2 Company AssignmentsThe HMS SeaBots Ranger Team is divided into three engineering departments: Mechanical, Electrical, and
Software. This enables our company to perform all the required tasks in an organized manner. Each engineer is assigned specific jobs, allowing our company to meet the specific needs of our clients. Our company believes in increased productivity via staying on task and meeting deadlines. To stay on track and work more efficiently, each division had a specific goal to follow each week. Our divisions worked together on specific tasks. For example, our company Software and Electrical Engineers collaborated to make the ROV’s gripper function properly. Another example is the joint effort required by the Mechanical and Electrical Engineers to attach the tether to the ROV frame. Our engineers work well both independently as well as with members of other engineering divisions. This led our company to be successful and to produce a fine product for our Port of Long Beach clients. The following table indicates the division of labor among the company.
4

Mechanical Engineers Electrical Engineers Software Engineers
● Design and build an ROV frame within the parameters and constraints defined by the clients
● Design and create 3D printed shrouds
● Determine the best location for the four thrusters
● Work with the pilot to determine the best location for the gripper, camera, and light
● Build the control box● Work with the Software
Engineers to attach the Arduino to control box
● Waterproof and protect all the electrical connections
● Delineate circuit components on SID
● Work with Mechanical Engineers to connect the tether to ROV’s thrusters
● Connect the camera and light to the control box
● Determine the fuse calculations
● Program the Arduino Uno for the gripper
● Assemble the gripper● Assist Electrical Engineers in
connecting the Arduino to the control box
● Work with Electrical Engineers to illustrate gripper system on the SID
● Troubleshoot all coding issues as they arise
Figure 3: Division of Labor Created by A. Aloni
2.3 Company ContractOur CEO created a work behavior contract for each member of the company. The contract explained our
company’s rules and expectations, along with consequences for behavior that is not compatible with our company’s high standards. The contract improved company management since it helped every member follow directions, use time efficiently, and stay on task. The contract increased productivity.
HMS SeaBots: Ranger Team
3. Port of Long Beach Mission Theme
ROVs are used in ports around the world in multiple ways. This year, for the Port of Long Beach, ROVs will perform four specific tasks.
1) Commerce: Hyperloop Construction - Place a frame over a baseplate and fill it with concrete. By eliminating the need for ships to dock, a hyperloop increases the productivity of cargo ships by decreasing the wait time while also reducing air pollution.
2) Entertainment: Light and Water Show Maintenance - Replace a broken water fountain with a new one. It’s important to maintain the light and water shows, which benefits the tourism industry and Long Beach’s economy.
3) Health: Environmental Cleanup - High quantities of heavy metals are a byproduct of Long Beach’s commerce operations. The concentration of heavy metals in the water will be decreased by locating, sampling, and securing the contaminated area. This prevents the spread of harmful substances to marine life.
4) Safety: Risk Mitigation - Lost cargo containers should be tracked and identified. Ones with the highest risk should be given priority for recovery to reduce adverse effects.
ROVs are essential to modernize ports and increase their commerce, health, safety, and entertainment standards.
5
3.1 Task Descriptions

HMS SeaBots: Ranger Team
4. Design Methodology
Figure 5: Design MethodologyCreated by S. Shah and J. Yao
The following methodology, from MATE’s “Underwater Robotics: Science, Design & Fabrication” textbook, is used to design and build our company’s ROVs.
1. Accept the Mission
2. Create a Mission Statement
5. Identify Constraints
3. Identify the Mission
Design Methodology
4. Consider Performance Variables
6. Classify Vehicle Systems
7. Create a Concept Design
8. Conduct Trials
9. Execute Missions
10. Document Design and Construction
6
ROV doing various tasks at a portPhoto Credit: Deep Trekker Inc.
Examination of contaminantsPhoto Credit: UVS Pty. Ltd.
ROV at work near a port Photo Credit: RC SE2 Underwater ROV
3.2 Mission Related Photos
Figure 4: Mission Related Photos

5. Engineering Principles
Figure 6: Engineering PrinciplesCreated by A. Aloni
Our company identified the engineering principles that would influence the design of our ROV and put them into a diagram, pictured below.
HMS SeaBots: Ranger Team
7

Figures 7: ROV CAD DrawingTinkercad Drawing Created by S. Shah
6.1 FrameThe Mechanical Engineers decided to build the ROV frame out of ½” PVC (Polyvinyl Chloride). This
decision was made for several reasons. PVC is cheap, accessible, waterproof, can easily be assembled or cut, and PVC connector pieces are plentiful. Furthermore, it is resistant to corroding. We had to cut the PVC to meet our client’s size expectations. We decided the frame would support four bilge pump motors for thrust. Two of the motors were placed on the outside of the frame and the two vertical motors were connected by a cross in the interior front and back of the frame. The ROV’s main design shape is a rectangular prism. The dimensions of the ROV are 40cm x 33cm x 30cm (Length x Width x Height). Its small profile and lightweight frame allow it to be efficiently launched and piloted. The computer design for our ROV displayed below was produced using Tinkercad, an online 3D CAD (Computer-Aided Design) tool. The CAD drawing was used as a reference when constructing the ROV.
The Mechanical Engineers used a rectangular frame design for two reasons: stability and strength. We achieved stability through careful consideration of the placement of our thrusters and add-ons (camera, gripper, and Raman spectrometer) so that the center of buoyancy was directly above the center of gravity. A box-like design is suited for underwater heavy-duty work. All of our attachments are secured with wire ties, and clamps were used to attach two buoyancy tubes on the top sides of our frame. Properly securing the add-ons prevented components from falling off or shifting during the pool missions, thus avoiding changes to the center of buoyancy and center of gravity. We are also aware that this design was a tradeoff of speed for stability. As a result, we wanted to minimize the ROV’s drag, so we drilled holes in the PVC connectors and used open PVC connector pieces whenever possible for a more hydrodynamic design. These decisions were key in allowing our ROV to maneuver easily in the water.
6. Design RationaleOur ROV is designed to complete the Port of Long Beach tasks efficiently. A great deal of thought went into
the ROV frame, propulsion system, control system, and accessories. Prior to the building stage, we brainstormed what components would be needed on the ROV to complete the missions. We inventoried the parts in the classroom from previous years to determine what we could reuse. Then, we determined what could be handmade, what had to be 3D printed, and what had to be commercially purchased. We also considered time and budget constraints regarding these components, which are described throughout the Design Rationale.
Figure 8: Final ROV Photo Credit: D. Mahajan
HMS SeaBots: Ranger Team
8

Buoyancy is one of the most important engineering principles that our company had to consider. Our goal was to have a neutrally buoyant ROV for two reasons. First, it would be easier to pilot a neutrally buoyant ROV because the ROV would be hovering in the middle of the water column. Second, a neutrally buoyant ROV is more energy efficient. When deciding the flotation material for the ROV, compressibility had to be taken into consideration. Compressibility is the concept that the deeper something is underwater, the more compact it will become due to water pressure. We knew not to use foam pool floats since they can be easily compressed and affect the buoyancy.
Figure 9: ROV’s Buoyancy TubesPhoto Credit: A. Aloni
HMS SeaBots: Ranger Team
6.2 Buoyancy Tubes
6.3 Propulsion System
Figure 10: Propulsion System Vertical Motor PlacementPhoto Credit: A. Kotgire
Our ROV features four Johnson Pump 500 GHP bilge pump motors for the propulsion system, each with a maximum Amp draw of 2.5. Two of the motors were placed on the outside of the frame on the right and left side of the ROV for forwards, backwards, and turning motions. The other two motors, located at the center forward and aft of the robot, are for vertical movement. With the positioning of these four motors, we traded off sideways “crabbing” motion in order to have more vertical power for this year’s missions.
We also did not want to purchase expensive syntactic foam, and we weren’t able to mold our own plastic material. Because of these reasons, our Mechanical Engineers decided to create air canisters for buoyancy tubes using two 2” PVC tubes with end caps. It was easier to adjust the PVC buoyancy tubes compared to commercial buoyancy tubes. We cut the air canisters to the exact length to be neutrally buoyant to avoid adding ballast to our ROV. One tube is 12” while the other tube is 13” to keep the ROV level, even when more components are on the left side of the ROV. Air canisters allow us to maintain buoyancy at any depth which is paramount when trying to complete the Port of Long Beach tasks.
9
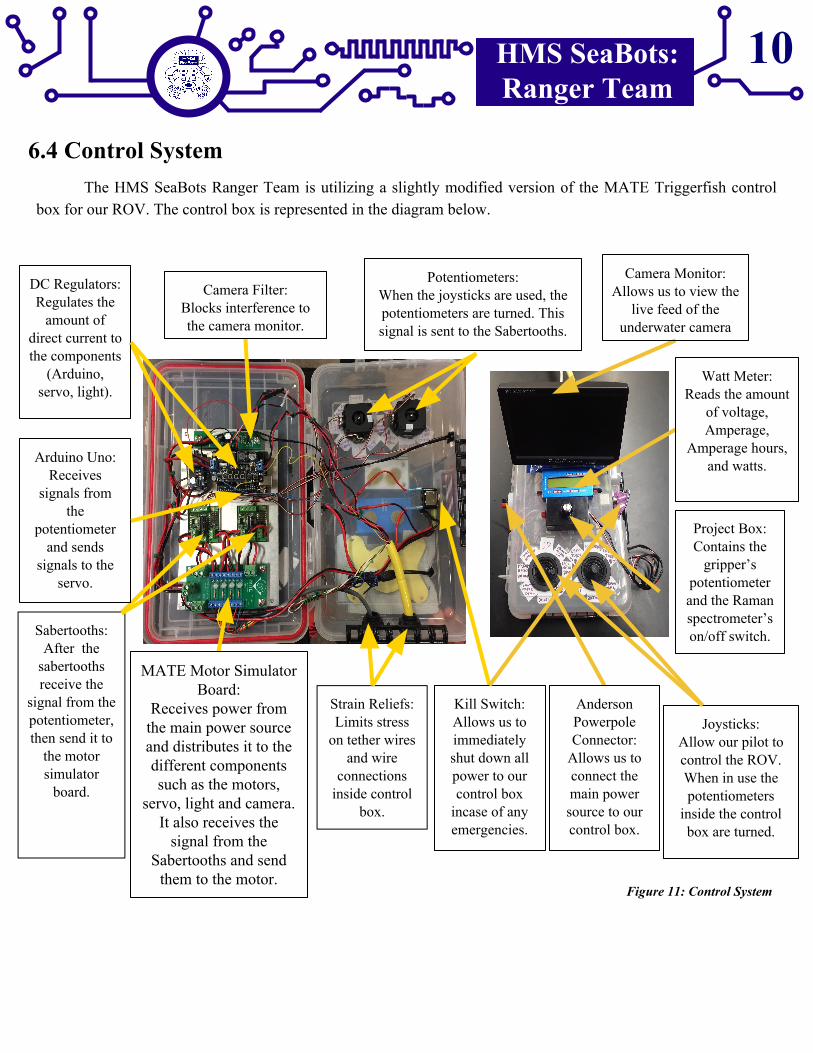
The HMS SeaBots Ranger Team is utilizing a slightly modified version of the MATE Triggerfish control box for our ROV. The control box is represented in the diagram below.
6.4 Control System
HMS SeaBots: Ranger Team
Joysticks:Allow our pilot to control the ROV. When in use the potentiometers
inside the control box are turned.
Potentiometers: When the joysticks are used, the potentiometers are turned. This signal is sent to the Sabertooths.
DC Regulators:Regulates the
amount of direct current to the components
(Arduino, servo, light).
Sabertooths:After the
sabertoothsreceive the
signal from the potentiometer, then send it to
the motor simulator
board.
Camera Filter:Blocks interference to the camera monitor.
Arduino Uno:Receives
signals from the
potentiometer and sends
signals to the servo.
Strain Reliefs:Limits stress
on tether wires and wire
connections inside control
box.
Kill Switch:Allows us to immediately shut down all power to our control box
incase of any emergencies.
Camera Monitor:Allows us to view the
live feed of the underwater camera
Watt Meter:Reads the amount
of voltage, Amperage,
Amperage hours, and watts.
Anderson Powerpole Connector:
Allows us to connect the main power source to our control box.
Project Box:Contains the
gripper’s potentiometer and the Raman spectrometer’s on/off switch.
MATE Motor Simulator Board:
Receives power from the main power source and distributes it to the different components such as the motors,
servo, light and camera. It also receives the
signal from the Sabertooths and send
them to the motor.
10
Figure 11: Control System

6.4.a SID (Systems Integration Diagram)The System Integrated Diagram (SID) is a detailed sketch of the ROV’s electrical systems. It accurately
displays all of the components and wiring connections. Our SID was a fundamental part of staying organized by providing crucial information about our system’s design and function. The SID also assists in troubleshooting our electrical circuits.
Figure 12: System Integration DiagramCreated by Company Software and Electrical Engineers
HMS SeaBots: Ranger Team
11

6.4.b. CameraOur company utilizes a Tiker HD, 8 LED, night vision vehicle backup camera. The night vision feature helps
us complete missions in low visibility situations. The camera’s high definition gives us greater visual acuity and resolution for high quality monitor viewing. The camera is housed in an inexpensive, homemade housing tube. The camera was superglued flat on the faceplate, and the faceplate was glued to the acrylic tube. All the wire connections were placed inside the acrylic tube and the tube was filled with clear varnish and then topped off with marine epoxy. We also used marine epoxy where the faceplate and the acrylic tube met. This proved to be the best waterproofing method we have used. We also repositioned our new camera for better field of view.
Our camera monitor is mounted on the top of our control box to give our pilot a view from the robot’s perspective. We used a 7” TFT-LCD color monitor. This cost-effective color monitor was chosen to distinguish the contaminants in the Health: Environmental Cleanup task. This monitor not only gives us high-resolution pictures and full color display, but it also has a low-power mode that saves energy.
Figure 13: CameraPhoto Credit: A. Aloni
Figure 14: Camera MonitorPhoto Credit: A. Aloni
Figure 15: Camera Mounted on ROVPhoto Credit: A. Wani
Figure 16: Camera Monitor Placement Photo Credit: A. Wani
HMS SeaBots: Ranger Team
12

6.4.d. Software Flowchart
Figure 17: Software Flowchart Created by A. Aloni, D. Imran Shaikh, S. Shah, and J. Yao
START
When the potentiometer is
turned, there will be a new value. In this
step, that value will be read. It will then command the Servo
to open based off that value.
In this function, the Servo will turn,
showing how far the gripper will open.
This value is measured in degrees.
As we utilize the gripper, we must
know the value of the Servo.
This function will tell us how far the Servo
gripper will open.
Read Specified Value of Analog Pin
Read the Current Angle of the Servo
Write Value of the Servo
END
Our company’s Software Engineers decided to use Arduino software to program an electronic gripper. The Arduino platform is a great entry-level program that permits a more precise and methodical performance from the gripper compared to alternative solutions, such as a hydraulic gripper. Our company modified a gripper code found in the online Arduino library. We added a reused DC voltage regulator in our control box to lower the voltage traveling to the Arduino Uno board because the Arduino operates at 5V and our ROV operates at 12V. The DC voltage regulator was reused to reduce ROV expenses, and the difference between a new and used DC voltage regulator is very slight. Our Software Engineers selected an HS-646WP HiTec servo, also powered through another DC regulator incorporated into our circuit, to receive the signal from the Arduino. This servo can rotate 60˚ in 0.2 seconds, only weighs 60 grams, and measures 6.35cm by 4.45cm by 4.93cm. Because this servo has an IP67 rating (meaning it can only be submerged to one meter), additional waterproofing was necessary. We used marine epoxy around all the seals and screw heads. To open and close the gripper, we wired a potentiometer inside a project box to operate the gripper with precision.
6.4.c. Software
HMS SeaBots: Ranger Team
The Arduino Uno must recognize the
servo so that it knows what it will be
controlling. Then, it creates the servo to
be used and recognized later in
the code.
Include & Define Servo
This step allows the signal to be sent from the Arduino Uno to the servo via pin 9
Attach Servo Variable to Pin 9
In this step, our company must ensure
that the code is repeated every time
our company needs to utilize the gripper. A
loop allows us to accomplish this.
Declare Function Loop
13

Our ROV utilizes two tethers that are both inserted into a tether sleeve to keep them together for ease of management. One is a neutrally buoyant tether. The neutrally buoyant tether consists of 5 pairs of wires: 2 pair of 26 AWG, 1 pair of 22 AWG, 2 pairs of 20 AWG. The neutrally buoyant tether powers and signals the camera, servo, and Raman spectrometer. The camera utilizes one pair of 20 AWG for power and one pair of 22 AWG for signal. The servo uses one pair of 20 AWG for power and one 26 AWG wire for signal, and the Raman spectrometer uses one pair of 26 AWG wire. The neutrally buoyant tether is a unique feature of the ROV since it does not interfere with our ROV’s buoyancy. The second tether is used for the four thrusters and consists of 4 pairs of 18 gauge wires. Both tethers were stripped from the previous year’s ROVs to reduce ROV expenses.
Another special feature of the robot is the gripper. The gripper is made with the Standard Gripper Kit A and a HiTec HS-646WP Waterproof Analog Servo. A servo-powered gripper is preferred over a hydraulic gripper due to inefficiency and inconsistency of the latter. The servo receives a signal from an Arduino Uno board which is mounted in our control box. The Arduino board is connected to a potentiometer mounted in a project box. The potentiometer allows us to control the servo, which will rotate to open or close the gripper. When the potentiometer is turned, the Uno reads the value of the potentiometer and sends the signal to the servo. This allows us to open our gripper up to 100 degrees, which makes it extremely important for every task of this year’s missions.
A Dorcy LED 150 Lumens True Spot Reflector simulates a Raman spectrometer. This special feature is used for the Environmental Cleanup task which requires a red light to be shined on two different agar sediment samples to determine the type and level of contamination. A small, light weight aluminum alloy flashlight was purchased to enhance the pilot’s ability to perform the task with superior visual enhancement. The batteries were removed from the flashlight and a circuit was created to include an on/off push button switch. A DC voltage regulator was added to the control box to lower the voltage going to the light from 12 to 4.5 volts. This causes the Raman Spectrometer to perform optimally while staying within the weight parameters of the ROV.
After identifying a contaminant with the Raman Spectrometer for the Environmental Cleanup task, a handmade agar sampler will be used to collect the contaminated agar from the ocean floor. This special feature was created from a one-way valve and a plastic extension tube, having an inlet diameter of 1½”. The one-way valve creates suction when the sample is collected. A variety of samplers were tested, including thinner tubes and tubes with “teeth”. However, the one-way valve method proved to be the most efficient. A handmade sampler is also more cost efficient than a commercially purchased one.
Raman Spectrometer
Figure 20: Red FlashlightPhoto Credit: A. Aloni
Neutrally Buoyant Tether
Figure 18: Neutrally Buoyant TetherPhoto Credit: A. Aloni
6.5 Special Features
Figure 21: Agar Sampler Photo Credit: A. Wani
Agar Sampler
Gripper
Figure 19: GripperPhoto Credit: A. Aloni
HMS SeaBots: Ranger Team
14

7. Safety
7.1 Safety Checklist✓ Tools are used safely and returned to their proper
location.
✓ Each propeller shroud is equipped with high visibility red and white warning tape signifying potential dangers posed by the propellers.
✓ Strain reliefs are used for tether and power wires going inside control box.
✓ All components in the control box are properly wired and secured. No copper wire is exposed. Electrical components to be submerged in water are properly housed or waterproofed or both.
✓ When stowed, tethers are neatly wrapped to avoid knots or kinks .
Figure 22: Safety Checklist/Protocol Created by A. Aloni
Figure 23: Safety Features of the ROV and Control Box Created by S. Jamil
7.3 Safety FeaturesSafety Feature Description
Shrouds Shrouds prevent foreign substances from harming the motors and indicate that the propellers are capable of causing injury.
Strain Reliefs for Tether Wires
Strain reliefs protect wires from damage or being disconnected while being pulled on or stretched.
Heat Sink in Control Box
The heat sink is a metal plate in the control box that dissipates heat from the circuit boards. It prevents the circuit and various components from overheating by regulating the temperature.
25 Amp Fuse and Kill Switch
Both the 25 Amp fuse and kill switch have the ability to cut power to our ROV. The inline fuse cuts all power if the circuit exceeds 25 Amps, preventing damage to circuit components. The kill switch allows us to immediately shut down the power in case of an emergency.
Watt MeterThe watt meter is used to ensure that there is a sufficient amount of voltage running through the circuit.
Waterproofing & Housing
Waterproofing offers protection to any wires or components entering the water. The housing offers a waterproof container for anything that is not waterproof.
HMS SeaBots: Ranger Team
✓ Company members are wearing closed-toed shoes on the pool deck at all times.
✓ All components going into the water are properly housed and/or waterproofed.
✓ Tether is neatly wrapped. Only the required amount of tether is unravelled.
✓ The camera is protected with marine epoxy to cover all wiring.
✓ Rid the ROV of corrosive elements by rinsing it after pool practices
Safety is paramount to preserve and protect our employees. Job Safety Officers set up safety precautions and protocols. The following procedures explain how safety was incorporated into the work environment. Employees are trained in CPR and operation of the AED to handle emergencies that may occur in the workplace. A fully stocked first aid kit is in a highly visible location as well.
7.2 Safety Protocol
15

7.4 Job Safety AnalysisTask Hazards Prevention
Drilling PVC● Drill may slip and injure worker● Cut pieces may become airborne
● Use a table vice to hold PVC when drilling
● Wear safety goggles to prevent damage
Cutting PVC ● PVC cutter blade is sharp ● Have one person hold the PVC pipe in place while another cuts the PVC
Soldering the Circuit Board
● High risk of getting burnt when soldering
● Possibility of burning the circuit board and/or frying the components
● Hold solder iron properly● Refrain from holding soldering iron in
place for too long● Safety eyewear must be worn
Testing Propellers● Spinning propellers may cause
injury to hands and fingers● Keep hands and fingers away from
propellers
Stripping Wires● Wires and/or insulation may get
damaged from improper wire stripping
● Practice using wire cutters easily and carefully inspect wires after being stripped
Waterproofing with Heated Tools
● Chance of getting burnt or damaging wires or other ROV parts
● Refrain from touching the heated part of the gun and pay close attention
● Keep hot equipment in a specified place to prevent accidental contact
Sharp Pins on Arduino
● It is easy to prick fingers on pins ● Keep fingers a safe distance away from pins
Pool Deck Safety
Tether/Lift Basket
Management
● Risk of Tether and Lift Basket Managers falling and drowning
● Wear a life vest while on the pool deck at all times
Deployment of ROV
● Risk of tripping on unraveled tether on the pool deck
● Ensure that only necessary tether is unbundled
Qualification● Those on deck may not be fit to
maneuver the robot● Test skills of everyone on deck to make
sure that all are qualified.
Figure 24: Job Safety Analysis Created by S. Jamil
HMS SeaBots: Ranger Team
16

8.1 Testing and Troubleshooting8. Critical Analysis
Troubleshooting involves identifying the cause of a problem and then devising a solution for it. It is an important skillset to identify problems and fix them in a timely manner. Troubleshooting needs to be conducted immediately to prevent a buildup of issues in the operation of the ROV.
HMS SeaBots: Ranger Team
We encountered another major problem with our gripper. This time our Electrical Engineers and Software Engineers collaborated to identify the cause of this problem. Various company members observed the ROV had a “ghost gripper” that intermittently closed and opened on its own. We considered this a major issue because the gripper plays a key role in every mission. By tracing the wires from the gripper to the control box, it was discovered that wires from the servo were pulled too taut, damaging the connection going into the servo and compromising the electrical signal transmission required to operate the gripper. The taut wires permanently damaged the servo. The only solution was to purchase a new servo and new wires to ensure electrical signal transmission to the operation of the gripper was maintained. To avoid another signal interference from taut wires, Electrical Engineers completed the connection with sufficient slack in the wires.
The Electrical Engineers encountered challenges when testing the ROV at the pool. On three separate occasions of pool testing, the pilot experienced camera problems. The camera monitor image became grainy and the camera malfunctioned. Our Electrical Engineers analyzed the issue and determined that our original homemade camera housing, made of a 1.5” PVC coupling and two reducer bushings on either end, was not secured properly. The PVC pieces were not tight enough and small openings under the seals were noted. Before our second pool test, we properly tightened the PVC connectors and also applied marine epoxy to the seals. We did not observe small openings under the seals. However, water entered the PVC housing again and fogged the camera lens and saturated the wire connections. Our Electrical Engineers decided to abandon the PVC camera housing method because it was evidently not a viable method of waterproofing our camera. This led us to conduct more research to find suitable camera housing. One solution was found on the MATE website in which a 5” long acrylic tubing and varnish is used to waterproof cameras. This method involves attaching an acrylic faceplate to 1.25” diameter acrylic tube. The camera was glued to the face plate, the camera wire connections were folded into the tube, and then the tube was filled with clear varnish. Our third test of the camera housing confirmed that the new solution worked! A bonus to our new camera housing unit was that it was smaller in size and lighter in weight.
Figures 25&26: Camera Housing EvolutionTop: Previous PVC housing
Bottom: Final solution (acrylic tubing)Photo Credit: A. Aloni
17
Figures 27: ROV Pool Test 1Photo Credit: J. Yao
Figures 28: ROV Pool Test 2Photo Credit: J. Yao

Technical Challenges
Challenge Solution
1. Cameras and Gripper - When connecting the camera, the camera fuse blew because we neglected to apply electrical tape to the newly soldered wires. The power wires touched, creating a short circuit. Another feature that caused issues was the gripper. The gripper constantly operated on its own in an inconvenient manner. After turning on the control box, the gripper often began causing issues.
1. Troubleshooting - After getting a new camera, we tested the camera after making each solder connection. Though more time was dedicated to the camera than expected, the company produced a working camera. For the gripper, we noticed that the wires were pulled too tight, which damaged our servo. We replaced our servo with a new one. After installing the new servo, we made sure to leave some extra slack for the servo wires to prevent damage.
2. ROV Design Constraint - According to the manual, the ROV had to be less than 48 cm in width and weigh less than 11 kilograms to meet our client’s preferred specifications in both the size and weight categories. We had to remember to include the ROV, the tether (excluding 1 meter), the control box, and the sample basket within these constraints. With a number of features to fit in a limited amount of space, decreasing the size of the ROV would take a great deal of time and thought.
2. Redesign - We constructed a 48 centimeter diameter hoop based on the information provided in the manual. We used the hoop as reference to adjust our prototype ROV to the correct size. After decreasing the size, we found that the weight was under the amount of our client’s preferred specifications.
3. Hyperloop Construction - While performing the hyperloop construction task, the company had trouble placing the frame over the baseplate. This was because one person did not have the precision to complete the action.
3. Collaboration - An additional person was assigned to placing the frame over the baseplate. One person would hold the frame out while the other person maneuvers the frame onto the baseplate. This allowed an increase amount of focus on positioning the frame over the baseplate.
Interpersonal Challenges
Challenge Solution
1. Time Constraints - The requirements for the MATE ROV competition are extremely demanding, especially on top of school work. The company had to meet deadlines for submitting important documents, prepare the oral presentation, and practice pool missions.
1. Start With a Clean Slate - We set goals and deadlines at our meetings to try to keep up with all the demands of the competition. However, working on a task for too long resulted in exhaustion and lack of focus. Returning to the task later was helpful and increased productivity. Company members also worked on tasks in their own time to accelerate the company’s progress.
2. Company Dynamics - Issues included disagreements regarding time, commitment, and decision-making. It is common and understandable for companies to face these type of issues. After all, no two company members will have the exact same thought process.
2. Group Discussions - Company members learned the importance of gathering together, understanding each other’s point of view and coming to a consensus as a group. With an understanding of others’ opinions, members are able to weigh each possibility and help decide what’s best for the company.
Figure 29: Challenges Faced Created by S. Jamil and J. Yao
8.2 Challenges
HMS SeaBots: Ranger Team
18

Consider All Constraints and Parameters When Designing and Building
Even though redesigning is an important aspect of the engineering design process, we realized that we could have prevented multiple redesigns early in our designing and building phase. Our Mechanical Engineers did not initially consider the size and weight restrictions mandated by our client. If these constraints were taken into consideration when we first started designing the ROV, a great deal of time would have been saved.
Waterproofing
Most “waterproof” items are not waterproof for the depths we are working in. We learned about IP ratings (Ingress Protection) which indicate sealing effectiveness of objects. We realized it was best to use multiple waterproofing methods to ensure that water did not damage our ROV’s accessories. A variety of methods were used including marine epoxy, butyl rubber tape, clear varnish, hot glue, heat shrink, acrylic tubing, and plasti-dip.
Test Everything Step By Step
Build - Test - Repeat. Do everything one step at a time. When we initially wired our camera, tether, and monitor, all the wire connections were simply twisted together with no soldered joints. Everything worked perfectly. However when we soldered the same wire connections together, the monitor did not receive the signals from the camera through the tether. We realized that since we did not solder and test every joint one step at a time, we could not figure out which connection(s) were causing the issue, therefore, making it difficult to troubleshoot and retrace our steps.
Wire Crosstalk
At our regional competition, the tether was too short to complete one of the missions, so we decided to replace the tether with one that was ten feet longer. After this change, we started experiencing crosstalk between the motors and the servo, causing the gripper to spasm. To solve this, we disconnected the servo wires from the neutrally buoyant tether and ran a new shielded tether between control box and servo. This blocked the interference and our servo worked properly.
Habits of the Mind
Persistence…This was taught to us by our ROV’s gripper! We had issues with our code, we had problems with interference from our motors, and we had problems with its wiring. The gripper taught us to never give up because we felt the gripper was fundamental to complete the Port of Long Beach missions. Innovation….Being open to new ideas from team members led to the development of a creative agar sampler that was much more effective than previous samplers. If we hadn’t been willing to take some risks, we would be using an inadequate agar sampler for the Health: Environmental Cleanup task.Striving for accuracy…Our engineers continually improved their skills and knowledge by conducting extensive research using the MATE textbook, MATE website, and other expert sources. We as a team applied what we learned to all aspects of our ROV, technical documentation, and marketing display.
8.3.b. Interpersonal Lessons
8.3 Lessons Learned8.3.a. Technical Lessons
Figure 30: Technical Lessons LearnedCreated by S. Jamil
HMS SeaBots: Ranger Team
19

Not Everything Is Perfect On the First Try
Not everything went as expected. Therefore, it was crucial to accept certain failures in order to stay calm and solve the problems. For example, we struggled to get our camera to function. Despite the difficulty of the many problems that we encountered when working with the camera, our company members acknowledged the fact that a solution was feasible. Consequently, the company members attempted perfecting the camera on multiple occasions. The final product was a fully assembled and waterproofed camera that could operate appropriately in the pool.
Teamwork
It was often challenging to get all ten company members to reach an unanimous agreement. Instead of letting these disagreements slow the progression of the company’s project, they were used as learning experiences. Our company was self-directed and self-motivated. Even though arguments persisted throughout the year, learning to communicate opinions, compromise ideas, and think interdependently led to improved teamwork. Learning to collaborate allowed more productivity.
Figure 31: Interpersonal Lessons LearnedCreated by S. Jamil
Although we believe that our final ROV is the product of our best efforts, there is always room for improvement. For example, a mini gripper would assist in completing missions, such as pulling the pin from the frame, that involve a great deal of precision. An additional upgrade that would lessen the difficulty of precise missions is a rearview camera that alerts the pilot of objects that the ROV may bump into. This can prevent damage to the ROV while it is in the pool. Untangling the tether would also be more convenient with the rear view camera. If an opportunity to modify the robot arises, our company would surely incorporate these improvements.
9. Future Improvements
Christopher Bauer - “My participation in the MATE competition was truly life-changing. As the CEO, I have learned leadership skills and other skills that have an important influence on modern business. I’ve learned to persevere when a frustrating issue came up. In a way, MATE has prepared me for my future and my life. A part of me will always remember the life skills and lessons that MATE has taught me.”
Jonathan Yao - “MATE was definitely a memorable experience. Through MATE, I became part of a realistic work environment. The company and I learned how to set priorities, including the construction of the ROV, technical documentation, and marketing display.”
Cherry Abraham - “MATE taught me how to work well with others as well as work efficiently by myself. Other than that, I had a great time learning different types of engineering skills as well as the ability to identify and solve problems that we faced.”
Sabrina Jamil - “Being a part of MATE helped me learn how to plan and work well. I learned that knowing your goal is the best way to achieve it quickly and successfully. I was introduced to an environment that let me see how I would be working in the future by collaborating with others.”
9.1 Reflections
HMS SeaBots: Ranger Team
20

Areeba Wani - “I am so thankful that I joined MATE this year. As a CTO, I’ve had to work harder than I have ever before. I had to make sure that our technical documentation was done on time and done well. As an EE, I learned how to collaborate to get the most amount of work done in the least amount of time. I learned how to work on a team. The lessons I’ve learned and the things MATE has helped me discover are priceless and precious, and I will treasure them forever.”
Aarushi Aloni - “MATE was a phenomenal experience. I learned time management skills which will help me in my high school and college career, along with the work force. I learned how to cooperate with others in the company, and how to work efficiently with others. As a Job Safety Officer, it showed me the importance of safety when working with anything, anywhere.”
Dayyan Imran Shaikh - “MATE has changed me in many ways. I learned what it is like to be in a company and how to work together. I learned so much engineering knowledge that will definitely help me in school and in the future. MATE will also help me accomplish tasks I never could do without the knowledge I have acquired.”
Abhishek Kotgire - “MATE has been a wonderful learning experience. I was able to apply my knowledge to design and build an ROV that can accomplish the missions. I learned many engineering principles.”
Krisha Mahajan - “MATE has taught me to give my one hundred percent every time I am doing something. It has also allowed me to understand the basics of electrical engineering. My colleagues helped me a lot through the process of learning this information.”
Saajan Shah - “The MATE program has taught me a variety of skills such as the ability to communicate with others. I obtained knowledge that I would not have learned in a typical classroom environment, which made the experience truly valuable.”
HMS SeaBots: Ranger Team
10.1 Funding
ActualDescription Budget Quantity Unit Price Total Price Variance PercentageMount Laurel School District Funding $1,000.00 1 $1,206.14 $1,206.14 $206.14 9.49%
Fundraisers $3,500.00 1 $4,000.00 $4,000.00 $500.00 31.48%
Funds From Parents $7,000.00 12 $625.00 $7,500.00 $500.00 59.03%Total Available Funding
$11,500.00 14 $12,706.14 $1,206.14 100.00%
10. Budget/Cost Accounting
21

HMS SeaBots: Ranger Team
10.2 Project Costing
Actual
Category Description Source Budget Quantity Unit Price Total Price
Variance Percentage
Frame
1/2 inch PVC Pipes, Tees, Crosses, Elbows, 4-ways, 5-ways Purchased $30.00 1 $25.97 $25.97 $4.03 0.21%
3D Printed ShroudsDonated $15.00 1 $0.00 $0.00 $15.00 0.00%
Zip Ties Re-Used $5.00 1 $0.00 $0.00 $5.00 0.00%
Subtotal for Frame $50.00 3 $25.97 $24.03 0.21%
Control Box
MATE TriggerFish Kit Purchased $640.00 1 $640.00 $640.00 $0.00 5.06%
TriggerFish Arduino Uno Kit Re-Used $60.00 1 $0.00 $0.00 $60.00 0.00%
65 PCS Male Jumper Wires Purchased $5.00 1 $5.00 $5.00 $0.00 0.04%
DC Voltage Regulators Purchased $15.00 1 $15.00 $15.00 $0.00 0.12%
Nylon Male-Female Threaded Purchased $10.00 1 $10.00 $10.00 $0.05 0.08%
Tether (From VideoRay) Donated $377.64 1 $0.00 $0.00 $377.64 0.00%
Subtotal for Control Box $1,107.64 6 $670.00 $437.64 5.30%
Propulsion
500 GPH Bile Pump Motors Donated $65.00 4 $0.00 $0.00 $65.00 0.00%
3D Printed Shrouds Donated $15.00 1 $0.00 $0.00 $15.00 0.00%
Vinyl Reflective Tape Purchased $4.00 1 $2.98 $2.98 $1.02 0.02%
Nylon Insert Lock Nuts Purchased $3.00 1 $2.08 $2.08 $0.92 0.02%
Stainless Steel Flat Phillips Screws Purchased $2.50 1 $1.98 $1.98 $0.52 0.02%
Subtotal for Propulsion $89.50 8 $7.04 $82.46 0.06%
Gripper
Standard Gripper Kit A-Channel Mount Purchased $10.00 1 $9.95 $9.95 $0.05 0.08%
HiTec Waterproof Analog Servo Purchased $45.00 1 $44.91 $44.91 $0.09 0.36%
SainSmart UNO R3 ATmega328P Purchased $10.00 1 $10.99 $10.99 -$0.99 0.09%
400 Holes Solderless Breadboard Purchased $5.00 1 $3.90 $3.90 $1.10 0.03%
Subtotal for Gripper $70.00 4 $69.75 $0.25 0.83%
CameraCamera Purchased $15.00 1 $17.99 $17.99 -$2.99 0.14%
Camera Housing Purchased $10.00 1 $6.28 $6.28 $3.72 0.05%
Subtotal for Camera $25.00 2 $24.27 $0.73 0.19%
Misc. Parts
Buoyancy Tubes Re-Used $2.00 1 $0.00 $0.00 $2.00 0.00%
Buoyancy Clamps Purchased $2.00 1 $1.64 $1.64 $0.36 0.01%
Flashlight Donated $50.00 1 $0.00 $0.00 $50.00 0.00%
Camera Monitor Re-Used$24.44 1 $0.00 $0.00 $24.44 0.00%
Subtotal for Misc. Parts $54.00 3 $1.64 $52.36 0.01%
Subtotal for ROV Expenditure $1,356.14 26 $798.67 $597.47 6.32%
22

HMS SeaBots: Ranger Team
10.3 General Expenses
Actual
Category Description Source Budget Quantity Unit Price
Total Price
Variance Percentage
Pool Testing
Pool Rental Purchased $500.00 1 $500.00 $500.00 $0.00 3.96%
STEM Classroom Pool Donated $0.00 1 $0.00 $0.00 $0.00 0.00%
Subtotal for Pool Testing $500.00 2 $500.00 $0.00 3.96%
Marketing
Poster Board Printing Purchased $75.00 1 $75.00 $75.00 $0.00 0.59%
Business Card Purchased $14.99 1 $14.99 $14.99 $0.00 0.12%
Product Category Binder Re-Used $5.00 1 $0.00 $0.00 $5.00 0.00%
Team Uniforms Purchased $300.00 12 $25.00 $300.00 $0.00 2.37%
Subtotal for Marketing $394.99 15 $389.99 $5.00 3.09%
Travel Expense
Flight from PHL to LAX Purchased $4,800.00 12 $400.00 $4,800.00 $0.00 37.98%
Lodging/Meals at Long Beach, CA Purchased $7,000.00 12 $500.00 $6,000.00 $1,000.00 47.47%
Other Misc. Costs(including MATE Registration Fee) Purchased $150.00 1 $150.00 $150.00 $0.00 1.19%
Subtotal for Travel Expense $11,950.00 25 $10,950.00 $1,000.00 86.64%
Subtotal for General Expense $12,844.99 42 $11,839.99 $1,005.00 93.68%
Total Project Cost $14,201.13 68 $12,638.66 $1,602.47 100.00%
Total Remaining Funds $67.48
ROV Cost Analysis
Description Amount Percentage
Value of Items Purchased $798.67 57.53%
Value of Items Reused $67.00 4.83%
Value of Items Donated $522.64 37.64%
Total Value of ROV $1,388.31 100.00%
HMS MATE Total Student Hours
Description Budget (Hours)
Actual (Hours) Variance Percentage
ROV Design1,250 1,375 -125 72.37%
ROV Pool Tests250 225 25 11.84%
Technical Documentation250 200 50 10.53%
Poster Designs20 25 -5 1.32%
Oral Presentation Practice100 75 25 3.95%
Total Hours1,870 1,900 -30 100.00%
23

Company Member Hours Served Service(s)
Cherian Abraham 3 hrs.4 hrs5 hrs.
Barnes & Noble Maker FaireMount Laurel Fall FestivalTake Your Child To Work Day
Aarushi Aloni 3 hrs. 4 hrs.5 hrs
Barnes & Noble Maker FaireMount Laurel Fall FestivalTake Your Child To Work Day
Chris Bauer 3 hrs. 4 hrs5 hrs.
Barnes & Noble Maker FaireMount Laurel Fall FestivalTake Your Child To Work Day
Dayyan Imran Shaikh
3 hrs.4 hrs.
Barnes & Noble Maker FaireMount Laurel Fall Festival
Sabrina Jamil 4 hrs5 hrs.
Barnes & Noble Maker FaireTake Your Child To Work Day
Abhishek Kotgire 5 hrs. Take Your Child To Work Day
Krisna Mahajan 4 hrs5 hrs.
Mount Laurel Fall FestivalTake Your Child To Work Day
Saajan Shah 0 hrs. None
Areeba Wani 3 hrs.5 hrs
Barnes & Noble Maker FaireTake Your Child To Work Day
Jonathan Yao 4 hrs5 hrs.
Mount Laurel Fall FestivalTake Your Child To Work Day
As a company, it is essential to give back to the community. We participated in three different service events: a Barnes & Noble Mini Maker Faire, Take Your Child To Work Day, and the Mount Laurel Fall Festival. At the Mini Maker Faire, we informed customers about the MATE program and how to solder components on a circuit board. On national Take Your Child To Work Day, we taught the teachers’ children how to pilot ROVs. At the Fall Festival, we talked to community members about our school’s STEM ocean exploration program and taught children and their parents how to pilot ROVs. As a company, the HMS SeaBots accumulated a total of 83 hours of community service as a company.
11. Community Service
Figure 32: Company Community Service ChartCreated by D. Imran Shaikh
HMS SeaBots: Ranger Team
24

12.3 Sponsors
12.1 References
The HMS SeaBots Ranger Team thank our sponsors for their generosity throughout the year as we prepared for the 2017 MATE Competition. We especially thank PA MATE for their donations, which included our 4 bilge pump motors.
12. Acknowledgements
12.2 List of Figures and Tables
"Arduino - Reference." Arduino - Reference. Web. 09 Apr. 2017.
“Create 3D Digital Designs with Online CAD." Tinkercad. Web. 07 Apr. 2017.
Hymel, Shawn. “Alternating Current (AC) vs. Direct Current (DC).” Alternating Current (AC) vs. Direct Current (DC), SparkFun Electronics,
learn.sparkfun.com/tutorials/alternating-current-ac-vs-direct-current-dc. Accessed 10 Apr. 2017.
PA MATE Regional Workshop at Villanova University 04 Feb. 2017.
"Ranger 2017 Manual."www.marinetech.org REVISIONS Web.
"Marine Advanced Technology Education :: Home." MATE. Web. 07 Apr. 2017.
Moore, Steven W., Harry Bohm, and Vickie Jensen. Underwater robotics: science, design & fabrication. Monterey, CA: Marine Advanced Technology Education (MATE) Center, 2010. Print.
Page Figure Number and Figure Title Page Figure Number and Figure Title
3
456678899
10111212121213
1: HMS SeaBots: Ranger Company Photo2: Company Schedule3: Division of Labor4: Mission Related Photos5: Design Methodology6: Engineering Principles7: ROV CAD Drawing8: Final ROV9: ROV’s Buoyancy Tubes10: Propulsion System (Vertical Motor Placement)11: Control System12. Systems Integration Diagram13: Camera14: Camera Monitor15: Camera Mounted on ROV16: Camera Monitor Placement17: Software Flowchart
141414141515
16171717171819
19-202425
18: Neutrally Buoyant Tether19: Gripper20: Red Flashlight21: Agar Sampler22: Safety Checklist/Protocol23: Safety Features of the ROV and Control Box24: Job Safety Analysis25: Camera Housing Evolution26: Camera Housing Evolution27: ROV Pool Test 128: ROV Pool Test 229: Challenges Faced30: Technical Lessons Learned31: Interpersonal Lessons Learned32: Company Community Service Chart33: Sponsor Logos
Figure 33: Sponsor Logos
HMS SeaBots: Ranger Team
25