
HiPath 3000 5000 V5.0 Getting Started
58
HiPath 3000 V5.0 HiPath 5000 V5.0 Getting Started
-
Upload
sorin-birou -
Category
Documents
-
view
40 -
download
7
description
telefonie siemens
Transcript of HiPath 3000 5000 V5.0 Getting Started

HiPath 3000 V5.0HiPath 5000 V5.0
Getting Started

GetstartedTOC.fm
For internal distribution only Contents
Contents 0
1 Introduction. . . . . . . . . . . . . . . . . . . . . . . . . . . . . . . . . . . . . . . . . . . . . . . . . . . . . . . . . . 1-1
2 HiPath 3000 V5.0 IP System. . . . . . . . . . . . . . . . . . . . . . . . . . . . . . . . . . . . . . . . . . . . . 2-12.1 Important Information. . . . . . . . . . . . . . . . . . . . . . . . . . . . . . . . . . . . . . . . . . . . . . . . . . 2-22.2 Step by Step Startup . . . . . . . . . . . . . . . . . . . . . . . . . . . . . . . . . . . . . . . . . . . . . . . . . . 2-4
2.2.1 Installing The Hardware . . . . . . . . . . . . . . . . . . . . . . . . . . . . . . . . . . . . . . . . . . . . 2-42.2.2 Installing Additional HiPath 3000 Modules . . . . . . . . . . . . . . . . . . . . . . . . . . . . . . 2-42.2.3 Initial Startup of HiPath 3000 . . . . . . . . . . . . . . . . . . . . . . . . . . . . . . . . . . . . . . . . 2-52.2.4 Connecting the HiPath 3000 to the LAN via the HG 1500 . . . . . . . . . . . . . . . . . . 2-62.2.5 Initial Configuration of the HiPath 3000. . . . . . . . . . . . . . . . . . . . . . . . . . . . . . . . . 2-92.2.6 Licensing The Features. . . . . . . . . . . . . . . . . . . . . . . . . . . . . . . . . . . . . . . . . . . . 2-112.2.7 Configuring The IP Clients . . . . . . . . . . . . . . . . . . . . . . . . . . . . . . . . . . . . . . . . . 2-122.2.8 Further Configuration . . . . . . . . . . . . . . . . . . . . . . . . . . . . . . . . . . . . . . . . . . . . . 2-142.2.9 Connection to the Internet . . . . . . . . . . . . . . . . . . . . . . . . . . . . . . . . . . . . . . . . . . 2-14
3 HiPath 3000 V5.0 Networked IP System . . . . . . . . . . . . . . . . . . . . . . . . . . . . . . . . . . . 3-13.1 Important Information. . . . . . . . . . . . . . . . . . . . . . . . . . . . . . . . . . . . . . . . . . . . . . . . . . 3-23.2 Step by Step Startup . . . . . . . . . . . . . . . . . . . . . . . . . . . . . . . . . . . . . . . . . . . . . . . . . . 3-4
3.2.1 Installing The Hardware . . . . . . . . . . . . . . . . . . . . . . . . . . . . . . . . . . . . . . . . . . . . 3-43.2.2 Installing Additional HiPath 3000 Modules . . . . . . . . . . . . . . . . . . . . . . . . . . . . . . 3-53.2.3 Initial Startup of HiPath 3000 . . . . . . . . . . . . . . . . . . . . . . . . . . . . . . . . . . . . . . . . 3-53.2.4 Connecting the HiPath 3000 to the LAN via the HG 1500 . . . . . . . . . . . . . . . . . . 3-63.2.5 Initial Configuration of the HiPath 3000. . . . . . . . . . . . . . . . . . . . . . . . . . . . . . . . . 3-93.2.6 Licensing The Features. . . . . . . . . . . . . . . . . . . . . . . . . . . . . . . . . . . . . . . . . . . . 3-113.2.7 Configuring The IP Clients . . . . . . . . . . . . . . . . . . . . . . . . . . . . . . . . . . . . . . . . . 3-123.2.8 Further Configuration . . . . . . . . . . . . . . . . . . . . . . . . . . . . . . . . . . . . . . . . . . . . . 3-153.2.9 Connection to the Internet . . . . . . . . . . . . . . . . . . . . . . . . . . . . . . . . . . . . . . . . . . 3-15
4 HiPath 5000 V5.0 IP System. . . . . . . . . . . . . . . . . . . . . . . . . . . . . . . . . . . . . . . . . . . . . 4-14.1 Important Information. . . . . . . . . . . . . . . . . . . . . . . . . . . . . . . . . . . . . . . . . . . . . . . . . . 4-24.2 Step by Step Startup . . . . . . . . . . . . . . . . . . . . . . . . . . . . . . . . . . . . . . . . . . . . . . . . . . 4-4
4.2.1 Installing The Hardware . . . . . . . . . . . . . . . . . . . . . . . . . . . . . . . . . . . . . . . . . . . . 4-44.2.2 Installing Additional HiPath 3000 Modules . . . . . . . . . . . . . . . . . . . . . . . . . . . . . . 4-44.2.3 Initial Startup of HiPath 3000 . . . . . . . . . . . . . . . . . . . . . . . . . . . . . . . . . . . . . . . . 4-54.2.4 Installing HiPath 5000 Server . . . . . . . . . . . . . . . . . . . . . . . . . . . . . . . . . . . . . . . . 4-64.2.5 Connecting the HiPath 3000 to the LAN via the HG 1500 . . . . . . . . . . . . . . . . . . 4-74.2.6 Initial Configuration of the HiPath 3000. . . . . . . . . . . . . . . . . . . . . . . . . . . . . . . . 4-104.2.7 Merging HiPath 3000 Systems (Nodes) . . . . . . . . . . . . . . . . . . . . . . . . . . . . . . . 4-124.2.8 Licensing The Features. . . . . . . . . . . . . . . . . . . . . . . . . . . . . . . . . . . . . . . . . . . . 4-134.2.9 Configuring The IP Clients . . . . . . . . . . . . . . . . . . . . . . . . . . . . . . . . . . . . . . . . . 4-144.2.10 Further Configuration . . . . . . . . . . . . . . . . . . . . . . . . . . . . . . . . . . . . . . . . . . . . 4-174.2.11 Connection to the Internet . . . . . . . . . . . . . . . . . . . . . . . . . . . . . . . . . . . . . . . . . 4-17
Index . . . . . . . . . . . . . . . . . . . . . . . . . . . . . . . . . . . . . . . . . . . . . . . . . . . . . . . . . . . . . . . . . Z-1
A31003-H3550-C100-1-7631, 02-2005HiPath 3000 V5.0, HiPath 5000 V5.0, Getting Started 0-1

Contents For internal distribution only
GetstartedTOC.fm
A31003-H3550-C100-1-7631, 02-20050-2 HiPath 3000 V5.0, HiPath 5000 V5.0, Getting Started
intro.fm
For internal distribution only Introduction
1 Introduction
HiPath 3000/5000 V5.0 is a highly scalable communications system designed for both small and medium sized companies as well as for extensive enterprise networks. HiPath 3000/5000 V5.0 is available in various configurations and variants – from straightforward standalone sys-tems with a small number of stations through to centrally administrated networks with 64 nodes and up to 2000 workpoint clients. The system architecture uses the benefits of distributed sys-tems to share the load between the individual components and to achieve optimum perfor-mance.
HiPath 3000/5000 V5.0 is available in the following three basic variants:
● HiPath 3000 V5.0 IP System:The Euro-ISDN-based standalone system is used for connecting analog/digital workpoint clients (such as optiPoint 500, optiPoint 600) and IP-based workpoint clients (such as op-tiPoint 400 and optiClient 130).
● HiPath 3000 V5.0 Networked IP System:The Networked System is a network of several HiPath 3000 V5.0 nodes networked over IP.
● HiPath 5000 V5.0 IP System:The HiPath 5000 V5.0 IP System is a purely IP based communication system which is in-stalled on Windows 2000/2003 Server PCs and features an open architecture. Therefore, the HiPath 5000 V5.0 system can be deployed in different multi-node system scenarios (e.g. together with HiPath 3000 V5.0 and/or HiPath 4000 V2.0), thus permitting the imple-mentation of different scenarios and individual capacity limits. The system is centrally ad-ministered via the HiPath 5000 Server. Central applications can run on the HiPath 5000 Server as well as on additional application servers (depending on the application scenarios and on the system capacity).
>A general introduction to the HiPath 3000/5000 family of products can be found● in the System Description and● in the Service Manualfor HiPath 3000/5000 V5.0. These documents also contain detailed information on system installation and startup.
A31003-H3550-C100-1-7631, 02-2005HiPath 3000 V5.0, HiPath 5000 V5.0, Getting Started 1-1

Introduction For internal distribution only
intro.fm
A31003-H3550-C100-1-7631, 02-20051-2 HiPath 3000 V5.0, HiPath 5000 V5.0, Getting Started
IP_standalone.fm
For internal distribution only HiPath 3000 V5.0 IP System
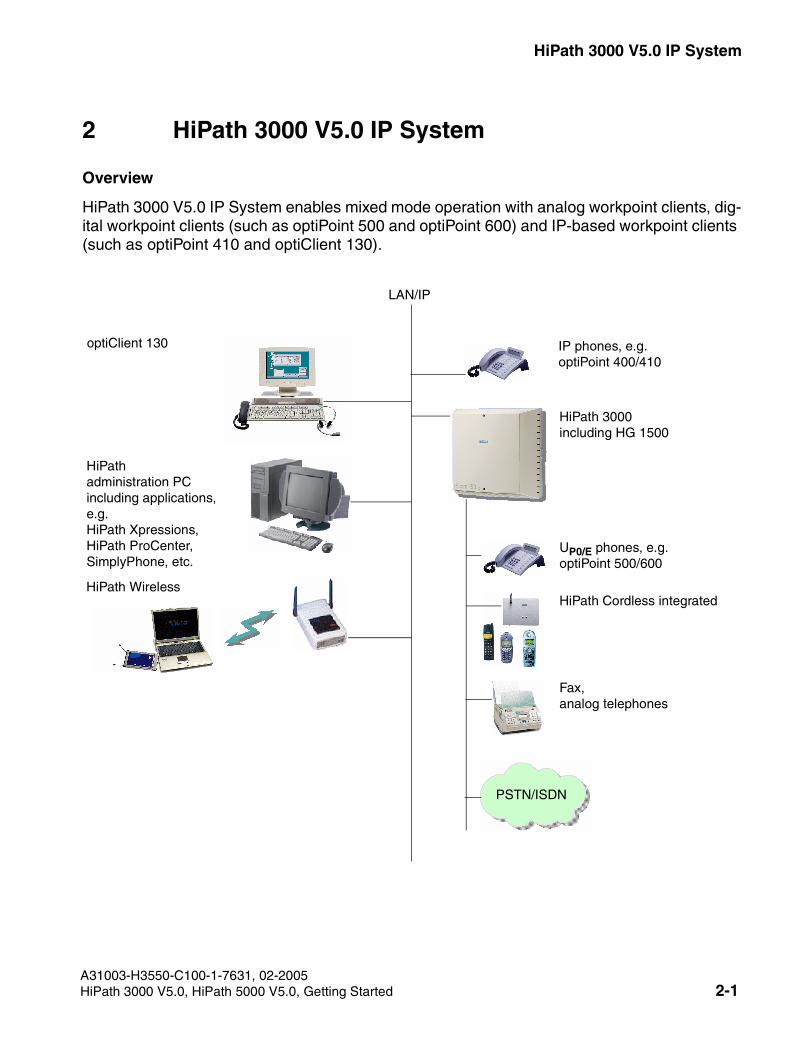
2 HiPath 3000 V5.0 IP System
Overview
HiPath 3000 V5.0 IP System enables mixed mode operation with analog workpoint clients, dig-ital workpoint clients (such as optiPoint 500 and optiPoint 600) and IP-based workpoint clients (such as optiPoint 410 and optiClient 130).
LAN/IP
IP phones, e.g.optiPoint 400/410
optiClient 130
HiPath 3000including HG 1500
HiPath Cordless integrated
HiPath administration PC including applications, e.g.HiPath Xpressions,HiPath ProCenter,SimplyPhone, etc.
UP0/E phones, e.g. optiPoint 500/600
PSTN/ISDN
Fax,analog telephones
HiPath Wireless
A31003-H3550-C100-1-7631, 02-2005HiPath 3000 V5.0, HiPath 5000 V5.0, Getting Started 2-1
HiPath 3000 V5.0 IP System For internal distribution only
IP_standalone.fm
Important Information
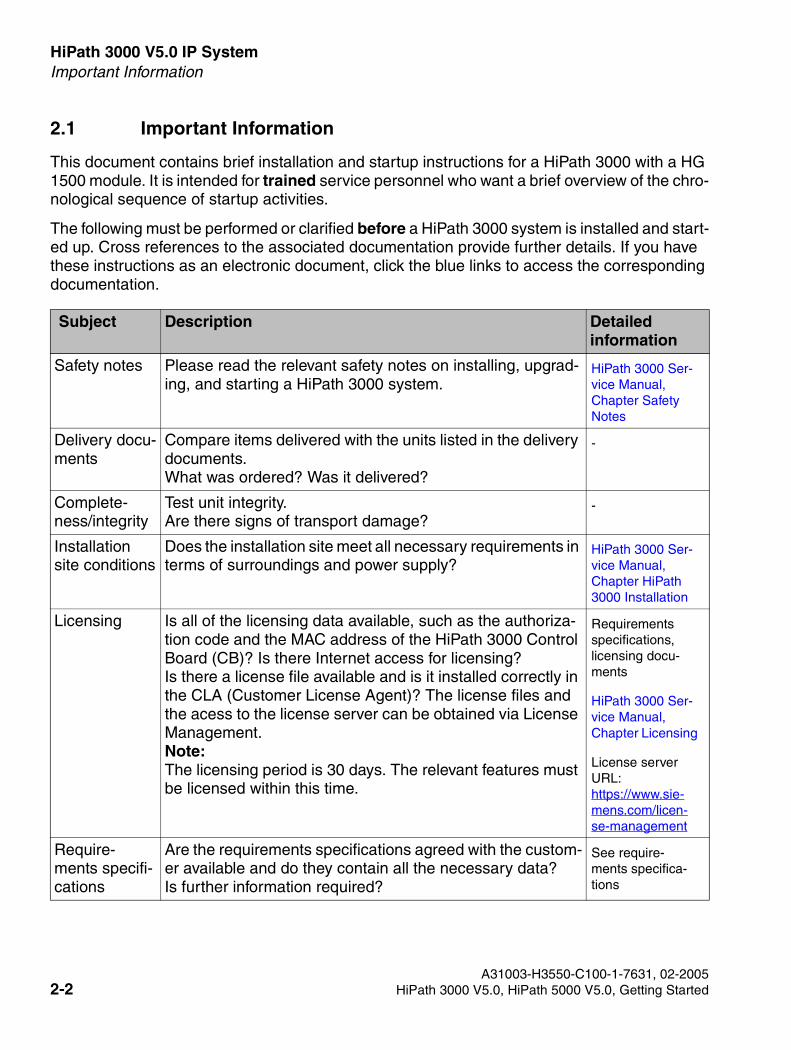
2.1 Important Information
This document contains brief installation and startup instructions for a HiPath 3000 with a HG 1500 module. It is intended for trained service personnel who want a brief overview of the chro-nological sequence of startup activities.
The following must be performed or clarified before a HiPath 3000 system is installed and start-ed up. Cross references to the associated documentation provide further details. If you have these instructions as an electronic document, click the blue links to access the corresponding documentation.
Subject Description Detailedinformation
Safety notes Please read the relevant safety notes on installing, upgrad-ing, and starting a HiPath 3000 system.
HiPath 3000 Ser-vice Manual, Chapter Safety Notes
Delivery docu-ments
Compare items delivered with the units listed in the delivery documents. What was ordered? Was it delivered?
-
Complete-ness/integrity
Test unit integrity. Are there signs of transport damage?
-
Installation site conditions
Does the installation site meet all necessary requirements in terms of surroundings and power supply?
HiPath 3000 Ser-vice Manual, Chapter HiPath 3000 Installation
Licensing Is all of the licensing data available, such as the authoriza-tion code and the MAC address of the HiPath 3000 Control Board (CB)? Is there Internet access for licensing?Is there a license file available and is it installed correctly in the CLA (Customer License Agent)? The license files and the acess to the license server can be obtained via License Management.Note:The licensing period is 30 days. The relevant features must be licensed within this time.
Requirements specifications,licensing docu-ments
HiPath 3000 Ser-vice Manual, Chapter Licensing
License server URL:https://www.sie-mens.com/licen-se-management
Require-ments specifi-cations
Are the requirements specifications agreed with the custom-er available and do they contain all the necessary data? Is further information required?
See require-ments specifica-tions
A31003-H3550-C100-1-7631, 02-20052-2 HiPath 3000 V5.0, HiPath 5000 V5.0, Getting Started

IP_standalone.fm
For internal distribution only HiPath 3000 V5.0 IP SystemImportant Information
Numbering plan
Has a numbering plan been developed in line with customer requirements?
Refer to the Requirements specifications
Customer LAN
Does the customer LAN meet the requirements for Voice over IP? Has a network analysis been performed? Are the results available? Is there a list of IP addresses that are al-ready assigned/still available? Are the IP addresses of the IP clients already defined and have they been assigned call numbers?
Refer to the re-quirements speci-fications
HiPath 3000 Ser-vice Manual, Chapter IP Fun-damentals
Administration HiPath 3000 is configured using the HiPath 3000 Manager service tool. Web-Based Management is required for config-uring the HG 1500 module. HiPath 3000 Manager should be available on the technician’s service laptop or should be in-stalled on a stationary PC (administration PC) at the cus-tomer site (in agreement with the customer). The V.24 inter-face and LAN are used for connecting to the HiPath 3000 system.
-
Subject Description Detailedinformation
A31003-H3550-C100-1-7631, 02-2005HiPath 3000 V5.0, HiPath 5000 V5.0, Getting Started 2-3

HiPath 3000 V5.0 IP System For internal distribution only
IP_standalone.fm
Step by Step Startup
2.2 Step by Step Startup
Perform the steps described below in chronological order to start up a HiPath 3000 IP System with a HG 1500 module. Each subject has a cross reference to relevant documentation provid-ing further details. If you have these instructions as an electronic document, click the blue links to access the corresponding documentation.
2.2.1 Installing The Hardware
2.2.2 Installing Additional HiPath 3000 Modules
Activity/description Detailedinformation
1. Mounting/installing the HiPath 3000 system. HiPath 3000 Ser-vice Manual, Chapter HiPath 3000 Installation
2. Mounting and installing the client PCs, administration PC and - if nec-essary - switches and routers.
3. Mounting, installing, and cabling of workpoint clients on a system-spe-cific basis.
HiPath 3000 Ser-vice Manual, Chapter Workpoint Clients
Status:The HiPath 3000 system and the workpoint clients in use are located at their installation sites and are physically connected to the customer network.
-
Activity/description Detailedinformation
1. The system must be disconnected from the power source (in the case of HiPath 35x0 and HiPath 33x0) before new modules are added.
HiPath 3000 Ser-vice Manual, Chapter HiPath 3000 Modules
2. Check the available ports (master/slave) for each slot (HDLC). HiPath 3000 Ser-vice Manual, Chapter Configu-ration Instructions
Status:New modules are installed correctly in the system.
-
A31003-H3550-C100-1-7631, 02-20052-4 HiPath 3000 V5.0, HiPath 5000 V5.0, Getting Started
IP_standalone.fm
For internal distribution only HiPath 3000 V5.0 IP SystemStep by Step Startup
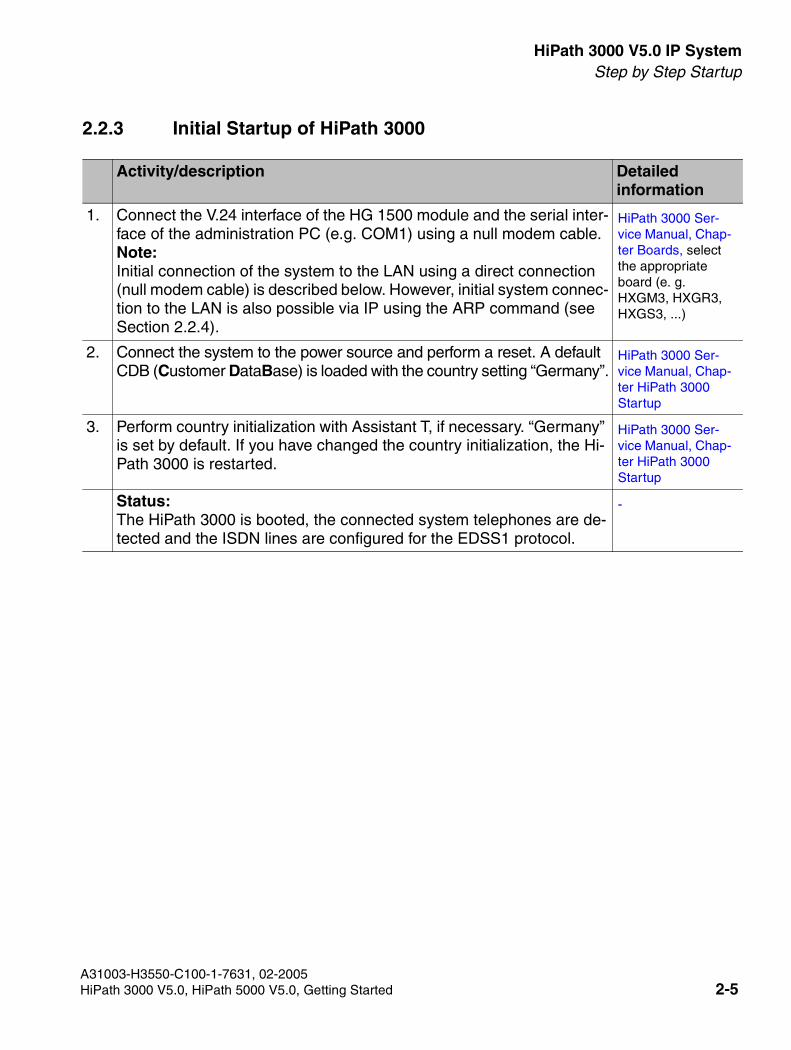
2.2.3 Initial Startup of HiPath 3000
Activity/description Detailedinformation
1. Connect the V.24 interface of the HG 1500 module and the serial inter-face of the administration PC (e.g. COM1) using a null modem cable.Note:Initial connection of the system to the LAN using a direct connection (null modem cable) is described below. However, initial system connec-tion to the LAN is also possible via IP using the ARP command (see Section 2.2.4).
HiPath 3000 Ser-vice Manual, Chap-ter Boards, select the appropriate board (e. g. HXGM3, HXGR3, HXGS3, ...)
2. Connect the system to the power source and perform a reset. A default CDB (Customer DataBase) is loaded with the country setting “Germany”.
HiPath 3000 Ser-vice Manual, Chap-ter HiPath 3000 Startup
3. Perform country initialization with Assistant T, if necessary. “Germany” is set by default. If you have changed the country initialization, the Hi-Path 3000 is restarted.
HiPath 3000 Ser-vice Manual, Chap-ter HiPath 3000 Startup
Status:The HiPath 3000 is booted, the connected system telephones are de-tected and the ISDN lines are configured for the EDSS1 protocol.
-
A31003-H3550-C100-1-7631, 02-2005HiPath 3000 V5.0, HiPath 5000 V5.0, Getting Started 2-5

HiPath 3000 V5.0 IP System For internal distribution only
IP_standalone.fm
Step by Step Startup
2.2.4 Connecting the HiPath 3000 to the LAN via the HG 1500
The HiPath 3000 is connected to the LAN via the HG 1500. You must first assign an IP address to the LAN1 interface of the HG 1500 and a default router to the gateway.
When setting up the HG 1500 for the first time you can
● use the Command Line Interpreter (CLI) or
● perform a configuration via remote access or
● perform a configuration via the LAN1 interface using the ARP command.
Initial setup using the CLI is described below.
Activity/description Detailedinformation
Starting and configuring the HyperTerminal connection
1. Start HyperTerminal on the administration PC under Start | Programs | Accessories | Communications.
Make the following settings:
2. Specify a name for the connection, e.g. HG 1500.
3. Select the COM port to which the HG 1500 is connected, e.g. COM1.
4. Set 19200 bits per second.
Administration using the Command Line Interface (CLI)
1. When the HyperTerminal connection has been established, you can access the HG 1500by pressing the Enter key.
HG 1500 Admin., Chapter Installa-tion of HG 1500
2. Log on with a username and password. The default username and password can be obtained from the system administrator.Note:You can change the username and password using HiPath 3000 Man-ager in the HiPath 3000 system.
In the CLI, enter the following commands after the vxTarget> prompt:
3. get write access Activates write function.
A31003-H3550-C100-1-7631, 02-20052-6 HiPath 3000 V5.0, HiPath 5000 V5.0, Getting Started

IP_standalone.fm
For internal distribution only HiPath 3000 V5.0 IP SystemStep by Step Startup
4. set ip address xxx.xxx.xxx.xxx Wildcard for IP address of the HG 1500 LAN1 interface, e.g. 1.150.1.232Note:Before assigning an IP address, use Ping to ensure that this address has not already been assigned.
5. set ip subnet yyy.yyy.yyy.yyy Wildcard for subnet mask of the HG 1500 LAN1 interface, e.g. 255.0.0.0.
6. set default gateway zzz.zzz.zzz.zzz Wildcard for the default router of the gateway, e.g. 1.150.6.10.
7. add wbm client aaa.aaa.aaa.aaa Wildcard for PC that the HG 1500 can configure using Web-Based Management, e.g. 1.150.1.10.
8. save configuration Stores the settings.
9. reset Restarts the system.
Once the entries for IP addresses 1 and 2 are displayed on the CLI, the reset is complete. Press the Enter key again to return to the login prompt.
Closing the HyperTerminal connection
1. Close the “HyperTerminal” program to release the COM interface for subsequent administration with HiPath 3000 Manager.
Administration with HiPath 3000 Manager
1. Connect the V.24 interface of the HiPath 3000 and the serial interface of the administration PC using a null modem cable.Note:You can remove the null modem cable from the HG 1500 and insert it in the HiPath 3000 V.24 interface. This can be done while the system is running.
HiPath 3000 Ser-vice Manual, Chapter HiPath 3000 Modules
Activity/description Detailedinformation
A31003-H3550-C100-1-7631, 02-2005HiPath 3000 V5.0, HiPath 5000 V5.0, Getting Started 2-7

HiPath 3000 V5.0 IP System For internal distribution only
IP_standalone.fm
Step by Step Startup
2. Start HiPath 3000 Manager with Start | Programs | HiPath 3000 Man-ager | HiPath 3000 Manager and log on with a username and pass-word. The default username and password can be obtained from the system administrator.Note:You can change the username and password using HiPath3000 Man-ager in the HiPath 3000 system.
HiPath 3000 Man-ager, Chapter Startup And Login
3. Load the CDB from the HiPath 3000 by means of the direct connection with File | Transfer | Communication | System -> PC.The options Direct and Read/write CDB must be selected.
HiPath 3000 Man-ager, Chapter Transfer | Commu-nication
4. In Settings | Network | Basic Settings, set the IP access protocol to HIP.
HiPath 3000 Man-ager, Chapter Ba-sic Settings
5. Under Settings | Network | Basic Settings, enter the IP address of the HiPath 3000 (e.g. 1.150.1.231) and the subnet mask of the HiPath 3000 (255.0.0.0) in the LAN Interface field.
HiPath 3000 Man-ager, Chapter Ba-sic Settings
6. If required, specify which IP PCs are to be accessed via which gateway under Settings | Network | Routing. Enter the IP address of the IP PC (e.g. 1.150.1.112), the subnet mask (e.g. 255.0.0.0) and the gateway (e.g. 1.150.1.10).
HiPath 3000 Man-ager, Chapter Routing
7. Restore the data to the system via the direct connection with File | Transfer | Communication | PC -> System.
HiPath 3000 Man-ager, Chapter Transfer | Commu-nication
8. Save the CDB.File | Save CDB As
HiPath 3000 Man-ager, Chapter Save CDB As...
Status:The HiPath 3000 can now be configured via LAN with HiPath 3000 Manager. The null modem cable can be removed from the HiPath 3000.
-
Activity/description Detailedinformation
A31003-H3550-C100-1-7631, 02-20052-8 HiPath 3000 V5.0, HiPath 5000 V5.0, Getting Started

IP_standalone.fm
For internal distribution only HiPath 3000 V5.0 IP SystemStep by Step Startup
2.2.5 Initial Configuration of the HiPath 3000
Activity/description Detailedinformation
1. Connect the HG 1500 of the HiPath 3000 with the LAN.Note:The administration PC must also be connected to the LAN.
HiPath 3000 Ser-vice Manual, Chapter Boards, select the appro-priate board (e. g. HXGM3, HXGR3, HXGS3, ...)
2. Check the LAN connection to the HG 1500 and to the HiPath 3000 us-ing a Ping command (e.g. ping 1.150.1.231). Now use HiPath 3000 Manager to load the CDB of the HiPath 3000 with File | Transfer | Communication | System -> PC.The options Read/write CDB and IP HiPath must be selected. As the IP address, select the IP address of the HiPath 3000 (in our example: 1.150.1.231).
HiPath 3000 Man-ager, Chapter Transfer | Commu-nication
3. Check whether the system telephones were detected correctly by se-lecting Settings | Set up Station | Stations.Assign the relevant station names to the call numbers of the system telephones (can be found in the customer’s numbering plan or the re-quirements specifications).Note:You can assign the relevant station names to the call numbers of the IP clients (can be found in the customer’s numbering plan or the require-ments specifications).
HiPath 3000 Man-ager, Chapter Set up Station | Sta-tions
4. You can change the station parameters by clicking the Station View button above the navigation area.
HiPath 3000 Man-ager, Chapter Sta-tion View
5. Enter a name for the system in the System Name field under Settings | System Parameters | System Settings. The name is shown in the system telephone display.
HiPath 3000 Man-ager, Chapter Sys-tem Settings
6. Under Settings | Lines/Networking | Routes, specify a route name (e.g. ISDN) in the Route Name field and the international dialing code (e.g. 49), the area code (e.g. 89), and the call number of the system without intercept code (e.g. 722) in the System Number-Incoming field.
HiPath 3000 Man-ager, Chapter Routes
7. Check the protocol of the trunks with Settings | Lines/Networking | Trunks. To do this select a line and click the corresponding Paramfield.
HiPath 3000 Man-ager, Chapter Trunks
A31003-H3550-C100-1-7631, 02-2005HiPath 3000 V5.0, HiPath 5000 V5.0, Getting Started 2-9

HiPath 3000 V5.0 IP System For internal distribution only
IP_standalone.fm
Step by Step Startup
8. Load any additional system languages with System Status | System-wide | System Texts. There are a total of eight system languages in all, four of which are defined by default and the other four loaded on a user-defined basis.Note:When loading the system languages, you should first transfer the CDB to the system, save it, and then change the system languages. A re-start is performed automatically following a change to the system lan-guages.
HiPath 3000 Man-ager, Chapter Se-lected Service Tasks, Swapping/Replacing Lan-guages
9. Restore the data to the system.File | Transfer | Communication | PC -> System
HiPath 3000 Man-ager, Chapter Transfer | Commu-nication
10. Save the CDB.File | Save CDB As
HiPath 3000 Man-ager, Chapter Save CDB As...
The date and time are updated after the first connection setup to the CO.
Status:The system telephones have been set up correctly, the system is ac-cessible from the CO, and administration of the system via LAN is pos-sible.
-
Activity/description Detailedinformation
A31003-H3550-C100-1-7631, 02-20052-10 HiPath 3000 V5.0, HiPath 5000 V5.0, Getting Started

IP_standalone.fm
For internal distribution only HiPath 3000 V5.0 IP SystemStep by Step Startup
2.2.6 Licensing The Features
Some features must be licensed before you can use them. For example, if using more than two B channels or HiPath ComScendo Services (additional IP clients such as optiClient 130 or op-tiPoint 410), etc.
In this case you must install License Management, including a license agent (CLA), on a PC in the network. The License Management software is available either on the software CD for the HiPath 3000/5000 V5.0 or on a separate CD. After installation you can use License Manage-ment to request a license file with the aid of the authorization code or MAC address of the Hi-Path 3000 Control Board (CB). Details can be found in the License Management Online Help. As soon as licensing is finished, you receive a license file, which is installed automatically in a subdirectory of the CLA (Customer License Agent). This file contains all of the data required for the subsequent distribution of the licenses for the features. This distribution of licenses is performed using HiPath 3000 Manager.
>If the CLA and HiPath 3000 Manager are not on the same PC, the IP address of the PC on which the CLA is installed can be entered in a configuration file in the HiPath 3000 Manager directory.
Activity/description Detailedinformation
Licensing the features with HiPath 3000 Manager
Requirement:You have installed License Management, including a license agent, on a PC in the network and have requested and received the required li-cense file (xml file). You can check that the license file for the license agent has been transferred correctly with License Management.
HiPath 3000 Ser-vice Manual, Chapter Licensing
1. Using HiPath 3000 Manager, load the CDB from the HiPath 3000 with File | Transfer | Communication | System -> PC.The options Read/write CDB and IP HiPath must be selected. As the IP address, select the IP address of the HiPath 3000 (in our example: 1.150.1.231).
HiPath 3000 Man-ager, Chapter Transfer | Commu-nication
2. Under Settings | Licensing, select the HXG tab. The license agent (CLA) opens the license file that corresponds to the MAC ID (of the Hi-Path 3000 system).
HiPath 3000 Man-ager, Chapter Li-censing
3. Check and/or change the number of licensed B channels (default: 2 B channels) and the number of licensed system clients (default: 0 system clients).
HiPath 3000 Man-ager, Chapter Li-censing
A31003-H3550-C100-1-7631, 02-2005HiPath 3000 V5.0, HiPath 5000 V5.0, Getting Started 2-11
HiPath 3000 V5.0 IP System For internal distribution only
IP_standalone.fm
Step by Step Startup
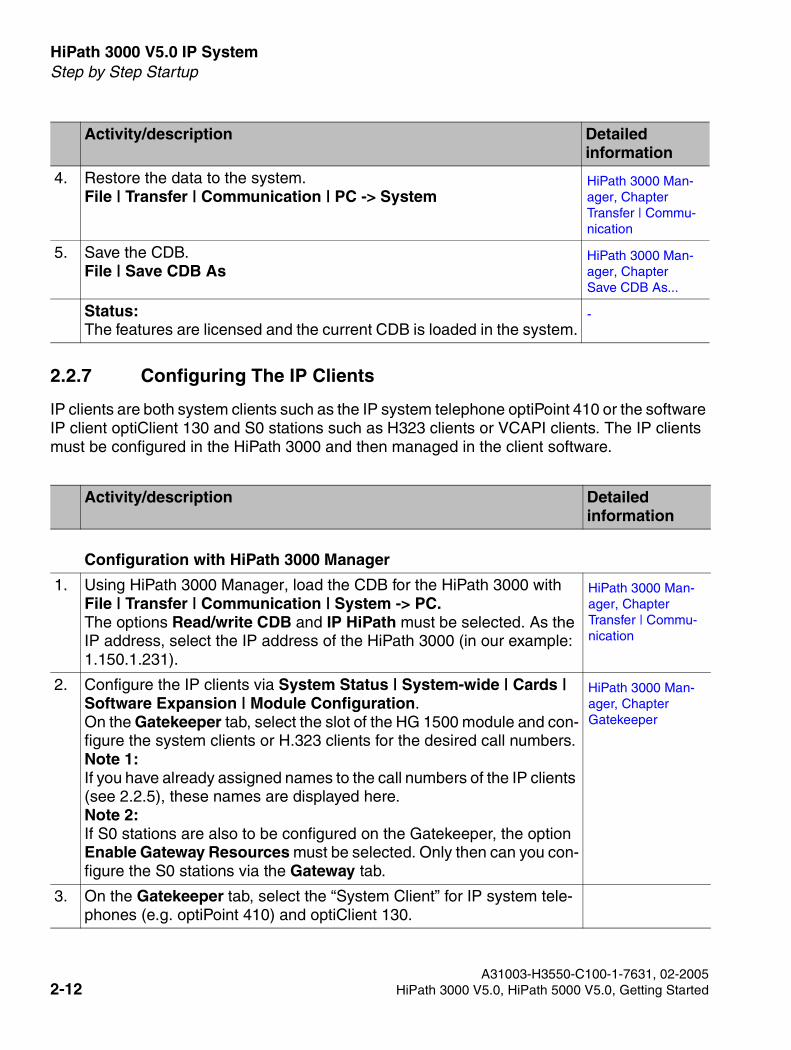
2.2.7 Configuring The IP Clients
IP clients are both system clients such as the IP system telephone optiPoint 410 or the software IP client optiClient 130 and S0 stations such as H323 clients or VCAPI clients. The IP clients must be configured in the HiPath 3000 and then managed in the client software.
4. Restore the data to the system.File | Transfer | Communication | PC -> System
HiPath 3000 Man-ager, Chapter Transfer | Commu-nication
5. Save the CDB.File | Save CDB As
HiPath 3000 Man-ager, Chapter Save CDB As...
Status:The features are licensed and the current CDB is loaded in the system.
-
Activity/description Detailedinformation
Configuration with HiPath 3000 Manager
1. Using HiPath 3000 Manager, load the CDB for the HiPath 3000 with File | Transfer | Communication | System -> PC.The options Read/write CDB and IP HiPath must be selected. As the IP address, select the IP address of the HiPath 3000 (in our example: 1.150.1.231).
HiPath 3000 Man-ager, Chapter Transfer | Commu-nication
2. Configure the IP clients via System Status | System-wide | Cards | Software Expansion | Module Configuration.On the Gatekeeper tab, select the slot of the HG 1500 module and con-figure the system clients or H.323 clients for the desired call numbers.Note 1:If you have already assigned names to the call numbers of the IP clients (see 2.2.5), these names are displayed here.Note 2:If S0 stations are also to be configured on the Gatekeeper, the option Enable Gateway Resources must be selected. Only then can you con-figure the S0 stations via the Gateway tab.
HiPath 3000 Man-ager, Chapter Gatekeeper
3. On the Gatekeeper tab, select the “System Client” for IP system tele-phones (e.g. optiPoint 410) and optiClient 130.
Activity/description Detailedinformation
A31003-H3550-C100-1-7631, 02-20052-12 HiPath 3000 V5.0, HiPath 5000 V5.0, Getting Started

IP_standalone.fm
For internal distribution only HiPath 3000 V5.0 IP SystemStep by Step Startup
4. On the Gatekeeper tab, select the “H.323 Client” for H.323 clients and VCAPI stations.
5. In addition to configuring H.323 clients:In Station View, select the relevant H.323 client and click the Work-point Client tab. In the S0 station field, select the option Used Fixed IP Address and specify the IP address of the H.323 client.If a H.323 client is operated on the Gatekeeper, the Gatekeeper assigns the call number and IP address. The IP address 0.0.0.0 must be con-figured in this case.Note:Before assigning an IP address, use Ping to ensure that this address has not already been assigned.
HiPath 3000 Man-ager, Chapter Sta-tion View | Work-point Clients
6. Restore the data to the system.File | Transfer | Communication | PC -> System
HiPath 3000 Man-ager, Chapter Transfer | Commu-nication
7. Save the CDB.File | Save CDB As
HiPath 3000 Man-ager, Chapter Save CDB As...
Status:The IP clients are configured in the HiPath 3000 and can be managed using the software.
-
Administration of an IP telephone using the optiPoint 410 as an ex-ample
1. Open the configuration menu on the telephone.-- For the optiPoint 410: press keys 103 simultaneously --The following appears in the telephone display:Administration:01=Configuration?
2. Enter the password via 01=Configuration? - Enter admin password
3. If a DHCP server is not being used, disable DHCP IP assignment via 01=Network? - 01=DHCP IP assign? - OFF
4. Enter the IP address of the IP client (e.g. 1.150.1.112) via 02=Terminal IP addr.?
5. Enter the subnet mask of the IP client (e.g. 255.0.0.0) via 03=Terminal mask?
Activity/description Detailedinformation
A31003-H3550-C100-1-7631, 02-2005HiPath 3000 V5.0, HiPath 5000 V5.0, Getting Started 2-13

HiPath 3000 V5.0 IP System For internal distribution only
IP_standalone.fm
Step by Step Startup
2.2.8 Further Configuration
Additional settings such as least cost routing (LCR), call pickup groups, or class of services must be configured with HiPath 3000 Manager. These settings should only be made by trained service personnel.
2.2.9 Connection to the Internet
You can establish an Internet connection using the HG 1500 module integrated in the HiPath 3000. The different options available and instructions for configuring them are provided with ex-amples in the documentation “HiPath Gateway 1500, HG 1500, Administration Manual, Chap-ter Practical Examples”.
6. Enter the IP address of the gateway (e.g. 1.150.1.10) via 04=Default route?
7. Return to the main menu and select 02=System?
8. Select the HiPath system to which the IP client is connected via 01=System type?
9. Enter the IP address of the HG 1500 (e.g. 1.150.1.232) via 02=PBX address?
10. Enter the call number of the IP client (e.g. 112) via 03=Subscriber number?
11. Save the changes and restart the telephone via 03=Start phone?
Administration of an IP software client (H.323 client)
1. When configuring the IP client specify the IP address of the HG 1500 as a gateway.
Status:The IP clients are ready.
Activity/description Detailedinformation
A31003-H3550-C100-1-7631, 02-20052-14 HiPath 3000 V5.0, HiPath 5000 V5.0, Getting Started

IP_Network.fm
For internal distribution only HiPath 3000 V5.0 Networked IP System
3 HiPath 3000 V5.0 Networked IP System
Overview
HiPath 3000 V5.0 Networked IP System enables mixed mode operation with analog workpoint clients, digital workpoint clients (such as optiPoint 500 and optiPoint 600) and IP-based work-point clients (such as optiPoint 410 and optiClient 130). It also makes it possible to network sev-eral nodes over IP.
LAN/IP
IP phones, e.g.optiPoint 400/410
optiClient 130
HiPath 3000including HG 1500
HiPath Cordless integrated
HiPath administration PC including applications, e.g.HiPath Xpressions,HiPath ProCenter,SimplyPhone, etc.
UP0/E phones, e.g. optiPoint 500/600
PSTN/ISDN
Fax,analog telephones
HiPath Wireless
PSTN/ISDN
UP0/E phones, e.g. optiPoint 500/600
HiPath 3000including HG 1500
A31003-H3550-C100-1-7631, 02-2005HiPath 3000 V5.0, HiPath 5000 V5.0, Getting Started 3-1

HiPath 3000 V5.0 Networked IP System For internal distribution only
IP_Network.fm
Important Information
3.1 Important Information
This document contains brief installation and startup instructions for one or more HiPath 3000 systems with a HG1500 module. It is intended for trained service personnel who want a brief overview of the chronological sequence of startup activities.
The following must be performed or clarified before a HiPath 3000 system is installed and start-ed up. Cross references to the associated documentation provide further details. If you have these instructions as an electronic document, click the blue links to access the corresponding documentation.
Subject Description Detailedinformation
Safety notes Please read the relevant safety notes on installing, upgrad-ing and starting HiPath 3000 systems.
HiPath 3000 Ser-vice Manual, Chapter Safety Notes
Delivery docu-ments
Compare items delivered with the units listed in the delivery documents. Were all ordered items delivered?
Complete-ness/integrity
Test unit integrity. Are there signs of transport damage?
Installation site conditions
Does the installation site meet all necessary requirements in terms of surroundings and power supply?
HiPath 3000 Ser-vice Manual, Chapter HiPath 3000 Installation
Licensing Is all of the licensing data available, such as the authoriza-tion code and the MAC addresses (MAC ID) of all HiPath 3000 Control Boards (CB)? Is there Internet access for li-censing?Is there a license file available for each HiPath 3000 and is it installed correctly in the CLA (Customer License Agent)? The license files and the acess to the license server can be obtained via License Management.Note:The licensing period is 30 days. The relevant features must be licensed within this time.
Requirements specifications,licensing docu-ments
HiPath 3000 Ser-vice Manual, Chapter Licensing
License server URL:https://www.sie-mens.com/licen-se-management
Require-ments specifi-cations
Are the requirements specifications agreed with the custom-er available and do they contain all the necessary data? Is further information required?
See require-ments specifica-tions
A31003-H3550-C100-1-7631, 02-20053-2 HiPath 3000 V5.0, HiPath 5000 V5.0, Getting Started
IP_Network.fm
For internal distribution only HiPath 3000 V5.0 Networked IP SystemImportant Information
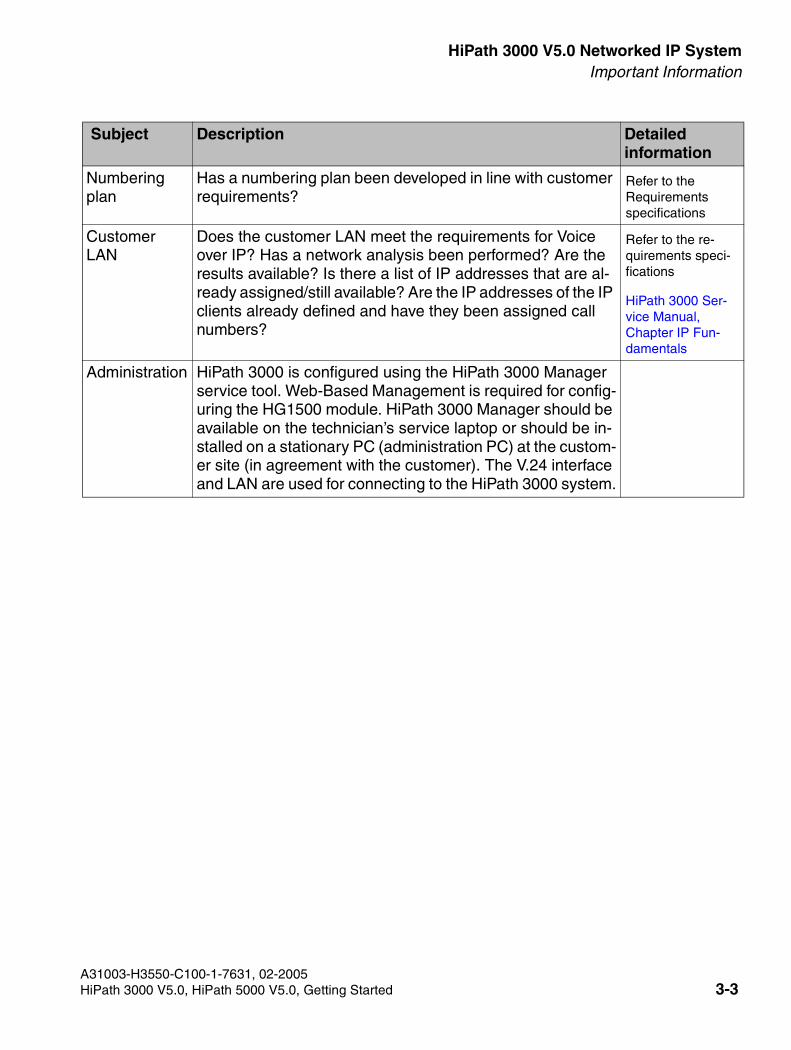
Numbering plan
Has a numbering plan been developed in line with customer requirements?
Refer to the Requirements specifications
Customer LAN
Does the customer LAN meet the requirements for Voice over IP? Has a network analysis been performed? Are the results available? Is there a list of IP addresses that are al-ready assigned/still available? Are the IP addresses of the IP clients already defined and have they been assigned call numbers?
Refer to the re-quirements speci-fications
HiPath 3000 Ser-vice Manual, Chapter IP Fun-damentals
Administration HiPath 3000 is configured using the HiPath 3000 Manager service tool. Web-Based Management is required for config-uring the HG1500 module. HiPath 3000 Manager should be available on the technician’s service laptop or should be in-stalled on a stationary PC (administration PC) at the custom-er site (in agreement with the customer). The V.24 interface and LAN are used for connecting to the HiPath 3000 system.
Subject Description Detailedinformation
A31003-H3550-C100-1-7631, 02-2005HiPath 3000 V5.0, HiPath 5000 V5.0, Getting Started 3-3

HiPath 3000 V5.0 Networked IP System For internal distribution only
IP_Network.fm
Step by Step Startup
3.2 Step by Step Startup
Perform the steps described below in chronological order to start up multiple HiPath 3000 sys-tems with HG1500 modules. Each subject has a cross reference to relevant documentation providing further details. If you have these instructions as an electronic document, click the blue links to access the corresponding documentation.
3.2.1 Installing The Hardware
>Startup of a single HiPath 3000 system is described below. When starting additional HiPath 3000 systems perform the steps described below again.
Activity/description Detailedinformation
1. Mounting/installing the HiPath 3000 system. HiPath 3000 Ser-vice Manual, Chapter HiPath 3000 Installation
2. Mounting and installing the client PCs, administration PC and - if nec-essary - switches and routers.
3. Mounting, installing, and cabling of workpoint clients on a system-spe-cific basis.
HiPath 3000 Ser-vice Manual, Chapter Workpoint Clients
Status:The HiPath 3000 system and the workpoint clients in use are located at their installation sites and are physically connected to the customer net-work.
A31003-H3550-C100-1-7631, 02-20053-4 HiPath 3000 V5.0, HiPath 5000 V5.0, Getting Started

IP_Network.fm
For internal distribution only HiPath 3000 V5.0 Networked IP SystemStep by Step Startup
3.2.2 Installing Additional HiPath 3000 Modules
3.2.3 Initial Startup of HiPath 3000
Initial startup must be performed for each HiPath 3000 system.
Activity/description Detailedinformation
1. The system must be disconnected from the power source (in the case of HiPath 35x0 and HiPath 33x0) before new modules are added.
HiPath 3000 Ser-vice Manual, Chapter HiPath 3000 Modules
2. Check the available ports (master/slave) for each slot (HDLC). HiPath 3000 Ser-vice Manual, Chapter Configu-ration Instructions
Status:New modules are installed correctly in the system.
Activity/description Detailedinformation
1. Connect the V.24 interface of the HG 1500 module and the serial inter-face of the administration PC (e.g. COM1) using a null modem cable.Note:Initial connection of the system to the LAN using a direct connection (null modem cable) is described below. However, initial system connec-tion to the LAN is also possible via IP using the ARP command (see Section 3.2.4).
HiPath 3000 Ser-vice Manual, Chapter Boards, select the appro-priate board (e. g. HXGM3, HXGR3, HXGS3, ...)
2. Connect the system to the power source and perform a reset. A default CDB (Customer DataBase) is loaded with the country setting “Germa-ny”.
HiPath 3000 Ser-vice Manual, Chapter HiPath 3000 Startup
3. Perform country initialization with Assistant T, if necessary. “Germany” is set by default. If you have changed the country initialization, the Hi-Path 3000 is restarted.
HiPath 3000 Ser-vice Manual, Chapter HiPath 3000 Startup
Status:The HiPath 3000 is booted, the connected system telephones are de-tected and the ISDN lines are configured for the EDSS1 protocol.
A31003-H3550-C100-1-7631, 02-2005HiPath 3000 V5.0, HiPath 5000 V5.0, Getting Started 3-5

HiPath 3000 V5.0 Networked IP System For internal distribution only
IP_Network.fm
Step by Step Startup
3.2.4 Connecting the HiPath 3000 to the LAN via the HG 1500
The HiPath 3000 is connected to the LAN via the HG 1500. You must first assign an IP address to the LAN1 interface of the HG 1500 and a default router to the gateway. When connecting additional HiPath 3000 systems (nodes) you must repeat the steps described below.
When setting up the HG 1500 for the first time you can
● use the Command Line Interpreter (CLI) or
● perform a configuration via remote access or
● perform a configuration via the LAN1 interface using the ARP command.
Initial setup using the CLI is described below.
Activity/description Detailedinformation
Starting and configuring the HyperTerminal connection
1.Start HyperTerminal on the administration PC under Start | Programs | Accessories | Communications.
Make the following settings:
2. Specify a name for the connection, e.g. HG 1500.
3. Select the COM port to which the HG 1500 is connected, e.g. COM1.
4. Set 19200 bits per second.
Administration using the Command Line Interface (CLI)
1.When the HyperTerminal connection has been established, you can access the HG 1500 by pressing the Enter key.
HG 1500 Admin., Chapter Installa-tion of HG 1500
2. Log on with a username and password. The default username and password can be obtained from the system administrator.Note:You can change the username and password using HiPath 3000 Manager E in the HiPath 3000 system.
In the CLI, enter the following commands after the vxTarget> prompt:
3. get write access Activates write function.
A31003-H3550-C100-1-7631, 02-20053-6 HiPath 3000 V5.0, HiPath 5000 V5.0, Getting Started
IP_Network.fm
For internal distribution only HiPath 3000 V5.0 Networked IP SystemStep by Step Startup
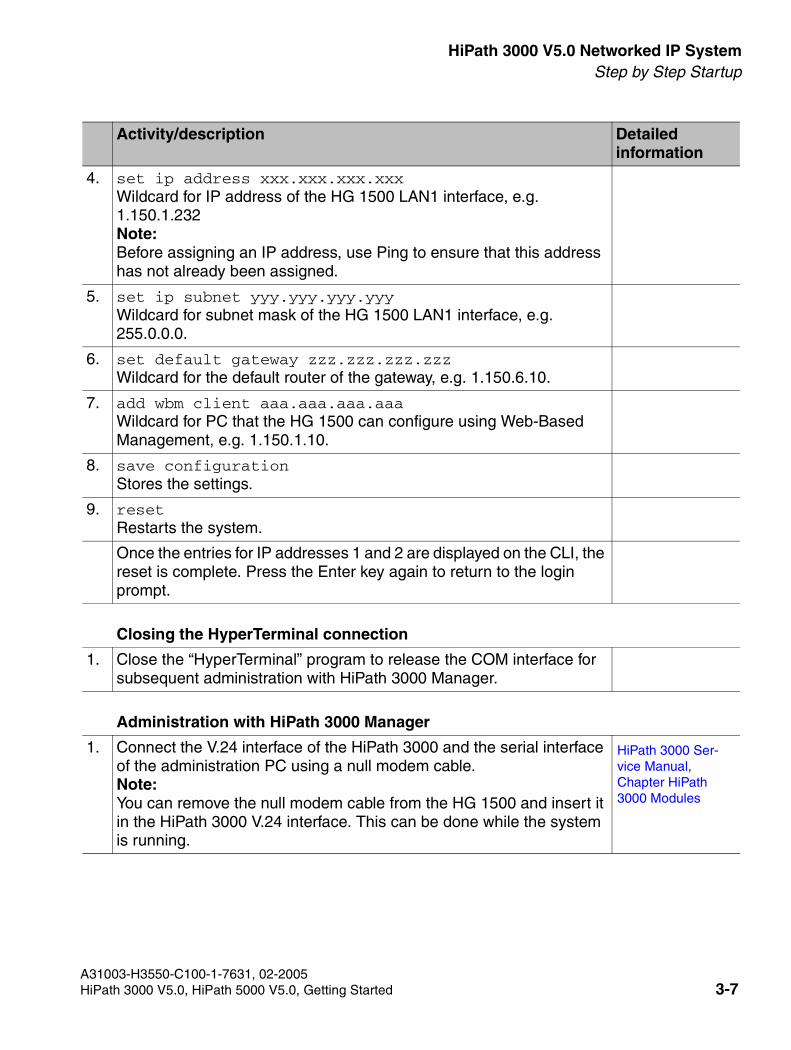
4. set ip address xxx.xxx.xxx.xxx Wildcard for IP address of the HG 1500 LAN1 interface, e.g. 1.150.1.232Note:Before assigning an IP address, use Ping to ensure that this address has not already been assigned.
5. set ip subnet yyy.yyy.yyy.yyy Wildcard for subnet mask of the HG 1500 LAN1 interface, e.g. 255.0.0.0.
6. set default gateway zzz.zzz.zzz.zzz Wildcard for the default router of the gateway, e.g. 1.150.6.10.
7. add wbm client aaa.aaa.aaa.aaa Wildcard for PC that the HG 1500 can configure using Web-Based Management, e.g. 1.150.1.10.
8. save configuration Stores the settings.
9. reset Restarts the system.
Once the entries for IP addresses 1 and 2 are displayed on the CLI, the reset is complete. Press the Enter key again to return to the login prompt.
Closing the HyperTerminal connection
1. Close the “HyperTerminal” program to release the COM interface for subsequent administration with HiPath 3000 Manager.
Administration with HiPath 3000 Manager
1. Connect the V.24 interface of the HiPath 3000 and the serial interface of the administration PC using a null modem cable.Note:You can remove the null modem cable from the HG 1500 and insert it in the HiPath 3000 V.24 interface. This can be done while the system is running.
HiPath 3000 Ser-vice Manual, Chapter HiPath 3000 Modules
Activity/description Detailedinformation
A31003-H3550-C100-1-7631, 02-2005HiPath 3000 V5.0, HiPath 5000 V5.0, Getting Started 3-7
HiPath 3000 V5.0 Networked IP System For internal distribution only
IP_Network.fm
Step by Step Startup
2. Start HiPath 3000 Manager with Start | Programs | HiPath 3000 Man-ager | HiPath 3000 Manager and log on with a username and pass-word. The default username and password can be obtained from the system administrator.Note:You can change the username and password using HiPath 3000 Manager E in the HiPath 3000 system.
HiPath 3000 Man-ager, Chapter Startup And Login
3. Load the CDB from the HiPath 3000 by means of the direct connection with File | Transfer | Communication | System -> PC.The options Direct and Read/write CDB must be selected.
HiPath 3000 Man-ager, Chapter Transfer | Commu-nication
4. In Settings | Network | Basic Settings, set the IP access protocol to HIP.
HiPath 3000 Man-ager, Chapter Ba-sic Settings
5. Under Settings | Network | Basic Settings, enter the IP address of the HiPath 3000 (e.g. 1.150.1.231) and the subnet mask of the HiPath 3000 (255.0.0.0) in the LAN Interface field.
HiPath 3000 Man-ager, Chapter Ba-sic Settings
6. If required, specify which IP PCs are to be accessed via which gateway under Settings | Network | Routing. Enter the IP address of the IP PC (e.g. 1.150.1.112), the subnet mask (e.g. 255.0.0.0) and the gateway (e.g. 1.150.1.10).
HiPath 3000 Man-ager, Chapter Routing
7. Restore the data to the system via the direct connection with File | Transfer | Communication | PC -> System.
HiPath 3000 Man-ager, Chapter Transfer | Commu-nication
8. Save the CDB.File | Save CDB As
HiPath 3000 Man-ager, Chapter Save CDB As...
Status:The HiPath 3000 can now be configured via LAN with HiPath 3000 Manager. The null modem cable can be removed from the HiPath 3000.
Activity/description Detailedinformation
A31003-H3550-C100-1-7631, 02-20053-8 HiPath 3000 V5.0, HiPath 5000 V5.0, Getting Started
IP_Network.fm
For internal distribution only HiPath 3000 V5.0 Networked IP SystemStep by Step Startup
3.2.5 Initial Configuration of the HiPath 3000
Initial configuration must be performed for each HiPath 3000 system.
Activity/description Detailedinformation
1. Connect the HG 1500 of the HiPath 3000 with the LAN.Note:The administration PC must also be connected to the LAN.
HiPath 3000 Ser-vice Manual, Chapter Boards, select the appro-priate board (e. g. HXGM3, HXGR3, HXGS3, ...)
2. Check the LAN connection to the HG 1500 and to the HiPath 3000 us-ing a Ping command (e.g. ping 1.150.1.231). Now use HiPath 3000 Manager to load the CDB of the HiPath 3000 via File | Transfer | Communication | System -> PC.The options Read/write CDB and IP HiPath must be selected. As the IP address, select the IP address of the HiPath 3000 (in our example: 1.150.1.231).
HiPath 3000 Man-ager, Chapter Transfer | Commu-nication
3. Check whether the system telephones were detected correctly by se-lecting Settings | Set up Station | Stations.Assign the relevant station names to the call numbers of the system telephones (can be found in the customer’s numbering plan or the re-quirements specifications).Note:You can assign the relevant station names to the call numbers of the IP clients (can be found in the customer’s numbering plan or the require-ments specifications).
HiPath 3000 Man-ager, Chapter Set up Station | Sta-tions
4. You can change the station parameters by clicking the Station View button above the navigation area.
HiPath 3000 Man-ager, Chapter Sta-tion View
5. Enter a name for the system in the System Name field under Settings | System Parameters | System Settings. The name is shown in the system telephone display.
HiPath 3000 Man-ager, Chapter Sys-tem Settings
6. Under Settings | Lines/Networking | Routes, specify a route name (e.g. ISDN) in the Route Name field and the international dialing code (e.g. 49), the area code (e.g. 89), and the call number of the system without intercept code (e.g. 722) in the System Number-Incoming field.
HiPath 3000 Man-ager, Chapter Routes
A31003-H3550-C100-1-7631, 02-2005HiPath 3000 V5.0, HiPath 5000 V5.0, Getting Started 3-9

HiPath 3000 V5.0 Networked IP System For internal distribution only
IP_Network.fm
Step by Step Startup
7. Check the protocol of the trunks with Settings | Lines/Networking | Trunks. To do this select a line and click the corresponding Param field.
HiPath 3000 Man-ager, Chapter Trunks
8. Load any additional system languages with System Status | System-wide | System Texts. There are a total of eight system languages in all, four of which are defined by default and the other four loaded on a user-defined basis.Note:When loading the system languages, you should first transfer the CDB to the system, save it, and then change the system languages. A re-start is performed automatically following a change to the system lan-guages.
HiPath 3000 Man-ager, Chapter Se-lected Service Tasks, Swapping/Replacing Lan-guages
9. Restore the data to the system.File | Transfer | Communication | PC -> System
HiPath 3000 Man-ager, Chapter Transfer | Commu-nication
10. Save the CDB.File | Save CDB As
HiPath 3000 Man-ager, Chapter Save CDB As...
The date and time are updated after the first connection setup to the CO.
Status:The system telephones have been set up correctly, the system is ac-cessible from the CO, and administration of the system via LAN is pos-sible.
Activity/description Detailedinformation
A31003-H3550-C100-1-7631, 02-20053-10 HiPath 3000 V5.0, HiPath 5000 V5.0, Getting Started

IP_Network.fm
For internal distribution only HiPath 3000 V5.0 Networked IP SystemStep by Step Startup
3.2.6 Licensing The Features
Some features must be licensed before you can use them. For example, if using more than two B channels or HiPath ComScendo Services (additional IP clients such as optiClient 130 or op-tiPoint 410), etc.
In this case you must install License Management, including a license agent (CLA), on a PC in the network. The License Management software is available either on the software CD for the HiPath 3000/5000 V5.0 or on a separate CD. After installation you can use License Manage-ment to request a license file with the aid of the authorization code or MAC address of the Hi-Path 3000 Control Board (CB). Details can be found in the License Management Online Help. As soon as licensing is finished, you receive a license file, which is installed automatically in a subdirectory of the CLA (Customer License Agent). The licensing procedure must be repeated for each HiPath 3000 system in the network. These files contain all of the data required for the subsequent distribution of the licenses for the features. This distribution of licenses is per-formed using HiPath 3000 Manager.
>If the CLA and HiPath 3000 Manager are not on the same PC, the IP address of the PC on which the CLA is installed can be entered in a configuration file in the HiPath 3000 Manager directory.
Activity/description Detailedinformation
Licensing the features with HiPath 3000 Manager
Perform the following steps for each HiPath 3000 system.
Requirement:You have installed License Management, including a license agent, on a PC in the network and have requested and received the required license file(s) (xml file). You can check that the license file(s) for the license agent has/have been transferred correctly with License Management.
HiPath 3000 Ser-vice Manual, Chapter Licensing
1. Load the HiPath 3000 SMG CDB using HiPath 3000 Manager via File | Transfer | Communication | System -> PC.The options Read/write CDB and IP HiPath must be selected. As the IP address, select the IP address of the HiPath 3000 (in our example: 1.150.1.231).
HiPath 3000 Man-ager, Chapter Transfer | Commu-nication
2. Under Settings | Licensing, select the HXG tab. The license agent (CLA) opens the license file that corresponds to the MAC ID (of the Hi-Path 3000 system).
HiPath 3000 Man-ager, Chapter Li-censing
A31003-H3550-C100-1-7631, 02-2005HiPath 3000 V5.0, HiPath 5000 V5.0, Getting Started 3-11

HiPath 3000 V5.0 Networked IP System For internal distribution only
IP_Network.fm
Step by Step Startup
3.2.7 Configuring The IP Clients
IP clients are both system clients such as the IP system telephone optiPoint 410 or the software IP client optiClient 130 and S0 stations such as H323 clients or VCAPI clients. The IP clients must be configured in the HiPath 3000 and then managed in the client software.
3. Check and/or change the number of licensed B channels (default: 2 B channels) and the number of licensed system clients (default: 0 system clients).Note:In the case of multiple HiPath 3000 systems, decide how you want to distribute the licenses to the individual systems.
HiPath 3000 Man-ager, Chapter Li-censing
4. Restore the data to the system.File | Transfer | Communication | PC -> System
HiPath 3000 Man-ager, Chapter Transfer | Commu-nication
5. Save the CDB.File | Save CDB As
HiPath 3000 Man-ager, Chapter Save CDB As...
Status:The features are licensed and the current CDB is loaded in the system.
Activity/description Detailedinformation
Configuration with HiPath 3000 Manager
1. Using HiPath 3000 Manager, load the CDB for the HiPath 3000 with File | Transfer | Communication | System -> PC.The options Read/write CDB and IP HiPath must be selected. As the IP address, select the IP address of the HiPath 3000 (in our example: 1.150.1.231).
HiPath 3000 Man-ager, Chapter Transfer | Commu-nication
Activity/description Detailedinformation
A31003-H3550-C100-1-7631, 02-20053-12 HiPath 3000 V5.0, HiPath 5000 V5.0, Getting Started
IP_Network.fm
For internal distribution only HiPath 3000 V5.0 Networked IP SystemStep by Step Startup
2. Configure the IP clients via System Status | System-wide | Cards | Software Expansion | Module Configuration.On the Gatekeeper tab, select the slot of the HG 1500 module and configure the system clients or H.323 clients for the desired call num-bers.Note 1:If you have already assigned names to the call numbers of the IP cli-ents (see 2.2.5), these names are displayed here.Note 2:If S0 stations are also to be configured on the Gatekeeper, the option Enable Gateway Resources must be selected. Only then can you configure the S0 stations via the Gateway tab.
HiPath 3000 Man-ager, Chapter Gatekeeper
3. On the Gatekeeper tab, select the “System Client” for IP system tele-phones (e.g. optiPoint 410) and optiClient 130.
4. On the Gatekeeper tab, select the “H.323 Client” for H.323 clients and VCAPI stations.
5. In addition to configuring H.323 clients:In Station View, select the relevant H.323 client and click the Work-point Client tab. In the S0 station field, select the option Used Fixed IP Address and specify the IP address of the H.323 client.If a H.323 client is operated on the Gatekeeper, the Gatekeeper as-signs the call number and IP address. The IP address 0.0.0.0 must be configured in this case.Note:Before assigning an IP address, use Ping to ensure that this address has not already been assigned.
HiPath 3000 Man-ager, Chapter Sta-tion View | Work-point Clients
6. Restore the data to the system.File | Transfer | Communication | PC -> System
HiPath 3000 Man-ager, Chapter Transfer | Commu-nication
7. Save the CDB.File | Save CDB As
HiPath 3000 Man-ager, Chapter Save CDB As...
Status:The IP clients are configured in the HiPath 3000 and can be managed using the software.
Activity/description Detailedinformation
A31003-H3550-C100-1-7631, 02-2005HiPath 3000 V5.0, HiPath 5000 V5.0, Getting Started 3-13

HiPath 3000 V5.0 Networked IP System For internal distribution only
IP_Network.fm
Step by Step Startup
Administration of an IP telephone using the optiPoint 410 as an example
1.Open the configuration menu on the telephone.-- For the optiPoint 410: press keys 103 simultaneously --The following appears in the telephone display:Administration:01=Configuration?
2. Enter the password via 01=Configuration? - Enter admin password
3. If a DHCP server is not being used, disable DHCP IP assignment via 01=Network? - 01=DHCP IP assign? - OFF
4. Enter the IP address of the IP client (e.g. 1.150.1.112) via 02=Terminal IP addr.?
5. Enter the subnet mask of the IP client (e.g. 255.0.0.0) via 03=Terminal mask?
6. Enter the IP address of the gateway (e.g. 1.150.1.10) via 04=Default route?
7. Return to the main menu and select 02=System?
8. Select the HiPath system to which the IP client is connected via 01=System type?
9. Enter the IP address of the HG 1500 (e.g. 1.150.1.232) via 02=PBX address?
10. Enter the call number of the IP client (e.g. 112) via 03=Subscriber number?
11. Save the changes and restart the telephone via 03=Start phone?
Administration of an IP software client (H.323 client)
1. When configuring the IP client specify the IP address of the HG 1500 as a gateway.
Status:The IP clients are ready.
Activity/description Detailedinformation
A31003-H3550-C100-1-7631, 02-20053-14 HiPath 3000 V5.0, HiPath 5000 V5.0, Getting Started

IP_Network.fm
For internal distribution only HiPath 3000 V5.0 Networked IP SystemStep by Step Startup
3.2.8 Further Configuration
Additional settings such as least cost routing (LCR), call pickup groups, or class of services must be configured with HiPath 3000 Manager. These settings should only be made by trained service personnel.
3.2.9 Connection to the Internet
You can establish an Internet connection using the HG 1500 module integrated in the HiPath 3000. The different options available and instructions for configuring them are provided with ex-amples in the documentation “HiPath Gateway 1500, HG 1500, Administration Manual, Chap-ter Practical Examples”.
A31003-H3550-C100-1-7631, 02-2005HiPath 3000 V5.0, HiPath 5000 V5.0, Getting Started 3-15

HiPath 3000 V5.0 Networked IP System For internal distribution only
IP_Network.fm
Step by Step Startup
A31003-H3550-C100-1-7631, 02-20053-16 HiPath 3000 V5.0, HiPath 5000 V5.0, Getting Started
IP_Verbund.fm
For internal distribution only HiPath 5000 V5.0 IP System
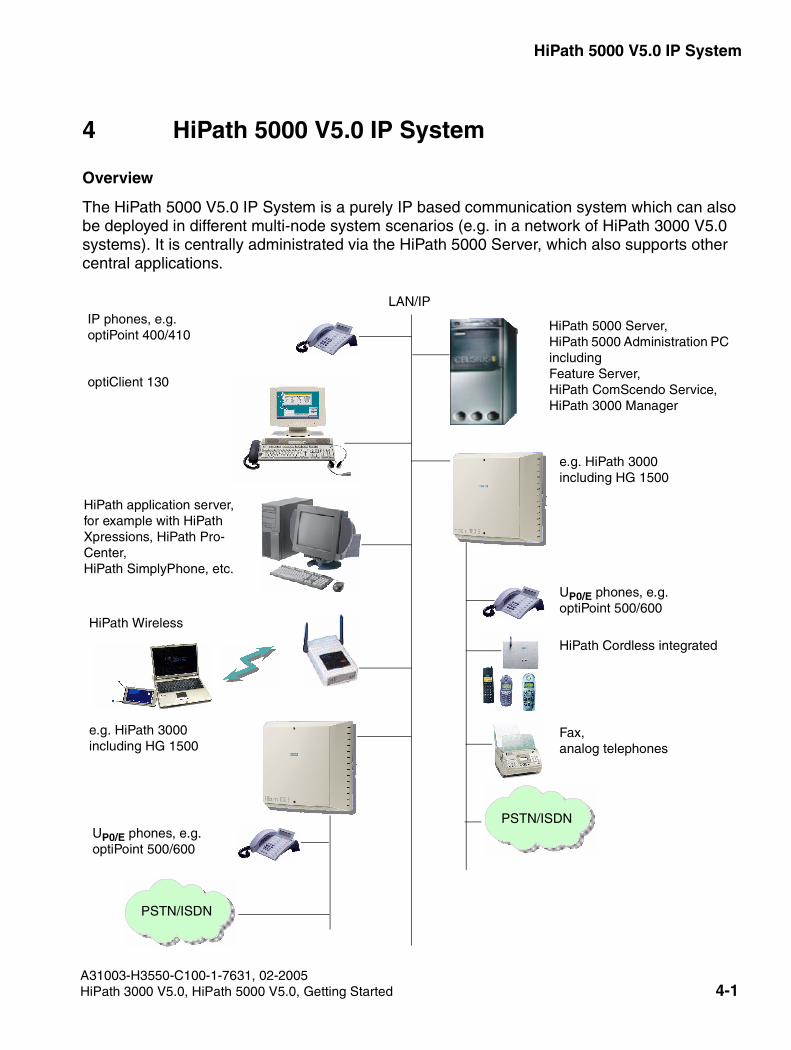
4 HiPath 5000 V5.0 IP System
Overview
The HiPath 5000 V5.0 IP System is a purely IP based communication system which can also be deployed in different multi-node system scenarios (e.g. in a network of HiPath 3000 V5.0 systems). It is centrally administrated via the HiPath 5000 Server, which also supports other central applications.
LAN/IP
HiPath 5000 Server,HiPath 5000 Administration PC includingFeature Server,HiPath ComScendo Service, HiPath 3000 Manager
IP phones, e.g.optiPoint 400/410
optiClient 130
e.g. HiPath 3000including HG 1500
HiPath Cordless integrated
HiPath application server, for example with HiPath Xpressions, HiPath Pro-Center, HiPath SimplyPhone, etc.
UP0/E phones, e.g. optiPoint 500/600
PSTN/ISDN
Fax,analog telephones
HiPath Wireless
PSTN/ISDN
UP0/E phones, e.g. optiPoint 500/600
e.g. HiPath 3000including HG 1500
A31003-H3550-C100-1-7631, 02-2005HiPath 3000 V5.0, HiPath 5000 V5.0, Getting Started 4-1

HiPath 5000 V5.0 IP System For internal distribution only
IP_Verbund.fm
Important Information
4.1 Important Information
This document contains brief installation and startup instructions for a HiPath 3000 network with a HiPath 5000 Server PC. It is intended for trained service personnel who want a brief overview of the chronological sequence of startup and configuration activities.
The following must be performed or clarified before a HiPath 3000/5000 network is installed and started up. Cross references to the associated documentation provide further details. If you have these instructions as an electronic document, click the blue links to access the corre-sponding documentation.
Subject Description Detailedinformation
Safety notes Please read the relevant safety notes on installing, upgrading and starting HiPath 3000/5000 systems.
HiPath 3000 Ser-vice Manual, Chapter Safety Notes
Delivery doc-uments
Compare items delivered with the units listed in the delivery documents. Were all ordered items delivered?
Complete-ness/integrity
Test unit integrity. Are there signs of transport damage?
Installation site condi-tions
Does the installation site meet all necessary requirements in terms of surroundings and power supply?
HiPath 3000 Ser-vice Manual, Chapter HiPath 3000 Installation
Licensing Is all of the licensing data available, such as the authorization code and the MAC address (MAC ID) of the first HiPath 3000 Control Board (CB) with the lowest node ID? Is there Internet access for licensing?Is the shared license file available and is it installed correctly in the CLA (Customer License Agent)? You only need one li-cense file for networked HiPath 3000 systems with HiPath 5000. The license files and the acess to the license server can be obtained via License Management.Note:The licensing period is 30 days. The relevant features must be licensed within this time.
Requirements specifications,licensing docu-ments
HiPath 3000 Ser-vice Manual, Chapter Licensing
License server URL:https://www.sie-mens.com/licen-se-management
Require-ments specifi-cations
Are the requirements specifications agreed with the custom-er available and do they contain all the necessary data? Is further information required?
See requirements specifications
A31003-H3550-C100-1-7631, 02-20054-2 HiPath 3000 V5.0, HiPath 5000 V5.0, Getting Started

IP_Verbund.fm
For internal distribution only HiPath 5000 V5.0 IP SystemImportant Information
Numbering plan
Has a numbering plan been developed in line with customer requirements?
Refer to the re-quirements speci-fications if neces-sary
Customer LAN
Does the customer LAN meet the requirements for Voice over IP? Has a network analysis been performed? Are the results available? Is there a list of IP addresses that are al-ready assigned/still available? Are the IP addresses of the IP clients already defined and have they been assigned call numbers?
See requirements specifications
HiPath 3000 Ser-vice Manual, Chapter IP Fun-damentals
Administra-tion
The HiPath 3000 Manager service tool is required for setting up and configuring the entire system. Web-Based Manage-ment is required for configuring the HG 1500 modules. Hi-Path 3000 Manager should be available on the technician’s service laptop or should be installed on the HiPath 5000 Server (administration PC) for central administration. You can install both of these programs from CD 1 via the master setup. The V.24 interface and LAN are used for connecting to the HiPath 3000/5000 system.
Subject Description Detailedinformation
A31003-H3550-C100-1-7631, 02-2005HiPath 3000 V5.0, HiPath 5000 V5.0, Getting Started 4-3

HiPath 5000 V5.0 IP System For internal distribution only
IP_Verbund.fm
Step by Step Startup
4.2 Step by Step Startup
Perform the steps described below in chronological order to start up HiPath 3000 with HiPath 5000 Server. Each subject has a cross reference to relevant documentation providing further details. If you have these instructions as an electronic document, click the blue links to access the corresponding documentation.
4.2.1 Installing The Hardware
4.2.2 Installing Additional HiPath 3000 Modules
Activity/description Detailedinformation
1. Mounting/installing the HiPath 3000 systems (nodes). HiPath 3000 Ser-vice Manual, Chapter HiPath 3000 Installation
2. Mounting and installing the HiPath 5000 server (also administration PC), the client PCs and - if necessary - switches and routers.
HiPath 3000/5000 Service Manual
3. Mounting, installing, and cabling of workpoint clients on a system-spe-cific basis.
HiPath 3000 Ser-vice Manual, Chapter Workpoint Clients
Status:The HiPath 3000 systems, server and workpoint clients are located at their installation sites and are physically connected to the customer network.
Activity/description Detailedinformation
1. The system must be disconnected from the power source (in the case of HiPath 35x0 and HiPath 33x0) before new modules are added.
HiPath 3000 Ser-vice Manual, Chapter HiPath 3000 Modules
2. Check the available ports (master/slave) for each slot (HDLC). HiPath 3000 Ser-vice Manual, Chapter Configu-ration Instructions
Status:New modules are installed correctly in the system.
A31003-H3550-C100-1-7631, 02-20054-4 HiPath 3000 V5.0, HiPath 5000 V5.0, Getting Started
IP_Verbund.fm
For internal distribution only HiPath 5000 V5.0 IP SystemStep by Step Startup
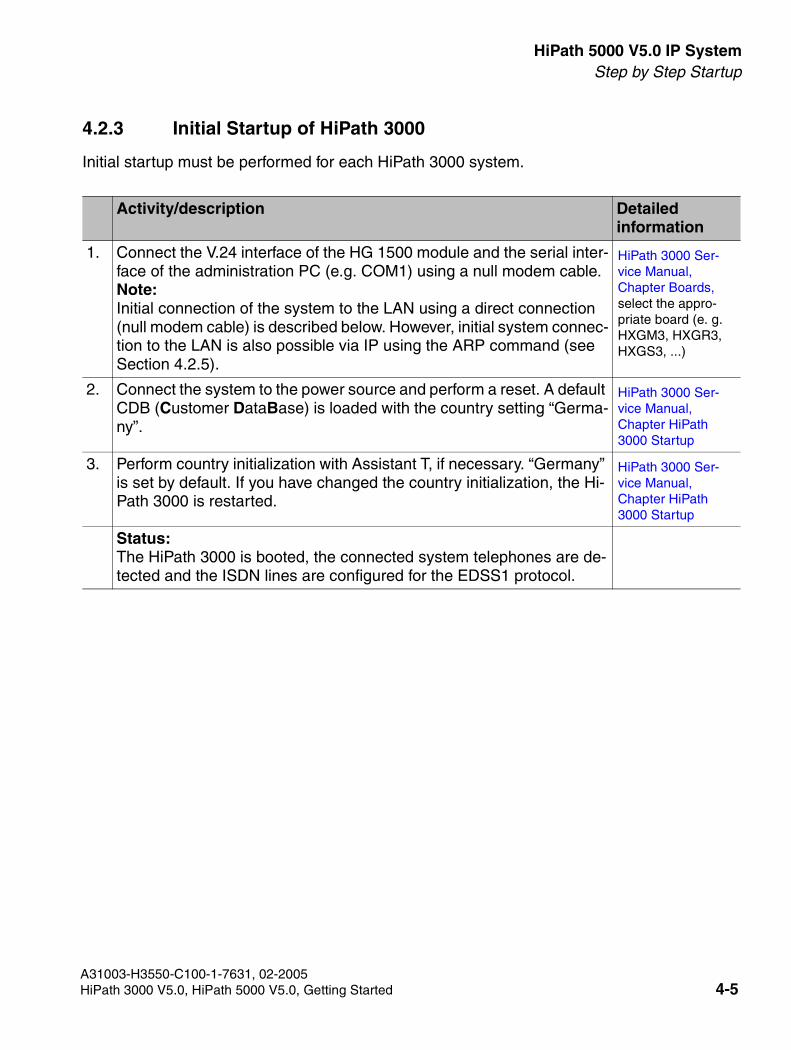
4.2.3 Initial Startup of HiPath 3000
Initial startup must be performed for each HiPath 3000 system.
Activity/description Detailedinformation
1. Connect the V.24 interface of the HG 1500 module and the serial inter-face of the administration PC (e.g. COM1) using a null modem cable.Note:Initial connection of the system to the LAN using a direct connection (null modem cable) is described below. However, initial system connec-tion to the LAN is also possible via IP using the ARP command (see Section 4.2.5).
HiPath 3000 Ser-vice Manual, Chapter Boards, select the appro-priate board (e. g. HXGM3, HXGR3, HXGS3, ...)
2. Connect the system to the power source and perform a reset. A default CDB (Customer DataBase) is loaded with the country setting “Germa-ny”.
HiPath 3000 Ser-vice Manual, Chapter HiPath 3000 Startup
3. Perform country initialization with Assistant T, if necessary. “Germany” is set by default. If you have changed the country initialization, the Hi-Path 3000 is restarted.
HiPath 3000 Ser-vice Manual, Chapter HiPath 3000 Startup
Status:The HiPath 3000 is booted, the connected system telephones are de-tected and the ISDN lines are configured for the EDSS1 protocol.
A31003-H3550-C100-1-7631, 02-2005HiPath 3000 V5.0, HiPath 5000 V5.0, Getting Started 4-5

HiPath 5000 V5.0 IP System For internal distribution only
IP_Verbund.fm
Step by Step Startup
4.2.4 Installing HiPath 5000 Server
HiPath 5000 V5.0 is installed on a server PC and includes the HiPath 3000 ComScendo Ser-vice software suite and the DB Feature Server. The server PC on which HiPath 5000 V5.0 is installed is generally also the administration PC of the network, which also contains HiPath 3000 Manager, Software Manager, Inventory Manager, etc. Other applications such as HiPath ProCenter Office, for example, can also run on the administration PC. For performance rea-sons, however, the administration PC and application PC can be separate in the network.
Activity/description Detailedinformation
1. Install all desired components using master setup. Note:During installation, perform only basic configuration for the respective components when prompted. Once installation is complete, the user, TAPI lines, IP clients and B channels should also be configured.
HiPath 3000 Ser-vice Manual, Chapter HiPath 5000 Component Installation
2. Install HiPath 3000 Manager using master setup. HiPath 3000 Ser-vice Manual, Chapter HiPath 5000 Component Installation
Status:The HiPath 5000 Server is installed.
A31003-H3550-C100-1-7631, 02-20054-6 HiPath 3000 V5.0, HiPath 5000 V5.0, Getting Started
IP_Verbund.fm
For internal distribution only HiPath 5000 V5.0 IP SystemStep by Step Startup
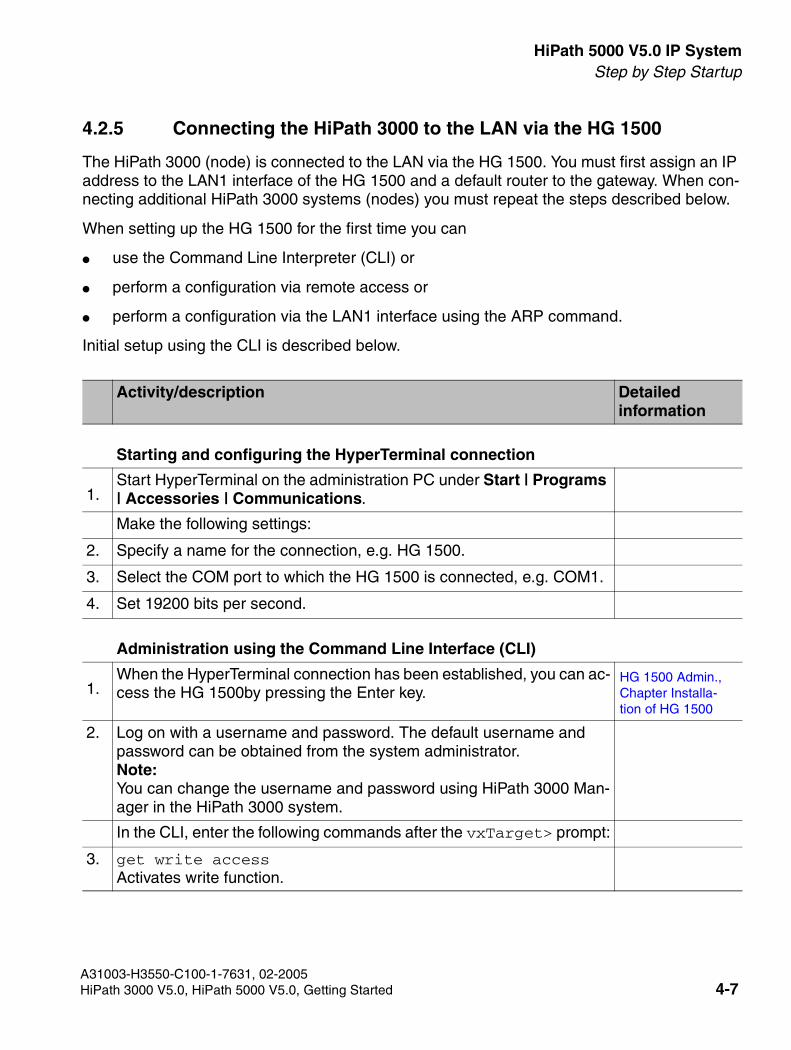
4.2.5 Connecting the HiPath 3000 to the LAN via the HG 1500
The HiPath 3000 (node) is connected to the LAN via the HG 1500. You must first assign an IP address to the LAN1 interface of the HG 1500 and a default router to the gateway. When con-necting additional HiPath 3000 systems (nodes) you must repeat the steps described below.
When setting up the HG 1500 for the first time you can
● use the Command Line Interpreter (CLI) or
● perform a configuration via remote access or
● perform a configuration via the LAN1 interface using the ARP command.
Initial setup using the CLI is described below.
Activity/description Detailedinformation
Starting and configuring the HyperTerminal connection
1.Start HyperTerminal on the administration PC under Start | Programs | Accessories | Communications.
Make the following settings:
2. Specify a name for the connection, e.g. HG 1500.
3. Select the COM port to which the HG 1500 is connected, e.g. COM1.
4. Set 19200 bits per second.
Administration using the Command Line Interface (CLI)
1.When the HyperTerminal connection has been established, you can ac-cess the HG 1500by pressing the Enter key.
HG 1500 Admin., Chapter Installa-tion of HG 1500
2. Log on with a username and password. The default username and password can be obtained from the system administrator.Note:You can change the username and password using HiPath 3000 Man-ager in the HiPath 3000 system.
In the CLI, enter the following commands after the vxTarget> prompt:
3. get write access Activates write function.
A31003-H3550-C100-1-7631, 02-2005HiPath 3000 V5.0, HiPath 5000 V5.0, Getting Started 4-7

HiPath 5000 V5.0 IP System For internal distribution only
IP_Verbund.fm
Step by Step Startup
4. set ip address xxx.xxx.xxx.xxx Wildcard for IP address of the HG 1500 LAN1 interface, e.g. 1.150.1.232Note:Before assigning an IP address, use Ping to ensure that this address has not already been assigned.
5. set ip subnet yyy.yyy.yyy.yyy Wildcard for subnet mask of the HG 1500 LAN1 interface, e.g. 255.0.0.0.
6. set default gateway zzz.zzz.zzz.zzz Wildcard for the default router of the gateway, e.g. 1.150.6.10.
7. add wbm client aaa.aaa.aaa.aaa Wildcard for PC that the HG 1500 can configure using Web-Based Management, e.g. 1.150.1.10.
8. save configuration Stores the settings.
9. reset Restarts the system.
Once the entries for IP addresses 1 and 2 are displayed on the CLI, the reset is complete. Press the Enter key again to return to the login prompt.
Closing the HyperTerminal connection
1. Close the “HyperTerminal” program to release the COM interface for subsequent administration with HiPath 3000 Manager.
Administration with HiPath 3000 Manager
1. Connect the V.24 interface of the HiPath 3000 and the serial interface of the administration PC using a null modem cable.Note:You can remove the null modem cable from the HG 1500 and insert it in the HiPath 3000 V.24 interface. This can be done while the system is running.
HiPath 3000 Ser-vice Manual, Chapter HiPath 3000 Modules
Activity/description Detailedinformation
A31003-H3550-C100-1-7631, 02-20054-8 HiPath 3000 V5.0, HiPath 5000 V5.0, Getting Started
IP_Verbund.fm
For internal distribution only HiPath 5000 V5.0 IP SystemStep by Step Startup
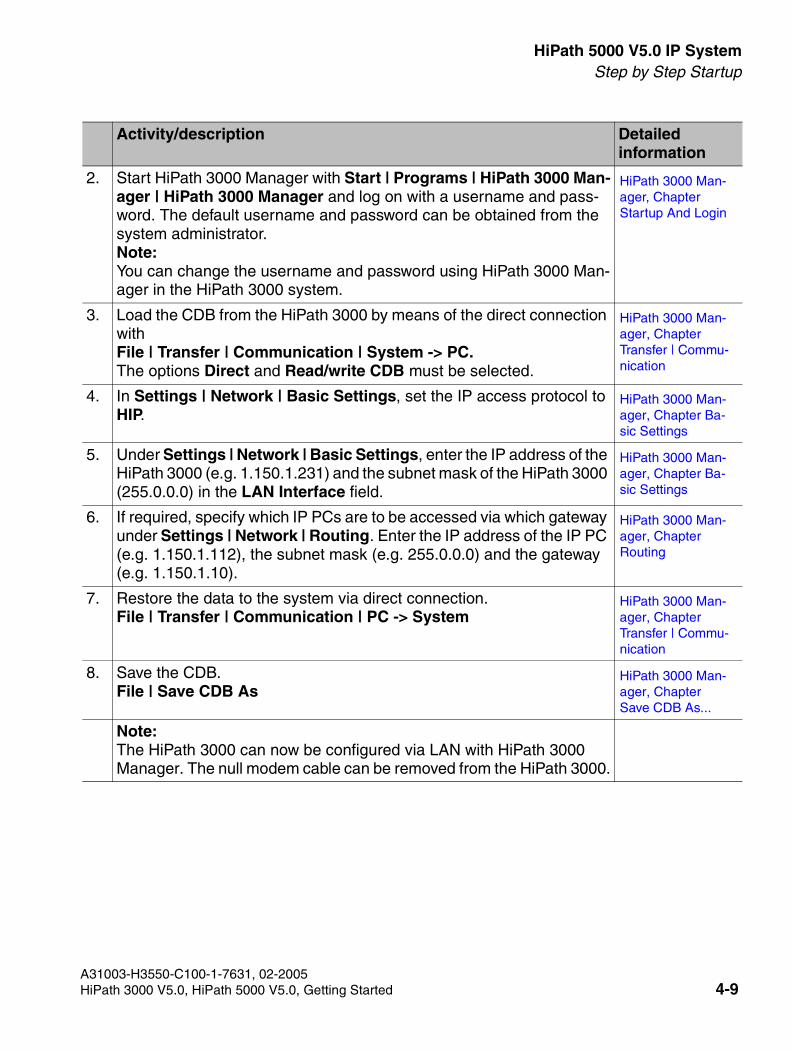
2. Start HiPath 3000 Manager with Start | Programs | HiPath 3000 Man-ager | HiPath 3000 Manager and log on with a username and pass-word. The default username and password can be obtained from the system administrator.Note:You can change the username and password using HiPath 3000 Man-ager in the HiPath 3000 system.
HiPath 3000 Man-ager, Chapter Startup And Login
3. Load the CDB from the HiPath 3000 by means of the direct connection with File | Transfer | Communication | System -> PC.The options Direct and Read/write CDB must be selected.
HiPath 3000 Man-ager, Chapter Transfer | Commu-nication
4. In Settings | Network | Basic Settings, set the IP access protocol to HIP.
HiPath 3000 Man-ager, Chapter Ba-sic Settings
5. Under Settings | Network | Basic Settings, enter the IP address of the HiPath 3000 (e.g. 1.150.1.231) and the subnet mask of the HiPath 3000 (255.0.0.0) in the LAN Interface field.
HiPath 3000 Man-ager, Chapter Ba-sic Settings
6. If required, specify which IP PCs are to be accessed via which gateway under Settings | Network | Routing. Enter the IP address of the IP PC (e.g. 1.150.1.112), the subnet mask (e.g. 255.0.0.0) and the gateway (e.g. 1.150.1.10).
HiPath 3000 Man-ager, Chapter Routing
7. Restore the data to the system via direct connection.File | Transfer | Communication | PC -> System
HiPath 3000 Man-ager, Chapter Transfer | Commu-nication
8. Save the CDB.File | Save CDB As
HiPath 3000 Man-ager, Chapter Save CDB As...
Note:The HiPath 3000 can now be configured via LAN with HiPath 3000 Manager. The null modem cable can be removed from the HiPath 3000.
Activity/description Detailedinformation
A31003-H3550-C100-1-7631, 02-2005HiPath 3000 V5.0, HiPath 5000 V5.0, Getting Started 4-9

HiPath 5000 V5.0 IP System For internal distribution only
IP_Verbund.fm
Step by Step Startup
4.2.6 Initial Configuration of the HiPath 3000
Initial configuration must be performed for each HiPath 3000 system.
Activity/description Detailedinformation
1. Connect the HG 1500 of the HiPath 3000 with the LAN.Note:The administration PC must also be connected to the LAN.
HiPath 3000 Ser-vice Manual, Chapter Boards, select the appro-priate board (e. g. HXGM3, HXGR3, HXGS3, ...)
2. Check the LAN connection to the HG 1500 and to the HiPath 3000 us-ing a Ping command (e.g. ping 1.150.1.231). Now use HiPath 3000 Manager to load the CDB of the HiPath 3000 with File | Transfer | Communication | System -> PC.The options Read/write CDB and IP HiPath must be selected. As the IP address, select the IP address of the HiPath 3000 (in our example: 1.150.1.231).
HiPath 3000 Man-ager, Chapter Transfer | Commu-nication
3. Activate the HiPath 5000 functionality with Settings | Network | Hi-Path 5000 Parameters.Specify the IP address of the HiPath 5000 Server PC and the node ID of the HiPath 3000 that you are currently managing. The node ID must be unique within the network.
HiPath 3000 Man-ager, Chapter Hi-Path 5000 Param-eters
4. Check whether the system telephones were detected correctly by se-lecting Settings | Set up Station | Stations.Assign the relevant station names to the call numbers of the system telephones (can be found in the customer’s numbering plan or the re-quirements specifications).Note:You can assign the relevant station names to the call numbers of the IP clients (can be found in the customer’s numbering plan or the re-quirements specifications).
HiPath 3000 Man-ager, Chapter Set up Station | Sta-tions
5. You can change the station parameters by clicking the Station View button above the navigation area.
HiPath 3000 Man-ager, Chapter Sta-tion View
6. Enter a name for the system in the System Name field under Settings | System Parameters | System Settings. The name is shown in the system telephone display.
HiPath 3000 Man-ager, Chapter Sys-tem Settings
A31003-H3550-C100-1-7631, 02-20054-10 HiPath 3000 V5.0, HiPath 5000 V5.0, Getting Started

IP_Verbund.fm
For internal distribution only HiPath 5000 V5.0 IP SystemStep by Step Startup
7. Under Settings | Lines/Networking | Routes, specify a route name (e.g. ISDN) in the Route Name field and the international dialing code (e.g. 49), the area code (e.g. 89), and the call number of the system without intercept code (e.g. 722) in the System Number-Incoming field.
HiPath 3000 Man-ager, Chapter Routes
8. Check the protocol of the trunks with Settings | Lines/Networking | Trunks. To do this select a line and click the corresponding Paramfield.
HiPath 3000 Man-ager, Chapter Trunks
9. Load any additional system languages with System Status | System-wide | System Texts. There are a total of eight system languages in all, four of which are defined by default and the other four loaded on a user-defined basis.Note:When loading the system languages, you should first transfer the CDB to the system, save it, and then change the system languages. A re-start is performed automatically following a change to the system lan-guages.
HiPath 3000 Man-ager, Chapter Se-lected Service Tasks, Swapping/Replacing Lan-guages
10. Restore the data to the system.File | Transfer | Communication | PC -> System
HiPath 3000 Man-ager, Chapter Transfer | Commu-nication
11. Save the CDB.File | Save CDB As
HiPath 3000 Man-ager, Chapter Save CDB As...
The date and time are updated after the first connection setup to the CO.
Status:The system telephones have been set up correctly, the system is ac-cessible from the CO, and administration of the system via LAN is pos-sible.
-
Activity/description Detailedinformation
A31003-H3550-C100-1-7631, 02-2005HiPath 3000 V5.0, HiPath 5000 V5.0, Getting Started 4-11

HiPath 5000 V5.0 IP System For internal distribution only
IP_Verbund.fm
Step by Step Startup
4.2.7 Merging HiPath 3000 Systems (Nodes)
Activity/description Detailedinformation
1. Load the default data from HiPath 5000 Server in HiPath 3000 Manager with File | HiPath 5000 | Transfer | HiPath 5000 Server. Select the ap-propriate HiPath 5000 Server via the Search button and then click the Server -> Manager button.
HiPath 3000 Man-ager, Chapter Transfer | HiPath 5000 Server
2. Add a new node to HiPath 3000 Manager with File | HiPath 5000 | New | HiPath 3000 and read out the CDB for the node with File | Transfer | System -> PC. Begin with the node with the smallest node ID and repeat for all nodes available in the network.
HiPath 3000 Man-ager, Chapter New | HiPath 3000
3. Transfer the CDB(s) to the central database by selectingFile | HiPath 5000 | Transfer | HiPath 5000 Server | Add Node.
HiPath 3000 Man-ager, Chapter Transfer | HiPath 5000 Server
4. If the HG1500 is not recognized by the Feature Server, reset all mod-ules selected as gateways via Web-Based Management (or alterna-tively reset the system).Note:To add further nodes, perform the steps described above again.
HG1500 Admin., Chapter Icons in the WBM Win-dow's Control Area
5. Save the data back to the HiPath 5000 Server with File | HiPath 5000 | Transfer | HiPath 5000 Server | Manager -> Server.
HiPath 3000 Man-ager, Chapter Transfer | HiPath 5000 Server
6. Save the CDB.File | Save CDB As
HiPath 3000 Man-ager, Chapter Save CDB As...
Status:All HiPath 3000 systems are logged on to HiPath 5000 Server and can be managed centrally via HiPath 3000 Manager.
A31003-H3550-C100-1-7631, 02-20054-12 HiPath 3000 V5.0, HiPath 5000 V5.0, Getting Started

IP_Verbund.fm
For internal distribution only HiPath 5000 V5.0 IP SystemStep by Step Startup
4.2.8 Licensing The Features
Some features must be licensed before you can use them. For example, if using more than two B channels or HiPath ComScendo Services (additional IP clients such as optiClient 130 or op-tiPoint 410), etc.
In this case you must install License Management, including a license agent (CLA), on a PC in the network. The License Management software is available either on the software CD for the HiPath 3000/5000 V5.0 or on a separate CD. After installation you can use License Manage-ment to request a license file with the aid of the authorization code or MAC address of the Hi-Path 3000 Control Board (CB). Details can be found in the License Management Online Help. As soon as licensing is finished, you receive a license file, which is installed automatically in a subdirectory of the CLA (Customer License Agent). Because there is a HiPath 5000 Server in the network, you only receive a license file for the HiPath 5000 Server, which contains all licens-es for the HiPath 3000 systems belonging to the network. This file contains all of the data re-quired for the subsequent distribution of the licenses for the features. This distribution of licens-es is performed using HiPath 3000 Manager.
>If the CLA and HiPath 3000 Manager are not on the same PC, the IP address of the PC on which the CLA is installed can be entered in a configuration file in the HiPath 3000 Manager directory.
Activity/description Detailedinformation
Licensing the features with HiPath 3000 Manager
Requirement:You have installed License Management, including a license agent, on a PC in the network and have requested and received the required li-cense file (xml file). You can check that the license file for the license agent has been transferred correctly with License Management.
HiPath 3000 Ser-vice Manual, Chapter Licensing
1. Load the data from HiPath 5000 Server in HiPath 3000 Manager with File | HiPath 5000 | Transfer | HiPath 5000 Server. Select the appro-priate HiPath 5000 Server via the Search button and then click the Server -> Manager button.
2. Under Settings | Licensing, select the HXG tab. The license agent (CLA) installed on the PC opens the license file that corresponds to the MAC ID (of the HiPath 3000 system).
HiPath 3000 Man-ager, Chapter Li-censing
A31003-H3550-C100-1-7631, 02-2005HiPath 3000 V5.0, HiPath 5000 V5.0, Getting Started 4-13
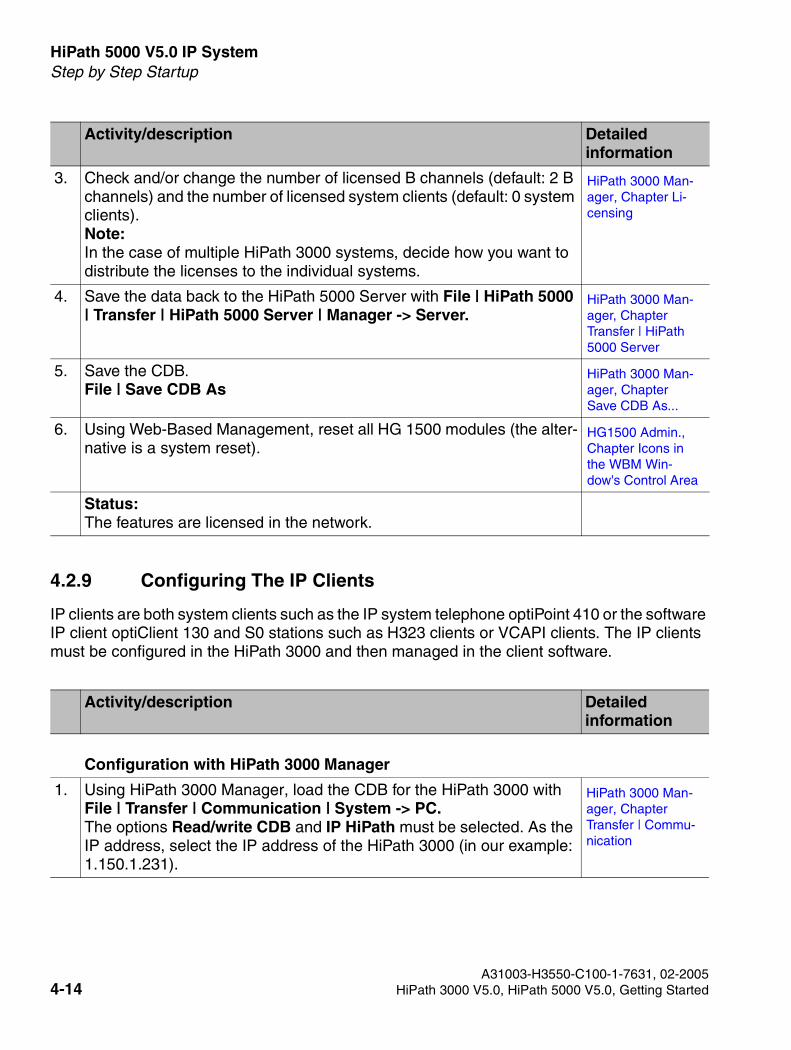
HiPath 5000 V5.0 IP System For internal distribution only
IP_Verbund.fm
Step by Step Startup
4.2.9 Configuring The IP Clients
IP clients are both system clients such as the IP system telephone optiPoint 410 or the software IP client optiClient 130 and S0 stations such as H323 clients or VCAPI clients. The IP clients must be configured in the HiPath 3000 and then managed in the client software.
3. Check and/or change the number of licensed B channels (default: 2 B channels) and the number of licensed system clients (default: 0 system clients).Note:In the case of multiple HiPath 3000 systems, decide how you want to distribute the licenses to the individual systems.
HiPath 3000 Man-ager, Chapter Li-censing
4. Save the data back to the HiPath 5000 Server with File | HiPath 5000 | Transfer | HiPath 5000 Server | Manager -> Server.
HiPath 3000 Man-ager, Chapter Transfer | HiPath 5000 Server
5. Save the CDB.File | Save CDB As
HiPath 3000 Man-ager, Chapter Save CDB As...
6. Using Web-Based Management, reset all HG 1500 modules (the alter-native is a system reset).
HG1500 Admin., Chapter Icons in the WBM Win-dow's Control Area
Status:The features are licensed in the network.
Activity/description Detailedinformation
Configuration with HiPath 3000 Manager
1. Using HiPath 3000 Manager, load the CDB for the HiPath 3000 with File | Transfer | Communication | System -> PC.The options Read/write CDB and IP HiPath must be selected. As the IP address, select the IP address of the HiPath 3000 (in our example: 1.150.1.231).
HiPath 3000 Man-ager, Chapter Transfer | Commu-nication
Activity/description Detailedinformation
A31003-H3550-C100-1-7631, 02-20054-14 HiPath 3000 V5.0, HiPath 5000 V5.0, Getting Started
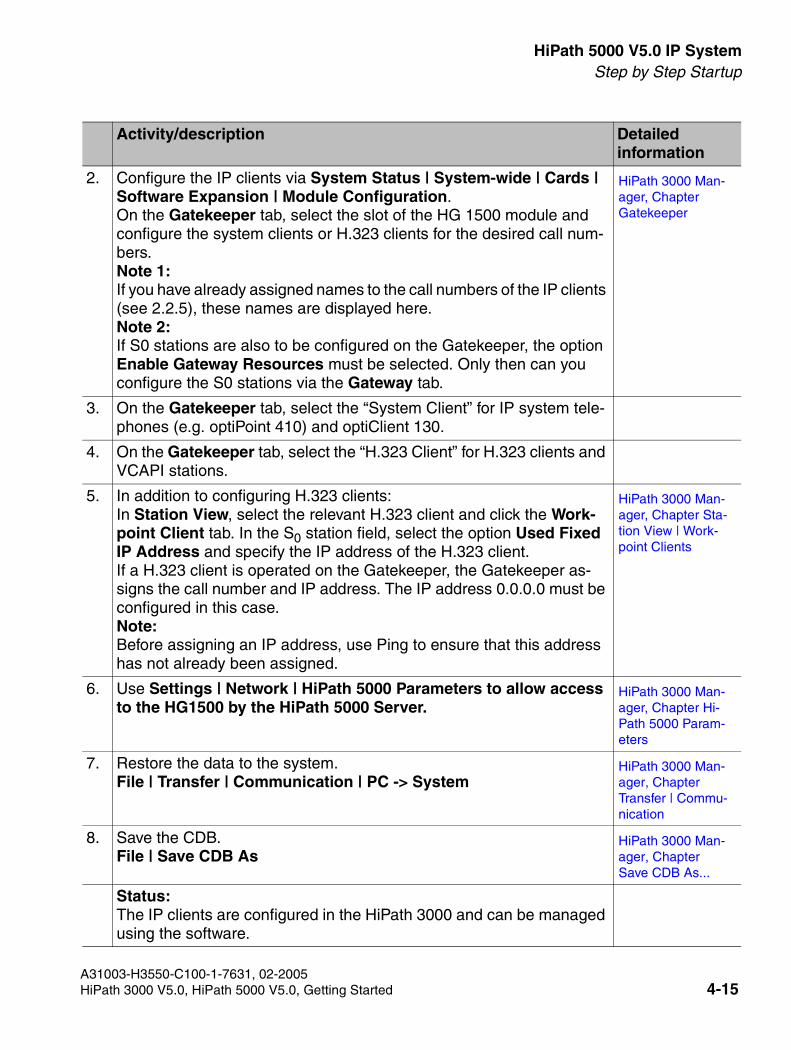
IP_Verbund.fm
For internal distribution only HiPath 5000 V5.0 IP SystemStep by Step Startup
2. Configure the IP clients via System Status | System-wide | Cards | Software Expansion | Module Configuration.On the Gatekeeper tab, select the slot of the HG 1500 module and configure the system clients or H.323 clients for the desired call num-bers.Note 1:If you have already assigned names to the call numbers of the IP clients (see 2.2.5), these names are displayed here.Note 2:If S0 stations are also to be configured on the Gatekeeper, the option Enable Gateway Resources must be selected. Only then can you configure the S0 stations via the Gateway tab.
HiPath 3000 Man-ager, Chapter Gatekeeper
3. On the Gatekeeper tab, select the “System Client” for IP system tele-phones (e.g. optiPoint 410) and optiClient 130.
4. On the Gatekeeper tab, select the “H.323 Client” for H.323 clients and VCAPI stations.
5. In addition to configuring H.323 clients:In Station View, select the relevant H.323 client and click the Work-point Client tab. In the S0 station field, select the option Used Fixed IP Address and specify the IP address of the H.323 client.If a H.323 client is operated on the Gatekeeper, the Gatekeeper as-signs the call number and IP address. The IP address 0.0.0.0 must be configured in this case.Note:Before assigning an IP address, use Ping to ensure that this address has not already been assigned.
HiPath 3000 Man-ager, Chapter Sta-tion View | Work-point Clients
6. Use Settings | Network | HiPath 5000 Parameters to allow access to the HG1500 by the HiPath 5000 Server.
HiPath 3000 Man-ager, Chapter Hi-Path 5000 Param-eters
7. Restore the data to the system.File | Transfer | Communication | PC -> System
HiPath 3000 Man-ager, Chapter Transfer | Commu-nication
8. Save the CDB.File | Save CDB As
HiPath 3000 Man-ager, Chapter Save CDB As...
Status:The IP clients are configured in the HiPath 3000 and can be managed using the software.
Activity/description Detailedinformation
A31003-H3550-C100-1-7631, 02-2005HiPath 3000 V5.0, HiPath 5000 V5.0, Getting Started 4-15

HiPath 5000 V5.0 IP System For internal distribution only
IP_Verbund.fm
Step by Step Startup
Administration of an IP telephone using the optiPoint 410 as an example
1.Open the configuration menu on the telephone.-- For the optiPoint 410: press keys 103 simultaneously --The following appears in the telephone display:Administration:01=Configuration?
2. Enter the password via 01=Configuration? - Enter admin password
3. If a DHCP server is not being used, disable DHCP IP assignment via 01=Network? - 01=DHCP IP assign? - OFF
4. Enter the IP address of the IP client (e.g. 1.150.1.112) via 02=Terminal IP addr.?
5. Enter the subnet mask of the IP client (e.g. 255.0.0.0) via 03=Terminal mask?
6. Enter the IP address of the gateway (e.g. 1.150.1.10) via 04=Default route?
7. Return to the main menu and select 02=System?
8. Select the HiPath system to which the IP client is connected via 01=System type?
9. Enter the IP address of the HG 1500 (e.g. 1.150.1.232) via 02=PBX address?
10. Enter the call number of the IP client (e.g. 112) via 03=Subscriber number?
11. Save the changes and restart the telephone via 03=Start phone?
Administration of an IP software client (H.323 client)
1. When configuring the IP client specify the IP address of the HG 1500 as a gateway.
Status:The IP clients are ready.
Activity/description Detailedinformation
A31003-H3550-C100-1-7631, 02-20054-16 HiPath 3000 V5.0, HiPath 5000 V5.0, Getting Started
IP_Verbund.fm
For internal distribution only HiPath 5000 V5.0 IP SystemStep by Step Startup
4.2.10 Further Configuration
Additional settings such as least cost routing (LCR), call pickup groups, or class of services must be configured with HiPath 3000 Manager. These settings should only be made by trained service personnel.
4.2.11 Connection to the Internet
You can establish an Internet connection using the HG 1500 module integrated in the HiPath 3000. The different options available and instructions for configuring them are provided with ex-amples in the documentation “HiPath Gateway 1500, HG 1500, Administration Manual, Chap-ter Practical Examples”.
A31003-H3550-C100-1-7631, 02-2005HiPath 3000 V5.0, HiPath 5000 V5.0, Getting Started 4-17

HiPath 5000 V5.0 IP System For internal distribution only
IP_Verbund.fm
Step by Step Startup
A31003-H3550-C100-1-7631, 02-20054-18 HiPath 3000 V5.0, HiPath 5000 V5.0, Getting Started

GetstartedSIX.fm
For internal distribution only Index
Index Z
HHiPath 3000 IP System
assigning IP addresses 2-6configuring IP functionality 2-12delivery documents 2-2installing the hardware 2-4licensing 2-2numbering plan 2-3requirements specifications 2-2safety notes 2-2
HiPath 3000 Networked IP Systemassigning IP addresses 3-6configuring IP functionality 3-12delivery documents 3-2installing the hardware 3-4licensing 3-2requirements specifications 3-2safety notes 3-2
HiPath 5000 Multi-Node IP Systemassigning IP addresses 4-7configuring IP functionality 4-14delivery documents 4-2installation 4-6installing the hardware 4-4licensing 4-2merging nodes 4-12numbering plan 4-3requirements specifications 4-2safety notes 4-2
A31003-H3550-C100-1-7631, 02-2005HiPath 3000 V5.0, HiPath 5000 V5.0, Getting Started
Z-1

Index For internal distribution only
GetstartedSIX.fm
A31003-H3550-C100-1-7631, 02-2005Z-2 HiPath 3000 V5.0, HiPath 5000 V5.0, Getting Started

www.siemens.com/hipath
Siemens AG 2005 • Siemens Communications • Hofmannstraße 51 • D-81359 München, GermanyReference No.: A31003-H3550-C100-1-7631 Subject to availability. Right of modification reserved.
The information provided in this document contains merely general
descriptions or characteristics of performance which in case of actual use
do not always apply as described or which may change as a result of
further development of the products.
An obligation to provide the respective characteristics shall only exist if
expressly agreed in the terms of contract.
The trademarks used are owned by Siemens AG or their respective
owners.
*1PA31003-H3550-C100-1-7631*