Hike Tracker V.2.0 - 007Software · Page: 1 Hike Tracker V.2.0.0 ... which tracks all relevant...
21
Page: 1 Hike Tracker V.2.0.0 Hike track application, which tracks all relevant information during your hike. This App is build for the square watches: Garmin Vivo Active, Vivo active HR and Forerunner 920XT, for the round watches: Fore runner 735XT, Fore runner 630, Fore runner 230, Fore runner 235, D2 Bravo, D2 Bravo Titanium, D2 Charlie, Fenix 3 HR, Fenix 3, Fenix 5, Fenix 5S, Fenix 5X Fenix Chronos and for the bike devices: Edge 520, Edge 820(+explore), Edge 1000 (+explore) and Edge 1030. More information about developments and documentation can be found on: http://www.007software.nl/apps/hike-trackers-page/ Index 1 Change log ....................................................................................................................................... 3 2 Usage ............................................................................................................................................... 3 2.1 Start screen.............................................................................................................................. 3 2.2 First data screen ...................................................................................................................... 4 2.3 Second data screen ................................................................................................................. 4 2.4 Third data screen ..................................................................................................................... 5 2.5 Fourth data screen .................................................................................................................. 5 2.6 Fifth data screen ...................................................................................................................... 5 2.7 Sixth data screen ..................................................................................................................... 6 3 Start/stop/pause ............................................................................................................................. 6 4 Locking keys ..................................................................................................................................... 7 5 Adding your license key and select automatic fetching of weather data and enable/disable auto pause ....................................................................................................................................................... 7 5.1 With the computer .................................................................................................................. 7 6 On your Phone................................................................................................................................. 8 7 Trouble shooting ........................................................................................................................... 11 8 Notes ............................................................................................................................................. 11 9 Buttons .......................................................................................................................................... 12 10 Buttons ...................................................................................................................................... 12 10.1 Buttons Vivoactive................................................................................................................. 12 10.2 Buttons Vivo Active HR .......................................................................................................... 13 10.3 Buttons Forerunner 920XT .................................................................................................... 14 10.4 Buttons Vivoactive 3 .............................................................................................................. 15 10.5 Buttons Forerunner 630 ........................................................................................................ 16
Transcript of Hike Tracker V.2.0 - 007Software · Page: 1 Hike Tracker V.2.0.0 ... which tracks all relevant...
Page: 1
Hike Tracker V.2.0.0
Hike track application, which tracks all relevant information during your hike. This App is build
for the square watches: Garmin Vivo Active, Vivo active HR and Forerunner 920XT, for the
round watches: Fore runner 735XT, Fore runner 630, Fore runner 230, Fore runner 235, D2
Bravo, D2 Bravo Titanium, D2 Charlie, Fenix 3 HR, Fenix 3, Fenix 5, Fenix 5S, Fenix 5X
Fenix Chronos and for the bike devices: Edge 520, Edge 820(+explore), Edge 1000
(+explore) and Edge 1030.
More information about developments and documentation can be found on:
http://www.007software.nl/apps/hike-trackers-page/
Index 1 Change log ....................................................................................................................................... 3
2 Usage ............................................................................................................................................... 3
2.1 Start screen.............................................................................................................................. 3
2.2 First data screen ...................................................................................................................... 4
2.3 Second data screen ................................................................................................................. 4
2.4 Third data screen ..................................................................................................................... 5
2.5 Fourth data screen .................................................................................................................. 5
2.6 Fifth data screen ...................................................................................................................... 5
2.7 Sixth data screen ..................................................................................................................... 6
3 Start/stop/pause ............................................................................................................................. 6
4 Locking keys ..................................................................................................................................... 7
5 Adding your license key and select automatic fetching of weather data and enable/disable auto
pause ....................................................................................................................................................... 7
5.1 With the computer .................................................................................................................. 7
6 On your Phone ................................................................................................................................. 8
7 Trouble shooting ........................................................................................................................... 11
8 Notes ............................................................................................................................................. 11
9 Buttons .......................................................................................................................................... 12
10 Buttons ...................................................................................................................................... 12
10.1 Buttons Vivoactive ................................................................................................................. 12
10.2 Buttons Vivo Active HR .......................................................................................................... 13
10.3 Buttons Forerunner 920XT .................................................................................................... 14
10.4 Buttons Vivoactive 3 .............................................................................................................. 15
10.5 Buttons Forerunner 630 ........................................................................................................ 16

Page: 2
10.6 Buttons Forerunner 230, 235, 735XT, D2 Bravo, D2 Bravo Titanium, Fenix3, Fenix 3HR, Fenix
5, Fenix5S, Fenix 5X, Fenix Chronos Etc. ........................................................................................... 17
10.7 Buttons Edge 520 .................................................................................................................. 18
10.8 Buttons Edge 820 .................................................................................................................. 19
10.9 Buttons Edge 1000 ................................................................................................................ 20
10.10 Disclaimer .......................................................................................................................... 21

Page: 3
1 Change log Date Description
15-12-2017
Version 2.0.0
• Made the types bigger
• Change the layout of the screens
• Added Wind arrow to point the direction to bring you home
• Added Danish language
25-04-2017
Version 1.0.0
• First release
2 Usage
Notes
• For button functions for the different devices, see the bottom of this document.
• If you check the checkbox for fetching the weather data automatically in the settings of Garmin Connect, your watch should be paired with your phone and your phone needs to be connected to the internet.
• If you do not have a Pro version, not all available fields will be visible. It took many hours to develop this App. For the price of a beers for me and a wine for my wife, you can purchase the Pro version and enjoy all features of this App.
• Register at www.007software.nl. You can buy the Pro version via the web shop. You get a license key, which you enter in the settings of the app via Garmin Express or through Garmin Connect on your phone. Instructions follow in this document.
• Don’t want to register. Pay via paypal with your paypal account or credit card.
• When you use this app, it is better to disable all notifications from your phone. When cycling, you won’t be able to check them anyway.
2.1 Start screen
Once started the GPS will search for your location. The green lines on the bottom of the
screen will show the signal strength.
A check is made to see if your phone , your tempe device and heart rate belt is
connected and in the Pro version they will show.
If you have a Tempe sensor attached and you bought the Pro version, then the temperature
from this Tempe device will be shown. Also note that with a Tempe, it may take a minute or more before the temperature is shown.
When the GPS strength is strong enough you can press the Start(enter) button to start
recording. (See the buttons paragraph). If you do this before the strength is good, the watch will still try to get the GPS and starts automatically when the strength is oke.
Page: 4
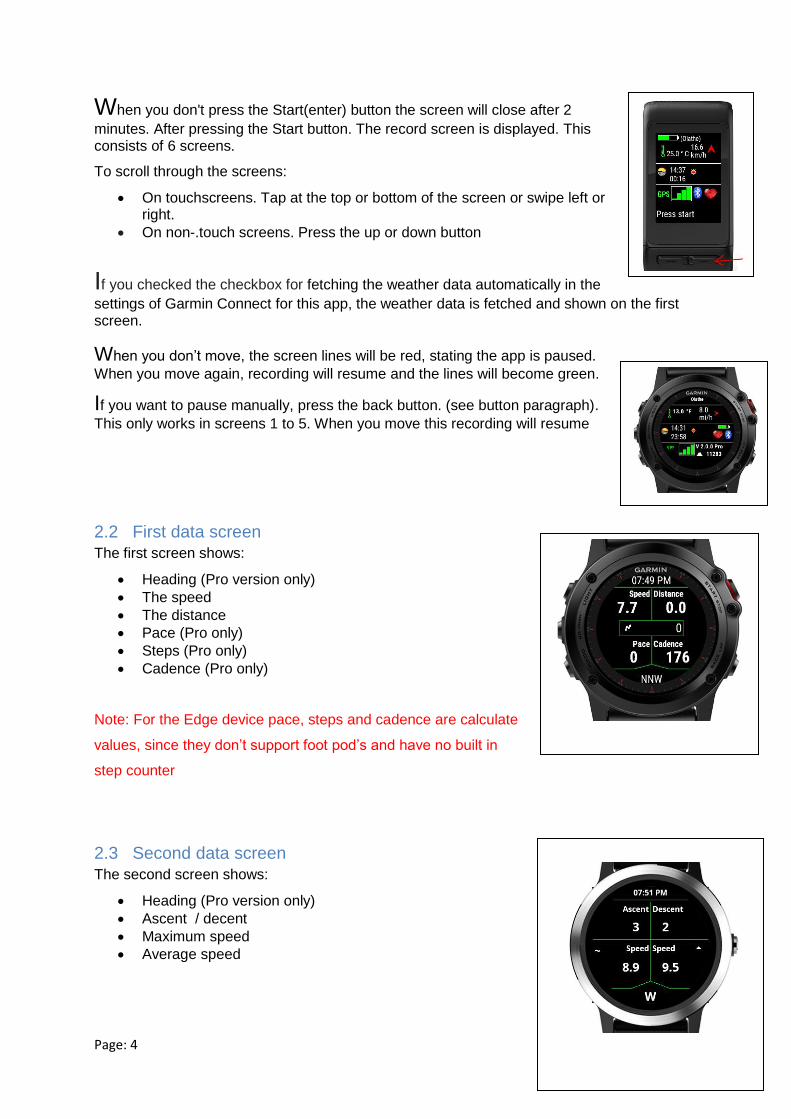
When you don't press the Start(enter) button the screen will close after 2
minutes. After pressing the Start button. The record screen is displayed. This consists of 6 screens.
To scroll through the screens:
• On touchscreens. Tap at the top or bottom of the screen or swipe left or right.
• On non-.touch screens. Press the up or down button
If you checked the checkbox for fetching the weather data automatically in the
settings of Garmin Connect for this app, the weather data is fetched and shown on the first screen.
When you don’t move, the screen lines will be red, stating the app is paused.
When you move again, recording will resume and the lines will become green.
If you want to pause manually, press the back button. (see button paragraph).
This only works in screens 1 to 5. When you move this recording will resume
2.2 First data screen
The first screen shows:
• Heading (Pro version only)
• The speed
• The distance
• Pace (Pro only)
• Steps (Pro only)
• Cadence (Pro only)
Note: For the Edge device pace, steps and cadence are calculate
values, since they don’t support foot pod’s and have no built in
step counter
2.3 Second data screen
The second screen shows:
• Heading (Pro version only)
• Ascent / decent
• Maximum speed
• Average speed
Page: 5
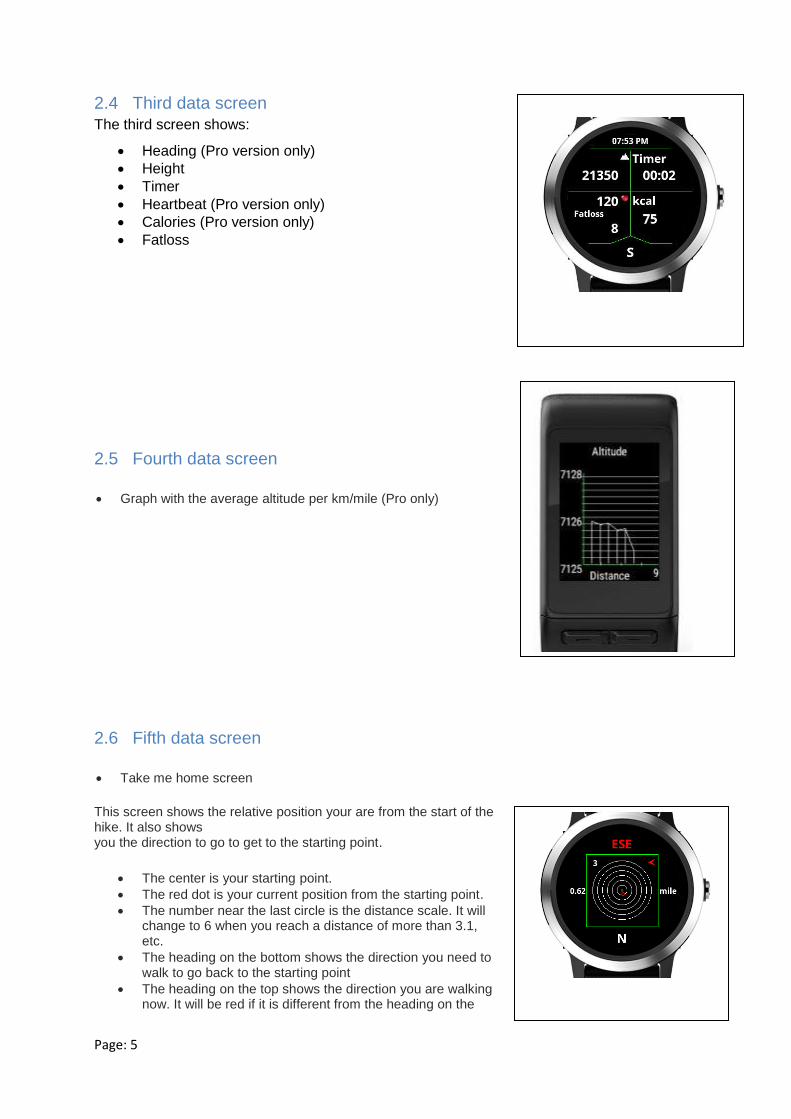
2.4 Third data screen
The third screen shows:
• Heading (Pro version only)
• Height
• Timer
• Heartbeat (Pro version only)
• Calories (Pro version only)
• Fatloss
2.5 Fourth data screen
• Graph with the average altitude per km/mile (Pro only)
2.6 Fifth data screen
• Take me home screen
This screen shows the relative position your are from the start of the hike. It also shows you the direction to go to get to the starting point.
• The center is your starting point.
• The red dot is your current position from the starting point.
• The number near the last circle is the distance scale. It will change to 6 when you reach a distance of more than 3.1, etc.
• The heading on the bottom shows the direction you need to walk to go back to the starting point
• The heading on the top shows the direction you are walking now. It will be red if it is different from the heading on the
Page: 6
bottom. If it is green you will walk in the direction of your starting point.
• The wind arrow will show you the direction to take to walk in the direction of your starting point
Note: This is not a navigation system. I tried it several times and it will indeed get you close to the starting point. Usage is at your own risk however.
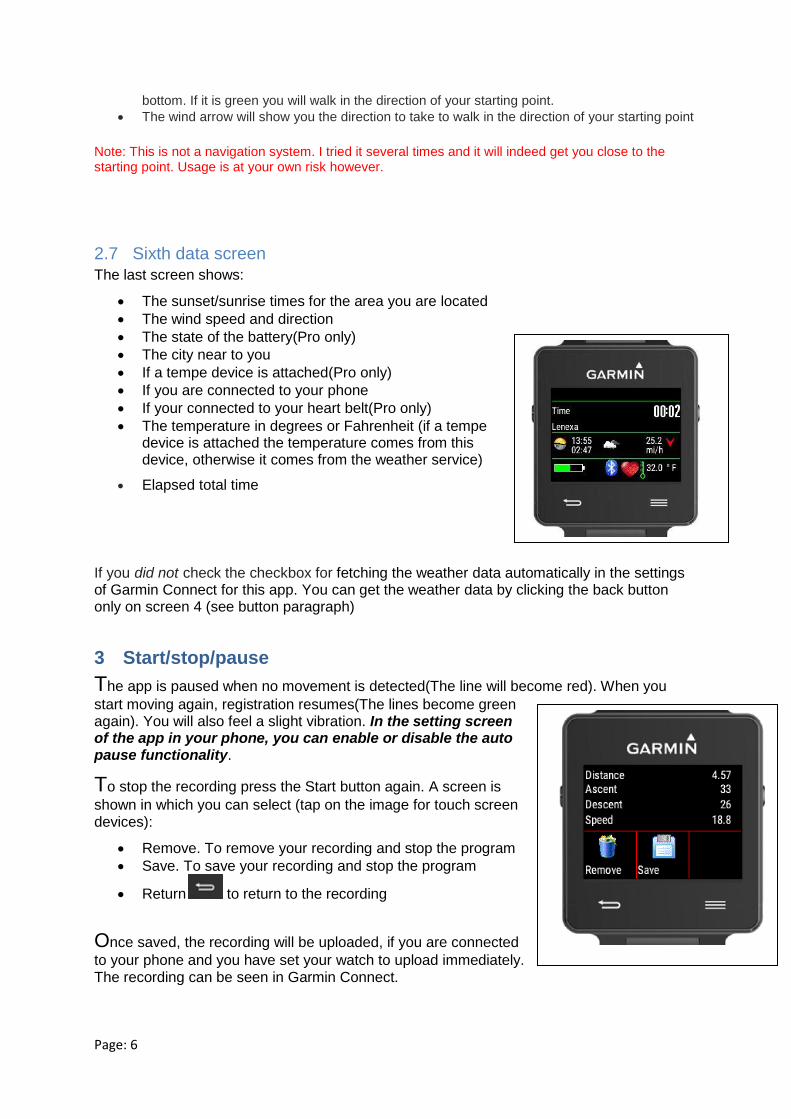
2.7 Sixth data screen
The last screen shows:
• The sunset/sunrise times for the area you are located
• The wind speed and direction
• The state of the battery(Pro only)
• The city near to you
• If a tempe device is attached(Pro only)
• If you are connected to your phone
• If your connected to your heart belt(Pro only)
• The temperature in degrees or Fahrenheit (if a tempe device is attached the temperature comes from this device, otherwise it comes from the weather service)
• Elapsed total time
If you did not check the checkbox for fetching the weather data automatically in the settings of Garmin Connect for this app. You can get the weather data by clicking the back button only on screen 4 (see button paragraph)
3 Start/stop/pause
The app is paused when no movement is detected(The line will become red). When you
start moving again, registration resumes(The lines become green again). You will also feel a slight vibration. In the setting screen of the app in your phone, you can enable or disable the auto pause functionality.
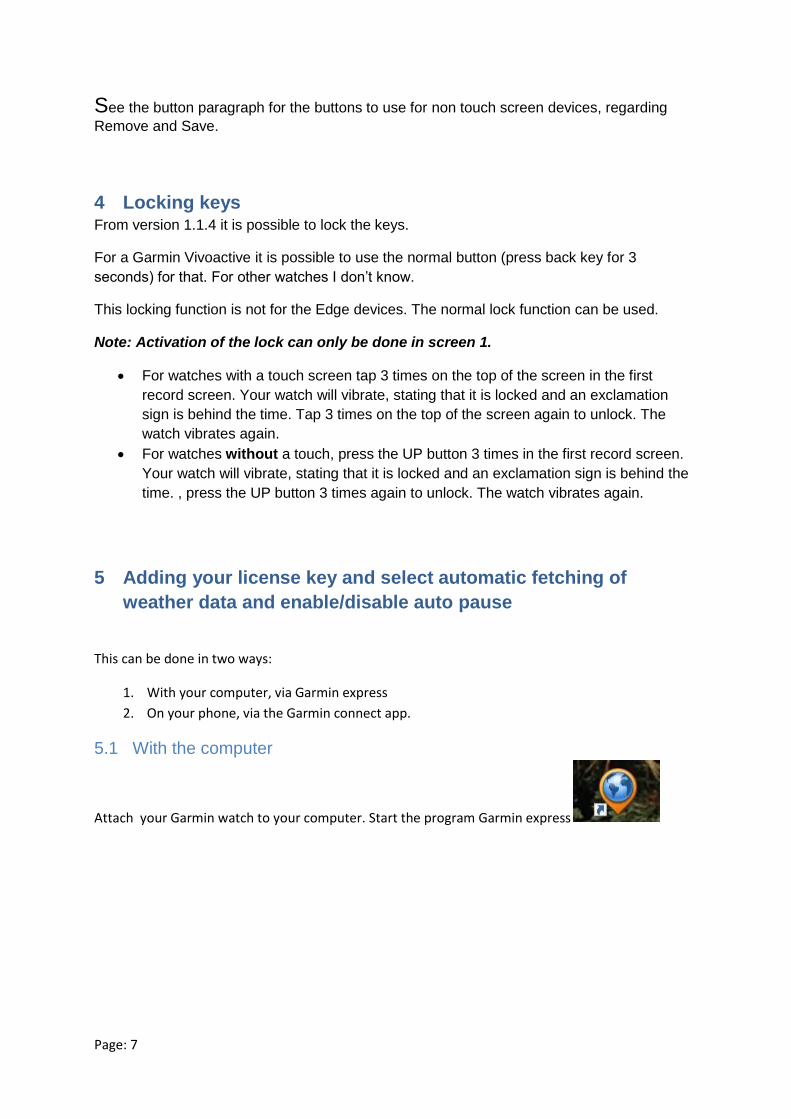
To stop the recording press the Start button again. A screen is
shown in which you can select (tap on the image for touch screen devices):
• Remove. To remove your recording and stop the program
• Save. To save your recording and stop the program
• Return to return to the recording
Once saved, the recording will be uploaded, if you are connected
to your phone and you have set your watch to upload immediately. The recording can be seen in Garmin Connect.
Page: 7
See the button paragraph for the buttons to use for non touch screen devices, regarding
Remove and Save.
4 Locking keys From version 1.1.4 it is possible to lock the keys.
For a Garmin Vivoactive it is possible to use the normal button (press back key for 3
seconds) for that. For other watches I don’t know.
This locking function is not for the Edge devices. The normal lock function can be used.
Note: Activation of the lock can only be done in screen 1.
• For watches with a touch screen tap 3 times on the top of the screen in the first
record screen. Your watch will vibrate, stating that it is locked and an exclamation
sign is behind the time. Tap 3 times on the top of the screen again to unlock. The
watch vibrates again.
• For watches without a touch, press the UP button 3 times in the first record screen.
Your watch will vibrate, stating that it is locked and an exclamation sign is behind the
time. , press the UP button 3 times again to unlock. The watch vibrates again.
5 Adding your license key and select automatic fetching of
weather data and enable/disable auto pause
This can be done in two ways:
1. With your computer, via Garmin express
2. On your phone, via the Garmin connect app.
5.1 With the computer
Attach your Garmin watch to your computer. Start the program Garmin express

Page: 8
Click on your watch symbol and then on the button Control App
Look for the Hike App in the list and click on the dots on the right of the description. (The image
shows an example of the Ski tracker)
In the next screen you can enter your license key and save it. (The image shows an example of the Ski
tracker)
6 On your Phone
Start the Garmin Connect App.
Click on the menu symbol and go to “Garmin devices”.

Page: 9
Select your Garmin watch
and click on “Connect IQ apps”
Then click on “Applications”.
Page: 10
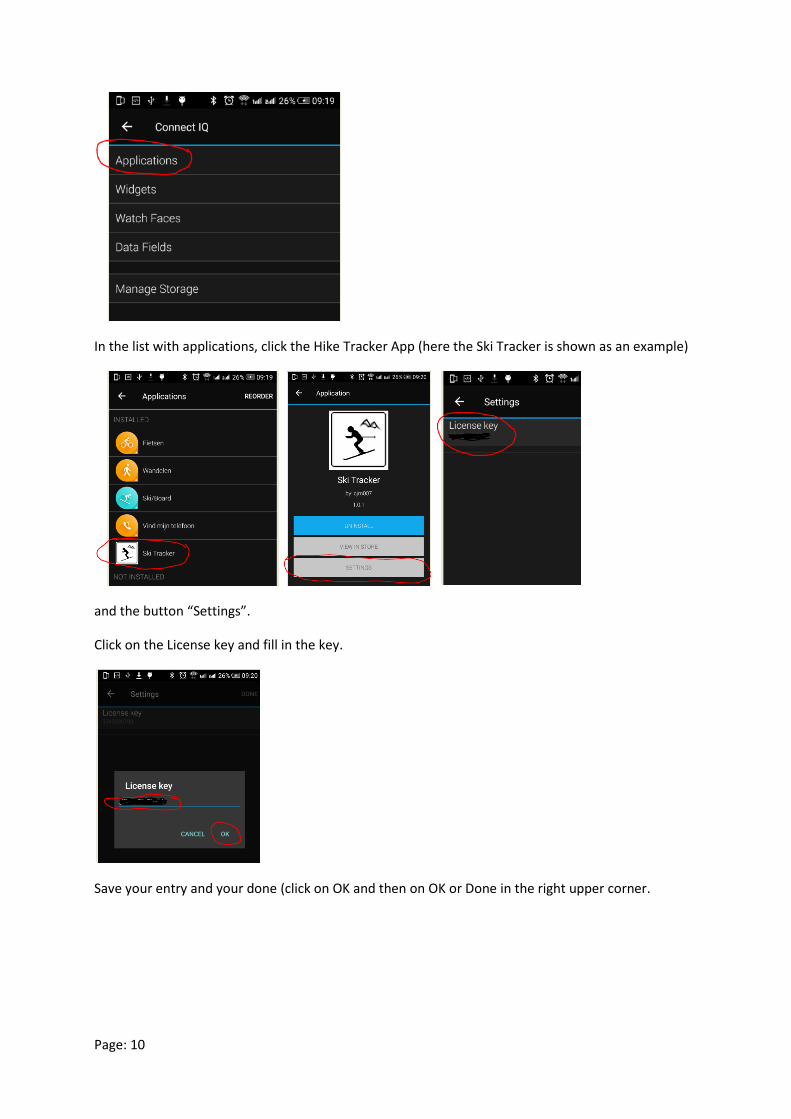
In the list with applications, click the Hike Tracker App (here the Ski Tracker is shown as an example)
and the button “Settings”.
Click on the License key and fill in the key.
Save your entry and your done (click on OK and then on OK or Done in the right upper corner.
Page: 11
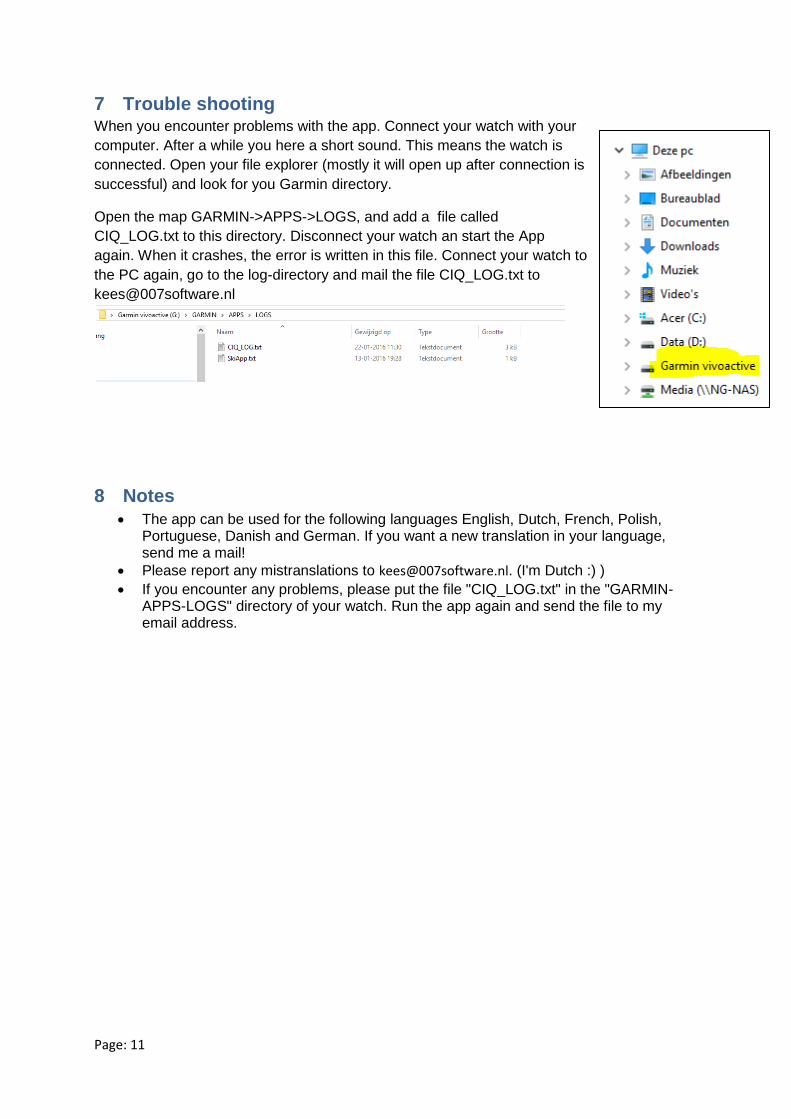
7 Trouble shooting When you encounter problems with the app. Connect your watch with your
computer. After a while you here a short sound. This means the watch is
connected. Open your file explorer (mostly it will open up after connection is
successful) and look for you Garmin directory.
Open the map GARMIN->APPS->LOGS, and add a file called
CIQ_LOG.txt to this directory. Disconnect your watch an start the App
again. When it crashes, the error is written in this file. Connect your watch to
the PC again, go to the log-directory and mail the file CIQ_LOG.txt to
8 Notes
• The app can be used for the following languages English, Dutch, French, Polish, Portuguese, Danish and German. If you want a new translation in your language, send me a mail!
• Please report any mistranslations to [email protected]. (I'm Dutch :) )
• If you encounter any problems, please put the file "CIQ_LOG.txt" in the "GARMIN-APPS-LOGS" directory of your watch. Run the app again and send the file to my email address.

Page: 12
9 Buttons
10 Buttons
10.1 Buttons Vivoactive
Top screen Previous screen (tap 3 times in the
first record screen, will
lock/unlock)
Swipe right Previous screen
Swipe left Next screen
Bottom screen Next screen
Start/stop Start / stop recording
Back Manually Pause in screen 1 and 2
Get weather data in screen 3
Save Save the recording
Remove Remove recording

Page: 13
10.2 Buttons Vivo Active HR
Top screen Previous screen(tap 3
times in the first record
screen, will
lock/unlock)
Swipe right Previous screen
Swipe left Next screen
Bottom screen Next screen
Start/stop Start / stop recording
Back Manually Pause in screen 1 and 2
Get weather data in screen 5
Save Save the recording
Remove Remove recording
Page: 14
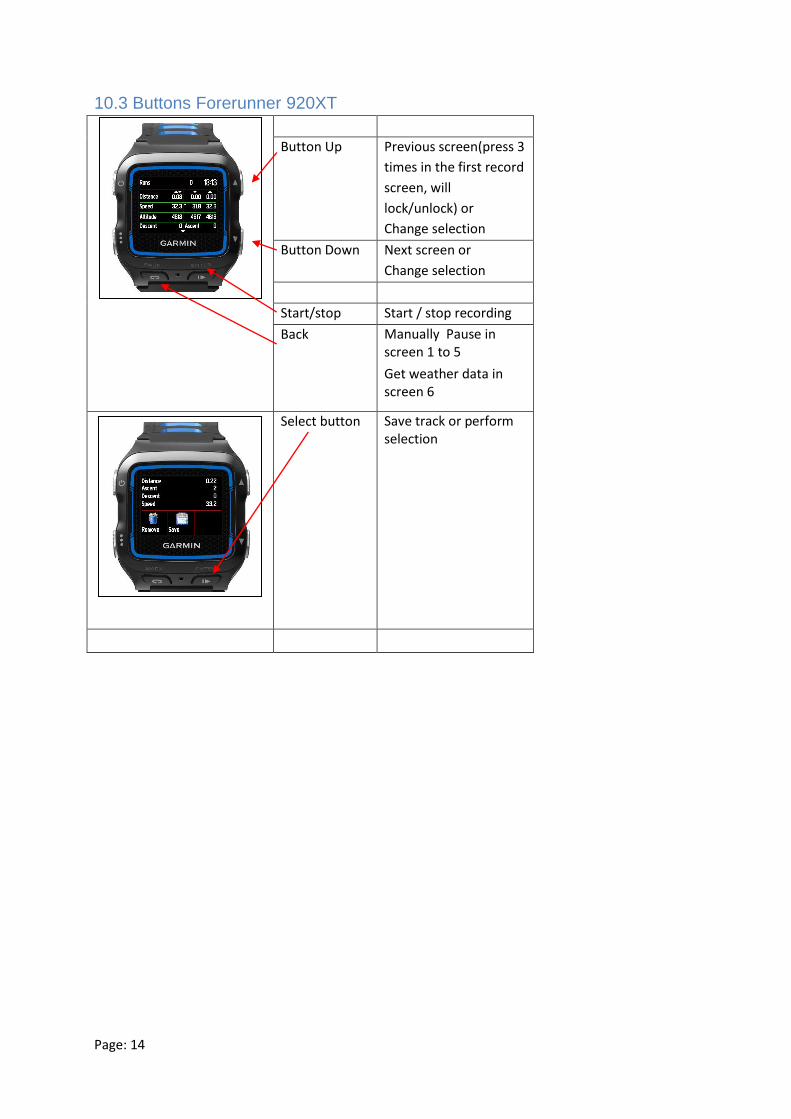
10.3 Buttons Forerunner 920XT
Button Up Previous screen(press 3
times in the first record
screen, will
lock/unlock) or
Change selection
Button Down Next screen or
Change selection
Start/stop Start / stop recording
Back Manually Pause in screen 1 to 5
Get weather data in screen 6
Select button Save track or perform selection

Page: 15
10.4 Buttons Vivoactive 3
Top screen Previous screen (tap 3
times in the first record
screen, will
lock/unlock)
Swipe right Previous screen
Swipe left Next screen
Bottom screen Next screen
Start/stop Start / stop recording
Back
Is swipe right
Manually Pause in screen 1 to 5
Get weather data in screen 6
Save Save the recording
Page: 16
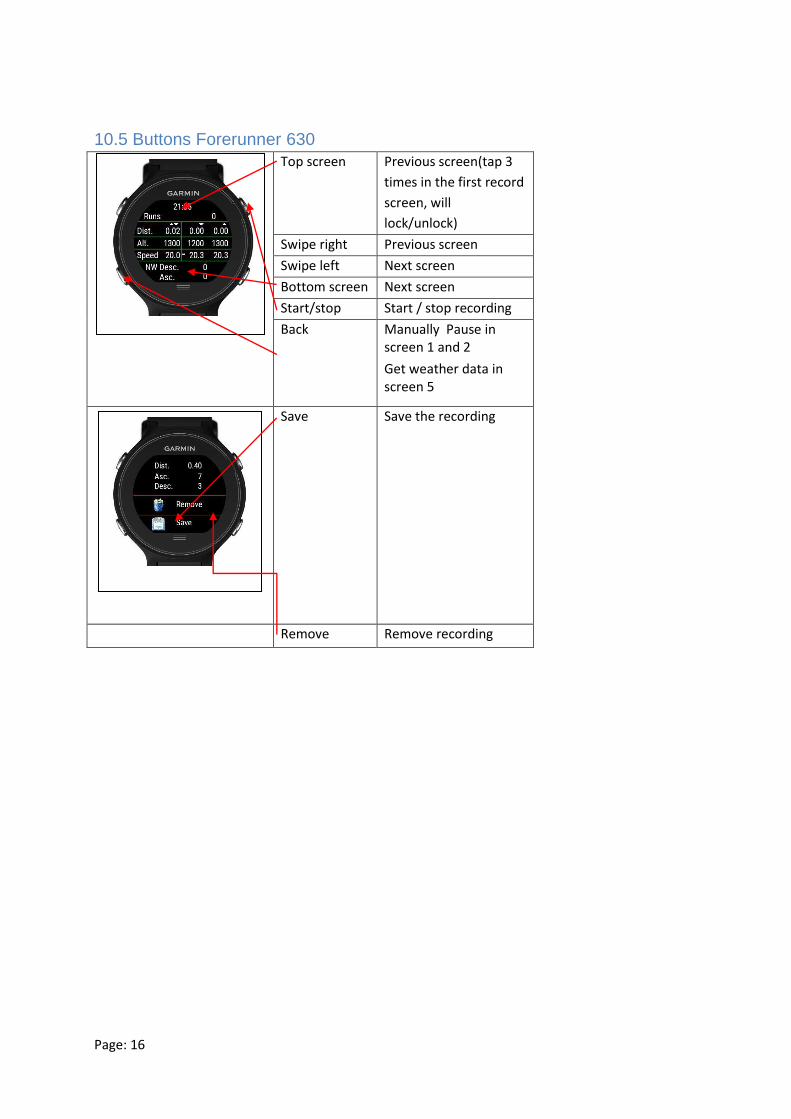
10.5 Buttons Forerunner 630
Top screen Previous screen(tap 3
times in the first record
screen, will
lock/unlock)
Swipe right Previous screen
Swipe left Next screen
Bottom screen Next screen
Start/stop Start / stop recording
Back Manually Pause in screen 1 and 2
Get weather data in screen 5
Save Save the recording
Remove Remove recording
Page: 17
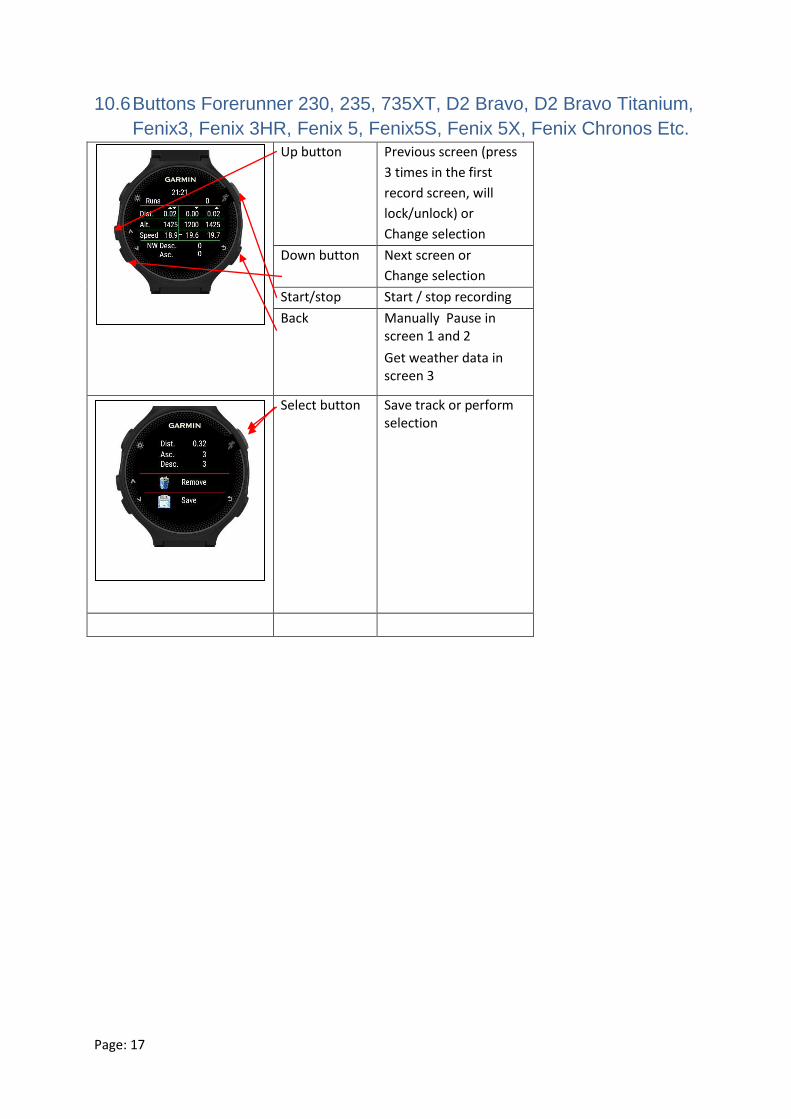
10.6 Buttons Forerunner 230, 235, 735XT, D2 Bravo, D2 Bravo Titanium,
Fenix3, Fenix 3HR, Fenix 5, Fenix5S, Fenix 5X, Fenix Chronos Etc. Up button Previous screen (press
3 times in the first
record screen, will
lock/unlock) or
Change selection
Down button Next screen or
Change selection
Start/stop Start / stop recording
Back Manually Pause in screen 1 and 2
Get weather data in screen 3
Select button Save track or perform selection

Page: 18
10.7 Buttons Edge 520
Up button Previous screen
Down button Next screen
Start/stop Start / stop recording
Back Manually Pause in screen 1 and 2
Get weather data in screen 3
Save Save track or selection
for Yes in the yes/no
screen
Remove Remove track or
selection for No in the
yes/no screen
Page: 19
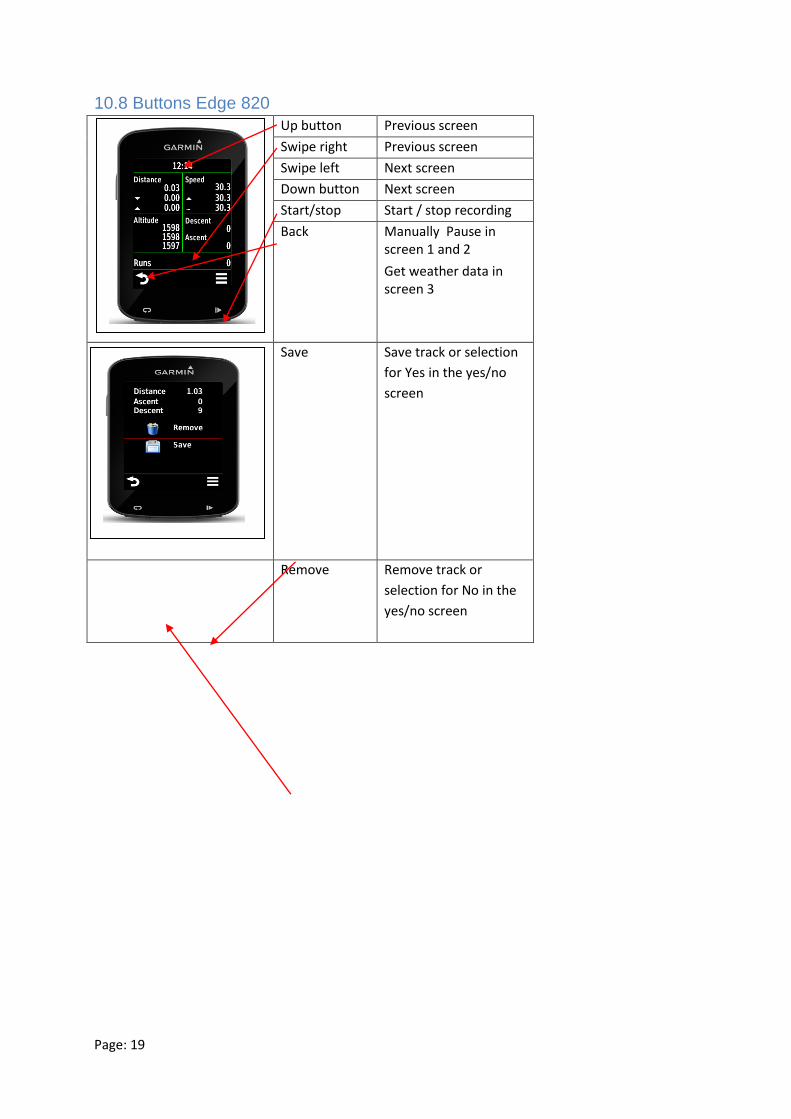
10.8 Buttons Edge 820
Up button Previous screen
Swipe right Previous screen
Swipe left Next screen
Down button Next screen
Start/stop Start / stop recording
Back Manually Pause in screen 1 and 2
Get weather data in screen 3
Save Save track or selection
for Yes in the yes/no
screen
Remove Remove track or
selection for No in the
yes/no screen

Page: 20
10.9 Buttons Edge 1000
Up button Previous screen
Swipe right Previous screen
Swipe left Next screen
Down button Next screen
Start/stop Start / stop recording
Back Manually Pause in screen 1 and 2
Get weather data in screen 3
Save Save track or selection
for Yes in the yes/no
screen
Remove Remove track or
selection for No in the
yes/no screen
Page: 21
10.10 Disclaimer
This app is provided ‘as is’ without warranty of any kind, either express or implied, including, but not
limited to, the implied warranties of fitness for a purpose, or the warranty of non-infringement.
Without limiting the foregoing, I (Kees Bond) makes no warranty that:
• the software will meet your requirements
• the software will be uninterrupted, timely, secure or error-free
• the results that may be obtained from the use of the software will be effective, accurate or
reliable
• the quality of the software will meet your expectations
• may be out of date, and I make no commitment to update the software right away.
• I assume no responsibility for errors or omissions in the software or documentation available
from this web site.
In no event shall I be liable to you or any third parties for any special, punitive, incidental, indirect or
consequential damages of any kind, or any damages whatsoever, including, without limitation, those
resulting from loss of use, data or profits, whether or not I have been advised of the possibility of
such damages, and on any theory of liability, arising out of or in connection with the use of this
software.
The use of this software is done at your own discretion and risk and with agreement that you will be
solely responsible for any damage to your computer system, watch of navigation device or loss of
data that results from such activities. No advice or information, whether oral or written, obtained by
you from me or from the this web site shall create any warranty for the software.


![Excel FinanceFormulas Vol[1].2.0.0](https://static.fdocuments.in/doc/165x107/577cd7931a28ab9e789f54c8/excel-financeformulas-vol1200.jpg)