
High Definition Text to Speech Synthesizer Systems
16
Users′ Guide TTS-EM-HD3 High Definition Text to Speech Synthesizer Systems Version 1.2 Version 1.2 Version 1.2 Version 1.2F Release Release Release Release
Transcript of High Definition Text to Speech Synthesizer Systems

Users′ Guide
TTS-EM-HD3
High Definition Text to Speech
Synthesizer Systems
Version 1.2Version 1.2Version 1.2Version 1.2FFFF Release Release Release Release

2
v 1.2 Rev F
Consult factory for latest specifications
prior to design-in
Applies to version 3.6 or greater revision level

1
TTS-EM OVERVIEW
The TTS-EM-HD3 offers a complete Text to Speech platform with an integrated high definition 25 W audio paging amplifier. Sophisticated ambient noise detection optionally controls up to 20 db of volume automatically, meeting
customer demands for clarity in environments with dynamic noise activity. Typical deployments include transportation centers, public places and industrial
installations. RS-232 connectivity offers simple setup, management and control using TX/RX serial streams. Text to Speech generation includes support for dictionary management, in-line control codes and dynamic language and voice
switching.
• Text to Speech supports up to 9
concurrent TTS languages or gender
voices. Choose from over 24 voices.
• High Definition amplifier offers
unparalleled intelligibility and direct
drive for paging system speakers
• Highly integrated OS provides superior
flexibility and support for remote
upgrade and file transfers
• Seamless switching from TTS to/from
user stored pre-recorded audio files
using inline control codes
• Integrated command and control
language provides complete user
control from remote locations
• Flexible power options permits powering
from a wide voltage range of 9 to 24
volts
• Ambient noise sensing uses speakers to
simplify installs. LEDs and terminal
report real-time noise levels and
volume.
• User definable power regulation permits
8 and 25 watt operation to protect
downstream speakers from overload
• Flash based, with upgradeable file
transfer support and dictionary
management Simple integration into
EXISTING products. No special
programming required.
Applications � Emergency Notification
� Alarm and security � Transportation systems
� Signage to Speech
� Machine control interfaces � Streaming text reader
Other Applications include:
Wireless audio transmitters and information systems, Email/SMS Readers,
GPS/Navigation Systems, Warning systems, Machine accessories, Smart Pagers, Ticketing and Kiosks, disability compliance for hearing impaired individuals (ADA).
"I can talk!"
ASCII TEXT
RS232
Ethernet
GAIN
ARM® CORE
Parser
CONTROL &
DECODE

2
CONTROLS AND CONNECTIONS
Basic Communications Real time text may be continuously sent to the TTS-EM using RS-232 text transfer. TextSpeak TTS-EM will also speak phrases as you type in real time on a connected keyboard.
In manual typing mode pressing the Enter key <CR> to begin a speech playback.
In streaming mode both ASCII <CR> or <DLE>1 will begin a speech playback.
<CR> is the convention for Enter, Carriage Return (ASCII 13, 0xD)
After manual typing text from a terminal keyboard, CR invokes sending a phrase to the TTS conversion routine
HELLO <CR> will speak “hello”
Speaker connection 4-8 ohm 3-25 watt
Ambient sense LED Displays noise level Refer to Table xx
Ambient noise input gain. Adjust to match speaker and average noise baseline
DC Power 9-24 volts Barrel jack access Refer to Table xx for Voltage vs Audio Power Out
I/O Ports. Audio Line Out
I/O Port USB for file transfers
DC Power 9-24 volts. Screw terminal access Refer to Table xx for Voltage vs Audio Power
RS-232

3
Connector Detail
POWER Input Use either 9-24 VDC screw connection or rear panel 2.1MM center
positive rear panel. Refer to Appendix A
SPKR (x2) Output
4 –12 ohm speakers are supported for power levels to 18 watts. For
maximum power, use a recommended 8-ohm load with a speaker
rated at a minimum of 25 watts. Speaker lead are not polarity
sensitive. Note: Connections must be direct to floated transformer or
speakers. Do not connect either lead to ground!
DIN Input
Digital Input is a flexible general-purpose sensor with Analog to Digital
capability. In simple operation mode a connection to ground will create
an event. This event signal will be sent to the earBridge cloud host for
management and further actions. In a more sophisticated connection,
a 16-button keypad can also be connected using a 3-wire interface.
Refer to Keypad Application notes for more information
DOUT Output
Digital Out is a processor level signal (5vdc) that is normally HIGH
when voice is being spoken. This pin is programmable, and may be
used for application specific purposes, such as keying a radio
transmitter or cycling disability compliant “locator tone” pulses at 2
second intervals
LINE Output
Line out is a volume controlled audio signal outputting the same audio
as the Speaker. It is capable of driving a –6db signal to the
unbalanced Line In of an audio amplifier. Note: SPEAKER AMPLIFIER
and ALC should be OFF for LINE OUT operation to avoid muting clicks
and insure noise free operation. Use remote programming or USB to
enable and disable these settings.
GND Ground This is the ground connection for the audio line out signal and the
DIN/DOUT ground references
ETHERNET In/Out
The TTS-EN-E-CE Ethernet connection offers full connectivity to the
cloud without Cellular, may be used as a primary or backup channel,
can distribute cellular to data/events to a wireless access point and
support a web browser interface (refer below)
USB In/Out
USB Mini Device Port. When used with a PC, earBridge will disconnect
and establish itself as a USB ‘Flash Drive’ folder “TextSpeak/Userdata”
viable from the PC. This allows a simple method to transfer files (like
.wav) and run earBridge onboard setup and utility application from a
PC
Digital Out
+ --- Speaker
Digital Input
Line Out
Gnd + --- 9-24 VDC Power
4
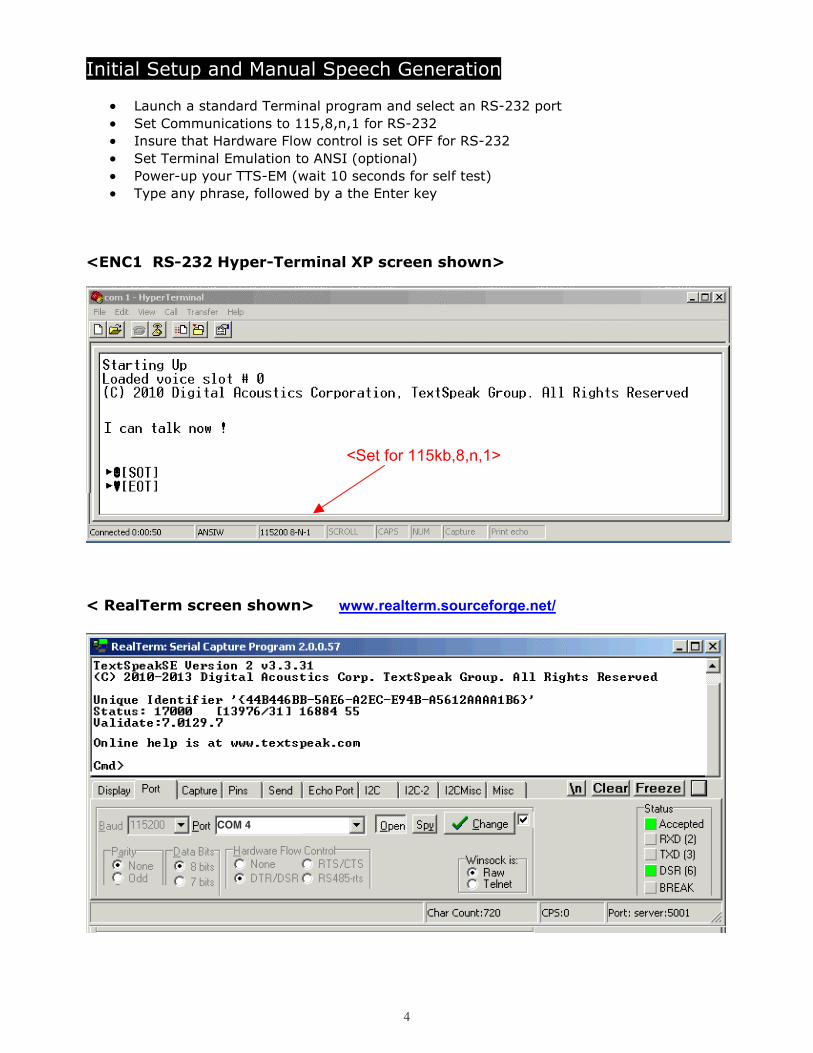
Initial Setup and Manual Speech Generation
• Launch a standard Terminal program and select an RS-232 port
• Set Communications to 115,8,n,1 for RS-232
• Insure that Hardware Flow control is set OFF for RS-232
• Set Terminal Emulation to ANSI (optional)
• Power-up your TTS-EM (wait 10 seconds for self test)
• Type any phrase, followed by a the Enter key
<ENC1 RS-232 Hyper-Terminal XP screen shown>
< RealTerm screen shown> www.realterm.sourceforge.net/
<Set for 115kb,8,n,1>
COM 4

5
Setup, Menu Operation and Command Mode
Setup, information and special commands are available using COMMAND MODE interface
Options available in Command Mode are:
• View current voice selections • Change the default mode voice if several voices are activated • Playback demonstrations of multi-language voices
• Edit the spoken power-up prompt • Update programs features and revision
• Change serial baud rate
After Entering COMMAND MODE all TTS functions will be temporarily suspended
To enter COMMAND MODE a required sequence of 3 “+” characters must be manually typed (with 500-700ms pause between each character)
Example:
+ + +
will result in an RS-232 response:
CMD>
Press H to view available choices. The RS-232 screen will respond with a help menu.
(C) 2010-2013 Digital Acoustics Corp. TextSpeak Group. All Rights Reserved
Unique Identifier '{44B446BB-5AE6-A2EC-E94B-A5612AAAA1B6}' HELP: .A Adaptive Level Set Adaptive Level Control (ALC), view ambient noise. B"text" Boot TTS Enter the text to be spoken at power-up (ex: b"hello") C Clear Screen This will clear an ANSI terminal screen D Display Files Show listing of files and memory in folder "UserData" E ignore ESC Ignore ESC commands in the TTS stream F Flash Drive Enable USB access to manage Flash memory H Help This list I Information Get current settings information P# Play Audio Generate test tones (1=1khz,2=sweep,3=noise) Q# Quiet Mode 'Q?' for options S Change Serial 115200,n,8,1 T TTS Mode Go from CMD mode to TTS mode U Update Update Firmware V# Select Voice Select a voice slot ? Review Review current settings and information
Cmd>

6
Command Mode Overview Over
A ALC Automatic Level Control and Amplifier control <see next section>
B Boot phrase to be spoken in TTS on power-up. (ex: B”anyphrase” <CR> )
C Clears terminal screen (ex: C <CR>)
D Display audio files stored in local memory default folder “UserData”
E ESC ON/OFF. Disable ESC sequence processing in data stream
F Flash Drive Enable USB port for audio or upgrade file transfer **
H Help Displays Help Menu
I Information Display version and settings
L# Level sets and saves audio volume output level #(0-9 range @ 4db/step)
P# Playback Generate playback of tones or test patterns #(0-3)
Q# Quiet Modes. Set power-up audio announcement & terminal duplex echo #(0-2)
S Serial RS-232 Speed Change (ex: S115200 <CR>)
T TTS mode return. Exits command mode (CMD>)
U Upgrade; reserved for field upgrades
V# Voice provides a means to choose a voice and set the power-up default voice. Refer to
‘?’ (below) to list available voices (ex: V1 <CR> selects voice “James”) #(0-400)
? Review voices. Provides information on available languages and voices.
** feature available on AUD, ENC and TTS-HD3 models
.

7
Voice File Index Lists
Command Mode option “V#” provides a unique method to select and preview samples
of voices in various languages. The “?” command will display a list of voices and their current availability. Active voices may be selected for TTS operation, or licensed. The screen below is a sample of voices for selection for 5 available languages.
The example cited above displays a list of voices. Status information displayed
provides the following information:
• Activated Voices are available for selection using “V” Command. The
selected voice is saved in memory and started in power-up.
• Not Activated The voice is installed, but not licensed for use. Contact
[email protected] for purchase and licensing procedures.
• Not Installed The voice in not installed in Flash Memory at the time of
purchase. Contact TextSpeak for additional information.
Commonly used menu commands are V# and ? to change voices and T return to TTS
Mode from CMD prompt. For inline commands that may be used embedded within the spoken text stream refer to the next section.
For languages not shown please contact [email protected] for the latest pricing and
availability of additional worldwide languages

8
Adaptive Level Control (ALC) Menu
Adaptive Level is an OPTIONAL menu available using ‘A’ from the main menu. When enabled, ALC uses the Speaker to listen to ambient noise levels and automatically
adjust level to increase and decrease speaker volume levels. In quiet times, the volume will be low, in noisier time, the volume will increase automatically. To use ALC
refer to the Menu Below, and the section “Adjusting ALC’.
I Internal Amplifier Enable/Disable. When in Disable mode, use Line Out to drive an
external audio power amplifier. This option permits using a Speaker or Dynamic
microphone ONLY as an input device to measure ambient noise in ALC mode.
A ALC Enable/Disable. When ALC is Enabled, ambient noise, measured at the speaker,
will be used to change the Text to Speech and audio file playback volume in a range of
either 12 or 20 db. When disabled the “L”, “R” and “V” commands below have not effect.
P Internal Amplifier Audio Power Limit. Select 3, 8 or 25-watt modes to match the
power rating of attached speakers. Refer to DC voltage/wattage in Table 5 to select
required power.
U/D
Baseline Volume Selects the relative “0 db” baseline volume for ALC centering. Ideally
users will set to this to a value of Vol=5 to Vol=7. With ALC Enabled, this is the center
“baseline” volume of loudness. ALC will increase above this volume (up to 2 steps, +8db)
in high noise environments and decrease (up to 3 steps, -12 db) in quiet environments.
L Leveling Range 12db/20db offers 2 ranges of ALC changes. Choose 12db ranges for
moderate gain change, or when using “3 watt” power limiting mode. Choose 20db when
maximum automatic gain change is desired for highly changing noise environments.
R
Rate Select 1 or 5 Seconds to set the desired “update interval” for volume changes. 5
Seconds is the default where the previous 5 seconds of average noise to be factored for
volume changes. In some cases, such as highly dynamic noise environments, 1-second
intervals may be used.
V View ALC – Set Enable to view ALC volume onscreen when a phrase is spoken . On
screen format is [ALC:8/7] . This indicates [Current ALC volume/Base volume].
Real-Time ALC Level Display (bottom of menu display)
The onscreen text shown at the bottom of the terminal display shows the relative volume change
above and below a reference volume in 4db steps. This digital output display provides a user
interface for setting the adjustable trim pot “ALC Gain” to set 0db for average noise.
Alternatively, the front panel LED for Solid Green may be used to set the trim-pot.
TextSpeak HD3 and TTS-EM-EN-Cx Series Amplifier and Auto Level Control (ALC) Setup
Select an option, Press ESC or 'Q' to quit
Key Status Description
--- ------ --------------------------------------------------
I AMP = ENABLED Internal amplifier Enable/Disable ('I' to change) A ALC = ENABLED Auto Level Control Enable/Disable ('A' to change) P POWER =25 Watts Set amplifier power 3/8/25 watts ('P' to toggle) U/D VOLUME= 4 Set baseline ALC volume, 1-6 (U/D to change) L RANGE = 12 db Set leveling range, 12/20db ('L' to change) R RATE = 1 sec Set update rate, fast/normal ('R' to change) V VIEW = DISABLED View ALC values, Enable/Disable ('V' to change)
Q Quit this menu
--------- Real-time ALC levels ---------
Value Updates occur in 1 second intervals
----- ----------------------------------
1 Ambient noise value, 0-100 (min/max) ALC is -4 dB below VOL:4

9
Inline and Keyboard Control Codes
The table below reflects Keyboard/TYPED and RS-232/ASCII control
Numeral shown with ‘d’ indicate ASCII decimal values not character “d”
Conventions: ���� = 16d and <esc> = 27d or a keyboard ESC key
Example: ����2 is ASCII data decimal 16 and 2 (0x10,0x02) <esc> ! is 23
ACTION TYPED ASCII ECHO REMARK
INVOKE
SPEECH <CR> ����<02d>
����<2d>
[SOT] Begin a TTS of text in buffer.
STOP
CAPTURE n/a ����<25d>
����<25d>
[EM]
End of Medium. Stop adding
text to speech buffer
RESTART
CAPTURE n/a ����<30d>
����<30d>
[RS]
Start capturing text, add text
to buffer.
PLAY
FILE <esc> p
”any.wav” ����p”any.wav”
[ACK]
<06d>
Begin synchronous playback of
recorded audio file “any.wav”
CANCEL <esc>
<esc> ����<24d>
����<24d>
[CAN]
Cancel/Abort speech in
progress and clear buffer.
REPEAT <esc>/ n/a n/a Repeat (must follow a space
and precede the <CR
VOL DN <esc>( ����<14d> [Vol=#] Volume Down, 0-9, 10 steps
VOL UP <esc>) ����<15d> [Vol=#] Volume Up 0-9, 0-9, 10 steps
VOL SET n/a ����<18d># ����<18d>
# [DC2] Volume Set, #=0-9
SLEEP <esc>! ����<23d> ����<23d>
[SLP]
Enter Suspend mode. Wake on
next (dummy) character
received QUERY
ALC <esc>a ����6
[ALC����
#/#]
#=ALC Volume / #=Base
Volume Range 0-9 (4db steps)
RESPONSES (INDICATES STATUS, SUCH AS SPEECH CONVERTING OR FINISHED TTS
ACTIVE
TTS n/a n/a
����<01d>
[SOH]
TTS Speech generation in
progress
IDLE n/a n/a ����<03d>
[EOT] End of TTS Speech generation.
OK n/a n/a [ACK]
<06d> Command Acknowledgment
WAKE n/a n/a ����<26d>
[RDY]
Awake from sleep, characters
will be processed

10
Storing Pre-Recorded Audio Files
Audio files may be transferred using the ‘TTS-em-Xfer’ utility, USB 2.0 or by FTP/Ethernet (EN-C2 only). Choosing USB transfer via the Flash Dish menu option will suspend TTS generation and convert the EM-EN-Cx into a virtual USB “Removable Disk” on a connected PC (e.g. ‘thumb’ drive). Once the PC has detected and shown the new “drive” in Windows Explorer you may drop audio files to the EN-Cx available 1.2 GB memory. The preferred location is the default root user folder \UserData. Refer to Software Utilities below for EN-C2 file transfers over Ethernet
Note: Do NOT remove or alter any files that are not in the Folder \UserData File formats should be *.wav files in the format 8,16,22, 44khz 16 bit , PCM or uLaw
Refer to online AppNote12821-usbdrive.pdf for more information
Inline (real-time) Language/Voice/Audio File Playback Inline Voice Change: The code sequence is <ESC> [digit] in ASCII will execute a real-time voice change. The [digit] numbers, ASCII "0"-"9" are the voices, in order, as listed in the voice listing menu. This method is supported, but not to be used in version 3.7.19 or later code. For version v3.7.19 or later code, the code sequence is <ESC>V[###] <CR> in ASCII will execute real-time voice change using the DIRECT voice ID number. The letter “V” and the following [###] represents 3 digits of the permanent voice ID (ranging from 101 to 399). Ex: <ESC>V102<CR> for voice Steven Voices change in about 2-3 seconds with the exception of transitions between Steven and Susan... (101 and 102). These changes require 6-8 seconds. Inline Wave File Audio: This sample text below demonstrates both spoken and non-spoken data with pre-recorded audio files. (tone1.wav and tone2.wav are factory recorded files). The sample below uses default root, indicated by “\”. Default user folder is “UserData” and does not require the “\” if files are stored in \UserData.
ESC p"\tone1.wav" Express 32, arriving in 2 minutes on track 12, for all points South. DLE EM This text is in-line data that is not spoken by the TTS processor DLE RS Please expect delays ESC p"\tone2.wav". End of test. CR
Download file sample http://www.textspeak.com/downloads/TTSdemo2d.txt
Adjusting the Adaptive Level Control (ALC)
Automatic Level-Gain Relative To Background Noise
-16
-12
-8
-4
0
4
8
12
54 58 60 65 69 75 80 85 90 94 98
Average Ambient Noise Sound Pressure Level (SPL dB)
Am
plifier R
ela
tive G
ain
(dB
)
12 dB Range
20 db Range

11
ALC Adjustment
The template sample above displays a 12db or 20 db selection for ALC, based on a 60-90db
ambient noise sensitivity (as measured at the speaker).
Ambient Noise Sensitivity Adjustment: Speaker sensitivity and physical placements vary.
To calibrate the ALC speaker sensitivity detection, a one time adjustment is required using the
front panel screwdriver trim pot. The volume trimpot adjusts with 15 turns. A clockwise
rotation increases gain sensitivity. Counter-clockwise turns decreases sensitivity. 7 turns from
either extreme of the 15 truns will “center” the trimpot. After the sensitivity is adjusted to the
“fit” the deployment environment, the ambient noise can be measured and used to set speaker
volume automatically, based on ambient noise.
The LED indicator and on-screen menu display both offers a fast and reliable adjustment setup.
Refer to Table 2 below. For a quick adjustment, set the “Baseline Volume” in the on-screen
menu display to “Vol=6” and then adjust the trimport to show the GREEN LED solidly on during
average, steady ambient noise. For precise calibration a Sound Pressure level meter and on-
site measurements may be used with the real-time menu on-screen display showing noise
readings.
Baseline Volume Level: Once set, ALC volume will seamlessly shift in small 4 dB increments
from the BASELINE VOLUME as the noise shown in the horizontal table above. Volume shifts
+8db ABOVE and –12db BELOW the baseline volume in 20db mode. Volume shifts +8db
ABOVE and -4 db BELOW baseline volume in 12db mode.
Example: 20db Mode: if Volume is set to “7” then the level will shift the range of Vol=4,5,6,7,8,9.
Example: 12db Mode: if Volume is set to “6” the shift will be a range of Vol= 5, 6 ,7 ,8.
AFTER DEPLOYMENT- REMOTE ADJUSTMENT
ALC adjustment (after deployment), when trimpot access is not available, is possible using
digital control. Changing the baseline Volume to any number VOL=3 to VOL=7 will allow new
baseline volume “window” to be set remotely. For more dramatic volume shifts, the amplifier
wattage may be changed of the range 3,8 and 25 watts, further shifting volume in 4db steps.
ALC QUICK TEST: First, set the VIEW OPTION on in ALC the menu setup to view results.
Next, in a quiet environment, enter Text and listen to the audio level. Then, speak for a few
seconds directly in the the speaker and watch the green LED turn to yellow. While the indicator
shows Yellow, generate a TTS phrase and listen to the increased volume. The onscreen display
will display the New Level, and the Baseline level in the form. For example, [ALC=7/6] would
indicate a loudness “7” , or 1 step (4 dB) louder than the baseline level of “7”.
LED Indicators
The onsreen display produces a real-time digital status of the ambient noise detection levels.
Levels displayed show detection gain as set via the adjacent front panel “trimpot” adjustment.
Nominal, moderate, average noise should set the Green LED on (without blinking) and/or show
a yellow LED flashing occaionally.
LED Status Relative noise represented 12db range 20dB Range
Green Flashing Low ambient noise detected -4 db -8 to –12
Green Solid Standard (baseline) ambient noise detected 0 db -4db to 0
Yellow Flashing Loud ambient noise +4 db 0 to +4 db
Yellow Solid Highest ambient noise +8 db +8 db
Red Solid Speech generation, noise sampling inactive - -
TABLE 2

12
Overview of Noise and Sound Pressure Levels (SPL)
Description
Sound Level Example
Quiet 40 dBA Quiet library
50 dBA Average home
Moderately loud 60 dBA Outdoor, Residential Light traffic
70 dBA Indoor Vacuum cleaner
Very loud 80 dBA Downtown City Noise (75-85 dB)
90 dBA Diesel truck (10 m away)
Uncomfortably loud 100 dBA Newspaper press
Refer to link here for additional information
TABLE 3
Power Supply Selection
Choosing the power supply for optimum audio power amplifier wattage
TextSpeak’s Audio Power amplifier output range from 3 to 25 watts based on the settings in
“Power Limit” in the ALC menu choices. Audio power (watts) capability depends on power
available from power supply rating. If a 3-watt limitation is set in the menu power will always
be 3 watts, regardless of the power supply voltage. However if a 25-watt limit is specified, the
DC power supply voltage/power will determine the audio power output capability.
Use the table below to select the correct minimum power supply for your desired audio output.
ALC Power
Limit Setting
DC Supply
Voltage
DC Supply
Current (A)
Audio Power 8ohms
1% THD
3 Watts 9 volts 1.0A 3 Watts
3 Watts 12volts 0.5A 3 Watts
3 Watts 24volts 0.2A 3 Watts
8 Watts 9 volts 2.0A 6 watts
8 Watts 12volts 1.0A 8 watts
8 Watts 24volts 0.5A 8 watts
25 Watts 9 volts 2.0A 6 watts
25 Watts 12volts 1.0A 8 watts
25 Watts 24volts 1.5A 25 watts
TABLE 4

13
Software Utilities
TTS-em-Xfer Transfer software utility simplifies product firmware upgrades and
dictionary file transfers for TTS-EM-HD3 products using the TTS speech data channel. TTS-EM-Xfer Version 1.09 or later may be used with both Serial connections.
NOTE: TRANSFER SPEEDS ARE LIMITED TO 115kbs. For large file transfers, such as Wave files, please use the “F” Flash Disk USB option described in the Menu Options page.
Power Supplies and Accessory Links
Refer to Table 4 to select compatible power supplies. Sample selection from Digikey.com USA
shown below for reference only
• Wall Mount 12v 20W Power Supply (refer to Table 4) T1061-P5P-ND T1154-P5P-ND T1155-P5P-ND
• Desktop 24v 40W Power Supply (refer to Table 4) T1205-P5P-ND T1206-P5P-ND
• Industrial and DIN RAIL mount supplies also available at www.digikey.com, www.mouser.com
Serial Terminal Programs
www.realterm.sourceforge.net/
http://ttssh2.sourceforge.jp/index.html.en
Additional information is at Downloads and additional information is at
http://www.textspeak.com/docs.htm
Announce.wav
Update.bin
C:\transfers\update.bin

14
Specifications H
Technical Support
Information online www.textspeak.com Email [email protected]
Telephone +1 (203)-803-1069 M-F 9-5 (GMT-5)
EULA
Hardware End User License Restrictions
The end user is licensed to use the TTS-EM for speech generation for real-time Text to
Speech conversion and playback in a public place. The end user may not use the TTS-EM to record and/or save audio in stored files to be used to playback or broadcast in
any public place.
# # #
TextSpeak Corporation TextSpeak Design Group, Westport, CT 06880 U.S.A. This document may contain advance information. Contact factory for technical specification before product design and/or use. Design and specifications are subject to change without notice. Digital Acoustics' product designs are packaged by leading manufacturers around the world. Digital Acoustics® is a registered trademark.
© 2014-2020 TextSpeak Corporation (TTS-EM-HD3-UserGuide-v1.2A.docset.16
Core Technology Digital Acoustics® TextSpeak TTS-EM-HD
Languages supported: Arabic Chinese Czech Danish Dutch English (UK) (US) (AU) Finnish French (F) (B) (C) German, Greek Japanese Korean Italian, Norwegian Polish Turkish Portuguese Russian Spanish (NA) (C) Swedish (Contact us for latest list)
Serial Interface RS-232 (9 pin DB9) 115.2K – 9600 bps
Prerecorded audio file protocol “.wav” 16bit PCM/uLaw 22/44khz
Prerecorded audio storage 1.2 GB Flash Memory, with transfer via USB or application software
Speaker Out Selectable 3/8/25 watt outputs 8ohms or Bal 600ohm in 3-watt mode
Line Out –10dbm Typical 1v p/p
Manual Volume Adjustment 10 steps 4db/step
Ambient Noise Detection 60-90db SPL
Automatic Level Control 12db/20 db selectable over 30db of ambient noise
Expansion Bus USB for Flash Memory transfers
Power (Nominal) 12V (8 watt power out) 24, (25w power out)
Remote Diagnostics Reporting over Serial
Remote Programming Flash programmable USB, Serial
Fault Management Short circuit speaker recovery fault detection
Connector I/O 3.81 MM DIN Plugables, USB-B, 2.1MM power
Temperature -30~70 C (Operating), -40 C~85 C (Storage)
Size 81mm x62mm x 19mm Weight 56 g (2 oz)
Contact TextSpeak for expanded dimension views


