High Brass Pedagogyradbrass.com/files/TBA_PearlandONLINE_HANDOUT2015.pdfEmbouchure problems to watch...
25
Trumpet Basics Randy Adams, Professor of Trumpet, Sam Houston State University 2014 TMEA Trumpet Clinic, San Antonio, Texas [email protected] STARTING OUT Breathing Two Phase Breath (See “Two Phase Breath” diagram) Breathe low, breathe high Low for volume of air, high for size of air column Move air from the bottom up, keeping upper passages open Empty lungs like squeezing toothpaste tube from bottom up Use the lower abdominal muscles (belt area) to move air – push air up and out from the bottom keeping the tube or bag big all the way up – do not squeeze the bag from the middle (i.e. upper abdominals or stomach area) as this only serves to compress the air column locking up the throat and tightening the sound Keep chest area open – don’t collapse Keep air column big all the way up to the embouchure Maintain an open pipe from lower lungs to lips Posture – “Sit while standing” (See “Long Tone Checklist”) Maintain arch in lower back Keep natural curve to spine Come up out of the hips as if suspended by a string Keep back from pressing against back of chair Keep shoulders relaxed, but not slumped Keep chest up (floating), but not tense and rigid Keep head balanced on top of spine (up-down/side-side) Bring instrument up to mouth with the arms – bend at the elbows without raising shoulders Do not move head towards instrument – bring the instrument to the head Keep head up and neck straight to avoid putting a kink in the “air-hose” in the throat Keep hands and arms relaxed Tension has a way of traveling up arms and shoulders, tensing the throat, constricting the airflow and dampening resonance in the sound Keep both feet flat on floor for good balance Good source for studying posture: The Alexander Technique http://www.alexandertechnique.com/ http://www.alexandertech.org/misc/musician.html
Transcript of High Brass Pedagogyradbrass.com/files/TBA_PearlandONLINE_HANDOUT2015.pdfEmbouchure problems to watch...

Trumpet Basics Randy Adams, Professor of Trumpet, Sam Houston State University
2014 TMEA Trumpet Clinic, San Antonio, Texas [email protected]
STARTING OUT Breathing Two Phase Breath (See “Two Phase Breath” diagram) Breathe low, breathe high Low for volume of air, high for size of air column Move air from the bottom up, keeping upper passages open Empty lungs like squeezing toothpaste tube from bottom up Use the lower abdominal muscles (belt area) to move air – push air up and out from the bottom keeping the tube or bag big all the way up – do not squeeze the bag from the middle (i.e. upper abdominals or stomach area) as this only serves to compress the air column locking up the throat and tightening the sound Keep chest area open – don’t collapse Keep air column big all the way up to the embouchure Maintain an open pipe from lower lungs to lips Posture – “Sit while standing” (See “Long Tone Checklist”) Maintain arch in lower back Keep natural curve to spine Come up out of the hips as if suspended by a string Keep back from pressing against back of chair Keep shoulders relaxed, but not slumped Keep chest up (floating), but not tense and rigid Keep head balanced on top of spine (up-down/side-side) Bring instrument up to mouth with the arms – bend at the elbows without raising shoulders Do not move head towards instrument – bring the instrument to the head Keep head up and neck straight to avoid putting a kink in the “air-hose” in the throat Keep hands and arms relaxed Tension has a way of traveling up arms and shoulders, tensing the throat, constricting the airflow and dampening resonance in the sound Keep both feet flat on floor for good balance Good source for studying posture: The Alexander Technique http://www.alexandertechnique.com/ http://www.alexandertech.org/misc/musician.html

Breathing exercises – 1. Hands on stomach and chest – feel expansion in both
areas while inhaling and exhaling – also check to make sure that the inhale sends the air down low first and the exhale empties the lowest parts first – inhale: “Get fat”/ exhale: “Get skinny”
2. Breathe through back of mouthpiece 3. Breathe through various size pipes and straws 4. Breathe while walking or running – in for five
counts, out for five counts; in for four, etc. 5. Use visual aids such as blowing hand away and
drawing it back with the breath – Breathe in and out in various counts with steady beat
6. Hold paper in front of face and blow – compare using a relaxed flow as compared to a tight “S” flow
7. Hold a sheet of paper against the wall using breath More breathing exercises – Breathing Gym DVD (also see “Breathing Gym Exercises” in this packet) http://www.focus-on-music.com/site/index.cfm Arnold Jacobs Materials and Tools – (Excellent resource)
http://www.windsongpress.com/ Some helpful concepts – Sound is moving air – big air = big sound / small air = small sound / constricted air = constricted sound No such thing as up and down, only forward-moving air fast and slow vibrations (narrow and wide wave patterns) Instrument is an amplifier broadcasting what the body is doing – YOU are the Instrument! “Trumpet in the Matrix” What is “REAL”? The “real” trumpet is in the mind; The trumpet in the hand is only a reflection of the real – it can only echo what is happening (or not) in the mind “Support” is moving air, not tense muscles Buzzing and First Sounds Blow air across room Blow air across room with side of mouthpiece rim on bottom lip keeping mouthpiece in a vertical position, i.e. perpendicular to the lips blowing across the top of the rim, not into the mpc. Rotate mouthpiece up to connect with upper lip creating a seal and allowing the lips to react with moving air inside mouthpiece Begin sound without using the tongue – lips in an open position and gradually bring lips together until they react with the air Listen for an airy, breathy sound on the mouthpiece buzz – if the mouthpiece sound is too pure it generally means the lips are too tight or teeth are too close together

Vowel sounds – “OH” on inhale AND exhale Yawn is most natural and efficient way to get a good breath The yawn shape in mouth and throat will also be most effective for moving the air out (in middle and lower registers, at least) Allow lips to ride on the air, not press into it – try this with your vocal chords and see how it affects the sound of your voice: squeeze your larynx together and talk, then relax and talk – the lips function the same way – all we are doing is moving the vibrat- ing mechanism farther forward Begin buzzing in middle or lower register then expand up and down Practice matching pitches and simple scale and arpeggio patterns Train the ears to hear correct intervals and reproduce them on the mouthpiece like singing (You don’t consciously control your vocal muscles to sing, you just sing) Train brain to think “Music” not mechanics – don’t control sounds by controlling muscle, control sounds by thinking music – “Sing with your lips” (Arnold Jacobs) – Buzz simple melodies Hold the mouthpiece on the end of the shank with the thumb and one one or two fingers only – avoid using excess pressure Embouchure Basics Diagrams – (See “Embouchure Basics” and “Embouchure Side View”) Aperture – correct vs. collapsed – what causes each? Side view – correct vs. incorrect – how incorrect muscle movement lip placement Teeth as foundation – lips set on Teeth (not each other, not on mpc) High vs. Low playing – how to firm up embouchure without stopping airflow Why pressure works/why pressure kills endurance Mpc placement – up/down Oral cavity open/relaxed, low tongue placement – “OH” vowel Jaw down and slightly forward, chin flat and pointing down Aperture – oval shaped opening caused by blowing air through a soft “M” Lips together but not pressed (set on teeth, not each other) Lips fairly moist for flexibility and response Mouthpiece types – Wide/flat rim – Helps endurance/hurts flexibility Narrow/rounded rim – Helps flexibility/hurts endurance Wide diameter – Larger sound/may hurt range and endurance Smaller diameter – Helps range and endurance/smaller brighter tone Deep cup – Darker tone/hurts upper register and projection Shallow cup – Helps upper register/brightens tone “V”/ “B”/ Bowl cups Opening the throat Backbore shapes

Embouchure problems to watch for – 1. “Smile” embouchure – thins out lips, limits range and endurance,
produces a thin, bright sound 2. Bunched chin – causes fuzzy sound, limited range, response and
articulation problems 3. Wet area of lips appearing outside mouthpiece 4. Lower lip disappearing during upper register playing 5. Improper mouthpiece placement – too high or too low – higher
placement darkens tone but limits range, lower placement may help with range but it thins out the sound
6. Puffed-out cheeks or “bubbles” above or below mouthpiece 7. Puckered lips protruding towards or into the mouthpiece 8. The Valsalva Maneuver – closing throat and bearing down on air 9. A “tear drop” shape in the middle of the upper lip – difficult for
high brass players to deal with Formation
1. Say “M” – “Mom, I’m mad” – Set lips on teeth 2. Blow air through the “M” to create aperture 3. Firm lips for upper register by a combination of rolling lips in
towards teeth and puckering – “A pucker tempered by a smile” (Donald Fink, The Art of Trombone Playing); Relax lips and lower jaw for lower notes allowing lips to roll only slightly forward to buzz on a softer surface area (see 9 and 10 below)
4. Teeth fairly (almost) aligned and held open 5. Tip of tongue is used for articulation, the back and middle is used
to shape airflow for range and tone color 6. Minimize mouthpiece pressure – use muscles to do what arms are
trying to do – compress lips on teeth so they can vibrate faster 7. Buzz on middle of the lips where the wet meets the dry keeping
middle relaxed enough to vibrate but firm enough to sustain pitch 8. Keep corners set firmly on the canine teeth and keep the middle
area soft enough to vibrate but firm enough to produce the pitch – Think of a guitar string anchored on either end by the bridge and the nut with the string vibrating in between
9. Higher notes are produced by a combination of firm corners and a flexed middle with a steady upward push on the air column (“A pucker tempered with a smile”) – The muscles flex and compress on the teeth (the smile) while maintaining a “padding” under the rim of the mouthpiece (the pucker) and keeping the aperture open to allow air to flow and vibrate the membranes – if the aperture collapses and stops the flow of air, the sound will stop; if the aperture only partially collapses while still allowing some restricted air movement, the sound will become scratchy or gravelly (see CD p. 12)
(Think of high notes as fast, narrow, focused vibrations)

10. Lower notes are produced by allowing the lips to relax and roll slightly forward in the middle while still maintaining contact with the teeth and keeping the corners firmly set AND opening the jaw to allow a larger column of air to flow (and larger vibration patterns) – if the lips are blown too far forward (away from the teeth and into the mouthpiece) the aperture will be filled with flabby muscle tissue and the sound will become gravelly, blatty or have a double buzz; it will also be very difficult to play louder dynamic levels; if the teeth stay too close together there will be too much hard surface next to the teeth to allow them to vibrate at the lower-wider frequency patterns and not be enough room inside the mouth to produce the large air column needed for those vibrations (Think of low sounds as big, wide vibrations)
Tone Centering and Resonant Intonation – “Tune the Tone” (See “The Centered Sound” diagram) When using a tuning device, find the best, most resonant found first then look at the tuner and adjust the tuning slide accordingly Centered sound w/overtones –
Bathroom resonance and Feedback Air molecules in any chamber or length of pipe will vibrate at certain frequencies determined by the size and shape of the chamber and the overtone series produced therein Good feedback / Bad feedback Overtones determine the color and quality of sound Sound pushed up (sharp) – Dampens overtones Sound squeezed from both directions – Dampens overtones Looking for an “OH” or “AH” vowel sound in the tone Colorful, productive sound needs to have both highs and lows A bright sound and a dark sound at the same time – the highs for clarity and carrying power, and the lows for warmth and mass A dark sound without highs is “woofy,” does not project well and difficult to tune with due to lack of upper overtones A bright sound without lows is thin and “edgy” and only projects “white noise” or buzz – without lower overtones there is no “body” or core to the sound thus making intonation difficult A DarkBright sound has a full and balanced compliment of overtones for good projection and intonation Bending Exercises – looking for the “sweet spot” or the point of optimum resonance, the most efficient sound Keeping sound consistent – concentrate on flow and tone And let the fingers change the pitches – stay in the middle of your sound and let the notes find themselves

When the sound is correctly balanced and resonant less effort is required to play thus improving range and endurance, intonation improves, accuracy improves, response improves flexibility improves Tone determines the whole package – intonation, response, endurance, accuracy, flexibility Tension anywhere in the body tends to dampen the tone – try talking with tense shoulders and stomach, then relax and notice the tone of your voice – it expands in size, depth and resonance Tension also tends to sharpen the pitch and thin out the sound Avoid Valsalva maneuver when ascending into upper register – practice blowing air away from the instrument Articulation – Make sure the air and the lips do their jobs without getting in the way of the tongue, and make sure the tongue does its job without getting in the way of the airflow and lip position – each part of the body has its own specific job, but often the lips will try to help the tongue, or the jaw will move with the tongue, or the tongue will stay in the way of the airflow after pronouncing the “Tah” for an attack, etc. Slurring between notes – keep airflow steady and sound consistent Valve Slurs – Cichowicz warm-up, Flow Studies, Clark Studies Lyric etudes (Bordogni, Concone, etc.) Keep airflow steady as valves and notes change Keep embouchure still from note to note (don’t try to shape each individual note) Keep tone consistent from note to note Water faucet – water keeps running steadily as you pass your finger through the stream Lip Slurs – Suring within the harmonic series on the same valves Keep airflow steady ascending and descending Don’t back-off for descending passages – the aperture must open up for lower notes and a larger airflow is required to keep the lips vibrating at those frequencies Articulating with the tongue – Speech patterns – tongue and lips shape sounds without stopping the flow of air “Attack” is not an accurate description for articulation “Release” and “Consonant” describe articulation more accurately. Tongue placement Front or Tip – “T” “TS” “TH” “P” Back – Vowel sounds like “AH” and “OH” Practice articulation away from instrument using air patterns Listen for clean starts and consistent vowel sounds.

Tongue movement The Tip moves up to touch the gums directly above top teeth while the back stays flat in the bottom of the mouth. Avoid thrusting the tongue forward “TA-TA” not “TEEAH-TEEAH,” “TSEEAH” or “TOYTOY” Practice speech/articulation patterns away from the instrument – blow rhythmic air patterns found in the music being performed. The back of the tongue stays flat and the tip moves up and down. Minimize movement inside mouth. If the back moves the airflow is affected and the tone and intonation change Practice first note of phrase in the rhythm of the phrase to Work out rhythm and steady tone/pitch, then add notes Note shapes - ▄ ▄ ▄, not ►►► or even ◄◄◄ (“Dwah”) Keep sound and air consistent from note to note and within each individual note – start and end each note with your best sound Jaw movement Tendency of throat and lips to “help out” with articulation Keep bottom teeth perfectly still in relation to articulation Only the tongue moves, the jaw’s job is to determine size of air column for high or low register playing. Check jaw movement by watching mirror or putting a hand on the chin while articulating an air pattern. Legato tonguing – Soften the tongue and the “TA” becomes a “DA” sometimes it may be helpful to even teach “NANA” (“N” can only be made when air is allowed to pass through the nose; when the nasal passage is closed off for playing, “N” is just the right firmness for legato) Multiple Tonguing – Introduce double tonguing in the second year Double tongue – “TAKATAKA” (Practice KAKA and KATA) Triple tongue – “TATAKA”; “TAKATA”; “TADAKA”; or “TAKATA-KATAKA” Soft tongue – D and G, or even “N” and “NG” (for most students – a few students will require more work on firming up the articulation) More Vowel, less consonant – we want the sound of the instrument, not the sound of the tongue Move air and sound from Point A to Point B Always think crescendo to keep air moving while the tongue is moving Don’t allow tongue to disrupt flow of air Practice articulation patterns away from the instrument Listen for flow of air, clean “T” and “K” sounds, watch for jaw movement (it should remain still)

The Two-Phase BreathAirflow
Phase OneLower Lungs
1. Diaphragm flexesdrawing air into lungs
2. Abdominal organs arepushed out to make roomfor air in lower lungs
3. Approximately ¾ breathsupply is attained
Phase TwoUpper Lungs
1. Intercostal muscles stretchas lungs expand against ribs
2. Chest area opens up makingroom for large airflow
3. Approximately ¼ remainingbreath supply is attained andupper body is enlarged for more efficient airflow
Breathe Phase-One breath for volume of airBreathe Phase-Two breath for efficiency of outflow
Blow air up and out by using lower abdominal muscles Use muscles in the region of your belt buckle, NOT upper stomach muscles
This keeps the air column large and powerful all the way up to the embouchure

Embouchure BasicsThe Correctly Formed Aperture
The Collapsed Aperture
1. Firm Corners2. Soft Middle3. Flowing Air
1. Lips Too Tight2. Teeth Too Close3. Insufficient Airflow
Causes Outcomes
1. Productive Airflow2. Resonant Tone3. Clear Response
1. Excess Back Pressure2. Scratchy Tone3. Poor Response

Embouchure Side View
Airflow
Tongue
Top Lip
Bottom Lip
Lip muscles flex and compress towards teeth to achieve adequate firmness for upper register without closing off the flow of air through the aperture
By keeping the corners of the mouth firmly in placewhile compressing towards teeth, the lips form a firm padding of support under the rim of the mouthpiece
If the lips are pressed together to play upper register notes the lip tissue gets pushed into the cup of the mouthpieceand the buzz occurs on a weaker, moresensitive area of the lip. Airflow is blocked and more mouthpiece pressure must be applied to maintain firmness for high notes. Stronger lower lip pushes
up forcing top lip out into cup

The Centered Sound
OvertonesBuzz Frequency
Available SpaceFor Pitch (Pipe Length)
The Squeezed Sound Playing Above Center

The Intonation Triangle
Great sounding intonation is determined by more than just the actual pitch level. In order for a section to sound in tune there must be a blend of tone colors and volume levels on a horizontal level, each player listening sideways and fitting
Inside the tone and volume of the players on either side.
If you match the tone color and the volume, you will usually have the pitch right too
If any one part of thistriangle is out of balance, the other partswill suffertoo.
Adjusting pitch can oftenmake intonation even
worse due to over-correction. Tone
And volume aremuch easier
to hear &correct.

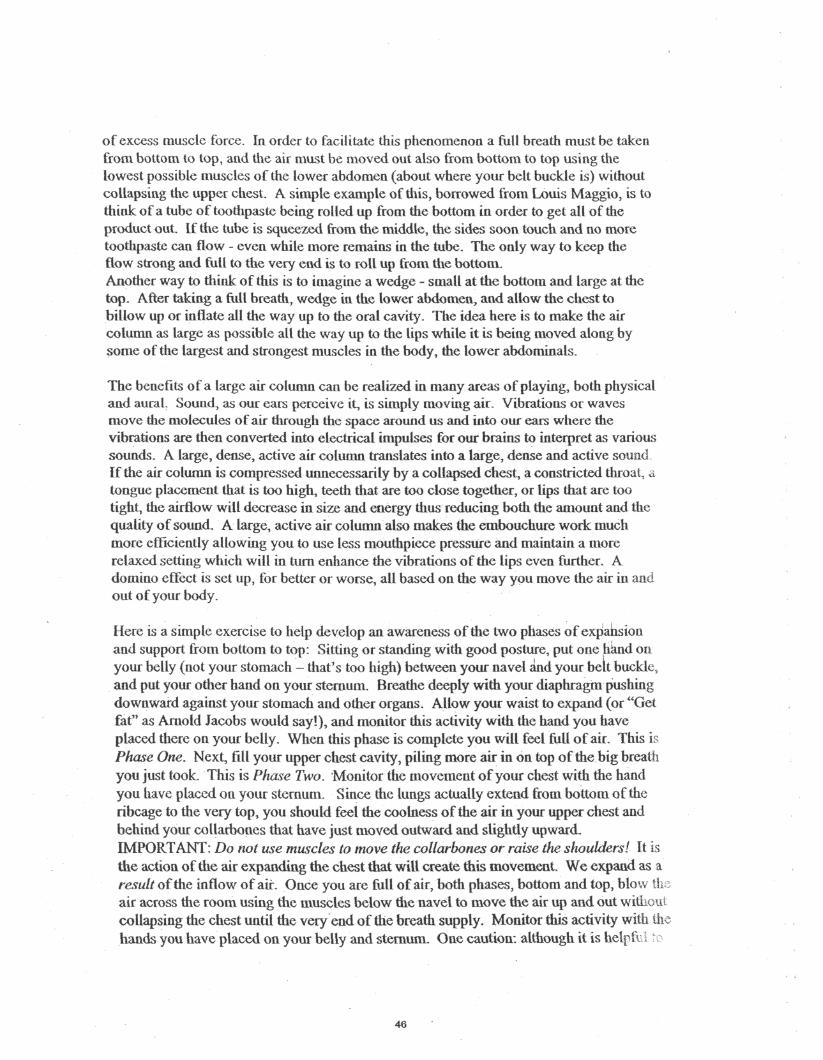
1. Fundamentals of Tone Productiou-
Buzziug -Lips atone- Begin making sounds by buzzing lips without the mouthpiece. Although thisis not quite the way the embouchure functions with the mouthpiece in place, it does helpto train the lips to manipulate pitches without the aid of mouthpiece pressure while at thesame time warming the muscles and enhancing blood circulation. The lip buzz, or freebuzz, is also beneficial in developing embouchure strength without the aid of the trumpetor mouthpiece. For example, one of the reasons excess mouthpiece pressure works is thatthe player uses his arms to do what the lips should be doing themselves - compress andmove inward towards the teeth.
To set up the free buzz the lips must be anchored on the teeth - not each other. Form anOn the mouthpicce-Hold the mouthpiece near the end of the shank with the thumb and index finger only (notall four fingers or a fist) in order to keep pressure to a minimum. Begin in the middleregister (second line G) and work gradually toward the octave above and below (seeMouthpiece Exercises). It is helpful to begin buzzing without using the tongue to initiatethe sound but just the air. Think of creating an open pipe in the middle of your bodyallowing air to flow freely through it from your lower abdomen and out across the lips.The throat should be open and relaxed, the tongue placed low in the mouth as ifpronouncing the word "hope" or "Pope." Notice that the P on the end of the word makesyour mouth even larger inside by pushing the tongue down farther and applying pressureagainst the cheeks. Another helpful image to use is a yawn or a sigh. Allow your lips tobuzz as the air moves across them and out through the mouthpiece (remember we're notusing the tongue to start the sound yet) keeping the embouchure as relaxed as possible atthis point. Listen for a buzzy sizzle in the sound with just a bit of hiss or airiness. A lackof sizzle and openness in the sound indicates an embouchure that is pinched or too tense.Try not to press the air as it leaves your mouth, but rather allow your lips to ride on themoving column of air like water skis skimming across the lake. Practice buzzing bothwith the mouthpiece alone and with the aid of a BE/IP™ or Buzz-Aid*M. (Information foracquiring these tools is included in this packet).
Breathing -The Two-Phase Breath-During a large breath the whole torso expands - front-to-back, bottom-to-top, side-to-side. It is helpful to organize the expansion of the torso into two primary sections orphases. Phase One encompasses the lower portions of the chest cavity and, mostimportantly, the belly or waist. This is the area of greatest expansion drawing in easily2/3 - 3/4 of a full capacity breath and is the easiest, most natural area to fill with air.Phase Two encompasses the upper chest and is a little more difficult to fill, because thesmall muscles between the ribs, the intercostals, must be stretched and the rib cageexpanded Although this area of the body holds relatively little air and is ill equipped foreffective air support, it is essential that expansion occurs here in order to provide roomfor optimum efficiency of the moving air column. A full and expanded upper chest opensup the air passages and enlarges the air column for a more powerful flow without the use
45
of excess muscle force. In order to facilitate this phenomenon a full breath must be takenfrom bottom to top, and the air must be moved out also from bottom to top using thelowest possible muscles of the lower abdomen (about where your belt buckle is) withoutcollapsing the upper chest. A simple example of this, borrowed from Louis Maggio, is tothink of a tube of toothpaste being rolled up from the bottom in order to get all of theproduct out. If the tube is squeezed from the middle, the sides soon touch and no moretoothpaste can flow - even while more remains in the tube. The only way to keep theflow strong and frill to the very end is to roll up from the bottom.Another way to think of this is to imagine a wedge - small at the bottom and large at thetop. After taking a fxill breath, wedge in the lower abdomen, and allow the chest tobillow up or inflate all the way up to the oral cavity. The idea here is to make the aircolumn as large as possible all the way up to the lips while it is being moved along bysome of the largest and strongest muscles in the body, the lower abdominals.
The benefits of a large air column can be realized in many areas of playing, both physicaland aural. Sound, as our ears perceive it, is simply moving air. Vibrations or wavesmove the molecules of air through the space around us and into our ears where thevibrations are then converted into electrical impulses for our brains to interpret as varioussounds. A large, dense, active air column translates into a large, dense and active souadIf the air column is compressed unnecessarily by a collapsed chest, a constricted throat, atongue placement that is too high, teeth that are too close together, or lips that are tootight, the airflow will decrease in size and energy thus reducing both the amount and thequality of sound, A large, active air column also makes the embouchure work muchmore efficiently allowing you to use less mouthpiece pressure and maintain a morerelaxed setting which will in turn enhance the vibrations of the lips even further. Adomino effect is set up, for better or worse, all based on the way you move the air in andout of your body.
Here is a simple exercise to help develop an awareness of the two phases of expansionand support from bottom to top: Sitting or standing with good posture, put one hand onyour belly (not your stomach - that's too high) between your navel and your belt buckle,and put your other hand on your sternum. Breathe deeply with your diaphragm pushingdownward against your stomach and other organs. Allow your waist to expand (or "Getfat" as Arnold Jacobs would say!), and monitor this activity with the hand you haveplaced there on your belly. When this phase is complete you will feel full of air. This isPhase One. Next, fill your upper chest cavity, piling more air in on top of the big breathyou just took. This is Phase Two. Monitor the movement of your chest with the handyou have placed on your sternum. Since the lungs actually extend from bottom of theribcage to the very top, you should feel the coolness of the air in your upper chest andbehind your collarbones that have just moved outward and slightly upward.IMPORTANT: Do not use muscles to move the collarbones or raise the shoulders! It isthe action of the air expanding the chest that will create this movement. We expand as aresult of the inflow of air. Once you are full of air, both phases, bottom and top, blow theair across the room using the muscles below the navel to move the air up and out withoutcollapsing the chest until the very end of the breath supply. Monitor this activity with thehands you have placed on your belly and sternum. One caution: although it is helpful to
46

think of the inhale as occurring in two primary "phases" or areas of the torso, the breathis really a single event with air flowing smoothly and efficiently into the body, filling thebottom of the bag first and then progressively filling up to the top, then keeping the top ofthe bag open for unhindered flow while the large, flexible muscles in the waist area movethe air up and out into the room. Practice this exercise regularly. It is helpful to beginwith some sort of breathing exercise daily before you make your first sounds. Thisexercise can also be done while lying down of the floor on your back with your kneo:bent and feet flat on the floor. Put both hands on your belly with the ends of your miodiefingers touching. As you inhale monitor the expansion of your torso with your hands andmentally scan your body making sure that you are not tensing any other muscles that arenot involved in the respiration process — larynx, shoulders, thighs, arms, etc.
Another simple exercise that can help encourage this full, two-phase expansion is toinhale and exhale through the back of a trumpet mouthpiece in time with a metronome.Set your Metronome to 60 BPM (beats per minute). Put the small end, or shank, of themouthpiece into your mouth with the end protruding in past your teeth. Starting withempty lungs, inhale for eight counts, pulling the air in as quickly as possible. You siu Adfeel this working your diaphragm and intercostals as you fill up from bottom to top. .iyou are pulling the air in correctly you should be full of air by about the fifth or sixthcount. For the remaining few beats continue to pile air in on top of what you havealready taken in (it's not very comfortable at this point!) being careful to keep your tlroatopen. When the eight counts are up, blow the air out through the mouthpiece just as v •;took it in - as quickly as possible, trying to get rid of all the air before the eight countare up and then continuing to blow as if trying to collapse the lungs until the end of i±ucount. Then, immediately turn the air around and inhale again the same way. Performthis exercise three or four times, and then remove the mouthpiece and take a nice decrelaxed breath exhaling in a sigh. This breath should feel substantially better and motefficient than the breathing you were doing before the exercise. While this mouthpkcbreathing exercise is really a gross exaggeration (we should never perform with our lung.•:•either this full or this empty), it i3 very helpful in expanding your limits and "warmingup" or "lubricating" the respiratory tract for optimum performance. This is also a gco::exercise to begin the day with, especially if you are feeling tight or stiff in the chestPosture-In order to facilitate effective movement of air for optimum tone quality, range,endurance, careful attention must be paid to posture, balance and tension. Problems wi?bflexibility and accuracy can also frequently be corrected by adjusting posture and easingunnecessary muscle tension. Correct posture is more a matter of balance than of sitt im;
or standing erect and rigid. Flexibility and lack of tension are primary goals. Aphn.Arnold Jacobs often used was to "stand while sitting." This will line up the spise, hes*and arms in such a way that there should be good balance and a comfortable feel. SOUKof the postural positions we commonly use such as slouching, slumping the shouldersleaning back in a chair, crossing our feet and legs, tilting me head too far forward orbackward, etc. actually create the need for more tension in order to hold the body mplace. Excess tension deadens your tone quality, sapping resonance and projection fix<;the sound and forcing you to work much harder than you need to. Tension in the aim-shoulders, hands, back, stomach, jaw, throat, face, and even your eyebrows can eau
47

problems such as bad intonation, "cracked" notes, dull sound, poor endurance, andgeneral discomfort while playing, and excess tension in any part of your body tends tospread to other areas as well until you find yourself tied up in a knot. For instance,excess tension in the stomach area will usually be countered by increased tension in thethroat. Try tensing your stomach now. Feel the tension in your throat start to increase asa result. You may even notice your shoulders begin to tighten just a little, and as they doyour biceps will also constrict slightly. Now try talking. Notice the smalt, dull quality ofyour voice. If you take a deep breath, relax your stomach muscles and shoulders andarms and speak again you should hear and feel a different, clearer, freer quality to yourvoice. This same phenomenon can be observed in your playing. An excellent resourcefor learning more about posture and balance is the Alexander Technique. There are manybooks on this method developed in the late 1800's by F. Matthias Alexander who washimself a theater performer who overcame severe vocal problems by correcting faultyposture and eliminating excess tension.
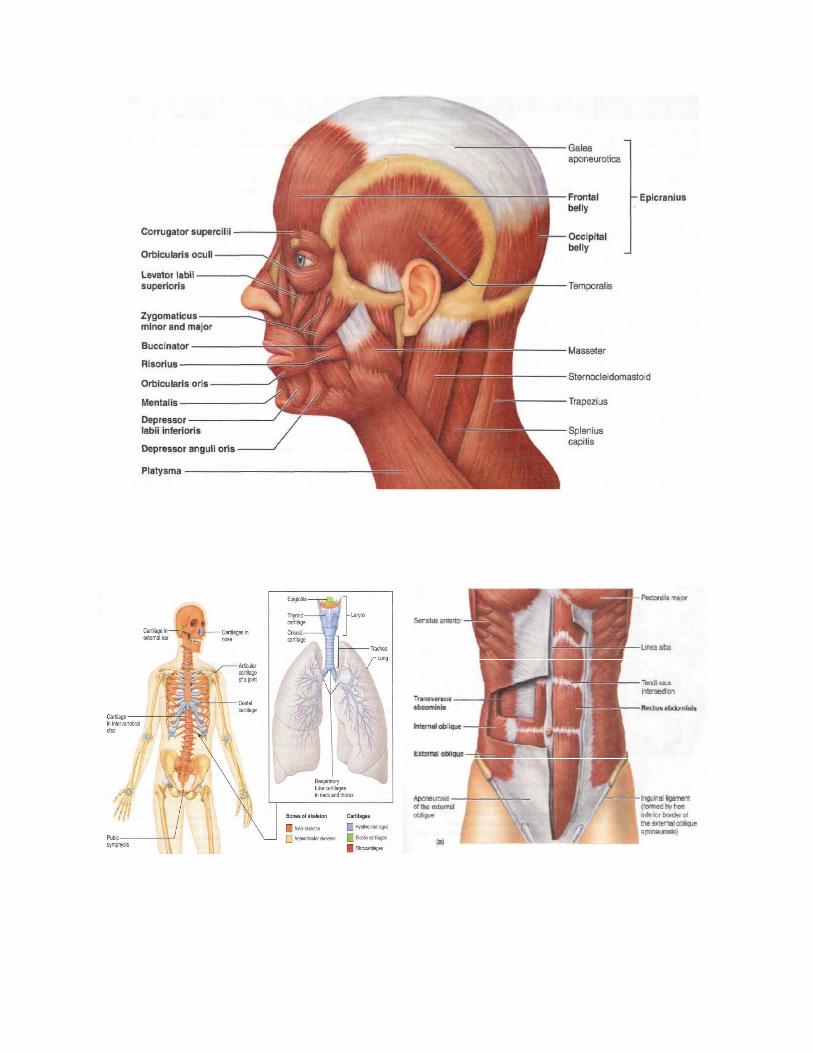
Embouchure basics-How and why-Aperture, corners, chin, cheeks, functions of top and bottom lips, teeth, jaw positions, Upposition, mouthpiece position, tongue positions, diagrams (front and side), anchoring lipson the teeth as opposed to lips or mpc.
Embouchure Basics, Posture, Tone Center
The brass player's embouchure is a paradoxical phenomenon requiring much training andregular maintenance. The very idea that it is possible to turn a "Bronx cheer" into musicwith the aid of a mouthpiece and some brass plumbing with a flared end almost defiesreason! And yet, with a careful combination of tension and suppleness, compression atidflow the warm and noble sound of the trumpet is possible.
The most crucial area of the embouchure, the place where the rubber meets the road, isthe aperture. This is the point where the air exits the body and the buzz is produced. Inorder for the aperture to function properly there must be a balance between firmness andsoftness, airflow and muscle function ("flow and flesh"). The aperture is actually anozzle of sorts controlling the air column's size, direction, focus and rate of flow. Theaperture must remain soft enough to vibrate freely, firm enough to produce desiredpitches and open enough to keep air flowing proportionate to volume and range.
One of the most common mistakes we make regarding proper aperture formation is thatwe tend to press the lips too tightly together, especially in the upper register, thus closingoff the "nozzle" and limiting the flow of air. It is important to remember that it is airpassing through the lips which causes them to vibrate. If the lips are pressed so tightlytogether that air cannot flow through them sufficiently, they will not vibrate. No amountof pressing or straining will produce the desired tones if there is no room for the air totravel through the lips and make them buzz. This presents us with a bit of a dilemmaHow are we to tighten our lips to play in the upper register if tightening them closes the

aperture and stops the flow of air? In order to produce higher pitches (faster vibrations)the vibrating surface must tighten somewhat and the airflow must increase its velocity.The answer to our dilemma may be found in studying Trumpeter's Enemy Number One:Excessive Mouthpiece Pressure. Why does mouthpiece pressure work? (And it doesindeed work. The only problem is that excessive mouthpiece pressure injures the lips andcauses them to swell thus cutting down on endurance). Mouthpiece pressure "works"because you're using your arms to do what your lips ought to be doing. You arecompressing the lips against the firm foundation of the dental structure and producing afirm, dense vibrating surface which can react with increased air speed to produce higherfrequency vibrations. What we need to learn to do is compress the lip muscles againstthe teeth by using the lip muscles themselves, not our arms, by "rolling in" (for lack of abetter term) toward the teeth and focusing toward the center of the mouthpiece. Thisallows us to make the lips firm enough to produce the higher pitches without closing offthe opening that lets the air pass through them. The muscle must become more denseproviding a firmer foundation as well as a protective cushion or pad between the teethand the mouthpiece. This is the "pucker tempered with a smile" referred to by DonaldFink in his "The Art of Trombone Playing," and it is a fundamental characteristic of alleffective brass embouchures. The lips come in towards the teeth as they do when smiling,but the corners stay firmly planted without stretching back as the area of lip outside themouthpiece move toward the center of the mouth as if to grip the outside of themouthpiece.
Great caution must be used when reading about or working on the embouchure! It isextremely easy to do too much of something and throw the whole mechanism out ofbalance. Use good judgment and common sense, and above all, use your ears.
Here's some very basic information on how (the various parts of the trumpetmouthpiece affect tone, range, endurance, intonation, comfort anil resistance.
"The Fine Line" Freedom vs. Resistanceby Karl Hammond
Every mouthpiece should be a balanced combination of blowing freedom with equalizedresistance. These features come together to create the ideal mouthpiece and are critical tothe efficiency of a player's set up. Every set up has this "fine line" of freedom andresistance. This occurs when the player finds the center of pitch along with the desiredsound and controlled flexibility. Each player's "fine line" is different. At Schilke Music,we do not make the assumption this "fine line" is the same for all players or musicalsituations. Through consultation, our Custom Shop will help assist a player to determinewhat sound they want and why their current set up doesn't accomplish this balance.
49

When a mouthpiece is to "open and free", the net musical result is usually a loss ofcontrol with poor attacks and "cracked" notes. When there is too much resistance in themouthpiece, the center of the note may be hard to find resulting in a "squirrelly" feel. Thecomponents of the mouthpiece that help create this balance are the rim, cup, throat, andbackbore.
One critical performance variable to address regarding custom mouthpiece work beforediscussing the various mouthpiece components is the "gap" size. The gap refers to thedistance created within the trumpet mouthpipe receiver occurring between the end of themouthpiece and the beginning of the lead pipe. A smaller gap can raise the pitch of thetrumpet compromising a player's accuracy and control. The notes don't "lock in" or"slot". If an instrument is playing flat consistently, the gap could be too large resulting inpoor attacks and a lack of focus to the sound. The trumpet shank or stem can be altered topenetrate further into the mouthpipe receiver to raise the pitch rather then alter the innercharacteristics of the mouthpiece. Knowing what brand and model of instrument a playerintends to use the mouthpiece with is essential information to start with to create acustom mouthpiece.
Rim-
The rim creates the ultimate feel for the player and is the connection between theequipment and the body.
¥ Wider Rims=more comfort/less flexibility. If a rim is too wide the player mayexperience a "pinched" sound and the loss of attack definition.
¥ Narrow Rims= more flexibility/less comfort. The placement of the rim high point; scritical. A more pronounced high point on the rim provides greater flexibility. If the highpoint is closer to the cup entrance, the rim may fbel smaller in diameter to the player,even with a larger cup volume.
The balance between comfort vs. flexibility and ultimately, feel vs. sound is vital to aplayer's success. Finding a rim that gives the player the longest amount of playing timeresulting in consistency, comfort, and resonance is desired.
Cup-
¥ Deeper Cup=richer, darker tone. More core with less highs in the sound.
¥ Shallower Cup= brighter, more brilliant. Higher overtones sound.
Regarding cup shape, bowl cups tend to have more resistance because of the flatterbottom of the cup. The net musical result is a more aggressive sound. The V-cup shapewill have a freer more open feel. In order to find a balance between blowing freedom ar.dresistance, V-cup mouthpieces tend to play better with some resistance in the backbore.
50

Regarding cup diameter, this is the one aspect of the mouthpiece that players use tocompare one piece to another based on personal feel and manufacturer measurements.The diameter will be determined by many variables that pertain to the individual playerincluding embouchure, experience, strength, instrument, and musical style. Widerdiameters require more strength to maintain the balanced characteristics of themouthpiece. The narrower diameter may produce a strained sound without focus andcontrol if a player needs more room.
Throat-
Trie throat of the mouthpiece is crucial to the mouthpiece freedom vs. resistanceequation. The player needs to understand how resistance impacts their performance. Atighter throat will increase the resistance greatly and lessen the amount of air gettingthrough the mouthpiece. Opening the throat will reduce the resistance in a more extremeway then opening the backbore. When the throat is opened, the amount of air (blowingfreedom) will increase therefore darkening the sound creating a larger center to the note.
Backbore-
The backbore is essentially an extension of the instrument's mouthpipe. The tightertapered backbore will produce brighter, more aggressive sound. A larger backbore willcreate a darker, thicker sound with greater depth. The backbore is the final variable wework on creating a custom mouthpiece because it will ultimately balance the top part ofthe mouthpiece (rim & cup) to achieve that "fine line" of blowing freedom with abalanced resistance.
51

Long Tone Checklist
TONE – SEARCH FOR CENTER OF THE TONE Resonance Listen up close and far away – Does the sound travel? Projection Does the tone touch the walls – Front, back, floor ceiling? Energy Always spinning forward with activity – Is the sound attractive? Focus Clarity, ring – A bright sound and a dark sound at the same time Color Listen for sounds within the sound – Various colors and overtones Articulation Make your best tone the instant you release the air – Like
turning on a light switch – the room is instantly filled with light Imagination See your sound as a circle with the tone resonating in the middle,
the largest portion of the circle, and filling up the entire space
BODY – ALWAYS USE CORRECT POSTURE Feet Flat on floor, perhaps one slightly ahead of the other Legs Relaxed, thighs perpendicular to back and calves, balanced Abdomen Relaxed, and always moving, never static – “Reduction
Phenomenon” as a bellows pumps out air Breathing Low, deep relaxed breath – natural but more of it
Breathe bottom-to-top, front-to-back, side-to-side Blow the air from your belt buckle – way down low, not your stomach (which is just below your ribcage) Don’t let your chest collapse – Keep the air column large Roll the toothpaste tube up from the bottom
“Lats” Muscles in upper back below shoulders – tension free Shoulders As relaxed as possible (no tension), sitting on ribs and lungs L. Hand/Arm Release death grip now! R. Hand/Arm Relaxed fingers resting lightly on top of the valves, curved as if
holding a softball or orange Neck In line with the spine, not cocked forward or backward Throat A straight, wide-open pipe for air to move through Head Balanced on top of neck, lifting upward & forward,
The head pivots on the neck right between your ears Face “Poker Face” – check each area brow to chin – no furrowed
brow, squinting or wrinkled chin Oral Cavity Tongue down, teeth apart, throat open – like yawning
Sam Houston State University 2004 25

INTONATION CONCERNS ON THE TRUMPET This chart is very general and may not apply equally to every player or every trumpet. Various designs in instrument construction, choice of mouthpiece, throat and back-bore size and the strength and ability of the player all can affect intonation on individual notes or throughout the range of the instrument. Environmental concerns such as temperature will also affect the pitch level (e.g. warmer temperatures will raise the pitch level, and cooler temperatures will lower it).
LOW F# Somewhat sharp G G# Somewhat flat A Bb B C Somewhat sharp (“bright”) C# Very sharp D Sharp Eb E Somewhat sharp F Sometimes slightly flat F# Sometimes slightly flat MIDDLE G G# A Somewhat sharp Bb B Sometimes slightly flat C Somewhat sharp (“bright” – especially on most C trumpets) C# Somewhat sharp D Flat Eb Flat (usually quite flat on C trumpets) E Flat (usually quite flat on C trumpets) F Somewhat sharp F# Somewhat sharp HIGH G Sharp G# Somewhat sharp A Sharp Bb B Slightly flat, but often sharp due to excess tension C Slightly flat, but often sharp due to excess tension
© 2002, R. Adams, Sam Houston State University
8

ENSEMBLE INTONATION JUST vs. EQUAL TEMPERAMENT
Interval Half step Whole step Minor third Major third Fourth Aug. fourth Dim. fifth Fifth Minor sixth Major sixth Minor seventh Major seventh Octave
Equal Temperament 100 200 300 400 500 600 600 700 800 900 1000 1100 1200
Just Intonation 112 (+12) 204 (+4) 316 (+16) 386 (-14) 498 (-2) 590 (-10) 610 (+10) 702 (+2) 814 (+14) 884 (-16) 996 (-4) 1088 (-12) 1200 (0)
Example: Key of C Major
C C# D D# E F F# G G# A A# B C 0 +12 +4 +16 -14 -2 +10 +2 +14 -16 -4 -12 0 Example: Key of A Major A A# B C C# D D# E F F# G G# A 0 +12 +4 +16 -14 -2 +10 +2 +14 -16 -4 -12 0 Notice that E in a C Major chord is 16 cents lower than the same note in an A Major chord. Also of note is the difference in the level of the C# in an A Major chord as opposed to the distance between the half step interval between C and C# in the key of C Major. F# and C# may have as much as a 26 cent pitch difference in their various harmonic applications.
© 2002, R. Adams, Sam Houston State University
7

Randy Adams is Professor of Trumpet at Sam Houston State University and has also taught at Houston Baptist University, San Jacinto College, and for many years previously he taught trumpet in Spring, Conroe, Cy-Fair, Pearland, and Clear Creek Independent School Districts. He served as Houston Symphony Orchestra Interim Trumpet for the 2001-2002 season and has been a member of the Houston Grand Opera Orchestra since 1984. Randy also performs with the Houston Ballet Orchestra and he performed Broadway musicals for 12 years with Houston’s Theatre Under the Stars and toured Europe during the summer months for 19 years with Alpenfest performing cornet solos, alpenhorn, musical handsaw, European folk music, and a variety of other musical styles. He also appeared with the band on on Minnesota Public Radio’s Prairie Home Companion Show. Randy plays guitar and bass at St. Cuthbert Episcopal Church in Houston, and he has recorded two solo guitar CD's for the church. He has also written more than 140 hymn arrangements and descants for brass and winds along with guitar chords and composed sacred choral anthems for CuthbertPraise, and he has written extensively for the SHSU trumpet ensembles. In recent years SHSU trumpet students have accrued an impressive list of accomplishments including two years placing in the top five in the National Trumpet Competition’s Trumpet Ensemble division. Students Robby Yarber from Groveton and Brian Fincher from Willis served as Lead Trumpet in the Disney College All-Star Band in California for two consecutive years respectively. Robby graduated and went on to play Lead Trumpet in the UNT 1:00 Lab Band last semester and is now touring with the Glen Miller Orchestra. Recent graduate Carlos Gil from the Woodlands is now a Graduate Assistant at Carnegie Mellon and is also performing as an extra with the Pittsburgh Symphony.