HERO3 UM Silver ENG REVB WEB - cbcdn1.gp...
62
1 U S E R M A N U A L
-
Upload
duongduong -
Category
Documents
-
view
216 -
download
0
Transcript of HERO3 UM Silver ENG REVB WEB - cbcdn1.gp...
1
U s e r M a n U a l

2
Join the GoPro party at facebook.com/gopro to see
what other GoPro owners are capturing and sharing.
Share your footage and join the GoPro movement!
3
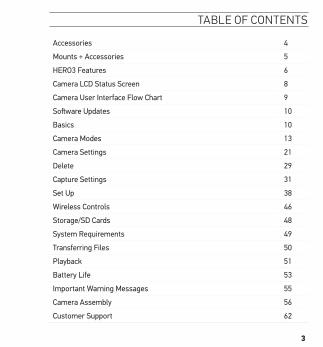
table of contents
Accessories 4
Mounts + Accessories 5
HERO3 Features 6
Camera LCD Status Screen 8
Camera User Interface Flow Chart 9
Software Updates 10
Basics 10
Camera Modes 13
Camera Settings 21
Delete 29
Capture Settings 31
Set Up 38
Wireless Controls 46
Storage/SD Cards 48
System Requirements 49
Transferring Files 50
Playback 51
Battery Life 53
Important Warning Messages 55
Camera Assembly 56
Customer Support 62
4
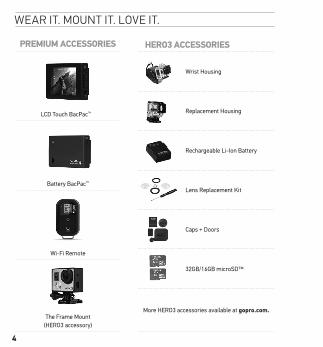
hero3 ACCessories
Wrist Housing
Replacement Housing
Rechargeable Li-Ion Battery
Lens Replacement Kit
Caps + Doors
32GB/16GB microSD™
More HERO3 accessories available at gopro.com.
Premium ACCessories
LCD Touch BacPac™
Battery BacPac™
Wi-Fi Remote
The Frame Mount (HERO3 accessory)
wear it. MoUnt it. love it.
5
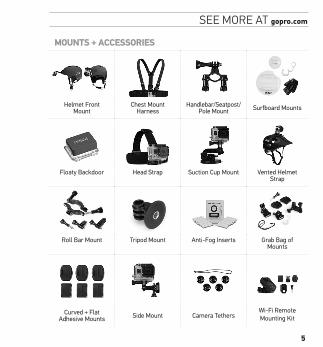
mounts + ACCessories
Helmet FrontMount
Chest MountHarness
Handlebar/Seatpost/Pole Mount Surfboard Mounts
Floaty Backdoor Head Strap Suction Cup Mount Vented Helmet Strap
Roll Bar Mount Tripod Mount Anti-Fog Inserts Grab Bag of Mounts
Curved + Flat Adhesive Mounts Side Mount Camera Tethers
Wi-Fi Remote Mounting Kit
see More at gopro.com
6
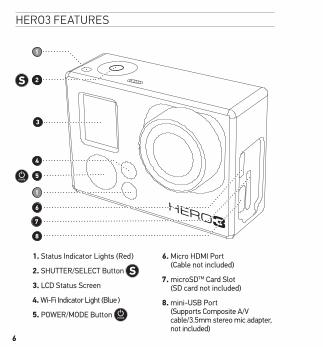
Hero3 featUres
1. Status Indicator Lights (Red)
2. SHUTTER/SELECT Button
3. LCD Status Screen
4. Wi-Fi Indicator Light (Blue )
5. POWER/MODE Button
6. Micro HDMI Port (Cable not included)
7. microSDTM Card Slot (SD card not included)
8. mini-USB Port (Supports Composite A/V cable/3.5mm stereo mic adapter, not included)
7
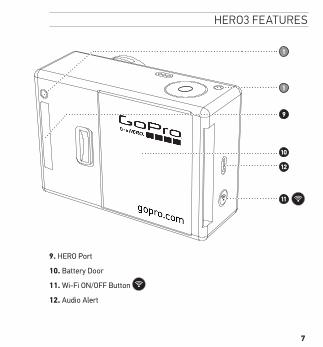
Hero3 featUres
9. HERO Port
10. Battery Door
11. Wi-Fi ON/OFF Button
12. Audio Alert
8
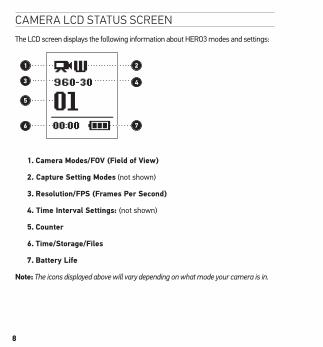
caMera lcd statUs screen
The LCD screen displays the following information about HERO3 modes and settings:
1. Camera modes/FoV (Field of View)
2. Capture setting modes (not shown)
3. resolution/FPs (Frames Per second)
4. time interval settings: (not shown)
5. Counter
6. time/storage/Files
7. Battery Life
note: The icons displayed above will vary depending on what mode your camera is in.
9
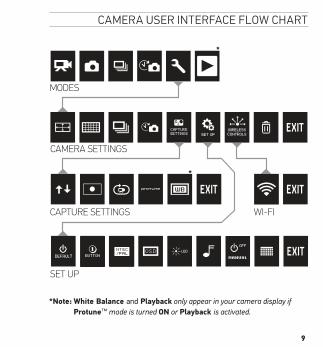
caMera User interface flow cHart
MODES
CAMERA SETTINGS
CAPTURE SETTINGS WI-FI
SET UP
*note: White Balance and Playback only appear in your camera display if Protune™ mode is turned on or Playback is activated.
10
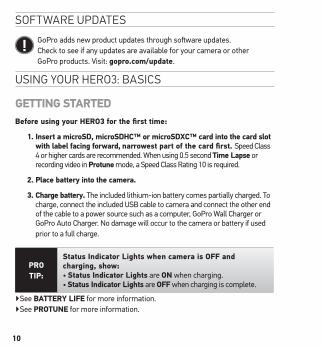
UsinG YoUr Hero3: basics
GettinG stArteDBefore using your hero3 for the first time:
1. insert a microsD, microsDhC™ or microsDXC™ card into the card slot with label facing forward, narrowest part of the card first. Speed Class 4 or higher cards are recommended. When using 0.5 second time Lapse or recording video in Protune mode, a Speed Class Rating 10 is required.
2. Place battery into the camera.
3. Charge battery. The included lithium-ion battery comes partially charged. To charge, connect the included USB cable to camera and connect the other end of the cable to a power source such as a computer, GoPro Wall Charger or GoPro Auto Charger. No damage will occur to the camera or battery if used prior to a full charge.
Pro tiP:
status indicator Lights when camera is oFF and charging, show:• status indicator Lights are on when charging.• status indicator Lights are oFF when charging is complete.
▶See BAtterY LiFe for more information. ▶See Protune for more information.
software UPdates
GoPro adds new product updates through software updates. Check to see if any updates are available for your camera or other GoPro products. Visit: gopro.com/update.

11
CAmerA DeFAuLt settinGsThe HERO3 Silver Edition camera powers up with the following default settings:
Video resolution 1080p30fps
Photo resolution 11 Megapixels (MP)
Photo Burst 10 photos in 1 second
time Lapse 0.5 seconds
Wi-Fi OFF
Pro tiP:
Want to change your ViDeo and Photo settings?
▶See settinGs menu to make changes.
UsinG YoUr Hero3: basics
12
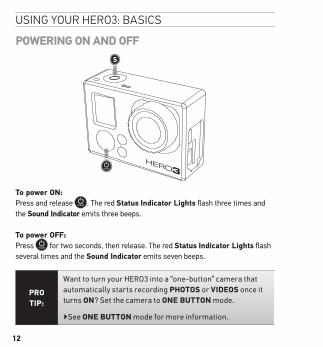
PoWerinG on AnD oFF
to power on: Press and release . The red status indicator Lights flash three times and the sound indicator emits three beeps. to power oFF: Press for two seconds, then release. The red status indicator Lights flash several times and the sound indicator emits seven beeps.
Pro tiP:
Want to turn your HERO3 into a “one-button” camera that automatically starts recording Photos or ViDeos once it turns on? Set the camera to one Button mode.
▶See one Button mode for more information.
UsinG YoUr Hero3: basics
13
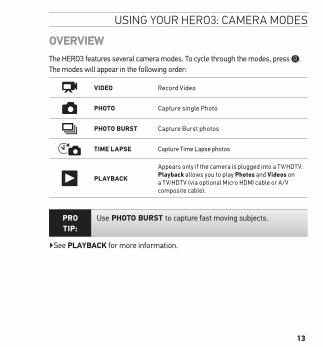
oVerVieWThe HERO3 features several camera modes. To cycle through the modes, press . The modes will appear in the following order:
ViDeo Record Video
Photo Capture single Photo
Photo Burst Capture Burst photos
time LAPse Capture Time Lapse photos
PLAYBACK
Appears only if the camera is plugged into a TV/HDTV. Playback allows you to play Photos and Videos on a TV/HDTV (via optional Micro HDMI cable or A/V composite cable).
Pro tiP:
Use Photo Burst to capture fast moving subjects.
▶See PLAYBACK for more information.
UsinG YoUr Hero3: caMera Modes

14
UsinG YoUr Hero3: caMera Modes
ViDeoTo record Video, verify the camera is in Video mode. If the Video icon on your camera’s LCD screen is not showing, press repeatedly until it appears.
to start recording: Press and release . The camera will emit one beep and the red status indicator Lights will flash while recording.
to stop recording: Press and release . The red status indicator Lights flash three times and the camera emits three beeps to indicate recording has stopped.
The HERO3 automatically stops recording when the memory card is full or the battery is out of power. Your video will be saved before the camera powers oFF.
▶See ViDeo mode for instructions on how to change resolution settings.
15
UsinG YoUr Hero3: caMera Modes
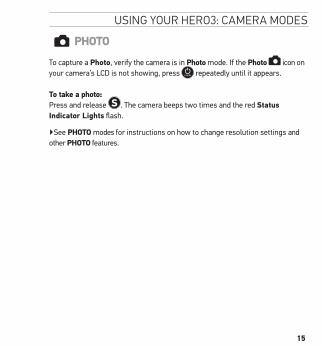
Photo
To capture a Photo, verify the camera is in Photo mode. If the Photo icon on your camera’s LCD is not showing, press repeatedly until it appears.
to take a photo: Press and release . The camera beeps two times and the red status indicator Lights flash.
▶See Photo modes for instructions on how to change resolution settings and other Photo features.
16
UsinG YoUr Hero3: caMera Modes
Photo BurstIn Photo Burst mode your camera takes multiple photos in short time intervals— 3 photos/1 sec, 5 photos/1 sec, 10 photos/1 sec or 10 photos/2 seconds.
To capture a Photo Burst series, verify the camera is in Photo Burst mode. If the Photo Burst icon on your camera’s LCD screen is not showing, press repeatedly until it appears.
to take a Photo Burst series:
Press and release . The red status indicator Lights flash and the camera beeps multiple times.
Pro tiP:
Sometimes 30 photos/1 second is too fast. Try a slower Photo Burst setting to better match the action.
▶See Photo Burst for instructions on how to change the interval settings.
17
UsinG YoUr Hero3: caMera Modes
time LAPsetime Lapse mode captures a series of photos at 0.5, 1, 2, 5, 10, 30 or 60 second intervals. When using the 0.5 seconds setting, an SD card with a Speed Class 10 Rating is required.
To capture a time Lapse series, verify the camera is in time Lapse mode. If the time Lapse icon is not showing on your camera’s LCD screen, press repeatedly until it appears.
to take time Lapse: Press and release . The camera initiates countdown and the red status indicator Lights flash each time a Photo is taken.
to stop time Lapse: Press and release . The red status indicator Lights flash three times and the camera emits three beeps to indicate that time Lapse has stopped.
▶See time LAPse for instructions on how to change the interval settings.
18
UsinG YoUr Hero3: caMera Modes
settinGs
The settings menu allows you to adjust a variety of camera settings including:
Video resolution
Photo resolution
time Lapse
Photo Burst
• and more
▶See settinGs menu to make changes, learn how to navigate menu options and read more details on each setting.
19
UsinG YoUr Hero3: caMera Modes
PLAYBACK
You can playback your GoPro Photos and Videos on a TV/HDTV or with the LCD Touch BacPac (optional accessory). Playback appears as a camera mode when camera is powered on and plugged into a TV/HDTV.
▶See PLAYBACK for more information on viewing your ViDeos and Photos.
20
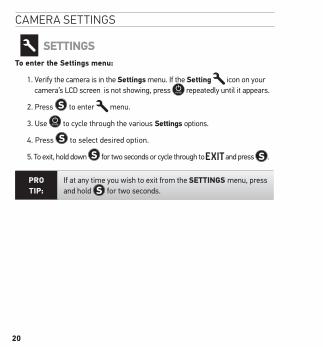
caMera settinGs
settinGsto enter the settings menu:
1. Verify the camera is in the settings menu. If the setting icon on your camera’s LCD screen is not showing, press repeatedly until it appears.
2. Press to enter menu.
3. Use to cycle through the various settings options.
4. Press to select desired option.
5. To exit, hold down for two seconds or cycle through to and press .
Pro tiP:
If at any time you wish to exit from the settinGs menu, press and hold for two seconds.
21
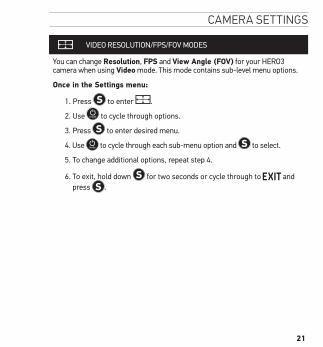
caMera settinGs
VIDEO RESOLUTION/FPS/FOV MODES
You can change resolution, FPs and View Angle (FoV) for your HERO3 camera when using Video mode. This mode contains sub-level menu options.
once in the settings menu:
1. Press to enter .
2. Use to cycle through options.
3. Press to enter desired menu.
4. Use to cycle through each sub-menu option and to select.
5. To change additional options, repeat step 4.
6. To exit, hold down for two seconds or cycle through to and press .
22
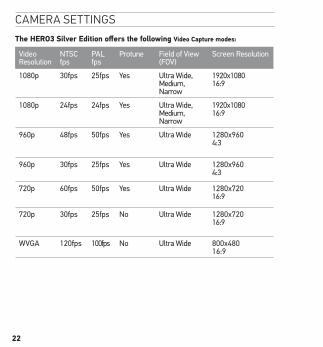
caMera settinGs
the hero3 silver edition offers the following Video Capture modes:
Video Resolution
NTSC fps
PAL fps
Protune Field of View (FOV)
Screen Resolution
1080p 30fps 25fps Yes Ultra Wide, Medium, Narrow
1920x1080 16:9
1080p 24fps 24fps Yes Ultra Wide, Medium, Narrow
1920x1080 16:9
960p 48fps 50fps Yes Ultra Wide 1280x960 4:3
960p 30fps 25fps Yes Ultra Wide 1280x960 4:3
720p 60fps 50fps Yes Ultra Wide 1280x720 16:9
720p 30fps 25fps No Ultra Wide 1280x720 16:9
WVGA 120fps 100fps No Ultra Wide 800x480 16:9
23
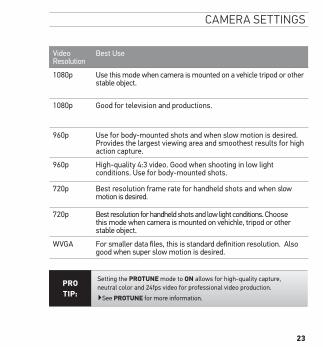
caMera settinGs
Video Resolution
Best Use
1080p Use this mode when camera is mounted on a vehicle tripod or other stable object.
1080p Good for television and productions.
960p Use for body-mounted shots and when slow motion is desired. Provides the largest viewing area and smoothest results for high action capture.
960p High-quality 4:3 video. Good when shooting in low light conditions. Use for body-mounted shots.
720p Best resolution frame rate for handheld shots and when slow motion is desired.
720p Best resolution for handheld shots and low light conditions. Choose this mode when camera is mounted on vehichle, tripod or other stable object.
WVGA For smaller data files, this is standard definition resolution. Also good when super slow motion is desired.
Pro tiP:
Setting the Protune mode to on allows for high-quality capture, neutral color and 24fps video for professional video production.
▶See Protune for more information.
24
caMera settinGs
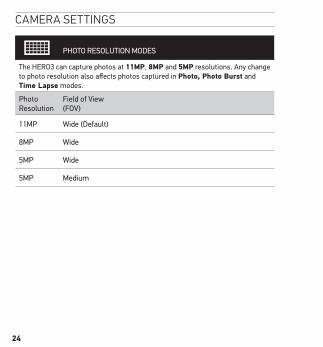
PHOTO RESOLUTION MODES
The HERO3 can capture photos at 11mP, 8mP and 5mP resolutions. Any change to photo resolution also affects photos captured in Photo, Photo Burst and time Lapse modes.
Photo Resolution
Field of View (FOV)
11MP Wide (Default)
8MP Wide
5MP Wide
5MP Medium
25
caMera settinGs
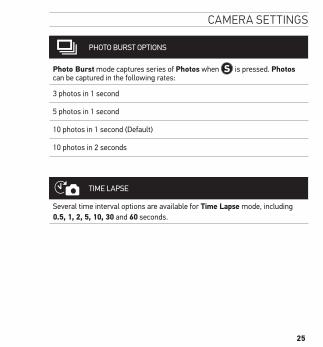
PHOTO BURST OPTIONS
Photo Burst mode captures series of Photos when is pressed. Photos can be captured in the following rates:
3 photos in 1 second
5 photos in 1 second
10 photos in 1 second (Default)
10 photos in 2 seconds
TIME LAPSE
Several time interval options are available for time Lapse mode, including 0.5, 1, 2, 5, 10, 30 and 60 seconds.
26
caMera settinGs
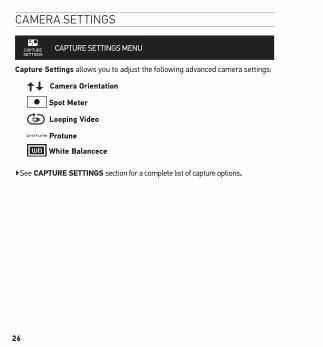
CAPTURE SETTINGS MENU
Capture settings allows you to adjust the following advanced camera settings:
Camera orientation
spot meter
Looping Video
Protune
White Balancece
▶See CAPture settinGs section for a complete list of capture options.
27
caMera settinGs
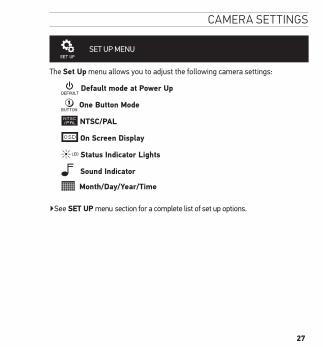
SET UP MENU
The set up menu allows you to adjust the following camera settings:
Default mode at Power up
one Button mode
ntsC/PAL
on screen Display
status indicator Lights
sound indicator
month/Day/Year/time
▶See set uP menu section for a complete list of set up options.
28
caMera settinGs
WIRELESS CONTROLS
The HERO3 camera’s built-in Wi-Fi allows you to connect to the Wi-Fi Remote or smartphone/tablet via the GoPro App. When Wi-Fi is on, your Wi-Fi status indicator Light will blink blue.
to turn Wi-Fi on/oFF:
Press to turn Wi-Fi on/oFF. The most recently used Wi-Fi mode will be active when Wi-Fi is on.
▶See WireLess ControLs section for a complete list of wireless functions.
29
caMera settinGs
DELETE
Delete the last file or all files and format the memory card. During delete LAst or ALL, the status indicator Lights blink until operation is complete.
CANCEL (Default)
LAST
ALL
to delete LAst or ALL:
1. Verify the camera is in settings mode. If the settings icon on your camera’s LCD screen is not showing, press repeatedly until it appears.
2. Press to enter settings menu.
3. Use to cycle through settings to locate .
4. Press to enter Delete.
5. Use to cycle through options.
6. Select highlighted option by pressing .
7. To exit, hold down for two seconds or cycle through to and press .
Pro tiP:
Use caution — by selecting ALL, the memory card will be formatted, deleting every file on your SD card.
30
caMera settinGs
EXIT
From the screen, press to exit the settings menu.
Pro tiP:
If at any time you wish to exit from the settinGs menu, press and hold for two seconds.
31
caPtUre settinGs
CAPture settinGs
to enter the Capture settings menu:
1. Verify the camera is in settings mode. If the settings icon on your camera’s LCD screen is not showing, press repeatedly until it appears.
2. Press to enter .
3. Use to cycle through settings to locate .
4. Press to enter Capture settings.
5. Use to locate the desired option to change.
6. Press to select the desired option.
7. Some options have a sub-menu. Use to cycle through the sub-menus.
8. Press to select a highlighted option.
9. To exit, hold down for two seconds or cycle through to and press .
32
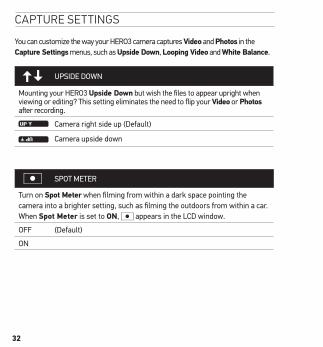
caPtUre settinGs
You can customize the way your HERO3 camera captures Video and Photos in the Capture settings menus, such as upside Down, Looping Video and White Balance.
UPSIDE DOWN
Mounting your HERO3 upside Down but wish the files to appear upright when viewing or editing? This setting eliminates the need to flip your Video or Photos after recording.
Camera right side up (Default)
Camera upside down
SPOT METER
Turn on spot meter when filming from within a dark space pointing the camera into a brighter setting, such as filming the outdoors from within a car. When spot meter is set to on, appears in the LCD window.
OFF (Default)
ON
33
caPtUre settinGs
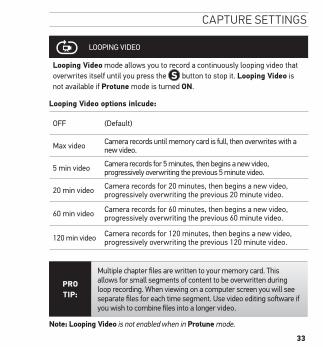
LOOPING VIDEO
Looping Video mode allows you to record a continuously looping video that overwrites itself until you press the button to stop it. Looping Video is not available if Protune mode is turned on.
Looping Video options inlcude:
OFF (Default)
Max video Camera records until memory card is full, then overwrites with a new video.
5 min video Camera records for 5 minutes, then begins a new video, progressively overwriting the previous 5 minute video.
20 min video Camera records for 20 minutes, then begins a new video, progressively overwriting the previous 20 minute video.
60 min video Camera records for 60 minutes, then begins a new video, progressively overwriting the previous 60 minute video.
120 min video Camera records for 120 minutes, then begins a new video, progressively overwriting the previous 120 minute video.
Pro tiP:
Multiple chapter files are written to your memory card. This allows for small segments of content to be overwritten during loop recording. When viewing on a computer screen you will see separate files for each time segment. Use video editing software if you wish to combine files into a longer video.
note: Looping Video is not enabled when in Protune mode.
34
caPtUre settinGs
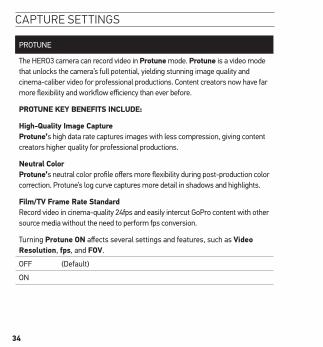
PROTUNE
The HERO3 camera can record video in Protune mode. Protune is a video mode that unlocks the camera’s full potential, yielding stunning image quality and cinema-caliber video for professional productions. Content creators now have far more flexibility and workflow efficiency than ever before.
Protune KeY BeneFits inCLuDe:
high-Quality image Capture Protune’s high data rate captures images with less compression, giving content creators higher quality for professional productions.
neutral Color Protune’s neutral color profile offers more flexibility during post-production color correction. Protune’s log curve captures more detail in shadows and highlights.
Film/tV Frame rate standard Record video in cinema-quality 24fps and easily intercut GoPro content with other source media without the need to perform fps conversion.
Turning Protune on affects several settings and features, such as Video resolution, fps, and FoV.
OFF (Default)
ON
35
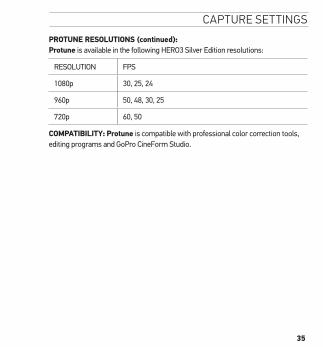
caPtUre settinGs Protune resoLutions (continued): Protune is available in the following HERO3 Silver Edition resolutions:
RESOLUTION FPS
1080p 30, 25, 24
960p 50, 48, 30, 25
720p 60, 50
ComPAtiBiLitY: Protune is compatible with professional color correction tools, editing programs and GoPro CineForm Studio.
36
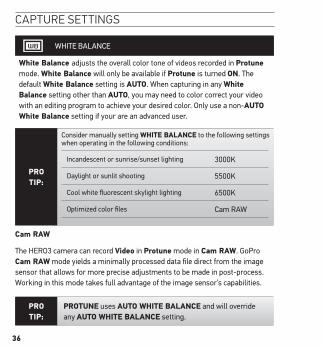
caPtUre settinGs
WHITE BALANCE
White Balance adjusts the overall color tone of videos recorded in Protune mode. White Balance will only be available if Protune is turned on. The default White Balance setting is Auto. When capturing in any White Balance setting other than Auto, you may need to color correct your video with an editing program to achieve your desired color. Only use a non-Auto White Balance setting if your are an advanced user.
Pro tiP:
Consider manually setting White BALAnCe to the following settings when operating in the following conditions:
Incandescent or sunrise/sunset lighting 3000K
Daylight or sunlit shooting 5500K
Cool white fluorescent skylight lighting 6500K
Optimized color files Cam RAW
Cam rAW
The HERO3 camera can record Video in Protune mode in Cam rAW. GoPro Cam rAW mode yields a minimally processed data file direct from the image sensor that allows for more precise adjustments to be made in post-process. Working in this mode takes full advantage of the image sensor’s capabilities.
Pro tiP:
Protune uses Auto White BALAnCe and will override any Auto White BALAnCe setting.
37
caPtUre settinGs
EXIT
From the eXit screen press to exit the Capture settings menu.
Pro tiP:
If at any time you wish to exit from the CAPture settinGs menu, press and hold for two seconds.
3838
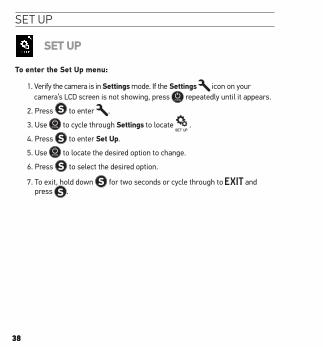
set UP
set uP
to enter the set up menu:
1. Verify the camera is in settings mode. If the settings icon on your camera’s LCD screen is not showing, press repeatedly until it appears.
2. Press to enter .
3. Use to cycle through settings to locate .
4. Press to enter set up.
5. Use to locate the desired option to change.
6. Press to select the desired option.
7. To exit, hold down for two seconds or cycle through to and press .
3939
set UP
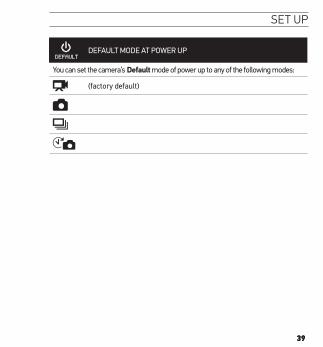
DEFAULT MODE AT POWER UP
You can set the camera’s Default mode of power up to any of the following modes:
(factory default)

40
set UP
ONE BUTTON
With one Button mode selected, the camera automatically begins recording when powering the camera on. one Button mode can be configured to start in Video or time Lapse.
OFF (Default)
ON
to turn one Button mode on:
1. Verify the camera is in settings mode. If the settings icon on your camera’s LCD screen is not showing, press repeatedly until it appears.
2. Press to enter menu.
3. Use to cycle through settings to locate .
4. Press to enter set up.
5. Use to cycle through to locate .
6. Press to enter one Button menu.
7. Use to cycle through options.
8. Press to select a highlighted option.
9. To exit, hold down for two seconds or cycle through to and press .
Next time you power your camera on, it will begin recording in its Default Power up mode. To stop recording, push and hold for two seconds.
41
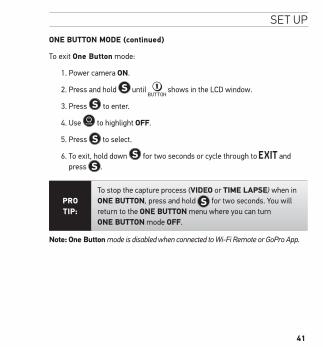
set UP
one Button moDe (continued)
To exit one Button mode:
1. Power camera on.
2. Press and hold until shows in the LCD window.
3. Press to enter.
4. Use to highlight oFF.
5. Press to select.
6. To exit, hold down for two seconds or cycle through to and press .
Pro tiP:
To stop the capture process (ViDeo or time LAPse) when in one Button, press and hold for two seconds. You will return to the one Button menu where you can turn one Button mode oFF.
note: one Button mode is disabled when connected to Wi-Fi Remote or GoPro App.

42
set UP
NTSC / PAL
The ntsC and PAL settings govern Video recording frame rate and playback when viewing Video on a TV/HDTV. Select ntsC when viewing a TV/HDTV in North America. Select PAL if viewing on a PAL TV/HDTV (most televisions outside of North America) or if viewing on a PAL TV/HDTV in any region.
ntsC (Default) PAL
1080p/30fps 1080p/25fps
1080p/24fps 1080p/24fps
960p/48fps 960p/50fps
960p/30fps 960p/25fps
720p/60fps 720p/50fps
720p/30fps 720p/25fps
WVGA/120fps WVGA/120fps
ONSCREEN DISPLAY
To display or hide the recording icons and file information on Video or the viewing screen during playback, turn onscreen Display (osD) oFF or on.
OFF
ON (Default)
43
set UP
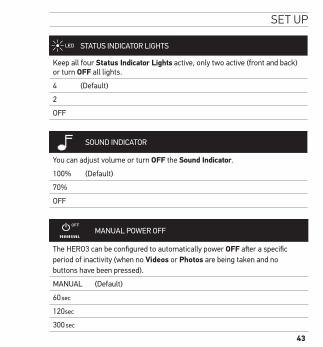
STATUS INDICATOR LIGHTS
Keep all four status indicator Lights active, only two active (front and back) or turn oFF all lights.
4 (Default)
2
OFF
SOUND INDICATOR
You can adjust volume or turn oFF the sound indicator.
100% (Default)
70%
OFF
MANUAL POWER OFF
The HERO3 can be configured to automatically power oFF after a specific period of inactivity (when no Videos or Photos are being taken and no buttons have been pressed).
MANUAL (Default)
60sec
120sec
300sec
44
set UP
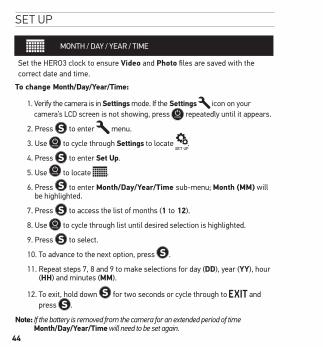
MONTH / DAY / YEAR / TIME
Set the HERO3 clock to ensure Video and Photo files are saved with the correct date and time.
to change month/Day/Year/time:
1. Verify the camera is in settings mode. If the settings icon on your camera’s LCD screen is not showing, press repeatedly until it appears.
2. Press to enter menu.
3. Use to cycle through settings to locate .
4. Press to enter set up.
5. Use to locate .
6. Press to enter month/Day/Year/time sub-menu; month (mm) will be highlighted.
7. Press to access the list of months (1 to 12).
8. Use to cycle through list until desired selection is highlighted.
9. Press to select.
10. To advance to the next option, press .
11. Repeat steps 7, 8 and 9 to make selections for day (DD), year (YY), hour (hh) and minutes (mm).
12. To exit, hold down for two seconds or cycle through to and press .
note: If the battery is removed from the camera for an extended period of time month/Day/Year/time will need to be set again.
45
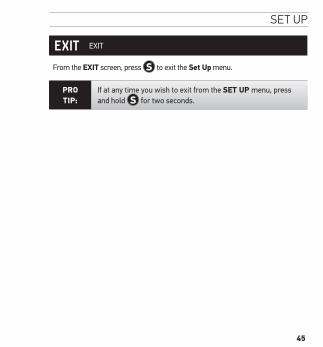
set UP
EXIT
From the eXit screen, press to exit the set up menu.
Pro tiP:
If at any time you wish to exit from the set uP menu, press and hold for two seconds.
46
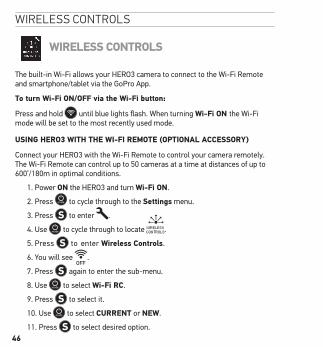
wireless controls
WireLess ControLs
The built-in Wi-Fi allows your HERO3 camera to connect to the Wi-Fi Remote and smartphone/tablet via the GoPro App.
to turn Wi-Fi on/oFF via the Wi-Fi button:
Press and hold until blue lights flash. When turning Wi-Fi on the Wi-Fi mode will be set to the most recently used mode.
usinG hero3 With the Wi-Fi remote (oPtionAL ACCessorY)
Connect your HERO3 with the Wi-Fi Remote to control your camera remotely. The Wi-Fi Remote can control up to 50 cameras at a time at distances of up to 600’/180m in optimal conditions.
1. Power on the HERO3 and turn Wi-Fi on.
2. Press to cycle through to the settings menu.
3. Press to enter .
4. Use to cycle through to locate .
5. Press to enter Wireless Controls .
6. You will see .
7. Press again to enter the sub-menu.
8. Use to select Wi-Fi rC.
9. Press to select it.
10. Use to select Current or neW.
11. Press to select desired option.

47
wireless controls
WireLess ControLs (ContinueD)
on your Wi-Fi remote:
1. Press to turn on the GoPro Wi-Fi Remote.
2. While holding , press and release .
3. Once you see , you can release .
4. A check will appear once the Wi-Fi Remote and camera have successfully paired.
The Wi-Fi Remote’s LCD screen will now mirror the HERO3 LCD screen.
usinG the hero3 With the GoPro APP
The GoPro App lets you control your camera remotely using a smartphone or tablet. Features include full camera control of all settings, live video preview to your smartphone or tablet for easy shot framing and more.
The GoPro App is available for free at the Apple App Store and is coming soon to Google Play.
Pro tiP:
Before you hit , see what your HERO3 camera sees by viewing it on your smartphone or tablet’s screen.
▶See gopro.com for more information.
48
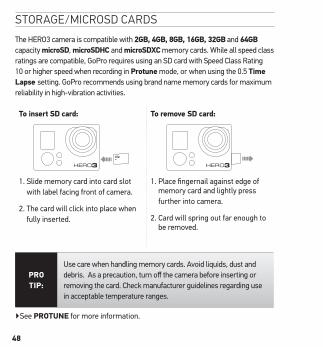
storaGe/Microsd cards
The HERO3 camera is compatible with 2GB, 4GB, 8GB, 16GB, 32GB and 64GB capacity microsD, microsDhC and microsDXC memory cards. While all speed class ratings are compatible, GoPro requires using an SD card with Speed Class Rating 10 or higher speed when recording in Protune mode, or when using the 0.5 time Lapse setting. GoPro recommends using brand name memory cards for maximum reliability in high-vibration activities.
to insert sD card: to remove sD card:
1. Slide memory card into card slot with label facing front of camera.
2. The card will click into place when fully inserted.
1. Place fingernail against edge of memory card and lightly press further into camera.
2. Card will spring out far enough to be removed.
Pro tiP:
Use care when handling memory cards. Avoid liquids, dust and debris. As a precaution, turn off the camera before inserting or removing the card. Check manufacturer guidelines regarding use in acceptable temperature ranges.
▶See Protune for more information.
49
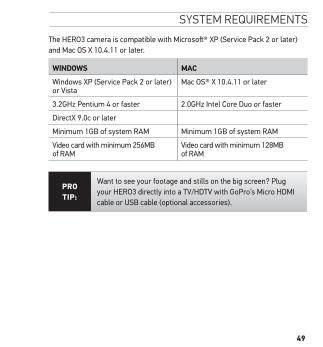
sYsteM reqUireMents
The HERO3 camera is compatible with Microsoft® XP (Service Pack 2 or later) and Mac OS X 10.4.11 or later.
WinDoWs mAC Windows XP (Service Pack 2 or later) or Vista
Mac OS® X 10.4.11 or later
3.2GHz Pentium 4 or faster 2.0GHz Intel Core Duo or faster
DirectX 9.0c or later
Minimum 1GB of system RAM Minimum 1GB of system RAM
Video card with minimum 256MB of RAM
Video card with minimum 128MB of RAM
Pro tiP:
Want to see your footage and stills on the big screen? Plug your HERO3 directly into a TV/HDTV with GoPro’s Micro HDMI cable or USB cable (optional accessories).
50
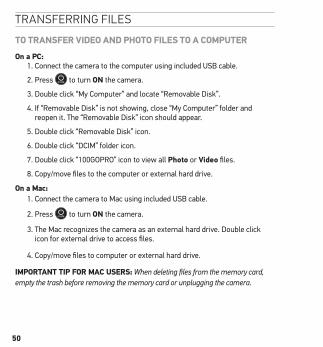
transferrinG files
to trAnsFer ViDeo AnD Photo FiLes to A ComPuter
on a PC:1. Connect the camera to the computer using included USB cable.
2. Press to turn on the camera.
3. Double click “My Computer” and locate “Removable Disk”.
4. If “Removable Disk” is not showing, close “My Computer” folder and reopen it. The “Removable Disk” icon should appear.
5. Double click “Removable Disk” icon.
6. Double click “DCIM” folder icon.
7. Double click “100GOPRO” icon to view all Photo or Video files.
8. Copy/move files to the computer or external hard drive.
on a mac:1. Connect the camera to Mac using included USB cable.
2. Press to turn on the camera.
3. The Mac recognizes the camera as an external hard drive. Double click icon for external drive to access files.
4. Copy/move files to computer or external hard drive.
imPortAnt tiP For mAC users: When deleting files from the memory card, empty the trash before removing the memory card or unplugging the camera.
51
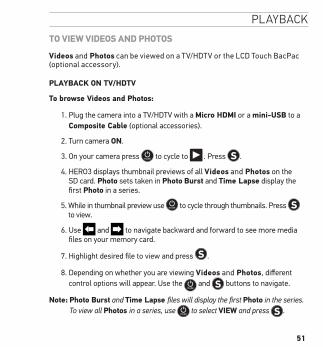
PlaYback
to VieW ViDeos AnD Photos
Videos and Photos can be viewed on a TV/HDTV or the LCD Touch BacPac (optional accessory).
PLAYBACK on tV/hDtV
to browse Videos and Photos:
1. Plug the camera into a TV/HDTV with a micro hDmi or a mini-usB to a Composite Cable (optional accessories).
2. Turn camera on.
3. On your camera press to cycle to . Press .
4. HERO3 displays thumbnail previews of all Videos and Photos on the SD card. Photo sets taken in Photo Burst and time Lapse display the first Photo in a series.
5. While in thumbnail preview use to cycle through thumbnails. Press to view.
6. Use and to navigate backward and forward to see more media files on your memory card.
7. Highlight desired file to view and press .
8. Depending on whether you are viewing Videos and Photos, different control options will appear. Use the and buttons to navigate.
note: Photo Burst and time Lapse files will display the first Photo in the series. To view all Photos in a series, use to select VieW and press .
52
PlaYback
PLAYBACK on LCD touCh BACPAC
Playback using the LCD Touch BacPac follows a similar process/procedure as described with a few slight variations.
▶See the LCD Touch BacPac User Manual for more information.
53
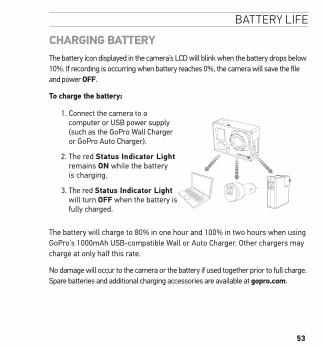
batterY life ChArGinG BAtterYThe battery icon displayed in the camera’s LCD will blink when the battery drops below 10%. If recording is occurring when battery reaches 0%, the camera will save the file and power oFF.
to charge the battery:
1. Connect the camera to a computer or USB power supply (such as the GoPro Wall Charger or GoPro Auto Charger).
2. The red status indicator Light remains on while the battery is charging.
3. The red status indicator Light will turn oFF when the battery is fully charged.
The battery will charge to 80% in one hour and 100% in two hours when using GoPro’s 1000mAh USB-compatible Wall or Auto Charger. Other chargers may charge at only half this rate.
No damage will occur to the camera or the battery if used together prior to full charge. Spare batteries and additional charging accessories are available at gopro.com.
54
batterY life
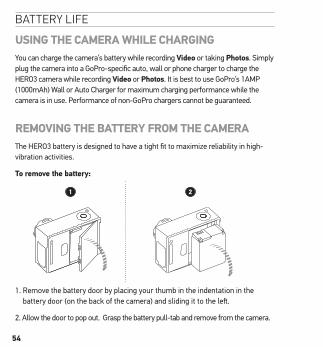
usinG the CAmerA WhiLe ChArGinGYou can charge the camera’s battery while recording Video or taking Photos. Simply plug the camera into a GoPro-specific auto, wall or phone charger to charge the HERO3 camera while recording Video or Photos. It is best to use GoPro’s 1AMP (1000mAh) Wall or Auto Charger for maximum charging performance while the camera is in use. Performance of non-GoPro chargers cannot be guaranteed.
remoVinG the BAtterY From the CAmerAThe HERO3 battery is designed to have a tight fit to maximize reliability in high-vibration activities.
to remove the battery:
1. Remove the battery door by placing your thumb in the indentation in the
battery door (on the back of the camera) and sliding it to the left.
2. Allow the door to pop out. Grasp the battery pull-tab and remove from the camera.
55
iMPortant warninG MessaGes
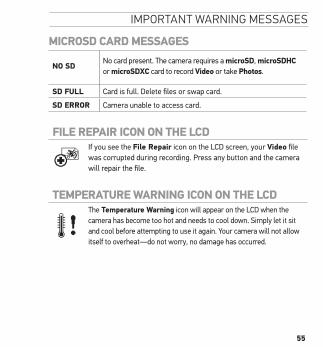
miCrosD CArD messAGes
no sD No card present. The camera requires a microsD, microsDhC or microsDXC card to record Video or take Photos.
sD FuLL Card is full. Delete files or swap card.
sD error Camera unable to access card.
FiLe rePAir iCon on the LCD If you see the File repair icon on the LCD screen, your Video file was corrupted during recording. Press any button and the camera will repair the file.
temPerAture WArninG iCon on the LCD The temperature Warning icon will appear on the LCD when the camera has become too hot and needs to cool down. Simply let it sit and cool before attempting to use it again. Your camera will not allow itself to overheat —do not worry, no damage has occurred.
56
caMera asseMblY
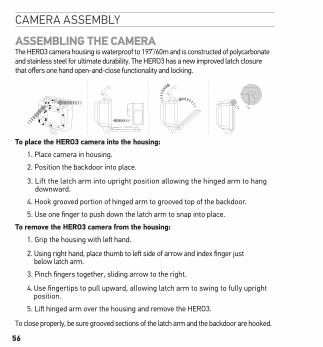
AssemBLinG the CAmerA The HERO3 camera housing is waterproof to 197’/60m and is constructed of polycarbonate and stainless steel for ultimate durability. The HERO3 has a new improved latch closure that offers one hand open-and-close functionality and locking.
to place the hero3 camera into the housing:
1. Place camera in housing.
2. Position the backdoor into place.
3. Lift the latch arm into upright position allowing the hinged arm to hang downward.
4. Hook grooved portion of hinged arm to grooved top of the backdoor.
5. Use one finger to push down the latch arm to snap into place.
to remove the hero3 camera from the housing:
1. Grip the housing with left hand.
2. Using right hand, place thumb to left side of arrow and index finger just below latch arm.
3. Pinch fingers together, sliding arrow to the right.
4. Use fingertips to pull upward, allowing latch arm to swing to fully upright position.
5. Lift hinged arm over the housing and remove the HERO3.
To close properly, be sure grooved sections of the latch arm and the backdoor are hooked.
57
caMera asseMblY
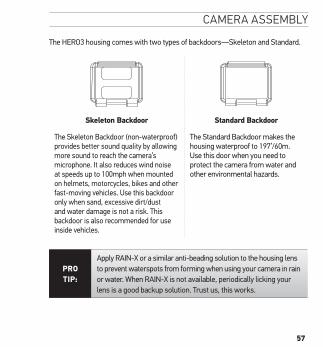
The HERO3 housing comes with two types of backdoors—Skeleton and Standard.
skeleton Backdoor standard Backdoor
The Skeleton Backdoor (non-waterproof) provides better sound quality by allowing more sound to reach the camera’s microphone. It also reduces wind noise at speeds up to 100mph when mounted on helmets, motorcycles, bikes and other fast-moving vehicles. Use this backdoor only when sand, excessive dirt/dust and water damage is not a risk. This backdoor is also recommended for use inside vehicles.
The Standard Backdoor makes the housing waterproof to 197’/60m. Use this door when you need to protect the camera from water and other environmental hazards.
Pro tiP:
Apply RAIN-X or a similar anti-beading solution to the housing lens to prevent waterspots from forming when using your camera in rain or water. When RAIN-X is not available, periodically licking your lens is a good backup solution. Trust us, this works.

58
caMera asseMblY
sWAPPinG housinG DoorsYour HERO3 camera housing comes with two types of backdoors—Standard and Skeleton (non-waterproof).
to change backdoor:
1. Open the backdoor of the housing so that it is hanging downwards. 2. Pull downwards on the backdoor until it snaps free from the hinge.3. Line up replacement backdoor into the hinge opening.4. Push upwards on the backdoor until it clicks into place.
59
caMera asseMblY
PreVentinG WAter DAmAGe to Your CAmerAThe rubber seal that lines the camera housing forms a waterproof barrier that protects your HERO3 in wet and underwater conditions. Keep the camera housing’s rubber seal clean; a single hair or grain of sand can cause a leak.
After every use in salt water you will need to rinse the outside of the housing with non-salt water and dry. Not doing this can eventually cause corrosion of the hinge pin and salt buildup in the seal, which can cause failure.
To clean the seal, rinse in fresh water and shake dry (drying with a cloth may cause lint to compromise the seal). Re-install the seal into the grooves in the backdoor of the housing.
WArninG: Failure to follow these steps each time you use your HERO3 can result in leaks that may damage or destroy your camera. Your warranty does not cover water damage resulting from user error.
60
caMera asseMblY
AttAChinG Your CAmerA to mountsTo attach your HERO3 camera to a mount, you will need an attachment buckle, thumb screw or hardware depending on the mount you are using. For more information on mounts, visit gopro.com/support.
Attachment Buckle
thumb screw Waterhousing Complete unit
usinG CurVeD or FLAt ADhesiVe mountsThe curved and flat adhesive mounts make it easy to attach the camera to curved and flat surfaces of helmets, vehicles and gear. With the attachment buckle the assembled camera housing can be clicked on/oFF the secured adhesive mounts.
Flat Adhesive mount Curved Adhesive mount
61
caMera asseMblY
AttAChinG ADhesiVe mounts
Pro tiPs:
Apply to clean surface only. Wax, oil, dirt or other debris will reduce adhesion, which can result in a weak bond and risk of losing camera should connection fail.
Attach mount in room temperature conditions. Mount’s adhesive will not bond properly if applied in cold or damp environments to cold or damp surfaces, or if the surface is not room temperature.
Adhesive mounts should only be mounted to smooth surfaces; porous or textured surfaces will not enable a proper bond. When applying mount, firmly press into place and ensure full contact over entire surface.
For best results, attach the mount a minimum of 24 hours prior to use.
▶See gopro.com/support for more information on mounts.
Locking Plug
Using the HERO3 in high impact sports such as surfing or skiing where significant impact may occur? Use the special locking plug which securely locks the attachment buckle fingers into place--helping prevent accidental housing release from the mount. The circular ring fits over the thumbscrew and acts as a leash to prevent dropping or losing the locking plug.

62
cUstoMer sUPPort
GoPro is dedicated to providing the best possible
service. To reach the GoPro Customer Support Team,
visit gopro.com/support.