Hermes Blue Sheet Implementation · Hermes Blue Sheet Implementation A Major Qualifying Project...
37
Project Number: MXC-0405 Hermes Blue Sheet Implementation A Major Qualifying Project Report submitted to the Faculty of Worcester Polytechnic Institute in partial fulfillment of the requirements for the Degree of Bachelors of Science by Aquame Matthews October 16, 2014 Approved: ______________________________________ Professor Michael J. Ciaraldi, Advisor This report represents work of a WPI undergraduate student submitted to the faculty as evidence of a degree requirement. WPI routinely publishes these reports on its web site without editorial or peer review. For more information about the projects program at WPI, see http://www.wpi.edu/Academics/Projects.
Transcript of Hermes Blue Sheet Implementation · Hermes Blue Sheet Implementation A Major Qualifying Project...

Project Number: MXC-0405
Hermes Blue Sheet Implementation
A Major Qualifying Project Report
submitted to the Faculty of
Worcester Polytechnic Institute
in partial fulfillment of the requirements for the
Degree of Bachelors of Science
by
Aquame Matthews
October 16, 2014
Approved:
______________________________________
Professor Michael J. Ciaraldi, Advisor
This report represents work of a WPI undergraduate student submitted to the faculty
as evidence of a degree requirement. WPI routinely publishes these reports on its web
site without editorial or peer review. For more information about the projects
program at WPI, see http://www.wpi.edu/Academics/Projects.

Abstract
This report details the design, development, and implementation of the Blue Sheet
process into the Hermes application as a replacement for the current Opportunity system to better
assist the user. The report is centered on the design decisions and rationales throughout the
project, paying particular attention to the summary tab. This report also gives an overview of
some of the technologies used within InterSystems as well as suggestions for future works.
Keywords: Blue Sheet, Software, Design

i
Contents
Project Overview .......................................................................................................................................... 1
1.1 InterSystems ........................................................................................................................................ 1
1.2 Hermes ................................................................................................................................................ 1
1.3 Blue Sheet ........................................................................................................................................... 2
Procedure ...................................................................................................................................................... 5
2.1 Tools ................................................................................................................................................... 5
2.1.1 Change Control Record ................................................................................................................ 5
2.1.3 ZEN .............................................................................................................................................. 7
2.1.4 Prodlog ......................................................................................................................................... 7
2.2 Design / Development Process ........................................................................................................... 7
2.2.1 Phase 0: Prioritization .................................................................................................................. 7
2.2.2 Phase 1: Skeleton/Functionality ................................................................................................... 8
2.2.3 Phase 2: Quality Testing ............................................................................................................ 25
Future Development .................................................................................................................................... 29
3.1 Solution Tab .................................................................................................................................. 29
3.2 Team Tab ...................................................................................................................................... 31
3.3 Other works ................................................................................................................................... 32

ii
List of Figures
Design Specification Summary tab ............................................................................................................... 3
Design specification solution tab .................................................................................................................. 4
Change control record entire state diagram .................................................................................................. 6
Implemented summary tab ............................................................................................................................ 8
General section design .................................................................................................................................. 9
Competitor component table ....................................................................................................................... 10
Competitor component modal ..................................................................................................................... 11
Recent component design ........................................................................................................................... 12
Flag component design ............................................................................................................................... 14
Flag component modal ................................................................................................................................ 15
Compound note modal ................................................................................................................................ 16
Compound activity modal ........................................................................................................................... 16
Win theme compoent design ....................................................................................................................... 19
Win theme modal design ............................................................................................................................ 19
Stakeholder table ......................................................................................................................................... 20
Stakeholder modal design ........................................................................................................................... 21
Financial tab implementation ...................................................................................................................... 22
Ported activity tab ....................................................................................................................................... 23
Ported projects tab ....................................................................................................................................... 23
Ported notes tab ........................................................................................................................................... 24
Ported documents tab .................................................................................................................................. 24
Ported add documents popup ...................................................................................................................... 25
Semi-developed solution tab ....................................................................................................................... 29
TrakCare and Core components .................................................................................................................. 29
Development component ............................................................................................................................ 30
Development modal .................................................................................................................................... 30
Third Party component ............................................................................................................................... 31
Semi-developed Team tab ........................................................................................................................... 31

iii
Source Code Listings
Query for Recent table ................................................................................................................................ 12
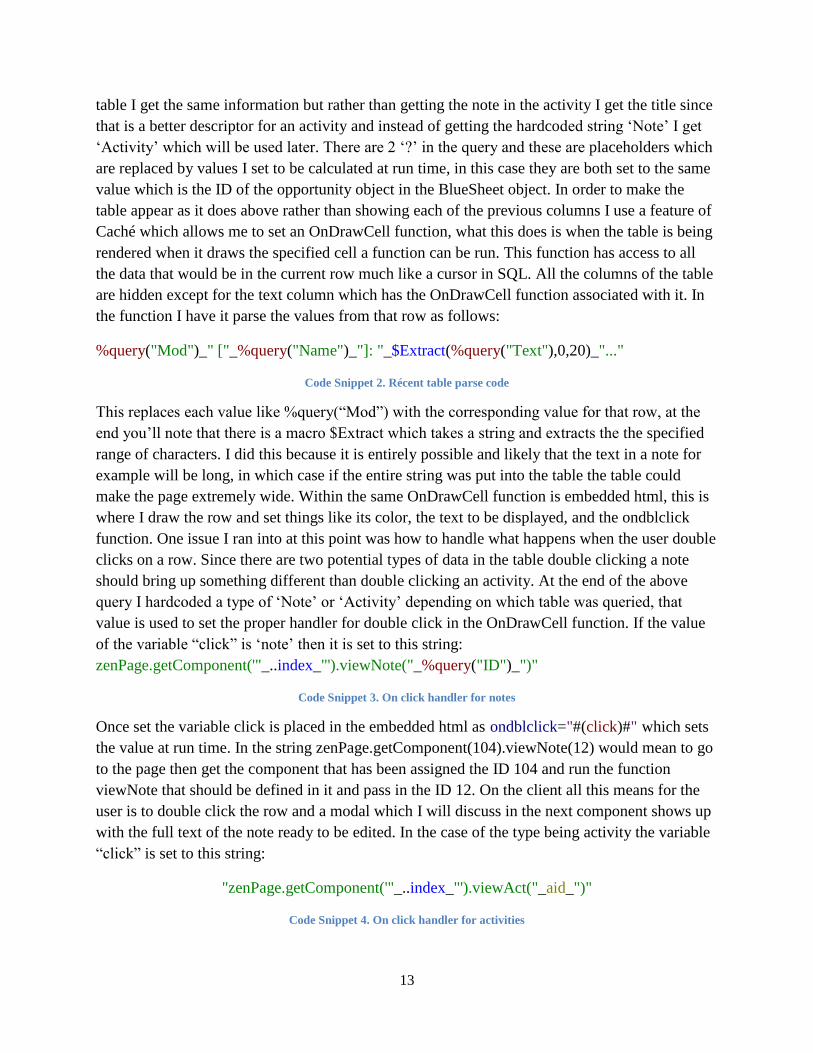
Recent table parse code ............................................................................................................................... 13
On click handler for notes ........................................................................................................................... 13
On click handler for activities ..................................................................................................................... 13
Updated query for Recent table .................................................................................................................. 15
Embedded html for Flag table ..................................................................................................................... 15
Original cursor for Flag sub table ............................................................................................................... 17
Embedded html for creating sub table ........................................................................................................ 18
Updated cursor for flag sub table ................................................................................................................ 18
Embedded SQL for link .............................................................................................................................. 20
1
Project Overview
1.1 InterSystems
InterSystems Corporation is a company that is privately owned by Phillip Ragon that
creates and sells software systems and technology. Caché is their database management tool as
well as an application development environment. Other products include Ensemble an
integration platform, DeepSee a real-time business analysis and intelligence tool, HealthShare a
healthcare informatics platform, and TrakCare which is also a healthcare informatics platform
but is only sold outside of the United States.
1.2 Hermes
Hermes is a customer relationship management tool; it is an internal application with
which the sales team at InterSystems can keep track of information about customers, companies,
opportunities, etc. The highest level of abstraction for Hermes is the company level; below
Companies there are Contacts, Activities, and Opportunities. At the company level of Hermes
users can see where the company is located and the type of company that it is, ranging from a
University to an Application Partner. At this level there are also InterSystems employees that
play different roles for that company such as the Account Manager, Project Manager, and Health
Care Architect.
An Opportunity is a chance for the sales team to sell InterSystems software to a customer.
At the opportunity level the sales team gets access to information like which members are
assigned which role, the product being sold, when the opportunity started, and when it is
expected to be completed. An important feature of the opportunity page is the plan/forecast tab;
here information is kept regarding the expected cost of various aspects of the opportunity on a
monthly basis. These aspects range from licensing to implementation and services. This allows
the sales team to better predict costs for a customer. At this level there are also contacts and
activities specific to the opportunity; that way the sales team knows exactly who to contact
within a company regarding a specific opportunity and know all actions that have happened with
it.
At the contact level the sales team gets a summary of who the contact is, where they are,
and how to contact them. Here there is also access information about the contact’s role in the
company and the department the contact works in. As a more personal touch Hermes can also
keep track of auxiliary information about a contact, like the names of their family members,
nicknames, and hobbies. Also at the Contact level are Activities. An Activity is any interaction
with the company that a sales team member documents; these can range from a simple phone call
or a meeting all the way to demonstration or sale. Activities allow the sales team to stay up to

2
date on the state that an opportunity or company is in; also these activities serve as a type of log
of events, making it easy for new members to get up to speed.
1.3 Blue Sheet
My work is centered on the revamping of the opportunity page within Hermes; certain
aspects will be carried over but most of the UI and back end will be changed. Within Hermes the
opportunity page is supposed to facilitate a defined sale process with predetermined phases
which can streamline the entire sale process. As it is now the opportunity page is data entry
centric which makes it easy to enter data and view it but does not aid the user in the pursuit of an
opportunity. The new design is based on the Miller Heiman Blue Sheet which is process centric;
this allows the user a clearer view of where the opportunity is in terms of completeness and gives
them summary information that will aid the sales team. One of the major additions is the
summary tab; here the user can view/edit information with new features. For example there is a
new red flags, unknown, and strengths pane; here the user can quickly see what is working
against them in a sale, what information still needs to be acquired, and what’s working to our
advantage. Activities can be associated with each of these types, once connected they show in
this pane so the user can see what actions are being taken; one action could be to clarify an
unknown for example. There is also a stakeholder pane; unlike in the original opportunity page
rather than simply listing someone as a contact for a certain opportunity the stakeholder pane
also shows the person’s degree of influence within their organization, their attitude toward
InterSystems, and the suggested response to that person which can be to motivate, persuade, or
ignore them.

3
Figure 1. Design Specification Summary tab
Another new feature is the solution tab; here the user can specify what is a part of the
solution for the opportunity. This can include products and services of InterSystems and third-
party organizations. For the InterSystems products and services the user can specify whether the
item is definitely a part of the solution, maybe a part, or definitely not a part. In the cases where a
customer wants a new feature added as part of the solution each new feature is listed in the
Development pane along with who is developing the feature and the estimated man-hours to
complete. Third-party items are broken into 3 categories (Software, Infrastructure, and Services)
listing what the software is and which company is providing it all in one pane. By setting the
page up this way the user can at a glance assess the InterSystems technology, the third-party
technology, and the technology being developed.

4
Figure 2. Design specification solution tab

5
Procedure
2.1 Tools
In order to complete the work in this project I used several different technologies, most of which
are proprietary to InterSystems.
2.1.1 Change Control Record
Change control record (CCR) is an internal application that is used to manage various
environments that code is written and deployed to. Within CCR there are 4 environments: Base,
Test, UAT, and LIVE; for this project I will be using all of these except for TEST. Development
is done in the Base environment; once the code is determined to be functional it is then passed to
the peer review stage where it is reviewed by another person (usually someone more senior). If
the code passes peer review it is then deployed into User Authorized Testing (UAT) where it can
be tested by a select group of people that actually use the system regularly to make sure the
change does what is needed. Also UAT is a chance for a sample of the user base to tell us
whether or not the change makes their job easier or not. From there the change is then peer
reviewed again and upon passing is sent to LIVE. The LIVE environment is where all users of
the system interact with the software and at that point the change is available to everyone. This is
a simplified version of the CCR process highlighting the main path through the system. The full
process with all the paths can be seen in Figure 4.

6
Figure 3. Change control record entire state diagram

7
2.1.3 ZEN
Zen is a proprietary programming language of InterSystems that is XML based. Within
Zen other languages can be embedded such as SQL, HTML, and JavaScript. When compiled in
Studio (an IDE) two things happen, on one side the code dynamically creates routines which
essentially are a series of HTML statements, on the other side a JS file is generated. In terms of
webservers Nginx, Apache, and IIS are all supported. All requests that come from a page ending
in .cls are sent to a CSP gateway which passes the request to a Caché super server via TCP to
then return the routine that was created at compile time. Within the routine is the html script tag
that references the JS file which sends a request to the server for that file. Hyper event requests
are send to a CSP broker as an encrypted HTML form, the server returns executable JS code,
data, or a combination of the two.
2.1.4 Prodlog
Prodlog is another in-house application at InterSystems which is used in conjunction with
CCR. Prodlog the application allows the user to write up a request for a change which is itself
called a prodlog. These prodlogs are then assigned to various developers and allow
communication about the issue if necessary. Once development has begun the prodlog is
connected to a CCR; upon completion the prodlog is then reassigned to the person that reported
the issue for them to verify that it has been resolved. If the change isn’t deemed to be fixed
properly the prodlog can be reassigned to a developer again and repeat the process.
2.2 Design / Development Process
The development process goes through several different phases leading up to the
development and beyond. First since there is a lot of work to be done on the project; rather than
just working on pieces in whatever order I see fit the order needs to be determined. Once the
order of the work to be done is determined, the skeleton has to be written to layout the basic UI.
Next is adding functionality, once I verify that everything looks the way it should, adding all the
missing backend code makes the UI functional. At this point most of the development will be
complete allowing for testing and minor changes to occur.
2.2.1 Phase 0: Prioritization
Looking at the complete spec with my advisor here at WPI and my mentor at
InterSystems it’s agreed that completion of the entire project in 7 weeks was a lofty goal. Rather
than trying to get everything done and falling short I worked on the core design and functionality.
This is comprised of several of the tabs including Summary, Solution, Team, Financials,
Activities, Notes, and Documents. To this end I have had a meeting with the Hermes team to
assess the importance and order of work for each of these tabs. As a result the Summary,
Financial, and Activities tabs were assigned a priority of 1 and all others were marked secondary.

8
2.2.2 Phase 1: Skeleton/Functionality
Before I get into any of the design it is important to mention one important consideration
that was made. Since the BlueSheet page will take time to be implemented it is important that the
current architecture of opportunities be preserved. To this end the data model for BlueSheet
objects include an opportunity object and various other new properties, also the opportunity
object will have a link to an optional BlueSheet in it. This allows all BlueSheets that are created
to be viewed as opportunities and vice versa essentially making BlueSheet backward compatible.
Of all the priority 1 items the summary tab has the most in it UI-wise, that in mind I decided to
tackle that one first. Figure 5 is the new summary tab which is based on the previously shown
specification diagram.
The code for the original opportunity page was written for the most part in one file that
was comprised of several pieces of code in the various languages used in Caché. Although
broken into sections within the file, the over three thousand lines of code could be hard to
navigate. This made it possible to change one things having unintended effects on other parts of
the page. To reduce confusion, I made almost the entire summary tab out of components.
Components in Zen are basically plug and play portions of code that can be put into pages to
provide some function. Components are not web pages on their own so they need to be put into a
page to be used. Within the BlueSheet page I have created a two layer component design. First
each of the tabs is a component, and then within each tab component there are more components
to allow each part of the tab to have its functionality fully encapsulated with that section. By
doing this the code for BlueSheet at the highest level is a total of 171 lines of code. On the
summary tab there are 6 separate components; this allowed the development of the Competitor
Figure 4. Implemented summary tab

9
component for example to have little to no effect on the development of the stakeholder
component. One portion of the summary tab isn’t actually in a component, which can be seen
here:
General Section
Figure 5. General section design
This section isn’t in a component because the functionality behind it is simple enough
that I don’t feel it needs to be separated out like the rest of the tab. This section is simple enough,
the Topic is the name of the current BlueSheet and the Account is the company that the
BlueSheet belongs to. These two fields as well as the First Billing field are all predetermined
when the page loads so the user won’t be changing them; this is why they are simply labels
unlike the description field which can be changed by the user at any time. Since the description
can be lengthy it makes sense to have that as a text area. The Process field and Tags fields are
also changeable by the user but rather than allowing the user to enter any value they can in the
case of Process choose between 2 options. Basic and Tendered are the only two processes that
we currently use in a BlueSheet but in the case of Tags there are several multi-selectable options.
Rather than using a drop down like the Process the Tags label is actually a drop down that allows
the user to select one or more options which is then displayed as a comma separated list as seen
above. When the page is loaded the Topic and Account values are taken from the BlueSheet
object which stores them within the Opportunity object which I mentioned before exists for
compatibility purposes. The Process is stored and retrieved in the same way but rather than
saving the whole string it is just saved as 1 or 2 for Basic and Tendered respectively which is
then used to get the proper value via an SQL query. Tags is the most interesting of these fields
because it is saved and retrieved in two ways; here is the display list and the logical list. The
display list is what can be seen in the disabled text field and the logical list is the list of values
that correspond to the display list. These two are needed because without the both of them the
text field wouldn’t work properly. The dropdown that is shown by clicking the Tags button takes

10
the logical values and checks the corresponding check boxes. The First Billing field is going to
be calculated based on data in another tab; currently there is no functionality there so more on
that in the future development section. Let’s take a look at the design of each component of the
summary tab now; as with the previous section I’ll go over the design of the UI followed by the
any details of the functionality.
Competitor Component
Figure 6. Competitor component table
The Competitor component is broken into two parts the table seen above and a Modal. A
Modal can look like a popup but is actually a part of the page that is hidden until it’s needed and
when it is shown it sits on top of the rest of the page. Here in the table on the left side is the
Name column which has two pieces of information in it; the first part is the name of the
competing company and the second in parentheses is the product that the competing company
has to offer. The right column is the threat level of the company with that particular product.
You’ll notice the bottom row of data doesn’t follow the zebra pattern of the first two columns
and that is because that particular competitor has been marked eliminated, this manifests in the
table as the row being dark grey with the text being light grey. I decided to design it this way
while thinking of use cases; if a company does get eliminated the user might still want to know
they were competitors at one point. One option was to create a separate table entirely for the
eliminated options but that would only serve to slow down the page and create an unnecessary
separation of the data. By simply having a flag within the table of competitors this conditional
effect is possible. To create a new competitor the user clicks the plus button in the top left which
shows a modal to be filled out. In order to edit these values the user double clicks on the row that
they wish to edit and the modal shows. This is what the modal looks like when the user tries to
edit the Microsoft column for example:

11
Figure 7. Competitor component modal
In the competitor modal you can see all the fields are prefilled to match what was in the
row as well as the note field which wasn’t visible from the table. That’s because when the user
double clicked on the row in the table the ID of the row corresponded to the id of the competitor
object with that information and it was used to populate all the fields. The Competitor dropdown
is retrieved via SQL from a table that has all the competitors, unlike the Process dropdown
discussed earlier the Competitor dropdown is auto completing and auto generating. This means
that as the user types in a competitor’s name if it is like anything in the list it will find those
items. This is achieved by linking the entered text to the SQL query which is dynamically
changing to look for the competitors with names like whatever has been entered. This feature
will become more important as time goes on because as the list of competitors increases the user
would have to scroll to find the entry that they are looking for. By doing it this way even if the
list is two thousand items long just typing the beginning of the competitors name can cut the list
down. The dropdown is also auto generating in the sense that if the entered competitor isn’t in
the list the user is given the option to add it to the table. This removes the need for the user to go
somewhere else to create the competitor then come back and add them to the BlueSheet thus
saving the user time. At the top of the modal there is a check box for eliminated which when
checked sets the eliminated flag in the object to 1 which then fulfills the condition of the
competitor table making the row and text change color. The Threat field is saved as 1, 2, or 3 in
the database corresponding to Low, Medium, and High respectively; when the modal is shown
the display value is selected from the threat table via SQL. Lastly there is the Note field which is
just saved and retrieved as a string.
To make all this possible there are two classes: the competitor class which just has 2
fields in it Id and Name and the BlueCompetitor class which has the following fields: Competitor,
Threat, Note, Blue (the ID of the BlueSheet it is associated with), and IsEliminated. This
separation is needed to allow Competitor names to be associated with different BlueSheet objects

12
at the same time. By having this separation the Microsoft(IE) competitor is associated with the
BlueSheet object with its ID set to1 in this case and has the various other values of the
BlueCompetitor class associated with it. This is only seen in the BlueSheet with the
corresponding ID, that way it is possible for the same competitor to be in the BlueSheet with its
ID set to 2 for example. Here the competitor can have completely different values for its
BlueCompetitor class and have no effect on the BlueCompetitor object in any other BlueSheet.
Recent Component
The Recent component has several parts to it, first there is the text field that allows the
user to enter a string to be associated with the Note or Activty they wish to create, then there are
the two buttons which ill explain later, and lastly there is the table itself. The table unlike most of
the Hermes application has one column filled with data from several columns. Ther point of the
table is to show the 25 most recently edited/created notes and activities associated with the
current BlueSheet object. For this to happen I wrote the following query:
select ID,$EXTRACT(ModifiedDateTime,0,10) as Mod,ModifiedUser->
ShortName as Name,text as Text,
'Note' as Type from crm.OpportunityNotes as n where n.Opportunity = ? union
select ID,$EXTRACT(ModifiedDateTime,0,10) as Mod,ModifiedUser->ShortName as Name,
Activity-> Reference as Text, 'Activity' as Type from crm.ActivityCompany as a where
a.Opportunity = ? order by Mod DESC
Code Snippet 1. Query for Recent table
Here I union two queries for essentially the same information but in the first part of the union it’s
the note table and in the second it’s from the Activity table. I get the ID of the object followed by
the date portion of the last modified date time, the name of the user who made the last
modification, the text of the note, and the hard coded string ‘Note’, in the case of the activity
Figure 8. Recent component design
13
table I get the same information but rather than getting the note in the activity I get the title since
that is a better descriptor for an activity and instead of getting the hardcoded string ‘Note’ I get
‘Activity’ which will be used later. There are 2 ‘?’ in the query and these are placeholders which
are replaced by values I set to be calculated at run time, in this case they are both set to the same
value which is the ID of the opportunity object in the BlueSheet object. In order to make the
table appear as it does above rather than showing each of the previous columns I use a feature of
Caché which allows me to set an OnDrawCell function, what this does is when the table is being
rendered when it draws the specified cell a function can be run. This function has access to all
the data that would be in the current row much like a cursor in SQL. All the columns of the table
are hidden except for the text column which has the OnDrawCell function associated with it. In
the function I have it parse the values from that row as follows:
%query("Mod")_" ["_%query("Name")_"]: "_$Extract(%query("Text"),0,20)_"..."
Code Snippet 2. Récent table parse code
This replaces each value like %query(“Mod”) with the corresponding value for that row, at the
end you’ll note that there is a macro $Extract which takes a string and extracts the the specified
range of characters. I did this because it is entirely possible and likely that the text in a note for
example will be long, in which case if the entire string was put into the table the table could
make the page extremely wide. Within the same OnDrawCell function is embedded html, this is
where I draw the row and set things like its color, the text to be displayed, and the ondblclick
function. One issue I ran into at this point was how to handle what happens when the user double
clicks on a row. Since there are two potential types of data in the table double clicking a note
should bring up something different than double clicking an activity. At the end of the above
query I hardcoded a type of ‘Note’ or ‘Activity’ depending on which table was queried, that
value is used to set the proper handler for double click in the OnDrawCell function. If the value
of the variable “click” is ‘note’ then it is set to this string:
zenPage.getComponent('"_..index_"').viewNote("_%query("ID")_")"
Code Snippet 3. On click handler for notes
Once set the variable click is placed in the embedded html as ondblclick="#(click)#" which sets
the value at run time. In the string zenPage.getComponent(104).viewNote(12) would mean to go
to the page then get the component that has been assigned the ID 104 and run the function
viewNote that should be defined in it and pass in the ID 12. On the client all this means for the
user is to double click the row and a modal which I will discuss in the next component shows up
with the full text of the note ready to be edited. In the case of the type being activity the variable
“click” is set to this string:
"zenPage.getComponent('"_..index_"').viewAct("_aid_")"
Code Snippet 4. On click handler for activities

14
Unlike the note, the id of the activity is not the same as the id of the row because the activity the
user wants to edit is part of a larger class ActivityCompany which is what really saved when an
activity is made on the BlueSheet page. So before the string is set the id is found within the
Activity Company object and that is used to set the value passed into the ondblclick handler for
the rows that are activities. The ‘Add as Note’ button does exactly what it suggests it does, it
takes the string entered by the user and creates a Note object and puts the entered string into the
text field of the newly created object. The ‘Add as Activity(Popup)’ button is a bit more complex
as the activity class itself is more complex than the Note class. When pressed the ‘Add as
Activity(Popup)’ button brings up a modal which will be explained in the next component. It is
important to note that the buttons will not do anything unless there is text in the text field next to
the buttons, this is handled by javascript on the client so that an unecesary trip to the server tot
create the object only to find that there is no text is avoided.
Flag Component
Figure 9. Flag component design
The flags component was the most complex of all the components that I had to make for
this project. It is a table that dynamically creates tables with itself, the first “row” is the text
‘Epic Offering Strong’, the ‘+’ and the two row table below that. The text ‘Epic Offering Strong’
is the title of the Flag, and the two rows below that are the Notes/Activities that have are
associated with that Flag. By clicking the green ‘+’ in the top left of the above image the user can
create a new Flag, this brings up a modal that allows the user to enter information seen here:

15
Figure 10. Flag component modal
Here the user can enter a title for the Flag as well as select a type for it as mentioned in
the design specifications to be Red Flag, Unknown, or Strength. Once the user clicks ‘OK’ the
new flag object is created and immediately shown in the table with a ‘+’ next to it to allow the
creation of notes and activities to be associated with it. Like the Recent Table component all the
data in the Flags table is created by my custom embedded html. First off let’s take a look at the
query I created:
select ID, Blue,Title, Type,
(select Count(*) from crm_BlueSheet.FlagAddOns where IsDeleted = 0 and Type = 'Note' and
Flag = f.ID) as Notes,
(select Count(*) from crm_BlueSheet.FlagAddOns where IsDeleted = 0 and Type =
'Activities' and Flag = f.ID) as Activities
from crm_BlueSheet.BlueFlags f where IsDeleted = 0 and Blue = ? group by f.ID
Code Snippet 5. Updated query for Recent table
In my query I get the ID, Blue (the ID of the BlueSheet object), the number of Notes associated
with the current Flag object, and the number of Activities associated with the current Flag object.
Just as the in the previous query the ‘?’ is replaced with a value at run time and in this case it’s
the ID of the BlueSheet object, the note and activity counts are used in the OnDrawCell function
for this table. In the OnDrawCell the first thing run is this embedded html:
&html<<div align="left">#(%query("Title"))#<button type="button" onclick="zenPage.getCom
ponent('#(..index)#').addToFlag();zenPage.getComponent('#(..index)#').SetFlag(#(%query("ID"))
#)">+</button></div>>
Code Snippet 6. Embedded html for Flag table
Here the %query(“Title”) gets the title value for the current row in the Flag table and puts it in
the top left of the row followed by a button that runs two functions when clicked.
zenPage.getComponent(203).SetFlag(2) takes a value in this case 2 and sets a variable that is
available to all functions in the component like a global to that value which is the ID of the Flag
object that the button is next to, this is needed in the other function addToFlag() which brings up

16
a modal that has 2 sides to it, a note side and an activity side. Let’s take a look at the note side
first seen here:
Figure 11. Compound note modal
This is the modal that is brought up when the user clicks the ‘+’ next to any Flag in the
Flag table, here we can see a radio button with two options and the note option is defaulted to be
selected. Here the user can enter whatever text they want to be in the new note associated with
the Flag and when they click save that note is added to a list of notes, more on in a bit. The other
option is the user wants to create an activity rather than a note, in order to do this they can click
the activity ratio button and the contents of the modal switch to show the required fields of an
activity seen here:
Figure 12. Compound activity modal
Here the user can enter the bare minimum needed to create an activity. There are several
fields in an activity and most of them are excluded from this modal. The reasoning behind it is

17
the fact that this is all part of the summary tab. The point of this tab isn’t to bring tons of
functionality to the user but to give them the information they need in brevity to quickly get an
understanding of the current state the opportunity is in and what needs to be done next. So rather
than letting the user get into the details of activity on this page, that is taken care of on the
Activity tab which I’ll go over later. Within the Activity side of the modal there is the title of the
activity, the type, the primary user which is set to the user that creates it, the Due date which has
a calendar modal to select a date and a time field to select a time down to 5 minute intervals, and
lastly a note field for any notes to be part of the activity. In the Recent Table component I
mentioned that the ‘Add as Activity(Popup)’ made a modal and it’s exactly the same as the
activity side of the modal I’m going over now. I also mentioned that there is a bit of complexity
with the ActivityCompany class, rather than just using the Activity class I chose to associate the
BlueSheet and Flag classes with the ActivityCompany class. This method extends the Activity
class and adds some useful fields the most important being an Opportunity field. When an
Activity is made in the Recent Table component this Opportunity field is set to the ID of the
Opportunity object in the BlueSheet class. This doesn’t work for the Flag class since it doesn’t
have an Opportunity object to associate the ActivityCompany class with, the same goes for notes;
since there is no Opportunity object for the note to associate with I needed another method of
connecting Notes and Activities with Flags. The solution that I came up with was to have two
properties of the Flag object be lists, one list of Note objects and another list of
ActivityCompany objects. This way the Note and ActivityCompany object would be connected
to the BlueSheet via the Opportunity object within it and the Flag object via these lists. This
double connection is just fine since the Flag object is “under the umbrella” of BlueSheet object
so the Note and Activity objects created for any Flag should still be associated with the
overarching BlueSheet. Once the lists were established I used SQL to get the list of Notes for
example and it was returned in the form of IDs (the IDs of each Note object in the list), I then
passed that list into the following SQL cursor:
DECLARE FlagCursor CURSOR FOR
SELECT ID,$EXTRACT(ModifiedDateTime,0,10) as Mod,ModifiedUser-
>Name as Name,text as Text, 'Note' as Type
INTO :id,:date,:name,:text,:type FROM crm.Notes
WHERE IsDeleted = 0 and ID %INLIST :listIDs
Code Snippet 7. Original cursor for Flag sub table
I used the cursor to get the needed information about each Note in the list of the Flag object and
used the same embedded html as the Recent Table component to create the sub table. The code
for the embedded html was only run if the list of Notes in this case wasn’t empty so that empty
tables wouldn’t be rendered. The only difference in the embedded html is right after the check on
the list of notes this line is run to create the table:

18
&html<<Table border="1" bordercolor="black" align="right" width="85%">>
Code Snippet 8. Embedded html for creating sub table
This ensures that the table is the same size regardless of the length of the strings put into it; to
keep the table from overflowing into other parts of the page, once the cursor is done the table is
closed with more embedded html. This worked fine in my local version of the code but once I
pushed it into the BASE environment the way the list IDs were being stored changed resulting in
errors when trying to run the above cursor making this solution no longer valid. In the end I
came up with another solution which is a separate table called FlagAddOns that has the ID of the
Flag object, the ID of the Note or Activity, and the type of object reference (either ‘Note’ or
‘Activity’). By doing it this way I eliminate the issue of the lists being stored in different ways
depending on the environment. The downside of this method is the use of an additional table;
this has no effect right now since the table is small making the query run fast enough but as the
new table gets bigger it can affect the performance of the cursor which now looks like this:
DECLARE FlagCursor CURSOR FOR
SELECT ID,$EXTRACT(ModifiedDateTime,0,10) as Mod,ModifiedUser->Name as Name,
text as Text,'Note' as Type INTO :id, :date, :name, :text, :type FROM crm.Notes WHERE IsDel
eted = 0 and ID IN (select Item from crm_BlueSheet.FlagAddOns where IsDeleted = 0 and
Type = 'Note' and Flag = :id) UNION
select ID,$EXTRACT(ModifiedDateTime,0,10) as Mod,ModifiedUser->ShortName as Name,
Activity-Reference as Text, 'Activity' as Type from crm.ActivityCompany WHERE IsDeleted =
0 and ID IN (select Item from crm_BlueSheet.FlagAddOns where IsDeleted = 0 and Type =
'Activity' and Flag = :id) order by Mod DESC)
Code Snippet 9. Updated cursor for flag sub table
As the cursor goes through the results the ID of each note is added to a list that is part of the
Flags component’s NoteList and ActList respectively, these lists are used when a Note or
Activity is saved. When saving a new Note object for example the ID is passed into a function
after the object is saved and if that ID isn’t in the NoteList then a new entry is made in the
FlagAddOns table and it is filled in accordingly and the Flag table is redrawn adding that ID to
NoteList. When saving a Note object that already exists the ID of the Note is again passed to a
function that checks to see if the ID is in the NoteList and since it is in the list no entry is created
in the FlagAddOns table and the table is redrawn. These lists provide two functions not only do I
save a trip to the server to check if I need to create new entries in the FlagAddOn table but also it
prevents blindly creating duplicates. The ‘Show History’ checkbox is supposed to show Flags
that have been marked completed; flags can be marked completed once all the activities in them
are done and deemed nonessential to be shown in the Flags table. Currently there is no
functionality behind this checkbox but I’ll go into more detail on it in the future development
section. The next component I’ll go over is the Win Themes component seen here:

19
Win Theme Component
Figure 13. Win theme component design
This component is a bit on the simpler side especially when compared to the Flags component
but I made it into its own component because it has a modal and does a bit of parsing. As is the
case with the rest of the BlueSheet page, the green plus brings up a modal which will be
explained momentarily, I chose to use a text area to display the themes because showing five text
fields that may or may not be filled didn’t look as nice knowing that they may never be all filled
in. When the user clicks the button this is the modal that is shown:
Figure 14. Win theme modal design
As you can see there is space for 5 strings, the text area on the page is read only so to add to the
list you have to come into this modal, this decision was made because it allows me two things.
One, I can enforce the 5 item rule since there is no space for any additional themes to be added,
and two the user can enter any string since the list isn’t comma delimited for example the user
can use commas without potentially making a sixth entry. For the modal to work the strings are
saved into a list within the BlueSheet object and when the modal is brought up each of the 5
items is mapped to a corresponding line; when saved the list in the BlueSheet object is cleared
and the 5 items are inserted and the text area is redrawn. The text area takes the list from the
BlueSheet object and passes it into a for loop that writes out a number starting at 1 followed by a
period and the string in the current position of the list, if the current list position is empty the

20
number that shows to the left of each string isn’t incremented. The last component on the
summary tab is the Stakeholder component seen here:
Stakeholder Component
Figure 15. Stakeholder table
This component also has two parts, one on the summary tab and the other in a separate modal
that shows when the green plus is clicked by the user. Here you can see there is a table that has
Name, Position and 4 other columns that I’ll explain in the modal. The Name column has an
OnDrawCell function associated with it which does the following:
&SQL(select DisplayName into :name from crm.Contact where ID = :id)
&html<<a href="ZenApp.View.Contact.cls?ID=#(id)#" target="_blank">#(name)#</td>>
Code Snippet 10. Embedded SQL for link
The first line is embedded SQL which takes the ID of the contact in the query for the whole table
and gets the display name for that contact. This display name is used to replace #(name)# at run
time and the id is used to replace #(id)# so that the column goes from being just the ID of the
contact to being a link to the contact page for that person. The more complex part of this
component is the modal which can be seen here:

21
Figure 16. Stakeholder modal design
This modal can also be accessed by clicking on any row of the Stakeholder table on the main
page; in this case the user would have clicked the row for Captain America. One important
aspect of the Stakeholder modal was the fact that the person could be from any company, to
allow this the company text field isn’t just a text field but has dynamic SQL on the backend. As
the user types a company name a list of companies show up that are like the entered text
allowing the user to select any company in the database. Once the company is selected the
contact dropdown is updated to only show contacts that belong to the selected company. If the
user selects a company and a contact then changes the company the contact field resets to blank;
this removes the potential for a user to select a contact that doesn’t belong to the selected
company introducing bad data into our database. Unlike the previous two fields the Position field
is just a text field which allows the user to enter any string they want to represent the position of
the Stakeholder being created. The next four sets of radio buttons correspond to the four columns
in the Stakeholder table on the summary tab and the single letter used for the values are the first
letter of each option in each radio set, so looking at the table Captain America has the role of the
decision maker. It’s important to note that these 4 radio button sets could have been either hard
coded or put into a database and accessed via SQL but I opted to hardcode them since the Miller
Heiman Blue Sheet model only has these 4 categories and options in it; they won’t be changing

22
as long as we choose to follow this model. The value behind each of the options in the radio
button set is also just the first letter which makes it easy to render in the table on the summary
tab since that’s how it’s stored and drawn rather than having to map the value to anything. The
same can be said when the modal is brought up to edit an existing Stakeholder. Lastly there is the
note field of the modal which is just stored as a string in the Stakeholder object, I could have
made the Note field be a Note object like in the ActivityCompany object but I found just using a
string was simple enough to do the job since this note would only need to exist within the
Stakeholder object anyway. The Stakeholder object has a contact object within it rather than just
the name of the person; I chose to do it this way for 3 reasons. One, this way the contact could be
viewed via the contact page to gain more information about the person rather than just the name,
two the contact could be updated and have that change be visible via the Stakeholder table on the
summary page, and three this way a contact can be a Stakeholder in more than one Blue Sheet at
a time. By having Stakeholders not be directly connected to the contact object Captain America
for example can be a decision maker in the BlueSheet 1 and a Coach in the BlueSheet 2. In both
cases changes to the contact itself will be seen in both BlueSheets. These are all the components
that I created on the summary tab, beyond that I also worked to port some of the existing
functionality from the Opportunity page to the new Blue Sheet page. First let’s look at the new
Financials tab which can be seen here:
Financials Tab
Figure 17. Financial tab implementation
The design specification for the Financials tab was a bit different in the placement and grouping
of the smaller parts of the page. The two sub tabs on the bottom of the page were placed as they

23
are so that the contents of the tab weren’t as wide; the original design once implemented resulted
in the user having to scroll horizontally to see everything and by placing it at the bottom in a sub
tab design that issue is resolved. Like everything else on the summary tab this entire tab is
collected into one component allowing development and bug fixes with little to no effect on the
other tabs and components. The next tab I ported was the Activities tab seen here:
Activities Tab
Although this table wasn’t in a component before I repackaged it to be in component
meaning any page can have the table on it by simply including the right package and name for it
cutting down the amount of code directly on the page. This table is connected to the Recent
Table component on the summary tab and to the Flag component. Once an Activity is created via
either of them it will show up in this table where it can be edited / deleted, the user can also
create a new activity via this table as well. As I mentioned before there are several other fields
associated with the Activity object and this is where the user should go to access them rather
than the summary tab which should be used to give the user a snapshot of the Blue Sheet and its
current state. When the user clicks either edit or new here they are taken to the activity page
where they have access to all the other features and fields of activities, in the case of delete the
row is just removed leaving the user within the Blue Sheet page.
Projects Tab
Next I ported the Projects tab, I again repackaged the code for this table as well to make
it easier to add to pages, unlike the Activities tab there isn’t a place for projects on the summary
tab. Projects are a bit more involved than activities or notes are so they were excluded from the
summary tab in the design specification. That being said in order to do anything related to
projects the user has to come here to create/edit/delete projects.
Figure 18. Ported activity tab
Figure 19. Ported projects tab

24
Notes Tab
Next I ported the Notes tab, this tab once repackaged is very similar to the activity tab
with one difference: when the user clicks edit or new here a modal that is the same as the note
modal on the summary tab is shown. If the user clicks new the modal shows empty allowing
entry of any text, if the user clicks edit then the selected note is shown ready to be changed. On
save in both cases the table is redrawn to stay updated with current data. The reasoning behind
not having a separate page for notes although they are objects in their own right is the fact that
they are very simple objects with only one field the user can directly change which is the string
stored within it. So rather than create an entire new page to show the one string all that is
required is a simple modal with a text area inside. The next thing I ported was the Document tab
which can be seen here:
Documents Tab
Unlike the other tabs the document tab was already in a component which made it very easy to
port, all I had to do was make the tab and include the right package and it was there. Here the
user can add documents to be associated with the BlueSheet object’s Opportunity object. Again
by doing the association in this way the Opportunity object can be viewed and stil have all the
documents associated with it. When the user clicks the plus sign on either side of the tab they are
brought to the popup seen here:
Figure 20. Ported notes tab
Figure 21. Ported documents tab

25
I say popup here rather than modal because unlike all the modals so far this pane is actually a
separate page entirely complete with a URL. On the top row the user can select a document type
or specify their own to be displayed on the document tab. The user then can choose to either
select a file from their computer to upload or specify a URL for a file and give it a name. There
is one issue that is unresolved at the moment with the document tab but more on that in the
future development section.
2.2.3 Phase 2: Quality Testing
The next step is testing this development. Since all this code is currently in the shared
BASE environment of the Change Control Record (CCR) it is available to several developers
including my mentor. I created a comprehensive testing plan that I will pass along to my mentor
to go through after I do all the tests myself. I’ll go over some of the testing points for each
component and the reasoning behind them in the same order as the component descriptions. For
the general section that isn’t a component the tests are simple enough.
General Section Testing
First the Title, Account, Tags, and Purchase Process need to show properly from the
associated Opportunity. These fields need to also auto update when the page is rendered to show
any changes made on the Opportunity page. The other side of this is that the changes that I make
to the Tags and Purchase Process fields also need to be seen on the Opportunity page. This is
important because the BlueSheet page and the Opportunity pages should show the same
information otherwise the user won’t know which one is correct. The description field is directly
connected to the BlueSheet object but still needs to be tested so it should keep whatever value I
store in it when the BlueSheet object is saved. It is important to note that for these test I’ll add a
button that when clicked saves the BlueSheet object which updates the corresponding fields of
the Opportunity object. This is the only section that actually needs this button since everything
else either adds entries to a table or is saved automatically. Since the First Billing field is hard
coded there is nothing to do for that field.
Figure 22. Ported add documents popup

26
Competitor Component Testing
The first thing to be tested here is that adding a new competitor to the table still shows
when the page is reloaded to ensure that the additions are persisted on the server. Next the auto
complete auto generate field behind the Competitor(Product) field in the modal needs to be
tested. To do this the simple part is typing a part of a Competitor that is in the database and
seeing that the proper selection is highlighted for the auto complete part. Then a new competitor
string needs to be entered to see if the confirm popup shows to ask the user to create a new
competitor. This selection should persist in the list of competitor options when I go back to
create a new competitor not only in this BlueSheet object but also in another test BlueSheet
object so when I create ‘Microsoft(IE)’ in BlueSheet A the same option should show in
BlueSheet B. Next when selecting a threat the option selected should correctly show as 1,2, or 3
in the database for the corresponding Threat object and the value set for the note field should
persist for that Competitor object. Lastly any changes made to the competitor in the edit modal
should instantly show in the table when the modal is closed including if a competitor is marked
eliminated they should be moved to the bottom of the table and colored accordingly.
Recent Component Testing
This component is connected to 3 other places so testing here is spread out to a degree.
First up is making sure that when either the ‘Add Note’ or ‘Add Activity (popup)’ button is
pressed and there is no string entered that nothing happens to avoid creating empty notes and
activities. Next the ‘Add Note’ button should take the entered string as is and create a Note
object; this new object should instantly show in the table within the component but also on the
Note tab of the BlueSheet page as well as the Note tab of the Opportunity page. This is where the
backwards compatibility comes into play, by having the note show in all these places the user
can go to the BlueSheet or the Opportunity page and get current information. The note should
also be clickable in the table for editing, this means that when double clicked the edit note modal
should show with the entire text of that Note object and when changed the row should not only
be updated to show the new string but also moved to the top of the table since it is now the most
recently changed item. These changes should be seen on the Note tab of both the BlueSheet page
and the Opportunity page. The same testing is going to be done for the ‘Add as Activity(popup)’
button with some extras, one the button should bring up the modal and have the text that was
entered be in the text field in the Note field of the modal. Two, the Primary User field should
properly default to the name of the current user. Three the activity should instantly be shown in
the table as the newest activity just like the note should but it should also show in the Activity
tab of both the BlueSheet page and the Opportunity page to keep the backwards compatibility.
The Activity modal has substantially more in it than the notes modal so the smaller details also
need to be tested for persistence like the date, hour, minute, and AM/PM.
Flags Component Testing
Here the first thing that needs to be tested is the addition of multiple Flag objects.
Multiple need to be added for two reasons, one to make sure new object are being created and

27
not just overwriting one object and two to make sure that the added Flag objects are staying
within the current BlueSheet object. Next is editing a Flag, by double clicking a flag the edit
modal should show allowing the name and type of the flag to be changed, this change should be
instantly visible in the table and persistent on refresh of the page. Then there’s testing the add
Note/Activity for Flag objects, multiple Notes/Activities need to be created here as well.
Multiple are needed so I can make sure the addition of Note/Activity objects are done to the right
Flag object. When the plus sign next to a Flag is clicked it should bring up the compound modal
that allows the creation of either a note or an Activity. When either is created it should show not
only under the Flag it’s associated with but also in the Recent Component table and the
corresponding tab of both the BlueSheet page and the Opportunity page keeping backwards
compatibility. The added Note/Activity should create the sub table under the corresponding Flag
object and be filled with data as soon as the modal to create it is closed. The subsequent object
added should continue to expand the table and have a zebra pattern. These rows, in the same way
as the Recent Component should be clickable and bring up the right type of modal and any
changes should be instantly visible in the sub table.
Win Theme Component Testing
The simplest thing to test here is that the text area is read only and the themes are drawn
properly with the numbering. The next step is making sure that the modal shows up when the
plus sign is clicked; within the modal there should be only one theme per line and all characters
should be accepted within each theme. Also it’s important to make sure that the text area auto
updates when the modal closes. Since the win themes are a property of BlueSheets the save is
done on close of the modal, this needs two BlueSheets to test it because it may not be updating
the correct BlueSheet.
Stakeholder Component Testing
First off is making sure that the data is rendered properly, one issue that can come of
having single letters in columns is that if they are too close together it tends to seem jumbled and
harder to read. Along the lines of rendering is making sure that the first column links to the
correct contact bringing up all the information about that contact. Next the plus sign needs to
show the modal empty of data, the first thing to be tested here is the auto complete of the
Company field. Along with the company field is the contact field which needs to update its query
based on the value entered in the company field. Next is making sure the four radio sets only
allow one entry per set and that all 4 are required. The position and the note are just strings so the
only real testing for them is that the data is persistent. Back in the table the rows are clickable
which means that at least two Stakeholders are needed for testing. When the user creates a new
Stakeholder the new entry should be added to the table instantly and leave the previous entries
unaffected. Also when the user edits an existing Stakeholder the changes should be instantly seen
and only on that row.

28
Other Tab Testing
Since the code in the other tabs was ported rather than written the testing at a high level is
the same. All the code was proven functional in the Opportunity page in the past so I’ll just go
over the testing plan for the document tab. On the document tab the first thing that needs to be
tested is the addition of documents to the tab. Clicking either of the plus signs should bring up a
popup to allow the user to specify a document to be added. First the document type drop down
should allow selection or accept a string into the ‘other document type’ field. Then the popup
should allow document specification via either local files or URL and show instantly in the list
on the document tab. The next thing to be tested in this tab is that the documents can be deleted
and all changes persist once the page is reloaded. The last thing to test is that these documents
only exist in the current BlueSheet and not in any other BlueSheets. Once the tab is tested the
next thing that needs to be tested is whether or not the change shows on the corresponding
Opportunity page. Since all the tabs besides the summary tab existed on the original Opportunity
page any changes made in theses tabs on the BlueSheet page should also be seen on the
Opportunity page.

29
Future Development
Although the allotted time for this project has come to an end I will still be working with
InterSystems to continue to advance the project. To this end I have already done some work
outside the scope of the project and have an idea of what will be developed next. I worked on
two tabs that were not ported or expected to be completed.
3.1 Solution Tab
Figure 23. Semi-developed solution tab
Much like the summary tab the solution tab was broken into various components so to
allow parallel development as well as portability to other places in the future. The solution tab is
supposed to be where the user can specify the pieces that make up the proposed solution for a
BlueSheet for a customer. Here the user can select TrakCare components, Core components,
pieces that are still in Development, and lastly any Third-party parts (Software, Infrastructure,
and Services). The TrakCare and Core components can be seen here:
Figure 24. TrakCare and Core components
30
Although these are two separate components they are built the same way and have the
same flaw. In both cases the lists are hardcoded radio lists, the user is supposed to click one
button on each line to say that technology is In (part of the solution), Maybe (potential use in the
solution), or Out (not part of the solution). The flaw is that these options can all be easily put into
a table and drawn into the component, by doing that it makes it easier to set which options show
in the list as well as the order that they show in which is a bit of a hassle as a hardcoded set of
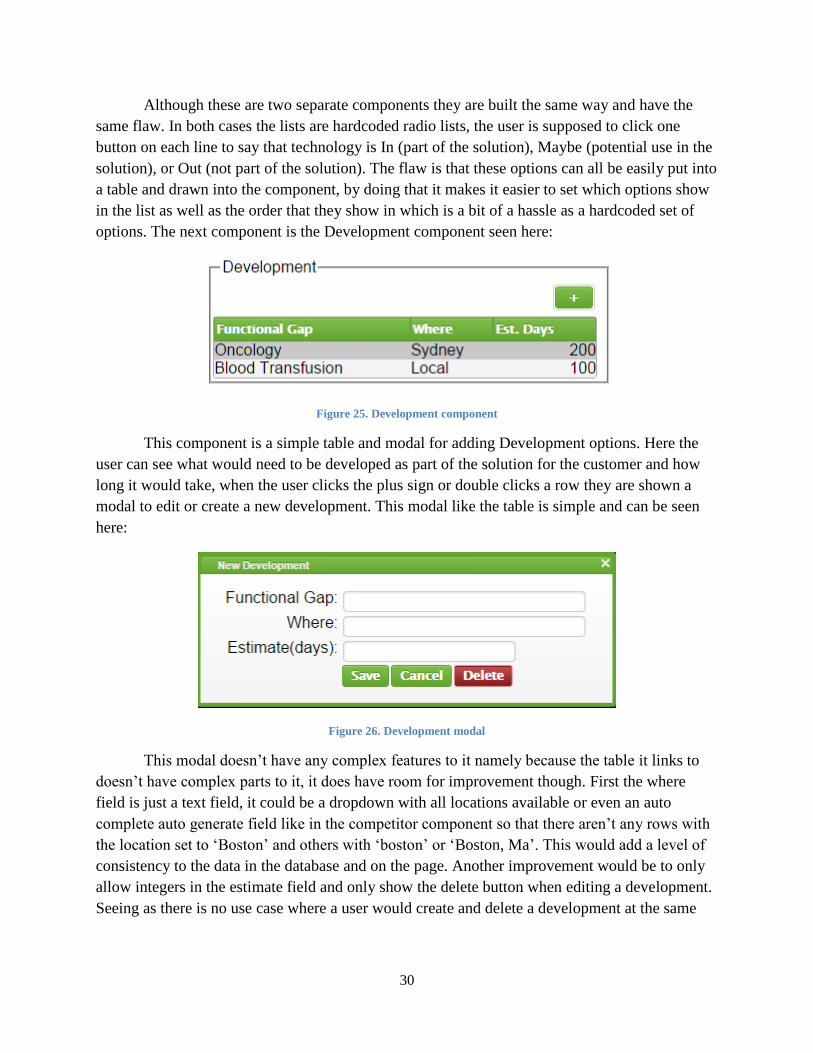
options. The next component is the Development component seen here:
Figure 25. Development component
This component is a simple table and modal for adding Development options. Here the
user can see what would need to be developed as part of the solution for the customer and how
long it would take, when the user clicks the plus sign or double clicks a row they are shown a
modal to edit or create a new development. This modal like the table is simple and can be seen
here:
Figure 26. Development modal
This modal doesn’t have any complex features to it namely because the table it links to
doesn’t have complex parts to it, it does have room for improvement though. First the where
field is just a text field, it could be a dropdown with all locations available or even an auto
complete auto generate field like in the competitor component so that there aren’t any rows with
the location set to ‘Boston’ and others with ‘boston’ or ‘Boston, Ma’. This would add a level of
consistency to the data in the database and on the page. Another improvement would be to only
allow integers in the estimate field and only show the delete button when editing a development.
Seeing as there is no use case where a user would create and delete a development at the same

31
time there is no need for the button there. The next component is the third party component seen
here:
Figure 27. Third Party component
This component has very little to it at the moment, the plus buttons currently don’t do
anything but they will add a row to the table corresponding table and let the user enter data into
two auto complete auto generate fields. By using these fields there is no need for a modal since
there are only the two fields to be filled in or edited. At the end of each table there is an
unmarked column which will have an OnDrawCell function associated with it which will draw a
button with an ‘X’ in it to allow the user to delete that column. The other tab that I worked on is
the Team tab seen here:
3.2 Team Tab
Figure 28. Semi-developed Team tab
The team tab exists on the Opportunity page but not as a separate tab. Here the user will be able
to specify the various roles that members of the Hermes team are in. The design is the same as the

32
original but there is no backend code connected to the dropdowns, this code will be the same as that of the
original as well.
3.3 Other works
There are two features that were originally part of this project but were not completed; these
features were left to be done after the project since they were deemed important but not essential to
functionality within the time frame of this project. The first is the First Billing field of the general section
seen in figure 6. This field is currently hardcoded to the string in it but should be calculated from the
financials tab. The value should be calculated via SQL to get the total to be billed and append the
currency of the BlueSheet which comes from the company of the associated Opportunity. The second
feature that is still in development is the ‘show history’ check box which can be seen in figure 10.
Currently the checkbox doesn’t do anything when clicked but should show Flags and their notes/activities
that are marked closed. To do this the checkbox when set to true will alter the where clause of the SQL
used to generate the table to show the closed Flags and the OnDrawCell will take care of showing the
notes/activities.