here’s this person you love more than anything in the...
59
. . . here’s this person you love more than anything in the world and you’re looking into her eyes and all you see is fear, absolute terror. I can’t even imagine what it’s like to not be able to breathe.
Transcript of here’s this person you love more than anything in the...

. . . here’s this person you love more than anything in the world and you’re looking
into her eyes and all you see is fear, absolute terror. I can’t even imagine what it’s like
to not be able to breathe.
CHAPTER 8 Module Review and Practice ExaminationCHAPTER 7 Managing Your Patient’s Airway

2-1.1 Name and label the major structures of the respiratorysystem on a diagram. (pp. 164–166)
2-1.2 List the signs of adequate breathing. (pp. 166–167)2-1.3 List the signs of inadequate breathing. (pp. 167–172)2-1.4 Describe the steps in performing the head-tilt, chin-lift.
(p. 172)2-1.5 Relate mechanism of injury to opening the airway.
(pp. 172–173)2-1.6 Describe the steps in performing the jaw thrust.
(pp. 172–174)2-1.7 State the importance of having a suction unit ready for
immediate use when providing emergency care.(pp. 176–178)
2-1.8 Describe the techniques of suctioning. (pp. 178–181)2-1.9 Describe how to artificially ventilate a patient with a
pocket mask. (pp. 190–191)2-1.10 Describe the steps in performing the skill of artificially
ventilating a patient with a bag-valve mask while usingthe jaw thrust. (pp. 193–194)
2-1.11 List the parts of a bag-valve mask system. (pp. 191–194)2-1.12 Describe the steps in performing the skill of artificially
ventilating a patient with a bag-valve mask for one andtwo rescuers. (pp. 191–194)
2-1.13 Describe the signs of adequate artificial ventilation usingthe bag-valve mask. (p. 197)
2-1.14 Describe the signs of inadequate artificial ventilationusing the bag-valve mask. (p. 197)
2-1.15 Describe the steps in artificially ventilating a patient witha flow restricted, oxygen-powered ventilation device.(pp. 194–195)
2-1.16 List the steps in performing the actions taken whenproviding mouth-to-mouth and mouth-to-stoma artificialventilation. (pp. 189–190)
2-1.17 Describe how to measure and insert an oropharyngeal(oral) airway. (pp. 181–183)
2-1.18 Describe how to measure and insert a nasopharyngeal(nasal) airway. (pp. 184–186)
2-1.19 Define the components of an oxygen delivery system.(pp. 200–208)
2-1.20 Identify a nonrebreather face mask and state the oxygenflow requirements needed for its use. (pp. 208–210)
2-1.21 Describe the indications for using a nasal cannula versusa nonrebreather face mask. (pp. 210–213)
2-1.22 Identify a nasal cannula and state the flow requirementsneeded for its use. (pp. 210–213)
Numbered objectives are from the U.S. Department of Transportation 1994 EMT-Basic National Standard Curriculum.
COGNITIVE OBJECTIVES
At the completion of this lesson, the EMT-Basic student will be able to:
Managing YourPatient’s Airway
Chapter 7 Managing Your Patient’s Airway ✱ 163
PSYCHOMOTOR OBJECTIVES
At the completion of this lesson, the EMT-Basic student will be able to:
2-1.25 Demonstrate the steps in performing the head-tilt, chin-lift. (pp. 172–173)
2-1.26 Demonstrate the steps in performing the jaw thrust.(pp. 173–174)
2-1.27 Demonstrate the techniques of suctioning. (pp. 176–181)2-1.28 Demonstrate the steps in providing mouth-to-mouth
artificial ventilation with body substance isolation (barriershields). (pp. 190–191)
2-1.29 Demonstrate how to use a pocket mask to artificiallyventilate a patient. (p. 191)
2-1.30 Demonstrate the assembly of a bag-valve mask unit.(pp. 191–192)
2-1.31 Demonstrate the steps in performing the skill ofartificially ventilating a patient with a bag-valve mask forone and two rescuers. (pp. 192–193)
2-1.32 Demonstrate the steps in performing the skill ofartificially ventilating a patient with a bag-valve maskwhile using the jaw thrust. (p. 194)
2-1.33 Demonstrate artificial ventilation of a patient with a flowrestricted, oxygen-powered ventilation device.(pp. 194–196)
Being successful in EMS means understanding priorities. So far you have learnedthat your safety and the safety of other EMS professionals at the scene of an emer-gency is the top priority. Now that you have learned how to identify and managesome of the more common hazards at the scene, we will begin discussing issues re-lating to patient care. We will begin with the single most important priority fol-lowing personal safety, an open and clear airway for the patient.
Without a clear airway and adequate air exchange, life quickly comes to anend. We can do without many things for an extended amount of time, such asfood, water, and shelter, but the human body cannot tolerate even short intervalswithout oxygen. In this chapter you will learn how to assess the status of a pa-tient’s airway as well as differentiate between adequate and inadequate respira-tions. You will also be introduced to many of the tools available to the EMT forhelping maintain an open and clear airway and ensure adequate oxygen.
2-1.34 Demonstrate how to artificially ventilate a patient with astoma. (p. 197)
2-1.35 Demonstrate how to insert an oropharyngeal (oral)airway. (pp. 181–183)
2-1.36 Demonstrate how to insert a nasopharyngeal (nasal)airway. (pp. 184–186)
2-1.37 Demonstrate the correct operation of oxygen tanks andregulators. (pp. 200–207)
2-1.38 Demonstrate the use of a nonrebreather face mask andstate the oxygen flow requirements needed for its use.(pp. 201, 208–210)
2-1.39 Demonstrate the use of a nasal cannula and state theflow requirements needed for its use. (pp. 210–213)
2-1.40 Demonstrate how to artificially ventilate the infant andchild patient. (pp. 195–196)
2-1.41 Demonstrate oxygen administration for the infant andchild patient. (pp. 195–196)
AFFECTIVE OBJECTIVES
At the completion of this lesson, the EMT-Basic student will be able to:
2-1.23 Explain the rationale for basic life support artificialventilation and airway protective skills taking priority overmost other basic life support skills. (pp. 163, 168, 176)
2-1.24 Explain the rationale for providing adequate oxygenationthrough high inspired oxygen concentrations to patientswho, in the past, may have received low concentrations.(pp. 190–191)
2-1.1 Name and label the majorstructures of the respiratorysystem on a diagram.
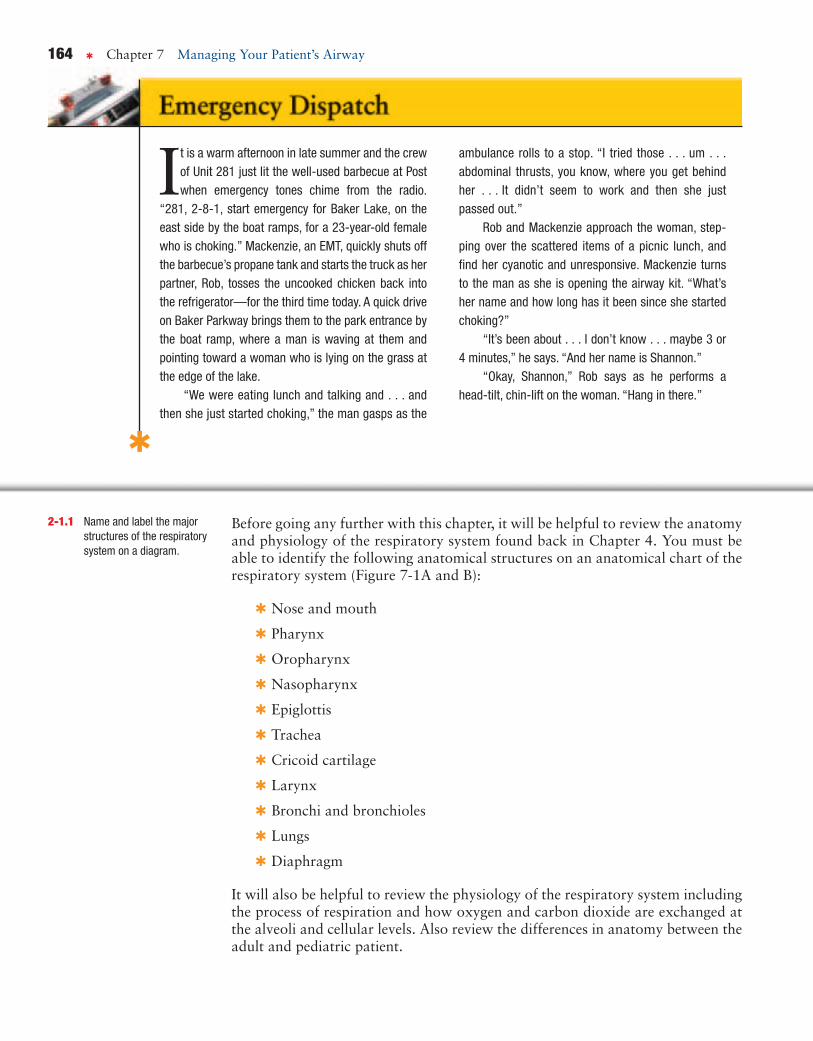
It is a warm afternoon in late summer and the crewof Unit 281 just lit the well-used barbecue at Postwhen emergency tones chime from the radio.
“281, 2-8-1, start emergency for Baker Lake, on theeast side by the boat ramps, for a 23-year-old femalewho is choking.” Mackenzie, an EMT, quickly shuts offthe barbecue’s propane tank and starts the truck as herpartner, Rob, tosses the uncooked chicken back intothe refrigerator—for the third time today. A quick driveon Baker Parkway brings them to the park entrance bythe boat ramp, where a man is waving at them andpointing toward a woman who is lying on the grass atthe edge of the lake.
“We were eating lunch and talking and . . . andthen she just started choking,” the man gasps as the
164 ✱ Chapter 7 Managing Your Patient’s Airway
ambulance rolls to a stop. “I tried those . . . um . . .abdominal thrusts, you know, where you get behindher . . . It didn’t seem to work and then she justpassed out.”
Rob and Mackenzie approach the woman, step-ping over the scattered items of a picnic lunch, andfind her cyanotic and unresponsive. Mackenzie turnsto the man as she is opening the airway kit. “What’sher name and how long has it been since she startedchoking?”
“It’s been about . . . I don’t know . . . maybe 3 or4 minutes,” he says. “And her name is Shannon.”
“Okay, Shannon,” Rob says as he performs ahead-tilt, chin-lift on the woman. “Hang in there.”
✱
Before going any further with this chapter, it will be helpful to review the anatomyand physiology of the respiratory system found back in Chapter 4. You must beable to identify the following anatomical structures on an anatomical chart of therespiratory system (Figure 7-1A and B):
✱ Nose and mouth
✱ Pharynx
✱ Oropharynx
✱ Nasopharynx
✱ Epiglottis
✱ Trachea
✱ Cricoid cartilage
✱ Larynx
✱ Bronchi and bronchioles
✱ Lungs
✱ Diaphragm
It will also be helpful to review the physiology of the respiratory system includingthe process of respiration and how oxygen and carbon dioxide are exchanged atthe alveoli and cellular levels. Also review the differences in anatomy between theadult and pediatric patient.

Chapter 7 Managing Your Patient’s Airway ✱ 165
Sinus
Nasal passage
NasopharynxPharynx
Oropharynx
Epiglottis
Larynx
Trachea
Diaphragm
Bronchiole
Left mainbronchus
Costalcartilage
Bronchiole
Respiratory bronchiole
Alveolarduct
Alveolus
Alveolarsac
ALVEOLAR SACS
Right mainbronchus
Pleura
Lowerlobe
Liver
Middlelobe
Upper lobeof right lung
Thyroid cartilage
Trachea
Cricoidcartilage
Upper lobe ofleft lung
FIGURE 7-1A The respiratory system.

Nasal cavity
NASOPHARYNX
OROPHARYNX
LARYNX
PHARYNX
LARYNGOPHARYNX
Soft palate
Tonsil
Vallecula
Epiglottis
Vocal cords
Trachea
Thyroid cartilage(Adam’s apple)
Hyoid bone
Mandible
Cricoid cartilage
Thyroid gland Esophagus
Tongue
Hard palate
FIGURE 7-1B Anatomy of the upper airway.
When Breathing Is AdequateIt happens nearly 20 thousand times each day and approximately 58 billion timesin an average lifetime. It is called breathing or respiration. When our respiratorysystem is functioning normally we hardly even notice it and often take it forgranted until something goes wrong.
When we are receiving an adequate supply of oxygen, the primary muscle re-sponsible for respiration is the diaphragm. It is a flat muscle that acts as a dividerbetween the chest and abdominal cavities. It moves up and down, causing air tomove in and out of the lungs.
There are three primary characteristics that must be assessed when determin-ing adequacy of breathing. They are:
✱ Rate—Rate refers to how many times the patient is breathing per minuteand is recorded as a number. Each inspiration � expiration � 1 respiration.Respiratory rates can be obtained by counting the number of breaths in oneminute. Normal rates for adult, child, and infants are as follows:• Adult: 12–20/minute• Child: 15–30/minute• Infant: 25–50/minuteDepending on the standard practice in your area, there are at least two com-mon methods for counting respirations. One requires counting the respira-
166 ✱ Chapter 7 Managing Your Patient’s Airway
2-1.2 List the signs of adequatebreathing.
✱ respirationinhalation and exhalation. Mayalso be called ventilation.
Chapter 7 Managing Your Patient’s Airway ✱ 167
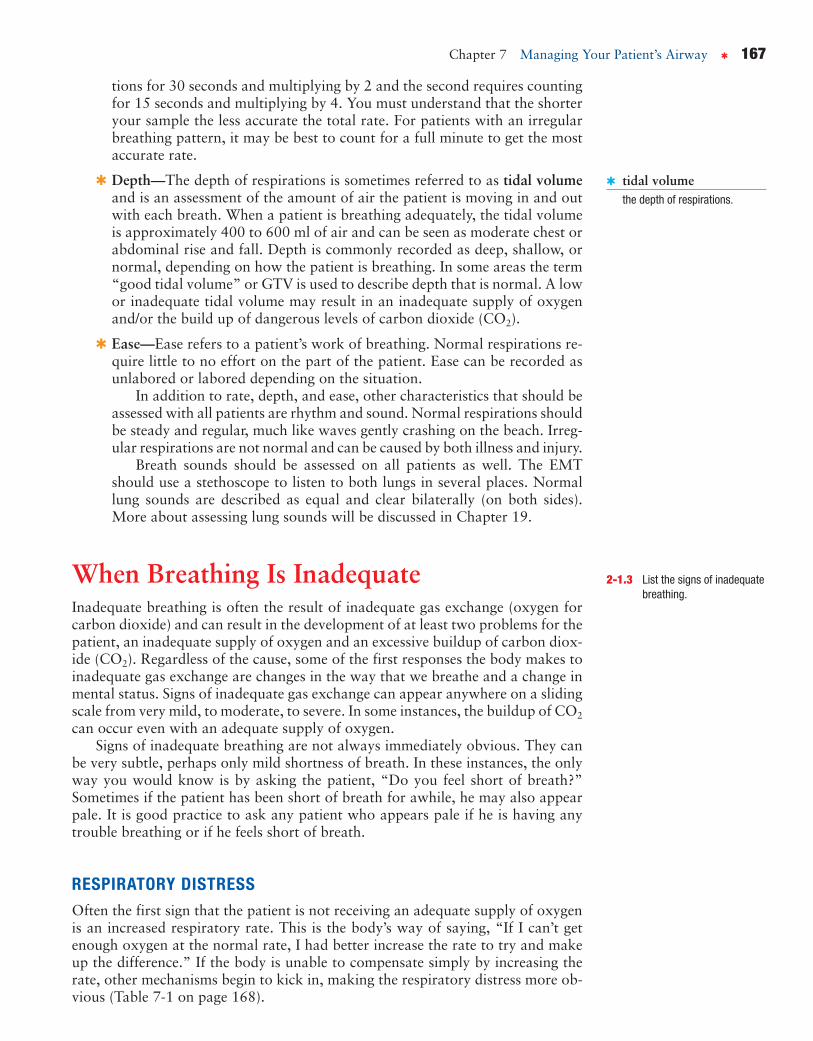
✱ tidal volumethe depth of respirations.
tions for 30 seconds and multiplying by 2 and the second requires countingfor 15 seconds and multiplying by 4. You must understand that the shorteryour sample the less accurate the total rate. For patients with an irregularbreathing pattern, it may be best to count for a full minute to get the mostaccurate rate.
✱ Depth—The depth of respirations is sometimes referred to as tidal volumeand is an assessment of the amount of air the patient is moving in and outwith each breath. When a patient is breathing adequately, the tidal volumeis approximately 400 to 600 ml of air and can be seen as moderate chest orabdominal rise and fall. Depth is commonly recorded as deep, shallow, ornormal, depending on how the patient is breathing. In some areas the term“good tidal volume” or GTV is used to describe depth that is normal. A lowor inadequate tidal volume may result in an inadequate supply of oxygenand/or the build up of dangerous levels of carbon dioxide (CO2).
✱ Ease—Ease refers to a patient’s work of breathing. Normal respirations re-quire little to no effort on the part of the patient. Ease can be recorded asunlabored or labored depending on the situation.
In addition to rate, depth, and ease, other characteristics that should beassessed with all patients are rhythm and sound. Normal respirations shouldbe steady and regular, much like waves gently crashing on the beach. Irreg-ular respirations are not normal and can be caused by both illness and injury.
Breath sounds should be assessed on all patients as well. The EMTshould use a stethoscope to listen to both lungs in several places. Normallung sounds are described as equal and clear bilaterally (on both sides).More about assessing lung sounds will be discussed in Chapter 19.
When Breathing Is InadequateInadequate breathing is often the result of inadequate gas exchange (oxygen forcarbon dioxide) and can result in the development of at least two problems for thepatient, an inadequate supply of oxygen and an excessive buildup of carbon diox-ide (CO2). Regardless of the cause, some of the first responses the body makes toinadequate gas exchange are changes in the way that we breathe and a change inmental status. Signs of inadequate gas exchange can appear anywhere on a slidingscale from very mild, to moderate, to severe. In some instances, the buildup of CO2
can occur even with an adequate supply of oxygen.Signs of inadequate breathing are not always immediately obvious. They can
be very subtle, perhaps only mild shortness of breath. In these instances, the onlyway you would know is by asking the patient, “Do you feel short of breath?”Sometimes if the patient has been short of breath for awhile, he may also appearpale. It is good practice to ask any patient who appears pale if he is having anytrouble breathing or if he feels short of breath.
RESPIRATORY DISTRESSOften the first sign that the patient is not receiving an adequate supply of oxygenis an increased respiratory rate. This is the body’s way of saying, “If I can’t getenough oxygen at the normal rate, I had better increase the rate to try and makeup the difference.” If the body is unable to compensate simply by increasing therate, other mechanisms begin to kick in, making the respiratory distress more ob-vious (Table 7-1 on page 168).
2-1.3 List the signs of inadequatebreathing.
168 ✱ Chapter 7 Managing Your Patient’s Airway
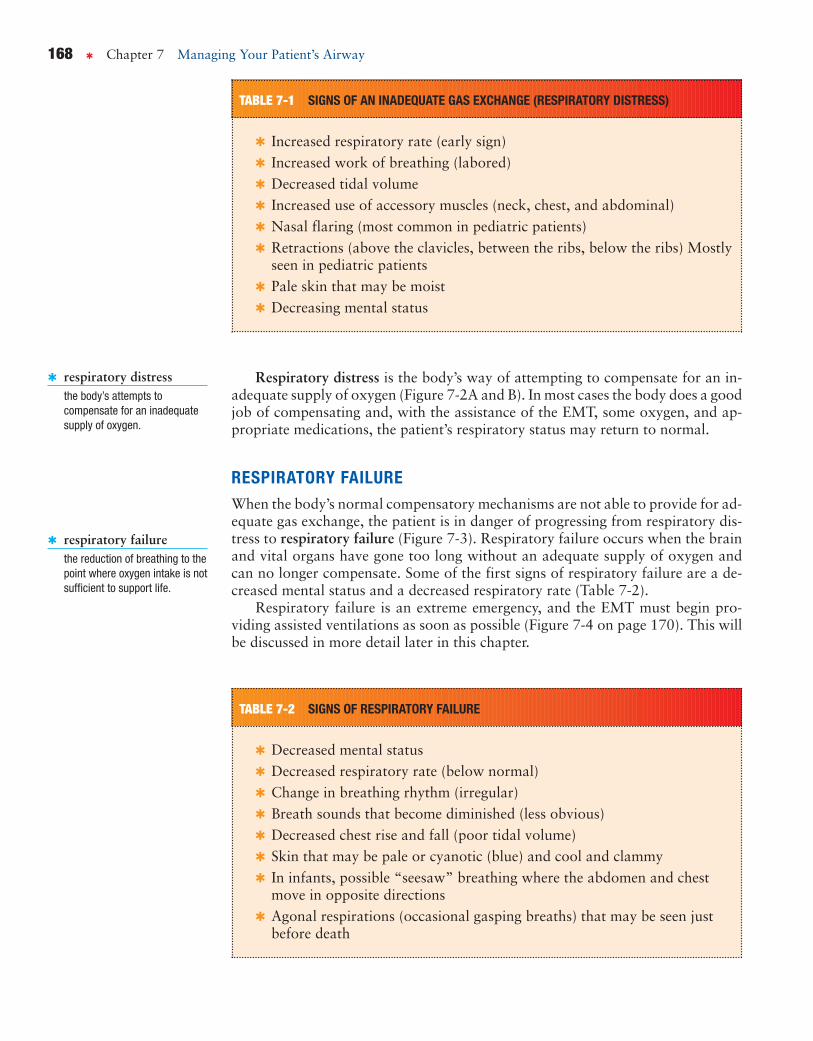
TABLE 7-1 SIGNS OF AN INADEQUATE GAS EXCHANGE (RESPIRATORY DISTRESS)
✱ Increased respiratory rate (early sign)✱ Increased work of breathing (labored)✱ Decreased tidal volume✱ Increased use of accessory muscles (neck, chest, and abdominal)✱ Nasal flaring (most common in pediatric patients)✱ Retractions (above the clavicles, between the ribs, below the ribs) Mostly
seen in pediatric patients✱ Pale skin that may be moist✱ Decreasing mental status
✱ respiratory distressthe body’s attempts tocompensate for an inadequatesupply of oxygen.
Respiratory distress is the body’s way of attempting to compensate for an in-adequate supply of oxygen (Figure 7-2A and B). In most cases the body does a goodjob of compensating and, with the assistance of the EMT, some oxygen, and ap-propriate medications, the patient’s respiratory status may return to normal.
RESPIRATORY FAILUREWhen the body’s normal compensatory mechanisms are not able to provide for ad-equate gas exchange, the patient is in danger of progressing from respiratory dis-tress to respiratory failure (Figure 7-3). Respiratory failure occurs when the brainand vital organs have gone too long without an adequate supply of oxygen andcan no longer compensate. Some of the first signs of respiratory failure are a de-creased mental status and a decreased respiratory rate (Table 7-2).
Respiratory failure is an extreme emergency, and the EMT must begin pro-viding assisted ventilations as soon as possible (Figure 7-4 on page 170). This willbe discussed in more detail later in this chapter.
✱ respiratory failurethe reduction of breathing to thepoint where oxygen intake is notsufficient to support life.
TABLE 7-2 SIGNS OF RESPIRATORY FAILURE
✱ Decreased mental status✱ Decreased respiratory rate (below normal)✱ Change in breathing rhythm (irregular)✱ Breath sounds that become diminished (less obvious)✱ Decreased chest rise and fall (poor tidal volume)✱ Skin that may be pale or cyanotic (blue) and cool and clammy✱ In infants, possible “seesaw” breathing where the abdomen and chest
move in opposite directions✱ Agonal respirations (occasional gasping breaths) that may be seen just
before death

Chapter 7 Managing Your Patient’s Airway ✱ 169
FIGURE 7-2A Patient displaying signs of respiratory distress.
PEDIATRIC DIFFERENCESAs discussed in Chapter 4, there are several differences in anatomy between adultand pediatric patients. Some of these differences may change the way that you carefor the patient.
In general, all of the structures of the pediatric respiratory system are smallerand therefore more easily blocked by swelling or foreign material. The tongue
FIGURE 7-2B A patient in respiratory distress mayassume the tripod position.
FIGURE 7-3 An unresponsive patient in respiratory failure.

170 ✱ Chapter 7 Managing Your Patient’s Airway
PATIENT’S CONDITION WHEN AND HOW TO INTERVENE
Key decision-making point:
Recognize inadequate breathingbefore respiratory arrestdevelops.
Assist ventilationsbefore they stop altogether!
Adequate breathing:Speaks full sentences;alert and calm
Increasing respiratory distress:Visibly short of breath;Speaking 3–4 word sentences;Increasing anxiety
Severe respiratory distress:Speaking only 1–2 word sentences;Very diaphoretic (sweaty);Severe anxiety
Continues to deteriorate:Sleepy with head-bobbing;Becomes unarousable
Respiratory arrest:No breathing
Nonrebreather mask or nasal cannula
Assisted ventilationsPocket face mask (PFM),bag-valve mask (BVM), orflow-restricted, oxygen-poweredventilation device (FROPVD)
Assist the patientʼs ownventilations, adjusting therate for rapid or slowbreathing
Artificial ventilationPocket face mask (PFM),bag-valve mask (BVM), orflow-restricted, oxygen-poweredventilation device (FROPV)
Assisted ventilations at12/minute for an adult or20/minute for a child or infant
Nonrebreather mask
FIGURE 7-4 Progress of respiratory distress and failure.

Chapter 7 Managing Your Patient’s Airway ✱ 171
takes up proportionately more volume inside the mouth, making it more difficultto visualize the back of the throat. The larynx and trachea are much softer andmore susceptible to damage. Being soft, the trachea is also susceptible to collapseif the patient’s head is tilted too far back during airway management. While thisis not damaging to the child, it will cause a partial airway blockage that will makeit more difficult to ventilate the patient. Pediatric patients, especially infants, areabdominal breathers, which means that the abdomen moves more than the chestas they breathe (Figure 7-5).
MANAGING THE AIRWAYDetermining whether or not a patient has a patent (open and clear) airway is anessential skill that all successful EMTs must master. In addition, you will need todetermine whether a spinal injury is suspected. Your management of that situationis critical and will be among your highest priorities for each patient.
ASSESSING AND OPENING THE AIRWAYIn responsive patients, assessing the airway is achieved quite easily by simply ob-serving the patient and listening to him speak. If he is alert and is able to speak incomplete sentences, it can be assumed that he has an open and clear airway. Whatyou must assess at that point is if he is breathing adequately or not.
In the unresponsive patient, determining whether the airway is patent is muchmore difficult and requires that specific procedures be performed by the EMT, de-pending on the condition and position of the patient. Factors that must be con-sidered while managing the airway of an unresponsive patient are:
✱ Patient position—If the patient is found face down or on his side and ap-pears to be breathing adequately, there may not be an immediate need to
Child has smaller noseand mouth.
In child, more space istaken up by tongue.
Airway structures are more easilyobstructed.
Cricoid cartilage is less rigid andless developed.
Child’s trachea is narrower.
FIGURE 7-5 Adult and pediatric airways.
✱ patentin reference to the airway(passage from nose or mouth tolungs), open and clear, withoutinterference to the passage ofair into and out of the body.

172 ✱ Chapter 7 Managing Your Patient’s Airway
move him. If you cannot determine if he is breathing adequately, then youmust roll him carefully onto his back to begin managing the airway.
✱ Mechanism of injury—Is there reason to believe the patient may have a neckor back injury? If so, the procedure you will use to open the airway will bedifferent than if there is no suspected spinal injury.
No Suspected Spinal InjuryIn most instances involving an unresponsive patient with no suspected spinal in-jury, the head-tilt, chin-lift maneuver is the most effective means of opening theairway. The tongue is the most common cause of airway obstruction in the unre-sponsive patient. Because the tongue is attached to the lower jaw, tilting the headback and moving the jaw upward also lifts the tongue, clearing the back of thethroat.
To perform the head-tilt, chin-lift (Figure 7-6A–C), follow these steps:
1. With the patient lying supine on a firm flat surface, kneel beside the pa-tient’s head.
2. Place the palm of one hand on the patient’s forehead and the index and mid-dle fingers of the other hand on the bony part of the jaw just below the chin.
3. Using equal pressure with both hands, tilt the patient’s head back as far asit will comfortably go.
4. Once the head is tilted back release pressure on the chin to allow the mouthto open slightly.
5. Place your ear next to the patient’s nose and mouth to listen for breathingand observe the chest for adequate rise and fall.
Suspected Spinal InjuryAny patient with an unknown mechanism of injury, or who you believe may havesuffered a spinal injury, must be cared for using a slightly different procedure.
2-1.4 Describe the steps inperforming the head-tilt,chin-lift.
✱ head-tilt, chin-liftmaneuvera means of opening the airwayby tilting the head back andlifting the chin. Used when notrauma, or injury, is suspected.See also jaw-thrust maneuver.
Rob—The EMT“I knew when I heard what happened—that this young lady’s boyfriend
had tried to perform the Heimlich maneuver on her before she had
passed out—that she probably wasn’t going to have a head or spine in-
jury. It’s not like he’s just going to drop his girlfriend to the ground when
she becomes unresponsive! So I felt the most effective technique for ini-
tially trying to open and look into her airway was the head-tilt, chin-lift.
Plus, I knew that we had to get that airway open quick.”
✱
2-1.5 Relate mechanism of injuryto opening the airway.

Chapter 7 Managing Your Patient’s Airway ✱ 173
Make no mistake; the airway is the top priority with all patients. However, whencaring for a patient with suspected spinal injury, we must make every attempt toopen the airway without compromising the neck or back. To do this you will usethe jaw-thrust maneuver (Figure 7-7 on page 174).
To perform the jaw-thrust maneuver, follow these steps:
1. With the patient lying supine on a firm flat surface, kneel at the top of thepatient’s head.
2. Place your thumbs on the cheekbones on either side of the patients, face.
3. Using the index and middle fingers of each hand at the angles of the patient’sjaw, push the jaw upward.
4. Place your ear next to the patient’s nose and mouth to listen for breathingand observe the chest for adequate rise and fall.
This procedure is best when at least two rescuers are present. If the patient is notbreathing adequately, the first rescuer can maintain an open airway while the sec-ond rescuer ventilates the patient. For the single rescuer, a modified jaw-thrust canbe performed from the side as well so the rescuer can also ventilate the patient.
FIGURE 7-6A Place the palm of one hand on the patient’s foreheadand the index and middle fingers of the other hand on the bony part ofthe jaw just below the chin.
FIGURE 7-6B Using equal pressure with both hands, tilt thepatient’s head back as far as it will comfortably go.
FIGURE 7-6C Correct position for the head-tilt, chin-lift.
2-1.6 Describe the steps inperforming the jaw thrust.
✱ jaw-thrust maneuvera means of correcting blockageof the airway by moving the jawforward without tilting the heador neck. Used when trauma, orinjury, is suspected. See alsohead-tilt, chin-lift maneuver.

174 ✱ Chapter 7 Managing Your Patient’s Airway
COMPLICATIONSSeveral factors can make it difficult to establish a patent airway. Trauma to theface will often cause swelling and bleeding that will make it difficult to keep theairway clear. Foreign body airway obstructions (FBAO), such as those caused byfood or small objects, are difficult to see and can cause both partial and completeobstructions. The procedure for clearing an FBAO is discussed in detail in Chapter19. Dental appliances such as crowns, bridges, and dentures can come loose insidethe mouth, contributing to the obstruction. Unless they are loose and falling backinto the throat, leave these appliances in place. Otherwise remove them with agloved hand and keep them in a safe place.
FIGURE 7-7 Jaw-thrust maneuver, side view. Inset shows EMT’s finger position at angle of the jaw just below theears.
The Boyfriend“That was the scariest thing that I’ve ever been through! One minute
we’re having this great picnic by the lake, and the next, Shannon is look-
ing at me with this panic in her eyes and she’s grabbing at her throat.
Do you know what that’s like? I mean, here’s this person who you love
more than anything in the world and you’re looking into her eyes and all
you see is fear, just absolute terror. I can’t even imagine what it’s like to
not be able to breathe. I’m so thankful for that ambulance crew. I don’t
know what I would’ve done had they not been there.”
✱

Chapter 7 Managing Your Patient’s Airway ✱ 175
Multiple ChoicePlace a check next to the correct answer.
1. All of the following are signs of inadequatebreathing EXCEPT:
_____ a. use of accessory muscles.
_____ b. increased respiratory rate.
_____ c. use of the tripod position.
_____ d. good chest rise and fall.
2. Adequate respirations are characterized by:
_____ a. effortless breathing.
_____ b. poor chest rise.
_____ c. nasal flaring.
_____ d. retractions.
3. Which of the following best describes howyou should handle a patient you areventilating who has loose dentures?
_____ a. Carefully push the dentures backinto place.
_____ b. Remove them with a gloved hand.
_____ c. Ask a family member to removethem.
_____ d. Ignore them and keep ventilating.
4. For which of the following patients would thejaw-thrust be most appropriate for openingthe airway?
_____ a. unresponsive 5-year-old from abicycle accident
_____ b. 56-year-old with chest pain
_____ c. unresponsive 27-year-old bee-stingpatient
_____ d. semiresponsive diabetic patient
5. ________ is the most common cause of airwayobstruction in the unresponsive patient.
_____ a. Blood
_____ b. A foreign body
_____ c. The tongue
_____ d. Saliva
Critical Thinking1. Describe what you would look for when determining if a patient is breathing adequately or not.
2. Discuss the difference between respiratory distress and respiratory failure and how each might present.
3. Describe how you would manage the airway of a trauma patient whose airway could not beadequately opened using the jaw-thrust maneuver.

176 ✱ Chapter 7 Managing Your Patient’s Airway
4. Place an “X” in the appropriate column or columns for each of the signs.
Sign Distress Failure
Increased respiratory rate
Decreased respiratory rate
Altered mental status
Use of accessory muscles
Tripod position
Nasal flaring
Decreased heart rate
Increased heart rate
The Basics of SuctioningIt is important to take the appropriate BSI precautions whenever you are manag-ing a patient’s airway because of the strong likelihood that he may vomit or thatyou may be exposed to body fluids. Gloves, a mask, and eye protection are theminimum recommended PPE for airway management.
Suction is an important skill that every EMT must learn and practice. TheEMT uses suction to assist in maintaining a patent airway that is at risk of be-coming blocked by materials such as blood, vomit, and saliva. Noisy respirationsare almost always a sign of partial airway obstruction. Gurgling is a strong indi-cation of partial upper airway obstruction caused by fluids. During manual venti-lations some of the air enters the stomach and may eventually cause the patient tovomit. You will use suction to minimize the chances that the vomit could enter thelungs. You must have suction ready at all times when caring for unresponsive pa-tients or when manually ventilating a patient.
Most suction units used in the field are adequate for suctioning fluids andsmall particles of food but are inadequate at picking up or clearing large objectssuch as chunks of food or teeth. For these objects, a combination of suctioning andfinger sweeps may be necessary.
SUCTION DEVICESSuction devices are quite simple. They consist of a pump, suction tubing, a catheter,and a reservoir to contain the material being suctioned. While there are many brandsand styles of suction devices in use today, most field suction units can be divided intothree categories: electric, oxygen-powered, and manually operated. (Figure 7-8A–D).
✱ Electric—These devices are found permanently mounted in the ambulancefor use during transport or can be a battery-powered portable type used onthe scene.
✱ Oxygen-powered—These typically portable devices function as an acces-sory to an oxygen regulator. They require an adequate supply of high pres-sure oxygen to function.
2-1.7 State the importance ofhaving a suction unit readyfor immediate use whenproviding emergency care.

Chapter 7 Managing Your Patient’s Airway ✱ 177
✱ Manually Operated—These devices are generally the most portable andeasy-to-use devices. Most are operated by squeezing a handle on the device.
SUCTION CATHETERSThe catheter is the part of the suction unit that is placed into the patient’s mouthor nose to assist in removing the material from the airway. Catheters come in awide variety of styles; however they all fit into one of two basic categories, rigid(hard) or soft (Figure 7-9 on page 178).
✱ Rigid—Sometimes called hard or tonsil-tip suction catheters, these cathetersare made of nonflexible plastic and can be straight or slightly curved. Theyare designed primarily for suctioning the mouth (oropharynx) of a semire-sponsive or unresponsive patient. In general, catheters used for suctioningthe mouth should not be inserted any farther than you can see. It is impor-tant when using rigid catheters to avoid touching the center of the back ofthe throat, as this may stimulate a gag reflex and cause vomiting.
✱ Soft—Sometimes referred to as “French” catheters, soft catheters are gener-ally long narrow tubes made of flexible plastic. They are most useful for suc-tioning through the nose (nasopharynx) of a semiresponsive or unresponsive
FIGURE 7-8A An oxygen-powered portable suction unit. FIGURE 7-8B Manually operated suction device (V-VAC).
FIGURE 7-8C A battery-powered portable suctioning unit. FIGURE 7-8D A mounted suction unit installed in the ambulancepatient compartment.

178 ✱ Chapter 7 Managing Your Patient’s Airway
patient. Soft catheters used to suction the nose must be measured to ensurethey are not placed too far into the airway. Measure these devices from thetip of the patient’s nose to the earlobe prior to insertion. The suction deviceshould be activated only after the catheter is fully inserted into the airway.Soft catheters are also ideal for suctioning the mouths of pediatric patients.
Suctioning TechniquesLike all other equipment on an ambulance, the suction unit should be inspectedon a daily basis. Because many units are battery operated, they must regularly becharged or the battery replaced. A properly functioning suction unit is capable ofdeveloping approximately 300 mmHg of vacuum power. Use the following guide-lines when using suction to help clear a patient’s airway.
ORAL SUCTIONINGFollow these steps to perform oral suctioning (Scan 7-1):
1. Take appropriate BSI precautions.
2. Attach the appropriate suction catheter to the suction tubing and confirmthat the suction tubing is securely attached to the device.
3. Place the tip of the catheter into the mouth as far to one side as possible andonly as far as you can see.
4. Activate the suction as you move the tip of the catheter around in small cir-cles on one side of the tongue.
5. Remove the tip and insert it in the same manner on the other side of the pa-tient’s mouth. Repeat the procedure.
6. For adult patients suction no more than 15 seconds at a time, child patients10 seconds, and infants 5 seconds.
NASAL SUCTIONINGFollow these steps to perform nasal suctioning (Scan 7-2 on page 180):
1. Take appropriate BSI precautions.
2. Attach the appropriate suction catheter to the suction tubing and confirmthat the suction tubing is securely attached to the device.
3. Measure the device from the tip of the patient’s nose to the earlobe.
FIGURE 7-9 Various types andsizes of suction catheters.
2-1.8 Describe the techniques ofsuctioning.

Chapter 7 Managing Your Patient’s Airway ✱ 179
4. Lubricate the catheter using a water based lubricant.
5. Carefully insert the catheter into one nostril.
6. Once completely inserted, activate the suction and twist the catheter andslowly remove it.
7. Repeat the procedure for the other nostril.
8. For adult patients suction no more than 15 seconds at a time, child patients10 seconds, and infants 5 seconds.
SCAN 7-1 ORAL SUCTIONING
Position yourself at the patient’s head and turn the patient’shead to the side.
Turn the unit on, attach a catheter, and test for suction at thebeginning of your shift.
Apply suction only after the rigid tip is in place. Do not lose sight of thetip while suctioning. Suction while withdrawing the tip.
Place the convex side of the rigid tip againstthe roof of the mouth. Insert just to the baseof the tongue.
▼
▼
▼
▼

180 ✱ Chapter 7 Managing Your Patient’s Airway
SCAN 7-2 NASAL SUCTIONING
Test the suction unit. Measure the device against the nose.
Lubricate the tip. Insert the catheter into the nose.
▼▼
▼▼
Activate the suction device.
▼
Remove suctioning.
▼

Chapter 7 Managing Your Patient’s Airway ✱ 181
Many suction devices have an adjustment that controls the amount of suctionbeing applied. Consider using lower power settings for pediatric patients. Whensuctioning newborns and infants, it is best to use a bulb-type suction device.
If your patient is producing secretions as fast as you can suction them, suctionas best you can for 15 seconds, then ventilate the patient for 2 minutes, followedby another 15 seconds of suctioning. Repeat this process as necessary duringtransport.
Suction catheters, tubing, and most reservoirs are disposable and should behanded off to the hospital personnel taking over care of the patient. Otherwisethey should be disposed of properly.
THE USE OF AIRWAY ADJUNCTSEMTs have two mechanical devices (airway adjuncts) they can use to assist inmaintaining a patent airway. They are the oropharyngeal airway, sometimes re-ferred to as the “oral” airway or OPA, and the nasopharyngeal airway, commonlyreferred to as the “nasal” airway or NPA. It must be clearly understood that bothof these devices only assist the EMT in maintaining a patent airway. Simply plac-ing either device does not ensure a patent airway. These devices should be used inconjunction with good airway management techniques, such as continuous mon-itoring for adequate chest rise and fall, head-tilt, chin-lift and jaw-thrust maneu-vers, and appropriate suctioning when indicated.
The Oropharyngeal Airway (OPA)OPAs are generally made of hard plastic and are designed to minimize the chancesthat the airway will become blocked by the tongue. They are only used on unre-sponsive patients who do not have an active gag reflex. Sometimes the only wayto determine if an unresponsive patient does not have a gag reflex is to attempt theinsertion of an OPA. If the patient begins to gag, you must remove it immediately.
Indications for the use of an OPA:
✱ Unresponsive
✱ No gag reflex
Follow these steps for the proper use of an OPA (Scan 7-3 on pages 182–183):
1. Take appropriate BSI precautions.
2. Manually open the airway using the appropriate method.
3. Select the appropriate size airway by measuring from the corner of the pa-tient’s mouth to the earlobe or angle of the jaw.
4. Open the patient’s mouth and insert the airway upside down (with the tipfacing the roof of the mouth) until it is approximately half way in, then ro-tate it 180 degrees as you insert it the rest of the way.
5. Allow the flange of the airway to come to rest against the outside of the pa-tient’s lips. It is okay to allow the flange to rest no further than the patient’steeth; however if you cannot see the airway, it may have dropped into themouth and become an obstruction.
✱ oropharyngeal airwaya curved device inserted intothe patient’s mouth and thepharynx to help maintain anopen airway.
✱ nasopharyngeal airwaya soft flexible breathing tubeinserted through the patient’snose into the pharynx to helpmaintain an open airway.
2-1.17 Describe how to measureand insert anoropharyngeal (oral) airway.

182 ✱ Chapter 7 Managing Your Patient’s Airway
SCAN 7-3 INSERTION OF OROPHARYNGEAL AIRWAY
Insert the airway with the tip pointing to the roof of the patient’smouth.
Measure from the corner of the patient’s mouth to the tip of the earlobe.
▼ ▼
▼
An alternative method is to insert the airway sideways and thenrotate it 90°.
After proper insertion, the patient is ready for ventilation.
▼

Chapter 7 Managing Your Patient’s Airway ✱ 183
Alternative methods for insertion of an OPA include inserting the airway side-ways and rotating it 90 degrees. This is just as effective as long as you ensure thatthe OPA is resting behind the tongue and not against it, pushing it further backinto the airway. The preferred method for inserting an OPA for an infant or smallchild is to use a tongue blade to press down on the tongue and then insert the OPAright side up directly over the tongue without rotating it (Figure 7-10). Proper in-sertion of an OPA in an adult is illustrated in Figure 7-11.
Rotate the airway 180° into position. When the airway is properly positioned, the flange rests against the patient’s mouth.
▼
FIGURE 7-10 Insertion of an oropharyngeal airway into achild, using a tongue depressor.
Air flow
Tongue
FIGURE 7-11 Oropharyngeal airway that is properly placed. Thetongue is kept from falling back to occlude the airway.

184 ✱ Chapter 7 Managing Your Patient’s Airway
The Nasopharyngeal Airway (NPA)NPAs are short round tubes made of soft flexible rubber or vinyl material (Figure7-12). They have a flange at the top and are beveled at the distal end. NPAs aredesigned to help maintain an open pathway through the nose and into the na-sopharynx. The NPA should not touch the back of the throat, so it is less likely tostimulate the gag reflex than the OPA. However, the NPA does very little, if any-thing, to keep the tongue from blocking the throat. This is why the NPA is the sec-ond choice between the two airways for an unresponsive patient with no gagreflex. NPAs are ideal for the unresponsive or semiresponsive patient who will nottolerate an OPA or the patient with major trauma to the jaw, or the patient whois convulsing, preventing the use of an OPA.
Follow these steps for the proper use of an NPA (Scan 7-4):
1. Take appropriate BSI precautions.
2. Manually open the airway using the appropriate method.
3. Select the appropriate size airway by first observing the opening of the nos-tril. Select an airway with a diameter slightly smaller than the opening of thepatient’s nostril. (continued on p. 186)
2-1.18 Describe how to measureand insert anasopharyngeal (nasal)airway.
FIGURE 7-12 Various types ofnasopharyngeal airways (NPA).
Mackenzie—The EMT“I was actually kind of scared on that call. I had never responded to
someone who still had the airway obstruction in place when we arrived.
I was ticking through this checklist in my head of things to do for a non-
breathing patient, from which adjuncts to use and how to size them to
how fast I should squeeze the bag on the BVM if it came to that. And
do you know what I kept forgetting? That this poor girl didn’t have a
patent airway! Luckily Rob remembered the ABCs and went right for
the airway.”
✱

Chapter 7 Managing Your Patient’s Airway ✱ 185
SCAN 7-4 INSERTION OF NASOPHARYNGEAL AIRWAY
Measure the nasopharyngeal airway from the patient’s nostril to theearlobe, or to the angle of the jaw.
Apply a water-based lubricant before insertion.
Gently push the tip of the nose upward, and insert the airway with thebeveled side toward the base of the nostril or toward the septum (wallthat separates the nostrils). Insert the airway, advancing it until theflange rests against the nostril.
▼
▼▼
Nasopharnygeal airway properly inserted.
▼

186 ✱ Chapter 7 Managing Your Patient’s Airway
4. Next measure from the tip of the nose to the patient’s earlobe. Adjust theflange or cut the airway to the appropriate length.
5. Lubricate the airway using a water-based lubricant.
6. Press gently on the tip of the nose to flare the nostrils, then insert the NPAposteriorly. Make certain that the opening of the bevel is facing inward (to-ward the septum).
7. Advance the airway until the flange comes to rest against the outside of thenostril.
8. If resistance is felt, try twisting the NPA slightly. If this does not work thenremove it and attempt the same procedure on the opposite side.
PATIENTS WITH FACIAL TRAUMA
Insertion of an NPA is contraindicated in patients with significant facial trauma. Fractures tothe face and skull could allow the airway to pass into a sinus cavity or into the cranium.
Multiple ChoicePlace a check next to the correct answer.
1. Which of the following patients is most inneed of immediate suctioning?
_____ a. an asthma patient with expiratorywheezes
_____ b. a nonbreathing pediatric patient
_____ c. a patient with gurgling soundswhile breathing
_____ d. a patient experiencing a severeallergic reaction
2. The most portable and easiest to use of thesuction devices is the _____________ device.
_____ a. manual
_____ b. battery-operated
_____ c. oxygen-powered
_____ d. ambulance-mounted
It should be noted that all NPAs come from the manufacturer designed for usein the right nostril. This is due to the curvature and the placement of the beveledopening. If the NPA will not easily slide into the right side then you will have touse a pair of scissors to snip the end and change the direction of the beveled open-ing. This is simple and does not significantly change the length of the NPA.

Chapter 7 Managing Your Patient’s Airway ✱ 187
3. Which of the following are the indications forinserting an OPA?
_____ a. responsive, active gag reflex
_____ b. unresponsive, no gag reflex
_____ c. responsive, no gag reflex
_____ d. unresponsive, active gag reflex
4. Prior to insertion, an NPA should bemeasured from the _____________ to the_____________.
_____ a. middle of the mouth, earlobe
_____ b. angle of the jaw, corner of themouth
_____ c. tip of the nose, corner of themouth
_____ d. tip of the nose, earlobe
5. The recommended maximum time allowed forsuctioning of an adult patient is_____________ seconds.
_____ a. 5
_____ b. 10
_____ c. 15
_____ d. 20
MatchingMatch the piece of equipment on the left with the applicable definition on the right.
1. _____ Oxygen-powered suction device
2. _____ Soft suction catheter
3. _____ Bulb syringe
4. _____ OPA
5. _____ NPA
A. This device requires that the patient beunresponsive and have no gag reflex.
B. This is best suited for suctioning an infant’s noseand/or mouth.
C. The primary contraindication for this device isface or head trauma.
D. This is most useful for suctioning through thenose of a semiresponsive or unresponsive patient
E. This is typically a portable device that functionsas an accessory to an oxygen regulator. Itrequires an adequate supply of high-pressureoxygen to function.
Critical Thinking 1. Discuss why it is good practice to have a suction device handy whenever you are performing manual
ventilations.
2. Discuss why airway adjuncts such as the OPA and NPA cannot be relied upon to maintain apatient’s airway by themselves.

188 ✱ Chapter 7 Managing Your Patient’s Airway
3. What are the contraindications for using an NPA and why?
Ventilating Your PatientNow that you have learned how to assess, establish, and maintain an open andclear airway for your patient, it’s time to learn what to do if your patient is notbreathing adequately or not breathing at all. Assessing whether an airway is patentis only half of the airway management equation. The other half is assessing the ad-equacy of the patient’s own ventilations and providing the necessary support whenneeded.
An adult patient who is breathing adequately will have a respiratory rate ofbetween 12 and 20 per minute and show good tidal volume with each breath. Thissection will focus on the patient who is not breathing adequately (less than 12times per minute in the case of an adult or too shallowly) and may be in need ofventilatory assistance.
The first thing you will want to assess as you approach a patient is the rise andfall of the chest or abdomen during breathing (Figure 7-13). Is it obvious that heis breathing or is it difficult to tell? If breathing is obvious, then you can assumethat tidal volume is adequate and you can move on to assess the adequacy of therate. If the rate is between 12 and 20 per minute, then the patient is breathing ad-equately and does not need assisted ventilations, but you may want to considergiving supplemental oxygen. This will be discussed later in this chapter.
If tidal volume is low and you cannot easily see that the patient is breathing,you will have to get more aggressive with your assessment. Kneel beside the pa-tient, establish an open airway using the most appropriate method, and place yourear next to the nose and mouth to listen for breathing while you observe the chestand abdomen for rise and fall. Count the respirations. The chances are that as apatient’s respiratory rate gets slower, the respirations will get more shallow as well.
FIGURE 7-13 Technique forassessing breathing in anunresponsive adult.

Chapter 7 Managing Your Patient’s Airway ✱ 189
A respiratory rate that is 10 per minute should be a big red flag. You need to com-pare the rate with the tidal volume, and if the tidal volume is shallow, you mayneed to assist the patient’s ventilations using one of the methods that we will dis-cuss next. A respiratory rate below 10 requires immediate intervention in the wayof assisted ventilations.
ASSISTED VENTILATIONSA patient who is still breathing but who you feel is not breathing adequately ei-ther because of rate and/or tidal volume issues needs immediate ventilatory assis-tance. You can accomplish this by assisting or enhancing the patient’s ownattempts to breathe with manual ventilations that you provide. The objective is tobreathe into the patient as he takes a breath and to make each of his breaths goodfull breaths by increasing the tidal volume. The exact techniques will vary some-what, depending on the device that you use. It is preferred to use supplementaloxygen when providing assisted ventilations.
Ventilation DevicesThere are several devices available to the EMT to assist with ventilating a patient.They are listed below in the order of preference. While the mouth-to-mouth andmouth-to-stoma techniques are viable options in some situations, they will not bediscussed here. These will be covered during your CPR training.
Ventilation devices listed in the order of preference are:
1. Mouth-to-mask with supplemental oxygen
2. Two rescuer bag-valve mask (BVM)
3. Demand valve
4. Single-rescuer BVM
When ventilating a patient, regardless of the device being used, you will wantto deliver approximately 12 breaths per minute for an adult, and 20 breaths perminute for pediatric patients. Newborns will require ventilations between 30
2-1.16 List the steps in performingthe actions taken whenproviding mouth-to-mouthand mouth-to-stomaartificial ventilation.
Shannon—The Patient“I woke up with a mask on my face and I was being forced to breathe. It
was a totally unnatural feeling . . . and a pretty frightening one! I can
remember taking a bite of my sandwich and laughing, and then sud-
denly I couldn’t get a breath. I’ve never been so scared in my life! I was
looking at my boyfriend and trying so hard to breathe. I really thought
that I was going to die.”
✱

190 ✱ Chapter 7 Managing Your Patient’s Airway
and 50 per minute. The delivery of each breath should be slow and delivered over1 second. If for any reason you are not able to ventilate using the following tech-niques, consider a possible foreign body airway obstruction and follow the rec-ommended technique for clearing the obstruction.
Remember to always take appropriate BSI precautions when managing a pa-tient’s airway including providing ventilations.
Mouth-to-Mask TechniqueIn most situations the pocket mask is the easiest barrier device to use and thequickest to deploy. Many EMS professionals and firefighters keep a pocket maskor similar barrier device on their person while on duty (Figure 7-14). This is to en-sure they will be ready to provide ventilations without delay should they encountera nonbreathing patient. For maximum protection against exposure to body fluidsa one-way-valve should be used in conjunction with the pocket mask or barrierdevice.
When used by itself, the pocket mask can allow for the delivery of between 10and 15 percent oxygen to the patient, because that is how much oxygen remainsin each of your exhaled breaths. If possible, use a pocket mask with a supplemen-tal oxygen inlet. This will allow you to deliver much higher concentrations of oxy-gen when the mask is connected to an oxygen source.
To provide ventilations using a pocket mask, follow these steps (Scan 7-5):
1. Take appropriate BSI precautions.
2. Position yourself at the side or top of the patient’s head.
3. Insert an appropriate airway adjunct.
4. Connect the mask to an appropriate oxygen source, if available, at a flowrate of 15 liters per minute (15 lpm).
5. Place the mask over the patient’s face, beginning at the top of the nose andwalking the mask down so that it rests just below the lower lip.
6. Using both hands, form a tight seal between the mask and the patient’s facewhile maintaining a head tilt or jaw thrust.
7. Take a normal breath and breathe into the one-way valve at the top of themask. Watch for chest rise and fall.
2-1.9 Describe how to artificiallyventilate a patient with apocket mask.
FIGURE 7-14 A pocket facemask.

Chapter 7 Managing Your Patient’s Airway ✱ 191
2-1.11 List the parts of a bag-valve-mask system.
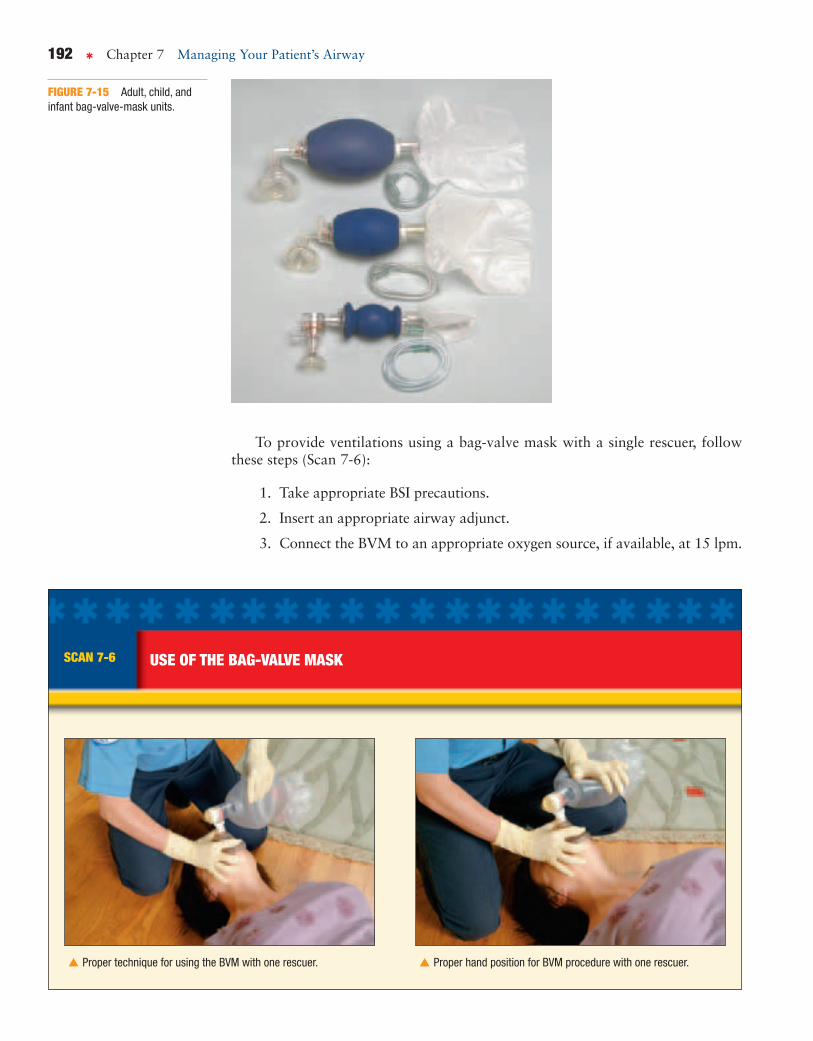
Bag-Valve-Mask TechniqueA bag-valve mask (BVM) consists of a self-inflating bag, a one-way valve, anda face mask. Most BVMs have the capacity to be connected to supplementaloxygen and have an external oxygen reservoir (Figure 7-15). Regardless of the configuration, all BVMs are most effective when connected to an oxygensource.
When connected to an oxygen source and used by two rescuers, the BVM isthe preferred device for delivering high concentrations of oxygen, up to 100 per-cent. Used without oxygen, the BVM will deliver room air that is approximately21 percent oxygen. BVMs come in several sizes, including adult, child, infant,and newborn. The adult-size BVM has a bag capacity or volume of between1,000 and 1,600 milliliters. If used improperly, the BVM has the potential to de-liver smaller volumes than a pocket mask. Be sure to watch the chest and ab-domen for adequate rise and fall with each breath. A single rescuer attemptingto use a BVM will most likely struggle with trying to maintain an adequate sealwhile squeezing the bag. For this reason it is a preferred device only when thereare two rescuers.
NOTE: At one time, BVMs were manufactured with “pop-off valves” to preventoverinflation of the patient. It is now known that these valves can release too soon,preventing adequate ventilation of the patient. BVMs with pop-off valves shouldbe taken out of service and replaced.
✱ bag-valve mask (BVM)a hand-held device with a facemask and self-refilling bag thatcan be squeezed to provideartificial ventilations to apatient. It can deliver air fromthe atmosphere or oxygen froma supplemental oxygen supply.
SCAN 7-5 VENTILATION USING A POCKET MASK
Place yourself beside the patient’s head andapply the mask.
Alternatively, position yourself directly above(at the top of) the patient’s head and applythe mask.
▼ ▼
2-1.12 Describe the steps inperforming the skill ofartifically ventilating apatient with a bag-valvemask for one and tworescuers.
192 ✱ Chapter 7 Managing Your Patient’s Airway
To provide ventilations using a bag-valve mask with a single rescuer, followthese steps (Scan 7-6):
1. Take appropriate BSI precautions.
2. Insert an appropriate airway adjunct.
3. Connect the BVM to an appropriate oxygen source, if available, at 15 lpm.
FIGURE 7-15 Adult, child, andinfant bag-valve-mask units.
SCAN 7-6 USE OF THE BAG-VALVE MASK
Proper technique for using the BVM with one rescuer. Proper hand position for BVM procedure with one rescuer.
▼▼
Chapter 7 Managing Your Patient’s Airway ✱ 193
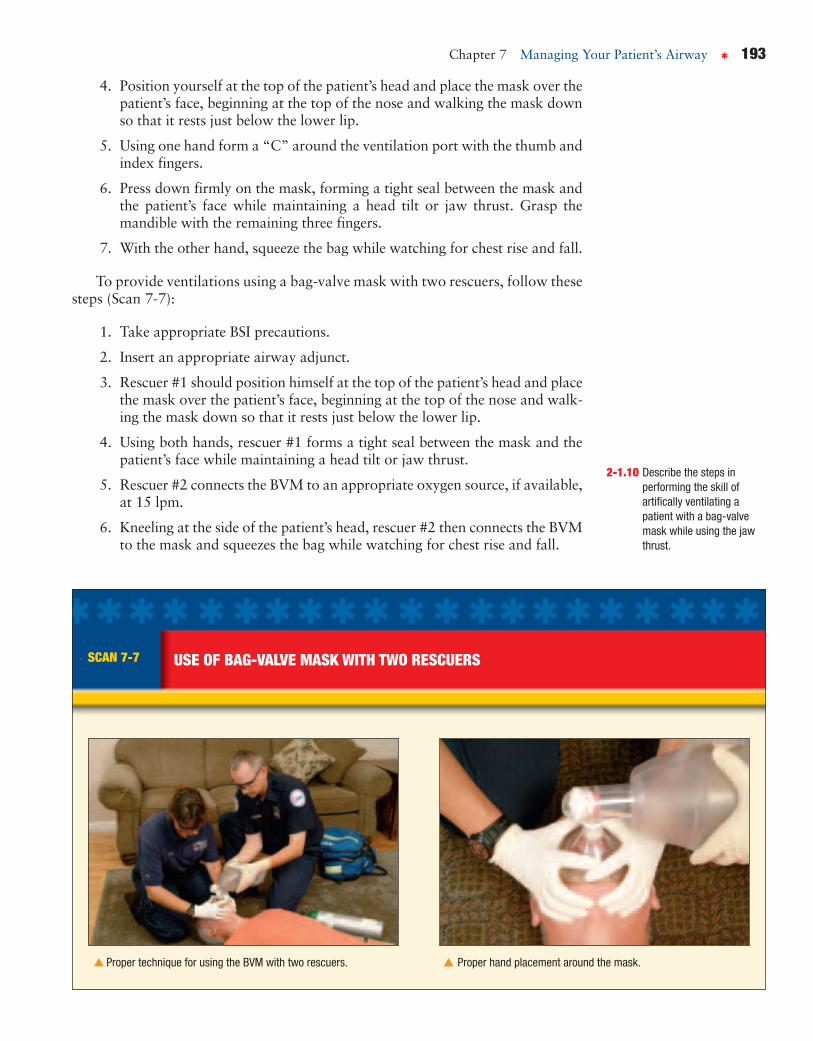
4. Position yourself at the top of the patient’s head and place the mask over thepatient’s face, beginning at the top of the nose and walking the mask downso that it rests just below the lower lip.
5. Using one hand form a “C” around the ventilation port with the thumb andindex fingers.
6. Press down firmly on the mask, forming a tight seal between the mask andthe patient’s face while maintaining a head tilt or jaw thrust. Grasp themandible with the remaining three fingers.
7. With the other hand, squeeze the bag while watching for chest rise and fall.
To provide ventilations using a bag-valve mask with two rescuers, follow thesesteps (Scan 7-7):
1. Take appropriate BSI precautions.
2. Insert an appropriate airway adjunct.
3. Rescuer #1 should position himself at the top of the patient’s head and placethe mask over the patient’s face, beginning at the top of the nose and walk-ing the mask down so that it rests just below the lower lip.
4. Using both hands, rescuer #1 forms a tight seal between the mask and thepatient’s face while maintaining a head tilt or jaw thrust.
5. Rescuer #2 connects the BVM to an appropriate oxygen source, if available,at 15 lpm.
6. Kneeling at the side of the patient’s head, rescuer #2 then connects the BVMto the mask and squeezes the bag while watching for chest rise and fall.
SCAN 7-7 USE OF BAG-VALVE MASK WITH TWO RESCUERS
Proper technique for using the BVM with two rescuers. Proper hand placement around the mask.
▼ ▼
2-1.10 Describe the steps inperforming the skill ofartifically ventilating apatient with a bag-valvemask while using the jawthrust.

194 ✱ Chapter 7 Managing Your Patient’s Airway
Be sure to use the jaw-thrust maneuver when ventilating a patient with an un-known mechanism of injury or with a suspected spinal injury (Figure 7-16). Thiscan be accomplished by pulling the lower jaw up toward the mask rather than tilt-ing the head back. If the chest does not rise and you are certain there is no airwayobstruction, set aside the BVM and attempt to ventilate using the mouth-to-masktechnique.
Demand Valve TechniqueSometimes referred to as a flow-restricted, oxygen-powered ventilation device(FROPVD) the demand valve is an oxygen-powered ventilation device that pro-vides 100 percent oxygen “on demand” at a peak flow rate of approximately 40lpm. The flow of oxygen can be triggered by either the patient or the rescuer. Whenattached to a mask that is placed tight over the patient’s face, the flow of oxygencan be triggered each time the patient inhales. The device can also be triggeredmanually by the rescuer by activating a button or lever on the device itself. Becausethere is limited control over the pressure delivered by the device, it is recommendedthat demand valves only be used for adult patients. All demand valves should beconfigured with an automatic pressure-relief valve and an audible alarm thatsounds whenever the relief valve is activated (Figure 7-17).
To provide ventilations using a demand valve, follow these steps (Scan 7-8):
1. Take appropriate BSI precautions.
2. Position yourself at the top of the patient’s head.
FIGURE 7-16 Proper techniquefor performing the jaw-thrustmaneuver with two rescuers.
2-1.15 Describe the steps inartificially ventilating apatient with a flow-restricted, oxygen-poweredventilation device.
✱ demand valvea device that uses oxygen underpressure to deliver artificialventilations. It has automaticflow restriction to preventoverdelivery of oxygen to thepatient. Also called a flow-restricted, oxygen-poweredventilation device (FROPVD).
FIGURE 7-17 A demand valvewith activation button.

Chapter 7 Managing Your Patient’s Airway ✱ 195
SCAN 7-8 USING THE DEMAND VALVE
Single EMT operating a demand valve. Two EMTs ventilating a patient with a demandvalve.
▼ ▼
3. Insert an appropriate airway adjunct.
4. Ensure that the valve of the oxygen tank is open and there is plenty ofoxygen.
5. Connect a mask to the demand-valve device.
6. Place the mask over the patient’s face, beginning at the top of the nose andwalking the mask down so that it rests just below the lower lip.
7. Using both hands, form a tight seal between the mask and the patient’s facewhile maintaining a head tilt or jaw thrust.
8. Activate the device while watching for chest rise and fall.
Be sure to use the jaw-thrust maneuver when ventilating a patient with an un-known mechanism of injury or with a suspected spinal injury. This can be ac-complished by pulling the lower jaw up toward the mask rather than tilting thehead back. If the chest does not rise and you are certain there is no airway ob-struction, set aside the demand valve and attempt to ventilate using the mouth-to-mask technique.
Ventilating Pediatric PatientsThe majority of techniques discussed so far apply to all patients, including chil-dren and infants. One exception that should be noted pertains to the head-tilt,chin-lift maneuver. While it is best to achieve full extension of the neck in adults,

196 ✱ Chapter 7 Managing Your Patient’s Airway
children between the ages of 1 and 8 years generally require only moderatehyperextension of the neck to achieve an adequate airway. Infants require onlyslight extension, sometimes called the “neutral” or “sniffing” position. The pri-mary reason for avoiding full extension of the neck in pediatric patients is thepossibility that the airway could “kink,” causing a partial obstruction. This ispossible because the tracheas of children and infants do not yet have fully devel-oped cartilage rings that help prevent collapse of the trachea during hyperexten-sion (Figures 7-18 and 7-19).
Pediatric patients also require significantly smaller tidal volumes during venti-lation. Care should be taken not to overinflate these patients, as gastric distensionoccurs more easily in children and infants. Ventilate only until you see adequatechest rise.
FIGURE 7-18 Ventilation of a child using a pocket face mask.
FIGURE 7-19 One-personventilation of an infant with a BVMdevice.

Chapter 7 Managing Your Patient’s Airway ✱ 197
Patients with a StomaSome patients may have holes surgically placed in the anterior aspect of the tra-chea to allow them to breathe. This may have been done secondary to traumaor perhaps the removal of a cancerous tumor. In most instances, there will bean obvious hole (stoma) in the front of the neck inferior to the Adam’s apple.Sometimes there is a tube inserted into the hole, called a tracheotomy tube(Figure 7-20).
A patient with a tracheotomy or laryngectomy who is having difficulty breath-ing may have a buildup of secretions at the stoma causing an obstruction. Use asuction device with a soft catheter to help clear the stoma. If necessary, attempt toventilate the patient using any one of the techniques mentioned above. It may benecessary to seal the stoma with a gloved hand if air is escaping through the stomaduring ventilations. If you have no success with conventional ventilations, seal offthe mouth and nose and attempt to ventilate through the stoma. Use an infantmask to seal over the stoma as these are typically small and round. A bag-valve-mask device can be connected directly to a tracheotomy tube (Figure 7-21). Thereis no need to perform a head-tilt, chin-lift or jaw thrust when ventilating througha stoma or tracheotomy tube.
Confirming Adequate VentilationsJust like being able to assess the adequacy of a patient’s own respirations, you mustalso be able to assess the adequacy of your manual ventilations. The primary signof adequate ventilations is chest rise and fall. You should observe good chest riseand fall with each ventilation. The rate should be appropriate for the age of thepatient. It is also likely that you will see the patient’s skin signs and pulse rate im-prove with adequate ventilations.
When ventilations are inadequate, you will not see good chest rise and fall andthe rate will be below or above what is considered acceptable for the age of thepatient. It is unlikely that you will see an improvement in the patient’s skin signsor pulse rate with inadequate ventilations.
✱ stomaa permanent surgical opening inthe anterior aspect of thetrachea through which thepatient breathes.
FIGURE 7-20 A stoma with a tracheotomy tube. FIGURE 7-21 Artificial ventilation can be accomplished in the patientwith a tracheotomy tube by attaching the bag-valve-mask devicedirectly to the tube.
2-1.13 Describe the signs ofadequate artificialventilation using the bag-valve mask.
2-1.14 Describe the signs ofinadequate artificialventilation using the bag-valve mask.
198 ✱ Chapter 7 Managing Your Patient’s Airway
Mackenzie—The EMT“Once Rob cleared the obstruction from Shannon’s airway, she was
breathing on her own, but it was really shallow and not very effective. So
I started assisting her ventilations with a BVM and supplemental oxy-
gen. It was amazing! The color started coming back to her skin and
Rob told me that her pulse was returning to normal. The next thing I
knew, her eyes opened and she was looking up at me. I remember that
look of . . . I don’t know . . . confusion, maybe? I guess I’d be pretty con-
fused too if I woke up and someone was ventilating me! I’m so glad that
this call turned out good. It was like something out of a textbook or
something.”
✱
Multiple ChoicePlace a check next to the correct answer.
1. What are the two characteristics that must beassessed in order to determine adequacy ofrespirations?
_____ a. rate and ease
_____ b. rate and tidal volume
_____ c. rate and lung sounds
_____ d. tidal volume and ease
2. The normal respiratory rate for newborns isbetween ________ and ________ breaths perminute.
_____ a. 12, 20
_____ b. 20, 30
_____ c. 30, 50
_____ d. 40, 60
3. The primary mechanism for determining ifyour ventilations are adequate or not is:
_____ a. skin color.
_____ b. lung sounds.
_____ c. mental status.
_____ d. chest rise and fall.
4. Because there is limited control over thepressure delivered by this device, it isrecommended that the ________ be used onlyfor adult patients.
_____ a. demand valve
_____ b. BVM
_____ c. pocket mask
_____ d. pressure regulator

Chapter 7 Managing Your Patient’s Airway ✱ 199
5. When attached to supplemental oxygen theBVM can deliver oxygen concentrations ashigh as ________ percent.
_____ a. 21
_____ b. 44
_____ c. 60
_____ d. 100
Critical Thinking 1. Describe how you would manage an unresponsive adult patient whose respirations are 8 times per
minute and shallow.
2. You are caring for a 6-year-old near-drowning patient who is in respiratory arrest. What will beyour device of choice for ventilating this patient, and why?
3. List the special factors that must be considered when providing manual ventilations for a pediatricpatient.

200 ✱ Chapter 7 Managing Your Patient’s Airway
4. Place an “X” in the box indicating the most appropriate ventilation device for the situation.
Mouth 2-Rescuer Demand 1-Rescuer Situation to Mask BVM Valve BVM
You are alone and off duty with an unresponsive nonbreathing infant.
You, your partner, and a firefighter are ventilating a patient as you carry him down a flight of stairs on a portable stretcher.
You and a firefighter are ventilating an adult male in the back of an ambulance.
You are alone in the back of an ambulance and ventilating an 8-year-old near-drowning patient.
You are ventilating a 20-year-old male who is the third patient from an accidental carbon monoxide poisoning.
Supplemental OxygenThe Food and Drug Administration has identified medical gases such as oxygen,carbon dioxide, helium, nitrogen, nitrous oxide, medical air, and combinations ofthese as drugs and requires them to be dispensed by prescription. In its naturalstate, oxygen is an odorless, colorless, and tasteless gas. Our atmosphere is madeup of approximately 21 percent oxygen, 78 percent nitrogen and 1 percent otherelements. When our bodies are functioning normally, room air provides an oxy-gen concentration that is more than adequate to support life.
Good perfusion occurs when all cells of the body receive an adequate supplyof well oxygenated blood. When a person experiences a serious illness or injury,his body’s ability to utilize oxygen is likely to become compromised. This com-promise will almost always result in poor perfusion, which can lead to shock andeventually death if not treated properly.
It is safe to say that all victims of illness or injury can benefit from oxygen(Figure 7-22). Some will benefit from larger concentrations while others will re-spond well to lower concentrations. The point is that oxygen is one of the mostimportant medical interventions the EMT can offer victims of illness and injury.
OXYGEN CYLINDERSOxygen is stored under pressure in containers known as cylinders, bottles, ortanks. Cylinders can be made of aluminum, steel, or composite materials. Oxygencylinders come in a variety of sizes with each size designated by a specific letter.Each size also contains a specific amount of oxygen when compressed to approx-imately 2,015 pounds per square inch (psi). The following list includes the most
2-1.19 Identify the components ofan oxygen delivery system.
✱ perfusionthe supply of oxygen to andremoval of wastes from thecells and tissues of the body asa result of the flow of bloodthrough the capillaries. See alsohypoperfusion.

Chapter 7 Managing Your Patient’s Airway ✱ 201
FIGURE 7-22 Patient receiving supplemental oxygen via a nonrebreather mask.
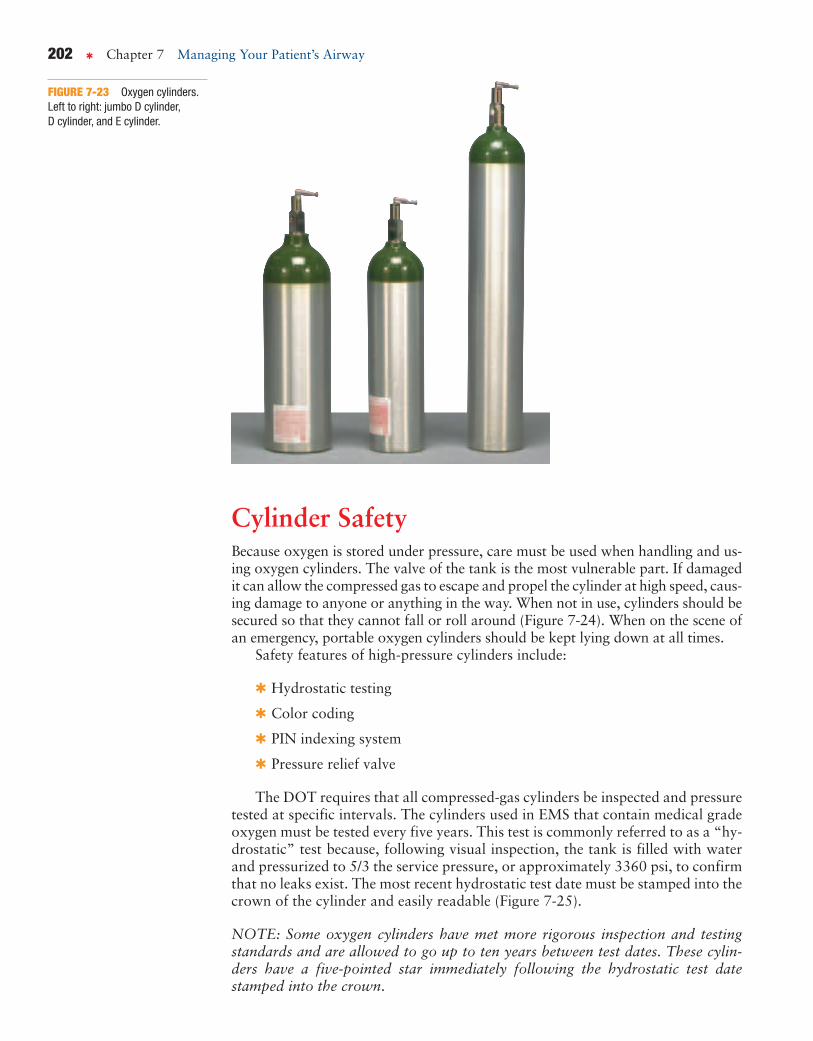
common cylinder sizes found in EMS along with the approximate volume in litersof oxygen (Figure 7-23 on page 202):
✱ D cylinder contains up to 425 liters
✱ Jumbo D cylinder contains up to 640 liters
✱ E cylinder contains up to 680 liters
✱ M cylinder contains up to 3,000 liters
✱ G cylinder contains up to 5,300 liters
✱ H cylinder contains up to 6,900 liters
Oxygen cylinders are comprised of two main components: the cylinder, whichcontains the pressurized oxygen, and a valve at the top, which opens and closesthe cylinder. The pressure regulator attaches to the cylinder valve when in use.
OXYGEN USE CRITERIA
The Food and Drug Administration allows oxygen (typically a prescription drug) to bemarketed and used as a nonprescription medication under certain criteria:
✱ That the oxygen unit must deliver a minimum of 6 liters per minute for at least 15 minutes
✱ That the oxygen unit must be clearly labeled as emergency oxygen
✱ That the providers be trained in the safe use and storage of oxygen
✱ That the oxygen unit be packaged with an appropriate delivery device
202 ✱ Chapter 7 Managing Your Patient’s Airway
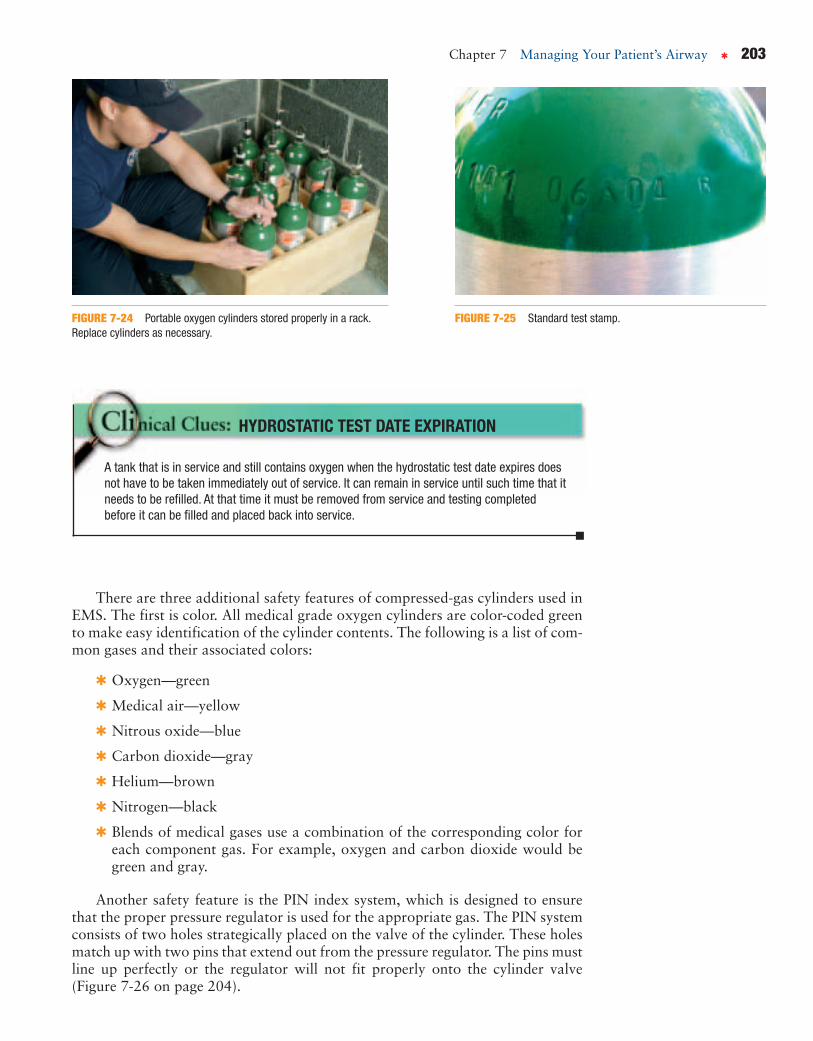
Cylinder SafetyBecause oxygen is stored under pressure, care must be used when handling and us-ing oxygen cylinders. The valve of the tank is the most vulnerable part. If damagedit can allow the compressed gas to escape and propel the cylinder at high speed, caus-ing damage to anyone or anything in the way. When not in use, cylinders should besecured so that they cannot fall or roll around (Figure 7-24). When on the scene ofan emergency, portable oxygen cylinders should be kept lying down at all times.
Safety features of high-pressure cylinders include:
✱ Hydrostatic testing
✱ Color coding
✱ PIN indexing system
✱ Pressure relief valve
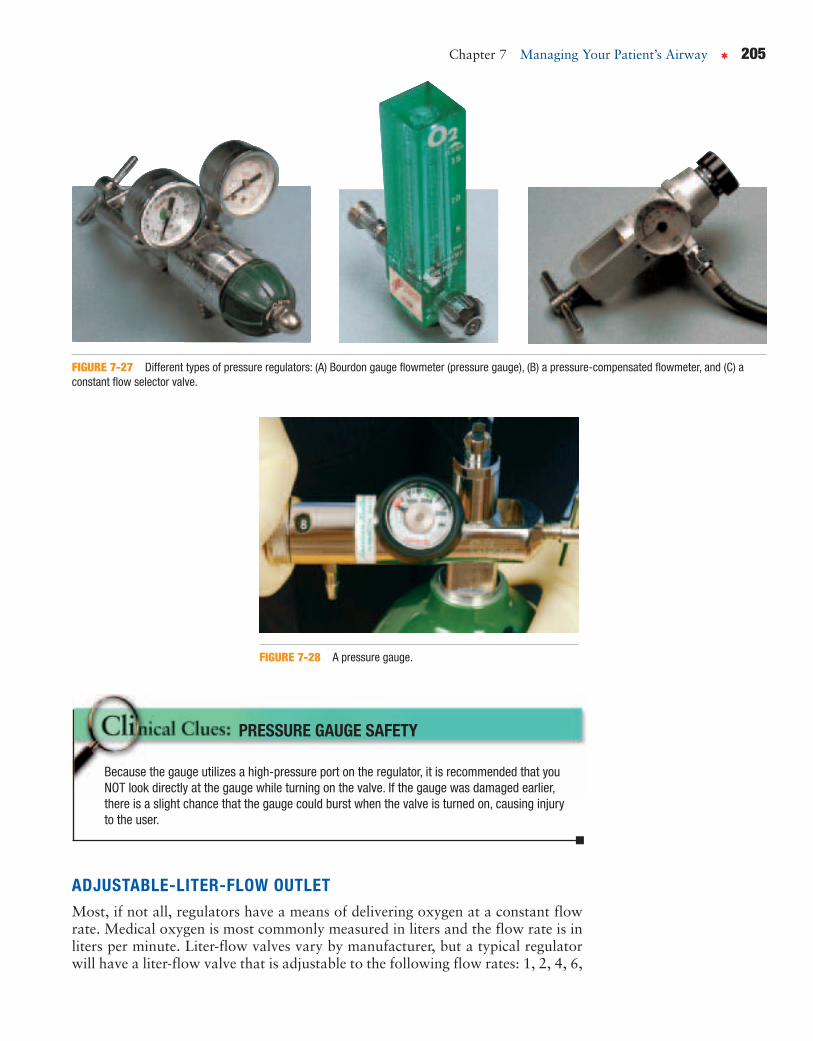
The DOT requires that all compressed-gas cylinders be inspected and pressuretested at specific intervals. The cylinders used in EMS that contain medical gradeoxygen must be tested every five years. This test is commonly referred to as a “hy-drostatic” test because, following visual inspection, the tank is filled with waterand pressurized to 5/3 the service pressure, or approximately 3360 psi, to confirmthat no leaks exist. The most recent hydrostatic test date must be stamped into thecrown of the cylinder and easily readable (Figure 7-25).
NOTE: Some oxygen cylinders have met more rigorous inspection and testingstandards and are allowed to go up to ten years between test dates. These cylin-ders have a five-pointed star immediately following the hydrostatic test datestamped into the crown.
FIGURE 7-23 Oxygen cylinders.Left to right: jumbo D cylinder,D cylinder, and E cylinder.
Chapter 7 Managing Your Patient’s Airway ✱ 203
FIGURE 7-24 Portable oxygen cylinders stored properly in a rack.Replace cylinders as necessary.
There are three additional safety features of compressed-gas cylinders used inEMS. The first is color. All medical grade oxygen cylinders are color-coded greento make easy identification of the cylinder contents. The following is a list of com-mon gases and their associated colors:
✱ Oxygen—green
✱ Medical air—yellow
✱ Nitrous oxide—blue
✱ Carbon dioxide—gray
✱ Helium—brown
✱ Nitrogen—black
✱ Blends of medical gases use a combination of the corresponding color foreach component gas. For example, oxygen and carbon dioxide would begreen and gray.
Another safety feature is the PIN index system, which is designed to ensurethat the proper pressure regulator is used for the appropriate gas. The PIN systemconsists of two holes strategically placed on the valve of the cylinder. These holesmatch up with two pins that extend out from the pressure regulator. The pins mustline up perfectly or the regulator will not fit properly onto the cylinder valve(Figure 7-26 on page 204).
FIGURE 7-25 Standard test stamp.
HYDROSTATIC TEST DATE EXPIRATION
A tank that is in service and still contains oxygen when the hydrostatic test date expires doesnot have to be taken immediately out of service. It can remain in service until such time that itneeds to be refilled. At that time it must be removed from service and testing completedbefore it can be filled and placed back into service.

204 ✱ Chapter 7 Managing Your Patient’s Airway
Still another safety feature is the pressure-relief valve. This is located on thecylinder valve and will allow for escape of the gas should the pressure inside the cylinder exceed a predetermined level. The release of pressure will prevent thecylinder from exploding.
PRESSURE REGULATORSA full oxygen cylinder is pressurized to approximately 2,015 psi. This pressure willvary somewhat depending on the temperature of the environment. For the oxygento be used by a patient, the pressure must be reduced to allow for a controlled de-livery. An appropriate pressure regulator is used for this purpose. A typical pres-sure regulator will reduce the pressure to between 40 and 60 psi.
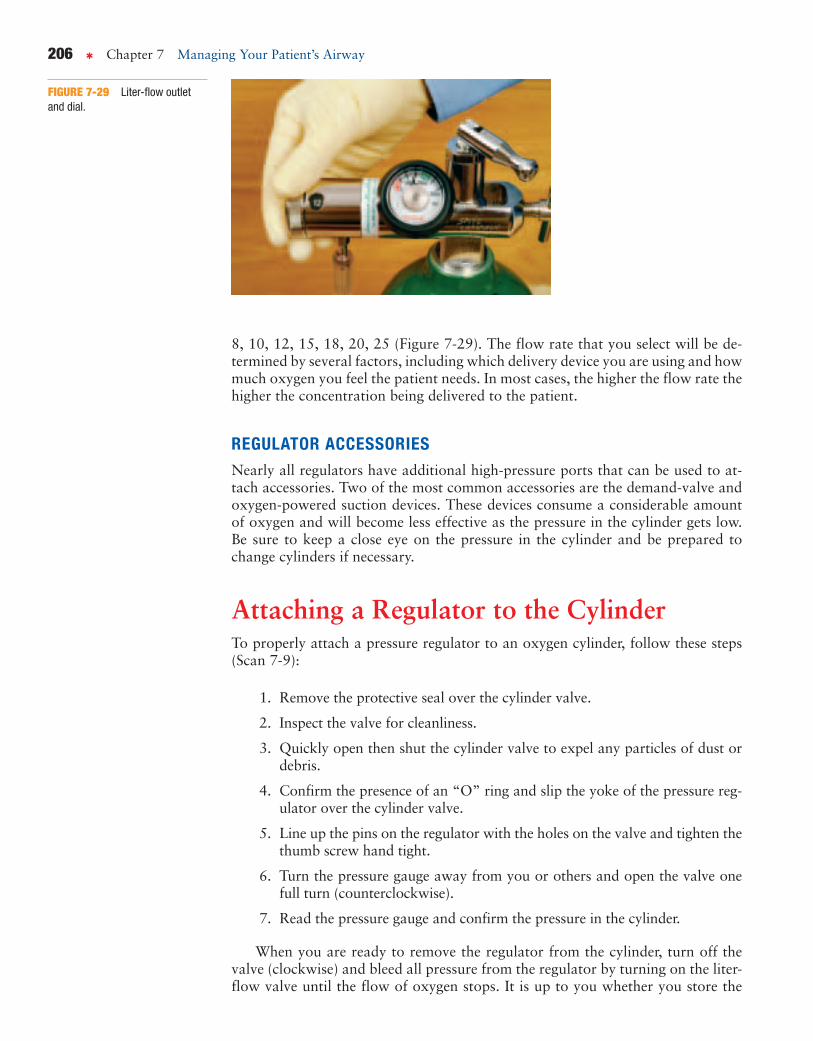
Functions of the Pressure RegulatorPressure regulators can have several functions in addition to simply regulating thepressure inside the cylinder (Figure 7-27 ). Depending on how they are configuredthey may be able to provide the following functions:
✱ Pressure gauge
✱ Adjustable-liter-flow outlet
✱ High-pressure port for use with a demand-valve or oxygen-powered suc-tion device
PRESSURE GAUGEIt’s probably safe to say that all regulators used in EMS have an integrated pres-sure gauge (Figure 7-28). Once the regulator is placed onto the cylinder valve andthe valve turned on, the pressure gauge will display the amount of pressure insidethe cylinder. Gauges are calibrated in pounds per square inch, so the dial will re-veal the amount of pressure remaining in the cylinder in psi. For practical purposesa cylinder with 2,000 psi is considered full, 1,000 psi is half full and 500 psi is onequarter full. In many EMS systems, a tank that is less than 500 psi is either refilledor replaced with a full cylinder.
FIGURE 7-26 The PIN safetysystem.
Chapter 7 Managing Your Patient’s Airway ✱ 205
FIGURE 7-27 Different types of pressure regulators: (A) Bourdon gauge flowmeter (pressure gauge), (B) a pressure-compensated flowmeter, and (C) aconstant flow selector valve.
FIGURE 7-28 A pressure gauge.
ADJUSTABLE-LITER-FLOW OUTLETMost, if not all, regulators have a means of delivering oxygen at a constant flowrate. Medical oxygen is most commonly measured in liters and the flow rate is inliters per minute. Liter-flow valves vary by manufacturer, but a typical regulatorwill have a liter-flow valve that is adjustable to the following flow rates: 1, 2, 4, 6,
PRESSURE GAUGE SAFETY
Because the gauge utilizes a high-pressure port on the regulator, it is recommended that youNOT look directly at the gauge while turning on the valve. If the gauge was damaged earlier,there is a slight chance that the gauge could burst when the valve is turned on, causing injuryto the user.
206 ✱ Chapter 7 Managing Your Patient’s Airway
8, 10, 12, 15, 18, 20, 25 (Figure 7-29). The flow rate that you select will be de-termined by several factors, including which delivery device you are using and howmuch oxygen you feel the patient needs. In most cases, the higher the flow rate thehigher the concentration being delivered to the patient.
REGULATOR ACCESSORIESNearly all regulators have additional high-pressure ports that can be used to at-tach accessories. Two of the most common accessories are the demand-valve andoxygen-powered suction devices. These devices consume a considerable amountof oxygen and will become less effective as the pressure in the cylinder gets low.Be sure to keep a close eye on the pressure in the cylinder and be prepared tochange cylinders if necessary.
Attaching a Regulator to the CylinderTo properly attach a pressure regulator to an oxygen cylinder, follow these steps(Scan 7-9):
1. Remove the protective seal over the cylinder valve.
2. Inspect the valve for cleanliness.
3. Quickly open then shut the cylinder valve to expel any particles of dust ordebris.
4. Confirm the presence of an “O” ring and slip the yoke of the pressure reg-ulator over the cylinder valve.
5. Line up the pins on the regulator with the holes on the valve and tighten thethumb screw hand tight.
6. Turn the pressure gauge away from you or others and open the valve onefull turn (counterclockwise).
7. Read the pressure gauge and confirm the pressure in the cylinder.
When you are ready to remove the regulator from the cylinder, turn off thevalve (clockwise) and bleed all pressure from the regulator by turning on the liter-flow valve until the flow of oxygen stops. It is up to you whether you store the
FIGURE 7-29 Liter-flow outletand dial.
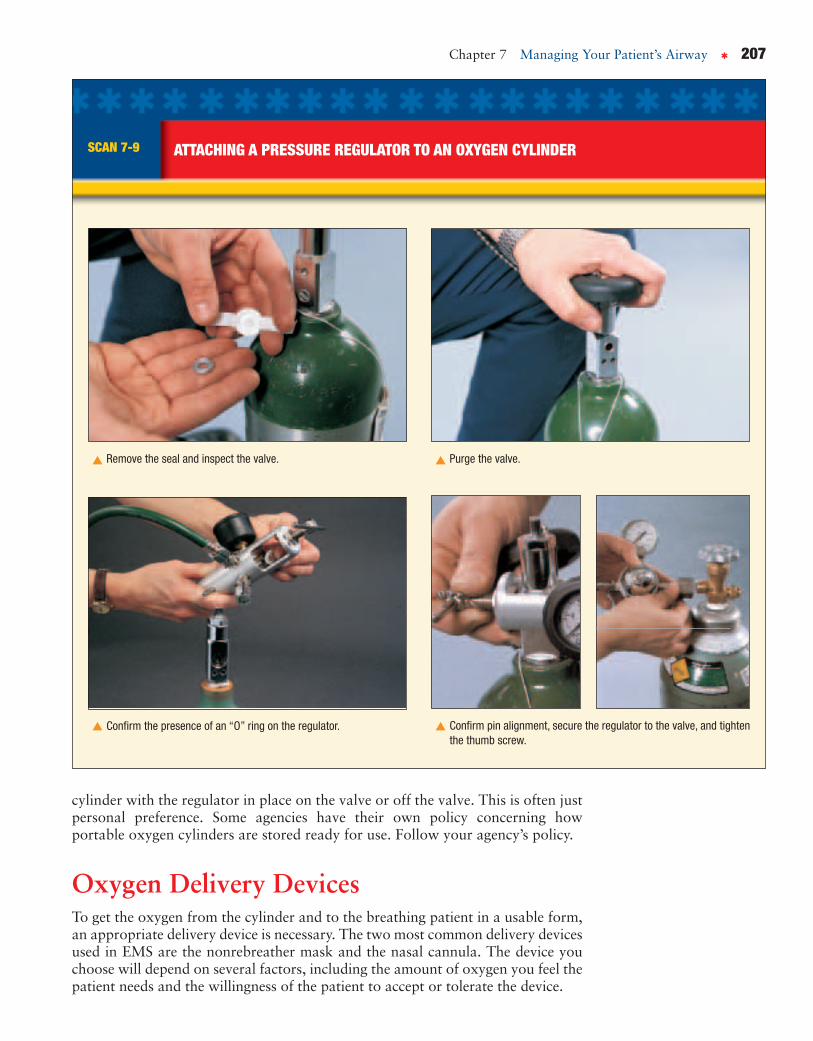
Chapter 7 Managing Your Patient’s Airway ✱ 207
cylinder with the regulator in place on the valve or off the valve. This is often justpersonal preference. Some agencies have their own policy concerning howportable oxygen cylinders are stored ready for use. Follow your agency’s policy.
Oxygen Delivery DevicesTo get the oxygen from the cylinder and to the breathing patient in a usable form,an appropriate delivery device is necessary. The two most common delivery devicesused in EMS are the nonrebreather mask and the nasal cannula. The device youchoose will depend on several factors, including the amount of oxygen you feel thepatient needs and the willingness of the patient to accept or tolerate the device.
SCAN 7-9 ATTACHING A PRESSURE REGULATOR TO AN OXYGEN CYLINDER
Remove the seal and inspect the valve. Purge the valve.
Confirm the presence of an “O” ring on the regulator.
▼
▼ ▼
Confirm pin alignment, secure the regulator to the valve, and tightenthe thumb screw.
▼

208 ✱ Chapter 7 Managing Your Patient’s Airway
Regardless of the liter-flow device being used, it is important to determine thatthe patient is breathing at an adequate rate and volume. Liter-flow devices providepassive oxygen flow, which means that the patient must be breathing adequatelyon his own to realize any benefit from the oxygen. The purpose of these devices isto increase the concentration of available oxygen to the patient. Liter-flow devicesDO NOT provide ventilations for the patient.
Nonrebreather MaskIn most situations in the prehospital setting, the nonrebreather mask is the pre-ferred device for delivering a constant flow of oxygen to the breathing patient. Itis called a nonrebreather mask because the design allows only minimal rebreath-ing of the patient’s exhaled air. It consists of a clear face mask, a one-way valve,an oxygen reservoir, and the supply tubing (Figure 7-30).
Sometimes referred to as a “high-flow” device, the nonrebreather mask worksbest at a liter-flow rate of 15 lpm. When properly placed, the nonrebreather maskcan increase the concentration of available oxygen to 90 percent.
To properly apply a nonrebreather mask to a patient, follow these steps(Scan 7-10):
1. Confirm that the patient is breathing with an adequate rate and tidal volume.
2. Advise the patient that you are going to give him some oxygen.
3. Select the appropriate size mask for the patient.
4. Connect the mask supply tubing to an appropriate oxygen source andadjust the liter flow to 15 lpm.
5. Place your thumb over the one-way valve inside the mask to expedite the fill-ing of the reservoir.
FIGURE 7-30 A nonrebreathermask.
NONREBREATHER MASK
Because a nonrebreather mask is not air tight, it will always allow some ambient air in aroundthe seal. For this reason a nonrebreather mask is not capable of providing a breathableoxygen concentration of 100 percent.
2-1.20 Identify a nonrebreatherface mask and state theoxygen flow requirementsneeded for its use.
✱ nonrebreather maska face mask and reservoir bagdevice that delivers highconcentrations of oxygen.

Chapter 7 Managing Your Patient’s Airway ✱ 209
SCAN 7-10 APPLYING A NONREBREATHER MASK TO A PATIENT
Inflate the reservoir.Connect the mask to the device.
Place the mask over the patient’s face.
▼
▼ ▼
6. Place the mask over the patient’s face, starting at the bridge of the nose andwalking the mask down the face.
7. Place the elastic band around the patient’s head and pull the ends throughthe mask to ensure a snug fit. Squeeze the aluminum nose strap to help sealthe mask across the nose.
Keep a close eye on the reservoir bag as the patient breathes in and out. Thebag should NOT completely deflate when the patient breathes in. The bag shouldalso have enough time to completely refill between breaths. If the reservoir be-comes deflated or does not refill completely between breaths, increase the liter-flow rate as appropriate.

210 ✱ Chapter 7 Managing Your Patient’s Airway
2-1.21 Describe the indications forusing a nasal cannulaversus a nonrebreatherface mask.
2-1.22 Identify a nasal cannulaand state the flowrequirements needed for itsuse.
✱ nasal cannulaa device that delivers lowconcentrations of oxygenthrough two prongs that rest inthe patient’s nostrils.
FIGURE 7-31 A nasal cannula properly placed on an adult patient.
Nasal CannulaA nasal cannula is used for patients who simply do not tolerate the nonrebreathermask or for patients who are not that critical and may benefit from lower con-centrations of oxygen. Patients sometimes feel that their breathing is being re-stricted by the nonrebreather mask because it covers their entire face, despite thefact that it is delivering oxygen. Before giving up on the mask, you should makeevery attempt to “coach” the patient into getting used to the mask. If that does notwork, many patients will tolerate a nasal cannula just fine.
The nasal cannula consists of a loop of tubing with a pair of prongs (short nar-row tubes) that are placed into the patient’s nostrils. The loop has an adjustableband and is connected to the supply tubing.
Sometimes referred to as a “low-flow” device, the nasal cannula works best at liter-flow rates between 2 and 6 lpm. When properly placed, the nasal cannula can increasethe concentration of available oxygen to approximately 44 percent (Figure 7-31).
To properly apply a nasal cannula to a patient, follow these steps (Scan 7-11):
1. Confirm that the patient is breathing with an adequate rate and tidal volume.
2. Advise the patient that you are going to give him some oxygen.
Mackenzie—The EMT“After the patient regained consciousness, I knew that she’d need a good
amount of oxygen to help recover from going four or five minutes with-
out any. I chose to put her on a nonrebreather mask with the oxygen set
at 15 liters. Because of my nervousness, I forgot to prefill the oxygen
reservoir, but Rob was nice enough to remind me.”
✱

Chapter 7 Managing Your Patient’s Airway ✱ 211
SCAN 7-11 APPLYING A NASAL CANNULA
Connect the nasal cannula to the regulator. Adjust the nasal cannula to full open.
Place the prongs in the patient’s nose. Wrap the tubing around the patient’s ears.
Adjust the slide under the patient’s chin.
▼
▼ ▼
▼ ▼

3. Select the appropriate size cannula for the patient.
4. Connect the cannula supply tubing to an appropriate oxygen source and ad-just the liter flow to between 2 and 6 lpm.
5. Slide the adjusting band downward to allow for full expansion of the can-nula loop.
6. Grasp the loop with the thumb and index finger of each hand on either sideof the prongs.
7. Advise the patient that the prongs will tickle a little bit but will not hurt. In-sert the prongs into the patient’s nostrils.
8. Slide your fingers along the loop and wrap each side around the patient’sears.
9. Slide the adjusting band up under the chin to take up any slack in the loop.Advise the patient to breathe through his nose.
Some EMS professionals prefer the cannula simply because it makes it easierto hear the patient when they are trying to get a medical history. This is not a goodreason to choose the cannula. When a patient is in need of supplemental oxygen,the device of choice should be the nonrebreather mask. Only if the patient will sim-ply not tolerate the mask should you attempt a nasal cannula. The device of choicemay also be specified by your local protocols.
212 ✱ Chapter 7 Managing Your Patient’s Airway
FIGURE 7-32 A simple oxygenhumidifier.

HUMIDIFIED OXYGENCompressed oxygen that is stored in cylinders is extremely dry and can cause dry-ness and irritation to the mucous membranes, especially in the nasal passages(Figure 7-32). If possible, liter-flow oxygen should be run through an oxygen hu-midifier. An oxygen humidifier is a container of sterile water that is connected tothe oxygen supply between the patient and the cylinder. As the oxygen passesthrough the water, it picks up tiny water molecules. This added moisture minimizesthe chances of dryness and irritation that the patient may experience. Humidifiersare found in hospitals and some ambulances and not typically used with portableoxygen cylinders.
Chapter 7 Managing Your Patient’s Airway ✱ 213
Multiple ChoicePlace a check next to the correct answer.
1. The oxygen concentration that is normallypresent in the air we breathe is ________percent.
_____ a. 19
_____ b. 21
_____ c. 44
_____ d. 78
2. In round numbers, an oxygen cylinder isconsidered full if it contains ________ psi ofpressure.
_____ a. 500
_____ b. 1,500
_____ c. 2,000
_____ d. 3,600
3. Which of the following is NOT a safetyfeature of high-pressure cylinders?
_____ a. hydrostatic testing
_____ b. color coding
_____ c. PIN indexing system
_____ d. round shape
4. The appropriate liter-flow range for a nasalcannula is between ________ and ________lpm.
_____ a. 2, 6
_____ b. 4, 8
_____ c. 10, 12
_____ d. 12, 15
5. A nonrebreather mask that is set at 15 lpm willdeliver an oxygen concentration ofapproximately ________ percent.
_____ a. 30
_____ b. 50
_____ c. 90
_____ d. 100

214 ✱ Chapter 7 Managing Your Patient’s Airway
MatchingMatch the piece of equipment on the left with the applicable definition on the right.
1. _____ Stoma
2. _____ OPA
3. _____ Nonrebreather mask
4. _____ Nasal cannula
5. _____ BVM
A. A low-flow O2 delivery device that is placed in the noseB. A device used to provide manual ventilations for a
nonbreathing patientC. A curved plastic device used to keep the tongue from
blocking the airwayD. A high-flow oxygen delivery device with an inflatable O2
reservoirE. A hole surgically placed in the anterior aspect of the
trachea
Critical Thinking1. What is the difference between medical oxygen and the air that we breathe in the atmosphere?
2. Explain how supplemental oxygen can help improve a patient’s perfusion status.
3. Explain why an NRB mask is not capable of providing a breathable oxygen concentration of 100 percent.

✱
Once Shannon had regained consciousnessand started breathing normally with the non-rebreather mask, Mackenzie urged her to be
seen by a doctor in the emergency room. At first Shan-non declined, citing embarrassment over the whole in-cident. She soon changed her mind after Rob explainedsome of the complications that could arise as the resultof having choked to the point of unconsciousness.
Rob and Mackenzie then helped Shannon ontotheir stretcher and into the ambulance where theytransported her, still on oxygen and without incident, toMemorial Hospital.
Her boyfriend followed them in his own car.
It cannot be overstated how important a patent airway and adequate ventilationsare. Once it has been determined that the scene is safe, these two things becomeyour top priority.
The use of airway adjuncts will assist you in maintaining an open airway, butthey must be used in conjunction with close monitoring of the airway.
As an EMT you have several options for ventilating a patient with inadequateor absent respirations. These options are listed here in the order of preference:
1. Mouth-to-Mask2. Two-rescuer BVM3. Demand valve4. Single-rescuer BVM
Whenever possible it is strongly suggested that you use supplemental oxygenwhen ventilating a patient. Supplemental oxygen increases the concentrationavailable to the patient and helps compensate for inadequate perfusion caused byillness and injury.
Constant-flow delivery devices such as the nonrebreather mask and the nasalcannula are passive devices and require the patient to be moving air adequately onhis own in order to benefit from them.
Chapter 7 Managing Your Patient’s Airway ✱ 215

MULTIPLE CHOICEPlace a check next to the correct answer.
1. During the respiratory assessment of the patient,the EMT must ensure that the patient has an openairway and has adequate:
_____ a. capillary refill.
_____ b. skin color.
_____ c. tidal volume.
_____ d. pulses.
2. Which of the following are structures of the lowerairway?
_____ a. esophagus, bronchi, larynx
_____ b. trachea, bronchi, alveoli
_____ c. nasopharynx, larynx, oropharynx
_____ d. trachea, pharynx, alveoli
3. The movement of air in and out of the lungs iscalled:
_____ a. respiration.
_____ b. exhalation.
_____ c. inhalation.
_____ d. ventilation.
4. Which of the following best describes the most ap-propriate way to open the airway of a child with nospinal injury?
_____ a. jaw thrust
_____ b. head tilt with full extension
_____ c. the sniffing position
_____ d. head tilt with slight extension
5. The recommended time allowed for suctioning aninfant’s airway is ________ seconds.
_____ a. 5
_____ b. 10
_____ c. 15
_____ d. 20
6. Rigid suction catheters are best suited for suction-ing the:
_____ a. nose of infants.
_____ b. mouth of an adult patient.
_____ c. the nose of an adult patient.
_____ d. the mouth of an infant.
7. Ventilating a patient with a BVM is best if per-formed:
_____ a. by a single rescuer.
_____ b. on responsive patients.
_____ c. by two rescuers.
_____ d. in the prone position.
8. Which maneuver is most appropriate for openingthe airway of a child with suspected spinal injury?
_____ a. modified chin lift
_____ b. head-tilt, chin-lift
_____ c. jaw thrust
_____ d. cross-finger technique
9. Which of the following best represents the most ap-propriate PPE for suctioning a patient?
_____ a. gloves and face mask
_____ b. gloves and gown
_____ c. gloves and eye protection
_____ d. gloves, mask, and eye protection
10. The appropriate liter-flow rate for a nonrebreathermask is ________ lpm.
_____ a. 6
_____ b. 10
_____ c. 15
_____ d. 30
216 ✱ Chapter 7 Managing Your Patient’s Airway

Chapter 7 Managing Your Patient’s Airway ✱ 217
CRITICAL THINKING1. How can you determine if the flow rate on a nonrebreather mask is adequate for the patient’s condition?
2. A nonrebreather mask and a cannula are sometimes referred to as “passive” delivery devices. Explain what ismeant by “passive” and how these devices differ from the demand-valve or the BVM.
3. Explain why a patient on a nonrebreather mask is not receiving a breathable concentration of 100% oxygen.
CASE STUDIES
Case Study 1
You have responded to a scene where a motorcycle has impacted a guardrail at a high rate of speed. Thepatient is unresponsive and lying face up. His helmet was removed by firefighters at the scene, and hehas an obvious open fracture of the lower left leg. Your initial assessment finds the man’s respirations tobe 8 and shallow, and you can hear gurgling as he breathes.
1. What is your first priority for this patient?
2. What will you do to address that priority?
218 ✱ Chapter 7 Managing Your Patient’s Airway
3. What device will you use to ventilate this patient?
Case Study 2
You have responded to a possible overdose at a homeless shelter. Upon arrival you find an approximately30-year-old female lying on the bathroom floor with some vomit near her mouth. She is breathing ap-proximately 10 times per minute and very shallow.
1. What method will you use to open this woman’s airway and why?
2. Will you need to provide assisted ventilations for this patient? If so, what device will you use?
3. What position might be the best for this patient as you transport her to the hospital?