Hephestos Maintenance Manual - storage.googleapis.com...// Hephestos Maintenance Manual English 7....
15
Hephestos Maintenance Manual
Transcript of Hephestos Maintenance Manual - storage.googleapis.com...// Hephestos Maintenance Manual English 7....

Hephestos
Maintenance Manual

© 2016 Mundo Reader SL. All rights reserved. The reproduction, copying, distribution, publication or modification of this material is
strictly prohibited unless carried out with the express prior written consent of Mundo Reader. As a sole exception to the previous,
Mundo Reader authorises the translation to other languages for educational purposes only. Profit making or commercial purposes are
forbidden. The clarification:“The present text is not an official BQ translation” must be included in these translations. Mundo Reader
shall not be responsible for the accuracy of said translations and reserves the right to request their removal from the public domain if
it sees fit.

Contents
04 About This manual
05 1.Checking the nuts and bolts
07 2.Cleaning the electronics
09 3.Checking the tension of the belts
09 4.Cleaning and lubricating the threaded and smooth rods
11 5.Cleaning the bed’s glass
12 6.Cleaning the Hot-End12 Step 1. Remove the protective part that surrounds the tip of the Hot-End. 12 Step 2. Perform a homing cycle via de LCD (Menu > Control > Move axis > Auto home).12 Step 3. Removing the filament.13 Step 4. Unclogging.13 Step 5. Cleaning the exterior of the Hot-End’s tip. 13 Step 6. Replacing the protective part.
14 7.Levelling the bed

4
// Hephestos Maintenance Manual English
About This Manual
Routine maintenance on your Hephestos should be carried out as described in the steps below. We want your Hephestos to be always ready and to produce the best possible results. The frequency with which this maintenance should be done will depend on the printer’s usage.
1. Checking the nuts and bolts.
2. Cleaning the electronics.
3. Checking the tension of the belts.
4. Cleaning and lubricating the threaded and smooth rods.
5. Cleaning the bed’s glass.
6. Cleaning the Hot-End.
7. Levelling the bed.

5
// Hephestos Maintenance Manual English
1. Checking the nuts and bolts.
Before starting make sure the printer is completely disconnected. This allows the axes to be moved without damaging the motors or electronics and also avoids potentially hazardous situations while performing the check.
Vibration during printing can cause the printer’s nuts and bolts to loosen.
It is advisable to start with the nuts on the base (front, side, frame and rear).
Next, move on to the bolts that hold the motors.
6
// Hephestos Maintenance Manual English
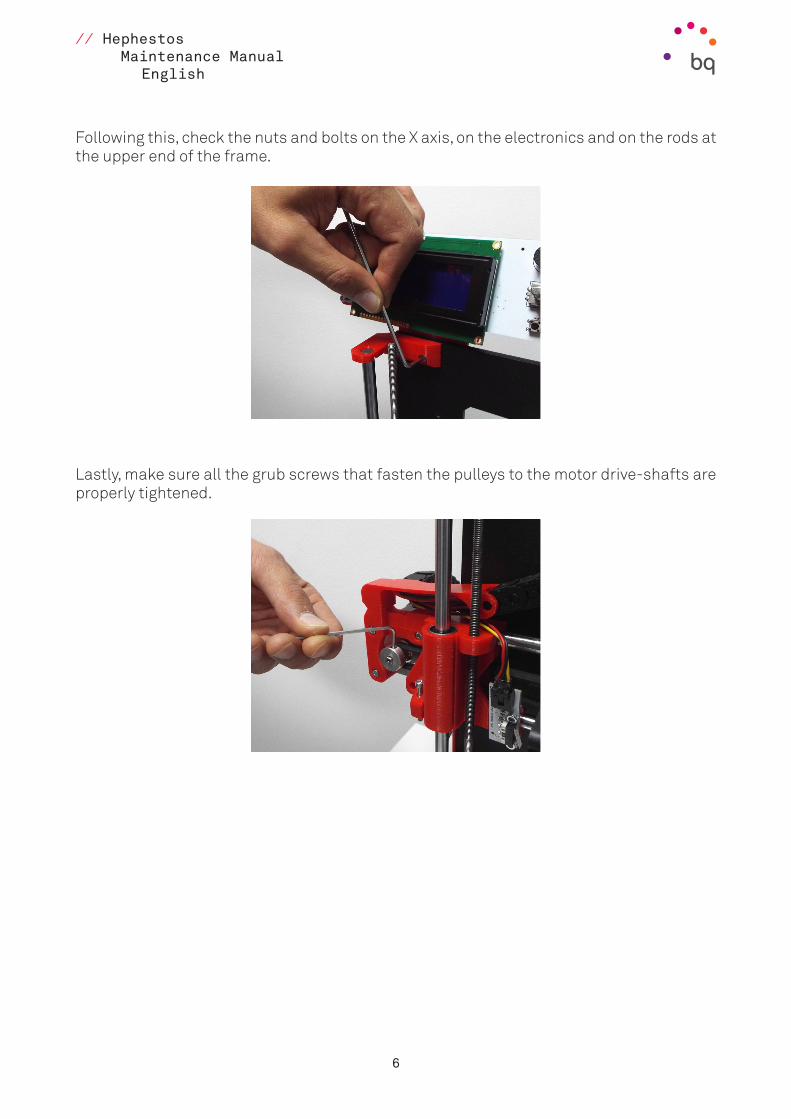
Following this, check the nuts and bolts on the X axis, on the electronics and on the rods at the upper end of the frame.
Lastly, make sure all the grub screws that fasten the pulleys to the motor drive-shafts are properly tightened.

7
// Hephestos Maintenance Manual English
2. Cleaning the fans and the electronics.
Dust accumulates on the fan blades and the electronics. This accumulation can cause cooling problems or faults in the electronics.
Clean the controller board with a soft brush taking care not to disconnect any cables or damage any components.
Ensure all the cables are properly connected.
The extruder has two fans, clean the side one first. First, manually move the extruder carriage to the right. Remove the bolts from the side fan and take it off the extruder. A metal part is adjacent to the fan, this is the heat sink. Separate it from the fan. Using the brush clean both sides of the fan blades and the entire surface of the heat sink.
Once this is done remove any accumulated dust and dirt from the interior of the extruder. Do this by stroking the brush from the inside toward the outside.

8
// Hephestos Maintenance Manual English
Reassemble the fan and the heat sink. When reassembling, ensure the sticker on the fan faces the extruder. Placing it the opposite way will reverse the air flow. If the fan has been assembled incorrectly, remove and reassemble it properly before printing.
The front fan must be cleaned without taking it off the extruder. Insert the brush between the blades and gently clean them.

9
// Hephestos Maintenance Manual English
3. Checking the tension of the belts.
Check the belts regularly given that with time and use they can lose tension. Loose belts can cause flaws in the print.
Move the belt with your fingers. If there is no play then it is tense. If it is loose, tense it using the tensioner.
4. Cleaning the threaded and smooth rods.
The smooth and threaded rods on the Z axis must be clean and lubricated so that the linear bearings and nuts move effortlessly without producing noise or annoying vibrations.
Start by cleaning the smooth rods with a paper towel. Linear bearings tend to push any dirt toward the ends of the rod causing it to accumulate there. Once clean, put a few drops of general-use liquid oil on a paper towel or cloth and wipe the rods with it.

10
// Hephestos Maintenance Manual English
When the smooth rods are done, use the brush to remove any dirt from the threaded rods on the Z axis. Apply a couple of drops of synthetic grease to each nut that transmits movement from the rods on the Z axis. Apply a couple of drops to each linear bearing as well.

11
// Hephestos Maintenance Manual English
5. Cleaning the bed’s glass.
Applying hairspray to the glass before printing will form a layer that thickens each time the said spray is used. This layer may also be formed by the remains of plastic from previous prints. It is advisable to clean the glass every so often given that the increasing thickness of this residue layer might cause the first layers of an object not to print correctly.
To clean the glass remove the clips that hold it to the aluminium base. The easiest cleaning method is to place it under a tap with hot water and remove the remains with a spatula.
Once this layer has been removed dry the glass thoroughly on both sides. Put it back onto the aluminium base and fasten with the clips.

12
// Hephestos Maintenance Manual English
6. Cleaning the Hot-End.
This procedure can be particularly hazardous if these steps are not followed. Adult supervision is required.
The Hot-End is the part that heats up and from where the hot plastic filament issues. Occasionally the interior of this part can become clogged preventing the plastic from flowing through it and consequently causing the printer to malfunction.
Step 1. Remove the protective part that surrounds the tip of the Hot-End
Do this by removing the screw that holds it. Once this part has been removed reconnect the power to the printer.
Step 2. Perform a homing cycle via de LCD (Menu > Control > Move axis > Auto home)
To facilitate access to the Hot-End’s nozzle move the X axis to 100.0mm and raise the Z axis to 160.0mm. Do this by accessing Menu > Control > Move Axis > Jog > Move 1mm > Move X and then turning the encoder until 100.0mm appears on the display. Position the Z axis at 160.0mm in the same way.
Step 3. Removing the filament
Once the axis has lifted and the motors have stopped, the filament can be removed from the extruder. Do this by accessing the filament change menu (Menu > Control > Filament > Unload). The Hot-End will start to heat up. From this point on exercise caution to avoid injury.

13
// Hephestos Maintenance Manual English
Step 4. Unclogging
Once the filament has been removed insert the tip of the acupuncture needle into the Hot-End’s nozzle (through the lower end). Take care not to place your fingers too close to the Hot-End. Move the needle up and down a few times. This movement will dislodge any residual plastic inside the Hot-End, effectively unclogging it. If the needle does not work, carefully insert a 1.5mm Allen key into the top end of the extruder and press down to dislodge any residual plastic inside the Hot-End.
Step 5. Cleaning the exterior of the Hot-End’s tip
Clean the exterior of the Hot-End’s tip with a wire-brush. Be very careful not to damage the wiring of the ceramic cartridge or of the thermistor.
Step 6. Replacing the protective part
To avoid burns it is important to let the Hot-End cool down completely before proceeding. When the temperature of the Hot-End is below 40º replace the protective part and its screw.

14
// Hephestos Maintenance Manual English
7. Levelling the bed.
A level bed is crucial for obtaining a good quality print.
The following symptoms indicate the bed needs calibrating:
• The prints come unstuck. This is because the separation between the extruder and the bed is too wide. Use hairspray, Fixpad or masking tape to strengthen adherence to the print bed.
• The first layer lacks PLA. This is usually due to the tip being too close to the bed which prevents the PLA from exuding.
• Large prints lift on one side or the first layer is uneven. This means the bed is not perfectly parallel with the XY plane. Repeat the levelling process and ensure that the distance between the tip and the bed is equal in each corner.
To level the bed, go to Menu > Control > Level plate. The extruder will position itself four points away from the bed. As a guide, place a sheet of paper between the nozzle and the bed. A slight resistance should be felt when moving the paper. Adjust the separation distance for each corner by turning its corresponding knurled knob.
Carrying out this maintenance regularly will keep the printer in optimal condition.