Help Document of Focuskyfocusky.com/manual/focusky-help-document.pdf · Help Document of Focusky...
47
Help Document of Focusky (2016/3/25)
Transcript of Help Document of Focuskyfocusky.com/manual/focusky-help-document.pdf · Help Document of Focusky...
Help Document of Focusky (2016/3/25)

2 Help Document of Focusky
Table of Contents
Overview .......................................................................................................... 3
Features ............................................................................................................ 4
Quick Start ....................................................................................................... 5
Register and Sign in ................................................................................................................ 5
Create New Project .................................................................................................................. 6
Design Interactive Presentation ......................................................................................... 6
Add Animation to Presentation .......................................................................................... 8
Publish Presentation .............................................................................................................. 9
User Interface ................................................................................................. 9
Start Interface ........................................................................................................................... 9
Main Interface ......................................................................................................................... 11
Menu Toolbar .................................................................................................................. 11
Convenient Buttons ...................................................................................................... 14
Add Frame ........................................................................................................................ 19
Action Bar ......................................................................................................................... 19
Element Toolbar ............................................................................................................ 20
Edit Path ............................................................................................................................ 33
Animation Editor ........................................................................................................... 35
Publish Presentation .................................................................................................... 39
Presenting Interface ................................................................................. 45
3 Help Document of Focusky
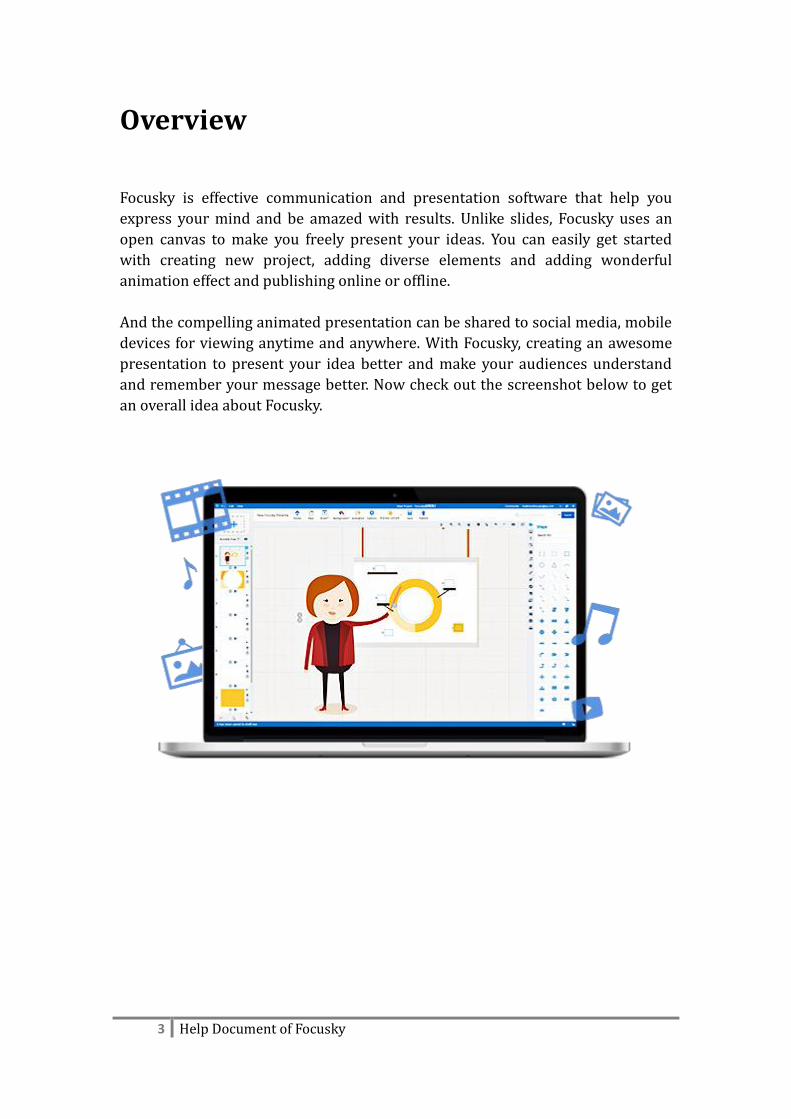
Overview
Focusky is effective communication and presentation software that help you
express your mind and be amazed with results. Unlike slides, Focusky uses an
open canvas to make you freely present your ideas. You can easily get started
with creating new project, adding diverse elements and adding wonderful
animation effect and publishing online or offline.
And the compelling animated presentation can be shared to social media, mobile
devices for viewing anytime and anywhere. With Focusky, creating an awesome
presentation to present your idea better and make your audiences understand
and remember your message better. Now check out the screenshot below to get
an overall idea about Focusky.
4 Help Document of Focusky
Features
General Features:
Easy create a new presentation
Diverse beautiful built-in and online templates
Amazing zooming effect, animation effect and transition effect
Infinite canvas and unlimited zoom and pan effect
Realistic 3D background, image background and video background
Easily alter background color
Easily drag and drop the frame to canvas
Preview the presentation immediately when editing
Save project simply for reediting later
Quickly save current settings as template
Edit Features:
Easily insert frame (rectangle, bracket, circle and invisible frame) to canvas
Diverse awesome elements (image, shape, link, formula and video)
Realistic 3D background, image and video background
Powerful animation editor for adding creative animation effect
Easily preview the presentation
Easy-to-use design tool for creating compelling presentation
Useful content layout for creating interesting content
Gorgeous roles to make presentation vivid
Customize the settings of inserted objects with ease
Edit Path:
Easily add objects to path
Drag to change sequence of path
Quickly editing path, add animation for inserted objects
Customize stay and delay time of path with ease
Publishing Features:
Focusky allows you to publish the presentation in multiple formats:
Publish to Cloud: Publish the animated presentation to Focusky Cloud platform
Windows Application: Save the presentation in Exe file format that can run on
Windows PC
Video: Convert the presentation into MP4 video to share, store and play offline
Web Page: Output the presentation as HTML web page format and upload to your
server
Mac OSX Application: Make an executable application to view the presentation on
Mac OS

5 Help Document of Focusky
Archive: Pack the presentation in ZIP file and share it via Email with ease
Mobile type: Save mobile type that can be viewed on mobile devices smoothly
Publish into PDF: Save the presentation as PDF file for read, share and store
easily
Quick Start
Register and Sign in
Open the software, then move to the upper right corner, click "Register Free" to
fill in the information to sign up. Then you can sign in Focuky to continue.
6 Help Document of Focusky
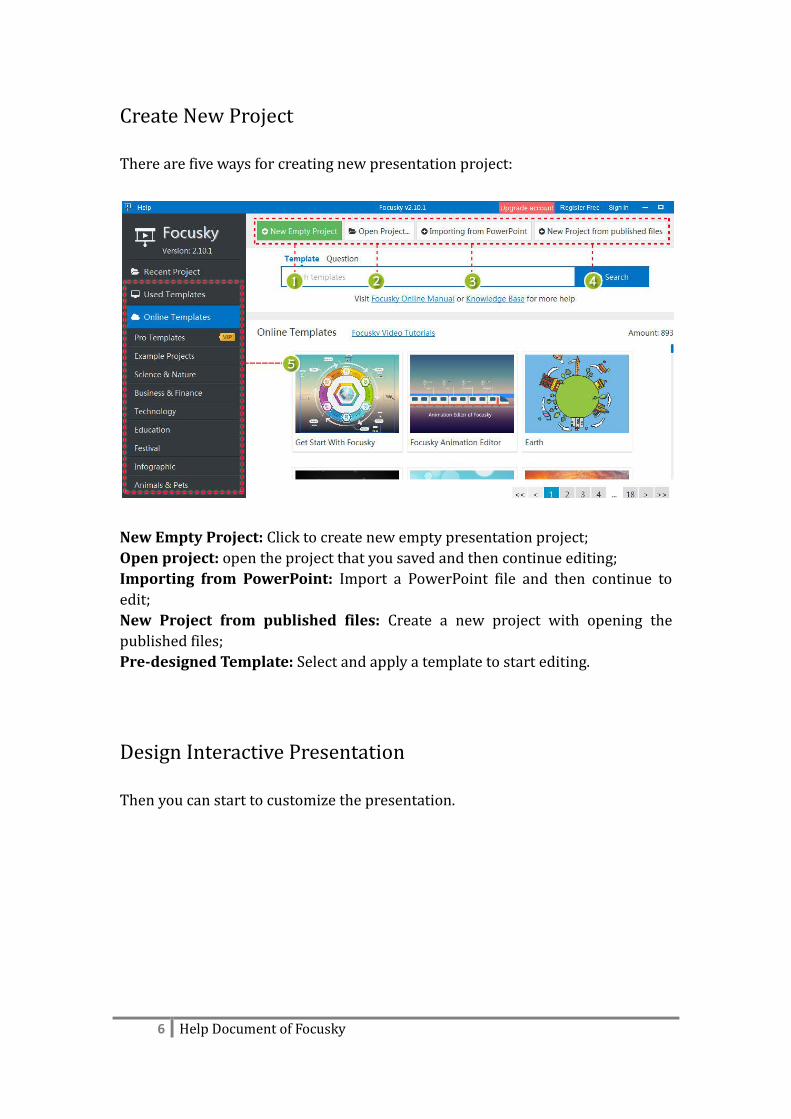
Create New Project
There are five ways for creating new presentation project:
New Empty Project: Click to create new empty presentation project;
Open project: open the project that you saved and then continue editing;
Importing from PowerPoint: Import a PowerPoint file and then continue to
edit;
New Project from published files: Create a new project with opening the
published files;
Pre-designed Template: Select and apply a template to start editing.
Design Interactive Presentation
Then you can start to customize the presentation.

7 Help Document of Focusky
(1) Background: Customize the presentation background (3D, image & video
background) and background color;
(2) Add Frame (path): Frame and path are similar to slides of PowerPoint. Click
the frame (invisible, rectangle, bracket and circle) icon or drag it to canvas,
then you can add contents into frame (path);
(3) Add Content: You are able to insert shapes, texts, images, links, videos, music,
SWF, smart art, symbol, formula, content layout, roles into presentation. And
you can customize the settings of inserted objects.
(4) Edit Path/Add Animation: It allows you to add, delete and change the order
of the path.

8 Help Document of Focusky
Add Animation to Presentation
Then you can add animation to inserted objects with animation editor of Focusky.
There are 4 types of animation effect for selection: Entrance, Emphasis, Exit and
Action Path. Check out the steps to add animation effect.
(1) Select a Path
(2) Select a object
(3) Add and Customize Animation Effect: Click “Add Effect” to select an
animation effect, then you can drag and drop to change the play order of
animation effect. And customize the animation settings such as delay time,
change effect and preview with ease.

9 Help Document of Focusky
Publish Presentation
Click "publish" button to continue. Select an output format, then customize
output settings such as title, description and more, click “Publish”.
User Interface
Start Interface
When you run Focusky, you will see the start interface where you can start a
new project. Focusky provides 5 ways to create new the presentation project:
new empty project, open project, import from PowerPoint file, open from
published file and pre-designed templates.

10 Help Document of Focusky
(1) Register and Sign in: Create an new account and sign in Focusky and
upgrade account;
(2) Create new project: 4 ways to create a new project;
(3) Search: To search for the template, question and answers that you need;
(4) Online Template: Divers online templates for creating new project. Select
and click to apply the template easily.

11 Help Document of Focusky
Main Interface
After you create a new project, you will be direct to the main interface where
you can design, customize and publish the presentation. The main interface
includes 6 sections: menu toolbar, convenient buttons, add frame, action bar,
element toolbar and edit path.
Menu Toolbar
(1) File

12 Help Document of Focusky
New Project: Create a new project in new window.
Create a new project by importing from PowerPoint: Open a PowerPoint file
and convert it to presentation to continue editing.
Open Project: Open a Focusky presentation project from local.
Save Project: Save the current project as a Focusky project file (.*fs).
Save Project As: Save a copy of the current project.
Close Project: Close the current project.
Import: Import a Microsoft PowerPoint document to enrich the presentation.
Export: Export the current project as PDF document.
Recent Project: A list of the recent project that you’ve opened or created.
Save as 3D Background: Save the current background as 3D background.
Import 3D Background: Import a 3D background from local.
Save as Template: Save the current settings as a new template.
Manage Template: the list of templates that you used or saved. You can export,
import and delete the templates.
Preview: preview the effect of presentation.
Publish: publish the presentation with an appropriate format.
Exit: exit the program.

13 Help Document of Focusky
(2) Edit
These tools are available in Action Bar and Convenient Buttons
(3) Help
Help: Open the Help Document in web browser.
Getting Started: Pop up the simplified user guide.
Video Tutorial: Multiple video tutorials about using Focusky.
Upgrade account: Go to the pricing page.
About: Check the version of the program.
Check for updates: Check if there is a newer version available.
Contact us: Create a ticket and tell us your question or suggestion.
Display language: change the display language of interface.
14 Help Document of Focusky
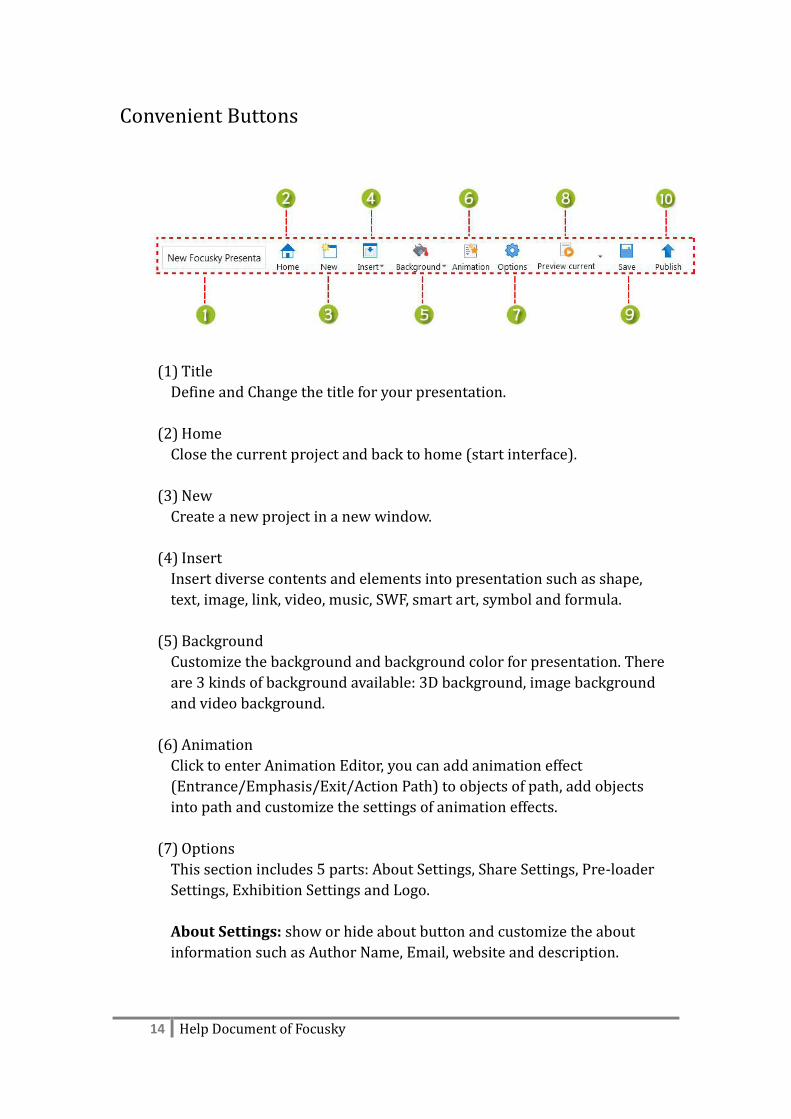
Convenient Buttons
(1) Title
Define and Change the title for your presentation.
(2) Home
Close the current project and back to home (start interface).
(3) New
Create a new project in a new window.
(4) Insert
Insert diverse contents and elements into presentation such as shape,
text, image, link, video, music, SWF, smart art, symbol and formula.
(5) Background
Customize the background and background color for presentation. There
are 3 kinds of background available: 3D background, image background
and video background.
(6) Animation
Click to enter Animation Editor, you can add animation effect
(Entrance/Emphasis/Exit/Action Path) to objects of path, add objects
into path and customize the settings of animation effects.
(7) Options
This section includes 5 parts: About Settings, Share Settings, Pre-loader
Settings, Exhibition Settings and Logo.
About Settings: show or hide about button and customize the about
information such as Author Name, Email, website and description.

15 Help Document of Focusky
Share Settings: show or hide the share button and then customize
description.
Pre-loader Settings: Customize the loader title, scroll text and the style
of pre-loader.

16 Help Document of Focusky
Exhibition Settings: Make presentation play automatically, add
background music, and customize bottom progress setting and
countdown settings.
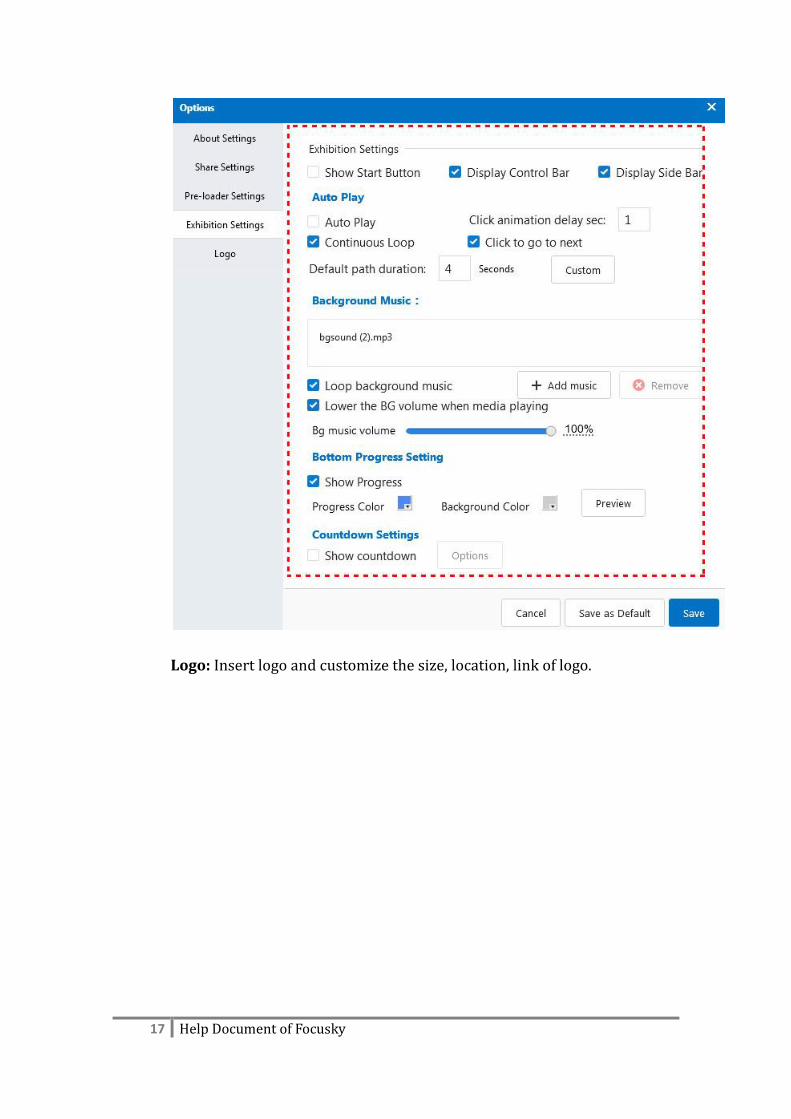
17 Help Document of Focusky
Logo: Insert logo and customize the size, location, link of logo.

18 Help Document of Focusky
(8) Preview and Preview Current: Preview the effect of all path or current
path (slide).
(9) Save
Save the current project or save the change in project.
(10) Publish
Publish the presentation online or offline. There are multiple formats are
available for viewing the presentation in a convenient way.
19 Help Document of Focusky
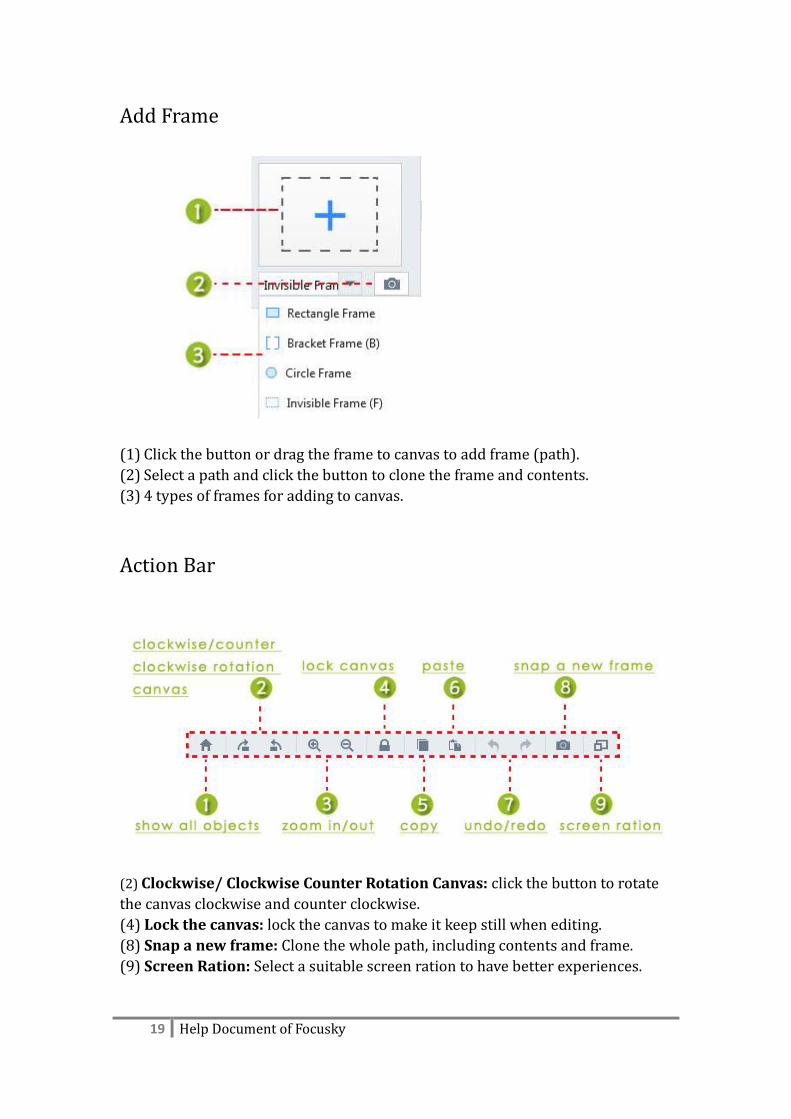
Add Frame
(1) Click the button or drag the frame to canvas to add frame (path).
(2) Select a path and click the button to clone the frame and contents.
(3) 4 types of frames for adding to canvas.
Action Bar
(2) Clockwise/ Clockwise Counter Rotation Canvas: click the button to rotate
the canvas clockwise and counter clockwise.
(4) Lock the canvas: lock the canvas to make it keep still when editing.
(8) Snap a new frame: Clone the whole path, including contents and frame.
(9) Screen Ration: Select a suitable screen ration to have better experiences.
20 Help Document of Focusky
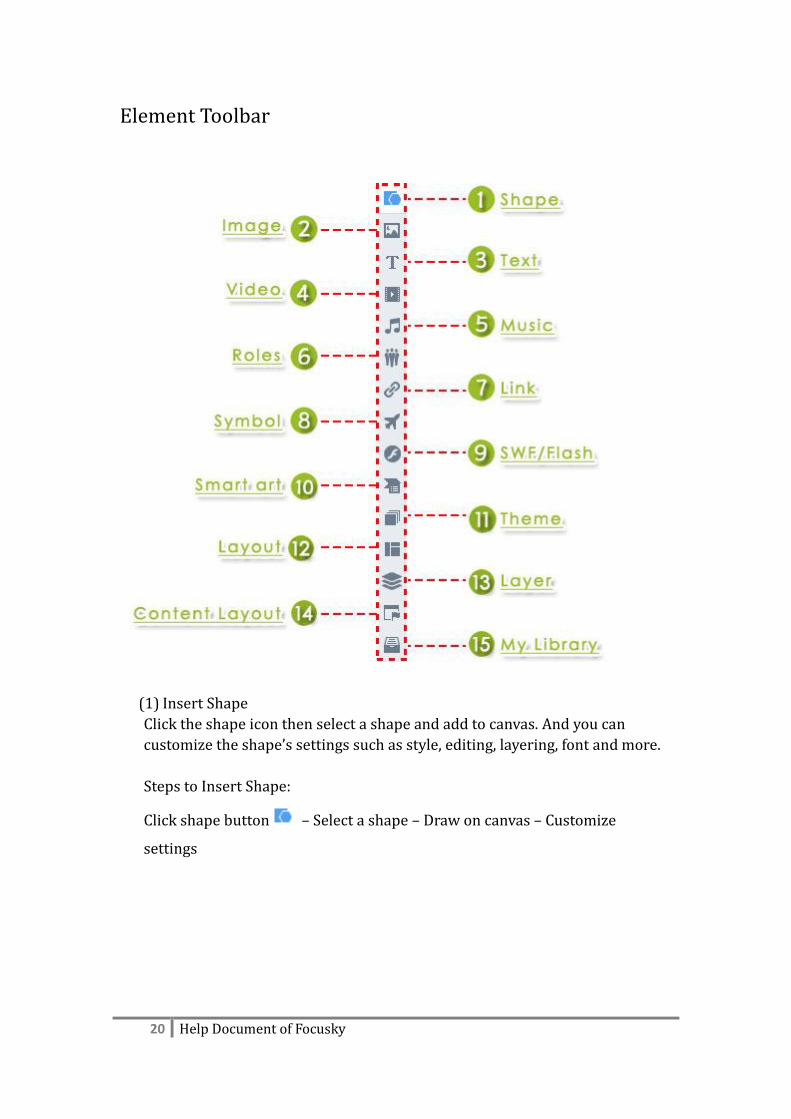
Element Toolbar
(1) Insert Shape
Click the shape icon then select a shape and add to canvas. And you can
customize the shape’s settings such as style, editing, layering, font and more.
Steps to Insert Shape:
Click shape button – Select a shape – Draw on canvas – Customize
settings
21 Help Document of Focusky
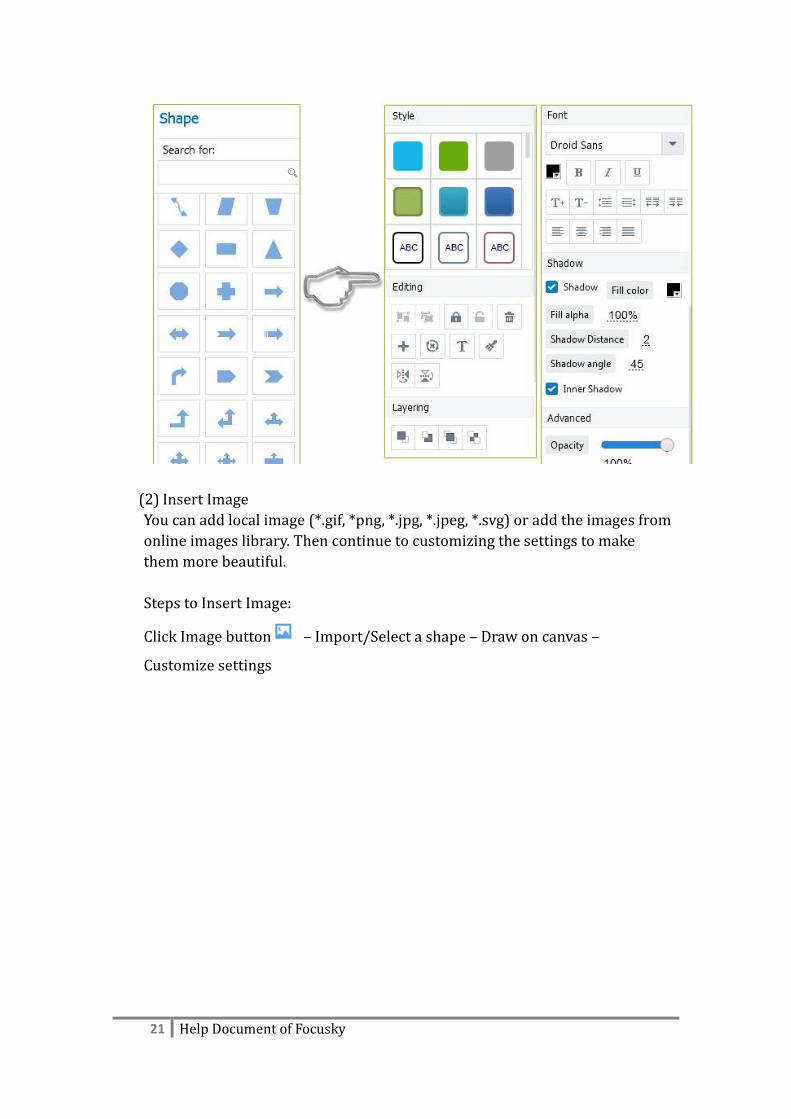
(2) Insert Image
You can add local image (*.gif, *png, *.jpg, *.jpeg, *.svg) or add the images from
online images library. Then continue to customizing the settings to make
them more beautiful.
Steps to Insert Image:
Click Image button – Import/Select a shape – Draw on canvas –
Customize settings

22 Help Document of Focusky
(3) Insert Text
Click button to insert text into canvas. And then you can edit the text,
customize font settings, add WordArt, shadow, background color and texture
with ease.
Steps to Insert Text:
Click Text button – Input Text – Customize settings

23 Help Document of Focusky
(4) Insert Video
Add Local Video:
Click "Add local video" button – Import local video – show video on
canvas – Customize video settings
Add Web Video:
Copy the video URL – Paste video URL in the box – Click "Add" to add video –
Customize video settings

24 Help Document of Focusky
(5) Add Music
Click the music button to add music player into path. And then import the
music (*.mp3). Then customize the settings of music player such as player
color, when to play and stop and more. (Click music button – Import music –
Customize music settings)

25 Help Document of Focusky
(6) Insert Roles
In order to make the presentation vivid and interesting, you can try to insert
roles. There are 3 kinds of roles available: Flash Actor, PNG Actor and GIF
Actor.
How to apply:
Click the roles button – Select a role – Show on canvas – Customize
role’s settings

26 Help Document of Focusky
(7) Insert Link
Click link button – draw the area to insert link – Input URL – Customize
the link
(8) Insert Symbol
There are diverse symbols for you to enrich your presentation. Just select a
symbol and click, then it will show on canvas with ease. And then you can
start to customize the symbol settings.

27 Help Document of Focusky
(9) Insert SWF
There are two ways to insert SWF file into presentation. One is to add local
SWF file, the other is to apply online SWF from online library.
Add local SWF:
Click SWF button – Add local SWF – Import SWF file – Customize file
settings
28 Help Document of Focusky
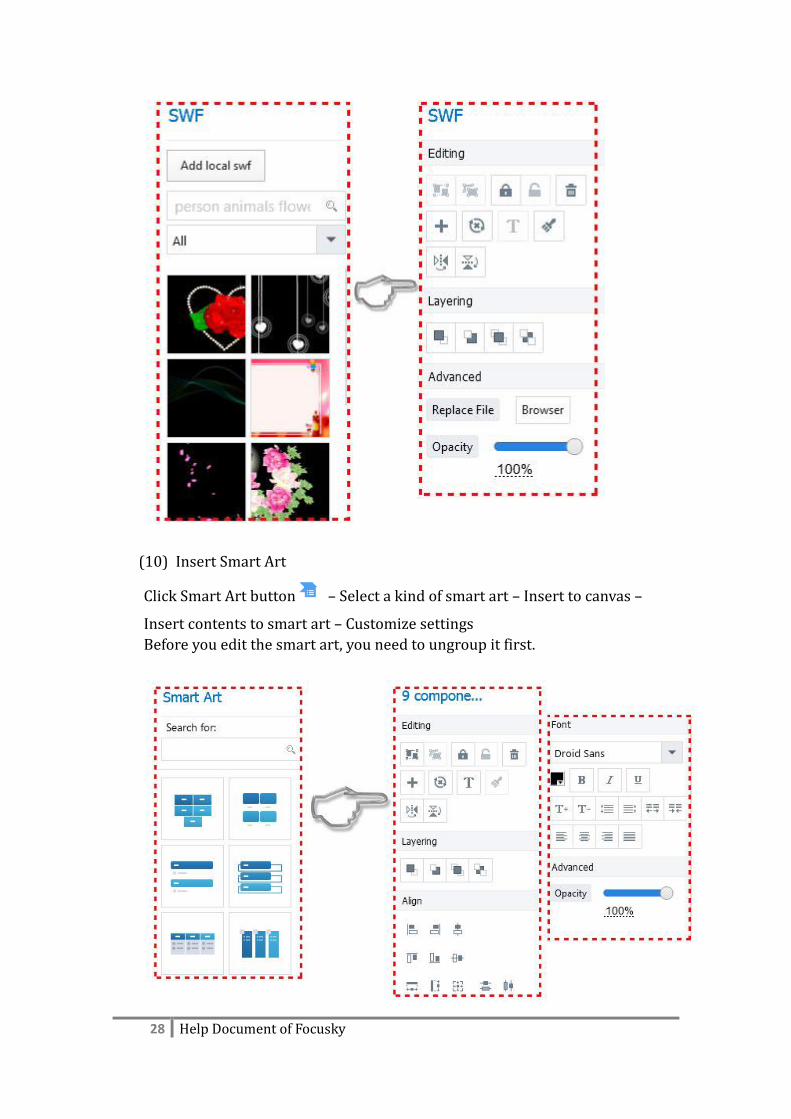
(10) Insert Smart Art
Click Smart Art button – Select a kind of smart art – Insert to canvas –
Insert contents to smart art – Customize settings
Before you edit the smart art, you need to ungroup it first.

29 Help Document of Focusky
(11) Theme
Click "Theme" icon to go to theme panel, click to apply the theme. You can
save the current as a new theme, import and export the theme with ease. And
it allows you to customize the title color, title font, shape color, preset style of
the presentation.
(12) Insert Layout
Focusky provides multiple layouts for users to insert contents with ease. And
the layout is a group, before you edit the layout, you should ungroup it in
advance.

30 Help Document of Focusky
(13) Layer
In order to edit the presentation easier, you can try to hide or show the layers
when editing. Click layer button , find the layer you need, and then click
the eye icon to make it show or hide.
(14) Content Layout
Focusky provides lots of content layouts for users to create the presentation
in an easier way. You can drag or click the content layout to make it show on
canvas and then change the text and images directly. Before you edit the
layout, please ungroup it.

31 Help Document of Focusky
(15) My Library
In My Library, you can see the different types of elements that you used. If you
want to add the material to My Library, click the objects and click button
to save. Moreover, you can import elements to Library and export from it.

32 Help Document of Focusky
(16) Formula
Click “Insert” button – Select Formula from the list – Input the formula – Show on
canvas
33 Help Document of Focusky
Edit Path
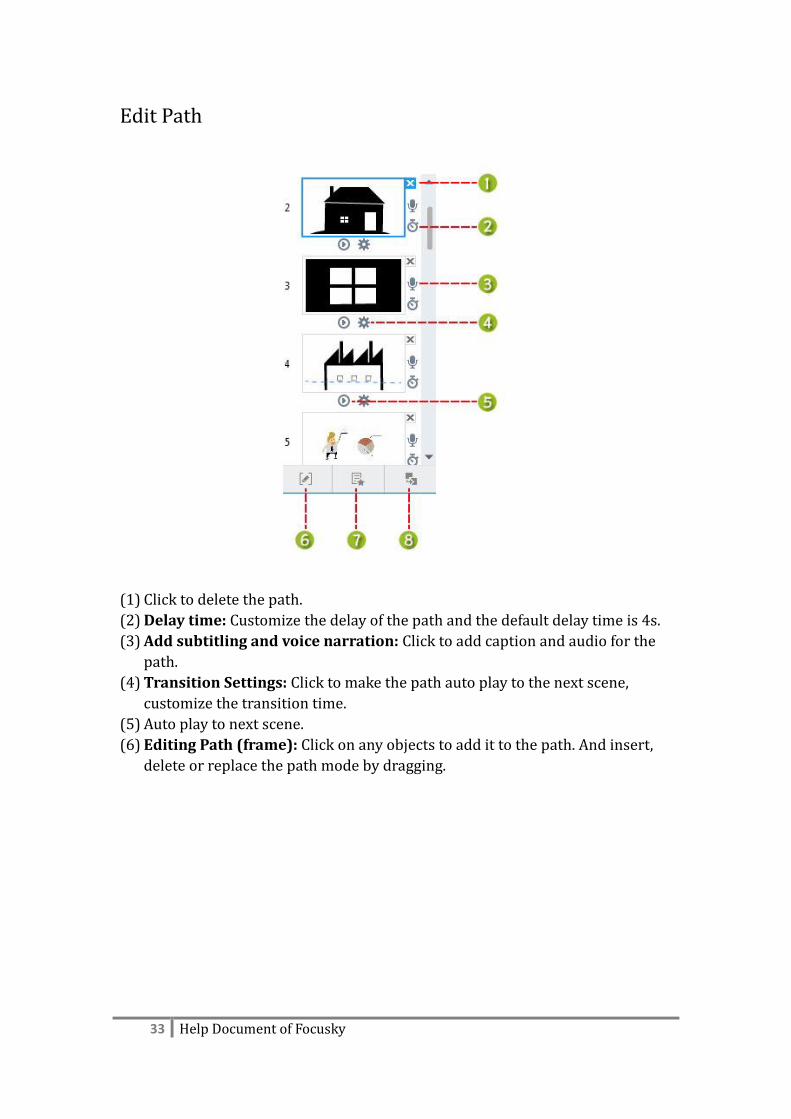
(1) Click to delete the path.
(2) Delay time: Customize the delay of the path and the default delay time is 4s.
(3) Add subtitling and voice narration: Click to add caption and audio for the
path.
(4) Transition Settings: Click to make the path auto play to the next scene,
customize the transition time.
(5) Auto play to next scene.
(6) Editing Path (frame): Click on any objects to add it to the path. And insert,
delete or replace the path mode by dragging.

34 Help Document of Focusky
(7) Animate Path Content: Click to enter Animation Editor, and then you can
insert entrance/emphasis/ exit/action path effect for selected objects.
(8) Records path, custom path stay delay time: Drag the path thumbnail to
change the order of path, customize the path duration (the time stays on the
path).

35 Help Document of Focusky
Animation Editor
Animation Editor helps to add animation effect to the objects of path and
customize the animation with ease. There are four animation effects available:
Entrance, Emphasis, Exit and Action Path.
(1) Path Thumbnail
This is the list of path thumbnail, you can drag to re-order the path then select
a path to add animation effect.

36 Help Document of Focusky
(2) Editing Area
After select a path then you can select an object in editing area to add
animation effect. In editing area, you will see all objects and player order of
animation effect.
(3) Add Effect
After selecting an object, click "Add Effect" button to choose an effect. You will
see four types animation effects (Entrance/Emphasis/Exit/Action Path) for
choosing. Then preview the animation effect by putting mouse over the
selected effect and click on it to apply.

37 Help Document of Focusky
(4) Customize Animation and Layer
a. Animation:
5) Start the animation on click, with previous and after previous.
6) Click to preview the animation effect of the object.
7) Click to change the animation effect.
8) Click to customize animation settings such as duration and delay time.

38 Help Document of Focusky
b. Layer
(5) Remove, Preview and Clear
(6) Add Object
Click to add new objects into canvas and add animation effect.

39 Help Document of Focusky
(7) Back to edit mode
Click to save the animation effect and exit the animation editor.
Publish Presentation
There are 8 options for users to publish the awesome presentation: Publish to
cloud, Windows Application (*.exe), Video (*.mp4), Web Page (*.html), Mac OSX
Application, Archive (*.zip), Mobile Type (*.mfs) and Publish to PDF.

40 Help Document of Focusky
(1) Publish to Cloud
Click "Publish to Cloud" button – Customize the output settings – Click
“Publish”
1) Customize the title, modify the presentation or not and make it public or

41 Help Document of Focusky
not.
2) Category: select a suitable category for presentation.
3) Option Settings: customize the pre-loader, share, about and exhibition
settings.
4) Advanced Option: fill in the keywords and description for the
presentation.
(2) Windows Application (.exe)
Click "Windows Application" button – Customize the output settings – Click
“Publish”
1) Customize the folder to save the file and the tile of Exe presentation.
2) Define the share, about and exhibition settings.
3) Advanced Option: Customize the window size when open Exe file.
(3) Video (*.mp4)
Click "Video" button – Customize video settings – Click “Publish”

42 Help Document of Focusky
Advanced Option
Video size: 5 video sizes for choosing; the larger video size you choose, the
larger file size of video you will have.
Path Duration (seconds): customize the time that stays on the path.
Background Music: Insert background music for your video presentation.
(4) Web Page (*.html)
Click "Web Page" button – Customize the output settings – Click “Publish”

43 Help Document of Focusky
1) Customize the output folder and HTML title of presentation.
2) Customize Pre-loader, share, about and exhibition settings.
3) Advanced Option: customize the keywords and description of
presentation for SEO friendly.
(5) Mac OSX Application
This is an output format for viewing the presentation on Mac OS.

44 Help Document of Focusky
1) Customize the output folder and title of presentation.
2) Customize the Share button, About button and Exhibitions settings.
3) Advanced Option: Customize the Window size when opening the
application.
(6) Archive (*.zip)
Click "Archive (*.zip) " button – Customize the output settings – Click
“Publish”
1) Select the direction to publish the presentation archive file.
2) Define Pre-loader, share button, about button and exhibition settings.
3) Advanced Option: Input the keywords and description of presentation.
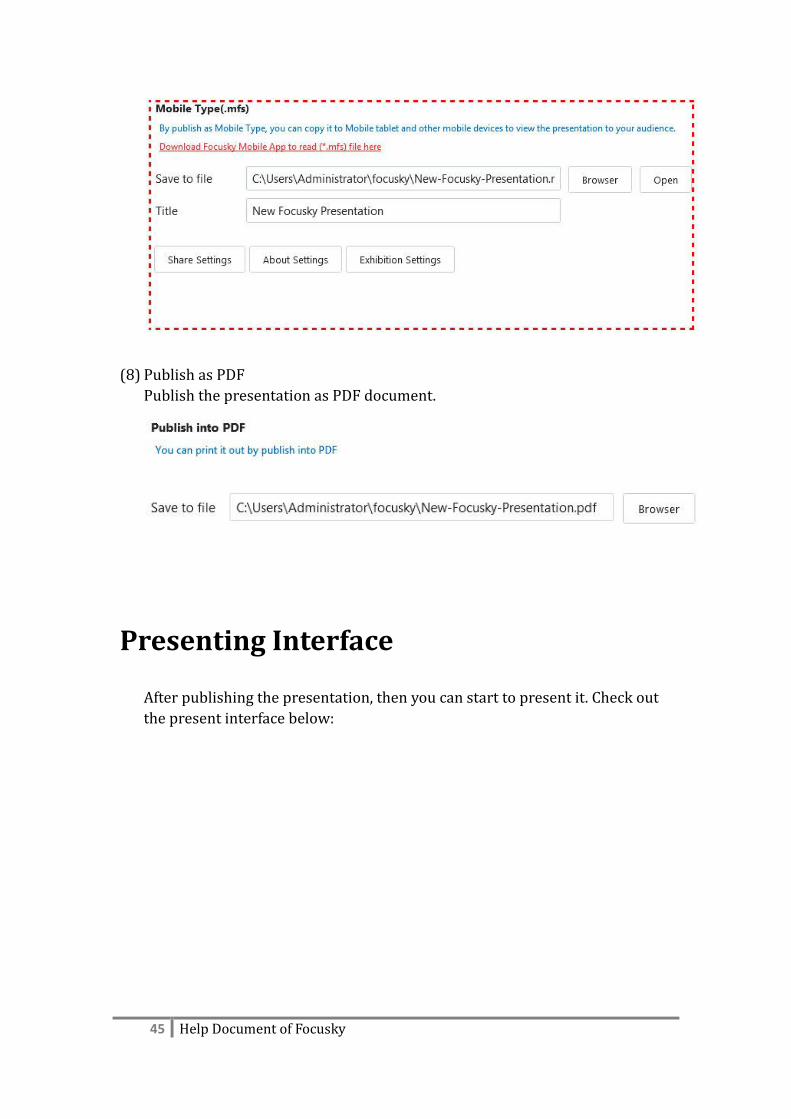
(7) Mobile Type (*.mfs)
Publishing as mobile Type, you can copy and paste it to smartphone and
tablet, and open it via Focusky Android or IOS App.
45 Help Document of Focusky
(8) Publish as PDF
Publish the presentation as PDF document.
Presenting Interface
After publishing the presentation, then you can start to present it. Check out
the present interface below:

46 Help Document of Focusky
(1) Sidebar
1) Thumbnail: click to show all the thumbnails of presentation.
2) Auto Play: click to start or stop playing the presentation
automatically.
3) Share: click to share copy online address, embed code of presentation,
and share to social media with ease. You can customize share setting
before publishing.
4) About: click to show more information about presentation and author.
You can customize share setting before publishing.
5) Home: click to show all objects of presentation.
6) Show/Hide Annotation Toolbar: click to make annotation toolbar
show or hide. And you can add annotation such as rectangle, ellipse,
line, dashed, arrow and more on presentation.
47 Help Document of Focusky
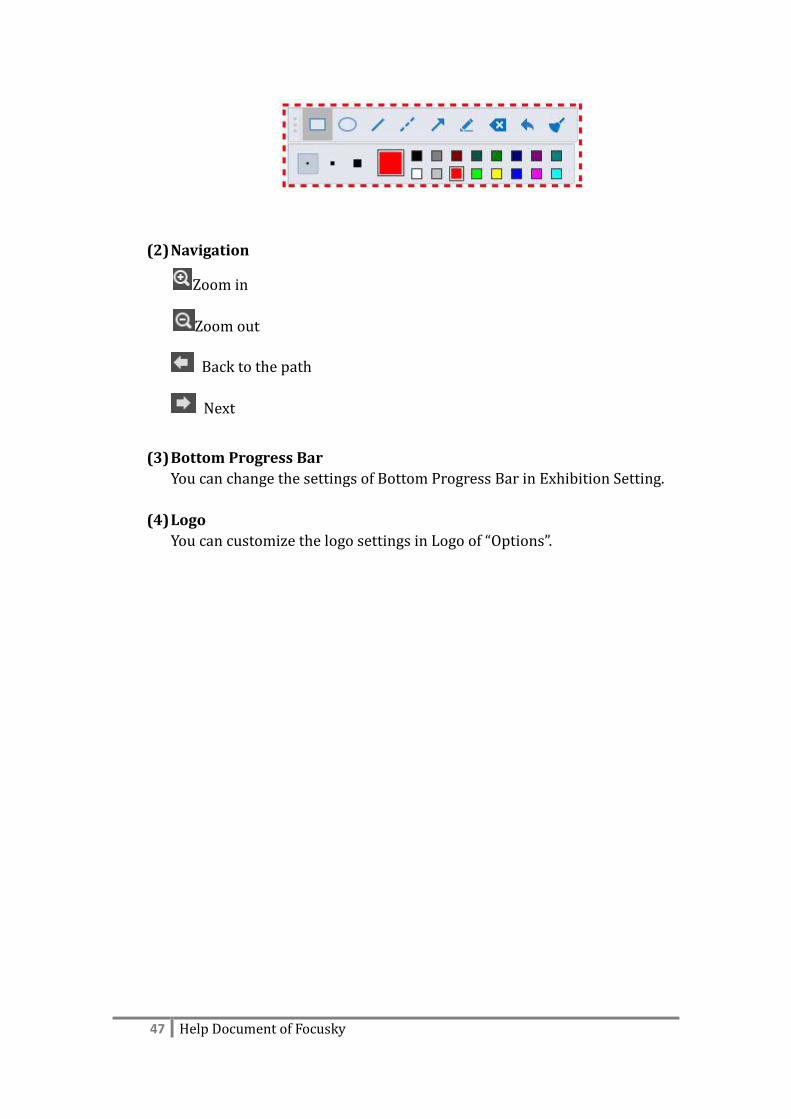
(2) Navigation
Zoom in
Zoom out
Back to the path
Next
(3) Bottom Progress Bar
You can change the settings of Bottom Progress Bar in Exhibition Setting.
(4) Logo
You can customize the logo settings in Logo of “Options”.