Health Eligibility Case Management System (HECMS ...
63
Health Eligibility Case Management System (HECMS) Installation Guide Enrollment System Redesign (ESR) Version 6.1 February 2013 Department of Veterans Affairs Product Development Management, Enrollment and Financial Systems (MEFS)
Transcript of Health Eligibility Case Management System (HECMS ...
Health Eligibility Case Management System (HECMS)
Installation Guide
Enrollment System Redesign (ESR)
Version 6.1
February 2013
Department of Veterans Affairs Product Development
Management, Enrollment and Financial Systems (MEFS)

February 2013 Health Eligibility Case Management System ii ESR 3.10 Installation Guide
Revision History Date Version Description Program
Manager Author
10/14/2012 6.1 Updated the details on the weblogic patch required for 3.10.
Glenda Miller Sudha Ramani
10/1/2012 6.0 Updated document version to correspond with change from 3.9 to 3.10 on cover. Updated Release dates to February 2013 on cover and footers. Updated all ESR 3.9 references to ESR 3.10 where appropriate. Updated Introduction section for ESR 3.10 added capabilities.
Glenda Miller Tom Hamilton
8/28/2012 5.0 Updated cover date to revised scheduled release of ESR 3.9 to November 2012.
Glenda Miller Tom Hamilton
7/26/2012 5.0 Reviewed and no changes are needed Glenda Miller Sudha Ramani
7/26/2012 5.0 Updated document version to correspond with change from 3.8 to 3.9 on cover. Updated Release dates to January 2013 on cover and footers. Updated ESR 3.8 references to ESR 3.9.
Glenda Miller Tom Hamilton
7/26/2012 4.1 Added missing 3.8 capabilities to Introduction section.
Glenda Miller Tom Hamilton
4/18/2012 4.0 Updated document version to correspond with change from 3.7 to 3.8 on cover. Updated Release dates to September 2012 on cover and footers. Updated ESR 3.7 references to ESR 3.8.
Added section to setup DTD files on web server
Glenda Miller Tom Hamilton
Shaopeng Sun
3/13/2012-3/14/2012
3.1 Merged the 3.6.1 changes from the SharePoint version and updated the TLS instructions for “Setting Up Mutual TLS between ESR and VAAFI servers to access PSIM WebService Interface” corresponding to the new production servers (SR).
Updated cover and footer dates to
Glenda Miller Sudha Ramani/Tom Hamilton

February 2013 Health Eligibility Case Management System iii ESR 3.10 Installation Guide
Date Version Description Program Manager
Author
June 2012. Minor formatting changes (TH).
2/23/2012 3.0 Updated document version to correspond with change from 3.6 to 3.7 on cover. Updated Release Dates to April 2012 on cover and footers. Updated ESR 3.6 references to ESR 3.7.
Glenda Miller Tom Hamilton
2/23/2012 2.3 Clarified reference to Weblogic 8.1.6 and removed all reference to Messaging Bridge solution
Glenda Miller Randhir Manhas / Laurie Sheppard
2/13/2012 2.2 Updated WebLogic version to 10.3.5. Glenda Miller Tom Hamilton
11/22/2011 2.1 Updated doc version and Release date to January 2012. Added Sudha Ramani’s configuration changes for 3.6.
Glenda Miller Tom Hamilton/Sudha Ramani
10/26/2011 2.0 Updated document version to correspond with change from 3.5 to 3.6 on cover. Updated Release Dates to December 2011 on cover and footers. Updated ESR 3.5 references to ESR 3.6.
Glenda Miller Tom Hamilton
9/13/2011 1.1 Updated cover and footer dates to correspond with new National Release date for 3.5 to September 2011.
Jennifer Freese Tom Hamilton
7/18/2011 1.0 Initiated document version to replace application version on cover.
Jennifer Freese Tom Hamilton
7/7/2011 Updated Related Documentation section.
Jennifer Freese Tom Hamilton
6/30/2011 TW updates. Jennifer Freese Tom Hamilton
6/29/2011 Updated the document for 3.5 – included instructions for setting up the interface with CDW.
Jennifer Freese Sudha Ramani
5/17/2011 General prep. For uploading to VDL. Removed Draft indicators. Updated hyperlinks in Related Documentation section.
Jennifer Freese Tom Hamilton
3/9/2011 Removed yellow highlighting Jennifer Freese Tom Hamilton

February 2013 Health Eligibility Case Management System iv ESR 3.10 Installation Guide
Date Version Description Program Manager
Author
3/3/2011 Reviewed/Edited/Formatted Jennifer Freese Tom Hamilton
2/14/2011 Added instructions for setting up TLS authentication on E&E servers
Added instructions for setting up JMS Queues on E&E servers for MSDS web service
Jennifer Freese Sudha Ramani
9/14/10 General formatting updates for ESR 3.3 and the E&E service. Added CO numbers to the E&E section added by Sudha Ramani.
Jennifer Freese Tom Hamilton
9/13/10 Added installation instructions for Enrollment and Eligibility Service (ESR 3.3)
Jennifer Freese Sudha Ramani
9/2/10 Preparation of baselined Release Notes document for ESR 3.3 Enhancements.
Jennifer Freese Tom Hamilton
8/11/09 Changed HealtheVet logo cover graphic back to VA Seal per Brian Morgan.
Sookie Spence Tom Hamilton
7/6/09 Changed cover graphic from VA Seal to HealtheVet logo. Internal links removed as required by FOIA. Updated cover and footer dates. Updated 3.0 to 3.0.1.
Sookie Spence Tom Hamilton
2/26/09 – 3/12/09
Addressed Product Support issues. Gerry Lowe Tom Hamilton

February 2013 Health Eligibility Case Management System v ESR 3.10 Installation Guide
Date Version Description Program Manager
Author
10/7/08 Removed the Deployment Sequence, Pre-Deployment Instructions and Preparation, and ESR Activation Phase Scripts sections. In their place is a reference to the ESR 3 0 Deployment - Phase 2 - Software Sequencing Plan (SSP) v1.2 document, which is bundled with this HECMS Installation Guide and includes the information from the removed sections. This will consolidate changes to the software sequencing plan (deployment) into one document (Deployment - Phase 2 - Software Sequencing Plan (SSP)), thereby eliminating updates to this document after ESR 3.0 goes into production.
Added the Deployment - Phase 2 - Software Sequencing Plan (SSP) reference to the Related Documentation section.
Gerry Lowe Tom Hamilton
10/2/08 Added Deployment Sequence Table 3 Gerry Lowe Tom Hamilton
9/25/08 Added developer (CR) updates Gerry Lowe Tom Hamilton
9/24/08 Added developer (SG) updates Gerry Lowe Tom Hamilton
9/17/08-9/18/08
Added information from ESR Operations Guide v1.0 dated July 2007.
Gerry Lowe Tom Hamilton
9/12/08-9/15/08
General updates to Acronyms and Definitions and minor updates to the general information.
Gerry Lowe Tom Hamilton
9/2/08 Added EVC R2 information to Introduction section from EVC R2 patch description.
Gerry Lowe Tom Hamilton
8/26/08 Updates based on developer’s input Gerry Lowe Tom Hamilton
8/14/08 Create Initial draft Installation document
Gerry Lowe Tom Hamilton

February 2013 Health Eligibility Case Management System vi ESR 3.10 Installation Guide
Table of Contents HEALTH ELIGIBILITY CASE MANAGEMENT SYSTEM (HECMS) V3.10 .............................................. 1
INTRODUCTION ............................................................................................................................................ 1
PURPOSE .................................................................................................................................................................... 6 SCOPE ........................................................................................................................................................................ 6 TARGET AUDIENCE .................................................................................................................................................... 6 RELATED DOCUMENTATION ...................................................................................................................................... 6
ADMINISTRATION TASKS ........................................................................................................................... 8
SETTING UP THE INITIAL ESR DOMAIN ...................................................................................................................... 8 INSTALLING ESR ..................................................................................................................................................... 12 WEBLOGIC PATCH TO ENABLE WEB SERVICES ......................................................................................................... 13 SETTING UP THE ESR WEB SERVER .......................................................................................................................... 13 INSTALLING WEBHELP ON THE WEB SERVERS.......................................................................................................... 15 SETTING UP THE DTD FILES ON THE WEB SERVER .................................................................................................... 15 SETTING UP THE ENROLLMENT AND ELIGIBILITY SERVICE (E&E) WEBLOGIC DOMAIN .......................................... 16 SETTING UP THE APACHE WEB SERVER TO TUNNEL THE WEB SERVICE REQUESTS .................................................... 17 TESTING THE INSTALLATION .................................................................................................................................... 18 SETTING UP TLS AUTHENTICATION IN E&E SERVERS .............................................................................................. 18 SETTING UP JMS QUEUES IN E&E SERVERS ............................................................................................................. 22 SETTING UP THE SFTP INTERFACE BETWEEN ESR LINUX AND WINDOWS SERVERS ................................................ 28 SETTING UP THE CDW DATA EXTRACTION PACKAGE IN ESR WINDOWS SERVER ................................................... 29 SETTING UP MUTUAL TLS BETWEEN ESR AND VAAFI SERVERS TO ACCESS PSIM WEBSERVICE INTERFACE ....... 33
DEPLOYMENT OVERVIEW ........................................................................................................................ 37
DATABASE INFORMATION ........................................................................................................................ 38
INSTRUCTIONS FOR INSTALLING M SERVER (OR DATABASE) COMPONENTS .............................. 39
PRE-INSTALLATION INSTRUCTIONS FOR THE M-SERVER/DATABASE COMPONENT .................................................. 39 INSTALLING M SERVER/DATABASE COMPONENTS .................................................................................................. 39
M ENVIRONMENT ........................................................................................................................................ 42
INSTRUCTIONS FOR INSTALLING MIDDLE TIER APPLICATIONS (E.G., APPLICATION SERVERS) ......................................................................................................................................................................... 43
INSTRUCTIONS FOR STARTING APPLICATIONS ON THE MIDDLE TIER APPLICATION SERVER ......................................................................................................................................................................... 44
INSTRUCTIONS FOR INSTALLING CLIENT COMPONENTS ................................................................. 45
POST-INSTALLATION REVIEW ................................................................................................................. 46
POST-INSTALLATION (SETUP AND CONFIGURATION) ........................................................................ 47
STARTING THE CLIENT-SIDE DESKTOP SOFTWARE ........................................................................... 48
M INSTALLATION EXAMPLE ..................................................................................................................... 49

February 2013 Health Eligibility Case Management System vii ESR 3.10 Installation Guide
ZIPPED FILE CONTENTS, WHERE APPLICABLE .................................................................................... 52
TROUBLESHOOTING ................................................................................................................................... 53
RECOVERING FROM A SERVER CRASH ..................................................................................................................... 53 ADDITIONAL INFORMATION ..................................................................................................................................... 53
ACRONYMS AND DEFINITIONS ................................................................................................................. 54

February 2013 Health Eligibility Case Management System 1 ESR 3.10 Installation Guide
Health Eligibility Case Management System (HECMS) V3.10
Introduction Enrollment System Redesign (ESR) V3.10 (a.k.a. HECMS) is the HealtheVet replacement system for the product known as Health Eligibility Center Legacy (HECL). It is both a re-host of HECL and in some instances (use cases/features), a re-engineering. HECMS allows staff at the HEC to work more efficiently and determine patient eligibility in a more timely manner. Messaging with the VA Medical Centers (VAMC) allows updates to the enterprise enrollment system to be shared with the field.
The release of the ESR 3.0 project marked a significant event in the HealtheVet (HeV) space. ESR 3.0.1 is comprised of a major change to the HECMS, an online business application for the HEC in Atlanta, GA. HECMS was one of the first modernized applications deployed under the HeV purview and its deployment is comprised of other components of the “system of systems”. This includes the Administrative Data Repository (ADR), Naming Directory Service (NDS), and Person Services Identity Management (PSIM).
Also in support of the implementation of ESR V3.0 was the Enrollment VistA Changes Release 2 (EVC R2) project that was undertaken in support of the technology and business changes that were occurring with ESR 3.0.
Some modified and new business functionality was being included in the new system, and corresponding changes were necessary in VistA for preliminary determination of the Veteran's Enrollment and Eligibility status. The EVC project was released in three phases. EVC Early Release and EVC R1 have been released and EVC R2 was released just prior to ESR 3.0.
ESR 3.3 added the Eligibility and Enrollment (E&E) Web Service (pg 15) which supports requests for data or information regarding the enrollment or eligibility of Veterans on an as-needed basis. An Enrollment Web Service brokers requests from other systems to HECMS, carrying out the system specific information request.
ESR 3.4 added the following additional Military Service Data Sharing (MSDS) capabilities.
• A manual query to the Beneficiary Identification Records Locator System (BIRLS) and VA/DoD Identity Repository (VADIR) via the MSDS Broker can be initiated from the Military Service page.
• The MSDS Query Status is displayed on the Current Eligibility page.
• The veteran’s record will be updated if the incoming data received data from BIRLS and VADIR is more favorable for the veteran.
• Medal of Honor data is now stored and displayed on the Military Service page.
• When new Military Service Episode (MSE) or Operation Enduring Freedom/Operation Iraqi Freedom (OEF/OIF) data is received from a site, an MSDS Broker query is triggered.
• HEC and Broker data is now used rather than site data to determine the Veteran Indicator, calculate the Combat Veteran End Date, and determine the veteran’s Period of Service.
• MSE data is shared with the sites (VistA).

HECMS Installation Guide
February 2013 Health Eligibility Case Management System 2 ESR 3.10 Installation Guide
ESR 3.5 added the following additional MSDS capabilities. • Activations from VADIR are received and processed into ESR Military Service Episodes (MSE)
• The Combat Veteran End Date computation was modified to allow a recalculation to an earlier date based on a user edit of the Military Service and/or Combat Service data to an earlier date.
• ESR accepts precise dates from the Broker when ESR has imprecise MSE dates on record.
• ESR does not perform a query of the MSDS Broker for persons with null/missing identity traits.
• Additional choices for Discharge Type on the Current Military Service screen became available. They are: 1) Honorable for VA Purposes (Honorable-VA) and, 2) Dishonorable for VA Purposes (Dishonorable-VA).
• Incoming BIRLS data was modified to map Branch of Service values for Air National Guard (ANG) and Army National Guard (ARNG) to Air Force and Army in ESR, respectively, and also set the Service Component field to Activated National Guard.
• If the Broker fails to create an MSE record, ESR creates a HEC-owned MSE from the site data.
ESR 3.5 added the following Public Law (PL111-163) requirement. • PL111-163 provides additional benefits for Catastrophically Disabled veterans by eliminating the
means test and Rx Copay test obligation. A one-time 640K letter was sent to all Catastrophically Disabled veterans to notify them of the additional benefit. A 640K letter was sent to Veterans who had not previously been notified and who were in Priority Group 1, 2, 3, or 4 at the time a Catastrophic Disability was added to their eligibility record.
ESR 3.5 added the following Add a Person capabilities. • Search to add a person (Search and Add New Person) – This functionality allows users to perform
searches for a registrant by any combination of criteria and enables the user to register (Add) a new person to the HECMS system or update a person who is “In Process”.
• Save person in-process (Save in Process) – This option allows users to save registrant records in a state of “In Process” so they can be returned to for completion at a later time.
• Cancel a registration (Cancel Registration) – This option allows users to cancel a registration that is in progress, or a registration that has been resumed from being “Saved in Process”.
• As part of the Add a Person registration process,
° enter Demographics information ° enter Financial information ° enter Eligibility information ° enter Military Service information ° enter Enrollment information
• Send a query to VBA when new person is added to ESR.
• Transmit registrant data using HL7 messaging.
• Run reports (EED 19) to see person registration statuses.
ESR 3.5 added the following Preferred Facility capabilities. • On the Demographics/Personal page, the Preferred Facility field became editable. The field
next to it is the Preferred Facility Source field, which will be the source of the preferred facility selection. It is not user-selectable but is automatically populated based on the source of the data.

HECMS Installation Guide
February 2013 Health Eligibility Case Management System 3 ESR 3.10 Installation Guide
• The nearest treating facility is automatically determined as the veteran’s preferred facility by communicating with an outside (of ESR) source (Corporate Data Warehouse {CDW}).
• New Missing Preferred Facility report (EED 20) displays which veterans have no preferred facility.
ESR V3.5 also added additional Patient Benefits Handbook functionality.
ESR 3.6 added the following E&E Web Service/T-Pharm enhancements.
• In support of the FSC Fee and Dialysis groups, sixteen additional fields were added to the E&E Web Service, plus the ability to allow a second request with a date-of-service parameter to be passed.
• A new service request returns historical data based on a Date of Service.
• A new Eligibility Determination request returns “Eligible” or “Not Eligible” based on the Enrollment Status.
• Also added was the Eligibility Determination Service (EDS) in support of the Third-Party Pharmacy (T-Pharm) effort. This effort was being done in two phases. The first phase (ESR 3.6) involved ESR receiving an Integration Control Number (ICN), determining the Eligibility Status based on the business rules, and returning the value to the requestor.
ESR 3.6 added the following Public Law (PL111-163) requirement.
• The Medal of Honor Indicator data stored and displayed on the Military Service page became editable.
• Receipt of a Medal Of Honor was added to the eligibilities considered when assigning an Enrollment Priority Group.
ESR 3.6 added additional Veteran Benefits Handbook functionality.
• A new Default Handbook Batch Release Control Number System Parameter was added for changing the release control number to be used with a Handbook Batch Release. See the System Parameters section of the ESR 3.6 HECMS User Manual for more information.
• A new Handbook Rollout Over System Parameter was added for turning the new enrollment triggers on and off. See the System Parameters section of the ESR 3.6 HECMS User Manual for more information.
• A new Handbook Active System Parameter was added that activates “trigger” events that prompt the sending of Handbook communications to the CMS. See the System Parameters section of the ESR 3.6 HECMS User Manual for more information.
See the Tabs/Communications/Handbook Status section of the ESR 3.6 HECMS User Manual for more details.
ESR 3.6 added additional VBA Pension Data Sharing functionality between VistA and ESR.
• A new VBA Data Sharing Indicator System Parameter was added for activating the new ZE2 segment (VistA) for sharing VBA Pension Data to/from VistA sites. See the System Parameters section of ESR 3.6 HECMS User Manual for more information.
• Eligibility for Dental benefits is now shared with VistA sites.
ESR 3.6 added the following additional MSDS capabilities:

HECMS Installation Guide
February 2013 Health Eligibility Case Management System 4 ESR 3.10 Installation Guide
• Automatic determination of OEF/OIF combat episodes using military pay and deployment records.
• Close and remove unwanted Work Items created from MSDS broker data processing.
• Ignore combat pay record from VADIR/BIRLS if there is no Combat Pay End Date.
ESR 3.6 release included the upgrade of the application server software WebLogic to version 10.3.5. Since the current VIE software Business-Ware 4.3.2 is not certified to support Weblogic 10.3.5, the ability to reinstall the Weblogic 8.1.6 servers for messaging purposes only will be retained.
ESR V3.7 added the following additional capabilities/changes:
• The Business Rule for Creation of Enrollment History records was changed. The number of data element changes that create enrollment history records was reduced. Changes to Enrollment Status, Priority Group, or EGT produce new history records, most other changes won’t.
• Updated the Priority Group 8 Report (P8G 2) to use the appropriate Relaxation Percentage rather than the fixed, initial percentage.
• An Appointment Request Response could now be selected during the ESR Registration (Add a Person) process on the Demographics/Personal screen.
• When registration of a patient (Add a Person) was completed, a bulletin was sent to the patient’s chosen Preferred Facility.
• Demographics/Identity Traits screen, Mother’s Maiden Name field was no longer shared with VistA.
• ESR sends a query to the MSDS Broker when a person is registered through ESR (AAP).
• The Country Code from VADIR Deployment to Service Location for Combat Pay is now mapped (MSDS).
• ESR shares Permanent Address and Home Telephone with the Master Veteran Index (MVI).
• MVI notifies ESR of Date of Death updates.
• E&E Web Service returns multiple Preferred Facilities for a Veteran if that Veteran has more than one active Preferred Facility.
• ESR uses HEC entered Eligibility Verification status for NSC and SC 0% non-compensable persons registered through ESR (AAP) to attempt to verify the Eligibility Status.
ESR V3.8 added the following additional capabilities/changes:
• A Delivery Preference sub tab which supports delivery preferences of either “Mail” or “Online” for the Veteran Benefits Handbook was added to the Communications tab.
• ESR uses MSDS data to verify eligibility.
• In the Permanent Mailing Address section, ESR separates Home Phone last update date/time from Permanent Address last update date/time.
• On Add A Person Search screen, the FIRST NAME and MIDDLE NAME fields were rearranged.
• On the Demographics/ Identity Traits screen, the Place of Birth State field became a dropdown menu with a list of state codes and foreign locations. The Race field changed to allow multiple selections.

HECMS Installation Guide
February 2013 Health Eligibility Case Management System 5 ESR 3.10 Installation Guide
ESR V3.9 added the following additional capabilities/changes:
• E&E Web Service – additional fields were added to the E&E Web Service.
• OPP Extracts – multiple Preferred Facilities and Ethnicity now appear in the Main file (OPP 5). A new OPP 9 was added which contains the beneficiary's Race.
• Handbook – the number of “trigger” events that prompt the sending of Handbook communications to the CMS was reduced. Handbook events were modified to trigger only when a different Preferred Facility (PF) has been added, or an existing PF is replaced by a different PF. – up to 3 PFs, including Station Number, are sent to the CMS vendor at the Community-based Outpatient Clinic (CBOC) level for inclusion in the Handbook.
• MSDS – the system now recalculates the Period of Service (POS) using the MSDS Broker when an ineligible non-service connected non-veteran is change to an eligible service-connected veteran.
• VOA Enhancements – new 1010EZ and 1010EZR formats became available through the ESR (HECMS) application via the “Print 1010EZ” and “Print 1010EZR” buttons under the Financials tab/Financial Overview screen.
ESR V3.10 adds the following additional capabilities/changes:
• Handbook – the Veteran Overview screen in the Communications section will have up to three hyperlinks for each of Handbook and Benefits at a Glance (currently only one of each is present). These hyperlinks will allow a user to view a historic Handbook or Benefits at a Glance.
• Enrollment Enhancements – there will be a onetime batch process to update CD Veterans to change the Means Test status to “No Longer Required” and the associated Pharmacy (Rx) Copay status to “No Longer Applicable”. – HL7 Messages in the ADR HL7_Transaction_Log table will be archived to the HL7_Archive table and then permanently deleted per an agreed upon schedule. On the Facility/Facilities screen, an additional hyperlink is being added to the page with the title, “View All Archived HL7 Messages”. When clicked, the Archived HL7 Message Log page will display.
• ICD-10 Changes – The 30-year-old ICD-9-CM code set is being replaced by the International Classification of Diseases, Tenth Revision, Clinical Modification (ICD-10-CM) and the International Classification of Diseases, Tenth Revision, Procedure Coding System (ICD-10-PCS) with dates of service, or date of discharge for inpatients, that occur on or after the ICD-10 Activation Date. There will be a period of time when VHA will require the use of both code sets (ICD-9 and ICD-10) to accommodate outpatient dates of service and inpatient discharges prior to and following the compliance date (the ICD-10 Activation Date) as well as for reporting and research purposes. New to ESR 3.10 is an added column in each of the Diagnosis and Procedure sections to indicate if the code displayed is an ICD-9 or ICD-10 code. The OPP 1 and OPP 2 extract reports have been modified to accommodate the new ICD-10 codes.
• Veteran Financial Assessment (VFA) – The VFA initiative reduces the need for Veterans to provide updated financial information to the VA annually to re-establish their eligibility for VA health care benefits. New enrollees and Veterans whose Means Tests expired prior to the VFA Start Date will be required to submit income information.

HECMS Installation Guide
February 2013 Health Eligibility Case Management System 6 ESR 3.10 Installation Guide
– A Means Test will no longer expire each year in the HECMS. – An ESR to IVM (Enrollment Database {EDB}) Web Service was established to exchange Veteran income/net worth information with the IVM Application (EDB). Additionally, all Means Tests will become effective immediately (Means Tests will no longer become Future Dated Tests). – A new system parameter, VFA Start Date, was added to the System Parameter section/screen that will establish the start of the Veteran Financial Assessment initiative.
Purpose The purpose of this document is to provide a high-level description of the processes and procedures for successful installation and deployment of the HECMS application.
Given the multiple systems involved, the ESR deployment is a complex operation and must be planned and sequenced accordingly. This document serves to articulate the steps necessary to sequence the deployment of ESR 3.5 and its necessary dependent systems.
Scope The scope of this document applies to activities conducted within the HECMS environment. It is tailored to provide technical instruction, guidance, and strategies for the successful installation and deployment of the HECMS project.
This document can be considered a “subset” of the Integrated Master Schedule (IMS), as it pertains to the deployment activities that relate to ESR. In addition, this document does not provide detailed steps on “how” to deploy each HeV application nor how to perform operations and health monitoring on each HeV application. Those details can be found in each system’s respective operations guide.
It is also important to note that if not specified, all other “normal” operational activities (as governed by each respective operations guide) are in force and must be followed.
While Activation Phase 1 will be briefly described, the primary scope of this document will be that of Activation Phase 2.
Target Audience The intended audience for this document includes software support/management (e.g., Information Resource Management [IRMs], Product Support [PS], Enterprise Management Center [EMC]) and development personnel involved in deploying and installing rehosted/re-engineered applications.
Related Documentation 1. ESR_3_10_Security_Guide 2. ESR_3_10_Developer’s_Guide 3. ESR_3_10_Systems_Management_Guide 4. ESR_3_10_User_Manual 5. ESR_3_10_Release_Notes 6. ESR 3.10 Operations Guide – Operations Guide

HECMS Installation Guide
February 2013 Health Eligibility Case Management System 7 ESR 3.10 Installation Guide
More Person Service Identity Management (PSIM) documentation can be found on the Technical Services Project Repository (TSPR) project notebook page by clicking on “Common Services - Person Service - FY09”.
Links to other Common Services used in the HECMS application can be found at the CS - ADR - ESR Integrated Project Home SharePoint site (username and password required).

HECMS Installation Guide
February 2013 Health Eligibility Case Management System 8 ESR 3.10 Installation Guide
Administration Tasks This section assumes that the reader has knowledge of WebLogic administration tasks using the administration console. More detailed information can be obtained from the official documentation via the following link.
• http://edocs.bea.com/wls/docs81/ConsoleHelp/index.html • http://download.oracle.com/docs/cd/E13222_01/wls/docs103/index.html
Setting up the Initial ESR Domain Assumptions / Prerequisites
The following assumptions and prerequisites apply to all WebLogic servers that will be part of the domain.
• Linux is installed and configured properly. (See CO40331FY07.)
CO40331FY07 Please change the following Kernel settings. If the current value on the server is greater than the specified value below, keep the current server value. /sbin/ifconfig lo mtu 1500 kernel.msgmni 1024 kernel.sem 1000 32000 32 512 fs.file-max 65535 kernel.shmmax 2147483648 net.ipv4.tcp_max_syn_backlog 8192 # increase TCP max buffer size net.core.rmem_max = 16777216 net.core.wmem_max = 16777216 # increase Linux autotuning TCP buffer limits min, default, and max number of bytes to use Note: you should leave tcp_mem alone. The defaults are fine. net.ipv4.tcp_rmem = 4096 87380 16777216 net.ipv4.tcp_wmem = 4096 65536 16777216 ifconfig eth0 txqueuelen 1000

HECMS Installation Guide
February 2013 Health Eligibility Case Management System 9 ESR 3.10 Installation Guide
• Make sure the missing Linux 32-bit shared libraries are installed. (See CO36416FY06.)
CO36416FY06 The Linux shared libraries had not been installed which resulted in the following error while running reports. Caused by: java.lang.UnsatisfiedLinkError: /usr/java/j2sdk1.4.2_14/jre/lib/i386/ libawt.so: libXp.so.6: cannot open shared object file: No such file or directory The command below needs to get run as root on the servers to install the shared libraries. up2date --arch=i386 xorg-x11-deprecated-libs If this step was run when the ESR app is running, then bring down the admin server, nodemanager and managed servers. Clean the logs by running “./cleanLogs.sh 2”. Bring up the servers again. To verify the install, cd to /usr/java/j2sdk1.6.0_24/jre/lib/i386 and type “ldd libawt.so”. This will show all the dependencies. weblogic@vhaesrapp1> pwd /usr/java/j2sdk1.6.0_24/jre/lib/i386 weblogic@vhaesrapp1> ldd libawt.so linux-gate.so.1 => (0xffffe000) libmlib_image.so => not found libjvm.so => not found libXp.so.6 => /usr/X11R6/lib/libXp.so.6 (0xf7d18000) libXt.so.6 => /usr/X11R6/lib/libXt.so.6 (0xf7cc7000) libXext.so.6 => /usr/X11R6/lib/libXext.so.6 (0xf7cb9000) libXtst.so.6 => /usr/X11R6/lib/libXtst.so.6 (0xf7cb3000) libX11.so.6 => /usr/X11R6/lib/libX11.so.6 (0xf7bd4000) libm.so.6 => /lib/tls/libm.so.6 (0xf7bb1000) libdl.so.2 => /lib/libdl.so.2 (0xf7bad000) libjava.so => not found libc.so.6 => /lib/tls/libc.so.6 (0xf7a81000) libSM.so.6 => /usr/X11R6/lib/libSM.so.6 (0xf7a77000) libICE.so.6 => /usr/X11R6/lib/libICE.so.6 (0xf7a5f000) /lib/ld-linux.so.2 (0x56555000) You can also run these two commands to verify if libXP.so.6.2 exists ls -al /usr/X11R6/lib64/libXp.so.6 lrwxrwxrwx 1 root root 12 May 29 12:45 /usr/X11R6/lib64/libXp.so.6 -> libXp.so.6.2 ls -al /usr/X11R6/lib/libXp.so.6 lrwxrwxrwx 1 root root 12 May 29 12:45 /usr/X11R6/lib/libXp.so.6 -> libXp.so.6.2

HECMS Installation Guide
February 2013 Health Eligibility Case Management System 10 ESR 3.10 Installation Guide
• Set up the WebLogic Linux Account with the following environment variables set in either .profile or .bash_profile (The BEA and Java version might change).
o The WebLogic account must have read and write access to the tmp directory. o The WebLogic account must have read access to the JAVA_HOME directory
• Make sure the limits.conf file is correct. See limits.conf@vaaacappl.
o Set up sudo to allow administrators to sudo su - weblogic
• BEA WebLogic 10.3.5 is installed to the location where the BEA_HOME variable is set. • Install Java to the location where the JAVA_HOME variable is set.
o Create a node manager directory as set by a NODEMGR_HOME variable.
Creating a basic ESR Domain
ESR will provide the domain creation scripts in a file named domain-scripts.tar.gz when it is time for initial domain configuration. The following steps apply to the server that will become the WebLogic administrative console.
• sudo to the WebLogic10 account or login as the WebLogic10 user.
* hard core 0
* soft nofile 4096
* hard nofile 65536
* soft memlock 64
* hard memlock 128
* soft nproc 2047
* hard nproc 16384
#!/bin/ksh
# Environment Setup Script for WebLogic
#
set -o vi
export FCEDIT=vi
export TMP=/tmp
export TMPDIR=/var/tmp
export APP_BASE=/u01/app
export BEA_HOME=$APP_BASE/bea10
export WL_HOME=$BEA_HOME/weblogic10
export PRODUCTION_MODE="true"
export JAVA_HOME=/usr/java/j2sdk1.6.0_24
export JAVA_VENDOR="Sun"
export NODEMGR_HOME=$BEA_HOME/nodemanager/
export PATH=$JAVA_HOME/bin:$WL_HOME/common/bin:$WL_HOME/server/bin:$HOME/bin:$PATH

HECMS Installation Guide
February 2013 Health Eligibility Case Management System 11 ESR 3.10 Installation Guide
• SCP the domain-scripts.tar.gz file (attached above) to /tmp/domain-scripts on the server.
• Unzip the domain-scripts.tar.gz file into the /tmp/domain-scripts directory.
cd /tmp/domain-scripts tar –xzf domain-scripts.tar.gz
• If the installDomain.sh or createBatchProcDirectory.sh file is not executable, make it executable.
chmod 744 *.sh
• Create the basic ESRDomain by running the installDomain.sh script from the /tmp/domain-scripts directory.
./installDomain ESRDomain.jar ESRDomain
• Create soft links to the ESRDomain and nodemanager directories in the WebLogic home directory
cd ~ ln –s /u01/app/bea10/user_projects/domains/ESRDomain ln –s /u01/app/bea10/nodemanager/
• CD to ESRDomain directory.
cd /u01/app/bea10/user_projects/domains/ESRDomain/
• Rename the startWebLogic.sh script to startWeblogic.sh (NOTE: difference in uppercase and lowercase “L”).
mv startWebLogic.sh startWeblogic.sh
• Run ./startWeblogic.sh & (NOTE: background execution) to start the WLS Admin server the very first time.
o Create new admin users by navigating to Security -> Realms -> myrealm -> Users. o On the General tab, create a new administrator user account and password. o Click Apply. o On the Group tab, assign the user to the Administrators group. o Click Apply. o Delete the default WebLogic user.
• Run ./stopWeblogic.sh <newUserName> <newPassword> to stop WLS Admin. • Delete boot.properties from your domain.
rm boot.properties
• Set up the environment so that the boot.properties file gets recreated.
export JAVA_OPTIONS=-Dweblogic.system.StoreBootIdentity=true
• Run ./startWeblogic.sh (NOTE: foreground execution) to start the WLS Admin server. When asked to provide user name and password, use your new admin user name and password.

HECMS Installation Guide
February 2013 Health Eligibility Case Management System 12 ESR 3.10 Installation Guide
• In another terminal, logged in as the WebLogic user, and in the ESRDomain directory, run ./storeCredentials.sh t3://<servername>:7001 <newUserName> <newPassword> to store the admin user credentials so that you don't have to provide user IDs and passwords from the command line every time a script is run. Replace the tags in < > with the appropriate values.
• Run ./stopWeblogic.sh to stop WLS Admin. • Remove the JAVA_OPTIONS environment variable or logoff the session.
export JAVA_OPTIONS=
• One of the servers in the cluster will act as the file store for batch processes. The required directory tree can be created by running the ./createBatchProcDirectory.sh script in the ESRDomain directory on the host server. All other servers in the cluster should mount a remote directory to /u02/batchProcess.
STOP. You are now ready to install ESR, which will occur later.
Installing ESR ESR will provide the scripts.zip, config.xml, and esr.ear files when it is time for installation. The files in the scripts.zip file and the config.xml file will replace the scripts in the ESRDomain directory. BEFORE the scripts, config.xml, and esr.ear can be built packaged and delivered, the development team needs to be notified with server names, server IP addresses, WebLogic admin user name, WebLogic admin user password, and CAIP server URL, so the nodemanager.host and config.xml files can be customized for the environment.
Steps 1 to 5 and 10 need to be done when ESR is installed for the first time. For subsequent installations, ignore these steps.
1. Unzip the contents of the scripts.zip into ESRDomain directory on all application servers.
2. Set permissions: chmod 774 /u01/app/bea10/user_projects/domains/ESRDomain/*.sh .
3. Copy the new config.xml into ESRDomain directory on the admin server.
4. In the ESRDomain directory, open config.xml in vi. Navigate to the bottom of the file and find the <EmbeddedLDAP stanza and the <SecurityConfiguration stanza. In another window and still in the ESRDomain directory, run cat on config.xml.booted. Find the <EmbeddedLDAP stanza and the <SecurityConfiguration stanza. Replace the stanzas, similar to the strings below, with the like stanzas from the config.xml.booted file. <EmbeddedLDAP CredentialEncrypted="{3DES}RHyup5TdHu/0p4Tb8Q3mFaI3v/1337YOyP//LJaiVY8=" Name="ESRDomain"/> <SecurityConfiguration CredentialEncrypted="{3DES}sAMA66CtQIOvXiEHSqDrHM82+oyF3+5/paQ1oVzr1o/RQ5RgR0LBEqQQ1AKLvMxF1gCxTShpe52e+Mobv5XbYoiWhFs2lz7j" Name="ESRDomain" RealmBootStrapVersion="1"/>
5. Copy the new nodemanager.hosts under the nodemanager directory of all the servers.
6. Using the existing scripts on the servers, shutdown ESR cluster, admin server, and node manager processes by running:

HECMS Installation Guide
February 2013 Health Eligibility Case Management System 13 ESR 3.10 Installation Guide
./stopCluster.sh
./stopNodemanager.sh
./stopWeblogic.sh).
7. Run "./cleanLogs.sh 2" on all servers.
8. Copy the new esr.ear into /u01/app/bea10/user_projects/domains/ESRDomain/applications/ directory on the admin server.
9. Start admin server on the admin server (run ./startWeblogic.sh & from the ESRDomain directory in the background).
10. Note: This step is needed when ESR is installed for the first time on a server. For subsequent installations, skip this step.
On another terminal, logged in as the WebLogic user, and in the ESRDomain directory, run ./storeCredentials.sh <newUserName> <newPassword> t3://<servername>:7001 to store the admin user credentials so that you don't have to provide user IDs and passwords from the command line every time a script is run. Replace tags in < > with the appropriate values.
11. Start node manager processes on all the servers (run ./startNodeManager.sh & in the background).
12. Start all ESR clusters (run ./startCluster.sh from the ESRDomain directory on the admin) .This command will start 3 clusters: ESRCluster1, ESRCluster2, and ESRCluster3.
13. After the previous step is complete, check if ESR is installed successfully on all 6 servers. Log onto ESR with the appropriate URL.
Weblogic patch to enable Web services
In order for the web services to work properly in the weblogic server 10.3.5, the following patch needs to be applied.
WebLogic Server Temporary Patch for 10056851
Instructions:
Download the jar file for the temporary patch from Oracle support website
Copy it to $WL_HOME\utils\bsu\cache_dir\
Cd $WL_HOME\utils\bsu
Run bsu.sh
Select the patch and apply
Setting up the ESR web server Assumptions / Prerequisites
The Apache web server has been installed on the Linux boxes.

HECMS Installation Guide
February 2013 Health Eligibility Case Management System 14 ESR 3.10 Installation Guide
Setting up ESR environment
Since ESR can run on multiple web servers depending on the environment (Prod, SQA, DR, EDEV), the steps below need to be repeated on each of the web servers for that specific environment.
1. Login to the Linux server which has the Apache web server installed.
2. SCP the webserversetup.tar file to /tmp/setup.
3. Untar the webserversetup.tar file under /tmp/setup.
4. If the setupWebServerEnv.sh is not executable, make it executable chmod 744 setupWebServerEnv.sh.
5. Run dos2unix setupWebServerEnv.sh.
6. Run ./setupWebServerEnv.
7. Open /etc/httpd/conf.d/weblogic.conf and uncomment and update the following attributes:
a. ServerName – Name and port that the server uses to identify itself.
b. Uncomment the section <IfModule mod_weblogic.c> and update the following attributes:
i. WeblogicCluster – The IP Addresses of the WebLogic clusters hosting the ESR web application. For ESR, the servers under ESRCluster1 host the ESR web application. The ESRCluster1 IP addresses can be found in the WebLogic config.xml (search for the string “ESRCluster1”). The config.xml resides under the /opt/bea/ESRDomain directory in the admin WebLogic server for the ESR application.
ii. ErrorPage – URL where the ESR Unavailable error page is located. This will physically reside under /var/www/html/status directory of the web server. So the path will be something like http://vaww.esr.aac.va.gov/status/ESR_Unavailable.html
8. Confirm that the WebHelp directory created under /var/www/html has read permissions for the Apache server. In the EDEV environment, it will need additional read and write access for the development group.
9. Once the steps are completed, point the load balancer to these web servers.
10. Copy /u01/app/bea10/wlserver10.3/server/lib/linux/i686/mod_wl_20.so from the WebLogic admin server to the /etc/httpd/modules directory of Apache server.
11. In the weblogic.conf file, ensure that the line specifying the module to load is mod_wl_20.so instead of mod_wl_20.so-x86_64.so.
Note: The setupWebServerEnv.sh performs the following tasks -
1. Copies the file weblogic.conf under the /etc/httpd/conf.d directory. 2. Creates a directory /var/www/html/status and sets permissions chmod 755 on
the status directory. 3. Copies the files related to the ESR Unavailable error page into this directory. 4. Creates a directory called "webhelp" under /var/www/html on vaaacwbd4.

HECMS Installation Guide
February 2013 Health Eligibility Case Management System 15 ESR 3.10 Installation Guide
Installing WebHelp on the web servers 1. Login to the Linux server which has the Apache web server installed.
2. SCP webhelp.zip and deployWebhelp.sh to /tmp/webhelpArchive from VAAACMUL1O: pscp D:\CM\IP5\20070329\CO43354FY07\webhelp* user@vaaacweb1s:/tmp/webhelpArchive/.
3. Set permissions: chmod –R 755 /tmp/webhelpArchive/.
4. Run Dos2Unix on deployWebhelp.sh: dos2unix /tmp/webhelpArchive/deployWebhelp.sh.
5. Deploy webhelp from /tmp/webhelpArchive directory: ./deployWebhelp.sh webhelp.zip (As root (sudo)).
6. Repeat steps 1-4 for all web servers in that environment.
Setting up the DTD files on the web server 1. Copy the following DTD files to /var/www/html folder on vhaesrweb1 and vhaesrweb2
a. ejb-jar_2_0.dtd
b. hibernate-mapping-3.0.dtd,
c. mapping.dtd, spring-beans.dtd,
d. struts-config_1_3.dtd,
e. tiles-config_1_1.dtd,
f. validator_1_1_3.dtd,
g. validator_1_3_0.dtd ,
h. weblogic-ejb-jar.dtd)
2. In vhaesrweb1 and vhaesrweb2, edit httpd.conf file (/etc/httpd/conf/httpd.conf) and enter a virtual host running on port 82 to redirect the access requests for dtd files as follows.
a. In vhaesrweb1 Listen 82
<VirtualHost vhaesrweb1.aac.va.gov:82>
ServerName vhaesrweb1.aac.va.gov
DocumentRoot /var/www/html
</VirtualHost>
b. In vhaesrweb2 Listen 82
<VirtualHost vhaesrweb2.aac.va.gov:82>
ServerName vhaesrweb2.aac.va.gov
DocumentRoot /var/www/html
</VirtualHost>

HECMS Installation Guide
February 2013 Health Eligibility Case Management System 16 ESR 3.10 Installation Guide
3. Add two services for the load balancer vaww-prd.esr.healthevet.va.gov (10.224.132.39) a. Vhaesrweb1.aac.va.gov 10.224.132.91 port 82 b. Vhaesrweb2.aac.va.gov 10.224.132.90 port 82
Setting up the Enrollment and Eligibility Service (E&E) WebLogic domain
The COs for the E&E web service deployment tasks are as follows:
• Stage 1B: R350242FY10 • PreProd: CO53836FY10 • Prod: CO53841FY10
Enrollment and Eligibility Service requires WebLogic 10.3 version. Separate application servers have been created with WebLogic 10.3 for E &E service.
Please note that
• All the scripts are in EEService_Scripts.tar.gz • Default WebLogic user password used in these scripts is "weblogic123" • Please change it to a new password while creating the domain.
1. Unzip the contents of the EEService_Scripts.tar.gz into a directory on all application servers.
2. Run dos2unix command on all the contents of this file.
3. Set the following environment variables. export BEA_HOME=/u01/app/bea export WL_HOME=/u01/app/bea/wlserver_10.3 export EEDOMAIN_HOME=/home/weblogic/bea/<DOMAINNAME> The domain name has the format EES-<Environmentname> e.g. EES-DEV, EES-SQA, EES-PreProd, EES-Prod.
4. Change directory the appropriate folder [dev , sqa etc..].
5. Use this command in the desired directory to remove ^M hars in the UNIX scripts. It will clean up all the files in the selected directory.
[weblogic@vhaesrapp41 dev]find . -type f -name '*' | xargs dos2unix
6. Open CreateDomain.py in vi and change the WebLogic user password and the password for the dbconnection pool.
7. Run script CreateDomain.sh and it creates the EES domain. bash$./CreateDomain.sh
8. Change directory to $EEDOMAIN_HOME/bin and run this command to start the admin server. For e.g.
[weblogic@vhaesrapp41 dev]./startWebLogic.sh
9. Logon to the admin console to make sure all the servers/machines/clusters/pools are created.
10. Run this command on all the managed servers to enroll those machines to the managed server in the domain.
HECMS Installation Guide
February 2013 Health Eligibility Case Management System 17 ESR 3.10 Installation Guide
[weblogic@vhaesrapp41 dev]$ ./SetNodeManager.sh
11. Run this command to start the node manager all the servers. [weblogic@vhaesrapp41 dev]$ ./StartNodeManager.sh
12. Change directory to $EEDOMAIN_HOME and create a directory "application".
13. Copy the war file esr-ws.war to the applications folder.
14. Change directory the appropriate folder under scripts to deploy the war file using this command. [weblogic@vhaesrapp41 dev]$ ./Deploy.sh
15. Start the managed servers in one of the following ways.
a. from the admin console.
b. using the WebLogic provided scripts under $EEDOMAIN_HOME/bin. c. [weblogic@vhaesrapp41 dev]$ ./StartManagedServers.sh.
16. If you need to reinstall the domain please follow these steps.
a. stop all the servers including the nodemanager and admin server.
b. delete all the files and folder from the domain home.
c. delete all the files and folders from nodemanager home
d. start over from step 1 above
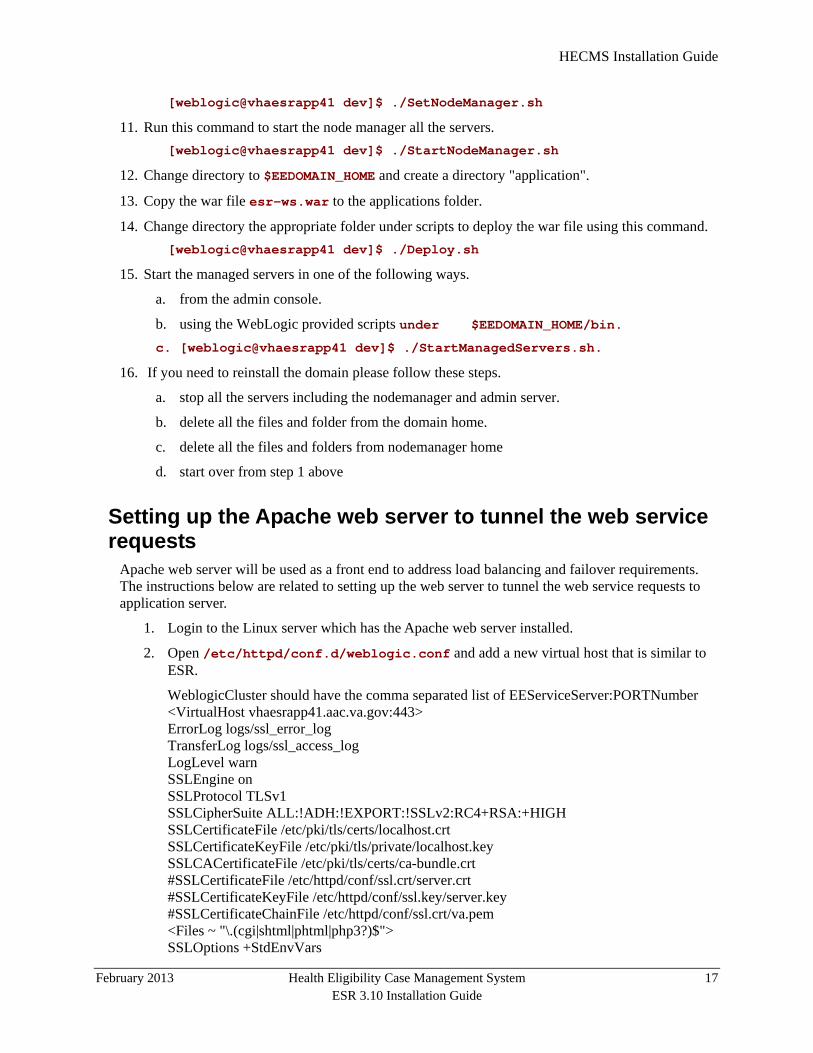
Setting up the Apache web server to tunnel the web service requests
Apache web server will be used as a front end to address load balancing and failover requirements. The instructions below are related to setting up the web server to tunnel the web service requests to application server.
1. Login to the Linux server which has the Apache web server installed.
2. Open /etc/httpd/conf.d/weblogic.conf and add a new virtual host that is similar to ESR.
WeblogicCluster should have the comma separated list of EEServiceServer:PORTNumber <VirtualHost vhaesrapp41.aac.va.gov:443> ErrorLog logs/ssl_error_log TransferLog logs/ssl_access_log LogLevel warn SSLEngine on SSLProtocol TLSv1 SSLCipherSuite ALL:!ADH:!EXPORT:!SSLv2:RC4+RSA:+HIGH SSLCertificateFile /etc/pki/tls/certs/localhost.crt SSLCertificateKeyFile /etc/pki/tls/private/localhost.key SSLCACertificateFile /etc/pki/tls/certs/ca-bundle.crt #SSLCertificateFile /etc/httpd/conf/ssl.crt/server.crt #SSLCertificateKeyFile /etc/httpd/conf/ssl.key/server.key #SSLCertificateChainFile /etc/httpd/conf/ssl.crt/va.pem <Files ~ "\.(cgi|shtml|phtml|php3?)$"> SSLOptions +StdEnvVars

HECMS Installation Guide
February 2013 Health Eligibility Case Management System 18 ESR 3.10 Installation Guide
</Files> <Directory "/var/www/cgi-bin"> SSLOptions +StdEnvVars </Directory> SetEnvIf User-Agent ".*MSIE.*" \ nokeepalive ssl-unclean-shutdown \ downgrade-1.0 force-response-1.0 CustomLog logs/ssl_request_log \ "%t %h %{SSL_PROTOCOL}x %{SSL_CIPHER}x \"%r\" %b" <IfModule mod_weblogic.c> # WeblogicCluster 10.224.88.120:8101 WeblogicCluster vhaesrapp41.aac.va.gov:8101 MatchExpression /esr-ws </IfModule> </VirtualHost>
3. Restart the Apache server.
Testing the Installation Try accessing the URL
https://vaww.esr.aac.va.gov:8443/esr-ws/spring-ws/getEESummary/eeSummary.wsdl
Please note this would vary according to the environment (Development, SQA, pre-prod and prod).
Please note that E&E web service is dependent on ESR.ear deployed on the WebLogic 10.3 server.
Setting up TLS authentication in E&E servers ESR interface to VADIR Webservice (also called Military Service Data Service - MSDS) uses Mutual TLS Authentication with VA issued certificates to identify and authorize server-to-server communications. TLS also provides the message’s confidentiality and integrity between the endpoints. For additional details, please refer to ESR MSDS interface control document.

HECMS Installation Guide
February 2013 Health Eligibility Case Management System 19 ESR 3.10 Installation Guide
ESR Security Boundary(within AITC’s GSS)
VADIR Security Boundary(within AITC’s GSS)
Java KeyStore
• Trusted Certificate Authorities• Public + Private Keys of this Machine• Public Key(s) of VDR Servers
SSL Configuration
• Trusted Certificate Authorities• Public + Private Keys of this Machine• “CN”s of ESR Servers
TLS• Authentication • Transport
ESR’sPublic
KeyVDR’sPublic
Key
Figure 1: ESR-VADIR security Boundary
Execute the following in VHAESRAPP45 server Pre-requisites:
Need to have VA.pem, VAVDRAPP1.aac.va.gov.pem, vhaesrapp45.aac.va.gov.pem in /u01/cert/
STEP 1:
navigate to /u01/app/bea/wlserver_10.3/server/lib/
STEP 2:
keytool -import -alias VA_internal_root_CA -file /u01/cert/va.pem -keystore /u01/app/bea/wlserver_10.3/server/lib/vacertstore.jks -storepass PASSWORD1
STEP 3:
keytool -import -alias vavdrapp1.aac.va.gov -file /u01/cert/vavdrapp1.aac.va.gov.pem -keystore /u01/app/bea/wlserver_10.3/server/lib/vacertstore.jks -storepass PASSWORD1 STEP 4:
keytool -list -keystore vacertstore.jks -v (when prompted for password specifye the PASSWORD1 from above) (should come back with 2 entries - alias VA_internal_root_CA and vavdrapp1.aac.va.gov ) STEP 5: java -classpath weblogic.jar utils.ImportPrivateKey -keystore /u01/app/bea/wlserver_10.3/server/lib/appcertstore.jks -storepass PASSWORD2 -storetype jks -keypass

HECMS Installation Guide
February 2013 Health Eligibility Case Management System 20 ESR 3.10 Installation Guide
PASSWORD2 –alias vhaesrapp45.aac.va.gov -certfile /u01/cert/vhaesrapp45.aac.va.gov.pem -keyfile /u01/cert/vhaesrapp45.aac.va.gov.key -keyfilepass PASSWORD2 NOTE: The PASSWORD2 specified in STEP5 should exactly match the password to open the certificate key file. STEP 6: keytool -list -keystore appcertstore.jks -v ((when prompted for password use PASSWORD2) (should come back with 1 entry - alias vhaesrapp45.aac.va.gov ) STEP 7: cd /u01/cert openssl verify -CAfile va.pem vhaesrapp45.aac.va.gov.pem
(check if the result is vhaesrapp45.aac.va.gov.pem: OK)
Execute the following in VHAESRAPP46 server Pre-requisites:
Need to have VA.pem, VAVDRAPP1.aac.va.gov.pem, vhaesrapp46.aac.va.gov.pem in /u01/cert/
STEP 1:
navigate to /u01/app/bea/wlserver_10.3/server/lib/
STEP 2:
keytool -import -alias VA_internal_root_CA -file /u01/cert/va.pem -keystore /u01/app/bea/wlserver_10.3/server/lib/vacertstore.jks -storepass PASSWORD1
STEP 3:
keytool -import -alias vavdrapp1.aac.va.gov -file /u01/cert/vavdrapp1.aac.va.gov.pem -keystore /u01/app/bea/wlserver_10.3/server/lib/vacertstore.jks -storepass PASSWORD1 STEP 4:
keytool -list -keystore vacertstore.jks -v (when prompted for password specifye the PASSWORD1 from above) (should come back with 2 entries - alias VA_internal_root_CA and vavdrapp1.aac.va.gov ) STEP 5: java -classpath weblogic.jar utils.ImportPrivateKey -keystore

HECMS Installation Guide
February 2013 Health Eligibility Case Management System 21 ESR 3.10 Installation Guide
/u01/app/bea/wlserver_10.3/server/lib/appcertstore.jks -storepass PASSWORD2 -storetype jks -keypass PASSWORD2 –alias vhaesrapp46.aac.va.gov -certfile /u01/cert/vhaesrapp46.aac.va.gov.pem -keyfile /u01/cert/vhaesrapp45.aac.va.gov.key -keyfilepass PASSWORD2 NOTE: The PASSWORD2 specified in STEP5 should exactly match the password to open the certificate key file. STEP 6: keytool -list -keystore appcertstore.jks -v ((when prompted for password use PASSWORD2) (should come back with 1 entry - alias vhaesrapp46.aac.va.gov ) STEP 7: cd /u01/cert openssl verify -CAfile va.pem vhaesrapp46.aac.va.gov.pem
(check if the result is vhaesrapp46.aac.va.gov.pem: OK)
Logon to weblogic administration console for VHAEES_PROD and repeat the steps below for EES-MS1 and EES-MS2
a. Navigate to Environment->Servers-->[EES-MS1]-->Configuration-->Keystores b. Set Keystores to “Custom Identity and Custom Trust” c. In the Identity section set:
i. Custom Identity Keystore to the /u01/app/bea/wlserver_10.3/server/lib/appcertstore.jks
ii. Custom Identity Keystore Type to jks iii. Custom Identity Keystore Passphrase to PASSWORD 2
d. In the Trust section set: i. Custom Trust Keystore to the file
/u01/app/bea/wlserver_10.3/server/lib/vacertstore.jks ii. Customer Keystore Type to jks
iii.Customer Trust Keystore Passphrase to PASSOWORD1 e. Click Save. f. Navigate to the SSL tab. g. Set Identity and Trust Locations to “Keystores” h. In the Identity section set:
i. Private Key Alias to the alias vhaesrapp45.aac.va.gov ii. Private Key Passphrase to PASSWORD2
i. Click on Advanced and set:
i. Hostname Verification to “None” ii. Custom Hostname Verifier to blank iii. Export Key Lifespan unchanged iv. Use Server Certs to checked v. Two Way Client Cert Behavior to “Client Certs Not Requested” vi. Cert Authenticator to blank
HECMS Installation Guide
February 2013 Health Eligibility Case Management System 22 ESR 3.10 Installation Guide
j. Click Save k. under SERVER START, ARGUMENTS add the following.
-Djavax.net.ssl.trustStore=/u01/app/bea/wlserver_10.3/server/lib/vacertstore.jks
-Djavax.net.ssl.trustStorePassword=PASSWORD1 -Djavax.net.ssl.keyStore=/u01/app/bea/wlserver_10.3/server/lib/appcertstore.jks -Djavax.net.ssl.keyStorePassword=PASSWORD2
Please note: It is better to cut and paste the current content from ARGUMENTS field and then add these two and paste the whole thing back.
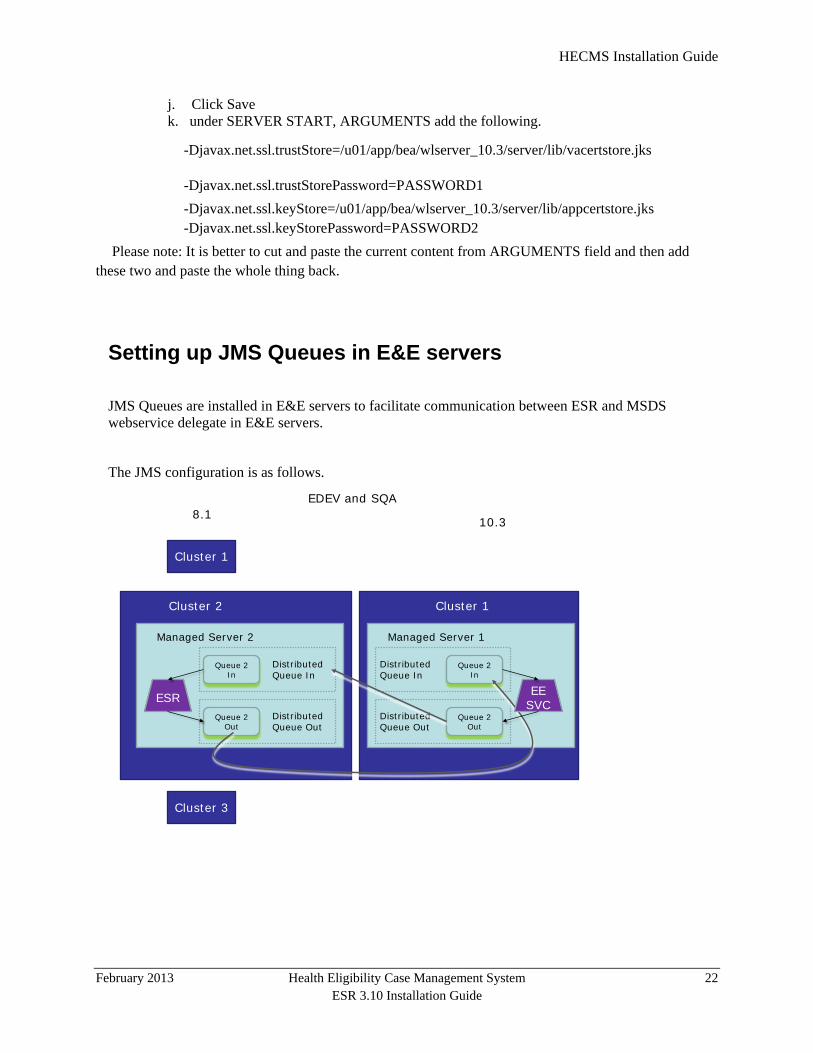
Setting up JMS Queues in E&E servers
JMS Queues are installed in E&E servers to facilitate communication between ESR and MSDS webservice delegate in E&E servers.
The JMS configuration is as follows.
8.1
Cluster 1
Cluster 3
Cluster 2
Managed Server 2
Queue 2 In
Distributed Queue In
Queue 2 Out
Distributed Queue Out
10.3
Cluster 1
Managed Server 1
Queue 2 In
Distributed Queue In
Queue 2 Out
Distributed Queue Out
ESR EESVC
EDEV and SQA

HECMS Installation Guide
February 2013 Health Eligibility Case Management System 23 ESR 3.10 Installation Guide
8.1 Cluster 2
Managed Server 2
Queue 2 In
Distributed Queue In
10.3
ESR
(Clusters 1 and 3 not shown)
Managed Server 4
Queue 4 In
Queue 2 Out
Distributed Queue Out
Queue 4 Out
ESR
Cluster 1
Managed Server 1
Queue 1 In
Distributed Queue In
EESVC
Managed Server 2
Queue 2 In
Queue 1 Out
Distributed Queue Out
Queue 2 Out
EESVC
Pre-Prod and Prod
The instructions for installing JMS Queues in ESR servers (weblogic 10.3) are as follows.
MSDS Queue Install Instructions for WebLogic 10.3 (ESR):
1. Navigate to the console application for ESR and log in with the appropriate credentials.
2. In the left tree pane, expand the path "ESRDomain -> Services -> JMS -> Connection Factories". Right-click on the "Connection Factories" item and choose "Configure a new JMS Connection Factory". In the screen that appears on the right, enter the following information: Name: "MSDS Connection Factory" JNDI Name: "jms.MSDS-ConnectionFactory" Client ID: (empty) Default Priority: 4 Default time to live: 0 Default time to deliver: 0 Default Delivery Mode: Persistent Default redelivery delay: 0 Messages maximum: 10 Overrun Policy: Keep Old Allow Close In On Message: (unchecked) Acknowledge policy: All Load Balancing Enabled: (checked) Server Affinity Enabled: (unchecked)
Click "Create" at the bottom right of the webpage.

HECMS Installation Guide
February 2013 Health Eligibility Case Management System 24 ESR 3.10 Installation Guide
In the next page that appears, check the radio button "All servers in the cluster" underneath the middle item that says "ESRCluster2".
Click "Apply" at the bottom right of the webpage.
You will see a new item appear in the left tree pane inside the "Connection Factories" folder called "MSDS Connection Factory". Step 2 is complete.
3. In the left tree pane, expand the path "ESRDomain -> Services -> JMS -> Templates". Right-click on "Templates" and choose "Configure a new JMS Template". In the screen that appears on the right, enter “MSDS Inbound Queue” in the name field and click “Create”. You will see the new template appear in the left tree pane inside the “Templates” folder.
4. Repeat step 3, but entering “MSDS Outbound Queue” for the name. Ensure both new Inbound and Outbound templates appear in the left tree pane under the “Templates” folder.
5. In the left tree pane, expand the path "ESRDomain -> Services -> JMS -> Servers -> MS2.JmsServer -> Destinations". Right-click on “Destinations” folder and choose “Configure a new JMSQueue”. Enter the following information in the screen on the right: Name: “MSDS Inbound [email protected]” JNDI Name: “[email protected]” Replicate JNDI name in cluster: (checked) Enable store: default Template: MSDS Inbound Queue Click “Create” at the bottom right of the webpage. You will see a new item appear in the left tree pane inside the “Destinations” folder called “MSDS Inbound [email protected]”.
6. Repeat step 5, substituting the following values: Name: “MSDS Outbound [email protected]” JNDI Name: “[email protected]” Template: MSDS Outbound Queue Ensure both new Inbound and Outbound queues appear in the left tree pane under the “Destinations” folder.
7. In the left tree pane, expand the path "ESRDomain -> Services -> JMS -> Distributed Destinations". Right-click on “Distributed Destinations” and choose “Configure a new JMSDistributedQueue…”. Enter the following information in the screen on the right: Name: “MSDS Inbound Queue” JNDI Name: “jms.InboundMSDSQueue” Local Balancing Policy: Round Robin

HECMS Installation Guide
February 2013 Health Eligibility Case Management System 25 ESR 3.10 Installation Guide
Forward Delay: -1 seconds Click “Create” at the bottom right of the webpage. At the top of the right panel, click the “Members” tab. Click the link “Configure a new Distributed Queue Member…”. Enter the following information in the screen on the right: Name: “MSDS Inbound [email protected]” JMS Queue: select the “MSDS Inbound [email protected]” option Weight: 1 Click the “Create” button at the bottom right of the webpage. Ensure a new item appears in the left tree pane underneath the “Distributed Destinations” folder called “MSDS Inbound [email protected]”.
8. Repeat step 7, substituting the following values for the main queue: Name: “MSDS Outbound Queue” JNDI Name: “jms.OutboundMSDSQueue” Also substitute the following values for the “Members” page: Name: “MSDS Outbound [email protected]” JMS Queue: select the “MSDS Outbound [email protected]” option Ensure both the Inbound and Outbound distributed destinations now appear in the left tree pane underneath the “Distributed Destinations” tab.
The instructions for installing JMS Queues in E&E servers (weblogic 10.3) are as follows.
Pre-requisite: Ensure that a domain name appclu-prod.eesvc.healthevet.va.gov exists and includes the servers vhaesrapp45.aac.va.gov and vhaesrapp46.aac.va.gov.
1. Set the following environment variable:
export EEDOMAIN_HOME=/home/weblogic/bea/EES-DEV
# Change the value of this variable for the appropriate environment:
# EES-DEV for edev
# EES-PREPROD for preprod
# EES-PROD etc
2. Unzip MSDS-scripts.zip, open a new command window and change directory
to the appropriate subfolder [dev, sqa, etc.]

HECMS Installation Guide
February 2013 Health Eligibility Case Management System 26 ESR 3.10 Installation Guide
3. Run this command in the directory containing the PrepMSDS.sh file to remove
^M chars:
[weblogic@vhaesrapp41 dev] dos2unix PrepMSDS.sh
If dos2unix isn't on the path, set the executable bit of the attached utility
by running "chmod +x ../dos2unix.sh" and then run "../dos2unix.sh ./PrepMSDS.sh"
4. Copy the PrepMSDS.sh and PrepMSDS.py files into the domain folder:
[weblogic@vhaesrapp41 dev] cp ./PrepMSDS* $EEDOMAIN_HOME
5. Change directory into the domain folder:
[weblogic@vhaesrapp41 dev] cd $EEDOMAIN_HOME
6. Update the credentials at the top of the PrepMSDS.py file to match
those required by the WebLogic server in the current environment. Values to change
are on lines 6 and 7: "eesvcUsername" and "eesvcPassword". For example, the
default values are "weblogic" / "weblogic123" as documented for WebLogic 10.3.
7. Run script PrepMSDS.sh, which adds new JMS components to existing
administration server config:
[weblogic@vhaesrapp41 dev] ./PrepMSDS.sh
If necessary, set the executable bit first by running "chmod +x ./PrepMSDS.sh"
8. Logon to the admin console to make sure the JMS components are created; for
example, a new JMS server called "EE-JMS".
9. Deploy the "jms-notran-adp" resource adapter by performing the following steps:
9a. In the WebLogic console, navigate to the ESR-WS -> Deployments section
in the left tree pane. Click "Install" button above the table of deployments
in the right pane.
9b. In the "Path" textbox, type the path to the server/lib folder inside the
WebLogic installation directory. For example:
/u01/app/bea/wlserver_10.3/server/lib
Press enter after typing it and it should refresh the file list below.
9c. Check the radio button next to the file below named "jms-notran-adp.rar".

HECMS Installation Guide
February 2013 Health Eligibility Case Management System 27 ESR 3.10 Installation Guide
Do not confuse this with the exploded directory called
"jms-notran-adp (open directory)". Click the "Next" button at the top of
the table.
9d. On the next screen, check the option "Install this deployment as an
application" and click "Next".
9e. On the next screen, check the radio button "All servers in the cluster".
It will automatically check the EECluster item above it. No other items on
the screen should be selected. Click "Next".
9f. On the next screen, accept all the defaults and click "Finish".
If it installs successfully, the deployments webpage will appear and a new item
will be in the table called "jms-notran-adp". Ensure the type of this item is
"Resource Adapter".
If it did not install successfully due to a Java error about "specification
version" or the type is not "Resource Adapter", contact ESR support for further
instructions and a workaround.
10. Deploy the msds-ws.war using standard deployment instructions for a war file.
11. Click the "View Changes and Restarts" link in the top left of the console webpage,
then click "Restart checklist" tab. If it says the admin server requires a restart,
restart the admin server now from the command line. Otherwise proceed to step 12.
12. Stop, then start the managed servers via the admin console.
13. Remove the PrepMSDS files from the domain folder (optional):
rm $EEDOMAIN_HOME/PrepMSDS.sh
rm $EEDOMAIN_HOME/PrepMSDS.py

HECMS Installation Guide
February 2013 Health Eligibility Case Management System 28 ESR 3.10 Installation Guide
Setting up the SFTP interface between ESR Linux and Windows Servers CO88253FY11
For ESR 3.5, in order to extract the data from the CDW, a windows server with SQL server database was established. Secured FTP connection needs to be established between ESR production windows server VAAUSESRSQL25 and ESR Linux server vhaesrweb1. In order to establish a passwordless SFTP connection, SSH keys were generated for the windows user ID, VAAITCESRUSR, using the reflection key gen utility. The .pub file was added to the authorized_keys file for aacesrprod on vhaesrweb1. The setup in production is shown below.
vhacdwa01 vaausesrsql25 vaausesrmul30

HECMS Installation Guide
February 2013 Health Eligibility Case Management System 29 ESR 3.10 Installation Guide
Setting up the CDW Data Extraction package in ESR Windows Server CO88253FY11
For the ESR 3.5 Preferred Facility enhancements, a daily data exchange between the CDW database and ESR needed to be established.
CDW is an SQL server database, therefore, an SQL server data extraction utility needed to be set up in the ESR windows server that hosts an SQL server database.
The instructions are below:
Introduction
This file describes the installation and operation process for a set of scripts which are used to retrieve PCMM data from the CDW database CDWWorks and transfer it to the ADR database.
This data is used in support of Preferred Facility functionality of the ESR application. The data retrieval process consists of two parts:
* initial bulk data load
* regular (daily) data updates.
The scripts for daily updates are designed to be run as an automatic task scheduled on regular (daily) basis.
Installation Pre-requisites
The following are pre-requisites to install and successfully run this package.
* The local server used to run the package has Windows operating system (Windows Server 2008 R2).
* Microsoft SQL Server 2008 R2 is installed with all the components.
* The secure copy (scp) utility is installed and configured to have a trusted connection with the ESR server.
* The Active Directory user account VAAITCESRUSR is created for the ESR application.
* Account VAAITCESRUSR has a privilege to create a database in local MS SQL Server.
* Account VAAITCESRUSR has a privilege to create and run a job using Task Scheduler on local Windows server.
* Account VAAITCESRUSR has a privilege to create a directory to store scripts and data files with adequate disk space.
* Account VAAITCESRUSR is configured to run scp and sqlcmd utilities on the local server.

HECMS Installation Guide
February 2013 Health Eligibility Case Management System 30 ESR 3.10 Installation Guide
* Account VAAITCESRUSR has permission to access CDW database on the CDW database server.
The content of this package
\install
README.txt (this file)
createCDWsupport.sql
createTablesCDWsupport.sql
\initial_load
getETLBatchIDfromCDWperRegion.sql
getPatProvRelFromCDWperSite.PROD.sql
getPatProvRelFromCDWperSite.sql
get_bulkPCMMdata.bat
get_data_per_region.bat
get_data_per_reg_site.bat
get_pcp_region_1.bat
get_pcp_region_2.bat
get_pcp_region_3.bat
get_pcp_region_4.bat
\daily_updates
getLastETLBatchID_totalrecs_fromCDWperRegion.sql
getPatProvRelFromCDWperRegion.PROD.sql
getPatProvRelFromCDWperRegion.sql
getStartETLBatchID_perRegion.sql
get_CDWupdates_per_region.bat
get_PCMMdata_updates.bat
Installation
Login as user VAAITCESRUSR to the local user to do the installation.
Create the following directories:
* Directory to store the data files (default: E:\MSSQL\PCMM2ESR)
HECMS Installation Guide
February 2013 Health Eligibility Case Management System 31 ESR 3.10 Installation Guide
* Directory to store scripts (default: E:\MSSQL\scripts
E:\MSSQL\scripts\install
E:\MSSQL\scripts\initial_load
E:\MSSQL\scripts\daily_updates)
* Directory to store CDWsupport database files (default: E:\MSSQL\Data)
Review the file createCDWsupport.sql. Make modifications in the script if you have chosen a location for the database files different from the default location.
Login to the local instance of MS SQL Server 2008 R2 as user VAAITCESRUSR. Run a script createCDWsupport.sql to create CDWsupport database (use master). Run a script createTablesCDWsupport.sql to create tables in CDWsupport database (use CDWsupport).
Review the file get_bulkPCMMdata.bat. Make modifications in this file if you have chosen a location for the scripts directory, data directory, secure copy user, ESR server name, data directory on ESR server, and a CDW database server name different than the default values.
Default values are as follows (see file get_bulkPCMMdata.bat):
set MyDirectory=E:\MSSQL\PCMM2ESR
set ScriptDirectory=E:\MSSQL\scripts\initial_load
set sftpuser=aacesrprod
set ESRserver= vaausesrmul30.aac.va.gov
set ESRdirectory=/u02/batchProcess/PCMM2ESR
set CDWserver=vhacdwa01.vha.med.va.gov
Review the file get_PCMMdata_updates.bat . Make modifications in this file if you have chosen a location for the scripts directory, data directory, secure copy user, ESR server name, data directory on the ESR server, and CDW database server name different than the default values.
Default values are as follows (see file get_PCMMdata_updates.bat):
set MyDirectory=E:\MSSQL\PCMM2ESR
set ScriptDirectory=E:\MSSQL\scripts\daily_updates
set sftpuser=aacesrprod
set ESRserver= vaausesrmul30.aac.va.gov
set ESRdirectory=/u02/batchProcess/PCMM2ESR
set CDWserver=vhacdwa01.vha.med.va.gov

HECMS Installation Guide
February 2013 Health Eligibility Case Management System 32 ESR 3.10 Installation Guide
Schedule tasks in Task Scheduler
As user VAAITCESRUSR start Task Scheduler utility and schedule a task to run script get_bulkPCMMdata.bat once for initial bulk data load of PCMM data. Also, schedule a regular (daily) task to run script get_PCMMdata_updates.bat for data updates. Make sure that a first run of the daily update task is scheduled after the initial bulk data load task is finished.
Operation
When the initial bulk data load task is completed check that the data was successfully retrieved and moved to the ESR server: the data directory on the local server should be empty, table ETLBatchRegion in CDWsupport database should have 4 records, and the table BatchErrorLog in CDWsupport database should have no records. If you experience errors, rerun the initial bulk data load process again until successful. Do not run daily updates task until you get the bulk data load completed.
Under normal operations the data directory on the local server should remain empty, since after successful data transfer, the data files are deleted from the local server. If you see a file in the data directory when the daily update task is not running, examine the file with the extension '.log' and check CDWsupport.BatchErrorLog table for errors.
Note that the data and log files have date stamp as part of their names.
Standard DBA operations to maintain the CDWsupport database are expected. In particular, regular database backups are recommended. The table ETLBatchRegion in the CDWsupport database is expected to be updated every time the daily update task is run successfully. The table BatchErrorLog in the CDWsupport database should be periodically reviewed for error messages from the daily data update process.

HECMS Installation Guide
February 2013 Health Eligibility Case Management System 33 ESR 3.10 Installation Guide
Setting Up Mutual TLS between ESR and VAAFI servers to access PSIM WebService Interface
The instructions for setting up TLS between ESR and VAAFI servers are included below,
VAAFI Security BoundaryESR Security Boundary(within AITC’s GSS)
Java KeyStore
• Trusted Certificate Authorities• Public + Private Keys of this Machine• Public Key(s) of VAAFI Servers
TLS Authentication Transport
ESR’sPublic
KeyVAAFI’sPublic
Key
Data Power
KeyStore
• Trusted Certificate Authorities• Public + Private Keys of this Machine• Public Key(s) of ESR Servers, MVI
Servers
MVI Security Boundary(within AITC’s GSS)
Java KeyStore
• Trusted Certificate Authorities• Public + Private Keys of this Machine• Public Key(s) of VAAFI Servers
VAAFI’s public
key
MVI’sPublic
Key
TLS Authentication Transport
The following instructions are for vaausesrapp21 server. The same instruction needs to be executed on all the servers vaausesrapp21 to vaausesrapp32. Please replace the appropriate server name before copying the commands.
Please note: When you cut and paste the commands from this document to a Linux server, sometimes “-“ are replaced by “.”s. Compare and verify the commands before proceeding.
Execute the following in VAAUSESRAPP21 server
Pre-requisites:
1. Create a directory cert under /u01 if one does not exist 2. Get the certificates VA.pem and esr-prod.aac.va.gov.pem, esr-prod.aac.va.gov.key, esr-
prod.aac.va.gov.decrypt.key from Tom Schenk along with key password. 3. Copy them to /u01/cert if they don’t exist 4. Need to know the password for the key for the certificate esr-prod.aac.va.gov.pem (this is referred
as PASSWORD2 in the commands below. Please replace PASSWORD2 with this password) 5. Copy the certificates ECA_Root_CA_2.cer, labws.eauth.va.gov.cer, ORC_ECA_SW_3.cer,
services.eauth.va.gov.cer in /u01/cert/ from the zip file attached ECA_Root_CA_2.cer, labws.eauth.va.gov.cer, ORC_ECA_SW_3.cer, services.eauth.va.gov.cer are delivered in the zip file IAM VAAFI Public Certs.zip
6. Ensure that the permissions on the hash files for the certificates are 644.
If the certificate extensions are .crt and not .pem, please replace the file extension name in the commands below.
STEP 0:
Create certs directory under /u01/app/bea10/wlserver_10.3/server/lib/

HECMS Installation Guide
February 2013 Health Eligibility Case Management System 34 ESR 3.10 Installation Guide
STEP 1:
Navigate to /u01/app/bea10/wlserver/server/lib/
STEP 2:
/usr/java/latest/bin/keytool -import -alias VA_internal_root_CA -file /u01/cert/va.pem -keystore /u01/app/bea10/wlserver_10.3/server/lib//vacertstore.jks -storepass PASSWORD1
STEP 3:
/usr/java/latest/bin/keytool -import -alias ECA_Root_CA_2 -file /u01/cert/ ECA_Root_CA_2.cer -keystore /u01/app/bea10/wlserver_10.3/server/lib//vacertstore.jks -storepass PASSWORD1 STEP 4:
/usr/java/latest/bin/keytool -import -alias ORC_ECA_SW_3 -file /u01/cert/ ORC_ECA_SW_3.cer -keystore /u01/app/bea10/wlserver_10.3/server/lib//vacertstore.jks -storepass PASSWORD1 STEP 5:
/usr/java/latest/bin/keytool -import -alias labws.eauth.va.gov -file /u01/cert/ labws.eauth.va.gov.cer -keystore /u01/app/bea10/wlserver_10.3/server/lib//vacertstore.jks -storepass PASSWORD1 STEP 6:
/usr/java/latest/bin/keytool -import -alias services.eauth.va.gov -file /u01/cert/ services.eauth.va.gov.cer -keystore /u01/app/bea10/wlserver_10.3/server/lib//vacertstore.jks -storepass PASSWORD1
STEP 7:
/usr/java/latest/bin/keytool -list -keystore vacertstore.jks -v (when prompted for password use PASSWORD1) (should come back with 5 entries - alias VA_internal_root_CA, ECA_Root_CA_2, labws.eauth.va.gov, ORC_ECA_SW_3, services.eauth.va.gov ) STEP 8: java -classpath /u01/app/bea10/wlserver_10.3/server/lib/weblogic.jar utils.ImportPrivateKey -keystore /u01/app/bea10/wlserver_10.3/server/lib//appcertstore.jks –storepass PASSWORD2 -storetype jks -keypass PASSWORD2 –alias vaausesrapp21.aac.va.gov -certfile /u01/cert/esr-prod.aac.va.gov.pem -keyfile /u01/cert/esr-prod.aac.va.gov.key –keyfilepass PASSWORD2 STEP 9: /usr/java/latest/bin/keytool -list -keystore appcertstore.jks -v ((when prompted for password use PASSWORD2)

HECMS Installation Guide
February 2013 Health Eligibility Case Management System 35 ESR 3.10 Installation Guide
(should come back with 1 entry - alias vaausesrapp21.aac.va.gov ) STEP 10: cd /u01/cert openssl verify -CAfile va.pem esr-prod.aac.va.gov.pem
(check if the result is esr-prod.aac.va.gov.pem: OK) STEP 11: Check if the SSL works wget -vvv --secure-protocol=tlsv1 --ca-certificate=/u01/cert/ECA_Root_CA_2.cer --certificate=/u01/cert/esr-prod.aac.va.gov.pem --private-key=/u01/cert/ esr-prod.aac.va.gov.decrypt.key https://services.eauth.va.gov:9193/psim_webservice/IdMWebService?wsdl When prompted for password enter "PASSWORD2" This should display the content of the WSDL.
Logon to weblogic administration console for VAAUSESRAPP21 http://vaausesrapp20.aac.va.gov:7001/console/login/LoginForm.jsp Verify the following configuration and reenter the passwords
a. Navigate to Environment->Servers-->MS1-->Configuration-->Keystores tab b. Set Keystores to “Custom Identity and Custom Trust” c. In the Identity section set:
i. Custom Identity Keystore to the /u01/app/bea10/wlserver_10.3/server/lib/appcertstore.jks
ii. Custom Identity Keystore Type to jks iii. Custom Identity Keystore Passphrase to PASSWORD2
d. In the Trust section set: i. Custom Trust Keystore to the file
/u01/app/bea10/wlserver_10.3/server/lib/vacertstore.jks ii. Customer Keystore Type to jks
iii.Customer Trust Keystore Passphrase to PASSWORD1 g. Click “Save” h. Click on the “SSL” tab
Set “Identity and trust locations” to “Keystore” `Set Private key alias to vaausesrapp21.aac.va.gov
Set Private key passphrase to PASSWORD2 Click on Advanced and set: Hostname Verification to “None” Custom Hostname Verifier to blank Export Key Lifespan unchanged Use Server Certs to checked
HECMS Installation Guide
February 2013 Health Eligibility Case Management System 36 ESR 3.10 Installation Guide
Two Way Client Cert Behavior to “Client Certs Not Requested” Cert Authenticator to blank
Click Save k. under SERVER START, ARGUMENTS verify the following and change the keystorepassword.
-Djavax.net.ssl.trustStore=/u01/app/bea10/user_projects/domains//ESRDomain/certs/vacertstore.jks -Djavax.net.ssl.trustStorePassword=PASSWORD1 -Djavax.net.ssl.keyStore=/u01/app/bea10/wlserver_10.3/server/lib//appcertstore.jks -Djavax.net.ssl.keyStorePassword=PASSWORD2
Please Note: It is better to cut and paste the current content from ARGUMENTS field and then add these two and paste the whole thing back.
Click Save n. Restart the managed servers

HECMS Installation Guide
February 2013 Health Eligibility Case Management System 37 ESR 3.10 Installation Guide
Deployment Overview ESR deployment involves consideration to other HeV systems. In addition, ESR deployment must also consider the existing legacy application that ESR is planned to replace. This system, commonly called HEC Legacy (HECL), is currently the System of Record (SOR) for the eligibility and enrollment data of its Veteran enrollees. The end-client of the HECL and HECMS systems is the HEC. To mitigate risk to HEC business operations, a phased deployment approach is in place to provide a stabilization period for the initial ESR 3.0 deployment. This phased approach consists of two “activation” phases and is documented in the following table. These serial activation phases shift the SOR responsibility and therefore have a distinct sequence of activities.
Please refer to the ESR 3 0 Deployment - Phase 2 - Software Sequencing Plan (SSP) document in TSPR for full details on the phased deployment sequence for ESR 3.0.

HECMS Installation Guide
February 2013 Health Eligibility Case Management System 38 ESR 3.10 Installation Guide
Database Information Go to TSPR for a view of the Administrative Data Repository (ADR) ERD Main database diagram with which ESR communicates.
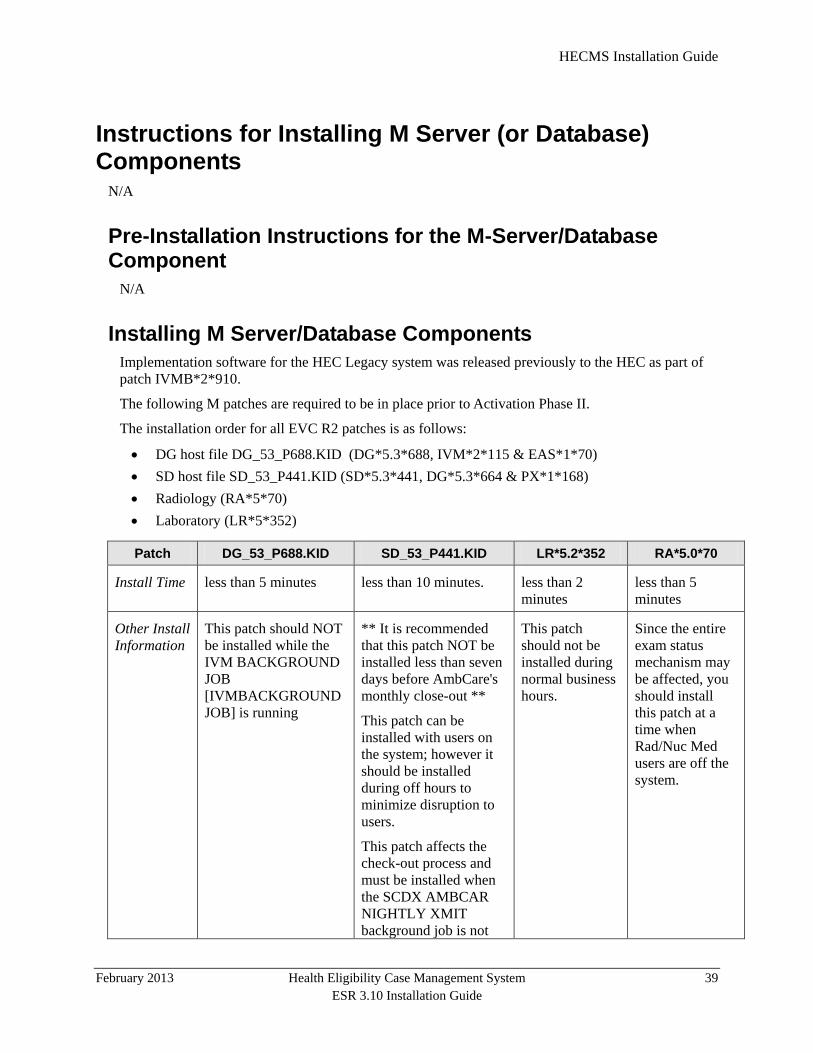
HECMS Installation Guide
February 2013 Health Eligibility Case Management System 39 ESR 3.10 Installation Guide
Instructions for Installing M Server (or Database) Components
N/A
Pre-Installation Instructions for the M-Server/Database Component
N/A
Installing M Server/Database Components Implementation software for the HEC Legacy system was released previously to the HEC as part of patch IVMB*2*910.
The following M patches are required to be in place prior to Activation Phase II.
The installation order for all EVC R2 patches is as follows:
• DG host file DG_53_P688.KID (DG*5.3*688, IVM*2*115 & EAS*1*70) • SD host file SD_53_P441.KID (SD*5.3*441, DG*5.3*664 & PX*1*168) • Radiology (RA*5*70) • Laboratory (LR*5*352)
Patch DG_53_P688.KID SD_53_P441.KID LR*5.2*352 RA*5.0*70
Install Time less than 5 minutes less than 10 minutes. less than 2 minutes
less than 5 minutes
Other Install Information
This patch should NOT be installed while the IVM BACKGROUND JOB [IVMBACKGROUND JOB] is running
** It is recommended that this patch NOT be installed less than seven days before AmbCare's monthly close-out **
This patch can be installed with users on the system; however it should be installed during off hours to minimize disruption to users.
This patch affects the check-out process and must be installed when the SCDX AMBCAR NIGHTLY XMIT background job is not
This patch should not be installed during normal business hours.
Since the entire exam status mechanism may be affected, you should install this patch at a time when Rad/Nuc Med users are off the system.

HECMS Installation Guide
February 2013 Health Eligibility Case Management System 40 ESR 3.10 Installation Guide
Patch DG_53_P688.KID SD_53_P441.KID LR*5.2*352 RA*5.0*70 running.
Inhibit Logins During Install
No No No No
DISABLE Scheduled Options and Menu Options
[DGPRE PRE-REGISTER OPTION] Preregister a Patient
[DG REGISTER PATIENT]
Register a Patient
[DG LOAD PATIENT DATA]
Load/Edit Patient Data
[DG MEANS TEST USER MENU]
Means Test User Menu
[DG MEANS TEST SUPERVISOR MENU]
Means Test Supervisor Menu
[EAS VIEW PATIENT ADDRESS]
View Patient Address
[EAS MT 0 DAY LETTER PRINT]
Zero Day Letters Print
[EAS MT 30 DAY LETTER PRINT]
Thirty Day Letters Print
[EAS MT 60 DAY LETTER PRINT]
Sixty Day Letters Print
Ambulatory Care Nightly [SCDX AMBCAR NIGHTLY XMIT]
Transmission to NPCDB
Appointment Management [SDAM APPT MGT]
Appointment Check-in/Check-out [SDAM APPT CHECK IN/OUT]
Add/Edit Stop Codes [SDADDEDIT]
Appointment Menu [SDAPP]
Check-in/Unsched. Visit [SDI]
Make Appointment [SDM]
PCE Encounter Data Entry [PXCE ENCOUNTER DATA ENTRY]
PCE Encounter Data Entry & Delete [PXCE ENCOUNTER ENTRY & DELETE]
PCE Encounter Entry Without Delete [PXCE ENCOUNTER ENTRY NO DELETE]
PCE Encounter Data Entry - [PXCE ENCOUNTER ENTRY SUPER]
None RA*
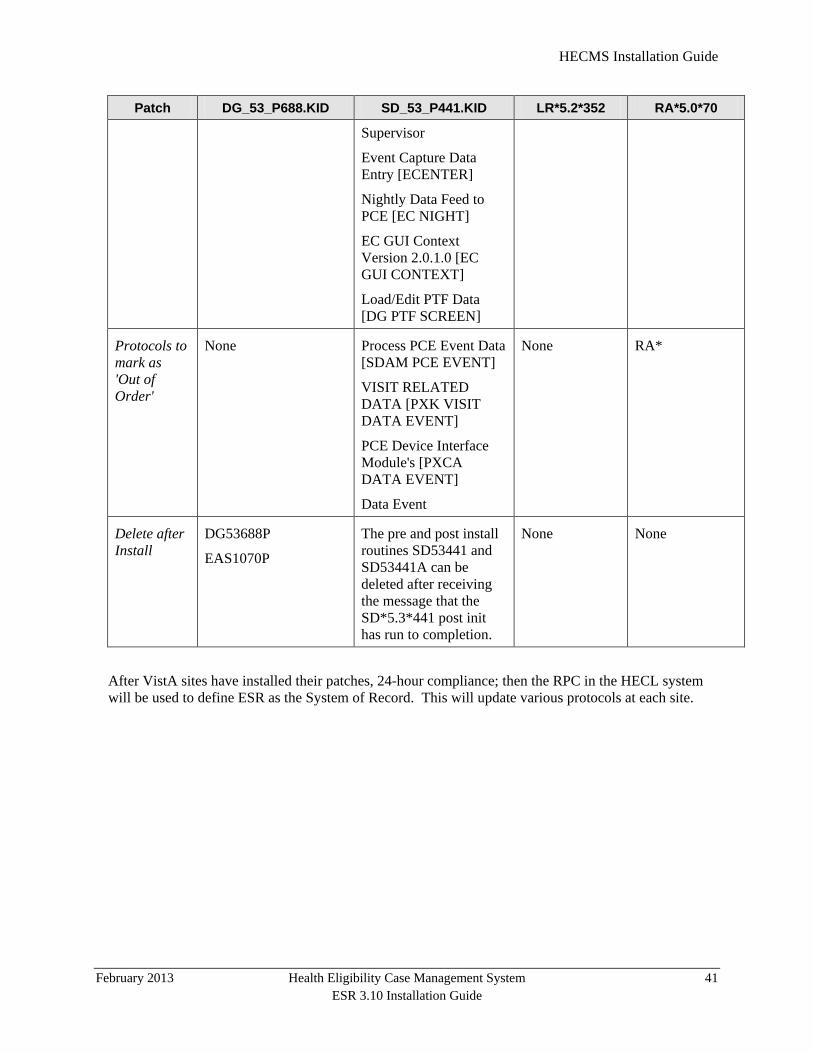
HECMS Installation Guide
February 2013 Health Eligibility Case Management System 41 ESR 3.10 Installation Guide
Patch DG_53_P688.KID SD_53_P441.KID LR*5.2*352 RA*5.0*70
Supervisor
Event Capture Data Entry [ECENTER]
Nightly Data Feed to PCE [EC NIGHT]
EC GUI Context Version 2.0.1.0 [EC GUI CONTEXT]
Load/Edit PTF Data [DG PTF SCREEN]
Protocols to mark as 'Out of Order'
None Process PCE Event Data [SDAM PCE EVENT]
VISIT RELATED DATA [PXK VISIT DATA EVENT]
PCE Device Interface Module's [PXCA DATA EVENT]
Data Event
None RA*
Delete after Install
DG53688P
EAS1070P
The pre and post install routines SD53441 and SD53441A can be deleted after receiving the message that the SD*5.3*441 post init has run to completion.
None None
After VistA sites have installed their patches, 24-hour compliance; then the RPC in the HECL system will be used to define ESR as the System of Record. This will update various protocols at each site.

HECMS Installation Guide
February 2013 Health Eligibility Case Management System 42 ESR 3.10 Installation Guide
M Environment Implementation software for all the VistA systems was released previously as part of patch EAS*1*71.

HECMS Installation Guide
February 2013 Health Eligibility Case Management System 43 ESR 3.10 Installation Guide
Instructions for Installing Middle Tier Applications (e.g., Application Servers)
The AITC is responsible for installing middle tier applications (such as application servers). The AITC maintains the instructions for installation of these applications.
All components and services are verified indirectly though a messaging and UI smoke test performed by the ESR SQA team.

HECMS Installation Guide
February 2013 Health Eligibility Case Management System 44 ESR 3.10 Installation Guide
Instructions for Starting Applications on the Middle Tier Application Server
The AITC is responsible for deploying and starting applications in the middle tier. Deployment instructions for a build would document specific steps that are not covered by the default startup instructions.
All components and services are verified indirectly though a messaging and UI smoke test performed by the ESR SQA team.

HECMS Installation Guide
February 2013 Health Eligibility Case Management System 45 ESR 3.10 Installation Guide
Instructions for Installing Client Components This section describes how to extract and install the client portion of ESR.
The ESR Client software is delivered as a ZIP file that contains all of the JAR files and configuration files needed for execution. The following steps can be used to extract and install these files in a development environment.
1. Obtain the ESRClient zip file.
2. Extract the ESRClient zip file to a directory on your hard drive.
3. Copy the jar files included to the proper location so that they are placed in the classpath of your application.
4. Copy or merge the caipConfig.xml file to a location where it can be found on your classpath. If you already have a caipConfig.xml file, merge the information from the ESRClient caipConfig.xml file in to your existing file.
There is a supplied JUnit test that can be used to test the setup. Execute the class gov.va.med.esr.service.external.TestCAIPClientToESR to execute the tests. Be sure to include the jars from the zip (including third party jars) in the client classpath.
The “standard” VA approved browser configuration will be sufficient. The “standard” VA configuration includes Internet Explorer v6.0 with SP3, popup-blocker enabled and no proxy settings.

HECMS Installation Guide
February 2013 Health Eligibility Case Management System 46 ESR 3.10 Installation Guide
Post-Installation Review All components and services are verified indirectly though a messaging and UI smoke test performed by the ESR development team.

HECMS Installation Guide
February 2013 Health Eligibility Case Management System 47 ESR 3.10 Installation Guide
Post-Installation (Setup and Configuration) All components and services are verified indirectly though a messaging and UI smoke test performed by the ESR SQA team.

HECMS Installation Guide
February 2013 Health Eligibility Case Management System 48 ESR 3.10 Installation Guide
Starting the Client-Side Desktop Software The HECMS application does not require any special browser settings. The “standard” approved VA browser configuration will be sufficient. The “standard” VA configuration includes Internet Explorer v6.0 with SP3, popup-blocker enabled and no proxy settings.
To access the HECMS application, open your IE v6.0. Enter the Enrollment Systems Redesign - Login URL supplied by your administrator.

HECMS Installation Guide
February 2013 Health Eligibility Case Management System 49 ESR 3.10 Installation Guide
M Installation Example For the EVC Release 2 suite of patches that must be installed at all VistA sites prior to Activation Phase II, refer to the Installing M Server/Database Components section in this document.
To switch to Activation Phase II, a menu option is run from the HEC Legacy system which calls an RPC at the VistA sites to ‘switch off’ the QRY Z10 and QRY Z11 receivers for HEC Legacy and to ‘switch on’ the QRY Z10 and QRY Z11 receivers for ESR. All ESR links and protocols are currently active from Activation Phase I and the RPC does not change that. Instead, the HEC legacy protocols are removed as subscribers from the event driver protocols and the ESR protocols attached in their place.
1. HEC Legacy Menu Option to call RPC
The menu option called is AYCB DUAL MESSAGING which is available only to users with security key AYCB DUAL MESSAGING.
A menu of options is displayed as follows:
Select OPTION NAME: AYCB DUAL MESSAGING Enable/Disable Dual Messaging
Select one of the following: 1 Enable Vista to ESR Messaging 2 Define ESR as the System of Record 3 Disable Vista to HEC Legacy Messaging 4 Disable Vista to ESR Messaging 5 Define HEC as the System of Record
Select option: 1// 2 Define ESR as the System of Record
Select one of the following: I Individual Vista site A All Vista sites
Select option: I// ndividual Vista site
Select Vista site: 500 ALBANY VAMC NY VAMC 500
Are you sure you want to define ESR as SOR at station 500? N// YES
Connecting to site: ALBANY VAMC
ESR set as SOR at: ALBANY VAMC
The example above is for selecting one site but for activation the ‘All Vista sites’ option is used. This option will loop through all institutions with logical links that are valid VistA sites.
The option hangs until a response is received from the VistA site which is then displayed on the screen. This is at least 15 seconds but never more than 2 minutes.
Possible error conditions are reported:
SOR unchanged This means the site was reached but protocols could not be updated. Normally this would only be reported if the ESR messaging for phase I was not enabled.

HECMS Installation Guide
February 2013 Health Eligibility Case Management System 50 ESR 3.10 Installation Guide
-1^Bad Handle This means the institution and link configuration on HEC prevented an RPC call being made
0^New This means that the link configuration allowed an RPC call but without response back from the site.
0^Unable to get data Ditto
The code for this option on HEC Legacy is in AYCBESR routine.
Note that two sites Bronx (526) and Jackson (586) where skipped in the Activation Phase I run because they do not get picked up as valid sites on HEC Legacy.
2. VistA Protocols for QRY Z10 and QRY Z11
This is the RPC (#8994) called from HEC:
NAME: EAS ESR MESSAGING TAG: TAG ROUTINE: EAS1071A RETURN VALUE TYPE: ARRAY VERSION: 1 DESCRIPTION: This is a stub RPC to trigger dual messaging changes on Vista Sites INPUT PARAMETER: MODE PARAMETER TYPE: LITERAL MAXIMUM DATA LENGTH: 16 REQUIRED: YES SEQUENCE NUMBER: 1 RETURN PARAMETER DESCRIPTION: The RPC will return error if the Vista process is unable to perform the required messaging changes for Vista/ESR or Vista/HEC.
This is the before state for the protocols changed by the RPC (HEC Legacy is SOR):
NAME: VAMC 500 QRY-Z10 SERVER ITEM TEXT: FINANCIAL QUERY/Query VAMC to HEC TYPE: event driver CREATOR: RYAN,DOLORES G TIMESTAMP: 60295,55882 SENDING APPLICATION: VAMC 500 TRANSACTION MESSAGE TYPE: QRY EVENT TYPE: Z10 ACCEPT ACK CODE: AL APPLICATION ACK TYPE: AL VERSION ID: 2.1 RESPONSE PROCESSING ROUTINE: D ORF^IVMCM SUBSCRIBERS: VAMC 500 QRY-Z10 CLIENT NAME: VAMC 500 QRY-Z11 SERVER ITEM TEXT: ENROLLMENT/ELIGIBILITY QUERY/Query VAMC to HEC TYPE: event driver CREATOR: RYAN,DOLORES G TIMESTAMP: 60295,55882 SENDING APPLICATION: VAMC 500 TRANSACTION MESSAGE TYPE: QRY EVENT TYPE: Z11 ACCEPT ACK CODE: AL APPLICATION ACK TYPE: AL VERSION ID: 2.1 RESPONSE PROCESSING ROUTINE: D ORF^IVMCM SUBSCRIBERS: VAMC 500 QRY-Z11 CLIENT
This is the after state for the protocols changed by the RPC (ESR is SOR):
NAME: VAMC 500 QRY-Z11 SERVER ITEM TEXT: ENROLLMENT/ELIGIBILITY QUERY/Query VAMC to HEC TYPE: event driver CREATOR: RYAN,DOLORES G

HECMS Installation Guide
February 2013 Health Eligibility Case Management System 51 ESR 3.10 Installation Guide
TIMESTAMP: 60295,55882 SENDING APPLICATION: VAMC 500 TRANSACTION MESSAGE TYPE: QRY EVENT TYPE: Z11 ACCEPT ACK CODE: AL APPLICATION ACK TYPE: AL VERSION ID: 2.1 RESPONSE PROCESSING ROUTINE: D ORF^IVMCM SUBSCRIBERS: EAS ESR 500 QRY-Z11 CLIENT NAME: VAMC 500 QRY-Z10 SERVER ITEM TEXT: FINANCIAL QUERY/Query VAMC to HEC TYPE: event driver CREATOR: RYAN,DOLORES G TIMESTAMP: 60295,55882 SENDING APPLICATION: VAMC 500 TRANSACTION MESSAGE TYPE: QRY EVENT TYPE: Z10 ACCEPT ACK CODE: AL APPLICATION ACK TYPE: AL VERSION ID: 2.1 RESPONSE PROCESSING ROUTINE: D ORF^IVMCM SUBSCRIBERS: EAS ESR 500 QRY-Z10 CLIENT

HECMS Installation Guide
February 2013 Health Eligibility Case Management System 52 ESR 3.10 Installation Guide
Zipped File Contents, Where Applicable N/A

HECMS Installation Guide
February 2013 Health Eligibility Case Management System 53 ESR 3.10 Installation Guide
Troubleshooting
Recovering from a Server Crash Although a rare scenario, there could be cases when the servers may crash. This could happen for different reasons for example, if there is memory leak or if the application runs out of database connections. The safest way to get the server up is to perform the following the steps:
1. Most installation problems can be resolved by simply removing installation files under staging directory and log files. To clean all installation files and log files, proceed to step 2
2. Refer to “Logging to ESR server as WebLogic User” section of the ESR Operations Guide in TSPR to log onto the ESR server hosting the WebLogic admin server under your account as WebLogic user.
3. Refer to “Determining if ESR servers are running” section of the ESR Operations Guide in TSPR to determine if Admin server, Managed servers, and Node Manager processes are running on all the ESR servers. If they are running, refer to “Stopping ESR servers using scripts ” section. When all ESR Servers are shutdown completely, proceed to step 4.
4. Refer to “Logging to ESR server as weblogic user” section of the ESR Operations Guide in TSPR to log onto each of the ESR servers under your account as weblogic user.
5. From the WebLogic user’s home account, type “./cleanLogs.sh 2” for each of the servers.
6. Refer to “Starting ESR application using scripts” section of the ESR Operations Guide in TSPR to start the Admin Server, all Managed Servers, and Node Managers on all the ESR servers.
7. Refer to “Installing ESR” section to install ESR. If the problem still persists, capture the exceptions and as much information as possible from log files. Refer to http://forums.oracle.com/forums/category.jspa?categoryID=202 for more information regarding how to solve installation problems.
Additional Information For more ESR troubleshooting information, the documentation can be found on the Technical Services Project Repository (TSPR) project notebook page by clicking on the ESR Troubleshooting guide.pdf. This is a living document and will be updated periodically.
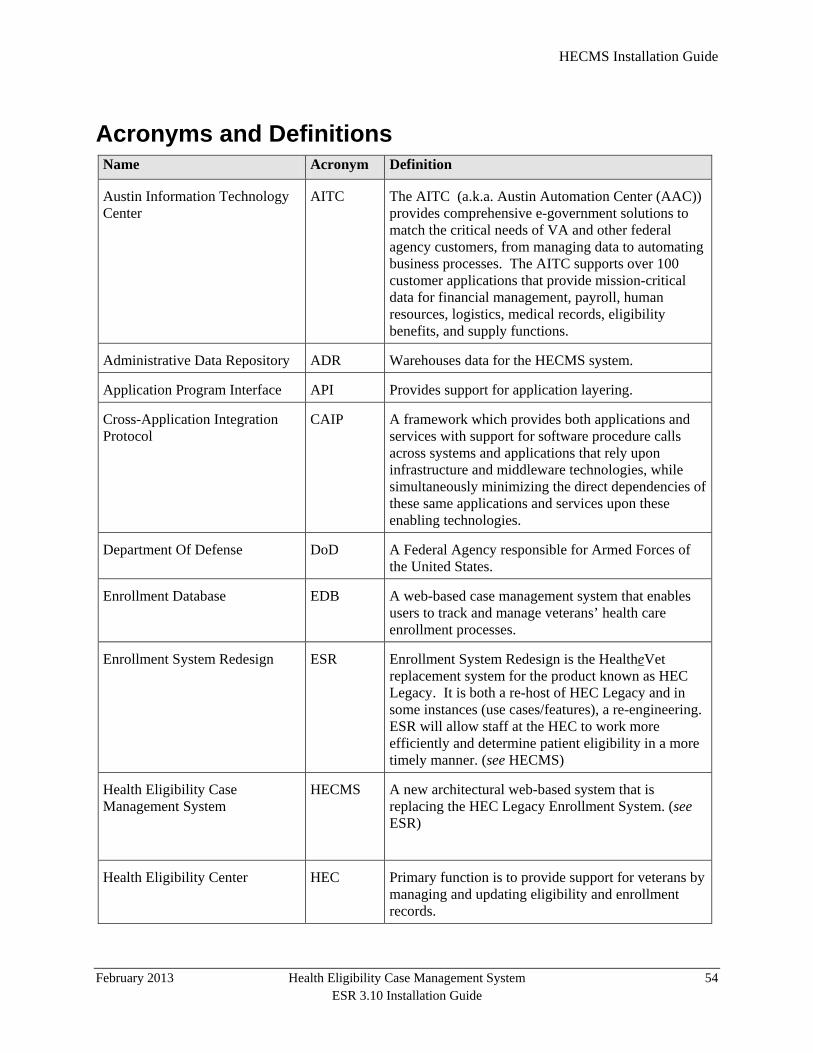
HECMS Installation Guide
February 2013 Health Eligibility Case Management System 54 ESR 3.10 Installation Guide
Acronyms and Definitions Name Acronym Definition
Austin Information Technology Center
AITC The AITC (a.k.a. Austin Automation Center (AAC)) provides comprehensive e-government solutions to match the critical needs of VA and other federal agency customers, from managing data to automating business processes. The AITC supports over 100 customer applications that provide mission-critical data for financial management, payroll, human resources, logistics, medical records, eligibility benefits, and supply functions.
Administrative Data Repository ADR Warehouses data for the HECMS system.
Application Program Interface API Provides support for application layering.
Cross-Application Integration Protocol
CAIP A framework which provides both applications and services with support for software procedure calls across systems and applications that rely upon infrastructure and middleware technologies, while simultaneously minimizing the direct dependencies of these same applications and services upon these enabling technologies.
Department Of Defense DoD A Federal Agency responsible for Armed Forces of the United States.
Enrollment Database EDB A web-based case management system that enables users to track and manage veterans’ health care enrollment processes.
Enrollment System Redesign ESR Enrollment System Redesign is the HealtheVet replacement system for the product known as HEC Legacy. It is both a re-host of HEC Legacy and in some instances (use cases/features), a re-engineering. ESR will allow staff at the HEC to work more efficiently and determine patient eligibility in a more timely manner. (see HECMS)
Health Eligibility Case Management System
HECMS A new architectural web-based system that is replacing the HEC Legacy Enrollment System. (see ESR)
Health Eligibility Center HEC Primary function is to provide support for veterans by managing and updating eligibility and enrollment records.

HECMS Installation Guide
February 2013 Health Eligibility Case Management System 55 ESR 3.10 Installation Guide
Name Acronym Definition
Health Insurance Portability and Accountability Act
HIPPA A privacy protection public law act.
Title I of HIPAA protects health insurance coverage for workers and their families when they change or lose their jobs.
Title II of HIPAA requires the establishment of national standards for electronic health care transactions and national identifiers for providers, health insurance plans, and employers.
Income Verification Matching IVM Verifies veterans self-reported income information based upon data that’s received from the IRS and SSA federal tax information. This information determines veterans’ responsibilities for making medical care co-payments and enhances revenue from first-party collections.
Integrated Master Schedule IMS An integrated and networked multi-layered schedule of program tasks required to complete the work effort captured in a related Integrated Master Plan (IMP). The IMS should include all IMP events and accomplishments and support each accomplishment closure criteria.
Internal Revenue Service IRS Federal Agency that gathers and stores income information.
Java ARchive JAR It is used for aggregating many files into one. It is generally used to distribute Java classes and associated metadata.
MyHealtheVet MHV MyHealtheVet is a web-based system that empowers veterans/beneficiaries with information and tools so that they can improve their health to the maximum extent possible. Participating veterans/beneficiaries are given copies of key portions of their electronic health records. This record is stored in a secure and private environment called an eVAult. The eVAult will be personalized with appropriate links to useful explanatory material to help veterans/beneficiaries understand what is in their record, and what they can do to improve their health condition. Veterans/beneficiaries can also add structured medical information in the "self-entered" section of their eVAult.
Naming Directive Service NDS A common dynamic routing service which determines the appropriate list for the delivery of events based on the need for synchronization, topic, and subscriber; and a common naming/directory

HECMS Installation Guide
February 2013 Health Eligibility Case Management System 56 ESR 3.10 Installation Guide
Name Acronym Definition service (used by the delivery service) to provide support for the mapping of logical destinations to physical destinations. A set of lookup APIs to other internal services.
Master Veteran Index MVI Uniquely identifies a patient and the facilities where the patient last received medical care.
Person Service Identity Management
PSIM A core business service that supports person data commonly required by other applications such as Enrollment. PSIM enumerates and maintains person identities of both patients and non-patients in HealtheVet-VistA.
Software Sequencing Plan SSP This is a special sequencing of steps for Activation Phase 2.
System of Record SOR A system of record (SoR) is an information storage system which is the authoritative data source for a given data element or piece of information.
Vitria Interface Engine VIE This is the Vitria BusinessWare that connects disparate system, transforms data, converts data, routes data, ensures the delivery of data, and is rules based. It provides a consistent HL7 compliant communication environment.
Transport Level Security TLS The TLS protocol allows client/server applications to communicate across a network in a way designed to prevent eavesdropping and tampering. TLS authentication is used to communicate with VADIR webservice.
VA Authentication Federation Infrastructure
VAAFI The VA Authentication Federation Infrastructure (VAAFI) provides e-authentication services through a trusted network of VA Applications, VA business partners, and Credential Service Providers (CSPs).