HDX-192 DSP Expansion Card Installation Guide - …akmedia.digidesign.com/support/docs/HDX-192 DSP...
4
HDX-192 DSP Expansion Card Installation Guide 1 HDX-192 DSP Expansion Card Installation Guide HDX-192 DSP Expansion Cards add mixer and plug-in process- ing capacity to a VENUE | S6L system. HDX cards are installed in the VENUE | E6L engine. A total of four HDX cards can be in- stalled in an E6L. Required Materials • HDX-192 DSP Expansion Card package, which includes: • (1) HDX-192 DSP Card • (1) HDX TDM Flex Cable • Phillips #1 screwdriver (not included) • Anti-Static wrist strap (not included) • Foam or other soft surface to place the card on (not included) Installing the DSP Card Installing a DSP card in E6L consists of the following steps: • Removing the E6L engine core • Installing the card • Connecting the HDX TDM cable between HDX cards • Replacing hardware • Confirming Installation Removing the E6L Engine Core HDX cards are installed in the E6L engine core, which slides out of the E6L chassis. To remove the E6L engine core 1 Put on your anti-static wrist band and configure according to its instructions. 2 Shut down your system, and disconnect any cables connected to your E6L engine. 3 Place your E6L on a table or other flat surface that provides enough room for the E6L engine core to be removed comfort- ably. Make sure your surface is clear of any debris. 4 On the back of the E6L, loosen the four thumbscrews that se- cure the core to the engine chassis. 5 Simultaneously pull the two bottom thumbscrews outward so the latches they are attached to are fully extended, as shown in Figure 2. 6 Using the handle, slowly slide the core partially out, locate the interior catch on the right side of the tray, and press it to release the core from the chassis. Figure 1. Four thumbscrews on the back of the E6L Figure 2. Latches fully extended Figure 3. Location of the interior catch © 2015 Avid Technology, Inc 9320-65340-00 REV A
Transcript of HDX-192 DSP Expansion Card Installation Guide - …akmedia.digidesign.com/support/docs/HDX-192 DSP...

HDX-192 DSP Expansion Card Installation Guide 1
HDX-192 DSP Expansion Card Installation Guide
HDX-192 DSP Expansion Cards add mixer and plug-in process-ing capacity to a VENUE | S6L system. HDX cards are installed in the VENUE | E6L engine. A total of four HDX cards can be in-stalled in an E6L.
Required Materials• HDX-192 DSP Expansion Card package, which includes:
• (1) HDX-192 DSP Card
• (1) HDX TDM Flex Cable
• Phillips #1 screwdriver (not included)
• Anti-Static wrist strap (not included)
• Foam or other soft surface to place the card on (not included)
Installing the DSP CardInstalling a DSP card in E6L consists of the following steps:
• Removing the E6L engine core
• Installing the card
• Connecting the HDX TDM cable between HDX cards
• Replacing hardware
• Confirming Installation
Removing the E6L Engine CoreHDX cards are installed in the E6L engine core, which slides out of the E6L chassis.
To remove the E6L engine core
1 Put on your anti-static wrist band and configure according to its instructions.
2 Shut down your system, and disconnect any cables connected to your E6L engine.
3 Place your E6L on a table or other flat surface that provides enough room for the E6L engine core to be removed comfort-ably. Make sure your surface is clear of any debris.
4 On the back of the E6L, loosen the four thumbscrews that se-cure the core to the engine chassis.
5 Simultaneously pull the two bottom thumbscrews outward so the latches they are attached to are fully extended, as shown in Figure 2.
6 Using the handle, slowly slide the core partially out, locate the interior catch on the right side of the tray, and press it to release the core from the chassis.
Figure 1. Four thumbscrews on the back of the E6L
Figure 2. Latches fully extended
Figure 3. Location of the interior catch
© 2015 Avid Technology, Inc 9320-65340-00 REV A

HDX-192 DSP Expansion Card Installation Guide 2
7 Slowly slide the core out of the E6L chassis completely, and place it on your work surface.
Installing the CardThe E6L engine core has four PCIe slots for DSP cards, and are numbered sequentially from top to bottom as you face the open side of the engine core (slots 1–4). Install your DSP expansion card in the open PCIe slot below the currently installed card(s). You must first remove the retaining bracket before installing the card.
To remove the DSP card retaining bracket and install the card:
1 Looking inside the core from the right side, locate the DSP as-sembly retaining bracket.
2 Locate the thumbscrew that secures the bracket to the bottom of the unit and loosen it completely.
3 Locate the two Phillips head screws on the top of the bracket, remove them, carefully remove the bracket, and set them all aside.
4 Locate the open PCIe slot below the topmost currently in-stalled DSP card, and remove the blank faceplate by unscrew-ing the corresponding screw. Set the screw aside to secure the HDX card after it is installed. The faceplate can be discarded.
5 Remove the DSP card from its packaging and place it on your foam surface, oriented as shown in Figure 7.
6 Disconnect the power cables connected to any HDX cards in-stalled above the slot in which you are installing the card.
The core will not slide out of the E6L chassis until the latches are fully extended and the catch has been released. If you experience any resistance, make sure the latches are fully extended before pulling.
Figure 4. HDX card Bracket thumbscrew
Figure 5. Removing one of two HDX card bracket screws
Figure 6. Open PCIe slot (right, 2nd slot shown), with blank faceplate removed (left)
Figure 7. Top view of the HDX card
Figure 8. Disconnecting the power cable of the top HDX card
HDX-192 DSP Expansion Card Installation Guide 3
7 Align the DSP card’s PCIe connector with the corresponding PCIe slot, and gently press the card into the PCIe slot.
8 When the DSP card is properly seated in its slot, tighten the screw on the front bracket of the HDX card to secure it to the chassis.
9 Locate a loose black and yellow HDX card power cable at the bottom of the unit, and, with the cable connector locking clip facing down, push the connector into the port until it clicks. Make sure the connector is securely connected.
10 Reconnect a power cable to the top card. All HDX cards should have power cables attached.
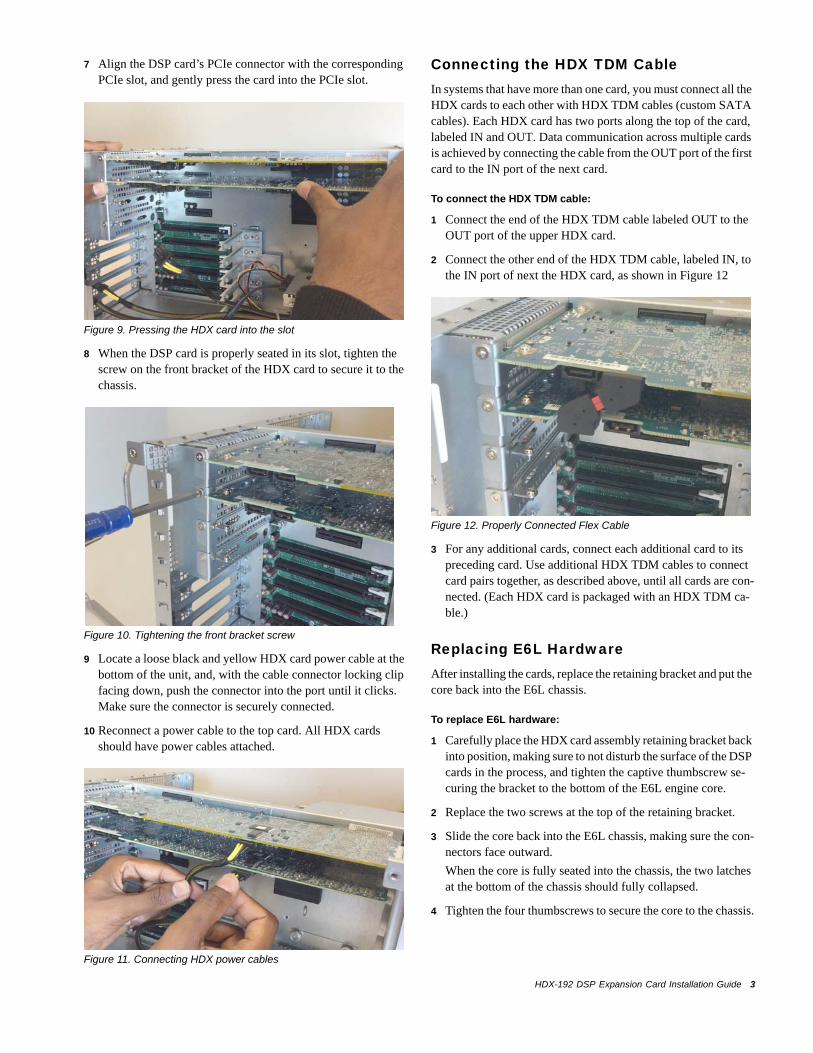
Connecting the HDX TDM CableIn systems that have more than one card, you must connect all the HDX cards to each other with HDX TDM cables (custom SATA cables). Each HDX card has two ports along the top of the card, labeled IN and OUT. Data communication across multiple cards is achieved by connecting the cable from the OUT port of the first card to the IN port of the next card.
To connect the HDX TDM cable:
1 Connect the end of the HDX TDM cable labeled OUT to the OUT port of the upper HDX card.
2 Connect the other end of the HDX TDM cable, labeled IN, to the IN port of next the HDX card, as shown in Figure 12
3 For any additional cards, connect each additional card to its preceding card. Use additional HDX TDM cables to connect card pairs together, as described above, until all cards are con-nected. (Each HDX card is packaged with an HDX TDM ca-ble.)
Replacing E6L HardwareAfter installing the cards, replace the retaining bracket and put the core back into the E6L chassis.
To replace E6L hardware:
1 Carefully place the HDX card assembly retaining bracket back into position, making sure to not disturb the surface of the DSP cards in the process, and tighten the captive thumbscrew se-curing the bracket to the bottom of the E6L engine core.
2 Replace the two screws at the top of the retaining bracket.
3 Slide the core back into the E6L chassis, making sure the con-nectors face outward.
When the core is fully seated into the chassis, the two latches at the bottom of the chassis should fully collapsed.
4 Tighten the four thumbscrews to secure the core to the chassis.
Figure 9. Pressing the HDX card into the slot
Figure 10. Tightening the front bracket screw
Figure 11. Connecting HDX power cables
Figure 12. Properly Connected Flex Cable

HDX-192 DSP Expansion Card Installation Guide4
Confirming InstallationAfter installing HDX cards, confirm that you successfully in-stalled them.
To confirm installation:
1 Connect power to the E6L, and connect an audio network ca-ble from your S6L control surface to E6L.
2 Power on your S6L and E6L.
3 On the external VENUE software screen, go to the Options >
Devices page. In the HDX DSP section, tap the tab (1–4) cor-responding to the slot in which you installed the card. The 18 DSPs provided by the HDX card should appear as Available.
Your S6L system may initiate a firmware update of your newly-installed HDX card. If so, follow the on-screen prompts to ensure a successful installation.
Figure 13. Options > Devices page showing the DSPs available on the HDX card installed in slot 2