HCP - Hofer Clavicula Pin · HCP - Hofer Clavicula Pin HCPd & HCPs - Hofer Clavicula Pin dynamic &...
28
Surgical Technique HCP - Hofer Clavicula Pin HCPd & HCPs - Hofer Clavicula Pin dynamic & static
Transcript of HCP - Hofer Clavicula Pin · HCP - Hofer Clavicula Pin HCPd & HCPs - Hofer Clavicula Pin dynamic &...
Surgical Technique
HCP - Hofer Clavicula PinHCPd & HCPs - Hofer Clavicula Pin dynamic & static

Content
Preface HCP-1
Introduction HCP-2
Implant Specific Information HCP-3
Indications, Contraindications HCP-3.1
Position of Patient and Approaches HCP-3.1
Implant Specific Details HCP-3.1
Nomenclature HCP-3.2
Recommendations HCP-3.3
Surgical Technique HCP-4
Indirect Insertion of the Implant - Short Description HCP-4.1
Antegrade-retrograde HCP-4.1.1
Retrograde-antegrade HCP-4.1.2
Direct Insertion of the Implant - Short Description HCP-4.2
From medial HCP-4.2.1
From lateral HCP-4.2.2
Insertion of the Implant - Detailed Explanations HCP-4.3
Indirect insertion HCP-4.3.1
Direct Insertion HCP-4.3.2
Removal of Excessive Material Length HCP-4.4
Wound Closure HCP-4.5
Post-Operative Treatment HCP-4.6
Implant Removal HCP-4.7
Clinical Cases HCP-5
Epilogue HCP-6
WarningThis description is not sufficient for immediate use of implants and instruments.An instruction into handling these instruments by a surgeon experienced with them is strongly recommended.
HCP-1
Please contact our 24/7 service hotline:Tel.: +43 (0)3382 53388Mail: [email protected]
For a safe handling and for the various surgical techniques Hofer-medical is pleased to offerdetailedtraining.
This document provides information about the handling of Hofer implants and instruments.
This operation manual‘s intention shall be considered as an addition and under no circumstances as a substitute to existing literature about surgical methods within orthopaedics and traumatolgy.
The content shall be regarded as a recommendation for a standardized procedure of how to apply the products without addressing the issues of any further necessary tasks, addtional operative actions and possible extensions of the surgical technique.The actual selection of the most suitable implant and its implantation method has to happen exclusively by the surgeonbasedonhiseducationandtheindividualdiagnosticfindings.
Please also consider that all illustrations printed here have a purely symbolic character to support the description of the surgical technique and can vary.
Furthermore, these operation instructions don‘t contain any details on the use of the instruments. Corresponding documents are available in the form of
• Instruction manual for instruments: intra and post-operative handling• Instruction manual for implants (enclosed to each implant)
Note that it is in the surgeons function to identify and characterize the respective injury and its subsequent treatment.
Preface
HCP-2 Introduction
Fractures of the collarbone are one of the most common injuries of the upper extremity.
To this day most collarbone fractures are treated conservatively.
Together with the conservative treatment exist the disadvantages of a hardly controllable pain symptomatology and uncontrollable fragment dislocations, which often lead to bothersome bulge-like formation or shortening of the shoulder girdle in secondary.
Plate osteosynthesis often leads to from a cosmetic point of view undesired cicatrice formation. This factor explains the upward trend to intra-medullary osteosynthesis of the collarbone.
Since the clavicle bone resulting from desmal bone formation does not contain a medullary canal in the classical sense,theinsertionofanelasticnailisoftenverydifficultespeciallyincaseofdelicatelybuiltwomen.
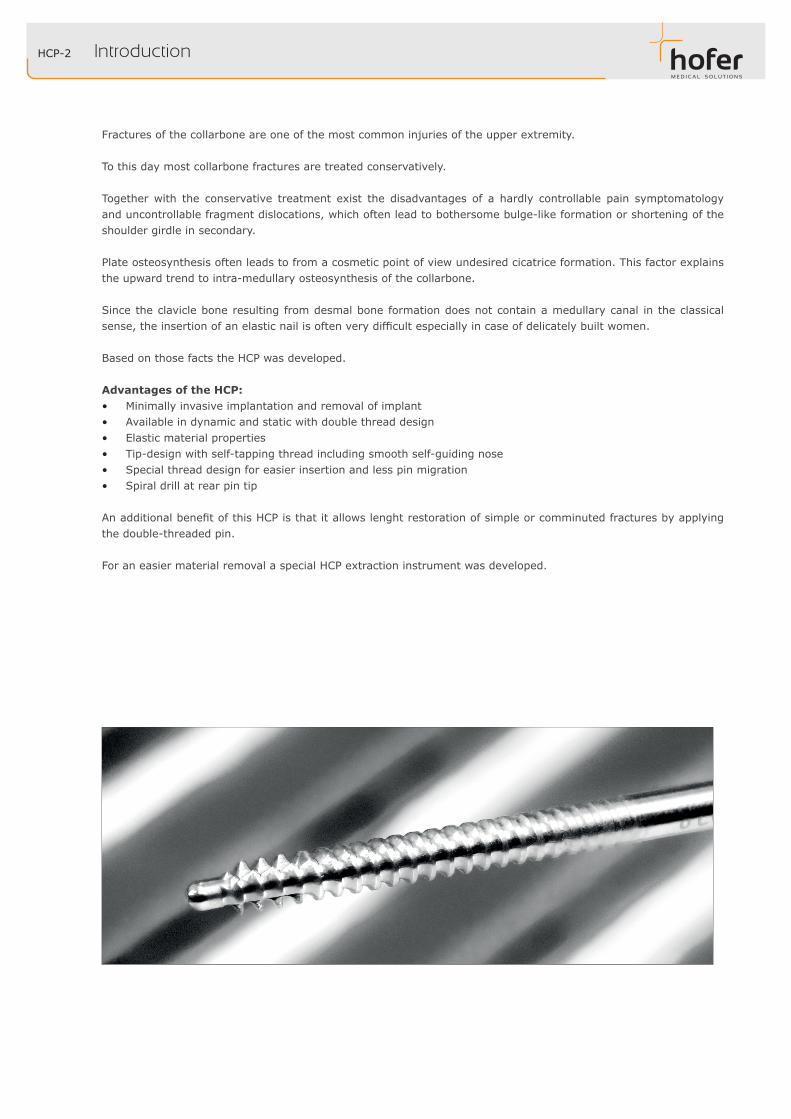
Based on those facts the HCP was developed.
Advantages of the HCP:• Minimally invasive implantation and removal of implant• Available in dynamic and static with double thread design• Elastic material properties• Tip-design with self-tapping thread including smooth self-guiding nose• Special thread design for easier insertion and less pin migration• Spiral drill at rear pin tip
AnadditionalbenefitofthisHCPisthatitallowslenghtrestorationofsimpleorcomminutedfracturesbyapplyingthe double-threaded pin.
For an easier material removal a special HCP extraction instrument was developed.
HCP-3.1
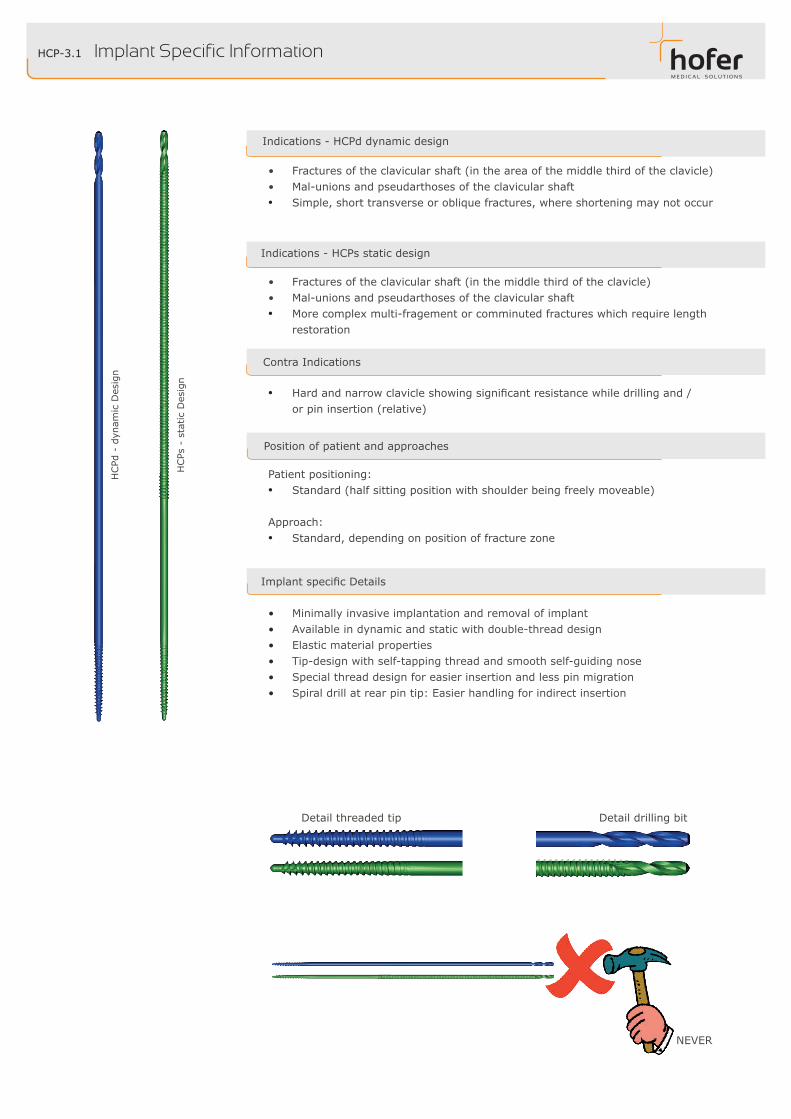
Indications - HCPs static design
Detail drilling bitDetail threaded tip
HCPd
- d
ynam
ic D
esig
n
HCPs
- s
tatic
Des
ign
Implant Specific Information
• Minimally invasive implantation and removal of implant• Available in dynamic and static with double-thread design• Elastic material properties • Tip-design with self-tapping thread and smooth self-guiding nose• Special thread design for easier insertion and less pin migration• Spiral drill at rear pin tip: Easier handling for indirect insertion
ImplantspecificDetails
Indications - HCPd dynamic design
• Fractures of the clavicular shaft (in the area of the middle third of the clavicle)• Mal-unions and pseudarthoses of the clavicular shaft• Simple, short transverse or oblique fractures, where shortening may not occur
Patient positioning:• Standard (half sitting position with shoulder being freely moveable)
Approach:• Standard, depending on position of fracture zone
Position of patient and approaches
NEVER
• Hardandnarrowclavicleshowingsignificantresistancewhiledrillingand/or pin insertion (relative)
Contra Indications
• Fractures of the clavicular shaft (in the middle third of the clavicle)• Mal-unions and pseudarthoses of the clavicular shaft• More complex multi-fragement or comminuted fractures which require length
restoration
HCP-3.2
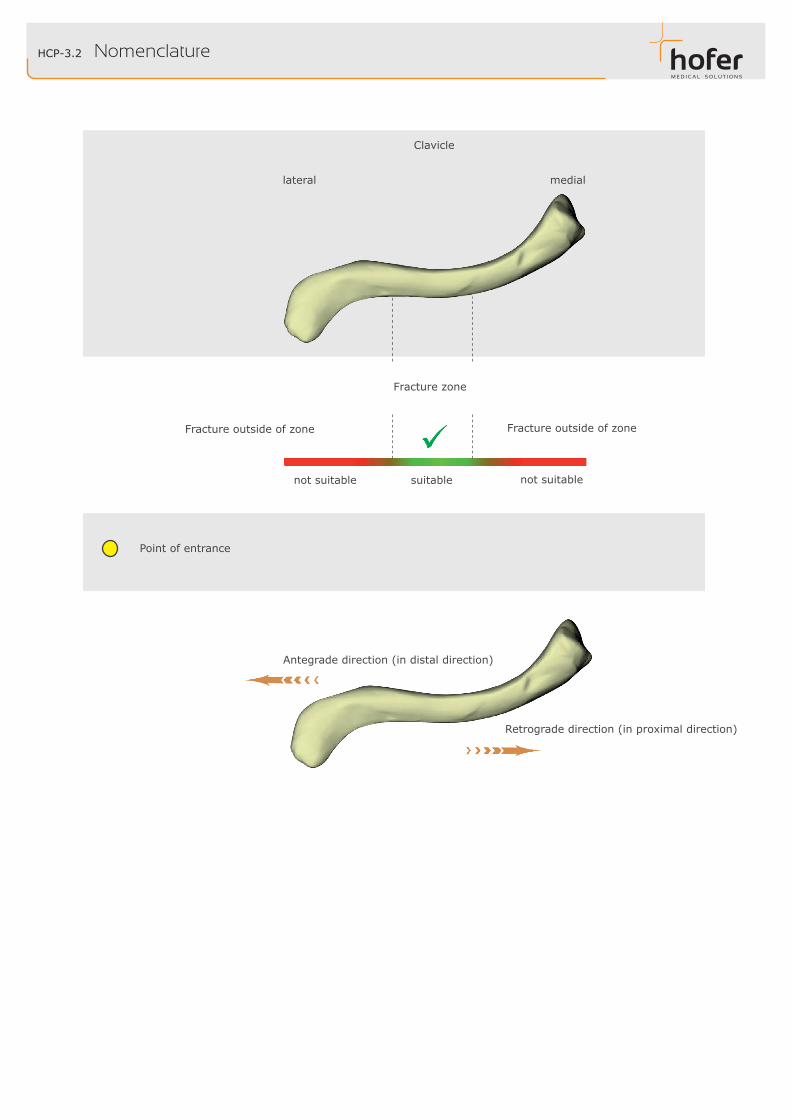
lateral
Antegrade direction (in distal direction)
medial
Retrograde direction (in proximal direction)
Point of entrance
Fracture zone
Clavicle
Nomenclature
not suitable suitable not suitable
Fracture outside of zone Fracture outside of zone
HCP-3.3
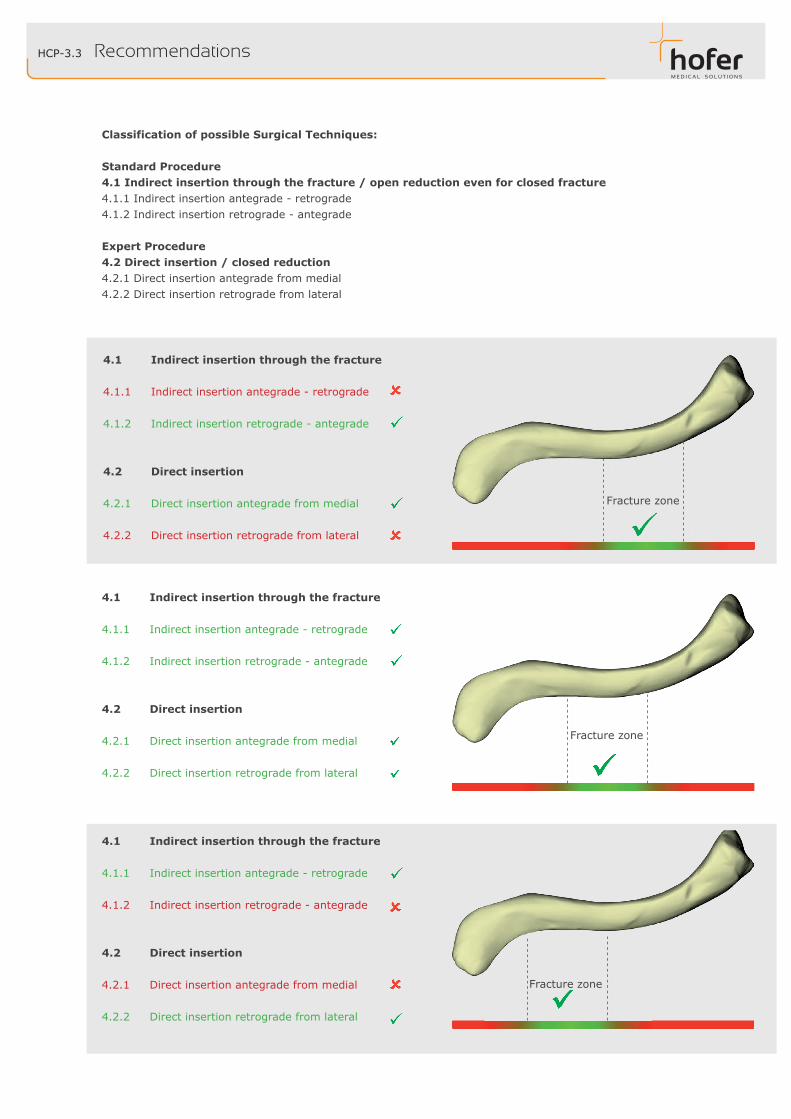
Fracture zone
Fracture zone
4.1 Indirect insertion through the fracture 4.1.1 Indirect insertion antegrade - retrograde 4.1.2 Indirect insertion retrograde - antegrade
4.2 Direct insertion 4.2.1 Direct insertion antegrade from medial 4.2.2 Direct insertion retrograde from lateral
4.1 Indirect insertion through the fracture 4.1.1 Indirect insertion antegrade - retrograde 4.1.2 Indirect insertion retrograde - antegrade
4.2 Direct insertion 4.2.1 Direct insertion antegrade from medial 4.2.2 Direct insertion retrograde from lateral
4.1 Indirect insertion through the fracture 4.1.1 Indirect insertion antegrade - retrograde 4.1.2 Indirect insertion retrograde - antegrade
4.2 Direct insertion 4.2.1 Direct insertion antegrade from medial 4.2.2 Direct insertion retrograde from lateral
Recommendations
Fracture zone
Classification of possible Surgical Techniques:
Standard Procedure4.1 Indirect insertion through the fracture / open reduction even for closed fracture4.1.1 Indirect insertion antegrade - retrograde4.1.2 Indirect insertion retrograde - antegrade
Expert Procedure4.2 Direct insertion / closed reduction4.2.1 Direct insertion antegrade from medial4.2.2 Direct insertion retrograde from lateral

HCP-4.1.1
①
②
①
②~ 15 mm
SLOWROTATION
SLOWROTATION
Use spiral drill with diameter of 3.2 mm
Indirect Insertion of the HCP antegrade - retrograde
Drilling of both fragments of the clavicle using the spiral drill
Screwing in the HCP with drill tip ahead until tip is located compeletely within the bone
Fracture zone Fracture zone
2) Antegrade drilling lateral
1) Retrograde drilling medial
STOP

①
②
HCP-4.1.1
SLOWROTATION
SLOWROTATION
Symbolic,exemplarypresentationofthefinalpositionoftheHCPdorHCPs:straightshaft,curvedtip
Indirect Insertion of the HCP antegrade - retrograde
CarefulscrewinginuntilreachingsignificantresistancewithroundedHCPtipahead
Whenreachingthefinalpositionofthepin,shorteningtheHCPdorHCPsto5-10mmexcessivelengthsothat the extraction instrument can take hold of the HCPd or HCPs
Swinging in the lateral clavicle

HCP-4.1.2
①
②
①
②
~ 15 mm
SLOWROTATION
SLOWROTATION
SLOWROTATION
Use spiral drill with diameter of 3.2 mm
Indirect Insertion of the HCP retrograde - antegrade
Drilling of both fragments of the clavicle using the spiral drill
Screwing in the HCP with drill tip ahead.
Fracture zoneFracture zone
2) Retrograde drilling medial1) Antegrade drilling lateral
STOP

①
②
HCP-4.1.2
SLOWROTATION
SLOWROTATION
Indirect Insertion of the HCP retrograde - antegrade
CarefulscrewinginuntilreachingsignificantresistancewithroundedHCPtipahead
Whenreachingthefinalpositionofthepin,shorteningoftheHCPdorHCPsto5-7mmexcessivelengthsothat the extraction instrument can take hold of the HCPd or HCPs
Symbolic,exemplarypresentationofthefinalpositionoftheHCPdorHCPs:straightshaft,curvedtip
Swinging in lateral clavicle

HCP-4.2.1
①
②
③
①
~ 20 mm~ 15 mm
SLOWROTATION
SLOWROTATION
Direct Insertion of the HCP antegrade from medial
After drilling pull back the spiral drill from the clavicle.
Drill the cortical bone with the spiral drill from medial.• drillthefirstcorticalbone,then• immediately turn the spiral drill in axial direction
Use spiral drill with diameter of 3.2 mm
Fracture zone Fracture zone
Total drill depth ~ 35 mm
HCP-4.2.1
SLOWROTATION
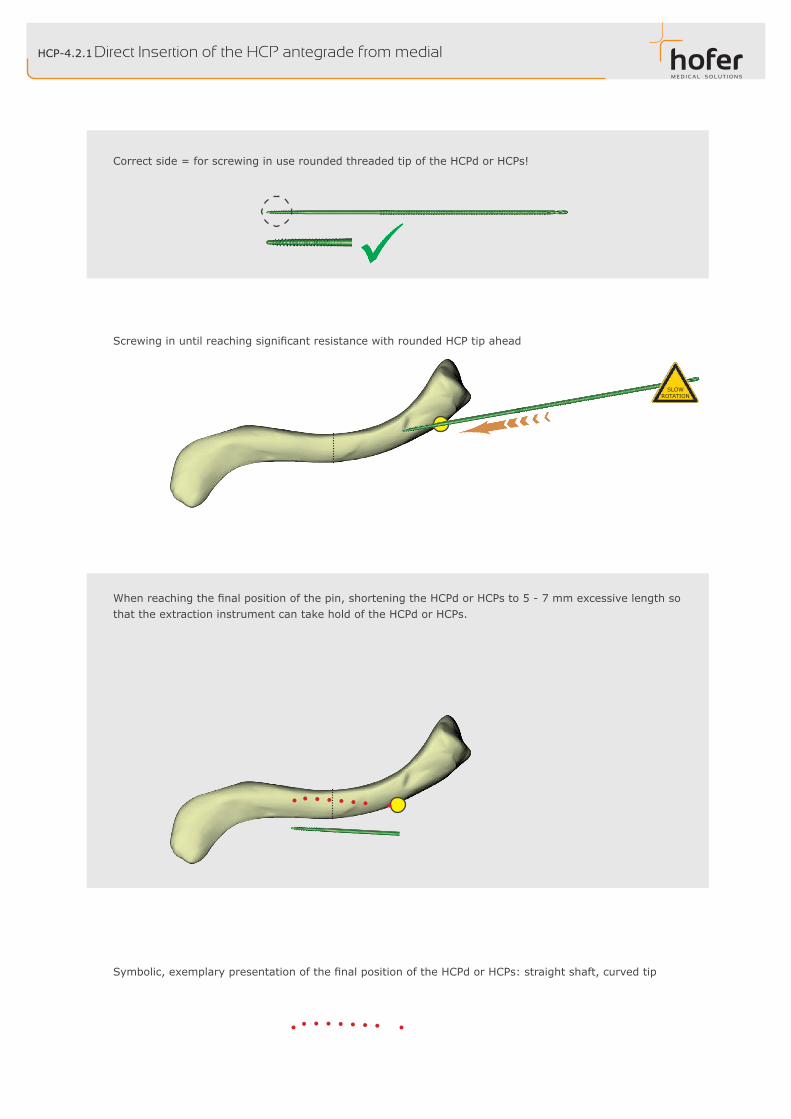
ScrewinginuntilreachingsignificantresistancewithroundedHCPtipahead
Whenreachingthefinalpositionofthepin,shorteningtheHCPdorHCPsto5-7mmexcessivelengthsothat the extraction instrument can take hold of the HCPd or HCPs.
Symbolic,exemplarypresentationofthefinalpositionoftheHCPdorHCPs:straightshaft,curvedtip
Correct side = for screwing in use rounded threaded tip of the HCPd or HCPs!
Direct Insertion of the HCP antegrade from medial

①
②
HCP-4.2.2
③
①
~ 20 mm ~ 15 mm
SLOWROTATION
SLOWROTATION
total drill depth ~ 35 mm
Direct Insertion of the HCP retrograde from lateral
Drill the cortical bone with the spiral drill from lateral.• drillthefirstcorticalbone,then • immediately turn the spiral drill in axial direction
After drilling pull back the spiral drill from the clavicle.
Use spiral drill with diameter of 3.2 mm
Fracture zone Fracture zone
HCP-4.2.2
SLOWROTATION
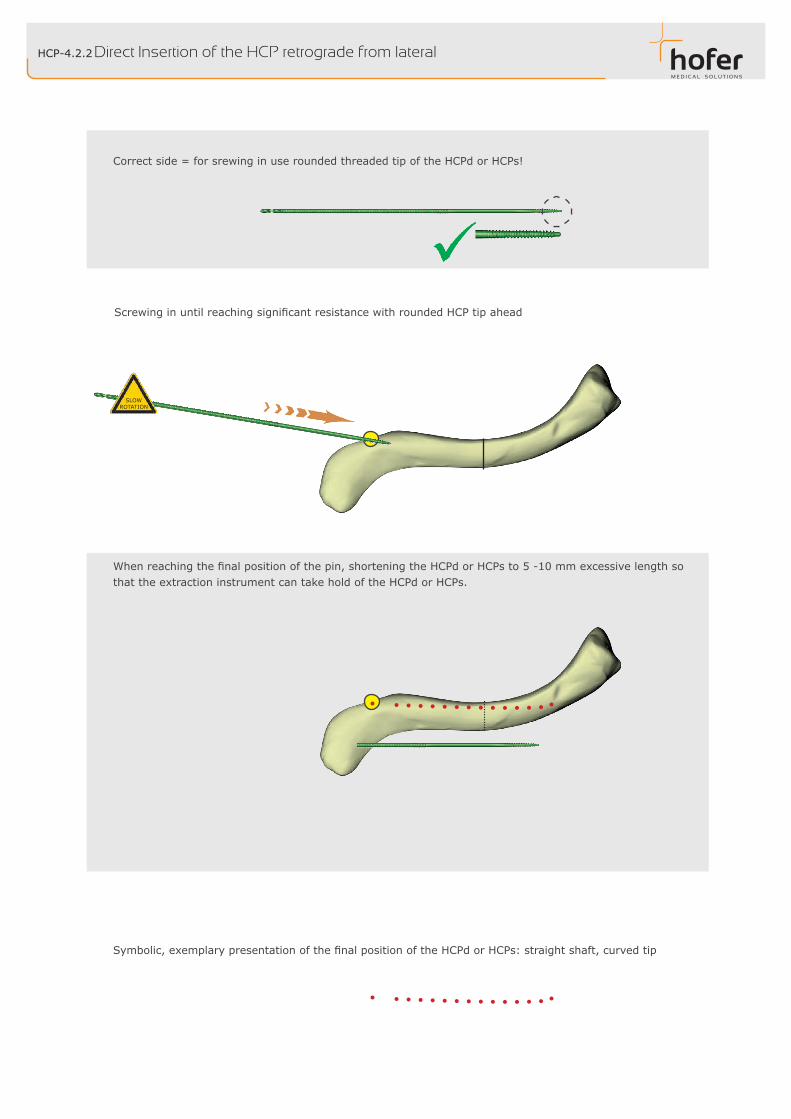
Whenreachingthefinalpositionofthepin,shorteningtheHCPdorHCPsto5-10mmexcessivelengthsothat the extraction instrument can take hold of the HCPd or HCPs.
Symbolic,exemplarypresentationofthefinalpositionoftheHCPdorHCPs:straightshaft,curvedtip
ScrewinginuntilreachingsignificantresistancewithroundedHCPtipahead
Correct side = for srewing in use rounded threaded tip of the HCPd or HCPs!
Direct Insertion of the HCP retrograde from lateral
HCP-4.3.1
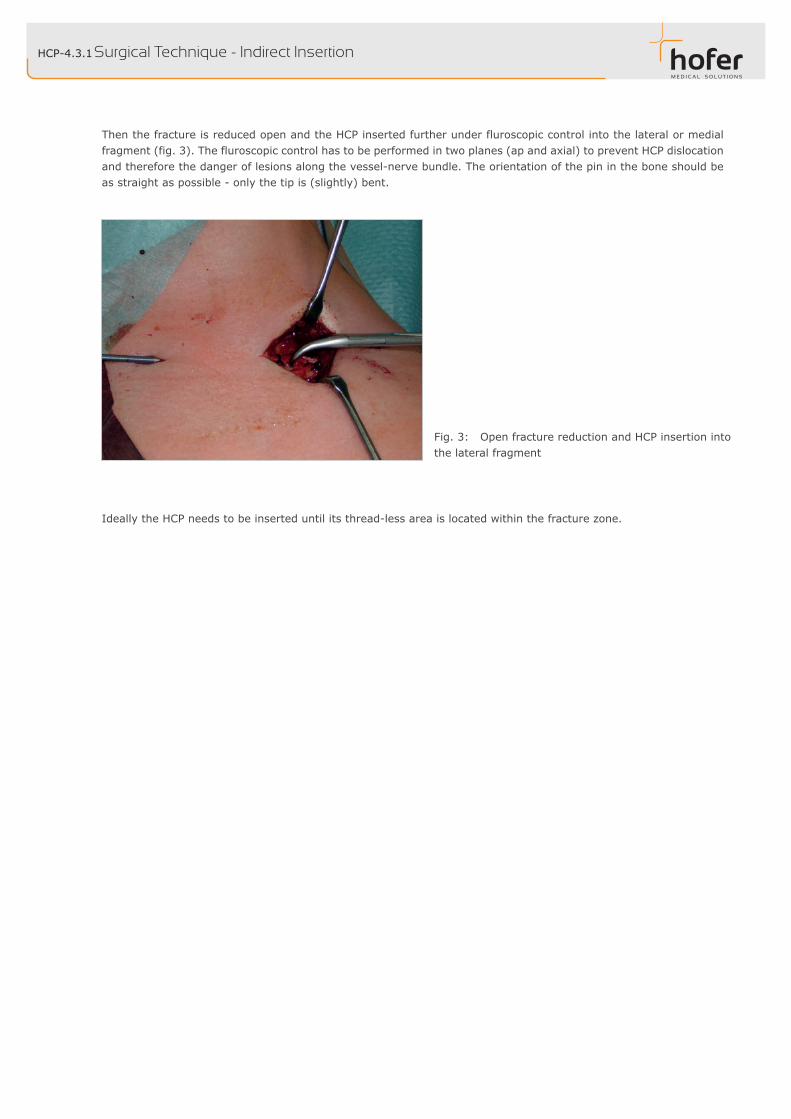
Fig. 2: Open reduction - retrograde drilling; HCP drill tip pointing medially
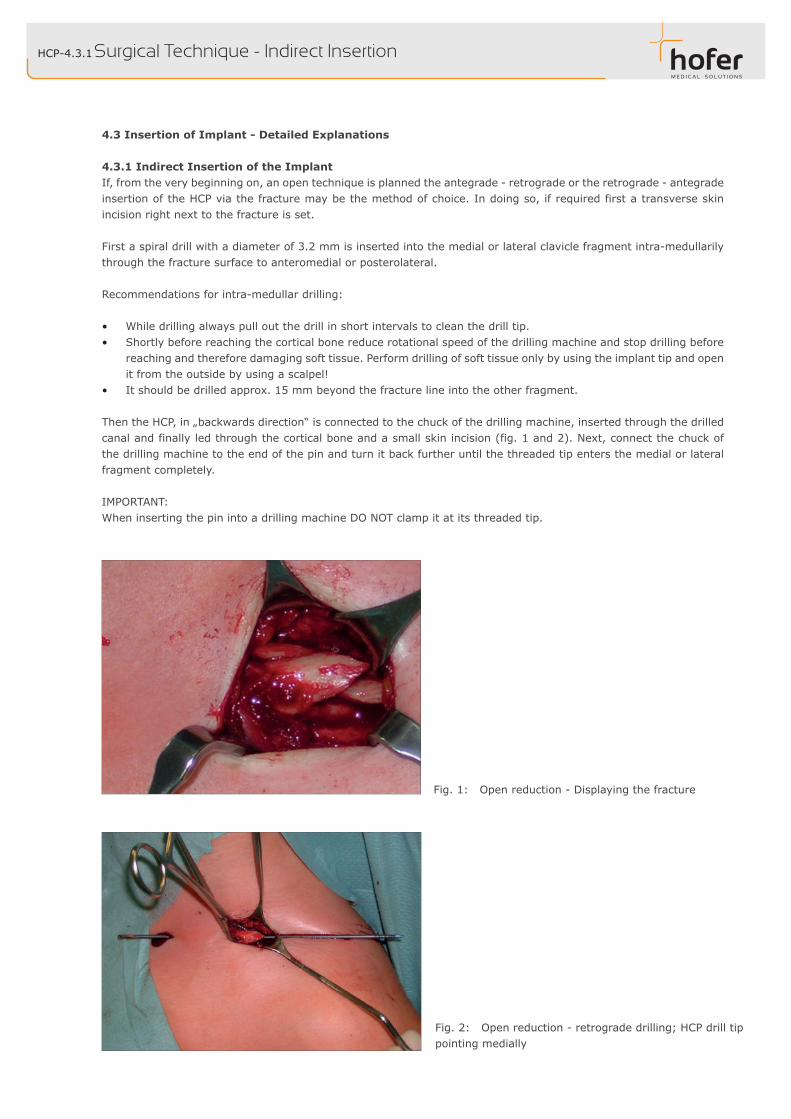
4.3 Insertion of Implant - Detailed Explanations
4.3.1 Indirect Insertion of the ImplantIf, from the very beginning on, an open technique is planned the antegrade - retrograde or the retrograde - antegrade insertion of the HCP via the fracture may be the method of choice. In doing so, if required first a transverse skin incision right next to the fracture is set.
First a spiral drill with a diameter of 3.2 mm is inserted into the medial or lateral clavicle fragment intra-medullarily through the fracture surface to anteromedial or posterolateral.
Recommendations for intra-medullar drilling:
• While drilling always pull out the drill in short intervals to clean the drill tip.• Shortly before reaching the cortical bone reduce rotational speed of the drilling machine and stop drilling before
reaching and therefore damaging soft tissue. Perform drilling of soft tissue only by using the implant tip and open it from the outside by using a scalpel!
• It should be drilled approx. 15 mm beyond the fracture line into the other fragment. Then the HCP, in „backwards direction“ is connected to the chuck of the drilling machine, inserted through the drilled canal and finally led through the cortical bone and a small skin incision (fig. 1 and 2). Next, connect the chuck of the drilling machine to the end of the pin and turn it back further until the threaded tip enters the medial or lateral fragment completely.
IMPORTANT:When inserting the pin into a drilling machine DO NOT clamp it at its threaded tip.
Surgical Technique - Indirect Insertion
Fig. 1: Open reduction - Displaying the fracture
HCP-4.3.1
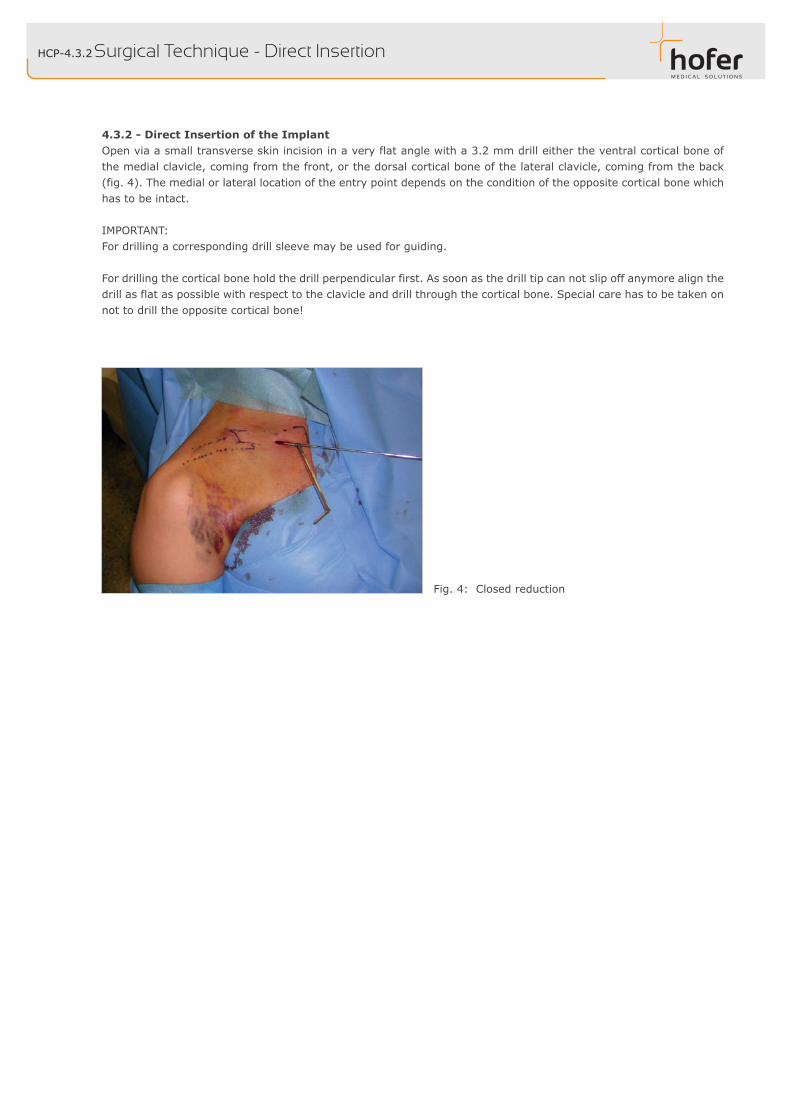
Then the fracture is reduced open and the HCP inserted further under fluroscopic control into the lateral or medial fragment (fig. 3). The fluroscopic control has to be performed in two planes (ap and axial) to prevent HCP dislocation and therefore the danger of lesions along the vessel-nerve bundle. The orientation of the pin in the bone should be as straight as possible - only the tip is (slightly) bent.
Ideally the HCP needs to be inserted until its thread-less area is located within the fracture zone.
Surgical Technique - Indirect Insertion
Fig. 3: Open fracture reduction and HCP insertion into the lateral fragment
HCP-4.3.2
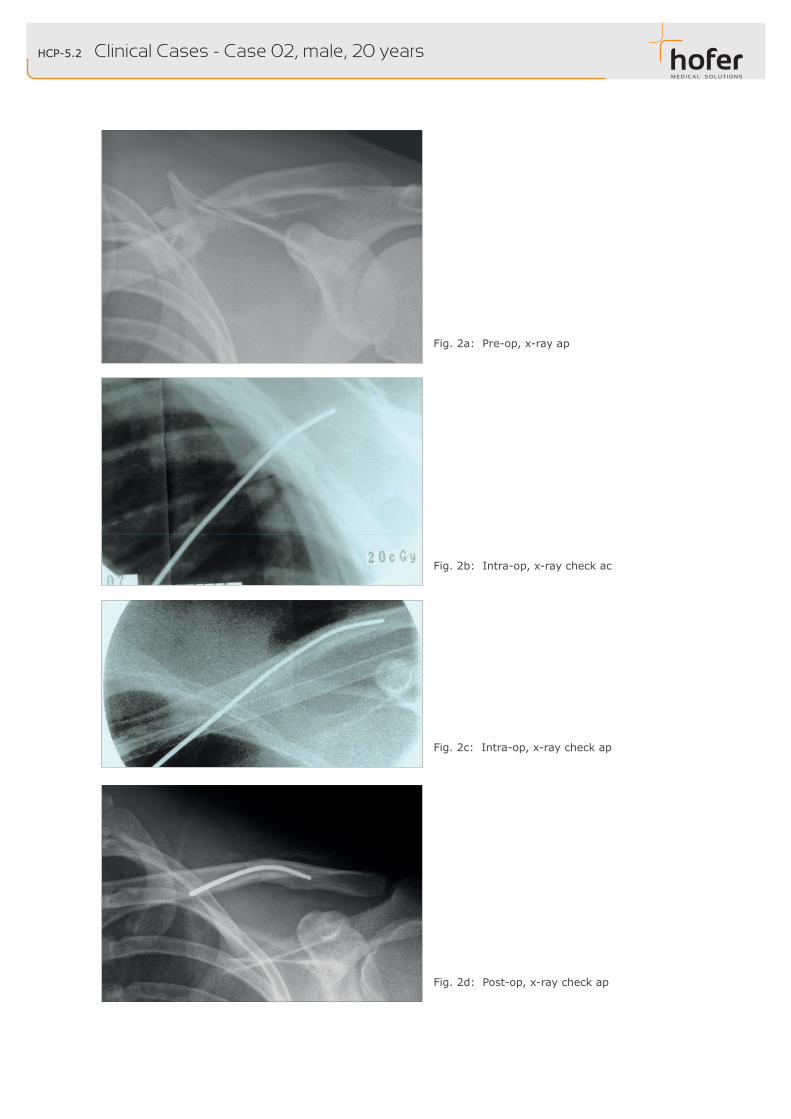
Fig. 4: Closed reduction
4.3.2 - Direct Insertion of the ImplantOpen via a small transverse skin incision in a very flat angle with a 3.2 mm drill either the ventral cortical bone of the medial clavicle, coming from the front, or the dorsal cortical bone of the lateral clavicle, coming from the back (fig. 4). The medial or lateral location of the entry point depends on the condition of the opposite cortical bone which has to be intact. IMPORTANT:For drilling a corresponding drill sleeve may be used for guiding.
For drilling the cortical bone hold the drill perpendicular first. As soon as the drill tip can not slip off anymore align the drill as flat as possible with respect to the clavicle and drill through the cortical bone. Special care has to be taken on not to drill the opposite cortical bone!
Surgical Technique - Direct Insertion

HCP-4.3.2 Surgical Technique - Direct Insertion
Fig. 6: C-Arm orientation axial
Fig. 5: C-Arm orientation ap
As next step the HCP, connected to a drilling machine, is inserted into the intramedullary canal laterally or medially under fluroscopy control (fig. 5 and 6) till the tip reaches the fracture zone and reduce the fracture. Perform this step slowly to prevent heat built up. Successful closed reduction can be obtained frequently by pulling the lateral fragment cranio-ventrally and pushing the medial fragment dorso-caudally by using the HCP (fig. 4). If closed reduction can not be performed an additional small incision for direct open reduction has to be taken into account.
IMPORTANT:For pin insertion the angle between HCP and clavicle has to remain small (< 15° relative to medial course of the clavicle). If the angle is too large the HCP may perforate the dorsal cortical bone, may not enter the clavicle at all since the necessary deflection is too small or due to a too small deflection bending radius the tip may even break off!The insertion using drilling machine should be performed slowly and constantly to prevent heat built up. The orien-tation of the pin in the bone should be as straight as possible - only the tip is (slightly) bent.
Ideally the HCP needs to be inserted until its thread-less area is located within the fracture zone.

HCP-4.4/4.5/4.6
Fig. 7: Skin closure after open reduction
Fig.8:Post-operativecontrolwithfluroscopy,checkofHCP location: HCP has to be located inside the clavicle.
4.4 - Removal of Excessive Material LengthThe final step for the implantation is to remove the excessive length of the pin. For its possible removal later on with the HCP extraction instrument an excessive length of not less than 5 mm is required. After pin shortening remove possible burrs or sharp edges.
4.6 - Post-Operative TreatmentAn immobilization for six weeks is recommended. The activity shall be limited based upon the level of pain and arm eleva-tion shall be kept restricted for not more than 90° within about the first six weeks.
4.5 - Wound Closure
Surgical Technique

HCP-4.7
SLOWROTATION
4.7 – Material Removal
After radiologic fracture healing (recommendations see table) the HCP can be removed.
Female Male Recommended point of removal
< 25 years < 25 years after 2 - 4 months depending on x-ray
25 - 35 years 25 -35 years after 4 - 6 months depending on x-ray
35 - 50 years 35 -60 years after 5 - 8 months depending on x-ray
> 50 years > 60 years after 7 - 9 months depending on x-ray
> 70 years > 75 years if no complications occur, removal may not be ne-cessary
Attention: The recommendations are based on experiences. Each patient has to be considered individually and if necessary the suggested point of removal has to be adjusted depending on the x-ray.
A special HCP extraction instrument for the material removal is available. The instrument gets connected to the wire‘s excessive length and is applied for unscrewing the pin with a T-handle.
Information about the handling of this instrument is available in the
• instruction manual for HCP extraction instrument.
IMPORTANT:Make first turns always by hand and with caution till the HCP can be turned smoothly.
Surgical Technique
When the HCP shows little resistance and can be connected to the chuck, a drilling machine may be used. On doing so, the removal of the pin shall be done constantly and not too fast to prevent unnecessary heat built-up and overstress of the implant.
first turns till running smoothly

HCP-5.1 Clinical Cases - Case 01, male, 46 years
Fig. 1e: Post-op, x-ray check ap
Fig. 1d: Intra-op, x-ray check ap
Fig. 1c: Intra-op, x-ray check ac
Fig. 1b: Intra-op, situs at open reduction
Fig. 1a: Pre-op, x-ray ap
HCP-5.2
Fig. 2d: Post-op, x-ray check ap
Fig. 2c: Intra-op, x-ray check ap
Fig. 2b: Intra-op, x-ray check ac
Fig. 2a: Pre-op, x-ray ap
Clinical Cases - Case 02, male, 20 years

HCP-5.3
Revision after plate osteosynthesis with screw pull out
Clinical Cases - Case 03, female, 35 years
Fig. 3a: Pre-op, x-ray ap
Fig. 3b: Post-op, x-ray check ap
Fig. 3c: 1 year post-op, x-ray check ap

HCP-5.4
Fig. 4b: Intra-op, x-ray check ap, posterolateral inserti-on
Fig. 4a: Pre-op, x-ray ap
Fig. 4c: Intra-op, x-ray check ac, posterolatateral inserti-on
Clinical Cases - Case 04, male, 56 years
Fig. 4d: Post-op, x-ray check ap
HCP-5.5
HCP-5.6
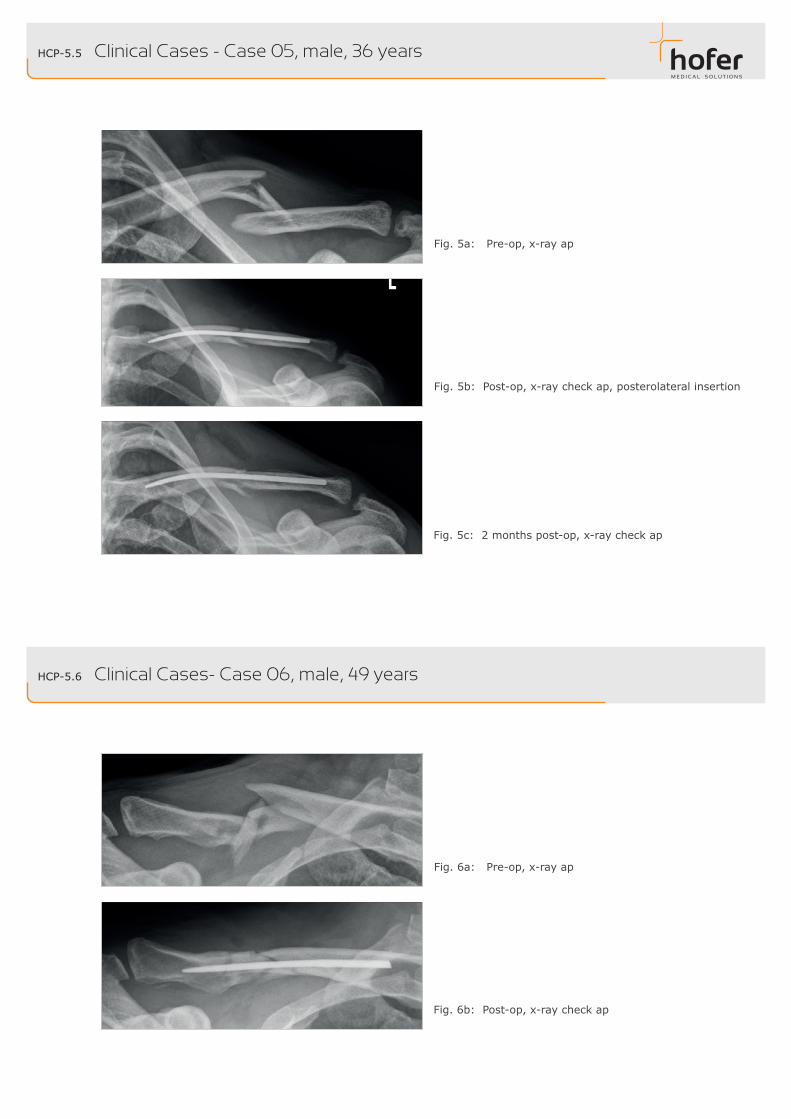
Fig. 5a: Pre-op, x-ray ap
Fig. 5b: Post-op, x-ray check ap, posterolateral insertion
Clinical Cases - Case 05, male, 36 years
Fig. 5c: 2 months post-op, x-ray check ap
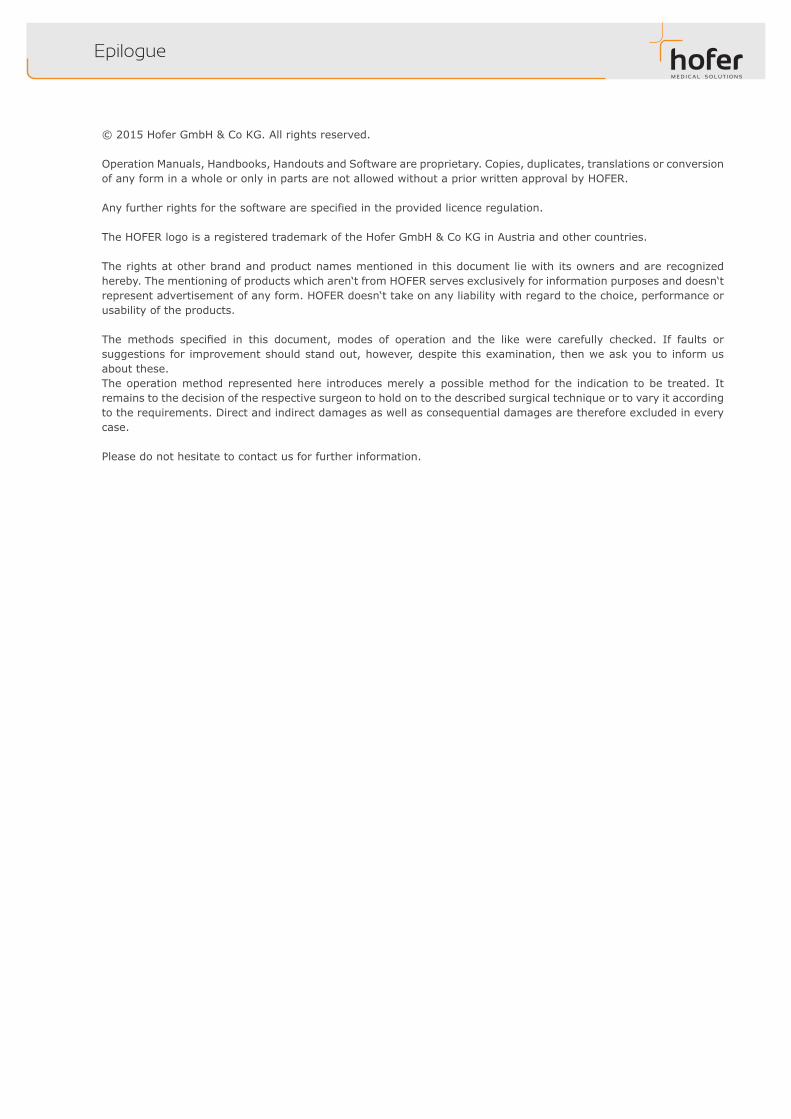
Clinical Cases- Case 06, male, 49 years
Fig. 6b: Post-op, x-ray check ap
Fig. 6a: Pre-op, x-ray ap
© 2015 Hofer GmbH & Co KG. All rights reserved.
Operation Manuals, Handbooks, Handouts and Software are proprietary. Copies, duplicates, translations or conversion of any form in a whole or only in parts are not allowed without a prior written approval by HOFER.
Any further rights for the software are specified in the provided licence regulation.
The HOFER logo is a registered trademark of the Hofer GmbH & Co KG in Austria and other countries.
The rights at other brand and product names mentioned in this document lie with its owners and are recognized hereby. The mentioning of products which aren‘t from HOFER serves exclusively for information purposes and doesn‘t represent advertisement of any form. HOFER doesn‘t take on any liability with regard to the choice, performance or usability of the products.
The methods specified in this document, modes of operation and the like were carefully checked. If faults orsuggestions for improvement should stand out, however, despite this examination, then we ask you to inform us about these. The operation method represented here introduces merely a possible method for the indication to be treated. It remains to the decision of the respective surgeon to hold on to the described surgical technique or to vary it according to the requirements. Direct and indirect damages as well as consequential damages are therefore excluded in every case.
Please do not hesitate to contact us for further information.
Epilogue

20150317mc_HCPd_HCPs_Surgical_Technique-ge
[email protected] www.hofer-medical.com
FN21826yUID ATU30764704
TEL:+43(0)3382/53388FAX:+43(0)3382/53093
HOFER GMBH & CO KGJahnstrasse 10-12A 8280 Fürstenfeld
HRB24645UID DE290596924
TEL: 0800-700 80 22 (innerhalb BRD)FAX: +49 201 56599 1069
HOFER-MEDICAL GMBHRuhrtalstraße 52-60D 45239 Essen
AUSTRIA
GERMANY
REGON 141527293UID PL1070011771
Tel.Kom.:+48603224112Fax: +48 748712273
HOFERGMBH&COKGSPÓŁKAKOMANDYTOWAODDZIAŁWPOLSCERadkowska 9PL 57-402 Nowa Ruda
POLAND
Rev. March 2015
Hofer GmbH & Co KG
FN21826yUID ATU30764704
TEL:+43(0)3382/53388FAX:+43(0)3382/53093
JAHNSTRASSE 10-12A-8280 FÜRSTENFELD
Adressen
Adresses