HC Plus Nurse Assessment - Sandatadocuments.hcplus.com/version/HC Plus Nurse Assessment 4.24...
70
HC Plus Nurse Assessment User Manual Version 4.24 Sandata Technologies, Inc. 26 Harbor Park Drive Port Washington, NY 11050 (516) 484-4400 http://www.sandata.com
Transcript of HC Plus Nurse Assessment - Sandatadocuments.hcplus.com/version/HC Plus Nurse Assessment 4.24...

HC Plus Nurse Assessment User Manual
Version 4.24
Sandata Technologies, Inc.
26 Harbor Park Drive
Port Washington, NY 11050
(516) 484-4400
http://www.sandata.com

User Manual HC Plus Nurse Assessment Version 4.24
TABLE OF CONTENTS
PREFACE....................................................................................................................................... 5
Contact Information .................................................................................................................... 5 About the Manual ....................................................................................................................... 5
INTRODUCTION .......................................................................................................................... 6 About Nurse Assessment ............................................................................................................ 6 System Types .............................................................................................................................. 6 Starting Nurse Assessment ......................................................................................................... 7
Starting Nurse Assessment on the Server ............................................................................... 7 Starting Nurse Assessment for Laptop or On Call versions ................................................... 7 Login Screen ........................................................................................................................... 7
MAIN MENU OVERVIEW........................................................................................................... 8 Title Bar/Main Menu .................................................................................................................. 8
Keyboard use for menus ......................................................................................................... 8 File Menu.................................................................................................................................... 8 Forms Menu................................................................................................................................ 9 Maintenance Menu.................................................................................................................... 10 Reports Menu............................................................................................................................ 10 Security Menu........................................................................................................................... 11 Window Menu .......................................................................................................................... 11
GENERAL FORMS OVERVIEW............................................................................................... 12 Items in a Form ......................................................................................................................... 12 Using the Tool Bar.................................................................................................................... 13
SETTING UP NURSE ASSESSMENT ....................................................................................... 15 Agency Screen .......................................................................................................................... 15
General Agency Data............................................................................................................ 15 Setup Options........................................................................................................................ 16
General Options ................................................................................................................ 16 Form Options .................................................................................................................... 17
Task and Kardex Options...................................................................................................... 18 Tasks ................................................................................................................................. 18 Kardex............................................................................................................................... 18
Code Tables .............................................................................................................................. 19 General Code Tables............................................................................................................. 19
Attendant, Case Manager, Cluster, Comments, Coordinator, Diagnosis, Functional Aid, Field Office, ICD-9 Codes, Language, Medication, Significant Symptoms, Supplier, Site, Zone ............................. 19
Nurse Table........................................................................................................................... 21 Task Master Table................................................................................................................. 21
NURSE ASSESSMENT FORMS ................................................................................................ 23 Client Forms Overview............................................................................................................. 23
Client Selection List.............................................................................................................. 23 New Clients........................................................................................................................... 24 Filter/Search.......................................................................................................................... 25 Archiving .............................................................................................................................. 26 Comment Entry..................................................................................................................... 26
- 2 -

User Manual HC Plus Nurse Assessment Version 4.24
Assigning Codes ................................................................................................................... 27 General Client Data............................................................................................................... 28
Nurse Task Assessment Form................................................................................................... 28 Proposed Forms .................................................................................................................... 28 1.1 Assessment...................................................................................................................... 29 1.2 Purpose of Visit/Diagnosis ............................................................................................. 30 1.3 Impairments .................................................................................................................... 31 2.1 Mobility........................................................................................................................... 32 2.2 Mental Status .................................................................................................................. 32 2.3 Judgement ....................................................................................................................... 33 3.1 Functional Aids............................................................................................................... 33 3.2 Additional Services/Meds............................................................................................... 34 4, 5, 6 Recommended Plan of Care....................................................................................... 35 7.1 Environment.................................................................................................................... 37 7.2 Comments ....................................................................................................................... 37
Supervisory Visit Form............................................................................................................. 38 1.1 Assessment...................................................................................................................... 38 1.2 Comments ....................................................................................................................... 39 1.3 Evidence.......................................................................................................................... 39
Plan of Care Form..................................................................................................................... 40 Plan of Care (01)................................................................................................................... 40
POC (01) Client ................................................................................................................ 40 POC (01) Impairment ....................................................................................................... 41 POC (01) Personal Care I ................................................................................................. 41 POC (01) Personal Care II ................................................................................................ 42 POC (01) Household Chores ............................................................................................ 42
Plan of Care (02)................................................................................................................... 43 POC (02) General Info...................................................................................................... 43 POC (02) Health Info........................................................................................................ 43 POC (02) Personal Care I ................................................................................................. 44 POC (02) Personal Care II ................................................................................................ 44 POC (02) Household Chores ............................................................................................ 45
Task Based Plan of Care ........................................................................................................... 45 Personal Emergency Response System (P.E.R.S.) Form.......................................................... 47
Questions 1 & 2 .................................................................................................................... 47 Questions 3 & 4 .................................................................................................................... 47 Questions 5 & 6 .................................................................................................................... 48
Initial Nurse Assessment Form................................................................................................. 48 History................................................................................................................................... 48 General.................................................................................................................................. 49 Mouth.................................................................................................................................... 49 Musculo- ............................................................................................................................... 50 Breast .................................................................................................................................... 50 Psycho-.................................................................................................................................. 51 Environ.................................................................................................................................. 51 Hazards ................................................................................................................................. 52
- 3 -

User Manual HC Plus Nurse Assessment Version 4.24
Emergency Kardex Form.......................................................................................................... 52 Client..................................................................................................................................... 53 Medical History .................................................................................................................... 53 Medical Providers ................................................................................................................. 54 Medications........................................................................................................................... 54
REPORTS..................................................................................................................................... 55 Printing Forms .......................................................................................................................... 55 Printing Reports ........................................................................................................................ 56
Client Task Report Incomplete Task Report Exceeds HRA Standard Times Report........... 56 Nurse Reports........................................................................................................................ 56 ICD-9 Reports....................................................................................................................... 58 P.E.R.S. Client ...................................................................................................................... 59 Client List.............................................................................................................................. 59 Zip Codes .............................................................................................................................. 59 Diagnosis............................................................................................................................... 60
MAIN/LAPTOP TRANSFERS.................................................................................................... 61 Laptop Upgrades....................................................................................................................... 62 Export Client Data .................................................................................................................... 62 Import client Data ..................................................................................................................... 63 Release Exported Clients .......................................................................................................... 63
ARCHIVING FUNCTIONS......................................................................................................... 68 OTHER MAINTENANCE FUNCTIONS ................................................................................... 69
Delete Discharged Clients......................................................................................................... 69 Pack and Reindex...................................................................................................................... 69 Current User.............................................................................................................................. 69
- 4 -

User Manual HC Plus Nurse Assessment Version 4.24
This Manual is a reference tool for Sandata’s HC Plus Nurse Assessment software product.
If you have any questions regarding the contents of this manual, please contact Sandata Client Relations at 516-484-4400.
• Fax: 516-484-6084
• Mailing Address: 26 Harbor Park Drive, Port Washington, NY 11050
• Internet: http://www.sandata.com
• Email [email protected]
About this Manual
The HC Plus Nurse Assessment User Manual contains detailed information about using the HC Plus Nurse Assessment program. (The program is also known simply as Nurse Assessment.) Each section will give you an overview of the Nurse Assessment features, step-by-step instructions, and descriptions of fields where applicable.
The contents of this manual and related documentation is proprietary to Sandata Technologies, Inc., and can not be copied or otherwise reproduced or disclosed to any third party. It is solely for use in connection with the Sandata HC Plus Nurse Assessment system and software and must be returned upon request or termination of services.
Copyright 2006 Sandata Technologies, Inc. All rights reserved.
- 5 -

User Manual HC Plus Nurse Assessment Version 4.24
INTRODUCTION
ABOUT NURSE ASSESSMENT The Nurse Assessment program provides home health care professionals with the means to create and manage a comprehensive database for task-based-care clients. The Nurse Assessment system has flexibility through multiple functions and reports available from the pull down menus.
Important features of the system include:
◊ Store and Print Forms for
Nurse Assessment Visit
Supervisory Visit
Plan of Care (2 versions available)
Task Based Plan of Care
P.E.R.S.
Initial Nurse Assessment
Emergency Kardex
◊ Archive Forms
◊ Laptop Export of Client Data
◊ Automatic Nightly Updates from HC Plus
◊ Optional Automatic Nightly Transfer to Santrax
◊ Various Report Options
◊ HIPAA Compliant User Security
SYSTEM TYPES There are three types of installations for the Nurse Assessment program. Here is a summary of the three types.
Server: This is the copy of the program that runs from our servers when you login through the website. (This was also known as “Main”.)
Laptop: This is a copy of the program that is run from a laptop computer. This copy of the program contains data that was exported from the server so a user can work on client forms while not connected to the Internet.
On Call: This is a copy of the program that contains a copy of the data from the server. The data gets copied from the server onto a laptop computer, where a nurse who is on call outside of normal business hours can access it.
Every agency will have access to the Server installation of Nurse Assessment. Laptop and On Call are optional features.
- 6 -

User Manual HC Plus Nurse Assessment Version 4.24
STARTING NURSE ASSESSMENT
Starting Nurse Assessment on the Server To access the Nurse Assessment program, use your normal HC Plus logon. You should see a shortcut that looks like the following.
Click on the shortcut to start the Nurse Assessment program. A few system messages may pop up on the screen, then the program will come up with the login screen.
Starting Nurse Assessment for Laptop or On Call versions A Nurse Assessment icon will be on the Windows desktop on the laptop computer that has the Nurse Assessment program properly installed.
Double-click the HC Plus Nurse Assessment icon to start the Nurse Assessment Program. The program will come up with the login screen.
Login Screen
Click on the arrow button and a drop down box will appear with a list of nurses. Selecting a specific nurse will allow the user to work with only those clients assigned to that nurse. Selecting Supervisor allows the user to work with any client regardless of the nurse assignment. Clients who are not assigned to a specific nurse can only be accessed by selecting Supervisor
Enter the assigned User Name and Password to gain access to the Nurse
Users may be assigned different access rights to the program. This may be used to restrict users from seeing or accessing various parts of the program. Information about setting up user access can be found later in this manual.
- 7 -

User Manual HC Plus Nurse Assessment Version 4.24
MAIN MENU OVERVIEW
TITLE BAR/MAIN MENU The title bar shows the name of the product, current version, system type and the agency ID and name. Under the title bar is the main menu. This document shows all of the menu options in the program. When a user logs into the program, certain features may be hidden or disabled based on the users access rights and whether your agency uses certain optional features.
Product Name
Version System Type
Agency ID
Main menu – The sections below give more information about the menu items and the sub-menus in the Nurse Assessment program.
Agency Name
Keyboard use for menus While many find it easy enough to use the mouse to make selections from the menu, some users prefer to use the keyboard. Many of the menu commands can be accessed using a keyboard instead of a mouse.
To access the menu hold down the Alt key, then press the underlined letter in the item you want to select from the main menu. To make a selection from one of the drop down menus, press the underlined letter from that menu. For example, to open the File menu and select New, the user can press <Alt-F> then <N>.
Some commands have shortcut keys assigned to them. The shortcut key appears on the menu to the right of the option. For example pressing <Ctrl-N> is another way to select New from the File menu. You can use a shortcut key from any screen that allows that function. The menu does not have to be opened to use it.
FILE MENU
The File menu provides several functions for working with records in a form. It also has the options for Restart Login and Exit.
- 8 -

User Manual HC Plus Nurse Assessment Version 4.24
Important Note: Make sure that the Nurse Assessment program is shut down properly to prevent damage to data files, which can result in a loss of data.
New: This will allow you to enter a new record in most forms.
Save: This allows the user to save the information in the current screen.
Close: This will close the active screen.
Select Client: This will bring you to the client list where you can select a different client to use. This is only available when working with client forms.
Delete: This will delete the active record.
Print Options: This provides options for selecting a printer, setting the number of copies, and setting how the printing should be queued on a network printer.
Print Preview: This will allow you to preview a report or form associated with the active screen.
Print: This will allow you to print a report or form associated with the active screen.
Restart Login: This will cause the program to restart at the login screen. This can be useful on a shared computer so one user can logout and allow another user to login.
Exit: Use this menu option to exit the Nurse Assessment program. You can also click the “X” in the upper right corner to exit.
FORMS MENU This menu lists all of the forms available for the user.
If the option for “proposed forms” is enabled, then the forms menu will display additional options for the Nurse Task Assessment form.
- 9 -

User Manual HC Plus Nurse Assessment Version 4.24
MAINTENANCE MENU
This menu provides access to various maintenance functions. This menu is different depending on the system type of the installation.
On the Server/Main program, the Maintenance menu displays these options.
On a Laptop or On Call installation, the Maintenance menu displays these options.
Some of the options on the Maintenance Menu have additional sub-menus. These will be described later when the corresponding maintenance function is described in further detail.
REPORTS MENU The reports menu provides options for printing the various forms and reports that are available in the Nurse Assessment program.
- 10 -

User Manual HC Plus Nurse Assessment Version 4.24
These are the forms that can be printed from the Nurse Assessment program.
These are the reports that can be printed from the Nurse Assessment program.
SECURITY MENU This menu should only be available to administrative users. It provides access for setting up passwords, and access rights for users and roles.
This manual does not give details about setting up security. The person who handles administration of the Nurse Assessment program should contact Client Relations to get a copy of the security manual.
WINDOW MENU This menu gives options to organize multiple windows or refresh the current window and it will list any forms that you have open.
Although it is sometimes helpful to have multiple forms opened at the same time, working with multiple forms can get confusing for most users. It is recommended that you only open one form at a time then close it before going into another form.
- 11 -

User Manual HC Plus Nurse Assessment Version 4.24
GENERAL FORMS OVERVIEW
ITEMS IN A FORM The following is an example of all functional items that may be in a form:
Page Frame Spinner
Combo Box
Command Buttons Option Group
Check Boxes Grid
List Box Edit Box
Scroll Bar
Page Frames: Allows the user to go from page to page for additional information. Click on the page tab to change from page to another.
Spinners: This is used for numbers, to increase or decrease the number presented. You can either key the number or use the arrow buttons.
Combo Box: Most Combo boxes allow the user to type in a value or the user can use the arrow button to display a list of options that can be assigned to that field.
List Box: The List box can be used in two ways. It will display a list of similar information to be assigned. Generally you can double click an item to bring up a window where you can edit information about that specific item. The second way is to display a list of items available for selection. Generally, double click on an item in the list box you want to select.
Edit Box: Use the Edit box for typing in information. It may have a limit in the amount of information that can be entered or it may hold a large amount of
- 12 -

User Manual HC Plus Nurse Assessment Version 4.24
information. In PC Sharp, you can usually double-click on the Edit box or press F3 to bring up an Edit window.
Option Group: The Option Group will let you choose only one of the options listed.
Command Buttons: Click on a Command button to perform an action.
Check Boxes: Click on the Check box to select or deselect that item. In some cases, clicking on a Check box can enable or disable related options. In other cases, some Check boxes will automatically turn off other Check boxes when those items are mutually exclusive.
Grid: A Grid displays information in rows and columns. Each box inside the Grid is refereed to as a cell. The user can change the information in any selected cell.
Scroll Bar: A List box, Edit Box, or a Grid may contain a Scroll Bar. This will allow the user to scroll up and down to see more information than what will fit in the available space. The arrow buttons can be used to scroll the list up or down.
USING THE TOOL BAR When a form is opened the toolbar may appear directly below the main menu at the top of the screen. Many of the buttons correspond with functions on the File menu. Generally it is easier to use the toolbar button than to make a selection from the menu.
“VCR” buttons
New
Save
Delete
Restore
Select Client
Print Preview
Close
- 13 -

User Manual HC Plus Nurse Assessment Version 4.24
◊ “VCR” Buttons – These are similar to the buttons on a VCR for going forward and backward through a group of records. When available these buttons will do the following.
First – This will bring you to the first record.
Prior – This will bring you to the prior record.
Next – This will bring you to the next record.
Last – This will bring you to the last record.
◊ New – This will allow you to enter a new record.
◊ Save – This allows the user to save the information in the current screen.
◊ Delete – This will delete the active record. The Delete button is not available while working in a client form. This will reduce the chance of accidentally deleting a client. If you need to delete a client, use Delete from the File menu.
◊ Restore – This allows the user to cancel any changes since the last time the information was saved. WARNING: If the user selects Restore, any changes made will be lost.
◊ Select Client – This will bring you to the client list where you can select a different client to use. This is only available when working with client forms.
◊ Preview – This will allow you to preview a report or form associated with the active screen.
◊ Print – This will allow you to print a report or form associated with the active screen.
◊ Close – This will close the active screen.
- 14 -
User Manual HC Plus Nurse Assessment Version 4.24
SETTING UP NURSE ASSESSMENT
AGENCY SCREEN The agency screen gives administrators the ability to configure certain options in the Nurse Assessment program. A password is required to access the configuration settings. The person responsible for the Nurse Assessment program can get the password by contacting Sandata’s Client Relations.
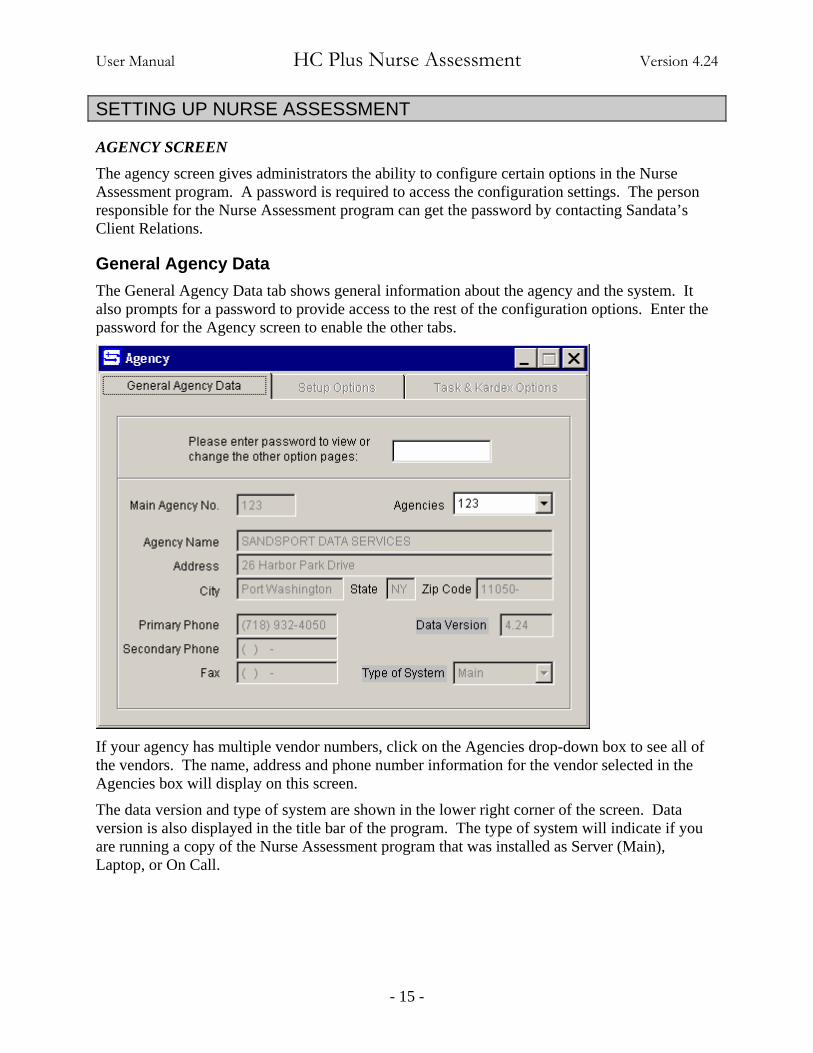
General Agency Data The General Agency Data tab shows general information about the agency and the system. It also prompts for a password to provide access to the rest of the configuration options. Enter the password for the Agency screen to enable the other tabs.
If your agency has multiple vendor numbers, click on the Agencies drop-down box to see all of the vendors. The name, address and phone number information for the vendor selected in the Agencies box will display on this screen.
The data version and type of system are shown in the lower right corner of the screen. Data version is also displayed in the title bar of the program. The type of system will indicate if you are running a copy of the Nurse Assessment program that was installed as Server (Main), Laptop, or On Call.
- 15 -

User Manual HC Plus Nurse Assessment Version 4.24
Setup Options The Setup Options tab contains several general options that you can use to configure the Nurse Assessment program. There are also form options, which control the way certain forms will print.
General Options ◊ Use History/Archive – This will turn on Current Form/History option on the Maintenance
menu and allow users to Archive forms.
◊ Allow Proposed Forms In Archive – This will allow the user to store and create proposed forms in Archive. Use History/Archive must be enabled to use this feature.
◊ Week Starts on – Allows the agency to set the day that will be used as the start of the week for that agency. Click on the drop-down arrow to select the day from the list.
◊ Queue printout as single job – This feature is useful for agencies that have several users sharing the same printer. It effects how the program sends forms to the printer.
With this feature turned OFF the program sends each page to the printer individually as it is ready to print. For users that have their own printer this will result in slightly faster printing. But if two users try to print to the same printer at the same time, their pages will be intermixed.
With this feature turned ON, the program will store each page until all of the pages are ready to print. Then it will send them all to the printer at the same time. So, if two users try to print at the same time all of the pages from one user will print together before all of the pages from the second user will print.
- 16 -

User Manual HC Plus Nurse Assessment Version 4.24
◊ Allow Laptop to Add New Clients – This setting determines whether clients can be added on a Laptop version of PC Sharp. Although we still support this feature, it is recommended that clients be added into HC Plus first then sent to Nurse Assessment through the automatic nightly transfer.
◊ Allow Release of Clients Exported to Laptop – Turning on this option will allow a one-time use of the feature to release exported clients.
◊ Show Diagnosis on Plan of Care – Turning on this option will cause the diagnosis information from the Nurse Task Assessment form to appear on the Plan of Care form. If this option is turned off then the user can manually enter information on the Plan of Care form.
◊ Code Table Maintenance Password – Turning on this option will require users to enter a password before they will be allowed to update code tables. When this option is turned on, set the password by entering it in the box to the right.
◊ Delete Client Record Password – Turning this option on will require the user to enter a password before they will be allowed to delete a client record. When this option is turned on, set the password by entering it in the box to the right.
Form Options ◊ Include secondary agency phone number on forms – This option will print a second phone
number on the Plan of Care form labeled, “After Hours Emergency Telephone”
◊ Include client signature on Supervisory Visit form – This will add a line for Client’s Signature and Date in the box under the agency name.
- 17 -

User Manual HC Plus Nurse Assessment Version 4.24
Task and Kardex Options The Task and Kardex Options tab contains options that apply to tasks in the Nurse Task Assessment for and option for the source of the comment field in the Kardex form.
Tasks ◊ Display Task Times as – Determines how task times should appear. Selecting Hours and
Minutes would display an hour and a half as 1:30. Selecting Minutes Only would display an hour and a half as 90.
◊ Default Range – Enter the default value to be used for a range for tasks.
◊ Default Provider – Enter the default provider for tasks in Nurse Assessment.
◊ Enable HC Plus Nurse Assessment to Santrax Transfers – This turns on fields in the task entry screen that contain additional data that can be sent to Santrax. Contact Sandata Client Relations to arrange to have the transfers activated for your agency.
Kardex This section deals with the options for the comment field in the Kardex form.
If Link Comments for Kardex is already turned on for your agency, then use this screen to choose which comments should appear on the Kardex form. If you contact Client Relations, we can arrange to have the comments for all clients updated to the current settings.
If Link Comments for Kardex is not turned on for your agency, then you will need to contact Client Relations to have this feature turned on. Before calling, use this screen to set the options
- 18 -

User Manual HC Plus Nurse Assessment Version 4.24
to choose which comments should appear on the Kardex form. Changing these options has no effect on the program until Link Comments for Kardex is turned on. When we turn on the Link Comments for Kardex option, we can optionally update the comments for all clients updated to the current settings.
If you are configured to use Link Comments for Kardex, but no longer want to use that option, contact Client Relations to have this feature turned off. When we turn off the Link Comment for Kardex option, we can optionally remove the comments for all clients.
CODE TABLES By selecting Codes from the Maintenance Menu, the user has access to all Code Tables where current information can be entered. The code tables are used to store common data that can easily be assigned to appropriate fields in the Nurse Assessment program.
General Code Tables Most Code Tables behave the same way. The example shown below shows the Diagnosis Table. The following code tables behave the same way:
◊ Attendant
◊ Case Manager
◊ Cluster
◊ Comments
◊ Coordinator
◊ Diagnosis
◊ Functional Aid
◊ Field Office
◊ ICD-9 Codes
◊ Language
◊ Medication
◊ Significant Symptoms
◊ Supplier
◊ Site
◊ Zone
- 19 -

User Manual HC Plus Nurse Assessment Version 4.24
This section will only appear if the Code Table Maintenance Password is set in the Agency Setup Options.
You can sort the list by clicking on the code or description headings.
To edit an entry, just position the cursor to where you want to make the change then type or delete characters.
To create a new code, click the New button on the toolbar or choose New from the File menu or use the shortcut key <Ctrl-N>
To delete an entry, click the Delete button or choose Delete from the File menu.
You can print or preview a report of all of the codes by clicking the Print or Preview buttons on the toolbar or choosing Print or Print Preview from the menu. You can also print by using the shortcut key <Ctrl-P>.
If the Edit Options section is visible, you must enter the password before you can do any editing or deleting. When the password is entered it will unlock all code tables for editing. (This only unlocks the password at the workstation the password was entered. This does not affect other work -stations) Click on Lock Codetable and the Code Table can no longer be edited until the password is re-entered.
- 20 -

User Manual HC Plus Nurse Assessment Version 4.24
Nurse Table The Nurse Table will be populated from the data in HC Plus by a nightly transfer. The nurse information should be entered into HC Plus then it should appear in Nurse Assessment the next day. You cannot edit the nurse information through the Nurse Assessment program.
You can sort or print the code table. Editing and using the New and Delete functions are prohibited.
Task Master Table The Task Master table contains a list of tasks from pages 4, 5 and 6 of the Nurse Task Assessment form. Double-click on a task to edit the information for that task. You can also use Print or Print Preview to print the task list. You cannot add or delete tasks.
- 21 -

User Manual HC Plus Nurse Assessment Version 4.24
When you double-click on a task, the task information will be displayed. You cannot change the Task ID, Task Name or the Short Name. You can edit the default information for the task.
Important Note: The Duration Code and Total and Partial times should be set to the HRA standard times for those tasks. These values will be used to determine if the task should print on the Exceeds HRA Standard Times report.
The task data in this table may be reset when upgrading to a new version
- 22 -

User Manual HC Plus Nurse Assessment Version 4.24
NURSE ASSESSMENT FORMS
CLIENT FORMS OVERVIEW
Client Selection List When you first choose the specific form you want to access, the Client Selection screen will appear. From this list you can select any client. After you select a client the Nurse Assessment program will remember that client until you select another.
◊ The client list shows Last Name, First Name, Client ID, Social Security Number, Vendor
Number, Discharge Code, Last Archive Date and Last Visit Date.
◊ You can change the order of the list to sort by Name, Client # or SSN by clicking on the corresponding bolded heading.
◊ The Visit Date column will change to reflect the visit date appropriate for the selected form. The following table shows which date will display as visit date for each form.
Form Source for Visit Date
Nurse Task Assessment Date Of This Visit – Bottom of page 7
Supervisory Visit Date of this visit – Bottom of page
Plan of Care (01) Date – Next to Status near upper right corner of page
Plan of Care (02) Date – Above Date of Birth near upper right corner of page
- 23 -

User Manual HC Plus Nurse Assessment Version 4.24
Form Source for Visit Date
Task Based Plan of Care Begin Date – Top of form
Initial Nurse Assessment Visit Date – Top center of page
P. E. R. S. Date of PERS Review – Near bottom of page
Kardex Most recent of the visit dates for Nurse Task Assessment or Supervisory Visit.
◊ To select a client, highlight that client on the list, then press <Enter> or click the Select button.
◊ When the list is sorted on Last Name, you can type the first couple of letters to get to that specific client quicker. Also, if the list is sorted by Client # or SSN, you can type the first few digits to get closer to the one you want to find.
◊ To add a new client, click on the New button.
◊ The Filter/Search button allows the user to narrow down the list of clients on the Client Selection screen to those clients who match the specified criteria. The Clear Filter button will clear the Filter/Search criteria and cause all clients to display on the list. The Filter Status will display under the client list.
New Clients Generally new clients will come from the transfer from HC Plus. It is best to enter the clients in HC Plus first then wait until the client appears in Nurse Assessment the next day. However, if you cannot wait and need to enter a client into Nurse Assessment, you can do so in several ways.
◊ From the Client Selection list, click the New button.
◊ From within a form, click the New button on the toolbar.
◊ From within a form go to the File menu then choose New.
◊ From within a form type <Ctrl-N>.
- 24 -

User Manual HC Plus Nurse Assessment Version 4.24
You must enter all of the required data in the New Client form. Be careful to enter this data correctly. Click the Save button to create the new client or click the Cancel button to exit this form without creating a new client.
Filter/Search The Filter/Search screen, which is also available on the Print Options form, allows the user to narrow down the list of clients to those clients who match the specified criteria.
Enter the criteria in the forms shown below. Click Reset to clear the search criteria. Click Set to set the criteria to the current entries. Click Cancel to exit this form without changing the criteria from the previous setting.
- 25 -

User Manual HC Plus Nurse Assessment Version 4.24
You may enter criteria of one item or several, depending on how you want to narrow the search.
For Vendor, Status, Laptop Export and P.E.R.S. click the option you want to use. A dot will appear in the circle to the left of the option that has been chosen.
For Nurse, Assessment Visit, Supervisory Visit, and Clustering Data click the button to the right of the box to display a drop-down list of options.
If you choose an option for Assessment or Supervisory Visit, then type in the appropriate information underneath the option.
For the text entry fields on the Client Data page, you can type the first character (letter or number) or first few characters to match any clients where that field starts with those letters. For example, entering “ba” in the Last Name field will match “Barson”, “Bass” and “Bausch”.
Archiving When selecting a client, agencies that have the archiving feature turned on will get a prompt to archive the forms for the selected client. You should choose yes if you are beginning a new form for a client or anytime you want the current state of the form saved before making changes. When you archive the data for all forms will be copied into the archive area. See the section on Archive for more information about how to view archived forms.
Comment Entry Some of the fields allow entry of more data than will fit on the screen. Most of these fields are linked to the Comment Text Edit Window. Double-click on a comment field or press the <F3> key to bring up the comment entry field.
If you have comment text entered into the comment code table, you can insert text from there by using the drop-down box at the bottom of the screen.
- 26 -
User Manual HC Plus Nurse Assessment Version 4.24
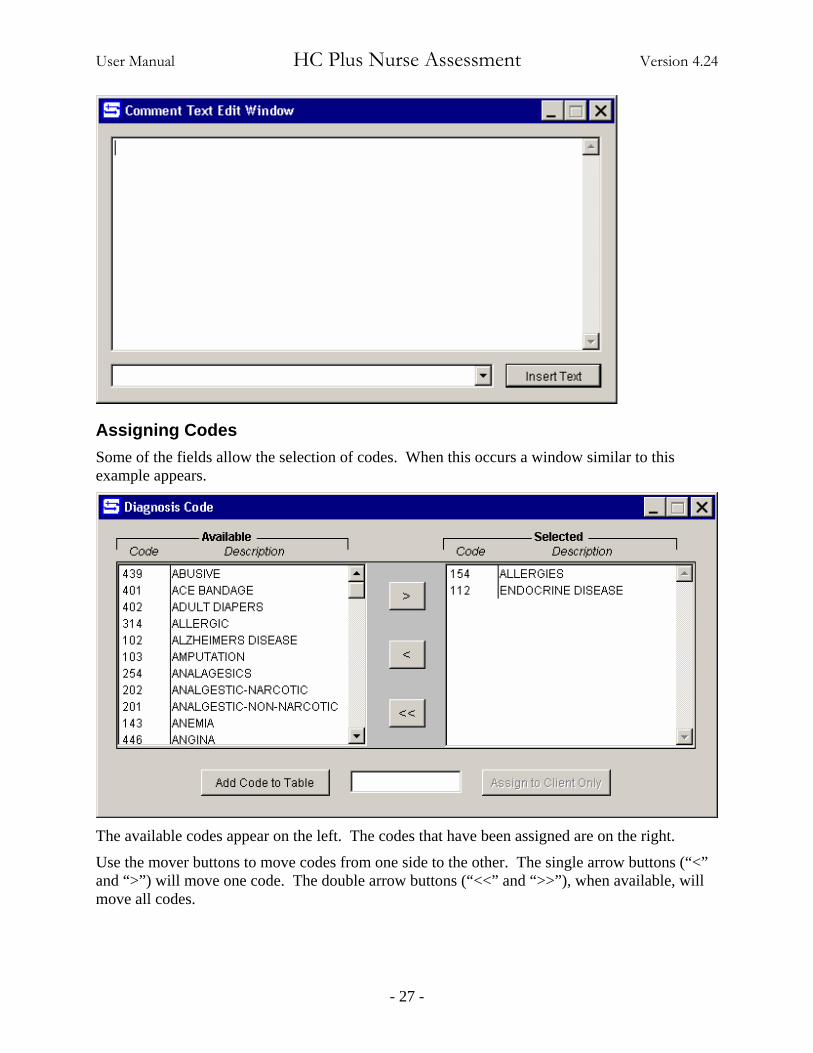
Assigning Codes Some of the fields allow the selection of codes. When this occurs a window similar to this example appears.
The available codes appear on the left. The codes that have been assigned are on the right.
Use the mover buttons to move codes from one side to the other. The single arrow buttons (“<” and “>”) will move one code. The double arrow buttons (“<<” and “>>”), when available, will move all codes.
- 27 -
User Manual HC Plus Nurse Assessment Version 4.24
If you want to use something that is not in the code table, type the description in the blank box near the bottom. You can add this code to the table where it will be available in the future or you can add the code for this client only.
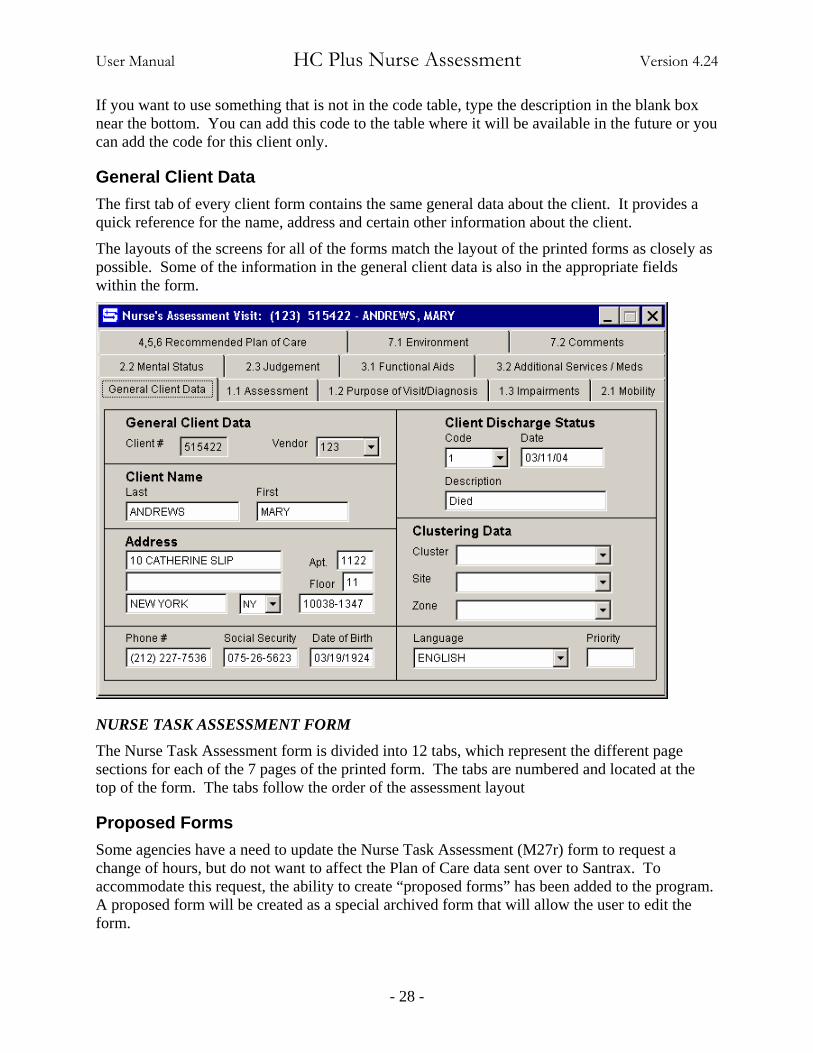
General Client Data The first tab of every client form contains the same general data about the client. It provides a quick reference for the name, address and certain other information about the client.
The layouts of the screens for all of the forms match the layout of the printed forms as closely as possible. Some of the information in the general client data is also in the appropriate fields within the form.
NURSE TASK ASSESSMENT FORM
The Nurse Task Assessment form is divided into 12 tabs, which represent the different page sections for each of the 7 pages of the printed form. The tabs are numbered and located at the top of the form. The tabs follow the order of the assessment layout
Proposed Forms Some agencies have a need to update the Nurse Task Assessment (M27r) form to request a change of hours, but do not want to affect the Plan of Care data sent over to Santrax. To accommodate this request, the ability to create “proposed forms” has been added to the program. A proposed form will be created as a special archived form that will allow the user to edit the form.
- 28 -

User Manual HC Plus Nurse Assessment Version 4.24
This is an optional feature. It can be enabled on the agency configuration screen. “Use History/Archive” must be enabled to use the proposed forms. To turn on this feature, check the box for “Use History/Archive” then check the box for “Allow Proposed Forms in Archive”.
When you create a “Proposed Form”, the program will prompt you to select a client. After you select the client, the program will confirm that you want to create a proposed form for that client. Clicking “Yes” will cause the current form for to be copied into Archive. The form will be flagged as “Proposed”. The “Proposed” copy of the form will open, allowing the user to make any changes. Those changes can be saved and printed. Changes to the “Proposed Form” will not affect the current form for the client.
The proposed form will exist in Archive. After closing the proposed form, if you wish to make further changes or print it again, you can switch to Archive from the Maintenance menu by choosing “Current Form/History” then “Multiple Forms per Client”.
1.1 Assessment This screen contains the data on the top of page 1 of the Nurse Assessment Visit form.
For a 24-hour case, enter the appropriate value. Otherwise, this field is calculated from the total task times from pages 4, 5 and 6.
- 29 -

User Manual HC Plus Nurse Assessment Version 4.24
1.2 Purpose of Visit/Diagnosis This page contains the data found in the middle of page 1 of the Nurse Assessment Visit form.
Diagnosis (Primary, Secondary and ICD-9 code), Significant Symptoms and Scheduled appointments bring up their own entry screens. The ones for the diagnosis fields and significant symptoms are similar, so only the Diagnosis Code screen is shown from that group.
- 30 -

User Manual HC Plus Nurse Assessment Version 4.24
Here is the Schedule Appointment screen
Use the buttons on the toolbar or options from the File menu to add or delete appointment records.
1.3 Impairments This page contains the data found on the bottom of page 1 of the Nurse Assessment Visit form.
- 31 -

User Manual HC Plus Nurse Assessment Version 4.24
2.1 Mobility This page contains the data found on the top of page 2 of the Nurse Assessment Visit form.
2.2 Mental Status This page contains the data found in the middle of page 2 of the Nurse Assessment Visit form.
- 32 -

User Manual HC Plus Nurse Assessment Version 4.24
2.3 Judgement This page contains the data found on the bottom of page 1 of the Nurse Assessment Visit form.
3.1 Functional Aids This page contains the data found on the top of page 3 of the Nurse Assessment Visit form.
The sections for the functional aids that the client has or needs and the section for the supplier bring up screens similar to the one for Diagnosis as shown in the section for tab 1.2
- 33 -

User Manual HC Plus Nurse Assessment Version 4.24
3.2 Additional Services/Meds This page contains the data found on the bottom of page 3 of the Nurse Assessment Visit form.
Medications will bring up the following screen.
This is similar to the other screens for assigning codes, but with a few added features. When medications are selected, an additional screen comes up asking for further information about the medication being assigned. After a medication is assigned, you can get this screen by clicking the Edit Medication button.
- 34 -

User Manual HC Plus Nurse Assessment Version 4.24
4, 5, 6 Recommended Plan of Care This page contains the tasks for pages 4, 5 and 6 of the Nurse Assessment Visit form.
The list shows all of the tasks on the Nurse Task Assessment form pages 4, 5 and 6. Double-click on a task to add or edit information for that task. The Task Assignment screen is shown below.
The subtotals and total task times appear on the bottom right side of the screen.
In the upper right corner is a checkbox for 24-hour case. If this is checked then the total weekly time, subtotals and total time will be blank.
- 35 -
User Manual HC Plus Nurse Assessment Version 4.24
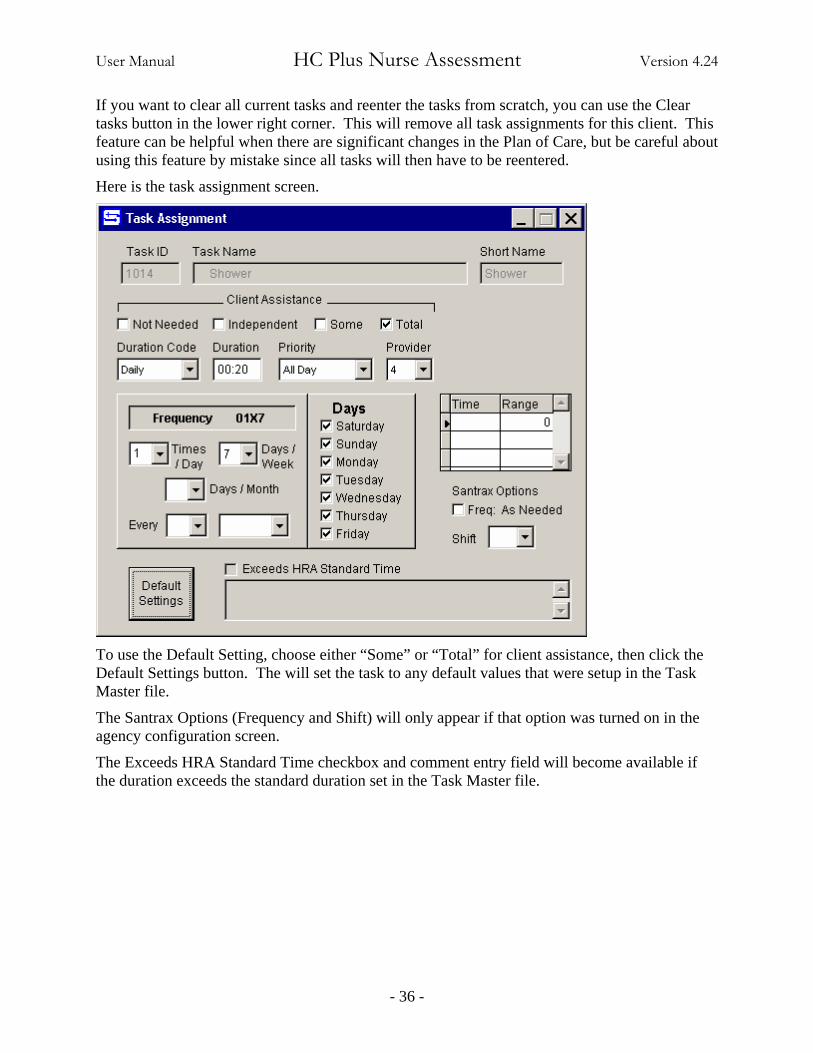
If you want to clear all current tasks and reenter the tasks from scratch, you can use the Clear tasks button in the lower right corner. This will remove all task assignments for this client. This feature can be helpful when there are significant changes in the Plan of Care, but be careful about using this feature by mistake since all tasks will then have to be reentered.
Here is the task assignment screen.
To use the Default Setting, choose either “Some” or “Total” for client assistance, then click the Default Settings button. The will set the task to any default values that were setup in the Task Master file.
The Santrax Options (Frequency and Shift) will only appear if that option was turned on in the agency configuration screen.
The Exceeds HRA Standard Time checkbox and comment entry field will become available if the duration exceeds the standard duration set in the Task Master file.
- 36 -

User Manual HC Plus Nurse Assessment Version 4.24
7.1 Environment This page contains the data found on the top of page 7 of the Nurse Assessment Visit form.
7.2 Comments This page contains the data found on the bottom of page 3 of the Nurse Assessment Visit form.
- 37 -
User Manual HC Plus Nurse Assessment Version 4.24
When you enter the Date of This Visit, the Month Next Visit To Be Made will be calculated as 6 months.
Nurse Name is required. You much choose a nurse that has a code assigned or the program will give you a message when you try to save.
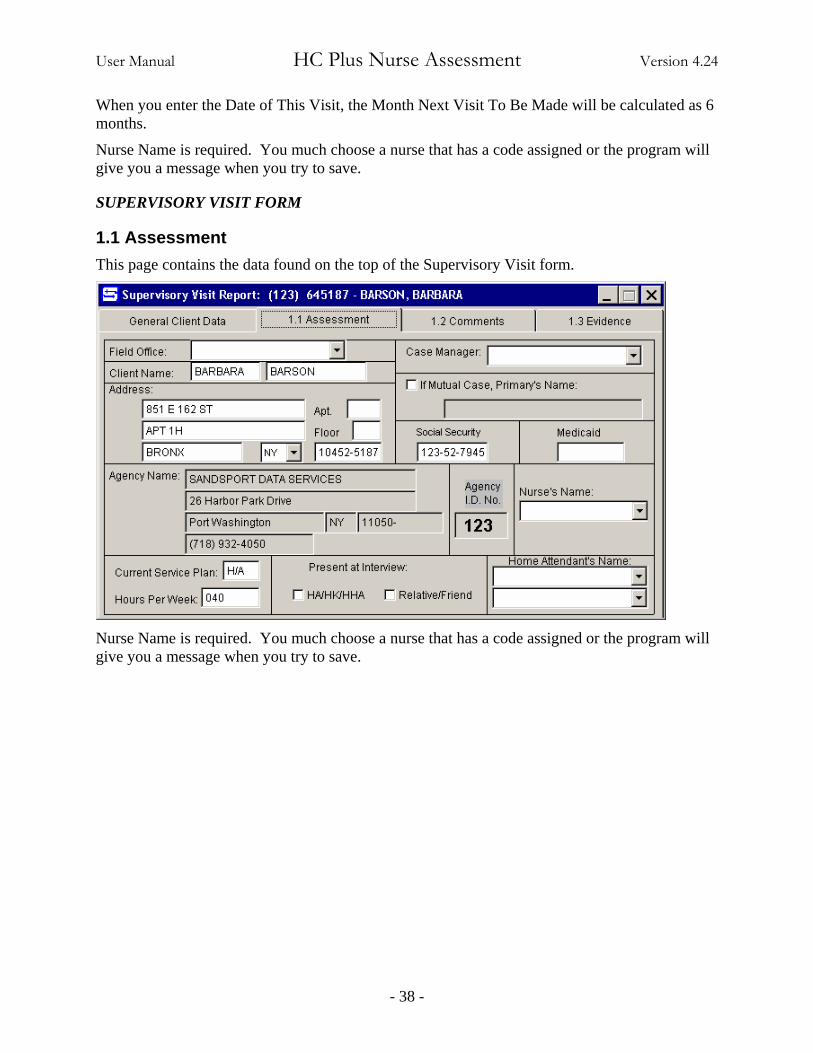
SUPERVISORY VISIT FORM
1.1 Assessment This page contains the data found on the top of the Supervisory Visit form.
Nurse Name is required. You much choose a nurse that has a code assigned or the program will give you a message when you try to save.
- 38 -

User Manual HC Plus Nurse Assessment Version 4.24
1.2 Comments This page contains the data found in the middle of the Supervisory Visit form.
1.3 Evidence This page contains the data found on the top of the Supervisory Visit form.
When you enter the Date of this visit, the Month next visit to be made will be calculated as 3 months.
- 39 -

User Manual HC Plus Nurse Assessment Version 4.24
PLAN OF CARE FORM
This form is optional. There are two variations of the form. Contact Sandata Client Relations to enable or disable this form for your agency or to change which form is selected for your agency.
Plan of Care (01) Below are the screens for the Plan of Care (01) form.
POC (01) Client
- 40 -

User Manual HC Plus Nurse Assessment Version 4.24
POC (01) Impairment
POC (01) Personal Care I
- 41 -

User Manual HC Plus Nurse Assessment Version 4.24
POC (01) Personal Care II
POC (01) Household Chores
- 42 -

User Manual HC Plus Nurse Assessment Version 4.24
Plan of Care (02) Below are the screens for the Plan of Care (02) form.
POC (02) General Info
POC (02) Health Info
- 43 -

User Manual HC Plus Nurse Assessment Version 4.24
POC (02) Personal Care I
POC (02) Personal Care II
- 44 -
User Manual HC Plus Nurse Assessment Version 4.24
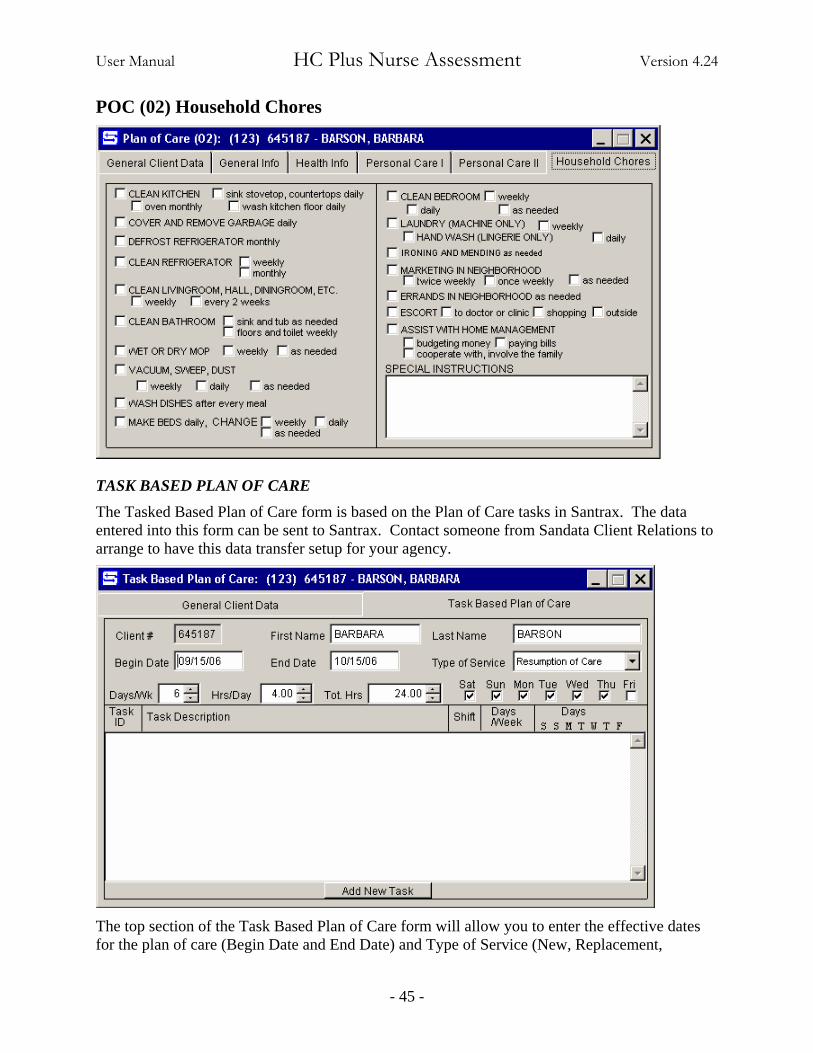
POC (02) Household Chores
TASK BASED PLAN OF CARE
The Tasked Based Plan of Care form is based on the Plan of Care tasks in Santrax. The data entered into this form can be sent to Santrax. Contact someone from Sandata Client Relations to arrange to have this data transfer setup for your agency.
The top section of the Task Based Plan of Care form will allow you to enter the effective dates for the plan of care (Begin Date and End Date) and Type of Service (New, Replacement,
- 45 -

User Manual HC Plus Nurse Assessment Version 4.24
Resumption of Care). Below that are Days per Week, Hours per Day, Total Hours and check boxes for days of the week. If you use the check boxes, the Days per Week will automatically be calculated based on the number of boxes checked. When you enter a value in the Hours per Day field, Total hours will automatically be calculated as Days per Week times the Hours per Day. Begin date is a required field and must be entered before you can save the form.
Click the “Add New Task” button to enter a new task. If you are editing an existing Plan of Care, then double-click on any of the tasks listed to bring up the task assignment screen.
Click on the entry box for Task or Description to get a list of available tasks. Only tasks that have not already been assigned will appear on the list. If you use the check boxes, the Days per Week will automatically be calculated based on the number of boxes checked. Only the days checked on the main form will be enabled on the Task Assignment form. Checking the “As Needed” box will uncheck all of the individual days.
- 46 -

User Manual HC Plus Nurse Assessment Version 4.24
PERSONAL EMERGENCY RESPONSE SYSTEM (P.E.R.S.) FORM
Questions 1 & 2 This page contains the data found on the top of the P.E.R.S. form.
Questions 3 & 4 This page contains the data found in the middle of the P.E.R.S. form.
- 47 -
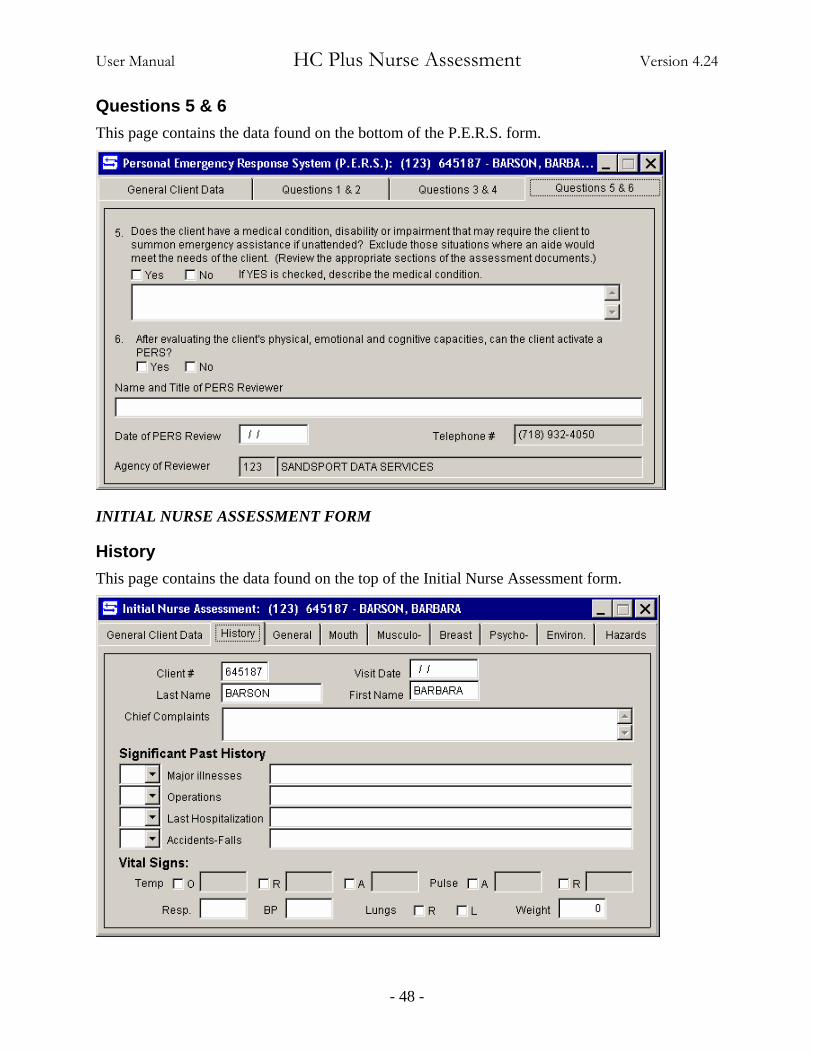
User Manual HC Plus Nurse Assessment Version 4.24
Questions 5 & 6 This page contains the data found on the bottom of the P.E.R.S. form.
INITIAL NURSE ASSESSMENT FORM
History This page contains the data found on the top of the Initial Nurse Assessment form.
- 48 -

User Manual HC Plus Nurse Assessment Version 4.24
General This page contains the data found in the middle of the Initial Nurse Assessment form.
Mouth This page contains the data found in the middle of the Initial Nurse Assessment form.
- 49 -

User Manual HC Plus Nurse Assessment Version 4.24
Musculo- This page contains the data found in the middle of the Initial Nurse Assessment form.
Breast This page contains the data found in the middle of the Initial Nurse Assessment form.
- 50 -

User Manual HC Plus Nurse Assessment Version 4.24
Psycho- This page contains the data found in the middle of the Initial Nurse Assessment form.
Environ. This page contains the data found in the middle of the Initial Nurse Assessment form.
- 51 -

User Manual HC Plus Nurse Assessment Version 4.24
Hazards This page contains the data found on the bottom of the Initial Nurse Assessment form.
EMERGENCY KARDEX FORM Most of the data on the Emergency Kardex form comes form other parts of the program. Data that comes from the Nurse Task Assessment or Supervisory Visit forms cannot be changed directly in the Emergency Kardex form.
There is an option in for the comments at the bottom of the page to be user entered or calculated by combining comments from other places in the program. See the agency configuration section for more information about this.
- 52 -

User Manual HC Plus Nurse Assessment Version 4.24
Client This page contains the data found on the top of the Emergency Kardex form.
Medical History This page contains the data found in the middle of the Emergency Kardex form.
- 53 -

User Manual HC Plus Nurse Assessment Version 4.24
Medical Providers This page contains the data found in the middle of the Emergency Kardex form.
Medications This page contains the data found on the bottom of the Emergency Kardex form.
- 54 -

User Manual HC Plus Nurse Assessment Version 4.24
REPORTS The items on the Reports Menu can be grouped into two different categories: Forms and Reports.
Forms use a common selection screen. Reports have their own individual options.
PRINTING FORMS
The top part of this form is the client selection area. Use the mover buttons to move clients from one side to the other. The single arrow buttons (“<” and “>”) will move one client. The double arrow buttons pointing to the left (“<<”) will remove all clients from the selected list. The double arrow buttons pointing to the right (“>>”) will move all clients to the selected list. You should only use this button in conjunction with the filter/search when only a small number of clients are on the available list.
The Visit Date column will reflect the visit date appropriate for the form initially selected from the Reports menu. Just under the Available list is a comment indicating the source of the visit date.
The Filter/Search can Clear Filter buttons can be used to filter which clients appear in the Available list. They work the same as the corresponding buttons on the Client Selection form. These buttons only affect the Available list. The filter does not affect the Selected list. You can set the filter, choose clients from that selection, and then change the filter to select additional clients.
In the lower right corner are the forms that can be printed. You may check any one or more forms to be printed at the same time.
There is a check box for Blank Form(s). When this box is checked, blank copies of the forms will print. You do not have to select any clients to print blank forms. If clients are selected, then the blank for will print in addition to the forms for the selected clients.
Use the Setup button to set printer options, such as the number of copies or to temporarily change the setting for queue printout as a singe job.
- 55 -

User Manual HC Plus Nurse Assessment Version 4.24
When you have made your selections, click the Print button to send the selected forms to the printer.
PRINTING REPORTS
Client Task Report Incomplete Task Report Exceeds HRA Standard Times Report These three reports will display the same type of selection screen.
The Available list will only display clients that have data to print for the selected report. Choose from the available list and use the mover buttons to bring clients over to the Selected list. You can preview or Print these reports.
Nurse Reports The Nurse Reports print various reports of clients assigned to a Nurse. The report can include all clients assigned to a Nurse or selected clients that had a visit on a particular date or clients who are due for a visit in a particular month.
- 56 -

User Manual HC Plus Nurse Assessment Version 4.24
Choose the report type in the upper left corner. To select the nurses to include in the report, click on the Nurse box. You must choose at least one nurse to print this report. For the other report types you have an checkbox where you can have it print for all nurses.
For Report by Last Visit Date, choose the date for the report and whether you want to print by last assessment visit or last supervisory visit.
- 57 -

User Manual HC Plus Nurse Assessment Version 4.24
For Report by Next Visit Date, choose the month for the report.
ICD-9 Reports These reports provide options for printing report listings either of clients with selected ICD-9 codes or ICD-9 codes within the selected zip code area.
- 58 -

User Manual HC Plus Nurse Assessment Version 4.24
Choose the report options from the choices on the screen. Double-click on the boxes to bring up the list of available ICD-9 codes or zip codes.
P.E.R.S. Client This report prints a list of those clients that have a P.E.R.S. form filled out. For the purposes of this report, a P.E.R.S. form is considered to be filled out if the reviewer field is not empty.
Client List This report will print a client list.
Zip Codes The Zip Code Report is a list of clients associated to a specific Zip Code. Choose one zip code at a time using either the standard 5-digit zip code or the zip+4 code.
- 59 -

User Manual HC Plus Nurse Assessment Version 4.24
Diagnosis The Diagnosis Report is a list of clients associated to a specific Diagnosis.
Double-click in the box for a list of all diagnosis codes.
- 60 -

User Manual HC Plus Nurse Assessment Version 4.24
MAIN/LAPTOP TRANSFERS The Nurse Assessment program supports the use of laptops for nurses. Client data can be exported onto a laptop. While exported, the client data can be edited on the laptop, but no changes can be made to those clients on the Main Nurse Assessment until they are transferred back.
Choose Import Client Data to transfer client data from a laptop back to Main.
Choose Export Client Data to transfer client data from Main onto a laptop.
The “Where to Transfer” section should give the path to the Nurse Assessment on the laptop computer. In most cases this is “C:\PC_Sharp\”. The value entered here will be remembered the next time a transfer occurs.
- 61 -

User Manual HC Plus Nurse Assessment Version 4.24
EXPORT CLIENT DATA
When you export client data a list of available clients will appear.
Use the arrow and double-arrow buttons to move clients from the Available list to the Selected list.
You can narrow down the Available list by using the Filter/Search button.
Check the box to Archive the selected clients before exporting to Laptop.
If you want to print or view a report of the clients being transferred, check the appropriate box.
When you click Export, the program will begin transferring data. This may take a few moments. When it is finished you will get a message.
- 62 -

User Manual HC Plus Nurse Assessment Version 4.24
IMPORT CLIENT DATA
When you import client data a list of the clients on the laptop, if any, will appear.
This screen is the same as the export screen, except that Archiving is not allowed on imports.
When you click Export, the program will begin transferring data. This may take a few moments. When it is finished you will get a message.
RELEASE EXPORTED CLIENTS This should only be used when the exported data is completely lost. If you release exported clients then try to import those clients from a laptop at a later date, any changes made to the released clients will be lost.
In order to release exported clients, someone authorized to access the Agency screen needs to turn on the option to Allow Release of Clients Exported to Laptop.
LAPTOP UPGRADES
The laptop must be on the same version as Main. When a transfer is initiated, the program will check the version on the laptop computer. If the version is different, the program will inform the user that an upgrade is required.
- 63 -

User Manual HC Plus Nurse Assessment Version 4.24
Choosing “No” will cancel both the upgrade and the transfer.
Choosing “Yes” will cause the upgrade program to be downloaded onto the laptop computer. You may see some messages pop up on the screen while this happens. When the download finishes you will get a message informing you that the download is ready to run.
Click the “OK” button to close the Nurse Assessment program. You need to run the laptop copy of the Nurse Assessment program to complete the upgrade process. This will automatically start the InstallShield Wizard to complete the upgrade.
- 64 -

User Manual HC Plus Nurse Assessment Version 4.24
Click Next to continue
Click Next to continue
This screen will indicate the progress being made. Don’t do anything at this point.
- 65 -

User Manual HC Plus Nurse Assessment Version 4.24
When the updated program files are installed, a program will run to upgrade the data files. This program may flash messages on the screen as it progresses. It will close automatically when it is finished, returning you to the InstallShield Wizard.
Click Finish to close the InstallShield Wizard and complete the laptop upgrade.
- 66 -

User Manual HC Plus Nurse Assessment Version 4.24
Use the arrow buttons to move clients from one side to the other. Click the Activate button to release any clients that were moved to the right side.
- 67 -

User Manual HC Plus Nurse Assessment Version 4.24
ARCHIVING FUNCTIONS The Archiving functions can be found on the Maintenance Menu
Save Form to History will archive the current form. Generally it is best to just archive the form when prompted when you go into the form.
Multiple Forms per Client puts you into Archive mode. This will allow you to view any forms stored in Archive. Archived forms cannot be modified. Proposed forms, if that feature is enabled, are also stored in the Archive database. Proposed forms can be modified.
When you go into Archive mode, the above options get disabled and the below options become enabled.
Current Form Only returns you to the main database.
Delete Forms by Date will allow you to delete archived forms that were archived prior to a specified date.
Delete Forms by Clients will allow you to delete all archived forms for specific clients.
- 68 -

User Manual HC Plus Nurse Assessment Version 4.24
OTHER MAINTENANCE FUNCTIONS
DELETE DISCHARGED CLIENTS This function can be used to clean the main database of clients that have been discharged for more than a year. The cut-off date will default to the end of the previous month in the previous year. The cut-off date can be changed, but it must be at least 1 year in the past.
When you delete, all clients that have a discharge code other than 0 and a discharge date that is on or before the date entered will be deleted from the Nurse Assessment database.
PACK AND REINDEX
The Pack and Reindex function is only available on Laptop installations. The Pack and Reindex function occurs automatically at night for the Main installation. It is recommended to run this utility monthly or at least quarterly.
After choosing Pack and Reindex from the Maintenance menu, the following warning will appear to make sure you want to proceed.
CURRENT USER The current user function allows a user to see what access rights have been assigned and to allow the user to change their password.
- 69 -

User Manual HC Plus Nurse Assessment Version 4.24
Click on the Set Password button to change the current password for this user.
To change the password type the new password in the Password box and retype it in the Confirm Password box. Both boxes must have the same value before the password will be updated.
If the agency requires users to change their password on a regular basis, the duration will show how often a password need to be changed and the current and new expiration dates will be displayed. The current expiration is the date when the current password will no longer be valid, if it is not changed today. The new expiration is the date when the new password will expire if a new password is entered today.
- 70 -


![Model No. HC-W585 HC-W585M HC-V385 - Panasonic USA … · HC-W585 [W585] HC-W585M [W585M] HC-V385 [V385] These operating instructions are designed for use with models , and . Pictures](https://static.fdocuments.in/doc/165x107/5f0237ed7e708231d40329d1/model-no-hc-w585-hc-w585m-hc-v385-panasonic-usa-hc-w585-w585-hc-w585m-w585m.jpg)