
Have a look at our guide to basic movie-making. October 2016 · you’re pretty much ready t os art...
35
1 Stuck for where to begin? Have a look at our guide to basic movie-making. October 2016 [email protected]
Transcript of Have a look at our guide to basic movie-making. October 2016 · you’re pretty much ready t os art...

1
Stuck for where to begin? Have a look at our guide to basic movie-making. October 2016 [email protected]

2
Equipment p3
6 Top Tips for Shooting Videos p4
Editing Your Video p11
Windows Movie Maker p12
iMovie p21
Additional Resources p30
Glossary p31
This guide is an adapted version of the excellent resource produced by The Wheel (2015)
Better Together 2015 Video Making Guide

3
Most people have access to a device capable of capturing video (often in glorious high definition). Now is the time to put those iPhones and Androids, digital SLR cameras and good ‘old fashioned’ camcorders to good use. Throw in a cheap tripod (to steady your device) and you’re pretty much ready to start rolling.
Remember. It’s not about how slick your video looks. It’s about how well you communicate your message. No video recording device? No problem. If you don’t have access to a video recording device, you could put together a photo montage (perhaps set to music or with narration), which you can then save as a video file.
All you need to put your photo montage together is:
• A selection of new or existing digital photos that will tell a positive story about your organisation.
• A PC or Mac on which you can edit the photos together in Windows Movie Maker, iMovie or similar software (see video editing section below).

4
5
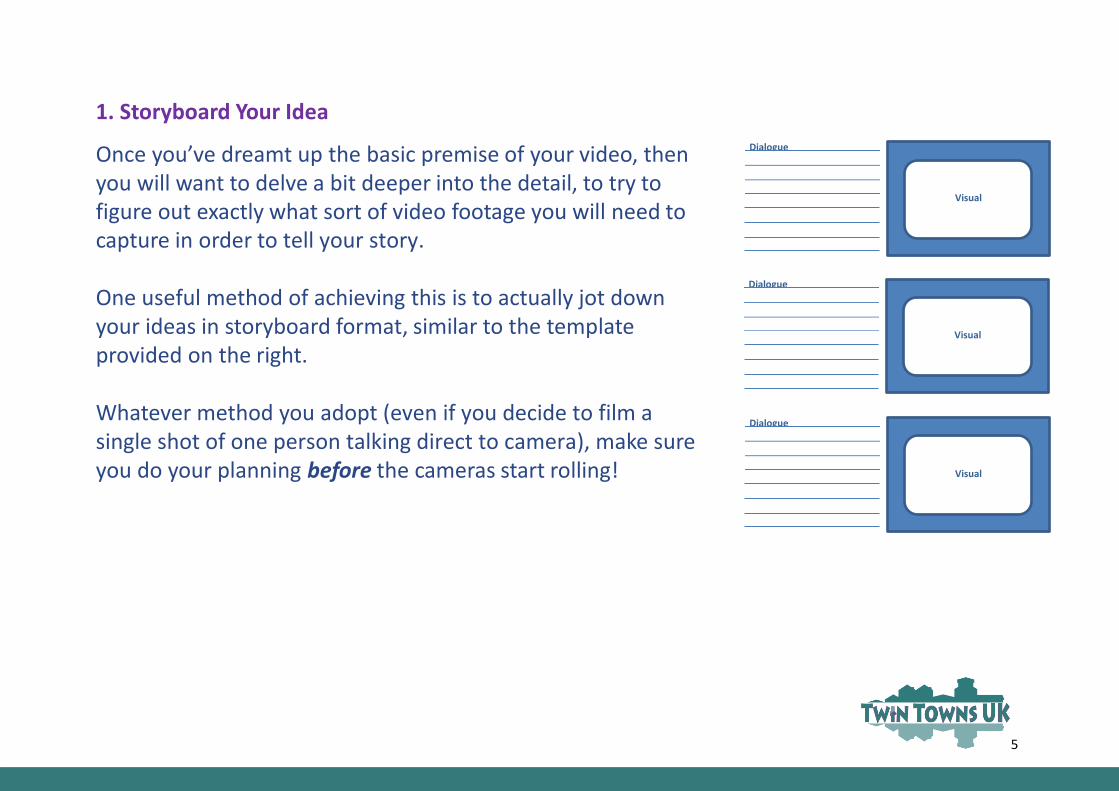
1. Storyboard Your Idea
Once you’ve dreamt up the basic premise of your video, then you will want to delve a bit deeper into the detail, to try to figure out exactly what sort of video footage you will need to capture in order to tell your story.
One useful method of achieving this is to actually jot down your ideas in storyboard format, similar to the template provided on the right.
Whatever method you adopt (even if you decide to film a single shot of one person talking direct to camera), make sure you do your planning before the cameras start rolling!
Dialogue
Visual
Dialogue
Visual
Dialogue
Visual

6
2. Know Your Equipment
The last thing you want to do on the day you are due to shoot your video is to show everyone that, actually, you’re not really sure how to switch on your camera after all. It’s not only embarrassing, but it can also be a big time-waster. So, why not take the initiative and familiarise yourself fully with how your kit works first.
You’ll need to know:
• How to record/end recording • How the sound/microphone works • How to zoom (see zoom warning below!) • How to recharge/change the batteries • How to use your tripod.
Once you’ve mastered these functions, you can then start focusing in on the bigger picture.

7
3. Brush Up On Your Interview Skills
Does your video require you to interview someone on camera? Easy enough, right? Well, yes, actually it is – so long as you’ve done your homework first. Your homework should include:
a. Getting the technical details out of the way first (see previous page).
b. Having a list of questions you want to ask (why not share these questions with your interviewee so that they can prepare too).
c. Being ready to improvise and adapt, should the answers you receive spark new questions.
d. Consider mimicking the pros by getting some ‘noddie shots’ (i.e. cut away shots of you
nodding in response to answers), along with some additional footage of the interviewee interacting with other members of staff or similar. It all adds extra flavour.

8
4. Throw Some Light (and Sound) On Proceedings
Nothing too drastic here – just a gentle reminder that you need to make sure that your subject matter (be that a person or a place) is sufficiently lit so as to be fully visible on-screen.
This may require you to shoot at a certain time of day (to capture the light), or even to consider changing venues if the available lighting does not do the job.
The same goes for sound. Firstly, you need to make sure that your camera can actually pick up the sound(s) that you want to record. If not, you
may need to consider purchasing a microphone which is compatible with your video device.
Other sound factors you need to take into account include, excessive background noise, wind interference and the noise made by the recording device itself (e.g. using the zoom on some devices can be quite noisy).
9
5. Video Rookie Mistakes to Avoid a. Missed Opportunities: we’ve all been there before, where we reach for our iPhone or
camcorder to capture some magical moment unfolding before our eyes, only to then realise that you didn’t press record.
b. Overzealous Zooming: zooming in and out on your subject can add a flashy veneer to your video. However, excessive zooming can be a distraction for the viewer, plus it can also lead to grainy or shaky images (when you zoom in on a distant object).
c. Backlight Boogiemen: if you’re not lucky enough to have the sort of video device that automatically adjusts exposure levels then, please, don’t make the common mistake of shooting your subject with a bright light source behind them. If you do, then chances are good that your subject will appear as a dark silhouette throughout your video. (Which is probably a good thing if you’re making a video all about mime – otherwise, avoid at all costs).
d. Audio Nightmares: before you start shooting, consider the level of background noise first. For example, if your star interviewee is in danger of being drowned out by

10
passing troupe of trombonists, you may want to consider moving elsewhere. Another very common audio pitfall to be aware of is the deceptive sound that even a small bit of windy weather can make on your microphone (which can make the wind sound like an approaching locomotive). (Yes, we mentioned the issue of good audio above already. We just wanted to make sure you heard us –it’s super important you know!)
e. Forgoing the Thrill of a Cheap Tripod: do you know what looks professional and doesn’t make the viewer feel seasick? A video that has been recorded using a tripod, that’s what. And, do you know what looks shaky and more suited to a day spent filming on a bouncy castle? A video shot without a tripod. If you can’t access a tripod, you could even balance your device on a table or shelf to keep it still.

11
Below you will find guidance on how to import your video, make basic edits and add titles and credits.
For Windows Movie Maker users
For iMovie users
12
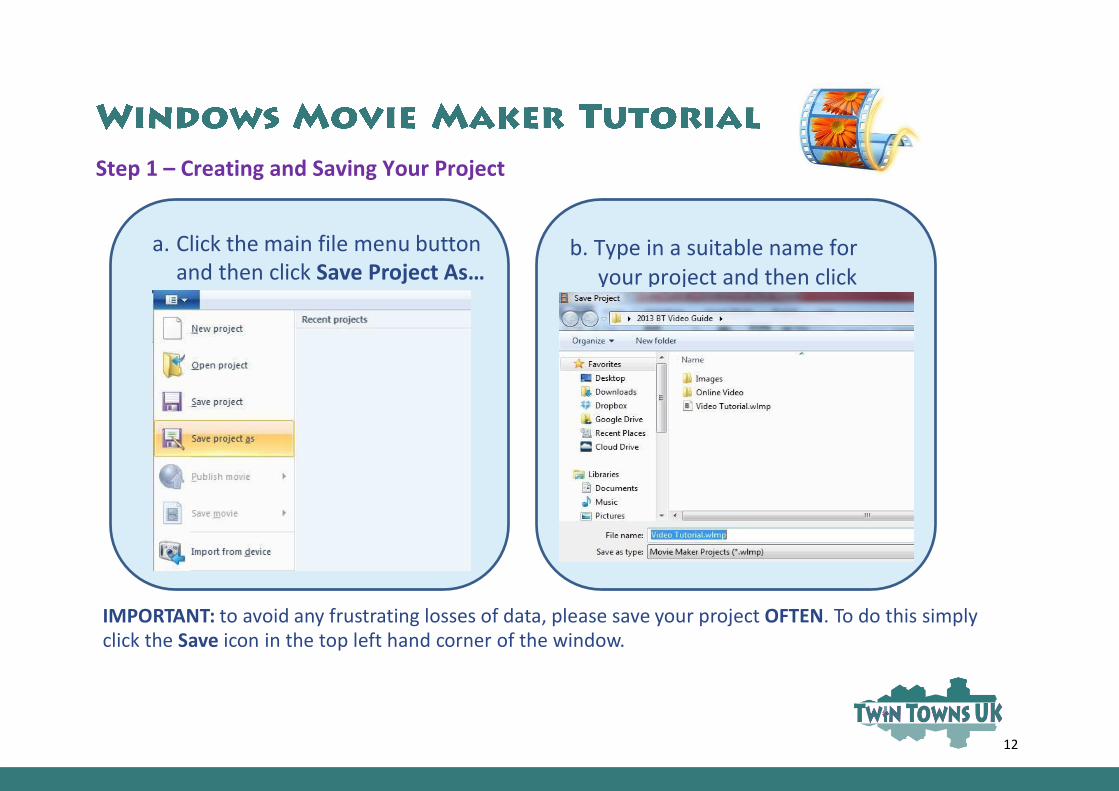
b. Type in a suitable name for your project and then click Save
Step 1 – Creating and Saving Your Project
a. Click the main file menu button and then click Save Project As…
IMPORTANT: to avoid any frustrating losses of data, please save your project OFTEN. To do this simply click the Save icon in the top left hand corner of the window.

13
Step 2 - Adding Your Videos and Photos
Alternatively, you can just drag and drop your video files/photos into Movie Maker from a file browser window of your external storage device.
b. Browse to your external storage device, select the file(s) you want to import and click Open.
a. Click the Home
tab and then click
Add Videos and
Photos

14
The Windows Movie Maker Live Timeline
a. Once you have imported your video(s) into Windows Movie Maker Live, they will automatically be displayed in your timeline (see below). Next you will learn how to use the timeline to turn your raw video into a neatly edited masterpiece.

15
Step 3 - Splitting Video Clips & Deleting Unwanted Footage a. Drag the black bar on your timeline to where you want to split your clips.
b. Go the Edit tab and click Split. (To delete any unwanted clips, right click over the
clip you want to delete and click Cut.)

16
Step 4 – Making Things Interesting with a Little Music
IMPORTANT: using non-licensed music with your video may lead to a breach of copyright. See Additional
Resources section below for ‘Podsafe’ music options.
a. On the Home tab, click the Add Music button. (You will have an option to enter your music from the beginning of the video or from a specific point.)
b. Click on the Music Tools tab at the top of the window to view a range of music editing tools, including Fade In / Fade Out, volume controls and start / end points.
17
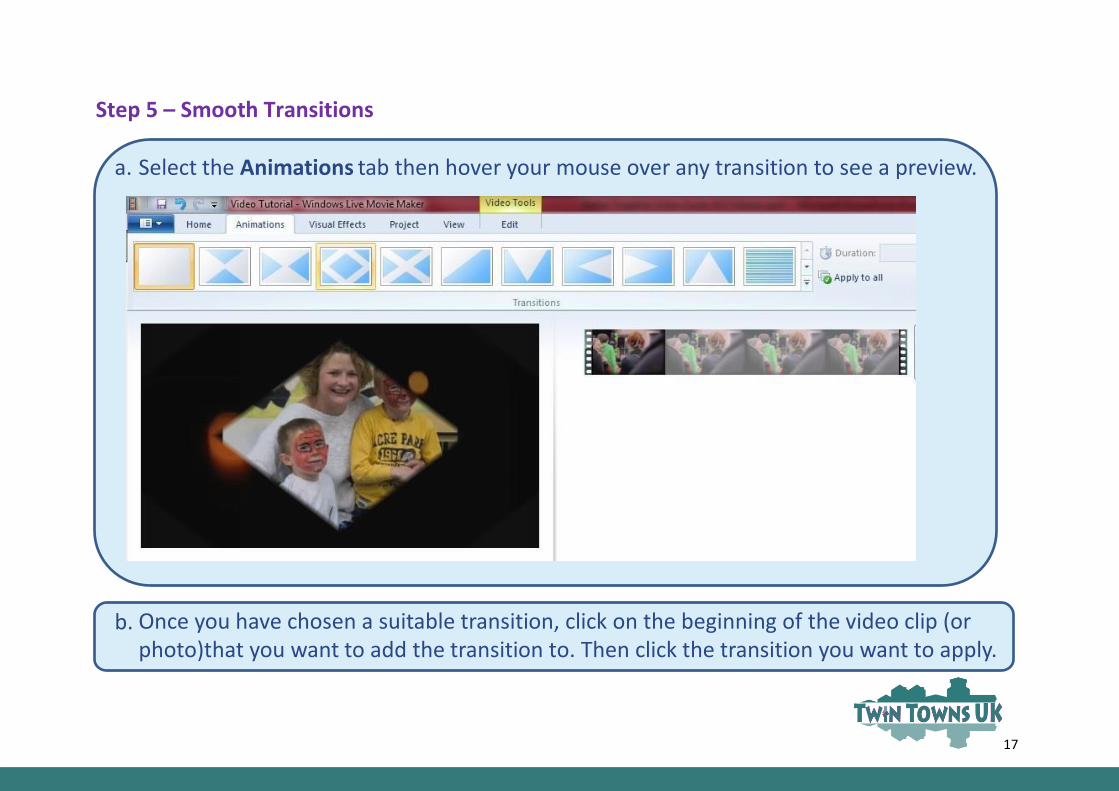
Step 5 – Smooth Transitions a. Select the Animations tab then hover your mouse over any transition to see a preview.
b. Once you have chosen a suitable transition, click on the beginning of the video clip (or photo)that you want to add the transition to. Then click the transition you want to apply.

18
Step 6 – Creating Captions
a. Click on the video clip you want to put a caption
on. Next, select the Home tab and then click
Caption.
b. A text box will appear on the lower
part of your video clip (or photo).
Click inside the text box and enter
your caption.
If you need to change your caption,
double click on the caption in your
timeline and then change the text in
the video preview pane. Right-click
on the caption in your timeline and
click Remove if you want to delete it.

19
Step 7 – Adding Titles or Credits for a Perfect Finish
a. Click on the Home tab and then click either Title or Credits.
(Titles at the start of the video, credits at the end).
b. A black slide will appear.
Click inside the text box
and enter your title /
credit.
Note: titles automatically display as a slow zoom and credits as downward scrolling text. You can use the motion options in the top right corner of the Format tab to adjust these settings.
20
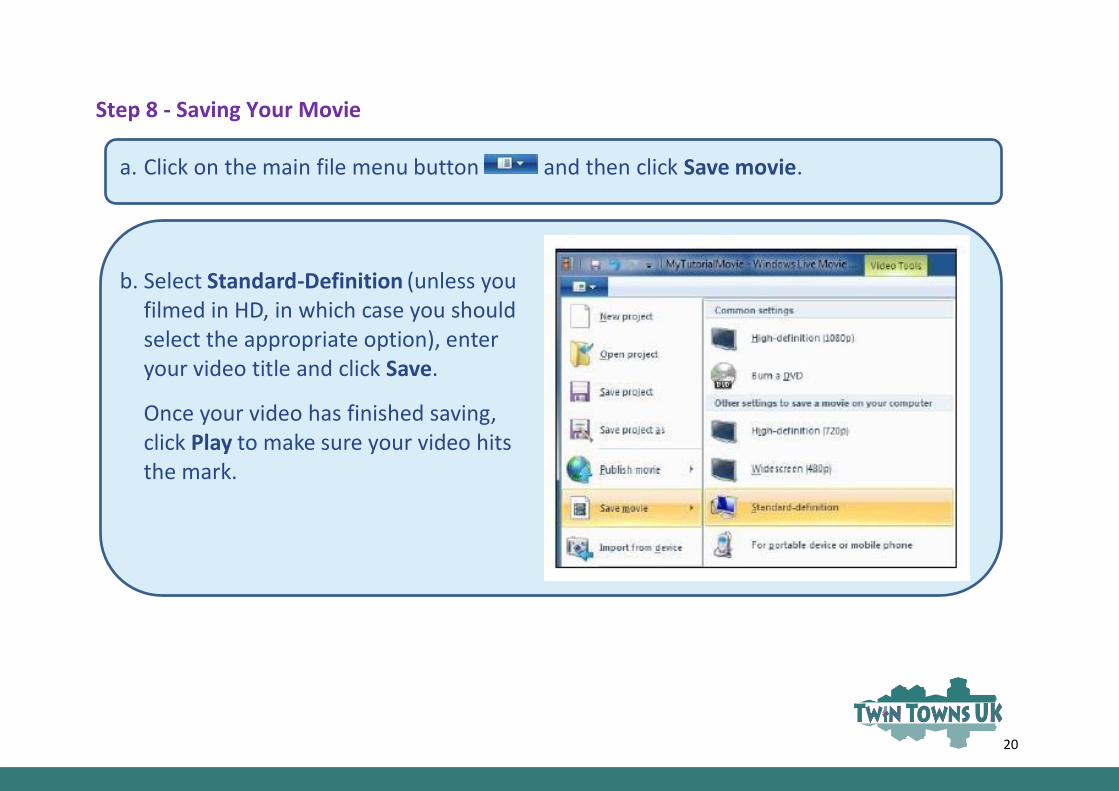
Step 8 - Saving Your Movie
a. Click on the main file menu button and then click Save movie.
b. Select Standard-Definition (unless you
filmed in HD, in which case you should select the appropriate option), enter your video title and click Save.
Once your video has finished saving, click Play to make sure your video hits the mark.

21
Step 1 – Creating and Saving Your Project a. Upon opening iMovie click File and
New Project.
IMPORTANT: to avoid any frustrating losses of data, please save your project OFTEN. To do this, simply click
the Save icon in the top left hand corner of the window.
b. Give your project a name and choose where to store it. Easiest thing to do is to create a new folder specifically for the video competition.

22
Step 2 – Adding Your Videos/Photos
a. Click the File tab and then click Import.
b. Browse to your camera or the folder where you have stored your video files.

23
iMovie timeline
a. Once you have imported your video(s) into iMovie they will be displayed in your
timeline your timeline (see below). Here you can edit and manipulate them.

24
Step 3 - Splitting Video Clips & Deleting Unwanted Footage
a. Move the little triangle on the timeline (known as the “Playhead”) to where you want to divide the clip.
b. Go the Clip tab and click Split Clip. (To delete any unwanted clips,
click the clip you want to delete and hit the Delete key).

25
Step 4 – Making Things Interesting with a Little Music a. Click the Music & Sound Effects button on the iMovie toolbar
b. You can add music from any source on your computer,
including iTunes. Simply drag the selected track into your
project, just below the video timeline.

26
Step 5 – Throwing in Some Smooth Transitions
a. Click the Transitions
button in the iMovie
toolbar.
b. Select a transition and drag it to before
or after the video clip you want to add the transition to.
27
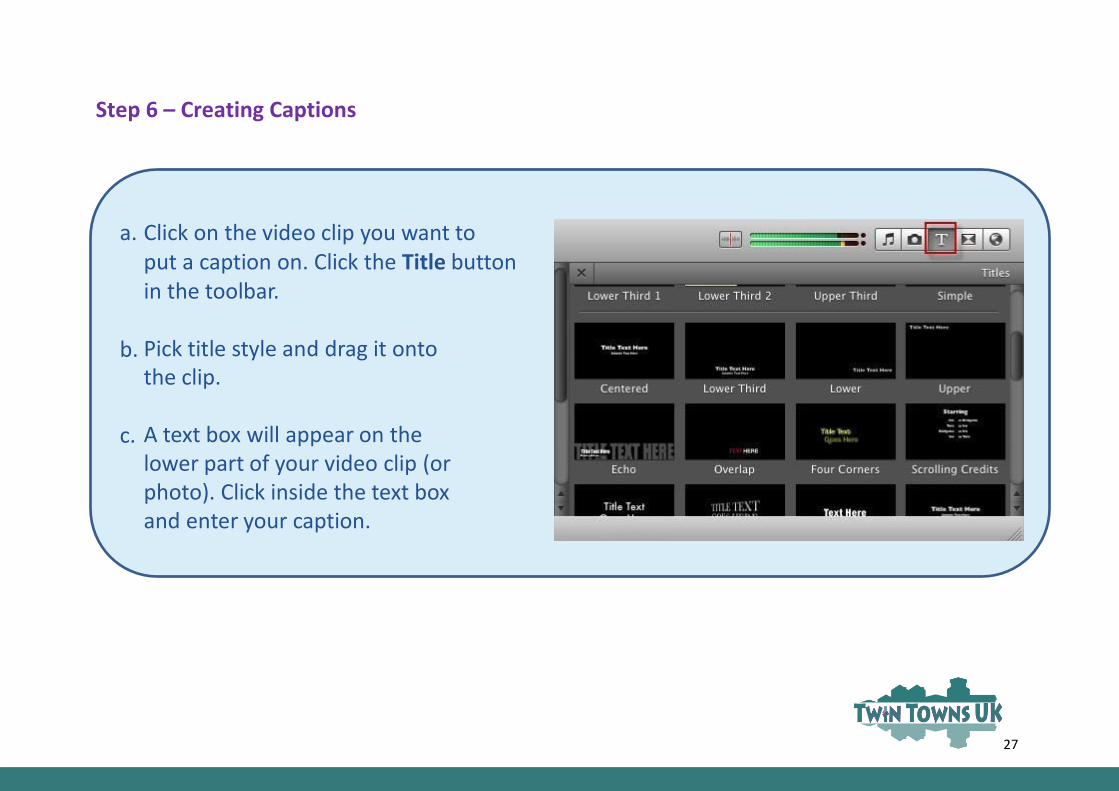
Step 6 – Creating Captions
a. Click on the video clip you want to put a caption on. Click the Title button in the toolbar.
b. Pick title style and drag it onto
the clip.
c. A text box will appear on the lower part of your video clip (or photo). Click inside the text box and enter your caption.

28
Step 7 – Credits for a Perfect Finish
a. Click on the Titles button again but this time choose the Credits option.
b. Edit the credits to fit your movie and then drag to the end of the video.

29
Step 8 - Saving Your Movie
a. Click on File and choose Finalise Project. Finalise Project will render your project in all sizes available. This may take some time, so you may want to do it overnight or while you are away from the computer. Once you have done it, you can share to iTunes, Facebook, YouTube, etc.

30
The Carnegie UK Trust is not responsible for the content of external websites.
Video Basics http://vimeo.com/videoschool/101 Video Editing Tutorials Windows Movie Maker Live Tutorial: http://www.youtube.com/watch?v=3ZZij3NNyVg How to edit your video in iMovies: http://www.youtube.com/watch?v=p_sZ4AeT8a4
Podsafe Music (music you can use without paying royalties) http://freemusicarchive.org http://www.soundclick.com Storyboard template www.sampletemplates.com/business-templates/free-storyboard-templates.html
Video Slideshow Software & Tutorials Creating a photo montage using Windows Movie Maker Live: http://www.youtube.com/watch?v=Ap3pE_fjmA4 A quick and easy tool for creating video slideshows online (free version is time limited): http://www.animoto.com Video File Converter Convert most video files between popular formats: http://download.cnet.com/Any-Video-Converter/3000-2194_4-10661456.html
31
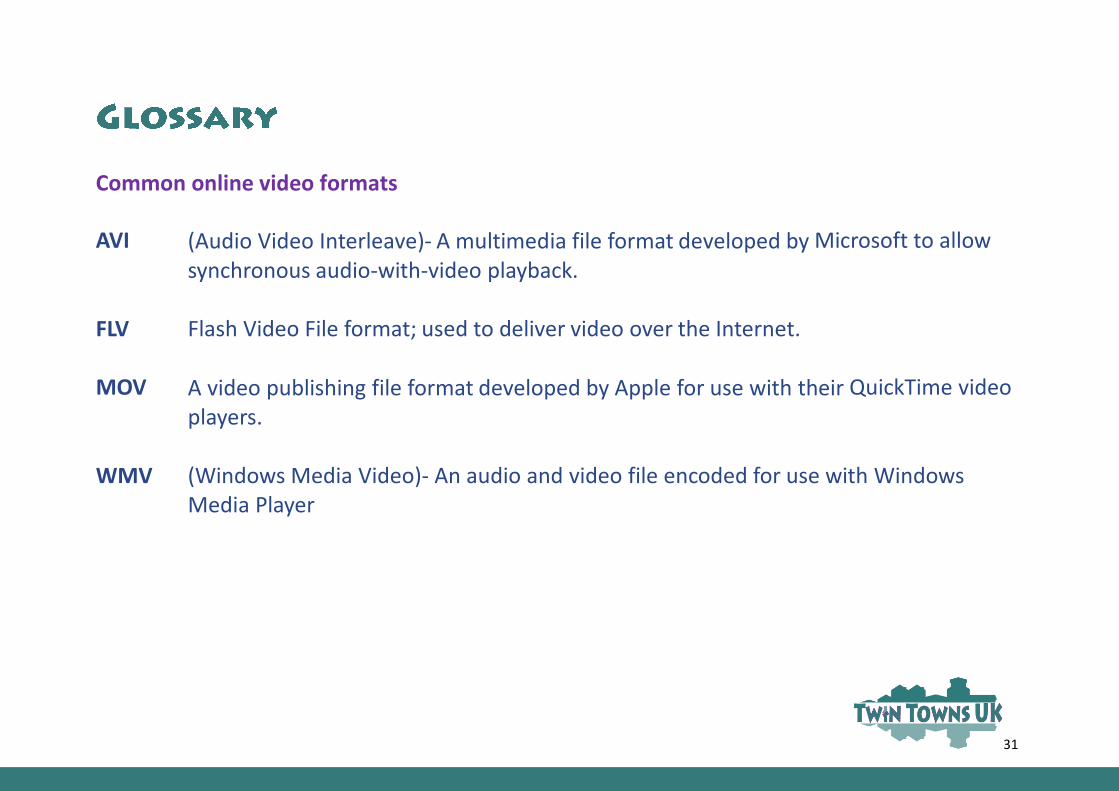
Common online video formats
AVI (Audio Video Interleave)- A multimedia file format developed by Microsoft to allow
synchronous audio-with-video playback.
FLV Flash Video File format; used to deliver video over the Internet.
MOV A video publishing file format developed by Apple for use with their QuickTime video players.
WMV (Windows Media Video)- An audio and video file encoded for use with Windows Media Player

32
A – Z of Video Terms Autoplay The function of a video player that starts play
automatically
Bandwidth The amount of information that can be sent through an internet connection.
Buffering Video A buffer is a temporary holding pen in a computer's memory for data for inputs (e.g., to software) or outputs (e.g., to a printer) until the process can deal with it
Captions Text that appears over a video that labels a scene, identifies a location or person, or narrates dialogue onscreen
Codec (COmpressor/DECompressor) – the technology used to compress an audio and/or video file for storage or transmission and then decompress for playback

33
Conversion The operation of changing data from one format to another so the output will be displayed in an appropriate manner for the device
Digital Camera A camera that does not take analog video; digital video cameras can capture truer colour and more details than analog cameras. Digital cameras frequently use digital video tapes, internal hard drives or memory cards
Embed In online video this refers to taking video from an online
video provider and transplanting it elsewhere on the web (websites, social networking sites, etc.) through the use of HTML code
High Definition (HD)
Technically, any video that is of higher resolution than standard definition
MiniDV Tape A small format digital video cassette
Online Video Any form of digital video that is available for internet use
34
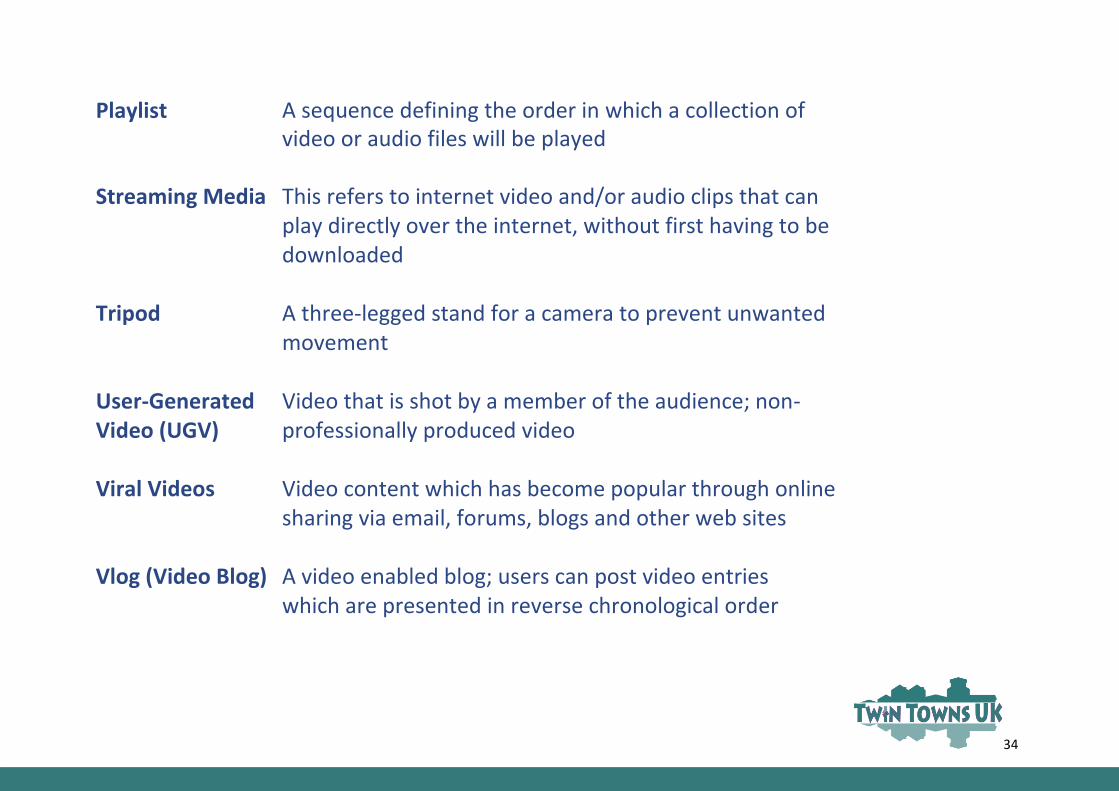
Playlist A sequence defining the order in which a collection of video or audio files will be played
Streaming Media This refers to internet video and/or audio clips that can play directly over the internet, without first having to be downloaded
Tripod A three-legged stand for a camera to prevent unwanted movement
User-Generated Video (UGV)
Video that is shot by a member of the audience; non-professionally produced video
Viral Videos Video content which has become popular through online sharing via email, forums, blogs and other web sites
Vlog (Video Blog) A video enabled blog; users can post video entries which are presented in reverse chronological order

35
Webcast A non-interactive, live broadcast over the web or an online distribution of audio and/or video to multiple viewers or listeners at the same time
Zoom (optical, digital)
Optical zoom relies on the camera's lens to bring the subject closer in the recorded video. Digital zoom does not use the lens, but rather enlarges a portion of the image digitally


