Haute Hamper - Sew News sewnews february/March 2012 Disguise dirty laundry in a stylish hamper...
4
58 sew NEWS FEBRUARY/MARCH 2012 Disguise dirty laundry in a stylish hamper featuring custom appliqués and removable laundry bags. HAUTE HAMPER { by Shannon Dennis }
Transcript of Haute Hamper - Sew News sewnews february/March 2012 Disguise dirty laundry in a stylish hamper...

58 sew news f e b r u a r y / M a r c h 2 0 1 2
Disguise dirty laundry in a stylish hamper featuring custom appliqués and removable laundry bags.
Haute Hamper
{ by Shannon Dennis }

SuppliesSupplies listed are enough to make one 101⁄2”x22”23” hamper and two 20”x24” laundry bags.7 3 yards of home-décor fabric (A) 7 11⁄2 yards of coordinating solid cotton fabric (B) 7 1 yard each of two coordinating print cotton fabrics (C & D)
7 1⁄2 each of five coordinating print cotton fabrics (E, F, G, H & I)
7 1 yard of heavyweight double-sided stiff fusible interfacing
7 Two 9”x12” sheets of fusible web 7 4 yards of 1”-wide lace trim7 51⁄2 yards of 3⁄4”-wide satin ribbon7 7”x22” rectangle of cut-away stabilizer7 Thread: all-purpose & decorative7 Hand sewing needle7 Removable fabric marker7 Ten 1⁄4”-diameter snaps7 1⁄2”-diameter wooden dowels: one 36”-long square, one 48”-long square & two 48”-long round
7 Hand or table saw7 Wood glue7 Staple gun and staples
CutFrom fabric A, cut one 25”x 71” rectangle for the hamper and one 11H”x 24” rectangle for the hamper bottom. From fabric B, cut two 11H”x 24” rectangles for the hamper base and two 16H”x 42” rectangles for the laundry bag lower panels. Cut two 15H”x 42” rectangles each from fabrics C and D for the laundry bag upper panels. Cut three 6”x 8” rectangles each from fabrics E, F, G and H for the band. From fabric I, cut four 3”x 8” rectangles for the band. From fabrics E, F, G, H and I, cut a total of eight 4”x7” rectangles for the appliqués. From the interfacing, cut one 11H”x 24” rectangle.From the lace trim, cut two 71”-long pieces. From the ribbon, cut two 82”-long pieces and ten 2H”-long pieces for the frame loops.
From the 48”-long square dowel, cut two 24”-long pieces using a hand or table saw. From the two 48”-long round dowels, cut four 22”-long pieces. From the 36”-long square dowel, cut two 9”-long pieces.
Appliqué Download the appliqué letters and filigree templates at sewnews.com/web_extras. Adhere a piece of fusible web to each appliqué rectangle wrong side, following the manufacturer’s instructions. Designate one appliqué rectangle for each appliqué letter and filigree, as desired. Trace each letter and filigree template onto the corresponding appliqué rectangle paper backing. Carefully cut out each appliqué using small, sharp scissors. Remove the paper backing; set aside. Fold the hamper rectangle in half widthwise to find the center; press, and then unfold. Position the hamper rectangle right side up on a flat work surface. Designate one rectangle long edge as the upper edge.Measure 8” from the rectangle upper edge along the centerline; mark. Draw a 5”-long horizontal line from each side of the mark. Position the letter N appliqué right side up over the hamper rectangle, aligning the upper edge with the horizontal line and the left edge with the center line; pin. Position the remaining letters on the hamper to spell out “Laundry”, spacing the letters G” apart and aligning the upper edges with the horizontal line; pin. Position the filigree appliqué right edge L” from the letter L appliqué left edge; pin. Make sure the letters are evenly spaced and aligned. Once satisfied with the placement, remove the pins; fuse (1).Select a narrow satin stitch and thread the machine with decorative thread. Center the stabilizer rectangle on the fabric wrong side under the appliqué letters. Satin stitch each appliqué perimeter. Remove the excess stabilizer beyond the appliqué perimeters, following the manufacturer’s instructions.
ConstructUse H” seam allowances unless otherwise noted.
S e W N e W S . c O M 59
Center
10” 8”
G” L”
1
60 sew news f e b r u a r y / M a r c h 2 0 1 2
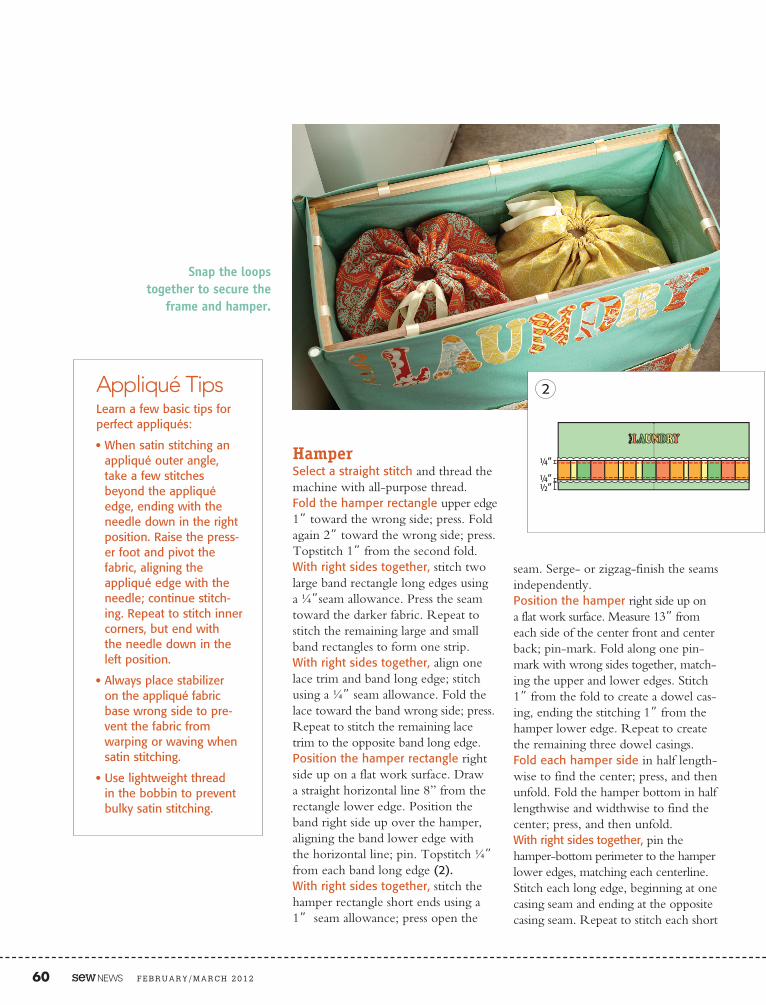
HamperSelect a straight stitch and thread the machine with all-purpose thread. Fold the hamper rectangle upper edge 1” toward the wrong side; press. Fold again 2” toward the wrong side; press. Topstitch 1” from the second fold. With right sides together, stitch two large band rectangle long edges using a G”seam allowance. Press the seam toward the darker fabric. Repeat to stitch the remaining large and small band rectangles to form one strip. With right sides together, align one lace trim and band long edge; stitch using a G” seam allowance. Fold the lace toward the band wrong side; press. Repeat to stitch the remaining lace trim to the opposite band long edge. Position the hamper rectangle right side up on a flat work surface. Draw a straight horizontal line 8” from the rectangle lower edge. Position the band right side up over the hamper, aligning the band lower edge with the horizontal line; pin. Topstitch G” from each band long edge (2).With right sides together, stitch the hamper rectangle short ends using a 1” seam allowance; press open the
seam. Serge- or zigzag-finish the seams independently.Position the hamper right side up on a flat work surface. Measure 13” from each side of the center front and center back; pin-mark. Fold along one pin- mark with wrong sides together, match- ing the upper and lower edges. Stitch 1” from the fold to create a dowel cas-ing, ending the stitching 1” from the hamper lower edge. Repeat to create the remaining three dowel casings. Fold each hamper side in half length-wise to find the center; press, and then unfold. Fold the hamper bottom in half lengthwise and widthwise to find the center; press, and then unfold. With right sides together, pin the hamper-bottom perimeter to the hamper lower edges, matching each centerline. Stitch each long edge, beginning at one casing seam and ending at the opposite casing seam. Repeat to stitch each short
Snap the loops together to secure the
frame and hamper.
Appliqué TipsLearn a few basic tips for perfect appliqués:
7 When satin stitching an appliqué outer angle, take a few stitches beyond the appliqué edge, ending with the needle down in the right position. Raise the press-er foot and pivot the fabric, aligning the appliqué edge with the needle; continue stitch-ing. Repeat to stitch inner corners, but end with the needle down in the left position.
7 Always place stabilizer on the appliqué fabric base wrong side to pre-vent the fabric from warping or waving when satin stitching.
7 Use lightweight thread in the bobbin to prevent bulky satin stitching.
G”
G” H”
2
S e W N e W S . c O M 61
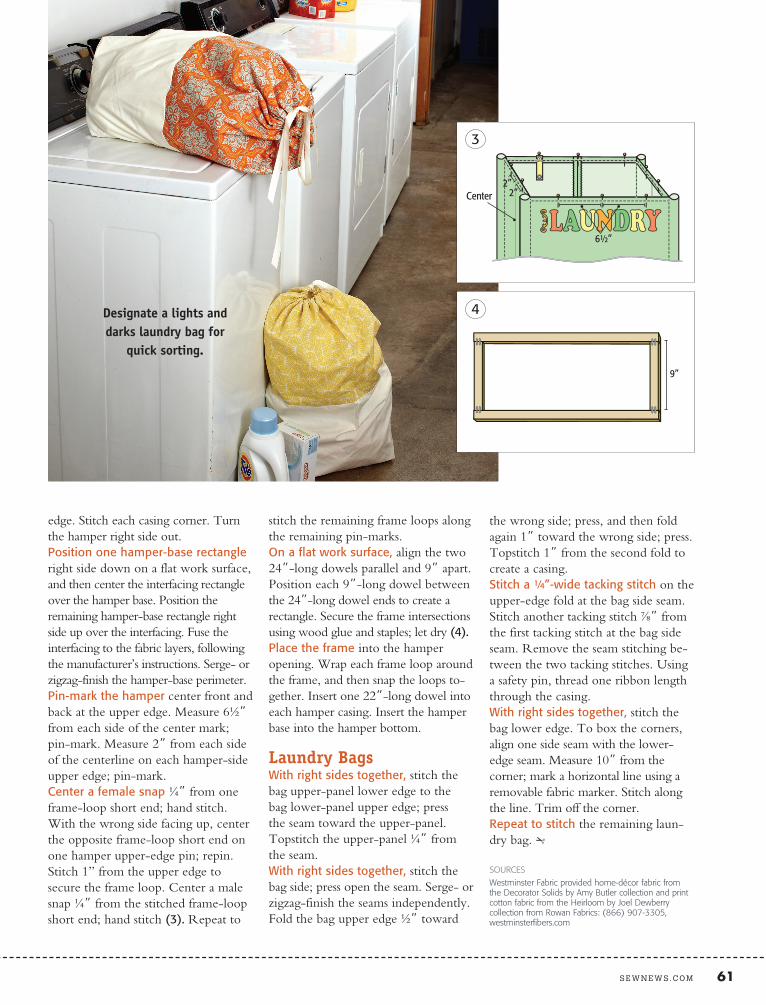
edge. Stitch each casing corner. Turn the hamper right side out. Position one hamper-base rectangle right side down on a flat work surface, and then center the interfacing rectangle over the hamper base. Position the remaining hamper-base rectangle right side up over the interfacing. Fuse the interfacing to the fabric layers, following the manufacturer’s instructions. Serge- or zigzag-finish the hamper-base perimeter.Pin-mark the hamper center front and back at the upper edge. Measure 6H” from each side of the center mark; pin-mark. Measure 2” from each side of the centerline on each hamper-side upper edge; pin-mark. Center a female snap G” from one frame-loop short end; hand stitch. With the wrong side facing up, center the opposite frame-loop short end on one hamper upper-edge pin; repin. Stitch 1” from the upper edge to secure the frame loop. Center a male snap G” from the stitched frame-loop short end; hand stitch (3). Repeat to
stitch the remaining frame loops along the remaining pin-marks. On a flat work surface, align the two 24”-long dowels parallel and 9” apart. Position each 9”-long dowel between the 24”-long dowel ends to create a rectangle. Secure the frame intersections using wood glue and staples; let dry (4).Place the frame into the hamper opening. Wrap each frame loop around the frame, and then snap the loops to-gether. Insert one 22”-long dowel into each hamper casing. Insert the hamper base into the hamper bottom.
Laundry BagsWith right sides together, stitch the bag upper-panel lower edge to the bag lower-panel upper edge; press the seam toward the upper-panel. Topstitch the upper-panel G” from the seam. With right sides together, stitch the bag side; press open the seam. Serge- or zigzag-finish the seams independently. Fold the bag upper edge H” toward
the wrong side; press, and then fold again 1” toward the wrong side; press. Topstitch 1” from the second fold to create a casing. Stitch a G”-wide tacking stitch on the upper-edge fold at the bag side seam. Stitch another tacking stitch M” from the first tacking stitch at the bag side seam. Remove the seam stitching be-tween the two tacking stitches. Using a safety pin, thread one ribbon length through the casing. With right sides together, stitch the bag lower edge. To box the corners, align one side seam with the lower-edge seam. Measure 10” from the corner; mark a horizontal line using a removable fabric marker. Stitch along the line. Trim off the corner. Repeat to stitch the remaining laun-dry bag. Z
SourceS
Westminster Fabric provided home-décor fabric from the Decorator Solids by Amy Butler collection and print cotton fabric from the Heirloom by Joel Dewberry collection from rowan Fabrics: (866) 907-3305, westminsterfibers.com
Designate a lights and darks laundry bag for
quick sorting.
Center
9”
6H”
2” 2”
3
4