Hardware Simulator Tutorial - idc.ac.il · Hardware Simulator Tutorial. ... HW Simulator Tutorial...
43
Slide 1/49 HW Simulator Tutorial Tutorial Index www.idc.ac.il/tecs This program is part of the software suite that accompanies the book The Elements of Computing Systems by Noam Nisan and Shimon Schocken MIT Press www.idc.ac.il/tecs This software was developed by students at the Efi Arazi School of Computer Science at IDC Chief Software Architect: Yaron Ukrainitz Hardware Simulator Tutorial
Transcript of Hardware Simulator Tutorial - idc.ac.il · Hardware Simulator Tutorial. ... HW Simulator Tutorial...

Slide 1/49HW Simulator Tutorial Tutorial Indexwww.idc.ac.il/tecs
This program is part of the software suitethat accompanies the book
The Elements of Computing Systemsby Noam Nisan and Shimon Schocken
MIT Press
www.idc.ac.il/tecs
This software was developed by students at theEfi Arazi School of Computer Science at IDC
Chief Software Architect: Yaron Ukrainitz
Hardware Simulator Tutorial

Slide 2/49HW Simulator Tutorial Tutorial Indexwww.idc.ac.il/tecs
Background
The Elements of Computing Systems evolves around the construction of a complete computer system, done in the framework of a 1- or 2-semester course.
In the first part of the book/course, we build the hardware platform of a simple yet powerful computer, called Hack. In the second part, we build the computer’s software hierarchy, consisting of an assembler, a virtual machine, a simple Java-like language called Jack, a compiler for it, and a mini operating system, written in Jack.
The book/course is completely self-contained, requiring only programming as a pre-requisite.
The book’s web site includes some 200 test programs, test scripts, and all the software tools necessary for doing all the projects.

Slide 3/49HW Simulator Tutorial Tutorial Indexwww.idc.ac.il/tecs
The book’s software suite
This tutorial is about the hardware simulator. Translators (Assembler, JackCompiler):
Used to translate from high-level to low-level;
Developed by the students, using the book’s specs; Executable solutions supplied by us.
OtherBin: simulators and translators software;
builtIn: executable versions of all the logic gates and chips mentioned in the book;
OS: executable version of the Jack OS;
TextComparer: a text comparison utility.
(All the supplied tools are dual-platform: Xxx.bat startsXxx in Windows, and Xxx.sh starts it in Unix)
Simulators(HardwareSimulator, CPUEmulator, VMEmulator):
Used to build hardware platforms andexecute programs;
Supplied by us.

Slide 4/49HW Simulator Tutorial Tutorial Indexwww.idc.ac.il/tecs
The Hack computer
The hardware simulator described in this tutorial can be used to build and test many different hardware platforms. In this book, we focus on one particular computer, called Hack.
Hack -- a 16-bit computer equipped with a screen and a keyboard -- resembles hand-held computers like game machines, PDA’s, and cellular telephones.
The first 5 chapters of the book specify the elementary gates, combinational chips, sequential chips, and hardware architecture of the Hack computer.
All these modules can be built and tested using the hardware simulator described in this tutorial.
That is how hardware engineers build chips for real: first, the hardware s designed, tested, and optimized on a softwaresimulator. Only then, the resulting gate logic is committed to silicon.

Slide 5/49HW Simulator Tutorial Tutorial Indexwww.idc.ac.il/tecs
Hardware Simulation Tutorial
I. Getting started
II. Test scripts
III. Built-in chips
IV. Clocked chips
V. GUI-empowered chips
VI. Debugging tools
VII. The Hack Platform
Relevant reading (from “The Elements of Computing Systems”):
Chapter 1: Boolean Logic
Appendix A: Hardware Description Language
Appendix B: Test Scripting Language

Slide 6/49HW Simulator Tutorial Tutorial Indexwww.idc.ac.il/tecs
Hardware Simulation Tutorial
Part I:
Getting Started

Slide 7/49HW Simulator Tutorial Tutorial Indexwww.idc.ac.il/tecs
/** Exclusive-or gate. out = a xor b */CHIP Xor {
IN a, b;OUT out;
// Implementation missing.}
/** Exclusive-or gate. out = a xor b */CHIP Xor {
IN a, b;OUT out;
// Implementation missing.}
Chip interface:
Chip Definition (.hdl file)
Name of the chipNames of its input and output pinsDocumentation of the intended chip operation
Typically supplied by the chip architect; similar to an API, or a contract.
chipinterface

Slide 8/49HW Simulator Tutorial Tutorial Indexwww.idc.ac.il/tecs
/** Exclusive-or gate. out = a xor b */CHIP Xor {
IN a, b;OUT out;
PARTS:Not(in=a, out=nota);Not(in=b, out=notb);And(a=a, b=notb, out=w1);And(a=nota, b=b, out=w2);Or(a=w1, b=w2, out=out);
}
/** Exclusive-or gate. out = a xor b */CHIP Xor {
IN a, b;OUT out;
PARTS:Not(in=a, out=nota);Not(in=b, out=notb);And(a=a, b=notb, out=w1);And(a=nota, b=b, out=w2);Or(a=w1, b=w2, out=out);
}
Any given chip can be implemented in several different ways. This particular implementation is based on: Xor(a,b) = Or(And(a,Not(b)), And(b,Not(a)))
Not, And, Or: Internal parts (previously built chips), invoked by the HDL programmernota, notb, w1, w2: internal pins, created and named by the HDL programmer; used to connect internal parts.
chip implementation
chipinterface
Chip Definition (.hdl file)

Slide 9/49HW Simulator Tutorial Tutorial Indexwww.idc.ac.il/tecs
Loading a Chip
Navigate to a directory and select an .hdl file.

Slide 10/49HW Simulator Tutorial Tutorial Indexwww.idc.ac.il/tecs
Loading a Chip
Names and current values of the chip’s input pins;To change their values, enter the new values here.
Read-only view of the loaded .hdl file;Defines the chip logic;To edit it, use an external text editor.
Names and current values of the chip’s output pins;Calculated by the simulator; read-only.
Names and current values of the chip’s internal pins(used to connect the chip’s parts, forming the chip’s logic);Calculated by the simulator; read-only.

Slide 11/49HW Simulator Tutorial Tutorial Indexwww.idc.ac.il/tecs
Exploring the Chip Logic
1. Click the PARTSkeyword
2. A table pops up, showing the chip’s internal parts (lower-level chips) and whether they are:
Primitive (“given”) or composite (user-defined)Clocked (sequential) or unclocked (combinational)

Slide 12/49HW Simulator Tutorial Tutorial Indexwww.idc.ac.il/tecs
1. Click any one of the chip PARTS
2. A table pops up, showing the input/output pins of the selected part (actually, its API), and their current values;A convenient debugging tool.
Exploring the Chip Logic

Slide 13/49HW Simulator Tutorial Tutorial Indexwww.idc.ac.il/tecs
Interactive Chip Testing
1. User: changes the values of some input pins
2. Simulator: responds by:Darkening the output and internal pins, to indicate that the displayed values are no longer validEnabling the eval(calculator-shaped) button.Re-
calc
3. User: Clicked the eval button4. Simulator: re-calculates the values
of the chip’s internal and outputpins (i.e. applies the chip logic to the new input values)
5. To continue interactive testing,enter new values into the inputpins and click the eval button.

Slide 14/49HW Simulator Tutorial Tutorial Indexwww.idc.ac.il/tecs
Hardware Simulation Tutorial
Part II:
Test Scripts
Slide 15/49HW Simulator Tutorial Tutorial Indexwww.idc.ac.il/tecs
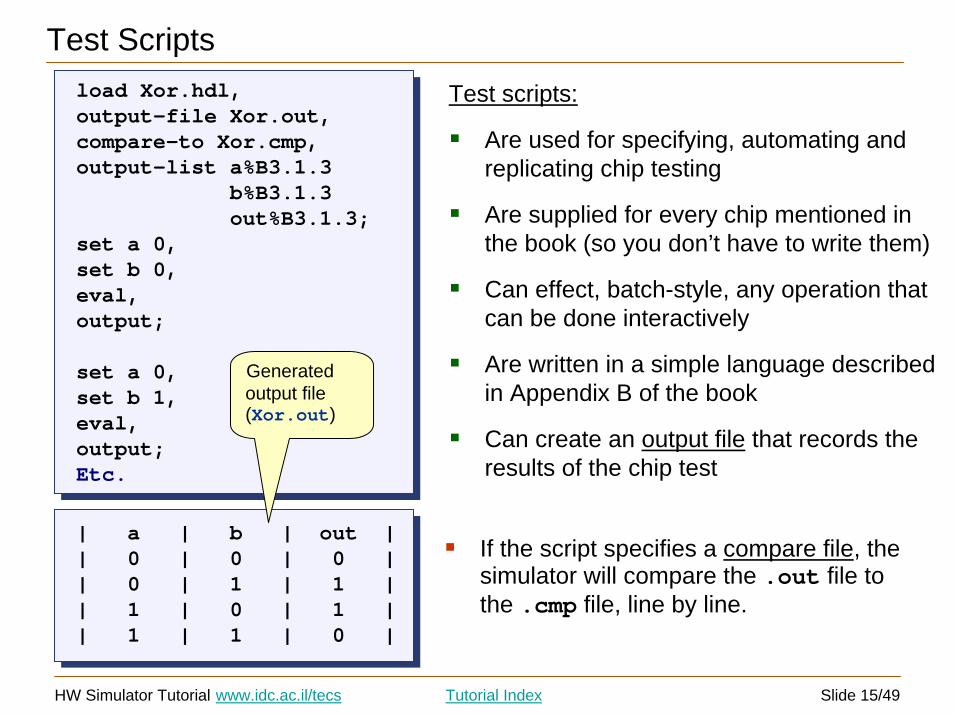
Test Scriptsload Xor.hdl,output-file Xor.out,compare-to Xor.cmp,output-list a%B3.1.3
b%B3.1.3out%B3.1.3;
set a 0,set b 0,eval,output;
set a 0,set b 1,eval,output;Etc.
load Xor.hdl,output-file Xor.out,compare-to Xor.cmp,output-list a%B3.1.3
b%B3.1.3out%B3.1.3;
set a 0,set b 0,eval,output;
set a 0,set b 1,eval,output;Etc.
If the script specifies a compare file, the simulator will compare the .out file to the .cmp file, line by line.
| a | b | out || 0 | 0 | 0 || 0 | 1 | 1 || 1 | 0 | 1 || 1 | 1 | 0 |
| a | b | out || 0 | 0 | 0 || 0 | 1 | 1 || 1 | 0 | 1 || 1 | 1 | 0 |
Generated output file (Xor.out)
Init
Simulation step
Simulation step
Test scripts:
Are used for specifying, automating and replicating chip testing
Are supplied for every chip mentioned in the book (so you don’t have to write them)
Can effect, batch-style, any operation that can be done interactively
Are written in a simple language described in Appendix B of the book
Can create an output file that records the results of the chip test

Slide 16/49HW Simulator Tutorial Tutorial Indexwww.idc.ac.il/tecs
Loading a Script
To load a new script (.tstfile), click this button;
Interactive loading of the chip itself (.hdl file) may not be necessary, since the test script typically contains a “load chip” command.

Slide 17/49HW Simulator Tutorial Tutorial Indexwww.idc.ac.il/tecs
Script Controls
Executes the next simulation step
Multi-step execution, until a pause
Pauses the script execution
Resetsthe script
Controls the script execution speed Script =
series of simulation steps, each ending with a semicolon.

Slide 18/49HW Simulator Tutorial Tutorial Indexwww.idc.ac.il/tecs
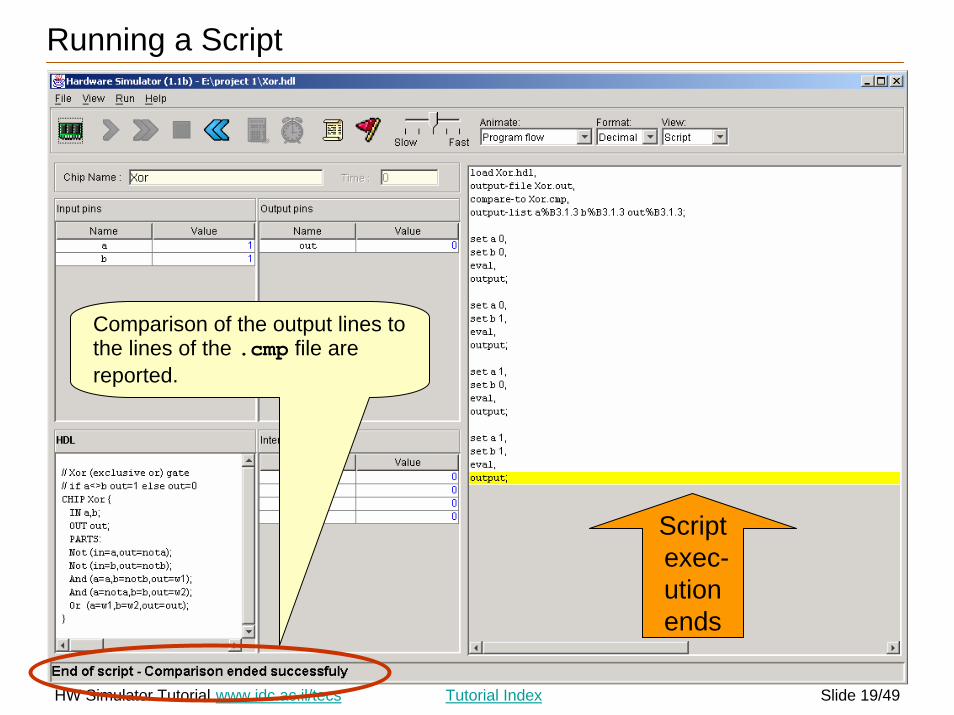
Running a Script
Typical “init” code:1. Loads a chip definition (.hdl) file2. Initializes an output (.out) file3. Specifies a compare (.cmp) file4. Declares an output line format.
Scriptexec-utionflow
Slide 19/49HW Simulator Tutorial Tutorial Indexwww.idc.ac.il/tecs
Scriptexec-utionends
Running a Script
Comparison of the output lines to the lines of the .cmp file are reported.

Slide 20/49HW Simulator Tutorial Tutorial Indexwww.idc.ac.il/tecs
Conclusion: the chip logic (Xor.hdl) is apparently correct (but not necessarily efficient).
Observation:This output file looks like a Xortruth table
Viewing Output and Compare Files

Slide 21/49HW Simulator Tutorial Tutorial Indexwww.idc.ac.il/tecs
Hardware Simulation Tutorial
Part III:
Built-in Chips

Slide 22/49HW Simulator Tutorial Tutorial Indexwww.idc.ac.il/tecs
Built-In ChipsGeneral
A built-in chip has an HDL interface and a Java implementation (e.g. here: Mux16.class)
The name of the Java class is specified following the BUILTIN keyword
Built-In implementations of all the chips that appear in he book are supplied in the tools/buitIn directory.
// Mux16 gate (example)CHIP Mux16 {
IN a[16],b[16],sel;OUT out[16];BUILTIN Mux16;
}
// Mux16 gate (example)CHIP Mux16 {
IN a[16],b[16],sel;OUT out[16];BUILTIN Mux16;
}
Built-in chips are used to:Implement primitive gates (in the computer built in this book: Nand and DFF)
Implement chips that have peripheral side effects (like I/O devices)
Implement chips that feature a GUI (for debugging)
Provide the functionality of chips that the user did not implement for some reason
Improve simulation speed and save memory (when used as parts in complex chips)
Facilitate behavioral simulation of a chip before actually building it in HDL
Built-in chips can be used either explicitly, or implicitly.

Slide 23/49HW Simulator Tutorial Tutorial Indexwww.idc.ac.il/tecs
Explicit Use of Built-in Chips
The chip is loaded from the tools/buitIn directory (includes executable versions of all the chips mentioned in the book).
Built-in implementation.
Standard interface.

Slide 24/49HW Simulator Tutorial Tutorial Indexwww.idc.ac.il/tecs
Implicit Use of Built-in Chips
When any HDL file is loaded, the simulator parses its definition. For each internal chip Xxx(...) mentioned in the PARTS section, the simulator looks for an Xxx.hdlfile in the same directory (e.g. Not.hdl, And.hdl, and Or.hdl in this example).
If Xxx.hdl is found in the current directory (e.g. if it was also written by the user), the simulator uses its HDL logic in the evaluation of the overall chip.If Xxx.hdl is not found in the current directory, the simulator attempts to invoke the file tools/builtIn/Xxx.hdl instead.
And since tools/builtIn includes executable versions of all the chips mentioned in the book, it is possible to build and test any of these chips before first building their lower-level parts.
/** Exclusive-or gate. out = a xor b */CHIP Xor {
IN a, b;OUT out;PARTS:Not(in=a,out=Nota);Not(in=b,out=Notb);And(a=a,b=Notb,out=aNotb);And(a=Nota,b=b,out=bNota);Or(a=aNotb,b=bNota,out=out);
}
/** Exclusive-or gate. out = a xor b */CHIP Xor {
IN a, b;OUT out;PARTS:Not(in=a,out=Nota);Not(in=b,out=Notb);And(a=a,b=Notb,out=aNotb);And(a=Nota,b=b,out=bNota);Or(a=aNotb,b=bNota,out=out);
}

Slide 25/49HW Simulator Tutorial Tutorial Indexwww.idc.ac.il/tecs
Hardware Simulation Tutorial
Part IV:
Clocked Chips
(Sequential Logic)

Slide 26/49HW Simulator Tutorial Tutorial Indexwww.idc.ac.il/tecs
Clocked (Sequential) Chips
The implementation of clocked chips is based on sequential logic
The operation of clocked chips is regulated by a master clock signal:
In our jargon, a clock cycle = tick-phase (low), followed by a tock-phase (high)
During a tick-tock, the internal states of all the clocked chips are allowed to change, but their outputs are “latched”
At the beginning of the next tick, the outputs of all the clocked chips in the architecture commit to the new values
In a real computer, the clock is implemented by an oscillator; in simulators, clock cycles can be simulated either manually by the user, or repeatedly by a test script.

Slide 27/49HW Simulator Tutorial Tutorial Indexwww.idc.ac.il/tecs
The D-Flip-Flop (DFF) Gate
Clocked chips
Clocked chips include registers, RAM devices, counters, and the CPU
The simulator knows that the loaded chip is clocked when one or more of its pins is declared “clocked”, or one or more of its parts (or sub-parts, recursively) is a clocked chip
In the hardware platform built in the book, all the clocked chips are based, directly or indirectly, on (many instances of) built-in DFF gates.
/** Data Flip-flop:* out(t)=in(t-1) * where t is the time unit. */CHIP DFF {
IN in;OUT out;
BUILTIN DFF;CLOCKED in, out;
}
/** Data Flip-flop:* out(t)=in(t-1) * where t is the time unit. */CHIP DFF {
IN in;OUT out;
BUILTIN DFF;CLOCKED in, out;
}
DFF:
A primitive memory gate that can “remember” a state over clock cycles
Can serve as the basic building block of all the clocked chips in a computer.

Slide 28/49HW Simulator Tutorial Tutorial Indexwww.idc.ac.il/tecs
Since this built-in chip also happens to be GUI- empowered, the simulator displays its GUI
(More about GUI-empowered chips, soon)
Simulating Clocked Chips
A built-in, clocked chip (RAM8) is loaded
Clocked (sequential) chips are clock-regulated.
Therefore, the standard way to test a clocked chip is to set its input pins to some values (as with combinational chips), simulate the progression of the clock, and watch how the chip logic responds to the ticks and the tocks.
For example, consider the simulation of an 8-word random-access memory chip (RAM8).

Slide 29/49HW Simulator Tutorial Tutorial Indexwww.idc.ac.il/tecs
4. Simulator:commits the chip’s output pin to the value of the chip’s internal state.
3. User: clicks the clock icon again (tock)
A built-in, clocked chip (RAM8) is loaded
1. User: enters some input values and clicks the clock icon once (tick)
Simulating Clocked Chips
2. Simulator:changes the internal state of the chip, but note that the chip’s output pin is not yet effected.

Slide 30/49HW Simulator Tutorial Tutorial Indexwww.idc.ac.il/tecs
Single-action tick-tock
Tick-tocks repeatedly and infinitely
Controls the script speed, and thus the simulated clock speed, and thus the overall chip execution speed Default script: always loaded when
the simulator starts running;
The logic of the default script simply runs the clock repeatedly;
Hence, executing the default script has the effect of causing the clock to go through an infinite train of tics and tocks.
This, in turn, causes all the clocked chip parts of the loaded chip to react to clock cycles, repeatedly.
Simulating Clocked Chips Using a Test Script

Slide 31/49HW Simulator Tutorial Tutorial Indexwww.idc.ac.il/tecs
Hardware Simulation Tutorial
Part V:
GUI-Empowered
chips

Slide 32/49HW Simulator Tutorial Tutorial Indexwww.idc.ac.il/tecs
2. If the loaded chip or some of its parts have GUI side-effects, the simulator displays the GUI’s here.
Built-in Chips with GUI Effects
1. A chip whose parts include built-in chipswas loaded into the simulator(ignore the chip logic for now)
GUI of the built-in Screen.hdl chip
GUI of the built-in RAM16K.hdl chip
GUI of the built-in Keyboard.hdl chip
For each GUI-empowered built-in chip that appears in the definition of the loaded chip, the simulator does its best to put the chip GUI in this area.
The actual GUI’s behaviors are then effected by the Java classes that implement the built-in chips.

Slide 33/49HW Simulator Tutorial Tutorial Indexwww.idc.ac.il/tecs
The Logic of the GUIDemo Chip
// Demo of built-in chips with GUI effectsCHIP GUIDemo {IN in[16],load,address[15];OUT out[16];PARTS:RAM16K(in=in,load=load,address=address[0..13],out=null);Screen(in=in,load=load,address=address[0..12],out=null);Keyboard(out=null);
}
// Demo of built-in chips with GUI effectsCHIP GUIDemo {IN in[16],load,address[15];OUT out[16];PARTS:RAM16K(in=in,load=load,address=address[0..13],out=null);Screen(in=in,load=load,address=address[0..12],out=null);Keyboard(out=null);
}
Effect: When the simulator evaluates this chip, it displays the GUI side-effects of its built-in chip parts
Chip logic: The only purpose of this demo chip is to force the simulator toshow the GUI of some built-in chips. Other than that, the chip logic is meaningless: it simultaneously feeds the 16-bit data input (in) into the RAM16K and the Screen chips, and it does nothing with the keyboard.
RAM16K,Screen, & Keyboard are built-in chips with GUI side-effects

Slide 34/49HW Simulator Tutorial Tutorial Indexwww.idc.ac.il/tecs
1. User enters:in = –1(=16 1’s in binary)address = 5012load = 1
GUIDemo Chip in Action
2. User:runs the clock
3. 16 black pixels are drawn beginning in row = 156col = 320
3. The chip logic routes the in value simultaneously into the Screen chip and the RAM16K chip
Explanation: According to the specification of the computer architecture described in the book, the pixels of the physical screen are continuously refreshed from an 8K RAM-resident memory map implemented by the Screen.hdl chip. The exact mapping between this memory chip and the actual pixels is specified in Chapter 5. The refresh process is carried out by the simulator.

Slide 35/49HW Simulator Tutorial Tutorial Indexwww.idc.ac.il/tecs
Hardware Simulation Tutorial
Part VI:
Debugging tools

Slide 36/49HW Simulator Tutorial Tutorial Indexwww.idc.ac.il/tecs
System Variables
The simulator recognizes and maintains the following variables:
Time: the number of time-units (clock-cycles) that elapsed since the script started running is stored in the variable time
Pins: the values of all the input, output, and internal pins of the simulated chip are accessible as variables, using the names of the pins in the HDL code
GUI elements: the values stored in the states of GUI-empowered built-in chips can be accessed via variables. For example, the value of register 3 of the RAM8 chip can be accessed via RAM8[3].
All these variables can be used in scripts and breakpoints, for debugging.

Slide 37/49HW Simulator Tutorial Tutorial Indexwww.idc.ac.il/tecs
Breakpoints
The breakpoints logic:Breakpoint = (variable, value)When the specified variable in some breakpoint reaches its specified value, the script pauses and a message is displayedA powerful debugging tool.
1. Open the breakpoints panel
2. Previously-declared breakpoints
3. Add, delete, or update breakpoints
3. To update an existing breakpoint, double-click it

Slide 38/49HW Simulator Tutorial Tutorial Indexwww.idc.ac.il/tecs
Scripts for Testing the Topmost Computer chip
load Computer.hdlROM32K load Max.hack,output-file ComputerMax.out,compare-to ComputerMax.cmp,output-list time%S1.4.1
reset%B2.1.2ARegister[]%D1.7.1DRegister[]%D1.7.1PC[]%D0.4.0RAM16K[0]%D1.7.1RAM16K[1]%D1.7.1RAM16K[2]%D1.7.1;
breakpoint PC 10;// First run: compute max(3,5)set RAM16K[0] 3,set RAM16K[1] 5,output;repeat 14 {
tick, tock, output;}// Reset the PC (preparing for// second run)set reset 1,tick, tock, output;// Etc.clear-breakpoints;
Scripts that test the CPU chip or the Computer chip described in the book usually start by loading a machine-language program (.asm or .hack file) into the ROM32K chip
The rest of the script typically uses various features like:
• Output files
• Loops
• Breakpoints
• Variables manipulation
• tick, tock
• Etc.
• All these features are described in Appendix B of the book (Test Scripting Language).

Slide 39/49HW Simulator Tutorial Tutorial Indexwww.idc.ac.il/tecs
Visual Options
Script: displays the current test scriptOutput: displays the generated output fileCompare: displays the supplied comparison fileScreen: displays the GUI effects of built-in chips, if any.
Program flow: animates the flow of the currently loaded programProgram & data flow: animates
the flow of the current program and the data flow throughout the GUI elements displayed on the screenNo animation (default):
program and data flow are not animated.Tip: When running programs on the CPU or Computer chip, any animation effects slow down the simulation considerably.
Format of displayed pin values:Decimal (default)HexadecimalBinary

Slide 40/49HW Simulator Tutorial Tutorial Indexwww.idc.ac.il/tecs
Hardware Simulation Tutorial
Part VII:
The HackHardware Platform

Slide 41/49HW Simulator Tutorial Tutorial Indexwww.idc.ac.il/tecs
Hack: a General-Purpose 16-bit Computer
Hang Man Maze
Pong Grades Stats
Sample applications running on the Hack computer:
These programs (and many more) were written in the Jack programming language, running in the Jack OS environment over the Hack hardware platform. The hardware platform is built in chapters 1-5, and the software hierarchy in chapters 6-12.

Slide 42/49HW Simulator Tutorial Tutorial Indexwww.idc.ac.il/tecs
The Hack Chip-Set and Hardware PlatformElementary logic gates(Project 1):Nand (primitive)
Not
And
Or
Xor
Mux
Dmux
Not16
And16
Or16
Mux16
Or8Way
Mux4Way16
Mux8Way16
DMux4Way
DMux8Way
Combinational chips(Project 2):HalfAdder
FullAdder
Add16
Inc16
ALU
Sequential chips(Project 3):DFF (primitive)
Bit
Register
RAM8
RAM64
RAM512
RAM4K
RAM16K
PC
Computer Architecture(Project 5):Memory
CPU
Computer
Most of these chips are generic, meaning that they can be used in the construction of many different computers.The Hack chip-set and hardware platform can be built using the hardware simulator, starting with primitive Nand.hdl and DFF.hdl gates and culminating in the Computer.hdl chip.This construction is described in chapters 1,2,3,5 of the book, and carried out in the respective projects.

Slide 43/49HW Simulator Tutorial Tutorial Indexwww.idc.ac.il/tecs
Aside: H.D. Thoreau about chips, bugs, and close observation:
I was surprised to find that the chips were covered with such combatants, that it was not a duellum, but a bellum, a war between two races of ants, the red always pitted against the black, and frequently two red ones to one black. The legions of these Myrmidons covered all the hills and vales in my wood-yard, and the ground was already strewn with the dead and dying, both red and black.
It was the only battle which I have ever witnessed, the only battlefield I ever trod while the battle was raging; internecine war; the red republicans on the one hand, and the black imperialists on the other. On every side they were engaged in deadly combat, yet without any noise that I could hear, and human soldiers never fought so resolutely.... The more you think of it, the less the difference. And certainly there is not the fight recorded in Concord history, at least, if in the history of America, that will bear a moment’s comparison with this, whether for the numbers engaged in it, or for the patriotism and heroism displayed.From “Brute Neighbors,” Walden (1854).