Hardening Windows - index-of.co.ukindex-of.co.uk/Hacking-Coleccion/Hardening Windows, 2nd...
217
Transcript of Hardening Windows - index-of.co.ukindex-of.co.uk/Hacking-Coleccion/Hardening Windows, 2nd...
Hardening WindowsSecond Edition
■ ■ ■
Jonathan Hassell
5394.book Page i Monday, September 19, 2005 2:52 PM
Hardening Windows, Second Edition
Copyright © 2006 by Jonathan Hassell
All rights reserved. No part of this work may be reproduced or transmitted in any form or by any means, electronic or mechanical, including photocopying, recording, or by any information storage or retrieval system, without the prior written permission of the copyright owner and the publisher.
ISBN (pbk): 1-59059-539-4
Printed and bound in the United States of America 9 8 7 6 5 4 3 2 1
Trademarked names may appear in this book. Rather than use a trademark symbol with every occurrence of a trademarked name, we use the names only in an editorial fashion and to the benefit of the trademark owner, with no intention of infringement of the trademark.
Lead Editor: Jim SumserTechnical Reviewer: Oris OrlandoEditorial Board: Steve Anglin, Dan Appleman, Ewan Buckingham, Gary Cornell, Tony Davis, Jason Gilmore,
Jonathan Hassell, Chris Mills, Dominic Shakeshaft, Jim SumserAssociate Publisher: Grace WongProject Manager: Kylie JohnstonCopy Edit Manager: Nicole LeClercCopy Editor: Liz WelchAssistant Production Director: Kari Brooks-CoponyProduction Editor: Katie StenceCompositor: Pat ChristensonProofreader: Elizabeth BerryIndexer: Toma MulliganInterior Designer: Van Winkle Design GroupCover Designer: Kurt KramesManufacturing Director: Tom Debolski
Distributed to the book trade worldwide by Springer-Verlag New York, Inc., 233 Spring Street, 6th Floor, New York, NY 10013. Phone 1-800-SPRINGER, fax 201-348-4505, e-mail ������������������ �����, or visit ���������������������������.
For information on translations, please contact Apress directly at 2560 Ninth Street, Suite 219, Berkeley, CA 94710. Phone 510-549-5930, fax 510-549-5939, e-mail �������������, or visit �������������������.
The information in this book is distributed on an “as is” basis, without warranty. Although every precaution has been taken in the preparation of this work, neither the author(s) nor Apress shall have any liability to any person or entity with respect to any loss or damage caused or alleged to be caused directly or indirectly by the information contained in this work.
The source code for this book is available to readers at ������������������� in the Source Code section.
5394.book Page ii Monday, September 19, 2005 2:52 PM
iii
Contents at a Glance
About the Author . . . . . . . . . . . . . . . . . . . . . . . . . . . . . . . . . . . . . . . . . . . . . . . . . . . . . . . . . . . . . . . .xi
About the Technical Reviewer . . . . . . . . . . . . . . . . . . . . . . . . . . . . . . . . . . . . . . . . . . . . . . . . . . . . xiii
Acknowledgments . . . . . . . . . . . . . . . . . . . . . . . . . . . . . . . . . . . . . . . . . . . . . . . . . . . . . . . . . . . . . . xv
Introduction . . . . . . . . . . . . . . . . . . . . . . . . . . . . . . . . . . . . . . . . . . . . . . . . . . . . . . . . . . . . . . . . . . xvii
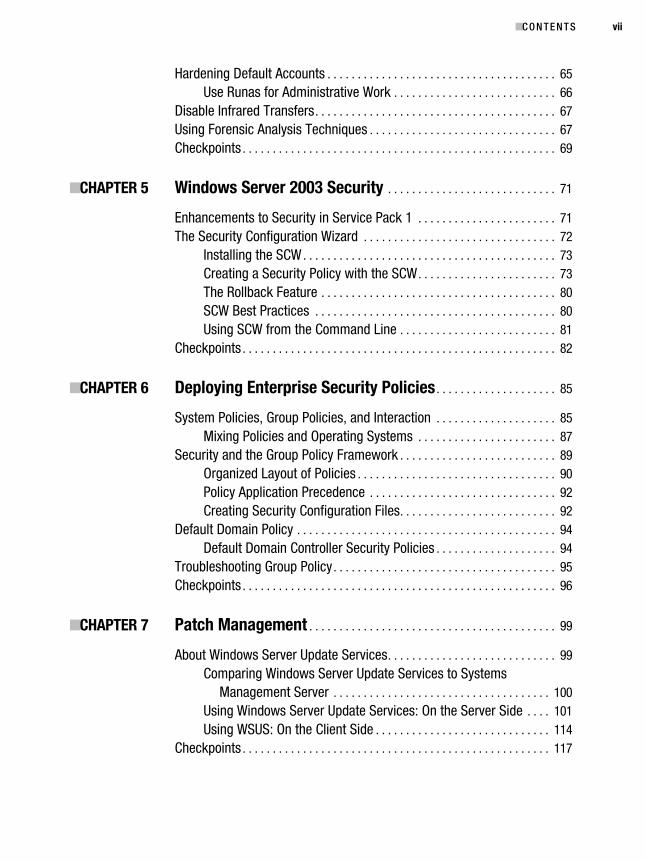
■CHAPTER 1 Some Words About Hardening . . . . . . . . . . . . . . . . . . . . . . . . . . . . . . . . . 1
■CHAPTER 2 Windows NT Security . . . . . . . . . . . . . . . . . . . . . . . . . . . . . . . . . . . . . . . . 11
■CHAPTER 3 Windows 2000 Security . . . . . . . . . . . . . . . . . . . . . . . . . . . . . . . . . . . . . . 35
■CHAPTER 4 Windows XP Security . . . . . . . . . . . . . . . . . . . . . . . . . . . . . . . . . . . . . . . . 49
■CHAPTER 5 Windows Server 2003 Security . . . . . . . . . . . . . . . . . . . . . . . . . . . . . . . 71
■CHAPTER 6 Deploying Enterprise Security Policies . . . . . . . . . . . . . . . . . . . . . . . . 85
■CHAPTER 7 Patch Management . . . . . . . . . . . . . . . . . . . . . . . . . . . . . . . . . . . . . . . . . . 99
■CHAPTER 8 Network Access Quarantine Control . . . . . . . . . . . . . . . . . . . . . . . . . 119
■CHAPTER 9 Internet Information Services Security . . . . . . . . . . . . . . . . . . . . . . . 137
■CHAPTER 10 Exchange Server 2003 Security . . . . . . . . . . . . . . . . . . . . . . . . . . . . . . 149
■CHAPTER 11 Security Auditing and Event Logs . . . . . . . . . . . . . . . . . . . . . . . . . . . . 163
■APPENDIX Quick-Reference Checklists . . . . . . . . . . . . . . . . . . . . . . . . . . . . . . . . . 173
■INDEX . . . . . . . . . . . . . . . . . . . . . . . . . . . . . . . . . . . . . . . . . . . . . . . . . . . . . . . . . . . . . . . . . . . . . 185
5394.book Page iii Monday, September 19, 2005 2:52 PM

5394.book Page iv Monday, September 19, 2005 2:52 PM
v
Contents
About the Author . . . . . . . . . . . . . . . . . . . . . . . . . . . . . . . . . . . . . . . . . . . . . . . . . . . . . . . . . . . . . . . . . . xi
About the Technical Reviewer. . . . . . . . . . . . . . . . . . . . . . . . . . . . . . . . . . . . . . . . . . . . . . . . . . . . . . xiii
Acknowledgments. . . . . . . . . . . . . . . . . . . . . . . . . . . . . . . . . . . . . . . . . . . . . . . . . . . . . . . . . . . . . . . . .xv
Introduction . . . . . . . . . . . . . . . . . . . . . . . . . . . . . . . . . . . . . . . . . . . . . . . . . . . . . . . . . . . . . . . . . . . . . xvii
■CHAPTER 1 Some Words About Hardening . . . . . . . . . . . . . . . . . . . . . . . . . . . . . . 1
What Is Security? . . . . . . . . . . . . . . . . . . . . . . . . . . . . . . . . . . . . . . . . . . . . . . . . 2The Security Dilemma . . . . . . . . . . . . . . . . . . . . . . . . . . . . . . . . . . . . . . . 3Enemies of Security . . . . . . . . . . . . . . . . . . . . . . . . . . . . . . . . . . . . . . . . . 4
What Windows Is Lacking . . . . . . . . . . . . . . . . . . . . . . . . . . . . . . . . . . . . . . . . . 4Some General Hardening Suggestions . . . . . . . . . . . . . . . . . . . . . . . . . . . . . . 5
Software Considerations . . . . . . . . . . . . . . . . . . . . . . . . . . . . . . . . . . . . . 6Hardware and Network Considerations. . . . . . . . . . . . . . . . . . . . . . . . . 7
Checkpoints . . . . . . . . . . . . . . . . . . . . . . . . . . . . . . . . . . . . . . . . . . . . . . . . . . . . . 9
■CHAPTER 2 Windows NT Security . . . . . . . . . . . . . . . . . . . . . . . . . . . . . . . . . . . . . . . 11
Windows NT System Policy Editor . . . . . . . . . . . . . . . . . . . . . . . . . . . . . . . . . 11Customizing and Applying Policies to Multiple Computers . . . . . . . 12Resolving Conflicts Between Multiple Policies . . . . . . . . . . . . . . . . . . 13Recommended User Policy Settings . . . . . . . . . . . . . . . . . . . . . . . . . . 14Extending Policies . . . . . . . . . . . . . . . . . . . . . . . . . . . . . . . . . . . . . . . . . . 19
Passwords . . . . . . . . . . . . . . . . . . . . . . . . . . . . . . . . . . . . . . . . . . . . . . . . . . . . . 19Password Policies . . . . . . . . . . . . . . . . . . . . . . . . . . . . . . . . . . . . . . . . . . 20Password Cracking . . . . . . . . . . . . . . . . . . . . . . . . . . . . . . . . . . . . . . . . . 21
Protecting User Accounts . . . . . . . . . . . . . . . . . . . . . . . . . . . . . . . . . . . . . . . . 22Registry Procedures . . . . . . . . . . . . . . . . . . . . . . . . . . . . . . . . . . . . . . . . . . . . . 22Protecting the File System . . . . . . . . . . . . . . . . . . . . . . . . . . . . . . . . . . . . . . . 23
Locking Down Local Directories . . . . . . . . . . . . . . . . . . . . . . . . . . . . . . 23Search Paths . . . . . . . . . . . . . . . . . . . . . . . . . . . . . . . . . . . . . . . . . . . . . . 24
Guarding Against Internet Threats . . . . . . . . . . . . . . . . . . . . . . . . . . . . . . . . . 25Windows NT Port Filtering . . . . . . . . . . . . . . . . . . . . . . . . . . . . . . . . . . . 25Protecting Against Viruses. . . . . . . . . . . . . . . . . . . . . . . . . . . . . . . . . . . 26
5394.book Page v Monday, September 19, 2005 2:52 PM
vi ■C O N T E N T S
Assigning Rights to Users . . . . . . . . . . . . . . . . . . . . . . . . . . . . . . . . . . . . . . . . 27Granting and Revoking User Rights . . . . . . . . . . . . . . . . . . . . . . . . . . . 27
Remote Access Server Configuration . . . . . . . . . . . . . . . . . . . . . . . . . . . . . . 30Selecting Appropriate Communications Protocols and Methods . . 30
Security Implications of Domains . . . . . . . . . . . . . . . . . . . . . . . . . . . . . . . . . 31Checkpoints . . . . . . . . . . . . . . . . . . . . . . . . . . . . . . . . . . . . . . . . . . . . . . . . . . . . 32
■CHAPTER 3 Windows 2000 Security . . . . . . . . . . . . . . . . . . . . . . . . . . . . . . . . . . . . 35
System Updates . . . . . . . . . . . . . . . . . . . . . . . . . . . . . . . . . . . . . . . . . . . . . . . . 35The “Slipstreaming” Process . . . . . . . . . . . . . . . . . . . . . . . . . . . . . . . . 36Critical Updates and Security Hotfixes. . . . . . . . . . . . . . . . . . . . . . . . . 37Managing Critical Updates Across Multiple Computers . . . . . . . . . . 37
Security Templates. . . . . . . . . . . . . . . . . . . . . . . . . . . . . . . . . . . . . . . . . . . . . . 38Creating a Custom Security Template . . . . . . . . . . . . . . . . . . . . . . . . . 40
Recommended Security Policy Settings . . . . . . . . . . . . . . . . . . . . . . . . . . . . 41User Accounts . . . . . . . . . . . . . . . . . . . . . . . . . . . . . . . . . . . . . . . . . . . . . 42Local Options . . . . . . . . . . . . . . . . . . . . . . . . . . . . . . . . . . . . . . . . . . . . . . 43
Other Security Considerations . . . . . . . . . . . . . . . . . . . . . . . . . . . . . . . . . . . . 46Windows Component Selection and Installation . . . . . . . . . . . . . . . . 46Tightening Running Services. . . . . . . . . . . . . . . . . . . . . . . . . . . . . . . . . 47
Checkpoints . . . . . . . . . . . . . . . . . . . . . . . . . . . . . . . . . . . . . . . . . . . . . . . . . . . . 48
■CHAPTER 4 Windows XP Security . . . . . . . . . . . . . . . . . . . . . . . . . . . . . . . . . . . . . . . 49
Implementing the Built-In Windows XP Firewall . . . . . . . . . . . . . . . . . . . . . 49Profiles . . . . . . . . . . . . . . . . . . . . . . . . . . . . . . . . . . . . . . . . . . . . . . . . . . . 50Configuring Through Group Policy . . . . . . . . . . . . . . . . . . . . . . . . . . . . 51The Internet Connection Firewall in XP Gold and
Service Pack 1 . . . . . . . . . . . . . . . . . . . . . . . . . . . . . . . . . . . . . . . . . . 51Disabling Unnecessary Services . . . . . . . . . . . . . . . . . . . . . . . . . . . . . . . . . . 53
Providing a Secure Configuration for Services. . . . . . . . . . . . . . . . . . 62Microsoft Baseline Security Analyzer Patch Check and
Security Tests . . . . . . . . . . . . . . . . . . . . . . . . . . . . . . . . . . . . . . . . . . . . . . . 63Installing Microsoft Baseline Security Analyzer . . . . . . . . . . . . . . . . . 63
Penetration Tests . . . . . . . . . . . . . . . . . . . . . . . . . . . . . . . . . . . . . . . . . . . . . . . 63File System Security. . . . . . . . . . . . . . . . . . . . . . . . . . . . . . . . . . . . . . . . . . . . . 64Disable Automated Logins . . . . . . . . . . . . . . . . . . . . . . . . . . . . . . . . . . . . . . . 65
5394.book Page vi Monday, September 19, 2005 2:52 PM
■C O N T E N T S vii
Hardening Default Accounts . . . . . . . . . . . . . . . . . . . . . . . . . . . . . . . . . . . . . . 65Use Runas for Administrative Work . . . . . . . . . . . . . . . . . . . . . . . . . . . 66
Disable Infrared Transfers. . . . . . . . . . . . . . . . . . . . . . . . . . . . . . . . . . . . . . . . 67Using Forensic Analysis Techniques . . . . . . . . . . . . . . . . . . . . . . . . . . . . . . . 67Checkpoints . . . . . . . . . . . . . . . . . . . . . . . . . . . . . . . . . . . . . . . . . . . . . . . . . . . . 69
■CHAPTER 5 Windows Server 2003 Security . . . . . . . . . . . . . . . . . . . . . . . . . . . . 71
Enhancements to Security in Service Pack 1 . . . . . . . . . . . . . . . . . . . . . . . 71The Security Configuration Wizard . . . . . . . . . . . . . . . . . . . . . . . . . . . . . . . . 72
Installing the SCW. . . . . . . . . . . . . . . . . . . . . . . . . . . . . . . . . . . . . . . . . . 73Creating a Security Policy with the SCW. . . . . . . . . . . . . . . . . . . . . . . 73The Rollback Feature . . . . . . . . . . . . . . . . . . . . . . . . . . . . . . . . . . . . . . . 80SCW Best Practices . . . . . . . . . . . . . . . . . . . . . . . . . . . . . . . . . . . . . . . . 80Using SCW from the Command Line . . . . . . . . . . . . . . . . . . . . . . . . . . 81
Checkpoints . . . . . . . . . . . . . . . . . . . . . . . . . . . . . . . . . . . . . . . . . . . . . . . . . . . . 82
■CHAPTER 6 Deploying Enterprise Security Policies . . . . . . . . . . . . . . . . . . . . 85
System Policies, Group Policies, and Interaction . . . . . . . . . . . . . . . . . . . . 85Mixing Policies and Operating Systems . . . . . . . . . . . . . . . . . . . . . . . 87
Security and the Group Policy Framework . . . . . . . . . . . . . . . . . . . . . . . . . . 89Organized Layout of Policies . . . . . . . . . . . . . . . . . . . . . . . . . . . . . . . . . 90Policy Application Precedence . . . . . . . . . . . . . . . . . . . . . . . . . . . . . . . 92Creating Security Configuration Files. . . . . . . . . . . . . . . . . . . . . . . . . . 92
Default Domain Policy . . . . . . . . . . . . . . . . . . . . . . . . . . . . . . . . . . . . . . . . . . . 94Default Domain Controller Security Policies . . . . . . . . . . . . . . . . . . . . 94
Troubleshooting Group Policy. . . . . . . . . . . . . . . . . . . . . . . . . . . . . . . . . . . . . 95Checkpoints . . . . . . . . . . . . . . . . . . . . . . . . . . . . . . . . . . . . . . . . . . . . . . . . . . . . 96
■CHAPTER 7 Patch Management . . . . . . . . . . . . . . . . . . . . . . . . . . . . . . . . . . . . . . . . . 99
About Windows Server Update Services. . . . . . . . . . . . . . . . . . . . . . . . . . . . 99Comparing Windows Server Update Services to Systems
Management Server . . . . . . . . . . . . . . . . . . . . . . . . . . . . . . . . . . . . 100Using Windows Server Update Services: On the Server Side . . . . 101Using WSUS: On the Client Side . . . . . . . . . . . . . . . . . . . . . . . . . . . . . 114
Checkpoints . . . . . . . . . . . . . . . . . . . . . . . . . . . . . . . . . . . . . . . . . . . . . . . . . . . 117
5394.book Page vii Monday, September 19, 2005 2:52 PM
viii ■C O N T E N T S
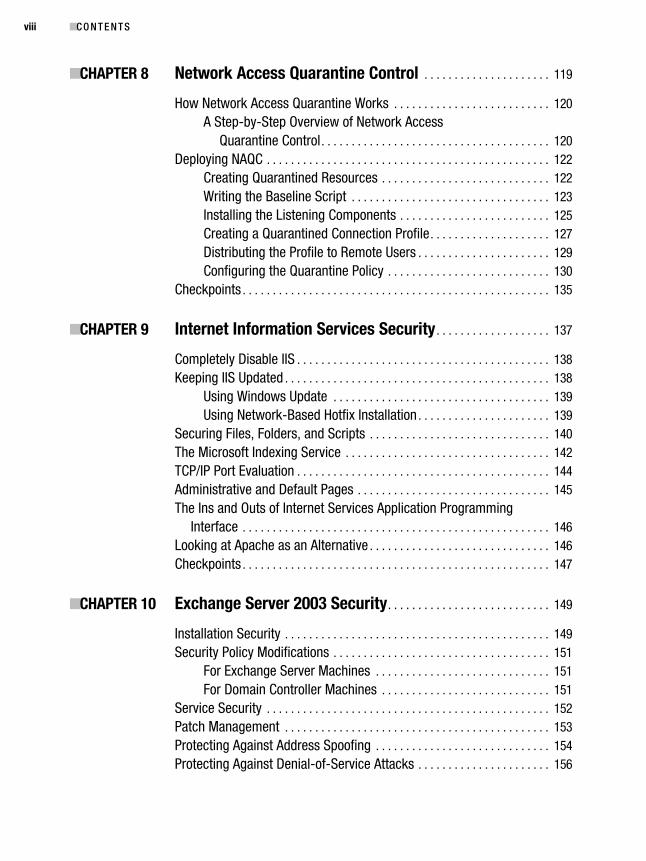
■CHAPTER 8 Network Access Quarantine Control . . . . . . . . . . . . . . . . . . . . . 119
How Network Access Quarantine Works . . . . . . . . . . . . . . . . . . . . . . . . . . 120A Step-by-Step Overview of Network Access
Quarantine Control. . . . . . . . . . . . . . . . . . . . . . . . . . . . . . . . . . . . . . 120Deploying NAQC . . . . . . . . . . . . . . . . . . . . . . . . . . . . . . . . . . . . . . . . . . . . . . . 122
Creating Quarantined Resources . . . . . . . . . . . . . . . . . . . . . . . . . . . . 122Writing the Baseline Script . . . . . . . . . . . . . . . . . . . . . . . . . . . . . . . . . 123Installing the Listening Components . . . . . . . . . . . . . . . . . . . . . . . . . 125Creating a Quarantined Connection Profile. . . . . . . . . . . . . . . . . . . . 127Distributing the Profile to Remote Users . . . . . . . . . . . . . . . . . . . . . . 129Configuring the Quarantine Policy . . . . . . . . . . . . . . . . . . . . . . . . . . . 130
Checkpoints . . . . . . . . . . . . . . . . . . . . . . . . . . . . . . . . . . . . . . . . . . . . . . . . . . . 135
■CHAPTER 9 Internet Information Services Security . . . . . . . . . . . . . . . . . . . 137
Completely Disable IIS . . . . . . . . . . . . . . . . . . . . . . . . . . . . . . . . . . . . . . . . . . 138Keeping IIS Updated . . . . . . . . . . . . . . . . . . . . . . . . . . . . . . . . . . . . . . . . . . . . 138
Using Windows Update . . . . . . . . . . . . . . . . . . . . . . . . . . . . . . . . . . . . 139Using Network-Based Hotfix Installation . . . . . . . . . . . . . . . . . . . . . . 139
Securing Files, Folders, and Scripts . . . . . . . . . . . . . . . . . . . . . . . . . . . . . . 140The Microsoft Indexing Service . . . . . . . . . . . . . . . . . . . . . . . . . . . . . . . . . . 142TCP/IP Port Evaluation . . . . . . . . . . . . . . . . . . . . . . . . . . . . . . . . . . . . . . . . . . 144Administrative and Default Pages . . . . . . . . . . . . . . . . . . . . . . . . . . . . . . . . 145The Ins and Outs of Internet Services Application Programming
Interface . . . . . . . . . . . . . . . . . . . . . . . . . . . . . . . . . . . . . . . . . . . . . . . . . . . 146Looking at Apache as an Alternative . . . . . . . . . . . . . . . . . . . . . . . . . . . . . . 146Checkpoints . . . . . . . . . . . . . . . . . . . . . . . . . . . . . . . . . . . . . . . . . . . . . . . . . . . 147
■CHAPTER 10 Exchange Server 2003 Security. . . . . . . . . . . . . . . . . . . . . . . . . . . 149
Installation Security . . . . . . . . . . . . . . . . . . . . . . . . . . . . . . . . . . . . . . . . . . . . 149Security Policy Modifications . . . . . . . . . . . . . . . . . . . . . . . . . . . . . . . . . . . . 151
For Exchange Server Machines . . . . . . . . . . . . . . . . . . . . . . . . . . . . . 151For Domain Controller Machines . . . . . . . . . . . . . . . . . . . . . . . . . . . . 151
Service Security . . . . . . . . . . . . . . . . . . . . . . . . . . . . . . . . . . . . . . . . . . . . . . . 152Patch Management . . . . . . . . . . . . . . . . . . . . . . . . . . . . . . . . . . . . . . . . . . . . 153Protecting Against Address Spoofing . . . . . . . . . . . . . . . . . . . . . . . . . . . . . 154Protecting Against Denial-of-Service Attacks . . . . . . . . . . . . . . . . . . . . . . 156
5394.book Page viii Monday, September 19, 2005 2:52 PM

■C O N T E N T S ix
Restricting SMTP Access. . . . . . . . . . . . . . . . . . . . . . . . . . . . . . . . . . . . . . . . 158Controlling Access . . . . . . . . . . . . . . . . . . . . . . . . . . . . . . . . . . . . . . . . . . . . . 160Checkpoints . . . . . . . . . . . . . . . . . . . . . . . . . . . . . . . . . . . . . . . . . . . . . . . . . . . 161
■CHAPTER 11 Security Auditing and Event Logs . . . . . . . . . . . . . . . . . . . . . . . . 163
For Windows 2000, XP, and Server 2003 . . . . . . . . . . . . . . . . . . . . . . . . . 163Recommended Items to Audit. . . . . . . . . . . . . . . . . . . . . . . . . . . . . . . 165Event Logs . . . . . . . . . . . . . . . . . . . . . . . . . . . . . . . . . . . . . . . . . . . . . . . 165The Event Viewer. . . . . . . . . . . . . . . . . . . . . . . . . . . . . . . . . . . . . . . . . . 166
For Windows NT 4.0. . . . . . . . . . . . . . . . . . . . . . . . . . . . . . . . . . . . . . . . . . . . 167Recommended Items to Audit. . . . . . . . . . . . . . . . . . . . . . . . . . . . . . . 168The Event Log . . . . . . . . . . . . . . . . . . . . . . . . . . . . . . . . . . . . . . . . . . . . 169
Filtering Events . . . . . . . . . . . . . . . . . . . . . . . . . . . . . . . . . . . . . . . . . . . . . . . . 169What Might Be Missing . . . . . . . . . . . . . . . . . . . . . . . . . . . . . . . . . . . . . . . . . 170Checkpoints . . . . . . . . . . . . . . . . . . . . . . . . . . . . . . . . . . . . . . . . . . . . . . . . . . . 170
■APPENDIX Quick-Reference Checklists . . . . . . . . . . . . . . . . . . . . . . . . . . . . . . 173
Chapter 1: Some Words About Hardening . . . . . . . . . . . . . . . . . . . . . . . . . 173Chapter 2: Windows NT Security . . . . . . . . . . . . . . . . . . . . . . . . . . . . . . . . . 174Chapter 3: Windows 2000 Security . . . . . . . . . . . . . . . . . . . . . . . . . . . . . . . 176Chapter 4: Windows XP Security . . . . . . . . . . . . . . . . . . . . . . . . . . . . . . . . . 177Chapter 5: Windows Server 2003 Security . . . . . . . . . . . . . . . . . . . . . . . . 178Chapter 6: Deploying Enterprise Security Policies . . . . . . . . . . . . . . . . . . 179Chapter 7: Patch Management. . . . . . . . . . . . . . . . . . . . . . . . . . . . . . . . . . . 180Chapter 8: Network Access Quarantine Control . . . . . . . . . . . . . . . . . . . . 180Chapter 9: Internet Information Services Security . . . . . . . . . . . . . . . . . . 181Chapter 10: Exchange Server 2003 Security. . . . . . . . . . . . . . . . . . . . . . . 181Chapter 11: Security Auditing and Event Logs . . . . . . . . . . . . . . . . . . . . . 183
■INDEX . . . . . . . . . . . . . . . . . . . . . . . . . . . . . . . . . . . . . . . . . . . . . . . . . . . . . . . . . . . . . . . . . . . . . . . 185
5394.book Page ix Monday, September 19, 2005 2:52 PM

5394.book Page x Monday, September 19, 2005 2:52 PM
ac20478e3412082af91ad516b5bf0c90
xi
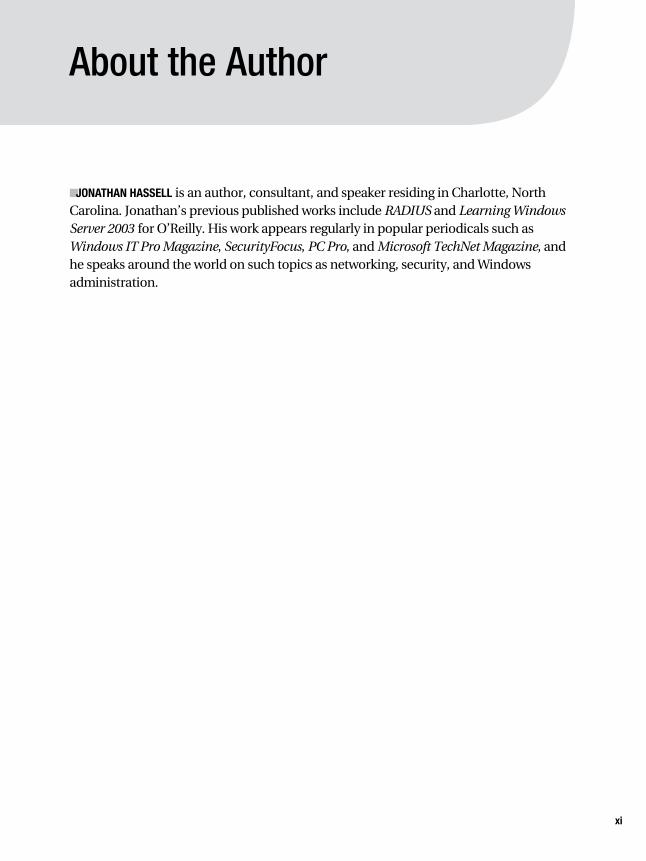
About the Author
■JONATHAN HASSELL is an author, consultant, and speaker residing in Charlotte, North Carolina. Jonathan’s previous published works include RADIUS and Learning Windows Server 2003 for O’Reilly. His work appears regularly in popular periodicals such as Windows IT Pro Magazine, SecurityFocus, PC Pro, and Microsoft TechNet Magazine, and he speaks around the world on such topics as networking, security, and Windows administration.
5394.book Page xi Monday, September 19, 2005 2:52 PM

5394.book Page xii Monday, September 19, 2005 2:52 PM
xiii
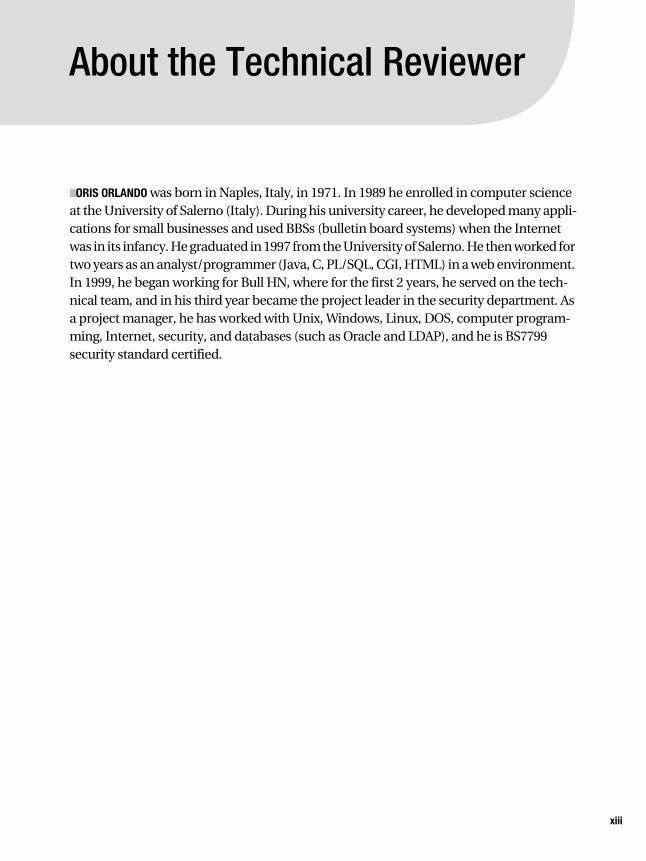
About the Technical Reviewer
■ORIS ORLANDO was born in Naples, Italy, in 1971. In 1989 he enrolled in computer science at the University of Salerno (Italy). During his university career, he developed many appli-cations for small businesses and used BBSs (bulletin board systems) when the Internet was in its infancy. He graduated in 1997 from the University of Salerno. He then worked for two years as an analyst/programmer (Java, C, PL/SQL, CGI, HTML) in a web environment. In 1999, he began working for Bull HN, where for the first 2 years, he served on the tech-nical team, and in his third year became the project leader in the security department. As a project manager, he has worked with Unix, Windows, Linux, DOS, computer program-ming, Internet, security, and databases (such as Oracle and LDAP), and he is BS7799 security standard certified.
5394.book Page xiii Monday, September 19, 2005 2:52 PM

5394.book Page xiv Monday, September 19, 2005 2:52 PM
xv
Acknowledgments
This book was written by me, but that is arguably the smallest part of the job. This tome was made possible and put together by a score of people other than me, and they all deserve praise and gratitude. First, my sincere appreciation goes to my editor, Jim Sumser, for his role in this work. Jim is a fabulous, flexible, and understanding guy, and I’m thankful for my opportunities to work with him. From the first edition, thanks are due to Tracy Brown Collins and Mark Nigara, both at Apress, who corrected my mistakes, kept me on schedule, and worked with me during a very busy period. And on the second edition, Kylie Johnston and Liz Welch took on the unenviable task of reminding me of deadlines and making my writing look good.
Also thanks to Oris Orlando for his timely and helpful comments upon reviewing the manuscript. Although he worked to point out mistakes and deficiencies in coverage, any errors and omissions that remain are mine and mine alone.
And finally, but certainly not least important, my significant other, Lisa, had the patience of a saint during this process and made the entire experience a lot easier on me. Thanks for all that you do for me. This one is for you.
5394.book Page xv Monday, September 19, 2005 2:52 PM

5394.book Page xvi Monday, September 19, 2005 2:52 PM
xvii
Introduction
Before I begin, let me offer my sincere thanks for purchasing this book! I’m glad you’ve made the decision to spend some time securing and hardening your systems. Not only are you helping yourself, but you’re also protecting the Internet community as a whole.
Hardening Windows is organized into chapters that focus on different aspects of system hardening. Chapters 2, 3, 4, and 5 describe procedures related to specific versions of Windows. This isn’t to say that the techniques described in one chapter for one version of Windows can’t be used on another: It’s simply a matter of organizing the flow of the book so you get the most from each chapter. The remaining chapters focus on different issues that affect the security and integrity of your systems and networks. At the end of each chapter, you’ll find a list of checkpoints, which summarize in a sentence or two each strategy discussed within the chapter. I’ve collected a list of checkpoints from every chapter and put them in the Appendix for easy reference.
This book is quick and simple, so it’s best to understand what’s inside before you even begin reading it. For one, the chapters themselves stand alone. You can read them in any order, and the material isn’t cumulative. Of course, you’re welcome to read them all, and cross-references are clearly identified when information in a chapter is discussed in more detail earlier in the book. However, if you choose to begin with Chapter 7, you won’t be missing anything. You also won’t be getting long, theoretical discussions about operating system design, kernel locking, OSI layers, and the like. Instead, you’re getting quick, prac-tical, checklist-style suggestions with a minimum of fluff. This book is meant to be carried under your arm to client workstations, placed on the top of the server rack, or snugly kept right beside your monitor for easy reference. It certainly isn’t a 1,600-page Windows bible.
Let me briefly address another issue: There are, of course, any number of hardening methods, and any number of opinions on how effective those methods are. This book would never be complete if it attempted to describe every view of every way to possibly secure a system from an unknown threat. Instead, I’ve chosen to keep the book short, using proven, time-tested ways to achieve maximum protection for the time and money invested. I think you’ll find the results more than acceptable.
In short, you have more than 150 suggestions for hardening your system. I hope this book helps you to do just that, and I hope you consider it a worthwhile investment. Thanks for reading.
5394.book Page xvii Monday, September 19, 2005 2:52 PM

5394.book Page xviii Monday, September 19, 2005 2:52 PM
1
■ ■ ■
C H A P T E R 1
Some Words About Hardening
You should be exactly as paranoid as it is cost-effective to be.
—Scott Collins
These are wise words from security expert Scott Collins, and they serve as the underlying motivation behind this book.
Computer security seems to be making the news a lot lately. Almost every week, malev-olent forces crawl out of the woodwork to take down high-profile websites. Companies lose millions of dollars and suffer damage to computer systems. As a result, large compa-nies spend thousands of dollars on security systems and products to protect the doors to their corporate networks. Microsoft bore the brunt of two intruder attacks on its web properties. The result was hours of downtime and decreased customer confidence.
It’s hard to know the number of intruders currently threatening the computer realm. Many systems administrators and users have built up a tolerance to attempted hacking. They have accepted intruders as the norm, as by-products of using a directly connected system. Many attempts, whether successful or not, go unnoticed by users. Internet secu-rity experts agree, though, that the number of attempts at security breaches is increasing, as is the sophistication and efficiency of the attempts. To keep up, vendors and security hardware manufacturers struggle to plug the security holes that intruders uncover and exploit with today’s easy-to-use system-cracking tools.
An intruder attack is only one facet of security with which you should be concerned. Viruses are another big security threat; the fact that they spread easily only increases their infestations. For example, worm viruses spread when users open email attachments, which cause the virus to email itself to the user’s entire contact list. Other Trojan horse viruses can come into your system and leave a back door for intruders who will use your computer to make countless attacks on other users’ machines.
Helping you learn how to protect your computing environment from these various threats is the purpose of this book. System administrators all around the world know the Internet is a hostile environment. They can’t tell when a hacker will attempt to gain access to the SQL server, but they can bet that there will be an attempt soon. Because the oper-ating system is vital to a computer’s functioning, and because it’s the only layer between
5394ch01.fm Page 1 Thursday, September 8, 2005 7:50 PM
2 C H A P T E R 1 ■ S O M E W O R D S A B O U T H A R D E N I N G
the machine’s available resources and its users, it’s critical that the OS resists compromise.
Hardening is this process of protecting a system against unknown threats. System administrators harden against whatever they think could be a threat. This book is designed to provide a quick and easy checklist-style reference for system administrators who need to anticipate those attacks and compromises. You’ll need to harden Windows NT, 2000, XP, and Server 2003 against these threats. And in this chapter, I’ll look at the theories behind security and hardening a system, and how you can take very general approaches to overall organizational security before investigating specific hardening practices on your Windows client and server machines.
What Is Security?To protect the well-being or integrity of something, to ensure the safety of property or interests in an object from intrusion, or to keep a concept or object private, you’ll need to secure a system. In the hostile environment of the Internet, system administrators need to restrict access to assets. To grant access to a selected group of users, you need to know who to trust and how to verify the credentials of—authenticate—those you allow to use your systems.
The cornerstones of any security policy include the following:
• Privacy, or the ability to keep things private and confidential
• Trust, or the question of whether you should take data or objects at face value
• Authenticity, or verifying that contacts are made with people who are accurately representing their identity
• Integrity, or the process of ensuring a system hasn’t yet been compromised and will remain secure
This book will focus entirely on the practical aspects of hardening a Windows-based computer. What are these practical checkpoints, which comprise the rest of this book, designed to do? What is the underlying motivation? Focusing for a bit on the more general aspects of computer security allows you to harden your systems in ways that you might otherwise ignore or fail to imagine. Therefore, I’ll discuss security and its associated theo-retical issues, and then move into practical considerations that aren’t limited to just Windows machines—suggestions that are appropriate for any connected machine.
5394ch01.fm Page 2 Thursday, September 8, 2005 7:48 PM
C H A P T E R 1 ■ S O M E W O R D S A B O U T H A R D E N I N G 3
The Security Dilemma
Security depends on two things: First, a person must define what security means for him, and second, that person must communicate that idea clearly and competently to the community around him. Security suffers from such a problem these days because of issues related directly to these two requirements. Security for each person is different. Though one person may be satisfied with a BIOS password and a floppy disk, another individual might take great pains to double- and triple-encrypt files. She may wish to transfer them only over IPsec-protected links, and purchase trusted Secure Sockets Layer (SSL) certificates for any type of public service she offers. And because the definition, meaning, and intrinsic value of security differs so wildly between parties, it’s difficult to communicate a clear security policy to the user community. Therein lies a critical problem—you can only have effective security when everyone understands the level of security required and when everyone agrees security is necessary. And in practice, as you might imagine, an understanding of security on the part of the user is something that’s usually severely lacking.
The very existence of security resides in trust. In fact, it can be argued that every secu-rity problem boils down to the simplest level as a question of trust. The idea of security is introduced for the sole purpose of protecting yourself against parties whom you don’t trust: either because of their malicious intentions or because of their questionable competence. To do this, usually some kind of technology is put into place to move trust from a risky “zone” to a safer, more palatable area. A great example is a front door lock: You don’t trust the general public, and therefore you’re wary of people stealing your belongings without your knowledge. You install a lock on the front door of your house. You still don’t trust the general public, but you trust the lock to do its job to keep the untrusted people out. You obviously have less of a problem trusting the lock than trusting the intentions of a great number of people with whom you’re unfamiliar. You can’t fully trust the lock either, so you install an alarm system that notifies the police if someone breaks in. You’ve displaced your trust from the public to the police, the alarm system, and the lock.
Each day, you proceed about your business, placing your trust semiconsciously in banks, automated teller machines, online shopping sites, the police, all levels of govern-ment, and other various establishments. The list goes on and on. You don’t question this trust, because it’s seldom broken, but that isn’t always the end result. For example, when a child learns to drive a car, he places lives at risk. Because of this risk, most municipalities and governments require the child to pass an exam to demonstrate her mastery of the safe operation of the equipment. Computer systems are equally capable of causing great damage, even though they aren’t sentient. Your life is interrupted when computer systems malfunction, and this indicates an increasing reliance on them. Your trust in computers and their users is often quite misplaced. This is where the problems truly come from.
5394ch01.fm Page 3 Thursday, September 8, 2005 7:48 PM
4 C H A P T E R 1 ■ S O M E W O R D S A B O U T H A R D E N I N G
Enemies of Security
To achieve truer security, system administrators need to examine a method for analyzing systems to probe their weaknesses and detail their own assumptions about those systems’ security, rather than blindly placing trust in them. If security is to be discussed in a more serious way, the following needs to exist:
• Identification of what one is trying to protect
• Evaluation of the main sources of risk and where trust is placed
• Assumption of possible countermeasures to potential attacks
You can define a secure system as one in which all of the threats have been analyzed and one in which countermeasures are in place for all of the threats. A few stumbling blocks hinder your ability to create secure systems. The first is complexity: Users will become impatient and work around security if it becomes too cumbersome for their work style and flow. Next is the need for backward compatibility in software. Often security is tightened in later revisions of software, but to remain operable with the previous version of a package, security restrictions might be loosened. Additionally, backups create a somewhat obscure but very real hole. The fact that backups are usually conducted with redundancy in mind might translate to more opportunity for data to be stolen. Security must be applied to backups as well as normal operations.
The problem, however, is how to know what all of the possible threats against a system are. That’s where this book comes in. You can’t always know all of your threats; it’s impos-sible to have that sort of knowledge. But you can batten down the hatches and take pre- cautions to forestall and thwart any future attempted intrusions.
What Windows Is LackingPart of identifying any underlying security problems is to look at the product you’re securing as a whole. Where are its weaknesses and what are the most vulnerable portions? Let’s look at what I see as the three Windows problems that are most overdue to be fixed.
Internet Explorer (IE) is the Achilles heel of Windows clients, and it’s unfortunate that the browser is the de facto standard for web surfing in so many business environments. Although Windows XP Service Pack 2 has done a lot to improve some of the glaring holes in the latest version of IE, Microsoft has publicly stated many times that it is unable or unwilling to port the set of fixes to IE to previous versions of Windows, including Windows 2000—a business client OS that is still seeing significant use in enterprises around the world. This is a disturbing trend that is on the one hand disappointing but, on the other, more reasonable hand, understandable.
5394ch01.fm Page 4 Thursday, September 8, 2005 7:48 PM
C H A P T E R 1 ■ S O M E W O R D S A B O U T H A R D E N I N G 5
What can you do to mitigate this risk? A few things spring to mind: Of course, you can mass-upgrade your clients to Windows XP. (Remember when buying new systems with a Microsoft volume licensing agreement, you can specify an XP license, but with it you get down-level rights to run Windows 2000 as long as you need it. So the cost of upgrade licenses has already been borne.) Also, investigate deploying Mozilla’s browser suite or the minimalist Firefox, as both are more secure browsers.
The Remote Procedure Call (RPC) protocol is a relic of days gone by: a deprecated communications method meant to be used on a network in which all participating hosts are trusted. How many decades has it been since that was the case? RPC essentially has no means to protect itself from even the simplest protocol-based transmission attacks, and the hosts on either end of an RPC transaction are often not hardened enough to withstand penetration themselves. Of course, efforts have been made in the latest releases of Exchange and Internet Security and Acceleration (ISA) Server to provide a more secure means to “enclose” RPC within other protocols. Although deploying Exchange 2003 and ISA Server 2004 are good ways to decrease the risk of RPC on the Internet, such systems are simply treating the symptoms and not the problem. We need to throw RPC out—like a beta tape in a world of DVDs, it’s simply not suitable—and find another way to transmit packets from machine to machine.
Given that, though, LAN Manager (LM) hashes are perhaps the single greatest weak-ness of the Windows password system itself. To make a long story short, any password with 14 or fewer characters is by default encrypted with a hashing algorithm that has been broken and thus is simple to penetrate. This vulnerability, although reduced, is present in Windows Server 2003—supposedly the secure operating system. This was a mistake on Microsoft’s part, and although you can’t expect the LAN Manager product itself to antici-pate computing power enhancements 15 to 20 years down the line, the company, with all its great minds and powerful thinkers, should have come up with a better way by default.
The quickest ways to mitigate this risk are either to disable these types of hashes via Group Policy, or to mandate 15-character or longer passwords. Obviously the latter choice has many benefits—you probably know that much already—and these benefits will be quantified throughout this book.
Some General Hardening SuggestionsIn the rest of this chapter, I’ll discuss some points that you can consider to harden your network overall. I’ve broken them down into three encompassing categories: software, hardware, and network considerations. Again, the following aren’t meant to be specific suggestions; they’re meant more as broad launching points for the specific checkpoints presented later in this book, and for future improvements to the integrity of your network that you can make on your own.
5394ch01.fm Page 5 Thursday, September 8, 2005 7:48 PM
6 C H A P T E R 1 ■ S O M E W O R D S A B O U T H A R D E N I N G
Software Considerations
Let’s begin with the behemoth: service packs. Service packs are applications that are released after the public release of a software package. More specifically, they’re collec-tions of hotfixes, or patches to flaws that are found after an application’s mainstream availability. Most of these service packs include security to correct areas of the program code that weren’t secured by the developers and therefore have vulnerabilities. You can be sure that your system will be examined by nefarious users looking for these vulnerabil-ities; you can be equally certain as you read this that new vulnerabilities are being searched out by these same miscreants. The bottom line: Keep all machines on the network updated and check with the operating system and application vendors on a regular basis for service releases and hotfix patches.
Next on the list are viruses, a rapidly growing irritation. As you may be aware, many new viruses are released weekly. Because of this, if an Internet connection comes any- where near any machine, you should use antivirus software. It should be kept up-to-date on a regular basis. To protect yourself, take a look at these guidelines:
• Any software downloaded from the Internet should be stored and installed on test systems before any production deployment, and the system should be scanned for viruses after the software has been tested.
• Like safe sex, don’t download software from unknown sources; a prominent viola-tion of this policy is the retrieval of programs from peer-to-peer file transfer ser- vices. This endangers not only the host computer but the entire network. Lately, viruses are beginning to spread after initial execution onto network shares and, depending on the strain of virus, can cause many hours of downtime, which results in a significant financial liability.
• For best results, you should configure your virus software to the most restrictive level, thereby ensuring that any virus activity is contained to one computer without infecting the network.
• Most modern antivirus programs include the option to attempt to repair an infected file—you will likely have mixed results with this feature. It’s acceptable to repair the infected file for a period of time so that the system can become operational.
• As a matter of practice, I always recommend that infected systems be wiped clean and reinstalled from an empty hard disk as soon as possible. As hard as the anti- virus companies try, they might never completely penetrate a virus’s payload; they might not ever realize the true extent of a virus’s damage to a system, so to be safe, restarting the system from a known clean baseline is always the cheapest insurance.
5394ch01.fm Page 6 Thursday, September 8, 2005 7:48 PM
C H A P T E R 1 ■ S O M E W O R D S A B O U T H A R D E N I N G 7
• Block all potentially malicious file types, such as VBS, EXE, JPG, PCX, COM, and SCR, from your mail server. These file types are rarely used for legitimate business purposes and can accidentally be executed by unsuspecting users. This can compromise your entire network. Remember the Melissa virus?
• Set your antivirus to scan the selected extension for virus patterns that may exist. This ensures that a virus doesn’t slip past your firewall.
Hardware and Network Considerations
In this section, you’ll look at some considerations about hardening your hardware. Because this book focuses on Windows, it doesn’t contain room anywhere else for these kinds of suggestions, but I’d be remiss not to include them. In any case, Windows depends as much on external hardware devices for security as it does on its own internal mechanisms.
The most obvious piece of the physical-device puzzle is the firewall, an integral part of any network that is connected to the Internet. Without a firewall, any Internet-connected machine can be subjected to denial-of-service (DoS) attacks, targeted service attacks, network-penetration efforts, and other bad events. All of these attacks are very difficult to trace back to their origin, too, making a “forensic analysis” next to impossible. Consider the following firewall suggestions:
• Block TCP ports 135, 139, and 445, and UDP ports 135, 137, and 445. These Microsoft Windows networking ports have been traditionally vulnerable to a great many distributed service attacks, and there’s little use for them over the Internet.
• Block all other unused ports. Each time you open a port you create a hole in the wall that you’ve built around your network, and you replace it with a window. The more ports you open—the more windows you install in your wall—the more transparent your network becomes to the outside. The bottom line? Open ports invite attacks.
The firewall’s brother in the security family is an intrusion-detection system (IDS), another vital part of hardening a Windows-based network. An IDS “sniffs out” or inspects all traffic going in and coming out of a network, and distinguishes patterns inside that traffic that could indicate suspicious activity. An IDS differs from a firewall in that a fire-wall looks for intrusions in order to stop them from happening. The firewall limits the access between networks in order to prevent intrusion and doesn’t signal an attack from inside the network. An IDS, on the other hand, evaluates a suspected intrusion once it has taken place, and signals an alarm. An IDS also watches for attacks that originate from within a system. It’s a beneficial addition to your network, and I highly recommend it.
Remote access remains one of the weakest links in network security if it’s incorrectly implemented, and in many cases it’s the Holy Grail for intruders looking to do damage.
5394ch01.fm Page 7 Thursday, September 8, 2005 7:48 PM
8 C H A P T E R 1 ■ S O M E W O R D S A B O U T H A R D E N I N G
If you allow remote access to your network either through dial-up connections or through a virtual private network (VPN) connection, you should restrict dial-up access to trusted users and limit the functionality of those users from remote locations. Policies can be designed in such a way that user activity will be traced. I recommend a VPN connection: Data that travels over a VPN is much less susceptible to interception than normal Point-to-Point Protocol (PPP) connections over the plain old telephone networks. If your data is particularly critical, you might consider putting systems in place that require credential validation for any resource that is accessed remotely, like client-side certificates and strong password authentication methods.
Also, it’s a safe bet to say that intruders would rather use the convenience and avail-ability of the Internet than work harder at “war dialing,” which is when an intruder generates phone numbers on a random basis and dials them to see if a modem answers. However, if your business needs require a modem bank to answer incoming calls, you might consider mandating a dial-back setting to a predetermined number; this is a great way to ensure that a connection is made only between the appropriate parties.
Physical segmentation of the network is always a good choice for security. If your hard-ware devices allow you to perform this segregation easily, then there’s little reason to not segment them. Virtual LANs (VLANs) are a great way to wall off large sections of your network. If you place your firewall within a separate VLAN from your network and spe- cify that only your firewall can access your network, then you’ve just eliminated the chance that an intruder could use another window of entry into your network. Segmenting a network can also add an element of security from an internal perspective, because you can segment a network in such a way that all users can see the servers but users cannot see each other. This reduces the possibility of hacking user data stored on user machines and greatly reduces the chance of a virus spreading around the computers. If the virus code can’t find other computers to infect, it cannot spread.
I feel compelled to include this bit here, even though a later chapter is devoted completely to Internet Information Services (IIS) hardening tips, because it’s so vital to security. Many exploits are targeted against IIS because it’s a very generic and widely used web server, and it’s left on by default in most instances. Because of this prevalence of worms, which travel at great speeds and exploit unsecured IIS web servers on publicly accessible networks, it’s highly recommended—imperative, even. Systems running IIS should be installed on an isolated network segment, or with no network cable attached, until the latest service packs and hotfixes are installed. Microsoft has published an IIS Lockdown tool, which is now part of the Microsoft Baseline Security Analyzer for Windows 2000 Server computers running IIS. It’s very important that this tool be used to harden the IIS box.
5394ch01.fm Page 8 Thursday, September 8, 2005 7:48 PM
C H A P T E R 1 ■ S O M E W O R D S A B O U T H A R D E N I N G 9
CheckpointsIn this chapter, I’ve discussed theories about security, and I’ve also listed some very broad, general suggestions for hardening the hardware, network, and software owned by your organization. Here’s a recap of what’s been covered so far:
• Learn the cornerstones of good security policy: privacy, trust, authentication, and integrity.
• Understand the social implications of security.
• Recognize the security dilemma—that users must understand the need for security and agree to the extent to which security is implemented.
• Consider transfers of trust in security policy.
• Understand the process of defining the concept of security: identification of the object to protect, evaluation of risk, and proposals for countermeasures to poten- tial attacks.
• Recognize some of the enemies of a secure system: complexity, backward compati-bility, backups.
• Embrace the role that hardening takes in protecting against unknown threats.
• Apply service packs to operating systems and applications throughout your company.
• Purchase, install, and keep updated antivirus software installed throughout your company networks.
• Test and scan new downloads, and practice safe computing when transferring files from public networks.
• Wipe virus-infected systems to a clean hard disk as soon as possible.
• Block malicious file attachments as they enter your network at the email server, before it reaches the client.
• Install a firewall and close off networking ports (TCP 135, 139, and 445; UDP 135, 137, and 445) and any other unused ports.
• Consider the purchase and installation of an intrusion-detection system.
5394ch01.fm Page 9 Thursday, September 8, 2005 7:48 PM
10 C H A P T E R 1 ■ S O M E W O R D S A B O U T H A R D E N I N G
• Properly restrict access to remote entry points to your network, and encourage the use of virtual private networks over traditional telephonic and modem connections.
• Implement dial-back for standard telephone connections.
• Investigate the physical segmentation of your network.
• Properly harden and secure any IIS systems on the network, and relegate IIS systems to a blocked-off segment of the network during the installation of patches.
• Read the rest of this book.
5394ch01.fm Page 10 Thursday, September 8, 2005 7:48 PM
11
■ ■ ■
C H A P T E R 2
Windows NT Security
Windows NT, by virtue of its age, is vulnerable to all sorts of attacks, from both outside and in. The most effective way to harden your NT system is to attack the problem of inse-curity from several perspectives, especially passwords, account policies, virus protection, and system policies. This chapter will give you the tools you need to achieve a reasonably hardened NT system in exchange for a bit of effort.
Windows NT System Policy EditorAkin to Group Policy, which is found in Windows 2000 and later versions, system policies in Windows NT provide a more effective way of applying and enforcing a common set of settings and security definitions across a domain of computers than tweaking settings individually on each computer. This approach is certainly not as customizable, flexible, easy-to-use, or scalable as Group Policy, but it’s still quite a bit better than manually applying hundreds of changes to multiple computers. Unfortunately, there is no direct parallel between the options available with system policies and the options available with Group Policies.
■Tip You can apply most of the methods and hardening strategies covered in later sections of this chap- ter to multiple computers using NT system policies, but you can’t apply policies to computers within Windows groups.
Windows NT loads with a default system policy in effect that continues to dictate which settings are in force whether it’s modified or not. You can view this policy and make the changes by using the NT System Policy Editor, which you access by selecting Start ➤ Run ➤ PolEdit. Once you’ve launched the program, and you’ve opened or created a new policy file from the File menu, two icons are displayed: Default User and Default Computer. These apply to all computers and all users in a domain, whereas more specific policies can apply to certain users and groups of users, as well as individual computers (for instance,
5394.book Page 11 Tuesday, August 30, 2005 10:37 PM

12 C H A P T E R 2 ■ W I N D O W S N T S E C U R I T Y
specific departments of users). Unfortunately, the idea of groups of computers was not introduced until Windows 2000 was released, and thus more creativity is required to have system policies apply to sets of computers with like roles.
When you double-click any given policy object, boxes appear on your screen that let you make changes to individual aspects of the policy. Each policy setting has three states, and you can cycle through each one by repeatedly clicking the box until the desired state appears. The three states are defined as follows:
• Settings turned on appear with a checked box beside the text describing the func-tion of the settings.
• Settings turned off appear with an unchecked box beside the text.
• Settings that have never been defined, and therefore are unused, appear with a grayed-out box.
There’s an important distinction to be made between settings that are disabled and settings that have no previous state set. Unused settings have no effect on system behavior, whereas unchecked settings, which signify that the particular policies are disabled, do affect the operation of NT in one way or another. Unused settings instruct NT to default to a particular Registry value that will define the settings’ operation for that session. At the same time the unused settings will simultaneously set or disable options in the policy override Registry settings. For example, if the Run Logon Scripts Simulta-neously policy is grayed out, the default settings in the Registry will take over. If the box is checked, then multiple scripts will run at the same time. However, if the box is unchecked, then multiple scripts will never run at the same time.
Customizing and Applying Policies to Multiple Computers
You can transfer settings between users, groups, and computers by cutting and pasting policies. This process makes a replica of the settings for the individual units. You can also apply system policies to multiple computers by taking advantage of the System Policies Update setting under the Network category. There are two modes by which multiple computers can gain access to and subsequently apply a set of system policies:
5394.book Page 12 Tuesday, August 30, 2005 10:37 PM
C H A P T E R 2 ■ W I N D O W S N T S E C U R I T Y 13
• Automatic mode, in which the remote computers contact a computer specified as the policy server, which is a primary domain controller (PDC), and download a file called NTCONFIG.POL from the NETLOGON share of that domain controller. This is automatic in that most domain controllers are always available. You can also ensure more availability by checking the Load Balancing box, which instructs clients to contact the backup domain controllers (BDCs) for a copy of the file in the event the PDC is unavailable. You can configure the NT File Replication Service to migrate the NTCONFIG.POL file to BDCs on the network automatically.
• Manual mode, in which the remote computers download a policy file (which can be named anything—there are no restrictions) from any computer on the network. This is more haphazard, because domain controllers are known to be the most available computers on the network, so users might encounter error messages if policy files are hosted on machines that are turned off frequently or otherwise disconnected from the network.
With regard to permissions, users need to be able to read these files. Administrators should be able to read and write them, and they should also own them.
To create a policy that applies to a group of users:
1. In the System Policy Editor window, select Add Group from the Edit menu.
2. Click Add, and then select the group.
3. Click OK. The main window will show the selected icons.
4. Make the policy changes for that group as necessary. This chapter provides more information on the types of changes and settings you can enable.
5. Click OK to close the Policy Editor.
Resolving Conflicts Between Multiple Policies
Conflicts between policies—for example, the Default User policy, which allows changes to a desktop background against a specific department policy prohibiting the same—are resolved according to an administrator’s specification. You can make this specification by selecting Group Priority on the Options menu. The orders of groups are determined here, and you can select which groups have priority over others by moving the selected groups up and down in the list using the appropriate buttons on the right side of the window.
5394.book Page 13 Tuesday, August 30, 2005 10:37 PM
14 C H A P T E R 2 ■ W I N D O W S N T S E C U R I T Y
■Note It’s important to remember that user-specific policies always trump any group-specific policies, regardless of the order in which they are specified in the Group Priority box.
Here’s a simple guide to the order in which policies are applied:
• Computer policy parts are applied whenever a computer either authenticates to the NT domain or connects to log on a user. If no specific computer policy part is avail-able, the Default Computer policy is used.
• User policy parts are applied when they exist, and they exclude any policies for groups of users that might exist—even if the user logging on is a member of that group. If there is no specific user policy part, the Default User policy is used, followed by any policies that apply to groups of which that user is a member.
• If there are separate policy parts for multiple groups, and users have multiple group memberships, then policies are applied one at a time, with conflicts being won by the last policy part to be applied. This is the case unless you adjust the order of policy application, as described earlier in this section.
■Tip To make your life easier, you should apply policies only to groups. If there’s a need to apply a policy to a specific person, consider creating a group and put that person in it. This strategy makes policies much more manageable.
Recommended User Policy Settings
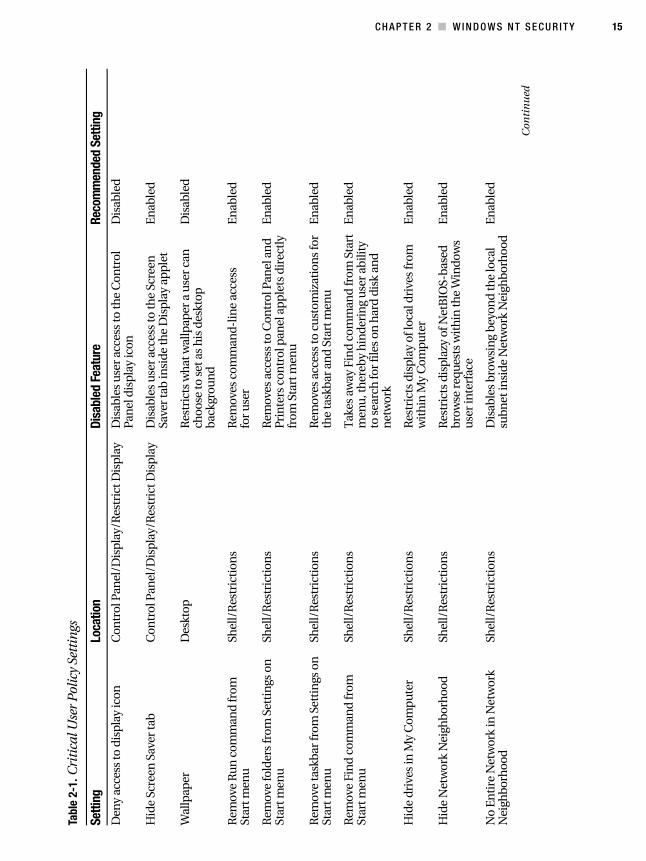
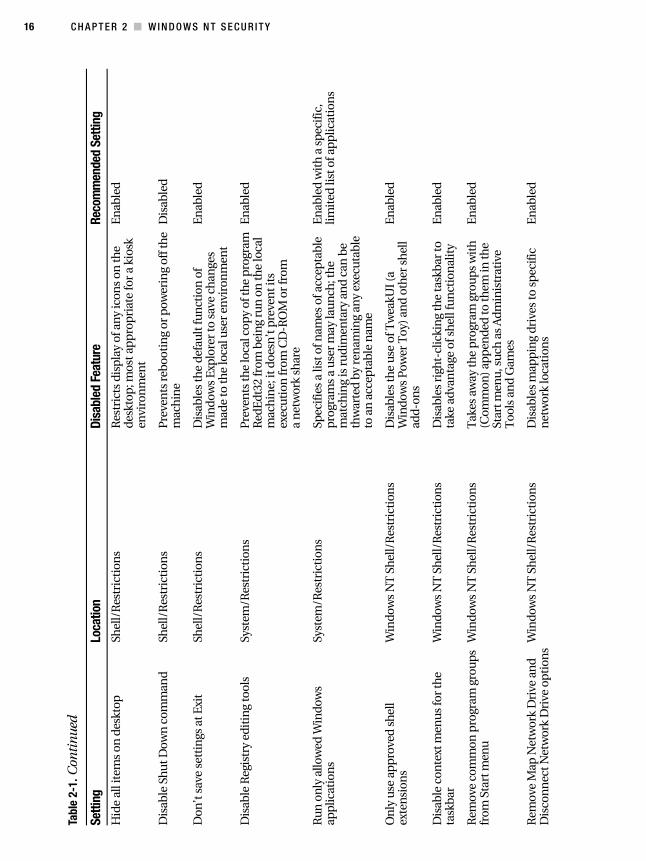
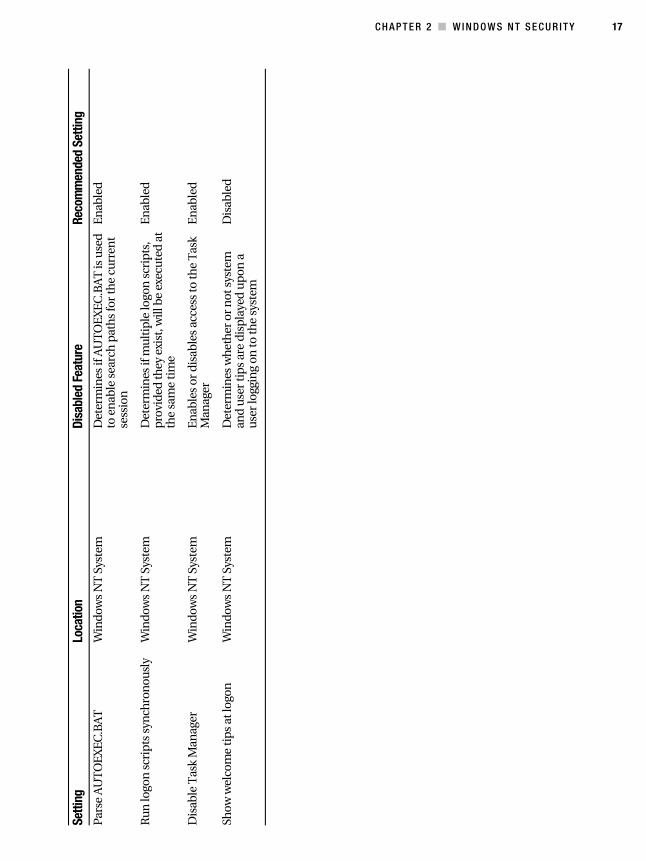
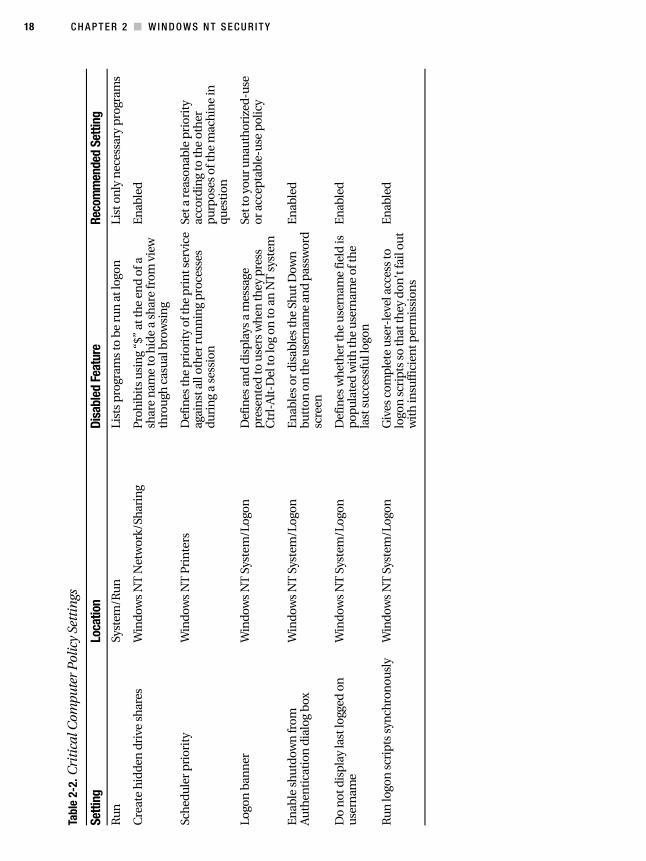
There are several critical policy settings that you should immediately define, as shown in Tables 2-1 and 2-2.
5394.book Page 14 Tuesday, August 30, 2005 10:37 PM
C H A P T E R 2 ■ W I N D O W S N T S E C U R I T Y 15
Tabl
e 2-
1. C
riti
cal U
ser
Pol
icy
Sett
ings
Setti
ngLo
catio
nDi
sabl
ed F
eatu
reRe
com
men
ded
Setti
ng
Den
y ac
cess
to d
isp
lay
icon
Con
trol
Pan
el/D
isp
lay/
Res
tric
t Dis
pla
yD
isab
les
use
r ac
cess
to th
e C
ontr
ol
Pan
el d
isp
lay
icon
Dis
able
d
Hid
e Sc
reen
Sav
er ta
bC
ontr
ol P
anel
/Dis
pla
y/R
estr
ict D
isp
lay
Dis
able
s u
ser
acce
ss to
the
Scre
en
Save
r ta
b in
side
the
Dis
pla
y ap
ple
tE
nab
led
Wal
lpap
erD
eskt
opR
estr
icts
wh
at w
allp
aper
a u
ser
can
ch
oose
to s
et a
s h
is d
eskt
op
back
grou
nd
Dis
able
d
Rem
ove
Ru
n c
omm
and
from
St
artm
enu
Shel
l/R
estr
icti
ons
Rem
oves
com
man
d-lin
e ac
cess
fo
ru
ser
En
able
d
Rem
ove
fold
ers
from
Set
tin
gs o
n
Star
t men
uSh
ell/
Res
tric
tion
sR
emov
es a
cces
s to
Con
trol
Pan
el a
nd
Prin
ters
con
trol
pan
el a
pp
lets
dir
ectl
y fr
om S
tart
men
u
En
able
d
Rem
ove
task
bar
from
Set
tin
gs o
n
Star
t men
uSh
ell/
Res
tric
tion
sR
emov
es a
cces
s to
cu
stom
izat
ion
s fo
r th
e ta
skba
r an
d St
art m
enu
En
able
d
Rem
ove
Fin
d co
mm
and
from
St
artm
enu
Shel
l/R
estr
icti
ons
Tak
es a
way
Fin
d co
mm
and
from
Sta
rt
men
u, t
her
eby
hin
deri
ng
use
r ab
ility
to
sea
rch
for
file
s on
har
d di
sk a
nd
net
wor
k
En
able
d
Hid
e dr
ives
in M
y C
omp
uter
Shel
l/R
estr
icti
ons
Res
tric
ts d
isp
lay
of lo
cal d
rive
s fr
om
wit
hin
My
Com
pu
ter
En
able
d
Hid
e N
etw
ork
Nei
ghbo
rhoo
dSh
ell/
Res
tric
tion
sR
estr
icts
dis
pla
zy o
f Net
BIO
S-ba
sed
brow
se r
eque
sts
wit
hin
the
Win
dow
s u
ser
inte
rfac
e
En
able
d
No
Enti
re N
etw
ork
in N
etw
ork
Nei
ghbo
rhoo
dSh
ell/
Res
tric
tion
sD
isab
les
brow
sin
g be
yon
d th
e lo
cal
subn
et in
side
Net
wor
k N
eigh
borh
ood
En
able
d
Con
tin
ued
5394.book Page 15 Tuesday, August 30, 2005 10:37 PM
16 C H A P T E R 2 ■ W I N D O W S N T S E C U R I T Y
Tabl
e 2-
1. C
onti
nu
ed
Setti
ngLo
catio
nDi
sabl
ed F
eatu
reRe
com
men
ded
Setti
ng
Hid
e al
l ite
ms
on d
eskt
opSh
ell/
Res
tric
tion
sR
estr
icts
dis
pla
y of
an
y ic
ons
on th
e de
skto
p; m
ost a
pp
rop
riat
e fo
r a
kios
k en
viro
nm
ent
En
able
d
Dis
able
Sh
ut D
own
com
man
dSh
ell/
Res
tric
tion
sPr
even
ts re
boot
ing
or p
ower
ing
off t
he
mac
hin
eD
isab
led
Don
’t s
ave
sett
ings
at E
xit
Shel
l/R
estr
icti
ons
Dis
able
s th
e de
fau
lt fu
nct
ion
of
Win
dow
s E
xplo
rer
to s
ave
chan
ges
mad
e to
the
loca
l use
r en
viro
nm
ent
En
able
d
Dis
able
Reg
istr
y ed
itin
g to
ols
Syst
em/R
estr
icti
ons
Prev
ents
the
loca
l cop
y of
the
pro
gram
R
edE
dt32
from
bei
ng
run
on
the
loca
l m
ach
ine;
it d
oesn
’t p
reve
nt i
ts
exec
uti
on fr
om C
D-R
OM
or
from
a
net
wor
k sh
are
En
able
d
Run
on
ly a
llow
ed W
indo
ws
app
licat
ion
sSy
stem
/Res
tric
tion
sSp
ecifi
es a
list
of n
ames
of a
ccep
tabl
e p
rogr
ams
a u
ser
may
lau
nch
; th
e m
atch
ing
is r
udi
men
tary
an
d ca
n b
e th
war
ted
by r
enam
ing
any
exec
uta
ble
to a
n a
ccep
tabl
e n
ame
En
able
d w
ith
a s
pec
ific
, lim
ited
list
of a
pp
licat
ion
s
On
ly u
se a
pp
rove
d s
hel
l ex
ten
sion
sW
indo
ws
NT
Sh
ell/
Res
tric
tion
sD
isab
les
the
use
of T
wea
kUI (
a W
indo
ws
Pow
er T
oy) a
nd
oth
er s
hel
l ad
d-on
s
En
able
d
Dis
able
con
text
men
us
for
the
task
bar
Win
dow
s N
T S
hel
l/R
estr
icti
ons
Dis
able
s ri
ght-
clic
kin
g th
e ta
skba
r to
ta
ke a
dvan
tage
of s
hel
l fu
nct
ion
alit
yE
nab
led
Rem
ove
com
mon
pro
gram
gro
ups
from
Sta
rt m
enu
Win
dow
s N
T S
hel
l/R
estr
icti
ons
Tak
es a
way
the
pro
gram
gro
up
s w
ith
(C
omm
on) a
pp
ende
d to
them
in th
e St
art m
enu,
suc
h a
s A
dmin
istr
ativ
e T
ools
an
d G
ames
En
able
d
Rem
ove
Map
Net
wor
k D
rive
an
d D
isco
nn
ect N
etw
ork
Dri
ve o
pti
ons
Win
dow
s N
T S
hel
l/R
estr
icti
ons
Dis
able
s m
app
ing
driv
es to
sp
ecifi
c n
etw
ork
loca
tion
sE
nab
led
5394.book Page 16 Tuesday, August 30, 2005 10:37 PM
C H A P T E R 2 ■ W I N D O W S N T S E C U R I T Y 17
Pars
e A
UT
OE
XE
C.B
AT
Win
dow
s N
T S
yste
mD
eter
min
es if
AU
TO
EX
EC
.BA
T is
use
d to
en
able
sea
rch
pat
hs
for
the
curr
ent
sess
ion
En
able
d
Run
logo
n s
crip
ts s
ynch
ron
ousl
yW
indo
ws
NT
Sys
tem
Det
erm
ines
if m
ult
iple
logo
n s
crip
ts,
pro
vide
d th
ey e
xist
, will
be
exec
ute
d at
th
e sa
me
tim
e
En
able
d
Dis
able
Tas
k M
anag
erW
indo
ws
NT
Sys
tem
En
able
s or
dis
able
s ac
cess
to th
e T
ask
Man
ager
En
able
d
Show
wel
com
e ti
ps
at lo
gon
Win
dow
s N
T S
yste
mD
eter
min
es w
het
her
or
not
sys
tem
an
d u
ser
tip
s ar
e di
spla
yed
up
on a
u
ser
logg
ing
on to
the
syst
em
Dis
able
d
Setti
ngLo
catio
nDi
sabl
ed F
eatu
reRe
com
men
ded
Setti
ng
5394.book Page 17 Tuesday, August 30, 2005 10:37 PM
18 C H A P T E R 2 ■ W I N D O W S N T S E C U R I T Y
Tabl
e 2-
2. C
riti
cal C
ompu
ter
Pol
icy
Sett
ings
Setti
ngLo
catio
nDi
sabl
ed F
eatu
reRe
com
men
ded
Setti
ng
Run
Syst
em/R
un
List
s p
rogr
ams
to b
e ru
n a
t log
onLi
st o
nly
nec
essa
ry p
rogr
ams
Cre
ate
hid
den
dri
ve s
har
esW
indo
ws
NT
Net
wor
k/Sh
arin
gPr
ohib
its
usi
ng
“$”
at th
e en
d of
a
shar
e n
ame
to h
ide
a sh
are
from
vie
w
thro
ugh
cas
ual
bro
wsi
ng
En
able
d
Sch
edu
ler
pri
orit
yW
indo
ws
NT
Pri
nte
rsD
efin
es th
e p
rior
ity
of th
e p
rin
t ser
vice
ag
ain
st a
ll ot
her
run
nin
g p
roce
sses
du
rin
g a
sess
ion
Set a
rea
son
able
pri
orit
y ac
cord
ing
to th
e ot
her
p
urp
oses
of t
he
mac
hin
e in
qu
esti
on
Logo
n b
ann
erW
indo
ws
NT
Sys
tem
/Log
onD
efin
es a
nd
disp
lays
a m
essa
ge
pre
sen
ted
to u
sers
wh
en th
ey p
ress
C
trl-
Alt
-Del
to lo
g on
to a
n N
T s
yste
m
Set t
o yo
ur u
nau
thor
ized
-use
or
acc
epta
ble-
use
pol
icy
En
able
sh
utd
own
from
A
uth
enti
cati
on d
ialo
g bo
xW
indo
ws
NT
Sys
tem
/Log
onE
nab
les
or d
isab
les
the
Shut
Dow
n
butt
on o
n th
e u
sern
ame
and
pas
swor
d sc
reen
En
able
d
Do
not
dis
pla
y la
st lo
gged
on
u
sern
ame
Win
dow
s N
T S
yste
m/L
ogon
Def
ines
wh
eth
er th
e u
sern
ame
fiel
d is
p
opu
late
d w
ith
the
use
rnam
e of
the
last
su
cces
sfu
l log
on
En
able
d
Run
logo
n s
crip
ts s
ynch
ron
ousl
yW
indo
ws
NT
Sys
tem
/Log
onG
ives
com
ple
te u
ser-
leve
l acc
ess
to
logo
n s
crip
ts s
o th
at th
ey d
on’t
fail
out
wit
h in
suff
icie
nt p
erm
issi
ons
En
able
d
5394.book Page 18 Tuesday, August 30, 2005 10:37 PM
C H A P T E R 2 ■ W I N D O W S N T S E C U R I T Y 19
Extending Policies
Recall that Windows 98 (including the second edition) and Windows NT were often part-ners on many corporate networks, and system policies can also extend themselves to configuring relevant settings on Windows 98 systems. Unlike Windows NT systems, which download the NTCONFIG.POL file from the NETLOGON share of the PDC, Windows 98 systems download a policy file called CONFIG.POL, which needs to be created on a Windows 98 system using the Windows 98 version of the System Policy Editor (the name of the program is POLEDIT and can be run from the Start menu using the Run option). Once you’ve finished creating the policy, save it to the NETLOGON share or the replication folder as CONFIG.POL, and it will deploy to Windows 98 clients as necessary.
ADM Files
You can extend the range of configurations and settings available with the System Policy Editor by using ADM files, which simply add the ability to manage any setting that can be applied by modifying the Registry. Microsoft makes available several ADM files with Microsoft Office–specific settings, and other security experts have also created custom ADM files that can be deployed internally without a lot of work.
You need to import an ADM file into the System Policy Editor before you can work on the settings it contains. To do so:
1. Copy the new ADM files to the %systemroot%\INF directory.
2. In the System Policy Editor, select Policy Template from the Options menu.
3. Click the Add button, and then select the ADM file you want to include.
4. Click OK.
You can now work with the settings within the System Policy Editor.
PasswordsIt’s arguable but completely believable that passwords are the weakest link in any security system. With more powerful computers working at faster speeds, what used to be a nearly impossible task—password cracking—has now become not quite trivial, but indeed much simpler. So it’s always important that your users choose good passwords that will cause difficulty to automated cracker programs.
5394.book Page 19 Tuesday, August 30, 2005 10:37 PM
20 C H A P T E R 2 ■ W I N D O W S N T S E C U R I T Y
■Note For examples of good passwords, check out the PASSPROP utility, which is included in the Windows NT Resource Kit. This small program will generate high-quality, random passwords that you can use in your organization or distribute as a model to your users.
Password Policies
Of course, you can’t teach old dogs new tricks, which is why you sometimes need to force your users into compliance. Here are several suggestions for a stringent policy that won’t cause an uprising among your users:
• Maximum password age: 90 days. This forces your users to change to a unique password every given interval. If you set this for too long of an interval, an attacker has an increased chance of obtaining a current password, but if you set it for too short of an interval, you’ll waste your security budget answering complaints about why your users have to change their passwords again. It also increases the chance of passwords appearing on sticky notes attached to monitors, and you all know that isn’t a good thing.
• Minimum password age: 1 day. More clever users may discover that, without this setting, they can circumvent the password-age requirement by changing their pass-word as mandated by the policy, and then immediately change the password back to their preferred phrase. Using this option requires the user to keep the changed password for at least one day before changing it back.
• Minimum password length: Eight characters. It’s easy to compute the probability that a three-letter password could be guessed in fewer permutations (and thus more rapidly) than a longer password. This is a surprisingly effective front against persistent password-cracking attempts.
• Password uniqueness: Five passwords. Windows will store a list of a user’s previous passwords in the Registry. Setting this option prevents the person from alternating between two common passwords, thereby forcing them to be creative and not reuse old passwords that may have been cracked.
5394ch02.fm Page 20 Wednesday, August 31, 2005 10:04 AM
C H A P T E R 2 ■ W I N D O W S N T S E C U R I T Y 21
• Account lockout: Locks after five failed attempts; resets counter after 10 minutes. Software is available to hackers that will attempt “brute force” attacks on user accounts, using a list of common passwords and a dictionary to attempt to crack an account over and over again. The lockout feature disables an account after a given number of attempts with failed passwords. The feature also includes a counter that resets the number of attempts.
• Lockout duration: 15 minutes. This option goes hand in hand with the previous configuration. The lockout duration feature resets accounts disabled by the account lockout feature. It’s important to remember the fundamental economic concept that idle users equal lost money. In a small business, this isn’t as much of an issue, because the administrator is usually available for 5 minutes to unlock a disabled account, but in organizations with thousands of sloppy typists, it can make for a large help-desk budget. Use with caution.
Password Cracking
Although it may seem like venturing to the dark side, a sage administrator can use the enemy’s tools against the enemy himself. There are numerous password-cracker utilities available for download on the Internet. The resounding favorite among most “white-hat” cracker administrators is PwDump, which can run through an NT system’s SAM database, pick out the passwords, and list them in a text dump in a format much like the /etc/passwd file you would find on a UNIX-esque system.
However, this next bit goes to show that passwords simply cannot be your only line of defense. The folks that run the site ������������� ��� ��������� have developed a Windows NT/2000/XP password cracker that can crack any alphanumeric password in 5 seconds (or 10 seconds if the password is longer than seven characters). What’s amazing is that this cracker doesn’t require a Linux-based Beowulf cluster or a supercomputer. It runs on an AMD Athlon XP 2500+ system with 1.5 GB of RAM. The really scary part is that they’ve posted a web page that allows you to enter an NT/2000/XP password hash, which you can obtain using the PwDump utility, and after a 5-second wait get the corresponding password.
There is a fix, though, if temporary. Change your NT/2000/XP passwords that contain only numbers and letters so that they also include at least one other nonalphanumeric character. Their cracker won’t crack such passwords. Obviously, that’s an artificial limita-tion. They could just as easily have calculated their large lookup tables with those non- alphanumeric password characters included.
5394.book Page 21 Tuesday, August 30, 2005 10:37 PM
22 C H A P T E R 2 ■ W I N D O W S N T S E C U R I T Y
Protecting User AccountsThough passwords are important gate sentries, they aren’t the only method of safe-guarding a system. Windows NT provides an operating system security feature called Account Policies, which lets you set restrictions on various properties of a user account.
• Rename the administrator account carefully. The administrator account is of course a popular target for crackers. By renaming the administrator account to something less obvious, you can reduce a very probable attack vector. However, this isn’t a surefire solution. You must be careful of any server products on your machine that require use of the administrator account—by renaming the account, you can break the server products beyond repair, thereby necessitating a reformat or reinstall on your server.
• Remove the Everyone group from the access control lists (ACLs) and add the Authenticated Users group in its place. This is an easy fix that won’t ruin any func-tionality on your machine. By default, Windows NT is installed with ACLs that allow reading and writing by anyone on the computer, whether that user is authenticated or not. Obviously this is a problem, because attackers on a larger network can connect to the box via standard Windows file sharing, map to a default administra-tive share like C$, and then have their way with any files on the drive. When you replace Everyone with Authenticated Users, only those who identify themselves to the computer with credentials that pass the checks of the local system authority are allowed access.
• Disable the Guest account. Few legitimate applications require access to the Guest account, and it’s a big hole in the security of a machine. The main problem with the Guest account is that you have no sense of who used the account and what that user did with it—there is no auditing or accountability for the actions performed with that account, which makes it infinitely more difficult to track down possible infiltra-tions and nefarious activity.
Registry ProceduresThe Registry is a boon to system administrators and a gold mine to undesirables. Almost every aspect of the operation of a Windows NT system is controlled by the keys, values, and hives contained therein. The following six Registry modifications are the most effec-tive ways to significantly harden the “under the hood” functionality of NT. If these keys do not exist, you will need to create them.
5394.book Page 22 Tuesday, August 30, 2005 10:37 PM
C H A P T E R 2 ■ W I N D O W S N T S E C U R I T Y 23
• Disable remote access and control of the Registry, or at the very minimum tightly control it. (HKLM\System\CurrentControlSet\Control\SecurePipeServers\Winreg, value 1; HKLM\System\CurrentControlSet\Services\LanManServer\Parameters\NullSessionPipes, value <Configure with authorized names>)
• Disable the display of the username of the last person to have used the system. (HKLM\SOFTWARE\Microsoft\Windows NT\Current Version\WinLogon\DontDisplayLastUserName, value 1)
• Set tight permissions on the security event log. (HKLM\System\CurrentControlSet\Services\EventLog\[LogName]\RestrictGuestAccess, value 1)
• Set tight permissions on printers and printer drivers, particularly those asso- ciated with certain sensitive roles, such as invoicing and check production. (HKLM\System\CurrentControlSet\Control\Print\Providers\LanManPrintServices\Servers, value 1)
• Disable anonymous logins, particularly their ability to list account names. (HKLM\System\CurrentControlSet\Control\LSAName\RestrictAnonymous, value 1)
• Set tight permissions on the ability to set scheduled tasks, either via the Windows GUI or through the command-line AT tool. (HKLM\System\CurrentControlSet\Control\Lsa\SubmitControl, value 1; HKLM\System\CurrentControlSet\Services\Schedule, value <Restrict access to administrators>)
Protecting the File SystemOnce an attacker is in a system, she can still be thwarted by establishing proper, secure file-system permissions, which are critical to fully hardening any system on any network.
Locking Down Local Directories
Table 2-3 contains a list of the most common files and directories on a Windows NT system and the suggested permissions that the group Everyone (or the group Authenti-cated Users, if you’ve taken the advice in this chapter) should have. These tend to be very restrictive, thereby reducing the surface through which a data attack could take place.
5394.book Page 23 Tuesday, August 30, 2005 10:37 PM
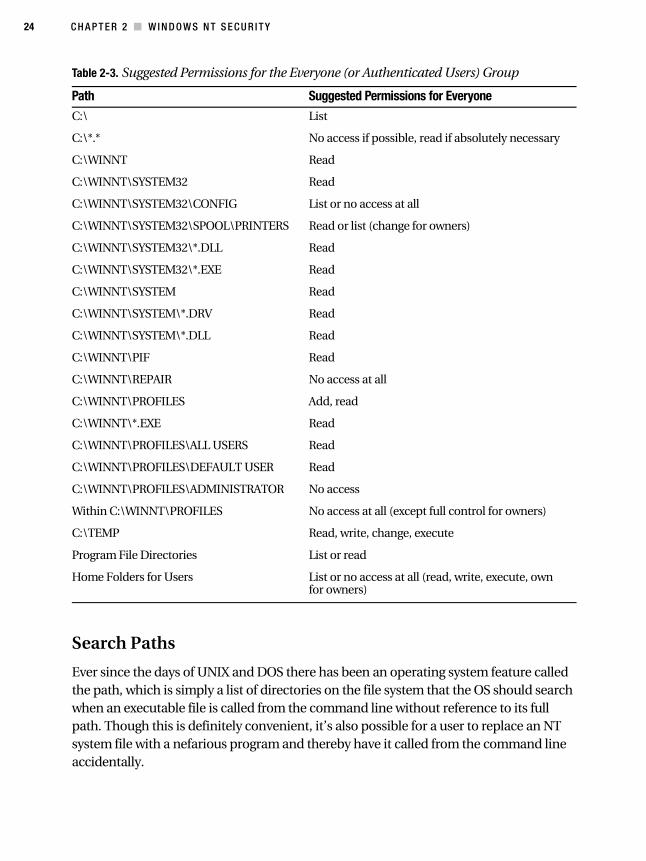
24 C H A P T E R 2 ■ W I N D O W S N T S E C U R I T Y
Search Paths
Ever since the days of UNIX and DOS there has been an operating system feature called the path, which is simply a list of directories on the file system that the OS should search when an executable file is called from the command line without reference to its full path. Though this is definitely convenient, it’s also possible for a user to replace an NT system file with a nefarious program and thereby have it called from the command line accidentally.
Table 2-3. Suggested Permissions for the Everyone (or Authenticated Users) Group
Path Suggested Permissions for EveryoneC:\ List
C:\*.* No access if possible, read if absolutely necessary
C:\WINNT Read
C:\WINNT\SYSTEM32 Read
C:\WINNT\SYSTEM32\CONFIG List or no access at all
C:\WINNT\SYSTEM32\SPOOL\PRINTERS Read or list (change for owners)
C:\WINNT\SYSTEM32\*.DLL Read
C:\WINNT\SYSTEM32\*.EXE Read
C:\WINNT\SYSTEM Read
C:\WINNT\SYSTEM\*.DRV Read
C:\WINNT\SYSTEM\*.DLL Read
C:\WINNT\PIF Read
C:\WINNT\REPAIR No access at all
C:\WINNT\PROFILES Add, read
C:\WINNT\*.EXE Read
C:\WINNT\PROFILES\ALL USERS Read
C:\WINNT\PROFILES\DEFAULT USER Read
C:\WINNT\PROFILES\ADMINISTRATOR No access
Within C:\WINNT\PROFILES No access at all (except full control for owners)
C:\TEMP Read, write, change, execute
Program File Directories List or read
Home Folders for Users List or no access at all (read, write, execute, own for owners)
5394.book Page 24 Tuesday, August 30, 2005 10:37 PM
C H A P T E R 2 ■ W I N D O W S N T S E C U R I T Y 25
There are a couple of ways to prevent this:
• Ensure that system directories come before anything else in the search path. This way, when NT looks for an executable called from the command line, it will find the version in the system directory first.
• Lock the system directory down. Remove write access from groups that don’t need it, particularly on system and program file directories. Also, lock user directories down in the same manner.
Guarding Against Internet ThreatsWindows NT comes out of the box unreasonably nonsecure. Despite the fact that NT itself has significant programming flaws that make the operating system code itself nonsecure (a fact that Microsoft officially acknowledged when it terminated support for the Work- station edition in mid-2003), it also installs with defaults that basically indicate to a would-be Internet attacker, “I am wide open. Have your way with me.”
This section covers two significant methods you can use to harden an NT system: filtering TCP/IP ports to reduce the risk of a port-vectored attack, and establishing a virus protection regimen to reduce the risk of Trojan horse, worm, and virus infiltration.
Windows NT Port Filtering
Windows NT comes with a rudimentary port filter that allows you to discard incoming packets based on their destination protocol and the protocol by which they were sent. You can access this port-filtering utility through the TCP/IP Properties page inside the Network control panel. On the Properties page, click the Advanced button of the pertinent IP address and then check the Enable Security box and click Configure.
Though the port filtering provided in NT certainly isn’t an enterprise-class firewall, it’s helpful when you have a machine that has sensitive data on it and ought to be guarded a bit more. It’s particularly helpful to have a machine that’s out in the open on the Internet and not behind some sort of protective device. You can only select ports and protocols to allow access; that is, you cannot selectively deny or configure stateful filtering, or do anything else. In fact, in future versions of Windows, the user interface for this function will be greatly improved. It allows you to select common services that a machine may be running and selectively allow them access, rather than having to come up with the entire list of ports you wish to allow without any assistance from Windows.
5394.book Page 25 Tuesday, August 30, 2005 10:37 PM
26 C H A P T E R 2 ■ W I N D O W S N T S E C U R I T Y
Protecting Against Viruses
CMP’s TechEncyclopedia defines viruses as “software used to infect a computer.” And infect certainly is a word with multiple implications. In the past, viruses wreaked all sorts of havoc, from displaying a large image of a cannabis leaf with a message urging govern-mental legalization of marijuana to killing the boot sector on a computer’s hard disk, thereby rendering it unbootable. Some even destroyed data. But most viruses were limited to the recipient’s system and the only way for them to spread was through floppy disks and other removable, writable media.
A consequence of today’s well-connected society, however, is the prevalence of Internet worms, Trojan horses, and other assorted nasties that currently plague our IT assets. Prime example: the Microsoft Blaster worm spreading itself around the Internet, infecting countless computers with little or no protection. As an administrator, you must be vigilant at counteracting the threat posed by viruses. Consider the following tips:
• Subscribe to virus-related mailing lists. NTBugTraq (���������� ��������� ��) is perhaps the most venerable of these lists, but any major antivirus product vendor will have these lists available and open to the public. Actively skimming the posts to these lists provides you with a leg up on the competition, because warnings and acknowledgments of new virus threats typically pass through those mediums before a general infection begins.
• Purchase antivirus software specifically designed for NT. Most consumer or prosumer antivirus products aren’t designed for NT’s environment, which hampers a lot of the low-level operating system access these programs need. Make sure that you buy only software designed for Windows NT systems.
• Configure your antivirus software to perform automatic virus-definition updates. These are generally free for one year with the purchase of an antivirus package, and even the renewal fees are a small price to pay compared to the cost of a rampant infection.
• Pay considerable attention to the integrity of code and applications downloaded from the Internet. Something from the Internet may not be what it seems, and that particular scenario is becoming more likely with each day. Test downloaded code in a “sandboxed” system, that is, unconnected to the Internet, in order to ensure that it has no malicious intent or effects.
5394.book Page 26 Tuesday, August 30, 2005 10:37 PM
C H A P T E R 2 ■ W I N D O W S N T S E C U R I T Y 27
• If you can find a copy of anti-spyware software that will run on Windows NT, install it to help keep the system free of these nasty programs.
• Install software as an un- or under-privileged user. Try to avoid software that requires administrator privileges to run. Always generate a new user account for a new software package that you don’t necessarily trust. Grant it just enough rights and permissions for the program to run.
Assigning Rights to UsersIn conjunction with system policies, user rights serve to define the boundaries of accept-able actions on the parts of users of a Windows NT system. User rights take a broader view, and generally aren’t concerned so much with any single action but with a “genre” of actions that affect system behavior as a whole. User rights also tend to be limited to classes of users below administrators. That is to say, with few exceptions, members of the Administrators group are never prevented from performing tasks vital to their daily duties no matter what a user-rights setting might indicate.
There are two fundamental groups of rights: basic and advanced. Basic rights are those commonly assigned to users and groups and those that typically might be reassigned and otherwise altered from their default. Advanced rights are those that sparingly need to be changed from their default settings. In addition, advanced rights are mainly granted to applications and administrators, not lower-level regular users and power users.
Granting and Revoking User Rights
User rights are assigned from within the User Manager (or User Manager for Domains). Click the Policies menu, and then select User Rights. This opens a User Rights Policy box, which specifies the domain or computer to which the rights settings will apply. You can also see the specific right, which can be changed using the drop-down list, as well as the list of users to which the right is granted. You can enable the display of advanced rights, as described earlier in this section, by checking the appropriate box at the bottom of the window.
Table 2-4 lists all user rights available to be defined, their function, and the recom-mended users and groups that should be granted that right. Generally, from an ease-of-management standpoint, it’s best to grant rights to groups of users rather than individual users. By granting individual rights you’ll find yourself in a patchwork of differing permis-sions among users. This will make it difficult to track and troubleshoot access problems. In addition, the default groups to which Windows NT assigns rights are already in a reasonably hardened rights structure. You shouldn’t find much need to change the groups or the rights.
5394.book Page 27 Tuesday, August 30, 2005 10:37 PM
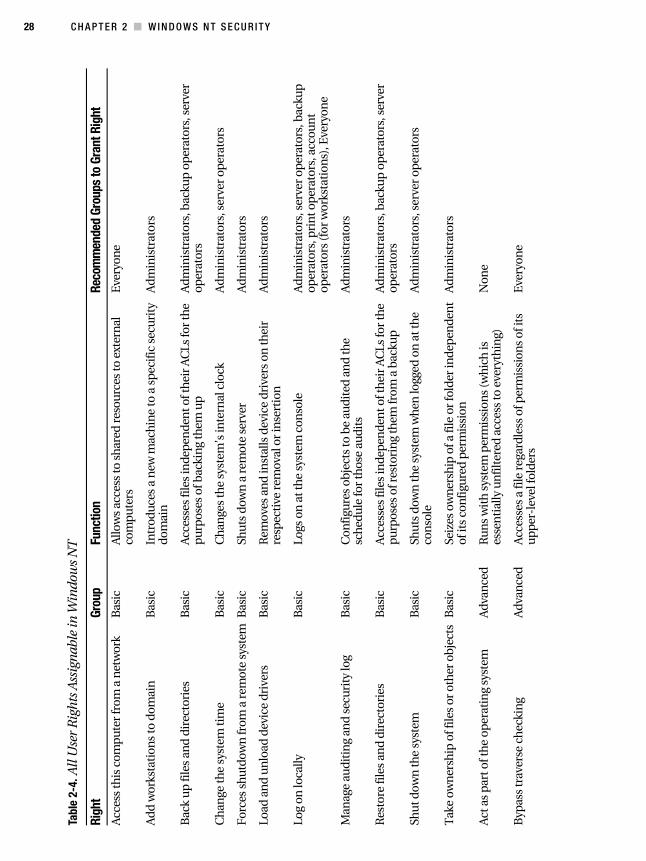
28 C H A P T E R 2 ■ W I N D O W S N T S E C U R I T Y
Tabl
e 2-
4. A
ll U
ser
Rig
hts
Ass
ign
able
in W
indo
ws
NT
Righ
tGr
oup
Func
tion
Reco
mm
ende
d Gr
oups
to G
rant
Rig
ht
Acc
ess
this
com
put
er fr
om a
net
wor
kB
asic
Allo
ws
acce
ss to
sh
ared
res
ourc
es to
ext
ern
al
com
pu
ters
Eve
ryon
e
Add
wor
ksta
tion
s to
dom
ain
Bas
icIn
trod
uces
a n
ew m
ach
ine
to a
sp
ecif
ic s
ecu
rity
do
mai
nA
dmin
istr
ator
s
Bac
k u
p fi
les
and
dire
ctor
ies
Bas
icA
cces
ses
file
s in
dep
ende
nt o
f th
eir
AC
Ls fo
r th
e p
urp
oses
of b
acki
ng
them
up
Adm
inis
trat
ors,
bac
kup
op
erat
ors,
ser
ver
oper
ator
s
Ch
ange
the
syst
em ti
me
Bas
icC
han
ges
the
syst
em’s
inte
rnal
clo
ckA
dmin
istr
ator
s, s
erve
r op
erat
ors
Forc
es s
hu
tdow
n fr
om a
rem
ote
syst
emB
asic
Shu
ts d
own
a r
emot
e se
rver
Adm
inis
trat
ors
Load
an
d un
load
dev
ice
driv
ers
Bas
icR
emov
es a
nd
inst
alls
dev
ice
driv
ers
on th
eir
resp
ecti
ve r
emov
al o
r in
sert
ion
Adm
inis
trat
ors
Log
on lo
cally
Bas
icLo
gs o
n a
t th
e sy
stem
con
sole
Adm
inis
trat
ors,
ser
ver
oper
ator
s, b
acku
p
oper
ator
s, p
rin
t op
erat
ors,
acc
oun
t op
erat
ors
(for
wor
ksta
tion
s), E
very
one
Man
age
audi
tin
g an
d se
curi
ty lo
gB
asic
Con
figu
res
obje
cts
to b
e au
dite
d an
d th
e sc
hed
ule
for
thos
e au
dits
Adm
inis
trat
ors
Res
tore
file
s an
d di
rect
orie
sB
asic
Acc
esse
s fi
les
inde
pen
den
t of t
hei
r A
CLs
for
the
pu
rpos
es o
f res
tori
ng
them
from
a b
acku
pA
dmin
istr
ator
s, b
acku
p o
per
ator
s, s
erve
r op
erat
ors
Shu
t dow
n th
e sy
stem
Bas
icSh
uts
dow
n th
e sy
stem
wh
en lo
gged
on
at t
he
con
sole
Adm
inis
trat
ors,
ser
ver
oper
ator
s
Tak
e ow
ner
ship
of f
iles
or o
ther
obj
ects
Bas
icSe
izes
ow
ner
ship
of a
file
or
fold
er in
dep
ende
nt
of it
s co
nfi
gure
d p
erm
issi
onA
dmin
istr
ator
s
Act
as
par
t of t
he
oper
atin
g sy
stem
Adv
ance
dR
un
s w
ith
sys
tem
per
mis
sion
s (w
hic
h is
es
sen
tial
ly u
nfi
lter
ed a
cces
s to
eve
ryth
ing)
Non
e
Byp
ass
trav
erse
ch
ecki
ng
Adv
ance
dA
cces
ses
a fi
le r
egar
dles
s of
per
mis
sion
s of
its
up
per
-lev
el fo
lder
sE
very
one
5394.book Page 28 Tuesday, August 30, 2005 10:37 PM

C H A P T E R 2 ■ W I N D O W S N T S E C U R I T Y 29
Cre
ate
a p
age
file
Adv
ance
dC
onst
ruct
s an
d co
nfi
gure
s a
pag
ing
file
for
virt
ual m
emor
yA
dmin
istr
ator
s
Cre
ate
a to
ken
obj
ect
Adv
ance
dM
akes
a to
ken
Non
e
Cre
ate
per
man
ent s
har
ed o
bjec
tsA
dvan
ced
Mak
es o
bjec
ts th
at p
rogr
ams
and
the
oper
atin
g sy
stem
can
sh
are
Non
e
Deb
ug
pro
gram
sA
dvan
ced
Ru
ns
wit
h d
ebu
g bi
ts c
onfig
ure
d fo
r ac
cess
Adm
inis
trat
ors
Gen
erat
e se
curi
ty a
udi
tsA
dvan
ced
Sets
au
dit e
ven
ts a
ccor
din
g to
a s
yste
m a
udi
t p
olic
yN
one
Incr
ease
qu
otas
Adv
ance
dM
odif
ies
syst
em-r
esou
rce
hea
p q
uot
as a
nd
con
trol
s ac
cess
to m
emor
y an
d C
PU ti
me
Adm
inis
trat
ors
Incr
ease
sch
edu
ling
pri
orit
yA
dvan
ced
Rai
ses
the
pri
orit
y of
a p
roce
ss a
gain
st a
ll ot
her
ru
nn
ing
pro
cess
esA
dmin
istr
ator
s
Lock
pag
es in
mem
ory
Adv
ance
dR
estr
ain
s a
pag
e of
dat
a to
rea
l mem
ory
for
an
inde
fin
ite
per
iod
of ti
me
Non
e
Log
on a
s a
batc
h jo
bA
dvan
ced
Use
d fo
r ap
plic
atio
ns
that
can
reg
iste
r as
a
batc
h w
ith
the
oper
atin
g sy
stem
Non
e
Log
on a
s a
serv
ice
Adv
ance
dU
sed
for
app
licat
ion
s th
at c
an r
egis
ter
as a
se
rvic
e w
ith
the
oper
atin
g sy
stem
Non
e
Mod
ify fi
rmw
are
envi
ron
men
t val
ues
Adv
ance
dH
ardw
are-
dep
ende
nt m
odifi
cati
on o
f var
iabl
es
rega
rdin
g a
sess
ion
Adm
inis
trat
ors
Prof
ile s
ingl
e p
roce
ssA
dvan
ced
Tak
es s
tati
stic
s on
pro
cess
per
form
ance
for
one
spec
ific
pro
cess
Adm
inis
trat
ors
Prof
ile s
yste
m p
erfo
rman
ceA
dvan
ced
Use
s th
e Pe
rfor
man
ce M
onit
or u
tilit
yA
dmin
istr
ator
s
Rep
lace
a p
roce
ss-l
evel
toke
nA
dvan
ced
Mod
ifie
s a
pro
cess
’s e
nvi
ron
men
tN
one
Righ
tGr
oup
Func
tion
Reco
mm
ende
d Gr
oups
to G
rant
Rig
ht
5394.book Page 29 Tuesday, August 30, 2005 10:37 PM
30 C H A P T E R 2 ■ W I N D O W S N T S E C U R I T Y
Remote Access Server ConfigurationThe Windows NT 4.0 Remote Access Server (RAS) is bundled with the product and provides clients a way to remotely access the corporate domain network. The NT Option Pack includes the Routing and Remote Access Service (RRAS), which extends some of the functionality of RAS. By default, these services provide a limited amount of security, since at the time of their creation, compatibility with legacy clients was paramount and security was less of an issue.
■Tip First and foremost, make sure only users who require remote access have it enabled in their user properties. Disable this right for all other users.
The first task to accomplish is to limit access to the COM port on the RAS server itself. In most instances, this will mean setting the server only to receive calls, but if you’ve chosen a dial-back configuration (in which clients dial the server and the server hangs up and then returns the call to a predefined number for that user), then you’ll need to enable bidirectional calling. To make these changes:
1. Right-click on Network Neighborhood and select Properties from the context menu.
2. Navigate to the Services tab and click on Remote Access Service.
3. Click Properties.
4. Click Configure.
5. Select the appropriate option under the Port Usage section, and then click OK.
Selecting Appropriate Communications Protocols and Methods
The next step is to limit the protocols that can be used with RAS and RRAS, and to require encryption for those protocols. To do so:
1. Right-click on Network Neighborhood and select Properties from the context menu.
2. Navigate to the Services tab and click on Remote Access Service.
5394.book Page 30 Tuesday, August 30, 2005 10:37 PM
C H A P T E R 2 ■ W I N D O W S N T S E C U R I T Y 31
3. Click Properties.
4. The Remote Access Setup screen appears. Click Network.
5. Select the dial-out protocol. I recommend only TCP/IP.
6. Under Server Settings, select only TCP/IP (unless you absolutely require some-thing else). Then, click the Configure button.
7. Select Allow remote TCP/IP clients to access this computer only, unless your clients need regular access to the network. Click OK.
8. Select Require data encryption, which will automatically require MS-CHAP or, optionally, MS-CHAP v2 for authentication—a relatively secure choice.
9. Click OK.
10. Click Continue.
Security Implications of DomainsWindows NT domains are relatively simple when compared to the complexity of the domain functionality in Active Directory. Domains are simply logical security boundaries for a particular Windows network, with everything in a domain accounted for in a central authentication database that is accessible to any user or object in the domain with appro-priate rights. Trusts between domains can be manually created when administrators agree, allowing users and objects from one domain to access resources in the other domain (and vice versa, in the case of a two-way trust).
It is inadvisable to create trusts unless it’s absolutely necessary for users in one domain to access resources in another. If trusts must be created, examine one-way trusts as a way of further refining and limiting access. With one-way trusts, the access only goes between point A and point B; the ability to access resources doesn’t flow in the opposite direction. If you have a lot of sensitive information, or data that needs to be very tightly controlled, consider placing it on servers that are members of a domain that has few, or ideally, no trust relationships.
If you are still in the process of creating your NT domains, consider any possible way to use a single-domain model. Trusts can be difficult to administer and troubleshoot, and a single-domain model is much simpler to audit and control access within. And as always, make sure client systems do not have shares that host files.
5394.book Page 31 Tuesday, August 30, 2005 10:37 PM
32 C H A P T E R 2 ■ W I N D O W S N T S E C U R I T Y
CheckpointsIn this chapter, I’ve discussed complete solutions for hardening an NT system against several kinds and methods of attack. Briefly, the main action points are as follows:
• Use Windows NT system policies and the System Policy Editor to set appropriately restrictive system policies for your organization.
• Set the maximum password age for your users to 90 days.
• Set the minimum password age for your users to 1 day.
• Set the minimum password length for your users to eight characters.
• Set the uniqueness factor for your passwords to at least five.
• Set the account lockout settings to five failed attempts and a counter reset after 10 minutes.
• Change your NT/2000/XP passwords that contain only numbers and letters so that they also include at least one other nonalphanumeric character.
• Rename the administrator account carefully.
• Remove the Everyone group from the ACLs and add the Authenticated Users group in its place.
• Disable the Guest account.
• Disable remote access and control of the Registry, or at the very minimum tightly control it.
• Disable the display of the username of the last person to have used the system.
• Set tight permissions on the security event log.
• Set tight permissions on printers and printer drivers, particularly those associated with certain sensitive roles, such as invoicing and check production.
• Disable anonymous logins, particularly their ability to list account names.
• Set tight permissions on the ability to set scheduled tasks, either via the Windows GUI or through the command-line AT tool.
5394.book Page 32 Tuesday, August 30, 2005 10:37 PM
C H A P T E R 2 ■ W I N D O W S N T S E C U R I T Y 33
• Secure local directories and assign restrictive permission to the Everyone or Authenticated Users group on those directories.
• Ensure that system directories come before anything else in the search path.
• Lock down the operating system directory very securely.
• Use the included port-filtering utility to restrict network traffic to incoming ports on which legitimate business is conducted.
• Be aware of new threats by subscribing to virus-related mailing lists.
• Purchase antivirus software specifically designed for NT, not just any software for “all versions of Windows.”
• Configure your antivirus software to perform automatic virus-definition updates, preferably on a nightly or at least weekly basis.
• Pay considerable attention to the integrity of code and applications downloaded from the Internet.
• Install software as an un- or under-privileged user.
• Grant user rights only to those users who need it.
• Assign default user rights to appropriate groups, as detailed earlier in the chapter.
• Limit access to your RAS server from afar by requiring dial-back.
• Specify secure protocols and require data encryption for remote access communications.
• Don’t create trusts unless it’s absolutely necessary for users in one domain to access resources in another.
• If trusts must be created, examine one-way trusts as a way of further refining and limiting access.
• Use a single-domain model when at all possible.
• Do not allow client machines to host shares.
5394.book Page 33 Tuesday, August 30, 2005 10:37 PM

5394.book Page 34 Tuesday, August 30, 2005 10:37 PM
35
■ ■ ■
C H A P T E R 3
Windows 2000 Security
Windows suffers from the WOOB syndrome: It’s wide open out of the box so that the user has all features and capabilities accessible to him automatically if he wants them. Unfortunately, the undesirables on the Internet have decided to take advantage of this unguarded default state and use it as a basis for staging attacks, hack attempts, and general computing mayhem.
This chapter focuses on protecting Windows 2000 Professional and Server, Windows XP Professional, and Windows Server 2003 through the use of system updates and update audits, password policies, user-account protection, and basic local computer-security policies.
System UpdatesThe first step to configuring any new Windows system is to update it with the latest service pack. Service packs are updates to critical Windows system files based on bug reports, security vulnerabilities, and (rarely) new features. Windows operating system service packs are normally cumulative in that they contain all fixes and service packs previous to the current level.
As of this writing, the latest service pack level available for the Windows 2000 platform is Service Pack 4, although there is what Microsoft terms a “security” rollup available for post–Service Pack 4 patching. The Windows XP client platform also has Service Pack 2 available. Both of these update packs are offered in two distinct versions:
• Microsoft Update service: With this option, the Microsoft Update website down-loads an ActiveX control to your computer and searches your installed operating system for updates that are needed. It then custom-delivers a service pack to you based on the update level of your current system. For example, you may have downloaded five of nine critical security updates. The version of the service pack you receive will be built to deliver the remaining four updates and anything else that hasn’t already been updated. Surf to �������������� ������ �� to get started using this version.
5394ch03.fm Page 35 Wednesday, August 31, 2005 10:20 AM
36 C H A P T E R 3 ■ W I N D O W S 2 0 0 0 S E C U R I T Y
• Network Download version: This is the complete service pack executable file designed to be stored on a file server and installed from a central location, either manually by a system administrator or automatically using automated tools like Systems Management Server or Microsoft Operations Manager. These files are usually hundreds of megabytes in size, so they’re apt to be burned on CD and stored for easy distribution.
The “Slipstreaming” Process
Many administrators complain that as they receive new systems to deploy on the corpo-rate network, it takes an increasing amount of time, relative to the age of the operating system (and therefore the number and complexity of updates released for that OS) to get said systems prepared for everyday use. Even if the systems come with an operating system preinstalled and updated, it’s likely that you have your own way of initially config-uring a system and its applications, and you probably wipe the system clean and reinstall the system.
You may have an image file to aid in new system deployment, created using a tool like Symantec’s Ghost or DriveImage or the Altiris line of network management and deploy-ment tools, but you still must keep your master image updated. Hence, a real need is created for a standard Windows distribution CD-ROM with the latest service pack completely integrated, or “slipstreamed.”
Fortunately, Microsoft has made it easy to create this handy tool. You’ll need the network/administrative (in other words, the full) version of the service pack for your respective platform. To create the slipstreamed CD, do the following:
1. Copy a stock Windows distribution CD into a directory on your hard drive. For the remainder of this example, let’s use c:\windist. You’ll likely need to create this directory.
2. Create a directory called c:\winsp, and copy the downloaded service pack file there. Let’s assume the service pack file is named w2ksp4.exe.
3. Extract the service pack to that directory by executing the following command from the command line or by selecting Start ➤ Run:
����������
4. Now, update the files from the regular Windows distribution CD with the new service pack files by executing the following command from the command line or from Start ➤ Run:
������������������ �!"#�$� �!"##%#�&'�(���������
5394ch03.fm Page 36 Wednesday, August 31, 2005 10:20 AM
C H A P T E R 3 ■ W I N D O W S 2 0 0 0 S E C U R I T Y 37
The files are then updated, and the process is complete. At this point, you can create a new CD for your own purposes, or create an administrative share for use with Remote Installation Service (RIS) and other tools. Slipstreaming is an easy way to make sure new systems are updated before they’re ever put into production.
Critical Updates and Security Hotfixes
Of course, it takes time to create service packs and test them for wide distribution. And it seems new bugs and security vulnerabilities are discovered on a daily basis, if not more often. To address these problems, Microsoft releases “hotfixes,” which patch specific problems. Normally, these aren’t as widely tested as service packs, which have formal technical beta programs with thousands of testers with various systems and implementa-tions, and they sometimes can cause instability. However, a cogent risk versus reward analysis would generally lead a prudent administrator to believe that applying hotfixes is a good protective measure.
There are a couple of different ways to get your systems updated with the latest hotfix files. As described earlier in this chapter, you can visit Windows Update (���������������������� ��) and dynamically receive any updates that Microsoft deems important. Also, with Windows 2000 Service Pack 3, 4, and all versions of Windows XP Home and Professional, the Critical Update Notification (CUN) service is available. This tool periodically checks the Windows Update catalog for new updates and alerts you to their presence. Upon installation of either the service pack or Windows XP itself, you should be prompted to configure this service.
Managing Critical Updates Across Multiple Computers
While the CUN tool and Windows Update are nice for individual users and small organi-zations, a more appropriate tool is available for network administrators. Microsoft has licensed a utility from Shavlik Technologies called HFNetChk. HFNetChk is a command-line tool that scans client computers for installed updates and patches. The comparison is based on an XML file of all available updates and the criteria for those updates, and Microsoft constantly updates the list.
The first time you run the tool, it will download the signed XML file, verify the file’s authenticity, and decompress it. HFNetChk then scans the selected computers to figure out the level of the operating system, service packs, and programs installed on the systems. HFNetChk looks at three aspects of your system to determine if a patch is installed: the Registry key that’s installed by the patch, the file version, and the checksum for each file that’s installed by the patch. By default, HFNetChk compares the files and Registry details on the computer that’s being scanned to the XML file it downloads. If any of the three criteria discussed previously aren’t satisfied, the tool considers the associated patch to be absent, and the results are displayed on the console. In the default
5394ch03.fm Page 37 Wednesday, August 31, 2005 10:20 AM
38 C H A P T E R 3 ■ W I N D O W S 2 0 0 0 S E C U R I T Y
configuration, HFNetChk output displays only those patches that are necessary to bring your computer up to date.
To use the tool, enter and run hfnetchk from the command line. Table 3-1 lists some command-line switches and their use.
Security TemplatesMicrosoft wisely decided to ship Windows 2000 with a few predefined security settings files, hereafter referred to as “security templates.” These files contain what are essentially recipes for configuring a machine’s security policy based on its daily role. There are six predefined security templates:
Table 3-1. Basic HFNetChk Command-Line Switches
Switch Function-h Specifies the NetBIOS computer name to scan. Separate multiple host names with a
comma. Example: hfnetchk -h computer1, computer2, server1, server2.
-fh Specifies the name of a file that contains NetBIOS computer names to scan, with one computer name on every line and up to 256 listings in the file. Example: hfnetchk -fh computers_to_scan.txt.
-i Specifies the Internet Protocol (IP) address of the computer to scan. Separate multiple IP addresses with a comma. Example: hfnetchk -i 172.16.1.10, 172.16.1.50, 192.168.1.10.
-fip Specifies the name of a file that contains addresses to scan, with one IP address for every line and up to 256 listings in a file. Example: hfnetchk -fip IP_addresses_to_scan.txt.
-r Specifies the IP address range to be scanned, starting with ipaddress1 and ending with ipaddress2 inclusive. Example: hfnetchk -r 172.16.1.1-172.16.1.35.
-d Specifies that all computers in the NetBIOS domain name should be scanned. Example: hfnetchk -d.
-n Scans all computers available on the network.
-b Scans only for those hotfixes marked as baseline critical by Microsoft. This switch requires the latest service pack to be installed.
-o Specifies the desired output format. “tab” outputs in tab-delimited format, which is useful for importing results into spreadsheets or databases. “wrap” outputs in a word-wrapped format. Example: hfnetchk -o tab.
-x Specifies the XML data source that contains the hotfix information. The location may be an XML file name, compressed XML .cab file, or a Uniform Resource Locator (URL). Example: hfnetchk -x mssecure.xml.
5394ch03.fm Page 38 Wednesday, August 31, 2005 10:20 AM
C H A P T E R 3 ■ W I N D O W S 2 0 0 0 S E C U R I T Y 39
• For computers running Windows 2000 Professional, basicwk.inf and securewk.inf
• For computers running Windows 2000 Server, basicsv.inf and securesv.inf
• For computers running Windows 2000 Server and functioning as a domain controller, basicdc.inf and securedc.inf
Inside these templates are specifications for almost all aspects of local security policy—the only area of local policy not included is user rights and groups. You’ll need to con- figure any desired user rights and groups modifications yourself. Additionally, Microsoft chose to include incremental security templates that go above and beyond the specifica-tions made in the basic templates. These templates, designed to be applied to new Windows 2000 installations that have already had a basic template applied, must be used on systems formatted with NTFS, at least on the boot partition (the one containing the operating system files). The incremental security templates are as follows:
• For workstations or servers in which users ought to be prevented from being in the Power Users group, apply the compatws.inf template. This template compensates for the lack of additional privileges afforded to members of the Power Users group by relaxing the rights restrictions on the normal Users group.
• To further secure workstations or servers, the securews.inf template increases the overall security level of a machine by tightening areas of the OS not under the purview of rights and restrictions. Areas that are more secured using this template include account policy settings, auditing controls, and Registry keys that are prom-inent in security policy. The appropriate version of this template for Windows 2000 domain controllers is securedc.inf.
• For the ultraparanoid and those with the most stringent security requirements, the hisecws.inf file (and for domain controllers, the hisecdc.inf file) can be used; however, because all network transmissions must be signed and encrypted by Windows 2000 machines, this template is appropriate only in pure Windows 2000 or greater environments.
These convenient templates are designed to be used with the Security Templates snap-in to the Microsoft Management Console (MMC). Using the snap-in, you can apply the basic and incremental security templates included with the product, or you can make custom modifications to the templates and create your own easily distributable template.
5394ch03.fm Page 39 Wednesday, August 31, 2005 10:20 AM
40 C H A P T E R 3 ■ W I N D O W S 2 0 0 0 S E C U R I T Y
To begin using the Security Templates snap-in, follow this procedure:
1. Enter and run mmc /s from a command line. This loads the Microsoft Man-agement Console in author mode, allowing you to add a snap-in.
2. From the Console menu, select Add/Remove Snap-in. Then click Add. This opens a dialog box titled Add Standalone Snap-in.
3. From the list, select Security Templates, click Add, and then click Close.
4. Click OK in the next dialog box to confirm the addition of the snap-in.
You now have the Security Templates snap-in added to a console. From this snap-in, you can expand the Security Templates section in the console tree on the left, and then expand the C:\WINNT\security\templates folder to view the predefined security templates that were previously discussed.
Creating a Custom Security Template
You may wish to make your own customized policy modifications that go further than those made in the templates shipped with Windows 2000. Creating a custom security template affords you an easy way to package, deploy, and apply these modifications with minimal administrative headaches. Best of all, you can use these templates in conjunc-tion with a utility called the Security Configuration and Analysis tool to assess the overall “hardness,” or state of security, of your machines.
To create your own security template, do the following:
1. In the Security Templates console, expand Security Templates in the tree view on the left, and right-click C:\WINNT\security\templates (this is the default tem-plates folder in the system).
2. Select New Template from the context menu that appears.
You may now make any policy modifications you wish in any one of the policy areas supported by the tool: account policies, local policies, the event log, restricted groups, system services, the Registry, and the file system. Your additions, deletions, and other changes are saved directly into the template as they’re made.
To take this one step further, you may decide to build on the basic policy settings provided by the basic and incremental templates shipped with Windows 2000. In that case, it’s quite simple to open the basic or incremental templates, resave to a different name, and make further modifications to it in order to create your own custom template, as shown in the following procedure:
5394ch03.fm Page 40 Wednesday, August 31, 2005 10:20 AM
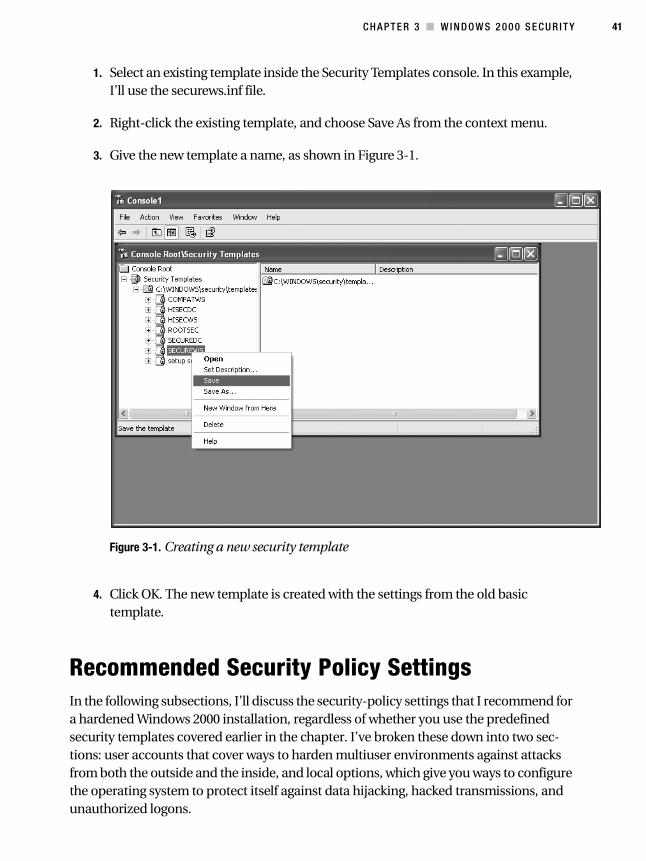
C H A P T E R 3 ■ W I N D O W S 2 0 0 0 S E C U R I T Y 41
1. Select an existing template inside the Security Templates console. In this example, I’ll use the securews.inf file.
2. Right-click the existing template, and choose Save As from the context menu.
3. Give the new template a name, as shown in Figure 3-1.
Figure 3-1. Creating a new security template
4. Click OK. The new template is created with the settings from the old basic template.
Recommended Security Policy SettingsIn the following subsections, I’ll discuss the security-policy settings that I recommend for a hardened Windows 2000 installation, regardless of whether you use the predefined security templates covered earlier in the chapter. I’ve broken these down into two sec- tions: user accounts that cover ways to harden multiuser environments against attacks from both the outside and the inside, and local options, which give you ways to configure the operating system to protect itself against data hijacking, hacked transmissions, and unauthorized logons.
5394ch03.fm Page 41 Wednesday, August 31, 2005 10:20 AM
42 C H A P T E R 3 ■ W I N D O W S 2 0 0 0 S E C U R I T Y
User Accounts
Multiuser systems are security holes in and of themselves. If you recall, the Windows NT operating system achieved government C2-level (orange book) security accreditation back in the mid-1990s. Although this seemed impressive initially, the joke was that the OS was only C2-certifiable in a non-networked, standalone environment. Given that NT was billed as a network operating system that would be used by many people, it was effectively a nonstarter to use C2 as a selling point.
Unfortunately, everyone needs multiple user accounts, so this section focuses on hard-ening these accounts as much as possible.
Password Requirements
Long passwords are more secure, period. The mathematics of the issue are fairly obvious: There are more permutations and combinations to try when brute-force cracking a longer password. Additionally, common English words (on which a dictionary attack can be based) are usually shorter than eight characters, making them easy to crack. Finally, aging passwords are nonsecure. Though most users tend to change their passwords on a regular basis when encouraged by administrators, some accounts—namely the Administrator and Guest accounts—often have the same password for life, which makes them an easy target for attack. To set these restrictions, do the following:
1. Open the Microsoft Management Console and navigate to the Local Computer Policy snap-in. This is normally under Start ➤ Programs ➤ Administrative Tools.
2. Navigate down the tree, through Security Settings, to Account Policies.
3. Click Password Policy.
4. Enable the Passwords Must Meet Complexity Requirements setting.
5. Change the Minimum Password Length to 8 characters.
6. Change the Maximum Password Age setting to 90 days.
Account Lockout Policies
An old-fashioned method for gaining unauthorized access to a system is to attempt authentication using a known username, or an unknown username that’s derived logi-cally along with a different password on each attempt. Windows can thwart this attack using an account lockout policy, which will disable an account for a specified period of time after a certain number of unsuccessful logon attempts.
To set the account lockout policy, do the following:
5394ch03.fm Page 42 Wednesday, August 31, 2005 10:20 AM
C H A P T E R 3 ■ W I N D O W S 2 0 0 0 S E C U R I T Y 43
1. Open the Microsoft Management Console and navigate to the Local Computer Policy snap-in. This is normally under Start ➤ Programs ➤ Administrative Tools.
2. Navigate down the tree, through Security Settings, to Account Policies.
3. Click Account Lockout Policy.
4. Set the Account Lockout Threshold to 3 for the maximum number of bad login attempts.
5. Set both the Account Lockout Duration and Reset Account Lockout After options to 15 minutes.
Local Options
In addition to securing local accounts, the newer Windows platforms give you the ability to lock down certain rights and configurations on the local computer, beyond any domain security policy that might be configured. Several of the options available do little to thwart attacks, so in this section I’ve covered the seven most effective changes you can make to your local security policy.
■Note You can enable all of the hardening suggestions in this section in the Security Options section of the Microsoft Management Console’s Local Computer Policy snap-in. You can find this snap-in normally by selecting Start ➤ Programs ➤ Administrative Tools. To get to the appropriate section, navigate to the snap-in tree by selecting Computer Configuration ➤ Windows Settings ➤ Security Settings ➤ Local Policies. Then click Security Options, and the different configuration switches will appear in the right-hand pane.
The instructions in this section assume that you’ve already loaded the snap-in and navigated to the appropriate section.
Anonymous Access
Windows allows access by an anonymous user to many shares and files through the use of a null user account; this is a security hazard, of course. You can still enable anonymous access to files and directories by explicitly granting rights to the ANONYMOUS USER account in Windows inside the appropriate access control list (ACL). This setting merely disables it by default, so you know exactly where connections are being made.
To fix this hazard, set the Additional Restrictions for Anonymous Connections selec-tion to No Access Without Explicit Anonymous Permissions.
5394ch03.fm Page 43 Wednesday, August 31, 2005 10:20 AM
44 C H A P T E R 3 ■ W I N D O W S 2 0 0 0 S E C U R I T Y
Shut Down Without Logon
Windows 2000 and Windows XP Professional machines come in a default configuration that allows you to shut down the system through the use of the Shutdown button on the logon screen. Windows 2000 and .NET servers disable this out of the box. Despite the convenience factor that this feature affords, it’s best to leave rebooting a machine to an aware user.
Disable the Allow System to Shut Down Without Having to Log On selection to secure this.
Automatic Logoff
Some users log on to the network and then don’t log off for months. This is a prominent security hole, because when that user leaves her desk, she is still authenticated to the network with her credentials. These can be used to do destructive things: file deletion and transfer, planting of a “root kit” or backdoor program, or password changing.
The way to make this work is twofold: First, each valid user needs to have a time when he isn’t permitted to log on. This can be somewhere in the morning for a standard 9 AM to 5 PM office, perhaps at 3 AM to 3:30 AM. Then, you need to make a change to the local security policy so that when the user’s logon time expires, he isn’t permitted to log on.
To set up a logon time restriction on a domain controller for an Active Directory–enabled domain, do the following:
1. Go to the Active Directory Users & Computers snap-in.
2. Expand the icon for your domain, and click the Users container.
3. Right-click a username, and select Properties.
4. Click the Account tab, and then click the Logon Hours button.
5. Select the appropriate region of time in the calendar block, and click the radio buttons to the right to either permit or deny logons during that time.
6. Click OK once, and then again to exit the user property sheet.
This option is only available on Active Directory–enabled machines.Now, make the change to the computer’s local security policy. In the Local Computer
Policy snap-in, enable the Automatically Log Off Users When Logon Time Expires option. If you don’t have a domain, you should enable the Automatically Log Off Users When Logon Time Expires (local) option.
5394ch03.fm Page 44 Wednesday, August 31, 2005 10:20 AM
C H A P T E R 3 ■ W I N D O W S 2 0 0 0 S E C U R I T Y 45
Digitally Signing Communication
It’s a good idea these days for a computer to authenticate itself to other computers during a communication. Otherwise, a technique called “spoofing” could be used, and a cracker’s computer could pose as the remote end of a connection and acquire potentially sensitive information. You can prevent this by using digital signatures. However, they aren’t pervasive; Windows compensates for this limited use by providing two options in the local policy: require them when possible, or require them, period.
I recommend requiring the signatures when possible on both ends of a connection (the remote procedure call, or RPC, protocol refers to the requesting end as the “client” and the responding end as the “server,” no matter the systems’ usual roles). Unsigned trans-missions should only occur when signatures aren’t available, supported, or possible.
To require digitally signed communication when possible, enable the Digitally Sign Client Communication (When Possible) and Digitally Sign Server Communication (When Possible) options.
Requiring the Three-Keystroke Salute at Logon
The logon screen is one of the most trusted aspects of a computer to a normal user. She trusts it enough that she gives her password and username, and then the computer trusts her, too, if all of that is correct and verified. A cracker can take advantage of this mutual trust by writing a program that runs as a system service—that is, it doesn’t need user priv-ileges. The program will mimic the logon box, grab the user’s input, and do something with it. “It” could be emailing the password to the cracker, saving the credentials to a backdoor program data file, or any number of other nefarious things. However, pressing Ctrl-Alt-Del brings Windows itself to attention, and you get the authentic Windows logon instead of a shell of one that a cracker creates. This is an easy step that makes your system much more secure.
To require this keystroke, disable the Disable Ctrl-Alt-Del Requirement for Logon option. (Yes, that’s right. Microsoft uses some questionable terminology.)
Last Username Display
By default, Windows displays the username of the last successfully authenticated person who used that particular system on the logon screen. This is giving needless information away, although some of your users are probably accustomed to it.
To disable the last username from being displayed, enable the Do Not Display Last User Name in Logon Screen option.
5394ch03.fm Page 45 Wednesday, August 31, 2005 10:20 AM
46 C H A P T E R 3 ■ W I N D O W S 2 0 0 0 S E C U R I T Y
Password Expiration Prompt
Earlier in this chapter I discussed setting password policies to prevent brute-force attacks. Of course, changing passwords is a problem for some users, who’d rather not be bothered with Internet security (IS) minutia and would like to simply use their computers to be productive. With this policy setting, you can tell the system to automatically remind a user when his password will expire and prompt him to change it. Setting this value to 14 days gives a user ample opportunity to change his password, because that’s in excess of most scheduled vacations and business trips.
To enable the password expiration prompt, set the Prompt User to Change Password Before Expiration option to 14 Days at Minimum.
Other Security ConsiderationsAlthough the earlier sections discussed policy modifications that will harden a Windows 2000 installation, there are other facets of the operating system that do require attention. Although simply making the policy modifications takes you partially on the journey to a hardened system, it’s only a portion of the full process. This section presents some areas that deserve your consideration.
Windows Component Selection and Installation
Security is a minimalist attitude: That is to say, when you harden a system, you want as few basic entry points as possible. This in effect shortens the length of the playing field for an intruder: She has fewer processes and fewer software products whose flaws she can exploit, and there’s less chance that you, the administrator, will configure something improperly or forget it entirely. Windows 2000 makes this a little more difficult, especially at install time, when it isn’t possible to select components that you would like not to be installed.
If I might offer a slight editorial aside, this is a serious flaw in Windows and a HUGE mistake on Microsoft’s part. It would have been bad enough if Microsoft decided that none of its operating systems should ever present the user with component installation options. But this functionality remains available in the Windows 9x line and even in Windows NT! And yet mysteriously, it isn’t present in Windows 2000 or Server 2003. It’s baffling to me why these options were removed at the point of installation. If anyone from Microsoft is reading this, please return the power of choice to me, the user!
5394ch03.fm Page 46 Wednesday, August 31, 2005 10:20 AM
C H A P T E R 3 ■ W I N D O W S 2 0 0 0 S E C U R I T Y 47
Tightening Running Services
Continuing with the minimalist approach, you need to ensure that the only services or processes running on your system are those that (a) you know about and (b) are critical to the functioning of a particular system or resource. This seems like a simple task initially, but Microsoft has made life a bit more difficult than it should be by failing to properly document which services are dependent on others. Therefore, it’s foolhardy to open the Services console and simply begin turning off services at random, hoping to tighten the network through broad, sweeping motions. It just won’t work. Instead, peruse the following list, making note of the bare minimum of services required to run Windows 2000:
• DNS Client
• Event Log
• File Replication (only on a domain controller)
• Kerberos Key Distribution Center (only on a domain controller)
• Logical Disk Manager
• Net Logon (only on a domain controller)
• NT LM Service Provider (only on a domain controller)
• Plug & Play
• Protected Storage
• RPC Locator (only on a domain controller)
• Security Accounts Manager
• Server (only on machines hosting resources to be shared)
• Windows Time (only on a domain controller)
• Workstation (only on machines connecting to other machines’ shared resources)
5394ch03.fm Page 47 Wednesday, August 31, 2005 10:20 AM
48 C H A P T E R 3 ■ W I N D O W S 2 0 0 0 S E C U R I T Y
CheckpointsIn this chapter, I’ve discussed updating your Windows 2000, XP, or .NET machine to the latest levels available and securing your system through password, account, and computer policies. Use the following quick-reference checkpoints to ensure that you’ve covered each step in the chapter appropriately.
• Update to the latest service-pack level for your platform.
• Create a “slipstreamed” distribution CD to deploy the latest service-pack update to any new OS installs.
• Use the latest hotfix file patches from Microsoft to relieve your system of vulnerabilities.
• Download and use HFNetChk to scan and inventory your network for security-patch installations.
• Set restrictions on Windows passwords. They should be at least six characters long, they shouldn’t be based on a dictionary word, and they shouldn’t last longer than 90 days.
• Configure Windows to disable or “lock out” accounts for at least 15 minutes after three unsuccessful authentication attempts.
• Disable all anonymous access except where explicitly allowed in file-system permissions.
• Disable the ability to shut down a system without first logging in to it.
• Enable automatic logoff upon logon time expiration, and set up at least one half hour each night during which no user is permitted to log on.
• Require digitally signed communications when possible, but not always.
• Require the user to press Ctrl-Alt-Del before logging on, a key sequence recognized only by the Windows operating system.
• Do not permit the username of the last user to be displayed at logon.
• Remind users to change their password automatically at least 14 days before its expiration.
5394ch03.fm Page 48 Wednesday, August 31, 2005 10:20 AM
49
■ ■ ■
C H A P T E R 4
Windows XP Security
The advent of always-on connections and the increase of business connectivity to the Internet have resulted in Windows XP computers being directly connected to the Internet, which is a hotbed of potentially dangerous people and computers. In this chapter, you’ll look at ways to specifically protect your Windows XP computers from threats that reside abroad.
One note from the beginning about coverage in this chapter: Microsoft has released Windows XP Service Pack 2 (SP2), which is a very broad and very comprehensive set of fixes, functionality updates, and feature introductions that harden Windows XP systems quite well. If you apply XP SP2, then over half of your work is done (enjoy your break): particularly for new installations, the service pack introduces a new set of secure defaults that lessens the need for you to run around targeting security settings for change. I’m going to assume in this chapter that you’re running XP SP2; if I’m giving instructions that apply only to a previous level of Windows XP, I’ll say so explicitly.
■Note The topics in this chapter can also apply to Windows 2000 systems, and the topics in the Windows 2000 chapter can apply here, unless explicitly stated that a topic is only for one of the two. So be sure to consult Chapter 3 for more advice.
Implementing the Built-In Windows XP FirewallIt’s simply a given that on Windows XP, you should install a firewall. If you have a case of the cheaps, you should use the included Windows Firewall to control access to services running on the machine. It’s a simple process to configure the Windows Firewall, and by doing so you harden the exterior interfaces to the machine from public access. To examine and configure your firewall settings, follow these steps:
1. From the Control Panel, open Security Center.
2. Click Windows Firewall.
5394.book Page 49 Tuesday, August 30, 2005 10:37 PM
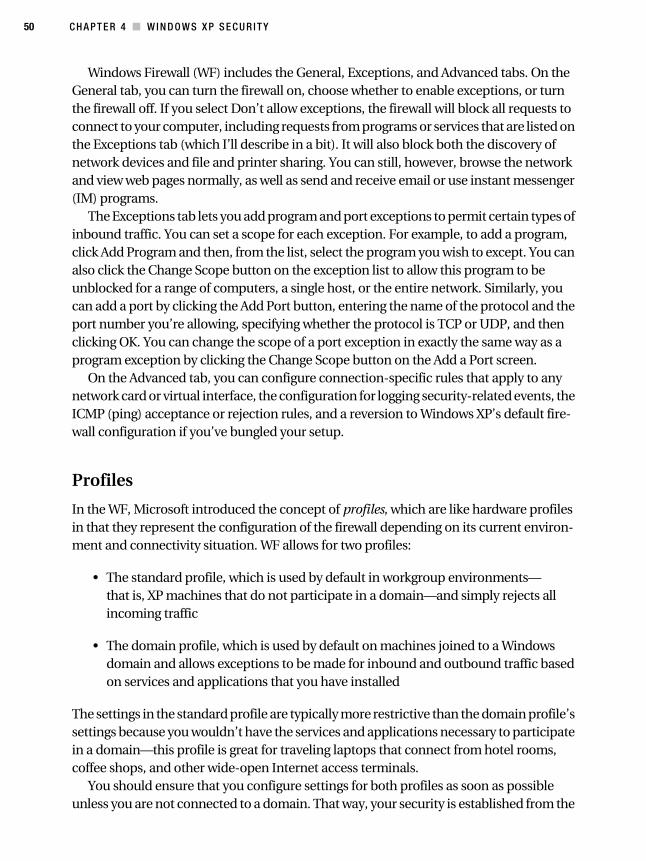
50 C H A P T E R 4 ■ W I N D O W S X P S E C U R I T Y
Windows Firewall (WF) includes the General, Exceptions, and Advanced tabs. On the General tab, you can turn the firewall on, choose whether to enable exceptions, or turn the firewall off. If you select Don’t allow exceptions, the firewall will block all requests to connect to your computer, including requests from programs or services that are listed on the Exceptions tab (which I’ll describe in a bit). It will also block both the discovery of network devices and file and printer sharing. You can still, however, browse the network and view web pages normally, as well as send and receive email or use instant messenger (IM) programs.
The Exceptions tab lets you add program and port exceptions to permit certain types of inbound traffic. You can set a scope for each exception. For example, to add a program, click Add Program and then, from the list, select the program you wish to except. You can also click the Change Scope button on the exception list to allow this program to be unblocked for a range of computers, a single host, or the entire network. Similarly, you can add a port by clicking the Add Port button, entering the name of the protocol and the port number you’re allowing, specifying whether the protocol is TCP or UDP, and then clicking OK. You can change the scope of a port exception in exactly the same way as a program exception by clicking the Change Scope button on the Add a Port screen.
On the Advanced tab, you can configure connection-specific rules that apply to any network card or virtual interface, the configuration for logging security-related events, the ICMP (ping) acceptance or rejection rules, and a reversion to Windows XP’s default fire-wall configuration if you’ve bungled your setup.
Profiles
In the WF, Microsoft introduced the concept of profiles, which are like hardware profiles in that they represent the configuration of the firewall depending on its current environ-ment and connectivity situation. WF allows for two profiles:
• The standard profile, which is used by default in workgroup environments—that is, XP machines that do not participate in a domain—and simply rejects all incoming traffic
• The domain profile, which is used by default on machines joined to a Windows domain and allows exceptions to be made for inbound and outbound traffic based on services and applications that you have installed
The settings in the standard profile are typically more restrictive than the domain profile’s settings because you wouldn’t have the services and applications necessary to participate in a domain—this profile is great for traveling laptops that connect from hotel rooms, coffee shops, and other wide-open Internet access terminals.
You should ensure that you configure settings for both profiles as soon as possible unless you are not connected to a domain. That way, your security is established from the
5394.book Page 50 Tuesday, August 30, 2005 10:37 PM
C H A P T E R 4 ■ W I N D O W S X P S E C U R I T Y 51
beginning. You can determine which profile the WF is using by opening the Windows Firewall applet from Control Panel ➤ Security Center and looking at the bottom of the General tab. The text will read “Windows Firewall is using your domain settings” or “Windows Firewall is using your standard settings” in each situation. If you’re interested in doing this from the command line, you can run the following command to accomplish the same thing:
��������������� ������� ����
Configuring Through Group Policy
If you’re running Windows XP in an Active Directory environment, you can configure WF through Group Policy (GP), which is a great way to establish a consistent configuration across all of your systems. If you are deploying your first XP SP2 system, you’ll need to run the Group Policy Object Editor from one XP SP2 machine to update the set of GPOs avail-able across your domain—once you do this, you can perform GP configuration from any domain-participating workstation, no matter the operating system.
The new GPOs are shown in Figure 4-1. Note that there are two configuration folders, one each for the domain profile and the standard profile.
Figure 4-1. New GPOs for Windows Firewall
The Internet Connection Firewall in XP Gold and Service Pack 1
If you’re not yet running XP SP2, then you’ll have to use the Internet Connection Firewall (ICF), which is not as nice and easy to configure as its more modern counterpart but which is still reasonably effective. To configure the ICF, do the following:
5394.book Page 51 Tuesday, August 30, 2005 10:37 PM
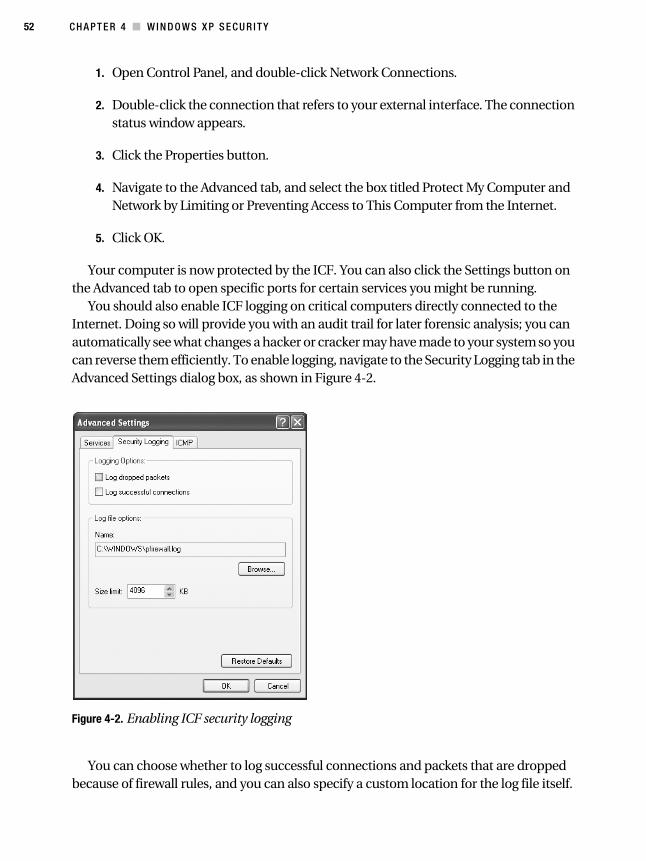
52 C H A P T E R 4 ■ W I N D O W S X P S E C U R I T Y
1. Open Control Panel, and double-click Network Connections.
2. Double-click the connection that refers to your external interface. The connection status window appears.
3. Click the Properties button.
4. Navigate to the Advanced tab, and select the box titled Protect My Computer and Network by Limiting or Preventing Access to This Computer from the Internet.
5. Click OK.
Your computer is now protected by the ICF. You can also click the Settings button on the Advanced tab to open specific ports for certain services you might be running.
You should also enable ICF logging on critical computers directly connected to the Internet. Doing so will provide you with an audit trail for later forensic analysis; you can automatically see what changes a hacker or cracker may have made to your system so you can reverse them efficiently. To enable logging, navigate to the Security Logging tab in the Advanced Settings dialog box, as shown in Figure 4-2.
Figure 4-2. Enabling ICF security logging
You can choose whether to log successful connections and packets that are dropped because of firewall rules, and you can also specify a custom location for the log file itself.
5394.book Page 52 Tuesday, August 30, 2005 10:37 PM
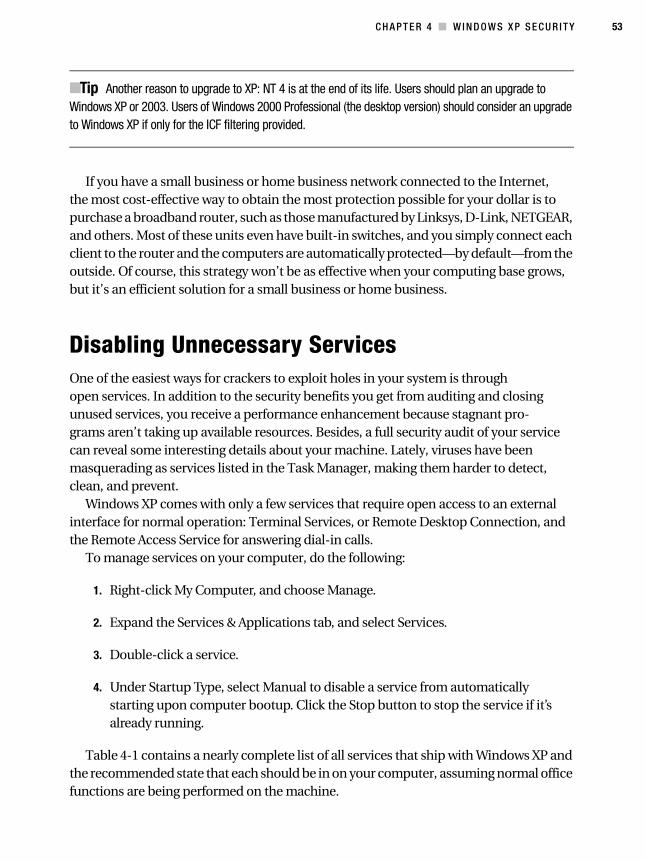
C H A P T E R 4 ■ W I N D O W S X P S E C U R I T Y 53
■Tip Another reason to upgrade to XP: NT 4 is at the end of its life. Users should plan an upgrade to Windows XP or 2003. Users of Windows 2000 Professional (the desktop version) should consider an upgrade to Windows XP if only for the ICF filtering provided.
If you have a small business or home business network connected to the Internet, the most cost-effective way to obtain the most protection possible for your dollar is to purchase a broadband router, such as those manufactured by Linksys, D-Link, NETGEAR, and others. Most of these units even have built-in switches, and you simply connect each client to the router and the computers are automatically protected—by default—from the outside. Of course, this strategy won’t be as effective when your computing base grows, but it’s an efficient solution for a small business or home business.
Disabling Unnecessary ServicesOne of the easiest ways for crackers to exploit holes in your system is through open services. In addition to the security benefits you get from auditing and closing unused services, you receive a performance enhancement because stagnant pro- grams aren’t taking up available resources. Besides, a full security audit of your service can reveal some interesting details about your machine. Lately, viruses have been masquerading as services listed in the Task Manager, making them harder to detect, clean, and prevent.
Windows XP comes with only a few services that require open access to an external interface for normal operation: Terminal Services, or Remote Desktop Connection, and the Remote Access Service for answering dial-in calls.
To manage services on your computer, do the following:
1. Right-click My Computer, and choose Manage.
2. Expand the Services & Applications tab, and select Services.
3. Double-click a service.
4. Under Startup Type, select Manual to disable a service from automatically starting upon computer bootup. Click the Stop button to stop the service if it’s already running.
Table 4-1 contains a nearly complete list of all services that ship with Windows XP and the recommended state that each should be in on your computer, assuming normal office functions are being performed on the machine.
5394.book Page 53 Tuesday, August 30, 2005 10:37 PM
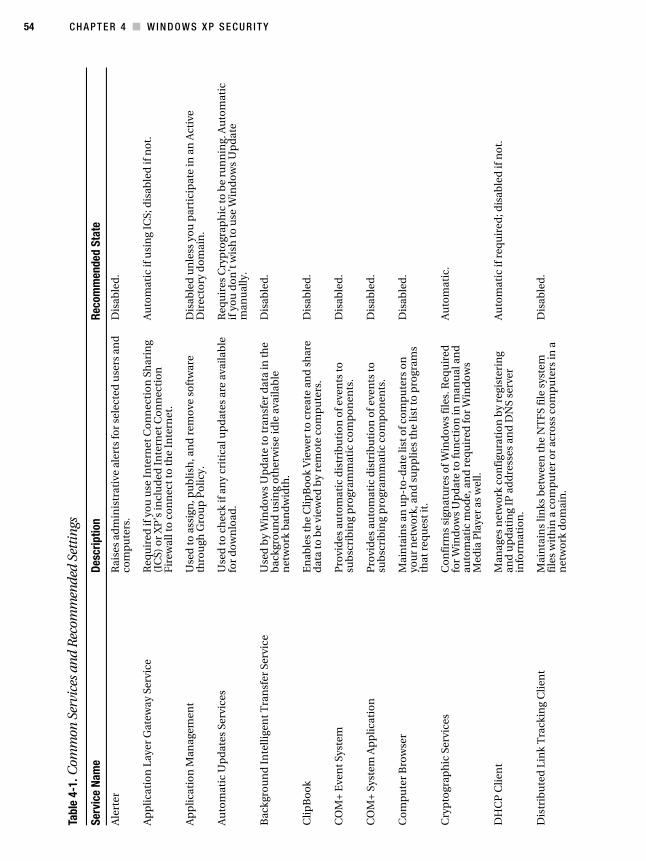
54 C H A P T E R 4 ■ W I N D O W S X P S E C U R I T Y
Tabl
e 4-
1. C
omm
on S
ervi
ces
and
Rec
omm
ende
d Se
ttin
gs
Serv
ice
Nam
eDe
scrip
tion
Reco
mm
ende
d St
ate
Ale
rter
Rai
ses
adm
inis
trat
ive
aler
ts fo
r se
lect
ed u
sers
an
d
com
pu
ters
.D
isab
led
.
Ap
pli
cati
on
Lay
er G
atew
ay S
ervi
ceR
equ
ired
if y
ou
use
In
tern
et C
on
nec
tio
n S
har
ing
(IC
S) o
r X
P’s
incl
ud
ed In
tern
et C
on
nec
tio
n
Fir
ewal
l to
co
nn
ect
to t
he
Inte
rnet
.
Au
tom
atic
if u
sin
g IC
S; d
isab
led
if n
ot.
Ap
pli
cati
on
Man
agem
ent
Use
d t
o a
ssig
n, p
ub
lish
, an
d r
emo
ve s
oft
war
e th
rou
gh G
rou
p P
oli
cy.
Dis
able
d u
nle
ss y
ou
par
tici
pat
e in
an
Act
ive
Dir
ecto
ry d
om
ain
.
Au
tom
atic
Up
dat
es S
ervi
ces
Use
d t
o c
hec
k if
an
y cr
itic
al u
pd
ates
are
ava
ilab
le
for
do
wn
load
.R
equ
ires
Cry
pto
grap
hic
to b
e ru
nn
ing.
Au
tom
atic
if
yo
u d
on
’t w
ish
to u
se W
ind
ow
s U
pd
ate
man
ual
ly.
Bac
kgro
un
d I
nte
llige
nt
Tra
nsf
erSe
rvic
eU
sed
by
Win
do
ws
Up
dat
e to
tran
sfer
dat
a in
the
bac
kgro
un
d u
sin
g o
ther
wis
e id
le a
vaila
ble
n
etw
ork
ban
dw
idth
.
Dis
able
d.
Cli
pB
oo
kE
nab
les
the
Cli
pB
oo
k V
iew
er t
o c
reat
e an
d s
har
e d
ata
to b
e vi
ewed
by
rem
ote
co
mp
ute
rs.
Dis
able
d.
CO
M+
Eve
nt
Syst
emP
rovi
des
au
tom
atic
dis
trib
uti
on
of e
ven
ts t
o
sub
scri
bin
g p
rogr
amm
atic
co
mp
on
ents
.D
isab
led
.
CO
M+
Sys
tem
Ap
plic
atio
nP
rovi
des
au
tom
atic
dis
trib
uti
on
of e
ven
ts t
o
sub
scri
bin
g p
rogr
amm
atic
co
mp
on
ents
.D
isab
led
.
Co
mp
ute
r B
row
ser
Mai
nta
ins
an u
p-t
o-d
ate
list
of c
om
pu
ters
on
yo
ur
net
wo
rk, a
nd
su
pp
lies
the
list
to
pro
gram
s th
at r
equ
est
it.
Dis
able
d.
Cry
pto
grap
hic
Ser
vice
sC
on
firm
s si
gnat
ure
s o
f Win
do
ws
file
s. R
equ
ired
fo
r W
ind
ow
s U
pd
ate
to fu
nct
ion
in m
anu
al a
nd
au
tom
atic
mo
de,
an
d r
equ
ired
for
Win
do
ws
Med
ia P
laye
r as
wel
l.
Au
tom
atic
.
DH
CP
Clie
nt
Man
ages
net
wo
rk c
on
figu
rati
on
by
regi
ster
ing
and
up
dat
ing
IP a
dd
ress
es a
nd
DN
S se
rver
in
form
atio
n.
Au
tom
atic
if r
equ
ired
; dis
able
d if
no
t.
Dis
trib
ute
d L
ink
Tra
ckin
g C
lien
tM
ain
tain
s li
nks
bet
wee
n th
e N
TF
S fi
le s
yste
m
file
s w
ith
in a
co
mp
ute
r o
r ac
ross
co
mp
ute
rs in
a
net
wo
rk d
om
ain
.
Dis
able
d.
5394.book Page 54 Tuesday, August 30, 2005 10:37 PM
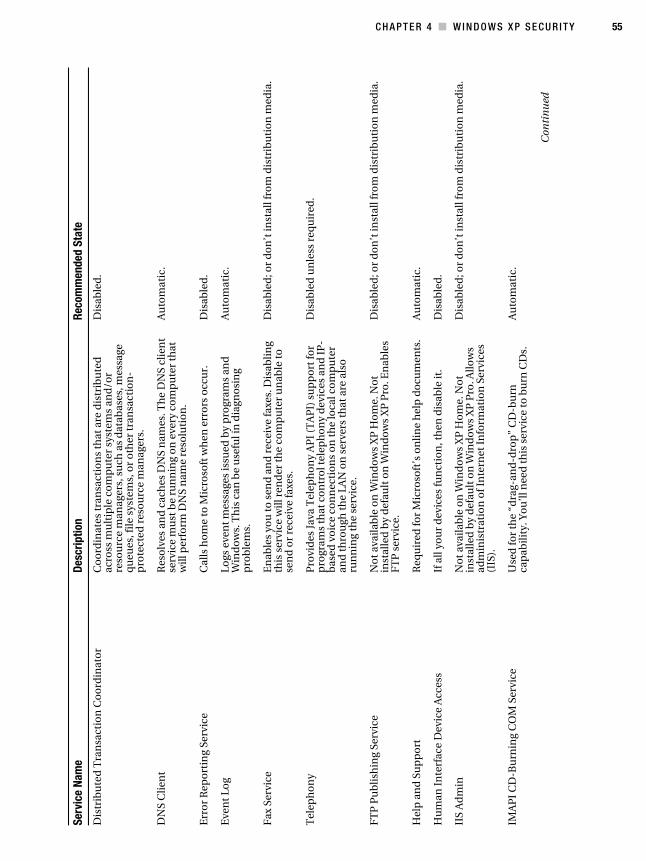
C H A P T E R 4 ■ W I N D O W S X P S E C U R I T Y 55
Dis
trib
ute
d T
ran
sact
ion
Co
ord
inat
or
Co
ord
inat
es t
ran
sact
ion
s th
at a
re d
istr
ibu
ted
ac
ross
mu
ltip
le c
om
pu
ter
syst
ems
and
/or
reso
urc
e m
anag
ers,
su
ch a
s d
atab
ases
, mes
sage
q
ueu
es, f
ile s
yste
ms,
or
oth
er t
ran
sact
ion
-p
rote
cted
res
ou
rce
man
ager
s.
Dis
able
d.
DN
S C
lien
tR
eso
lves
an
d c
ach
es D
NS
nam
es. T
he
DN
S cl
ien
t se
rvic
e m
ust
be
run
nin
g o
n e
very
co
mp
ute
r th
at
will
per
form
DN
S n
ame
reso
luti
on
.
Au
tom
atic
.
Err
or
Rep
ort
ing
Serv
ice
Cal
ls h
om
e to
Mic
roso
ft w
hen
err
ors
occ
ur.
Dis
able
d.
Eve
nt
Log
Lo
gs e
ven
t m
essa
ges
issu
ed b
y p
rogr
ams
and
W
ind
ow
s. T
his
can
be
use
ful i
n d
iagn
osi
ng
pro
ble
ms.
Au
tom
atic
.
Fax
Ser
vice
En
able
s yo
u t
o s
end
an
d r
ecei
ve fa
xes.
Dis
abli
ng
this
ser
vice
wil
l ren
der
th
e co
mp
ute
r u
nab
le t
o
sen
d o
r re
ceiv
e fa
xes.
Dis
able
d; o
r d
on
’t in
stal
l fro
m d
istr
ibu
tio
n m
edia
.
Tel
eph
on
yP
rovi
des
Jav
a T
elep
ho
ny
AP
I (T
AP
I) s
up
po
rt fo
r p
rogr
ams
that
co
ntr
ol t
elep
ho
ny
dev
ices
an
d I
P-
bas
ed v
oic
e co
nn
ecti
on
s o
n t
he
loca
l co
mp
ute
r an
d t
hro
ugh
the
LAN
on
ser
vers
th
at a
re a
lso
ru
nn
ing
the
serv
ice.
Dis
able
d u
nle
ss r
equ
ired
.
FT
P P
ub
lish
ing
Serv
ice
No
t av
aila
ble
on
Win
do
ws
XP
Ho
me.
No
t in
stal
led
by
def
ault
on
Win
do
ws
XP
Pro
. En
able
s F
TP
ser
vice
.
Dis
able
d; o
r d
on
’t in
stal
l fro
m d
istr
ibu
tio
n m
edia
.
Hel
p a
nd
Su
pp
ort
Req
uir
ed fo
r M
icro
soft
’s o
nlin
e h
elp
do
cum
ents
.A
uto
mat
ic.
Hu
man
In
terf
ace
Dev
ice
Acc
ess
If a
ll yo
ur
dev
ices
fun
ctio
n, t
hen
dis
able
it.
Dis
able
d.
IIS
Ad
min
No
t av
aila
ble
on
Win
do
ws
XP
Ho
me.
No
t in
stal
led
by
def
ault
on
Win
do
ws
XP
Pro
. Allo
ws
adm
inis
trat
ion
of I
nte
rnet
In
form
atio
n S
ervi
ces
(IIS
).
Dis
able
d; o
r d
on
’t in
stal
l fro
m d
istr
ibu
tio
n m
edia
.
IMA
PI
CD
-Bu
rnin
g C
OM
Ser
vice
Use
d fo
r th
e “d
rag-
and
-dro
p”
CD
-bu
rn
cap
abili
ty. Y
ou
’ll n
eed
th
is s
ervi
ce t
o b
urn
CD
s.A
uto
mat
ic.
Con
tin
ued
Serv
ice
Nam
eDe
scrip
tion
Reco
mm
ende
d St
ate
5394.book Page 55 Tuesday, August 30, 2005 10:37 PM
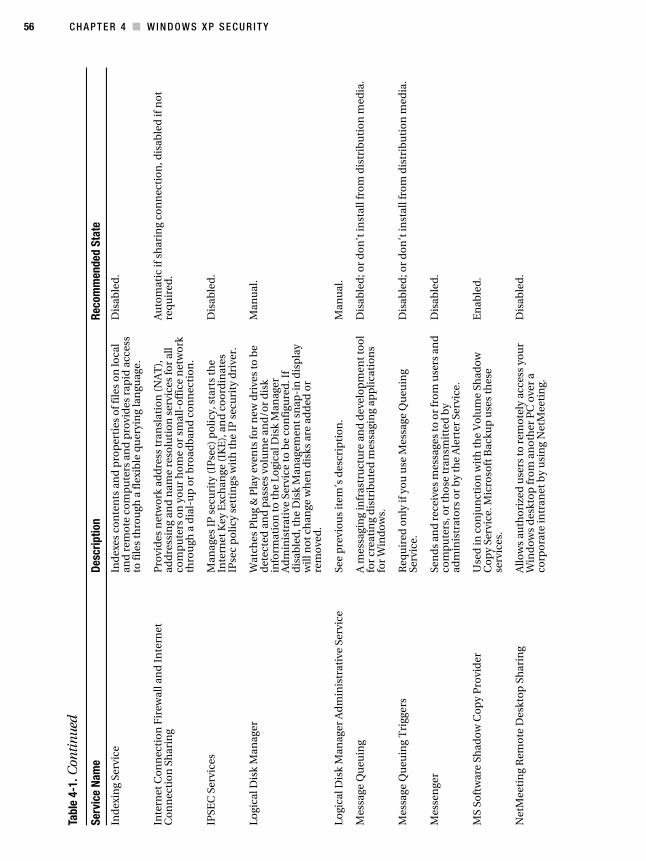
56 C H A P T E R 4 ■ W I N D O W S X P S E C U R I T Y
Tabl
e 4-
1. C
onti
nu
ed
Serv
ice
Nam
eDe
scrip
tion
Reco
mm
ende
d St
ate
Ind
exin
g Se
rvic
eIn
dex
es c
on
ten
ts a
nd
pro
per
ties
of f
iles
on
loca
l an
d r
emo
te c
om
pu
ters
an
d p
rovi
des
rap
id a
cces
s to
file
s th
rou
gh a
flex
ible
qu
eryi
ng
lan
guag
e.
Dis
able
d.
Inte
rnet
Co
nn
ecti
on
Fir
ewal
l an
dIn
tern
et
Co
nn
ecti
on
Sh
arin
gP
rovi
des
net
wo
rk a
dd
ress
tran
slat
ion
(N
AT
),
add
ress
ing
and
nam
e re
solu
tio
n s
ervi
ces
for
all
com
pu
ters
on
yo
ur
ho
me
or
smal
l-o
ffic
e n
etw
ork
th
rou
gh a
dia
l-u
p o
r b
road
ban
d c
on
nec
tio
n.
Au
tom
atic
if s
har
ing
con
nec
tio
n, d
isab
led
if n
ot
req
uir
ed.
IPSE
C S
ervi
ces
Man
ages
IP
sec
uri
ty (
IPse
c) p
oli
cy, s
tart
s th
e In
tern
et K
ey E
xch
ange
(IK
E),
an
d c
oo
rdin
ates
IP
sec
po
licy
sett
ings
wit
h t
he
IP s
ecu
rity
dri
ver.
Dis
able
d.
Lo
gica
l Dis
k M
anag
erW
atch
es P
lug
& P
lay
even
ts fo
r n
ew d
rive
s to
be
det
ecte
d a
nd
pas
ses
volu
me
and
/or
dis
k in
form
atio
n to
th
e Lo
gica
l Dis
k M
anag
er
Ad
min
istr
ativ
e Se
rvic
e to
be
con
figu
red
. If
dis
able
d, t
he
Dis
k M
anag
emen
t sn
ap-i
n d
isp
lay
will
no
t ch
ange
wh
en d
isks
are
ad
ded
or
rem
ove
d.
Man
ual
.
Lo
gica
l Dis
k M
anag
er A
dm
inis
trat
ive
Serv
ice
See
pre
vio
us
item
’s d
escr
ipti
on
.M
anu
al.
Mes
sage
Qu
euin
gA
mes
sagi
ng
infr
astr
uct
ure
an
d d
evel
op
men
t to
ol
for
crea
tin
g d
istr
ibu
ted
mes
sagi
ng
app
lica
tio
ns
for
Win
do
ws.
Dis
able
d; o
r d
on
’t in
stal
l fro
m d
istr
ibu
tio
n m
edia
.
Mes
sage
Qu
euin
g T
rigg
ers
Req
uir
ed o
nly
if y
ou
use
Mes
sage
Qu
euin
g Se
rvic
e.D
isab
led
; or
do
n’t
inst
all f
rom
dis
trib
uti
on
med
ia.
Mes
sen
ger
Sen
ds
and
rec
eive
s m
essa
ges
to o
r fr
om
use
rs a
nd
co
mp
ute
rs, o
r th
ose
tran
smit
ted
by
adm
inis
trat
ors
or
by
the
Ale
rter
Ser
vice
.
Dis
able
d.
MS
Soft
war
e Sh
ado
w C
op
y P
rovi
der
Use
d in
co
nju
nct
ion
wit
h t
he
Vo
lum
e Sh
ado
w
Co
py
Serv
ice.
Mic
roso
ft B
acku
p u
ses
thes
e se
rvic
es.
En
able
d.
Net
Mee
tin
g R
emo
te D
eskt
op
Shar
ing
Allo
ws
auth
ori
zed
use
rs t
o r
emo
tely
acc
ess
you
r W
ind
ow
s d
eskt
op
fro
m a
no
ther
PC
ove
r a
corp
ora
te in
tran
et b
y u
sin
g N
etM
eeti
ng.
Dis
able
d.
5394.book Page 56 Tuesday, August 30, 2005 10:37 PM
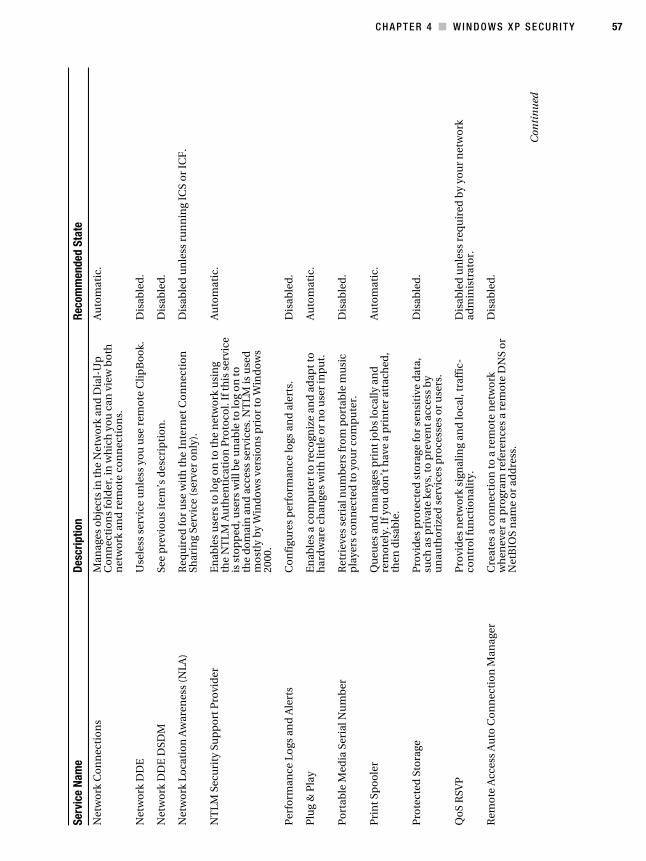
C H A P T E R 4 ■ W I N D O W S X P S E C U R I T Y 57
Net
wo
rk C
on
nec
tio
ns
Man
ages
ob
ject
s in
the
Net
wo
rk a
nd
Dia
l-U
p
Co
nn
ecti
on
s fo
lder
, in
wh
ich
yo
u c
an v
iew
bo
th
net
wo
rk a
nd
rem
ote
co
nn
ecti
on
s.
Au
tom
atic
.
Net
wo
rk D
DE
Use
less
ser
vice
un
less
yo
u u
se r
emo
te C
lipB
oo
k.D
isab
led
.
Net
wo
rk D
DE
DSD
MSe
e p
revi
ou
s it
em’s
des
crip
tio
n.
Dis
able
d.
Net
wo
rk L
oca
tio
n A
war
enes
s (N
LA)
Req
uir
ed fo
r u
se w
ith
th
e In
tern
et C
on
nec
tio
n
Shar
ing
Serv
ice
(ser
ver
on
ly).
Dis
able
d u
nle
ss r
un
nin
g IC
S o
r IC
F.
NT
LM S
ecu
rity
Su
pp
ort
Pro
vid
erE
nab
les
use
rs t
o lo
g o
n t
o t
he
net
wo
rk u
sin
g th
eN
TLM
Au
then
tica
tio
n P
roto
col.
If t
his
ser
vice
is
sto
pp
ed, u
sers
wil
l be
un
able
to lo
g o
nto
th
ed
om
ain
an
d a
cces
s se
rvic
es. N
TLM
isu
sed
m
ost
ly b
y W
ind
ow
s ve
rsio
ns
pri
or
to W
ind
ow
s 20
00.
Au
tom
atic
.
Per
form
ance
Lo
gs a
nd
Ale
rts
Co
nfi
gure
s p
erfo
rman
ce lo
gs a
nd
ale
rts.
Dis
able
d.
Plu
g &
Pla
yE
nab
les
a co
mp
ute
r to
rec
ogn
ize
and
ad
apt
to
har
dw
are
chan
ges
wit
h li
ttle
or
no
use
r in
pu
t.A
uto
mat
ic.
Po
rtab
le M
edia
Ser
ial N
um
ber
Ret
riev
es s
eria
l nu
mb
ers
fro
m p
ort
able
mu
sic
pla
yers
co
nn
ecte
d t
o y
ou
r co
mp
ute
r.D
isab
led
.
Pri
nt
Spo
ole
rQ
ueu
es a
nd
man
ages
pri
nt
job
s lo
cally
an
d
rem
ote
ly. I
f yo
u d
on
’t h
ave
a p
rin
ter
atta
ched
, th
en d
isab
le.
Au
tom
atic
.
Pro
tect
ed S
tora
geP
rovi
des
pro
tect
ed s
tora
ge fo
r se
nsi
tive
dat
a,
such
as
pri
vate
key
s, t
o p
reve
nt
acce
ss b
y u
nau
tho
rize
d s
ervi
ces
pro
cess
es o
r u
sers
.
Dis
able
d.
Qo
S R
SVP
Pro
vid
es n
etw
ork
sig
nal
ing
and
loca
l, tr
affi
c-co
ntr
ol f
un
ctio
nal
ity.
Dis
able
d u
nle
ss r
equ
ired
by
you
r n
etw
ork
ad
min
istr
ato
r.
Rem
ote
Acc
ess
Au
to C
on
nec
tio
n M
anag
erC
reat
es a
co
nn
ecti
on
to
a r
emo
te n
etw
ork
w
hen
ever
a p
rogr
am r
efer
ence
s a
rem
ote
DN
S o
r N
etB
IOS
nam
e o
r ad
dre
ss.
Dis
able
d.
Con
tin
ued
Serv
ice
Nam
eDe
scrip
tion
Reco
mm
ende
d St
ate
5394.book Page 57 Tuesday, August 30, 2005 10:37 PM
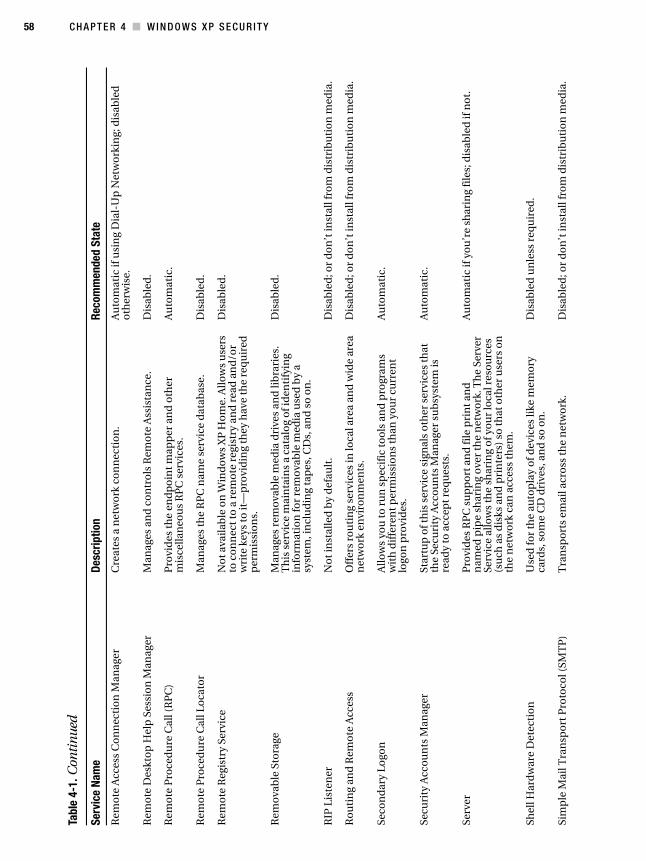
58 C H A P T E R 4 ■ W I N D O W S X P S E C U R I T Y
Tabl
e 4-
1. C
onti
nu
ed
Serv
ice
Nam
eDe
scrip
tion
Reco
mm
ende
d St
ate
Rem
ote
Acc
ess
Co
nn
ecti
on
Man
ager
Cre
ates
a n
etw
ork
co
nn
ecti
on
.A
uto
mat
ic if
usi
ng
Dia
l-U
p N
etw
ork
ing;
dis
able
d
oth
erw
ise.
Rem
ote
Des
kto
p H
elp
Ses
sio
n M
anag
erM
anag
es a
nd
co
ntr
ols
Rem
ote
Ass
ista
nce
.D
isab
led
.
Rem
ote
Pro
ced
ure
Cal
l (R
PC
)P
rovi
des
th
e en
dp
oin
t m
app
er a
nd
oth
er
mis
cella
neo
us
RP
C s
ervi
ces.
Au
tom
atic
.
Rem
ote
Pro
ced
ure
Cal
l Lo
cato
rM
anag
es th
e R
PC
nam
e se
rvic
e d
atab
ase.
Dis
able
d.
Rem
ote
Reg
istr
y Se
rvic
eN
ot a
vaila
ble
on
Win
do
ws
XP
Ho
me.
Allo
ws
use
rs
to c
on
nec
t to
a r
emo
te r
egis
try
and
rea
d a
nd
/or
wri
te k
eys
to it
—p
rovi
din
g th
ey h
ave
the
req
uir
ed
per
mis
sio
ns.
Dis
able
d.
Rem
ova
ble
Sto
rage
Man
ages
rem
ova
ble
med
ia d
rive
s an
d li
bra
ries
. T
his
ser
vice
mai
nta
ins
a ca
talo
g o
f id
enti
fyin
g in
form
atio
n fo
r re
mo
vab
le m
edia
use
d b
y a
syst
em, i
ncl
ud
ing
tap
es, C
Ds,
an
d s
o o
n.
Dis
able
d.
RIP
Lis
ten
erN
ot
inst
alle
d b
y d
efau
lt.
Dis
able
d; o
r d
on
’t in
stal
l fro
m d
istr
ibu
tio
n m
edia
.
Ro
uti
ng
and
Rem
ote
Acc
ess
Off
ers
rou
tin
g se
rvic
es in
loca
l are
a an
d w
ide
area
n
etw
ork
en
viro
nm
ents
.D
isab
led
; or
do
n’t
inst
all f
rom
dis
trib
uti
on
med
ia.
Seco
nd
ary
Logo
nA
llow
s yo
u t
o r
un
sp
ecif
ic t
oo
ls a
nd
pro
gram
s w
ith
dif
fere
nt
per
mis
sio
ns
than
yo
ur
curr
ent
logo
n p
rovi
des
.
Au
tom
atic
.
Secu
rity
Acc
ou
nts
Man
ager
Star
tup
of t
his
ser
vice
sig
nal
s o
ther
ser
vice
s th
at
the
Secu
rity
Acc
ou
nts
Man
ager
su
bsy
stem
is
read
y to
acc
ept r
equ
ests
.
Au
tom
atic
.
Serv
erP
rovi
des
RP
C s
up
po
rt a
nd
file
pri
nt a
nd
n
amed
pip
e sh
arin
g o
ver
the
net
wo
rk. T
he
Serv
er
Serv
ice
allo
ws
the
shar
ing
of y
ou
r lo
cal r
eso
urc
es
(su
ch a
s d
isks
an
d p
rin
ters
) so
th
at o
ther
use
rs o
n
the
net
wo
rk c
an a
cces
s th
em.
Au
tom
atic
if y
ou
’re
shar
ing
file
s; d
isab
led
if n
ot.
Shel
l Har
dw
are
Det
ecti
on
Use
d fo
r th
e au
top
lay
of d
evic
es li
ke m
emo
ry
card
s, s
om
e C
D d
rive
s, a
nd
so
on
.D
isab
led
un
less
req
uir
ed.
Sim
ple
Mai
l Tra
nsp
ort
Pro
toco
l (SM
TP
)T
ran
spo
rts
emai
l acr
oss
th
e n
etw
ork
.D
isab
led
; or
do
n’t
inst
all f
rom
dis
trib
uti
on
med
ia.
5394.book Page 58 Tuesday, August 30, 2005 10:37 PM
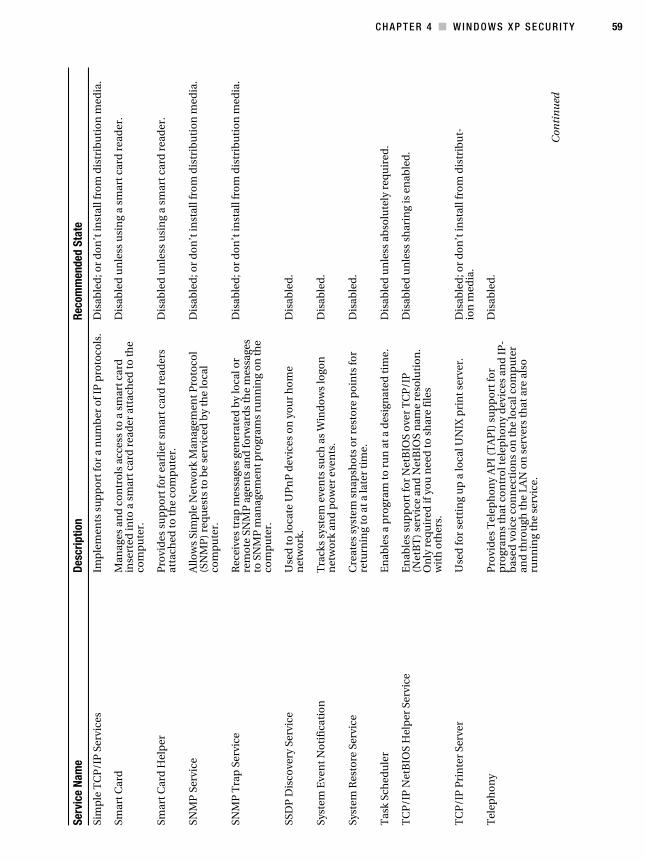
C H A P T E R 4 ■ W I N D O W S X P S E C U R I T Y 59
Sim
ple
TC
P/I
P S
ervi
ces
Imp
lem
ents
su
pp
ort
for
a n
um
ber
of I
P p
roto
cols
.D
isab
led
; or
do
n’t
inst
all f
rom
dis
trib
uti
on
med
ia.
Smar
t C
ard
Man
ages
an
d c
on
tro
ls a
cces
s to
a s
mar
t ca
rd
inse
rted
into
a s
mar
t ca
rd r
ead
er a
ttac
hed
to
the
com
pu
ter.
Dis
able
d u
nle
ss u
sin
g a
smar
t car
d r
ead
er.
Smar
t C
ard
Hel
per
Pro
vid
es s
up
po
rt fo
r ea
rlie
r sm
art
card
rea
der
s at
tach
ed to
th
e co
mp
ute
r.D
isab
led
un
less
usi
ng
a sm
art c
ard
rea
der
.
SNM
P S
ervi
ceA
llow
s Si
mp
le N
etw
ork
Man
agem
ent
Pro
toco
l (S
NM
P)
req
ues
ts t
o b
e se
rvic
ed b
y th
e lo
cal
com
pu
ter.
Dis
able
d; o
r d
on
’t in
stal
l fro
m d
istr
ibu
tio
n m
edia
.
SNM
P T
rap
Ser
vice
Rec
eive
s tr
ap m
essa
ges
gen
erat
ed b
y lo
cal o
r re
mo
te S
NM
P a
gen
ts a
nd
forw
ard
s th
e m
essa
ges
to S
NM
P m
anag
emen
t pro
gram
s ru
nn
ing
on
the
com
pu
ter.
Dis
able
d; o
r d
on
’t in
stal
l fro
m d
istr
ibu
tio
n m
edia
.
SSD
P D
isco
very
Ser
vice
Use
d t
o lo
cate
UP
nP
dev
ices
on
yo
ur
ho
me
net
wo
rk.
Dis
able
d.
Syst
em E
ven
t N
oti
fica
tio
nT
rack
s sy
stem
eve
nts
su
ch a
s W
ind
ow
s lo
gon
n
etw
ork
an
d p
ow
er e
ven
ts.
Dis
able
d.
Syst
em R
esto
re S
ervi
ceC
reat
es s
yste
m s
nap
sho
ts o
r re
sto
re p
oin
ts fo
r re
turn
ing
to a
t a la
ter
tim
e.D
isab
led
.
Tas
k Sc
hed
ule
rE
nab
les
a p
rogr
am t
o r
un
at
a d
esig
nat
ed ti
me.
Dis
able
d u
nle
ss a
bso
lute
ly r
equ
ired
.
TC
P/I
P N
etB
IOS
Hel
per
Ser
vice
En
able
s su
pp
ort
for
Net
BIO
S o
ver
TC
P/I
P
(Net
BT
) se
rvic
e an
d N
etB
IOS
nam
e re
solu
tio
n.
On
ly r
equ
ired
if y
ou
nee
d t
o s
har
e fi
les
wit
ho
ther
s.
Dis
able
d u
nle
ss s
har
ing
is e
nab
led
.
TC
P/I
P P
rin
ter
Serv
erU
sed
for
sett
ing
up
a lo
cal U
NIX
pri
nt
serv
er.
Dis
able
d; o
r d
on
’t in
stal
l fro
m d
istr
ibu
t-io
n m
edia
.
Tel
eph
on
yP
rovi
des
Tel
eph
on
y A
PI
(TA
PI)
su
pp
ort
for
pro
gram
s th
at c
on
tro
l tel
eph
on
y d
evic
es a
nd
IP
-b
ased
vo
ice
con
nec
tio
ns
on
th
e lo
cal c
om
pu
ter
and
th
rou
gh th
e LA
N o
n s
erve
rs t
hat
are
als
o
run
nin
g th
e se
rvic
e.
Dis
able
d.
Con
tin
ued
Serv
ice
Nam
eDe
scrip
tion
Reco
mm
ende
d St
ate
5394.book Page 59 Tuesday, August 30, 2005 10:37 PM
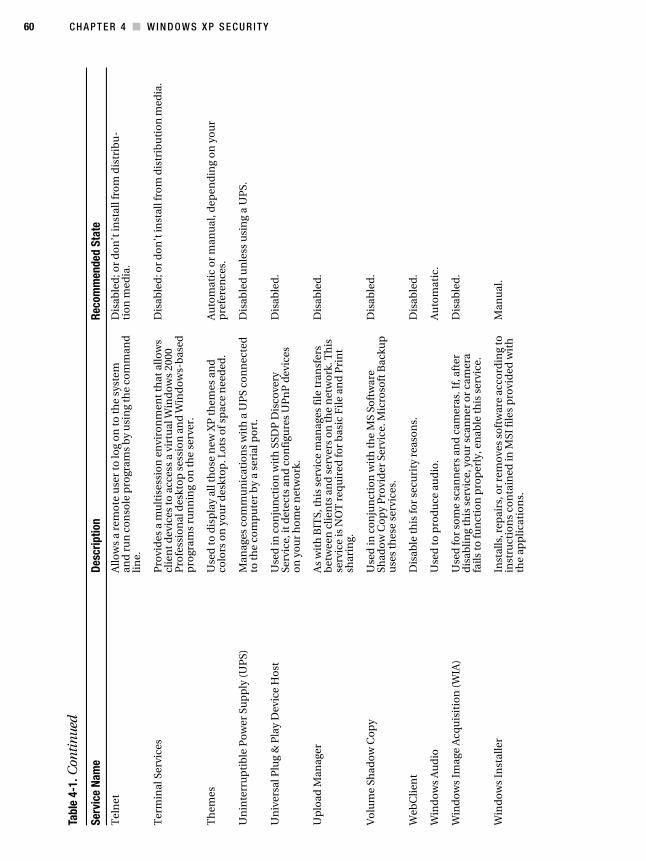
60 C H A P T E R 4 ■ W I N D O W S X P S E C U R I T Y
Tabl
e 4-
1. C
onti
nu
ed
Serv
ice
Nam
eDe
scrip
tion
Reco
mm
ende
d St
ate
Tel
net
Allo
ws
a re
mo
te u
ser
to lo
g o
n to
the
syst
em
and
run
co
nso
le p
rogr
ams
by
usi
ng
the
com
man
d
lin
e.
Dis
able
d; o
r d
on
’t in
stal
l fro
m d
istr
ibu
-ti
on
med
ia.
Ter
min
al S
ervi
ces
Pro
vid
es a
mu
ltis
essi
on
en
viro
nm
ent t
hat
allo
ws
clie
nt d
evic
es to
acc
ess
a vi
rtu
al W
ind
ow
s 20
00
Pro
fess
ion
al d
eskt
op
ses
sio
n a
nd
Win
do
ws-
bas
ed
pro
gram
s ru
nn
ing
on
the
serv
er.
Dis
able
d; o
r d
on
’t in
stal
l fro
m d
istr
ibu
tio
n m
edia
.
Th
emes
Use
d t
o d
isp
lay
all t
ho
se n
ew X
P t
hem
es a
nd
co
lors
on
yo
ur
des
kto
p. L
ots
of s
pac
e n
eed
ed.
Au
tom
atic
or
man
ual
, dep
end
ing
on
yo
ur
pre
fere
nce
s.
Un
inte
rru
pti
ble
Po
wer
Su
pp
ly (
UP
S)M
anag
es c
om
mu
nic
atio
ns
wit
h a
UP
S co
nn
ecte
d
to t
he
com
pu
ter
by
a se
rial
po
rt.
Dis
able
d u
nle
ss u
sin
g a
UP
S.
Un
iver
sal P
lug
& P
lay
Dev
ice
Ho
stU
sed
in c
on
jun
ctio
n w
ith
SSD
P D
isco
very
Se
rvic
e, it
det
ects
an
d c
on
figu
res
UP
nP
dev
ices
o
n y
ou
r h
om
e n
etw
ork
.
Dis
able
d.
Up
load
Man
ager
As
wit
h B
ITS,
this
ser
vice
man
ages
file
tra
nsf
ers
bet
wee
n c
lien
ts a
nd
ser
vers
on
th
e n
etw
ork
. Th
is
serv
ice
is N
OT
req
uir
ed fo
r b
asic
Fil
e an
d P
rin
t sh
arin
g.
Dis
able
d.
Vo
lum
e Sh
ado
w C
op
yU
sed
in c
on
jun
ctio
n w
ith
th
e M
S So
ftw
are
Shad
ow
Co
py
Pro
vid
er S
ervi
ce. M
icro
soft
Bac
kup
u
ses
thes
e se
rvic
es.
Dis
able
d.
Web
Cli
ent
Dis
able
th
is fo
r se
curi
ty r
easo
ns.
Dis
able
d.
Win
do
ws
Au
dio
Use
d t
o p
rod
uce
au
dio
.A
uto
mat
ic.
Win
do
ws
Imag
e A
cqu
isit
ion
(W
IA)
Use
d fo
r so
me
scan
ner
s an
d c
amer
as. I
f, a
fter
d
isab
lin
g th
is s
ervi
ce, y
ou
r sc
ann
er o
r ca
mer
a fa
ils to
fun
ctio
n p
rop
erly
, en
able
th
is s
ervi
ce.
Dis
able
d.
Win
do
ws
Inst
alle
rIn
stal
ls, r
epai
rs, o
r re
mo
ves
soft
war
e ac
cord
ing
to
inst
ruct
ion
s co
nta
ined
in M
SI fi
les
pro
vid
ed w
ith
th
e ap
pli
cati
on
s.
Man
ual
.
5394.book Page 60 Tuesday, August 30, 2005 10:37 PM
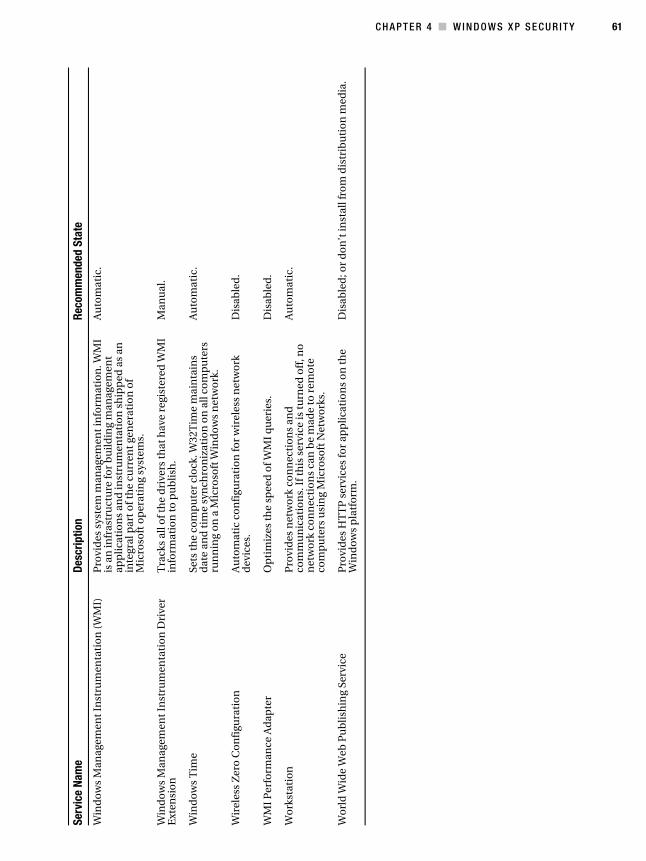
C H A P T E R 4 ■ W I N D O W S X P S E C U R I T Y 61
Win
do
ws
Man
agem
ent
Inst
rum
enta
tio
n (
WM
I)P
rovi
des
sys
tem
man
agem
ent
info
rmat
ion
. WM
I is
an
infr
astr
uct
ure
for
bu
ild
ing
man
agem
ent
app
lica
tio
ns
and
inst
rum
enta
tio
n s
hip
ped
as
an
inte
gral
par
t o
f th
e cu
rren
t ge
ner
atio
n o
f M
icro
soft
op
erat
ing
syst
ems.
Au
tom
atic
.
Win
do
ws
Man
agem
ent
Inst
rum
enta
tio
n D
rive
r E
xten
sio
nT
rack
s al
l of t
he
dri
vers
th
at h
ave
regi
ster
ed W
MI
info
rmat
ion
to p
ub
lish
.M
anu
al.
Win
do
ws
Tim
eSe
ts t
he
com
pu
ter
clo
ck. W
32T
ime
mai
nta
ins
dat
e an
d t
ime
syn
chro
niz
atio
n o
n a
ll co
mp
ute
rs
run
nin
g o
n a
Mic
roso
ft W
ind
ow
s n
etw
ork
.
Au
tom
atic
.
Wir
eles
s Z
ero
Co
nfi
gura
tio
nA
uto
mat
ic c
on
figu
rati
on
for
wir
eles
s n
etw
ork
d
evic
es.
Dis
able
d.
WM
I P
erfo
rman
ce A
dap
ter
Op
tim
izes
th
e sp
eed
of W
MI
qu
erie
s.D
isab
led
.
Wo
rkst
atio
nP
rovi
des
net
wo
rk c
on
nec
tio
ns
and
co
mm
un
icat
ion
s. I
f th
is s
ervi
ce is
tu
rned
off
, no
n
etw
ork
co
nn
ecti
on
s ca
n b
e m
ade
to r
emo
te
com
pu
ters
usi
ng
Mic
roso
ft N
etw
ork
s.
Au
tom
atic
.
Wo
rld
Wid
e W
eb P
ub
lish
ing
Serv
ice
Pro
vid
es H
TT
P s
ervi
ces
for
app
lica
tio
ns
on
th
e W
ind
ow
s p
latf
orm
.D
isab
led
; or
do
n’t
inst
all f
rom
dis
trib
uti
on
med
ia.
Serv
ice
Nam
eDe
scrip
tion
Reco
mm
ende
d St
ate
5394.book Page 61 Tuesday, August 30, 2005 10:37 PM
62 C H A P T E R 4 ■ W I N D O W S X P S E C U R I T Y
As you can see from Table 4.1, not very much is actually needed to keep your Windows XP installation functioning in a nondomain environment. Most of the enabled services just pose an unfavorable security risk compared to the reward, bring little or no benefit, consume resources, and can be safely turned off.
Providing a Secure Configuration for Services
While disabling unnecessary services is an excellent, and fundamental, step to hardening Windows, there are some other necessary items to accomplish to further secure the ser- vices that remain and any services that you may add in the future. Peruse the following list of best practices and consider implementing them:
• Give strong passwords to service accounts. When you install applications that require services to be run, you are typically given the option to choose an account under which the service is to be run. Use 15+ character passwords, and remember that you must set these passwords both in Active Directory Users and Computers or Computer Management (depending on your operating environment) and in the Log On tab of the service’s property sheet.
• Never let users log on using service accounts. This most particularly applies to the Administrator account—never assign the Administrator account to a service, and never distribute any service account name and password to any users. There is absolutely no reason to do so, and if users can access systems in these contexts, they can wreak more havoc than you might be able to imagine. Just don’t do it.
• Do not allow network access to service accounts. For one, this means don’t create domain accounts for services; wherever possible, use a local account on the server where the service is located. Also, check the Deny Access to this Computer from the Network right within the service account’s property sheet to eliminate network access for that account.
• Use accounts of least privilege for service accounts. Windows XP includes a great set of built-in accounts, collectively called the Network Service and Local Service, which are specifically designed to be used for services that require different amounts of network connectivity. Use these where possible to decrease the attack surface of services.
5394.book Page 62 Tuesday, August 30, 2005 10:37 PM

C H A P T E R 4 ■ W I N D O W S X P S E C U R I T Y 63
Microsoft Baseline Security Analyzer Patch Check and Security TestsWindows Update is a good way to update a few computers on your network, but it’s a bad strategy for a large network because it requires user intervention and isn’t easily auto-mated. As you’ll discover in Chapter 9, Microsoft has a better way to automate patch rollout on more than a handful of computers using its Software Update Services package. However, neither option offers a good, sweeping way of determining the update level of your machines.
To fill this need, Microsoft has issued the Baseline Security Analyzer (MBSA) tool, which will query each machine on your network and detect which available patches haven’t been installed. The tool is simple to use, easy to automate, and is more suited to a mass analysis than Windows Update. However, it lacks the intelligence and logic of its web-based counterpart. You’ll probably see a lot of updates that don’t pertain to your machines, even though they aren’t installed. It’s up to you to verify that the specific patch listed in the results from the MBSA session doesn’t apply to specific machines on your network. You’ll also need to reboot after each patch application.
Installing Microsoft Baseline Security Analyzer
To install MBSA, follow this procedure:
1. Go to ����������� � ���� � and search for HFNetChk. (I would include a direct URL, but Microsoft has a tendency to change its website around quite often.)
2. Download, execute, and install the program to C:\hfnetchk.
3. At the command prompt, enter hfnetchk –z –v.
The –z and –v switches tell the MBSA tool to go out and download a database of all available patches. It will then scan a computer or set of computers for patches that haven’t been installed, and indicate which haven’t been installed along with the Microsoft Knowledge Base article number. You can look up the appropriate patch using the number provided by the MBSA at ����������� � ���� ������ �.
Penetration TestsMany security vendors provide free or low-cost online tools that evaluate the security of your system, of course with the underlying motive of persuading you to buy their product. These tools are most often a “penetration test” that can indicate how effectively you’ve hardened your system.
5394.book Page 63 Tuesday, August 30, 2005 10:37 PM
64 C H A P T E R 4 ■ W I N D O W S X P S E C U R I T Y
Symantec offers its security check, as well as other tools, at ������������������������� �. Here you can scan for holes in your computer’s external interfaces—a very basic penetration test—or scan for viruses that might be present on your system, and track a cracker’s location if you have his source IP. If you’ve followed the steps in this chapter so far, I highly recommend taking advantage of the Scan for Security Risks option to ensure that you haven’t missed anything. In addition to probing your open ports, the option can also detect some Trojan horse viruses that can invade your computer and open a back door.
There’s one thing you should be aware of: Each of these Symantec tools download to your system Active X content, which of course should at least give a competent, astute administrator pause. It’s up to you to trust a particular vendor. Generally, the more popular security-testing sites will have the most robust scanning tools.
Steve Gibson, of the venerable Gibson Research Corporation, has also made available the popular ShieldsUp! test at ������������ �. It performs much the same function as the Symantec tools.
File System SecurityPart of hardening your overall XP system is to ensure that your file system is adequately secured. Microsoft provides NT File System (NTFS) support in Windows XP. NTFS allows for more robust security features and user permissions and also adds some basic fault tolerance, with which the older FAT file system just cannot compete. Make sure all of your hard drives are formatted with NTFS unless you have systems that dual-boot to another, older operating system that doesn’t support NTFS on the same disk.
To check your hard drive partitions, do the following:
1. Log in as Administrator, and double-click My Computer.
2. Right-click each hard drive letter and choose Properties.
3. Navigate to the General tab. Here, Windows will identify the file system type.
Follow the previous steps for each drive letter, noting which ones are labeled FAT or FAT32.
To convert a FAT or FAT32 partition to NTFS, do the following:
1. Open a command prompt.
2. At the command prompt, enter convert x: /FS:NTFS /V. Replace x with one of the drive letters you noted previously.
3. Repeat the previous step for each FAT or FAT32 partition.
5394.book Page 64 Tuesday, August 30, 2005 10:37 PM
C H A P T E R 4 ■ W I N D O W S X P S E C U R I T Y 65
When you’ve finished, reboot the system for the changes to take effect.You might also choose to use third-party disk conversion utilities, like PartitionMagic
or Norton Disk Doctor, to convert your file system to NTFS. It’s a painless procedure, no matter which tool you use to do it. Of course, you should always remember to back up your data before performing any change to a disk’s configuration or function.
Disable Automated LoginsWindows XP offers a feature for machines that aren’t participating in a security domain where accounts without passwords can automatically log in at a computer’s startup without requiring any user intervention. Obviously, this is a huge security hole for machines connected to any kind of network. You’ll want to disable this.
To disable automated logins, do the following:
1. Inside Control Panel, open Administrative Tools.
2. Double-click Local Security Policy.
3. Select a username.
4. Make sure there is a password set for each user account that’s enabled.
Hardening Default AccountsThe main premise is that in order for someone to access an XP system, she must have a username and password. To that effect, Windows creates the Administrator account, for use by the machine’s owner, and a Guest account, which has limited privileges and is designed for people who don’t have continuing business on a machine. This isn’t just an XP function.
Of course, crackers have taken advantage of the presence of both accounts. You might consider renaming the two accounts to reduce the surface vulnerability of the machine. This doesn’t work for server machines all the time; sometimes server software and ser- vices require the Administrator account to be named the same, but for client machines, renaming is usually a good strategy. This is true particularly for XP computers, because they tend to be directly connected to the Internet more than computers that are running older versions of Windows.
You can configure the Administrator account as follows:
5394.book Page 65 Tuesday, August 30, 2005 10:37 PM
66 C H A P T E R 4 ■ W I N D O W S X P S E C U R I T Y
1. Log in as Administrator.
2. Go to the Control Panel, double-click Administrative Tools, and then double-click Computer Management.
3. Open Local Users and Groups.
4. Click the User folder.
5. Right-click the Administrator account, and choose to rename it. Make it a less obvious name.
6. Right-click this renamed Administrator account and select Set Password.
You can configure the Guest account as follows:
1. Right-click the Guest account, and choose to rename it. Make it a less obvious name.
2. Right-click this renamed Guest account, then select Set Password.
For security reasons, the Guest account in XP is disabled by default. Enabling the Guest account allows anonymous users to access the system. Even if no one sits down and logs in as a guest to your system, the account is used. If you share a folder, the default permis-sion is that everyone has full control, and because Guest is included within the built-in Everyone group, a hole is opened. A standard practice is to always remove the share permissions from Everyone and add them to Authenticated Users. This is a much safer configuration.
Use Runas for Administrative Work
One of the most fundamental laws of security is that you, as the administrator, should use the account of least privilege whenever possible. If you are doing day-to-day work that doesn’t require special privileges or powers, then use a regular user account just like the other people in your organization.
Microsoft understood this principle and integrated a convenience feature (yes, security and convenience can meet in a satisfying way in a few instances) called Runas, which allows you to execute applications and programs in a security context other than your current one. So you can run as a normal user in a regular, limited-privilege account, and then access Active Directory Users and Computers using the Runas feature under your administrator credentials. To use Runas:
5394.book Page 66 Tuesday, August 30, 2005 10:37 PM
C H A P T E R 4 ■ W I N D O W S X P S E C U R I T Y 67
1. Find the application you want to use in Windows Explorer.
2. Hold down the Shift key and right-click on the application’s executable.
3. Click the Run As option.
4. Select The Following User, and then enter the credentials of the alternate account as appropriate.
5. Click OK.
You can also use Runas from the command line. For example, you can create a shell with administrator credentials with the following command, issued from Start ➤ Run:
������������������������������ ����
You’ll be prompted for the password to the JHWNXPLTP\Administrator account.
Disable Infrared TransfersNearly all modern notebook computers have the capability to use infrared for file trans-fers and other communications—supposedly a convenience tool that allows users to synchronize data with their personal digital assistants (PDAs), music devices like iPods, and other mobile hardware. However, the ability to introduce files into a machine through the air presents an interesting, if yet unexploited, attack vector that should be closed for all but the most knowledgeable users.
In Control Panel, open the Wireless Link applet, and then disable Allow Others to Send Files to Your Computer Using Infrared Communications. While Windows by default would open a pop-up balloon when someone tried to initiate a file transfer, sometimes you can’t trust users to select the right option.
Using Forensic Analysis TechniquesPart of hardening a system is knowing when your efforts haven’t protected against or prevented an attack. Here are some common indicators that your system has been compromised:
• A system alert, alarm, or related indication from an intrusion-detection tool
• Suspicious entries in system or security logs in XP’s Event Viewer
5394.book Page 67 Tuesday, August 30, 2005 10:37 PM
68 C H A P T E R 4 ■ W I N D O W S X P S E C U R I T Y
• Unsuccessful logon attempts
• New user accounts of unknown origin
• New files on the physical file system of unknown origin and function
• Unexplained changes or attempt to change file sizes, checksums, timestamps, especially on files within the C:\WINNT or C:\WINDOWS hierarchy (depending on whether the system was upgrading from a previous release of Windows or simply installed from scratch)
• Unexplained addition, deletion, or modification of data
• Denial of service activity or inability of one or more users to log in to an account, including admin or root logins to the console
• System crashes
• Poor system performance
• Unauthorized operation of a program or the addition of a sniffer application to capture network traffic or usernames or passwords
• Port scanning and the use of exploit and vulnerability scanners, remote requests for information about systems and users, or social-engineering attempts
• Unusual usage times; statistically, more security incidents occur during non- working hours than any other time
• An indicated last time of usage for an account that doesn’t correspond to the actual last time of usage for that account
• Unusual usage patterns; for example, programs are being compiled in the account of a user who doesn’t know how to program
Keep alert for these indicators. If any are tripped, back up any personal data on a machine, verify that data’s integrity, and then reformat the machine and reinstall Windows. It isn’t a safe bet to try to reconstruct a compromised machine for later production use.
5394.book Page 68 Tuesday, August 30, 2005 10:37 PM
C H A P T E R 4 ■ W I N D O W S X P S E C U R I T Y 69
CheckpointsIf you’re in a hurry, the action items within this chapter include the following:
• Upgrade to Windows XP Service Pack 2 as soon as possible.
• Use XP’s included Windows Firewall (or the Internet Connection Firewall if you’re not yet running XP Service Pack 2) to close off open ports.
• Configure Windows Firewall profiles explicitly to provide the best security from the beginning.
• Enable ICF logging for later forensic analysis and intrusion detection.
• If you have a small office or home office network, purchase an inexpensive broad-band router for further protection.
• Adjust your running services list to match that in this book.
• Test your service load and ensure that only services required for necessary func-tionality are running and enabled.
• Give strong passwords to service accounts.
• Never let users log on using service accounts.
• Do not allow network access to service accounts.
• Use accounts of least privilege for service accounts.
• Use the Microsoft Baseline Security Analyzer (MBSA) to analyze the current update level of machines on your network.
• Also visit Windows Update to identify and install appropriate hotfixes and software updates.
• Visit a reputable online software vendor and perform penetration tests on your machines to ensure that ports are closed off and your hardening efforts were effective.
• Format the partitions on your machines with NTFS.
• Disable automated logins by ensuring there is a password for each user account on a machine. (This applies only to machines that aren’t participating in a security domain.)
5394.book Page 69 Tuesday, August 30, 2005 10:37 PM

70 C H A P T E R 4 ■ W I N D O W S X P S E C U R I T Y
• Rename the Administrator account.
• Rename the Guest account.
• Replace the Everyone group with the Authenticated Users group inside the access control lists (ACLs) of your shares.
• Use an account of least privilege for normal administrative work, and use Runas when you need an administrator security context.
• Disable infrared transfers.
• Understand the typical signs of a compromised machine.
• If a machine becomes compromised, don’t attempt to resurrect it. Get personal data off, verify the integrity of that data, and then reformat and reinstall the machine.
5394.book Page 70 Tuesday, August 30, 2005 10:37 PM
71
■ ■ ■
C H A P T E R 5
Windows Server 2003 Security
Windows Server 2003 is filled with evidence of Microsoft’s renewed vigor around securing its products. Particularly with the release of Service Pack 1 in the first half of 2005, the company has enhanced and improved the security underpinnings and offerings in its flagship server operating system.
In this chapter, I’ll begin by briefly outlining some of the more minor security enhance-ments in Service Pack 1 and then spend the remainder of the chapter covering the largest new feature in the release—the Security Configuration Wizard.
Enhancements to Security in Service Pack 1Windows Server 2003 Service Pack includes not only all the security hotfixes and vulnera-bility corrections released to date, but also several enhancements to security operations. This particular release is akin to Windows XP’s Service Pack 2, both in scope and in the degree of modification of the OS. Most of the security enhancements, including improve-ments in the user interface, found in XP Service Pack 2 have been brought to Windows Server 2003.
The product contains the following fixes to some problems in the release version of Windows Server 2003:
• A correction to the way Certificate Services provides service to Microsoft Outlook clients resolves the problem in which clients are asked multiple times for their passwords.
• Users now have the ability to take advantage of the security of the Secure Sockets Layer (SSL) protocol while running IIS 6.0 in kernel mode. (Briefly, components running in kernel mode benefit from increased performance because the processes run closer to the core of the operating system and not in other “layers” of the OS.)
• Improvements have been made to the way errors are logged when accessing the API for the HTTP protocol in Windows Server 2003.
5394.book Page 71 Tuesday, August 30, 2005 10:37 PM

72 C H A P T E R 5 ■ W I N D O W S S E R V E R 2 0 0 3 S E C U R I T Y
• The Windows Firewall included in Windows Server 2003 SP1 includes support for IPv6.
• Terminal Services connections can take advantage of SSL for server authentication. This option is disabled by default, but you can enable it through the GUI. To use this feature, the server must have an SSL-compatible certificate with a private key, and the client must trust the root of the server’s certificate.
• On clean installations, inbound connections are blocked until an administrator acknowledges the status of Automatic Updates and the availability of updates on the Microsoft Update site.
• The Automatic Updates interface, as well as the Windows Firewall, now sports the XP-style interface.
The Security Configuration WizardThe single most important new feature of Windows Server 2003 (albeit with Service Pack 1, or SP1) is the Security Configuration Wizard (SCW), which provides a roles-based way to lock down the surface of your Windows Server 2003 machines. It’s a great way to navigate the maze of services found in the operating system and to safely decide which ones can be turned off without affecting functionality for you or your users.
In essence, the SCW uses a back-end XML database that is intimately familiar with Windows Server 2003 and all its associated products, including enterprise applications such as Exchange, ISA, Identity Integration Server, and the like. Using this data, the SCW can make intelligent decisions about which services need to be running and which can be turned off.
The SCW supports what is in effect an auditing mode, which begins by examining a machine and reporting the roles assigned to it (those roles being the ones assigned through the Manage Your Server Wizard). This is a great way to check the configurations of your servers. You can go a few steps further with the active configuration mode, which allows you to simply tell the wizard what roles should be assigned to the server. The SCW will configure the server itself, turning services and ports on and off as needed.
The SCW creates files called security policies, which are simply reports of the results the SCW returns when analyzing a machine. The first machine to create a security policy is known as the baseline machine. These security policies can be exported and then applied to any server that matches the configuration of the baseline machine.
Another neat feature is the ability to import and export configurations, which makes it a lot simpler to deploy the same configuration to multiple servers nearly simultaneously. Additionally, you can add information about your custom, homegrown applications to
5394.book Page 72 Tuesday, August 30, 2005 10:37 PM
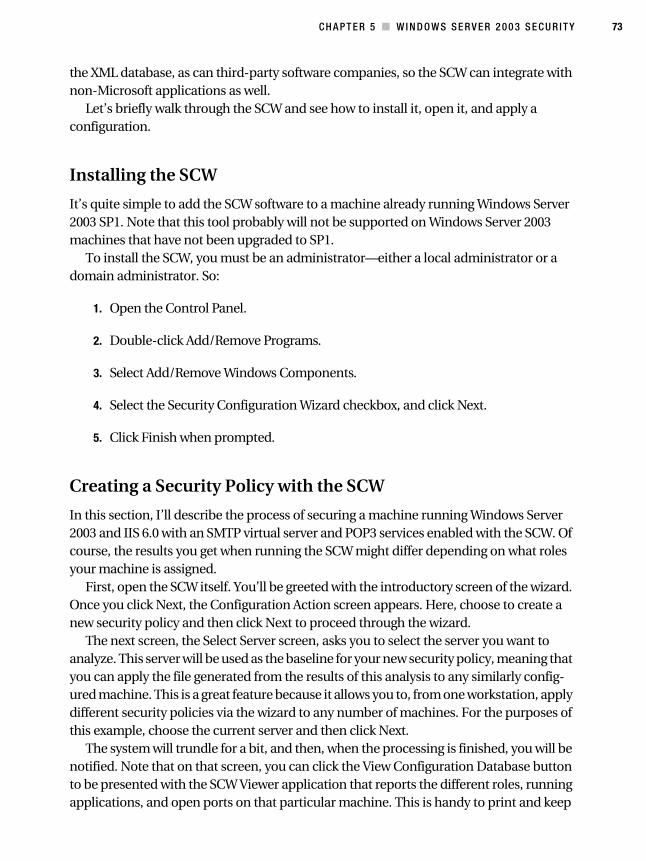
C H A P T E R 5 ■ W I N D O W S S E R V E R 2 0 0 3 S E C U R I T Y 73
the XML database, as can third-party software companies, so the SCW can integrate with non-Microsoft applications as well.
Let’s briefly walk through the SCW and see how to install it, open it, and apply a configuration.
Installing the SCW
It’s quite simple to add the SCW software to a machine already running Windows Server 2003 SP1. Note that this tool probably will not be supported on Windows Server 2003 machines that have not been upgraded to SP1.
To install the SCW, you must be an administrator—either a local administrator or a domain administrator. So:
1. Open the Control Panel.
2. Double-click Add/Remove Programs.
3. Select Add/Remove Windows Components.
4. Select the Security Configuration Wizard checkbox, and click Next.
5. Click Finish when prompted.
Creating a Security Policy with the SCW
In this section, I’ll describe the process of securing a machine running Windows Server 2003 and IIS 6.0 with an SMTP virtual server and POP3 services enabled with the SCW. Of course, the results you get when running the SCW might differ depending on what roles your machine is assigned.
First, open the SCW itself. You’ll be greeted with the introductory screen of the wizard. Once you click Next, the Configuration Action screen appears. Here, choose to create a new security policy and then click Next to proceed through the wizard.
The next screen, the Select Server screen, asks you to select the server you want to analyze. This server will be used as the baseline for your new security policy, meaning that you can apply the file generated from the results of this analysis to any similarly config-ured machine. This is a great feature because it allows you to, from one workstation, apply different security policies via the wizard to any number of machines. For the purposes of this example, choose the current server and then click Next.
The system will trundle for a bit, and then, when the processing is finished, you will be notified. Note that on that screen, you can click the View Configuration Database button to be presented with the SCW Viewer application that reports the different roles, running applications, and open ports on that particular machine. This is handy to print and keep
5394.book Page 73 Tuesday, August 30, 2005 10:37 PM
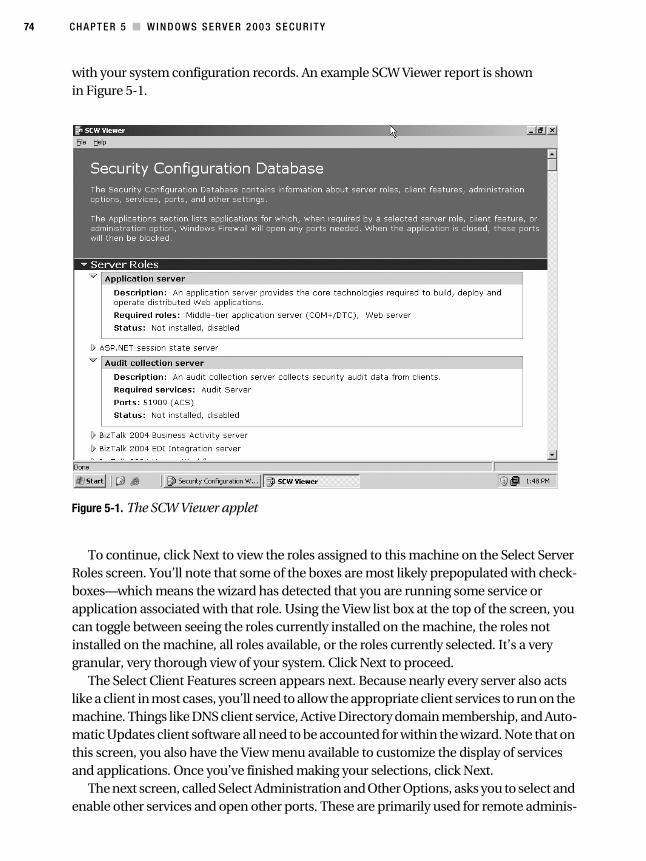
74 C H A P T E R 5 ■ W I N D O W S S E R V E R 2 0 0 3 S E C U R I T Y
with your system configuration records. An example SCW Viewer report is shown in Figure 5-1.
Figure 5-1. The SCW Viewer applet
To continue, click Next to view the roles assigned to this machine on the Select Server Roles screen. You’ll note that some of the boxes are most likely prepopulated with check-boxes—which means the wizard has detected that you are running some service or application associated with that role. Using the View list box at the top of the screen, you can toggle between seeing the roles currently installed on the machine, the roles not installed on the machine, all roles available, or the roles currently selected. It’s a very granular, very thorough view of your system. Click Next to proceed.
The Select Client Features screen appears next. Because nearly every server also acts like a client in most cases, you’ll need to allow the appropriate client services to run on the machine. Things like DNS client service, Active Directory domain membership, and Auto-matic Updates client software all need to be accounted for within the wizard. Note that on this screen, you also have the View menu available to customize the display of services and applications. Once you’ve finished making your selections, click Next.
The next screen, called Select Administration and Other Options, asks you to select and enable other services and open other ports. These are primarily used for remote adminis-
5394.book Page 74 Tuesday, August 30, 2005 10:37 PM
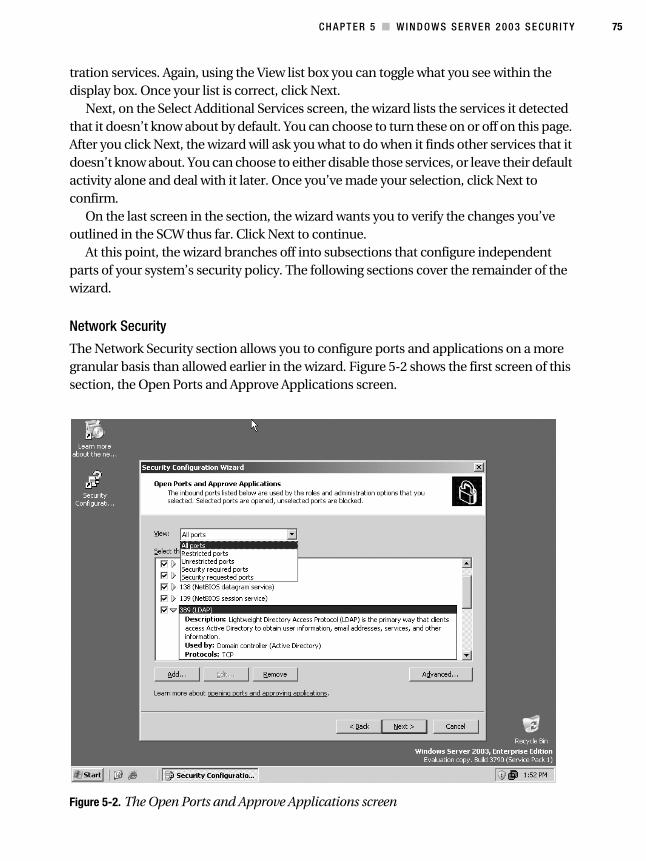
C H A P T E R 5 ■ W I N D O W S S E R V E R 2 0 0 3 S E C U R I T Y 75
tration services. Again, using the View list box you can toggle what you see within the display box. Once your list is correct, click Next.
Next, on the Select Additional Services screen, the wizard lists the services it detected that it doesn’t know about by default. You can choose to turn these on or off on this page. After you click Next, the wizard will ask you what to do when it finds other services that it doesn’t know about. You can choose to either disable those services, or leave their default activity alone and deal with it later. Once you’ve made your selection, click Next to confirm.
On the last screen in the section, the wizard wants you to verify the changes you’ve outlined in the SCW thus far. Click Next to continue.
At this point, the wizard branches off into subsections that configure independent parts of your system’s security policy. The following sections cover the remainder of the wizard.
Network Security
The Network Security section allows you to configure ports and applications on a more granular basis than allowed earlier in the wizard. Figure 5-2 shows the first screen of this section, the Open Ports and Approve Applications screen.
Figure 5-2. The Open Ports and Approve Applications screen
5394.book Page 75 Tuesday, August 30, 2005 10:37 PM
76 C H A P T E R 5 ■ W I N D O W S S E R V E R 2 0 0 3 S E C U R I T Y
You can select inbound ports to open by clicking the checkbox beside each applicable port entry. If you do not select a port, it will be closed once the policy is applied to the machine. By clicking the Add button, you can add a port or application to the list that isn’t already present. And by clicking the Advanced button, you can restrict ports on the list to certain subnets or further secure the port using an IPsec filter. Click Next to continue once you’ve selected the appropriate ports.
Confirm the port configuration on the next screen, and then click Next.
Registry Settings
The Registry Settings section allows you to set the behavior of certain communications protocols, directly in the Registry, that are used to pass data between machines. These modifications protect against password cracking and man-in-the-middle attacks. On the first screen, Require SMB Security Signatures (shown in Figure 5-3), you indicate what level of update the oldest client on your computer currently has installed. You also tell the wizard what sort of excess processor capacity you have, which has a direct relation to whether the wizard will recommend that you turn on signing and encryption for commu-nications to and from this computer.
Figure 5-3. The Require SMB Security Signatures screen
5394.book Page 76 Tuesday, August 30, 2005 10:37 PM
C H A P T E R 5 ■ W I N D O W S S E R V E R 2 0 0 3 S E C U R I T Y 77
The Require LDAP Signing screen is next. Here, simply tell the wizard if your clients all have Windows 2000 Service Pack 3 or later, which will enable LDAP queries to be signed to prevent spoofing a query’s source address. The following screen, called Outbound Authentication Methods, allows you to tell the wizard how the computer authenticates itself to remote machines—either via domain or local accounts or simple file-sharing passwords for older, Windows 9x–based clients. You’ll then be asked several questions about your selection, each involving the update level of those remote machines. The wizard in this case is simply making sure that the signing and encryption options it inte-grates into the policy won’t break the ability to communicate with any important systems on your network.
At the end of this section of the wizard, you’ll have an opportunity to confirm the changes to the Registry that you want to make. Click Next to continue.
Audit Policy
In the Audit Policy section, you have the opportunity to tell the wizard what level of auditing you’d like (you have three choices—none, success auditing only, or com- plete auditing), and then the wizard will automatically enable and disable certain parts of the auditing system for you. Once you’ve made your choice of auditing level, you’ll be presented with a screen much like Figure 5-4.
On this screen, you can see how the wizard applied your auditing level preference to the system’s various audit-enabled areas: logins to an account, account management, directory service access, logon events, object access, policy change, privilege use, process tracking, and system events. You can see what the machine’s current setting is against what the proposed policy’s setting is. You also have the option to include a security template, SCWAudit.inf, that would automatically audit access of the file system.
■Warning If you choose to include the SCWAudit.inf template, you will not be able to roll back the file system access audit policy.
Finishing the Policy
Once you have proceeded through the wizard and answered all the questions, you will be given an opportunity to review the proposed policy in the SCW Viewer applet described a bit earlier in the chapter. Confirm all of your changes, and then select the location to save the policy. You can also elect to apply the policy to the current machine now, or simply save the policy and wait to apply it to this machine or others until a later time.
5394.book Page 77 Tuesday, August 30, 2005 10:37 PM
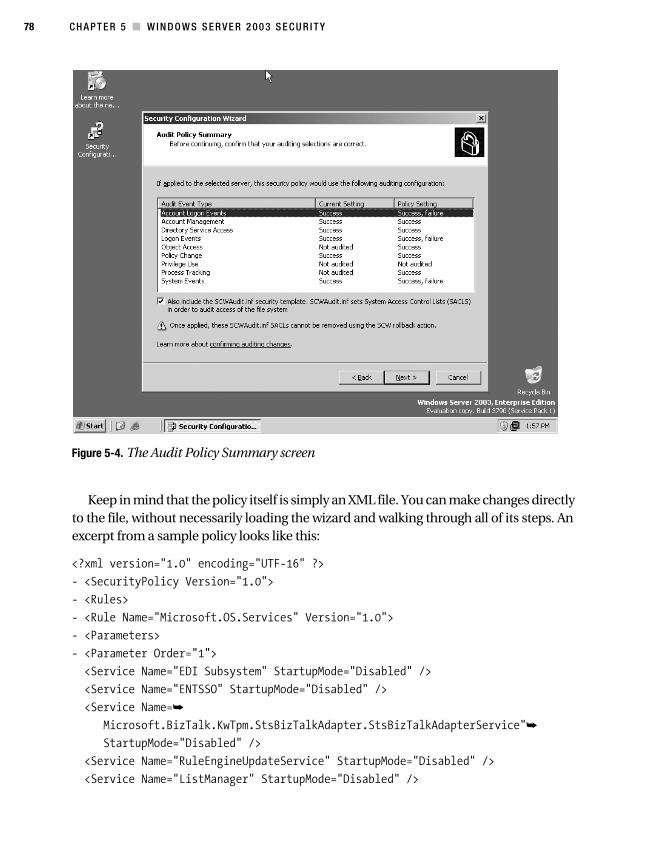
78 C H A P T E R 5 ■ W I N D O W S S E R V E R 2 0 0 3 S E C U R I T Y
Figure 5-4. The Audit Policy Summary screen
Keep in mind that the policy itself is simply an XML file. You can make changes directly to the file, without necessarily loading the wizard and walking through all of its steps. An excerpt from a sample policy looks like this:
���������� �������� ���� ��������������
���������� ������!��� �������
���"����
���"����#$����%����&��'����������!��� �������
��� $$�����
��� $$�����'�������
����������#$����()*���+��������$��,%�����)�$+�����-��
����������#$����(#���'����$��,%�����)�$+�����-��
����������#$���➥
�����%����&��.�/�$�0�12�,����.�/�$�03�$,�����.�/�$�03�$,���������➥
�������$��,%�����)�$+�����-��
����������#$����"���( �� ��,�$������������$��,%�����)�$+�����-��
����������#$����4��%$ $������$��,%�����)�$+�����-��
5394.book Page 78 Tuesday, August 30, 2005 10:37 PM
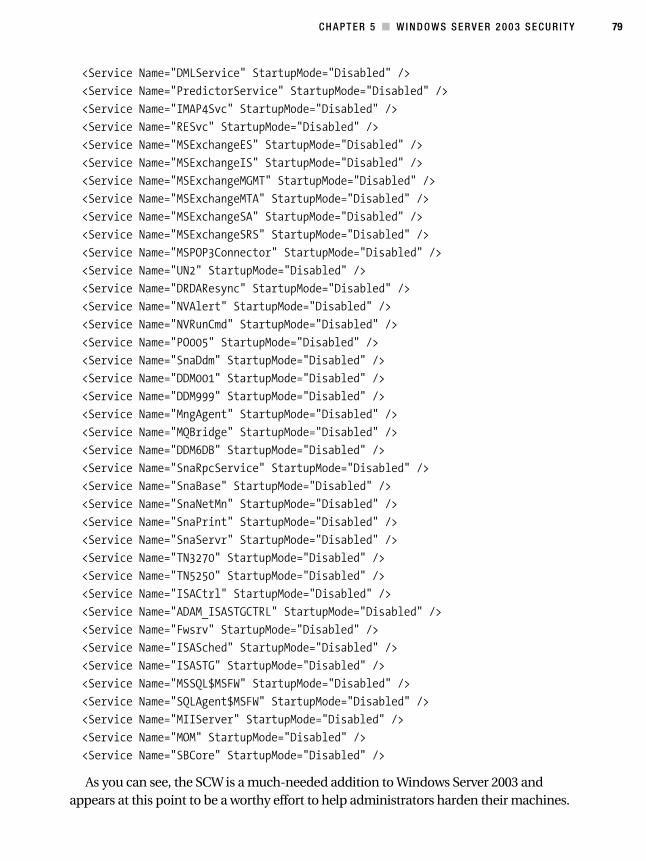
C H A P T E R 5 ■ W I N D O W S S E R V E R 2 0 0 3 S E C U R I T Y 79
����������#$����)%4����������$��,%�����)�$+�����-��
����������#$���� ����������������$��,%�����)�$+�����-��
����������#$����*%3 5�������$��,%�����)�$+�����-��
����������#$����"(�������$��,%�����)�$+�����-��
����������#$����%�(��6$ ��(�����$��,%�����)�$+�����-��
����������#$����%�(��6$ ��*�����$��,%�����)�$+�����-��
����������#$����%�(��6$ ��%7%�����$��,%�����)�$+�����-��
����������#$����%�(��6$ ��%�3����$��,%�����)�$+�����-��
����������#$����%�(��6$ ���3����$��,%�����)�$+�����-��
����������#$����%�(��6$ ���"�����$��,%�����)�$+�����-��
����������#$����%� ' 89� ��������$��,%�����)�$+�����-��
����������#$�����#:����$��,%�����)�$+�����-��
����������#$����)")3"�� �����$��,%�����)�$+�����-��
����������#$����#!3�������$��,%�����)�$+�����-��
����������#$����#!"� 9������$��,%�����)�$+�����-��
����������#$���� '��;����$��,%�����)�$+�����-��
����������#$����� $)������$��,%�����)�$+�����-��
����������#$����))%�������$��,%�����)�$+�����-��
����������#$����))%<<<����$��,%�����)�$+�����-��
����������#$����% �3�� �����$��,%�����)�$+�����-��
����������#$����%=.��������$��,%�����)�$+�����-��
����������#$����))%�).����$��,%�����)�$+�����-��
����������#$����� $",�����������$��,%�����)�$+�����-��
����������#$����� $.$�����$��,%�����)�$+�����-��
����������#$����� $#��% ����$��,%�����)�$+�����-��
����������#$����� $ � �����$��,%�����)�$+�����-��
����������#$����� $�������$��,%�����)�$+�����-��
����������#$�����#8:>�����$��,%�����)�$+�����-��
����������#$�����#;:;�����$��,%�����)�$+�����-��
����������#$����*�39������$��,%�����)�$+�����-��
����������#$����3)3%?*�3��79�"4����$��,%�����)�$+�����-��
����������#$�����2�����$��,%�����)�$+�����-��
����������#$����*�3��6������$��,%�����)�$+�����-��
����������#$����*�3��7����$��,%�����)�$+�����-��
����������#$����%��=4@%��A����$��,%�����)�$+�����-��
����������#$�����=43�� �@%��A����$��,%�����)�$+�����-��
����������#$����%**��������$��,%�����)�$+�����-��
����������#$����%'%����$��,%�����)�$+�����-��
����������#$�����.9������$��,%�����)�$+�����-�
As you can see, the SCW is a much-needed addition to Windows Server 2003 and appears at this point to be a worthy effort to help administrators harden their machines.
5394.book Page 79 Tuesday, August 30, 2005 10:37 PM
80 C H A P T E R 5 ■ W I N D O W S S E R V E R 2 0 0 3 S E C U R I T Y
The Rollback Feature
If you applied a security policy with SCW that broke some or all of the functionality of the machine, you can roll back the security policy that caused the problem and return the machine to an operational state. However, if SCW-applied policy is later edited in Local Security Policy after you apply it, the changes can’t be rolled back to their preapplication state, since the SCW has no way of tracking the changes made through another interface. They remain in their current configuration.
For services and Registry values, rolling back a policy restores settings that were changed during the configuration process. Windows Firewall and IPsec rollback consists of unassigning any SCW policy that is currently in place and reassigning the previous policy that was in place before the SCW policy was applied.
Also keep in mind that if you enabled file system access auditing, that policy cannot be rolled back. However, for most other policies, the rollback feature is a decent insurance policy that helps protect against recoverable mistakes.
■Note Do not end the Security Configuration Wizard either through Task Manager or shutting down the machine while it’s applying a policy. A policy should instead be rolled back after it has been completely applied to the system.
SCW Best Practices
Follow the points in this section to achieve best results from using the SCW.Of course, before you begin, go ahead and upgrade to Service Pack 1 and install the
Security Configuration Wizard. You can find links to download the service pack plastered all over the Windows Server 2003 website at 6��,B--222������&�����-2� ��2���:��8. It’s a fairly large service pack, so even on a fast connection it will take a few minutes to come down the pipe. After it’s downloaded, simply double-click to install it (and make sure you choose to back up your current installation files in case of a problem). Once the service pack is installed and you’ve rebooted your server, go into Control Panel, double-click Add/Remove Programs, select Windows Components from the right, and then check the box for the Security Configuration Wizard. Make sure your CD is inserted, and after a couple of minutes, the wizard is ready to roll. (Or is that “role”? Har, har.)
Next, run the SCW on each of your unique role-based servers and save the policies. There’s no need to go all-out when you first run the SCW—let it walk you through and help you decide the policies you want to set, and then simply save the file. You can reuse it later on an unlimited number of machines, and saving the file will also give you a chance to (a) learn the XML format the wizard uses and (b) double-check the settings and changes the wizard wants to apply before actually committing them to production systems.
5394.book Page 80 Tuesday, August 30, 2005 10:37 PM
C H A P T E R 5 ■ W I N D O W S S E R V E R 2 0 0 3 S E C U R I T Y 81
Roll out saved policies one by one on the appropriate machines. Once you’ve vetted the policies you created in the previous step, start applying them individually to servers that are performing like roles. Start with your file servers, and then move to domain controllers, Exchange machines, SQL Server boxes, and so on. A controlled but steady deployment is your best bet for success.
Then, don’t forget to include your existing security templates if necessary. Remember that the SCW has full support for your existing security templates you may have created. There’s no need for the SCW to obsolesce this. On the last step of the Create a New Policy part of the wizard, there’s a button called Include Security Templates that you can click to select the template file to wrap into the manifest of your new policy. Unfortunately, there’s no way to intuitively roll these back once you’ve applied them.
Finally, beg your service vendors for updates to their software that support configura-tion through the SCW. The SCW is extensible. Do you have third-party services that the SCW doesn’t know about? Get in touch with your vendor and demand this support.
Using SCW from the Command Line
Security Configuration Wizard (SCW) includes the Scwcmd.exe command-line tool. This tool is versatile and can perform many tasks that you might want to automate using scripts or batch files. Here, I’ll briefly outline the most common tasks you will want to perform using SCWCMD.
Configuring Servers with a Policy
The most basic use of the command-line tool is to configure one or many servers with an SCW-generated policy. You can apply a policy to the current machine, to a remote machine using either its NetBIOS name or IP address, or to an entire organizational unit’s worth of machines. For example, to apply the machine.xml policy to the current computer, simply use this:
�2������ &�����-,B�$�6� �����
To apply the policy to all of the machines in the FileServers OU within company.com, you need to use the full LDAP name in the arguments of the command. It should look some-thing like this:
��2������ &�����-��B'����������C)9����,$ �C)9�����-,B�$�6� �����
Analyzing Machines for Policy Compliance
You can also analyze a machine, a list of servers, or an entire organizational unit with an SCW-generated policy. For example, to analyze your SQL Server machine with the sqlserver.xml policy, use the following:
�2����$ $��/��-�B�=4��� $���-,BD���������-�B$��� ��$��
5394.book Page 81 Tuesday, August 30, 2005 10:37 PM
82 C H A P T E R 5 ■ W I N D O W S S E R V E R 2 0 0 3 S E C U R I T Y
Or, to analyze the SQL Servers organizational unit, use the following. Note that the entire LDAP name needs to be used when specifying Active Directory–based containers with this command.
�2����$ $��/��-��B'���=4����C)9����,$ �C)9�����-,BD���������-�B$��� ��$��
The results of running this command are returned to an XML file generated by the wizard, which you can view using another option in SCWCMD. I’ll demonstrate that in a bit.
Roll Back SCW Policies
If you make a mistake and need to “undo” a policy application on either a local or remote machine, you can use the command-line tool to get the machine back up quickly. You can also use the /u switch to perform the operation using another user’s credentials, if yours aren’t sufficient on a remote machine.
For example, to roll back a policy on the machine R2B2SRV1, use the following:
�2�������+$�0�-�B":.:�"!��-�B$��� ��$��
You can also use an IP address if you aren’t sure of the friendly name of a machine:
�2�������+$�0�-�B�<:���E�:�:�-�B���$�$���
Viewing Analysis Results
You can use the scwcmd view command to render the raw XML results file that the wizard generates with an XML transform file that makes the results easier to read. The directory %windir%\security\msscw\transformfiles contains .xsl transform files, which are applied to the .xml policy file for the rendering process.
To view a policy file, use the following syntax:
�2�������2�-�B,�����&��������-B,��������2���
CheckpointsHere are the points to remember about Windows Server 2003 security:
• Upgrade to Service Pack 1 and install the Security Configuration Wizard as described in this chapter.
• Run the SCW on each of your unique role-based servers and save the policies in a central location.
• Roll out saved policies one by one on the appropriate machines.
• Don’t forget to include your existing security templates if necessary.
5394.book Page 82 Tuesday, August 30, 2005 10:37 PM
C H A P T E R 5 ■ W I N D O W S S E R V E R 2 0 0 3 S E C U R I T Y 83
• Beg your service vendors for updates to their software that support configuration through the SCW.
• Automate deployments of SCW policies through the command-line tool SCWCMD.
5394.book Page 83 Tuesday, August 30, 2005 10:37 PM

5394.book Page 84 Tuesday, August 30, 2005 10:37 PM

85
■ ■ ■
C H A P T E R 6
Deploying Enterprise Security Policies
Windows 2000 and later operating systems come with an excellent, if a bit rocky, management system called Group Policy. Although the system drew a lot of criticism, namely from those opposed to Microsoft, there are a lot of positives to it.
Group Policy is a step in the right direction in many ways. For one, it somewhat assuages the need to purchase complex system management software like Microsoft Systems Management Server or IBM’s Tivoli enterprise IT management products. Addi-tionally, Group Policy offers Windows-specific management options that external products don’t necessarily support (programmers familiar with Group Policy liken it to Windows NT’s System Policy Editor on steroids). But Group Policy also functions as a rudimentary yet effective software advertisement and distribution mechanism. And finally, it provides Windows administrators with a way to centrally manage security configurations and permissions on client machines running Windows 2000 or later.
Group Policy allows you to define boundaries for security, management, and software distribution based on the structure of your enterprise Active Directory. Windows offers a tool called the Security Configuration and Analysis tool, which is covered in detail in Chapter 3, and which includes support for managing Group Policy settings destined to be applied to client machines. These settings are grouped into collections, called Group Policy objects (GPOs), that are stored together in a file created with the Group Policy snap-in in the Microsoft Management Console (MMC) application. Microsoft has also just released the Group Policy Management Console, which is a wonderful tool that’s quite a bit more intuitive than the administrator applets that ship with Windows 2000 and Windows Server 2003. In this chapter, I’ll take a look at configuring enterprise-wide security policies and applying and enforcing them using these Group Policy tools.
System Policies, Group Policies, and InteractionPolicies have, of course, come a long way since the concept was first introduced into a Windows operating system. Windows 95 first contained “system policies,” a part of the
5394.book Page 85 Tuesday, August 30, 2005 10:37 PM
86 C H A P T E R 6 ■ D E P L O Y I N G E N T E R P R I S E S E C U R I T Y P O L I C I E S
operating system that was later carried forward into editions of Windows 98, Windows ME, and NT. System policy hinges on remote administration of a workstation from a central console, hence the inclusion of the Remote Registry Service and Remote Registry Editor applications. Its sole purpose was to facilitate making widespread changes to a user’s Registry settings—wallpaper, removing system administration applets from the Start menu, and other runtime configurations—without making the administrator visit each workstation.
How did system policies actually work? It’s simpler than you might otherwise believe. Windows would store a copy of the Registry modifications an administrator makes—usually with the Windows Policy Editor, POLEDIT.EXE—in the NETLOGON share on all Windows domain controllers. Microsoft hardcoded instructions into Windows 9x and NT to retrieve a specific file from that share, so there was no real client-side configuration. So a specific user would authenticate to Windows, during the process of which the operating system would retrieve a copy of the appropriate file from the domain controller and apply the user and computer settings in that file to the user’s Registry session. The effects of those changes are seen when Windows or an application consults the Registry.
Contrast this setup with Group Policy. Group Policy is made up not of one file sitting on a domain controller share, but of many assorted slices of settings, known as Group Policy objects. These objects, coupled with information on login scripts and the like stored in the SYSVOL shares on any Windows 2000 domain controller, work to create Group Policy as a whole. Whereas with system policies only Registry entries could be modified, with Group Policy a whole subset of Windows functions can be controlled. Group Policy provides an interface for controlling Windows’s dynamic link libraries—those DLL files that always fill the SYSTEM32 directories on all systems. And also, Microsoft decided that Group Policy would be the only way to manage some subsystems of Windows. You won’t find utilities in the Administrative Tools group to manage IP security (IPsec) or other lower-level oper-ating system functions; you’ll have to depend on Group Policy for that.
Now those without administrative domains in Windows 2000 (in other words, those without Active Directory) aren’t necessarily left out in the cold. A common misconception about Group Policy is that it’s only available on Active Directory–enabled networks. That isn’t the case. Although the functionality of an Active Directory–less Group Policy is more limited, it can still be used. Without AD, Group Policy becomes a limited local administra-tion tool that controls local users, groups, and computer settings, but not those of several computers. You can, however, create and distribute these policies to other Windows 2000 workstations and servers from a central location, though management isn’t as simple.
A nice feature of Group Policy is that it automatically replicates its settings and objects to other domain controllers within the same domain. This mimics the functionality of the NT-esque directory replication service that propagated NTCONFIG.POL, the system policy file for NT machines, from the primary domain controller down to the backup
5394.book Page 86 Tuesday, August 30, 2005 10:37 PM
C H A P T E R 6 ■ D E P LO Y I N G E N T E R P R I S E S E C U R I T Y P O L I C I E S 87
domain controllers. However, without Group Policy and Active Directory, you need to take advantage of the File Replication Service, which is included with Windows 2000. This replicates anything in a domain controller’s SYSVOL directory out to other domain controllers. So take heed that the contents of the NETLOGON share on Windows 2000 domain controllers don’t automatically replicate.
Mixing Policies and Operating Systems
The waters become muddy when you examine the environment in which most corporate networks run. There’s usually a mix of machines, some 9x, ME, NT, Windows 2000, and XP machines, and servers running NT, 2000, and Server 2003. How do system policies and Group Policy interact in a world where certain systems listen to some of the policies but not all? There are a few issues to note, and I’ll discuss them in this section:
• First, older systems—those running Windows 9x and NT namely—will not recog-nize or understand Group Policy. But newer systems will understand older policy types. Windows NT machines can’t apply Group Policy, because they weren’t built to understand it. But Windows 2000 machines can use system policies from NT domain controllers, because they know system policies exist and have the logic built in to ask for them.
• Second, Group Policy is refreshed upon user logon and at various, regular intervals throughout a user’s session (for user settings) and throughout the time a computer is connected to the network (for computer settings). This is usually done at a domain controller’s behest around every 90 minutes or so for workstations and every 5 minutes for servers. System policies are only retrieved from the domain controller at user logon. They aren’t pushed during the day.
• Third, Windows 9x and NT only looks at system policies from the domain con- troller that holds the current user’s account. This only applies in situations where a machine’s account is in a domain separate from a user’s personal account, but it’s a bit of reverse logic that I don’t understand completely. Most system policy set- tings adjust computer configurations, so why not apply policies based on machine domains? It’s a nonissue at this point, with Group Policy, but it’s still something to be aware of.
5394.book Page 87 Tuesday, August 30, 2005 10:37 PM
88 C H A P T E R 6 ■ D E P L O Y I N G E N T E R P R I S E S E C U R I T Y P O L I C I E S
• Fourth, to further confuse and annoy administrators, Windows 2000 differs from NT in that it responds to policies from both the user and the machine domain. This works with regular NT 4 domains and Active Directory domains. But Windows only applies the parts of the policy that apply to users from the user’s domain; it ignores machine policy that resides on a user’s domain. The converse is also true: Windows applies machine policies retrieved from the machine domain, but it ignores user policy from the machine domain. Also, just to be different, Windows 2000 retrieves policies from domain controllers throughout the day (not only just upon user logon), even without Active Directory. This halfway emulates the native function-ality of Group Policy.
• Fifth, if a domain offers both system policies and Group Policy, a client machine will only retrieve and apply domain GPOs. It will completely ignore system policies. Likewise, if a domain only has available system policies, the system will apply those. If conflicts exist between requirements set by a system policy and requirements set by a Group Policy object, then the Group Policy object will always be applied. So Group Policy on a domain always trumps system policies.
• Finally, domain Group Policy objects always trump local Group Policy objects. There are no exceptions to this, because it would make for a huge security hole, thereby giving local administrators more control over a machine than domain administrators have.
Table 6-1 explains the possible outcomes of mixing policy across different operating systems and domain control environments.
Table 6-1. Effects of Using Different Operating Systems in Different Domain Environments
User Machine Client OS Domain Type Domain Type Resulting BehaviorWindows 9x AD N/A Windows will download and apply settings
in CONFIG.POL only.
Windows 9x NT N/A Windows will download and apply settings in CONFIG.POL only.
Windows NT AD AD NT will ignore GPOs and only apply settings it receives when it downloads NTCONFIG.POL from the current user account’s home domain controller.
Windows NT AD NT NT will ignore GPOs and only apply settings it receives when it downloads NTCONFIG.POL from the current user account’s home domain controller.
5394ch06.fm Page 88 Wednesday, August 31, 2005 10:33 AM

C H A P T E R 6 ■ D E P LO Y I N G E N T E R P R I S E S E C U R I T Y P O L I C I E S 89
Security and the Group Policy FrameworkWindows Group Policy allows you to configure security options that reside inside GPOs that apply to certain partitions and boundaries inside your organization’s Active Direc-tory. The Group Policy Framework defines seven areas in which Group Policy can manage security settings across an Active Directory structure. Table 6-2 describes them.
Windows NT NT AD NT will ignore GPOs and only apply settings it receives when it downloads NTCONFIG.POL from the current user account’s home domain controller.
Windows NT NT NT NT downloads NTCONFIG.POL from the current user account’s home domain controller.
Windows 2000/XP AD AD Windows applies Group Policies from both domain controllers (user settings from the user domain and computer settings from the machine domain), which are applied in favor of any local Group Policies that might be in effect.
Windows 2000/XP AD NT Windows applies user settings from the domain Group Policy it receives from the user’s Active Directory–enabled domain. Windows also downloads NTCONFIG.POL from the machine domain and applies computer settings from it. Domain Group Policies will always win a conflict over both system and local Group Policies, and local Group Policies always win over system policies.
Windows 2000/XP NT AD Windows applies the user settings from the NTCONFIG.POL it downloads from the user’s home domain. It applies domain GPOs found in Active Directory in the machine’s home domain.
Windows 2000/XP NT NT Windows downloads system policy files from each domain controller and applies the user settings from the user domain’s NTCONFIG.POL and the computer settings from the machine domain’s NTCONFIG.POL. If local Group Policies are in effect on the workstation itself, they override any system policies downloaded from domain controllers.
User Machine Client OS Domain Type Domain Type Resulting Behavior
5394.book Page 89 Tuesday, August 30, 2005 10:37 PM
90 C H A P T E R 6 ■ D E P L O Y I N G E N T E R P R I S E S E C U R I T Y P O L I C I E S
Organized Layout of Policies
With power comes complexity, and Group Policy is no exception. Many hours of Windows administrators’ lives have been squandered on basic troubleshooting of Group Policy. Answers to quandaries such as “Why isn’t this policy in effect on this system?” or “I thought I turned OFF IPsec!” can be difficult to track down if your Active Directory is full of GPOs that are applied inconsistently, redundantly, and inappropriately.
To curtail your security policies and make them easier to locate, disable, change, and apply, try to follow the guidelines listed here.
■Note Although the focus of this chapter is on the Group Policy Security Framework, the majority of this general advice works for any GPO you wish to deploy.
Table 6-2. Group Policy Framework Security Settings
Framework Area DescriptionAccount area This framework area applies security configuration to user
accounts, including passwords, account lockouts, and Kerberos ticket policies. Password and account-lockout policies apply to workstations and servers; Kerberos ticket policies apply only to domain controllers.
Local policies This area allows you to set auditing and event-logging policies, user rights assignments, and Registry keys that directly affect system security. Settings in this area apply to all Windows 2000 or later systems, and not only to a specific type.
Restricted groups This particularly useful group allows you to define policies regarding a user’s membership into security groups that allow elevated privileges. It’s simple to define a policy where domain users can never be a member of the local Administrators group; other policies are equally easy.
System services Here you can set startup options for services and access controls on them.
Registry In this area you can configure access permissions on specific keys in the Registry.
Public key policies You can establish settings for encrypted recovery agents for the Windows encrypting file system (EFS), certificate authorities for a specific Windows domain, trusted certificate authorities, and other public cryptography options.
IPsec policies on Active Directory
This area allows you to define IPsec configurations for any given unit in your Active Directory.
5394.book Page 90 Tuesday, August 30, 2005 10:37 PM
C H A P T E R 6 ■ D E P LO Y I N G E N T E R P R I S E S E C U R I T Y P O L I C I E S 91
• Group your policies logically and define boundaries to contain them. Although your Active Directory may be organized by geographic location, your system manage-ment needs might revolve around a different paradigm. For example, you may need IPsec for all company executives’ laptops, but they might not all be in your New York office. Or all middle managers in your corporation might require a customized version of Internet Explorer that doesn’t lock them out from accessing the Internet, which might be the default configuration for all computers in the domain. The idea is to map out the kinds of restrictions you need, and then define boundaries to which those policies apply. This will make it easier to apply them to the target users and computers even if the geographical and managerial boundaries do not match.
• Inside those boundaries, configure policies that represent common values in your organization. Do you normally configure workstations in your finance department to lock a computer after three unsuccessful logon attempts? Does a particular domain in your forest need additional desktop restrictions—should they not be allowed to run Control Panel? Change their wallpaper? Install software on their own? These are the kinds of policy sets that probably sound familiar. Group these together and create GPOs for each of these like sets of policy settings.
• Configure organizational units inside Active Directory that contain machines grouped according to like roles or functions within an organization. This gets further into the granulation of your security policies. For example, Windows comes by default with domain controllers residing in a separate organizational unit in Active Directory. You might consider putting desktops, laptops, and servers into their own organizational units, which makes it easier to apply policies solely to laptops, such as requiring the use of the EFS.
Continuing with that train of thought, I’ll now give you an understatement: It can require some work to configure Group Policy correctly and effectively. The most difficult parts of the process are planning and laying out the policy settings; Windows takes care of the actual deployment to client computers, which is one of the features that makes Group Policy a compelling management tool. This ease of deployment is a double-edged sword, however. It’s equally simple to misconfigure an access control list or change a setting (anybody who has played with the Require Signed Communications settings knows this all too well) and wreak utter havoc on your domain.
Even more difficult sometimes is getting the big picture. That is to say, it’s hard to see how your Active Directory layout and structure—which probably mimics your organiza-tion’s hierarchical personnel structure logically and traditionally—can coexist with GPOs, which seem to cross hierarchy boundaries and rely on other scopes of an application. With careful planning however, Group Policy can overlay your existing directory structure and complement it with its own management boundaries.
5394.book Page 91 Tuesday, August 30, 2005 10:37 PM
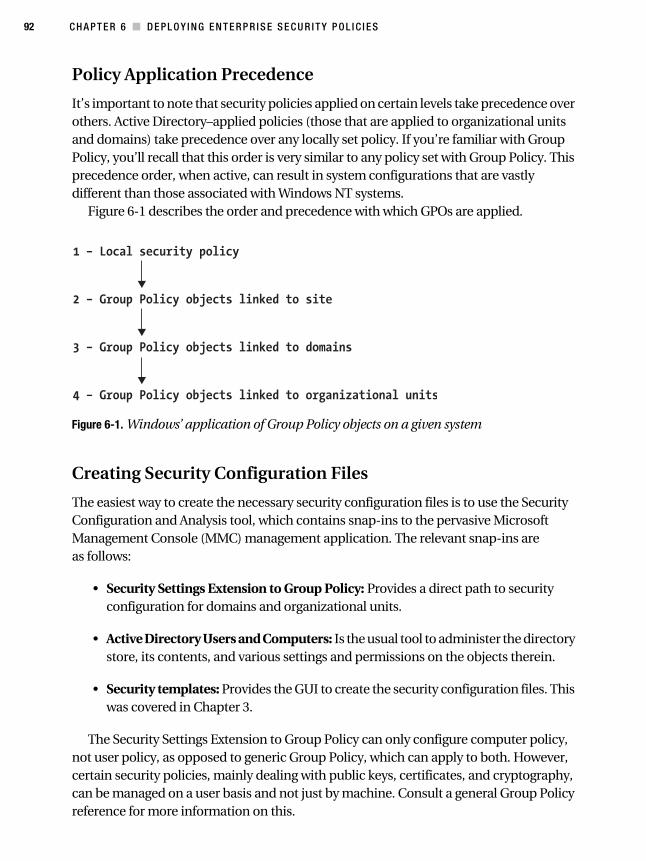
92 C H A P T E R 6 ■ D E P L O Y I N G E N T E R P R I S E S E C U R I T Y P O L I C I E S
Policy Application Precedence
It’s important to note that security policies applied on certain levels take precedence over others. Active Directory–applied policies (those that are applied to organizational units and domains) take precedence over any locally set policy. If you’re familiar with Group Policy, you’ll recall that this order is very similar to any policy set with Group Policy. This precedence order, when active, can result in system configurations that are vastly different than those associated with Windows NT systems.
Figure 6-1 describes the order and precedence with which GPOs are applied.
Figure 6-1. Windows’ application of Group Policy objects on a given system
Creating Security Configuration Files
The easiest way to create the necessary security configuration files is to use the Security Configuration and Analysis tool, which contains snap-ins to the pervasive Microsoft Management Console (MMC) management application. The relevant snap-ins are as follows:
• Security Settings Extension to Group Policy: Provides a direct path to security configuration for domains and organizational units.
• Active Directory Users and Computers: Is the usual tool to administer the directory store, its contents, and various settings and permissions on the objects therein.
• Security templates: Provides the GUI to create the security configuration files. This was covered in Chapter 3.
The Security Settings Extension to Group Policy can only configure computer policy, not user policy, as opposed to generic Group Policy, which can apply to both. However, certain security policies, mainly dealing with public keys, certificates, and cryptography, can be managed on a user basis and not just by machine. Consult a general Group Policy reference for more information on this.
5394.book Page 92 Tuesday, August 30, 2005 10:37 PM
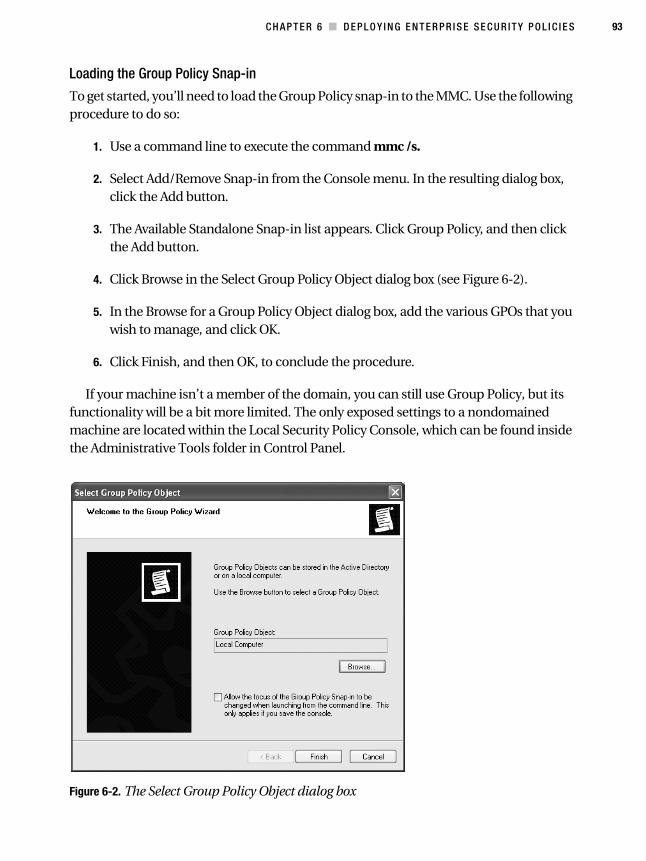
C H A P T E R 6 ■ D E P LO Y I N G E N T E R P R I S E S E C U R I T Y P O L I C I E S 93
Loading the Group Policy Snap-in
To get started, you’ll need to load the Group Policy snap-in to the MMC. Use the following procedure to do so:
1. Use a command line to execute the command mmc /s.
2. Select Add/Remove Snap-in from the Console menu. In the resulting dialog box, click the Add button.
3. The Available Standalone Snap-in list appears. Click Group Policy, and then click the Add button.
4. Click Browse in the Select Group Policy Object dialog box (see Figure 6-2).
5. In the Browse for a Group Policy Object dialog box, add the various GPOs that you wish to manage, and click OK.
6. Click Finish, and then OK, to conclude the procedure.
If your machine isn’t a member of the domain, you can still use Group Policy, but its functionality will be a bit more limited. The only exposed settings to a nondomained machine are located within the Local Security Policy Console, which can be found inside the Administrative Tools folder in Control Panel.
Figure 6-2. The Select Group Policy Object dialog box
5394.book Page 93 Tuesday, August 30, 2005 10:37 PM
94 C H A P T E R 6 ■ D E P L O Y I N G E N T E R P R I S E S E C U R I T Y P O L I C I E S
Default Domain PolicyWhen you install Windows 2000 or later, a default domain security policy is created. It’s a simple task to use this default policy as a base and add and customize settings based on your individual implementation. Let’s take a look at this default policy first, and then work through customizing it.
To view the default domain security policy, do the following:
1. Open the Active Directory Users and Computers snap-in.
2. Expand the domain tree corresponding to your domain’s name in the left pane.
3. Right-click the domain name and select Properties.
4. Click the Group Policy tab, select Default Domain Policy in the details box, and then click the Edit button. Windows displays the Group Policy window.
5. To view each of the default domain policies, drill down through Computer Config-uration ➤ Windows Settings ➤ Security Settings, and click Account Policies.
6. Look at the right pane. You should see Password Policy, Account Lockout Policy, and Kerberos Policy, and by clicking on each you can view or change the default configuration of them.
Default Domain Controller Security Policies
You’ll need to use the Group Policy MMC snap-in to look at the default security policy on the domain controller organizational unit. Do the following to access the snap-in:
1. Load the snap-in as described earlier in the chapter. Ensure that you selected the Domain Controllers.yourdomain.com object in step 4 of the previous list.
2. In the left pane, drill down through Computer Configuration ➤ Windows Settings ➤ Security Settings.
3. Click Account Policies. In the right pane, you should see the possible security options for this organizational unit.
The special way that account policies are distributed to domain controllers deserves comment. All domain controllers in a specific domain will apply security policies estab-lished at the domain level no matter where the actual computer object for that domain controller resides in Active Directory. This helps to ensure that consistent account poli-cies apply to any domain accounts. All other policies are applied at the normal hier- archical level, both to domain controllers and to other workstations and servers in the
5394.book Page 94 Tuesday, August 30, 2005 10:37 PM
C H A P T E R 6 ■ D E P LO Y I N G E N T E R P R I S E S E C U R I T Y P O L I C I E S 95
domain. Only domain controllers are affected by this special exception. Just a tip to remember when you’re planning account policy distribution among your organiza- tional units.
You can view a domain controller’s effective security policy by doing the following:
1. Choose Start, click Run, and type GPEdit.msc. The Group Policy Editor opens.
2. In the left pane, drill down through Computer Configuration ➤ Windows Settings ➤ Security Settings, and click Local Policies.
You can now view the domain controller’s effective security policy. When you’ve finished, close the Group Policy\Local Computer Policy snap-in. When prompted to save console settings, click No, unless you’ve done something you’d like to hold on to.
At this point, you now have all the tools to begin pushing automated security configu-rations to clients running Windows 2000 and later. All of the settings covered so far in this book, unless noted at the time, are fair game for distribution under Group Policy. Now, I’ll focus for a bit on how to fix problems when Group Policy goes awry.
Troubleshooting Group PolicyThe process of diagnosing what’s going on with Group Policy and why it isn’t doing what you want it to do can be infuriating at times. Use the steps recommended in the following section to assist you in tracking down where your problem lies.
DNS problems can plague your network and make it nearly impossible for GPOs to be applied. This problem mainly manifests itself in the requirements for logging on to a domain. Without DNS, you still might be able to authenticate to a domain controller, but GPOs will simply break. That’s because they require various types of DNS subrecords, known as SRV records, so that you can know which computer has which service to manage. This is a good place to start looking if Group Policy simply doesn’t function.
If you’re a seasoned network professional, you’ll be familiar with the concept of inher-itance. This can also be a stumbling block with Group Policy. Beware of a couple of options. One is the No Override function, which does nothing more than cease the processing of any GPOs under the object on which the option is set. Also be wary of the Block Inheritance function, which stops the processing of GPOs that reside above the object on which the object is set. This is a case of knowing what you set and properly documenting it, but it can still eat up hours upon hours of troubleshooting time.
Another issue you might see is that of Group Policy distribution and synchronization. Distribution and synchronization both rely on a versioning system managed internally by Windows that keeps track of unique revisions of the two parts of a GPO. These are the Group Policy container, which is associated with a particular organizational structure in Active Directory, and the Group Policy template, which is a file located in the SYSVOL\Policies directory. These are normally pushed out from the Windows 2000 or
5394.book Page 95 Tuesday, August 30, 2005 10:37 PM

96 C H A P T E R 6 ■ D E P L O Y I N G E N T E R P R I S E S E C U R I T Y P O L I C I E S
Windows Server 2003 domain controller that’s in the primary domain controller (PDC) emulator role and sent to all the other domain controllers in a given domain. But if the versioning system is wrong or somehow corrupted, this distribution may not completely finish, or it might not even occur at all. Windows comes with a couple of tools that will help you fish out the nonstandard GPOs: GPOTOOL, REPLMON, and the newly available Group Policy Management Console (see the Microsoft website for more) can all help you see these objects. Look at logs on the affected domain controllers and see if any errors can help you determine the cause.
Along the same lines is actually realizing when GPOs are distributed, retrieved, and applied. Earlier in the chapter I pointed out that the interval Windows 2000 uses to push out new GPOs is 90 minutes for workstations and regular member servers and 5 minutes for domain controllers. But this is only for new or revised GPOs. If there have been no Group Policy changes, nothing is pushed unless you manually do so, either from the command line or through another systemwide policy that pushes policy regardless of whether a change has occurred. So remember that local configuration changes won’t necessarily be corrected by Group Policy unless either the domain GPO itself changes or you force a refresh of Group Policy.
CheckpointsIf you’re in a hurry, the highlights of this chapter include the following:
• Group your policies logically and define boundaries to contain them.
• Inside those boundaries, configure policies that represent common values in your organization.
• Configure organizational units inside Active Directory that contain machines grouped according to like roles, or functions within an organization.
• Adjust the default domain security policy to encompass a common security config-uration to be deployed across all systems in your domain.
• Adjust the default domain controller security policy to more secure settings that should be applied to all machines serving that role in your Active Directory.
• Use the Computer Configuration nodes in Group Policy to adjust machine-specific settings regardless of the logged-on user.
• Use the User Configuration nodes in Group Policy to adjust user-specific settings that will follow the person across all machines in the policy’s scope.
5394.book Page 96 Tuesday, August 30, 2005 10:37 PM
C H A P T E R 6 ■ D E P LO Y I N G E N T E R P R I S E S E C U R I T Y P O L I C I E S 97
And if you’re having Group Policy problems, here’s a rundown of things to look for:
• Check your domain’s DNS configuration to make sure SRV subrecords are being properly registered.
• Make sure that the No Override and Block Inheritance functionality of Group Policy isn’t hindering the application of Group Policy objects.
• Examine your domain controller logs to see if the File Replication Service is throwing any errors related to the versioning of Group Policy Template files.
• Force a refresh of Group Policy from a domain controller’s command line if all else fails.
5394.book Page 97 Tuesday, August 30, 2005 10:37 PM

5394.book Page 98 Tuesday, August 30, 2005 10:37 PM
99
■ ■ ■
C H A P T E R 7
Patch Management
The bane of every administrator’s existence. The pain in the rear of system management. That never-ceasing headache that pounds at CIOs everywhere. You might have guessed by now that I’m speaking of patch management.
And I use the term “management” loosely. For example, the year 2003 saw the release of more than 40 updates that you had to apply to a new Dell computer running Windows XP. There were over 20 updates for Windows 2000 Service Pack 3 that needed to be applied to new systems before Microsoft released Service Pack 4 in the summer of 2003. And right now, machines running Windows XP Service Pack 2—released in summer of 2004—need some 10 patches, including a couple that require reboots, to get up to speed. This ever-growing hairball of security fixes, bug fixes, critical updates, and patch revisions has almost gotten to the point where it would be easier to disconnect all machines from the Internet and work with stone tablets than deploy new systems.
It shouldn’t be that way, and Microsoft realizes that. They’ve come out with a tool that’s not perfect, that has limited functionality, and that isn’t very flexible. But it’s got two great things going for it: It’s timely, and it works fairly well. That product is Windows Server Update Services (WSUS), and this chapter will focus on installing, implementing, and administering WSUS on your network. I’ll also cover a comparison between WSUS and a flagship network and system-management product (Systems Management Server), and how to monitor WSUS for failures.
About Windows Server Update ServicesAs part of its Strategic Technology Protection Program, Microsoft sought to leverage its Windows Update technology—the software that runs the universal update site for all but the oldest versions of Windows—and integrate it into a LAN-based patch management solution. WSUS at this point does NOT focus on adding new features to already released software; it’s only concerned with critical updates that allow administrators to somewhat easily deploy critical updates to servers running Windows 2000 or Windows Server 2003, and desktop computers running Windows 2000 Professional or Windows XP Professional. It’s designed to work especially in networks with an Active Directory implementation, but it will function without one.
5394ch07.fm Page 99 Monday, September 12, 2005 6:22 PM

100 C H A P T E R 7 ■ P A T C H M A N A G E M E N T
Installing WSUS on your network requires the following two elements:
• One server, running either Windows 2000 Server Service Pack 3 or Windows Server 2003 Service Pack 1 (for the purposes of this chapter, I’ll assume you’re using the latter) connected to the Internet running the actual server component of WSUS. This server needs, for all practical purposes, at least a 1 GHz processor and 768 MB of RAM. You also need IIS installed. This machine acts as a local version of the public Windows Update site, which contains critical updates and service packs for all supported operating systems. This server synchronizes with the public Windows Update site on a schedule that the corporate administrator selects. That adminis-trator then approves or rejects the availability of certain updates on the WSUS server. You can also have multiple WSUS servers on an intranet and configure which client machines are directed to specific WSUS servers for updates.
• The Automatic Updates feature of Windows 2000 Service Pack 3 and higher, Windows XP Professional at any revision level, or any edition of Windows Server 2003. Directed by a variety of methods, the client computers that are running this Automatic Updates feature are sent to the local network’s WSUS server on a set schedule to download updates appropriate to their machines. The WSUS server will analyze the operating system, service-pack level, and any currently installed updates, and push only those updates that are both needed AND approved by the administrator beforehand.
Comparing Windows Server Update Services to Systems Management Server
Microsoft’s WSUS, as mentioned before, is only concerned with deploying critical updates to modern, post-2000 NT-based operating systems. The flagship administrative product from Redmond, called Systems Management Server (SMS), is quite a bit more flexible than WSUS, but it also costs thousands of dollars more. For the price tag (which was free at press time), however, WSUS offers a decent value. What does SMS offer that WSUS doesn’t have? Table 7-1 lists the update features of both management solutions, and compares and contrasts them.
If you already have a patch management solution in place, stick with that. There’s probably very little in WSUS that would entice you to change your existing solution, at least with regard to the current revision. Particularly, if you’re using SMS to distribute patches, you should use the latest feature-pack release. Although WSUS is ideal for small and medium-sized organizations, larger businesses will probably find the money spent
5394ch07.fm Page 100 Monday, September 12, 2005 6:22 PM
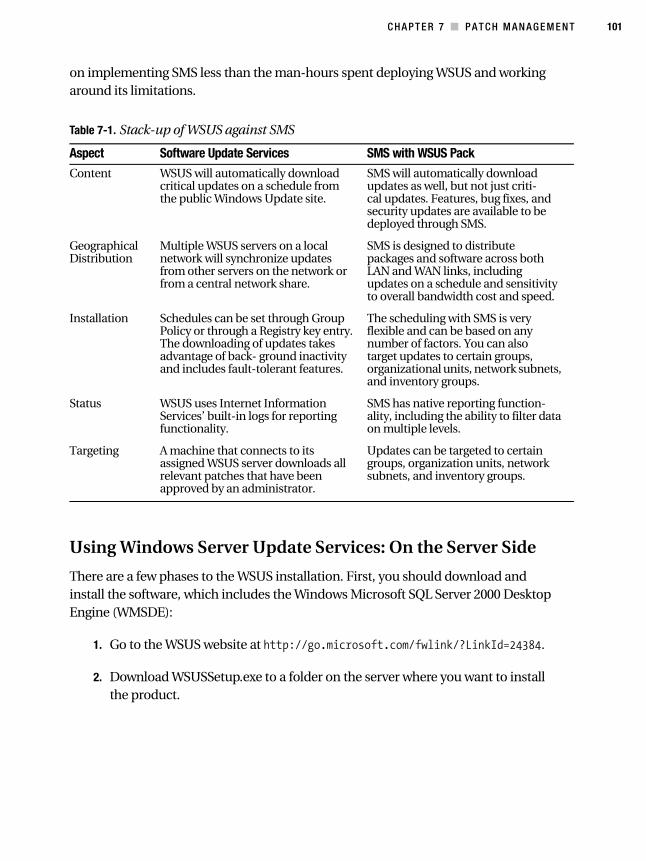
C H A P T E R 7 ■ P A T C H M A N A G E M E N T 101
on implementing SMS less than the man-hours spent deploying WSUS and working around its limitations.
Using Windows Server Update Services: On the Server Side
There are a few phases to the WSUS installation. First, you should download and install the software, which includes the Windows Microsoft SQL Server 2000 Desktop Engine (WMSDE):
1. Go to the WSUS website at ������������� �������������������������.
2. Download WSUSSetup.exe to a folder on the server where you want to install the product.
Table 7-1. Stack-up of WSUS against SMS
Aspect Software Update Services SMS with WSUS PackContent WSUS will automatically download
critical updates on a schedule from the public Windows Update site.
SMS will automatically download updates as well, but not just criti- cal updates. Features, bug fixes, and security updates are available to be deployed through SMS.
Geographical Distribution
Multiple WSUS servers on a local network will synchronize updates from other servers on the network or from a central network share.
SMS is designed to distribute packages and software across both LAN and WAN links, including updates on a schedule and sensitivity to overall bandwidth cost and speed.
Installation Schedules can be set through Group Policy or through a Registry key entry. The downloading of updates takes advantage of back- ground inactivity and includes fault-tolerant features.
The scheduling with SMS is very flexible and can be based on any number of factors. You can also target updates to certain groups, organizational units, network subnets, and inventory groups.
Status WSUS uses Internet Information Services’ built-in logs for reporting functionality.
SMS has native reporting function- ality, including the ability to filter data on multiple levels.
Targeting A machine that connects to its assigned WSUS server downloads all relevant patches that have been approved by an administrator.
Updates can be targeted to certain groups, organization units, network subnets, and inventory groups.
5394ch07.fm Page 101 Monday, September 12, 2005 6:22 PM
102 C H A P T E R 7 ■ P A T C H M A N A G E M E N T
3. Double-click the file using the server on which you want to install or upgrade WSUS.
4. Click Next on the Welcome screen to continue.
5. Decide whether to accept or reject the license agreement, and click Next.
6. The Select Update Source screen appears. Here, you can choose where the client computers will get their updates. You can either allow the WSUS server to store update content locally by clicking the Store updates locally checkbox and selecting a location on your filesystem, or direct clients to the Internet-based Microsoft Update site by leaving it unchecked. Click Next to continue.
7. The Database Options page is next, where you select the software used to store information about the updates that are offered. Select the default option of using WMSDE, which the wizard will install for you, unless you have an available instance of a SQL Server 2000 database to use instead. Click Next.
8. Next comes the Web Site Selection page, where you specify the website that WSUS will use. Be careful to note the two important addresses presented on this page: the URL that clients will use to get updates, and the URL for the administrative console. If you’re installing WSUS on a computer that already has a website running on port 80, you may need to create a custom website running on a dif-ferent port. You can use IIS Manager (in the Administrative Tools area of the Start menu) to accomplish this. Click Next to continue.
9. You should now see the Mirror Update Settings page, where you specify which management role this WSUS server should serve. For the purposes of this demon-stration, you’re installing the first WSUS server on your network, so you can skip this screen. (It comes in handy when you have multiple WSUS servers that should contain identical updates and approval records within their databases.) Click Next to continue.
10. On the Ready to Install Windows Server Update Services screen, confirm your selections, and then click Next.
5394ch07.fm Page 102 Monday, September 12, 2005 6:22 PM
C H A P T E R 7 ■ P A T C H M A N A G E M E N T 103
The next step is to make sure that your WSUS server can receive update information from the Internet. If you restrict Internet access via your firewall to certain domains, be sure to add the following domains to your exceptions list:
• ������������ ���������� �������
• ������� ������ ���������� ������
• ���� ��� ������ ���������� ������
• ������� ����������� ������
• ���� ��� ����������� ������
• ������� ������ ���������
• ��������������������� ���������
• ������������������� ������
• ������� ��������������� ���������
• ��������� ��������� ���
• ��������� ��!���������� ������
The Administrative Console
To open the administrative console for WSUS, select Start ➤ All Programs ➤ Administra-tive Tools ➤ Microsoft Windows Server Update Services. You can also open this console from your web browser by surfing to �������"#$##��!��%���"#$#&��. Alternatively, you can select Start ➤ All Programs ➤ Administrative Tools ➤ Microsoft Software Update Services to open your web browser to the site shown in Figure 7-1.
You may need to set a proxy server configuration if you use such a system to connect to the Internet. To do so, on the console toolbar select Options, and then click Synchroniza-tion Options. Select the Use a proxy server when synchronizing checkbox in the Proxy server area and then enter the appropriate name and port number. (This form is used in much the same way that you would Internet Explorer’s options.) You can also enter credentials should they be needed by clicking the Use user credentials to connect to the proxy server box. To apply these settings, click Save settings under Tasks, and then click OK to confirm this action.
5394ch07.fm Page 103 Monday, September 12, 2005 6:22 PM
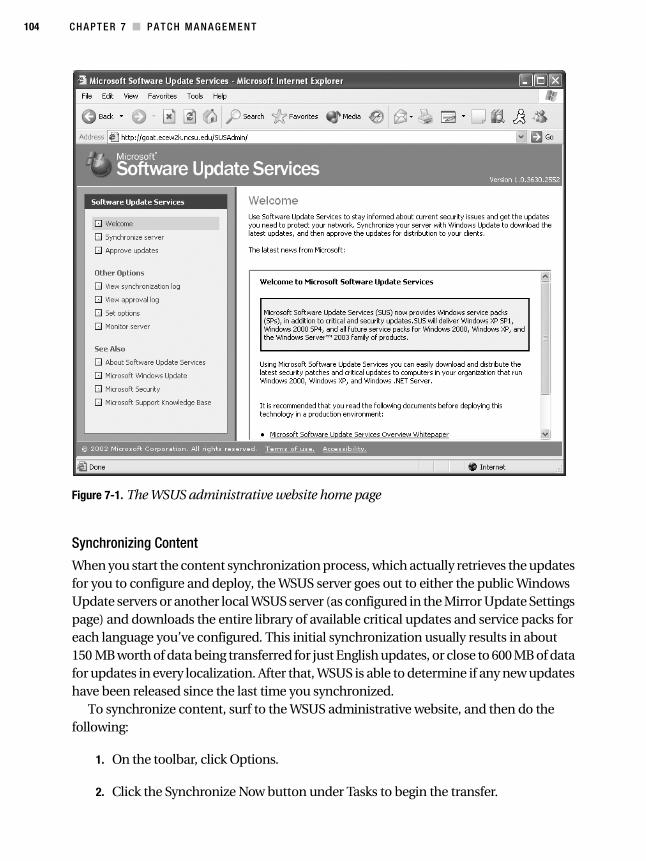
104 C H A P T E R 7 ■ P A T C H M A N A G E M E N T
Figure 7-1. The WSUS administrative website home page
Synchronizing Content
When you start the content synchronization process, which actually retrieves the updates for you to configure and deploy, the WSUS server goes out to either the public Windows Update servers or another local WSUS server (as configured in the Mirror Update Settings page) and downloads the entire library of available critical updates and service packs for each language you’ve configured. This initial synchronization usually results in about 150 MB worth of data being transferred for just English updates, or close to 600 MB of data for updates in every localization. After that, WSUS is able to determine if any new updates have been released since the last time you synchronized.
To synchronize content, surf to the WSUS administrative website, and then do the following:
1. On the toolbar, click Options.
2. Click the Synchronize Now button under Tasks to begin the transfer.
5394ch07.fm Page 104 Monday, September 12, 2005 6:22 PM
C H A P T E R 7 ■ P A T C H M A N A G E M E N T 105
You can set some advanced synchronization options as well, which you can find by clicking Options on the toolbar and selecting Synchronization Options. Under Update Files and Languages, click Advanced, then read the warning and click OK.
• Use the “Download updates to this server only when updates are approved” option to determine if updates should be fetched from Microsoft Update during the synchronization process itself, or if updates should be downloaded only when an update is approved. This is a great bandwidth-management feature.
• Use the “Download express installation files” option to specify whether express installation files should be downloaded during synchronization, for faster installa-tion on client computers.
• Use the Languages section to filter updates that are written in languages that aren’t deployed on your network, so that when you synchronize, bandwidth and time isn’t wasted downloading patches for those localized versions. You can choose to match the locale of the server, download all localizations regardless, or download updates in languages that you specify in a list.
Creating a Computer Group
Computer groups are an important part of even the most basic WSUS systems. Computer groups enable you to target updates to specific sets of computers that likely share some common criteria. WSUS ships with two default groups, called All Computers and Unas-signed Computers. When each client computer initially contacts the WSUS server (more on that process a bit later in the chapter), the server adds it to both these groups. Of course, it’s likely that you’ll want to create your own computer groups, since you can control the deployment of updates much more precisely with them. For example, you can create a group named Test that contains some lab machines. You can initially deploy a new patch to the test group, and then, once you’ve verified the patch works on those machines, roll it out to other groups. Since there’s no limit to the number of custom groups you can create, you can also block off machines into departments, function, roles, or any other denominator you wish to use.
Setting up computer groups takes three steps. First, specify whether you intend to use server-side targeting (which involves manually adding each computer to its group by using WSUS) or client-side targeting (which involves automatically adding the clients by using either Group Policy or Registry keys). Next, create the computer group on WSUS. Finally, move the computers into groups by using whichever method you chose in the first step.
In this section, I’ll talk about server-side targeting, since it’s the method you’re more likely to use by far.
To specify that you’ll use server-side targeting to select members of computer groups:
5394ch07.fm Page 105 Monday, September 12, 2005 6:22 PM
106 C H A P T E R 7 ■ P A T C H M A N A G E M E N T
1. In the console toolbar, click Options, and then click Computer Options.
2. Click the Use computer groups task in Windows Server Update Services in the Computer Options box.
3. Within Tasks, click Save settings, and then click OK to confirm your selection.
Next, create a computer group. We’ll create the Test group I mentioned earlier in this example:
1. In the console toolbar, click Computers.
2. Within Tasks, click Create a computer group.
3. Enter test in the Group name box, and then click OK.
Finally, add a machine to that group. Of course, you’ll need to follow the instructions in the “Using WSUS: On the Client Side” section later in this chapter to get the Automatic Updates software deployed, which will populate the WSUS console with a list of available computers. Once that’s done, though, follow these steps to add a machine to a group:
1. In the console toolbar, click Computers.
2. In the Groups box, click the All Computers group, and then in the list, click the computer you want to move into the Test group.
3. Under Tasks, click Move the selected computer, and then select the Test group and click OK to perform the move.
And that’s all there is to it. Lather, rinse, and repeat until you have a group structure appropriate to your network and deployment methodology.
Approving Content
Now that you have an actual library of updates on or near your WSUS host machine, and you’ve defined a couple of computer groups, you can approve the updates individually for distribution to client machines within your network. The approval process makes it easy to withhold patches until further testing is done, which partly assuages the general fear accompanying the installation of patches that are suspected of causing more problems than they fix. To begin the update approval process, do the following:
5394ch07.fm Page 106 Monday, September 12, 2005 6:22 PM

C H A P T E R 7 ■ P A T C H M A N A G E M E N T 107
1. In the console toolbar, click Updates. On the resulting page, you’ll see only critical and security updates that have been approved for use on client computers; this is by virtue of a filter that you can later adjust to view only updates relevant to what you’re currently administering.
2. Within the update list, select the updates that you would like to approve. Click the Details tab to learn more information about the updates. You can select multiple updates at once by holding down the Shift key.
3. When you’ve finished your selection, click Change approval under Update Tasks.
4. The Approve Updates dialog box appears. Click Install in the Approval column for the Test group, and then click OK.
WSUS will notify you when the approval is complete. In the right pane, where all the updates are shown, each patch’s status is shown as one of five possible values. A new update is one that was just recently downloaded and hasn’t been approved yet. An approved update is available for distribution to each client machine. An update that isn’t approved will not be distributed to clients, but the actual patch file remains in the library on the WSUS host machine. An updated patch indicates a new version of an earlier patch that currently exists in the library. And finally, a temporarily unavailable patch is one whose dependent files were downloaded incorrectly, could not be found, or were otherwise unable to be located by WSUS.
If, for some reason, you would like to clear the list of approved updates, you can clear all checkboxes on the list of available updates and then click Approve. This will remove any available updates from the WSUS catalog, and your client machines will stop down-loading the updates until you approve more fixes. This will not, however, uninstall the patches from the client machines.
Checking the Status of Update Deployments
Once a full 24 hours has passed, you can check the status of the approved update deploy-ment. On the console toolbar, click Reports, and then on the resulting page, click Status of Updates. You can apply a filter by adjusting the settings under View, and you can change the view (perhaps to see the status of an update by computer group and then by computer, for example) by adjusting the controls on that page.
You can also print a status report by clicking Print report, under Tasks.
5394ch07.fm Page 107 Monday, September 12, 2005 6:22 PM
108 C H A P T E R 7 ■ P A T C H M A N A G E M E N T
Pushing Out the Automated Updates Client
Once your client computers first contact the WSUS server, the latest Automatic Updates software installed on your client computers will self-update to the latest version. There is one exception to this: The version of Automatic Updates included with Windows XP without any service packs cannot update itself automatically. You’ll need to manually push this out via Group Policy, a login script, or “sneakernet”-style management.
You can install the updated Automatic Updates (AU) client on your clients by using the MSI install package, self-updating from the old Critical Update Notification (CUN) tool, installing Windows 2000 Service Pack 3 or 4, installing Windows XP Service Pack 1, or installing Windows Server 2003.
You can download the Automatic Updates client from the Microsoft website at the WSUS web page, located at �������������� �������"#$#. On a standalone machine, the AU client can be added simply by running the MSI file on the machine.
Manually installing a file can quickly become a pain when you have more than just a few machines to handle. Fortunately, because the client installation program is in the form of an MSI, you can easily push the program to clients by using Group Policy. To create a new GPO, assign it to your computers, and then have it installed automatically:
■Note The application will be installed in the context of the local computer, so make sure that authenti-cated users have rights on the source folders.
1. Open the Active Directory Users and Computers MMC snap-in.
2. Right-click the domain or organizational unit to which you’re interested in deploying the client, and select Properties.
3. Click the Group Policy tab.
4. Click New to create a new Group Policy object (GPO). Type in a name for the GPO.
5. Select the new GPO from the list, and click Edit to open the Group Policy Object Editor.
6. Expand Computer Configuration, and then select Software Settings.
5394ch07.fm Page 108 Monday, September 12, 2005 6:22 PM
C H A P T E R 7 ■ P A T C H M A N A G E M E N T 109
7. Right-click Software Installation in the left pane, select New, and then click Package.
8. Enter the path to the Automatic Updates MSI file you downloaded from the Web. Make sure you use a network path and not a local path to ensure that your clients can find the file at boot time. Click Open.
9. Choose Assigned to assign the package to the computers in the domain or organi-zational unit, and then click OK.
10. Allow time for polices to replicate through the domain. Usually this is accom-plished within 15 minutes.
11. Restart the client computers. The client software should be installed before the Logon dialog box is displayed.
You can also deploy the client MSI through a logon script by calling MSIEXEC fol- lowed by the client software file name as an argument. The software will be installed as requested.
Configuring the Automatic Updates Client
The Automatic Updates client doesn’t have any user-interface options for determining the origin of updates to install. You must specify this information with either a Registry change on each of the client computers or through Group Policy, either locally or based through a domain. Once the changes take effect, you’ll be able to see the machines in the Computers page of the WSUS console.
Through a domain-based Group Policy, direct clients to the WSUS server should use the following procedure:
1. Open the Default Domain Policy GPO in Active Directory Users and Computers and click the Edit button.
2. Expand Computer Configuration, Administrative Templates, and Windows Components.
3. Select Windows Update. The right pane will contain four options that pertain to the Automatic Updates client, as depicted in Figure 7-2.
5394ch07.fm Page 109 Monday, September 12, 2005 6:22 PM
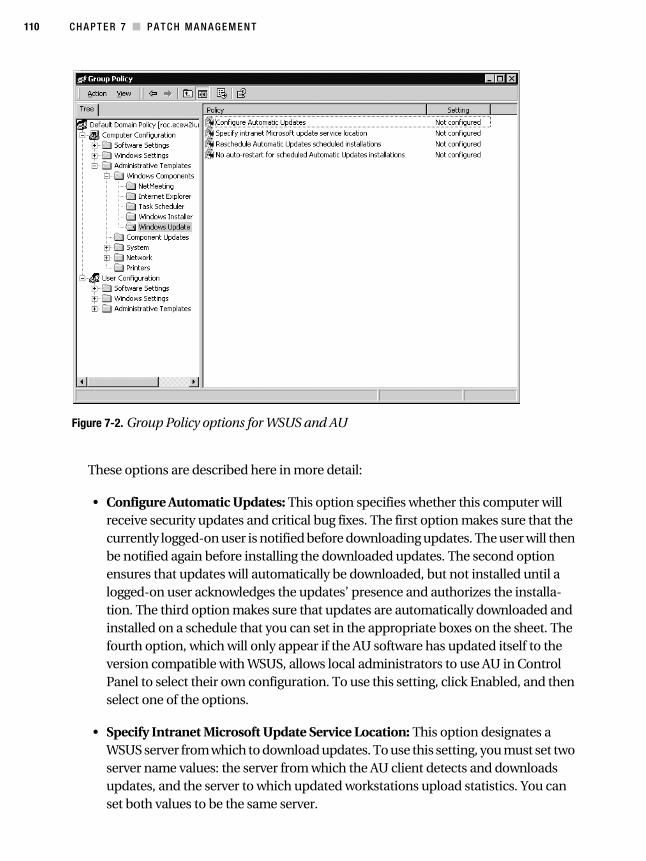
110 C H A P T E R 7 ■ P A T C H M A N A G E M E N T
Figure 7-2. Group Policy options for WSUS and AU
These options are described here in more detail:
• Configure Automatic Updates: This option specifies whether this computer will receive security updates and critical bug fixes. The first option makes sure that the currently logged-on user is notified before downloading updates. The user will then be notified again before installing the downloaded updates. The second option ensures that updates will automatically be downloaded, but not installed until a logged-on user acknowledges the updates’ presence and authorizes the installa-tion. The third option makes sure that updates are automatically downloaded and installed on a schedule that you can set in the appropriate boxes on the sheet. The fourth option, which will only appear if the AU software has updated itself to the version compatible with WSUS, allows local administrators to use AU in Control Panel to select their own configuration. To use this setting, click Enabled, and then select one of the options.
• Specify Intranet Microsoft Update Service Location: This option designates a WSUS server from which to download updates. To use this setting, you must set two server name values: the server from which the AU client detects and downloads updates, and the server to which updated workstations upload statistics. You can set both values to be the same server.
5394ch07.fm Page 110 Monday, September 12, 2005 6:22 PM
C H A P T E R 7 ■ P A T C H M A N A G E M E N T 111
• Enable Client-Side Targeting: This option enables client computers to automati-cally populate groups on the WSUS server. To use this option, click the Enabled option, type the name of the group to which this computer should belong on the WSUS, and then click OK. Keep in mind that you need to actually create the group on the WSUS server for this to take effect.
• Reschedule Automatic Updates Scheduled Installations: This option specifies the amount of time to wait after booting before continuing with a scheduled installa-tion that was missed previously for whatever reason (power outage, system powered off, network connection lost, and so on). If the status is set to Enabled, a missed scheduled installation will occur the specified number of minutes after the computer is next started. If the status is set to Disabled or Not Configured, a missed scheduled installation will simply roll over to the next scheduled installation.
• No Auto-restart for Scheduled Automatic Updates Installations: This option designates whether a client computer should automatically reboot or not when an update that’s just installed requires a system restart. If the status is set to Enabled, Automatic Updates will not restart a computer automatically during a scheduled installation if a user is logged in to the computer. Instead, it will notify the user to restart the computer to complete the installation. If the status is set to Disabled or Not Configured, Automatic Updates will notify the user that the computer will automatically restart in 5 minutes to complete the installation.
• Automatic Update Detection Frequency: This option details the hours that Windows will use to figure out how long to wait before pinging the WSUS server to see if new updates are available. This time is actually determined by using the hours specified in this option and subtracting anywhere from 0 to 20 percent of the hours specified. This offset helps to manage load. If the status is set to Enabled, you need to specify the number of hours; if it’s set to Disabled or Not Configured, AU will check for new updates every 22 hours.
• Allow Automatic Update Immediate Installation: This option specifies whether AU should automatically install updates that don’t interrupt Windows or need a reboot. If you enable this option, AU will auto-install such updates; if you disable it, they will not be immediately installed.
• Delay Restart for Scheduled Installations: This setting defines the amount of time AU will wait before executing a scheduled reboot. If this setting is enabled, the scheduled restart will happen after the number of minutes you specify. If it’s set to Disabled or Not Configured, the default waiting period is 5 minutes.
5394ch07.fm Page 111 Monday, September 12, 2005 6:22 PM
112 C H A P T E R 7 ■ P A T C H M A N A G E M E N T
• Re-Prompt for Restart with Scheduled Installations: If this setting is enabled, a scheduled restart will occur in the specified number of minutes after the prompt for restarting was postponed by the user. If it’s set to Disabled or Not Configured, the scheduled restart will take place 10 minutes after the first prompt.
• Allow Non-Administrators to Receive Update Notifications: If this setting is enabled, all users can receive notifications that updates are ready for download and/or installation. If it’s set to Disabled or Not Configured, AU will notify only logged-on administrators that pending update action is necessary.
• Remove Links and Access to Windows Update: If this setting is enabled, end users cannot get updates from a Windows Update website that you have not approved. If this policy is not enabled, the Windows Update icon remains in place for local administrators to visit. Such local administrators can in fact install unapproved updates.
You will want to allow 10 to 15 minutes for the changes to the domain’s policy to replicate among all domain controllers. To manually initiate detection of these client machines, on the client, open a command prompt and type wuauclt.exe /detectnow.
To adjust the Group Policy on a machine that isn’t managed by Active Directory, you need to load the appropriate templates into the Microsoft Management Console. Follow these steps:
1. Click Start, select Run, and type GPEDIT.msc to load the Group Policy snap-in.
2. Expand Computer Configuration and Administrative Templates.
3. Click Add/Remove Templates, and then click Add.
4. Enter the name of the Automatic Updates ADM file, which you can find in the INF subdirectory within your Windows root. In addition, you can find it in the INF sub-directory within the WSUS server machine’s Windows root.
5. Click Open, and then click Close to load the wuau.adm file.
You can now adjust the policy settings as described in the previous subsection.Finally, to adjust some of these behavior settings through Registry changes, use the
appropriate key for each of the following settings:
5394ch07.fm Page 112 Monday, September 12, 2005 6:22 PM
C H A P T E R 7 ■ P A T C H M A N A G E M E N T 113
• To enable or disable Automatic Updates: Create the value NoAutoUpdate in the HKEY_LOCAL_MACHINE\SOFTWARE\Policies\Microsoft\_Windows\WindowsUpdate\AU key. The value is a DWORD with possible values 0 (enabled) or 1 (disabled).
• To configure the update download and notification behavior: Create the value AUOptions in the HKEY_LOCAL_MACHINE\SOFTWARE\Policies\_Microsoft\Windows\WindowsUpdate\AU key. The value is a DWORD that includes integers 2 (notify of download and notify before installation), 3 (automatically download but notify before installation), 4 (automatically download and schedule the installa-tion), and 5 (let the local administrator choose the setting).
• To schedule an automated installation: Create the values ScheduledInstallDay and ScheduledInstallTime in the HKEY_LOCAL__MACHINE\SOFTWARE\Policies\Microsoft\Windows\WindowsUpdate\AU key. The value for each is a DWORD. For ScheduledInstallDay, the range is from 0 to 7, with 0 indicating every day and 1 through 7 indicating the days of the week, Sunday through Saturday. For ScheduledInstallTime, the range is from 0 to 23, signifying the hour of the day in military time.
• To specify a particular WSUS server to use with the Automatic Updates client: Create the value UseWUServer in HKEY_LOCAL_MACHINE\_SOFTWARE\Policies\Microsoft\Windows\WindowsUpdate\AU key. The value is a DWORD; set it to 1 to enable the custom WSUS server name. Then, create the values WUServer and WUStatusServer in the same key, of types Reg_SZ, and specify the name (with the http://) as the value.
• To specify how long to wait before completing a missed installation: Create the value RescheduleWaitTime in the HKEY_LOCAL_MACHINE\_SOFTWARE\Policies\Microsoft\Windows\WindowsUpdate\AU key. The value is a DWORD that ranges from 1 to 60, measured in minutes.
• To specify whether to restart a scheduled installation with a currently logged-on nonadministrative user: Create the NoAutoRebootWithLoggedOnUsers value in the HKEY_LOCAL__MACHINE\SOFTWARE\Policies\Microsoft\Windows\WindowsUpdate\AU key. The value is a DWORD that can be 0, which indicates that a reboot will indeed take place, or 1, which indicates the reboot will be postponed while a user is logged on.
5394ch07.fm Page 113 Monday, September 12, 2005 6:22 PM
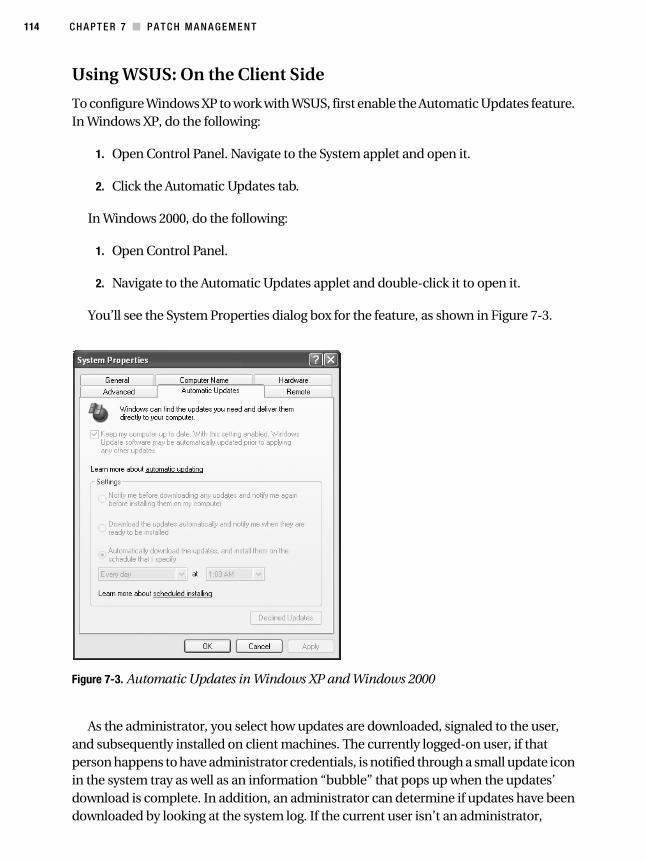
114 C H A P T E R 7 ■ P A T C H M A N A G E M E N T
Using WSUS: On the Client Side
To configure Windows XP to work with WSUS, first enable the Automatic Updates feature. In Windows XP, do the following:
1. Open Control Panel. Navigate to the System applet and open it.
2. Click the Automatic Updates tab.
In Windows 2000, do the following:
1. Open Control Panel.
2. Navigate to the Automatic Updates applet and double-click it to open it.
You’ll see the System Properties dialog box for the feature, as shown in Figure 7-3.
Figure 7-3. Automatic Updates in Windows XP and Windows 2000
As the administrator, you select how updates are downloaded, signaled to the user, and subsequently installed on client machines. The currently logged-on user, if that person happens to have administrator credentials, is notified through a small update icon in the system tray as well as an information “bubble” that pops up when the updates’ download is complete. In addition, an administrator can determine if updates have been downloaded by looking at the system log. If the current user isn’t an administrator,
5394ch07.fm Page 114 Monday, September 12, 2005 6:22 PM
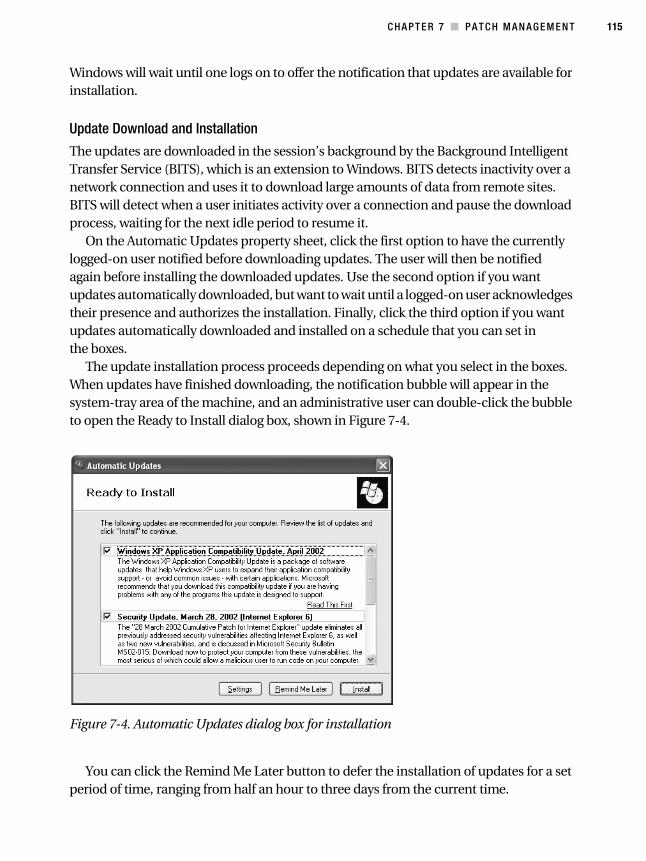
C H A P T E R 7 ■ P A T C H M A N A G E M E N T 115
Windows will wait until one logs on to offer the notification that updates are available for installation.
Update Download and Installation
The updates are downloaded in the session’s background by the Background Intelligent Transfer Service (BITS), which is an extension to Windows. BITS detects inactivity over a network connection and uses it to download large amounts of data from remote sites. BITS will detect when a user initiates activity over a connection and pause the download process, waiting for the next idle period to resume it.
On the Automatic Updates property sheet, click the first option to have the currently logged-on user notified before downloading updates. The user will then be notified again before installing the downloaded updates. Use the second option if you want updates automatically downloaded, but want to wait until a logged-on user acknowledges their presence and authorizes the installation. Finally, click the third option if you want updates automatically downloaded and installed on a schedule that you can set in the boxes.
The update installation process proceeds depending on what you select in the boxes. When updates have finished downloading, the notification bubble will appear in the system-tray area of the machine, and an administrative user can double-click the bubble to open the Ready to Install dialog box, shown in Figure 7-4.
Figure 7-4. Automatic Updates dialog box for installation
You can click the Remind Me Later button to defer the installation of updates for a set period of time, ranging from half an hour to three days from the current time.
5394ch07.fm Page 115 Monday, September 12, 2005 6:22 PM
116 C H A P T E R 7 ■ P A T C H M A N A G E M E N T
If you’ve configured Automatic Updates to install fixes on a regular schedule, the updates will be downloaded in the background and automatically installed on that schedule. Automatic Updates installs the update and restarts the computer if an update requires that, even if no local administrator is logged on. If an administrator is logged on, she will have the chance to cancel the process; if a normal user is logged on, he will receive a notification of the impending process and a countdown to its initiation. However, between the set install time and the current time, if updates have finished downloading the notification will appear in the system tray as described earlier in this section. The user will not have the option to click Remind Me Later, but he can choose to install the updates at that time to have the process over with before the predetermined installation time.
Monitoring the Client-Side System
WSUS and the Automatic Updates client provide several event templates that are written to the system event log to describe the current status of the update process, any errors that are encountered, and a brief notation of what updates were successfully installed. You can program an event-log monitoring tool to monitor for certain event IDs that are specific to WSUS. This tool will give you a picture of your network’s health with regard to updates. Table 7-2 lists these events and their meanings and contexts.
Table 7-2. WSUS and AU Client Event Log Messages
Event ID Label Description16 Unable to connect The client can’t connect to either the Windows Update site or
the WSUS server, but will continue trying indefinitely.
17 Install ready; no recurring schedule
Updates have been downloaded and are ready to be installed, but an administrator must log on and manually start the installation process.
18 Install ready; recurring schedule
Updates have been downloaded and are ready to be installed. The date this install is scheduled to occur is listed within the event description.
19 Install success Updates have been successfully installed; these have been listed.
20 Install failure Some updates didn’t install correctly; these have been listed.
21 Restart required; no recurring schedule
Updates have been installed, but a reboot is required, and until this reboot is complete Windows cannot fetch more updates for installation. Any user can reboot the machine.
22 Restart required; recurring schedule
Updates have been installed, but a reboot is required and has been scheduled within 5 minutes.
5394ch07.fm Page 116 Monday, September 12, 2005 6:22 PM
C H A P T E R 7 ■ P A T C H M A N A G E M E N T 117
CheckpointsIf you take nothing else from this chapter, soak in these key points and strategies:
• Don’t do anything else until you have some sort of patch-management system installed and running on your network. It WILL BE a priority one of these days if your network is connected to the Internet.
• Deploy WSUS unless you have a large business that would benefit from SMS, unless you’re already running SMS, or unless you’ve already got a sufficient patch-management system in place.
• Set WSUS to automatically synchronize on a daily basis, so that you receive updates as soon as possible after they’re released.
• Approve only the updates for localizations that you maintain. There’s no need to have the Japanese version of a patch if you have no Japanese-installed Windows machines.
• Use Group Policy or some other automated method to deploy the Automated Updates client to machines that aren’t currently running at least Windows 2000 Service Pack 3 or Windows XP Service Pack 1.
• Enable Automatic Updates on your network.
• Schedule update installations at least weekly, if not daily.
• Educate your users about the ramifications of not keeping their systems updated.
• Use event-log monitoring software to ensure that WSUS continues to function correctly.
• Did I mention not to do anything else until you have some sort of patch-management system installed and working on your network?
5394ch07.fm Page 117 Monday, September 12, 2005 6:22 PM

5394ch07.fm Page 118 Monday, September 12, 2005 6:22 PM
119
■ ■ ■
C H A P T E R 8
Network Access Quarantine Control
One of the easiest and arguably most prevalent ways for nefarious software or Internet users to creep onto your network is not through holes in your firewall, or brute-force pass-word attacks, or anything else that might occur at your corporate headquarters or campus. It’s through your mobile users, when they try to connect to your business network while on the road.
Let’s consider why that is the case. Most remote users are only authenticated on the basis of their identity; no effort is made to verify that their hardware and software meets a certain baseline requirement. Remote users could—and do every day—fail any or all of the following:
• The latest service pack and the latest security hotfixes are installed.
• The corporation-standard antivirus software is installed and running, and the latest signature files are being used.
• Internet or network routing is disabled.
• Windows XP’s Windows Firewall (WF), Internet Connection Firewall (ICF), or any other approved firewall, is installed, enabled, and actively protecting ports on the computer.
You would expect your business desktops to follow policy, but in the past, mobile users have traditionally been forgotten or grudgingly accepted as exceptions to the rule. However, Windows Server 2003 includes a feature in its Resource Kit, called Network Access Quarantine Control (NAQC), which allows you to prevent remote users from connecting to your network with machines that aren’t up to date and secure. This chapter will detail how this feature works and how to install and configure it.
5394ch08.fm Page 119 Monday, September 12, 2005 6:09 PM
120 C H A P T E R 8 ■ N E T W O R K A C C E S S Q U A R A N T I N E C O N T R O L
How Network Access Quarantine WorksNAQC prevents unhindered, free access to a network from a remote location until after the destination computer has verified that the remote computer’s configuration meets certain requirements and standards as outlined in a script.
To use NAQC, your remote-access computers must be running any of the following: Windows 98 Second Edition, Windows ME, Windows 2000, or Windows XP Home or Professional. These versions of Windows support a connectoid that contains the connec-tion information, the baseline script, and a notifier component, which you can create using the Connection Manager Administration Kit (CMAK) in Windows Server 2003. Addi-tionally, you’ll need at least one back-end Windows Server 2003 machine that’s running an approved listening component; for the purpose of this chapter, I’ll assume you’re running the Remote Access Quarantine Agent service (called RQS.EXE) from the Windows Server 2003 Resource Kit. Finally, you’ll need an NAQC-compliant RADIUS server, such as the Internet Authentication Service in Server 2003, so that you can restrict network access.
Under NAQC, when a connection is established, the destination computers give the remote, connecting computer an IP address, but a “quarantine mode” is established.
In quarantine mode, the following restrictions are in effect:
• A set of packet filters is enabled that restricts the traffic sent to and received from a remote-access client.
• A session timer is enabled that limits the duration of a remote client’s connection in quarantine mode before being terminated.
Once the remote computer is in quarantine mode, the baseline script is run. If Windows runs the script and is satisfied with the result, it contacts the listening service running on the Server 2003 back-end machine and reports this result. Quarantine mode is then removed and normal network access is restored. Otherwise, the client is even- tually disconnected when the session timer reaches the configured limit as described previously.
A Step-by-Step Overview of Network Access Quarantine Control
Here is a detailed outline of how the connection and quarantining process works, assuming you’re using RQC.EXE on the client end from the CMAK and RQS.EXE on the back end from the Resource Kit.
1. The remote user connects his computer, using the quarantined Connection Manager (CM) profile, to the quarantine-enabled connection point, which is usually a machine running the Routing and Remote Access Service (RRAS).
2. The remote user authenticates.
5394ch08.fm Page 120 Monday, September 12, 2005 6:09 PM
C H A P T E R 8 ■ N E T W O R K A C C E S S Q U A R A N T I N E C O N T R O L 121
3. RRAS sends a RADIUS Access-Request message to the RADIUS server—in this case, a Server 2003 machine running the Internet Authentication Service (IAS).
4. The IAS server verifies the remote user’s credentials successfully and checks its remote-access policies. The connection attempt matches the configured quar-antine policy.
5. The connection is accepted, but with quarantine restrictions in place. The IAS server sends a RADIUS Access-Accept message, including the MS-Quarantine-IPFilter and MS-Quarantine-Session-Timeout attributes, to RRAS.
6. The remote user completes the remote-access connection with the RRAS server, which includes leasing an IP address and establishing other network settings.
7. RRAS configures the MS-Quarantine-IPFilter and MS-Quarantine-Session-Timeout settings for the connection, now in quarantine mode. At this point, the remote user can only send traffic that matches the quarantine filters—all other traffic is filtered. It can only remain connected for the value, in seconds, of the MS-Quarantine-Session-Timeout attribute before the quarantine baseline script must be run and the result reported back to RRAS.
8. The CMAK profile runs the quarantine script, currently defined as the “post-connect action.”
9. The quarantine script runs and verifies that the remote-access client computer’s configuration meets a baseline. If so, the script runs RQC.EXE with its command-line parameters, including a text string representing the version of the quarantine script being used.
10. RQC.EXE sends a notification to RRAS, indicating that the script ended successfully.
11. The notification is received by RQS.EXE on the back end.
12. The listener component on the RRAS server verifies the script version string in the notification message with those configured in the Registry of the RRAS, and returns a message indicating that the script version was either valid or invalid.
13. If the script version was acceptable, RQS.EXE calls the MprAdminConnectionRemoveQuarantine() API, which indicates to RRAS that it’s time to remove the MS-Quarantine-IPFilter and MS-Quarantine-Session-Timeout settings from the connection and reconfigure the session for normal network access.
5394ch08.fm Page 121 Monday, September 12, 2005 6:09 PM
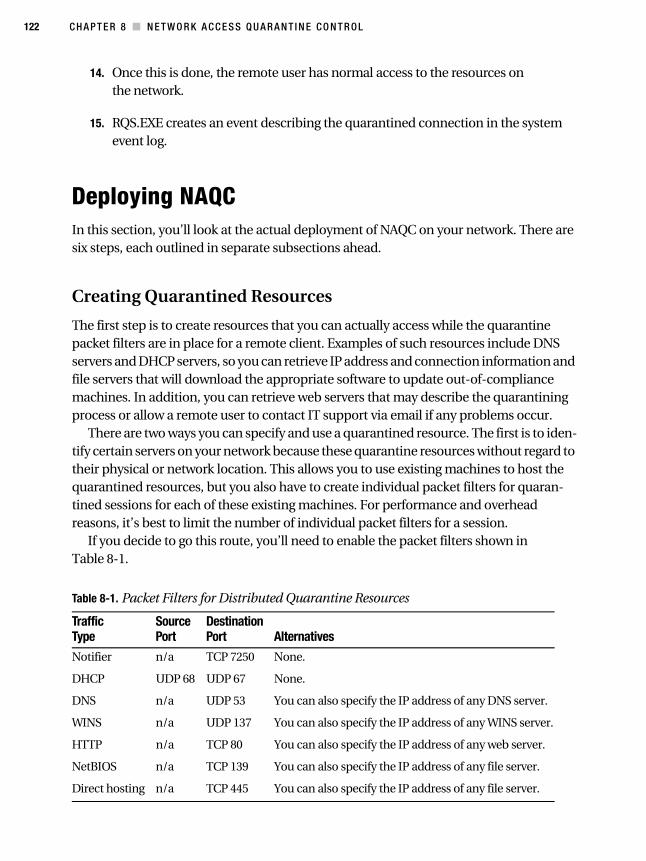
122 C H A P T E R 8 ■ N E T W O R K A C C E S S Q U A R A N T I N E C O N T R O L
14. Once this is done, the remote user has normal access to the resources on the network.
15. RQS.EXE creates an event describing the quarantined connection in the system event log.
Deploying NAQCIn this section, you’ll look at the actual deployment of NAQC on your network. There are six steps, each outlined in separate subsections ahead.
Creating Quarantined Resources
The first step is to create resources that you can actually access while the quarantine packet filters are in place for a remote client. Examples of such resources include DNS servers and DHCP servers, so you can retrieve IP address and connection information and file servers that will download the appropriate software to update out-of-compliance machines. In addition, you can retrieve web servers that may describe the quarantining process or allow a remote user to contact IT support via email if any problems occur.
There are two ways you can specify and use a quarantined resource. The first is to iden-tify certain servers on your network because these quarantine resources without regard to their physical or network location. This allows you to use existing machines to host the quarantined resources, but you also have to create individual packet filters for quaran-tined sessions for each of these existing machines. For performance and overhead reasons, it’s best to limit the number of individual packet filters for a session.
If you decide to go this route, you’ll need to enable the packet filters shown in Table 8-1.
Table 8-1. Packet Filters for Distributed Quarantine Resources
TrafficType
SourcePort
DestinationPort Alternatives
Notifier n/a TCP 7250 None.
DHCP UDP 68 UDP 67 None.
DNS n/a UDP 53 You can also specify the IP address of any DNS server.
WINS n/a UDP 137 You can also specify the IP address of any WINS server.
HTTP n/a TCP 80 You can also specify the IP address of any web server.
NetBIOS n/a TCP 139 You can also specify the IP address of any file server.
Direct hosting n/a TCP 445 You can also specify the IP address of any file server.
5394ch08.fm Page 122 Monday, September 12, 2005 6:09 PM
C H A P T E R 8 ■ N E T W O R K A C C E S S Q U A R A N T I N E C O N T R O L 123
You can also configure any other packet filters peculiar to your organization.The other approach is to limit your quarantined resources to a particular IP subnet.
This way, you just need one packet filter to quarantine traffic to a remote user, but you have to readdress machines and, in most cases, take them out of their existing service or buy new ones.
When you use this method, the packet filter requirements are much simpler. You simply need to open one for notifier traffic on destination TCP port 7250, and one for DHCP traffic on source UDP port 68 and destination IDP port 67. For all other traffic, you should open the address range of the dedicated quarantine resource subnet. And again, you can also configure any other packet filters peculiar to your organization.
Writing the Baseline Script
The next step is to actually write a baseline script that will be run on the client. This is really independent to your organization, but all scripts must run RQC.EXE if the baseline compliance check was successful and they should include the following parameters:
������������ ��������������������������������������������
The switches and arguments are explained in the following list:
• The ConnName argument is the name of the connectoid on the remote machine, which is most often inherited from the dial-in profile variable %DialRasEntry%.
• The TunnelConnName argument is the name of the tunnel connectoid on the remote machine, which is most often inherited from the dial-in profile variable %TunnelRasEntry%.
• The TCPPort argument is, obviously, the port used by the notifier to send a success message. This default is 7250.
• The Domain argument is the Windows security domain name of the remote user, which is most often inherited from the dial-in profile variable %Domain%.
• The Username argument is, as you might guess, the username of the remote user, which is most often inherited from the dial-in profile %UserName%.
• The ScriptVersion argument is a text string that contains the script version that will be matched on the RRAS server. You can use any keyboard characters except /0 in a consecutive sequence.
Here is a sample batch file script:
5394ch08.fm Page 123 Monday, September 12, 2005 6:09 PM
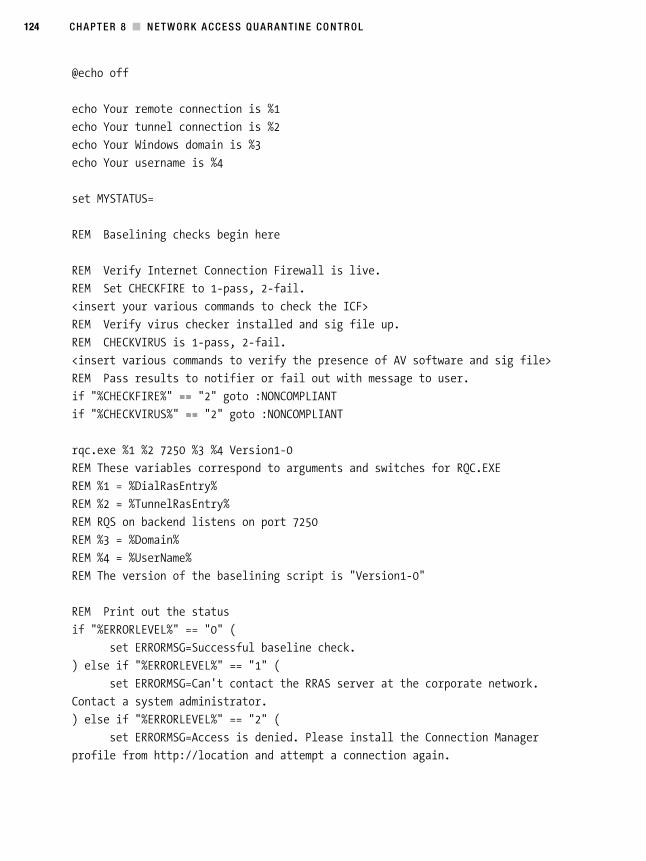
124 C H A P T E R 8 ■ N E T W O R K A C C E S S Q U A R A N T I N E C O N T R O L
���������
������� ������������������������
������� ��� ���������������������
������� ����� �!�� ��������"
������� �� ����������#
����$���%���&
�
'($��)�������*�����+��,�*�������
'($�������-�.�������������������/���!��������0�1
'($�������2(�3/.'(�����4���5��4���1
6�������-� ��0��� ����� ���������+�����.�/7
'($�������-�0�� ������+���������� �� ���*������ �1
'($���2(�3�.'�������4���5��4���1
6�������0��� ����� �����0����-�����������������%������!���� ���*�����7
'($��������� ������������������������ ��!�������*����� ���1
���8��2(�3/.'(�8�&&�8�8�*����9�:��:$�;.%��
���8��2(�3�.'���8�&&�8�8�*����9�:��:$�;.%��
���1�<��������=�>?��"��#���������4?
'($�������0��,������������� �����* ������ ��!�����������'@�1(A(
'($����&�����'�(���-�
'($����&��� ����'�(���-��
'($�'@�����,�+�� �����������������=�>?
'($��"�&��������
'($��#�&���������
'($�����0��������������,�������*�����������8��������4?8
'($��������� ��������� �
���8�('':';(�(;�8�&&�8?8�B
����������('':'$�C&� ������ ��,�����������+1
D���������8�('':';(�(;�8�&&�8�8�B
����������('':'$�C&��E�������������''%�����0���������������������!��+1�
���������-���� ���������1
D���������8�('':';(�(;�8�&&�8�8�B
����������('':'$�C&%��������� ���� 1�����������������������������$�*���
����������������9FF��������� �������������������*��1
5394ch08.fm Page 124 Monday, September 12, 2005 6:09 PM
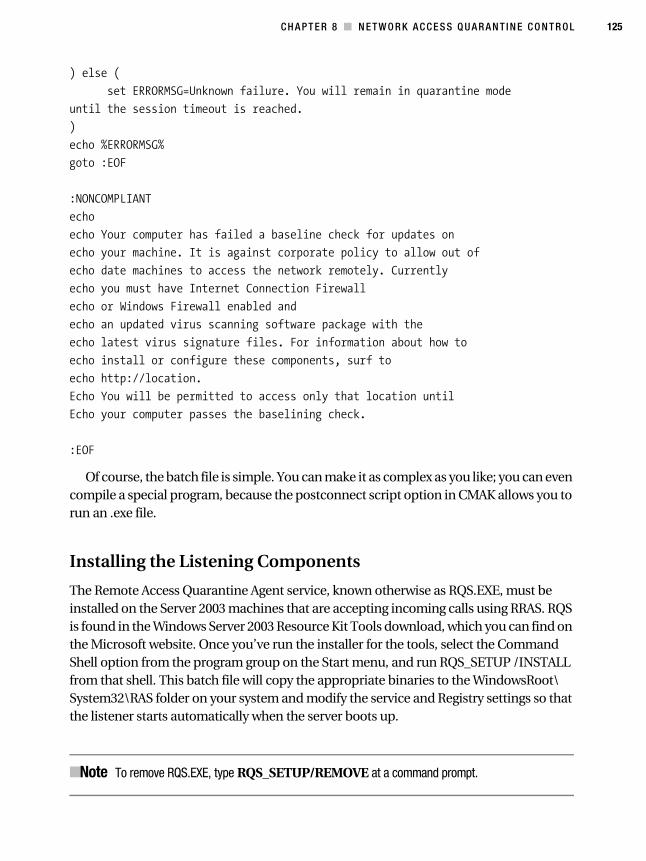
C H A P T E R 8 ■ N E T W O R K A C C E S S Q U A R A N T I N E C O N T R O L 125
D������B
����������('':'$�C&��+��!����� ��1��� �!������������� �������� ��
��������������������� ���������� 1
D
������('':'$�C�
*����9(:/
9�:��:$�;.%��
�����
������� ����� ����������� ��,�����������+����� � ������
�����-� �������1�.�����*�������������������-�������!�� ����
����� ��������������������������!��+�������-1�� ������-
�����-� � ����0��.�������������������/���!����
����������� �!��/���!�����,�� ��
������� � �� �0�� ��������*�����!�����+*��!�������
�����������0�� ����*�� ��������1�/�������������,� ����!����
��������������������* ������������������5�� �����
���������9FF�������1
(������ �!����,��������� �������������-������������� ����
(����-� ����� ��������������,�������*�����+1
9(:/
Of course, the batch file is simple. You can make it as complex as you like; you can even compile a special program, because the postconnect script option in CMAK allows you to run an .exe file.
Installing the Listening Components
The Remote Access Quarantine Agent service, known otherwise as RQS.EXE, must be installed on the Server 2003 machines that are accepting incoming calls using RRAS. RQS is found in the Windows Server 2003 Resource Kit Tools download, which you can find on the Microsoft website. Once you’ve run the installer for the tools, select the Command Shell option from the program group on the Start menu, and run RQS_SETUP /INSTALL from that shell. This batch file will copy the appropriate binaries to the WindowsRoot\System32\RAS folder on your system and modify the service and Registry settings so that the listener starts automatically when the server boots up.
■Note To remove RQS.EXE, type RQS_SETUP/REMOVE at a command prompt.
5394ch08.fm Page 125 Monday, September 12, 2005 6:09 PM
126 C H A P T E R 8 ■ N E T W O R K A C C E S S Q U A R A N T I N E C O N T R O L
A bit of manual intervention is required, however. You need to specify the version string for the baseline script. The listener service will match the version reported by the remote computer to the value stored on the RRAS computer so you can make sure that the client is using the latest acceptable version of a script. To make this change manually after you’ve run RQS_SETUP from the Tools download, do the following:
1. Open the Registry Editor.
2. Navigate to the HKEY_LOCAL_MACHINE\System\CurrentControlSet\_Services\Rqs key.
3. Right-click in the right pane, and select New String.
4. Name the string AllowedValue.
5. Double-click the new entry, and enter the string that refers to an acceptable version of the script.
Alternatively, you can modify the RQS_SETUP batch file, so this step can be automated for future deployments. Do the following:
1. Open the RQS_SETUP.BAT file in Notepad.
2. Select Find from the Edit menu.
3. In Find What, enter Version1\0, and click OK. The text cursor should be on a line that says: REM REG ADD %ServicePath% /v AllowedSet /_t REG_MULTI_SZ /d Version1\0Version1a\0Test.
4. To add just one acceptable version, delete “REM” from the beginning of the line.
5. Now, replace the text “Version1\0Version1a\0Test” with the script version string you want to be passed by RQC.EXE.
6. If you want to add more than one acceptable version, replace the text “Version1\0Version1a\0Test” with the acceptable version strings, each separated by the “\0” line.
7. Save the file, and then exit Notepad.
RQS is set as a dependency of RRAS. However, when RRAS is restarted, RQS doesn’t automatically restart, so you’ll need to manually restart it if you ever stop RRAS manually.
5394ch08.fm Page 126 Monday, September 12, 2005 6:09 PM
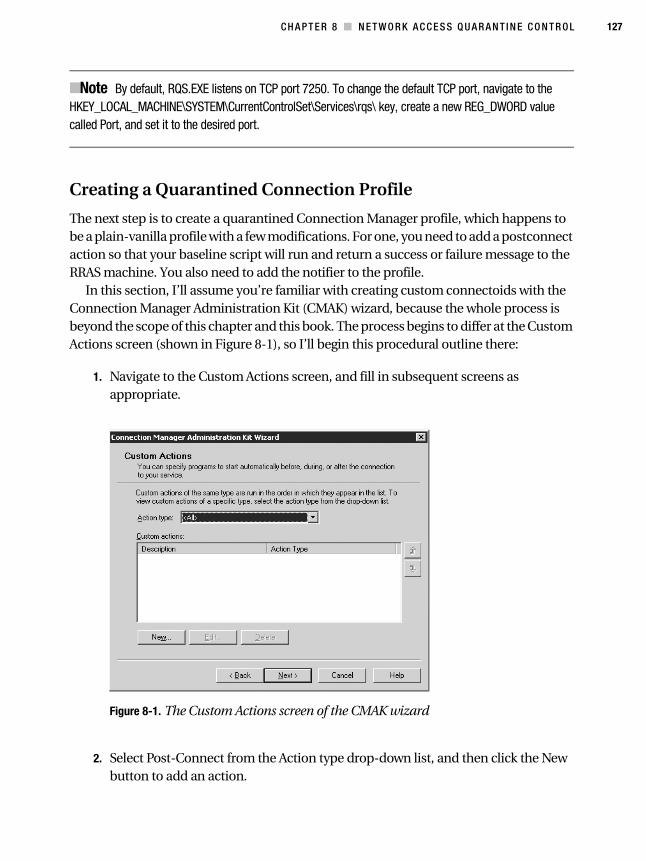
C H A P T E R 8 ■ N E T W O R K A C C E S S Q U A R A N T I N E C O N T R O L 127
■Note By default, RQS.EXE listens on TCP port 7250. To change the default TCP port, navigate to the HKEY_LOCAL_MACHINE\SYSTEM\CurrentControlSet\Services\rqs\ key, create a new REG_DWORD value called Port, and set it to the desired port.
Creating a Quarantined Connection Profile
The next step is to create a quarantined Connection Manager profile, which happens to be a plain-vanilla profile with a few modifications. For one, you need to add a postconnect action so that your baseline script will run and return a success or failure message to the RRAS machine. You also need to add the notifier to the profile.
In this section, I’ll assume you’re familiar with creating custom connectoids with the Connection Manager Administration Kit (CMAK) wizard, because the whole process is beyond the scope of this chapter and this book. The process begins to differ at the Custom Actions screen (shown in Figure 8-1), so I’ll begin this procedural outline there:
1. Navigate to the Custom Actions screen, and fill in subsequent screens as appropriate.
Figure 8-1. The Custom Actions screen of the CMAK wizard
2. Select Post-Connect from the Action type drop-down list, and then click the New button to add an action.
5394ch08.fm Page 127 Monday, September 12, 2005 6:09 PM

128 C H A P T E R 8 ■ N E T W O R K A C C E S S Q U A R A N T I N E C O N T R O L
3. The New Custom Action dialog box is displayed, as shown in Figure 8-2.
Figure 8-2. The New Custom Action dialog box
4. Type a descriptive title for the postconnection action in the Description box. In Program to run, enter the name of your baseline script. You can also use the Browse button to look for it. Type the command-line switches and their arguments in the Parameters box. Finally, check the two bottom boxes, Include the custom action program with this service profile and Program interacts with the user.
5. Click OK, and you should return to the Custom Actions screen. Click Next.
6. Continue filling in the wizard screens as appropriate, until you come to the Addi-tional Files screen, as depicted in Figure 8-3.
7. Click Add, and then enter RQC.EXE in the dialog box. You can use the Browse button to search for it graphically. Once you’ve finished, click OK.
8. You’ll be returned to the Additional Files screen, where you’ll see RQC.EXE listed. Click Next.
9. Complete the remainder of the wizard as appropriate.
5394ch08.fm Page 128 Monday, September 12, 2005 6:09 PM
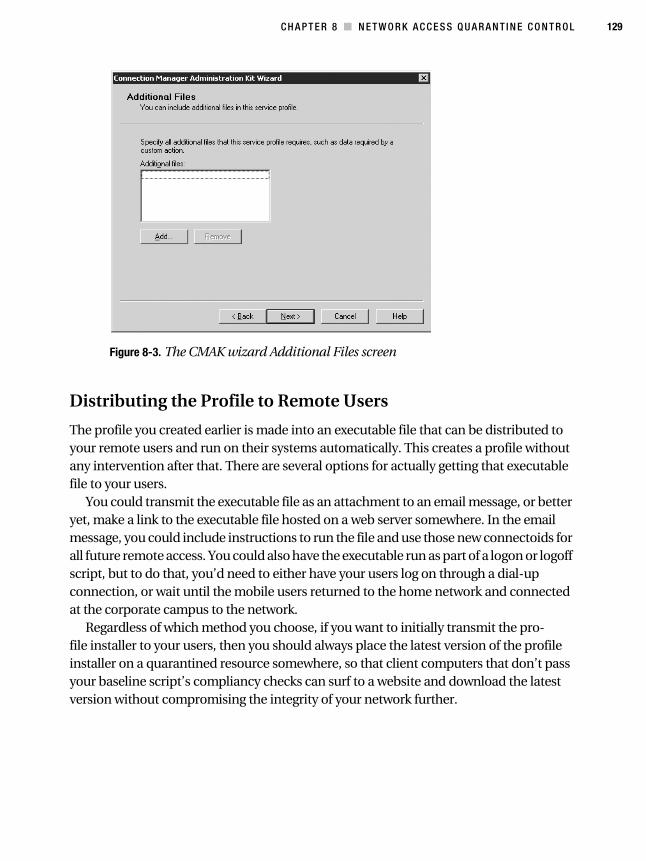
C H A P T E R 8 ■ N E T W O R K A C C E S S Q U A R A N T I N E C O N T R O L 129
Figure 8-3. The CMAK wizard Additional Files screen
Distributing the Profile to Remote Users
The profile you created earlier is made into an executable file that can be distributed to your remote users and run on their systems automatically. This creates a profile without any intervention after that. There are several options for actually getting that executable file to your users.
You could transmit the executable file as an attachment to an email message, or better yet, make a link to the executable file hosted on a web server somewhere. In the email message, you could include instructions to run the file and use those new connectoids for all future remote access. You could also have the executable run as part of a logon or logoff script, but to do that, you’d need to either have your users log on through a dial-up connection, or wait until the mobile users returned to the home network and connected at the corporate campus to the network.
Regardless of which method you choose, if you want to initially transmit the pro- file installer to your users, then you should always place the latest version of the profile installer on a quarantined resource somewhere, so that client computers that don’t pass your baseline script’s compliancy checks can surf to a website and download the latest version without compromising the integrity of your network further.
5394ch08.fm Page 129 Monday, September 12, 2005 6:09 PM
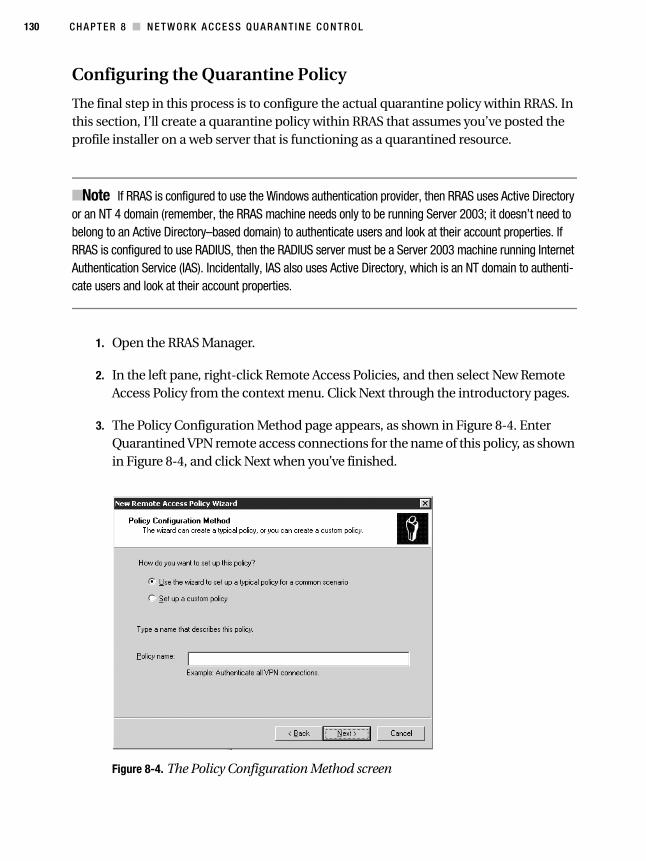
130 C H A P T E R 8 ■ N E T W O R K A C C E S S Q U A R A N T I N E C O N T R O L
Configuring the Quarantine Policy
The final step in this process is to configure the actual quarantine policy within RRAS. In this section, I’ll create a quarantine policy within RRAS that assumes you’ve posted the profile installer on a web server that is functioning as a quarantined resource.
■Note If RRAS is configured to use the Windows authentication provider, then RRAS uses Active Directory or an NT 4 domain (remember, the RRAS machine needs only to be running Server 2003; it doesn’t need to belong to an Active Directory–based domain) to authenticate users and look at their account properties. If RRAS is configured to use RADIUS, then the RADIUS server must be a Server 2003 machine running Internet Authentication Service (IAS). Incidentally, IAS also uses Active Directory, which is an NT domain to authenti-cate users and look at their account properties.
1. Open the RRAS Manager.
2. In the left pane, right-click Remote Access Policies, and then select New Remote Access Policy from the context menu. Click Next through the introductory pages.
3. The Policy Configuration Method page appears, as shown in Figure 8-4. Enter Quarantined VPN remote access connections for the name of this policy, as shown in Figure 8-4, and click Next when you’ve finished.
Figure 8-4. The Policy Configuration Method screen
5394ch08.fm Page 130 Monday, September 12, 2005 6:09 PM
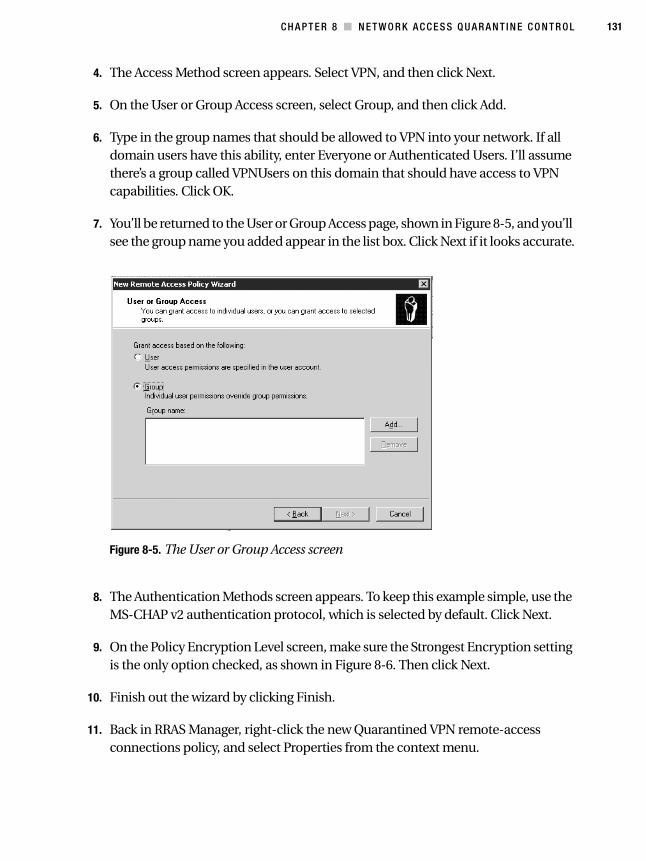
C H A P T E R 8 ■ N E T W O R K A C C E S S Q U A R A N T I N E C O N T R O L 131
4. The Access Method screen appears. Select VPN, and then click Next.
5. On the User or Group Access screen, select Group, and then click Add.
6. Type in the group names that should be allowed to VPN into your network. If all domain users have this ability, enter Everyone or Authenticated Users. I’ll assume there’s a group called VPNUsers on this domain that should have access to VPN capabilities. Click OK.
7. You’ll be returned to the User or Group Access page, shown in Figure 8-5, and you’ll see the group name you added appear in the list box. Click Next if it looks accurate.
Figure 8-5. The User or Group Access screen
8. The Authentication Methods screen appears. To keep this example simple, use the MS-CHAP v2 authentication protocol, which is selected by default. Click Next.
9. On the Policy Encryption Level screen, make sure the Strongest Encryption setting is the only option checked, as shown in Figure 8-6. Then click Next.
10. Finish out the wizard by clicking Finish.
11. Back in RRAS Manager, right-click the new Quarantined VPN remote-access connections policy, and select Properties from the context menu.
5394ch08.fm Page 131 Monday, September 12, 2005 6:09 PM
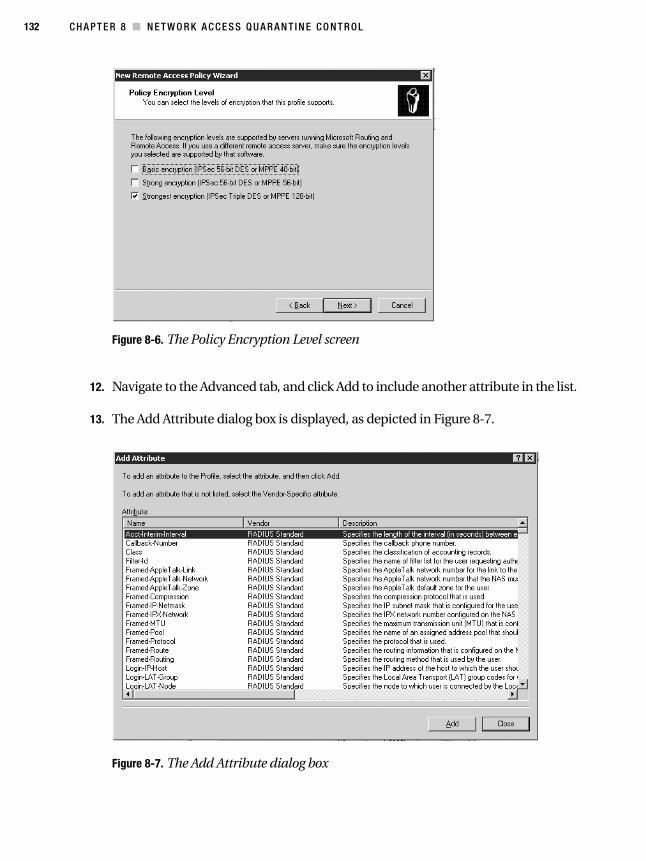
132 C H A P T E R 8 ■ N E T W O R K A C C E S S Q U A R A N T I N E C O N T R O L
Figure 8-6. The Policy Encryption Level screen
12. Navigate to the Advanced tab, and click Add to include another attribute in the list.
13. The Add Attribute dialog box is displayed, as depicted in Figure 8-7.
Figure 8-7. The Add Attribute dialog box
5394ch08.fm Page 132 Monday, September 12, 2005 6:09 PM

C H A P T E R 8 ■ N E T W O R K A C C E S S Q U A R A N T I N E C O N T R O L 133
14. Click MS-Quarantine-Session-Timeout, and then click Add.
15. In the Attribute Information dialog box, type the quarantine session time in the Attribute Value field. Use a sample value of 60, which will be measured in seconds, for this demonstration. Click OK, and then OK again to return to the Advanced tab.
16. Click Add. In the Attribute list, click MS-Quarantine-IPFilter, and then click Add again. You’ll see the IP Filter Attribute Information screen, as shown in Figure 8-8.
Figure 8-8. The IP Filter Attribute Information dialog box
17. Click the Input Filters button, which displays the Inbound Filters dialog box.
18. Click New to add the first filter. The Add IP Filter dialog box is displayed. In the Pro-tocol field, select TCP. In the Destination port field, enter 7250. Click OK.
19. Now, go back to the Inbound Filters screen, and select the option Permit only the packets listed below. Your screen should look like Figure 8-9.
20. Click New and add the input filter for DHCP traffic, and repeat the previous steps. Make sure to include the appropriate port number and type as described earlier in this chapter.
21. Click New and add the input filter for DNS traffic, and repeat the previous steps. Make sure to include the appropriate port number and type as described earlier in this chapter.
5394ch08.fm Page 133 Monday, September 12, 2005 6:09 PM
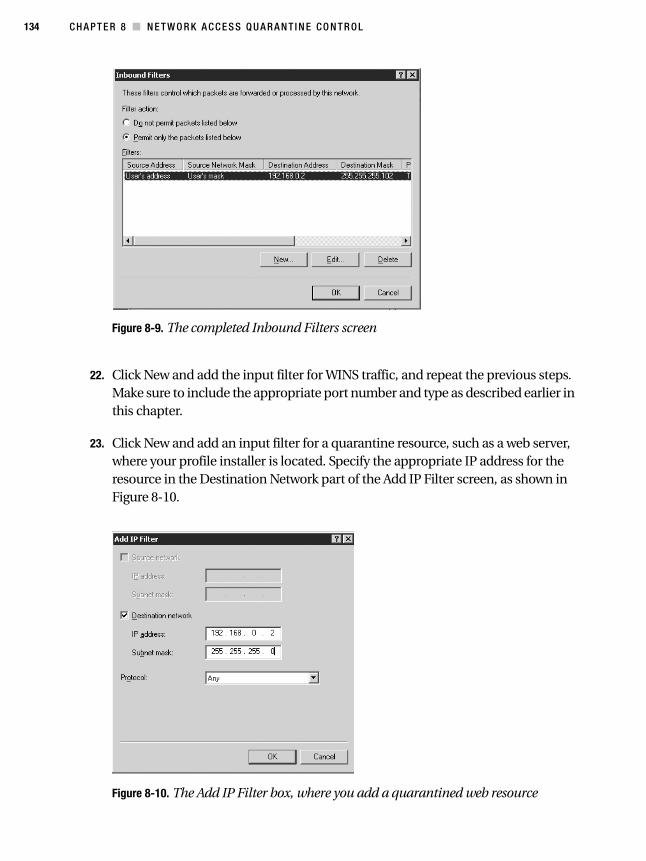
134 C H A P T E R 8 ■ N E T W O R K A C C E S S Q U A R A N T I N E C O N T R O L
Figure 8-9. The completed Inbound Filters screen
22. Click New and add the input filter for WINS traffic, and repeat the previous steps. Make sure to include the appropriate port number and type as described earlier in this chapter.
23. Click New and add an input filter for a quarantine resource, such as a web server, where your profile installer is located. Specify the appropriate IP address for the resource in the Destination Network part of the Add IP Filter screen, as shown in Figure 8-10.
Figure 8-10. The Add IP Filter box, where you add a quarantined web resource
5394ch08.fm Page 134 Monday, September 12, 2005 6:09 PM
C H A P T E R 8 ■ N E T W O R K A C C E S S Q U A R A N T I N E C O N T R O L 135
24. Finally, click OK on the Inbound Filters dialog box to save the filter list.
25. On the Edit Dial-in Profile dialog box, click OK to save the changes to the profile settings.
26. Then, to save the changes to the policy, click OK once more.
Although it’s certainly advantageous to have all users connected through a quarantined session until you can verify their configurations, you may find some logistical or political problems within your organization that mitigate this requirement. If so, the simplest way to excuse a user or group of users from participating in the quarantine is to create an exception security group with Active Directory. The members of this group should be the ones that need not participate in the quarantining procedure.
Using that group, you should create another policy that applies to the exceptions group, which is configured with the same settings as the quarantine remote-access policy you created earlier in the chapter. This time, though, don’t add or configure either the MS-Quarantine-IPFilter or the MS-Quarantine-Session-Timeout attributes. Once you’ve created the policy, move the policy that applies to the exceptions group so that it’s evalu-ated before the policy that quarantines everyone else.
CheckpointsIf you take nothing else from this chapter, note the following:
• Assess how much of a risk you’re taking by not consistently and regularly verifying the update level of remote machines that connect to your network.
• Implement NAQC.
• Create exceptions groups for important people.
5394ch08.fm Page 135 Monday, September 12, 2005 6:09 PM

5394ch08.fm Page 136 Monday, September 12, 2005 6:09 PM
137
■ ■ ■
C H A P T E R 9
Internet Information Services Security
Ever since the Gartner report came out in 2002, Microsoft’s web platform has steadily deteriorated in reputation. That report advised anyone using Internet Information Services (IIS) in any version as a public-facing, production web server to immediately consider switching to Apache, the popular UNIX web server. Most of it was deserved, too, when you consider the inexcusable buffer overflows, what seems like ten security bulle-tins each week, worms that take over computers faster than they can be secured when you’re on the network, and so on.
Part of the problem was that the version of IIS included with Windows NT and Windows 2000, versions 4 and 5 respectively, were unacceptably lax in their default permissions: Everyone could do everything at any given time. Even the fact that IIS was installed by default during a Windows installation was a bad move: It didn’t matter if you wanted a web server or not, because you got one anyway.
Those who prey on nonsecure web servers rely on users who are lazy or unknowledge-able about keeping their servers hardened and updated. Essentially, the climate of the Internet has degenerated into a situation where even innocent users that get penetrated are used as attack vectors against other innocent but open servers. The responsibility lies not just with the attackers who promulgate these worms, but with the administrators who allow their machines to be used like toys. The bottom line is this: If you can’t keep your IIS server secure, you’re the enemy, not a friend.
In this chapter, I’ll look at nine simple steps you can take to make sure that you’re neither a victim of nor an accessory to hackers. Note that entire books have been written about securely configuring IIS, and that’s beyond the scope of this tome. But because IIS is bundled with Windows, I’ll briefly look at ways you can easily harden IIS without having to purchase volumes of information.
5394ch09.fm Page 137 Tuesday, September 13, 2005 1:08 PM
138 C H A P T E R 9 ■ I N T E R N E T I N F O R M A T I O N S E R V I C E S S E C U R I T Y
Completely Disable IISAlthough it’s probably the simplest suggestion in this section, it’s also the most effective. It’s a lot harder to attack a web server through vulnerability in the web-server software when a machine isn’t functioning as a web server. Unfortunately, Windows NT and Windows 2000 install IIS by default and enable it, too, so it’s always running, or waiting to serve either a standard, legitimate HTTP request or a message from a cracker.
IIS 6, found in Windows Server 2003, fixes this problem somewhat: When you first install Windows, IIS isn’t enabled at all, and even when you do enable it, it starts in a locked-down mode whereby dynamic content generation and script-execution capabili-ties are disabled. You can only serve static HTML pages. This is a big step in the right direction. In fact, when you upgrade a machine running Windows 2000 Server to Server 2003, if it detects an IIS installation that still has the default settings engaged (a good sign it hasn’t been modified or isn’t in use), then it will disable IIS after the upgrade. You have to explicitly turn it back on.
If you do happen to be running IIS on a machine for any reason, and you’d like to decommission the machine as a web server, you can do so by following these steps:
1. Open the Computer Management applet inside Control Panel.
2. Double-click the Services icon to launch the Services console.
3. Scroll through the list and select World Wide Web Publishing Service.
4. Right-click the service, and select Stop.
5. Also, if you don’t intend to run the web server anymore, set the startup options to Disabled, and the service won’t be relaunched upon a reboot of the machine.
■Tip You can also access the services with IIS Management, and from there, you can start and stop indi-vidual websites as well.
Obviously, if you’re actually using IIS, this suggestion won’t help you, so let’s continue to look at measures you can take to harden an IIS box.
Keeping IIS UpdatedNow that you know what hotfixes you need, you can update all of your IIS boxes around your network. There are a few ways to do this, depending on how involved you as the administrator want to get. I’ll look at two, with a tip for a third method.
5394ch09.fm Page 138 Tuesday, September 13, 2005 1:08 PM
C H A P T E R 9 ■ I N T E R N E T I N F O R M A T I O N S E R V I C E S S E C U R I T Y 139
Using Windows Update
Microsoft has recently improved its Windows Update website utility. When you surf to ���������������� ��������, the site will search your system to see what update level you’re at, and then it will list which hotfixes and service packs would be applicable for your individual machine. This is a good, automated way to ensure that all the code is completely up to date on your machine. The downside? You’re never quite sure what’s been installed where, because you don’t actually go through the installation process yourself.
You can also set up the Automatic Updates utility in Windows by right-clicking My Computer and selecting Properties from the menu. Navigate to the Automatic Updates tab, and you can indicate to machines running Windows 2000 Server with at least Service Pack 3 or Windows Server 2003 if you want updates to automatically trickle down to your computer and be installed on a set schedule. If you set patches to automatically download and install, you won’t ever have to worry about not being up to date. Alas, some people don’t trust Microsoft enough to come out with robust patches that could simply be installed on the day of their release; most administrators are in the habit of waiting a few days after a patch and letting other businesses be guinea pigs. But if you’re a one-person shop, and you have eight other tasks to do, the Automatic Updates solution might be good for you.
Using Network-Based Hotfix Installation
You can also download the individual security hotfixes and service packs one by one, save them to a central directory, and manually update each IIS machine on your network. Simply look at each security bulletin, or download the appropriate service packs (Windows Server 2003 Service Pack 1 is the latest available), and store them in the same directory. Then, prepare a batch file.
Let’s say you have two hotfix files to install. You surf the Web, find the files, and down-load them to \\mercury\qfe. Each hotfix is a separate executable. To simplify installation, I’ll make use of two switches, –z and –m, that instruct the hotfix setup process to do so quietly (without raising dialog boxes to the user) and to avoid rebooting at the end. Armed with this knowledge, I’ll simply prepare a batch file similar to the following:
���������������� �������
�������������� �!� ��"��!��#$�#�
�����������%�� �!� ��"��!��#$�#�
Now, if you’re running this batch file on computers running Windows 2000, you’ll need to use the QChain utility. QChain looks at a group of updates you install, matches them up, reads their changes, and arranges them all so that you don’t have to reboot after each hotfix installation. You invoke QChain after the hotfixes are installed, and it works its magic after that. So, we’ll add the following line:
5394ch09.fm Page 139 Tuesday, September 13, 2005 1:08 PM
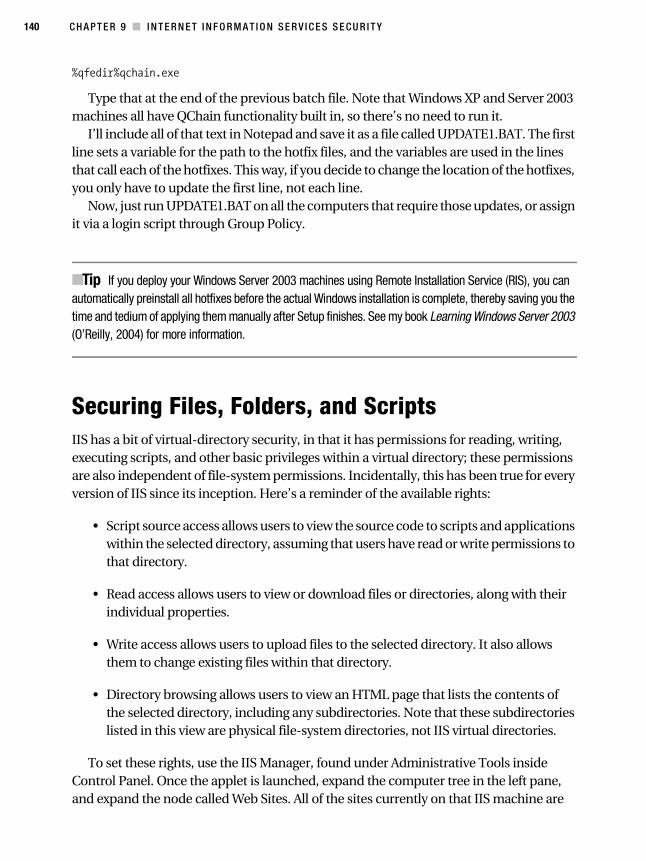
140 C H A P T E R 9 ■ I N T E R N E T I N F O R M A T I O N S E R V I C E S S E C U R I T Y
��������������!�
Type that at the end of the previous batch file. Note that Windows XP and Server 2003 machines all have QChain functionality built in, so there’s no need to run it.
I’ll include all of that text in Notepad and save it as a file called UPDATE1.BAT. The first line sets a variable for the path to the hotfix files, and the variables are used in the lines that call each of the hotfixes. This way, if you decide to change the location of the hotfixes, you only have to update the first line, not each line.
Now, just run UPDATE1.BAT on all the computers that require those updates, or assign it via a login script through Group Policy.
■Tip If you deploy your Windows Server 2003 machines using Remote Installation Service (RIS), you can automatically preinstall all hotfixes before the actual Windows installation is complete, thereby saving you the time and tedium of applying them manually after Setup finishes. See my book Learning Windows Server 2003 (O’Reilly, 2004) for more information.
Securing Files, Folders, and ScriptsIIS has a bit of virtual-directory security, in that it has permissions for reading, writing, executing scripts, and other basic privileges within a virtual directory; these permissions are also independent of file-system permissions. Incidentally, this has been true for every version of IIS since its inception. Here’s a reminder of the available rights:
• Script source access allows users to view the source code to scripts and applications within the selected directory, assuming that users have read or write permissions to that directory.
• Read access allows users to view or download files or directories, along with their individual properties.
• Write access allows users to upload files to the selected directory. It also allows them to change existing files within that directory.
• Directory browsing allows users to view an HTML page that lists the contents of the selected directory, including any subdirectories. Note that these subdirectories listed in this view are physical file-system directories, not IIS virtual directories.
To set these rights, use the IIS Manager, found under Administrative Tools inside Control Panel. Once the applet is launched, expand the computer tree in the left pane, and expand the node called Web Sites. All of the sites currently on that IIS machine are
5394ch09.fm Page 140 Tuesday, September 13, 2005 1:08 PM
C H A P T E R 9 ■ I N T E R N E T I N F O R M A T I O N S E R V I C E S S E C U R I T Y 141
listed here. To set permissions, right-click the name of a site and choose Properties. Then, click the Home Directory tab, and you’ll be greeted with a screen similar to that of Figure 9-1.
Figure 9-1. The IIS Manager Home Directory permissions section
On this page, you can make the necessary adjustments to permissions based on what content you have on each website. You can also follow the same procedure mentioned previously for each virtual directory on a website to further fine-tune the “virtual” permis-sions that IIS gives you.
But as I’ve mentioned earlier in the chapter, users browsing web content on your IIS machines are actually logging into a guestlike IUSR account on your machine or directory service. If they’re using an account on the system, it logically follows that you can set permissions for that account on the file system to further reduce the chances of unautho-rized access.
Out of the box, IIS 6 in Server 2003 sets the following restrictions on the NTFS permis-sions given to the IUSR account:
• A user logged on through the IUSR account can only read and list the contents of the web root directory. No execute permissions are present, so scripts cannot run, and no one can write files to the directory.
• The IUSR account has read, execute, and list contents permissions inside the Windows directory, just as the Authenticated Users group does.
5394ch09.fm Page 141 Tuesday, September 13, 2005 1:08 PM
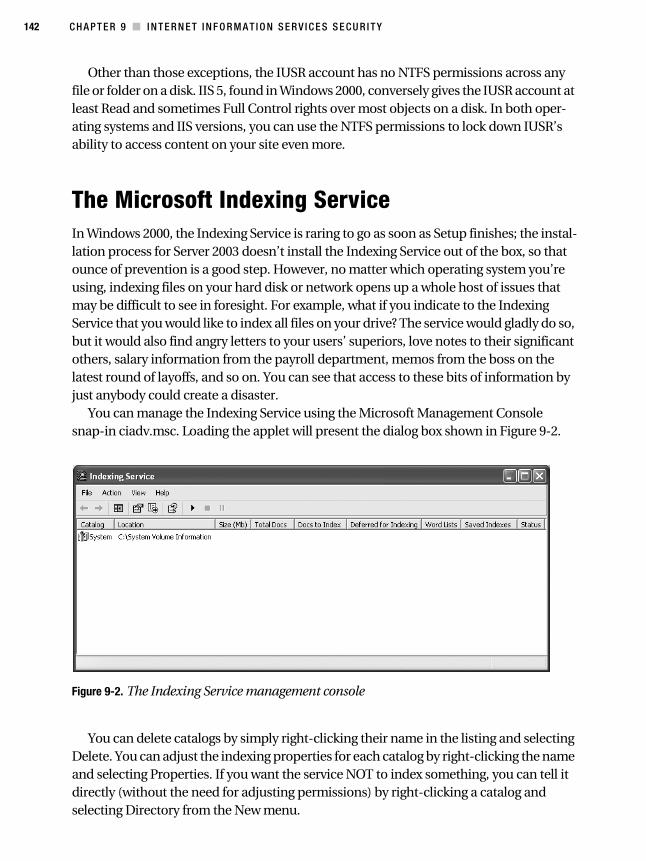
142 C H A P T E R 9 ■ I N T E R N E T I N F O R M A T I O N S E R V I C E S S E C U R I T Y
Other than those exceptions, the IUSR account has no NTFS permissions across any file or folder on a disk. IIS 5, found in Windows 2000, conversely gives the IUSR account at least Read and sometimes Full Control rights over most objects on a disk. In both oper-ating systems and IIS versions, you can use the NTFS permissions to lock down IUSR’s ability to access content on your site even more.
The Microsoft Indexing ServiceIn Windows 2000, the Indexing Service is raring to go as soon as Setup finishes; the instal-lation process for Server 2003 doesn’t install the Indexing Service out of the box, so that ounce of prevention is a good step. However, no matter which operating system you’re using, indexing files on your hard disk or network opens up a whole host of issues that may be difficult to see in foresight. For example, what if you indicate to the Indexing Service that you would like to index all files on your drive? The service would gladly do so, but it would also find angry letters to your users’ superiors, love notes to their significant others, salary information from the payroll department, memos from the boss on the latest round of layoffs, and so on. You can see that access to these bits of information by just anybody could create a disaster.
You can manage the Indexing Service using the Microsoft Management Console snap-in ciadv.msc. Loading the applet will present the dialog box shown in Figure 9-2.
Figure 9-2. The Indexing Service management console
You can delete catalogs by simply right-clicking their name in the listing and selecting Delete. You can adjust the indexing properties for each catalog by right-clicking the name and selecting Properties. If you want the service NOT to index something, you can tell it directly (without the need for adjusting permissions) by right-clicking a catalog and selecting Directory from the New menu.
5394ch09.fm Page 142 Tuesday, September 13, 2005 1:08 PM
C H A P T E R 9 ■ I N T E R N E T I N F O R M A T I O N S E R V I C E S S E C U R I T Y 143
Now, bear with me for a moment as I delve into some seemingly backwards logic. The Indexing Service by default takes a directory and indexes all of its contents, including child files and subfolders. The key to excluding directories from indexing is to add a direc-tory to the catalog and instruct the service not to index it. In the Add Directory dialog box, you see an option to the right, called Include in Index. This is where you can indicate whether or not to index a particular directory. So, you can enter the base directory for the index—let’s call it C:\Documents—and tell the Indexing Service to index it by clicking Yes next to the option on the right. But for this example, suppose you have a folder in C:\Documents called Top Secret. Tell Indexing Service to ignore it by adding C:\Documents\Top Secret as a directory, but before you click OK switch the Yes to a No under Include in Index.
Of course, that’s a very backwards way of doing things, and it would have been a far better decision on the part of Microsoft to include an option that gives you the choice of which subfolders, if any, to index, within the management console of the Indexing Service. In true Microsoft form, you can make these changes somewhat intuitively, albeit in a different place—the Advanced Attributes section of the Properties sheet of any file or folder. Just right-click any folder, select Properties, and then go to the General tab and click Advanced. The top section, Archive and Index Attributes, contains an option that allows you to enable or disable the Indexing Service’s access to this object. When you make a change and click OK, a dialog box will appear, asking if you want to apply the changes to subfolders and files within those subfolders.
With those points out of the way, consider the following suggestions for toning down the Indexing Service’s influence in your organization:
• Immediately remove the two catalogs the service creates upon installation by default, called Web and System. These index all web content and all files on your system, respectively.
• Understand the hierarchical nature of the indexing permission. If you give a main folder permission to be indexed, any subfolders contained within that folder will automatically have permission to be indexed as well.
• Take the policy of blanket-disabling the indexing permission on folders, and explic-itly enable the permission on files and folders that you’re sure you want indexed. It’s easier to control what’s being indexed when everything is NOT indexed by default.
The Indexing Service is a good thing, when kept under control. Unfortunately, a few worms have decided to take advantage of some flaws in its construction, so if you make use of the service, you need to especially ensure that you keep your IIS machines updated early and often.
5394ch09.fm Page 143 Tuesday, September 13, 2005 1:08 PM
144 C H A P T E R 9 ■ I N T E R N E T I N F O R M A T I O N S E R V I C E S S E C U R I T Y
TCP/IP Port EvaluationThis should really go without saying at this point in this text—this is a hardening book, after all—but go ahead and protect your IIS machines—only allow traffic on ports 80 and 443. I know there are remote-administration features, and those are great for internal servers, but with the continued security flaws that IIS has had, why take a chance exposing what amounts to root access to the outside world? Kill everything but ports 80 and 443 into your IIS machine and rest a bit easier at night.
You can disable these ports through a hardware or software firewall, or through an IPsec filter. I’ll cover the IPsec method here, and this procedure will work for Windows 2000, Windows XP, and Windows Server 2003.
First, you need to create a filter action that describes what to allow and what to deny:
1. Start the Local Security Policy Microsoft Management Console (MMC) snap-in—you can do this from within Control Panel and Administrative Tools.
2. Right-click IPSec Security Policies on Local Machine, and then select Manage IP filter lists and filter actions.
3. Navigate to the Manage Filter Actions tab, and click Add to create a new filter action. Click Next to skip the introduction.
4. Type LockDownWeb-Permit as the name for the new filter action, because you’ll be using this action to permit web traffic. Click Next when you’ve finished.
5. Select Permit, and then click Next.
6. Click Finish to complete the first filter action.
7. Create a second filter action called LockDownWeb-Block using the same pro-cedure, except choose Block on the Filter Action dialog box this time.
8. Click Close once you’ve finished.
Now it’s time to actually create the filters and lists based on the actions you defined previously:
1. Right-click IPSec Security Policies on Local Machine, and then select Manage IP Filter Lists and Filter Actions.
2. Click the Add button to create a new IP filter list.
3. Use AllTraffic for the filter list name.
5394ch09.fm Page 144 Tuesday, September 13, 2005 1:08 PM
C H A P T E R 9 ■ I N T E R N E T I N F O R M A T I O N S E R V I C E S S E C U R I T Y 145
4. Now, click the Add button again to create a new filter. Just select the default options through the IP Filter wizard to create a filter that will catch all traffic.
5. Click Close when you’ve finished.
6. Now, click Add to create another filter list, and use CatchWebTraffic for the name.
7. Click Add, and then click Next.
8. Select Any IP Address from the Source address drop-down list, and then click Next.
9. Select My IP Address from the Destination address drop-down list, and then click Next.
10. Choose TCP from the Select a Protocol Type drop-down list, and then click Next.
11. Select To This Port and then indicate port 80.
12. Click Next and then Finish.
At this point, you’ve filtered all traffic except for what’s flowing to port 80. If you have an SSL site that needs access, click Add, and then repeat the second procedure to create another filter that permits traffic to go to port 443. You might want to make a note of the values presented in Table 9-1.
Administrative and Default PagesLots of web-based programs often come with sample files, instruction pages, and installa-tion scripts that assist you in setting up and using the programs easily. In my web-hosting business, more than 75 percent of the scripts I use on a day-to-day basis, whether they’re ones that my customers need installed or ones that I use to manage the systems, come with install scripts and default pages that leave access to an account, a database, or even worse—a machine—that’s practically unguarded. These scripts don’t advertise their
Table 9-1. Values to Create IPsec Rule for SSL Web Serving
Prompt InformationSource Address Any IP address
Destination Address My IP address
Protocol TCP
From Port Any
To Port 443
5394ch09.fm Page 145 Tuesday, September 13, 2005 1:08 PM
146 C H A P T E R 9 ■ I N T E R N E T I N F O R M A T I O N S E R V I C E S S E C U R I T Y
presence, but it isn’t hard for a nefarious cracker to look in standard places, like a direc-tory called INSTALL, off the web root, and wreak havoc on a machine.
IIS is no different than these other programs. Here’s an action list of items of which to rid yourself, assuming none are being actively used:
• IIS 6, found in Windows Server 2003, comes with a web-based program so that you can remotely administer an IIS server from afar. I’ll make my comment on that in as few words as possible: bad idea.
• FrontPage Extensions also expose a lot of functionality that might not otherwise be needed. If you’re using FrontPage, then by all means continue to make use of the bots, but if you’ve just installed the extensions because you don’t feel like digging the Windows CD out if you ever need it again, then go ahead and uninstall it.
• Also, if you aren’t using the extensions or any type of SharePoint site, be it from Team Services or the full-fledged Portal Server product, delete the Microsoft Share-Point Administration site.
• Get rid of web-based printing—does anyone actually use it anyway?—by deleting the folder called Printers from the web root.
The Ins and Outs of Internet Services Application Programming InterfaceInternet Services Application Programming Interface (ISAPI) is CGI’s like-minded brother on the Windows platform. It allows for dynamic extensions to static HTML content, and technologies like Active Server Pages, .NET, and other dynamic languages that use ISAPI filters to interact with IIS. Of course, this opens up a potential security hole.
You need to make sure that the only ISAPI filters configured on your system are those that are in use. (You can find ISAPI filters in the Properties sheet for any website.) For most systems, that would be the ASP.NET service. Look through your web root directory, and note the extensions on all of your content. Are there any that differ from .HTM? If not, make sure any filters that are listed in the Properties tab are removed.
As a colleague of mine points out, the entire Code Red virus could have been prevented had the IDA ISAPI filter been removed from IIS installations worldwide.
Looking at Apache as an AlternativeOf course, the best way to harden IIS may be to use Apache. You might be trading one headache for another, but let’s look at some of the benefits that Apache offers over IIS.
5394ch09.fm Page 146 Tuesday, September 13, 2005 1:08 PM
C H A P T E R 9 ■ I N T E R N E T I N F O R M A T I O N S E R V I C E S S E C U R I T Y 147
Apache’s model uses a parent and child process, whereby the parent only exists to make sure a child process is available. (In IIS 6 there’s a similar model, but in previous versions there isn’t.)
While IIS 6 has moved quite a lot of web serving down into the kernel to speed up requests and improve reliability, that might not be the best idea. Generally, the more you put in the kernel, the greater chance your operating system will fail.
Apache is also easy to modify, extend, and embrace. If you need a specific application platform, or a script, or something that doesn’t come “in the box” per se, there’s a good probability that with Apache’s large user base, someone has already done it and made the results public.
Security is definitely a big issue. There will always be viruses and worms that target IIS. Apache issues security warnings from time to time, but they’re limited in scope and generally easy to remedy. If there’s a security hole in Apache, often you can work around it with a code fix, or you can change your configuration to work around the problem.
CheckpointsIn this chapter, I’ve discussed quick ways to ensure that your IIS machine doesn’t become a victim of crackers and worms. Here is the list of points by which you can harden IIS:
• If you’re not running a web server on your Windows machine, disable IIS.
• Regularly check the level of updates for your IIS machines, particularly those on an automated update regimen, and ensure that they’re receiving the patches that they need to stay secure.
• Apply hotfixes and service packs as soon as possible after they’re released and have gone through sufficient crash testing.
• Secure your web content using both IIS server permissions and NTFS file-system permissions, not one or the other.
• Consider whether you need the Indexing Service, and disable it if it isn’t absolutely critical to your web operation.
• Close any ports that don’t absolutely need to be open.
• On a related note, install a firewall in front of any public-facing IIS servers unless it’s absolutely impossible.
• Delete any default web pages and directories, especially administrative install scripts, that could be used to obtain full privileges on your machine.
5394ch09.fm Page 147 Tuesday, September 13, 2005 1:08 PM
148 C H A P T E R 9 ■ I N T E R N E T I N F O R M A T I O N S E R V I C E S S E C U R I T Y
• Only use ISAPI filters if you need them. Delete any unused filters that exist on the server.
• Consider using Apache for your Internet-facing servers and using only IIS internally.
5394ch09.fm Page 148 Tuesday, September 13, 2005 1:08 PM
149
■ ■ ■
C H A P T E R 1 0
Exchange Server 2003 Security
A lthough the focus of this book is on hardening the Windows client operating systems, many organizations tend to install Windows servers for the purposes of running Exchange Server. So, respecting that fact, I decided to include a chapter on ways to very simply but effectively protect your Microsoft Exchange Server 2003.
This is certainly not meant to be a complete guide—that could take an entire volume—but it’s mentioned in this book to bring it to your attention, and to help you out in one of the most common administrative situations there is for Windows administrators.
Please note that this chapter primarily covers Exchange Server 2003. Although Exchange 2000 Server still enjoys a large deployment worldwide, a lot of organizations have migrated their groupware installations to Exchange Server 2003. I’ve made an attempt to note resources and tips that pertain to Exchange 2000 in this chapter, but do be aware that the focus is on the current version. For a detailed site on configuring Exchange 2000 securely, please visit ��������������� ����� ���������������� ��������������� �����
■Tip As an additional resource, Microsoft has a best practices document available at ������������ ����� ����� ��������� �������� ��������� �������� that will give you more suggestions about applying security to Exchange Server 2003.
Installation SecurityThere is, of course, a recommended way to install Exchange for the most versatility. Keep the following best practices in mind when installing Exchange on your network in the future:
5394ch10.fm Page 149 Tuesday, September 13, 2005 6:43 PM
150 C H A P T E R 1 0 ■ E X C H A N G E S E R V E R 2 0 0 3 S E C U R I T Y
• Install Exchange in its own Program Files directory on its own disk partition, sepa-rate from everything else.
• Place Exchange log files on their own partition, and place Exchange database files on their own partition.
• After installation is complete, be sure to install the latest service packs for Exchange 2000 Server and Exchange Server 2003. As of press time, the latest available release is Service Pack 3 for the former and Service Pack 1 for the latter. Also, there is a “rollup”-style update that contains fixes for Exchange 2000 released after Service Pack 1 that I definitely recommend you obtain and install as soon as possible after installation.
• Be sure that after either version of Exchange is installed that you do NOT set up Outlook on the server. There is a nasty interaction between Outlook and some Exchange server-side components that can cause enough headaches and errors to make you reinstall the system from scratch—something you obviously want to avoid.
Set the following partition access control list (ACL) entries for each of the aforemen-tioned partitions:
• For System, grant Full Control.
• For the local computer account, grant Full Control.
• For Domain Administrators, grant Full Control.
• For Authenticated Users, grant Read and Execute.
Additionally, you might consider creating an IPsec rule to protect the computer. In this ruleset, you might allow unrestricted use of the local network connection for domain users, other Exchange Server machines within your organization, and domain controllers. However, for others, consider limiting incoming traffic to port 80 for servers hosting Outlook Web Access (OWA) on Exchange. Block any other access.
■Note The complete procedure for implementing IPsec rules is given in Chapter 9.
5394ch10.fm Page 150 Tuesday, September 13, 2005 6:43 PM
C H A P T E R 1 0 ■ E X C H A N G E S E R V E R 2 0 0 3 S E C U R I T Y 151
Security Policy ModificationsMicrosoft has made available baseline security guides, in the form of security templates, that you can apply as security policy according to the various roles your Exchange Server has. To apply them to your computers, you can simply import them into Group Policy via the Domain Group Policy or through a more granular object.
The Microsoft site with the security templates for Exchange Server machines is called the Security Operations Guide for Exchange 2000 Server, and it’s located at ������������ ����� ����� �������� ��������������������� �������� ���������� �������� �������������!�� �"���
■Note Security templates are covered in depth in Chapter 4.
In addition to the changes made by the previous templates, I recommend that you make the modifications outlined in the following section.
For Exchange Server Machines
For the machines that run Exchange Server itself, I recommend these steps. Under User Rights Assignment, do the following:
• Grant the Access This Computer from the Network ability to the Authenticated Users, Backup Operators, and Enterprise Domain Controllers groups.
• Grant the Manage Auditing and Security Log ability to the Exchange Domain Servers group of your security domain.
Under Local Policies and Security Options:
• Set the value of Number of Previous Logons to Cache to 3.
• Disable the Shut Down System Immediately if Unable to Log Security Audits policy.
For Domain Controller Machines
For plain domain controllers, I recommend the following procedure. Under Local Policies and Security Options, do the following:
5394ch10.fm Page 151 Tuesday, September 13, 2005 6:43 PM

152 C H A P T E R 1 0 ■ E X C H A N G E S E R V E R 2 0 0 3 S E C U R I T Y
• Disable the Digitally Sign Client Communications (Always) policy.
• Disable the Digitally Sign Server Communications (Always) policy.
• Set the value of the LAN Manager Authentication Level policy to Send LM & NTLM—Use Ntlmv2 Session Security if Negotiated.
Service SecurityExchange runs as a set of services that communicate both within themselves and with the local computer. Additionally, the local computer and these processes act as a team when communicating with remote computers such as clients themselves, other Exchange servers within an organization, and Active Directory domain controllers.
Figure 10-1 shows the services that run on an Exchange server by default and the dependencies they have on each other and with other Windows server processes.
Figure 10-1. Exchange Server service dependencies
5394ch10.fm Page 152 Tuesday, September 13, 2005 6:43 PM
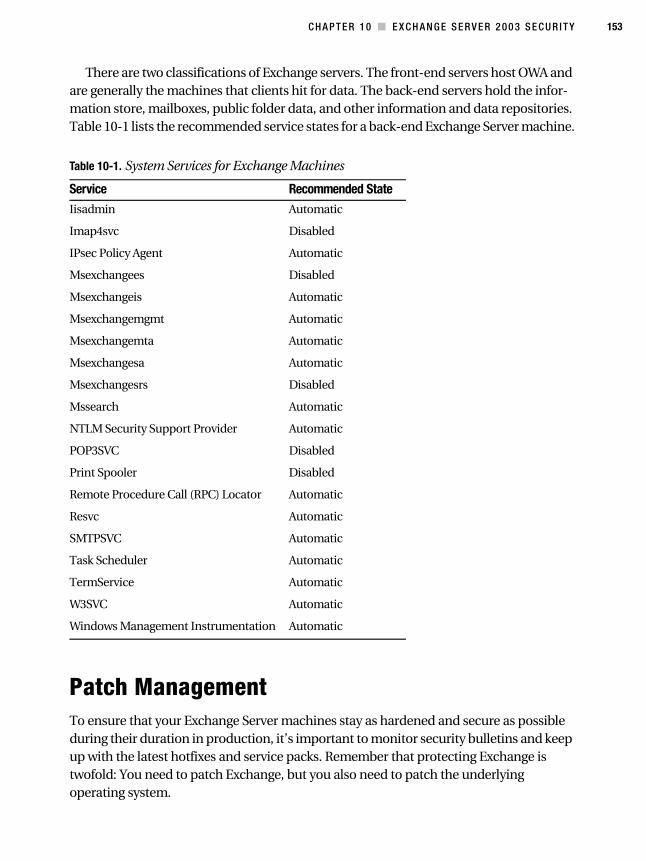
C H A P T E R 1 0 ■ E X C H A N G E S E R V E R 2 0 0 3 S E C U R I T Y 153
There are two classifications of Exchange servers. The front-end servers host OWA and are generally the machines that clients hit for data. The back-end servers hold the infor-mation store, mailboxes, public folder data, and other information and data repositories. Table 10-1 lists the recommended service states for a back-end Exchange Server machine.
Patch ManagementTo ensure that your Exchange Server machines stay as hardened and secure as possible during their duration in production, it’s important to monitor security bulletins and keep up with the latest hotfixes and service packs. Remember that protecting Exchange is twofold: You need to patch Exchange, but you also need to patch the underlying operating system.
Table 10-1. System Services for Exchange Machines
Service Recommended StateIisadmin Automatic
Imap4svc Disabled
IPsec Policy Agent Automatic
Msexchangees Disabled
Msexchangeis Automatic
Msexchangemgmt Automatic
Msexchangemta Automatic
Msexchangesa Automatic
Msexchangesrs Disabled
Mssearch Automatic
NTLM Security Support Provider Automatic
POP3SVC Disabled
Print Spooler Disabled
Remote Procedure Call (RPC) Locator Automatic
Resvc Automatic
SMTPSVC Automatic
Task Scheduler Automatic
TermService Automatic
W3SVC Automatic
Windows Management Instrumentation Automatic
5394ch10.fm Page 153 Tuesday, September 13, 2005 6:43 PM
154 C H A P T E R 1 0 ■ E X C H A N G E S E R V E R 2 0 0 3 S E C U R I T Y
It so happens that vulnerabilities in Exchange don’t happen as often as do general Windows operating system vulnerabilities. However, because of this, the problems discovered in Exchange aren’t usually publicized through Windows Update or Software Update Services, as described elsewhere in this book. Although this is slated to change in future releases of these tools—part of Microsoft’s grand plan is to make patching all Microsoft products a one-stop affair—for now, it necessitates your subscribing to mailing lists and staying on top of issues. You can also make use of the Microsoft Baseline Security Analyzer, covered elsewhere in this book, to ensure that your system meets a secure configuration foundation.
Protecting Against Address SpoofingA prominent way of intruding on any email system is by manipulating the From field in an email message. The Simple Mail Transfer Protocol (SMTP) doesn’t verify a user’s identity as presented in an email message, but Exchange can help you minimize this practice, which is commonly known as “message spoofing.”
Perhaps the most nefarious problems related to address spoofing are external attackers who mimic an email address of an internal user. This social-engineering technique is used most often to encourage another user to disclose personal or sensitive information. Once the attacker has this data, he uses it to mount a more formal, sophisticated intrusion or attack. To make matters worse, Exchange will automatically resolve an email address in its address book to the name used in the global address list, which makes it quite difficult to discern a message’s origin. Did it come from inside, or is it an Internet message? Fortu-nately, you can change Exchange’s default configuration so that mail from outside the organization always remains unresolved, whether or not it contains a properly formatted address that matches one in the global address list. Then, instruct your users to look for unresolved email addresses as a warning sign of a spoofed message.
To set this behavior, do the following:
1. Start the Windows Registry Editor.
2. Locate or create the following key in the Registry (where 2 is the SMTP virtual server number): HKEY_LOCAL_MACHINE\SYSTEM\CurrentControlSet\Services\MsExchangeTransport\Parameters\2.
3. Select Add Value from the Edit menu.
4. Add a value named ResolveP2, of type REG_DWORD.
5394ch10.fm Page 154 Tuesday, September 13, 2005 6:43 PM
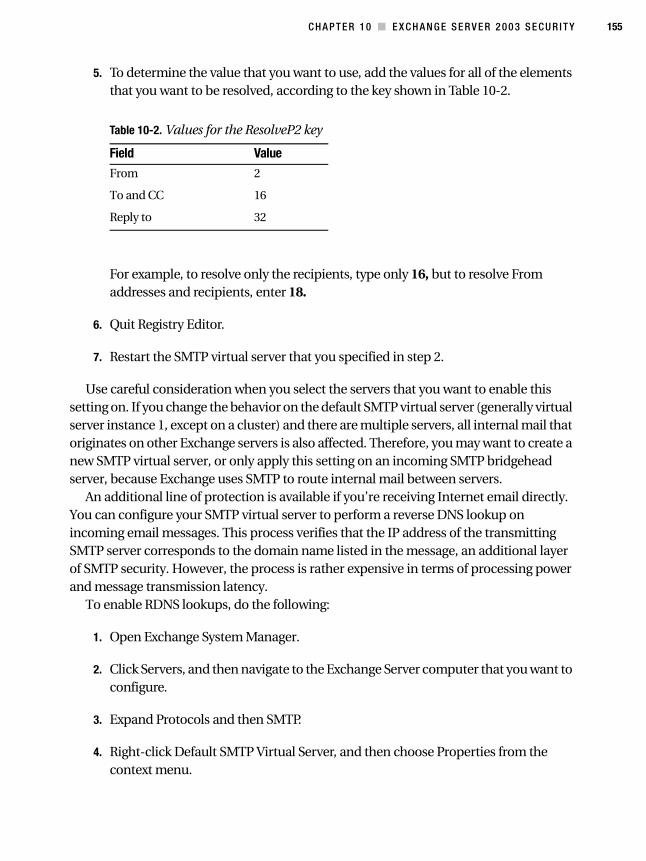
C H A P T E R 1 0 ■ E X C H A N G E S E R V E R 2 0 0 3 S E C U R I T Y 155
5. To determine the value that you want to use, add the values for all of the elements that you want to be resolved, according to the key shown in Table 10-2.
For example, to resolve only the recipients, type only 16, but to resolve From addresses and recipients, enter 18.
6. Quit Registry Editor.
7. Restart the SMTP virtual server that you specified in step 2.
Use careful consideration when you select the servers that you want to enable this setting on. If you change the behavior on the default SMTP virtual server (generally virtual server instance 1, except on a cluster) and there are multiple servers, all internal mail that originates on other Exchange servers is also affected. Therefore, you may want to create a new SMTP virtual server, or only apply this setting on an incoming SMTP bridgehead server, because Exchange uses SMTP to route internal mail between servers.
An additional line of protection is available if you’re receiving Internet email directly. You can configure your SMTP virtual server to perform a reverse DNS lookup on incoming email messages. This process verifies that the IP address of the transmitting SMTP server corresponds to the domain name listed in the message, an additional layer of SMTP security. However, the process is rather expensive in terms of processing power and message transmission latency.
To enable RDNS lookups, do the following:
1. Open Exchange System Manager.
2. Click Servers, and then navigate to the Exchange Server computer that you want to configure.
3. Expand Protocols and then SMTP.
4. Right-click Default SMTP Virtual Server, and then choose Properties from the context menu.
Table 10-2. Values for the ResolveP2 key
Field ValueFrom 2
To and CC 16
Reply to 32
5394ch10.fm Page 155 Tuesday, September 13, 2005 6:43 PM
156 C H A P T E R 1 0 ■ E X C H A N G E S E R V E R 2 0 0 3 S E C U R I T Y
5. Navigate to the Delivery tab.
6. Click the Advanced button, and then click the Perform Reverse DNS Lookup on Incoming Messages checkbox.
7. Click OK, and then click OK again.
Protecting Against Denial-of-Service AttacksDenial-of-service (DoS) attacks are generally very difficult targets from which to protect yourself. There are a couple of options within Exchange, however, that will help you to lessen the effect of them.
The message limits parameters allow you to configure a limit to the number of recipi-ents per message as well as a maximum message size, a maximum number of messages per connection, and so on. These limits will help to ensure that a DoS attack using mail transport is very difficult.
1. Open Exchange System Manager.
2. Click Servers, and then navigate to the Exchange Server computer that you want to configure.
3. Expand Protocols and then SMTP.
4. Right-click Default SMTP Virtual Server, and then choose Properties from the context menu.
5. Navigate to the Messages tab.
6. To set a maximum message size, click the Limit Message Size to (KB) box and enter a value in the Size box.
7. To set a maximum size on a particular SMTP session, click the Limit Session Size to (KB) box, and enter a value.
8. To set a maximum number of messages per connection (the default is 20), click the Limit Number of Messages per Connection box and then enter a value.
5394ch10.fm Page 156 Tuesday, September 13, 2005 6:43 PM
C H A P T E R 1 0 ■ E X C H A N G E S E R V E R 2 0 0 3 S E C U R I T Y 157
9. To set a maximum number of recipients for a single message, click the Limit Number of Recipients per Message box and enter a value. Any messages that are larger than this number of recipients is returned to the sender with a nondelivery report (NDR)—commonly known as a bounce message.
10. Click OK.
An attacker could also poison your Exchange machines by sending a large number of mails to a particular server until it runs out of disk space to store them. You can prevent the negative effects of this by setting storage limits on mailboxes and public folders, as follows:
1. In Exchange System Manager, expand the Servers container.
2. Select the server that hosts the mailbox store that you want to configure, and then double-click Storage group in the right pane.
3. Right-click the mailbox store that you want to configure, select Properties, and navigate to the Limits tab.
4. Click to select one or all of the following checkboxes under Storage limits:
• To simply warn a user that his mailbox has exceeded its limit, click Issue Warning At. Type a value in kilobytes.
• To send a warning message that states that the user will not be able to send any more messages until she deletes or archives her old mail, select Prohibit Send At. Type a value in kilobytes.
• To send a warning message that states that the user has exceeded mailbox limits and cannot receive any messages, select Prohibit Send and Receive At. Type a value in kilobytes.
5. Either click the time that you want the warning messages to be generated in the Warning Message Interval box or click Customize to select times from a calendar.
6. After you configure the warning message interval times, click OK.
5394ch10.fm Page 157 Tuesday, September 13, 2005 6:43 PM
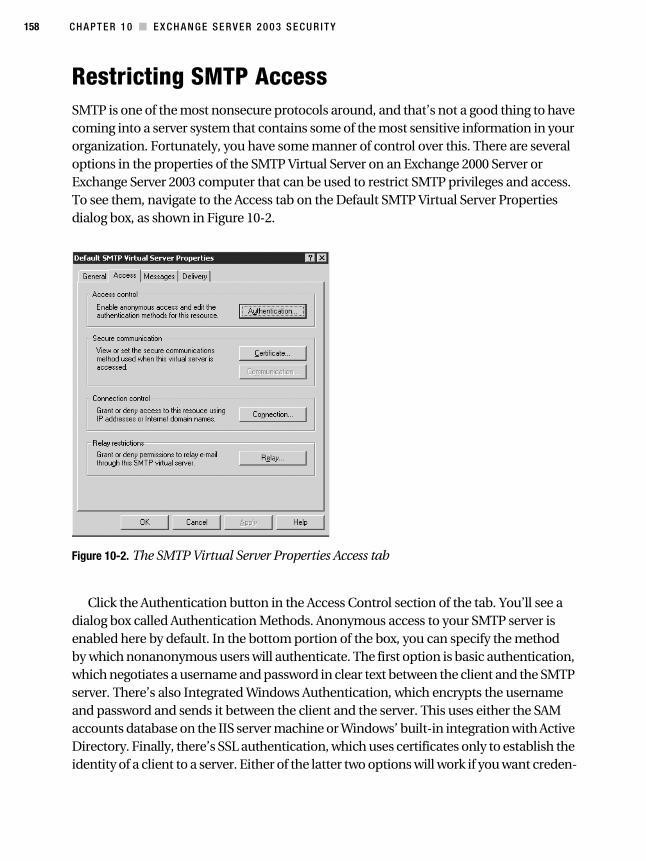
158 C H A P T E R 1 0 ■ E X C H A N G E S E R V E R 2 0 0 3 S E C U R I T Y
Restricting SMTP AccessSMTP is one of the most nonsecure protocols around, and that’s not a good thing to have coming into a server system that contains some of the most sensitive information in your organization. Fortunately, you have some manner of control over this. There are several options in the properties of the SMTP Virtual Server on an Exchange 2000 Server or Exchange Server 2003 computer that can be used to restrict SMTP privileges and access. To see them, navigate to the Access tab on the Default SMTP Virtual Server Properties dialog box, as shown in Figure 10-2.
Figure 10-2. The SMTP Virtual Server Properties Access tab
Click the Authentication button in the Access Control section of the tab. You’ll see a dialog box called Authentication Methods. Anonymous access to your SMTP server is enabled here by default. In the bottom portion of the box, you can specify the method by which nonanonymous users will authenticate. The first option is basic authentication, which negotiates a username and password in clear text between the client and the SMTP server. There’s also Integrated Windows Authentication, which encrypts the username and password and sends it between the client and the server. This uses either the SAM accounts database on the IIS server machine or Windows’ built-in integration with Active Directory. Finally, there’s SSL authentication, which uses certificates only to establish the identity of a client to a server. Either of the latter two options will work if you want creden-
5394ch10.fm Page 158 Tuesday, September 13, 2005 6:43 PM
C H A P T E R 1 0 ■ E X C H A N G E S E R V E R 2 0 0 3 S E C U R I T Y 159
tials to be passed in a secure environment; basic authentication simply passes the credentials over the wire unprotected, leaving an open door for sniffers.
Back on the Access tab, you can grant or deny access to a site based on the client’s IP address. This is useful if you have an abusive group of hosts that perhaps have been cracked, or if you wish to restrict users of a site to only internal hosts. Click the Connection button, and then click the Edit button under IP Address and Domain Name Restrictions to configure this. You first select whether all users will be granted or denied access to the site by using the radio buttons at the top of the window. Then, you can configure individual exceptions to the rule you defined previously in the White List box. Click Add to include an address in the Exceptions list. You’ll be prompted with a box, asking whether you’d like to except a single computer, a group of computers (an IP subnet), or an entire domain (DNS-based domain, that is). Again, restricting or allowing access based on a DNS domain name is a very expensive operation, because each HTTP request must be accom-panied by a reverse lookup on the part of the IIS server. This can slow response time considerably and cause processor utilization to increase significantly. Enable this only if you’re sure of the consequences or if you have a relatively lightly traveled website to restrict.
Select the appropriate response, and then type in the actual IP address, network number and subnet, or domain name. You can click the DNS Lookup button to perform a reverse lookup on a certain domain name in order to obtain its appropriate IP numbers. When you’re finished, click OK, and you’ll be returned to the Restrictions dialog box. Now, keep in mind that if you’ve configured default access for everyone to your site, the excepted addresses will be denied access. Conversely, if you’ve denied access by default to all IP addresses, the excepted addresses will be allowed access. This may seem obvious, but during a quick change it’s easy to become a little confused at the quasi-backward logic. Click OK once you’re finished.
Finally, the Relay Restrictions section of the Access tab lets you lock down your server so that it can be used only by clients that you’ve approved of and not by anonymous spammers that could take advantage of your open resource. This functions similarly to the Connection Control dialog box, where you add IP addresses and allow or deny their access to the server. The difference is that with a relay restriction, you’re only saying that these IP address aren’t allowed to send outgoing mail through this server. With the connection control, you’re restricting the ability of a set of addresses to even communi-cate with the server—either to bring mail to the server OR to send outgoing mail. This is an important distinction.
Usually, you add local IP addresses on your site to this list and only allow those addresses to talk. Also, you can specify whether computers that authenticate to the SMTP server can send outgoing email, regardless of whether they appear in the list. This is useful for Internet addresses—your clients, as long as they authenticate, can still use the SMTP server even though their address isn’t local.
5394ch10.fm Page 159 Tuesday, September 13, 2005 6:43 PM
160 C H A P T E R 1 0 ■ E X C H A N G E S E R V E R 2 0 0 3 S E C U R I T Y
Controlling AccessExchange uses administrative groups, which are collections of Exchange objects that are grouped together to help manage and delegate permissions. An administrative group can contain policies, routing groups, public folder hierarchies, servers, conferencing objects, and chat networks.
The easiest way to assign permissions to administrative groups is through the Exchange Administration Delegation wizard, which requires a user with Full Control over the Exchange organization. To start the Exchange Administration Delegation wizard, right-click the organization or administrative group in Exchange System Manager, and then select Delegate Control from the context menu.
Table 10-3 shows the three administrative roles provided in Exchange.
In some cases you’ll find that using the Exchange Administration Delegation wizard doesn’t provide enough granularity in assigning security. You can modify the Security tab on the individual objects within Exchange. However, by default, the Security tab is only displayed on address lists, global address lists, mailbox stores, public folder stores, and the top-level public folder hierarchy. To display the Security tab on all Exchange objects, you need to make a Registry change, as follows:
1. Run the Registry Editor.
2. Locate the following key in the registry: HKEY_CURRENT_USER\_Software\Microsoft\Exchange\ExAdmin.
3. Select Add Value from the Edit menu.
4. Add a value named ShowSecurityPage, of type REG_DWORD.
5. Double-click the new value, and enter a 1 for its attribute.
This change takes effect immediately, so you don’t need to restart Exchange System Manager. However, the change will only affect the user that’s currently logged on.
Table 10-3. Administrative Roles in Exchange
Role DescriptionExchange View Only Can list and read properties of all objects in child containers.
Exchange Administrator Can do all administrative tasks and grant all permissions except taking ownership, changing permissions, or opening user mailboxes.
Exchange Full Administrator Can do all administrative tasks and grant all permissions except opening user mailboxes or impersonating a user’s mailbox.
5394ch10.fm Page 160 Tuesday, September 13, 2005 6:43 PM
C H A P T E R 1 0 ■ E X C H A N G E S E R V E R 2 0 0 3 S E C U R I T Y 161
CheckpointsIn this chapter, I’ve looked briefly at the high points of hardening Exchange Server 2003 and its environment. The strategies I recommend include the following:
• Install Exchange in its own Program Files directory on its own disk partition, sepa-rate from everything else.
• Place Exchange log files on their own partition, and place Exchange database files on their own partition.
• After installation is complete, be sure to install the latest service packs for Exchange 2000 Server or Exchange Server 2003. As of press time, the latest available release is Service Pack 3 for the former and Service Pack 1 for the latter.
• Set the following partition access control list (ACL) entries for each of the afore- mentioned partitions as defined in the chapter.
• Consider creating an IPsec rule to protect Exchange Server computers.
• Use the baseline security templates from Microsoft’s Security Operations Guide for Exchange 2000 Server site in order to implement policy-based security.
• Make the outlined policy changes in this chapter in addition to the previous base-line templates so you can harden your system even more.
• Understand the dependencies of Exchange Server and general Windows operating system services.
• Make the appropriate changes to service state as suggested in this chapter.
• Stay on top of security hotfixes and service releases for not only Exchange Server, but Windows server versions as well.
• Subscribe to a security bulletin mailing list.
• Set Exchange to not resolve Internet email messages, so that your users can easily detect a spoofed message.
• Enable reverse DNS lookups on Internet mail received so that you can verify the transmitting SMTP server’s identity and the trustworthiness of a particular message.
• Set a maximum number of recipients per message.
5394ch10.fm Page 161 Tuesday, September 13, 2005 6:43 PM
162 C H A P T E R 1 0 ■ E X C H A N G E S E R V E R 2 0 0 3 S E C U R I T Y
• Set a maximum message size.
• Set a maximum number of messages per SMTP session.
• Set a maximum size of an SMTP session.
• Set storage limits on mailboxes and public folders so you can prevent an attacker from filling up disk space.
• Restrict SMTP access by IP address or domain.
• Ensure that your SMTP server is a closed relay so you can prevent spammers from taking advantage of your connection.
• Delegate Exchange permissions appropriately.
• Modify Exchange System Manager so that the Security tab is present in the Proper-ties view of all objects.
5394ch10.fm Page 162 Tuesday, September 13, 2005 6:43 PM
163
■ ■ ■
C H A P T E R 1 1
Security Auditing and Event Logs
You’ve come to the final chapter in this book, which is no small feat—congratulations! This part of the book focuses mainly on how you can discern if your hardening efforts, fine-tuned with what you’ve learned in the first ten chapters, were successful at thwarting attacks. Event logs and security auditing policies are an astute administrator’s best friend, but most IT personnel overlook logs, as if logs were there for no other purpose than to simply take up valuable hard disk space.
Auditing and event-viewing procedures are different on Windows NT, 2000, XP, and Server 2003, so I’ll group each platform and tackle different approaches independently. At the close of the chapter, I’ll look at ways to decipher events and make log searching and checking easier.
For Windows 2000, XP, and Server 2003Auditing controls and properties for versions of Windows later than NT are modified through Group Policy objects (GPOs) in Windows 2000, XP, and Server 2003. Assuming your computer is participating in an Active Directory domain, you can find the domain auditing policy inside the Default Domain Policy, by selecting Computer Configuration ➤ Windows Settings ➤ Security Settings ➤ Local Policies ➤ Audit Policies. Otherwise, you can view the Local Security Policy through the Administrative Tools applet in Control Panel.
The settings for each Group Policy object indicate on what type of events and on what type of result a log entry will be written. The options for auditing policies are outlined here:
• Audit account logon events
• Audit account management
• Audit directory service access
5394ch11.fm Page 163 Monday, September 12, 2005 6:24 PM
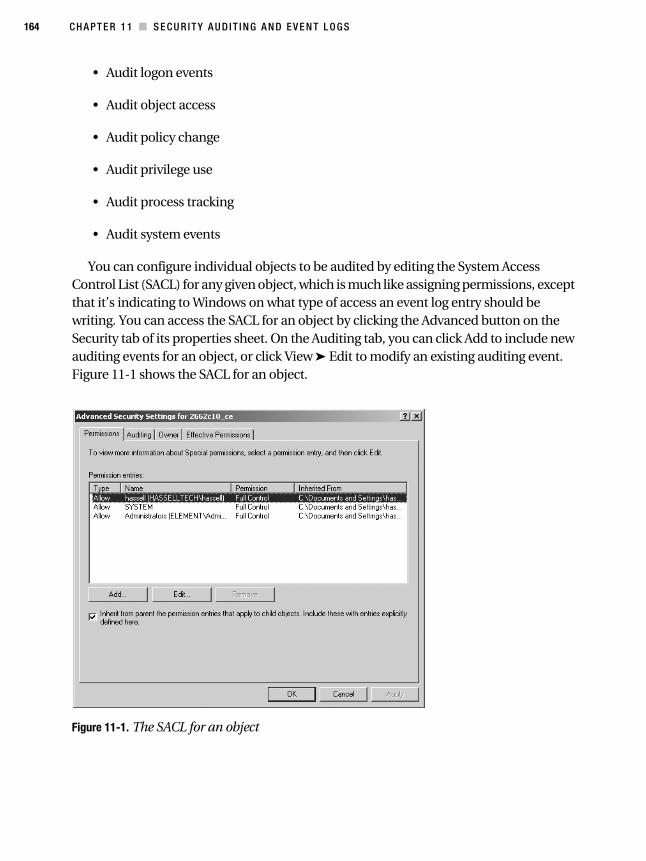
164 C H A P T E R 1 1 ■ S E C U R I T Y A U D I T I N G A N D E V E N T L O G S
• Audit logon events
• Audit object access
• Audit policy change
• Audit privilege use
• Audit process tracking
• Audit system events
You can configure individual objects to be audited by editing the System Access Control List (SACL) for any given object, which is much like assigning permissions, except that it’s indicating to Windows on what type of access an event log entry should be writing. You can access the SACL for an object by clicking the Advanced button on the Security tab of its properties sheet. On the Auditing tab, you can click Add to include new auditing events for an object, or click View ➤ Edit to modify an existing auditing event. Figure 11-1 shows the SACL for an object.
Figure 11-1. The SACL for an object
5394ch11.fm Page 164 Monday, September 12, 2005 6:24 PM
C H A P T E R 1 1 ■ S E C U R I T Y A U D I T I N G A N D E V E N T L O G S 165
■Note Only NTFS files and folders can be audited. FAT partitions don’t support auditing events because they don’t contain the necessary permission information.
Recommended Items to Audit
You’ll want to take particular note of the following items from your event logs:
• Logon and logoff events, which can indicate repeated logon failures and point to a particular user account that’s being used for an attack
• Account management, which indicates users who have tried to use or have used their granted user- and computer-administration power
• Startup and shutdown, which shows both the user who has tried to shut down a system and what services may not have started up properly upon the reboot
• Policy changes, which can indicate the users who are tampering with security settings
• Privilege use, which can show any attempts to change permissions to certain objects
Event Logs
Similar to auditing policies, the policies for configuring the event logs are found inside the Default Domain Policy, by selecting Computer Configuration ➤ Windows Settings ➤ Security Settings ➤ Local Policies ➤ Event Log.
The settings for each of these GPOs indicate the amount of disk space dedicated to storing log events as well as the permissions granted to view the event logs, how long their contents are retained before rolling over to new logs, and how those event logs are supposed to be retained during that time. The options for event-log policies are described here:
• Maximum application log size
• Maximum security log size
• Maximum system log size
5394ch11.fm Page 165 Monday, September 12, 2005 6:24 PM
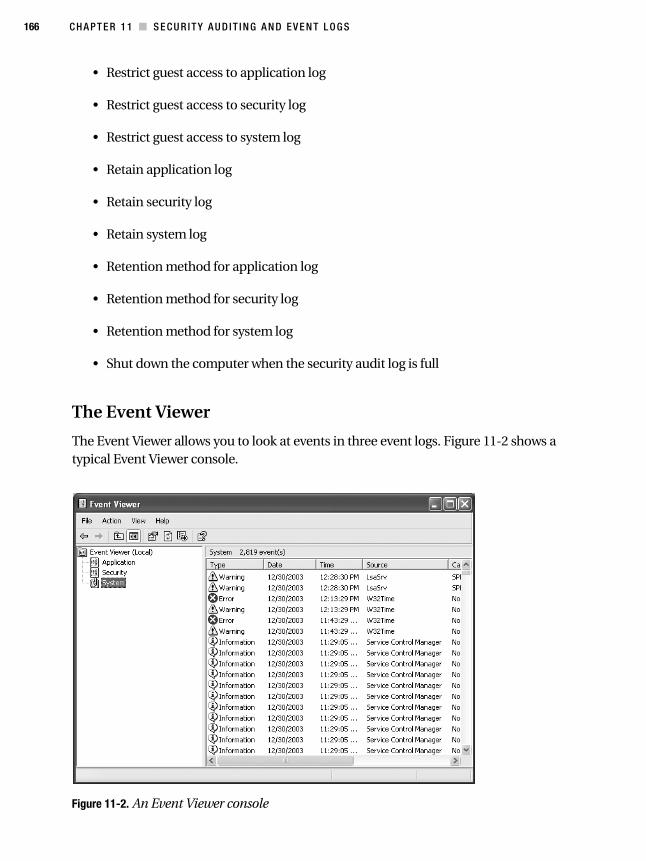
166 C H A P T E R 1 1 ■ S E C U R I T Y A U D I T I N G A N D E V E N T L O G S
• Restrict guest access to application log
• Restrict guest access to security log
• Restrict guest access to system log
• Retain application log
• Retain security log
• Retain system log
• Retention method for application log
• Retention method for security log
• Retention method for system log
• Shut down the computer when the security audit log is full
The Event Viewer
The Event Viewer allows you to look at events in three event logs. Figure 11-2 shows a typical Event Viewer console.
Figure 11-2. An Event Viewer console
5394ch11.fm Page 166 Monday, September 12, 2005 6:24 PM
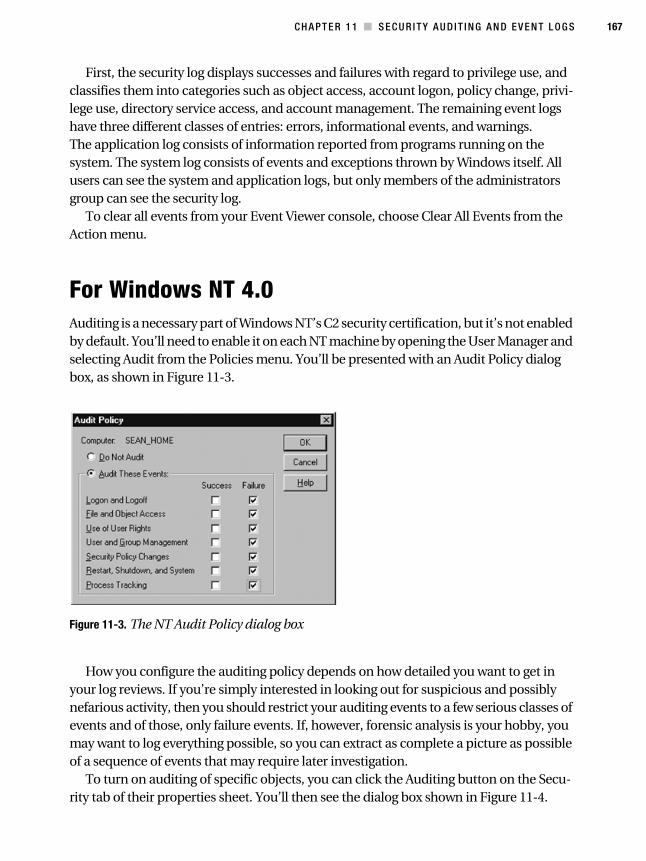
C H A P T E R 1 1 ■ S E C U R I T Y A U D I T I N G A N D E V E N T L O G S 167
First, the security log displays successes and failures with regard to privilege use, and classifies them into categories such as object access, account logon, policy change, privi-lege use, directory service access, and account management. The remaining event logs have three different classes of entries: errors, informational events, and warnings. The application log consists of information reported from programs running on the system. The system log consists of events and exceptions thrown by Windows itself. All users can see the system and application logs, but only members of the administrators group can see the security log.
To clear all events from your Event Viewer console, choose Clear All Events from the Action menu.
For Windows NT 4.0Auditing is a necessary part of Windows NT’s C2 security certification, but it’s not enabled by default. You’ll need to enable it on each NT machine by opening the User Manager and selecting Audit from the Policies menu. You’ll be presented with an Audit Policy dialog box, as shown in Figure 11-3.
Figure 11-3. The NT Audit Policy dialog box
How you configure the auditing policy depends on how detailed you want to get in your log reviews. If you’re simply interested in looking out for suspicious and possibly nefarious activity, then you should restrict your auditing events to a few serious classes of events and of those, only failure events. If, however, forensic analysis is your hobby, you may want to log everything possible, so you can extract as complete a picture as possible of a sequence of events that may require later investigation.
To turn on auditing of specific objects, you can click the Auditing button on the Secu-rity tab of their properties sheet. You’ll then see the dialog box shown in Figure 11-4.
5394ch11.fm Page 167 Monday, September 12, 2005 6:24 PM
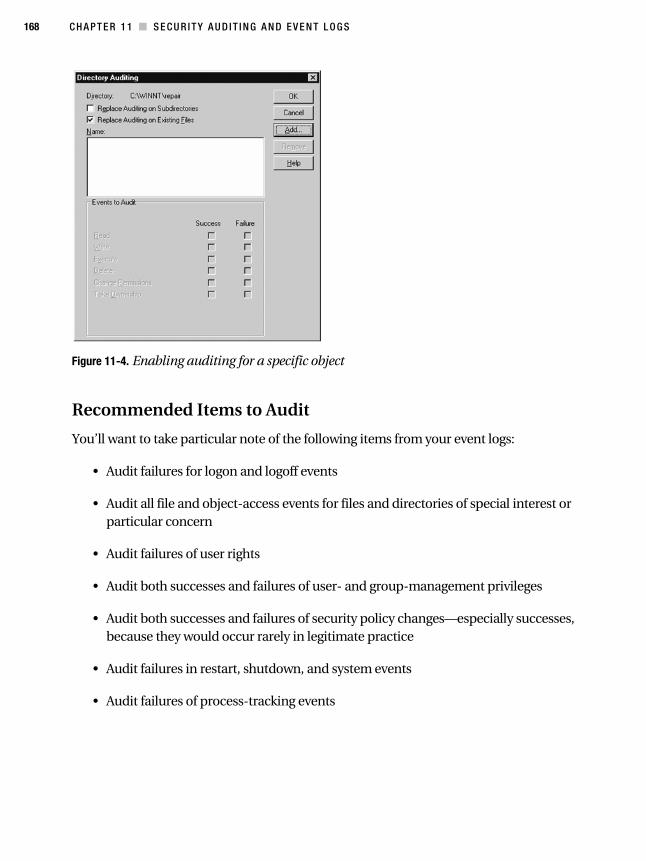
168 C H A P T E R 1 1 ■ S E C U R I T Y A U D I T I N G A N D E V E N T L O G S
Figure 11-4. Enabling auditing for a specific object
Recommended Items to Audit
You’ll want to take particular note of the following items from your event logs:
• Audit failures for logon and logoff events
• Audit all file and object-access events for files and directories of special interest or particular concern
• Audit failures of user rights
• Audit both successes and failures of user- and group-management privileges
• Audit both successes and failures of security policy changes—especially successes, because they would occur rarely in legitimate practice
• Audit failures in restart, shutdown, and system events
• Audit failures of process-tracking events
5394ch11.fm Page 168 Monday, September 12, 2005 6:24 PM
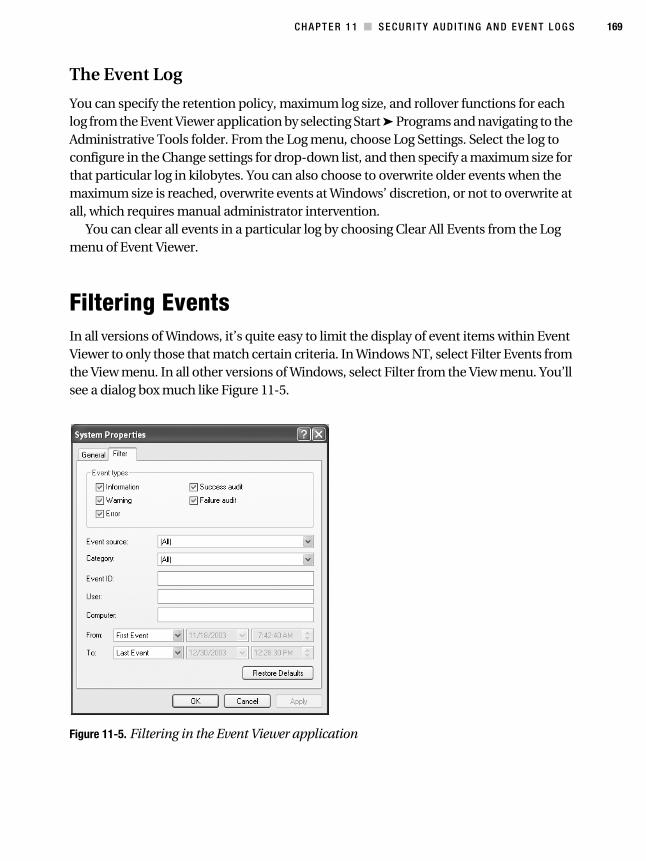
C H A P T E R 1 1 ■ S E C U R I T Y A U D I T I N G A N D E V E N T L O G S 169
The Event Log
You can specify the retention policy, maximum log size, and rollover functions for each log from the Event Viewer application by selecting Start ➤ Programs and navigating to the Administrative Tools folder. From the Log menu, choose Log Settings. Select the log to configure in the Change settings for drop-down list, and then specify a maximum size for that particular log in kilobytes. You can also choose to overwrite older events when the maximum size is reached, overwrite events at Windows’ discretion, or not to overwrite at all, which requires manual administrator intervention.
You can clear all events in a particular log by choosing Clear All Events from the Log menu of Event Viewer.
Filtering EventsIn all versions of Windows, it’s quite easy to limit the display of event items within Event Viewer to only those that match certain criteria. In Windows NT, select Filter Events from the View menu. In all other versions of Windows, select Filter from the View menu. You’ll see a dialog box much like Figure 11-5.
Figure 11-5. Filtering in the Event Viewer application
5394ch11.fm Page 169 Monday, September 12, 2005 6:24 PM
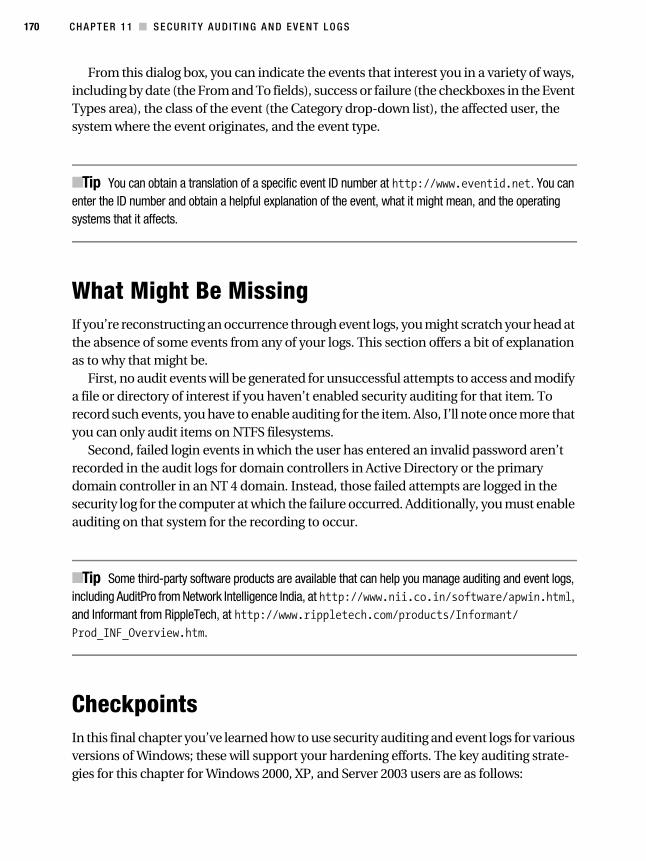
170 C H A P T E R 1 1 ■ S E C U R I T Y A U D I T I N G A N D E V E N T L O G S
From this dialog box, you can indicate the events that interest you in a variety of ways, including by date (the From and To fields), success or failure (the checkboxes in the Event Types area), the class of the event (the Category drop-down list), the affected user, the system where the event originates, and the event type.
■Tip You can obtain a translation of a specific event ID number at �������������������. You can enter the ID number and obtain a helpful explanation of the event, what it might mean, and the operating systems that it affects.
What Might Be MissingIf you’re reconstructing an occurrence through event logs, you might scratch your head at the absence of some events from any of your logs. This section offers a bit of explanation as to why that might be.
First, no audit events will be generated for unsuccessful attempts to access and modify a file or directory of interest if you haven’t enabled security auditing for that item. To record such events, you have to enable auditing for the item. Also, I’ll note once more that you can only audit items on NTFS filesystems.
Second, failed login events in which the user has entered an invalid password aren’t recorded in the audit logs for domain controllers in Active Directory or the primary domain controller in an NT 4 domain. Instead, those failed attempts are logged in the security log for the computer at which the failure occurred. Additionally, you must enable auditing on that system for the recording to occur.
■Tip Some third-party software products are available that can help you manage auditing and event logs, including AuditPro from Network Intelligence India, at �������������� ����������������������, and Informant from RippleTech, at ������������������� �� �������� ������������������������������.
CheckpointsIn this final chapter you’ve learned how to use security auditing and event logs for various versions of Windows; these will support your hardening efforts. The key auditing strate-gies for this chapter for Windows 2000, XP, and Server 2003 users are as follows:
5394ch11.fm Page 170 Monday, September 12, 2005 6:24 PM
C H A P T E R 1 1 ■ S E C U R I T Y A U D I T I N G A N D E V E N T L O G S 171
• Logon and logoff events, which can indicate repeated logon failures and point to a particular user account that’s being used for an attack
• Account management, which indicates users who have tried to use or used their granted-user and computer-administration power
• Startup and shutdown, which displays both the user who has tried to shut down a system and what services may not have started up properly upon the reboot
• Policy changes, which can indicate users tampering with security settings
• Privilege use, which can show attempts to change permissions to certain objects
For Windows NT users, the chief auditing points include the following:
• Audit failures for logon and logoff events.
• Audit all file and object access events for files and directories of special interest or particular concern.
• Audit failures of user rights.
• Audit both successes and failures of user- and group-management privileges.
• Audit both successes and failures of security policy changes—especially successes, because they would occur rarely in legitimate practice.
• Audit failures in restart, shutdown, and system events.
• Audit failures of process-tracking events.
For all versions of Windows, the following items apply:
• Make searching easier by filtering events inside Event Viewer.
• Search on events that interest you at ������������������� to learn more about them.
• Understand why some events might not be recorded in certain error logs.
5394ch11.fm Page 171 Monday, September 12, 2005 6:24 PM

5394ch11.fm Page 172 Monday, September 12, 2005 6:24 PM
173
■ ■ ■
A P P E N D I X
Quick-Reference Checklists
For easy reference and use, I’ve compiled the chapter checklists from each section of the book into one master list and placed it here in the appendix. The lists are separated by chapter, so you can easily look up the discussion around a particuladanir point.
Chapter 1: Some Words About Hardening• Learn the cornerstones of good security policy: privacy, trust, authentication, and
integrity.
• Understand the social implications of security.
• Recognize the security dilemma—that users must understand the need for security and agree to the extent to which security is implemented.
• Consider transfers of trust in security policy.
• Understand the process of defining the concept of security: identification of the object to protect, evaluation of risk, and proposals for countermeasures to potential attacks.
• Recognize some of the enemies of a secure system: complexity, backward compati-bility, backups.
• Embrace the role that hardening takes in protecting against unknown threats.
• Apply service packs to operating systems and applications throughout your company.
• Purchase, install, and keep updated antivirus software installed throughout your company networks.
5394ap.fm Page 173 Monday, September 12, 2005 6:27 PM
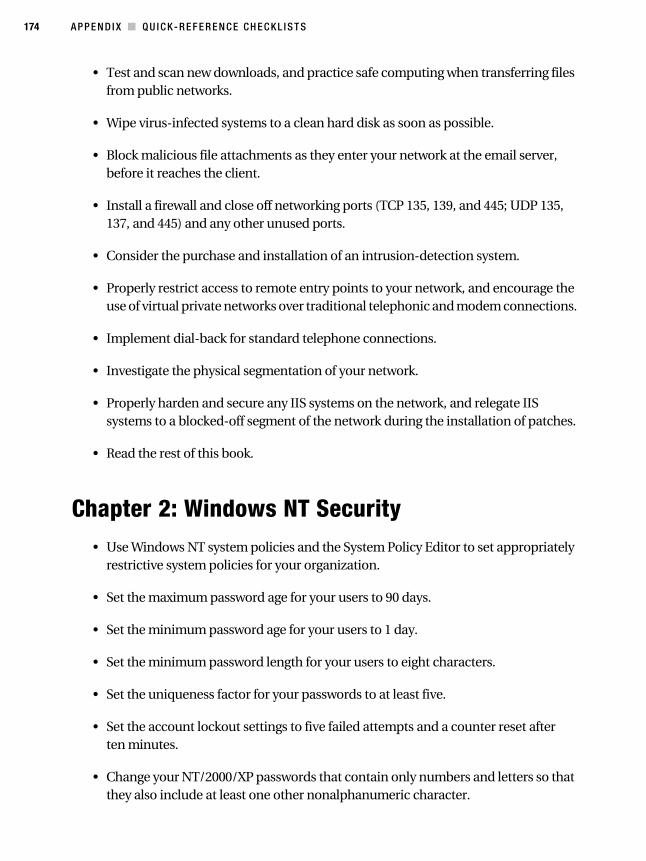
174 A P P E N D I X ■ Q U I C K - R E F E R E N C E C H E C K L I S T S
• Test and scan new downloads, and practice safe computing when transferring files from public networks.
• Wipe virus-infected systems to a clean hard disk as soon as possible.
• Block malicious file attachments as they enter your network at the email server, before it reaches the client.
• Install a firewall and close off networking ports (TCP 135, 139, and 445; UDP 135, 137, and 445) and any other unused ports.
• Consider the purchase and installation of an intrusion-detection system.
• Properly restrict access to remote entry points to your network, and encourage the use of virtual private networks over traditional telephonic and modem connections.
• Implement dial-back for standard telephone connections.
• Investigate the physical segmentation of your network.
• Properly harden and secure any IIS systems on the network, and relegate IIS systems to a blocked-off segment of the network during the installation of patches.
• Read the rest of this book.
Chapter 2: Windows NT Security• Use Windows NT system policies and the System Policy Editor to set appropriately
restrictive system policies for your organization.
• Set the maximum password age for your users to 90 days.
• Set the minimum password age for your users to 1 day.
• Set the minimum password length for your users to eight characters.
• Set the uniqueness factor for your passwords to at least five.
• Set the account lockout settings to five failed attempts and a counter reset after ten minutes.
• Change your NT/2000/XP passwords that contain only numbers and letters so that they also include at least one other nonalphanumeric character.
5394ap.fm Page 174 Monday, September 12, 2005 6:27 PM
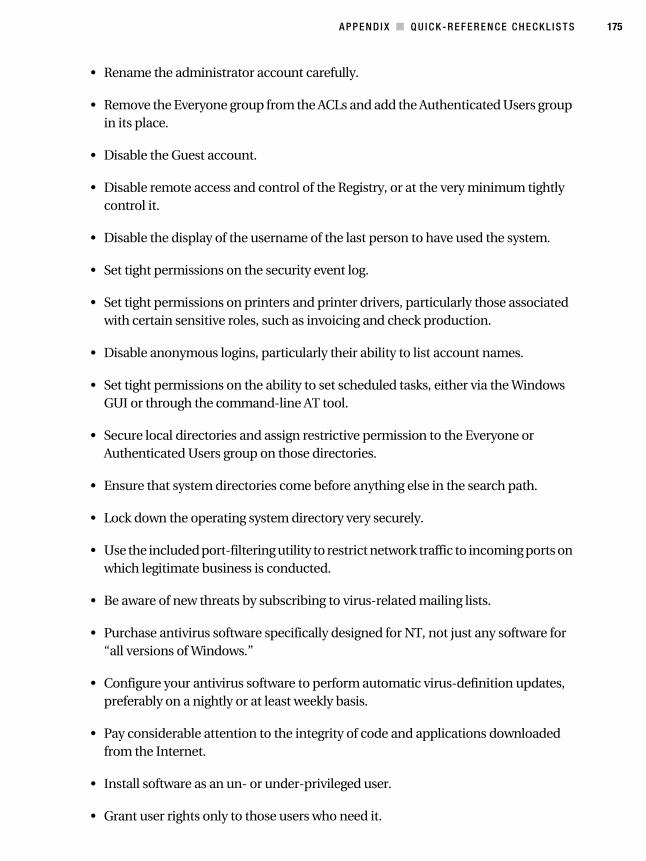
A P P E N D I X ■ Q U I C K - R E F E R E N C E C H E C K L I S T S 175
• Rename the administrator account carefully.
• Remove the Everyone group from the ACLs and add the Authenticated Users group in its place.
• Disable the Guest account.
• Disable remote access and control of the Registry, or at the very minimum tightly control it.
• Disable the display of the username of the last person to have used the system.
• Set tight permissions on the security event log.
• Set tight permissions on printers and printer drivers, particularly those associated with certain sensitive roles, such as invoicing and check production.
• Disable anonymous logins, particularly their ability to list account names.
• Set tight permissions on the ability to set scheduled tasks, either via the Windows GUI or through the command-line AT tool.
• Secure local directories and assign restrictive permission to the Everyone or Authenticated Users group on those directories.
• Ensure that system directories come before anything else in the search path.
• Lock down the operating system directory very securely.
• Use the included port-filtering utility to restrict network traffic to incoming ports on which legitimate business is conducted.
• Be aware of new threats by subscribing to virus-related mailing lists.
• Purchase antivirus software specifically designed for NT, not just any software for “all versions of Windows.”
• Configure your antivirus software to perform automatic virus-definition updates, preferably on a nightly or at least weekly basis.
• Pay considerable attention to the integrity of code and applications downloaded from the Internet.
• Install software as an un- or under-privileged user.
• Grant user rights only to those users who need it.
5394ap.fm Page 175 Monday, September 12, 2005 6:27 PM
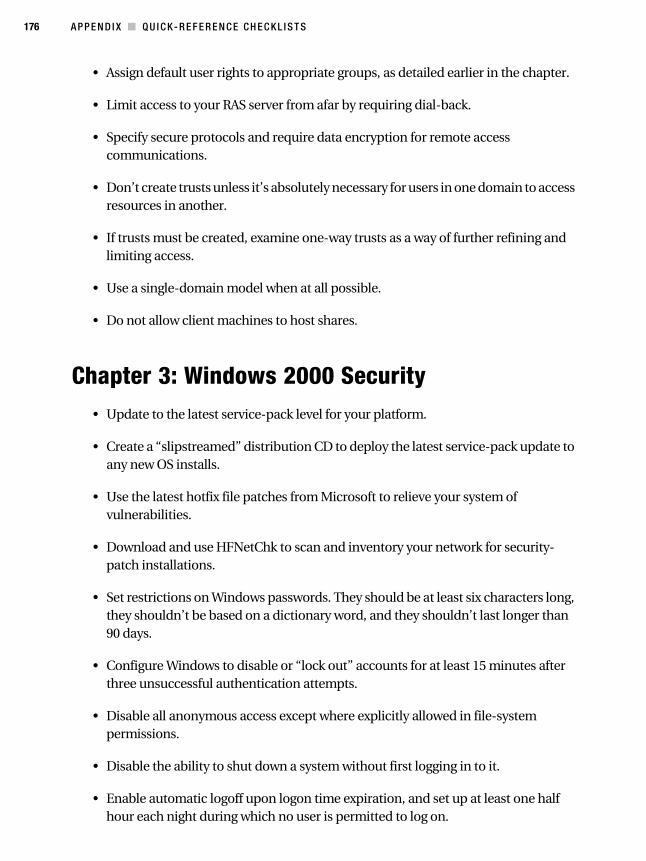
176 A P P E N D I X ■ Q U I C K - R E F E R E N C E C H E C K L I S T S
• Assign default user rights to appropriate groups, as detailed earlier in the chapter.
• Limit access to your RAS server from afar by requiring dial-back.
• Specify secure protocols and require data encryption for remote access communications.
• Don’t create trusts unless it’s absolutely necessary for users in one domain to access resources in another.
• If trusts must be created, examine one-way trusts as a way of further refining and limiting access.
• Use a single-domain model when at all possible.
• Do not allow client machines to host shares.
Chapter 3: Windows 2000 Security• Update to the latest service-pack level for your platform.
• Create a “slipstreamed” distribution CD to deploy the latest service-pack update to any new OS installs.
• Use the latest hotfix file patches from Microsoft to relieve your system of vulnerabilities.
• Download and use HFNetChk to scan and inventory your network for security-patch installations.
• Set restrictions on Windows passwords. They should be at least six characters long, they shouldn’t be based on a dictionary word, and they shouldn’t last longer than 90 days.
• Configure Windows to disable or “lock out” accounts for at least 15 minutes after three unsuccessful authentication attempts.
• Disable all anonymous access except where explicitly allowed in file-system permissions.
• Disable the ability to shut down a system without first logging in to it.
• Enable automatic logoff upon logon time expiration, and set up at least one half hour each night during which no user is permitted to log on.
5394ap.fm Page 176 Monday, September 12, 2005 6:27 PM
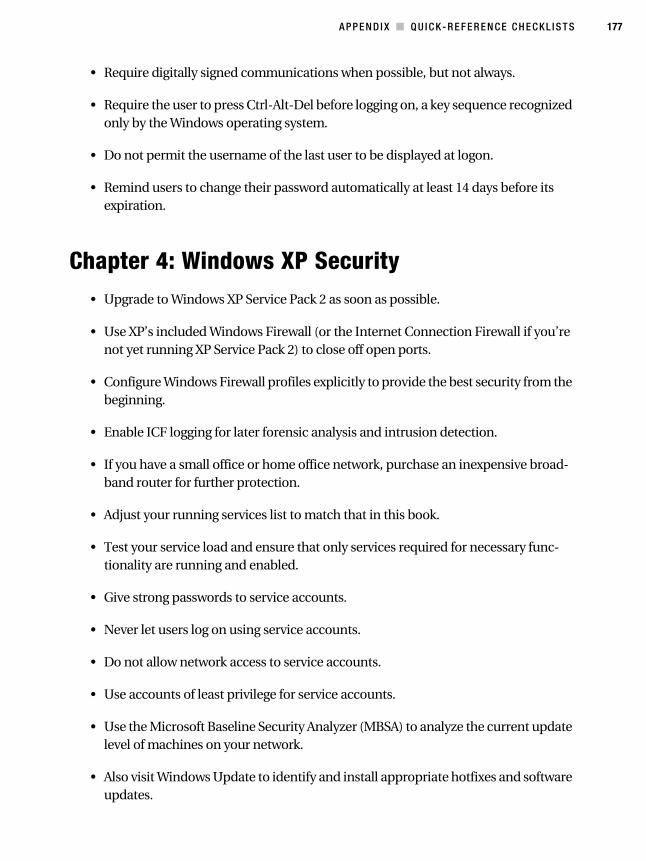
A P P E N D I X ■ Q U I C K - R E F E R E N C E C H E C K L I S T S 177
• Require digitally signed communications when possible, but not always.
• Require the user to press Ctrl-Alt-Del before logging on, a key sequence recognized only by the Windows operating system.
• Do not permit the username of the last user to be displayed at logon.
• Remind users to change their password automatically at least 14 days before its expiration.
Chapter 4: Windows XP Security• Upgrade to Windows XP Service Pack 2 as soon as possible.
• Use XP’s included Windows Firewall (or the Internet Connection Firewall if you’re not yet running XP Service Pack 2) to close off open ports.
• Configure Windows Firewall profiles explicitly to provide the best security from the beginning.
• Enable ICF logging for later forensic analysis and intrusion detection.
• If you have a small office or home office network, purchase an inexpensive broad-band router for further protection.
• Adjust your running services list to match that in this book.
• Test your service load and ensure that only services required for necessary func-tionality are running and enabled.
• Give strong passwords to service accounts.
• Never let users log on using service accounts.
• Do not allow network access to service accounts.
• Use accounts of least privilege for service accounts.
• Use the Microsoft Baseline Security Analyzer (MBSA) to analyze the current update level of machines on your network.
• Also visit Windows Update to identify and install appropriate hotfixes and software updates.
5394ap.fm Page 177 Monday, September 12, 2005 6:27 PM
178 A P P E N D I X ■ Q U I C K - R E F E R E N C E C H E C K L I S T S
• Visit a reputable online software vendor and perform penetration tests on your machines to ensure that ports are closed off and your hardening efforts were effective.
• Format the partitions on your machines with NTFS.
• Disable automated logins by ensuring there is a password for each user account on a machine. (This applies only to machines that aren’t participating in a security domain.)
• Rename the Administrator account.
• Rename the Guest account.
• Replace the Everyone group with the Authenticated Users group inside the access control lists (ACLs) of your shares.
• Use an account of least privilege for normal administrative work, and use Runas when you need an administrator security context.
• Disable infrared transfers.
• Understand the typical signs of a compromised machine.
• If a machine becomes compromised, don’t attempt to resurrect it. Get personal data off, verify the integrity of that data, and then reformat and reinstall the machine.
Chapter 5: Windows Server 2003 Security• Upgrade to Service Pack 1 and install the Security Configuration Wizard as
described in this chapter.
• Run the SCW on each of your unique role-based servers and save the policies in a central location.
• Roll out saved policies one by one on the appropriate machines.
• Don’t forget to include your existing security templates if necessary.
5394ap.fm Page 178 Monday, September 12, 2005 6:27 PM
A P P E N D I X ■ Q U I C K - R E F E R E N C E C H E C K L I S T S 179
• Beg your service vendors for updates to their software that support configuration through the SCW.
• Automate deployments of SCW policies through the command-line tool SCWCMD.
Chapter 6: Deploying Enterprise Security Policies• Group your policies logically and define boundaries to contain them.
• Inside those boundaries, configure policies that represent common values in your organization.
• Configure organizational units inside Active Directory that contain machines grouped according to like roles, or functions within an organization.
• Adjust the default domain security policy to encompass a common security config-uration to be deployed across all systems in your domain.
• Adjust the default domain controller security policy to more secure settings that should be applied to all machines serving that role in your Active Directory.
• Use the Computer Configuration nodes in Group Policy to adjust machine-specific settings regardless of the logged-on user.
• Use the User Configuration nodes in Group Policy to adjust user-specific settings that will follow the person across all machines in the policy’s scope.
And if you’re having Group Policy problems, here’s a rundown of things to look for:
• Check your domain’s DNS configuration to make sure SRV subrecords are being properly registered.
• Make sure that the No Override and Block Inheritance functionality of Group Policy isn’t hindering the application of Group Policy objects.
• Examine your domain controller logs to see if the File Replication Service is throwing any errors related to the versioning of Group Policy Template files.
• Force a refresh of Group Policy from a domain controller’s command line if all else fails.
5394ap.fm Page 179 Monday, September 12, 2005 6:27 PM
180 A P P E N D I X ■ Q U I C K - R E F E R E N C E C H E C K L I S T S
Chapter 7: Patch Management• Don’t do anything else until you have some sort of patch-management system
installed and running on your network. It WILL BE a priority one of these days if your network is connected to the Internet.
• Deploy WSUS unless you have a large business that would benefit from SMS, unless you’re already running SMS, or unless you’ve already got a sufficient patch-management system in place.
• Set WSUS to automatically synchronize on a daily basis, so that you receive updates as soon as possible after they’re released.
• Approve only the updates for localizations that you maintain. There’s no need to have the Japanese version of a patch if you have no Japanese-installed Windows machines.
• Use Group Policy or some other automated method to deploy the Automated Updates client to machines that aren’t currently running at least Windows 2000 Service Pack 3 or Windows XP Service Pack 1.
• Enable Automatic Updates on your network.
• Schedule update installations at least weekly, if not daily.
• Educate your users about the ramifications of not keeping their systems updated.
• Use event-log monitoring software to ensure that WSUS continues to function correctly.
• Did I mention not to do anything else until you have some sort of patch-management system installed and working on your network?
Chapter 8: Network Access Quarantine Control• Assess how much of a risk you’re taking by not consistently and regularly verifying
the update level of remote machines that connect to your network.
• Implement NAQC.
• Create exceptions groups for important people.
5394ap.fm Page 180 Monday, September 12, 2005 6:27 PM

A P P E N D I X ■ Q U I C K - R E F E R E N C E C H E C K L I S T S 181
Chapter 9: Internet Information Services Security• If you’re not running a web server on your Windows machine, disable IIS.
• Regularly check the level of updates for your IIS machines, particularly those on an automated update regimen, and ensure that they’re receiving the patches that they need to stay secure.
• Apply hotfixes and service packs as soon as possible after they’re released and have gone through sufficient crash testing.
• Secure your web content using both IIS server permissions and NTFS file-system permissions, not one or the other.
• Consider whether you need the Indexing Service, and disable it if it isn’t absolutely critical to your web operation.
• Close any ports that don’t absolutely need to be open.
• On a related note, install a firewall in front of any public-facing IIS servers unless it’s absolutely impossible.
• Delete any default web pages and directories, especially administrative install scripts, that could be used to obtain full privileges on your machine.
• Only use ISAPI filters if you need them. Delete any unused filters that exist on the server.
• Consider using Apache for your Internet-facing servers and using only IIS internally.
Chapter 10: Exchange Server 2003 Security• Install Exchange in its own Program Files directory on its own disk partition, sepa-
rate from everything else.
• Place Exchange log files on their own partition, and place Exchange database files on their own partition.
• After installation is complete, be sure to install the latest service packs for Exchange 2000 Server or Exchange Server 2003. As of press time, the latest available release is Service Pack 3 for the former and Service Pack 1 for the latter.
5394ap.fm Page 181 Monday, September 12, 2005 6:27 PM
182 A P P E N D I X ■ Q U I C K - R E F E R E N C E C H E C K L I S T S
• Set the following partition access control list (ACL) entries for each of the aforemen-tioned partitions as defined in the chapter.
• Consider creating an IPsec rule to protect Exchange Server computers.
• Use the baseline security templates from Microsoft’s Security Operations Guide for Exchange 2000 Server site in order to implement policy-based security.
• Make the outlined policy changes in this chapter in addition to the previous base-line templates so you can harden your system even more.
• Understand the dependencies of Exchange Server and general Windows operating system services.
• Make the appropriate changes to service state as suggested in this chapter.
• Stay on top of security hotfixes and service releases for not only Exchange Server, but Windows server versions as well.
• Subscribe to a security bulletin mailing list.
• Set Exchange to not resolve Internet email messages, so that your users can easily detect a spoofed message.
• Enable reverse DNS lookups on Internet mail received so that you can verify the transmitting SMTP server’s identity and the trustworthiness of a particular message.
• Set a maximum number of recipients per message.
• Set a maximum message size.
• Set a maximum number of messages per SMTP session.
• Set a maximum size of an SMTP session.
• Set storage limits on mailboxes and public folders so you can prevent an attacker from filling up disk space.
• Restrict SMTP access by IP address or domain.
• Ensure that your SMTP server is a closed relay so you can prevent spammers from taking advantage of your connection.
5394ap.fm Page 182 Monday, September 12, 2005 6:27 PM
A P P E N D I X ■ Q U I C K - R E F E R E N C E C H E C K L I S T S 183
• Delegate Exchange permissions appropriately.
• Modify Exchange System Manager so that the Security tab is present in the Properties view of all objects.
Chapter 11: Security Auditing and Event LogsThe key auditing strategies for this chapter for Windows 2000, XP, and Server 2003 users are as follows:
• Logon and logoff events, which can indicate repeated logon failures and point to a particular user account that’s being used for an attack
• Account management, which indicates users who have tried to use or used their granted-user and computer-administration power
• Startup and shutdown, which displays both the user who has tried to shut down a system and what services may not have started up properly upon the reboot
• Policy changes, which can indicate users tampering with security settings
• Privilege use, which can show attempts to change permissions to certain objects
For Windows NT users, the chief auditing points include the following:
• Audit failures for logon and logoff events.
• Audit all file and object access events for files and directories of special interest or particular concern.
• Audit failures of user rights.
• Audit both successes and failures of user- and group-management privileges.
• Audit both successes and failures of security policy changes—especially successes, because they would occur rarely in legitimate practice.
• Audit failures in restart, shutdown, and system events.
• Audit failures of process-tracking events.
5394ap.fm Page 183 Monday, September 12, 2005 6:27 PM

184 A P P E N D I X ■ Q U I C K - R E F E R E N C E C H E C K L I S T S
For all versions of Windows, the following items apply:
• Make searching easier by filtering events inside Event Viewer.
• Search on events that interest you at ������������������� to learn more about them.
• Understand why some events might not be recorded in certain error logs.
5394ap.fm Page 184 Monday, September 12, 2005 6:27 PM
185
INDEX
■AAltiris
network management software, 36
■Ccomputer network. See network
computer security
ActiveX content, downloading, 64
and Internet, 1–2
antivirus mailing lists, 26, 175
antivirus software, 6–7, 26, 173
authentication, 173
backups, 4
cornerstones of, 2, 173
credential validation, 2, 8
defined, 2
denial-of-service (DoS) attacks, 7
dial-back connection, implementing, 174
digital signatures, 45
ensuring integrity of, 2
file types, malicious, 7
firewall, 7, 174
hardening, defined, 2
hotfix patches, 6
identifying sources of risk, 4
individual definitions of, 3
infected files, repairing, 6
infected systems, wiping clean, 6, 174
integrity and, 173
Internet downloads, 6, 26, 174
Internet Explorer (IE), 4
intruder attacks, 1, 4
intrusion-detection system (IDS), 7, 174
LAN Manager (LM) hashes, 5
malicious file attachments, blocking, 174
Microsoft Blaster worm, 26
Mozilla Firefox browser, 5
network ports, blocking, 7, 174
network, physically segmenting, 174
peer-to-peer file sharing, 6
penetration tests, 63
privacy, 2, 173
remote access, 7, 174
Remote Procedure Call (RPC) protocol, 5
remote users, security problems, 119
Secure Sockets Layer (SSL) certificates, 3
secure system, defined, 4, 173
security check, online, 64
security policy, communicating, 3
service packs, 6, 173
service packs, updating, 35, 176
ShieldsUp! test, 64
“spoofing,” 45
stumbling blocks to, 4
targeted service attacks, 7
trust and, 2–3, 173
user understanding of, 3, 173
usernames, capturing, 68
virtual private networks, using, 174
viruses, 1, 6, 64, 174
“war dialing,” 8
Windows XP, Service Pack 2, 4
See also passwords
computer software. See software
5394index.fm Page 185 Thursday, September 22, 2005 10:55 AM
186 ■I N D E X
■EExchange Server 2003
access, granting, 150
address spoofing, 154
administrative groups, permissions, 160
database files, partitioning, 150
default email configuration, changing, 154–55
Default SMTP Virtual Server Properties dialog box, 158
denial-of-service (DoS) attacks, protecting against, 156–57
email addresses, resolved/unresolved, 154, 182
email messages, spoofed, 154
Exchange 2000 Server, 149, 158
Exchange 2000 Server, Service Pack 3, 150
Exchange Administration Delegation wizard, 160
Exchange objects, Security tab, 160
Exchange servers, service dependencies, 152–53, 182
Exchange System Manager, 155–57, 160, 162, 183
Group Policy, 151
installing, 149, 181
IPsec rule, creating, 150, 182
log files, partitioning, 150, 181
mailboxes, setting storage limits, 157, 182
Microsoft Baseline Security Analyzer, 154
Outlook Web Access (OWA), 150, 153
Outlook, installation precautions, 150
partitions, access control list (ACL) entries, 150, 182
patch management, 153
Program Files directory, partitioning, 150, 181
public folders, setting storage limits, 157
reverse DNS lookup, enabling, 155–56, 182
security templates, 151, 182
service packs, upgrading to, 150, 153, 181–82
Simple Mail Transfer Protocol (SMTP), 154–55, 158–59, 182
SMTP virtual server, reverse DNS lookup, 155
spoofed email messages, 154
system services, recommended states, 153
■GGibson Research Corporation
ShieldsUp! test, 64
Group Policy
account area, configuring, 90
account policy distribution, 94
Active Directory, 85–87, 89–92, 94, 179
administrative domains, Windows 2000, 86
benefits of, 85
Computer Configuration nodes, 179
configuration guidelines, 90–91, 179
deployment difficulties, 91
distribution and synchronization problems, 95
DNS problems, 95, 179
domain controllers, replication to, 86
domain security policy, default, 94, 179
dynamic link library (DLL) files, 86
encrypting file system (EFS), 90–91
event logs, 163
Exchange Server 2003, 151
File Replication Service, Windows 2000, 87, 179
GPOTOOL, 96
Group Policy Editor, 95
Group Policy Framework, 89–90
Group Policy Management Console, 85, 96
Group Policy objects (GPOs), 85–86, 95, 163, 165, 179
5394index.fm Page 186 Thursday, September 22, 2005 10:55 AM
187■I N D E X
Group Policy objects (GPOs), creating, 91
Group Policy objects (GPOs), forcing a refresh, 96, 179
Group Policy objects (GPOs), retrieval interval, 87, 96
Group Policy snap-in, 85
Group Policy snap-in, accessing, 94
Group Policy snap-in, loading, 93
inheritance problems, 95
IPsec policies, defining, 90
local policies, setting, 90
Local Security Policy Console, 93
as management tool, 91
Microsoft Management Console (MMC), 85, 92
operating systems, interactions with, 87–89
public key policies, establishing, 90
purpose of, 85–86
Registry, configuring permissions, 90
Remote Registry Editor, 86
REPLMON, 96
restricted groups, defining policies, 90
Security Configuration and Analysis tool, 85, 92
security configuration files, creating, 92
security options, configuring, 89
security policies, domain controllers, 95
security policies, order of precedence, 92
System Access Control List (SACL), 164
system policies, interactions with, 87–89
system policies, Registry settings, 86
system policies, Windows OS, 85–86
system services, configuring, 90
troubleshooting, 95–96
User Configuration nodes, 179
Windows Policy Editor (POLEDIT.EXE), 86
See also security auditing
■IInternet Explorer (IE)
security weakness of, 4
Windows 2000, 4
Windows XP, Service Pack 2, 4
Internet Information Services (IIS)
administrative and default pages, 145
Apache web server, benefits of, 146, 181
Apache web server, security holes, 147
Automatic Updates (AU) utility, 139
Code Red virus, 146
default installation of, 138
disabling, 138, 181
file-system permissions, 140, 181
FrontPage Extensions, removing, 146
Group Policy, 140
hotfixes, updating via batch file, 139
IDA ISAPI filter, 146
IIS 5, 142
IIS 6, 141, 147
IIS 6, locked-down mode, 138
IIS 6, removing web-based program, 146
IIS Manager, 140
Indexing Service, 142, 181
Indexing Service, including/excluding folders and files, 143
Indexing Service, managing permissions, 143
installing on a network segment, 8, 174
Internet Services Application Programming Interface (ISAPI), 146
IPsec filters, creating, 144–45
IUSR account, NTFS permissions, 141
Microsoft Management Console snap-in (ciadv.msc), 142
Microsoft SharePoint Administration site, removing, 146
Microsoft's Lockdown tool, 8
5394index.fm Page 187 Thursday, September 22, 2005 10:55 AM
188 ■I N D E X
Internet Information Services (IIS) (continued)
port 80, enabling, 144–45
port 443, enabling, 144–45
QChain utility, 139
Remote Installation Service (RIS), 140
script permissions, 140
security vulnerabilities of, 137
service packs, updating via batch file, 139
TCP/IP port access, 144, 181
updating, 138, 181
virtual-directory security, 140
web servers, nonsecure, 137
web-based printing, removing, 146
Windows 2000 Server, 139
Windows 2000, 137–38, 142, 144
Windows 2000, QChain utility, 139
Windows NT, 137–38
Windows Server 2003, 138–42, 144, 146
Windows Update, 139
Windows XP, 140, 144
ISA Server 2004, 5
■LLAN Manager (LM)
hashes, disabling via Group Policy, 5
hashes, weakness of, 5
■MMicrosoft Corporation
volume licensing agreement, 5
Microsoft Office
ADM files, 19
Mozilla
Firefox browser, 5
■Nnetwork
credential validation, 8
firewall, 7–8
intrusion-detection system (IDS), 7
physical segmentation of, 8
Point-to-Point Protocol (PPP) connection, 8
remote access and security, 7
TCP ports, blocking, 7
UDP ports, blocking, 7
Virtual LANs (VLANs), 8
virtual private network (VPN) connection, 8
Network Access Quarantine Control (NAQC)
back-end machine, 120
baseline script, 120–21, 127
baseline script, sample, 123, 125
baseline script, specifying a version string, 126
Connection Manager (CM) profile, 120
Connection Manager (CM) profile, creating, 127–28
Connection Manager (CM) profile, distributing, 129
Connection Manager Administration Kit (CMAK) wizard, 127
Connection Manager Administration Kit (CMAK), RQC.EXE, 120–21
connectoid, components of, 120
connectoid, creating, 127
deploying, 122, 180
DHCP servers, 122
DNS servers, 122
exceptions security group, creating, 135, 180
function of, 120
Internet Authentication Service (IAS), 120–21, 130
IP address, remote-access client, 120
mobile users, security problems, 119
MS-Quarantine-IPFilter settings, 121
MS-Quarantine-Session-Timeout settings, 121
packet filters, 120, 122
procedural overview, 120
purpose of, 119
quarantine mode, 120
5394index.fm Page 188 Thursday, September 22, 2005 10:55 AM
189■I N D E X
quarantine policy, 121
quarantine policy, configuring, 130–31, 133, 135
quarantine policy, exempting users, 135
quarantined resources, creating, 122
quarantined resources, dedicated IP subnet, 123
RADIUS Access-Request message, 121
RADIUS server, 120, 130
Remote Access Quarantine Agent service (RQS.EXE), 120–21, 126
Remote Access Quarantine Agent service (RQS.EXE), installing/removing, 125
remote users, security problems, 119, 180
remote-access computers, OS requirements, 120
Routing and Remote Access Service (RRAS), 120, 126, 130
session timer, 120
TCP port, default, 123, 127
web servers, 122
Windows Server 2003 Resource Kit Tools, 125
Windows Server 2003 Resource Kit, 119–20
Windows Server 2003, 120
■Ppasswords, 19
capturing, 68
changing, 42, 177
characters in, alphanumeric, 21
characters in, nonalphanumeric, 21, 174
cracking, 19–21
expiration prompt, 46
failed, 21
invalid, 170
maximum allowable age of, 20, 42, 174
minimum allowable age of, 20, 174
PASSPROP utility, Windows NT, 20
PwDump utility, 21
random, 20
recommended length of, 20, 42, 62, 174
service accounts and, 62
setting restrictions on, Windows 2000, 42
setting, Windows XP, 62
uniqueness of, 20, 174
user account lockout, 21, 42–43, 174, 176
user complaints about, 20
user policies, Windows NT, 20
vulnerability of, 19
Windows password system, 5
See also computer security
■RRemote Procedure Call (RPC) protocol
Exchange 2003, 5
ISA Server 2004, 5
security weakness of, 5
■Ssecurity auditing
application log, 167
auditing policy options, 163–64
Default Domain Policy, 163, 165
enabling, 170
event logs, 163
event logs, configuring, 165–66
event logs, missing events, 170, 184
Event Viewer, 166–67, 169
events, filtering, 169–70
FAT partitions, 165
Local Security Policy, 163
NTFS file system, 165, 170
security log, 167, 170
System Access Control List (SACL), 164
system log, 167
Windows 2000, 163–66, 169–70
Windows NT, 167–70
Windows Server 2003, 163–66, 169–70
Windows XP, 163–66, 169–70
See also Group Policy
5394index.fm Page 189 Thursday, September 22, 2005 10:55 AM
190 ■I N D E X
Shavlik Technologies
HFNetChk utility, 37–38, 63
software
antivirus programs, 6–7, 26
file types, malicious, 7
infected files, repairing, 6
installing safely on Windows NT, 27
Internet downloads, 6, 26
peer-to-peer file sharing, 6
service packs, 6
viruses, 1, 6
Symantec
DriveImage program, 36
Ghost program, 36
security check, online, 64
system administrators
and hackers, 1
and Internet, 1
authenticating users, 2
Systems Management Server (SMS)
Windows Server Update Services (WSUS), comparison with, 100–101
■WWindows 2000
access control list (ACL), 43
Administrator account, 42
anonymous logins, 43, 176
automatic logoff, 44, 176
component installation options, 46
Critical Update Notification (CUN), 37
Ctrl-Alt-Del, 45, 177
digital signatures, 45
digitally signed/unsigned communication, 45, 177
domain controllers, 39
domain, Active Directory enabled, 44
Event Viewer, 166–67, 169, 184
Group Policy, 11
Guest account, 42
HFNetChk utility, 37, 176
HFNetChk utility, command-line switches, 38
hotfix patches, 37, 176
Internet Explorer (IE), 4
last username display, disabling, 45
Local Computer Policy snap-in, 43
logon screen, 45
logon time restriction, 44
master image file, 36
Microsoft Management Console (MMC), 39
Microsoft Operations Manager, 36
Microsoft Update service, 35
Network Download version, 36
NTFS, 39
null user account, 43
password expiration prompt, 46, 177
password restrictions, setting, 42–43, 176
Power Users group, 39
Professional Edition, 35, 39
Registry keys, 37, 39
Remote Installation Service (RIS), 37
remote procedure call (RPC) protocol, 45
running services, tightening, 47
security auditing policies, 163–66, 183
Security Configuration and Analysis tool, 40
security policy, local accounts, 41, 43–46
security policy, user accounts, 41–42
Security Templates snap-in, 39–40
security templates, 38–41
security updates, network deployment of, 37
Server Edition, 35, 39
Service Pack 3, 37
Service Pack 4, 35
Services console, 47
shutdown without logon, 44, 176
“slipstreaming” system updates, 36–37, 176
“spoofing,” 45
5394index.fm Page 190 Thursday, September 22, 2005 10:55 AM
191■I N D E X
system distribution CD-ROM, 36
system updates, deploying, 36
Systems Management Server, 36
user account lockout, 42–43
Windows 2000 Server
Microsoft Baseline Security Analyzer, 8
Windows 98
CONFIG.POL policy file, 19
POLEDIT, 19
System Policy Editor, 19
as Windows NT client, 19
Windows NT
access control lists (ACLs), 22, 28
Account Policies, 22
ADM files, 19
Administrator account, 22
Administrator account, renaming, 175
Administrators group, 27
advanced user rights, 27
anonymous logins, disabling, 23, 175
anti-spyware software, 27
antivirus software, 26, 175
Authenticated Users group, 22–23, 175
AUTOEXEC.BAT, 17
backup domain controllers (BDCs), 13
basic user rights, 27
C2-level security accreditation, 42, 167
client machines, hosting shares, 176
COM port, RAS server, 30
common program groups, 16
communications protocols, selecting, 30–31
computer policy settings, 18
data encryption, 31, 176
Default Computer policy, 14
Default User policy, 14
device drivers, loading/unloading, 28
dial-back configuration, 30, 176
domain controllers, 13
domain network, accessing remotely, 30
domains, 11, 31
domains, trusts between, 31, 176
event logs, 167
event logs, configuring, 168
Event Viewer, 169, 184
Everyone group, 22–23, 175
executables, renaming, 16
file-system permissions, 23–24
groups of users, 11–14
Guest account, 22, 175
hidden drive shares, 18
Internet downloads, 175
Internet threats, 25
last username display, disabling, 175, 177
local directories, securing, 175
logon banner, 18
logon scripts, 17–18
Map/Disconnect Network Drive options, 16
MS-CHAP/MS-CHAP v2, 31
NT File Replication Service, 13
NT Option Pack, 30
NTBuqTraq mailing list, 26
NTCONFIG.POL, 19
PASSPROP utility, 20
password cracking, 21
password policies, 19–21, 174
port-filtering utility, using, 175
primary domain controller (PDC), 13, 19
print service priority, 18
printers, permissions on, 23, 175
PwDump utility, 21
RAS server, COM port, 30
RedEdt32, 16
Registry, 12, 16, 19–20, 22–23, 175
Remote Access Server (RAS), 30
remote access, disabling, 175
Routing and Remote Access Service (RRAS), 30
5394index.fm Page 191 Thursday, September 22, 2005 10:55 AM
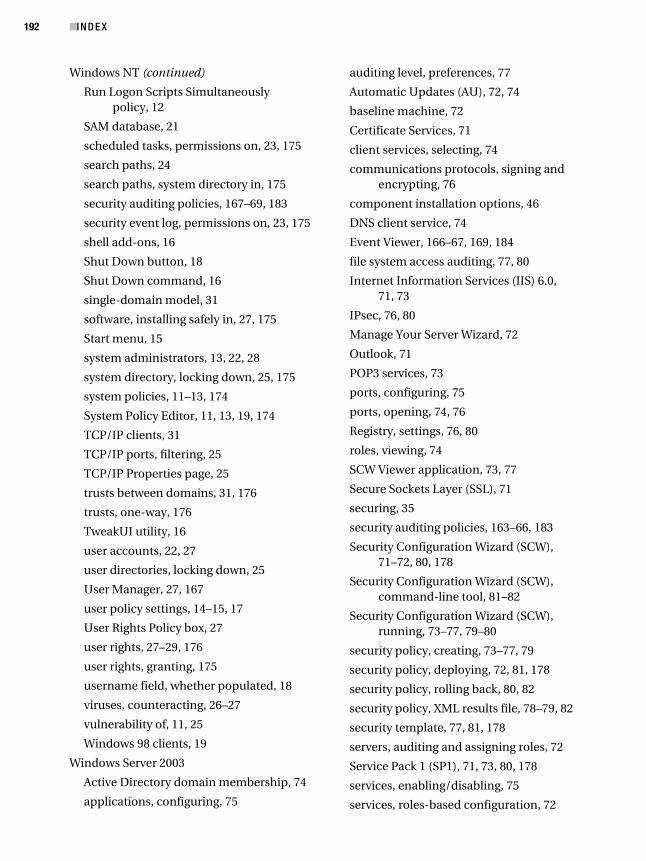
192 ■I N D E X
Windows NT (continued)
Run Logon Scripts Simultaneously policy, 12
SAM database, 21
scheduled tasks, permissions on, 23, 175
search paths, 24
search paths, system directory in, 175
security auditing policies, 167–69, 183
security event log, permissions on, 23, 175
shell add-ons, 16
Shut Down button, 18
Shut Down command, 16
single-domain model, 31
software, installing safely in, 27, 175
Start menu, 15
system administrators, 13, 22, 28
system directory, locking down, 25, 175
system policies, 11–13, 174
System Policy Editor, 11, 13, 19, 174
TCP/IP clients, 31
TCP/IP ports, filtering, 25
TCP/IP Properties page, 25
trusts between domains, 31, 176
trusts, one-way, 176
TweakUI utility, 16
user accounts, 22, 27
user directories, locking down, 25
User Manager, 27, 167
user policy settings, 14–15, 17
User Rights Policy box, 27
user rights, 27–29, 176
user rights, granting, 175
username field, whether populated, 18
viruses, counteracting, 26–27
vulnerability of, 11, 25
Windows 98 clients, 19
Windows Server 2003
Active Directory domain membership, 74
applications, configuring, 75
auditing level, preferences, 77
Automatic Updates (AU), 72, 74
baseline machine, 72
Certificate Services, 71
client services, selecting, 74
communications protocols, signing and encrypting, 76
component installation options, 46
DNS client service, 74
Event Viewer, 166–67, 169, 184
file system access auditing, 77, 80
Internet Information Services (IIS) 6.0, 71, 73
IPsec, 76, 80
Manage Your Server Wizard, 72
Outlook, 71
POP3 services, 73
ports, configuring, 75
ports, opening, 74, 76
Registry, settings, 76, 80
roles, viewing, 74
SCW Viewer application, 73, 77
Secure Sockets Layer (SSL), 71
securing, 35
security auditing policies, 163–66, 183
Security Configuration Wizard (SCW), 71–72, 80, 178
Security Configuration Wizard (SCW), command-line tool, 81–82
Security Configuration Wizard (SCW), running, 73–77, 79–80
security policy, creating, 73–77, 79
security policy, deploying, 72, 81, 178
security policy, rolling back, 80, 82
security policy, XML results file, 78–79, 82
security template, 77, 81, 178
servers, auditing and assigning roles, 72
Service Pack 1 (SP1), 71, 73, 80, 178
services, enabling/disabling, 75
services, roles-based configuration, 72
5394index.fm Page 192 Thursday, September 22, 2005 10:55 AM
193■I N D E X
SMTP virtual server, 73
Terminal Services, 72
vulnerability of, 5
website, 80
Windows 2000, Service Pack 3, 77
Windows Firewall, 72, 80
Windows XP, Service Pack 2, 71
Windows Server Update Services (WSUS)
Active Directory, use of, 99
administrative console, opening, 103
All Computers group, 105
Automatic Updates (AU) client, configuring, 108–9, 111–13, 180
Automatic Updates (AU) client, Group Policy options, 110–12
Automatic Updates (AU) client, Registry key changes, 112–13
Automatic Updates (AU), 100, 116
Automatic Updates (AU), enabling, 114, 180
Automatic Updates (AU), self-updating of, 108
Background Intelligent Transfer Service (BITS), 115
client-side monitoring, 116
client-side targeting, 105
computer groups, creating, 105–6
Critical Update Notification (CUN) tool, 108
Group Policy, 101, 105, 108
Group Policy, adjusted settings, 112
Group Policy, domain-based, 109
installing, 100–103
Internet connection, 100, 103
Internet Information Services (IIS), 100–101
Microsoft Management Console, 112
patch-management systems, 99, 180
proxy server, configuring, 103
purpose of, 99
Registry keys, 101, 105
server, configurations on intranet, 100
server, hardware and software requirements, 100
server-side targeting, 105
SQL Server 2000 database, 102
Strategic Technology Protection Program, 99
synchronizing content, 104–5, 180
system administrator, 114
system updates, approval/rejection of, 100, 106–7
system updates, deployment status, 99, 107
system updates, installing, 115, 180
system updates, testing, 105–6
Systems Management Server (SMS), comparison with, 100–101, 180
Unassigned Computers group, 105
website selection, 102
Windows 2000, configuring with, 114
Windows Microsoft SQL Server 2000 Desktop Engine (WMSDE), 101–2
Windows Update, 99–100
Windows XP, configuring with, 114
Windows XP
accounts of least privilege, 62, 66, 177
Active Directory, 51
ActiveX content, downloading, 64
Administrator account, 62
Administrator account, configuring, 65
Administrator account, renaming, 178
anonymous users, system access, 66
Authenticated Users, 66
automated logins, disabling, 65, 178
broadband routers, 53, 177
compromised system, signs of, 67–68, 178
connection exceptions, 50
connection port, adding, 50
connection port, opening, 52
Critical Update Notification (CUN), 37
5394index.fm Page 193 Thursday, September 22, 2005 10:55 AM
194 ■I N D E X
Windows XP (continued)
Ctrl-Alt-Del, 45
default accounts, hardening, 65
domain profile, 50–51
Event Viewer, 67, 166–67, 169, 184
Everyone group, 66, 178
FAT/FAT32 partitions, converting to NTFS, 64
file system, securing, 64–65
forensic analysis techniques, 67–68
Group Policy Object Editor, 51
Guest account, configuring, 65–66
Guest account, renaming, 178
hard drive partitions, checking, 64
HFNetChk utility, 37, 63
HFNetChk utility, command-line switches, 38
Home Edition, 37
hotfix patches, 37
infrared transfers, disabling, 67, 178
Internet Connection Firewall (ICF), 51–53, 177
last username display, disabling, 45
Local Service, 62
logon attempts, unsuccessful, 68
logon screen, 45
master image file, 36
Microsoft Baseline Security Analyzer (MBSA), 63, 177
Microsoft Knowledge Base, 63
Microsoft Operations Manager, 36
Microsoft Update service, 35
Network Download version, 36
Network Service, 62
NTFS, security features, 64
partitions, formatting with NTFS, 178
password expiration prompt, 46
passwords, service accounts, 62
penetration tests, 63, 178
poor system performance and, 68
Professional Edition, 35, 37
Registry keys, 37
reinstalling operating system, 68, 178
Remote Access Service, 53
Remote Desktop Connection, 53
Remote Installation Service (RIS), 37
Runas, 66–67, 178
securing, 35
security auditing policies, 163–66, 183
security check, online, 64
security updates, network deployment of, 37
service accounts, hardening, 62, 177
Service Pack 1, 51
Service Pack 2, 35, 49, 177
services, disabling, 53, 177
services, recommended, 54–56, 58–59, 61, 177
shutdown without logon, 44
“slipstreaming” system updates, 36–37
Software Update Services package, 63
standard profile, 50–51
system distribution CD-ROM, 36
system updates, applying, 63
system updates, deploying, 36
Systems Management Server, 36
Task Manager and viruses, 53
Terminal Services, 53
upgrading to, 5
viruses, 53, 64
Windows 2000, 49
Windows 2000 Professional, 53
Windows Firewall (WF), 49–51, 177
Windows NT, 53
Windows Update, 63, 177
5394index.fm Page 194 Thursday, September 22, 2005 10:55 AM

5394index.fm Page 195 Thursday, September 22, 2005 10:55 AM

5394index.fm Page 196 Thursday, September 22, 2005 10:55 AM

5394index.fm Page 197 Thursday, September 22, 2005 10:55 AM
forums.apress.comFOR PROFESSIONALS BY PROFESSIONALS™
JOIN THE APRESS FORUMS AND BE PART OF OUR COMMUNITY. You’ll find discussions that cover topics
of interest to IT professionals, programmers, and enthusiasts just like you. If you post a query to one of our
forums, you can expect that some of the best minds in the business—especially Apress authors, who all write
with The Expert’s Voice™—will chime in to help you. Why not aim to become one of our most valuable partic-
ipants (MVPs) and win cool stuff? Here’s a sampling of what you’ll find:
DATABASES
Data drives everything.
Share information, exchange ideas, and discuss any databaseprogramming or administration issues.
INTERNET TECHNOLOGIES AND NETWORKING
Try living without plumbing (and eventually IPv6).
Talk about networking topics including protocols, design,administration, wireless, wired, storage, backup, certifications,trends, and new technologies.
JAVA
We’ve come a long way from the old Oak tree.
Hang out and discuss Java in whatever flavor you choose:J2SE, J2EE, J2ME, Jakarta, and so on.
MAC OS X
All about the Zen of OS X.
OS X is both the present and the future for Mac apps. Makesuggestions, offer up ideas, or boast about your new hardware.
OPEN SOURCE
Source code is good; understanding (open) source is better.
Discuss open source technologies and related topics such asPHP, MySQL, Linux, Perl, Apache, Python, and more.
PROGRAMMING/BUSINESS
Unfortunately, it is.
Talk about the Apress line of books that cover softwaremethodology, best practices, and how programmers interact withthe “suits.”
WEB DEVELOPMENT/DESIGN
Ugly doesn’t cut it anymore, and CGI is absurd.
Help is in sight for your site. Find design solutions for yourprojects and get ideas for building an interactive Web site.
SECURITY
Lots of bad guys out there—the good guys need help.
Discuss computer and network security issues here. Just don’t letanyone else know the answers!
TECHNOLOGY IN ACTION
Cool things. Fun things.
It’s after hours. It’s time to play. Whether you’re into LEGO®
MINDSTORMS™ or turning an old PC into a DVR, this is wheretechnology turns into fun.
WINDOWS
No defenestration here.
Ask questions about all aspects of Windows programming, gethelp on Microsoft technologies covered in Apress books, orprovide feedback on any Apress Windows book.
HOW TO PARTICIPATE:
Go to the Apress Forums site at http://forums.apress.com/.
Click the New User link.
BOB_Forums7x925 8/18/03 Page ______