Handling instructions · 2019. 5. 20. · time, your ears will become accustomed to it. This...
20
Handling instructions UR 18DSDL
Transcript of Handling instructions · 2019. 5. 20. · time, your ears will become accustomed to it. This...

Handling instructions
UR 18DSDL
0000Book_UR18DSDL.indb 10000Book_UR18DSDL.indb 1 2018/04/12 9:28:382018/04/12 9:28:38
2
ⒶⒷⒸⒹⒺⒼⒻ ⒾⒽ Ⓙ Ⓚ
Ⓛ
Ⓜ
Ⓟ
Ⓝ
!
@
$
^
*
0
#
%
&
(
)
2
5
9
1
3
6
4
0000Book_UR18DSDL.indb 20000Book_UR18DSDL.indb 2 2018/04/12 9:28:392018/04/12 9:28:39

3
1 2
3 4
5 6
3
q w
e
3
6
r
t
r
3
uy
e
i
0000Book_UR18DSDL.indb 30000Book_UR18DSDL.indb 3 2018/04/12 9:28:392018/04/12 9:28:39

4
7 8
9 10
7p
a
so
d
p
sf
8
9
g
0000Book_UR18DSDL.indb 40000Book_UR18DSDL.indb 4 2018/04/12 9:28:392018/04/12 9:28:39
5
CORDLESS RADIO SAFETY WARNINGS
WARNINGRead all safety warnings and all instructions.Failure to follow the warnings and instructions may result in electric shock, fi re and/or serious injury.
Save all warnings and instructions for future reference.1. Use only the specifi ed power supply voltage.
• Use of any other voltage may lead to fi re or electric shock.
2. Avoid damaging the AC adapter cord.• Do not modify, forcibly bend, twist or pull the cord,
place heavy objects on it or place it near heating appliances.
• When not in use, remove the power plug (AC adapter) from the electric socket and from the radio. Failure to do so may lead to electric shock or fi re.
3. Do not touch the power plug (AC adapter) with wet hands.• Doing so may result in electric shock.
4. Do not use the radio in the bathroom or shower.• Do not use the radio in wet or damp places or in the
rain.• Doing so may result in electric shock, emission of
smoke or malfunction.5. Do not touch the FM antenna or power plug (AC
adapter) during thunderstorms.• Doing so may result in electric shock.
6. Do not disassemble or modify the radio.• Doing so may result in electric shock or fi re.
Inspections and repairs should be performed by the store where purchased or by a HiKOKI power tool service center.
7. Insert the power plug (AC adapter) securely as far as it will go.• Dust or dirt between the power plug and the electric
socket may lead to fi re. Remove the power plug periodically and wipe off any dust or dirt with a dry cloth.
8. Do not let any unspecifi ed objects or water get inside the radio body.• With the exception of the AC adapter and the
rechargeable battery, if any metal or fl ammable object or water gets inside the back door, it may lead to electric shock or fi re.
• Take care to prevent iron powder from the bass refl ex speakers, dust or water getting into the radio.
9. Do not sit or stand on the radio.• Doing so may lead to accidents or malfunction.
10. Do not place the radio on an unstable surface or in a high place. Do not hang the radio from the handle.• The radio may fall and cause injury or malfunction.
11. When no slide battery is loaded, attach the slide terminal cover to the terminal to prevent cuts and other injuries that may result from touching the terminal area.
12. Handle the backup batteries with care.• Danger of explosion if battery is incorrectly replaced.
Replace only with the same or equivalent type.• Incorrect handling of the batteries may result in
rupture or leakage, leading to fi re, injury or pollution of the surrounding area. Be sure to observe the following precautions.– Use only the specifi ed batteries– Do not heat or disassemble the batteries– Do not throw the batteries into fi re or water– Do not charge the batteries– Make sure the batteries are correctly oriented
and avoid short-circuiting– Do not reuse batteries or use diff erent types of
battery– Remove the batteries when the radio is not in use
In the event of leakage from the batteries, wipe the battery case clean.
Should any battery fl uid get on your body, wash it off carefully.
If is displayed when you turn the power on with the rechargeable battery inserted, the battery power is low.
Power the radio from the AC adapter or insert a charged battery.
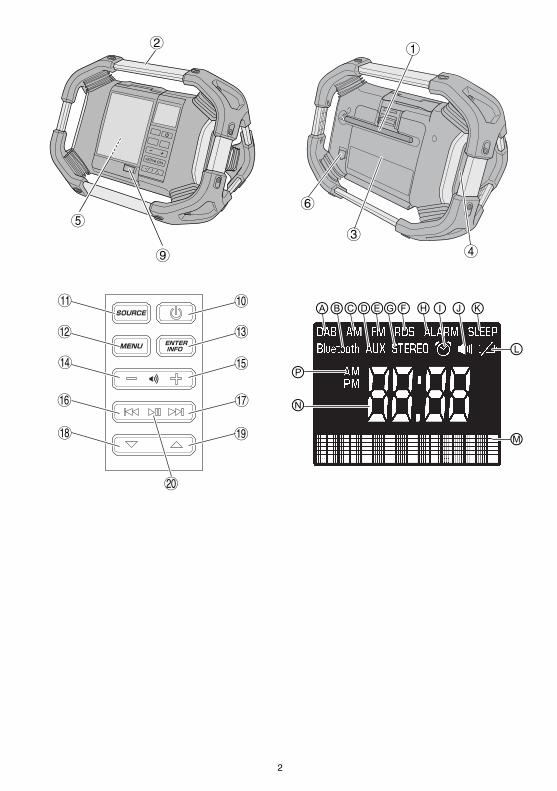
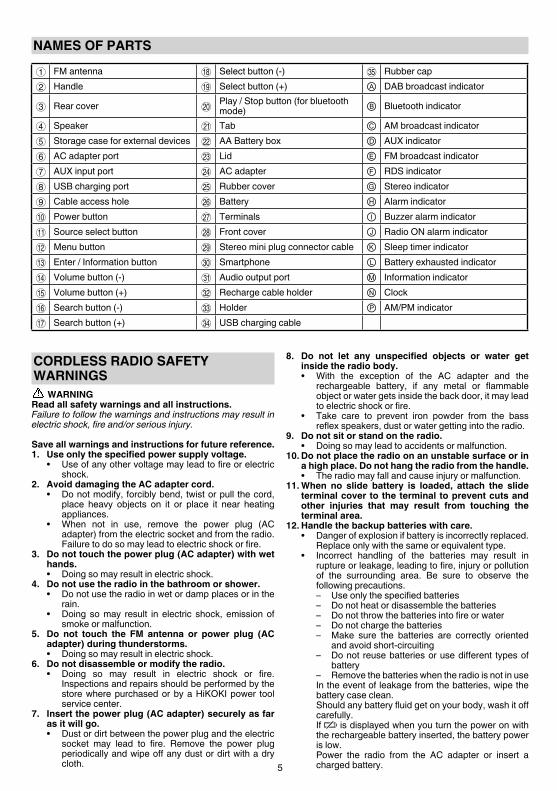
NAMES OF PARTS
1 FM antenna * Select button (-) g Rubber cap2 Handle ( Select button (+) Ⓐ DAB broadcast indicator
3 Rear cover )Play / Stop button (for bluetooth mode) Ⓑ Bluetooth indicator
4 Speaker q Tab Ⓒ AM broadcast indicator5 Storage case for external devices w AA Battery box Ⓓ AUX indicator6 AC adapter port e Lid Ⓔ FM broadcast indicator7 AUX input port r AC adapter Ⓕ RDS indicator8 USB charging port t Rubber cover Ⓖ Stereo indicator9 Cable access hole y Battery Ⓗ Alarm indicator0 Power button u Terminals Ⓘ Buzzer alarm indicator! Source select button i Front cover Ⓙ Radio ON alarm indicator@ Menu button o Stereo mini plug connector cable Ⓚ Sleep timer indicator# Enter / Information button p Smartphone Ⓛ Battery exhausted indicator$ Volume button (-) a Audio output port Ⓜ Information indicator% Volume button (+) s Recharge cable holder Ⓝ Clock^ Search button (-) d Holder Ⓟ AM/PM indicator& Search button (+) f USB charging cable
0000Book_UR18DSDL.indb 50000Book_UR18DSDL.indb 5 2018/04/12 9:28:402018/04/12 9:28:40
6
13. Recharge only with the charger specifi ed by the manufacturer.• A charger that is suitable for one type of rechargeable
battery may create a risk of fi re when used with another battery.
14. Use the radio only with specifi cally designated rechargeable battery.• Use of any other rechargeable battery may create a
risk of injury and fi re.15. When rechargeable battery is not in use, keep
it away from other metal objects like paper clips, coins, keys, nails, screws, or other small metal objects that can make a connection from one terminal to another.• Shorting the battery terminals together may cause
burns or a fi re.16. Under abusive conditions, liquid may be ejected
from the battery; avoid contact. If contact accidentally occurs, fl ush with water. If liquid contacts eyes, additionally seek medical help.• Liquid ejected from the battery may cause irritation
or burns.17. Have your radio serviced by a qualifi ed repair
person using only identical replacement parts.• This will ensure that the safety of the radio is
maintained.18. The main unit and adapter shall not be exposed to
dripping or splashing and that no objects fi lled with liquids, such as vases, shall be placed on the unit and adapter.
19. The batteries (battery pack or batteries installed) shall not be exposed to excessive heat such as sunshine, fi re or the like.
20. The MAINS plug of adapter is used as the disconnect device, the disconnect device shall remain readily operable.
PROTECTING YOUR HEARINGContinuous exposure to loud noise may result in permanent hearing loss. The louder the volume, the shorter the time in which hearing loss may occur.If you listen to large volume sound over a long period of time, your ears will become accustomed to it. This creates the illusion that the volume level is appropriate, despite the fact that it may be damaging your hearing.Observe the following to prevent hearing loss.CAUTION1. Make sure you give your ears a rest by taking
regular breaks and not listening for long periods of time.
Even when set at safe volume levels, listening continuously over long periods of time may cause hearing loss.
2. Be careful not to increase the volume as your hearing adapts to the sound output.
Beware of being accustomed to a certain volume level. Adjust the volume to a safe level before your ears become accustomed to loud volumes.
3. If your ears begin to ring, if you feel any discomfort, or if conversation seems faint or indistinct, discontinue listening to music and have your ears examined by a doctor.
PRECAUTIONS WHEN CONNECTING TO EXTERNAL EQUIPMENTUnexpected problems may result in the loss or corruption of data stored in smartphones and other peripheral equipment connected to the radio. With this possibility in mind, a backup of the data should always be made in advance.
Note that Koki Holdings cannot be held responsible for the corruption or loss of data stored within smartphones and other peripheral equipment connected to the radio, nor any damage to the equipment itself.
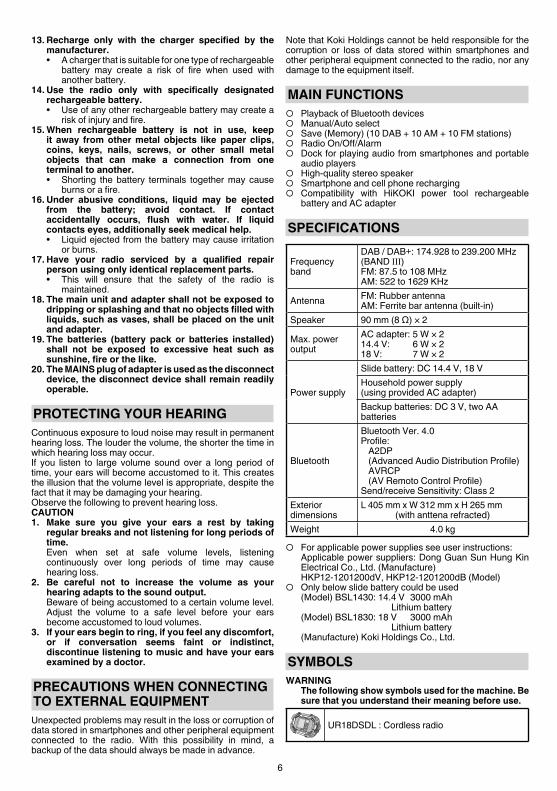
MAIN FUNCTIONS○ Playback of Bluetooth devices○ Manual/Auto select○ Save (Memory) (10 DAB + 10 AM + 10 FM stations)○ Radio On/Off /Alarm○ Dock for playing audio from smartphones and portable
audio players○ High-quality stereo speaker○ Smartphone and cell phone recharging○ Compatibility with HiKOKI power tool rechargeable
battery and AC adapter
SPECIFICATIONS
Frequency band
DAB / DAB+: 174.928 to 239.200 MHz (BAND III)FM: 87.5 to 108 MHzAM: 522 to 1629 KHz
Antenna FM: Rubber antennaAM: Ferrite bar antenna (built-in)
Speaker 90 mm (8 Ω) × 2
Max. power output
AC adapter: 5 W × 214.4 V: 6 W × 218 V: 7 W × 2
Power supply
Slide battery: DC 14.4 V, 18 VHousehold power supply(using provided AC adapter)Backup batteries: DC 3 V, two AA batteries
Bluetooth
Bluetooth Ver. 4.0Profi le:
A2DP(Advanced Audio Distribution Profi le)AVRCP(AV Remoto Control Profi le)
Send/receive Sensitivity: Class 2Exterior dimensions
L 405 mm x W 312 mm x H 265 mm(with anttena refracted)
Weight 4.0 kg
○ For applicable power supplies see user instructions: Applicable power suppliers: Dong Guan Sun Hung Kin
Electrical Co., Ltd. (Manufacture) HKP12-1201200dV, HKP12-1201200dB (Model)○ Only below slide battery could be used (Model) BSL1430: 14.4 V 3000 mAh Lithium battery (Model) BSL1830: 18 V 3000 mAh Lithium battery (Manufacture) Koki Holdings Co., Ltd.
SYMBOLSWARNING The following show symbols used for the machine. Be
sure that you understand their meaning before use.
UR18DSDL : Cordless radio
0000Book_UR18DSDL.indb 60000Book_UR18DSDL.indb 6 2018/04/12 9:28:402018/04/12 9:28:40

7
For applicable power supplies see user instructions.
Only for EU countries Do not dispose of electric tools together with household waste material!In observance of European Directive 2002/96/EC on waste electrical and electronic equipment and its implementation in accordance with national law, electric tools that have reached the end of their life must be collected separately and returned to an environmentally compatible recycling facility.
Power button
Source select button
Menu button
Enter / Information button
Volume button
Search button
Select button
Play / Stop button
Buzzer alarm indicator
Radio ON alarm indicator
Battery exhausted indicator
STANDARD ACCESSORIESIn addition to the main unit (1 unit), the package contains the accessories listed in the below.○ AC adapter ....................................................................1○ AA batteries ..................................................................2○ Recharge cable holder ..................................................1 (for Apple Lightning connector) * Android holder is built into the main unit.
Standard accessories are subject to change without notice.
PRIOR TO OPERATION● Installing backup batteriesTime settings and radio station frequencies can be saved by installing batteries in the unit.1. To access the storage box for the backup batteries,
unlatch the tab and open the rear cover. (Fig. 1)2. Open the backup battery storage box and insert the
two AA batteries (included) into the storage box in the direction indicated. (Fig. 2)
NOTE○ Do not reverse battery polarity (+/-) when installing the
batteries.○ Do not mix old and new batteries. Always replace both
batteries at the same time.○ Do not burn batteries or dispose them as household
waste.● AC adapter installationPower can be supplied by plugging the AC adapter (included) into a standard household outlet.Pull back the rubber cover and connect the AC adapter to the AC adapter port. (Fig. 3)Next, plug the AC adapter into an electrical outlet.NOTE○ When used together with the batteries, the AC adapter
is the main power source and no battery power is consumed.
○ When used together with the AC adapter, the batteries will not recharge as this device has no recharge function.
Storing the AC adapterThe AC adapter can be stored in the compartment behind the rear cover. (Fig. 4)● Battery installationCAUTION Do not touch the terminals. Doing so may result in cuts to the hand or other injuries.Only a 14.4 V or 18 V slide-type battery can be used with this device.Installing the batteryOpen the rear cover, align the battery with the grooves of this device and slide it all the way in. (Fig. 5)NOTE○ Do not apply any excessive pressure when inserting the
battery. If the battery does not easily slide into place, it is not being inserted properly.
Check to see if the battery is facing the correct direction and that there is nothing obstructing the path of insertion.
○ If is displayed when the device is switched on following battery installation, the battery charge is low.
In this situation, either use the AC adapter or install a fully charged battery.
● Changing the date displayThe following selections are available for date display. YYYY/MM/DD (Year/Month/Day) MM/DD/YYYY (Month/Day/Year) DD/MM/YYYY (Day/Month/Year)1. Press the Menu button.
2. Press the Select button and display “ ”.
Date display3. Press the Enter / Information button.
4. Press the Select button and display the date display
selection of your choice.
YYYY/MM/DD5. Press the Enter / Information button.
● Set the dateUsing the control panel, follow the steps below to set up the date.1. Press the Menu button.
0000Book_UR18DSDL.indb 70000Book_UR18DSDL.indb 7 2018/04/12 9:28:402018/04/12 9:28:40

8
2. Press the Select button and display “ ”.
Date adjust3. Press the Enter / Information button.
4. Press the Select button and adjust “year” digits.
20145. Press the Enter / Information button.
6. Press the Select button and adjust “month” digits.
03 / 017. Press the Enter / Information button.
8. Press the Select button and adjust “day” digits.
03 / 319. Press the Enter / Information button.
● Set the timeUsing the control panel, follow the steps below to set up the time.1. Press the Menu button.
2. Press the Select button and display “ ”.
Clock adjust3. Press the Enter / Information button.
4. Press the Select button and adjust “hour” digits.
12 : 005. Press the Enter / Information button.
6. Press the Select button and adjust “minute” digits.
12 : 557. Press the Enter / Information button.
8. Press the Select button and select “ ” or “ ”
12H 24H9. Press the Enter / Information button.
● Synchronize the time and date (DAB
mode only)1. Press the Source select button and select “ ”.
DAB2. Press the Select button and display “ ”.
Date Time Sync3. Press the Enter / Information button.
4. Press the Select button and display “ ” or “ ”.
ON
5. Press the Enter / Information button.
If “ ” is selected, your radio can be synchronized the time and date.
LISTENING TO RADIO BROADCASTS● Selecting DAB, FM or AM bandwidth1. Power ON.
2. Press the Source select button and select the radio’s
bandwidth (DAB/FM/AM).
DAB AM FM● Selecting stationsAuto station selectionA long press of the Search button will automatically scan and search clear station broadcast frequencies. To select the next station broadcast, long press the Search button again.
(Long Press)
Manual station selectionPress the Search button to change frequencies and select a station.
Preset station selectionPress the Select button to quickly switch between preset stations.
At the time of purchase, there are no preset stations. Follow the steps below to register preset stations.<Manual preset registration>1. Tune into a radio station of your choice and press the
Menu button.
2. Press the Select button and display “ ”.
Preset3. Press the Enter / Information button.
4. Press the Select button and select a preset number from
0 to 9 for registering the station.
Preset 25. Press the Enter / Information button to register the
station.
<Auto preset registration>This feature allows the automatic registration of available radio stations in the area of use.(Maximum of 10 stations)1. Press the Menu button.
2. Press the Select button and display “ ”.
Auto scan
0000Book_UR18DSDL.indb 80000Book_UR18DSDL.indb 8 2018/04/12 9:28:402018/04/12 9:28:40

9
3. Press the Enter / Information button to begin auto preset registration of available radio stations.
NOTE○ A broadcasting radio station will not be registered if its
frequency is weak.○ Depending on location of use, non-radio signals such as
noise may be registered.○ See page 11 when recharging with USB in “ ” or
“ ” mode.● For better receptionFM broadcastsAdjust reception by changing the facing and angle of the antenna.“ ” will be displayed when receiving a stereo broadcast.Switching to monaural reception can reduce noise.<Switching to monaural reception>1. Press the Menu button.
2. Press the Select button and display “ ”.
Stereo3. Press the Enter / Information button.
4. Press the Select button and display “ ” .
OFF5. Press the Enter / Information button to complete setup.
AM broadcastsMove the device and face it in a direction in which the reception is best.
<Volume adjustment>Use the Volume button to adjust the volume from 0 to 30.
DRC (DYNAMIC RANGE CONTROL) FOR DABDRC can make quieter sounds easier to hear when your radio is used in a noisy environment.1. Press the Menu button.
2. Press the Select button and display “ ”.
DRC3. Press the Enter / Information button.
4. Press the Select button and display “ ” , “ ”or
“ ” .
Half5. Press the Enter / Information button to complete
adjustment.
ADJUSTING SOUND QUALITYSound quality (Bass/Treble) can adjusted according to preference.1. Press the Menu button.
2. Press the Select button and display “Select EQ”.
Select EQ3. Press the Enter / Information button.
4. Press the Select button and display “ ”. “5” is for maximum bass output. < - > < + > 0 · 1 · 2 · 3 · 4 · 5
Bass 35. Press the Enter / Information button.
6. Press the Select button and display “ ”. “5” is for maximum treble output. < - > < + > 0 · 1 · 2 · 3 · 4 · 5
Treble 37. Press the Enter / Information button to complete
adjustment.
NOTE○ The radio does not allow Bass or Treble settings of “5” if
the volume level is 25 or more.○ If the Bass or Treble is set at “5”, the setting will be
automatically adjusted down to “4” when the volume level is raised above 25. Moreover, when the volume level is lowered to 24 or less, the reduced setting will automatically revert back to “5”.
USING EXTERNAL DEVICES FOR AUDIO PLAYBACKAudio can be played back from smartphones, portable music players and other external devices.CAUTION Make sure to lower the volume output of the player
before playback.NOTE There are two types of connector cable, straight type and
L type. Use an L type cable when connecting or storing large
external devices.1. Open the external device storage area Switch the radio’s power OFF and open the front cover.
(Fig. 6)2. Connect an external device Using a commercially available stereo mini-plug
connector cable (ø3.5 mm), connect the radio’s AUX input port to the audio output port of the external device. (Fig. 7)
3. Secure the external device The right and left holders can be moved to the right or left
by pinching the top and bottom of each holder. Secure the external device between the two holders.
(Fig. 8)
0000Book_UR18DSDL.indb 90000Book_UR18DSDL.indb 9 2018/04/12 9:28:412018/04/12 9:28:41

10
4. Playback With the radio’s power switched ON, press the Source
select button and display “ ” .
AUX Make sure to lower the volume output of the external
device before music playback. Volume can be adjusted through the radio.
(Volume) Close the front cover after selecting tracks and adjusting
volume.NOTE You may be unable to raise the volume level if the
volume level of the external device is too low.
NOTE○ When connecting a smartphone, please be aware that
the ringtones of incoming calls for some models are not output to speaker.
○ External devices may be damaged if used in locations exposed to the sun or hot temperatures.
○ See page 11 when recharging with USB in “ ” mode.
CONNECTING WITH BLUETOOTH DEVICESIf smartphones, portable music players and other devices are Bluetooth compatible, audio can be output from this product via Bluetooth communication.1. Pairing (Registering devices) Pairing is required for Bluetooth communication. Set your Bluetooth device to pairing mode. (For instructions on pairing, see the manual for the
Bluetooth device to be used.)2. Set the radio for pairing mode Press the Source select button and display “ ” .
Bluetooth Long press the Play / Stop button (located between
the Search buttons) until the displayed “ ” is fl ashing.
(Long Press) Ready
Select “UR18DSDL” on your Bluetooth device’s list of connected devices to complete the pairing.
3. Input pass key Some Bluetooth devices may require pass key input
when connecting. If this should be the case, input “0000”. Also, if connection authorization is requested, input
“authorized”. Connection is successful once “ ” is displayed.
ConnectedNOTE○ Once paired, connection will be automatically
established the next time the devices are switched on. If the Bluetooth connection is lost, re-pair the devices.
○ No more than two devices can be paired simultaneously.○ Connection with all Bluetooth devices cannot be
guaranteed. Before attempting connection, always check for compatibility.
4. Playback Make sure to lower the volume output of the Bluetooth
device before music playback. Volume can be adjusted through the radio. Use the Bluetooth device to select tracks .
You can also select tracks with the radio’s control buttons.
(Volume)
(Play / Stop, Search)NOTE○ Some Bluetooth devices may not respond to the radio’s
control buttons.○ See page 11 when recharging with USB in “ ”
mode.
USING THE TIMER FUNCTION● Setting the sleep timerPower can be set to automatically switch OFF after a certain amount of time has elapsed by using the sleep timer function.1. Press the Menu button.
2. Press the Select button and display “ ”.
Sleep3. Press the Enter / Information button.
4. Press the Select button to adjust the time period to
elapse (between “0 – 90” minutes) before the power is switched OFF.
30 Min5. Press the Enter / Information button.
6. “ ” will be displayed on the LCD.○ To check the remaining time, press the Menu button
once again and select “ ”.○ To cancel the sleep timer, set the time to switch OFF at 0
minutes.● Setting the alarm (Buzzer alarm)The radio can be set up to activate a beeping alarm at a specifi c time.1. Press the Menu button.
2. Press the Select button and display “ ”.
Buzzer alarm3. Press the Enter / Information button.
4. Press the Select button and display “ ” .
ON5. Press the Enter / Information button.
6. Press the Select button and adjust “hour” digits.
12 : 007. Press the Enter / Information button.
8. Press the Select button and adjust “minute” digits.
12 : 309. Press the Enter / Information button.
0000Book_UR18DSDL.indb 100000Book_UR18DSDL.indb 10 2018/04/12 9:28:412018/04/12 9:28:41
11
10. Press the Select button to set up repeat.OnceDailyWeekdays onlySaturday and Sunday only
Daily11. Press the Enter / Information button to complete setup.
will be displayed on the LCD.
○ To cancel the alarm setting, go to “ ” once again and change the setting to “ ” .
○ The alarm sound will automatically switch off after 10 minutes. The sound can also be switched off by pressing any button.
NOTE The volume of the buzzer alarm cannot be changed.● Setting the radio ON alarm timerUsing the radio ON alarm timer function, the radio can be set up to switch ON at a specifi c time to enjoy a station broadcast.1. Press the Menu button.
2. Press the Select button and display “ ”.
Radio alarm3. Press the Enter / Information button.
4. Press the Select button and display “ ” .
ON5. Press the Enter / Information button.
6. Press the Select button and adjust “hour” digits.
12 : 007. Press the Enter / Information button.
8. Press the Select button and adjust “minute” digits.
12 : 559. Press the Enter / Information button.
10. Press the Select button to set up repeat.
OnceDailyWeekdays onlySaturday and Sunday only
Daily11. Press the Enter / Information button.
12. Select radio bandwidth. Press the Select button to display “DAB”, “AM” or “FM”.
FM
13. Press the Enter / Information button.
14. Press the Select button to display a preset station.
P2 FM 79.5 MHz To select a station by broadcast frequency, use the
Search button.
FM 80.0 MHz15. Press the Enter / Information button to complete setup.
will be displayed on the LCD.○ To cancel the radio alarm setting, go to “ ”
once again and change the setting to “ ” .NOTE The radio’s volume will be at the level when the radio
was last switched OFF.
RECHARGING YOUR SMARTPHONEDevices such as a smartphone and mobile phone can be recharged by connecting the device to this radio.The recharge function is only available for the “ ”, “ ”, “ ” or “ ” mode. (Recharging cannot be done in “ ” mode.)NOTE○ When recharging in “ ” or “Bluetooth” mode, set the
volume output at 20 or less. The radio is designed to deactivate USB output and
disable the recharging of smartphones and mobile phones when the volume is at 21 or more.
(For “ ” or “ ” mode, USB recharging will continue even if the volume output is 21 or more.)
○ On rare occasions, sound output may be interrupted or power could shutdown during USB recharging.
If either should occur, lower the volume level or stop recharging with the USB.
○ The radio is designed to deactivate USB output and disable the recharging of smartphones and mobile phones when the power level of the battery is low.
Should the aforementioned occur, recharge the battery or replace with a fully charged battery.
○ If the voltage is low when the AC adapter is in use, the USB output may be cut off , discontinuing any recharging.
1. Using a commercially available USB connection/recharge cable, connect to the USB charging port located in the radio’s storage case for external devices. (Fig. 9)
2. Secure the smartphone with the holders and close the cover. (Fig. 8)
(See “Secure the external device” on page 9)NOTE○ Use a fully charged battery when using a battery as this
device’s power source. You will not be able to recharge smartphones or mobile
phones when the battery power level becomes low.○ The time required for charging varies in accordance with
the smartphone or mobile phone being recharged.○ Do not use the recharge function for any devices other
than a smartphone or mobile phone.○ The radio may not be able to recharge some smartphone
or mobile phone models.Two recharge cable holders, one for Android and the other for Apple (Lightning connector) are included.Select the holder that best suits your device.○ Should your device be too large for the radio’s external
device storage case, draw the cable through the cable access hole. (Fig. 10)
0000Book_UR18DSDL.indb 110000Book_UR18DSDL.indb 11 2018/04/12 9:28:422018/04/12 9:28:42

12
NOTE As the recharge cable holders are designed for standard
size terminals, the holders may not be able to securely fasten certain terminals depending on the recharge cable used.
MAINTENANCE AND INSPECTIONWARNING When not in use or during inspection and maintenance,
be sure to remove the AC plug, rechargeable battery and backup batteries.
● Inspecting the mounting screws Regularly inspect all mounting screws and ensure that
they are properly tightened. Should any of the screws be loose, retighten them immediately. Failure to do so could result in serious hazard.
● Cleaning on the outside When the radio is stained, wipe with a soft dry cloth or a
cloth moistened with soapy water. Do not use chloric solvents, gasoline or paint thinner, for
they melt plastics.● Storing the Radio Do not store the radio in the following places.
○ Within reach of or easily accessible to children○ In humid or dusty places○ In high temperature such as inside a car or exposed
to direct sunlight○ In extremely cold places or directly exposed to cold
draughts ○ Where the temperature changes drastically○ Where it is exposed to smoke or steam such as near
a cooking appliance or humidifi erMODIFICATIONS HiKOKI Power Tools are constantly being improved
and modifi ed to incorporate the latest technological advancements.
Accordingly, some parts may be changed without prior notice.
GUARANTEEWe guarantee HiKOKI Power Tools in accordance with statutory/country specifi c regulation. This guarantee does not cover defects or damage due to misuse, abuse, or normal wear and tear. In case of complaint, please send the Power Tool, undismantled, with the GUARANTEE CERTIFICATE found at the end of this Handling instruction, to a HiKOKI Authorized Service Center.
NOTEDue to HiKOKI’s continuing program of research and development, the specifi cations herein are subject to change without prior notice.
Hikoki Power Tools (U.K.) Ltd.Precedent Drive, Rooksley, Milton Keynes, MK 13, 8PJ, United KingdomTel: +44 1908 660663Fax: +44 1908 606642URL: http://www.hikoki-powertools.uk
Hikoki Power Tools Deutschland GmbHSiemensring 34, 47877 willich, GermanyTel: +49 2154 49930Fax: +49 2154 499350URL: http://www.hikoki-powertools.de
0000Book_UR18DSDL.indb 120000Book_UR18DSDL.indb 12 2018/04/12 9:28:422018/04/12 9:28:42
13
A
A
1
1819
19
24
27
5253
21
1 1
1
3
45
67
8
9 10 11 12
1715 1620
21
2223
13
14
1
25
26
2829
3031
3233
341
3938
35
36 37
40
29
4647
48
45
1
4243
44
43
42
145
46
4847
49
50
51
41
41
B
B
7171
71
71
7171
71
71
71
71
71
71
71 7171
71
71 71
72
72
72
72
72
72
74
78
73
7677
72
77 79
74
75
76
79
77
7778
7977
7675
74
7572
72
7274
76
77 79
79
77
75
74
76
78
79
77
76
74
75
77
77
77
73
73
73 73
73
73
73
7373
73
7373
73
73
73
73
502
501
75
73
0000Book_UR18DSDL.indb 130000Book_UR18DSDL.indb 13 2018/04/12 9:28:422018/04/12 9:28:42

14
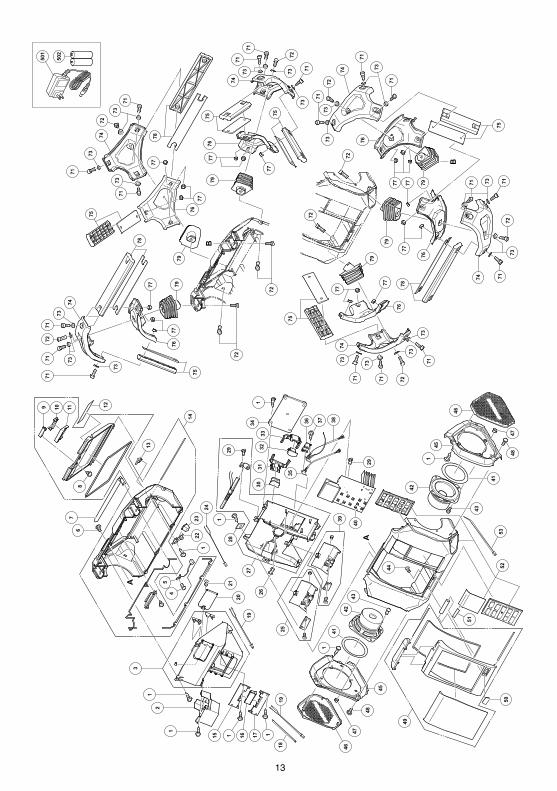
ITEM
N
O.
PAR
T N
AME
Q’T
Y
1TA
PPIN
G S
CRE
W (W
/FLA
NG
E)
D2.3
X833
2AD
APTE
R ST
ORA
GE
CAS
E1
3BU
TTER
Y C
OM
PART
MEN
T SE
T1
4M
ACH
INE
SCRE
W (W
/FLA
NG
E)
M3X
81
5C
ON
NEC
TOR
A1
6TA
PPIN
G S
CRE
W D
4X12
77
RUBB
ER A
NTE
NN
A1
8TA
PPIN
G S
CRE
W (W
/FLA
NG
E)
D2X8
2
9LO
WER
BAC
K C
OVE
R BU
TTO
N1
10UP
PER
BAC
K C
OVE
R BU
TTO
N1
11BA
CK
CO
VER
LATC
HIN
G B
112
NAM
E PL
ATE
113
SOC
KET
CO
VER
114
BAC
K C
ABIN
ET S
ET1
15UP
PER
CO
NTA
CT
BRAK
ET1
16BA
TTER
Y TE
RMIN
AL1
17LO
WER
CO
NTA
CT
BRAC
KET
118
INTE
RNAL
WIR
E (B
)1
19C
ON
NEC
TOR
C2
20BA
TTER
Y C
OVE
R1
21SC
REW
M3
122
DC J
ACK
BRAC
KET
123
DC J
ACK
124
CO
NN
ECTO
R B
125
CAB
LE H
OLD
ER (A
NDR
OID
)1
26SU
PPO
RT1
27BR
ACKE
T SE
T1
28SQ
UARE
WAS
HER
729
TAPP
ING
SC
REW
D2X
66
30LE
FT L
ATC
HIN
G1
ITEM
N
O.
PAR
T N
AME
Q’T
Y
31LE
FT L
ATC
H M
OUN
TIN
G1
32LI
GH
T LA
TCH
ING
133
RIG
HT
LATC
H M
OUN
TIN
G1
34LA
TCH
ING
PLA
TE1
35PC
B AS
S'Y
(USB
)1
36PC
B PL
ATE
137
TAPP
ING
SC
REW
D2X
104
38PC
B AS
S'Y
(AUX
)1
39C
ABLE
HO
LDER
(APP
LE)
140
PCB
ASS'
Y (A
)1
41SP
EAKE
R RE
SIST
NC
E ST
RIP
242
SPEA
KER
(DSD
L)2
43M
ACH
INE
SCRE
W M
3X6
844
TAPP
ING
SC
REW
D2X
72
45SI
DE P
LATE
246
SPEA
KER
GRI
LL S
ET2
47N
UT M
3 8
48H
EX. S
OC
KET
HD.
BO
LT M
4X8
649
FRO
NT
CO
VER
SET
150
USB
EXIT
CO
VER
151
BLUE
TOO
TH L
ABEL
152
FRO
NT
CAB
INET
SET
A1
53C
ON
NEC
TOR
D1
71H
EX. S
OC
KET
HD.
BO
LT M
5X18
18
72H
EX. S
OC
KET
HD.
BO
LT M
5X10
12
73BO
LT W
ASH
ER M
5 30
74UP
PER
PRO
TEC
TOR
675
SHO
RT L
AVER
SET
676
LOW
ER P
ROTE
CTO
R6
77N
UT M
5 18
78LO
NG
LEV
ER S
ET3
79AB
SORB
ER S
ET6
ITEM
N
O.
PAR
T N
AME
Q’T
Y
501
AC A
DAPT
ER1
502
AA B
ATTE
RY2
0000Book_UR18DSDL.indb 140000Book_UR18DSDL.indb 14 2018/04/12 9:28:432018/04/12 9:28:43

15
GUARANTEE CERTIFICATE1 Model No.2 Serial No.3 Date of Purchase4 Customer Name and Address5 Dealer Name and Address (Please stamp dealer name and address)
1
2
3
4
5
0000Book_UR18DSDL.indb 150000Book_UR18DSDL.indb 15 2018/04/12 9:28:432018/04/12 9:28:43

16
0000Book_UR18DSDL.indb 160000Book_UR18DSDL.indb 16 2018/04/12 9:28:432018/04/12 9:28:43

17
0000Book_UR18DSDL.indb 170000Book_UR18DSDL.indb 17 2018/04/12 9:28:432018/04/12 9:28:43

18
0000Book_UR18DSDL.indb 180000Book_UR18DSDL.indb 18 2018/04/12 9:28:432018/04/12 9:28:43

19
0000Book_UR18DSDL.indb 190000Book_UR18DSDL.indb 19 2018/04/12 9:28:432018/04/12 9:28:43

806Code No. C99714814 ŌPrinted in China
EC DECLARATION OF CONFORMITYWe declare under our sole responsibility that Cordless Radio, identifi ed by type and specifi c identifi cation code *1), is in conformity with all relevant requirements of the directives *2) and standards *3). Technical fi le at *4) – See below.The European Standard Manager at the representative offi ce in Europe is authorized to compile the technical fi le.The declaration is applicable to the product affi xed CE marking.
*1) UR18DSDL C351309S*2) 2014/30/EU, 2014/35/EU, 2011/65/EU, 2014/53/EU*3) EN60065:2014+AC:2016
EN62479:2010EN55032:2012+AC:2013EN61000-3-2:2014EN61000-3-3:2013EN55020:2007+A12:2016EN301489-1 V1.9.2EN301489-17 V2.2.1EN300328 V2.1.1Included AC Adaptor is in conformity with COMISSION REGULATION (EC) No 278/2009 implementing Directive 2005/32/EC amended by 2009/125/EC
*4) Representative offi ce in EuropeHikoki Power Tools Deutschland GmbHSiemensring 34, 47877 Willich, Germany
Head offi ce in JapanKoki Holdings Co., Ltd.Shinagawa Intercity Tower A, 15-1, Konan 2-chome,Minato-ku, Tokyo, Japan
29. 6. 2018Naoto YamashiroEuropean Standard Manager
29. 6. 2018
A. NakagawaCorporate Offi cer
0000Book_UR18DSDL.indb 200000Book_UR18DSDL.indb 20 2018/04/12 9:28:432018/04/12 9:28:43