
H2G Create a new SAP Web IDE plugin...H2G Create a new SAP Web IDE plugin 4.5 Deploy the project...
48
SAP Web Integrated Development Environment How-To Guide Provided by Customer Experience Group H2G Create a new SAP Web IDE plugin Applicable Releases: SAP Web Integrated Development Environment 1.4 Version 1.1 - October 2014
Transcript of H2G Create a new SAP Web IDE plugin...H2G Create a new SAP Web IDE plugin 4.5 Deploy the project...

SAP Web Integrated Development Environment How-To Guide
Provided by Customer Experience Group
H2G Create a new SAP Web IDE plugin Applicable Releases: SAP Web Integrated Development Environment 1.4 Version 1.1 - October 2014

H2G Create a new SAP Web IDE plugin
Document History Document Version Authored By Description
1.1 Customer Experience Group
Changed names and screen shots
1.0 Customer Experience Group
First release of this guide
2

H2G Create a new SAP Web IDE plugin
TABLE OF CONTENTS
1. Business Scenario ............................................................................................................................ 4
2. Background Information .................................................................................................................. 4
3. Prerequisites ................................................................................................................................... 4
4. Step-by-Step Procedure ................................................................................................................... 4 4.1 Create a new plugin project.................................................................................................................. 5 4.2 Make some changes and run the plugin again .................................................................................... 8 4.3 Create a folder for the plugin repository and copy the plugin inside ................................................. 10 4.4 Create the catalog.json file ................................................................................................................. 12 4.5 Deploy the project repository on the SAP HANA Cloud ...................................................................... 14 4.6 Create the destination in the SAP HANA Cloud cockpit ...................................................................... 18 4.7 Activate the plugin in SAP Web IDE .................................................................................................... 20 4.8 Create a second plugin for extending an existing template ............................................................... 22 4.9 Make some changes and test the new template................................................................................ 27 4.10 Copy the new plugin in the repository folder ................................................................................... 32 4.11 Update the catalog.json file ............................................................................................................. 33 4.12 Update the project repository on SAP HANA Cloud .......................................................................... 34 4.13 Create and activate a new version of the repository ........................................................................ 37 4.14 Activate the plugin in SAP Web IDE .................................................................................................. 39
5. Appendix ...................................................................................................................................... 41 5.1 The plugin.json file .............................................................................................................................. 41 5.2 The command file (HelloWorld.js) ...................................................................................................... 45 5.3 The interface file (Sample.json) .......................................................................................................... 46 5.4 The service implementation file (Sample.js) ....................................................................................... 47
3

H2G Create a new SAP Web IDE plugin
1. BUSINESS SCENARIO SAP Web Integrated Development Environment (or SAP Web IDE) is a next-generation cloud-based meeting space where multiple project stakeholders can work together from a common web interface, connecting to the same shared repository with virtually no setup required. It includes multiple interactive features that allow you to collaborate with your colleagues and accelerate the development of your HTML5/UI5 applications. 2. BACKGROUND INFORMATION In this How-To Guide we will see how to create a new SAP Web IDE plugin from scratch and how to share it to other users. The plugin we are going to create will add a new functionality to the Edit menu of our SAP Web IDE. It will be just showing a simple greeting message when calling the related menu item. Furthermore we will explore the creation of a custom template in order to extend the existing SAP Fiori Starter template that will be put in a new template category. 3. PREREQUISITES As a prerequisite you need to have your installation of SAP Web IDE up and running. 4. STEP-BY-STEP PROCEDURE This is the sequence of steps:
1) Create a new plugin project 2) Make some changes and run the plugin again 3) Create a folder for the plugin repository and copy the plugin inside 4) Create the catalog.json file 5) Deploy the project repository on the SAP HANA Cloud 6) Create the destination in the SAP HANA Cloud cockpit 7) Activate the plugin in SAP Web IDE 8) Create a second plugin for extending an existing template 9) Make some changes and test the new template 10) Copy the new plugin in the repository folder 11) Update the catalog.json file 12) Update the project repository on SAP HANA Cloud 13) Create and activate a new version of the repository 14) Activate the plugin SAP Web IDE
4

H2G Create a new SAP Web IDE plugin
4.1 Create a new plugin project This first step will take care of creating the basic structure of the entire plugin. SAP Web IDE provides us with a wizard template for this in order to facilitate us in the creation of all the needed components.
1. From the File New Project create a new project
2. Enter the name of the project (i.e. “coolpluginproject”) and click on Next
3. Select Plugin Development Empty Plugin Project and click on Next
5

H2G Create a new SAP Web IDE plugin
4. Enter a name for the new plugin and a short description; choose to include the sample implementation code and click on Next
5. Click on Finish
6. The final structure of the entire project is the following:
6

H2G Create a new SAP Web IDE plugin
7. If you want to test the new created plugin you can do it: select the plugin.json file and click on Run Run Plugin Project
8. A new tab will open in your browser. This new tab contains a copy of your SAP Web IDE environment in debug mode with the plugin already enabled in it. If you click on the Tools menu, you should see the new plugin. For the moment it just contains some sample code
9. By clicking on Tools Sample Hello World you will see that the new plugin is working fine
10. Click on OK and close the second tab in the browser. You have successfully created and tested your
first plugin.
7

H2G Create a new SAP Web IDE plugin
4.2 Make some changes and run the plugin again ...
1. Be sure you have closed the second tab in the browser and that you are working on the normal SAP
Web IDE environment (no debug mode!)
2. Just for showing how to make some basic changes to this project, we can try to change the labels in the i18n property file and the name of the plugin. Go in the i18n folder and double click on the file i18n.properties
3. Change the value for the command_helloworld property to “Welcome” and the value for the property commandgroup_sample to “Greetings”, then save the file
4. Now double click on the plugin.json file. It will be opened on the right side
8

H2G Create a new SAP Web IDE plugin
5. Replace all the occurrences of the word “tools” with “edit”
6. Save the file
7. Now if you run the plugin again you will see that there is a new item, “Greetings Welcome”, in the Edit menu
8. Close the Debug Mode - SAP Web IDE
9. You have successfully changed your first plugin!
9

H2G Create a new SAP Web IDE plugin
4.3 Create a folder for the plugin repository and copy the plugin inside Since you may have several plugins in your environment, you need to create a plugin repository to host them. Of course you can use repositories in order to group plugins by functionality. Each plugin repository will contain also a file named catalog.json with all the information related to every included plugin. We will create this file in the next chapter
1. Open SAP Web IDE
2. Select the Local folder and click on the button for creating a new folder
3. Enter the name of the plugin repository (i.e. “bigpluginrepo”) and click on Create
4. Now select the folder containing the plugin project we have created previously, right click on it and choose Copy
10

H2G Create a new SAP Web IDE plugin
5. Select the new plugin repository folder, right click on it and choose Paste to copy the plugin project inside this new container
6. This is the final structure of your plugin repository. It now contains our first plugin.
..
11
H2G Create a new SAP Web IDE plugin
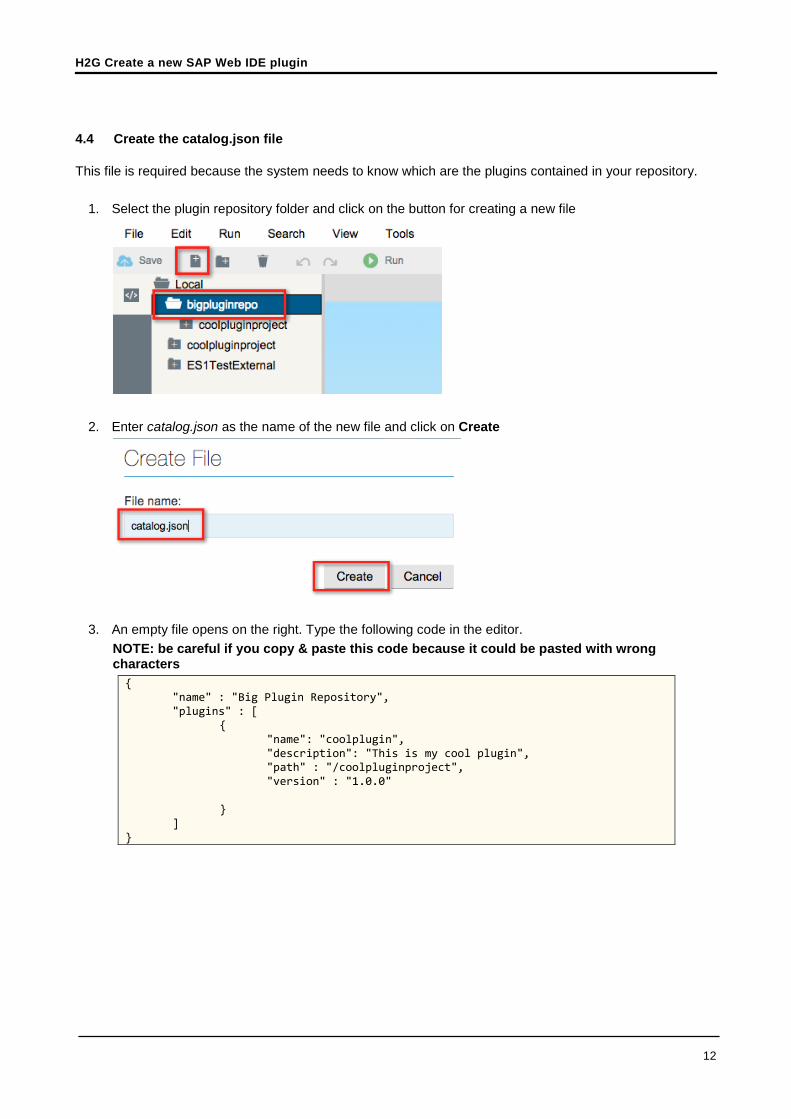
4.4 Create the catalog.json file ...
This file is required because the system needs to know which are the plugins contained in your repository. Choose the menu option Fil e -> New -> Pr ojec t
1. Select the plugin repository folder and click on the button for creating a new file
2. Enter catalog.json as the name of the new file and click on Create
3. An empty file opens on the right. Type the following code in the editor. NOTE: be careful if you copy & paste this code because it could be pasted with wrong characters { "name" : "Big Plugin Repository", "plugins" : [ { "name": "coolplugin", "description": "This is my cool plugin", "path" : "/coolpluginproject", "version" : "1.0.0" } ] }
12

H2G Create a new SAP Web IDE plugin
4. Save the file
5. You have successfully created your catalog.json file.
13

H2G Create a new SAP Web IDE plugin
4.5 Deploy the project repository on the SAP HANA Cloud ...
This step is mandatory to see the plugin among all the available external plugins. We need to deploy our plugin repository folder to the SAP HANA Cloud. This operation will create a Git repository on the HANA Cloud putting the entire plugin repository project there. Then we need to create and activate a new version of the project application. Choose the menu option Fil e -> New -> Pr ojec t
1. Open SAP Web IDE
2. Select the plugin repository folder
3. Right click on it and select Deploy to SAP HANA Cloud
14

H2G Create a new SAP Web IDE plugin
4. Enter the password for your account and click on Deploy
5. Your plugin repository has been successfully deployed to SAP HANA Cloud
6. Go to the SAP HANA Cloud Cockpit (i.e. https://account.hanatrial.ondemand.com/cockpit)
7. Click on the HTML5 Applications button: you should be able to see now your application/repository
8. Click on the name of your application
15

H2G Create a new SAP Web IDE plugin
9. Click on Development and create a new version for the first row in the table, this means that you are going to activate the latest version of your application
10. Enter a version number (i.e. “1.0”) and click on Add
11. Click on Version Management and activate the new version
12. Click Yes to restart the application
16

H2G Create a new SAP Web IDE plugin
13. If you check the status of your application it should be now started
14. Look at the Application URL on the same page and write down this link: it will be used in the next
chapter
15. You have successfully deployed your project to SAP HANA Cloud
17

H2G Create a new SAP Web IDE plugin
4.6 Create the destination in the SAP HANA Cloud cockpit ...
In order for the system to recognize the new plugin, you need to create a new destination in the SAP HANA Cloud cockpit. This is a special destination witch points to the application URL of your plugin application in the SAP HANA Cloud. Choose the menu option Fil e -> New -> Pr ojec t
1. Open the SAP HANA Cloud cockpit (i.e. https://account.hanatrial.ondemand.com/cockpit)
2. Click on Destinations
3. Click on New Destination
4. Enter the following values to create the new destination:
Parameter Value
Name bigpluginrepo
Type HTTP
Description My Plugin Repository
URL <the application URL copied at step 14 of previous chapter>
Proxy Type Internet
Cloud Conn. Version 2
Authentication AppToAppSSO
18

H2G Create a new SAP Web IDE plugin
5. Before saving the destination, we need to add some properties to the destination. These are the properties we need to add:
Property Value
WebIDEEnabled true
WebIDEUsage plugin_repository
TrustAll true
Click on the New Property button and add the first property to the destination as follows
6. Do the same for all the properties listed in the table at step 5
7. Once finished, save the destination by clicking on the Save button
8. You have successfully created a destination for your plugin repository.
19

H2G Create a new SAP Web IDE plugin
4.7 Activate the plugin in SAP Web IDE ...
Let’s activate the plugin. This is made directly from the SAP Web IDE environment. Choose the menu option Fil e -> New -> Pr ojec t
1. Open SAP Web IDE or refresh it if you have it already open
2. Click on Tools External Plugins
3. Provide your credentials if required
4. You should get your new plugin repository containing your plugin
20

H2G Create a new SAP Web IDE plugin
5. Select the plugin repository you have created and enable your plugin, then click on OK
6. Refresh your browser
7. Now, if you look in the Edit menu you should see your plugin successfully activated
21
H2G Create a new SAP Web IDE plugin
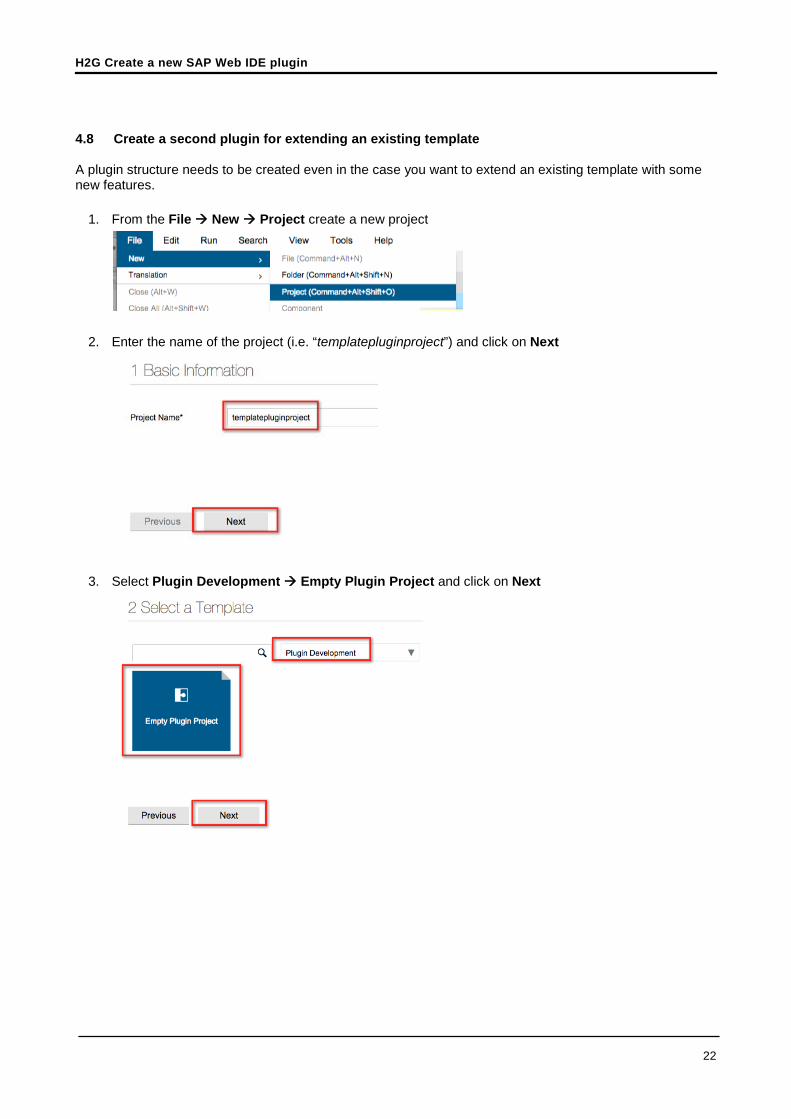
4.8 Create a second plugin for extending an existing template A plugin structure needs to be created even in the case you want to extend an existing template with some new features.
1. From the File New Project create a new project
2. Enter the name of the project (i.e. “templatepluginproject”) and click on Next
3. Select Plugin Development Empty Plugin Project and click on Next
22

H2G Create a new SAP Web IDE plugin
4. Enter the name of the plugin and a short description; please notice that this time we are not choosing to include the sample implementation code because we don’t need it. We just need the plugin structure in order to host our template. Click on Next
5. Click on Finish
6. The final structure of the entire project is the following:
23

H2G Create a new SAP Web IDE plugin
7. Now we can extend the template inside this new plugin. Select the root folder of this second plugin and right click on it. Choose New Component
8. Check that the name reported here is the same of the name of your second plugin and click on Next
9. Choose New Template from Existing Template and click on Next
24

H2G Create a new SAP Web IDE plugin
10. Provide the name for the new template, a short description. Let the type for this template be “project” and choose to create also a new category where this template will be put into. Then click on Next
11. Select one of the available templates and click on Next. In this case we have chosen SAP Fiori Starter Application
12. Click on Finish
25

H2G Create a new SAP Web IDE plugin
13. As you can see a new template has been added in this second plugin. This template has its own folder structure
14. If you click on the plugin.json file in this new plugin project, you see that some extra code has been automatically added to it for the template configuration
15. You have successfully created your second plugin for extending an existing template.
26
H2G Create a new SAP Web IDE plugin
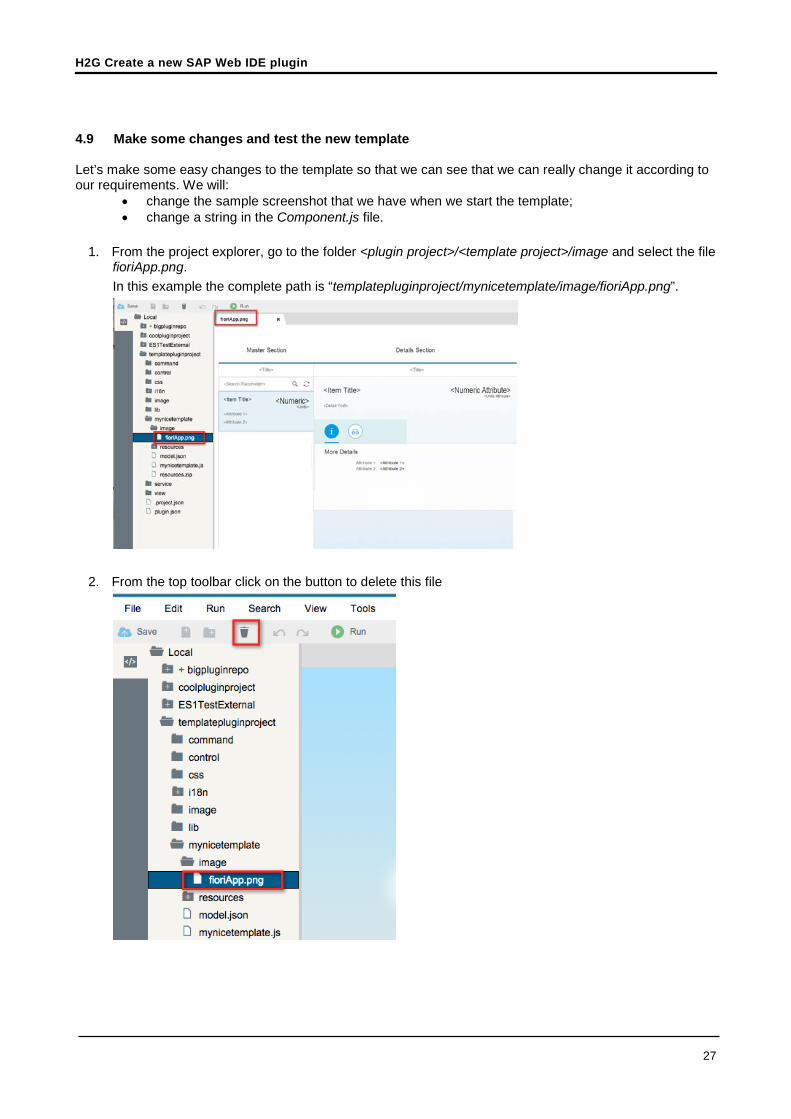
4.9 Make some changes and test the new template Let’s make some easy changes to the template so that we can see that we can really change it according to our requirements. We will:
• change the sample screenshot that we have when we start the template; • change a string in the Component.js file.
1. From the project explorer, go to the folder <plugin project>/<template project>/image and select the file
fioriApp.png. In this example the complete path is “templatepluginproject/mynicetemplate/image/fioriApp.png”.
2. From the top toolbar click on the button to delete this file
27

H2G Create a new SAP Web IDE plugin
3. Confirm that you want to delete this file
4. Select the image folder, right click on it and choose Import File
5. Click on Browse
6. Load the new image file and make sure that it has the same fioriApp.png name
7. Click on Import
28
H2G Create a new SAP Web IDE plugin
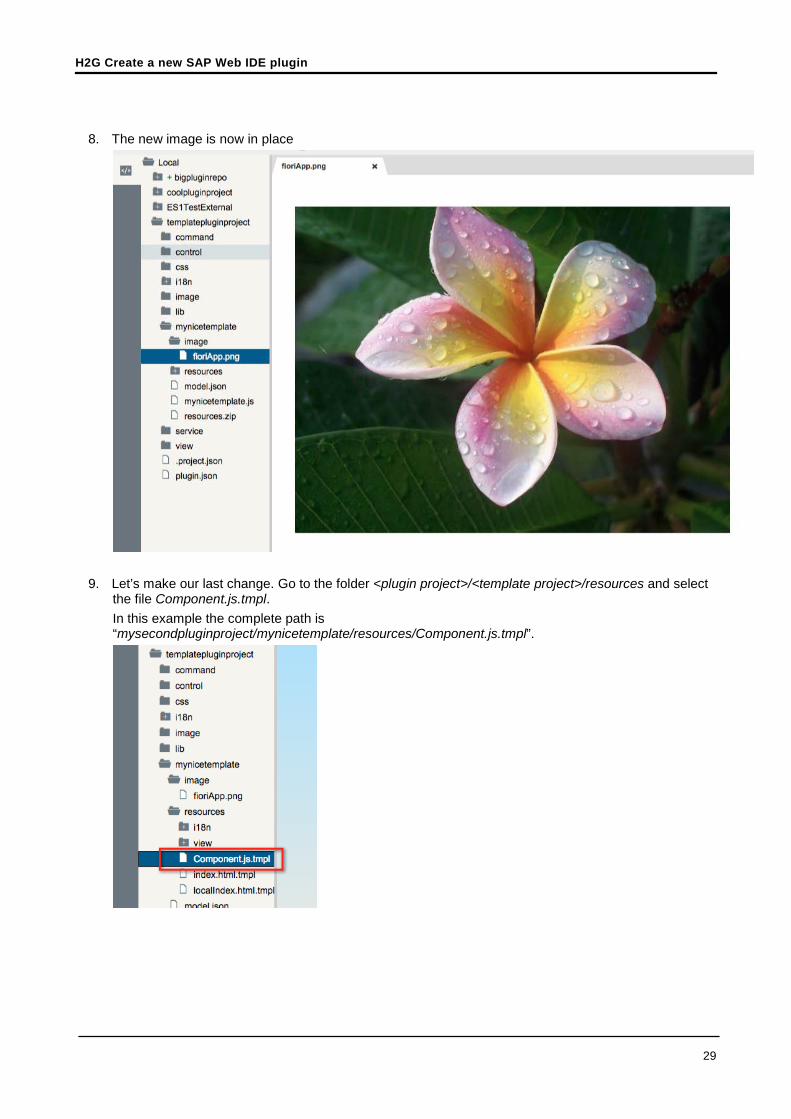
8. The new image is now in place
9. Let’s make our last change. Go to the folder <plugin project>/<template project>/resources and select the file Component.js.tmpl. In this example the complete path is “mysecondpluginproject/mynicetemplate/resources/Component.js.tmpl”.
29

H2G Create a new SAP Web IDE plugin
10. Double click on this file; the file opens on the right side.
11. At line 6 change the name “Master Detail Sample” to a different text (i.e. “Super Nice Template”). Save the file
12. As we have done for the first plugin we can test this by selecting the plugin.json file and clicking on Run Run Plugin Project
30

H2G Create a new SAP Web IDE plugin
13. When a copy of your SAP Web IDE environment opens debug mode, the new template should be enabled automatically. Indeed if you try to create a new project you should now see at the step 2 of the process a new category and a new template to use
14. If you continue with the wizard you see at step 4 that the new image has been applied successfully
15. As a final test, if you complete the wizard you should see, opening the Component.js file, the new name for the project we have assigned before
16. You have successfully tested the new template, now you can close the tab where SAP Web IDE is running in debug mode.
31

H2G Create a new SAP Web IDE plugin
4.10 Copy the new plugin in the repository folder For this operation you can proceed either as explained in the chapter 4.4 or as in the following few steps. We need simply to copy the new plugin under the plugin repository folder.
1. Select the plugin project and right click on it. Then choose Copy
2. Select the plugin repository folder, right click on it and choose Paste
3. At the end you should have two plugins in your plugin repository folder
32

H2G Create a new SAP Web IDE plugin
4.11 Update the catalog.json file Now that we have added this new plugin to the repository we have also to update the catalog.json file in order to make it available for usage.
1. Double click on the catalog.json file in the project explorer
2. Add the highlighted code in the editor; this will declare the new plugin in the repository. NOTE: be careful if you copy & paste this code because it could be pasted with wrong characters { "name" : "Big Plugin Repository", "plugins" : [ { "name": "coolplugin", "description": "This is my cool plugin", "path" : "/coolpluginproject", "version" : "1.0.0" }, { "name": "templateplugin", "description": "This is my template plugin", "path" : "/templatepluginproject", "version" : "1.0.0" } ] }
3. Save the file
33

H2G Create a new SAP Web IDE plugin
4.12 Update the project repository on SAP HANA Cloud Since we have done some changes to the project repository, we need to update the project repository on SAP HANA Cloud. We cannot proceed as we did in the chapter 4.6: deployment on the cloud can be done only the first time. After that we need to use another way and this is the Git client.
1. Select the plugin repository project in the project explorer and click on View Git Pane in order to open the Git client
2. A new pane will open on the right side. Since we are already pointing to the repository project, the Git Pane will show us all the files pending for being updated to the SAP HANA Cloud
34

H2G Create a new SAP Web IDE plugin
3. Click on the Stage All checkbox in order to mark them all. These are the files that will be included in the package that will be sent to the remote repository
4. Enter a commit description in the textbox and click on Commit. The package will be prepared and stored in the local repository
5. When all the files disappear, it means that the package has been sent without errors. Alternatively you can check the status of this operation by enabling the Console from the View menu. In this case you should see the following message in the console window
6. Now we need to send all to the remote repository. Click on Push and select origin/master
35

H2G Create a new SAP Web IDE plugin
7. Provide your SCN username and password and click on OK
8. Push operation was successful
9. You have successfully updated the project on SAP HANA Cloud.
36

H2G Create a new SAP Web IDE plugin
4.13 Create and activate a new version of the repository ...
Since we have pushed new stuff on the plugin repository, the version that is currently active is not up to date. So we need to create a new version that contains our last changes. This version needs to be activated as well. Choose the menu option Fil e -> New -> Pr ojec t
1. Go to the SAP HANA Cloud Cockpit (i.e. https://account.hanatrial.ondemand.com/cockpit)
2. Click on the HTML5 Applications button: you should be able to see now your application/repository
3. Click on the name of your application
37

H2G Create a new SAP Web IDE plugin
4. Click on Development and create again a new version for the first row in the table: this commit contains the latest updates of the plugin repository
5. Enter a version number (i.e. “1.1”) and click on Add
6. Click on Version Management and activate the new version
7. Click Yes to restart the application
8. You have successfully activated a new version of the plugin repository in SAP Web IDE.
38

H2G Create a new SAP Web IDE plugin
4.14 Activate the plugin in SAP Web IDE ...
The final step is to activate this second plugin. Choose the menu option Fil e -> New -> Pr ojec t
1. Reopen or refresh SAP Web IDE
2. Click on Tools External Plugins
3. Select the plugin repository you have created and enable your last plugin, then click on OK
39

H2G Create a new SAP Web IDE plugin
4. IMPORTANT! Refresh again your browser
5. If you create a new project you should be able to find the new template
6. Congratulations! You have successfully extended an existing template.
40
H2G Create a new SAP Web IDE plugin
5. APPENDIX In this appendix I would like to give you some further details regarding how a plugin project is structured. The file and folder structure is created by the wizard template according to the Plugin File and Folder Structure paradigm, which is something like this:
<plugin_name> - the plugin root folder |command - command implementations |service - service implementations & service interfaces |lib - open source libs |image - all image files |css - all css files |i18n - all internationalization files |model - all model classes |control - all UI5 controls |view - all UI5 views |Plugin.js - the plugin module |plugin.json - the plugin configuration file
5.1 The plugin.json file As you can see in the root of the plugin folder there is a file named plugin.json. It contains:
• the name of the plugin class • the dependencies of the plugin • the inherent service configurations for the plugin
In general, its content are settings inherent to the plugin not likely to be changed by an administrator or by the user via personalization: this file is used to tell to SAP Web IDE what services are needed by the plugin and what services the plugin itself provides. A plugin is defined by this plugin.json file by specifying the following properties:
• name:<string> the unique name of the plugin (e.g. sap.watt.uitools.myplugin)
• description:<string> the description of the plugin
• i18n:<string> optional. The path to a i18n file, which consists of a namespace identifier, a folder name (normally i18n) and a file name (e.g. sap.watt.uitools.myplugin/i18n/i18n)
• module:<string> optional. Path to a module that is used as a private event handler target of the plugin. By convention this name must be named Plugin.js
• requires:<object> all required dependencies of the plugin are listed here
o services:<array> - the list of all the services required by the plugin • provides:<object>
public contributions of the plugin to the overall system. The following contributions are possible: o services:<object> - registration of public services o interfaces:<object> - registration of interfaces
• configures:<object> the plugin configurations
o services:<array> - configuration of required or provided services • subscribes:<object>
subscriptions to events of required or provided services, they can be only made to the plugin module or provided services.
41

H2G Create a new SAP Web IDE plugin
If you open the existing plugin.json file, you see that it has exactly this structure: { "name": "coolplugin", "description": "This is a cool plugin", "i18n" : "coolplugin/i18n/i18n", "requires": { "services": [ "usernotification", "log", "command", "commandGroup" ] }, "provides": { "services" : { "sample" : { "implements": "coolplugin.service.Sample", "module": "coolplugin/service/Sample" } }, "interfaces": { "coolplugin.service.Sample": "coolplugin/service/Sample" } }, "configures": { "services": { "command:commands" : [ { "id" : "coolplugin.helloWorld", "label": "{i18n>command_helloWorld}", "service" : "coolplugin/command/HelloWorld" } ], "commandGroup:groups": [ { "id" : "edit.sample", "label" : "{i18n>commandgroup_sample}" }, { "id" : "edit.sample.helloWorld" } ], "commandGroup:items": [ { "parent" : "edit", "type": "menu", "group": "edit.sample", "prio": 100 }, { "parent" : "edit.sample", "type": "inline", "group": "edit.sample.helloWorld", "prio": 10 }, { "parent" : "edit.sample.helloWorld", "type": "action", "command": "coolplugin.helloWorld", "prio": 10 } ] } }, "subscribes": { "sample:notificationDisplayed": "sample:onAfterNotificationDisplayed" } }
42

H2G Create a new SAP Web IDE plugin
The first information we have to provide is the name of the plugin, a short description and the file that contains the internationalization strings. This file normally is located under the folder i18n and has the following structure:
#__ldi.translation.uuid=17cd18a0-bb43-9040-9c76-2aee71ce4d06 # XTXT: sample_helloMessage = Hello {0}! # XMIT: command_helloWorld = Hello World # XMIT: commandgroup_sample = Sample
The first line contains an ID to uniquely identify the translation file. All the other lines are a comment (starting with “#”), a unique parameter that identifies the command and the value associated to this parameter. You can have as many i18n files as the languages you want to have for your plugin. In the source code of your plugin, when the parser encounters a string like this "label": "{i18n>command_helloWorld}", it searches in the i18n files of your language for the string “command_helloWorld” and replaces it with the corresponding value, which is in our case “Hello World”. This is how the translation mechanism works. The second block to examine is the requires section. In this section it’s specified what services this plugin requires. The plugin in this particular example requires
• usernotification - because it wants to count how many times the greeting message is shown • log - because it wants to print the number of the shown messages to the
console • command - because we need to add a command to the menu • commandGroup - because we want to add a new group
"requires": { "services": [ "usernotification", "log", "command", "commandGroup" ] },
What services will this plugin provide? We define this in the following section. This section specifies the names of the services that will be later available to other plugins in the “context.service”, the interfaces that are implemented and the module with the implementation. The interfaces section is important because it also specifies the path to the service. Notice that the strings are case sensitive. In this example, our plugin will provide a service named “sample”, which implements the interface described in the Sample.json file and uses the module Sample.js file, both located under the service folder of the plugin.
"provides": { "services" : { "sample" : { "implements": "coolplugin.service.Sample", "module": "coolplugin/service/Sample" } }, "interfaces": { "coolplugin.service.Sample": "coolplugin/service/Sample" } },
43

H2G Create a new SAP Web IDE plugin
The configures section defines two things: the command that we are going to call from the menu item and the menu item itself. The command we are going to execute has the id = myfirstplugin.helloWorld and is located under the command folder in the Sample.js file. We will see this file later. The command will be inserted in the Edit menu under a subgroup labeled Sample and it will appear with the label defined in the i18n file by the label command_helloWorld. The priority of 100 means that it will be placed after all other commands with lower priority.
"configures": { "services": { "command:commands" : [ { "id" : "coolplugin.helloWorld", "label": "{i18n>command_helloWorld}", "service" : "coolplugin/command/HelloWorld" } ], "commandGroup:groups": [ { "id" : "edit.sample", "label" : "{i18n>commandgroup_sample}" }, { "id" : "edit.sample.helloWorld" } ], "commandGroup:items": [ { "parent" : "edit", "type": "menu", "group": "edit.sample", "prio": 100 }, { "parent" : "edit.sample", "type": "inline", "group": "edit.sample.helloWorld", "prio": 10 }, { "parent" : "edit.sample.helloWorld", "type": "action", "command": "coolplugin.helloWorld", "prio": 10 } ] } },
The latest section is the one related to the subscribes. It means that every time a notification is displayed the onAfterNotificationDisplayed event is fired and the inner code of this event is executed.
"subscribes": { "sample:notificationDisplayed": "sample:onAfterNotificationDisplayed" }
44

H2G Create a new SAP Web IDE plugin
5.2 The command file (HelloWorld.js)
When you click on the menu Edit Sample Hello World the file that is executed is located under the command folder and it’s named “HelloWorld.js”. Let’s give a little of information regarding the content of this file. There are three functions that we need to implement:
• execute: this will call the required function (“sayHello”) inside the implementation file (Sample.js) in order to execute the command;
• isAvailable: this function specifies if the command needs to be always available or if it’s available only under certain conditions: in this case we have made it always available. This means that it will be always visible in the menu.
• isEnabled: this function specifies if the command needs to be always enabled or if it’s enabled only under certain conditions: in this case we have made it always enabled.
These files are:
/** * A command sample for calling the 'sample' service. * * The command is added to the menu bar at 'Edit->Sample->Hello World' as defined in the
plugin.json file. */ define({ execute : function() { return this.context.service.sample.sayHello("World"); }, isAvailable : function() { return true; }, isEnabled : function() { return true; } });
45

H2G Create a new SAP Web IDE plugin
5.3 The interface file (Sample.json) This file is located under the service folder. In this file are exposed all the methods that the plugin’s service needs to implement. In this case for example the service needs to implement the following two functions:
• sayHello: to display the greeting message • getNotificationCount: to get the number of the times the greeting is displayed on the screen
Aaprt these two methods, the service will have to implement the handler for the “notificationDisplayed” event.
{ "name" : "coolplugin.service.Sample", "description" : "The sample service interface", "methods" : { "sayHello" : { "description": "Display a greeting message notification", "params" : [ { "name" : "sName", "type" : "string", "description" : "The name of the user to greet" } ] }, "getNotificationCount" : { "description": "Get the number of greeting notifications displayed so far", "returns" : { "type" : "number", "description" : "Number of greeting notifications displayed so far" } } }, "events" : { "notificationDisplayed" : { "params" : [ { "name" : "notificationCount", "type" : "number", "description" : "The number of greeting notifications displayed so far" } ] } } }
46

H2G Create a new SAP Web IDE plugin
5.4 The service implementation file (Sample.js) This file is located under the service folder as well. It contains a service implementation for displaying a greeting notification and counting the number of alerts displayed. The service provides a public API, which is defined in its interface (in this example, Sample.json file) and can be used by other plugins. Every method call on a service is asynchronous and returns a Q-promise. If not done explicitly by the method, the return value is automatically wrapped with a promise object. Please refer to the following guide for further information about asynchronous Javascript (http://documentup.com/kriskowal/q/). Other services (which are required by this service plugin, as defined in the plugin.json file) can be accessed using “this.context.service” property. A service can fire events that are defined in its interface. These events can be handled by any other service. A service can also handle events from any other service (including its own). The events subscription along with the handler methods must be defined in the plugin.json file. In particular in this file we have the following functions implemented:
• init: this function is automatically executed when the service is initialized; • sayHello: this is the function which does the job of showing the popup message and increasing
the counter of the times when the message is displayed; • getNotificationCount: returns the number of times the popup message is shown; • onAfterNotificationDisplayed: each time the popup message is displayed an event is fired: this
event takes care of displaying the number of notifications in the log console.
define({ _iNotificationCount : null, init : function() { this._iNotificationCount = 0; }, sayHello : function(sName) { var that = this; this._iNotificationCount++; var sMessage = this.context.i18n.getText("i18n", "sample_helloMessage", [ sName ]); // Display greeting notification and fire event return this.context.service.usernotification.info(sMessage).then(function() { return that.context.event.fireNotificationDisplayed({ notificationCount : that.getNotificationCount() }); }); }, getNotificationCount : function() { return this._iNotificationCount; }, onAfterNotificationDisplayed : function(oEvent) { var iCount = oEvent.params.notificationCount; // Display log message to the SAP River RDE console (accessed via 'View->Console' menu) // Log messages don't need to be translatable this.context.service.log.info("Sample", "Number of Hello notifications shown so far: " + iCount, [ "user" ]).done(); } });
47

© 2015 SAP SE or an SAP affiliate company. All rights reserved. No part of this publication may be reproduced or transmitted in any form or for any purpose without the express permission of SAP SE or an SAP affiliate company. SAP and other SAP products and services mentioned herein as well as their respective logos are trademarks or registered trademarks of SAP SE (or an SAP affiliate company) in Germany and other countries. Please see http://www.sap.com/corporate-en/legal/copyright/index.epx#trademark for additional trademark information and notices. Some software products marketed by SAP SE and its distributors contain proprietary software components of other software vendors. National product specifications may vary. These materials are provided by SAP SE or an SAP affiliate company for informational purposes only, without representation or warranty of any kind, and SAP SE or its affiliated companies shall not be liable for errors or omissions with respect to the materials. The only warranties for SAP SE or SAP affiliate company products and services are those that are set forth in the express warranty statements accompanying such products and services, if any. Nothing herein should be construed as constituting an additional warranty. In particular, SAP SE or its affiliated companies have no obligation to pursue any course of business outlined in this document or any related presentation, or to develop or release any functionality mentioned therein. This document, or any related presentation, and SAP SE’s or its affiliated companies’ strategy and possible future developments, products, and/or platform directions and functionality are all subject to change and may be changed by SAP SE or its affiliated companies at any time for any reason without notice. The information in this document is not a commitment, promise, or legal obligation to deliver any material, code, or functionality. All forward-looking statements are subject to various risks and uncertainties that could cause actual results to differ materially from expectations. Readers are cautioned not to place undue reliance on these forward-looking statements, which speak only as of their dates, and they should not be relied upon in making purchasing decisions.
www.sap.com


![DataManager Plugin - d36j349d8rqm96.cloudfront.net Plugin - M… · DataManager Plugin 6Version History 6 Version History 6.1Plugin Version Plugin-Version Date [dd.mm.yyyy] Notes](https://static.fdocuments.in/doc/165x107/5f05b5577e708231d4144e44/datamanager-plugin-plugin-m-datamanager-plugin-6version-history-6-version.jpg)

