Guidelines on Dormant Accounts Web Reporting System · Introduction . The Central Bank of The...
19
The Central Bank of The Bahamas Guidelines on Dormant Accounts Web Reporting System January, 2009 Page | 1
Transcript of Guidelines on Dormant Accounts Web Reporting System · Introduction . The Central Bank of The...

The Central Bank of The Bahamas
Guidelines on Dormant Accounts Web
Reporting System
January, 2009
Page | 1
Introduction The Central Bank of The Bahamas Dormant Accounts Reporting System (CBOB DARS) is a secure web portal provided for submitting your annual Dormant Accounts information. This site will allow you to securely send your annual statutory Dormant Accounts submission, either via uploading a spreadsheet or manually keying in the accounts. You will be able to print or download reports from the site that show the list of accounts you submitted, so you can verify immediately the accuracy of your submission. The CBOB DARS site is located at: https://submissions.centralbankbahamas.com
Security The CBOB DARS site uses a 256-bit SSL Certificate to ensure that information transferred to and from the site is secure. SSL (Secure Sockets Layer) will create a secure tunnel of information between your computer and the CBOB Web Server. This is accomplished by your web browser identifying and examining the signed digital certificate from the CBOB Web Server, at which point secret keys are computed at both ends of the connection. Any information passed through this connection is first encrypted before being sent across the internet. The DARS website is also password protected. You will be required to know your unique User ID and Password to log onto the site. The password will have the following restrictions: • Requires at least 6 minimum characters • Requires at least 1 capital letter • Requires at least 1 number A full audit is kept of all activity entered in the system. All information entered through the DARS website will go into a pending queue at the Central Bank, awaiting verification by the Central Bank upon receipt of your payment(s) (by cheques, EFT, RTGS, etc.) corresponding to the submission(s). This will facilitate detection of potential data integrity issues (e.g. differences between the dollar value and currency of accounts transferred and the actual payments received), before the information is finalized and updated to the Central Bank’s system. By statute, the information that is submitted has been restricted to the minimum sensitive information possible. No Account Holder Names or Addresses are passed.
Page | 2

Test System You will be provided access to a Test system to give you the chance to familiarize yourself with the process, without the potential to harm the live data. Also, since the Dormant Accounts submission process is only performed once a year, you may need a refresher trial run each year. The DARS Test site is hosted by MIMICS, Inc. in Los Angeles, California. The site is available at: https://submissions.centralbankbahamas.com/AbandonedPropertyTest You will be provided with the same initial password for both systems, and will be required to change the password in both systems. Please save your password for both the Live and Test DARS sites in a secure location. We request that you not submit any actual data to the Test site. Instead, please submit only test data with false account numbers.
Page | 3
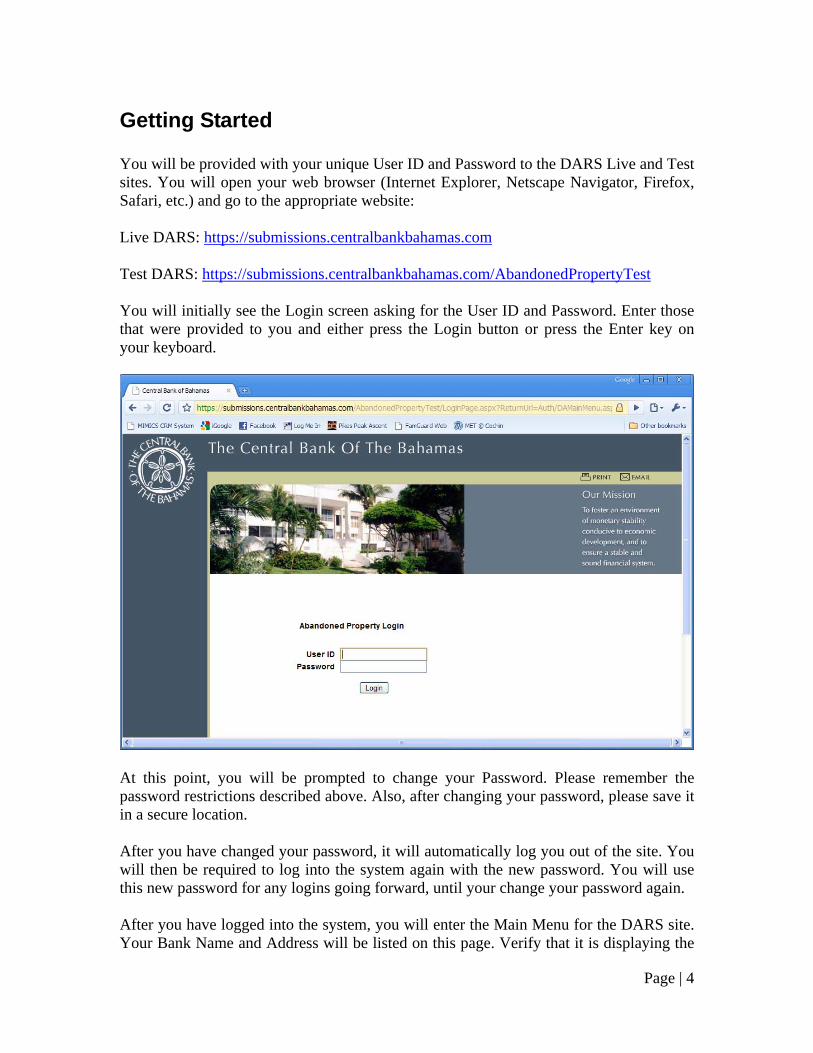
Getting Started You will be provided with your unique User ID and Password to the DARS Live and Test sites. You will open your web browser (Internet Explorer, Netscape Navigator, Firefox, Safari, etc.) and go to the appropriate website: Live DARS: https://submissions.centralbankbahamas.com Test DARS: https://submissions.centralbankbahamas.com/AbandonedPropertyTest You will initially see the Login screen asking for the User ID and Password. Enter those that were provided to you and either press the Login button or press the Enter key on your keyboard.
At this point, you will be prompted to change your Password. Please remember the password restrictions described above. Also, after changing your password, please save it in a secure location. After you have changed your password, it will automatically log you out of the site. You will then be required to log into the system again with the new password. You will use this new password for any logins going forward, until your change your password again. After you have logged into the system, you will enter the Main Menu for the DARS site. Your Bank Name and Address will be listed on this page. Verify that it is displaying the
Page | 4
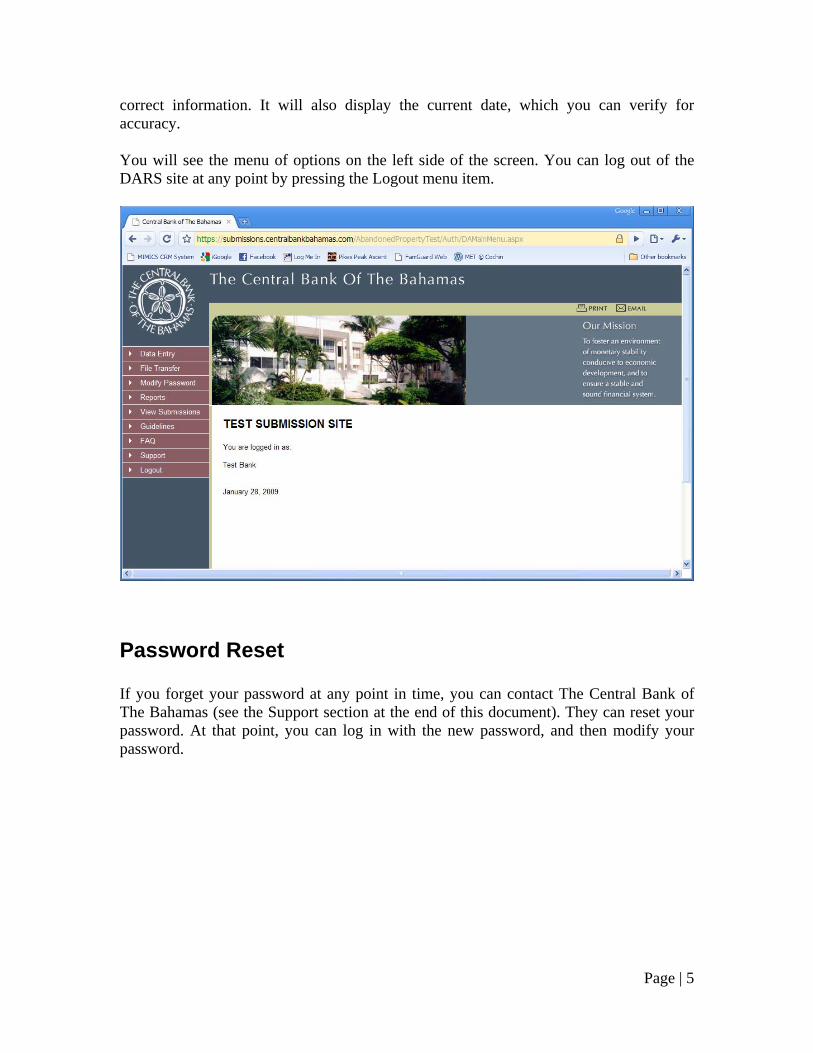
correct information. It will also display the current date, which you can verify for accuracy. You will see the menu of options on the left side of the screen. You can log out of the DARS site at any point by pressing the Logout menu item.
Password Reset If you forget your password at any point in time, you can contact The Central Bank of The Bahamas (see the Support section at the end of this document). They can reset your password. At that point, you can log in with the new password, and then modify your password.
Page | 5
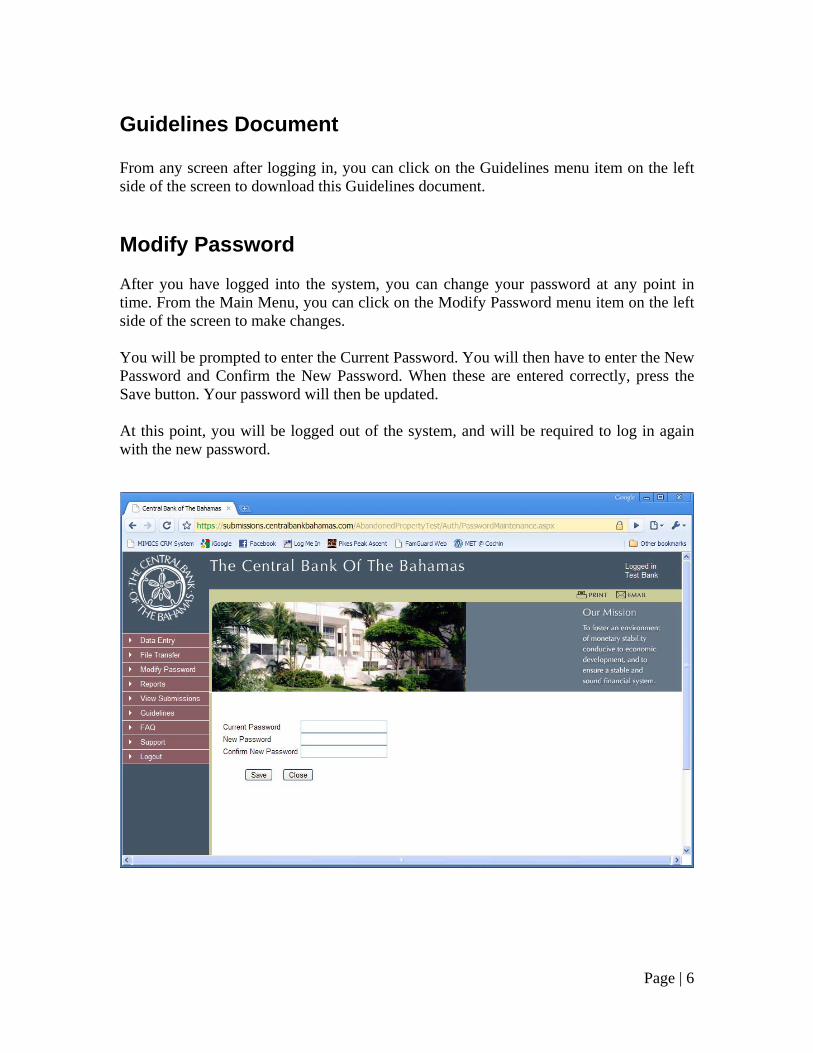
Guidelines Document From any screen after logging in, you can click on the Guidelines menu item on the left side of the screen to download this Guidelines document. Modify Password After you have logged into the system, you can change your password at any point in time. From the Main Menu, you can click on the Modify Password menu item on the left side of the screen to make changes. You will be prompted to enter the Current Password. You will then have to enter the New Password and Confirm the New Password. When these are entered correctly, press the Save button. Your password will then be updated. At this point, you will be logged out of the system, and will be required to log in again with the new password.
Page | 6

Data Entry There are two ways to submit information in the DARS site. The first is the Data Entry option. This may be used when you have only a limited number of Dormant Accounts to submit. If the number of accounts exceeds ten (10), it will probably be easier to use the File Transfer option explained below. It is assumed that you are submitting this information at the same time as sending a cheque or other payment to the Central Bank. The system will ask for the payment information at the bottom of the screen, so that the payment can be cross referenced against the accounts. On the Data Entry screen, the top section provides a grid for you to key in the accounts to be submitted. You can enter accounts for multiple Currencies in the grid, before submitting.
To enter an account in the grid, you will fill in: • Account Type – Options of “Checking”, “Savings” and “Fixed”. • Account No – The dormant Account Number. • Currency – The currency the Account is denominated in. • Acct Balance - The balance on the Account.
Page | 7

• Branch Code – This is the list of registered Branches for your Bank that is on file at The Central Bank. Choose the Branch Code of the Branch where the account is located.
• Last Trans Date – This is the date the account was last accessed by the Customer (this date must be at least seven years prior to December 31st of the Submission Year). Click on the icon for the calendar to access a pop-up calendar, for choosing the date. At the top of the pop-up calendar, you can drop down and select the relevant Month or Year. You can also press the “<” or “>” buttons by the month to scroll one month in either direction. When you are on the appropriate month, click the appropriate day of the month. This will then close the pop-up and fill in the date on the Data Entry screen.
When you have completed filling in the data for one Account in the grid, then press the Add button. This will save the pending account you just completed, and will add a new blank record to the grid to allow you to enter the next account. To edit or delete a record you saved, there is an Edit and a Delete link to the right side of the record in the grid. Pressing Edit will allow you to modify the details of the record. Pressing Delete will remove the record from the grid. When you have completed filling out all of your accounts in the grid, you will proceed to fill in the bottom section of the screen. You will then fill out the Control Grid. This grid will have one record for each possible Account Currency. You will have to edit every record that has a Currency that was used in the top Accounts grid. To edit a record, press the Edit link at the right side of the grid. You will then fill in the following for each record:
Page | 8

• Total Amount – This Amount must exactly match the total Acct Balance from the top grid of all accounts of the same Currency. If these amounts do not match, you will get an error when you try to Submit and will not be allowed to. This is used as a control figure to make sure there were not any errors keying in the information.
• Payment Method – This is the manner in which you are submitting the payment to the Central Bank for this Currency. For each Currency, you may send the payment in different methods.
• Cheque/Ref No – This relates to the payment being sent. If you are sending a Cheque for this Currency, then you will enter the Cheque Number here. If you are submitting the payment by RTGS or SWIFT, then list the Reference Number here.
When you are done filling in the information for one record, press the Update button to save that information into the grid. You will also fill in the following fields at the bottom of the page: • Submission Year – This will typically be the previous year. For example, in January
2009, you will be submitting for the Year 2008. • Currency – The Currency of all of the accounts entered in the grid above. Please note
that you have to submit separately for each currency. • Total Amount – This should equal the total Acct Balance for all entries in the grid.
This is used to check that the entries in the grid were keyed in accurately. If this amount does not match the sum of the records in the grid, then the system will give an error message.
• Date – This is the date you are submitting the information. It cannot be changed. • Payment Method – This is the form of payment you will be using to send the funds
related to these accounts to the Central Bank. You should be submitting the information on this screen at the time when you are sending in payment, so that you have the payment information available to you.
• Ref Number – This is the cheque number (for Cheques) or the reference number for other payment methods (e.g. RTGS) for the payment submitted for these Accounts.
• Payment Date – This is the date the payment was sent to the Central Bank. • Comments – This is for your general use. You can enter any information that you
would like the Central Bank to see related to this particular submission. • Certified By
o First Name – The given name of the person submitting this information. o Middle Name – This field is optional. o Last Name – The family name of the person submitting this information. o Position – The business title of the person submitting the information. o Email Address – The Email Address of the person submitting the information.
This will be used by the Central Bank to contact you in case there is any problem with the submission.
o Phone Number – The Phone Number of the person submitting the information. This will be used by the Central Bank to contact you in case there is any problem with the submission.
Page | 9

When you have entered all of the information correctly in the grid, and have also filled in the submission information at the bottom of the page, you can then press the Submit button. If all of the information has been filled in correctly, it will be saved to the pending queue for the Central Bank. You will also receive a confirmation email to the Email Address that you entered. The Central Bank will then verify the information when the payment is received, and will post the records to its database when verified. When you have submitted a batch of accounts, the screen will then be cleared out.
Page | 10

File Transfer The second option for submitting data in the DARS site is through the File Transfer option. This option is recommended when you have a large number of accounts to submit. It will require you to enter your newly Dormant Accounts into a spreadsheet and upload it to the DARS site. Again, it is assumed that you are submitting this information at the same time as sending a cheque or other payment to the Central Bank for each Currency of accounts being submitted. The system will ask for the payment information at the bottom of the screen, so that the payment can be cross referenced against the Accounts submitted. The submission spreadsheet is in the format you may already be familiar with from previous years’ submissions to the Central Bank. To download a new copy of the latest template format, you can click on the link at the top of the screen for “Download Sample.” This will pop up a message asking you if you want to Open or Save the sample spreadsheet. Choose to Save it, and specify a location on your network where you can easily locate it.
On the spreadsheet, you will have a tab for “Accounts” where you should enter the accounts to submit. There is also a tab for “Instructions” that will give you information on how to fill out the spreadsheet. When you have completed filling out the spreadsheet, save it on your computer or network. Then, on the DARs site, in the File Transfer section, press the Browse button to select that spreadsheet.
Page | 11

When you have completed selecting the spreadsheet, you will fill in the bottom section of the screen.
• First, fill in the grid of Currency totals. You will see a grid with one row per
Currency. For each row that you submitted information for in the spreadsheet, press the Edit button.
• You will then fill in the grid: o Currency – The Currency of the Accounts entered. o Total Amount – This should equal the total Acct Balance for all entries in the
spreadsheet that are of the Currency selected. This is used to check that the entries in the spreadsheet were keyed in accurately. If this amount does not match the sum of the records in the spreadsheet for that Currency, then the system will give an error message.
o Payment Method – This is the form of payment you will be using to send the funds (for each currency) related to these accounts to the Central Bank. You should be submitting the information on this screen at the time when you are sending in payment, so that you have the payment information available to you.
o Reference No – This is the cheque number (for Cheques) or the reference number for other payment methods (e.g. RTGS) for the payment submitted for the Currency selected.
You will then fill in the Submission information:
Page | 12

• Submission Year – This will typically be the previous year. For example, in January
2009, you will be submitting for the Year 2008. • Date – This is the date you are submitting the information. It cannot be changed. • Payment Date – This is the date the payments were sent to the Central Bank. • Certified By
o First Name – The given name of the person submitting this information. o Middle Name – This field is optional. o Last Name – The family name of the person submitting this information. o Position – The business title of the person submitting the information. o Email Address – The Email Address of the person submitting the information.
This will be used by the Central Bank to contact you in case there is any problem with the submission.
o Phone Number – The Phone Number of the person submitting the information. This will be used by the Central Bank to contact you in case there is any problem with the submission.
• Comments – This is for your general use. You can enter any information that you would like The Central Bank to see related to this particular submission.
When you have entered all of the information correctly, you can then press the Submit button. If all of the information has been filled in correctly, it will then save the information to the pending queue for the Central Bank. You will also receive a confirmation email to the Email Address that you entered. The Central Bank will then verify the information when the payments are received, and will post the records to its database when verified.
Page | 13

Reports You will be able to view, download, or print reports from the DARS site that will show you the list of accounts you submitted. You will be able to then verify that the information submitted is accurate. Click on the “Reports” link on the left menu. To print a report of your submission history, under the “Submitted Accounts” header, you will have fields that can be used to filter the report:
• Begin Date – This is a required filter. The report will only print accounts submitted
on or after the Begin Date selected. • End Date – This is a required filter. The report will only print accounts submitted on
or before the End Date selected. • Currency – This is an optional filter. If you do not wish to filter by Currency, then
leave the field blank. If you select a Currency in the dropdown, the report will only print accounts of the Currency selected.
• Branch Code – This is an optional filter. If you do not wish to filter by Branch Code, then leave the field blank. If you select a Branch Code in the dropdown, the report will only print accounts from the Branch Code selected.
Page | 14
• Account Number – This is an optional filter. If you do not wish to filter by Account Number, then leave the field blank. If you select a specific Account Number in the dropdown, the report will only print accounts with that Account Number.
• Account Type – This is an optional filter. If you do not wish to filter by Account Type, then leave the field blank. If you select a specific Account Type in the dropdown, the report will only print accounts of the Account Type selected.
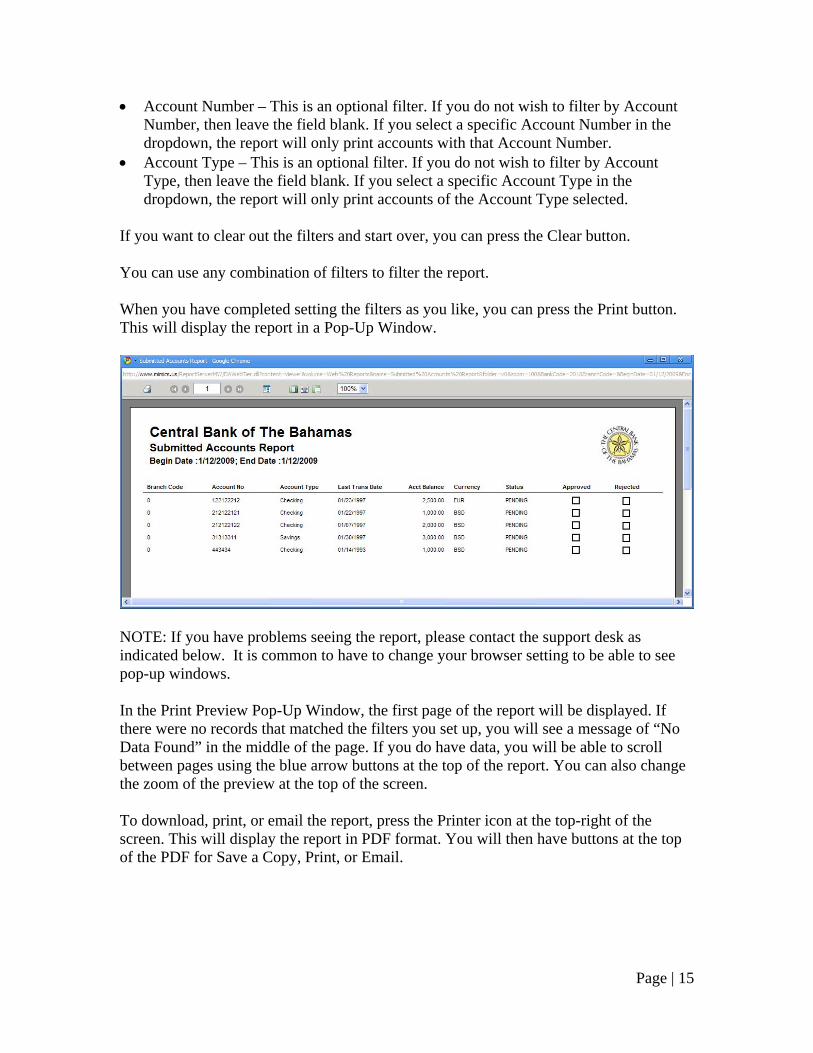
If you want to clear out the filters and start over, you can press the Clear button. You can use any combination of filters to filter the report. When you have completed setting the filters as you like, you can press the Print button. This will display the report in a Pop-Up Window.
NOTE: If you have problems seeing the report, please contact the support desk as indicated below. It is common to have to change your browser setting to be able to see pop-up windows. In the Print Preview Pop-Up Window, the first page of the report will be displayed. If there were no records that matched the filters you set up, you will see a message of “No Data Found” in the middle of the page. If you do have data, you will be able to scroll between pages using the blue arrow buttons at the top of the report. You can also change the zoom of the preview at the top of the screen. To download, print, or email the report, press the Printer icon at the top-right of the screen. This will display the report in PDF format. You will then have buttons at the top of the PDF for Save a Copy, Print, or Email.
Page | 15
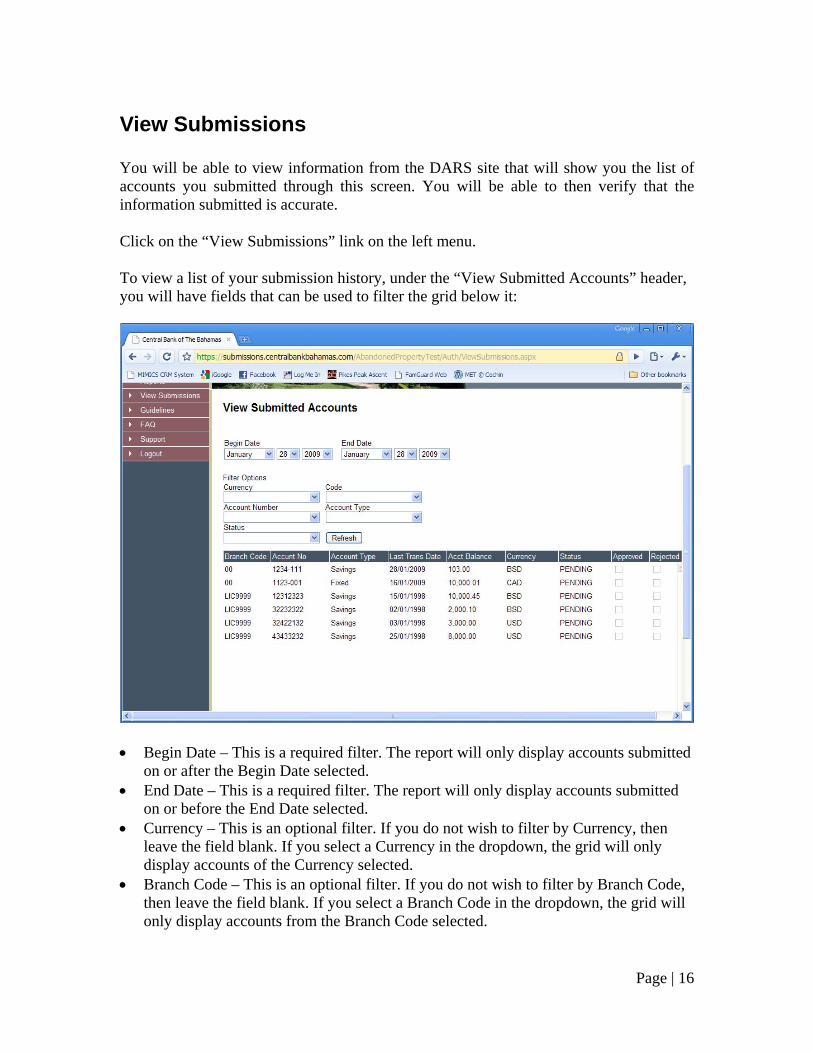
View Submissions You will be able to view information from the DARS site that will show you the list of accounts you submitted through this screen. You will be able to then verify that the information submitted is accurate. Click on the “View Submissions” link on the left menu. To view a list of your submission history, under the “View Submitted Accounts” header, you will have fields that can be used to filter the grid below it:
• Begin Date – This is a required filter. The report will only display accounts submitted
on or after the Begin Date selected. • End Date – This is a required filter. The report will only display accounts submitted
on or before the End Date selected. • Currency – This is an optional filter. If you do not wish to filter by Currency, then
leave the field blank. If you select a Currency in the dropdown, the grid will only display accounts of the Currency selected.
• Branch Code – This is an optional filter. If you do not wish to filter by Branch Code, then leave the field blank. If you select a Branch Code in the dropdown, the grid will only display accounts from the Branch Code selected.
Page | 16

• Account Number – This is an optional filter. If you do not wish to filter by Account Number, then leave the field blank. If you select a specific Account Number in the dropdown, the grid will only display accounts with that Account Number.
• Account Type – This is an optional filter. If you do not wish to filter by Account Type, then leave the field blank. If you select a specific Account Type in the dropdown, the grid will only display accounts of the Account Type selected.
You can use any combination of filters to filter the report. When you have completed setting the filters as you like, you can press the Refresh button. This will display the records in the grid below.
Page | 17

Support
After searching for your answer on the Frequently Asked Question Page of the website, if you still require assistance, you can obtain information and support using the steps outlined below. To ensure best possible support, we request that all requests include as much relevant information as possible.
The following three steps will guide you through the support contact process.
1. Step 1 - Use an appropriate subject line 2. Step 2 - Institution information 3. Step 3 - Choose appropriate contact e-mail address
Step 1 - Use an appropriate subject line
For fastest response please include the following information in the subject line of your e-mail:
1. The name of the service for which you are contacting support 2. Your Username and Institution name 3. A brief issue description
E-mails not containing appropriate subject lines might be misrouted, resulting in a delay in response.
Example subject: AbandonedProperty - ValuedCustomer - Unable to upload data
Step 2 - Customer information
Please include the below information with your support request. Clicking on an e-mail address in step three will launch your default e-mail editor and place a pre-populated template in the message body. If you are using a web-browser based e-mail account you will need to copy and paste the information below into your support e-mail. Be sure to fill it out before submitting your support request.
o Institution Name: o Your Name: o E-mail Address: o Web site URL (if applicable): o Problem description:
Step 3 - Choose appropriate contact e-mail address
Please ensure you choose the correct e-mail address when you are submitting your e-mail. If your support request is misrouted there will be a delay in response. Please
Page | 18
Page | 19
submit only a single support request for a particular issue in a 72 hour period. Though it is not always possible, we endeavour to answer all support contacts in a prompt and timely fashion. Alternatively, you may contact the appropriate support at the numbers listed below.
Clicking on the appropriate e-mail address will launch your default e-mail editor and pre-populate it with the required contact form.
• Non-technical support related requests and information - [email protected] 242-302-9875
• Technical support and information – [email protected] 242-302-2788