Guidelines for Installing Rolled Erosion Control Products ... · Guidelines for Installing Rolled...
21
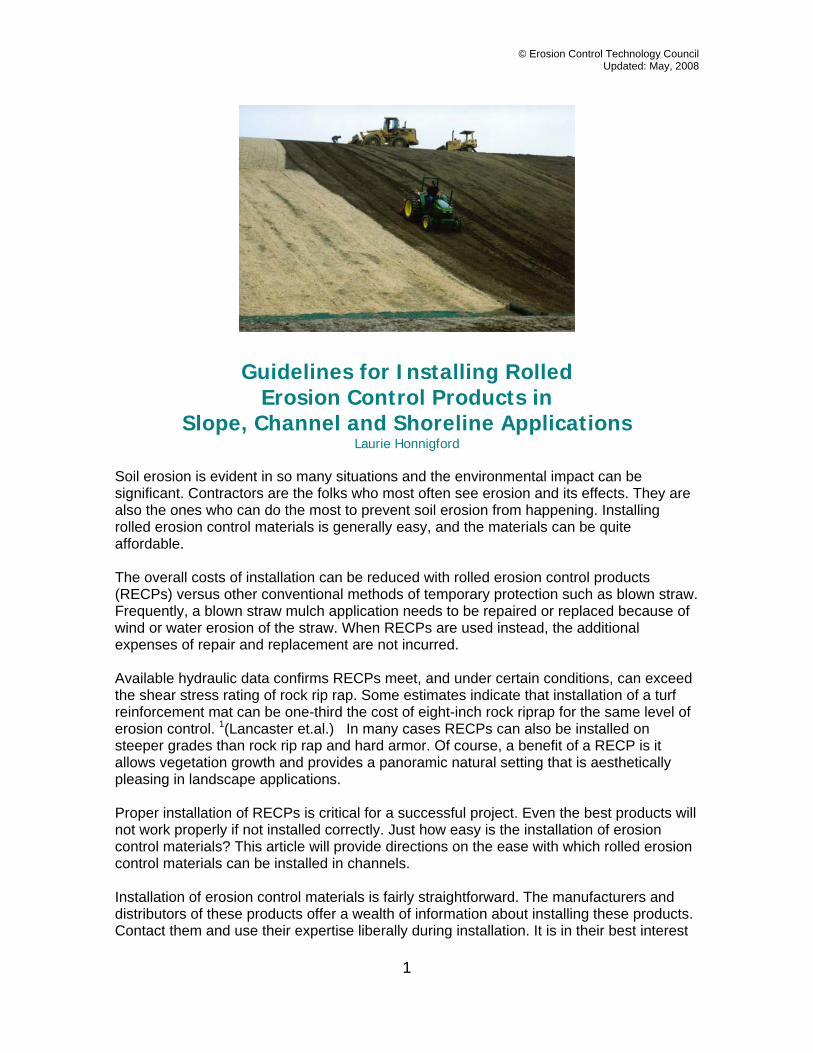
© Erosion Control Technology Council Updated: May, 2008 1 Guidelines for Installing Rolled Erosion Control Products in Slope, Channel and Shoreline Applications Laurie Honnigford Soil erosion is evident in so many situations and the environmental impact can be significant. Contractors are the folks who most often see erosion and its effects. They are also the ones who can do the most to prevent soil erosion from happening. Installing rolled erosion control materials is generally easy, and the materials can be quite affordable. The overall costs of installation can be reduced with rolled erosion control products (RECPs) versus other conventional methods of temporary protection such as blown straw. Frequently, a blown straw mulch application needs to be repaired or replaced because of wind or water erosion of the straw. When RECPs are used instead, the additional expenses of repair and replacement are not incurred. Available hydraulic data confirms RECPs meet, and under certain conditions, can exceed the shear stress rating of rock rip rap. Some estimates indicate that installation of a turf reinforcement mat can be one-third the cost of eight-inch rock riprap for the same level of erosion control. 1 (Lancaster et.al.) In many cases RECPs can also be installed on steeper grades than rock rip rap and hard armor. Of course, a benefit of a RECP is it allows vegetation growth and provides a panoramic natural setting that is aesthetically pleasing in landscape applications. Proper installation of RECPs is critical for a successful project. Even the best products will not work properly if not installed correctly. Just how easy is the installation of erosion control materials? This article will provide directions on the ease with which rolled erosion control materials can be installed in channels. Installation of erosion control materials is fairly straightforward. The manufacturers and distributors of these products offer a wealth of information about installing these products. Contact them and use their expertise liberally during installation. It is in their best interest
Transcript of Guidelines for Installing Rolled Erosion Control Products ... · Guidelines for Installing Rolled...
© Erosion Control Technology Council Updated: May, 2008
1
Guidelines for Installing Rolled
Erosion Control Products in Slope, Channel and Shoreline Applications
Laurie Honnigford Soil erosion is evident in so many situations and the environmental impact can be significant. Contractors are the folks who most often see erosion and its effects. They are also the ones who can do the most to prevent soil erosion from happening. Installing rolled erosion control materials is generally easy, and the materials can be quite affordable. The overall costs of installation can be reduced with rolled erosion control products (RECPs) versus other conventional methods of temporary protection such as blown straw. Frequently, a blown straw mulch application needs to be repaired or replaced because of wind or water erosion of the straw. When RECPs are used instead, the additional expenses of repair and replacement are not incurred. Available hydraulic data confirms RECPs meet, and under certain conditions, can exceed the shear stress rating of rock rip rap. Some estimates indicate that installation of a turf reinforcement mat can be one-third the cost of eight-inch rock riprap for the same level of erosion control. 1(Lancaster et.al.) In many cases RECPs can also be installed on steeper grades than rock rip rap and hard armor. Of course, a benefit of a RECP is it allows vegetation growth and provides a panoramic natural setting that is aesthetically pleasing in landscape applications. Proper installation of RECPs is critical for a successful project. Even the best products will not work properly if not installed correctly. Just how easy is the installation of erosion control materials? This article will provide directions on the ease with which rolled erosion control materials can be installed in channels. Installation of erosion control materials is fairly straightforward. The manufacturers and distributors of these products offer a wealth of information about installing these products. Contact them and use their expertise liberally during installation. It is in their best interest

© Erosion Control Technology Council Updated: May, 2008
2
to give you sound advice on proper installation techniques on the erosion control products that they manufacture. Their advice may also save the Contractor money in installation.
In describing the installation methods, the assumption is made that the designer of the project has chosen the proper products to be used in the project. There is a lot of information about designing project using rolled erosion control products on the ectc.org website. Tools of the Trade - Rolled Erosion Control Materials Defined What are rolled erosion control products (RECPs)? Rolled erosion control products consist of either organic or synthetic materials fabricated into a mat or blanket designed to be rolled over a prepared surface and fastened to the soil. RECPs hold soil in place while vegetation is established. There are four basic types of rolled erosion control products:
Erosion control nettings (ECN) – A planar woven natural fiber or extruded geosynthetic mesh used as a component in the manufacture of RECPs or separately as a temporary degradable RECP to anchor loose fiber mulches. Open-weave textiles (OWT) – A temporary degradable RECP composed of processed natural or polymer yarns woven into a matrix and used to provide erosion control and facilitate vegetation establishment. Erosion-control blankets (ECB) – A temporary degradable RECP composed of processed natural or polymer fibers mechanically, structurally or chemically bound together to form a continuous matrix. Netting types can be matched to the job site requirements. Turf reinforcement mats (TRM) – A rolled erosion control product composed of non-degradable synthetic fibers, filaments, nets, wire mesh and/or other elements, processed into a permanent, three dimensional matrix of sufficient thickness. TRMs, which may be supplemented with degradable components, are designed to impart immediate erosion protection, enhance vegetation establishment and provide long-term functionality by permanently reinforcing vegetation during and after maturation. Note: TRMs are typically used in hydraulic applications, such as high flow ditches and channels, steep slopes, stream banks, and shorelines, where erosive forces may exceed the limits of natural, unreinforced vegetation or in areas where limited vegetation establishment is anticipated.
RECPs work by holding soil in place while seed germination and vegetation establishment occurs. The length of time a RECP will work depends upon product composition, geographic location in which it is used and the amount of sunlight, rain and climatic conditions the product is exposed to. Specifying the type of RECP that should be used is another topic entirely. This article will focus on installation only. Staples and Stakes The second material choice that needs to be made is what type of staple is appropriate for the project. The following is a guideline only.

© Erosion Control Technology Council Updated: May, 2008
3
The standard anchoring device for temporary degradable RECPS has been 11 gauge wire staples. Soil, site conditions and type of RECP being installed will affect which staples should be used. In sandy soil conditions longer, wider staples may be necessary to provide sufficient fastening of the RECP to the ground. Staples typically range from six inches to 24 inches in length with a one-inch to two-inch crown. Some manufacturers offer staple guns to expedite installation. The main reason for the staple gun is to allow the installer to easily drive the staple to its full length and flush with the soil surface. If a staple is not installed flush with the ground, site maintenance can become more difficult. Long term non-degradable RECPs are usually used on sites requiring more aggressive soil erosion control and reinforced root systems. Hence, these materials usually require a stronger anchoring system. Wire staples, metal pins with washers, plastic pegs, rebar, and wooden stakes are often used in these instances. When using wooden stakes, pressure treated wood should be used in applications where longevity is required. The Project Engineer should use his or her best judgment in selecting stake length for good fastening, particularly where solid anchoring is essential. The following is a general guideline for staple selection. In the following installation instructions, the generic use of the word “staple or stake” implies that the proper type has been selected to match the type of RECP being used, the site and soil conditions.
Length Soil Conditions
6 inches Typical soil conditions. Six-inch staples used in all but loose soil types.
8 inches
Loam, relatively loose sandy loam to sandy soils. Eight-inch staples are typically used in high velocity channel applications.
> 12 inches
Excessively loose soils, slopes containing fine silt, sand, or soft mud. Deep and soft fills, loose sands, silts, loams or “quick” conditions. Staples 12 inches and longer are used in shoreline applications in which wave action is a factor or in instances where soils remain saturated for long periods of time.

© Erosion Control Technology Council Updated: May, 2008
4
Installation of RECPs on Slopes Slope Step One – Site Preparation The first step in the installation of RECPs on slopes is site preparation. Be sure the site is properly prepared before installing any RECP. The site should be fine graded to a smooth profile and relatively free from all weeds, clods, stones, roots, sticks, rivulets, gullies, crusting and caking. Fill any voids and make sure that the slope is compacted properly. Slope Step Two – Seeding The second step in the installation process of RECPs on slopes is to seed the area to be vegetated. Select a seed mix for vegetation adapted to the local geographical area. The seed must also be suitable for site-specific soil conditions. Always match the seed to site soil conditions for optimum germination, root system development, vegetation density, and long term functionality. Prior to RECP installation if the prepared seed bed becomes crusted or eroded, or if eroded places, ruts or depressions exist for any reason, the contractor must rework the soil until it is smooth and re-seed such areas which are reworked.
Steps One & Two - Site Preparation and Seeding
© Erosion Control Technology Council Updated: May, 2008
5
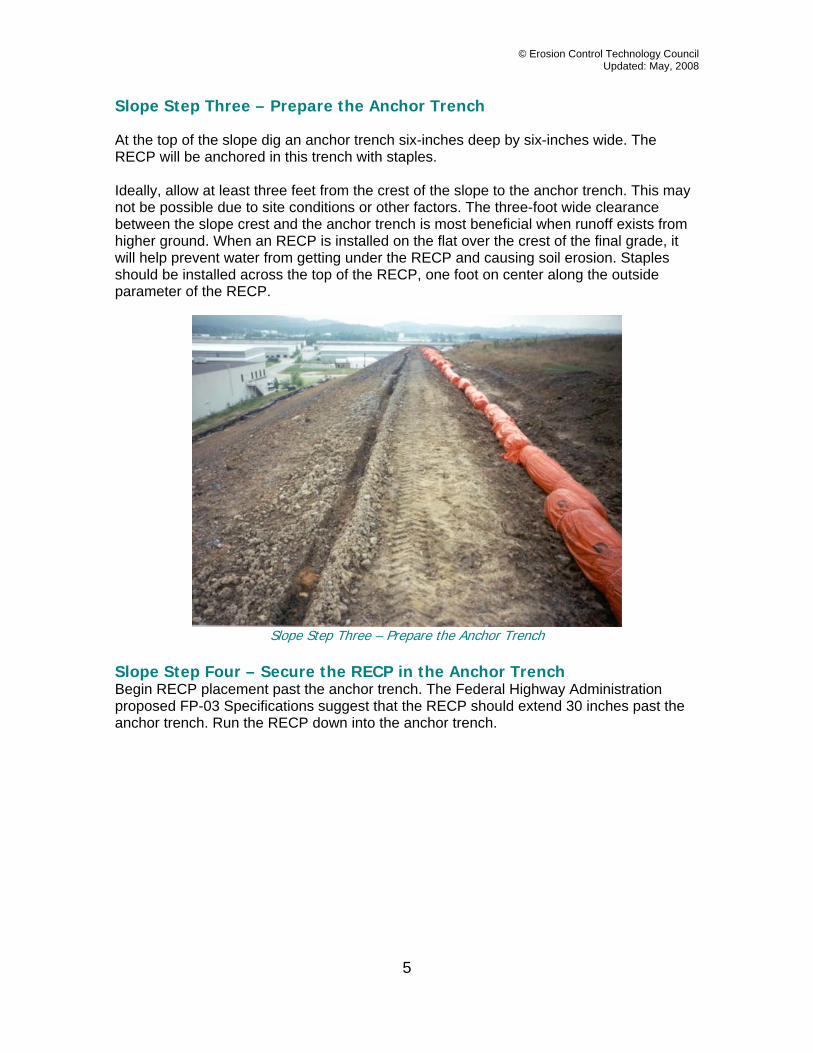
Slope Step Three – Prepare the Anchor Trench At the top of the slope dig an anchor trench six-inches deep by six-inches wide. The RECP will be anchored in this trench with staples. Ideally, allow at least three feet from the crest of the slope to the anchor trench. This may not be possible due to site conditions or other factors. The three-foot wide clearance between the slope crest and the anchor trench is most beneficial when runoff exists from higher ground. When an RECP is installed on the flat over the crest of the final grade, it will help prevent water from getting under the RECP and causing soil erosion. Staples should be installed across the top of the RECP, one foot on center along the outside parameter of the RECP.
Slope Step Three – Prepare the Anchor Trench
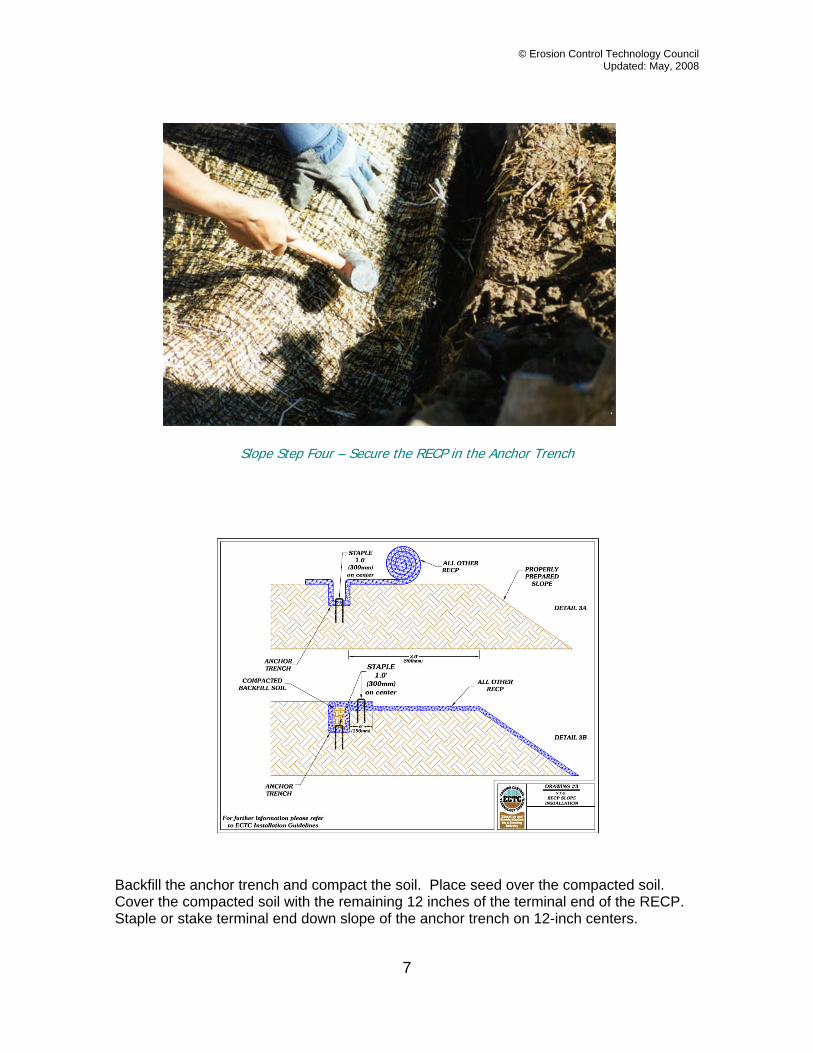
Slope Step Four – Secure the RECP in the Anchor Trench Begin RECP placement past the anchor trench. The Federal Highway Administration proposed FP-03 Specifications suggest that the RECP should extend 30 inches past the anchor trench. Run the RECP down into the anchor trench.

© Erosion Control Technology Council Updated: May, 2008
6
Anchor the RECP with staples in the anchor trench. The Federal Highway Administration proposed FP-03 Specifications suggest that the RECP be fastened using staples or stakes 12 inches on center. ECTC suggests that you use this as a guideline, but take RECP type, soil and site conditions into consideration when securing the RECP into the anchor trench. Be sure to drive staples or stakes flush with the soil surface.
© Erosion Control Technology Council Updated: May, 2008
7
Slope Step Four – Secure the RECP in the Anchor Trench
Backfill the anchor trench and compact the soil. Place seed over the compacted soil. Cover the compacted soil with the remaining 12 inches of the terminal end of the RECP. Staple or stake terminal end down slope of the anchor trench on 12-inch centers.

© Erosion Control Technology Council Updated: May, 2008
8
Slope Step Five –RECP Deployment Slope Step Five –RECP Deployment Starting at the crest of the slope, roll the RECP down the slope in a controlled manner. The best way is for the installer to be on the downside of the slope in front of the RECP and walk the roll down the slope with each backward step. Approximately every 20 feet to 25 feet pull the RECP to take out any excess slack. Do not over stretch the RECP as this may cause bridging of the RECP over the soil surface. The goal is to have the RECPs contour and have intimate contact with the soil. To overlap or not to overlap? The edges of the adjacent RECPs may or may not overlap, depending upon type of product used and the manufacturer’s recommended practice. Check with the product manufacturer for instructions on this aspect of the installation. The manufacturers have done extensive research and have tremendous field experience on what method works best for their products. If an overlap is recommended, it is typically two inches to four inches. Some RECP manufacturers recommend that the adjacent RECPs be installed so that the edges butt against one another and do not allow the soil to be exposed. Slope Step Six – Staple or Stake the RECP Secure the overlap or the edges with staples. The typical installation will require one staple be placed at three to five feet intervals along the vertical length of the RECPs. Staples should be staggered every 18 inches to 24 inches horizontally across the RECP.
© Erosion Control Technology Council Updated: May, 2008
9
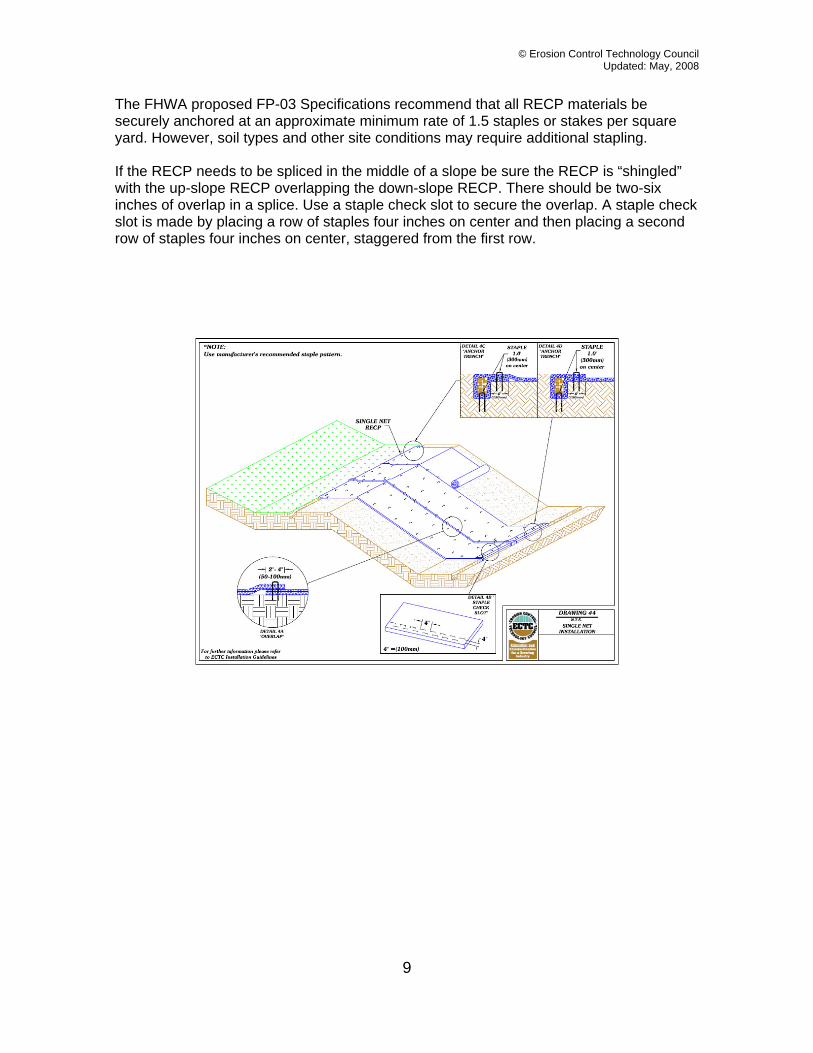
The FHWA proposed FP-03 Specifications recommend that all RECP materials be securely anchored at an approximate minimum rate of 1.5 staples or stakes per square yard. However, soil types and other site conditions may require additional stapling. If the RECP needs to be spliced in the middle of a slope be sure the RECP is “shingled” with the up-slope RECP overlapping the down-slope RECP. There should be two-six inches of overlap in a splice. Use a staple check slot to secure the overlap. A staple check slot is made by placing a row of staples four inches on center and then placing a second row of staples four inches on center, staggered from the first row.

© Erosion Control Technology Council Updated: May, 2008
10
Slope Step Seven – Securing the RECP at the slope toe Roll the RECP two feet past the toe of the slope using an anchor trench as shown in Drawing #5. Secure with staples or stakes one foot on center across the RECP. Alternative Slope Installation Method On short slopes, some manufacturers allow for a horizontal installation method to avoid extra handling and cutting of the RECP. In other words, the RECP is installed from the base of the slope first rolling the product out horizontally across the slope face and proceed up to and over the crest to protect the final grade. The same final grade installation and stapling procedures still apply. At the base of the slope, allow the RECP to extend two feet on to the flat ground at the toe area (if possible) and then let the remainder of the RECP width lay up the slope above the toe area. Some manufacturers suggest that their RECPs be buried in a toe trench, stapled, and buried before proceeding with the remainder of the installation. The next RECP is then installed up the slope, above and parallel to the first RECP. Allow a two-inch to six-inch overlap from the higher RECP onto the RECP below to create a shingle effect.
+

© Erosion Control Technology Council Updated: May, 2008
11
Installation of RECPs in Channels
Channel Step One – Site Preparation The first step in installation of RECPs in channels is site preparation. Be sure the site is properly prepared before laying down any RECP. The site should be fine graded to a smooth profile and relatively free from all weeds, clods, stones, roots, sticks, rivulets, gullies, crusting and caking. Fill any voids and make sure that the channel is compacted properly.
Channel Step One – Site Preparation Channel Step Two – Seeding The second step in the installation process of RECPs on channels is to seed the area to be vegetated. Select a seed mix for vegetation adapted to the local geographical area. The seed must also be suitable for site-specific soil conditions.

© Erosion Control Technology Council Updated: May, 2008
12
Always match the seed to site soil conditions for optimum germination, root system development, vegetation density, and long term functionality. Prior to RECP installation if the prepared seed bed becomes crusted or eroded, or if eroded places, ruts or depressions exist for any reason, the contractor should rework the soil until it is smooth and re-seed such areas which are reworked. The seeding types may vary based on the water conditions expected immediately after installation. The types of seeds planted above the anticipated water line may differ from the seed planted below the anticipated water line. Channel Step Three –RECP Deployment in the channel bottom. When installing a RECP in a channel, the RECPs should be unrolled in the direction of water flow. First the RECP is deployed in the channel bottom. It is desirable to minimize the number of seams that are placed on the bottom of the channel. It is also necessary to prevent a seam from going down the center of the channel bottom or in areas of concentrated water flow.
When installing two RECPs side by side in a waterway the center of the RECP should be centered in the area of concentrated water flow. Install adjoining RECP’s away from the center of the channel bottom. When abutting RECP panels, follow the manufacturer’s recommendations. If the manufacturer recommends overlapping the RECP, the overlap will generally be two to four inches. Continue to install a common row of staples at two-foot minimums along the length of the offset center overlap. The RECP must be secured at the beginning of the channel. The anchoring method recommended in the Federal Highway Administration’s proposed FP-03 Specifications is a six-inch x six-inch check slot is dug perpendicular to the direction of water flow across

© Erosion Control Technology Council Updated: May, 2008
13
the entire width of the channel. The RECP is laid in the check slot with 30 inches of the RECP extending upstream of the check slot. Stake or staple the RECP in the check slot on 12-inch centers. Backfill the anchor trench and compact the soil. Place seed over the compacted soil if necessary. Cover the compacted soil with the remaining 12 inches of the terminal end of the RECP. Staple or stake terminal end down slope of the anchor trench on 12-inch centers.
Channel Step Four - Check Slots Check slots are recommended in the Federal Highway Administration’s proposed FP-03 Specification to be placed perpendicular to the flow direction across the entire width of the channel at 25-foot intervals and at the terminal end of the channel. The check slots placed at 25-foot intervals can be done in one of two ways, depending upon the Engineers discretion and/or the manufacturer’s recommendations. One type of check slot is constructed by installing a double row of staples or stakes staggered and spaced four inches apart. Place the first row of staples or stakes four inches on center. The second option is to put in a check slot six-inches wide x six-inches deep, secure RECP in the upstream side of the check slot with staples or stakes on 12-inch centers. Flip the RECP roll on the upstream edge. Back fill the check slot as shown in drawing 9 and compact the soil. Continue rolling the RECP down stream over the completed check slot.

© Erosion Control Technology Council Updated: May, 2008
14
Channel Step Five –RECP Deployment on the side slopes. Continue to roll the RECP along the channel bottom and side slopes in the direction of the water flow. As the RECP is installed from the channel bottom up the slope a shingle type installation is recommended with the up-slope RECP overlapping the lower RECP approximately two inches to four inches. Anchor the RECPs with a minimum staple pattern of one staple every 24 inches across the width and one staple every 36 inches down its length. If the RECP needs to be spliced, be sure the RECP is “shingled” with the up-stream RECP overlapping the down-stream RECP. There should be four inches of overlap in a splice. Use a staple check slot to secure the overlap. Anchor the RECP placed at the top of the channel slope in the same manner as described in the slope section.
© Erosion Control Technology Council Updated: May, 2008
15
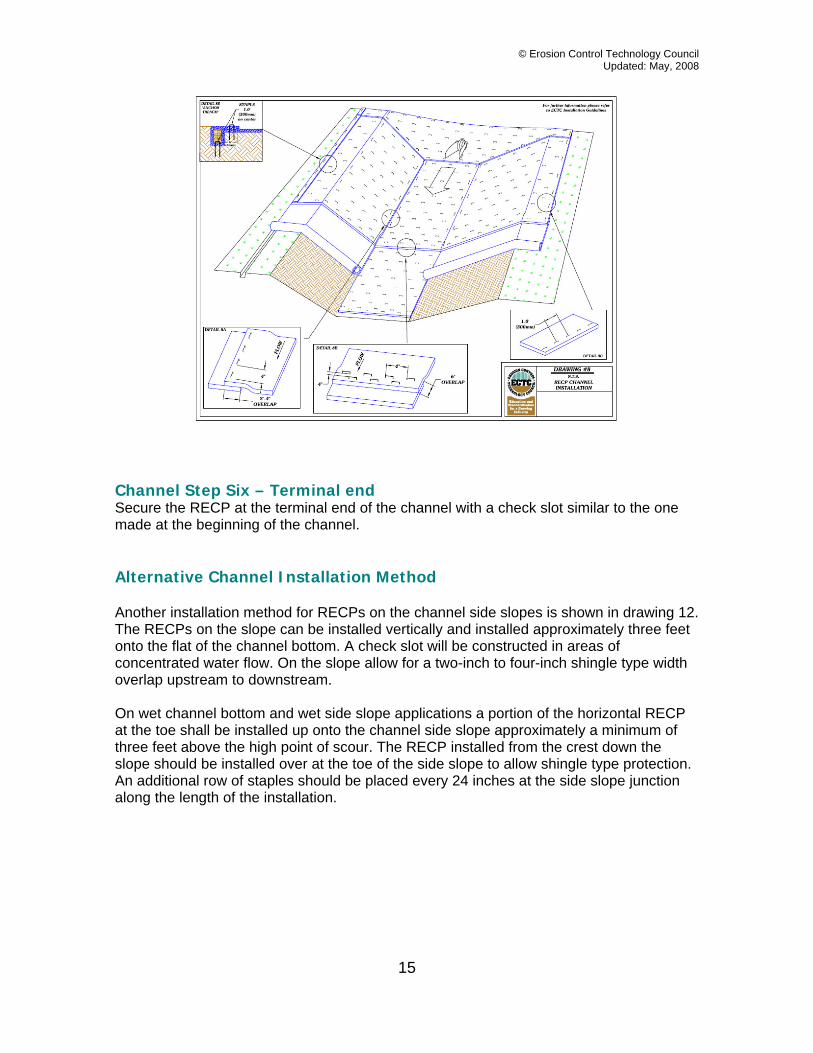
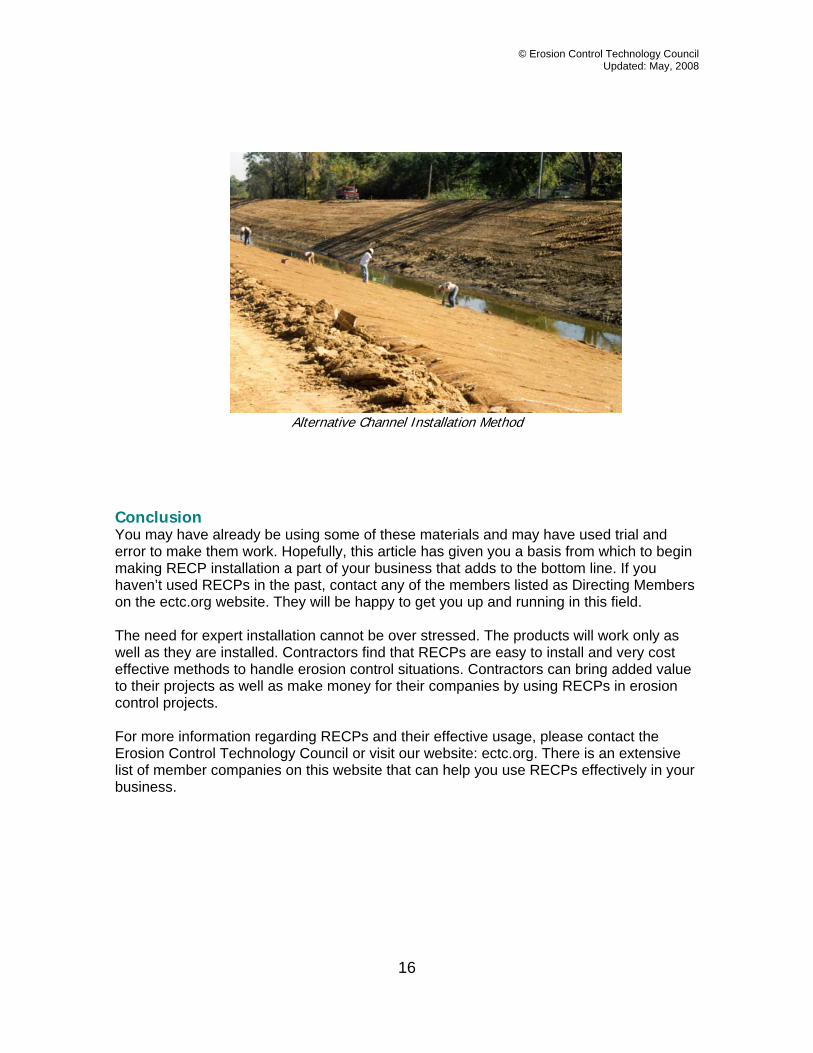
Channel Step Six – Terminal end Secure the RECP at the terminal end of the channel with a check slot similar to the one made at the beginning of the channel. Alternative Channel Installation Method Another installation method for RECPs on the channel side slopes is shown in drawing 12. The RECPs on the slope can be installed vertically and installed approximately three feet onto the flat of the channel bottom. A check slot will be constructed in areas of concentrated water flow. On the slope allow for a two-inch to four-inch shingle type width overlap upstream to downstream. On wet channel bottom and wet side slope applications a portion of the horizontal RECP at the toe shall be installed up onto the channel side slope approximately a minimum of three feet above the high point of scour. The RECP installed from the crest down the slope should be installed over at the toe of the side slope to allow shingle type protection. An additional row of staples should be placed every 24 inches at the side slope junction along the length of the installation.
© Erosion Control Technology Council Updated: May, 2008
16
Alternative Channel Installation Method Conclusion You may have already be using some of these materials and may have used trial and error to make them work. Hopefully, this article has given you a basis from which to begin making RECP installation a part of your business that adds to the bottom line. If you haven’t used RECPs in the past, contact any of the members listed as Directing Members on the ectc.org website. They will be happy to get you up and running in this field. The need for expert installation cannot be over stressed. The products will work only as well as they are installed. Contractors find that RECPs are easy to install and very cost effective methods to handle erosion control situations. Contractors can bring added value to their projects as well as make money for their companies by using RECPs in erosion control projects. For more information regarding RECPs and their effective usage, please contact the Erosion Control Technology Council or visit our website: ectc.org. There is an extensive list of member companies on this website that can help you use RECPs effectively in your business.
© Erosion Control Technology Council Updated: May, 2008
17
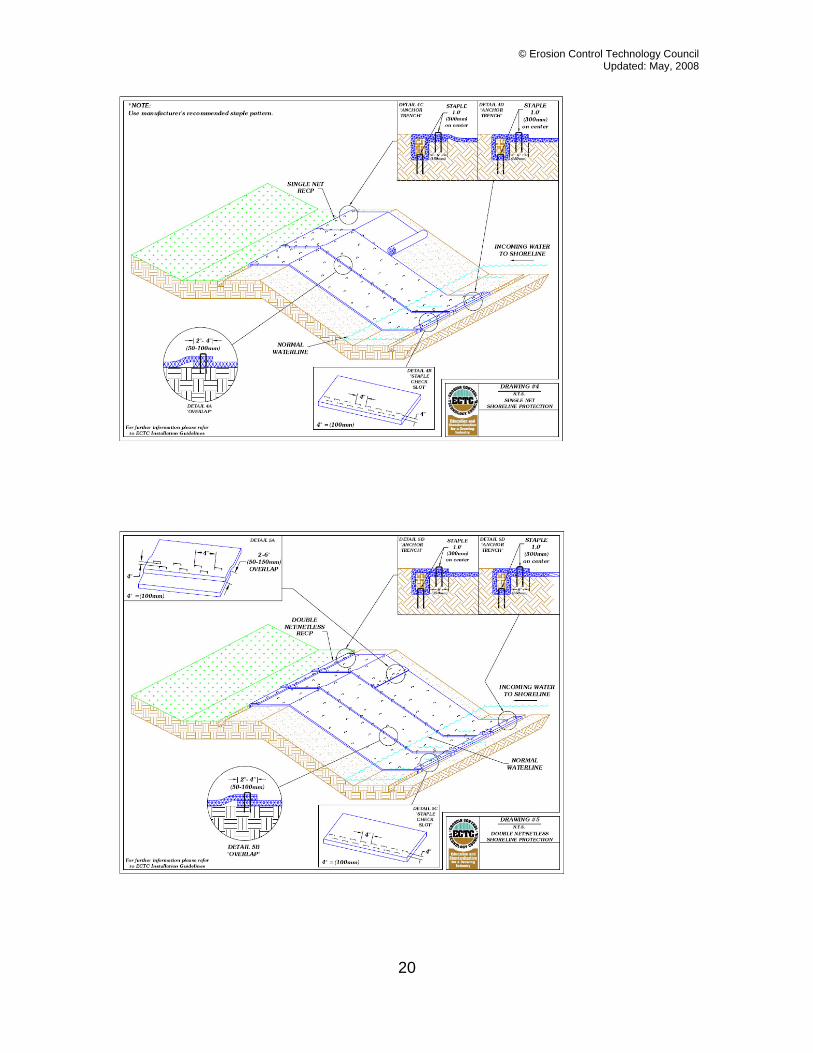
Installation of RECPs in Shorelines Shoreline Step One – Site Preparation The first step in the installation of RECPs on shorelines is site preparation. Be sure the site is properly prepared before installing any RECP. The site should be fine graded to a smooth profile and relatively free from all weeds, clods, stones, roots, sticks, rivulets, gullies, crusting and caking. Fill any voids and make sure that the slope is compacted properly. Shoreline Step Two – Seeding The second step in the installation process of RECPs on shorelines is to seed the area to be vegetated. Select a seed mix for vegetation adapted to the local geographical area. The seed must also be suitable for site-specific soil conditions. Always match the seed to site soil conditions for optimum germination, root system development, vegetation density, and long term functionality. Prior to RECP installation if the prepared seed bed becomes crusted or eroded, or if eroded places, ruts or depressions exist for any reason, the contractor must rework the soil until it is smooth and re-seed such areas which are reworked. Shoreline Step Three – Prepare the Anchor Trench At the top of the shoreline dig an anchor trench six-inches deep by six-inches wide. The RECP will be anchored in this trench with staples. Ideally, allow at least three feet from the crest of the shoreline to the anchor trench. This may not be possible due to site conditions or other factors. The three-foot wide clearance between the shoreline crest and the anchor trench is most beneficial when runoff exists from higher ground. When an RECP is installed on the flat over the crest of the final grade, it will help prevent water from getting under the RECP and causing soil erosion. Staples should be installed across the top of the RECP, one foot on center along the outside parameter of the RECP.

© Erosion Control Technology Council Updated: May, 2008
18
Shoreline Step Four – Secure the RECP in the Anchor Trench Anchor the RECP with staples in the anchor trench. The Federal Highway Administration proposed FP-03 Specifications suggest that the RECP be fastened using staples or stakes 12 inches on center. ECTC suggests that you use this as a guideline, but take RECP type, soil and site conditions into consideration when securing the RECP into the anchor trench. Be sure to drive staples or stakes flush with the soil surface.

© Erosion Control Technology Council Updated: May, 2008
19
Backfill the anchor trench and compact the soil. Place seed over the compacted soil. Cover the compacted soil with the remaining 12 inches of the terminal end of the RECP. Staple or stake terminal end down slope of the anchor trench on 12-inch centers
Shoreline Step Five –RECP Deployment Starting at the crest of the shoreline, roll the RECP down the slope and onto the shoreline in a controlled manner. The best way is for the installer to be on the downside of the slope in front of the RECP and walk the roll down the slope with each backward step. Approximately every 20 feet to 25 feet pull the RECP to take out any excess slack. Do not over stretch the RECP as this may cause bridging of the RECP over the soil surface. The goal is to have the RECPs contour and have intimate contact with the soil. For shoreline applications it is recommended to overlap RECPs and the typical overlap is two to four inches. Shoreline Step Six – Staple or Stake the RECP Secure the overlap. The typical installation will require one staple be placed at three to five feet intervals along the vertical length of the RECPs. Staples should be staggered every 18 inches to 24 inches horizontally across the RECP.
© Erosion Control Technology Council Updated: May, 2008
20
© Erosion Control Technology Council Updated: May, 2008
21
Shoreline Step Seven – Securing the RECP at the slope toe Roll the RECP two feet past the toe of the slope. Secure with staples or stakes one foot on center across the RECP. About ECTC The Erosion Control Technology Council is a trade association of rolled erosion control material manufacturers. The Council is involved in educating industry on RECPs, setting the standards for material specifications and installation procedures. The Council is available to assist contractors in the installation process and provide information on rolled erosion control materials. Laurie Honnigford is the Marketing Coordinator and consultant to ECTC. She has been involved in various aspects of the erosion control business for the past 12 years. References: Flexible Channel Lining Systems: The Benefits of Geosynthetically reinforced Vegetation over Rock Riprap. Lancaster, Tim; Lutyens, Don; Austin, Deron. CE News, May 1999 Federal Highway Administration proposed FP03 Specification. 4/1/01 version.