Advisor Version Release & Monthly Update Changes – v4.3, v4.4, v4.5, v4.6, v4.7, v5.0

SINAMICS
Guide to updating firmware from versions V4.3.x through V4.6.x to V4.7.x for SINAMICS S120 with CU310-2 and CU320-2
Page 1 / 21 June 30, 2014 Unrestricted / © Siemens AG 2014
Guide to updating firmware from versions V4.3.x through V4.6.x
to V4.7.x for SINAMICS S120 with CU310-2 and CU320-2
Contents
1 Hardware requirements ........................................................................................................................................................... 3
2 Guide to updating firmware via Starter and CompactFlash card ............................................................................................. 5
2.1 Preconditions .................................................................................................................................................................. 5
2.2 Starting situation ............................................................................................................................................................. 5
2.3 Firmware update procedure ........................................................................................................................................... 5
2.3.1 Back up your data ....................................................................................................................................................... 5
2.3.2 Connect the PC/PG to the drive .................................................................................................................................. 5
2.3.3 Back up the existing project........................................................................................................................................ 5
2.3.4 Switch off the electronic power supply ...................................................................................................................... 7
2.3.5 Insert the CF card in the reader for the PC / PG ......................................................................................................... 7
2.3.6 Back up licenses .......................................................................................................................................................... 7
2.3.7 Delete the entire contents of the CF card .................................................................................................................. 7
2.3.8 Copy new firmware to the CF card ............................................................................................................................. 7
2.3.9 Install the backed-up licenses ..................................................................................................................................... 7
2.3.10 Install the backed-up project ................................................................................................................................. 7
2.3.11 Insert the CF card into the Control Unit ................................................................................................................. 9
2.3.12 Switch on the electronic power supply .................................................................................................................. 9
2.3.13 Perform automatic firmware update in the drive .................................................................................................. 9
2.3.14 Restart following completion of firmware update ............................................................................................... 10
3 Guide to updating via the web server .................................................................................................................................... 11
3.1 Preconditions ................................................................................................................................................................ 11
3.2 Starting situation ........................................................................................................................................................... 11
3.3 Firmware update procedure ......................................................................................................................................... 11
3.3.1 Establish the network connection (hardware) ......................................................................................................... 11

SINAMICS
Guide to updating firmware from versions V4.3.x through V4.6.x to V4.7.x for SINAMICS S120 with CU310-2 and CU320-2
Page 2 / 21 June 30, 2014 Unrestricted / © Siemens AG 2014
3.3.2 Configure the network connection (software) ......................................................................................................... 11
3.3.3 Check the network connection ................................................................................................................................. 13
3.3.4 Start the web server ................................................................................................................................................. 14
3.3.5 Log in to the web server ........................................................................................................................................... 16
3.3.6 Update the firmware in the web server ................................................................................................................... 19
3.3.7 Complete the firmware update ................................................................................................................................ 21
3.3.8 Restore the original PC/PG settings .......................................................................................................................... 21

SINAMICS
Guide to updating firmware from versions V4.3.x through V4.6.x to V4.7.x for SINAMICS S120 with CU310-2 and CU320-2
Page 3 / 21 June 30, 2014 Unrestricted / © Siemens AG 2014
1 HARDWARE REQUIREMENTS
The hardware release of the Control Units determines which firmware versions can be installed.
The CU310-2DP (order number 6SL3040-1LA00-0AA0) and CU310-2PN (order number 6SL3040-1LA01-0AA0) are not supported
by firmware versions lower than V4.4.
Any hardware release of the CU320-2DP with order number 6SL3040-1MA00-0AA0 can be upgraded to device version V4.6 /
V4.7.
The CU320-2 PN with order number 6SL3040-1MA01-0AA0 is supported by firmware version V4.4 and higher.
The hardware version of your Control Unit is specified on the type plate:
Fig. 1-1: CU320-2DP with type plate
Type plate with order number and
hardware version
Type plate with order number and
hardware version

SINAMICS
Guide to updating firmware from versions V4.3.x through V4.6.x to V4.7.x for SINAMICS S120 with CU310-2 and CU320-2
Page 4 / 21 June 30, 2014 Unrestricted / © Siemens AG 2014
Fig. 1-2: CU310-2 type plate with version data
Firmware versions of V4.3.x or higher can only be installed on 1GB or 2GB1 CompactFlash cards. 1GB cards are supplied with
firmware version V4.3.x or higher and 2GB cards with firmware version V4.6 or higher.
1 The 2GB CompactFlash cards are an essential requirement for use of the feature Powerfail-proof firmware update via web
server.
Short type plate with order number and hardware version
SINAMICS
Guide to updating firmware from versions V4.3.x through V4.6.x to V4.7.x for SINAMICS S120 with CU310-2 and CU320-2
Page 5 / 21 June 30, 2014 Unrestricted / © Siemens AG 2014
2 Guide to updating firmware via Starter and CompactFlash card
2.1 Preconditions
Reader for CompactFlash cards for connection to a PC/PG
PC/PG with STARTER
o Version >= 4.3.x incl. appropriate SSP for new firmware version2
o With communication interface to the Control Unit
2.2 Starting situation
The starting situation involves a SINAMICS S120 converter on which the installed firmware version is to be changed.
2.3 Firmware update procedure
2.3.1 BACK UP YOUR DATA
To back up your parameter settings, perform the following steps.
2.3.2 CONNECT THE PC/PG TO THE DRIVE
Connect the PC/PG to the drive using, for example, the PROFIBUS or PROFINET interface. For a detailed description of this
process, refer to the Starter Help.
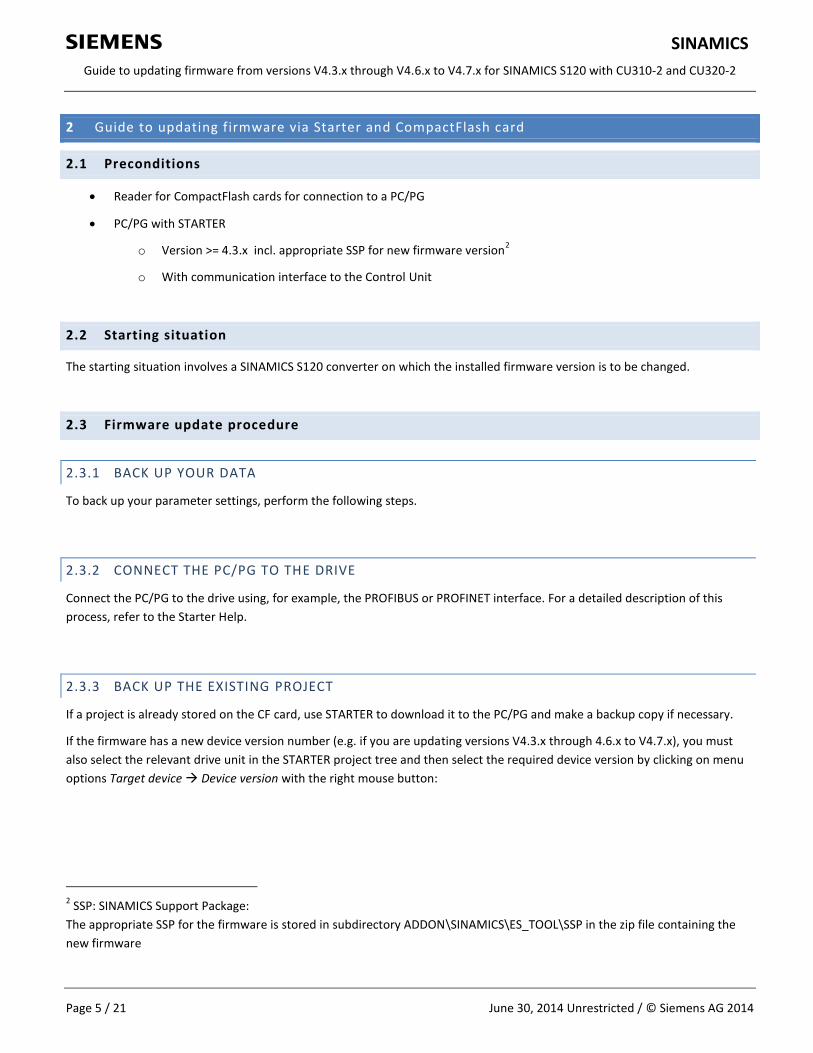
2.3.3 BACK UP THE EXISTING PROJECT
If a project is already stored on the CF card, use STARTER to download it to the PC/PG and make a backup copy if necessary.
If the firmware has a new device version number (e.g. if you are updating versions V4.3.x through 4.6.x to V4.7.x), you must
also select the relevant drive unit in the STARTER project tree and then select the required device version by clicking on menu
options Target device Device version with the right mouse button:
2 SSP: SINAMICS Support Package:
The appropriate SSP for the firmware is stored in subdirectory ADDON\SINAMICS\ES_TOOL\SSP in the zip file containing the
new firmware
SINAMICS
Guide to updating firmware from versions V4.3.x through V4.6.x to V4.7.x for SINAMICS S120 with CU310-2 and CU320-2
Page 6 / 21 June 30, 2014 Unrestricted / © Siemens AG 2014
Fig. 2-1: STARTER menu selection "Device version"
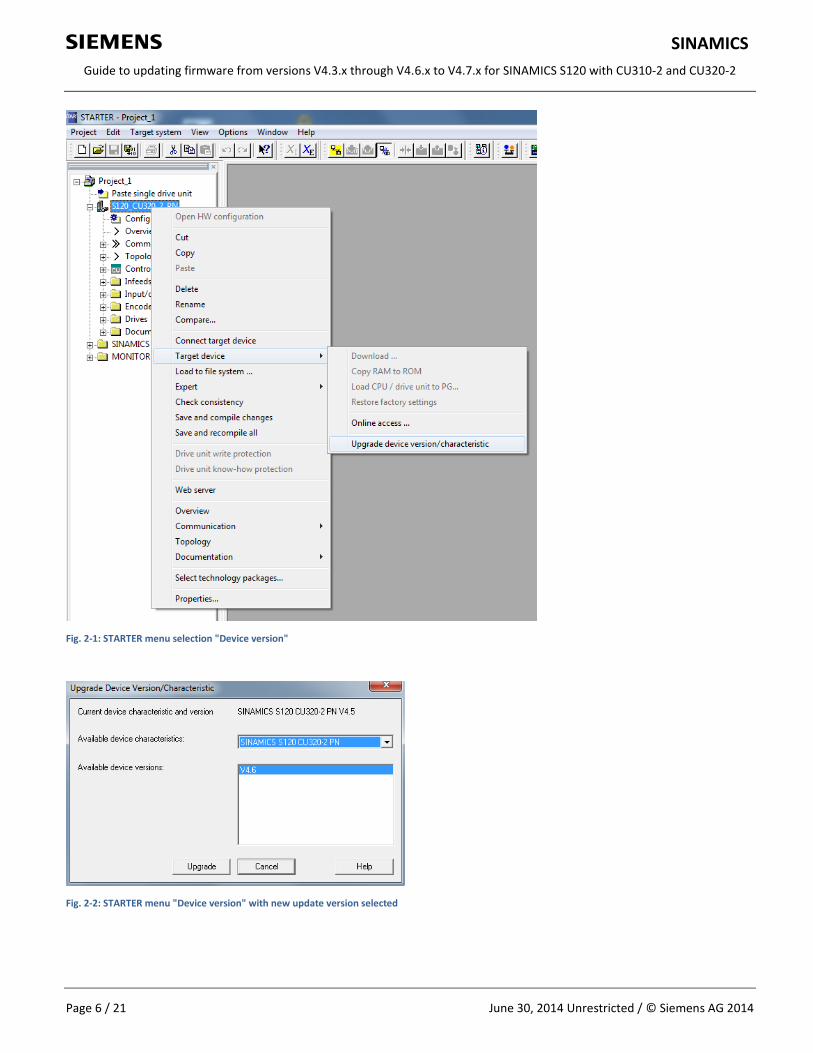
Fig. 2-2: STARTER menu "Device version" with new update version selected

SINAMICS
Guide to updating firmware from versions V4.3.x through V4.6.x to V4.7.x for SINAMICS S120 with CU310-2 and CU320-2
Page 7 / 21 June 30, 2014 Unrestricted / © Siemens AG 2014
NOTICE
All project data and parameters on the CompactFlash card are deleted by the upgrade process described below!
2.3.4 SWITCH OFF THE ELECTRONIC POWER SUPPLY
Disconnect the power supply from the Control Unit (including the 24 V DC supply)
2.3.5 INSERT THE CF CARD IN THE READER FOR THE PC / PG
Remove the CompactFlash card from the Control Unit
Insert this CompactFlash card into the reader connected to/in the PC/PG
2.3.6 BACK UP LICENSES
If the CompactFlash card contains a KEYS folder, back it up using the Windows Explorer on the PC/PG. This folder contains
possible license keys for software options under license.
2.3.7 DELETE THE ENTIRE CONTENTS OF THE CF CARD
Delete all files and folders from the CompactFlash card using Windows Explorer on the PC.
2.3.8 COPY NEW FIRMWARE TO THE CF CARD
Extract the new firmware from the zip file using an unzip application, e.g. WINZIP, to any temporary directory of your
choice on the PC/PG.
Use Windows Explorer to move the contents of the temporary directory to the CompactFlash card.
2.3.9 INSTALL THE BACKED-UP LICENSES
Use Windows Explorer to move the KEYS folder (if applicable, see step 2.3.6), from the PC/PG to the main directory on the
CompactFlash card.
2.3.10 INSTALL THE BACKED-UP PROJECT
Navigate to the backed-up project in STARTER (see step 2.3.3)

SINAMICS
Guide to updating firmware from versions V4.3.x through V4.6.x to V4.7.x for SINAMICS S120 with CU310-2 and CU320-2
Page 8 / 21 June 30, 2014 Unrestricted / © Siemens AG 2014
Select the drive unit in the STARTER project navigator
Execute the command Load to File System in the context menu (right mouse button) (see Fig. 2-3)
In the dialog which now appears (see Fig. 2-4), select the drive / main directory of the CompactFlash card under Select
target and then start the project export to the CompactFlash card.
The project will now be transferred with all drive parameter settings including DCC libraries (if applicable) to the CompactFlash
card.
Fig. 2-3: STARTER menu selection "Load to File System"

SINAMICS
Guide to updating firmware from versions V4.3.x through V4.6.x to V4.7.x for SINAMICS S120 with CU310-2 and CU320-2
Page 9 / 21 June 30, 2014 Unrestricted / © Siemens AG 2014
Fig. 2-4: STARTER menu "Load to File System"
Alternatively, you can copy the project to the CompactFlash card at a later time (when you are connected online to the drive
unit) using command Download followed by "Copy RAM to ROM".
2.3.11 INSERT THE CF CARD INTO THE CONTROL UNIT
Remove the CompactFlash card safely (using Remove hardware) from the reader
Insert the CompactFlash card into the CU310-2/CU320-2 Control Unit
2.3.12 SWITCH ON THE ELECTRONIC POWER SUPPLY
Reconnect the power supply to the Control Unit (including the 24 V DC supply)
2.3.13 PERFORM AUTOMATIC FIRMWARE UPDATE IN THE DRIVE
With firmware version V4.3.x and later, the firmware of the integrated components is updated automatically.
During this process, the RDY (READY) LED on the Control Unit flashes orange at a frequency of 0.5 Hz.
Fig. 2-5: STARTER alarm display while updating of component firmware is in progress

SINAMICS
Guide to updating firmware from versions V4.3.x through V4.6.x to V4.7.x for SINAMICS S120 with CU310-2 and CU320-2
Page 10 / 21 June 30, 2014 Unrestricted / © Siemens AG 2014
When the firmware update process is complete, the LED flashes faster at 2 Hz.
Warning 1007 is active for the upgraded components and is displayed in the STARTER alarm window:
Fig. 2-6: STARTER alarm display following updating of component firmware
2.3.14 RESTART FOLLOWING COMPLETION OF FIRMWARE UPDATE
When the update process is complete, restart the Control Unit by switching the power supply off and then on again.
Done. The drive unit is now functional again.
The current firmware versions of the modules are displayed in the STARTER version overview:
Fig. 2-7: STARTER version overview
SINAMICS
Guide to updating firmware from versions V4.3.x through V4.6.x to V4.7.x for SINAMICS S120 with CU310-2 and CU320-2
Page 11 / 21 June 30, 2014 Unrestricted / © Siemens AG 2014
3 GUIDE TO UPDATING VIA THE WEB SERVER
3.1 Preconditions
PC/PG with Ethernet card
Physical network connection (Ethernet) between the Control Unit and the PC/PG
3.2 Starting situation
The starting situation involves a SINAMICS S120 converter on which firmware version V4.6 or higher is already installed3 and
needs to be changed to a different firmware version.
3.3 Firmware update procedure
The following guide explains the steps you need to take in order to update firmware via the SINAMICS web server on a
Windows PC.
3.3.1 ESTABLISH THE NETWORK CONNECTION (HARDWARE)
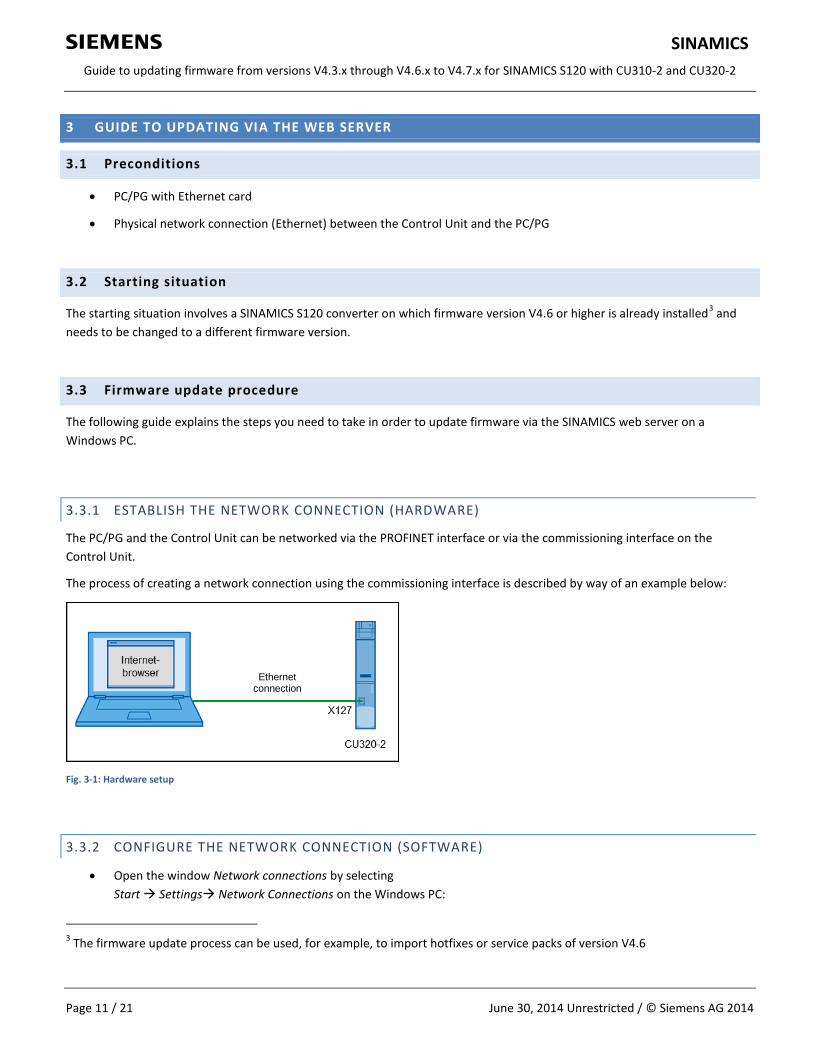
The PC/PG and the Control Unit can be networked via the PROFINET interface or via the commissioning interface on the
Control Unit.
The process of creating a network connection using the commissioning interface is described by way of an example below:
Fig. 3-1: Hardware setup
3.3.2 CONFIGURE THE NETWORK CONNECTION (SOFTWARE)
Open the window Network connections by selecting
Start Settings Network Connections on the Windows PC:
3 The firmware update process can be used, for example, to import hotfixes or service packs of version V4.6
Ethernet connection

SINAMICS
Guide to updating firmware from versions V4.3.x through V4.6.x to V4.7.x for SINAMICS S120 with CU310-2 and CU320-2
Page 12 / 21 June 30, 2014 Unrestricted / © Siemens AG 2014
Fig. 3-2: Network connections
Select the LAN interface which is connected to the Control Unit
Open the properties box for this network connection by clicking on the relevant command in the context menu (right
mouse button)
Fig. 3-3: Properties of the network connection
Select Internet Protocol (TCP/IP) in the properties box

SINAMICS
Guide to updating firmware from versions V4.3.x through V4.6.x to V4.7.x for SINAMICS S120 with CU310-2 and CU320-2
Page 13 / 21 June 30, 2014 Unrestricted / © Siemens AG 2014
Click on the Properties button
Make a note of the existing settings so that you can restore them later!
Select the settings as they are shown in Fig. 3-4 and confirm by clicking on the OK button:
Fig. 3-4: TCP/IP settings on the PC/PG
Note
In the steps described above, it has been assumed that the network settings for the commissioning interface are still the same
as the factory settings (p8901 – p8904). If this is not the case, an IP address contained in the same subnet as the IP address of
the Control Unit must be entered in the dialog shown in Fig. 3-4 .
3.3.3 CHECK THE NETWORK CONNECTION
Open the DOS Shell (Start -> Run -> cmd -> OK) on the Windows PC and execute a Ping command to the Control Unit (IP
address: 169.254.11.22):

SINAMICS
Guide to updating firmware from versions V4.3.x through V4.6.x to V4.7.x for SINAMICS S120 with CU310-2 and CU320-2
Page 14 / 21 June 30, 2014 Unrestricted / © Siemens AG 2014
Fig. 3-5: Unsuccessful ping to the Control Unit
Fig. 3-6: Successful ping to the Control Unit
Check the network connection and the network settings on the PC/PG and the Control Unit if the ping is unsuccessful (see Fig.
3-5).
3.3.4 START THE WEB SERVER
If step 3.3.3 has been successful, launch the web browser on your PC/PG and enter the IP address of the Control Unit in the
address line:

SINAMICS
Guide to updating firmware from versions V4.3.x through V4.6.x to V4.7.x for SINAMICS S120 with CU310-2 and CU320-2
Page 15 / 21 June 30, 2014 Unrestricted / © Siemens AG 2014
Fig. 3-7: Start the web server
If the Ping worked, but the start page of the web server is not displayed, then the problem is probably attributable to one of
the following:
1. The firmware on the Control Unit is lower than version V4.6
A web server is not a component of the firmware
2. The proxy server settings of the web browser are not correct
Check the proxy server settings (see Section 3.3.4.1)
3. The web server is not activated on the Control Unit
Follow the instructions in step 3.3.5.2
3.3.4.1 Proxy server settings on the PC/PG
Where a direct connection exists between the PC/PG and the Control Unit (see Fig. 3 1), a proxy server should not be set in the
web browser.
The method of changing proxy server settings varies depending on the web browser product and can differ from version to
version of the same web browser product. Consult the Help function of the relevant browser product for instructions.
To enter proxy server settings in Internet Explorer 7, for example, select

SINAMICS
Guide to updating firmware from versions V4.3.x through V4.6.x to V4.7.x for SINAMICS S120 with CU310-2 and CU320-2
Page 16 / 21 June 30, 2014 Unrestricted / © Siemens AG 2014
Tools Internet Options Connections LAN Settings:
Fig. 3-8: LAN settings / Proxy server configuration
IMPORTANT
Before you make any changes, make a note of the existing settings so that you can restore them after the firmware has been
updated!
3.3.5 LOG IN TO THE WEB SERVER
3.3.5.1 Control Unit has not yet been parameterized
If the Control Unit is still set to its factory settings and the web page shown in Fig. 3-9 is displayed, then you don't need to log
in, i.e. you do not need to enter either a user name or a password and you can proceed immediately with step 3.3.6.

SINAMICS
Guide to updating firmware from versions V4.3.x through V4.6.x to V4.7.x for SINAMICS S120 with CU310-2 and CU320-2
Page 17 / 21 June 30, 2014 Unrestricted / © Siemens AG 2014
Fig. 3-9: Start page of web server when Control Unit is not parameterized
3.3.5.2 Administrator password is not known
If you do not know the administrator password or a user administrator has not yet been set up for the web server, then you
must now configure the user administrator accordingly in STARTER (at least STARTER V4.3.2; Starter V4.3.1 with appropriate
SSPs is not sufficient):
Set up a link to the Control Unit in STARTER (see also Chapter 2.3.2)
Select the relevant drive (not the Control Unit) in the project navigator
In the context menu (right mouse button), select the command "Web server".

SINAMICS
Guide to updating firmware from versions V4.3.x through V4.6.x to V4.7.x for SINAMICS S120 with CU310-2 and CU320-2
Page 18 / 21 June 30, 2014 Unrestricted / © Siemens AG 2014
Fig. 3-10: STARTER: Configuring the web server settings
Now activate the web server and the user administrator in the web server dialog:
Fig. 3-11: Activating the web server and web server users in STARTER
Then execute the command Copy RAM to ROM.

SINAMICS
Guide to updating firmware from versions V4.3.x through V4.6.x to V4.7.x for SINAMICS S120 with CU310-2 and CU320-2
Page 19 / 21 June 30, 2014 Unrestricted / © Siemens AG 2014
3.3.5.3 Administrator password is known
Log in to the web server with the user name Administrator and the password that you have already chosen for the Control Unit
in question:
Fig. 3-12: Start page following logon as administrator
3.3.6 UPDATE THE FIRMWARE IN THE WEB SERVER
Navigate to the page Manage config in the web server
In the box Send new update data , select the zip file containing the new firmware on your PC/PG:

SINAMICS
Guide to updating firmware from versions V4.3.x through V4.6.x to V4.7.x for SINAMICS S120 with CU310-2 and CU320-2
Page 20 / 21 June 30, 2014 Unrestricted / © Siemens AG 2014
Fig. 3-13: Update page of the web server
Click on button Send update data to start the firmware update process:
Fig. 3-14: Firmware download progress dialog
Now be patient and follow the status messages / instructions displayed by the web server.

SINAMICS
Guide to updating firmware from versions V4.3.x through V4.6.x to V4.7.x for SINAMICS S120 with CU310-2 and CU320-2
Page 21 / 21 June 30, 2014 Unrestricted / © Siemens AG 2014
3.3.7 COMPLETE THE FIRMWARE UPDATE
When the update process is complete, it might be necessary to restart the Control Unit manually (see Section 2.3.14 )
depending on the device versions of the components installed in the drive.
After you have restarted the Control Unit (if necessary), refresh the web page displayed for the drive in the web
browser by pressing key F5 .
You can now check whether the firmware update was successful / unsuccessful by examining the version data
displayed on the web server start page and by selecting tab Messages and Logs Diagbuffer (log in using your
administrator ID):
Fig. 3-15: Checking the success of the firmware update in the diag buffer
Any active messages are displayed on tab Messages and Logs Alarms Drive where they can also be acknowledged.
Messages which cannot be acknowledged must be processed accordingly.
3.3.8 RESTORE THE ORIGINAL PC/PG SETTINGS
If you have changed the network settings (see Fig. 3-4) and / or the proxy server settings (see Fig. 3-8) on the PC/PG in order to
update the firmware, you must now restore them to their original values.