Guide to Solvent Welding PVC Pipe and Fittings · Guide to Solvent Welding PVC Pipe and Fittings...
11
Guide to Solvent Welding PVC Pipe and Fittings Preferred by Professionals for Over 35 Years
Transcript of Guide to Solvent Welding PVC Pipe and Fittings · Guide to Solvent Welding PVC Pipe and Fittings...

Guide to Solvent Welding PVC Pipe and Fittings
Preferred by Professionals for Over 35 Years

� �
For over 35 years, professional contractors have relied on Christy’s products to make strong and permanent joints for PVC pressure and drainage lines. This guide is intended to assist you in learning the techniques and technical requirements needed for joining plastic pipe and fittings.
The recommendations presented here are based on the knowledge and experience of Christy’s team of chemists, technical experts and field support personnel. It is recommended that you carefully observe and respect job site conditions as they have a significant impact on the quality and reliability of plastic pipe joints.
Christy’s offers hands-on training of proper joining techniques. Users that need to expand their familiarity with best practices are encouraged to contact us to arrange individualized training.
Christy’s solvent cements offers solutions for virtually every application providing the distributor and contractor “one stop shopping” in a single proven brand. Our technical brochures can guide you toward selecting the right products and formulations for your application.
Christy’s solvent cement and primers are manufactured in a dedicated facility using state-of-the-art equipment and sophisticated process controls. The company’s on-site testing laboratories maintain stringent quality standards using multiple test procedures. These ensure the absolute consistency and performance required to meet ASTM, NSF and UPC standards noted for each product.
Solvent-cemented joints are easy to make and permanent if one follows basic rules, namely: the pipe must be cut square, clean, and sufficient solvent cement must be applied; assembly must be made while the joining surfaces are still wet; and the joint must be left to cure for a period of time before movement. Obviously, this is an over-simplification of the solvent cement procedure, but easy to remember because failed PVC joints do so for the following reasons:
• Insufficient solvent cement applied to both surfaces.
• Solvent cement applied to only one surface.
• The solvent cement has partially dried or is completely dried prior to assembly of the joint.
• Using a partially “jelled” or “stringy” cement which cannot bite into the pipe or fitting.
• Cementing surfaces were not properly prepared prior to applying the solvent cement (dirty, etc.)
• Improper solvent cement type was used.
• Excessive tolerances (gap) between pipe and fitting that cannot be “filled” by the solvent cement being used.
• Piping not properly bottomed out: either a “dry” joint or not cut square.
• The joint has been disturbed and the bond broken prior to a firm set.
• Climate conditions: temperature and humidity greatly impact creation of proper joints.
Welcome overvieW
� �
Leaky joints will invariably show shiny spots that could create leak channels from the socket bottom to the outer edge of the joint. A properly made joint will always have a dull satin-like finish. Removal of the shine shows that active solvent has attacked the surfaces, allowing chemical fusion to take place.
The procedures described here will make strong, pressure-tight joints in the shop or in the field. However, it is the knowledge of the operator/installer performing the solvent cementing function that is of critical importance for a successful job. These procedures are general in nature, and may vary among different manufacturers; however, these procedures apply to both pressure and non-pressure applications and apply only to PVC (polyvinyl chloride) as described in Specification D 2855. Plastic pipe and fittings are manufactured within certain predetermined tolerances to provide for small variations in the manufacturing process.
Please read the cautions and warnings as described on each container. Solvent cements are highly flammable, can cause severe irritation to the eyes, lungs, and skin if not properly handled and used in a well ventilated area. Solvent cements are classified as hazardous materials by various government agencies.
Solvent cements are considered unstable for use if there is an appreciable change in viscosity; if they become jellied or string-like, they should be discarded. Do not mix solvent cements. Solvent cements cannot be reactivated with primers or other solvents. Do not thin.
Make certain you have the proper solvent cement for the job. Available today are regular, medium and heavy body solvent cements each with an intended function. There are also clear and different pigmented solvent cements available, as well as specialty solvent cements. The regular body grades are usually near-water-thin and intended for small diameter PVC piping—½ inch, ¾ inch, and 1 inch. The viscosity can be determined by shaking the can. Sound and feel help indicate the viscosity. Great care must be exercised when using a regular body solvent cement because the viscosity is such that it has a tendency to run and leave very little on the piping. Climatic variables can also make the solvent evaporate more quickly.
• An excellent test for any solvent cement is to apply a small amount to the piping, allow it to penetrate for up to one minute, and then scrape it with a knife to determine the mil penetration of the solvent.
• Shaking the closed container can also tell you a lot. If the solvent cement sounds and feels like water, a water-thin cement is typically good for small-diameter applications. Additionally, shaking the can will help determine if the cement is still liquid or if it has started to set or gel in the can.
When not in use, store solvents and primers in a cool, dry storage area, out of direct sunlight. When storing an opened container, make certain the lid is firmly secured and sealed by turning the can upside down to observe if it leaks. Screw-top containers are not considered to be airtight and have a limited shelf life.
overvieW (continued)
Working With Solvent cementS

� �
Preparation - Assemble the proper materials for the job: primer, solvent cement, and applicators necessary for the pipe sizes being assembled. Solvent cementing is a fast procedure because you must put together wet joints with speed. An individual joint should be put together in less than one minute on the smaller diameters of PVC piping. Therefore, make certain you have everything necessary to do the job—rags, knife, saw, sandpaper, applicator, pipe, fittings, file, so that the task at hand can be accomplished quickly, with precision, and in a timely manner.
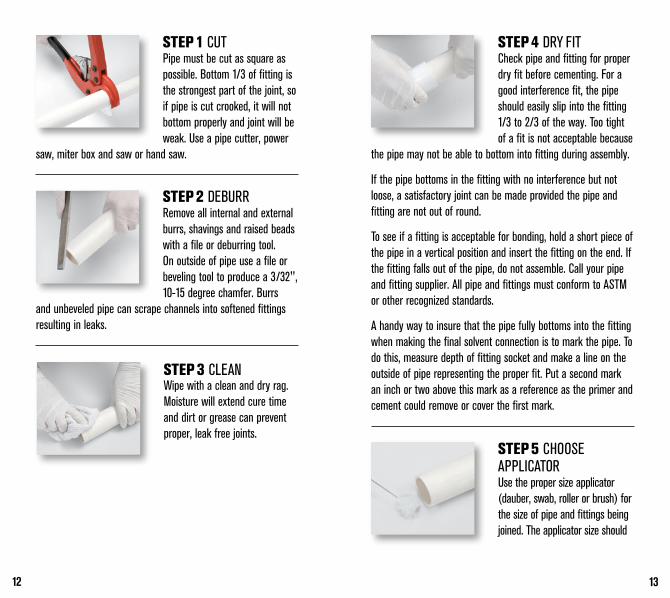
Pipe must be cut as square as possible. The bottom 1/3 of fitting is the strongest part of the joint , so if you have a crooked cut, pipe will not bottom properly. Use a pipe cutter, power saw, miter box and saw or hand saw.
Step 1 CUT
Remove all internal and external burrs, shavings and raised beads with a file or deburring tool. On outside of pipe use a file or beveling tool to produce a 3/32", 10-15 degree chamfer. Burrs
and unbeveled pipe can scrape channels into softened fittings resulting in leaks.
Step 2 DEBURR
Wipe with a clean and dry rag. Moisture will extend cure time and dirt or grease can prevent proper, leak free joints.
Step 3 CLEAN
Check pipe and fitting for proper dry fit before cementing. For a good interference fit, the pipe should easily slip into the fitting 1/3 to 2/3 of the way. Too tight of a fit is not acceptable because
the pipe may not be able to bottom into fitting during assembly.
If the pipe bottoms in the fitting with no interference but not loose, a satisfactory joint can be made provided the pipe and fitting are not out of round.
To see if a fitting is acceptable for bonding, hold a short piece of the pipe in a vertical position and insert the fitting on the end. If the fitting falls out of the pipe, do not assemble. Call your pipe and fitting supplier. All pipe and fittings must conform to ASTM or other recognized standards.
A handy way to insure that the pipe fully bottoms into the fitting when making the final solvent connection is to mark the pipe. To do this, measure depth of fitting socket and make a line on the outside of pipe representing the proper fit. Put a second mark an inch or two above this mark as a reference as the primer and cement could remove or cover the first mark.
Step 4 DRy FIT
Solvent cementing With A Primer

� �
Use the proper size applicator (dauber, swab, roller or brush) for the size of pipe and fittings being joined. The applicator size should be at least 1/2 the diameter of
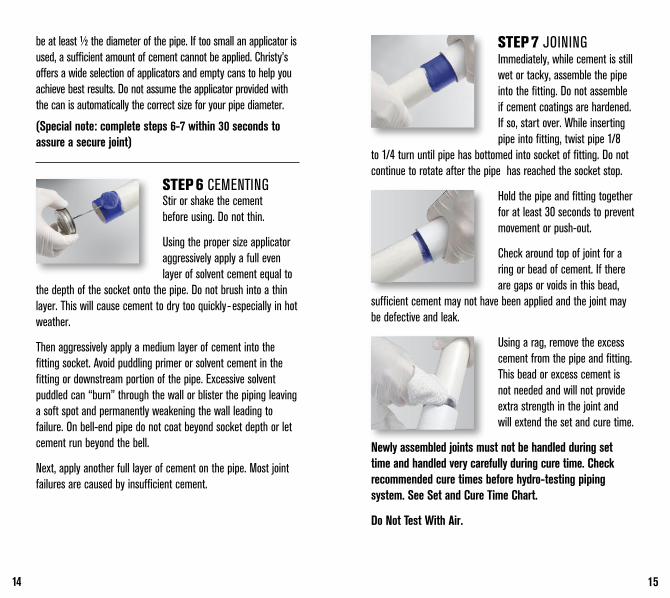
the pipe. If too small an applicator is used, a sufficient amount of cement cannot be applied. Christy’s offers a wide selection of applicators and empty cans to help you achieve best results. Do not assume the applicator provided with the can is automatically the correct size for your pipe diameter.
(Special note: complete steps �-� within �0 seconds to assure a secure joint)
A primer is used to penetrate and soften the surfaces of the pipe and fittings so that they can be fused together.
To check the penetration or softening properties of the primer before installation begins, take a small piece of scrap pipe and aggressively apply the primer. While still wet, use a knife or other sharp object and drag across the primed surface. A thin layer of the pipe surface will scrape away if there has been proper penetration and softening.Please note, in cold weather repeated applications of primer and cement and more time will be required for proper penetration and softening.
Begin priming process with proper size applicator, aggressively apply the primer into the fitting socket. Keep the surface wet
Step 5 CHOOSE APPLICATOR
until softened. It may be necessary to re-dip the applicator in the primer. Do not let primer puddle in the socket.
Next, quickly and aggressively apply primer to the pipe up to or just below the mark measuring the fitting socket length.
Then, without hesitation, apply a second application of primer to the fitting socket. Again do not let primer puddle or run past the fitting stop.
Step 6 PRIMING
Step 7 CEMENTINGStir or shake the cement before using. Do not thin.
While surfaces of fitting and pipe are still wet or tacky from priming, use the proper size
applicator to aggressively apply a full even layer of solvent cement equal to the depth of the socket onto the pipe. Do not brush into a thin layer. This will cause cement to dry too quickly- especially in hot weather.
Then aggressively apply a medium layer of cement into the fitting socket. Avoid puddling primer or solvent in the fitting or downstream portion of the pipe. Excessive solvent and/or primer puddled can “burn” through the wall or blister the piping leaving a soft spot and permanently weakening the wall leading to failure. On bell-end pipe do not coat beyond socket depth or let cement run beyond the bell.
Next, apply another full layer of cement on the pipe. Most joint failures are caused by insufficient cement.

10 11
Immediately, while cement is still wet or tacky, assemble the pipe into the fitting. Do not assemble if cement coatings are hardened. If so, start over. While inserting pipe into fitting, twist pipe 1/8
to 1/4 turn until pipe has bottomed into socket of fitting. Do not continue to rotate after the pipe has reached the socket stop.
Hold the pipe and fitting together for at least 30 seconds to prevent movement or push-out.
Check around top of joint for a ring or bead of cement. If there are gaps or voids in this bead,
sufficient cement may not have been applied and the joint may be defective and leak.
Using a rag, remove the excess cement from the pipe and fitting. This bead or excess cement is not needed and will not provide extra strength in the joint and will extend the set and cure time.
newly assembled joints must not be handled during set time and handled very carefully during cure time. check recommended cure times before hydro-testing piping system. See Set and cure time chart.
Do not test With Air.
Step 8 JOINING
Good solvent cemented joints can be made without a primer in certain pipe applications if local codes permit. We recommend that joints being made without a primer only be used for pressure water systems below 4" and for DWV or low pressure applications 6" or smaller.
Always use a primer for chemical bearing piping systems and always check local code requirements before beginning installation.
When joining pipe and fittings without a primer, extra care must be given during the application of the cement on the pipe and fitting surfaces to assure that adequate penetration and softening of the pipe and fittings has been achieved. To check the penetration or softening properties of the cement before installation begins, take a small piece of scrap pipe and aggressively apply the cement. While still wet, use a knife or other sharp object and drag across the wet surface. A thin layer of the pipe surface will scrape away if there has been proper penetration and softening. In cold weather repeated applications of cement and more time will be required for proper penetration and softening.
PrePArAtion - Assemble the proper materials for the job: Solvent cementing is a fast procedure because you must put together wet joints with speed. Therefore, make certain you have everything necessary to do the job—rags, knife, saw, applicator, pipe, fittings, file, so that the task at hand can be accomplished quickly, with precision, and in a timely manner.
Solvent cementing Without A Primer
1� 1�
Step 1 CUT
Step 2 DEBURR
Pipe must be cut as square as possible. Bottom 1/3 of fitting is the strongest part of the joint, so if pipe is cut crooked, it will not bottom properly and joint will be weak. Use a pipe cutter, power
saw, miter box and saw or hand saw.
Remove all internal and external burrs, shavings and raised beads with a file or deburring tool. On outside of pipe use a file or beveling tool to produce a 3/32", 10-15 degree chamfer. Burrs
and unbeveled pipe can scrape channels into softened fittings resulting in leaks.
Wipe with a clean and dry rag. Moisture will extend cure time and dirt or grease can prevent proper, leak free joints.
Step 3 CLEAN
Check pipe and fitting for proper dry fit before cementing. For a good interference fit, the pipe should easily slip into the fitting 1/3 to 2/3 of the way. Too tight of a fit is not acceptable because
the pipe may not be able to bottom into fitting during assembly.
If the pipe bottoms in the fitting with no interference but not loose, a satisfactory joint can be made provided the pipe and fitting are not out of round.
To see if a fitting is acceptable for bonding, hold a short piece of the pipe in a vertical position and insert the fitting on the end. If the fitting falls out of the pipe, do not assemble. Call your pipe and fitting supplier. All pipe and fittings must conform to ASTM or other recognized standards.
A handy way to insure that the pipe fully bottoms into the fitting when making the final solvent connection is to mark the pipe. To do this, measure depth of fitting socket and make a line on the outside of pipe representing the proper fit. Put a second mark an inch or two above this mark as a reference as the primer and cement could remove or cover the first mark.
Step 4 DRy FIT
Use the proper size applicator (dauber, swab, roller or brush) for the size of pipe and fittings being joined. The applicator size should
Step 5 CHOOSE APPLICATOR
1� 1�
Immediately, while cement is still wet or tacky, assemble the pipe into the fitting. Do not assemble if cement coatings are hardened. If so, start over. While inserting pipe into fitting, twist pipe 1/8
to 1/4 turn until pipe has bottomed into socket of fitting. Do not continue to rotate after the pipe has reached the socket stop.
Hold the pipe and fitting together for at least 30 seconds to prevent movement or push-out.
Check around top of joint for a ring or bead of cement. If there are gaps or voids in this bead,
sufficient cement may not have been applied and the joint may be defective and leak.
Using a rag, remove the excess cement from the pipe and fitting. This bead or excess cement is not needed and will not provide extra strength in the joint and will extend the set and cure time.
newly assembled joints must not be handled during set time and handled very carefully during cure time. check recommended cure times before hydro-testing piping system. See Set and cure time chart.
Do not test With Air.
be at least ½ the diameter of the pipe. If too small an applicator is used, a sufficient amount of cement cannot be applied. Christy’s offers a wide selection of applicators and empty cans to help you achieve best results. Do not assume the applicator provided with the can is automatically the correct size for your pipe diameter.
(Special note: complete steps �-� within �0 seconds to assure a secure joint)
Stir or shake the cement before using. Do not thin.
Using the proper size applicator aggressively apply a full even layer of solvent cement equal to
the depth of the socket onto the pipe. Do not brush into a thin layer. This will cause cement to dry too quickly- especially in hot weather.
Then aggressively apply a medium layer of cement into the fitting socket. Avoid puddling primer or solvent cement in the fitting or downstream portion of the pipe. Excessive solvent puddled can “burn” through the wall or blister the piping leaving a soft spot and permanently weakening the wall leading to failure. On bell-end pipe do not coat beyond socket depth or let cement run beyond the bell.
Next, apply another full layer of cement on the pipe. Most joint failures are caused by insufficient cement.
Step 6 CEMENTING
Step 7 JOINING

1� 1�
Working with large Diameter Pipe and Fittings: Depending on the size of the PVC piping to be installed, up to four people and mechanical joining tools may be required to quickly and properly align and install plastic pipe. Position yourself, pipe, and fittings to assure proper joint alignment during installation. Use specialized tools to assure pipe and fittings properly “bottom” completely. The finished joint must not be disturbed until cured. Always select the proper size applicators and follow all procedures carefully. Select the appropriate solvent cement type / formulation based on the guidelines in the Christy’s solvent cements family brochure. Contact Christy’s technical department for further information and recommendations.
Working in freezing temperatures is difficult. Red Hot Blue Glue® is the finest cement available for extreme conditions. Red Hot Blue Glue® has EXCELLENT COLD WEATHER STABILITy for virtually all practical applications.
By following our standard instructions and using a little extra care and patience, successful solvent cemented joints can be made at temperatures even as low as 0° F. In cold weather, solvents penetrate and soften the plastic surfaces more slowly than in warm weather. Also, the plastic is more resistant to solvent attack. Therefore, it becomes even more important to pre-soften surfaces with a Christy’s Primer. Longer cure times are also necessary. The cure schedules printed in our technical brochure allow a wide margin for safety, but for colder weather, more time should be allowed.
things to remember when Solvent cementing in cold Weather:1. Prefabricate as much of the system as is possible in a heated and ventilated work area.2. Store cements and primers in a warm area when not in use and make sure they remain fluid. Also store fittings in a warmer area, if possible.3. Take special care to remove dirt and moisture (including ice and snow) from the surfaces to be joined.4. Use primer to soften the joining surfaces before applying cement. More than one application may be necessary. Aggressively “Scrub” primer into pipe surface until milky.5. Be sure to apply solvent cement “male-female-male” sequentially, per directions on can.6. Wipe-off excess cement and solvent bead.7. Allow a longer cure period before the system is tested and used.8. Read and follow directions carefully before installation.
Solvent cementing tiPS AnD ADDitionAl conSiDerAtionS
colD WeAther Solvent cementing

1� 1�
Temperature Range
Pipe Sizes ½" to 1¼"
Pipe Sizes 1½" to 3"
60° - 100°F40° - 60°F0° - 40°F
2-3 Minutes5 Minutes10 Minutes
5 Minutes10 Minutes15 Minutes
tYPicAl initiAl Set timeS For chriStY’S™ Solvent cementS
Typical set schedule is required time before it is advisable to carefully handle joint. In wet or humid conditions, additional set time may be required of up to 50% of amount listed. Use as general guidelines only.
Relative Humidity60% or Less*
Cure Time Pipe Sizes½" to 1¼"
Cure Time Pipe Sizes1½" to 2"
Temperature Range During Assembly and Cure Periods
Up to180 PSI
Above180 to
370 PSI
Up to180 PSI
Above180 to315 PSI
60° - 100°F40° - 60°F0° - 40°F
15 Minutes20 Minutes30 Minutes
6 Hours12 Hours48 Hours
30 Minutes45 Minutes
1 Hour
12 Hours24 Hours96 Hours
tYPicAl Joint cure ScheDule For chriStY’S™ Solvent cementS
Pipe Diameter ½" ¾" 1" 1½" 2" 3"
Number of Joints 300 200 125 90 60 40
tYPicAl numBer oF JointS Per QuArt oF chriStY’S Solvent cementS
exPerience the chriStY’S ADvAntAgeRed Hot Blue Glue is the easiest-to-use and most reliable solvent cement for irrigation. Fast setting for quick pressurization. Excellent viscosity for uniform coverage and “no blown joints”. Works well in all weather conditions, wet or dry.
A WorD ABout loW vocChristy’s environmentally-responsible Low VOC products are formulated to meet the requirements of California South Coast Air Quality Management District. For US Green Building Council LEED projects, low VOC solvent cements can earn credits toward green building certification.
Cure Time Pipe Sizes2½" to 8"
Cure Time Pipe Sizes10" to 15"
Cure Time Pipe Sizes 15"+
Up to180 PSI
Above180 to315 PSI
Up to100 PSI
Above100 PSI
Up to100 PSI
1.5 Hours4 Hours72 Hours
24 Hours48 Hours8 Days
24 Hours48 Hours8 Days
48 Hours4 Days16 Days
72 Hours6 Days14 Days
* In damp or humid weather allow 50% more cure time. These figures are estimates based on our laboratory tests. Due to the many variables in the field, use as a general guide only.
Pipe Sizes 3½" to 8"
Pipe Sizes 10" to 15"
Pipe Sizes 15"+
30 Minutes2 Hours12 Hours
2 Hours8 Hours24 Hours
4 Hours16 Hours48 Hours
Pipe Diameter 4" 6" 8" 10" 12" 15" 18”
Number of Joints 30 10 5 2-3 1-2 ¾ ½

© 2010, T. Christy Enterprises, Inc. all rights reserved. Revised October 2010.
T. Christy Enterprises, Inc. 655 E. Ball Rd. • Anaheim, CA 92805
Tel: (714) 507-3300 • Fax: (714) 507-3310
www.TChristy.com 800-BLU-GLUE
ChrISTy’S oFFErS a FULL FamILy oF SoLVEnT CEmEnTS and PrImErS.
LIT.IG.102010