Guide to Securing Microsoft Windows NT Networks...
146
UNCLASSIFIED UNCLASSIFIED Report Number: C4-001R-00 Guide to Securing Microsoft Guide to Securing Microsoft Guide to Securing Microsoft Guide to Securing Microsoft Windows NT Windows NT Windows NT Windows NT Networks Networks Networks Networks Network Security Evaluations and Tools Division of the Systems and Network Attack Center (SNAC) National Security Agency 9800 Savage Rd. Suite 6704 Ft. Meade, MD 20755-6704 [email protected] Authors: Paul F. Bartock Karl J. Brown Melanie R. Cook Julie M. Haney CTOC(AW) John Hollenbeck, USN Harley E. Parkes Capt. York W. Pasanen, USAF Nichole L. Scheibe Capt. Robin G. Stephens, USAF Capt. Martin L. White, USAF Updated: September 18, 2001 Version 4.2
Transcript of Guide to Securing Microsoft Windows NT Networks...
UNCLASSIFIED
UNCLASSIFIED
Report Number: C4-001R-00
Guide to Securing Microsoft Guide to Securing Microsoft Guide to Securing Microsoft Guide to Securing Microsoft Windows NTWindows NTWindows NTWindows NT Networks Networks Networks Networks
Network Security Evaluations and Tools Division of the
Systems and Network Attack Center (SNAC)
National Security Agency 9800 Savage Rd. Suite 6704 Ft. Meade, MD 20755-6704
Authors: Paul F. Bartock Karl J. Brown Melanie R. Cook Julie M. Haney CTOC(AW) John Hollenbeck, USN Harley E. Parkes Capt. York W. Pasanen, USAF Nichole L. Scheibe Capt. Robin G. Stephens, USAF Capt. Martin L. White, USAF
Updated: September 18, 2001Version 4.2

UNCLASSIFIED
UNCLASSIFIED ii
This Page Intentionally Left Blank
UNCLASSIFIED
UNCLASSIFIED iii
Change Control
Version Date Details 4.2 31 Aug 2001 Added notes on page iv and page 27 about implementing the
operating system recommendations in this guide prior to installing and securing Microsoft Exchange.
4.2 31 Aug 2001 Added a warning on page 31 for the “Users must log on in order to change password” setting describing the problem with new user accounts that require the user to change their password at first logon.
4.2 31 Aug 2001 Modified the existing note and added a warning on page 36 for the “Log on as a Service” user right informing the user that the template file will remove all users/groups from this right.
4.2 31 Aug 2001 Added a note on page 39 for the “Audit access to internal system object” setting describing the event 560 errors.
4.2 31 Aug 2001 Corrected the registry key location for preventing users from installing print drivers on page 41.
4.2 31 Aug 2001 Corrected the registry key location for restricting management of shared resources on page 41.
4.2 31 Aug 2001 Added section for setting file permissions for the Dr. Watson crash dump file (user.dmp) on pages 65.
4.2 31 Aug 2001 Removed references to setting the RestrictGuestAccess value in the winreg registry key from Chapter 13 and Appendix D. The proper way to restrict remove registry access is through the ACL permissions on the winreg key.
4.2 31 Aug 2001 Corrected text under installation of the ENPASFLT.DLL on page 90 to read “via setup.exe” vice “via the Install_enpasflt.exe”.
4.2 31 Aug 2001 Added a warning on page 90 that requiring all users to change their password at next logon after installing the ENPASFLT.DLL can cause performance problems on larger networks.
4.2 31 Aug 2001 Added a note on page 107 (Appendix A) on the LMCompatibility level setting required for Windows 95/98 clients.
4.2 31 Aug 2001 Updated Appendix C with information on the Security Rollup Package (SRP) and removed all hotfixes that are included in the SRP. Added MS advisory MS 01-043.
UNCLASSIFIED
UNCLASSIFIED iv
Warnings
� Do not attempt to install any of the settings in this guide without first testing in a non-operational environment.
� This document is only a guide containing recommended security settings. It is not meant to replace well-structured policy or sound judgment. Furthermore this guide does not address site-specific configuration issues. Care must be taken when implementing this guide to address these issues such as the use of products like Microsoft Exchange, IIS, and SMS.
� The security changes described in this document only apply to Microsoft Windows NT 4.0 Service Pack 6a systems and should not be applied to any other Windows NT versions or operating systems.
� Microsoft Exchange security is tightly coupled to the operating system. File permissions, registry settings, password usage, user rights and other issues associated with Windows NT security have a direct impact on Exchange security. It is recommended that you implement the recommendations contained in this guide prior to installing Microsoft Exchange Server or the Exchange or Outlook clients.
� You can severely impair or disable a Windows NT system with incorrect changes or accidental deletions when using programs (Examples: Security Configuration Manager, Regedt32.exe, and Regedit.exe) to change the system configuration. Therefore, it is extremely important to test all settings recommended in this guide before installing them on an operational network.
� Currently, no Undo function exists for deletions made within the Windows NT registry. The registry editor (Regedt32.exe or Regedit.exe) prompts you to confirm the deletions if Confirm On Delete is selected from the options menu. When you delete a registry key, the message does not include the name of the key you are deleting. Therefore, check your selection carefully before proceeding with any deletion.
� SOFTWARE IS PROVIDED "AS IS" AND ANY EXPRESS OR IMPLIED WARRANTIES, INCLUDING, BUT NOT LIMITED TO, THE IMPLIED WARRANTIES OF MERCHANTABILITY AND FITNESS FOR A PARTICULAR PURPOSE ARE EXPRESSLY DISCLAIMED. IN NO EVENT SHALL THE CONTRIBUTORS BE LIABLE FOR ANY DIRECT, INDIRECT, INCIDENTAL, SPECIAL, EXEMPLARY, OR CONSEQUENTIAL DAMAGES (INCLUDING, BUT NOT LIMITED TO, PROCUREMENT OF SUBSTITUTE GOODS OR SERVICES; LOSS OF USE, DATA, OR PROFITS; OR BUSINESS INTERRUPTION) HOWEVER CAUSED AND ON ANY THEORY OF LIABILITY, WHETHER IN CONTRACT, STRICT LIABILITY, OR TORT (INCLUDING NEGLIGENCE OR OTHERWISE) ARISING IN ANY WAY OUT OF THE USE OF THIS SOFTWARE, EVEN IF ADVISED OF THE POSSIBILITY OF SUCH DAMAGE.
� This document is current as of September 18, 2001. See http://www.microsoft.com/ for the latest changes or modifications to the Windows NT operating system.

UNCLASSIFIED
UNCLASSIFIED v
War
ning
s
This Page Intentionally Left Blank

UNCLASSIFIED
UNCLASSIFIED vi
Acknowledgem
ents
Acknowledgements
The authors would like to acknowledge the authors of the “Guide to Implementing Windows NT in Secure Network Environments” and the “Guide to Securing Microsoft Windows NT Networks” versions 2.0, 2.1, 3.0, 4.0, and 4.1.
The authors would like to acknowledge Mike Samsel for his development work of the Enhanced Password DLL included with this Guide.
The authors would like to acknowledge John Hollenbeck, Sherri Bavis, Greg Christensen, Jerry Kirdy, and Jeff Morrison for their support in gathering hotfixes, testing of security configurations and identifying required modifications to this guide.
Some parts of this document were drawn from Microsoft copyright materials with their permission.
UNCLASSIFIED
UNCLASSIFIED vii
Trad
emar
k In
form
atio
n Trademark Information
Microsoft, MS-DOS, Windows, Windows NT, Windows 98, Windows 95, Windows for Workgroups, and Windows 3.1 are either registered trademarks or trademarks of Microsoft Corporation in the U.S.A. and other countries.
All other names are registered trademarks or trademarks of their respective companies.
UNCLASSIFIED
UNCLASSIFIED viii
Table of C
ontents
Table of Contents
Change Control........................................................................................................................................... iii
Warnings .....................................................................................................................................................iv
Acknowledgements....................................................................................................................................vi
Trademark Information .............................................................................................................................vii
Table of Contents .....................................................................................................................................viii
Table of Figures..........................................................................................................................................xi
Table of Tables ..........................................................................................................................................xii
Introduction..................................................................................................................................................1 Getting the Most from this Guide ...............................................................................................................1 About the Guide to Securing Microsoft Windows NT Networks ................................................................2
Chapter 1 Windows NT 4.0 Overview ........................................................................................................5 Windows NT Security Architecture ............................................................................................................5 Workgroups and Domains .........................................................................................................................7 Single Master Domain Model.....................................................................................................................8 Multiple Master Domain Model ..................................................................................................................9
Chapter 2 Windows NT Pre-Configuration Recommendations ............................................................13 Windows NT 4.0 Installation Recommendations .....................................................................................13 File System Selection ..............................................................................................................................13 Physical Security......................................................................................................................................14
Chapter 3 Installing Service Pack 6, Hotfixes, and the Security Configuration Manager..................17 Service Pack 6a Pre-installation Checklist ..............................................................................................17 Service Pack 6a Pre-installation File System Changes...........................................................................19 Installing Service Pack 6a........................................................................................................................19 Post Service Pack 6a Hotfixes.................................................................................................................21
To download and install subsequent hotfixes: ..................................................................................21 To remove installed hotfixes: ............................................................................................................22
Installing the Security Configuration Manager.........................................................................................22 To install the SCM GUI and command line tools: .............................................................................22
Chapter 4 Security Configuration Manager ............................................................................................25 SCM Functionality....................................................................................................................................25 Loading the SCM Snap-in into the MMC .................................................................................................26 Security Configuration Files.....................................................................................................................26 Editing Security Configuration Files.........................................................................................................28
Chapter 5 Modifying Account Policy Settings with the Security Configuration Manager.................29 Password Policy.......................................................................................................................................29
UNCLASSIFIED
UNCLASSIFIED ix
Tabl
e of
Con
tent
s
Account Lockout Policy ........................................................................................................................... 31 Chapter 6 Modifying Local Policy Settings with the Security Configuration Manager ..................... 33
Auditing Policy......................................................................................................................................... 33 User Rights Assignment.......................................................................................................................... 35 Security Options ...................................................................................................................................... 38
Chapter 7 Modifying Event Log Settings with the Security Configuration Manager ......................... 43 Event Log Settings .................................................................................................................................. 43 Managing the Event Logs........................................................................................................................ 45
Chapter 8 Managing Restricted Groups with the Security Configuration Manager .......................... 47 Modifying Restricted Groups via the Security Configuration Manager ................................................... 47
Chapter 9 Managing System Services with the Security Configuration Manager ............................. 49 Modifying System Services via the Security Configuration Manager ..................................................... 49
Chapter 10 Modifying Registry Security Settings with the Security Configuration Manager........... 51 Modifying Registry settings via the Security Configuration Manager...................................................... 51 Recommended Registry Key Permissions.............................................................................................. 53
Chapter 11 Modifying File System Security Settings with the Security Configuration Manager ..... 59 Modifying File System settings via the Security Configuration Manager ................................................ 59 Recommended File and Folder Permissions .......................................................................................... 61
Chapter 12 Running Security Configuration Files................................................................................. 68 SCM Databases ...................................................................................................................................... 68 SCM Command Line Options ................................................................................................................. 69 Performing a Security Analysis ............................................................................................................... 70 Configuring a System.............................................................................................................................. 71
Chapter 13 Manual Settings..................................................................................................................... 74 System Boot Time ................................................................................................................................... 74 Manual Registry Changes ....................................................................................................................... 74
Adding Registry Keys and Key Values............................................................................................. 75 Removing Registry Keys .................................................................................................................. 75 Enforcing NTLMv2 Authentication.................................................................................................... 75 Disabling CDROM Autorun............................................................................................................... 75 Securing Additional Base Named Objects ....................................................................................... 76 Controlling the Ability to Schedule Tasks......................................................................................... 76 Securing Print Driver Installation ...................................................................................................... 76 Preventing the 8.3 Filename attack.................................................................................................. 76 Enabling NetBT to Open TCP and UDP Ports Exclusively .............................................................. 77 Disabling Automatic Logon of Administrator .................................................................................... 77 Protecting Kernel Object Attributes .................................................................................................. 77 Removing OS/2 and POSIX Subsystems ........................................................................................ 78 Removing Netware DLL ................................................................................................................... 78
Manual Folder and File Permission Changes ......................................................................................... 78 Share Permissions .................................................................................................................................. 80 Auditing.................................................................................................................................................... 81

UNCLASSIFIED
UNCLASSIFIED x
Table of C
ontents
To enable file system auditing: .........................................................................................................81 Emergency Repair Disk ...........................................................................................................................84 Application Problems ...............................................................................................................................86 Domain Backup Policy .............................................................................................................................86 Account Policy .........................................................................................................................................88
Remove group accounts ...................................................................................................................88 Set a password for the renamed Guest account ..............................................................................88 Create a decoy “administrator” account............................................................................................88 Administrators should have two accounts ........................................................................................88 Dormant accounts should be removed .............................................................................................88 Local users should not exist on workstations in a domain................................................................88 Strong SAM encryption .....................................................................................................................88
Enabling Strong Password Functionality with ENPASFLT.DLL ..............................................................89 Chapter 14 Network Security ...................................................................................................................92
Default Network Protocols .......................................................................................................................92 Configuring Network Components...........................................................................................................92 Advanced TCP/IP Settings ......................................................................................................................96 Disabling the Server Services and Computer Browser Service where appropriate. ...............................97
Via the Service Manager in Control Panel ........................................................................................98 Via the SCM ......................................................................................................................................98
Remote Access Service...........................................................................................................................98 RAS Permissions ............................................................................................................................101 Point-to-Point Tunneling Protocol ...................................................................................................102 RAS Auditing...................................................................................................................................102
Other Network Security Concerns .........................................................................................................103 Appendix A Securing Microsoft Windows 95/98 Client.......................................................................106
System Boot Precautions ......................................................................................................................106 Authentication ........................................................................................................................................107 The System Policy Editor.......................................................................................................................107 Application Process Protection ..............................................................................................................112
Appendix B Example Logon Banner .....................................................................................................114
Appendix C Windows NT 4.0 Post Service Pack 6a Hotfix Information ............................................116 Security Rollup Package........................................................................................................................116 Additional Required Hotfixes .................................................................................................................117
Appendix D Windows NT Configuration Checklist ..............................................................................120
Appendix E Further Information Sources.............................................................................................128
Appendix F References...........................................................................................................................132
UNCLASSIFIED
UNCLASSIFIED xi
Table of Figures
Table of Figures
Figure 1 Workgroup Model .....................................................................................................................7 Figure 2 Domain Model Implementation.................................................................................................8 Figure 3 Master Domain Model...............................................................................................................9 Figure 4 Multiple Master Domain Model ...............................................................................................10 Figure 5 Password Policy Recommended Settings..............................................................................31 Figure 6 Account Lockout Policy Recommended Settings...................................................................32 Figure 7 Recommended Audit Policy ...................................................................................................34 Figure 8 Recommended User Rights ...................................................................................................38 Figure 9 Event Log Recommended Configuration................................................................................45 Figure 10 System Services Recommended Settings ...........................................................................50 Figure 11 Configuration File Selection..................................................................................................69 Figure 12 Auditable Events...................................................................................................................82 Figure 13 Registry Key Auditing Dialog Box.........................................................................................83 Figure 14 Identification Tab of Network Window ..................................................................................93 Figure 15 Protocols Tab of Network Window .......................................................................................94 Figure 16 TCP/IP Properties Window...................................................................................................95 Figure 17 Advanced IP Addressing Window ........................................................................................95 Figure 18 Windows NT Server RAS Network Configuration ..............................................................100 Figure 19 RAS Server TCP/IP Configuration Window........................................................................101 Figure 20 Share Level Security Example ...........................................................................................110 Figure 21 User-level Share Security...................................................................................................110
UNCLASSIFIED
UNCLASSIFIED xii
Table of Figures
Table of Tables
Table 1 Workgroup Model ...................................................................................................................... 7 Table 2 Microsoft Security Configuration Files..................................................................................... 27 Table 3 Enhanced Security Configuration Files ................................................................................... 27 Table 4 Password Policy Options......................................................................................................... 31 Table 5 Account Lockout Policy Options.............................................................................................. 32 Table 6 Recommended Audit Policy Settings ...................................................................................... 34 Table 7 Recommended User Rights .................................................................................................... 37 Table 8 Recommended Security Options Configuration ...................................................................... 42 Table 9 Event Log Settings .................................................................................................................. 44 Table 10 Permission Options ............................................................................................................... 52 Table 11 Recommended Registry Settings.......................................................................................... 57 Table 12 Recommended File System Settings .................................................................................... 64 Table 13 Dr. Watson Crash Dump Directory........................................................................................ 65 Table 14 IIS Special Permissions......................................................................................................... 66 Table 15 SCM Command Line Parameters ......................................................................................... 70 Table 16 Configuration File Names...................................................................................................... 71 Table 17 Recommended File Folder Permissions ............................................................................... 79 Table 18 Manual File Additions and Permissions ................................................................................ 80 Table 19 Recommended Printer Share Settings.................................................................................. 81 Table 20 Registry Audit Events ............................................................................................................ 84 Table 21 Logon Policy........................................................................................................................ 108 Table 22 Password Policy .................................................................................................................. 109 Table 23 File and Print Sharing Policy ............................................................................................... 109 Table 24 Microsoft Client Policy ......................................................................................................... 111 Table 25 Control Panel Policy ............................................................................................................ 112
UNCLASSIFIED
UNCLASSIFIED xiii
Cha
pter
6 –
Mod
ifyin
g Lo
cal P
olic
y Se
tting
s
This Page Intentionally Left Blank

UNCLASSIFIED
UNCLASSIFIED 1
Intro
duct
ion
Introduction The purpose of this document is to inform the reader about the Windows NT 4.0 security mechanisms that are available and how these security mechanisms can be implemented in a network environment. It is intended to provide a solid security foundation for any Windows NT 4.0 network by providing step-by-step instructions on how to utilize the operating system’s built-in security features, additional add-on service packs and hotfixes to eliminate known security vulnerabilities. While networks will vary in purpose and scope, this document outlines security recommendations and procedures that can be adapted for any Windows NT 4.0 network.
The Guide to Securing Microsoft Windows NT Networks presents detailed information on how to secure a network based Windows NT 4.0 operating system in coordination with Microsoft’s current service pack (SP6a). Specifically, this document addresses the built-in security features and shortfalls of the default Windows NT 4.0 operating system. The following essential assumptions have been made to limit the scope of this document:
� The network consists of machines running Microsoft Windows NT 4.0 and Microsoft Windows 95/98 clients.
WARNING: Windows 95 and 98 do not support the same level of security as Windows NT 4.0. See Appendix A for further information.
� All network machines are Intel-based architecture.
� Users of this guide have a working knowledge of Windows NT 4.0 installation and basic system administration skills.
This document is intended for Windows NT 4.0 network administrators, but should be read by anyone involved or interested in Windows NT 4.0 or network security.
Getting the Most from this Guide
The following list contains suggestions to successfully secure a Windows NT network according to this guide.
WARNING: This list does not address site-specific issues and every setting in this book should be tested on a non-operational network.
� Read the guide in its entirety. Subsequent chapters build on information and settings discussed in prior chapters. Omitting or deleting steps can potentially lead to an unstable system and/or network that will require reconfiguration and reinstallation of software.
� Perform pre-configuration recommendations:
o Perform a complete backup of your system if this is not a new installation (Chapter 13).
o Convert FAT partitions to NTFS if possible. (Chapter 2)
o Create new emergency repair disks if this is not a new installation (Chapter 13).
o Read Service Pack 6a readme.txt file (Companion CD).
UNCLASSIFIED
UNCLASSIFIED 2
Introduction
� Install Service Pack 6a via msnt128.exe (Chapter 3).
� If a previous Service Pack and hotfixes were previously installed on system, perform the following actions:
o Delete the uninstall directory for the previous Service Pack.
o Delete the registry keys pointing to pre-Service Pack 6 hotfixes.
� Install post Service Pack 6a hotfixes (Chapter 3).
� Read the Security Configuration Manager readme.txt file (Companion CD).
� Install the Security Configuration Manager and Management Console (Chapter 4).
� Load MMC snap-in for Security Configuration Manager.
� Review security configuration files contained in the companion CD and make changes to security configuration files as required for your specific site’s policies and architecture (Chapters 5-11).
� Apply appropriate security configuration file applicable to each specific system. For example, apply the BDC.inf file for a Backup Domain Controller (Chapter 4 and 12).
� Make the following manual changes: (Chapter 13)
o Manual registry changes.
o Manual file and directory permission changes.
o Configure share permissions to include printer shares.
o Implement file and registry auditing.
� Make appropriate security settings for network protocols and services (Chapter 14).
o TCP/IP
o RAS
o Ensure ports 135, 137, 138, and 139 are blocked at the premise router.
o Turn off unnecessary services and close all unnecessary ports (Chapter 14).
About the Guide to Securing Microsoft Windows NT Networks
This document consists of the following chapters:
Chapter 1, “Windows NT 4.0 Overview,” provides an overview of the Windows NT 4.0 operating system. Discusses the characteristics of the operating system, to include the security components that enforce security policies and domain models.
Chapter 2, “Windows NT Pre-Configuration Recommendations,” contains recommendations for how to install Microsoft Windows NT, file system selection, backup, physical security, and a Pre-Service Pack – 6a installation checklist.
Chapter 3, “Installing Service Pack 6a, Hotfixes, and the Security Configuration Manager,” contains instructions on how to install Service Pack 6a, post-Service Pack 6a hotfixes, and the Security Configuration Manager.
UNCLASSIFIED
UNCLASSIFIED 3
Intro
duct
ion
Chapter 4, “Security Configuration Manager,’’ describes how to use the Security Configuration Manager to implement, edit, and create new security configuration files. This chapter also introduces the security configuration files included with this document.
Chapter 5, “ Modifying Account Policy Settings with the Security Configuration Manager,” explains how to set domain wide account policies using the Security Configuration Manager. The section also covers Password Policy and Account Lockout.
Chapter 6, “Modifying Local Policy Settings with the Security Configuration Manager,” illustrates how to use the Security Configuration Manager to implement and modify Local Policy settings. Specifically this section describes suggested policies for Auditing, User Rights, and Security Attributes.
Chapter 7, “Modifying Event Log Settings with the Security Configuration Manager,” explains how to capture, view, and store the critical events that have occurred on the network by modifying the Event Log Settings. Also included in this section is Management of Event Logs.
Chapter 8, “Managing Restricted Groups via the Security Configuration Manager,” discusses how to manage the membership of sensitive groups using the Restricted Groups option. This section describes how to prevent users from elevating their privilege to the Administrators group through various attack tools and hacks.
Chapter 9, “Managing System Services with the Security Configuration Manager,” illustrates how to manage System Service settings such as Startup Modes and Access Control Lists using the Security Configuration Manager. This section also describes how settings are established that can control which users and/or groups can read and execute, write to, delete, start, pause, or stop a service.
Chapter 10, “Modifying Registry Security Services with the Security Configuration Manager,” discusses how to configure access control lists for Registry Keys. Also discussed is how to implement adequate security in a Windows NT environment, by modifying registry keys and their associated permissions must be changed.
Chapter 11, “Modifying File System Security Settings with the Security Configuration Manager,” steps the reader through the actions required to modify file and folder permissions using the Security Configuration Manager. Additionally, this section outlines recommended file and folder permission settings.
Chapter 12, “Running Security Configuration Files,” explains how to perform security analysis and configuration via the GUI or the command line program, once the appropriate configuration file(s) have been modified.
Chapter 13, “Manual Settings,” describes the recommended registry settings for shares, folders, files and auditing that must be configured manually. Additionally, the section illustrates the steps required to create an Emergency Repair Disk and to restore the system from this disk. The domain backup policy and security implications are also discussed.
Chapter 14, “Network Security,” discusses the security implications when connecting Microsoft Windows NT computers to a network. This chapter includes dynamic host configuration protocol (DHCP), trust relationships, router configuration, remote access, and protocol selection.
Appendix A, “Windows 95/98 Client Information,” discusses recommended settings and configurations for Windows 95/98 Clients on a Windows NT 4.0 Network secured using this book.

UNCLASSIFIED
UNCLASSIFIED 4
Introduction
Appendix B, “Example Logon Banner,” contains the logon banner that is included in the Trusted Network Interpretation of the TCSEC (Document number: NSC-TG-005, 31 July 1987) known as the “Red Book.”
Appendix C, “Windows NT 4.0 Post-Service Pack 6a Hotfix Information,” contains a comprehensive list of all post-Service Pack 6a hotfixes for Windows NT 4.0.
Appendix D, “Windows NT Configuration Checklist,” contains a checklist to use when configuring a Windows NT computer with this manual.
Appendix E, “Further Information,” contains a list of the hyperlinks used throughout this guide.
Appendix F, “References,” contains a list of resources cited.
UNCLASSIFIED
UNCLASSIFIED 5
Cha
pter
1-W
indo
ws
NT
4.0
Ove
rvie
w
Chapter
1 Windows NT 4.0 Overview
Windows NT 4.0 is a true, 32-bit, preemptive, multitasking operating system that is designed to provide a robust and secure operating system. Windows NT 4.0 comes in two versions: Windows NT 4.0 Server and Windows NT 4.0 Workstation. Both versions have the familiar Windows 95/98 interface, but beneath the graphical user interface (GUI) is a powerful operating system designed for corporate and high-end users. The Windows NT 4.0 Server can do everything that a Windows NT Workstation can do and adds a comprehensive set of tools for managing and administering a Windows NT 4.0 network.
Windows NT Security Architecture
The Windows NT Security Architecture permeates the entire operating system. It provides a secure way to control all access to objects, such as files and printers. Access to these objects is checked by the security subsystem to ensure no application or user gains access without proper authorization. The security subsystem includes the following major components: the Local Security Authority (LSA), the Security Account Manager (SAM), the Security Reference Monitor (SRM), and the logon processes. The security subsystem’s primary objective is to regulate access to objects. Under Windows NT, an administrator assigns permissions to users and groups to grant or deny access to particular objects. For example, permissions are used to determine if a user is able to read or write to a particular file. Additionally, an administrator can set rights for a user or group to control the actions that a user or group can perform on the computer or domain. The following actions are examples of rights: ability to shut down the system: perform backups, upload and download drivers, and manage audit logs. Below are descriptions of relevant security items.
Security Identifiers (SIDs)
Within the Windows NT security architecture, users are identified by their unique Security Identifier (SID), not their username. The security subsystem generates a unique SID at the time the account is created. The generated SID is guaranteed to be unique across both time and space—no other user in the system, or any other system, currently has or will have the same SID. Unlike UNIX, where User IDs can be reused, SIDs are entirely unique.
Windows NT generates a SID using a proprietary hashing function based on the current system time, the amount of execution time the current process has used in the user mode, and the computer name or domain name. The Domain name is dependent on whether the account is created within the User Manager or the User Manager for Domains. These three factors in concert with the hashing function provide a SID that is
UNCLASSIFIED
UNCLASSIFIED 6
Chapter 1-W
indows
NT 4.0 O
verview
virtually guaranteed to be unique. If the user belongs to a group, the user will be given a unique SID for that group while still maintaining his or her own unique SID.1
Objects
Almost everything in the Windows NT Operating System is represented as an object. This includes memory devices, system processes, threads, and even windows that appear on the desktop. Objects are the key to providing a high level of security in the Windows NT operating system. An object is a self-contained entity that contains its own data and the functions needed to manipulate that data.2 Objects contain data and information on who or what processes can access that data/resource. These strict controls provide great flexibility for security management.
Access Control List (ACL)
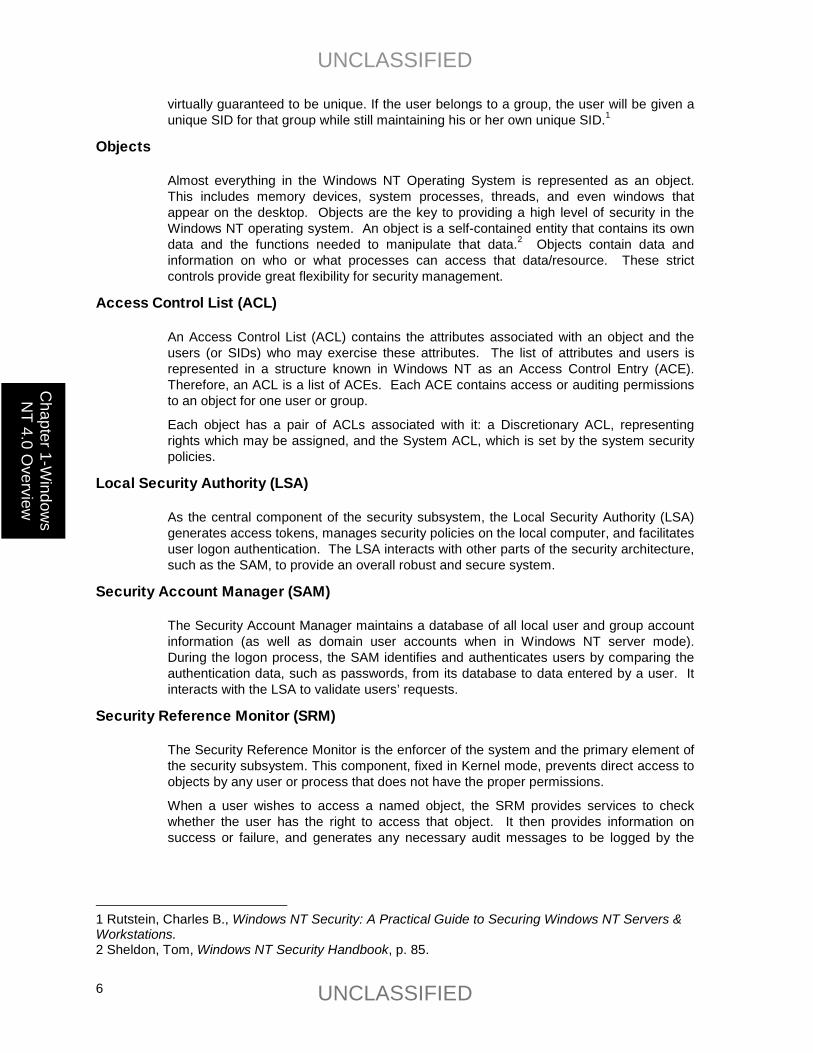
An Access Control List (ACL) contains the attributes associated with an object and the users (or SIDs) who may exercise these attributes. The list of attributes and users is represented in a structure known in Windows NT as an Access Control Entry (ACE). Therefore, an ACL is a list of ACEs. Each ACE contains access or auditing permissions to an object for one user or group.
Each object has a pair of ACLs associated with it: a Discretionary ACL, representing rights which may be assigned, and the System ACL, which is set by the system security policies.
Local Security Authority (LSA)
As the central component of the security subsystem, the Local Security Authority (LSA) generates access tokens, manages security policies on the local computer, and facilitates user logon authentication. The LSA interacts with other parts of the security architecture, such as the SAM, to provide an overall robust and secure system.
Security Account Manager (SAM)
The Security Account Manager maintains a database of all local user and group account information (as well as domain user accounts when in Windows NT server mode). During the logon process, the SAM identifies and authenticates users by comparing the authentication data, such as passwords, from its database to data entered by a user. It interacts with the LSA to validate users’ requests.
Security Reference Monitor (SRM)
The Security Reference Monitor is the enforcer of the system and the primary element of the security subsystem. This component, fixed in Kernel mode, prevents direct access to objects by any user or process that does not have the proper permissions.
When a user wishes to access a named object, the SRM provides services to check whether the user has the right to access that object. It then provides information on success or failure, and generates any necessary audit messages to be logged by the
1 Rutstein, Charles B., Windows NT Security: A Practical Guide to Securing Windows NT Servers & Workstations. 2 Sheldon, Tom, Windows NT Security Handbook, p. 85.
UNCLASSIFIED
UNCLASSIFIED 7
Cha
pter
1-W
indo
ws
NT
4.0
Ove
rvie
w
LSA. Note that although it runs in kernel mode, it responds equally to both user and system authorization requests.3
Workgroups and Domains It is important to make an accurate assessment of the needs of an organization prior to selecting a specific network configuration. In Windows NT, the system administrator has the option of implementing the network as a workgroup, a domain, or both.
Workgroups
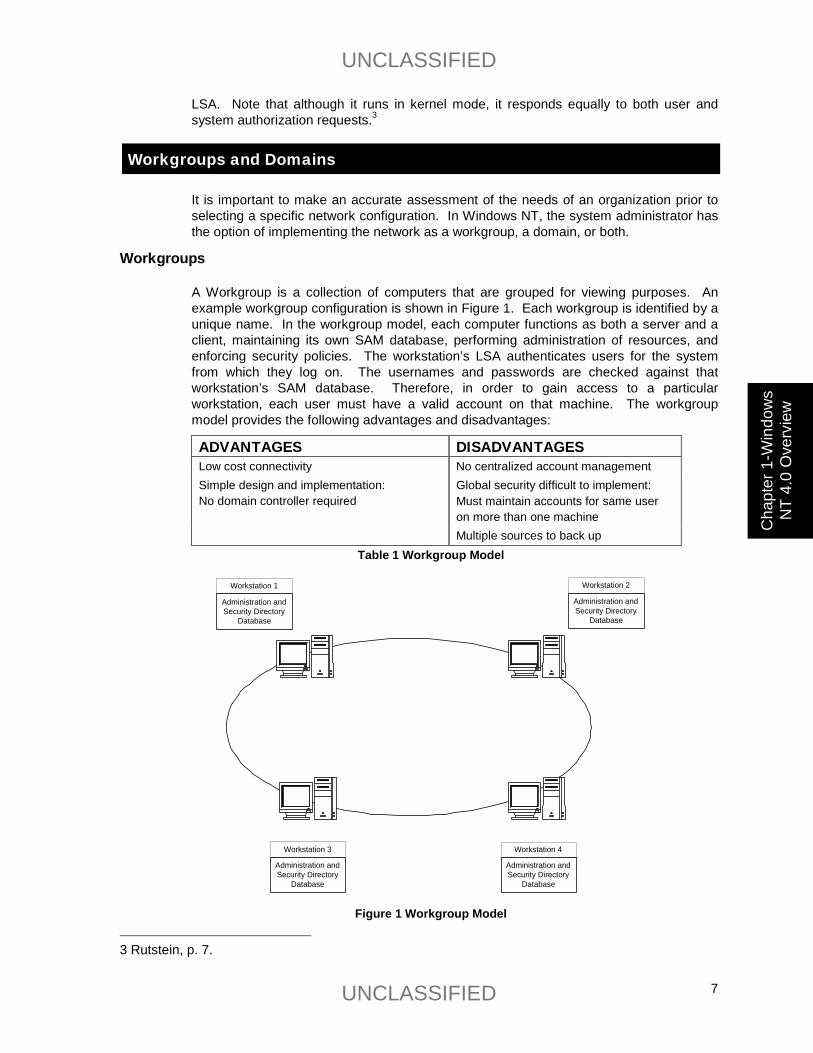
A Workgroup is a collection of computers that are grouped for viewing purposes. An example workgroup configuration is shown in Figure 1. Each workgroup is identified by a unique name. In the workgroup model, each computer functions as both a server and a client, maintaining its own SAM database, performing administration of resources, and enforcing security policies. The workstation’s LSA authenticates users for the system from which they log on. The usernames and passwords are checked against that workstation’s SAM database. Therefore, in order to gain access to a particular workstation, each user must have a valid account on that machine. The workgroup model provides the following advantages and disadvantages:
ADVANTAGES DISADVANTAGES Low cost connectivity No centralized account management Simple design and implementation: No domain controller required
Global security difficult to implement: Must maintain accounts for same user on more than one machine
Multiple sources to back up Table 1 Workgroup Model
Workstation 4Workstation 3
Workstation 1 Workstation 2
Administration andSecurity Directory
Database
Administration andSecurity Directory
Database
Administration andSecurity Directory
Database
Administration andSecurity Directory
Database
Figure 1 Workgroup Model 3 Rutstein, p. 7.
UNCLASSIFIED
UNCLASSIFIED 8
Chapter 1-W
indows
NT 4.0 O
verview
Domains
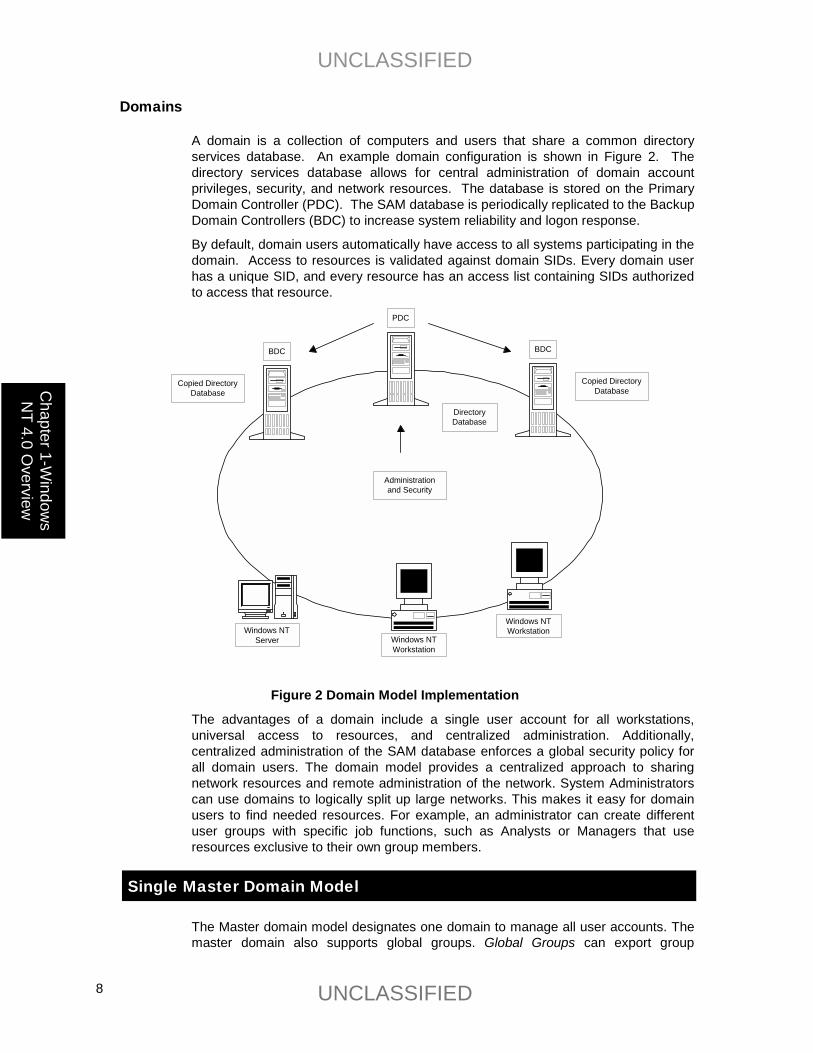
A domain is a collection of computers and users that share a common directory services database. An example domain configuration is shown in Figure 2. The directory services database allows for central administration of domain account privileges, security, and network resources. The database is stored on the Primary Domain Controller (PDC). The SAM database is periodically replicated to the Backup Domain Controllers (BDC) to increase system reliability and logon response.
By default, domain users automatically have access to all systems participating in the domain. Access to resources is validated against domain SIDs. Every domain user has a unique SID, and every resource has an access list containing SIDs authorized to access that resource.
DirectoryDatabase
Copied DirectoryDatabase
BDC
Copied DirectoryDatabase
Administrationand Security
PDC
BDC
Windows NTServer
Windows NTWorkstation
Windows NTWorkstation
Figure 2 Domain Model Implementation
The advantages of a domain include a single user account for all workstations, universal access to resources, and centralized administration. Additionally, centralized administration of the SAM database enforces a global security policy for all domain users. The domain model provides a centralized approach to sharing network resources and remote administration of the network. System Administrators can use domains to logically split up large networks. This makes it easy for domain users to find needed resources. For example, an administrator can create different user groups with specific job functions, such as Analysts or Managers that use resources exclusive to their own group members.
Single Master Domain Model
The Master domain model designates one domain to manage all user accounts. The master domain also supports global groups. Global Groups can export group
UNCLASSIFIED
UNCLASSIFIED 9
Cha
pter
1-W
indo
ws
NT
4.0
Ove
rvie
w
information to other domains. By defining global groups in the master domain, other domains can import the group information easily. This model gives you both centralized administration and the organizational benefits of multiple domains.
This model balances the requirements for account security with the need for readily available resources on the network because users are given permission to resources based on their master domain logon identity. The single master domain model is particularly suited for:
� Centralized account management. User accounts can be centrally managed; add/delete/change user accounts from a single point.
� Decentralized resource management or local system administration capability. Department domains can have their own administrators who manage the resources in the department.
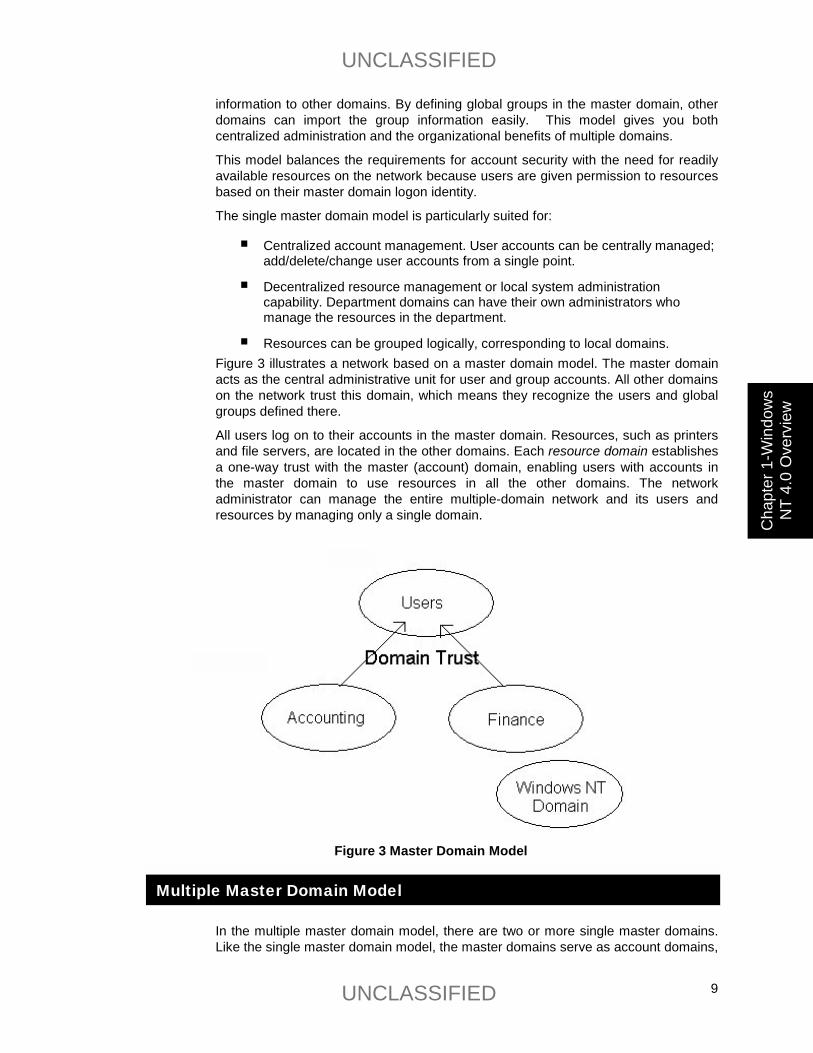
� Resources can be grouped logically, corresponding to local domains. Figure 3 illustrates a network based on a master domain model. The master domain acts as the central administrative unit for user and group accounts. All other domains on the network trust this domain, which means they recognize the users and global groups defined there.
All users log on to their accounts in the master domain. Resources, such as printers and file servers, are located in the other domains. Each resource domain establishes a one-way trust with the master (account) domain, enabling users with accounts in the master domain to use resources in all the other domains. The network administrator can manage the entire multiple-domain network and its users and resources by managing only a single domain.
Figure 3 Master Domain Model
Multiple Master Domain Model
In the multiple master domain model, there are two or more single master domains. Like the single master domain model, the master domains serve as account domains,
UNCLASSIFIED
UNCLASSIFIED 10
Chapter 1-W
indows
NT 4.0 O
verview
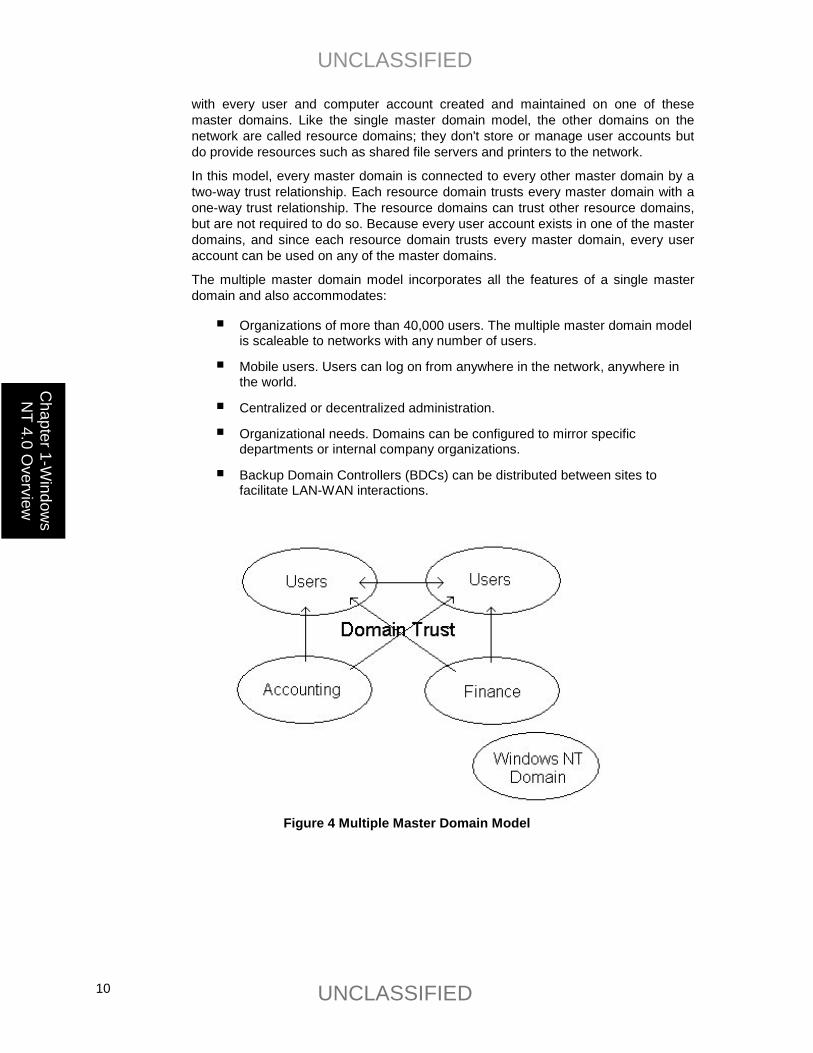
with every user and computer account created and maintained on one of these master domains. Like the single master domain model, the other domains on the network are called resource domains; they don't store or manage user accounts but do provide resources such as shared file servers and printers to the network. In this model, every master domain is connected to every other master domain by a two-way trust relationship. Each resource domain trusts every master domain with a one-way trust relationship. The resource domains can trust other resource domains, but are not required to do so. Because every user account exists in one of the master domains, and since each resource domain trusts every master domain, every user account can be used on any of the master domains. The multiple master domain model incorporates all the features of a single master domain and also accommodates:
� Organizations of more than 40,000 users. The multiple master domain model is scaleable to networks with any number of users.
� Mobile users. Users can log on from anywhere in the network, anywhere in the world.
� Centralized or decentralized administration. � Organizational needs. Domains can be configured to mirror specific
departments or internal company organizations.
� Backup Domain Controllers (BDCs) can be distributed between sites to facilitate LAN-WAN interactions.
Figure 4 Multiple Master Domain Model
UNCLASSIFIED
UNCLASSIFIED 11
Cha
pter
1-W
indo
ws
NT
4.0
Ove
rvie
w
Disadvantages of the multiple master domain model include the following characteristics:
� The numbers of groups and trust relationships multiply rapidly as the number of domains increases.
� User accounts and groups are not located in a single location, complicating network documentation.

UNCLASSIFIED
UNCLASSIFIED 12
This Page Intentionally Left Blank
UNCLASSIFIED
UNCLASSIFIED 13
Cha
pter
2-P
reco
nfig
urat
ion
Rec
omm
enda
tions
Chapter
2 Windows NT Pre-Configuration Recommendations
Before the upgrade software is installed, it is important to make some configuration changes to ensure that the installation is as smooth as possible. Since all installations are different, it is important to back up all computers and test the new software before installing it across a whole network.
Some of the pre-configuration recommendations involve security related system settings that are required before installing the service pack, hotfixes, and the Security Configuration Manager.
WARNING: It is extremely important to test hardware and software drivers for compatibility with Service Pack 6a. Check the documentation supplied with the drivers and the manufacturer’s web page for this information prior to installing any new software or making any recommended changes. If this information is not available it becomes even more critical to test the installation and security settings before installing on an operational network.
Windows NT 4.0 Installation Recommendations
For the highest level of system integrity, Windows NT 4.0 should be installed on its own partition. Data and applications should be kept separate from the operating system partition.
Any domain model is well suited for large networks or networks that require strong security policies, centralized account management, and flexibility in assigning user rights and permissions. Therefore, it is recommended that all government agencies implement a domain model for their networks.
File System Selection
All volumes must use the New Technology File System (NTFS) in order to achieve the highest level of security. Under Windows NT, only NTFS supports Discretionary Access Control to the directories and files. NTFS volumes provide secure and auditable access to the files. Therefore, any File Allocation Table (FAT16) partitions should be converted to NTFS. This conversion will not take effect immediately on the system drive or any drives being used for page swapping; in this case it is performed when the system is restarted. This process should not destroy any data.
A non-NTFS volume can be converted at any time using the Convert.exe program (%SystemRoot%\system32\convert.exe). The Convert command must be executed from a command prompt window using an administrative account. The syntax for this command is:
UNCLASSIFIED
UNCLASSIFIED 14
Chapter 2-Preconfiguration
Recom
mendations
CONVERT drive_letter /FS:NTFS [/V]
NOTE: The /v switch runs the program in verbose mode.
Steps needed to convert the system drive to NTFS:
� Select Start→Programs→Command Prompt
� At the command prompt, type:
convert c: /FS:NTFS NOTE: Substitute the drive letter of the operating system partition if Windows NT is located on a partition other than C:
NOTE: The Windows NT 4.0 convert command only converts your file system to NTFS. It does not set the default permissions for system files after the conversion. See Microsoft Knowledge Base Article Q157963 for further information on default file and directory permissions and how to set them using fixacl.exe, available in the Windows NT 4.0 Resource Kit Supplement 2.
At this point the EVERYONE group will have full control of the entire partition. It is critical that stricter file permissions be set before any users are added to the system. The Everyone group includes all users, including anonymous users and null connections.
� Restart system.
Physical Security
A physical security policy must be formulated and implemented throughout the organization. It is paramount that users understand and adhere to the organization’s physical security policy. Educating users of their responsibilities is essential to maintaining a strong physical security posture and preventing inadvertent disclosure of sensitive data to unauthorized personnel.
Controlling Access to the Site
Physical security measures are needed to protect systems and data from theft, corruption, and natural disasters. Security guards, key-card access systems, and surveillance equipment are critical if the site is open to the public or if information is extremely sensitive. Unauthorized personnel entering the building undetected could gain access to computers, wiring systems, phone systems, and other equipment. Monitoring equipment, such as surveillance cameras, can be installed. Therefore, controlling physical access to the site is the first step.
Controlling Access to Computers
Files can be modified or hardware tampered with if physical access to computers is not managed properly. To enhance physical security, implement the following security measures:
� Keep servers in a locked room
UNCLASSIFIED
UNCLASSIFIED 15
Cha
pter
2-P
reco
nfig
urat
ion
Rec
omm
enda
tions
� Disable the floppy based boot option if available
� Remove the floppy drive if not required or install a locking device
� The CPU case should be secured by a key stored safely away from the computer
� Remove network cards if not required
� Remove modem cards if not required
� Refer to system documentation to implement a power-on bios password NOTE: Many hardware platforms can be protected using a power-on password. A power-on password prevents unauthorized personnel from starting an operating system. Power-on passwords are a function of the computer hardware, not the operating system software. Therefore the procedure for setting up the power-on password depends on the type of computer and is available in the vendor’s documentation supplied with the system.
Controlling Access to the Network
Unauthorized users can access domain resources through unsecured network connections. To enhance network security, implement the following security measures:
� Secure network cables and connections
� Use optical fiber links rather than twisted pair when cabling passes through unsecured areas
� Remove unnecessary systems from the network
� Remove unused cables from the network
� Remove unnecessary Remote Access connections (i.e. modem) from the network
Controlling Access to Software
In addition to the physical security policies that limit compromises, implement the following software security measures:
� Resources such as emergency repair disks and backup software should be kept in a secure area.
� Only system administrators should be given the ability to install software
� Software should be inventoried and protected from unauthorized personnel
� Use current virus scanning software to prevent the introduction of malicious code

UNCLASSIFIED
UNCLASSIFIED 16
This Page Intentionally Left Blank
UNCLASSIFIED
UNCLASSIFIED 17
Cha
pter
3-In
stal
latio
n
Chapter
3 Installing Service Pack 6, Hotfixes, and the Security Configuration Manager
Since Windows NT 4.0’s introduction, Microsoft has released six service packs. A service pack is a periodic update to the operating system that contains fixes to numerous problems users have experienced. Updates addressing specific problems introduced between service packs are called hotfixes. Service packs are cumulative, meaning they include all hotfixes from previous service packs, as well as new fixes.
As of the release of this guide, the latest Windows NT service pack is Service Pack 6a. Service Pack 6a includes security enhancements.
To achieve the highest level of Windows NT security, install Service Pack 6a and the Post Service Pack 6a hotfix. For a complete list of available service packs and hotfixes go to Windows NT 4.0 Server Downloads at http://www.microsoft.com/ntserver/nts/downloads/recommended/SP6/. It is also important to install any hotfixes for Service Pack 6a that have been released since this guide was written.
Service Pack 6a provides support for an administrator tool called the Security Configuration Manager (SCM). This tool allows for security analysis and configuration of Windows NT machines. The installation of the SCM will be discussed in this chapter. Chapter 4 provides further details on the use of the SCM.
WARNING: Test extensively before installing any software on an operational system. Also, Chapter 2 lists many pre-installation recommendations.
Service Pack 6a Pre-installation Checklist
The following checklist is designed to provide a simple, easy to follow list to use before installing any software recommended in this book. This checklist does not include any of the physical security recommendations or access control settings.
� Read the Service Pack 6a Readme file at http://www.microsoft.com/ntserver/nts/downloads/recommended/sp6/readme.asp for installation instructions, descriptions of Service Pack 6a fixes, added functionality, and software/hardware incompatibilities.
NOTE: Taking a few minutes to read the Readme file could save hours of frustration if the software and/or hardware on your system is incompatible with Service Pack 6a.
� Follow Microsoft’s eight step pre-installation checklist before installing Service Pack 6a:
1) Perform a full backup of files and the registry.
UNCLASSIFIED
UNCLASSIFIED 18
Chapter 3-Installation
2) Update the emergency repair disk (ERD). Use the rdisk /s parameter to get the Security and SAM registry hives updated on the disk. For more instructions, see the following Knowledge Base articles:
� Q156328—Description of Windows NT Emergency Repair Disk
� Q122857—RDISK /S and RDISK /S- Options in Windows NT NOTE: rdisk /s can cause serious problems with large SAMs. See Q122857 for more information.
3) Perform a full system restart and check the Event Viewer for errors. Resolve any
issues before installing SP6a.
4) Copy your previous Uninstall directory to a safe location. By default, this directory is located in %SystemRoot%\$NTServicePackUninstall$.
NOTE: Before installing Service Pack 6a, it is advised to save the current service pack's uninstall folder. For example, if you remove SP6, the system would be restored to the previous service pack installed (for example, SP5). If you continued to experience problems and wanted to restore the system to a state before SP5, the backup of the older service packs uninstall folder would allow you successfully remove SP5. Besides retaining the most recoverable system, this will allow tracking the history of the system.
5) Run Srvinfo.exe from the Windows NT 4.0 Resource Kit and document existing hotfix information.
6) Disable any non-essential third-party drivers and services not required for starting the system. Contact the manufacturers about updated versions.
7) Verify available disk space. The installation of SP6a requires 60 MB to 120 MB of drive space for the installation, depending on whether the Uninstall option is chosen.
8) Close all active debugging sessions or remote control sessions before starting the installation.
� Identify any third party software and verify the software is compatible with Service Pack 6a.
� Perform a full backup of your system, including system registry files. A full backup is the only way to restore your system to a previous working installation. See Chapter 12 for information regarding domain backup policy and security implications.
NOTE: This step is unnecessary if installing Service Pack 6a onto a new system that does not have any software or data installed.

UNCLASSIFIED
UNCLASSIFIED 19
Cha
pter
3-In
stal
latio
n
Service Pack 6a Pre-installation File System Changes
Removing Old Hotfix Uninstall Folders
If hotfixes for previous service packs have been installed on the system, uninstall folders for these hotfixes exist. To minimize confusion with post-Service Pack 6a hotfixes and avoid accidentally uninstalling a Service Pack 4 hotfix after Service Pack 6a has been installed, these old uninstall folders should be removed prior to installing SP6a. For additional information on the problems that could occur if old uninstall folders are not removed, refer to http://support.microsoft.com/support/kb/articles/q194/3/34.asp.
Each hotfix uninstall folder is located in %SystemRoot%, the directory in which Windows NT was installed (usually C:\winnt).
� Delete each hotfix uninstall folder in %SystemRoot% NOTE: The Hotfix Uninstall folders are preceded with $NtUninstall. A Q number (Microsoft Knowledge Base article number) or the word Hotfix Group usually follows the $NtUninstall. For example, a hotfix uninstall folder could be called %SystemRoot%\$NtUninstallQ156655$.
Installing Service Pack 6a
For security reasons, it is recommended that the 128-bit version of Service Pack 6a be installed instead of the 40-bit version. The 128-bit Service is available from Microsoft.
NOTE: The 128-bit version is restricted to U.S. and Canadian sites.
If you would like to install post Service Pack 6a hotfixes at the same time as the service pack, please first read the section later in this chapter.
Creating An Uninstall Directory
In case the service pack needs to be backed off, an uninstall directory should be created. The uninstall directory is created during the install process. When prompted by the install program, check the “Backup up files necessary to uninstall this Service Pack at a later time” checkbox. The uninstall subdirectory is located in the %SystemRoot% directory with the name $NtServicePackUninstall$.
The system will need at least 60 MB of free space on the operating system partition to create an uninstall directory.
Installing Service Pack 6a from a Compact Disk
If Service Pack 6a has been obtained from Microsoft on CDROM or via the Companion CDROM associated with this guide, the following checklist can be used:
� Insert the compact disc containing Service Pack 6a into the CD-ROM drive.
� Select Start → Programs → Command Prompt and change directory to the drive letter associated with the CD-ROM drive.
� Change directory to the service pack directory.
� Change directory to \i386\update
UNCLASSIFIED
UNCLASSIFIED 20
Chapter 3-Installation
� Run update.exe to install the service pack.
� Follow the directions that appear on the screen. See the note above about creating an uninstall directory.
Installing the Service Pack from a Network Drive
If Service Pack 6a is located on a network drive the following checklist can be used:
� Select Start → Programs → Command Prompt and type the command (e.g. netuse) to connect to the network drive, which contains the Service Pack 6a files.
� Change directory to the network drive folder containing the service pack files.
� Change directory to \i386\update
� Run update.exe to install the service pack.
� Follow the instructions that appear on the screen.
Downloading and Extracting the Service Pack from the Internet
If Service Pack 6a is not available on CD-ROM, download the 128-bit version from the following site:
http://www.microsoft.com/ntserver/nts/downloads/recommended/sp6/
NOTE: Because the 128-bit version of the service pack is limited to U.S. and Canadian sites only, you will have to proceed through two web pages that will verify if your IP address is from the U.S. or Canada before being able to download the service pack.
The following checklist will aid in installing Service Pack 6a:
� To extract the service pack files and begin installation, change to the directory where you downloaded the service pack and type MSNT128.EXE at the command prompt or double click on the file name in Windows NT Explorer.
� Follow the instructions that appear on the screen. See the note above about creating an uninstall directory.
Reapplying Service Pack 6a
The following are recommendations when reinstalling Service Pack 6a after installing new components:
NOTE: Any post Service Pack 6a installation changes or additions of software/hardware components made to the system which affect the registry or system files require the reapplication of Service Pack 6a. This is necessary because files in Service Pack 6a supercede original Windows NT files.
� If an uninstall directory was previously created (%SystemRoot%\$NtServicePackUninstall$), rename this directory or else it will be overwritten. To rename the directory:
� Select Start→→→→Programs→→→→Windows NT Explorer
� Right click on the uninstall directory (%SystemRoot%\$NtServicePackUninstall$)
� Select Rename

UNCLASSIFIED
UNCLASSIFIED 21
Cha
pter
3-In
stal
latio
n
� Rename the directory
(e.g %SystemRoot%\$NtServicePackUninstall$.old)
� Reinstall Service Pack 6a.
Removing Service Pack 6a
The following list contains instructions on how to remove Service Pack 6a from a system and return the system to its state prior to installation:
� Select Start→→→→Programs→→→→Command Prompt
� Change directory to the uninstall directory:
%SystemRoot%\$NTServicePackUninstall$\spuninst
� Execute spuninst.exe
The spuninst.exe program will replace the files updated by Service Pack 6a with the files from the previous installation and will return your registry settings to their pre-Service Pack 6a state.
NOTE: If you install any applications that require Service Pack 6a or have bug fixes contained in Service Pack 6a, performing an uninstall could adversely affect those applications.
Post Service Pack 6a Hotfixes
Since some hotfixes overwrite files that other hotfixes modify, install the hotfixes in ascending order of the date/time stamp on the executables. Although Microsoft recommends applying a hotfix only if a system experiences the specific problem the fix addresses, it is recommended that all security-related hotfixes be installed immediately after installation of Service Pack 6a. If Service Pack 6a is reapplied at any time, the hotfixes must also be re-installed.
Appendix C contains a list of post-Service Pack 6a hotfixes, along with the software versions containing or affected by a problem, the date of the hotfix, where to download the fix, the size of the compressed executable, and a Microsoft Knowledge Base article number to find out more information about the hotfix. The Microsoft Knowledge Base is located at http://support.microsoft.com/support.
As of the publication of this guide, numerous security-related post-Service Pack 6a hotfixes have been released. Additional hotfixes may address vendor-specific products and should be installed on a case-by-case basis. Please check http://support.microsoft.com/Support/NTServer/Content/ServicePacks/Default.asp on a regular basis to see if new hotfixes have been released.
See Appendix C for more detailed information on individual hotfixes.
Manual Installation of Recommended Hotfixes
The companion CD contains only the hotfixes released at the time of guide publication. Therefore, any hotfix for Service Pack 6a released after the release of this guide needs to be downloaded and installed.
To download and install subsequent hotfixes: � Download the self-extracting hotfix executables from Microsoft.
UNCLASSIFIED
UNCLASSIFIED 22
Chapter 3-Installation
� Change directory to where the hotfix files are located and execute hotfix.exe.
� Reboot the system when prompted.
Reapplying Post Service Pack 6a Hotfixes
Anytime Service Pack 6a is reapplied, all hotfixes must be subsequently reapplied. See the Reapplying Service Pack 6a section above for more information on reinstalling the service pack.
Removing Hotfixes
Hotfixes must be removed prior to removing Service Pack 6a. Hotfixes must be removed as a group if installed as a group; otherwise, remove hotfixes in the reverse order as applied.
To remove installed hotfixes: � Select Start →→→→ Programs →→→→ Command Prompt
� Change directory to the location of the extracted hotfix installation files.
� Execute hotfix.exe /y WARNING: Removing hotfixes can cause unpredictable results
Installing the Security Configuration Manager
Service Pack 4 and higher support a security tool for Windows NT 4.0, the Security Configuration Manager (SCM). The SCM allows an administrator to define and set security settings for Windows NT 4.0 machines through the use of configuration files. The tool also provides for analysis of security settings on a machine prior to security configuration.
Graphical User Interface (GUI) and command-line interfaces are available. Both require that Service Pack 4 or higher be installed prior to SCM installation. The GUI also requires Internet Explorer 3.02 or higher and Microsoft Management Console (MMC) 1.0 or higher. The MMC may be installed during SCM installation.
It is recommended that the command line interface be installed along with the GUI version. The command line program allows for applying only specific parts of the SCM configuration file, whereas the GUI only allows for application of the entire configuration file.
Chapter 4 provides further details on using the Security Configuration Manager.
To install the SCM GUI and command line tools: � If the CD-ROM version of Service Pack 4 is available:
� On the CD, change directory to \mssce\i386
� If the CD-ROM version of Service Pack 4 is unavailable:
� Download the correct version of the SCM (scesp4i.exe or scesp4a.exe, as appropriate) from ftp://ftp.microsoft.com/bussys/winnt/winnt-public/tools/scm/.
UNCLASSIFIED
UNCLASSIFIED 23
Cha
pter
3-In
stal
latio
n
� At the command prompt or from Windows NT Explorer, run the self-extracting file scesp4i.exe
� To install both the GUI and command line versions:
� Run mssce.exe.
� Answer Yes to install MMC as part of the SCE installation.
� To install the command line version only:
� At the command prompt, run mssce.exe /c.
New Inheritance Model
The Security Configuration Manager was originally designed for use with the upcoming Windows 2000 operating system. Therefore, the Windows 2000 ACL inheritance model was back-ported to Windows NT 4.0 and is now available with the SCM. You will notice that the ACL editor for files and folders appears to be different than before.
Within the new inheritance model, permissions on child objects are automatically inherited from their parent. This can be seen by the check in the Allow inheritable permissions from the parent to propagate to this object checkbox in the ACL editor. More permissions can be explicitly defined for a child object in addition to those the child inherits from its parent.
When the checkbox is not checked, the ACLs defined on that object apply only to that object and its children. No permissions are inherited from the parent object.
Within the SCM configuration files, files or folders that you do not wish to inherit permissions from parent objects must either be explicitly listed with desired permissions, or ignored.
For more information on the new inheritance model provided with the SCM, refer to "Installing Security Configuration Manager from SP4 Changes Windows NT 4.0 ACL Editor" at http://support.microsoft.com/support/kb/articles/q195/5/09.asp.

UNCLASSIFIED
UNCLASSIFIED 24
This Page Intentionally Left Blank
UNCLASSIFIED
UNCLASSIFIED 25
Cha
pter
4-S
ecur
ity
Con
figur
atio
n M
anag
er Chapter
4 Security Configuration Manager
Service Pack 4 and higher includes support for the Security Configuration Manager (SCM). The SCM allows system administrators to consolidate all security related system settings into a single configuration file (called an inf file in this guide because of the file extension .inf). These security settings may then be applied to any number of Windows NT machines. It is possible to layer security configuration files to adjust for different software applications and security settings. The current version of the SCM only allows for security settings to be analyzed or applied to the local system.
The SCM allows configuration of the following security areas:
� Account Policies - includes Password Policy and Account Lockout Policy
� Local Policies – includes Audit Policy, User Rights Assignment, and Security Options
� Event Log – includes settings for the event logs
� Restricted Groups – includes membership settings for sensitive groups
� System Services – includes configurations for services such as network transport
� Registry – includes registry key permission settings
� File System – includes file and folder permission settings This chapter provides a general overview of the SCM and discusses the SCM configuration files included with the companion CD. Chapters 5 through 11 cover how to modify the inf files, and Chapter 12 describes how to conduct a security analysis and configuration through the SCM.
For more detailed information on the SCM, refer to http://www.microsoft.com/ntserver/techresources/security/securconfig.asp.
SCM Functionality
The security configuration manager supports both a graphical user interface (GUI) and a command line tool.
The SCM GUI
The SCM graphical user interface is provided as a Microsoft Management Console (MMC) snap-in.
The SCM GUI allows an administrator to:
� Create and/or edit security configuration files
� Perform a security analysis
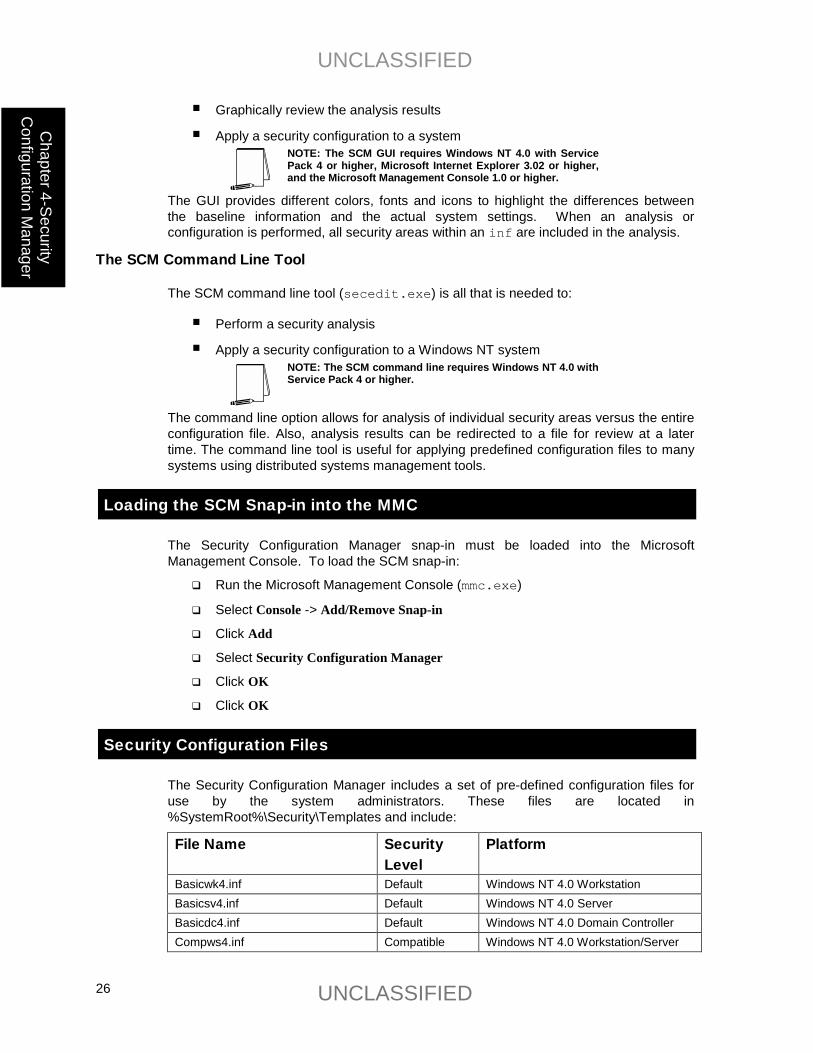
UNCLASSIFIED
UNCLASSIFIED 26
Chapter 4-Security
Configuration M
anager
� Graphically review the analysis results
� Apply a security configuration to a system NOTE: The SCM GUI requires Windows NT 4.0 with Service Pack 4 or higher, Microsoft Internet Explorer 3.02 or higher, and the Microsoft Management Console 1.0 or higher.
The GUI provides different colors, fonts and icons to highlight the differences between the baseline information and the actual system settings. When an analysis or configuration is performed, all security areas within an inf are included in the analysis.
The SCM Command Line Tool
The SCM command line tool (secedit.exe) is all that is needed to:
� Perform a security analysis
� Apply a security configuration to a Windows NT system NOTE: The SCM command line requires Windows NT 4.0 with Service Pack 4 or higher.
The command line option allows for analysis of individual security areas versus the entire configuration file. Also, analysis results can be redirected to a file for review at a later time. The command line tool is useful for applying predefined configuration files to many systems using distributed systems management tools.
Loading the SCM Snap-in into the MMC
The Security Configuration Manager snap-in must be loaded into the Microsoft Management Console. To load the SCM snap-in:
� Run the Microsoft Management Console (mmc.exe)
� Select Console -> Add/Remove Snap-in
� Click Add
� Select Security Configuration Manager
� Click OK
� Click OK
Security Configuration Files
The Security Configuration Manager includes a set of pre-defined configuration files for use by the system administrators. These files are located in %SystemRoot%\Security\Templates and include:
File Name Security Level
Platform
Basicwk4.inf Default Windows NT 4.0 Workstation Basicsv4.inf Default Windows NT 4.0 Server Basicdc4.inf Default Windows NT 4.0 Domain Controller Compws4.inf Compatible Windows NT 4.0 Workstation/Server
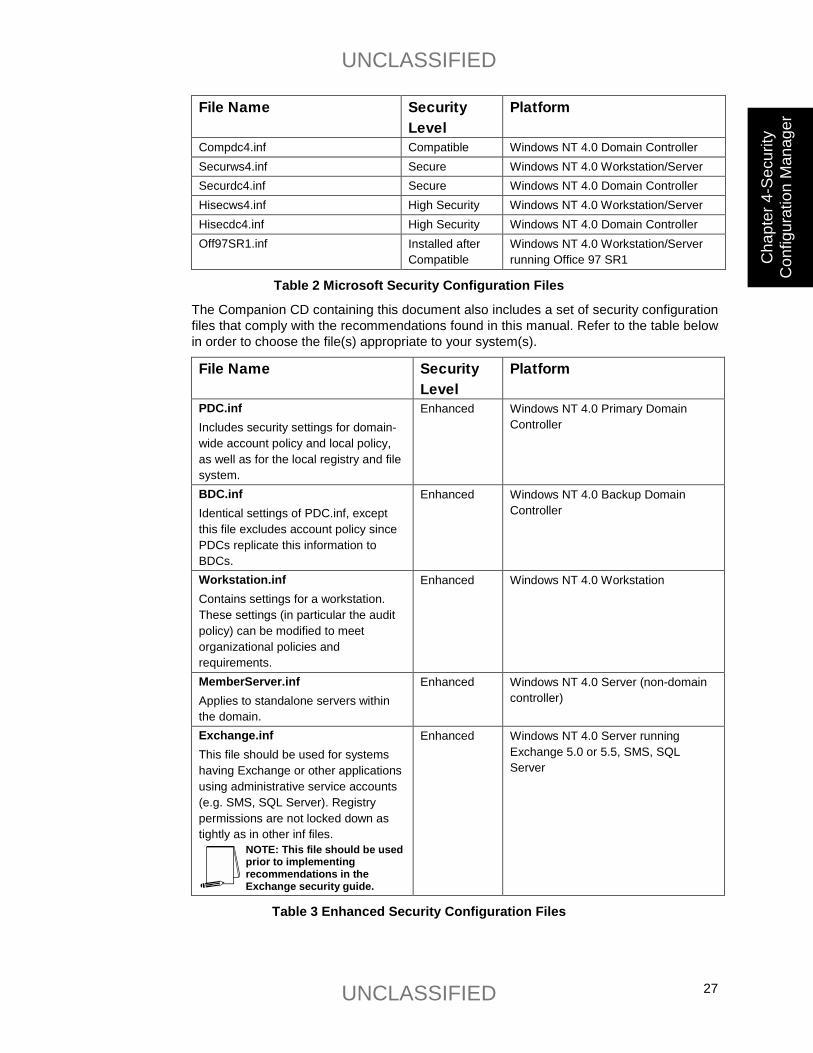
UNCLASSIFIED
UNCLASSIFIED 27
Cha
pter
4-S
ecur
ity
Con
figur
atio
n M
anag
er File Name Security
Level Platform
Compdc4.inf Compatible Windows NT 4.0 Domain Controller Securws4.inf Secure Windows NT 4.0 Workstation/Server Securdc4.inf Secure Windows NT 4.0 Domain Controller Hisecws4.inf High Security Windows NT 4.0 Workstation/Server Hisecdc4.inf High Security Windows NT 4.0 Domain Controller Off97SR1.inf Installed after
Compatible Windows NT 4.0 Workstation/Server running Office 97 SR1
Table 2 Microsoft Security Configuration Files
The Companion CD containing this document also includes a set of security configuration files that comply with the recommendations found in this manual. Refer to the table below in order to choose the file(s) appropriate to your system(s).
File Name Security Level
Platform
PDC.inf Includes security settings for domain-wide account policy and local policy, as well as for the local registry and file system.
Enhanced Windows NT 4.0 Primary Domain Controller
BDC.inf Identical settings of PDC.inf, except this file excludes account policy since PDCs replicate this information to BDCs.
Enhanced Windows NT 4.0 Backup Domain Controller
Workstation.inf Contains settings for a workstation. These settings (in particular the audit policy) can be modified to meet organizational policies and requirements.
Enhanced Windows NT 4.0 Workstation
MemberServer.inf Applies to standalone servers within the domain.
Enhanced Windows NT 4.0 Server (non-domain controller)
Exchange.inf This file should be used for systems having Exchange or other applications using administrative service accounts (e.g. SMS, SQL Server). Registry permissions are not locked down as tightly as in other inf files.
NOTE: This file should be used prior to implementing recommendations in the Exchange security guide.
Enhanced Windows NT 4.0 Server running Exchange 5.0 or 5.5, SMS, SQL Server
Table 3 Enhanced Security Configuration Files
UNCLASSIFIED
UNCLASSIFIED 28
Chapter 4-Security
Configuration M
anager
� Copy the configuration files included on the Companion CD to the template directory (%Systemroot%\Security\Templates\).
Editing Security Configuration Files
The security settings of any of the predefined configuration files can be modified. The following steps should be followed to modify a configuration file(s):
� Within the MMC, double-click on the Security Configuration Manager node in the left pane
� Double-click the Configurations node
� Double-click the default configuration file directory (%Systemroot%\Security\Templates). A list of available configuration files is revealed.
� Double-click on a specific configuration file
� Double-click on a specific security area
� Double click on a security object in the right pane
� Customize the security setting for your environment
� To save the customized configuration file, right-click on the file in the left pane and select Save
Chapters 5 through 11 detail the recommendations for each security area and how to modify the configuration files.

UNCLASSIFIED
UNCLASSIFIED 29
Cha
pter
5-M
odify
ing
Acco
unt P
olic
y
Chapter
5 Modifying Account Policy Settings with the Security Configuration Manager
A key component of controlling the security in a Windows NT domain is the proper setting of account policies. Depending on the type of system (e.g. domain controller, workstations, member server), account policy configuration will impact the network differently. When configuring a primary domain controller’s account policy, all domain controllers will be impacted because a PDC’s password and lockout policy is a domain-wide setting enforced by all domain controllers. Configuring account policies on workstations and member servers only impacts the local password or lockout policy on the machine. To ensure a consistent password and lockout policy throughout the entire domain, you must set the same policy on the primary domain controller (PDC), member servers and workstations. Excluded from this list are the backup domain controllers (BDCs), which will inherit the domain-wide account policy from the PDC.
Before Service Pack 4, account policy could only be configured through the User Manager. Now account policy should be configured via the Security Configuration Manager (SCM).
To view account policy settings of an SCM template double-click the following:
� Security Configuration Manager
� Configurations
� Default configuration file directory (%SystemRoot%\Security\Templates)
� Specific configuration file
� Account Policies NOTE: After making any modifications to the configuration files make sure the changes are saved (See Chapter 4) and then test the changes before installing them on an operational network.
Password Policy
Before making modifications to the Account Policy dialog box, review your organizations written password security policy. The settings made in the Account Policy dialog box should comply with the written password policy. Users should read and sign statements acknowledging compliance with the organizational computer policy.
Recommendations for a password policy include:
� Users should never write down passwords
� Passwords should be difficult to guess and include uppercase, lowercase, special (e.g. punctuation and extended character set), and numeric characters
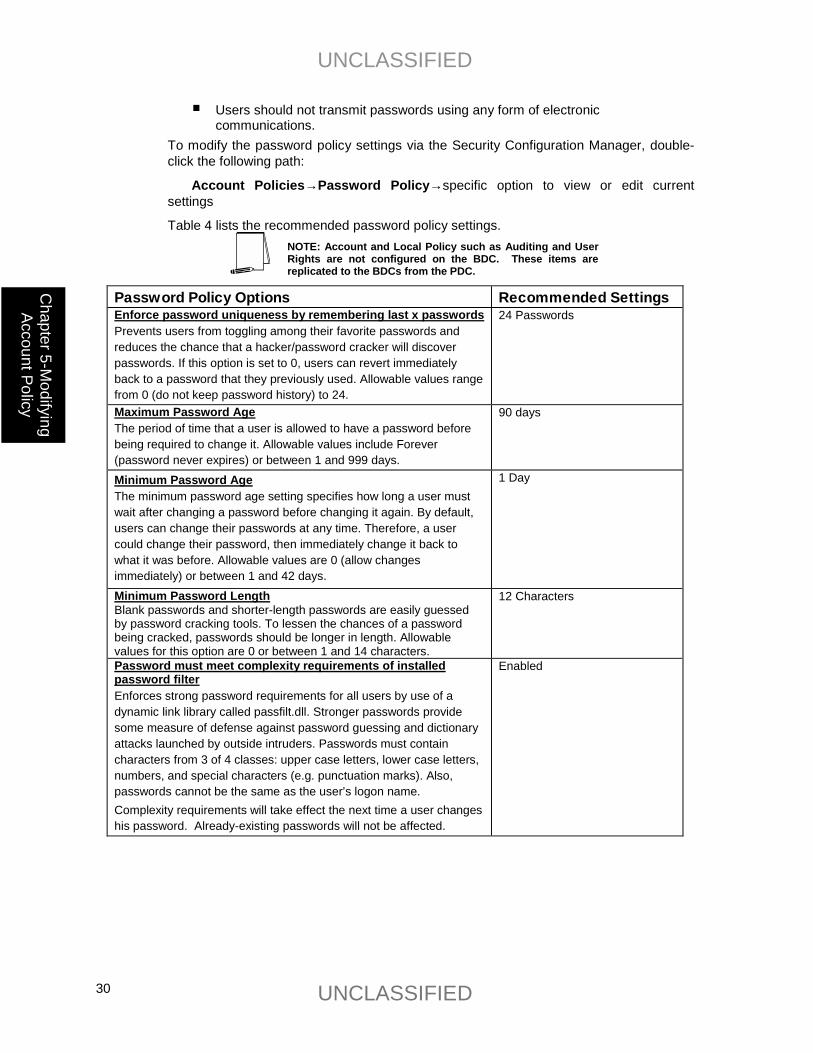
UNCLASSIFIED
UNCLASSIFIED 30
Chapter 5-M
odifying Account Policy
� Users should not transmit passwords using any form of electronic communications.
To modify the password policy settings via the Security Configuration Manager, double-click the following path:
Account Policies→Password Policy→specific option to view or edit current settings
Table 4 lists the recommended password policy settings. NOTE: Account and Local Policy such as Auditing and User Rights are not configured on the BDC. These items are replicated to the BDCs from the PDC.
Password Policy Options Recommended Settings Enforce password uniqueness by remembering last x passwords Prevents users from toggling among their favorite passwords and reduces the chance that a hacker/password cracker will discover passwords. If this option is set to 0, users can revert immediately back to a password that they previously used. Allowable values range from 0 (do not keep password history) to 24.
24 Passwords
Maximum Password Age The period of time that a user is allowed to have a password before being required to change it. Allowable values include Forever (password never expires) or between 1 and 999 days.
90 days
Minimum Password Age The minimum password age setting specifies how long a user must wait after changing a password before changing it again. By default, users can change their passwords at any time. Therefore, a user could change their password, then immediately change it back to what it was before. Allowable values are 0 (allow changes immediately) or between 1 and 42 days.
1 Day
Minimum Password Length Blank passwords and shorter-length passwords are easily guessed by password cracking tools. To lessen the chances of a password being cracked, passwords should be longer in length. Allowable values for this option are 0 or between 1 and 14 characters.
12 Characters
Password must meet complexity requirements of installed password filter Enforces strong password requirements for all users by use of a dynamic link library called passfilt.dll. Stronger passwords provide some measure of defense against password guessing and dictionary attacks launched by outside intruders. Passwords must contain characters from 3 of 4 classes: upper case letters, lower case letters, numbers, and special characters (e.g. punctuation marks). Also, passwords cannot be the same as the user’s logon name. Complexity requirements will take effect the next time a user changes his password. Already-existing passwords will not be affected.
Enabled
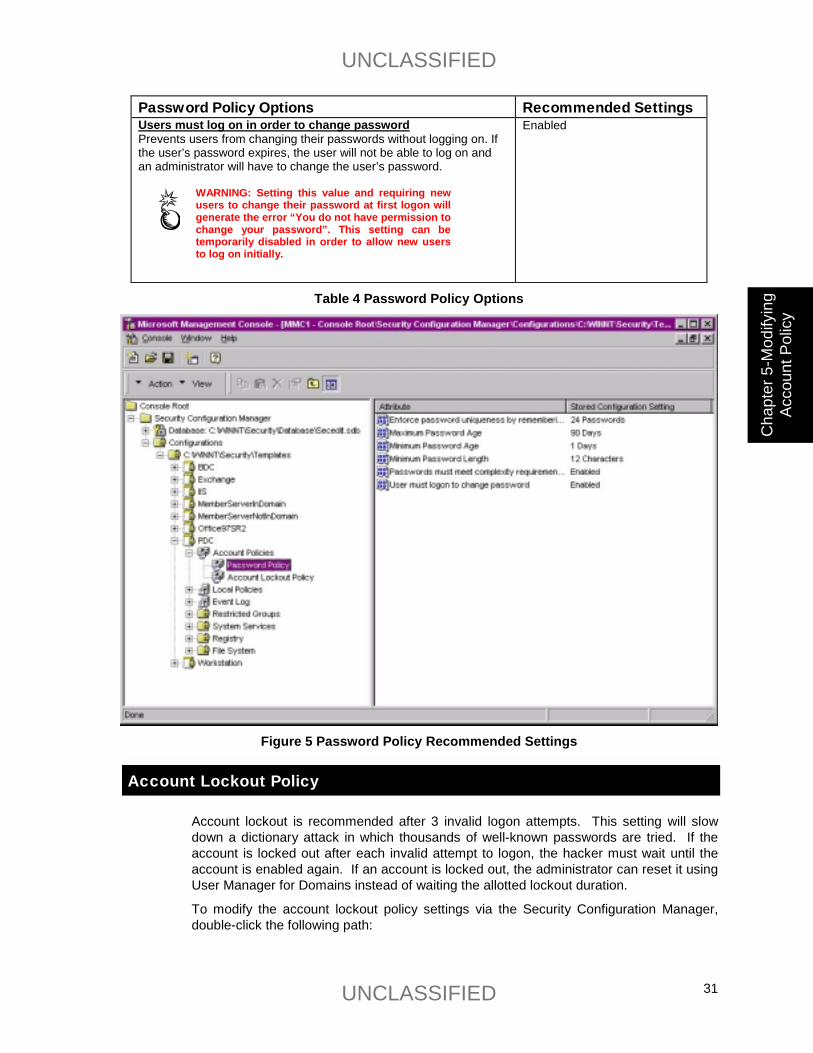
UNCLASSIFIED
UNCLASSIFIED 31
Cha
pter
5-M
odify
ing
Acco
unt P
olic
y
Password Policy Options Recommended Settings Users must log on in order to change password Prevents users from changing their passwords without logging on. If the user’s password expires, the user will not be able to log on and an administrator will have to change the user’s password.
WARNING: Setting this value and requiring new users to change their password at first logon will generate the error “You do not have permission to change your password”. This setting can be temporarily disabled in order to allow new users to log on initially.
Enabled
Table 4 Password Policy Options
Figure 5 Password Policy Recommended Settings
Account Lockout Policy
Account lockout is recommended after 3 invalid logon attempts. This setting will slow down a dictionary attack in which thousands of well-known passwords are tried. If the account is locked out after each invalid attempt to logon, the hacker must wait until the account is enabled again. If an account is locked out, the administrator can reset it using User Manager for Domains instead of waiting the allotted lockout duration.
To modify the account lockout policy settings via the Security Configuration Manager, double-click the following path:
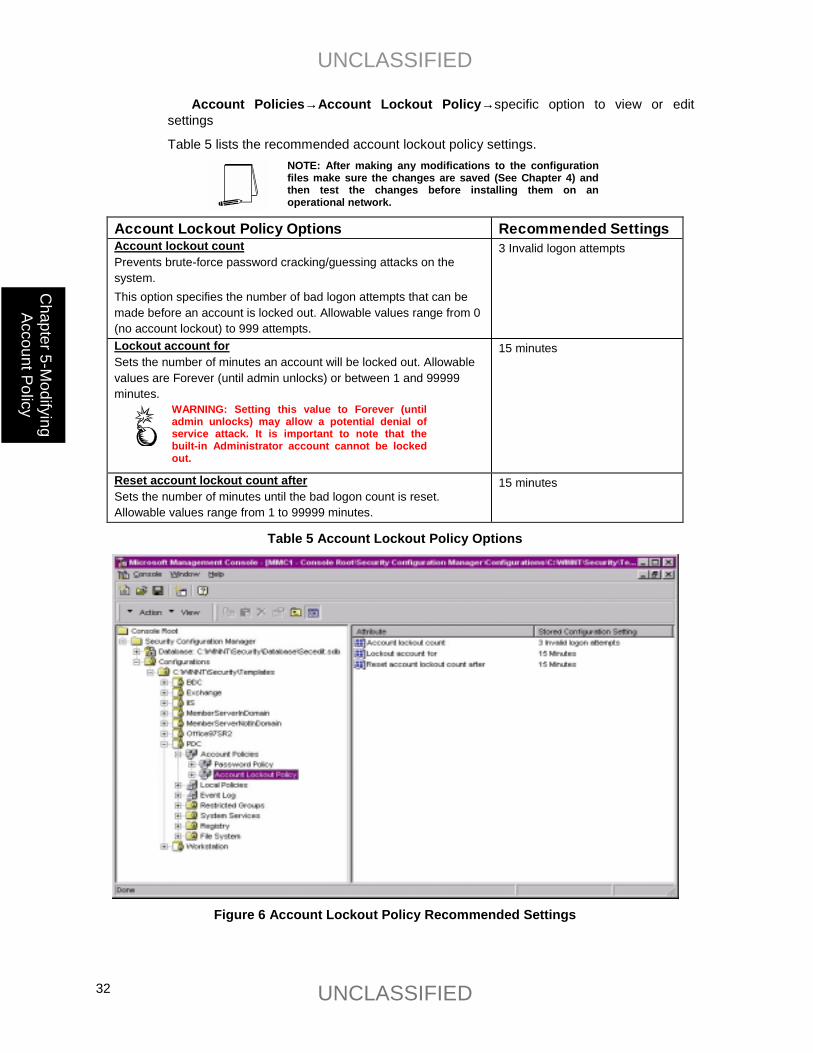
UNCLASSIFIED
UNCLASSIFIED 32
Chapter 5-M
odifying Account Policy
Account Policies→Account Lockout Policy→specific option to view or edit settings
Table 5 lists the recommended account lockout policy settings. NOTE: After making any modifications to the configuration files make sure the changes are saved (See Chapter 4) and then test the changes before installing them on an operational network.
Account Lockout Policy Options Recommended Settings Account lockout count Prevents brute-force password cracking/guessing attacks on the system. This option specifies the number of bad logon attempts that can be made before an account is locked out. Allowable values range from 0 (no account lockout) to 999 attempts.
3 Invalid logon attempts
Lockout account for Sets the number of minutes an account will be locked out. Allowable values are Forever (until admin unlocks) or between 1 and 99999 minutes.
WARNING: Setting this value to Forever (until admin unlocks) may allow a potential denial of service attack. It is important to note that the built-in Administrator account cannot be locked out.
15 minutes
Reset account lockout count after Sets the number of minutes until the bad logon count is reset. Allowable values range from 1 to 99999 minutes.
15 minutes
Table 5 Account Lockout Policy Options
Figure 6 Account Lockout Policy Recommended Settings
UNCLASSIFIED
UNCLASSIFIED 33
Cha
pter
6-M
odify
ing
Loca
l Pol
icy
Modifying Local Policy Settings with the Security Configuration Manager
The Local Policies section in the SCM includes Audit Policy, User Rights Assignment, and Security Options. Audit Policy and User Rights Assignment are typically managed from User Manager. Additionally, Security Options that are manually modified using Regedt32, can also be configured with the SCM.
To view local policy settings of an SCM template double-click the following:
� Security Configuration Manager
� Configurations
� Default configuration file directory (%SystemRoot%\Security\Templates)
� Specific configuration file
� Local Policies NOTE: After making any modifications to the configuration files make sure the changes are saved (See Chapter 4) and then test the changes before installing them on an operational network.
Auditing Policy
Auditing is critical to maintaining the security of the domain. On Windows NT systems, auditing is not enabled by default, and Audit Policies are set on a per-system basis via the Security Configuration Manager or the User Manager. Each Windows NT system includes auditing capabilities that collect information about individual system usage. The logs collect information on applications, system, and security events. The three types of auditing are User Account, File System Auditing and System Registry Auditing. Once System Auditing is enabled, use Windows NT Explorer to set File System Auditing and Regedt32 to set System Registry Auditing.
WARNING: Auditing can consume a large amount of processor time and disk space. It is highly recommended that administrators check, save, and clear audit logs daily/weekly to reduce the chances of system degradation or save audit logs to a separate machine. It is also recommended that logs be kept on a separate partition.
User Account Auditing
Each event that is audited in an audit policy is written to the security event log. The security event log can be viewed with the Event Viewer.
Chapter
6
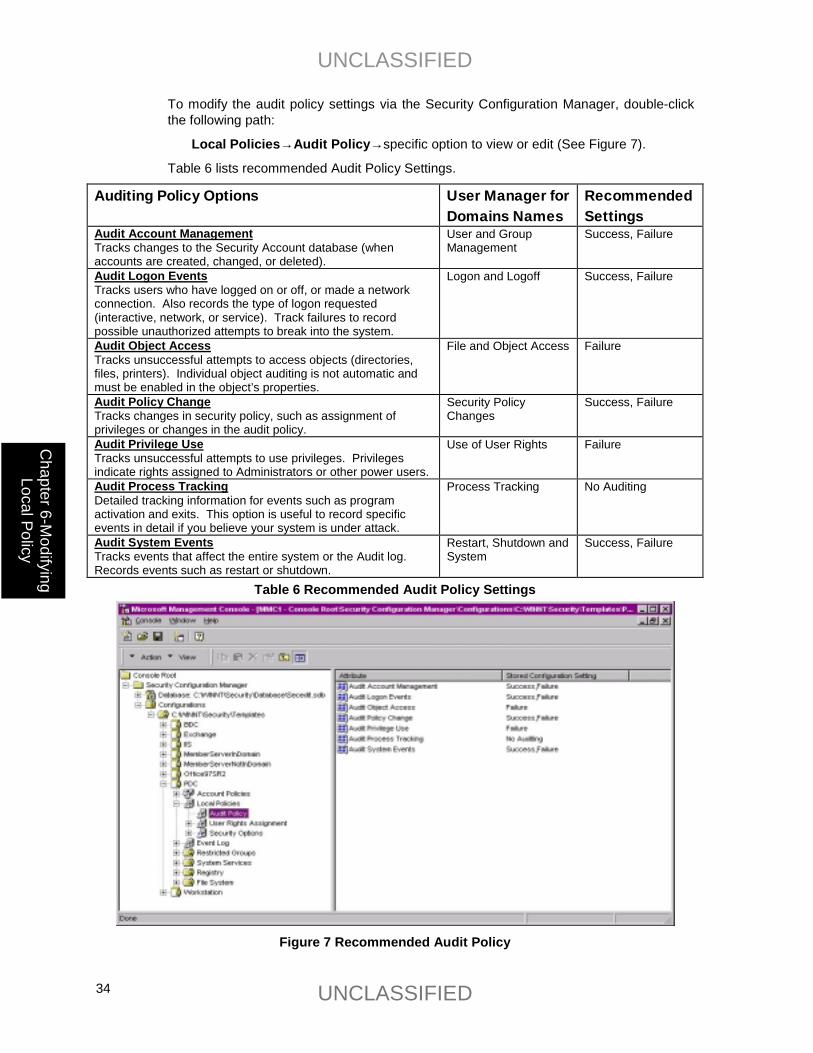
UNCLASSIFIED
UNCLASSIFIED 34
Chapter 6-M
odifying Local Policy
To modify the audit policy settings via the Security Configuration Manager, double-click the following path:
Local Policies→Audit Policy→specific option to view or edit (See Figure 7).
Table 6 lists recommended Audit Policy Settings.
Auditing Policy Options User Manager for Domains Names
Recommended Settings
Audit Account Management Tracks changes to the Security Account database (when accounts are created, changed, or deleted).
User and Group Management
Success, Failure
Audit Logon Events Tracks users who have logged on or off, or made a network connection. Also records the type of logon requested (interactive, network, or service). Track failures to record possible unauthorized attempts to break into the system.
Logon and Logoff Success, Failure
Audit Object Access Tracks unsuccessful attempts to access objects (directories, files, printers). Individual object auditing is not automatic and must be enabled in the object’s properties.
File and Object Access Failure
Audit Policy Change Tracks changes in security policy, such as assignment of privileges or changes in the audit policy.
Security Policy Changes
Success, Failure
Audit Privilege Use Tracks unsuccessful attempts to use privileges. Privileges indicate rights assigned to Administrators or other power users.
Use of User Rights Failure
Audit Process Tracking Detailed tracking information for events such as program activation and exits. This option is useful to record specific events in detail if you believe your system is under attack.
Process Tracking No Auditing
Audit System Events Tracks events that affect the entire system or the Audit log. Records events such as restart or shutdown.
Restart, Shutdown and System
Success, Failure
Table 6 Recommended Audit Policy Settings
Figure 7 Recommended Audit Policy
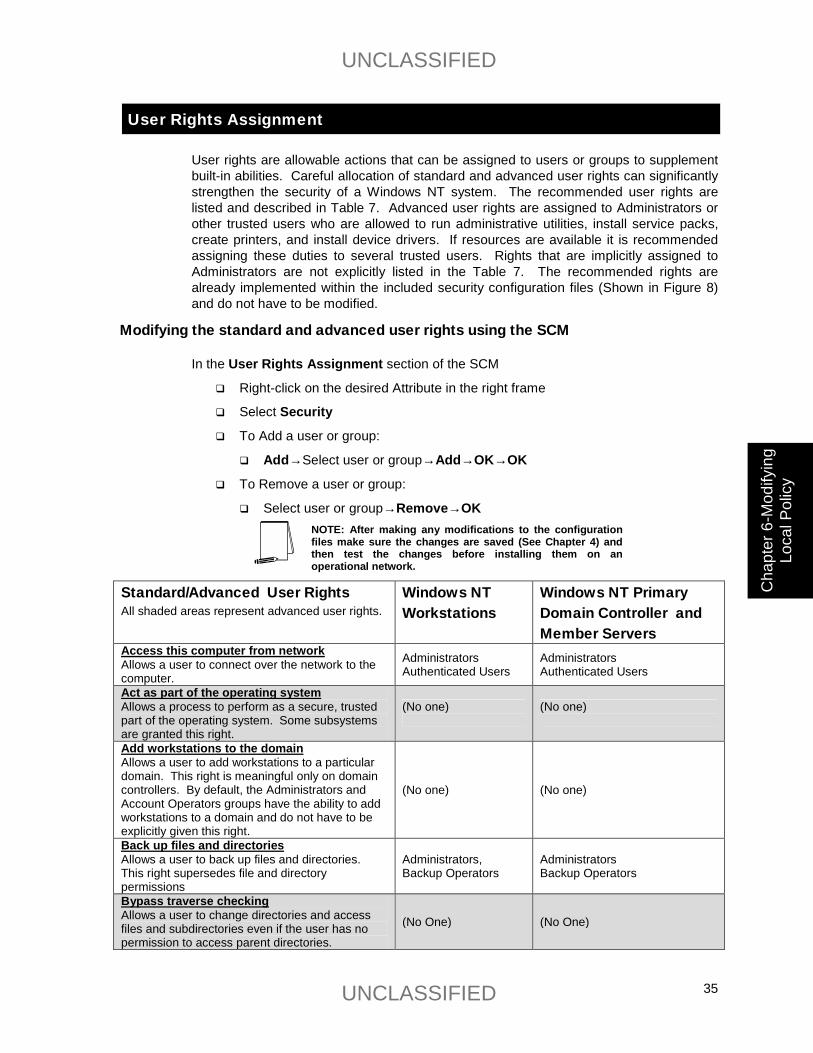
UNCLASSIFIED
UNCLASSIFIED 35
Cha
pter
6-M
odify
ing
Loca
l Pol
icy
User Rights Assignment
User rights are allowable actions that can be assigned to users or groups to supplement built-in abilities. Careful allocation of standard and advanced user rights can significantly strengthen the security of a Windows NT system. The recommended user rights are listed and described in Table 7. Advanced user rights are assigned to Administrators or other trusted users who are allowed to run administrative utilities, install service packs, create printers, and install device drivers. If resources are available it is recommended assigning these duties to several trusted users. Rights that are implicitly assigned to Administrators are not explicitly listed in the Table 7. The recommended rights are already implemented within the included security configuration files (Shown in Figure 8) and do not have to be modified.
Modifying the standard and advanced user rights using the SCM
In the User Rights Assignment section of the SCM
� Right-click on the desired Attribute in the right frame
� Select Security
� To Add a user or group:
� Add→Select user or group→Add→OK→OK
� To Remove a user or group:
� Select user or group→Remove→OK NOTE: After making any modifications to the configuration files make sure the changes are saved (See Chapter 4) and then test the changes before installing them on an operational network.
Standard/Advanced User Rights All shaded areas represent advanced user rights.
Windows NT Workstations
Windows NT Primary Domain Controller and Member Servers
Access this computer from network Allows a user to connect over the network to the computer.
Administrators Authenticated Users
Administrators Authenticated Users
Act as part of the operating system Allows a process to perform as a secure, trusted part of the operating system. Some subsystems are granted this right.
(No one)
(No one)
Add workstations to the domain Allows a user to add workstations to a particular domain. This right is meaningful only on domain controllers. By default, the Administrators and Account Operators groups have the ability to add workstations to a domain and do not have to be explicitly given this right.
(No one) (No one)
Back up files and directories Allows a user to back up files and directories. This right supersedes file and directory permissions
Administrators, Backup Operators
Administrators Backup Operators
Bypass traverse checking Allows a user to change directories and access files and subdirectories even if the user has no permission to access parent directories.
(No One) (No One)

UNCLASSIFIED
UNCLASSIFIED 36
Chapter 6-M
odifying Local Policy
Standard/Advanced User Rights All shaded areas represent advanced user rights.
Windows NT Workstations
Windows NT Primary Domain Controller and Member Servers
Change the system time Allows a user to set the time for the internal clock of the computer
Administrators Administrators
Create a pagefile Allows a user to create new pagefiles for virtual memory swapping
Administrators Administrators
Create a token object Allows a process to create access tokens. Only the Local Security Authority should be allowed create this object.
(No one) (No one)
Create permanent shared object Allows a user to create special permanent objects, such as \\Device, that are used within Windows NT.
(No one) (No one)
Debug programs Allows a user to debug various low-level objects such as threads.
(No one) (No one)
Force shutdown from a remote system Allows a user to shutdown a Windows NT system remotely over a network.
Administrators Administrators
Generate security audits Allows a process to generate security audit log entries.
(No one) (No one)
Increase quotas This right has no effect in current versions of Windows NT.
(No one) (No one)
Increase scheduling priority Allows a user to boost the execution priority of a process.
Administrators Administrators
Load and unload device drivers Allows a user to install and remove device drivers. Administrators Administrators
Lock pages in memory Allows a user to lock pages in memory so they cannot be paged out to a backing store such as Pagefile.sys.
(No one) (No one)
Log on as a batch job This right has no effect in current versions of Windows NT.
(No one) (No one)
Log on as a service Allows a process to register with the system as a service.
NOTE: Some applications such as Microsoft Exchange require a service account, which should have this right. Review the users/groups assigned this right on the system PRIOR to applying the security templates in order to determine which assignments are necessary.
WARNING: The provided template files will remove all users/groups from this right unless you modify the setting.
As needed As needed
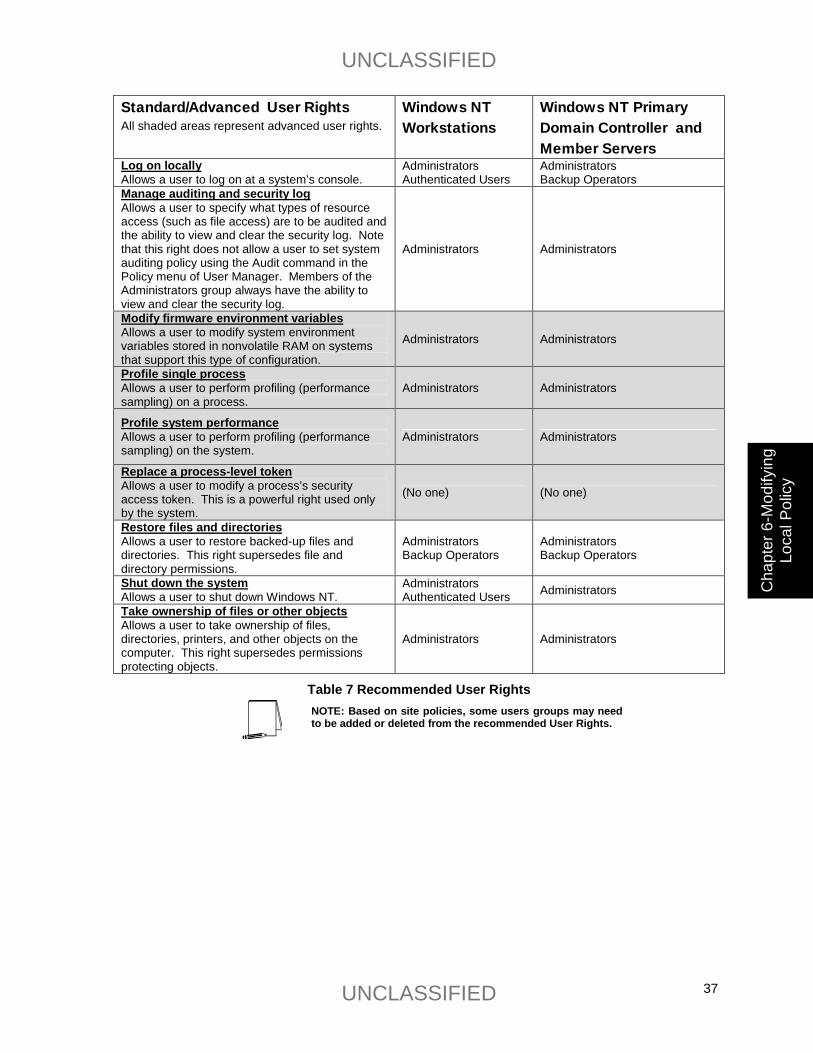
UNCLASSIFIED
UNCLASSIFIED 37
Cha
pter
6-M
odify
ing
Loca
l Pol
icy
Standard/Advanced User Rights All shaded areas represent advanced user rights.
Windows NT Workstations
Windows NT Primary Domain Controller and Member Servers
Log on locally Allows a user to log on at a system’s console.
Administrators Authenticated Users
Administrators Backup Operators
Manage auditing and security log Allows a user to specify what types of resource access (such as file access) are to be audited and the ability to view and clear the security log. Note that this right does not allow a user to set system auditing policy using the Audit command in the Policy menu of User Manager. Members of the Administrators group always have the ability to view and clear the security log.
Administrators Administrators
Modify firmware environment variables Allows a user to modify system environment variables stored in nonvolatile RAM on systems that support this type of configuration.
Administrators Administrators
Profile single process Allows a user to perform profiling (performance sampling) on a process.
Administrators Administrators
Profile system performance Allows a user to perform profiling (performance sampling) on the system.
Administrators Administrators
Replace a process-level token Allows a user to modify a process’s security access token. This is a powerful right used only by the system.
(No one) (No one)
Restore files and directories Allows a user to restore backed-up files and directories. This right supersedes file and directory permissions.
Administrators Backup Operators
Administrators Backup Operators
Shut down the system Allows a user to shut down Windows NT.
Administrators Authenticated Users Administrators
Take ownership of files or other objects Allows a user to take ownership of files, directories, printers, and other objects on the computer. This right supersedes permissions protecting objects.
Administrators Administrators
Table 7 Recommended User Rights NOTE: Based on site policies, some users groups may need to be added or deleted from the recommended User Rights.
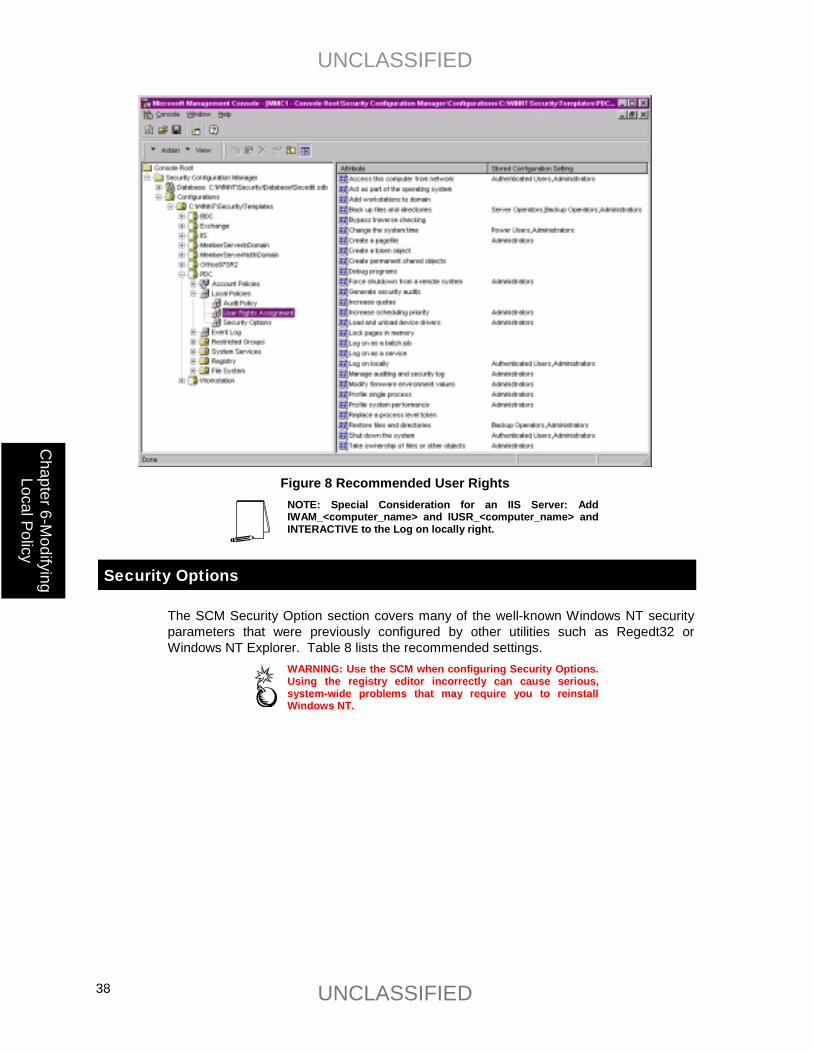
UNCLASSIFIED
UNCLASSIFIED 38
Chapter 6-M
odifying Local Policy
Figure 8 Recommended User Rights
NOTE: Special Consideration for an IIS Server: Add IWAM_<computer_name> and IUSR_<computer_name> and INTERACTIVE to the Log on locally right.
Security Options
The SCM Security Option section covers many of the well-known Windows NT security parameters that were previously configured by other utilities such as Regedt32 or Windows NT Explorer. Table 8 lists the recommended settings.
WARNING: Use the SCM when configuring Security Options. Using the registry editor incorrectly can cause serious, system-wide problems that may require you to reinstall Windows NT.
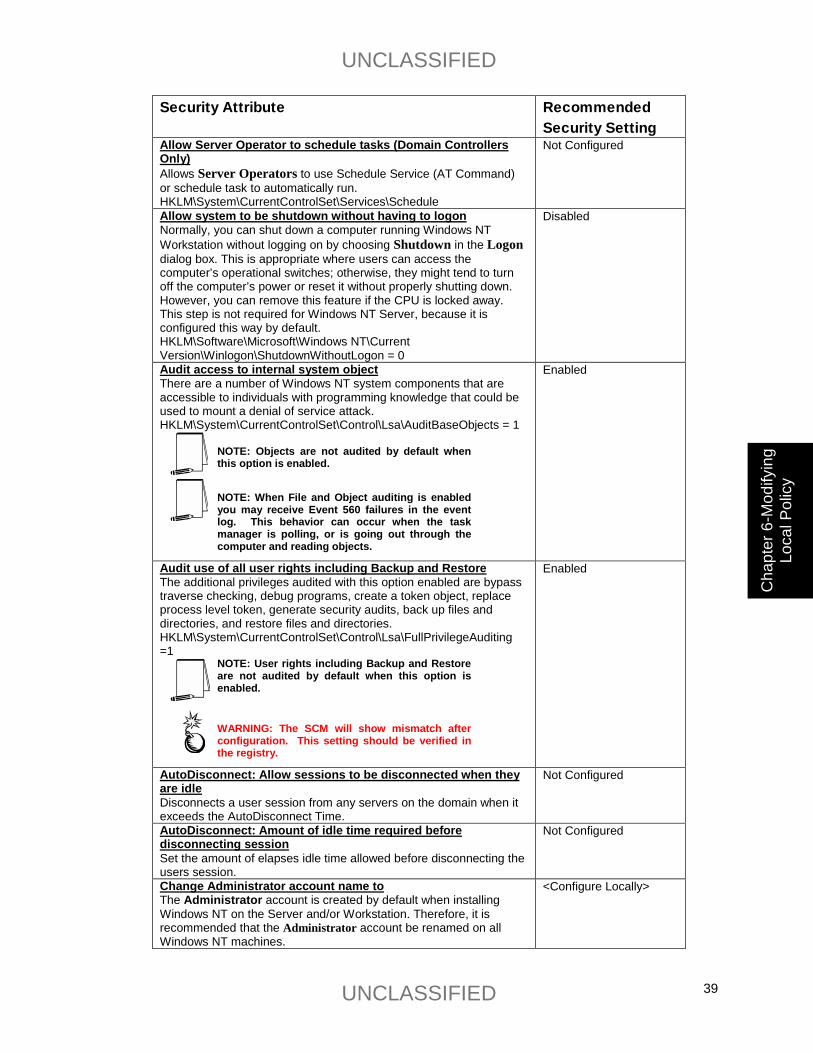
UNCLASSIFIED
UNCLASSIFIED 39
Cha
pter
6-M
odify
ing
Loca
l Pol
icy
Security Attribute Recommended Security Setting
Allow Server Operator to schedule tasks (Domain Controllers Only) Allows Server Operators to use Schedule Service (AT Command) or schedule task to automatically run. HKLM\System\CurrentControlSet\Services\Schedule
Not Configured
Allow system to be shutdown without having to logon Normally, you can shut down a computer running Windows NT Workstation without logging on by choosing Shutdown in the Logon dialog box. This is appropriate where users can access the computer’s operational switches; otherwise, they might tend to turn off the computer’s power or reset it without properly shutting down. However, you can remove this feature if the CPU is locked away. This step is not required for Windows NT Server, because it is configured this way by default. HKLM\Software\Microsoft\Windows NT\Current Version\Winlogon\ShutdownWithoutLogon = 0
Disabled
Audit access to internal system object There are a number of Windows NT system components that are accessible to individuals with programming knowledge that could be used to mount a denial of service attack. HKLM\System\CurrentControlSet\Control\Lsa\AuditBaseObjects = 1
NOTE: Objects are not audited by default when this option is enabled.
NOTE: When File and Object auditing is enabled you may receive Event 560 failures in the event log. This behavior can occur when the task manager is polling, or is going out through the computer and reading objects.
Enabled
Audit use of all user rights including Backup and Restore The additional privileges audited with this option enabled are bypass traverse checking, debug programs, create a token object, replace process level token, generate security audits, back up files and directories, and restore files and directories. HKLM\System\CurrentControlSet\Control\Lsa\FullPrivilegeAuditing =1
NOTE: User rights including Backup and Restore are not audited by default when this option is enabled.
WARNING: The SCM will show mismatch after configuration. This setting should be verified in the registry.
Enabled
AutoDisconnect: Allow sessions to be disconnected when they are idle Disconnects a user session from any servers on the domain when it exceeds the AutoDisconnect Time.
Not Configured
AutoDisconnect: Amount of idle time required before disconnecting session Set the amount of elapses idle time allowed before disconnecting the users session.
Not Configured
Change Administrator account name to The Administrator account is created by default when installing Windows NT on the Server and/or Workstation. Therefore, it is recommended that the Administrator account be renamed on all Windows NT machines.
<Configure Locally>
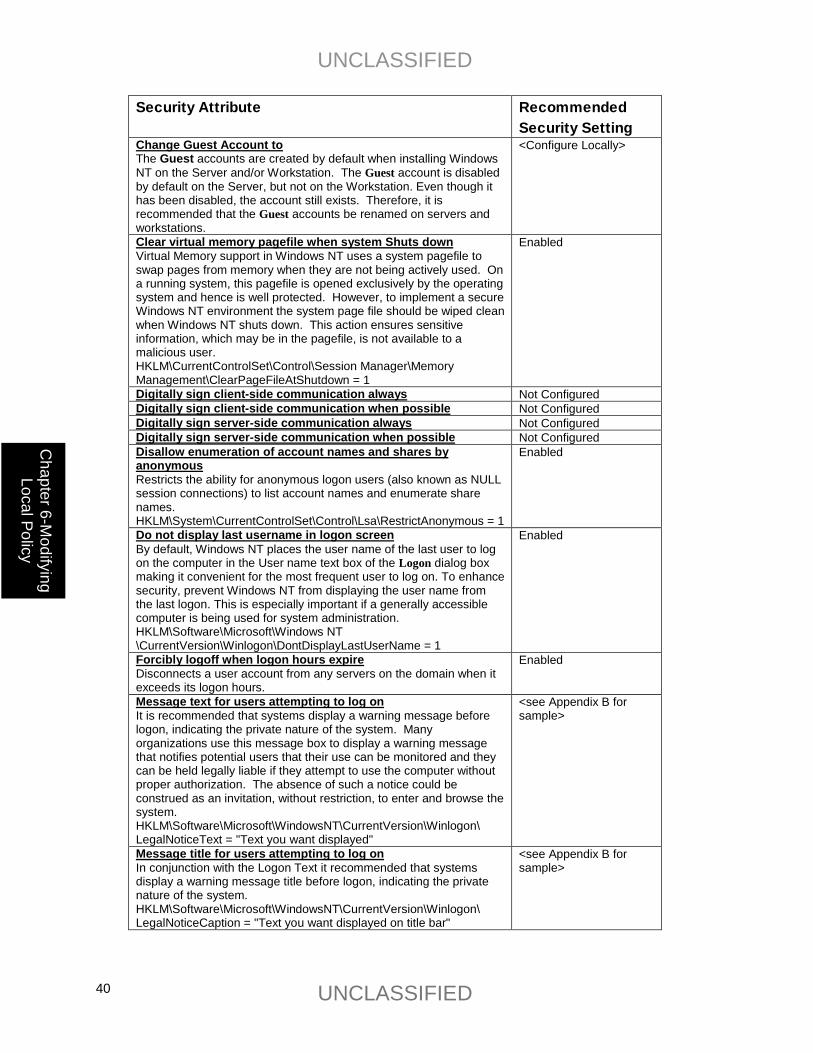
UNCLASSIFIED
UNCLASSIFIED 40
Chapter 6-M
odifying Local Policy
Security Attribute Recommended Security Setting
Change Guest Account to The Guest accounts are created by default when installing Windows NT on the Server and/or Workstation. The Guest account is disabled by default on the Server, but not on the Workstation. Even though it has been disabled, the account still exists. Therefore, it is recommended that the Guest accounts be renamed on servers and workstations.
<Configure Locally>
Clear virtual memory pagefile when system Shuts down Virtual Memory support in Windows NT uses a system pagefile to swap pages from memory when they are not being actively used. On a running system, this pagefile is opened exclusively by the operating system and hence is well protected. However, to implement a secure Windows NT environment the system page file should be wiped clean when Windows NT shuts down. This action ensures sensitive information, which may be in the pagefile, is not available to a malicious user. HKLM\CurrentControlSet\Control\Session Manager\Memory Management\ClearPageFileAtShutdown = 1
Enabled
Digitally sign client-side communication always Not Configured Digitally sign client-side communication when possible Not Configured Digitally sign server-side communication always Not Configured Digitally sign server-side communication when possible Not Configured Disallow enumeration of account names and shares by anonymous Restricts the ability for anonymous logon users (also known as NULL session connections) to list account names and enumerate share names. HKLM\System\CurrentControlSet\Control\Lsa\RestrictAnonymous = 1
Enabled
Do not display last username in logon screen By default, Windows NT places the user name of the last user to log on the computer in the User name text box of the Logon dialog box making it convenient for the most frequent user to log on. To enhance security, prevent Windows NT from displaying the user name from the last logon. This is especially important if a generally accessible computer is being used for system administration. HKLM\Software\Microsoft\Windows NT \CurrentVersion\Winlogon\DontDisplayLastUserName = 1
Enabled
Forcibly logoff when logon hours expire Disconnects a user account from any servers on the domain when it exceeds its logon hours.
Enabled
Message text for users attempting to log on It is recommended that systems display a warning message before logon, indicating the private nature of the system. Many organizations use this message box to display a warning message that notifies potential users that their use can be monitored and they can be held legally liable if they attempt to use the computer without proper authorization. The absence of such a notice could be construed as an invitation, without restriction, to enter and browse the system. HKLM\Software\Microsoft\WindowsNT\CurrentVersion\Winlogon\ LegalNoticeText = "Text you want displayed"
<see Appendix B for sample>
Message title for users attempting to log on In conjunction with the Logon Text it recommended that systems display a warning message title before logon, indicating the private nature of the system. HKLM\Software\Microsoft\WindowsNT\CurrentVersion\Winlogon\ LegalNoticeCaption = "Text you want displayed on title bar"
<see Appendix B for sample>
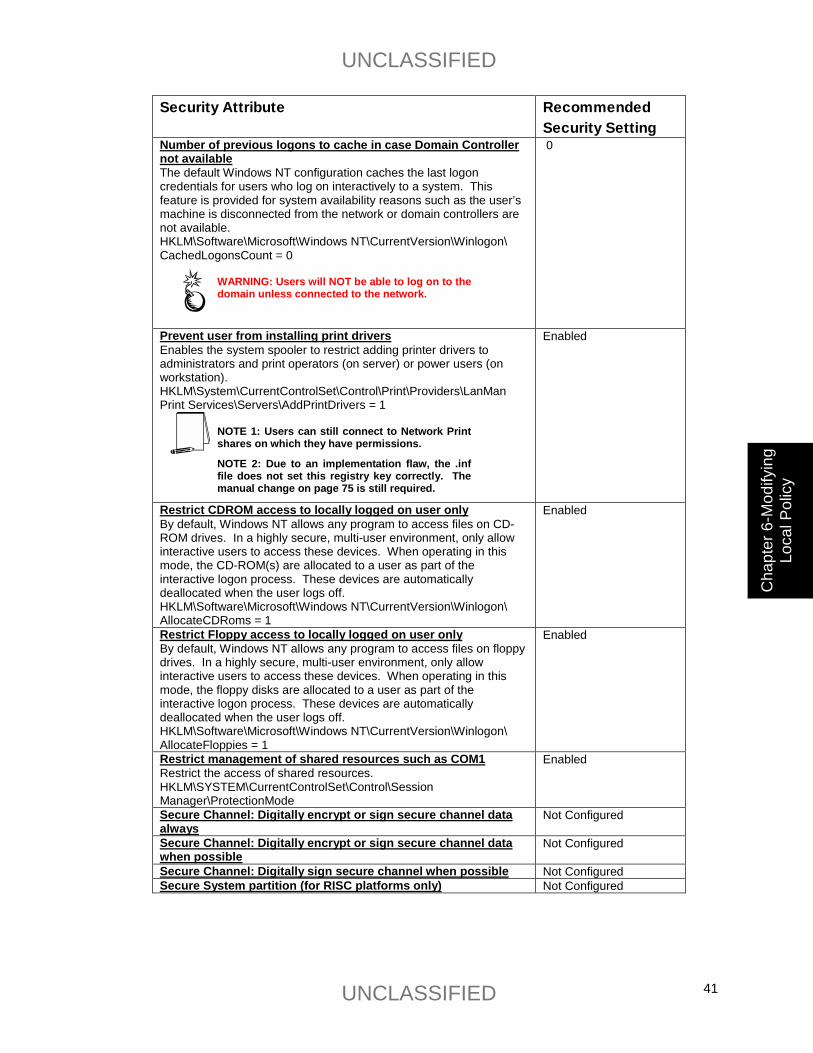
UNCLASSIFIED
UNCLASSIFIED 41
Cha
pter
6-M
odify
ing
Loca
l Pol
icy
Security Attribute Recommended Security Setting
Number of previous logons to cache in case Domain Controller not available The default Windows NT configuration caches the last logon credentials for users who log on interactively to a system. This feature is provided for system availability reasons such as the user’s machine is disconnected from the network or domain controllers are not available. HKLM\Software\Microsoft\Windows NT\CurrentVersion\Winlogon\ CachedLogonsCount = 0
WARNING: Users will NOT be able to log on to the domain unless connected to the network.
0
Prevent user from installing print drivers Enables the system spooler to restrict adding printer drivers to administrators and print operators (on server) or power users (on workstation). HKLM\System\CurrentControlSet\Control\Print\Providers\LanMan Print Services\Servers\AddPrintDrivers = 1
NOTE 1: Users can still connect to Network Print shares on which they have permissions.
NOTE 2: Due to an implementation flaw, the .inf file does not set this registry key correctly. The manual change on page 75 is still required.
Enabled
Restrict CDROM access to locally logged on user only By default, Windows NT allows any program to access files on CD-ROM drives. In a highly secure, multi-user environment, only allow interactive users to access these devices. When operating in this mode, the CD-ROM(s) are allocated to a user as part of the interactive logon process. These devices are automatically deallocated when the user logs off. HKLM\Software\Microsoft\Windows NT\CurrentVersion\Winlogon\ AllocateCDRoms = 1
Enabled
Restrict Floppy access to locally logged on user only By default, Windows NT allows any program to access files on floppy drives. In a highly secure, multi-user environment, only allow interactive users to access these devices. When operating in this mode, the floppy disks are allocated to a user as part of the interactive logon process. These devices are automatically deallocated when the user logs off. HKLM\Software\Microsoft\Windows NT\CurrentVersion\Winlogon\ AllocateFloppies = 1
Enabled
Restrict management of shared resources such as COM1 Restrict the access of shared resources. HKLM\SYSTEM\CurrentControlSet\Control\Session Manager\ProtectionMode
Enabled
Secure Channel: Digitally encrypt or sign secure channel data always
Not Configured
Secure Channel: Digitally encrypt or sign secure channel data when possible
Not Configured
Secure Channel: Digitally sign secure channel when possible Not Configured Secure System partition (for RISC platforms only) Not Configured
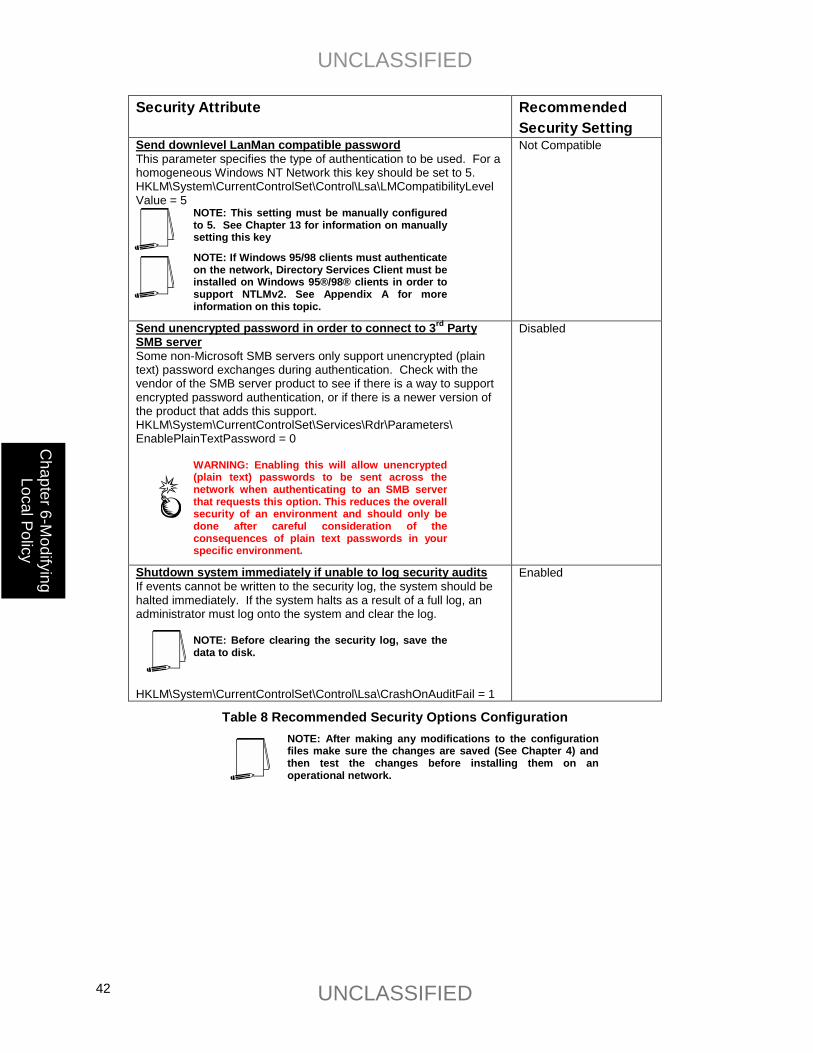
UNCLASSIFIED
UNCLASSIFIED 42
Chapter 6-M
odifying Local Policy
Security Attribute Recommended Security Setting
Send downlevel LanMan compatible password This parameter specifies the type of authentication to be used. For a homogeneous Windows NT Network this key should be set to 5. HKLM\System\CurrentControlSet\Control\Lsa\LMCompatibilityLevel Value = 5
NOTE: This setting must be manually configured to 5. See Chapter 13 for information on manually setting this key
NOTE: If Windows 95/98 clients must authenticate on the network, Directory Services Client must be installed on Windows 95®/98® clients in order to support NTLMv2. See Appendix A for more information on this topic.
Not Compatible
Send unencrypted password in order to connect to 3rd Party SMB server Some non-Microsoft SMB servers only support unencrypted (plain text) password exchanges during authentication. Check with the vendor of the SMB server product to see if there is a way to support encrypted password authentication, or if there is a newer version of the product that adds this support. HKLM\System\CurrentControlSet\Services\Rdr\Parameters\ EnablePlainTextPassword = 0
WARNING: Enabling this will allow unencrypted (plain text) passwords to be sent across the network when authenticating to an SMB server that requests this option. This reduces the overall security of an environment and should only be done after careful consideration of the consequences of plain text passwords in your specific environment.
Disabled
Shutdown system immediately if unable to log security audits If events cannot be written to the security log, the system should be halted immediately. If the system halts as a result of a full log, an administrator must log onto the system and clear the log.
NOTE: Before clearing the security log, save the data to disk.
HKLM\System\CurrentControlSet\Control\Lsa\CrashOnAuditFail = 1
Enabled
Table 8 Recommended Security Options Configuration NOTE: After making any modifications to the configuration files make sure the changes are saved (See Chapter 4) and then test the changes before installing them on an operational network.
UNCLASSIFIED
UNCLASSIFIED 43
Cha
pter
7 –
Mod
ifyin
g Ev
ent L
og S
ettin
gs
Modifying Event Log Settings with the Security Configuration Manager
Windows NT event logs record system events as they occur. The Security, Application, and System event logs contain information generated by the specified audit settings. In order to record, retrieve, and store event logs on a Windows NT system, the administrator must enable auditing and configure the events to be audited as outlined in Chapter 6. In addition to the audit settings enabled in the SCM, auditing of other system objects such as specific files, registry keys, and printers can be enabled. For more details on event logs and auditing, refer to Chapter 13.
To view event log settings of an SCM template double-click the following:
� Security Configuration Manager
� Configurations
� Default configuration file directory (%SystemRoot%\Security\Templates)
� Specific configuration file
� Event Log NOTE: After making any modifications to the configuration files make sure the changes are saved (See Chapter 4) and then test the changes before installing them on an operational network.
WARNING: Under Local Policy, Security Options, “Audit use of all user rights including Backup and Restore" shows up as a mismatch even if the setting is configured correctly.
Event Log Settings
Event log settings that can be configured with the SCM include maximum size, guest access, how long logs will be retained, and how the operating system handles logs at the maximum size.
To modify Event Log Settings via the Security Configuration Manager, double-click the following path:
Event Log→Settings for Event Logs→specific option to view or edit
Table 9 lists recommended Event Log settings for the Application, Security, and System logs.
Chapter
7
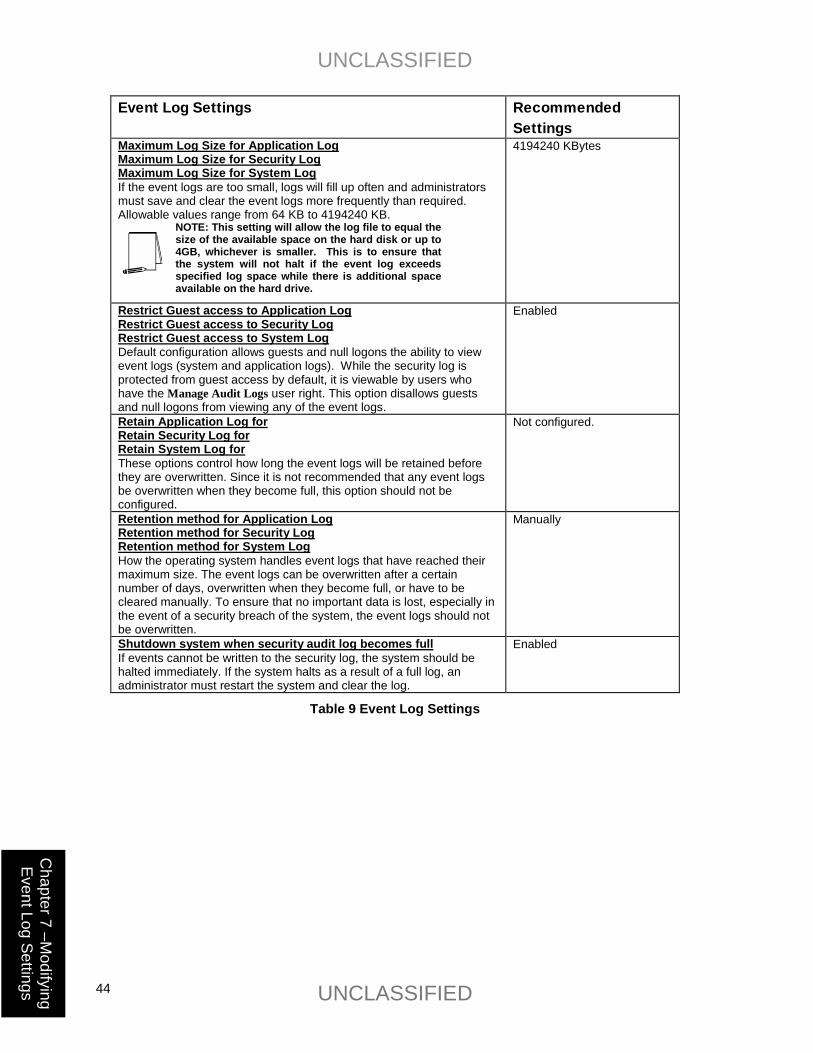
UNCLASSIFIED
UNCLASSIFIED 44
Chapter 7 –M
odifying Event Log Settings
Event Log Settings Recommended Settings
Maximum Log Size for Application Log Maximum Log Size for Security Log Maximum Log Size for System Log If the event logs are too small, logs will fill up often and administrators must save and clear the event logs more frequently than required. Allowable values range from 64 KB to 4194240 KB.
NOTE: This setting will allow the log file to equal the size of the available space on the hard disk or up to 4GB, whichever is smaller. This is to ensure that the system will not halt if the event log exceeds specified log space while there is additional space available on the hard drive.
4194240 KBytes
Restrict Guest access to Application Log Restrict Guest access to Security Log Restrict Guest access to System Log Default configuration allows guests and null logons the ability to view event logs (system and application logs). While the security log is protected from guest access by default, it is viewable by users who have the Manage Audit Logs user right. This option disallows guests and null logons from viewing any of the event logs.
Enabled
Retain Application Log for Retain Security Log for Retain System Log for These options control how long the event logs will be retained before they are overwritten. Since it is not recommended that any event logs be overwritten when they become full, this option should not be configured.
Not configured.
Retention method for Application Log Retention method for Security Log Retention method for System Log How the operating system handles event logs that have reached their maximum size. The event logs can be overwritten after a certain number of days, overwritten when they become full, or have to be cleared manually. To ensure that no important data is lost, especially in the event of a security breach of the system, the event logs should not be overwritten.
Manually
Shutdown system when security audit log becomes full If events cannot be written to the security log, the system should be halted immediately. If the system halts as a result of a full log, an administrator must restart the system and clear the log.
Enabled
Table 9 Event Log Settings
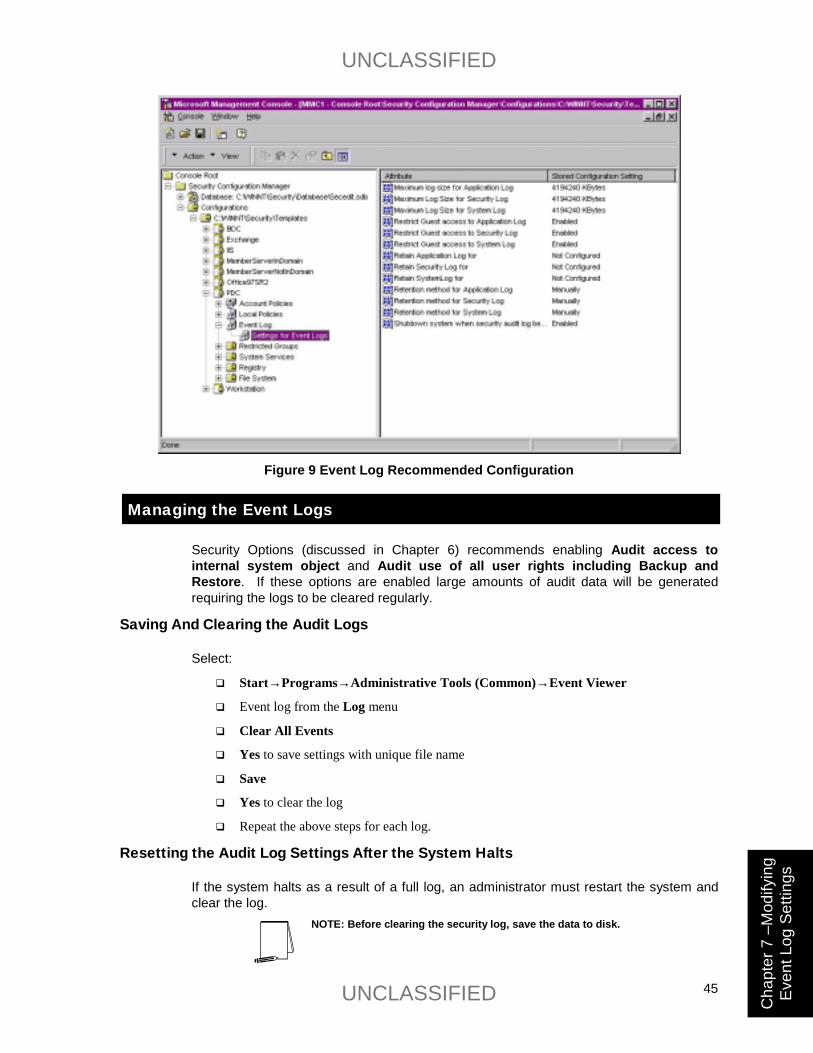
UNCLASSIFIED
UNCLASSIFIED 45
Cha
pter
7 –
Mod
ifyin
g Ev
ent L
og S
ettin
gs
Figure 9 Event Log Recommended Configuration
Managing the Event Logs
Security Options (discussed in Chapter 6) recommends enabling Audit access to internal system object and Audit use of all user rights including Backup and Restore. If these options are enabled large amounts of audit data will be generated requiring the logs to be cleared regularly.
Saving And Clearing the Audit Logs
Select:
� Start→Programs→Administrative Tools (Common)→Event Viewer
� Event log from the Log menu
� Clear All Events
� Yes to save settings with unique file name
� Save
� Yes to clear the log
� Repeat the above steps for each log.
Resetting the Audit Log Settings After the System Halts
If the system halts as a result of a full log, an administrator must restart the system and clear the log.
NOTE: Before clearing the security log, save the data to disk.
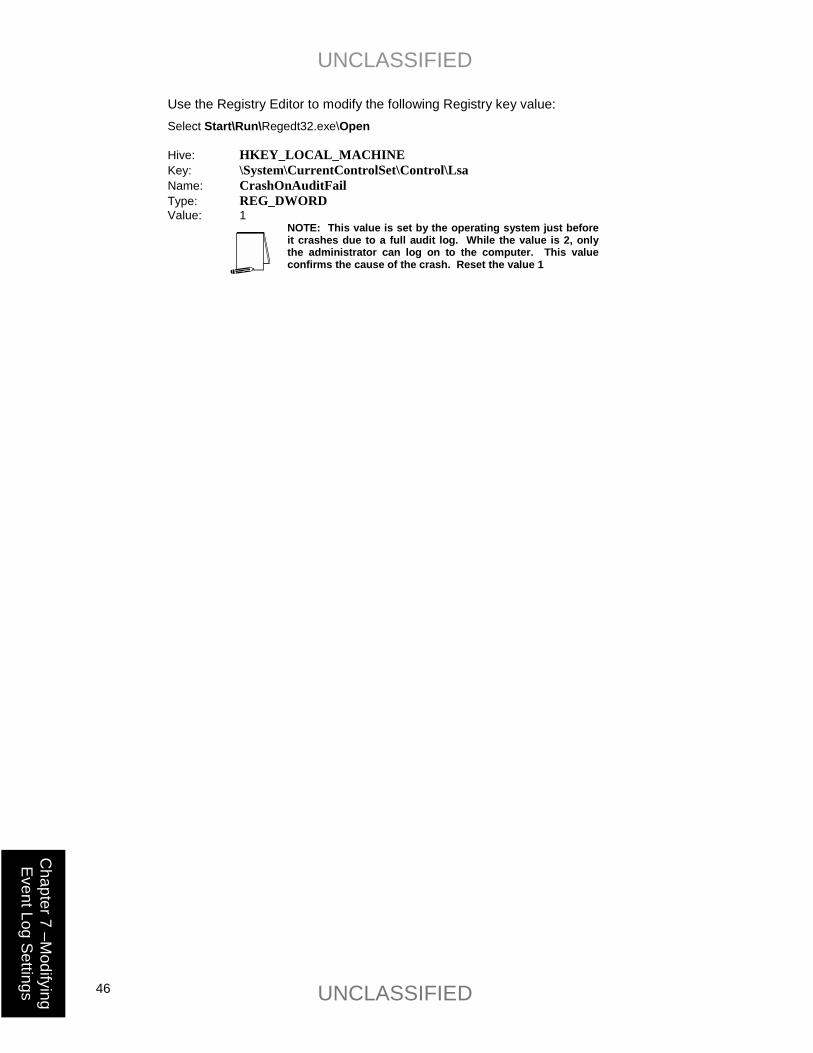
UNCLASSIFIED
UNCLASSIFIED 46
Chapter 7 –M
odifying Event Log Settings
Use the Registry Editor to modify the following Registry key value: Select Start\Run\Regedt32.exe\Open Hive: HKEY_LOCAL_MACHINE Key: \System\CurrentControlSet\Control\Lsa Name: CrashOnAuditFail Type: REG_DWORD Value: 1
NOTE: This value is set by the operating system just before it crashes due to a full audit log. While the value is 2, only the administrator can log on to the computer. This value confirms the cause of the crash. Reset the value 1

UNCLASSIFIED
UNCLASSIFIED 47
Cha
pter
8 –
Man
agin
gR
estri
cted
Gro
ups
Managing Restricted Groups with the Security Configuration Manager
The Restricted Groups option allows the administrator to manage the membership of sensitive groups. These groups can either be local (e.g. Administrators, Power Users, etc.) or global (e.g. Domain Admins, Domain Users, etc.), built-in or created. For example, if you want the Administrators group to only consist of the built-in Administrator account, you could add the Administrators group to the Restricted Groups option and add Administrator in the Members of Administrators column. This setting could prevent other users from elevating their privilege to the Administrators group through various attack tools and hacks.
Not all groups need to be added to the Restricted Group list. It is recommended that only sensitive groups be configured through the SCM. Any groups not listed will retain their membership lists.
For all groups listed for this option, any groups and/or users listed which are not currently members of that group are added, and any users and/or groups currently members of the group but not listed in the configuration file are removed.
Modifying Restricted Groups via the Security Configuration Manager
Since the settings in the Restricted Groups option should be site-specific, no restricted group settings are configured in the companion configuration (inf) files. However, a site may need to restrict the membership of sensitive groups within the domain.
To view restricted group settings of an SCM template double-click the following:
� Security Configuration Manager
� Configurations
� Default configuration file directory (%SystemRoot%\Security\Templates)
� Specific configuration file
� Restricted Groups NOTE: After making any modifications to the configuration files make sure the changes are saved (See Chapter 4) and then test the changes before installing them on an operational network.
The following steps describe how to add a restricted group to the list:
� Right-click Restricted Groups
� Select Add Group
� Double-click each group you wish to add and OK
� Double-click newly added group in the right frame
Chapter
8
UNCLASSIFIED
UNCLASSIFIED 48
Chapter 8 –
Managing
Restricted G
roups
� Click Add
� Double-click each group and/or user you wish to be members of the group
� Click OK→OK WARNING: If you add a Restricted Group and then delete it from the configuration file at a later time, you must ensure that the group is indeed gone from the inf file. Windows 2000 will allow for control over reverse membership as part of the is a Member of column. This column lists groups to which the restricted group can belong. This option is not yet available with Windows NT 4.0 and is grayed out in the GUI. However, entries for Member_Of still exist in the inf file. Despite deleting the groups through the GUI, the Member_Of section may not be deleted from the actual inf. You must manually open the inf file in a text editor and remove all entries under the Group Management section. Failure to do so may result in unpredictable behavior regarding group membership.
NOTE: After making any modifications to the configuration files make sure the changes are saved (See Chapter 4) and then test the changes before installing them on an operational network.
UNCLASSIFIED
UNCLASSIFIED 49
Cha
pter
9 –
Man
agin
gSe
rvic
es
Managing System Services with the Security Configuration Manager
The System Services option allows for configuration of Startup Modes and Access Control Lists for all system services. Configuration options include startup settings (Automatic, Manual, or Disabled) for services such as network, file, and print services. Security settings can also be established that control which users and/or groups can read and execute, write to, delete, start, pause, or stop a service.
Modifying System Services via the Security Configuration Manager
Because of the broad nature of this area, system service configuration is site-specific. Services not listed in this option can be added. However, you will need to create and attach a new SCM DLL attachment. For more information on creating SCM attachments, refer to Microsoft’s TechNet January, 1999 white paper “MS Security Configuration Manager for Windows NT 4” at http://www.microsoft.com/ntserver/techresources/security/securconfig.asp.
To view system services settings of an SCM template double-click the following:
� Security Configuration Manager
� Configurations
� Default configuration file directory (%SystemRoot%\Security\Templates)
� Specific configuration file
� System Services NOTE: After making any modifications to the configuration files make sure the changes are saved (See Chapter 4) and then test the changes before installing them on an operational network.
The following steps describe how to configure system service settings.
� Double-click the service to configure
� Uncheck Exclude this setting from configuration checkbox
� Service startup mode: Select Automatic, Manual, or Disabled
� Click Edit Security
� Click Add (to add groups and/or users to the access list)
� Double-click each user or group to add and OK
� Check the permissions that each user or group should have for that service
� Click Remove (to remove groups and/or users from the access list)
Chapter
9
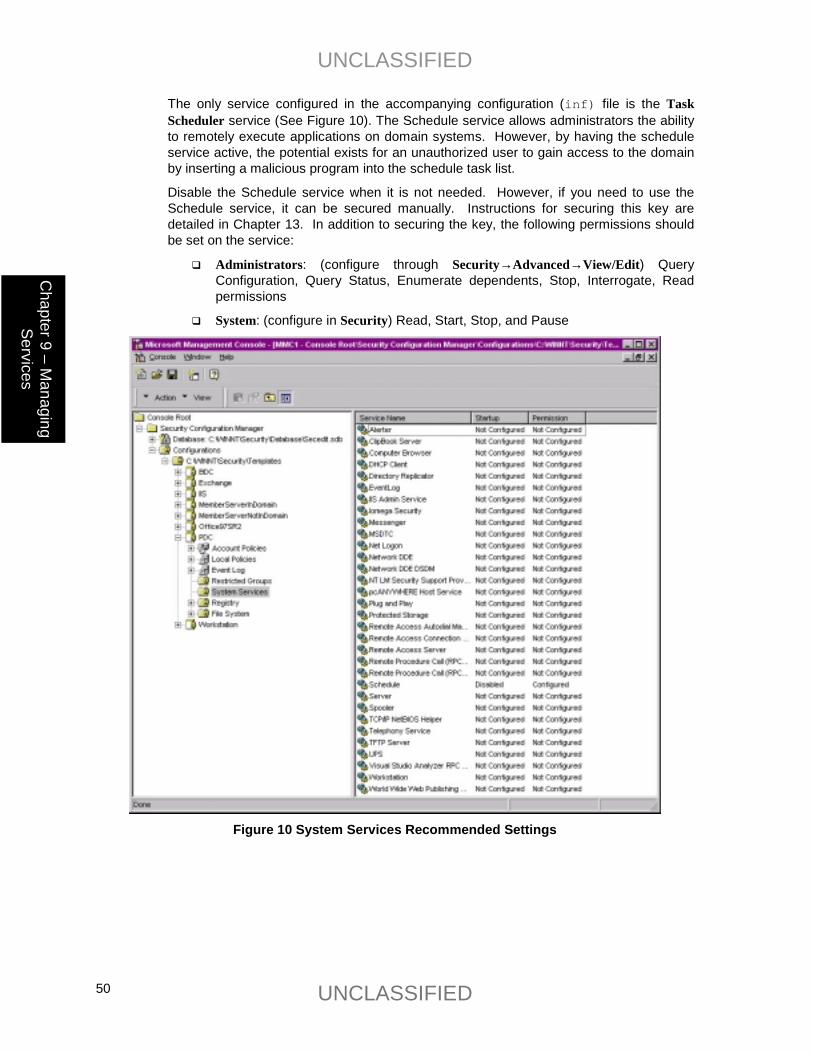
UNCLASSIFIED
UNCLASSIFIED 50
Chapter 9 –
Managing
Services
The only service configured in the accompanying configuration (inf) file is the Task Scheduler service (See Figure 10). The Schedule service allows administrators the ability to remotely execute applications on domain systems. However, by having the schedule service active, the potential exists for an unauthorized user to gain access to the domain by inserting a malicious program into the schedule task list.
Disable the Schedule service when it is not needed. However, if you need to use the Schedule service, it can be secured manually. Instructions for securing this key are detailed in Chapter 13. In addition to securing the key, the following permissions should be set on the service:
� Administrators: (configure through Security→Advanced→View/Edit) Query Configuration, Query Status, Enumerate dependents, Stop, Interrogate, Read permissions
� System: (configure in Security) Read, Start, Stop, and Pause
Figure 10 System Services Recommended Settings

UNCLASSIFIED
UNCLASSIFIED 51
Cha
pter
10
– M
odify
ing
Reg
istry
Set
tings
Modifying Registry Security Settings with the Security Configuration Manager
The SCM can be used to configure access control lists for Registry Keys. In order to implement adequate security in a Windows NT environment, registry keys and their associated permissions must be changed. The recommended changes can also be made manually using Regedt32, however this method is more time-consuming.
WARNING: By default, some protections are set on the various components of the registry that allow work to be done while providing standard-level security. For high-level security, additional access rights must be added to specific registry keys. This should be done with caution because programs that users need to do their jobs often require access to certain keys on the users’ behalf. Care should be taken to follow these steps exactly, as additional, unnecessary changes to the registry can render a system unusable and even unrecoverable.
Modifying Registry settings via the Security Configuration Manager
Recommended changes to the registry are listed below. In addition to these changes several registry modifications must be done manually as specified in Chapter 13.
To view registry settings of an SCM template select the following:
� Security Configuration Manager
� Configurations
� Default file directory (%SystemRoot%\Security\Templates)
� Specific configuration file
� Registry
There are three layers of permission windows with the SCM.
� Security with the options: Full Control, Read, Execute, Write, and Delete
� Access Control Settings with the options: Full Control, Read, Write, and Special
� Permission Entry for <Registry Key> with options: Full Control, Query Value, Set Value, Create Subkey, Enumerate Subkeys, Notify, Create Link, Delete, Read Permissions, Change Permissions, and Take Ownership.
Table 10 shows permissions set in each window when you check Full Control, Read, Execute, Write, or Delete. Any time a combination of Read, Execute, Write, and Delete are selected the permission is noted as Special in the Access Control Settings window.
Chapter
10
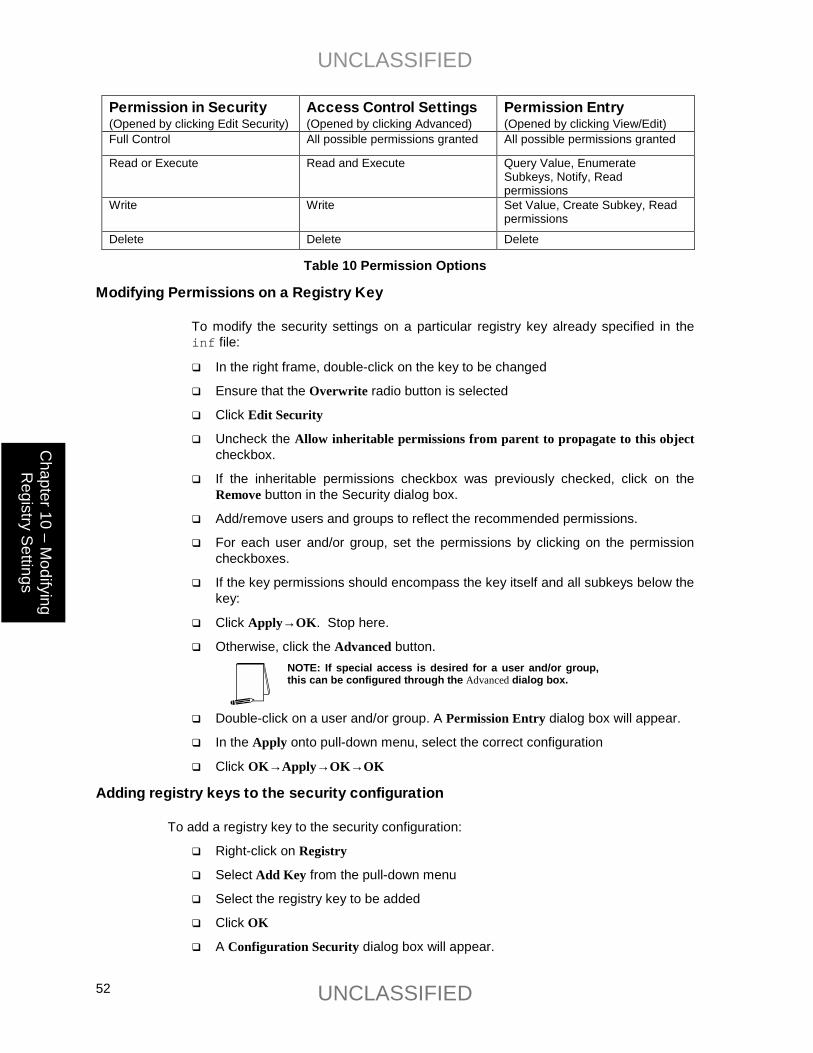
UNCLASSIFIED
UNCLASSIFIED 52
Chapter 10 –
Modifying
Registry Settings
Permission in Security (Opened by clicking Edit Security)
Access Control Settings (Opened by clicking Advanced)
Permission Entry (Opened by clicking View/Edit)
Full Control All possible permissions granted All possible permissions granted
Read or Execute
Read and Execute Query Value, Enumerate Subkeys, Notify, Read permissions
Write Write Set Value, Create Subkey, Read permissions
Delete Delete Delete
Table 10 Permission Options
Modifying Permissions on a Registry Key
To modify the security settings on a particular registry key already specified in the inf file:
� In the right frame, double-click on the key to be changed
� Ensure that the Overwrite radio button is selected
� Click Edit Security
� Uncheck the Allow inheritable permissions from parent to propagate to this object checkbox.
� If the inheritable permissions checkbox was previously checked, click on the Remove button in the Security dialog box.
� Add/remove users and groups to reflect the recommended permissions.
� For each user and/or group, set the permissions by clicking on the permission checkboxes.
� If the key permissions should encompass the key itself and all subkeys below the key:
� Click Apply→OK. Stop here.
� Otherwise, click the Advanced button. NOTE: If special access is desired for a user and/or group, this can be configured through the Advanced dialog box.
� Double-click on a user and/or group. A Permission Entry dialog box will appear.
� In the Apply onto pull-down menu, select the correct configuration
� Click OK→Apply→OK→OK
Adding registry keys to the security configuration
To add a registry key to the security configuration:
� Right-click on Registry
� Select Add Key from the pull-down menu
� Select the registry key to be added
� Click OK
� A Configuration Security dialog box will appear.
UNCLASSIFIED
UNCLASSIFIED 53
Cha
pter
10
– M
odify
ing
Reg
istry
Set
tings
� Click OK
� Double-click on the registry key in the right frame when it appears
� Configure the permissions according to the steps detailed in the previous Modifying permissions on a registry key section.
Excluding registry keys from the security configuration
There are occasions where a specific registry key should retain its current security settings. To ensure that parent keys don’t propagate their new permissions down to such registry keys, you may exclude the object from configuration.
To exclude an object:
� In the right frame of Registry, double-click on the key to be changed
� Click the Ignore radio button.
� Click OK
Recommended Registry Key Permissions
Registry keys not explicitly listed below are assumed to inherit the permissions of their parent key. Keys with Ignore are explicitly excluded from SCM configuration and retain their original permissions.
The following notation is used in this section of the SCM:
� CLASSES_ROOT indicates HKEY_CLASSES_ROOT hive
� MACHINE indicates HKEY_LOCAL_MACHINE hive
� USERS indicates HKEY_USERS hive
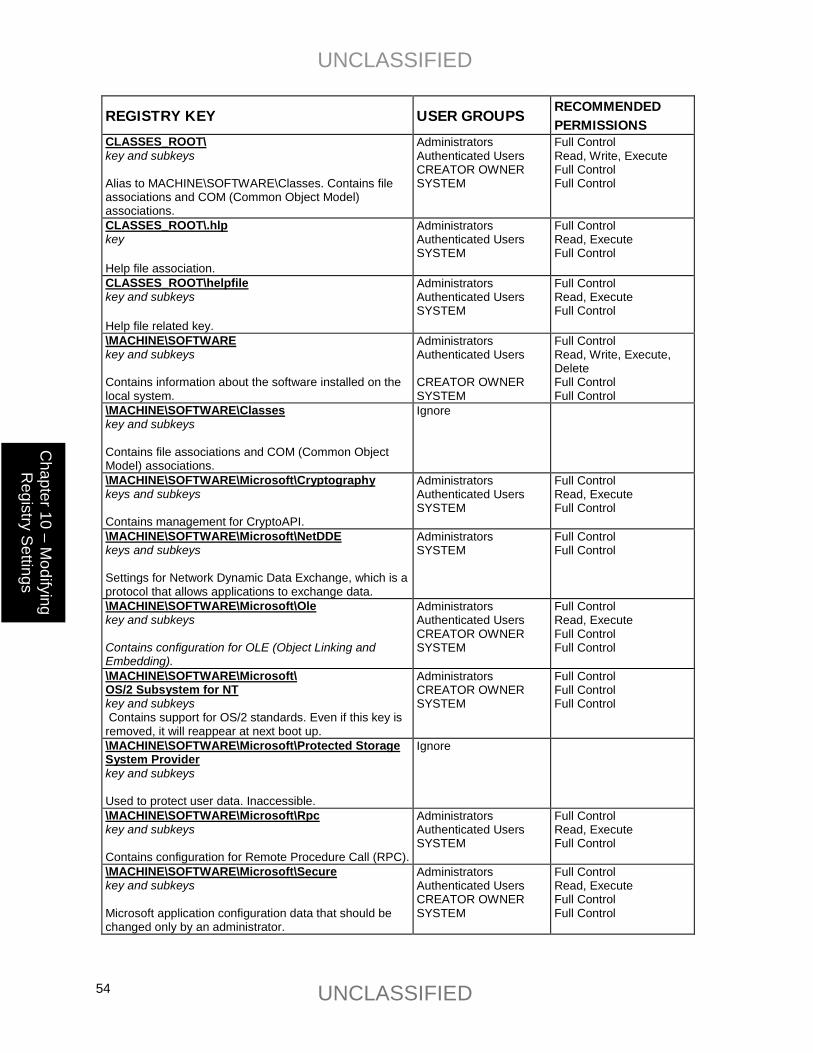
UNCLASSIFIED
UNCLASSIFIED 54
Chapter 10 –
Modifying
Registry Settings
REGISTRY KEY USER GROUPS RECOMMENDED PERMISSIONS
CLASSES_ROOT\ key and subkeys Alias to MACHINE\SOFTWARE\Classes. Contains file associations and COM (Common Object Model) associations.
Administrators Authenticated Users CREATOR OWNER SYSTEM
Full Control Read, Write, Execute Full Control Full Control
CLASSES_ROOT\.hlp key Help file association.
Administrators Authenticated Users SYSTEM
Full Control Read, Execute Full Control
CLASSES_ROOT\helpfile key and subkeys Help file related key.
Administrators Authenticated Users SYSTEM
Full Control Read, Execute Full Control
\MACHINE\SOFTWARE key and subkeys Contains information about the software installed on the local system.
Administrators Authenticated Users CREATOR OWNER SYSTEM
Full Control Read, Write, Execute, Delete Full Control Full Control
\MACHINE\SOFTWARE\Classes key and subkeys Contains file associations and COM (Common Object Model) associations.
Ignore
\MACHINE\SOFTWARE\Microsoft\Cryptography keys and subkeys Contains management for CryptoAPI.
Administrators Authenticated Users SYSTEM
Full Control Read, Execute Full Control
\MACHINE\SOFTWARE\Microsoft\NetDDE keys and subkeys Settings for Network Dynamic Data Exchange, which is a protocol that allows applications to exchange data.
Administrators SYSTEM
Full Control Full Control
\MACHINE\SOFTWARE\Microsoft\Ole key and subkeys Contains configuration for OLE (Object Linking and Embedding).
Administrators Authenticated Users CREATOR OWNER SYSTEM
Full Control Read, Execute Full Control Full Control
\MACHINE\SOFTWARE\Microsoft\ OS/2 Subsystem for NT key and subkeys Contains support for OS/2 standards. Even if this key is removed, it will reappear at next boot up.
Administrators CREATOR OWNER SYSTEM
Full Control Full Control Full Control
\MACHINE\SOFTWARE\Microsoft\Protected Storage System Provider key and subkeys Used to protect user data. Inaccessible.
Ignore
\MACHINE\SOFTWARE\Microsoft\Rpc key and subkeys Contains configuration for Remote Procedure Call (RPC).
Administrators Authenticated Users SYSTEM
Full Control Read, Execute Full Control
\MACHINE\SOFTWARE\Microsoft\Secure key and subkeys Microsoft application configuration data that should be changed only by an administrator.
Administrators Authenticated Users CREATOR OWNER SYSTEM
Full Control Read, Execute Full Control Full Control
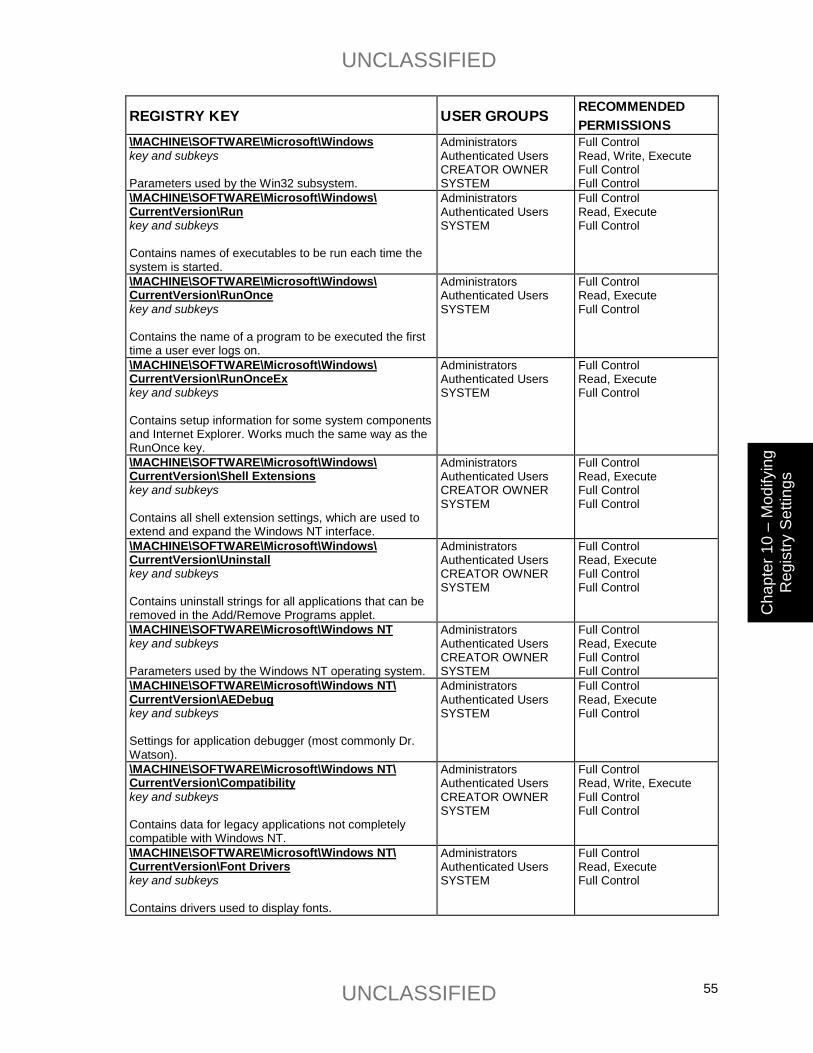
UNCLASSIFIED
UNCLASSIFIED 55
Cha
pter
10
– M
odify
ing
Reg
istry
Set
tings
REGISTRY KEY USER GROUPS RECOMMENDED PERMISSIONS
\MACHINE\SOFTWARE\Microsoft\Windows key and subkeys Parameters used by the Win32 subsystem.
Administrators Authenticated Users CREATOR OWNER SYSTEM
Full Control Read, Write, Execute Full Control Full Control
\MACHINE\SOFTWARE\Microsoft\Windows\ CurrentVersion\Run key and subkeys Contains names of executables to be run each time the system is started.
Administrators Authenticated Users SYSTEM
Full Control Read, Execute Full Control
\MACHINE\SOFTWARE\Microsoft\Windows\ CurrentVersion\RunOnce key and subkeys Contains the name of a program to be executed the first time a user ever logs on.
Administrators Authenticated Users SYSTEM
Full Control Read, Execute Full Control
\MACHINE\SOFTWARE\Microsoft\Windows\ CurrentVersion\RunOnceEx key and subkeys Contains setup information for some system components and Internet Explorer. Works much the same way as the RunOnce key.
Administrators Authenticated Users SYSTEM
Full Control Read, Execute Full Control
\MACHINE\SOFTWARE\Microsoft\Windows\ CurrentVersion\Shell Extensions key and subkeys Contains all shell extension settings, which are used to extend and expand the Windows NT interface.
Administrators Authenticated Users CREATOR OWNER SYSTEM
Full Control Read, Execute Full Control Full Control
\MACHINE\SOFTWARE\Microsoft\Windows\ CurrentVersion\Uninstall key and subkeys Contains uninstall strings for all applications that can be removed in the Add/Remove Programs applet.
Administrators Authenticated Users CREATOR OWNER SYSTEM
Full Control Read, Execute Full Control Full Control
\MACHINE\SOFTWARE\Microsoft\Windows NT key and subkeys Parameters used by the Windows NT operating system.
Administrators Authenticated Users CREATOR OWNER SYSTEM
Full Control Read, Execute Full Control Full Control
\MACHINE\SOFTWARE\Microsoft\Windows NT\ CurrentVersion\AEDebug key and subkeys Settings for application debugger (most commonly Dr. Watson).
Administrators Authenticated Users SYSTEM
Full Control Read, Execute Full Control
\MACHINE\SOFTWARE\Microsoft\Windows NT\ CurrentVersion\Compatibility key and subkeys Contains data for legacy applications not completely compatible with Windows NT.
Administrators Authenticated Users CREATOR OWNER SYSTEM
Full Control Read, Write, Execute Full Control Full Control
\MACHINE\SOFTWARE\Microsoft\Windows NT\ CurrentVersion\Font Drivers key and subkeys Contains drivers used to display fonts.
Administrators Authenticated Users SYSTEM
Full Control Read, Execute Full Control
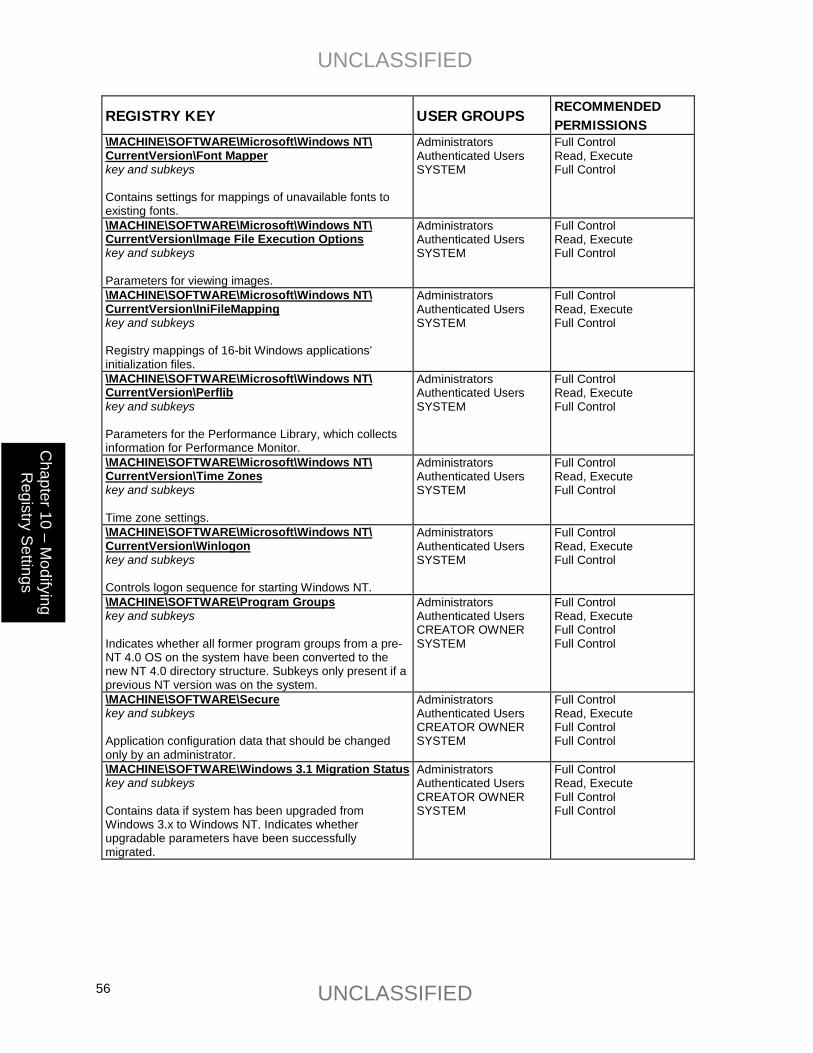
UNCLASSIFIED
UNCLASSIFIED 56
Chapter 10 –
Modifying
Registry Settings
REGISTRY KEY USER GROUPS RECOMMENDED PERMISSIONS
\MACHINE\SOFTWARE\Microsoft\Windows NT\ CurrentVersion\Font Mapper key and subkeys Contains settings for mappings of unavailable fonts to existing fonts.
Administrators Authenticated Users SYSTEM
Full Control Read, Execute Full Control
\MACHINE\SOFTWARE\Microsoft\Windows NT\ CurrentVersion\Image File Execution Options key and subkeys Parameters for viewing images.
Administrators Authenticated Users SYSTEM
Full Control Read, Execute Full Control
\MACHINE\SOFTWARE\Microsoft\Windows NT\ CurrentVersion\IniFileMapping key and subkeys Registry mappings of 16-bit Windows applications’ initialization files.
Administrators Authenticated Users SYSTEM
Full Control Read, Execute Full Control
\MACHINE\SOFTWARE\Microsoft\Windows NT\ CurrentVersion\Perflib key and subkeys Parameters for the Performance Library, which collects information for Performance Monitor.
Administrators Authenticated Users SYSTEM
Full Control Read, Execute Full Control
\MACHINE\SOFTWARE\Microsoft\Windows NT\ CurrentVersion\Time Zones key and subkeys Time zone settings.
Administrators Authenticated Users SYSTEM
Full Control Read, Execute Full Control
\MACHINE\SOFTWARE\Microsoft\Windows NT\ CurrentVersion\Winlogon key and subkeys Controls logon sequence for starting Windows NT.
Administrators Authenticated Users SYSTEM
Full Control Read, Execute Full Control
\MACHINE\SOFTWARE\Program Groups key and subkeys Indicates whether all former program groups from a pre-NT 4.0 OS on the system have been converted to the new NT 4.0 directory structure. Subkeys only present if a previous NT version was on the system.
Administrators Authenticated Users CREATOR OWNER SYSTEM
Full Control Read, Execute Full Control Full Control
\MACHINE\SOFTWARE\Secure key and subkeys Application configuration data that should be changed only by an administrator.
Administrators Authenticated Users CREATOR OWNER SYSTEM
Full Control Read, Execute Full Control Full Control
\MACHINE\SOFTWARE\Windows 3.1 Migration Statuskey and subkeys Contains data if system has been upgraded from Windows 3.x to Windows NT. Indicates whether upgradable parameters have been successfully migrated.
Administrators Authenticated Users CREATOR OWNER SYSTEM
Full Control Read, Execute Full Control Full Control
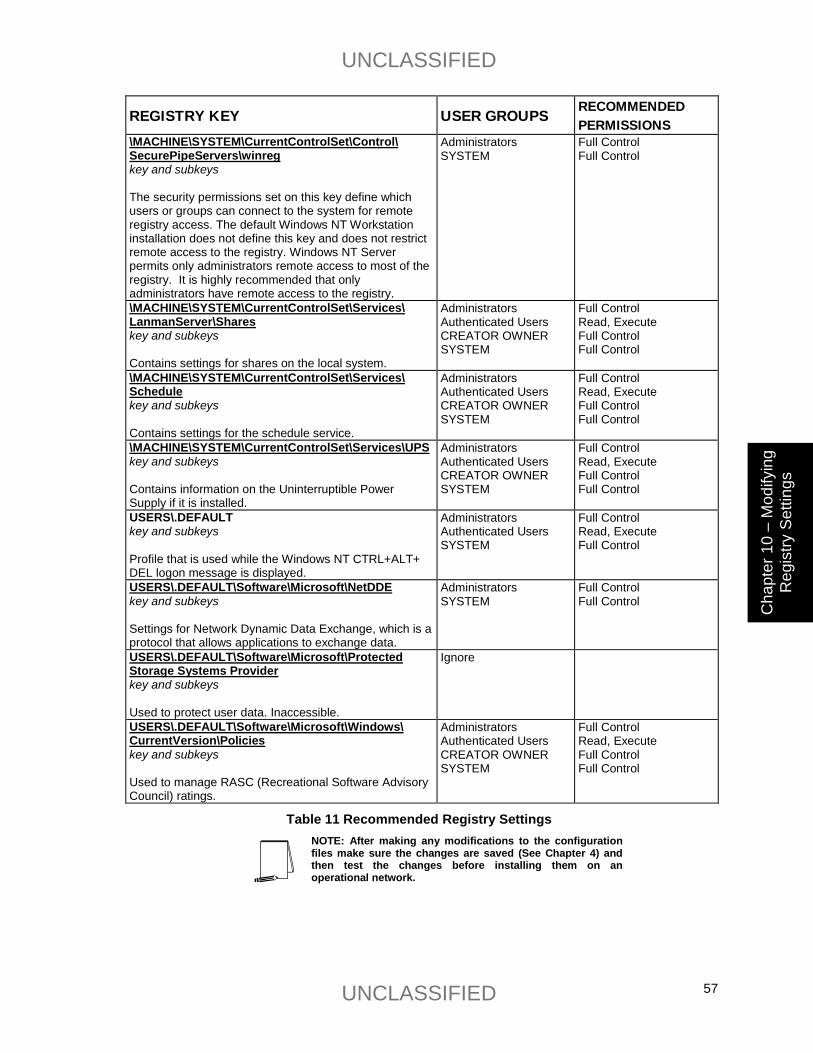
UNCLASSIFIED
UNCLASSIFIED 57
Cha
pter
10
– M
odify
ing
Reg
istry
Set
tings
REGISTRY KEY USER GROUPS RECOMMENDED PERMISSIONS
\MACHINE\SYSTEM\CurrentControlSet\Control\ SecurePipeServers\winreg key and subkeys The security permissions set on this key define which users or groups can connect to the system for remote registry access. The default Windows NT Workstation installation does not define this key and does not restrict remote access to the registry. Windows NT Server permits only administrators remote access to most of the registry. It is highly recommended that only administrators have remote access to the registry.
Administrators SYSTEM
Full Control Full Control
\MACHINE\SYSTEM\CurrentControlSet\Services\ LanmanServer\Shares key and subkeys Contains settings for shares on the local system.
Administrators Authenticated Users CREATOR OWNER SYSTEM
Full Control Read, Execute Full Control Full Control
\MACHINE\SYSTEM\CurrentControlSet\Services\ Schedule key and subkeys Contains settings for the schedule service.
Administrators Authenticated Users CREATOR OWNER SYSTEM
Full Control Read, Execute Full Control Full Control
\MACHINE\SYSTEM\CurrentControlSet\Services\UPS key and subkeys Contains information on the Uninterruptible Power Supply if it is installed.
Administrators Authenticated Users CREATOR OWNER SYSTEM
Full Control Read, Execute Full Control Full Control
USERS\.DEFAULT key and subkeys Profile that is used while the Windows NT CTRL+ALT+ DEL logon message is displayed.
Administrators Authenticated Users SYSTEM
Full Control Read, Execute Full Control
USERS\.DEFAULT\Software\Microsoft\NetDDE key and subkeys Settings for Network Dynamic Data Exchange, which is a protocol that allows applications to exchange data.
Administrators SYSTEM
Full Control Full Control
USERS\.DEFAULT\Software\Microsoft\Protected Storage Systems Provider key and subkeys Used to protect user data. Inaccessible.
Ignore
USERS\.DEFAULT\Software\Microsoft\Windows\ CurrentVersion\Policies key and subkeys Used to manage RASC (Recreational Software Advisory Council) ratings.
Administrators Authenticated Users CREATOR OWNER SYSTEM
Full Control Read, Execute Full Control Full Control
Table 11 Recommended Registry Settings NOTE: After making any modifications to the configuration files make sure the changes are saved (See Chapter 4) and then test the changes before installing them on an operational network.

UNCLASSIFIED
UNCLASSIFIED 58
This Page Intentionally Left Blank

UNCLASSIFIED
UNCLASSIFIED 59
Cha
pter
11–
Mod
ifyin
g Fi
le S
yste
m S
ettin
gs
Modifying File System Security Settings with the Security Configuration Manager
NTFS is a highly secure file system that provides a reliable way to safeguard valuable information. NTFS works in concert with the Windows NT user account system to allow authenticated users access to files. The system provides extended permissions for controlling access to files and prohibits easy access to data on disk if someone manages to boot the system with another operating system. To implement the highest level of security, always format Windows NT partitions with the NT File System.
It is important to understand that Windows NT does not encrypt data or system files stored on a physical disk. Since file data is not encrypted, an intruder gaining physical access to any of the NTFS formatted volumes can use a low-level, byte-editing program to read or change information on those volumes. The security provided by NTFS is based on system controls that are managed by the Windows NT operating system. As long as Windows NT is operating, NTFS permissions and user access control lists prevent unauthorized users from accessing files either locally or over the network.
NTFS allows for varying levels of file access permissions to users or groups of users. Coupled with file access permissions is the concept of “inheritance.” By default, newly created files or folders inherit the parent folder’s file access permissions.
Modifying File System settings via the Security Configuration Manager
The recommended changes to system files and folders are listed in Table 12.
The necessary changes can be made in one of two ways. The first method is to use the Security Configuration Manager and the provided template to apply the recommended file and folder permissions. The alternative and more time-consuming method is to change permissions on each file and folder manually.
There are several file system changes that must be manually completed after running the SCM. See Chapter 13 for the additional modifications.
To view file system settings of an SCM template select the following:
� Security Configuration Manager
� Configurations
� Default file directory (%SystemRoot%\Security\Templates)
� Specific configuration file
� File System
Chapter
11
UNCLASSIFIED
UNCLASSIFIED 60
Chapter 11–M
odifying File System
Settings
Modifying Permissions on a File or Folder
To modify the security settings on a particular file or folder already specified in the inf file:
� In the right frame, double-click on the file or folder to be changed
� Ensure that the Overwrite radio button is selected
� Click Edit Security
� Uncheck the Allow inheritable permissions from parent to propagate to this object checkbox.
� If the inheritable permissions checkbox was previously checked, click on the Remove button in the Security dialog box.
� Add/remove users and groups to reflect the recommended permissions.
� For each user and/or group, set the permissions by clicking on the permission checkboxes.
� If the folder permissions should encompass the folder itself, all files within the folder, and all subfolders:
� Click the Apply→OK. Stop here.
� Otherwise, click the Advanced button.
� Double-click on a user and/or group. A Permission Entry dialog box will appear.
� In the Apply onto pull-down menu, select the correct configuration (e.g. This folder only).
� Click OK→Apply→OK→OK.
Adding files or folders to the security configuration
To add a file or folder to the security configuration:
� Right-click on File System
� Select Add Files or Add Folder from the pull-down menu
� Select the file or folder to be added
� Click OK
� A Configuration Security dialog box will appear.
� Configure the permissions according to the steps detailed in the previous Modifying permissions on a file or folder section.
Excluding files or folders from the security configuration
There are occasions where a specific file or folder should retain its current security settings. To ensure that parent folders don’t propagate their new permissions down to such files or folders, you may exclude the object from configuration.
To exclude an object:
� In the right frame of File System, double-click on the file or folder to be changed
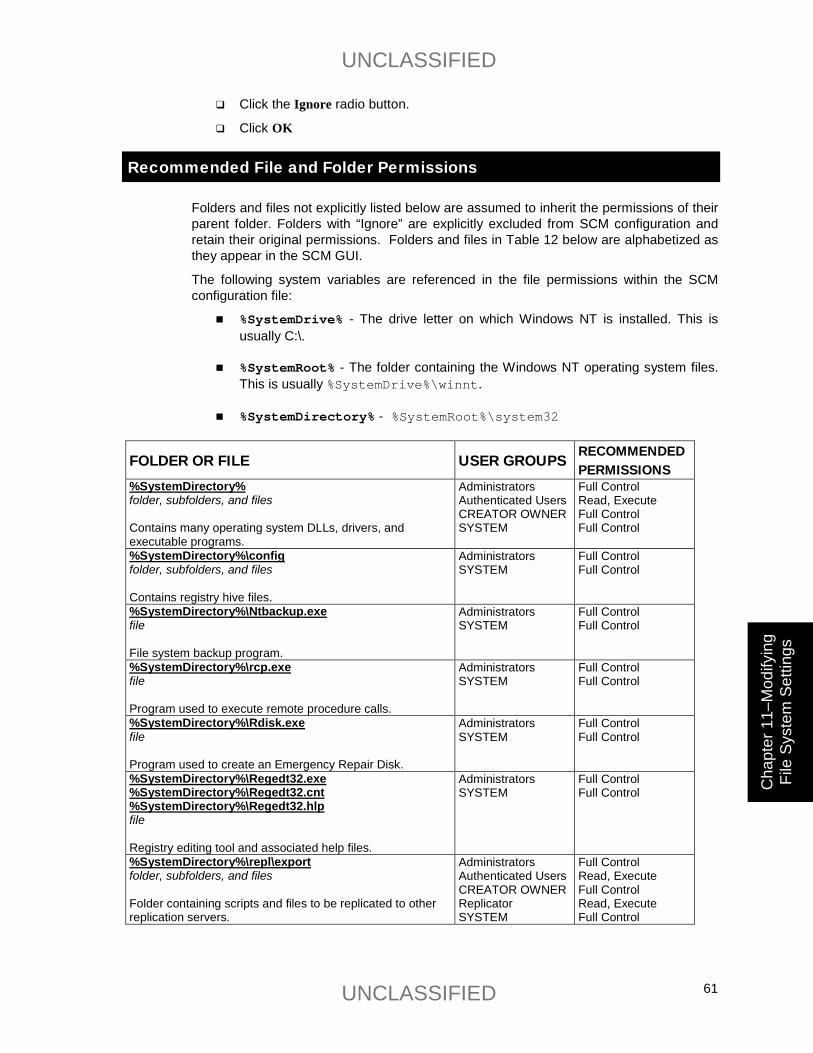
UNCLASSIFIED
UNCLASSIFIED 61
Cha
pter
11–
Mod
ifyin
g Fi
le S
yste
m S
ettin
gs
� Click the Ignore radio button.
� Click OK
Recommended File and Folder Permissions
Folders and files not explicitly listed below are assumed to inherit the permissions of their parent folder. Folders with “Ignore” are explicitly excluded from SCM configuration and retain their original permissions. Folders and files in Table 12 below are alphabetized as they appear in the SCM GUI.
The following system variables are referenced in the file permissions within the SCM configuration file:
� %SystemDrive% - The drive letter on which Windows NT is installed. This is usually C:\.
� %SystemRoot% - The folder containing the Windows NT operating system files. This is usually %SystemDrive%\winnt.
� %SystemDirectory% - %SystemRoot%\system32
FOLDER OR FILE USER GROUPS RECOMMENDED PERMISSIONS
%SystemDirectory% folder, subfolders, and files Contains many operating system DLLs, drivers, and executable programs.
Administrators Authenticated Users CREATOR OWNER SYSTEM
Full Control Read, Execute Full Control Full Control
%SystemDirectory%\config folder, subfolders, and files Contains registry hive files.
Administrators SYSTEM
Full Control Full Control
%SystemDirectory%\Ntbackup.exe file File system backup program.
Administrators SYSTEM
Full Control Full Control
%SystemDirectory%\rcp.exe file Program used to execute remote procedure calls.
Administrators SYSTEM
Full Control Full Control
%SystemDirectory%\Rdisk.exe file Program used to create an Emergency Repair Disk.
Administrators SYSTEM
Full Control Full Control
%SystemDirectory%\Regedt32.exe %SystemDirectory%\Regedt32.cnt %SystemDirectory%\Regedt32.hlp file Registry editing tool and associated help files.
Administrators SYSTEM
Full Control Full Control
%SystemDirectory%\repl\export folder, subfolders, and files Folder containing scripts and files to be replicated to other replication servers.
Administrators Authenticated Users CREATOR OWNER Replicator SYSTEM
Full Control Read, Execute Full Control Read, Execute Full Control
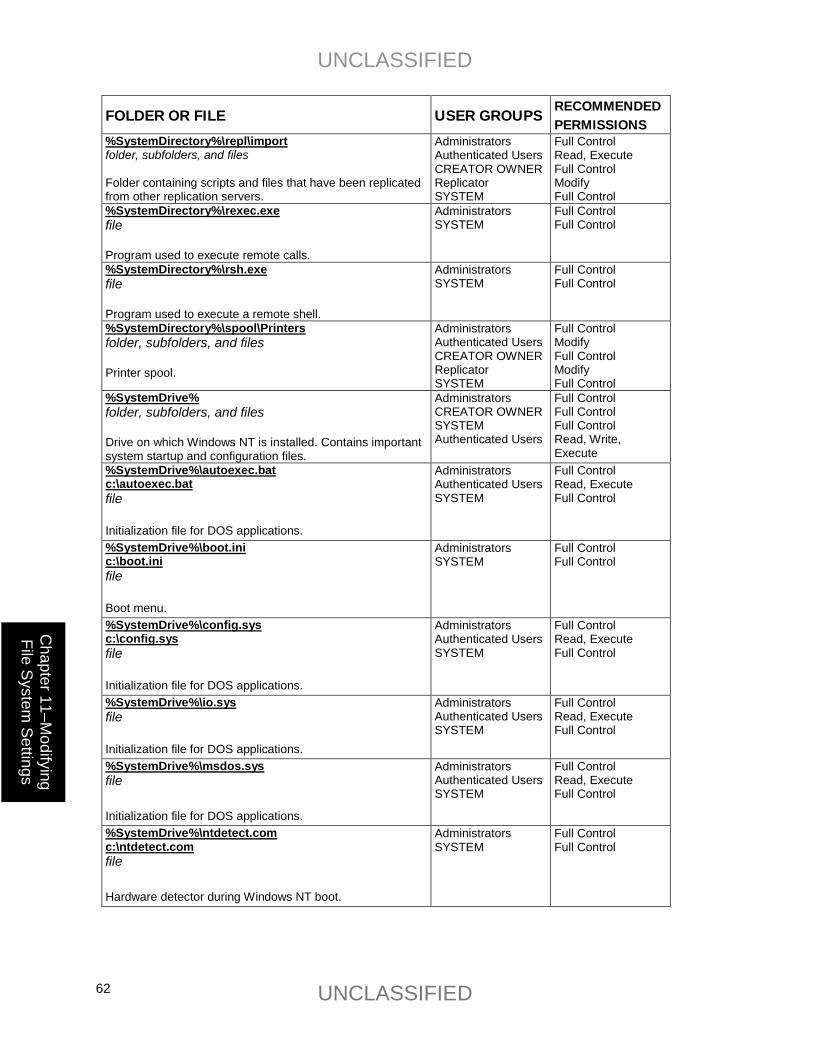
UNCLASSIFIED
UNCLASSIFIED 62
Chapter 11–M
odifying File System
Settings
FOLDER OR FILE USER GROUPS RECOMMENDED PERMISSIONS
%SystemDirectory%\repl\import folder, subfolders, and files Folder containing scripts and files that have been replicated from other replication servers.
Administrators Authenticated Users CREATOR OWNER Replicator SYSTEM
Full Control Read, Execute Full Control Modify Full Control
%SystemDirectory%\rexec.exe file Program used to execute remote calls.
Administrators SYSTEM
Full Control Full Control
%SystemDirectory%\rsh.exe file Program used to execute a remote shell.
Administrators SYSTEM
Full Control Full Control
%SystemDirectory%\spool\Printers folder, subfolders, and files Printer spool.
Administrators Authenticated Users CREATOR OWNER Replicator SYSTEM
Full Control Modify Full Control Modify Full Control
%SystemDrive% folder, subfolders, and files Drive on which Windows NT is installed. Contains important system startup and configuration files.
Administrators CREATOR OWNER SYSTEM Authenticated Users
Full Control Full Control Full Control Read, Write, Execute
%SystemDrive%\autoexec.bat c:\autoexec.bat file Initialization file for DOS applications.
Administrators Authenticated Users SYSTEM
Full Control Read, Execute Full Control
%SystemDrive%\boot.ini c:\boot.ini file Boot menu.
Administrators SYSTEM
Full Control Full Control
%SystemDrive%\config.sys c:\config.sys file Initialization file for DOS applications.
Administrators Authenticated Users SYSTEM
Full Control Read, Execute Full Control
%SystemDrive%\io.sys file Initialization file for DOS applications.
Administrators Authenticated Users SYSTEM
Full Control Read, Execute Full Control
%SystemDrive%\msdos.sys file Initialization file for DOS applications.
Administrators Authenticated Users SYSTEM
Full Control Read, Execute Full Control
%SystemDrive%\ntdetect.com c:\ntdetect.com file Hardware detector during Windows NT boot.
Administrators SYSTEM
Full Control Full Control
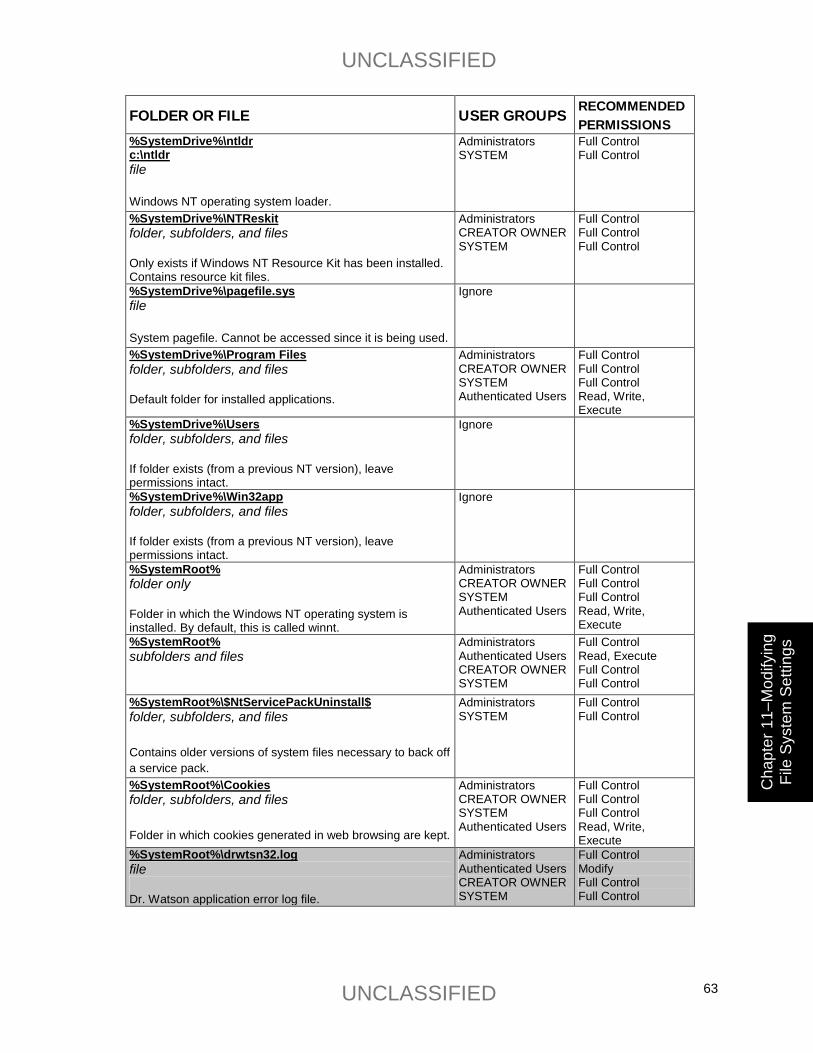
UNCLASSIFIED
UNCLASSIFIED 63
Cha
pter
11–
Mod
ifyin
g Fi
le S
yste
m S
ettin
gs
FOLDER OR FILE USER GROUPS RECOMMENDED PERMISSIONS
%SystemDrive%\ntldr c:\ntldr file Windows NT operating system loader.
Administrators SYSTEM
Full Control Full Control
%SystemDrive%\NTReskit folder, subfolders, and files Only exists if Windows NT Resource Kit has been installed. Contains resource kit files.
Administrators CREATOR OWNER SYSTEM
Full Control Full Control Full Control
%SystemDrive%\pagefile.sys file System pagefile. Cannot be accessed since it is being used.
Ignore
%SystemDrive%\Program Files folder, subfolders, and files Default folder for installed applications.
Administrators CREATOR OWNER SYSTEM Authenticated Users
Full Control Full Control Full Control Read, Write, Execute
%SystemDrive%\Users folder, subfolders, and files If folder exists (from a previous NT version), leave permissions intact.
Ignore
%SystemDrive%\Win32app folder, subfolders, and files If folder exists (from a previous NT version), leave permissions intact.
Ignore
%SystemRoot% folder only Folder in which the Windows NT operating system is installed. By default, this is called winnt.
Administrators CREATOR OWNER SYSTEM Authenticated Users
Full Control Full Control Full Control Read, Write, Execute
%SystemRoot% subfolders and files
Administrators Authenticated Users CREATOR OWNER SYSTEM
Full Control Read, Execute Full Control Full Control
%SystemRoot%\$NtServicePackUninstall$ folder, subfolders, and files Contains older versions of system files necessary to back off a service pack.
Administrators SYSTEM
Full Control Full Control
%SystemRoot%\Cookies folder, subfolders, and files Folder in which cookies generated in web browsing are kept.
Administrators CREATOR OWNER SYSTEM Authenticated Users
Full Control Full Control Full Control Read, Write, Execute
%SystemRoot%\drwtsn32.log file Dr. Watson application error log file.
Administrators Authenticated Users CREATOR OWNER SYSTEM
Full Control Modify Full Control Full Control
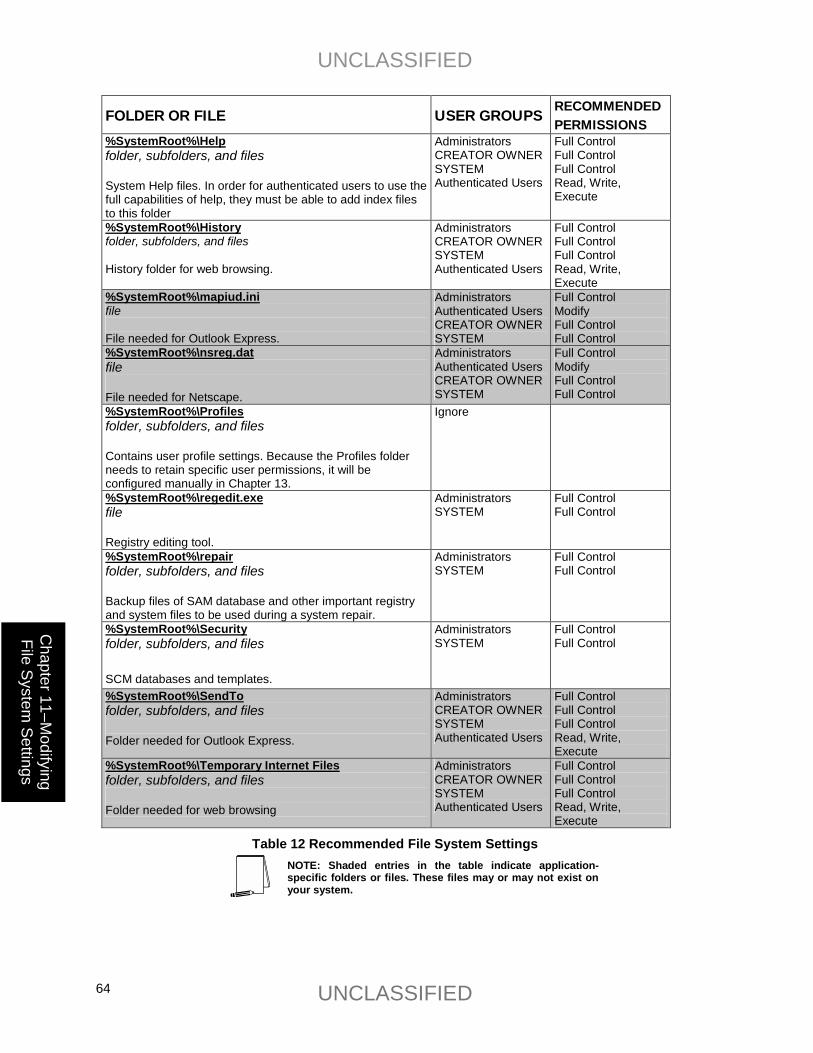
UNCLASSIFIED
UNCLASSIFIED 64
Chapter 11–M
odifying File System
Settings
FOLDER OR FILE USER GROUPS RECOMMENDED PERMISSIONS
%SystemRoot%\Help folder, subfolders, and files System Help files. In order for authenticated users to use the full capabilities of help, they must be able to add index files to this folder
Administrators CREATOR OWNER SYSTEM Authenticated Users
Full Control Full Control Full Control Read, Write, Execute
%SystemRoot%\History folder, subfolders, and files History folder for web browsing.
Administrators CREATOR OWNER SYSTEM Authenticated Users
Full Control Full Control Full Control Read, Write, Execute
%SystemRoot%\mapiud.ini file File needed for Outlook Express.
Administrators Authenticated Users CREATOR OWNER SYSTEM
Full Control Modify Full Control Full Control
%SystemRoot%\nsreg.dat file File needed for Netscape.
Administrators Authenticated Users CREATOR OWNER SYSTEM
Full Control Modify Full Control Full Control
%SystemRoot%\Profiles folder, subfolders, and files Contains user profile settings. Because the Profiles folder needs to retain specific user permissions, it will be configured manually in Chapter 13.
Ignore
%SystemRoot%\regedit.exe file Registry editing tool.
Administrators SYSTEM
Full Control Full Control
%SystemRoot%\repair folder, subfolders, and files Backup files of SAM database and other important registry and system files to be used during a system repair.
Administrators SYSTEM
Full Control Full Control
%SystemRoot%\Security folder, subfolders, and files SCM databases and templates.
Administrators SYSTEM
Full Control Full Control
%SystemRoot%\SendTo folder, subfolders, and files Folder needed for Outlook Express.
Administrators CREATOR OWNER SYSTEM Authenticated Users
Full Control Full Control Full Control Read, Write, Execute
%SystemRoot%\Temporary Internet Files folder, subfolders, and files Folder needed for web browsing
Administrators CREATOR OWNER SYSTEM Authenticated Users
Full Control Full Control Full Control Read, Write, Execute
Table 12 Recommended File System Settings NOTE: Shaded entries in the table indicate application-specific folders or files. These files may or may not exist on your system.

UNCLASSIFIED
UNCLASSIFIED 65
Cha
pter
11–
Mod
ifyin
g Fi
le S
yste
m S
ettin
gs
NOTE: After making any modifications to the configuration files make sure the changes are saved (See Chapter 4) and then test the changes before installing them on an operational network.
Special Consideration for Dr. Watson “user.dmp” File
By default, the Everyone group has Full Control of the Dr. Watson crash dump file (user.dmp). This file contains various program error details, including information on the computer and the user logged in at the time the error took place. If a user successfully gained access to this file, they could obtain confidential information such as username and password.
To prevent users from getting access to potentially sensitive information, select from one of the following options for protecting the crash dump file:
1) If information from the crash dump file is not required, delete the “drwtsn32.exe” entry from the HKLM\SOFTWARE\Microsoft\Windows NT\CurrentVersion\AeDebug registry key. This will cause Dr. Watson to be replaced with a simple “Application Error” box.
2) If information from the crash dump file is desired, create a directory that will be used to hold the crash dump files. Set the permissions for this directory as described in Table 13.
Group/User Name Permissions Administrators Full Control Authenticated Users Modify (This folder only) CREATOR OWNER Full Control SYSTEM Full Control
Table 13 Dr. Watson Crash Dump Directory
Run “drwtsn32.exe” and modify the crash dump location to the directory you just created. Also set the crash dump file name to %username%.dmp. For example, if you created a directory called DrWatson under the Winnt directory the entry would be “%windir%\DrWatson\%username%.dmp”. This will cause the Dr. Watson application to generate separate dump files for each user on the system and will prevent a user from accessing a dump file created by another user.
For additional information on this issue refer to the Security Focus Advisory (2001-03-23), “Microsoft Windows NT Dr Watson 'user.dmp' Permissions Vulnerability” at http://www.securityfocus.com/.
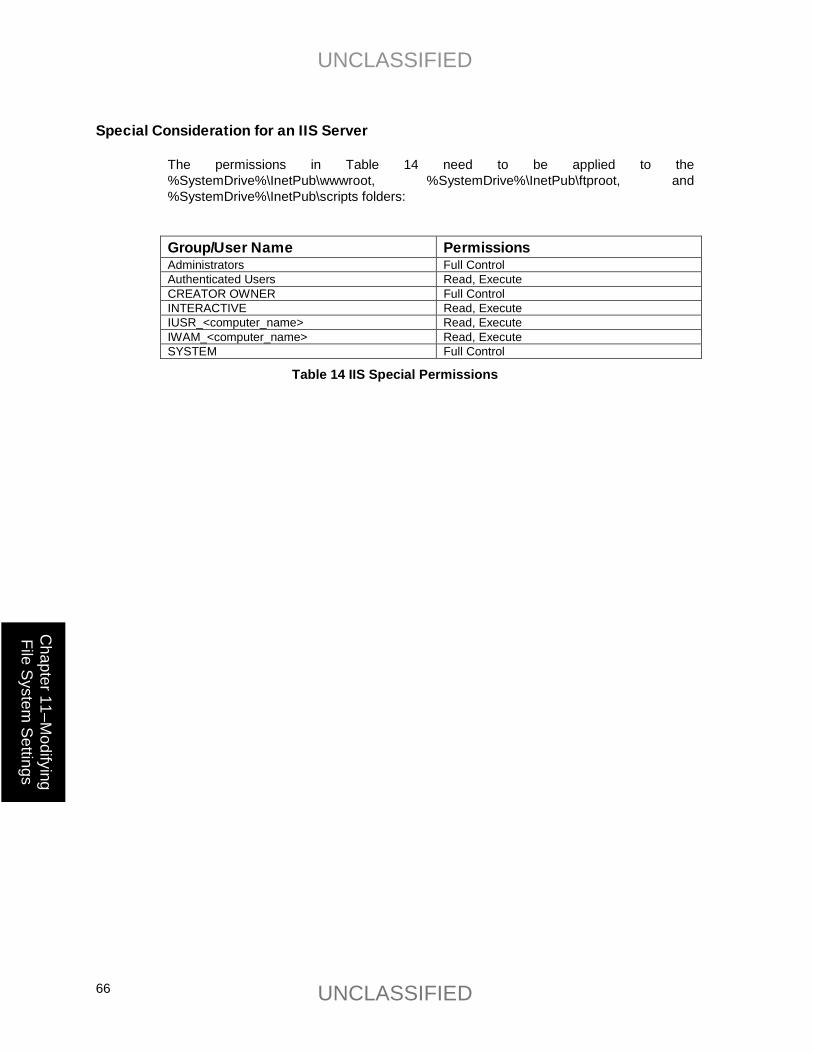
UNCLASSIFIED
UNCLASSIFIED 66
Chapter 11–M
odifying File System
Settings
Special Consideration for an IIS Server
The permissions in Table 14 need to be applied to the %SystemDrive%\InetPub\wwwroot, %SystemDrive%\InetPub\ftproot, and %SystemDrive%\InetPub\scripts folders:
Group/User Name Permissions Administrators Full Control Authenticated Users Read, Execute CREATOR OWNER Full Control INTERACTIVE Read, Execute IUSR_<computer_name> Read, Execute IWAM_<computer_name> Read, Execute SYSTEM Full Control
Table 14 IIS Special Permissions

UNCLASSIFIED
UNCLASSIFIED 67
Cha
pter
11–
Mod
ifyin
g Fi
le S
yste
m S
ettin
gs
This Page Intentionally Left Blank
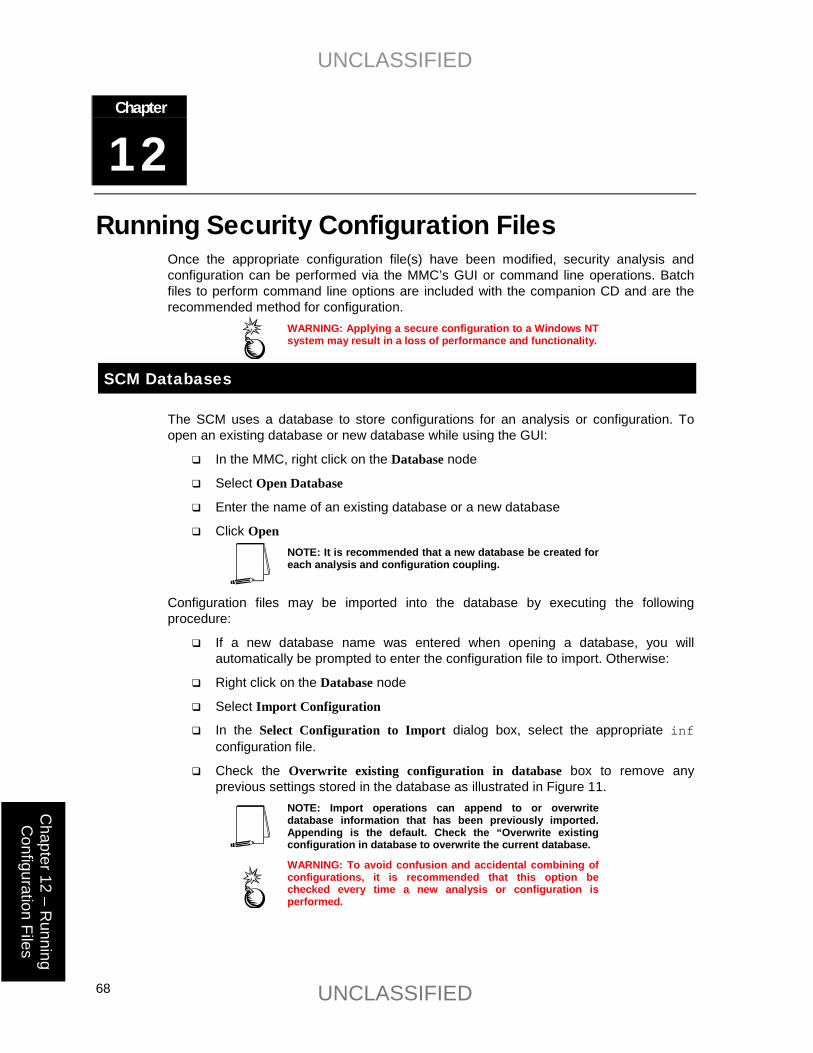
UNCLASSIFIED
UNCLASSIFIED 68
Chapter 12 – R
unning C
onfiguration Files
Chapter
12 Running Security Configuration Files
Once the appropriate configuration file(s) have been modified, security analysis and configuration can be performed via the MMC’s GUI or command line operations. Batch files to perform command line options are included with the companion CD and are the recommended method for configuration.
WARNING: Applying a secure configuration to a Windows NT system may result in a loss of performance and functionality.
SCM Databases
The SCM uses a database to store configurations for an analysis or configuration. To open an existing database or new database while using the GUI:
� In the MMC, right click on the Database node
� Select Open Database
� Enter the name of an existing database or a new database
� Click Open NOTE: It is recommended that a new database be created for each analysis and configuration coupling.
Configuration files may be imported into the database by executing the following procedure:
� If a new database name was entered when opening a database, you will automatically be prompted to enter the configuration file to import. Otherwise:
� Right click on the Database node
� Select Import Configuration
� In the Select Configuration to Import dialog box, select the appropriate inf configuration file.
� Check the Overwrite existing configuration in database box to remove any previous settings stored in the database as illustrated in Figure 11.
NOTE: Import operations can append to or overwrite database information that has been previously imported. Appending is the default. Check the “Overwrite existing configuration in database to overwrite the current database.
WARNING: To avoid confusion and accidental combining of configurations, it is recommended that this option be checked every time a new analysis or configuration is performed.

UNCLASSIFIED
UNCLASSIFIED 69
Cha
pter
12
– R
unni
ng
Con
figur
atio
n Fi
les
Figure 11 Configuration File Selection
� Click Open
SCM Command Line Options
The command line syntax for the SCM is:
secedit {/analyze | /configure} [/cfg filename] [/db filename][/log LogPath] [/verbose] [/quiet] [/overwrite] [/areas Areas]
Table 15 explains the parameter syntax for SCM options.
Parameter Description /analyze Performs an analysis /configure Performs a configuration /cfg filename Path to a configuration file that will be appended to the database prior to
performing the analysis /db filename Path to the database that SCE will perform the analysis against. If this
parameter is not specified, the last configuration/analysis database is used. If there is no previous database, %SystemRoot%\Security\Database\secedit.sdb is used.
NOTE: It is recommended that a new database be created for each analysis and configuration coupling.
/log LogPath Path to log file for the process. If not provided, progress information is output to the console.
NOTE: Log information is appended to the specified log file. You must specify a new file name if you want a new log file to be created.
/verbose Specify detailed progress information /quiet Suppress screen and log output
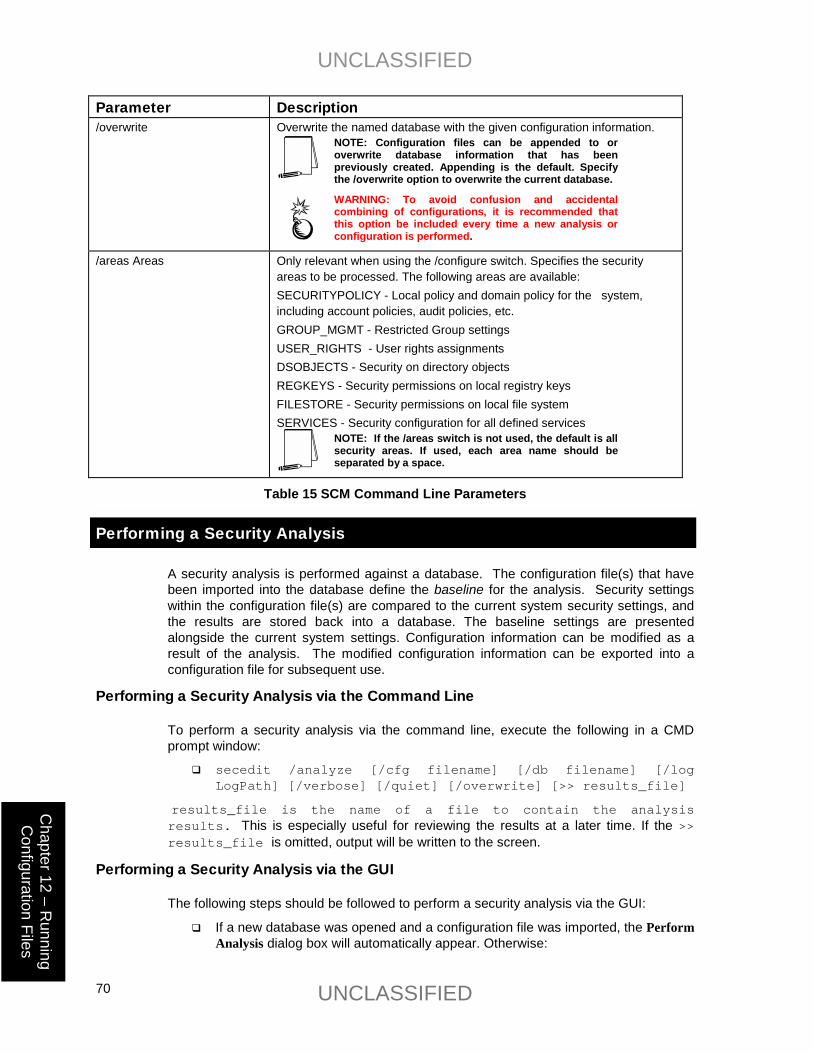
UNCLASSIFIED
UNCLASSIFIED 70
Chapter 12 – R
unning C
onfiguration Files
Parameter Description /overwrite Overwrite the named database with the given configuration information.
NOTE: Configuration files can be appended to or overwrite database information that has been previously created. Appending is the default. Specify the /overwrite option to overwrite the current database.
WARNING: To avoid confusion and accidental combining of configurations, it is recommended that this option be included every time a new analysis or configuration is performed.
/areas Areas Only relevant when using the /configure switch. Specifies the security areas to be processed. The following areas are available: SECURITYPOLICY - Local policy and domain policy for the system, including account policies, audit policies, etc. GROUP_MGMT - Restricted Group settings USER_RIGHTS - User rights assignments DSOBJECTS - Security on directory objects REGKEYS - Security permissions on local registry keys FILESTORE - Security permissions on local file system SERVICES - Security configuration for all defined services
NOTE: If the /areas switch is not used, the default is all security areas. If used, each area name should be separated by a space.
Table 15 SCM Command Line Parameters
Performing a Security Analysis
A security analysis is performed against a database. The configuration file(s) that have been imported into the database define the baseline for the analysis. Security settings within the configuration file(s) are compared to the current system security settings, and the results are stored back into a database. The baseline settings are presented alongside the current system settings. Configuration information can be modified as a result of the analysis. The modified configuration information can be exported into a configuration file for subsequent use.
Performing a Security Analysis via the Command Line
To perform a security analysis via the command line, execute the following in a CMD prompt window:
� secedit /analyze [/cfg filename] [/db filename] [/logLogPath] [/verbose] [/quiet] [/overwrite] [>> results_file]
results_file is the name of a file to contain the analysisresults. This is especially useful for reviewing the results at a later time. If the >>results_file is omitted, output will be written to the screen.
Performing a Security Analysis via the GUI
The following steps should be followed to perform a security analysis via the GUI:
� If a new database was opened and a configuration file was imported, the Perform Analysis dialog box will automatically appear. Otherwise:
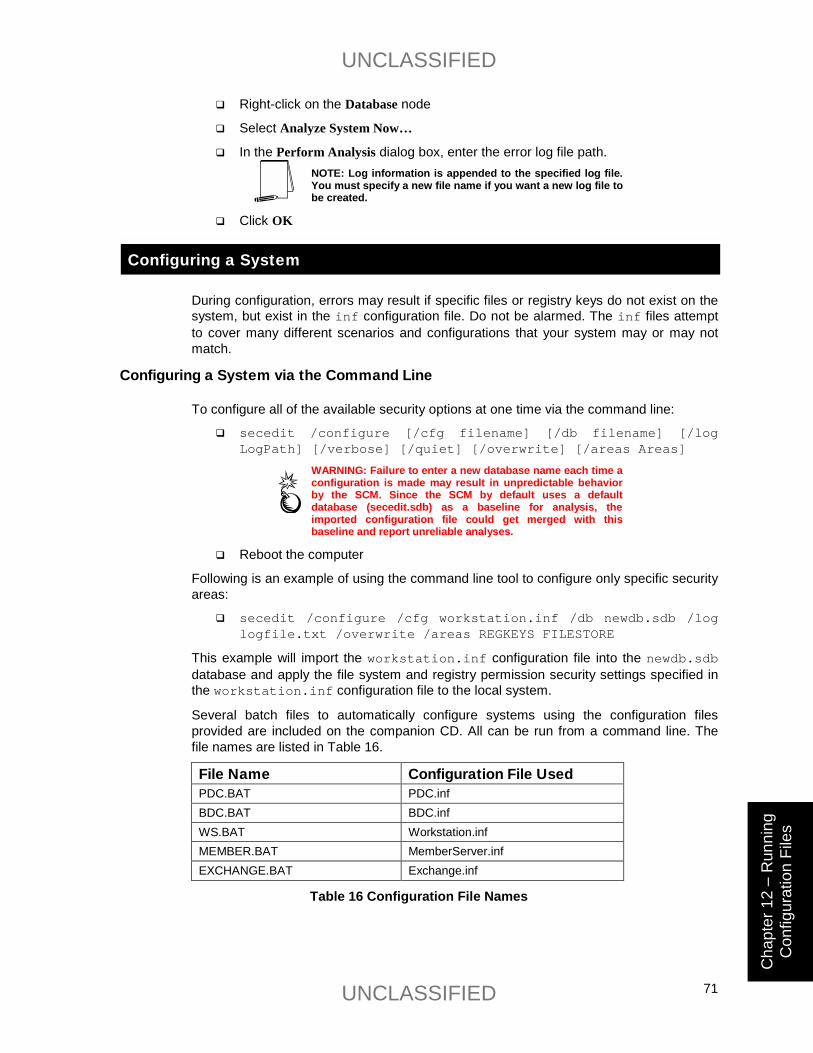
UNCLASSIFIED
UNCLASSIFIED 71
Cha
pter
12
– R
unni
ng
Con
figur
atio
n Fi
les
� Right-click on the Database node
� Select Analyze System Now…
� In the Perform Analysis dialog box, enter the error log file path. NOTE: Log information is appended to the specified log file. You must specify a new file name if you want a new log file to be created.
� Click OK
Configuring a System
During configuration, errors may result if specific files or registry keys do not exist on the system, but exist in the inf configuration file. Do not be alarmed. The inf files attempt to cover many different scenarios and configurations that your system may or may not match.
Configuring a System via the Command Line
To configure all of the available security options at one time via the command line:
� secedit /configure [/cfg filename] [/db filename] [/logLogPath] [/verbose] [/quiet] [/overwrite] [/areas Areas]
WARNING: Failure to enter a new database name each time a configuration is made may result in unpredictable behavior by the SCM. Since the SCM by default uses a default database (secedit.sdb) as a baseline for analysis, the imported configuration file could get merged with this baseline and report unreliable analyses.
� Reboot the computer
Following is an example of using the command line tool to configure only specific security areas:
� secedit /configure /cfg workstation.inf /db newdb.sdb /loglogfile.txt /overwrite /areas REGKEYS FILESTORE
This example will import the workstation.inf configuration file into the newdb.sdb database and apply the file system and registry permission security settings specified in the workstation.inf configuration file to the local system.
Several batch files to automatically configure systems using the configuration files provided are included on the companion CD. All can be run from a command line. The file names are listed in Table 16.
File Name Configuration File Used PDC.BAT PDC.inf BDC.BAT BDC.inf WS.BAT Workstation.inf MEMBER.BAT MemberServer.inf EXCHANGE.BAT Exchange.inf
Table 16 Configuration File Names
UNCLASSIFIED
UNCLASSIFIED 72
Chapter 12 – R
unning C
onfiguration Files
Configuring a System via the GUI
The following steps should be followed to configure a system using the SCM:
� Right-click on the Database node
� Select Configure Now….
� In the Configure System dialog box, enter the error log file path. NOTE: Log information is appended to the specified log file. You must specify a new file name if you want a new log file to be created.
� Click OK
� Reboot the computer.

UNCLASSIFIED
UNCLASSIFIED 73
Cha
pter
12
– R
unni
ng
Con
figur
atio
n Fi
les
This Page Intentionally Left Blank
UNCLASSIFIED
UNCLASSIFIED 74
Chapter 13 – M
anual Settings
Chapter
13 Manual Settings
There are many settings that must be done manually to secure a Windows NT system. These settings are listed and described in the following sections.
System Boot Time
System boot time is the time delay presented to the user during boot up. A boot time greater than 0 allows a user to boot into a different operating system configuration than is allowed.
Modify the system boot time by performing the following actions:
� Select Start →→→→ Settings →→→→ Control Panel
� Double-click System
� Select the Startup/Shutdown tab
� Enter 0 in the Show List for text field
Manual Registry Changes
In addition to the registry permissions set with the SCM in Chapter 5, there are several other recommended registry modifications to ensure greater system security.
WARNING: Incorrect registry modifications can severely impair or disable a Windows NT system. Currently, there is no Undo command for deletions within the registry. The registry editors prompt for confirmation of deletions if Confirm On Delete is selected from the Options menu. When deleting a key, the message does not include the name of the key being deleted. Therefore, check the selection carefully before proceeding.
Running the Registry Editor
Windows NT comes with two registry editors, Regedit.exe and Regedt32.exe.
Regedit.exe is based on the Windows 95 registry editor and does not have facilities for modifying permissions. Therefore, the Windows NT registry editor, Regedt32.exe, should always be used to make changes in the Windows NT registry.
To start the Windows NT registry editor:
� Log on as an administrator � Select Start → Run � Type Regedt32.exe in the Open dialog box � In the registry editor, go to the Options menu � Verify that Confirm on Delete is checked
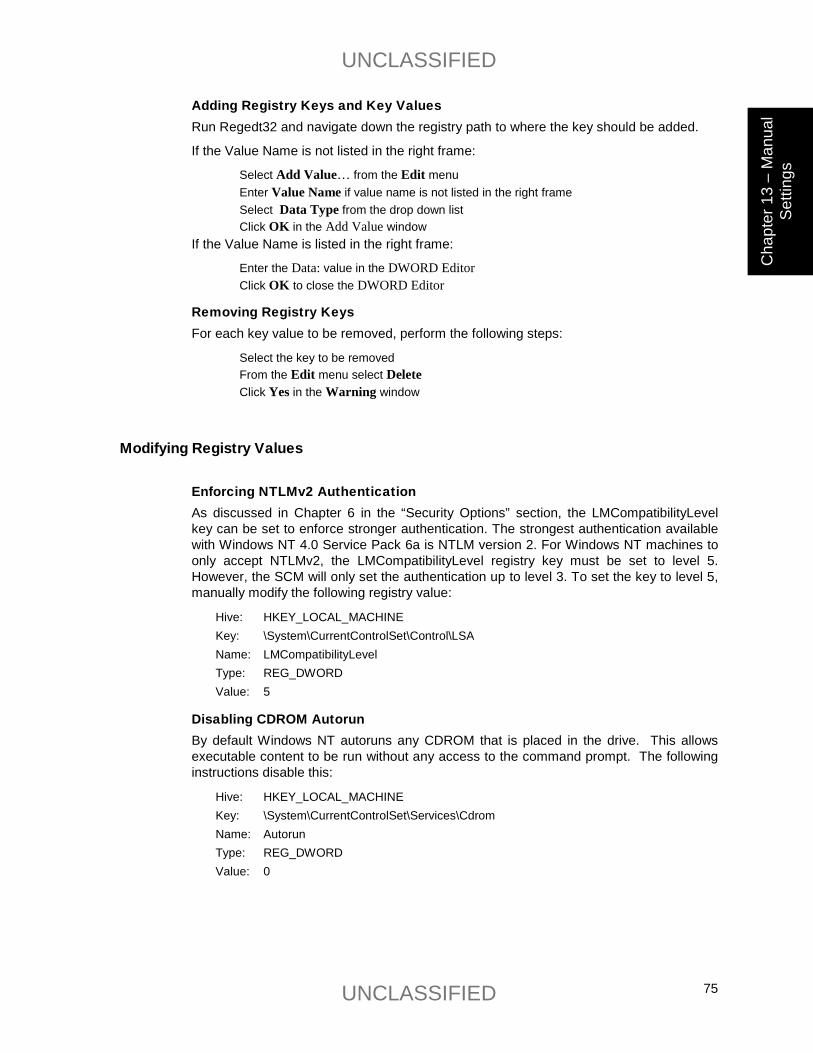
UNCLASSIFIED
UNCLASSIFIED 75
Cha
pter
13
– M
anua
l Se
tting
s
Adding Registry Keys and Key Values Run Regedt32 and navigate down the registry path to where the key should be added.
If the Value Name is not listed in the right frame:
� Select Add Value… from the Edit menu � Enter Value Name if value name is not listed in the right frame � Select Data Type from the drop down list � Click OK in the Add Value window
If the Value Name is listed in the right frame:
� Enter the Data: value in the DWORD Editor � Click OK to close the DWORD Editor
Removing Registry Keys For each key value to be removed, perform the following steps:
� Select the key to be removed � From the Edit menu select Delete � Click Yes in the Warning window
Modifying Registry Values
Enforcing NTLMv2 Authentication As discussed in Chapter 6 in the “Security Options” section, the LMCompatibilityLevel key can be set to enforce stronger authentication. The strongest authentication available with Windows NT 4.0 Service Pack 6a is NTLM version 2. For Windows NT machines to only accept NTLMv2, the LMCompatibilityLevel registry key must be set to level 5. However, the SCM will only set the authentication up to level 3. To set the key to level 5, manually modify the following registry value:
Hive: HKEY_LOCAL_MACHINE Key: \System\CurrentControlSet\Control\LSA Name: LMCompatibilityLevel Type: REG_DWORD Value: 5
Disabling CDROM Autorun By default Windows NT autoruns any CDROM that is placed in the drive. This allows executable content to be run without any access to the command prompt. The following instructions disable this:
Hive: HKEY_LOCAL_MACHINE Key: \System\CurrentControlSet\Services\Cdrom Name: Autorun Type: REG_DWORD Value: 0
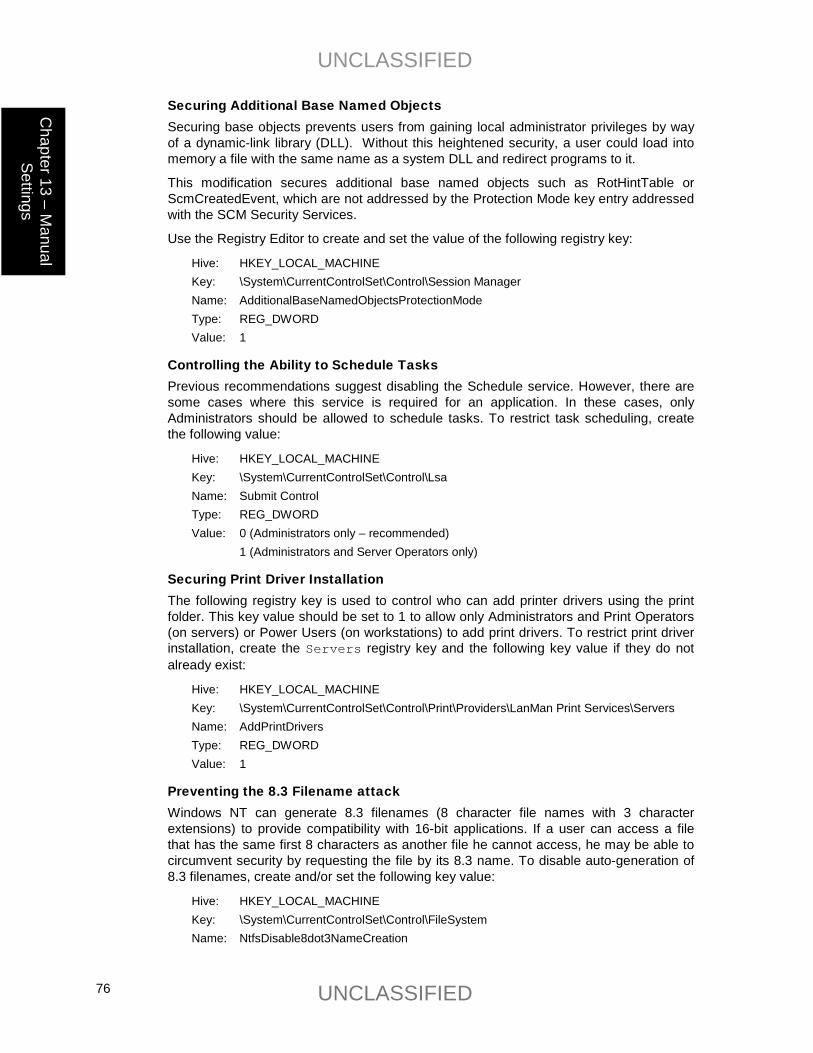
UNCLASSIFIED
UNCLASSIFIED 76
Chapter 13 – M
anual Settings
Securing Additional Base Named Objects Securing base objects prevents users from gaining local administrator privileges by way of a dynamic-link library (DLL). Without this heightened security, a user could load into memory a file with the same name as a system DLL and redirect programs to it.
This modification secures additional base named objects such as RotHintTable or ScmCreatedEvent, which are not addressed by the Protection Mode key entry addressed with the SCM Security Services.
Use the Registry Editor to create and set the value of the following registry key:
Hive: HKEY_LOCAL_MACHINE Key: \System\CurrentControlSet\Control\Session Manager Name: AdditionalBaseNamedObjectsProtectionMode Type: REG_DWORD Value: 1
Controlling the Ability to Schedule Tasks Previous recommendations suggest disabling the Schedule service. However, there are some cases where this service is required for an application. In these cases, only Administrators should be allowed to schedule tasks. To restrict task scheduling, create the following value:
Hive: HKEY_LOCAL_MACHINE Key: \System\CurrentControlSet\Control\Lsa Name: Submit Control Type: REG_DWORD Value: 0 (Administrators only – recommended) 1 (Administrators and Server Operators only)
Securing Print Driver Installation The following registry key is used to control who can add printer drivers using the print folder. This key value should be set to 1 to allow only Administrators and Print Operators (on servers) or Power Users (on workstations) to add print drivers. To restrict print driver installation, create the Servers registry key and the following key value if they do not already exist:
Hive: HKEY_LOCAL_MACHINE Key: \System\CurrentControlSet\Control\Print\Providers\LanMan Print Services\Servers Name: AddPrintDrivers Type: REG_DWORD Value: 1
Preventing the 8.3 Filename attack Windows NT can generate 8.3 filenames (8 character file names with 3 character extensions) to provide compatibility with 16-bit applications. If a user can access a file that has the same first 8 characters as another file he cannot access, he may be able to circumvent security by requesting the file by its 8.3 name. To disable auto-generation of 8.3 filenames, create and/or set the following key value:
Hive: HKEY_LOCAL_MACHINE Key: \System\CurrentControlSet\Control\FileSystem Name: NtfsDisable8dot3NameCreation
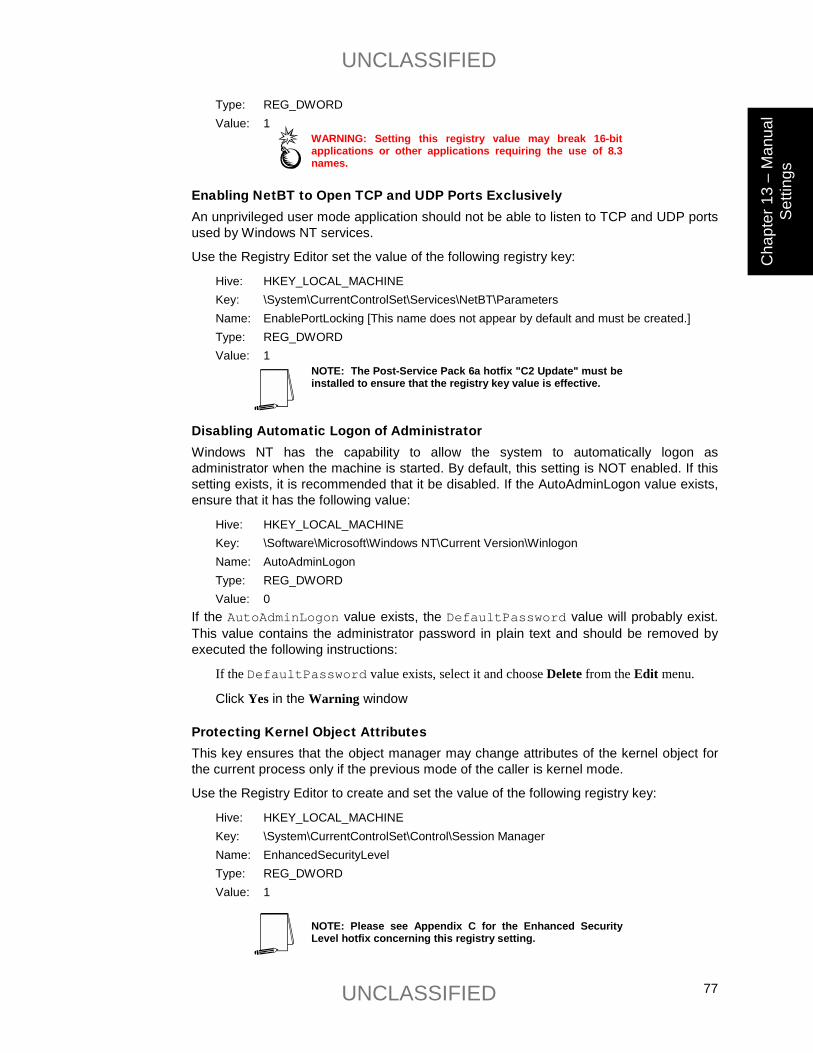
UNCLASSIFIED
UNCLASSIFIED 77
Cha
pter
13
– M
anua
l Se
tting
s
Type: REG_DWORD Value: 1
WARNING: Setting this registry value may break 16-bit applications or other applications requiring the use of 8.3 names.
Enabling NetBT to Open TCP and UDP Ports Exclusively An unprivileged user mode application should not be able to listen to TCP and UDP ports used by Windows NT services.
Use the Registry Editor set the value of the following registry key:
Hive: HKEY_LOCAL_MACHINE Key: \System\CurrentControlSet\Services\NetBT\Parameters Name: EnablePortLocking [This name does not appear by default and must be created.] Type: REG_DWORD Value: 1
NOTE: The Post-Service Pack 6a hotfix "C2 Update" must be installed to ensure that the registry key value is effective.
Disabling Automatic Logon of Administrator Windows NT has the capability to allow the system to automatically logon as administrator when the machine is started. By default, this setting is NOT enabled. If this setting exists, it is recommended that it be disabled. If the AutoAdminLogon value exists, ensure that it has the following value:
Hive: HKEY_LOCAL_MACHINE Key: \Software\Microsoft\Windows NT\Current Version\Winlogon Name: AutoAdminLogon Type: REG_DWORD Value: 0
If the AutoAdminLogon value exists, the DefaultPassword value will probably exist. This value contains the administrator password in plain text and should be removed by executed the following instructions:
� If the DefaultPassword value exists, select it and choose Delete from the Edit menu.
� Click Yes in the Warning window
Protecting Kernel Object Attributes This key ensures that the object manager may change attributes of the kernel object for the current process only if the previous mode of the caller is kernel mode.
Use the Registry Editor to create and set the value of the following registry key:
Hive: HKEY_LOCAL_MACHINE Key: \System\CurrentControlSet\Control\Session Manager Name: EnhancedSecurityLevel Type: REG_DWORD Value: 1
NOTE: Please see Appendix C for the Enhanced Security Level hotfix concerning this registry setting.
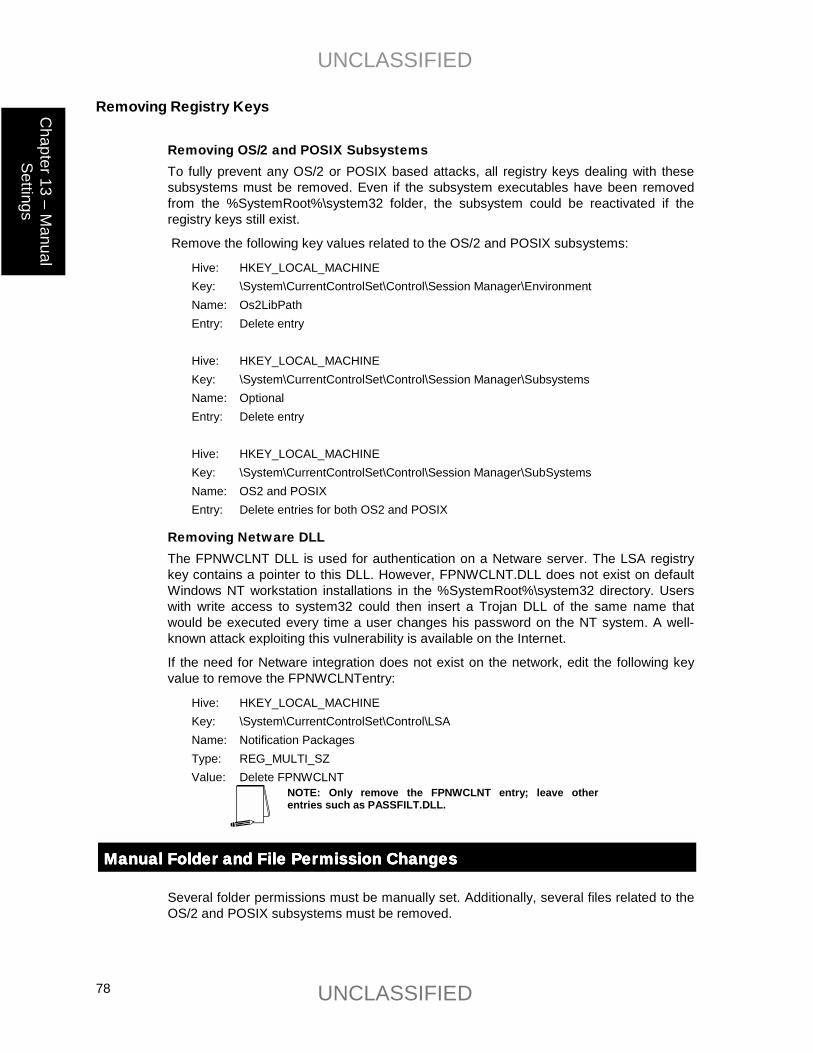
UNCLASSIFIED
UNCLASSIFIED 78
Chapter 13 – M
anual Settings
Removing Registry Keys
Removing OS/2 and POSIX Subsystems To fully prevent any OS/2 or POSIX based attacks, all registry keys dealing with these subsystems must be removed. Even if the subsystem executables have been removed from the %SystemRoot%\system32 folder, the subsystem could be reactivated if the registry keys still exist.
Remove the following key values related to the OS/2 and POSIX subsystems:
Hive: HKEY_LOCAL_MACHINE Key: \System\CurrentControlSet\Control\Session Manager\Environment Name: Os2LibPath Entry: Delete entry Hive: HKEY_LOCAL_MACHINE Key: \System\CurrentControlSet\Control\Session Manager\Subsystems Name: Optional Entry: Delete entry Hive: HKEY_LOCAL_MACHINE Key: \System\CurrentControlSet\Control\Session Manager\SubSystems Name: OS2 and POSIX Entry: Delete entries for both OS2 and POSIX
Removing Netware DLL The FPNWCLNT DLL is used for authentication on a Netware server. The LSA registry key contains a pointer to this DLL. However, FPNWCLNT.DLL does not exist on default Windows NT workstation installations in the %SystemRoot%\system32 directory. Users with write access to system32 could then insert a Trojan DLL of the same name that would be executed every time a user changes his password on the NT system. A well-known attack exploiting this vulnerability is available on the Internet.
If the need for Netware integration does not exist on the network, edit the following key value to remove the FPNWCLNTentry:
Hive: HKEY_LOCAL_MACHINE Key: \System\CurrentControlSet\Control\LSA Name: Notification Packages Type: REG_MULTI_SZ Value: Delete FPNWCLNT
NOTE: Only remove the FPNWCLNT entry; leave other entries such as PASSFILT.DLL.
ManuManuManuManual Folder and File Permission Changesal Folder and File Permission Changesal Folder and File Permission Changesal Folder and File Permission Changes
Several folder permissions must be manually set. Additionally, several files related to the OS/2 and POSIX subsystems must be removed.
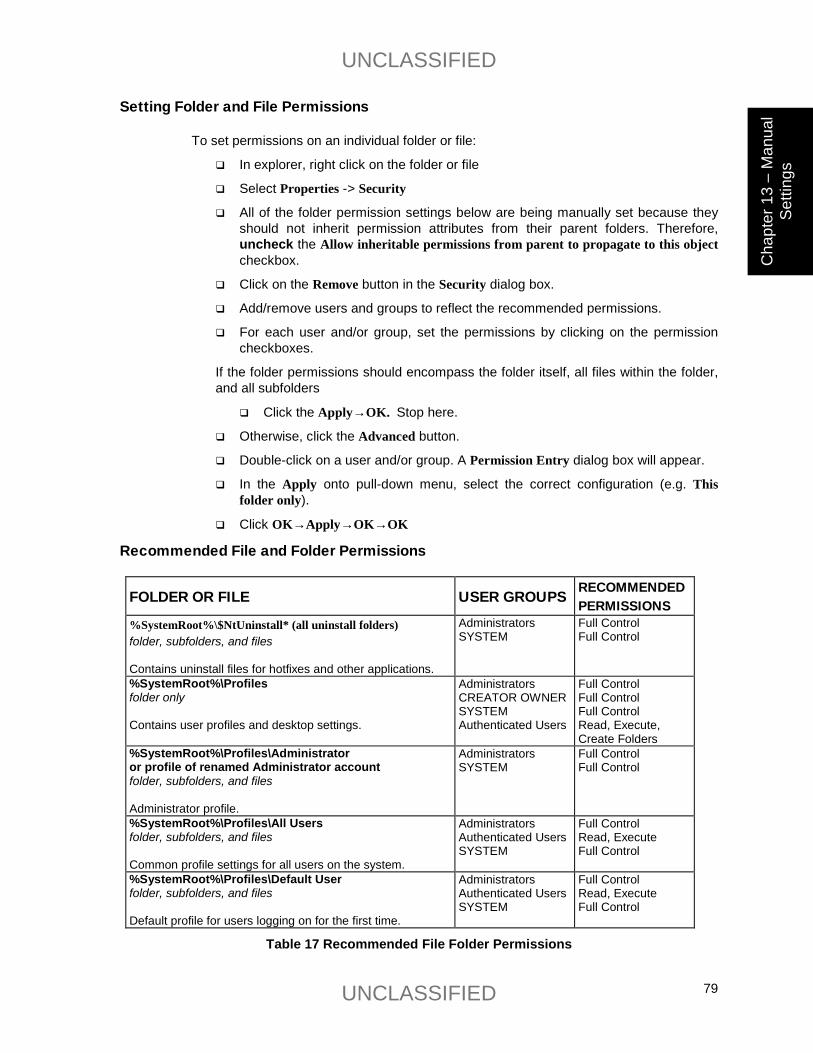
UNCLASSIFIED
UNCLASSIFIED 79
Cha
pter
13
– M
anua
l Se
tting
s
Setting Folder and File Permissions
To set permissions on an individual folder or file:
� In explorer, right click on the folder or file
� Select Properties -> Security
� All of the folder permission settings below are being manually set because they should not inherit permission attributes from their parent folders. Therefore, uncheck the Allow inheritable permissions from parent to propagate to this object checkbox.
� Click on the Remove button in the Security dialog box.
� Add/remove users and groups to reflect the recommended permissions.
� For each user and/or group, set the permissions by clicking on the permission checkboxes.
If the folder permissions should encompass the folder itself, all files within the folder, and all subfolders
� Click the Apply→OK. Stop here.
� Otherwise, click the Advanced button.
� Double-click on a user and/or group. A Permission Entry dialog box will appear.
� In the Apply onto pull-down menu, select the correct configuration (e.g. This folder only).
� Click OK→Apply→OK→OK
Recommended File and Folder Permissions
FOLDER OR FILE USER GROUPS RECOMMENDED PERMISSIONS
%SystemRoot%\$NtUninstall* (all uninstall folders) folder, subfolders, and files Contains uninstall files for hotfixes and other applications.
Administrators SYSTEM
Full Control Full Control
%SystemRoot%\Profiles folder only Contains user profiles and desktop settings.
Administrators CREATOR OWNER SYSTEM Authenticated Users
Full Control Full Control Full Control Read, Execute, Create Folders
%SystemRoot%\Profiles\Administrator or profile of renamed Administrator account folder, subfolders, and files Administrator profile.
Administrators SYSTEM
Full Control Full Control
%SystemRoot%\Profiles\All Users folder, subfolders, and files Common profile settings for all users on the system.
Administrators Authenticated Users SYSTEM
Full Control Read, Execute Full Control
%SystemRoot%\Profiles\Default User folder, subfolders, and files Default profile for users logging on for the first time.
Administrators Authenticated Users SYSTEM
Full Control Read, Execute Full Control
Table 17 Recommended File Folder Permissions
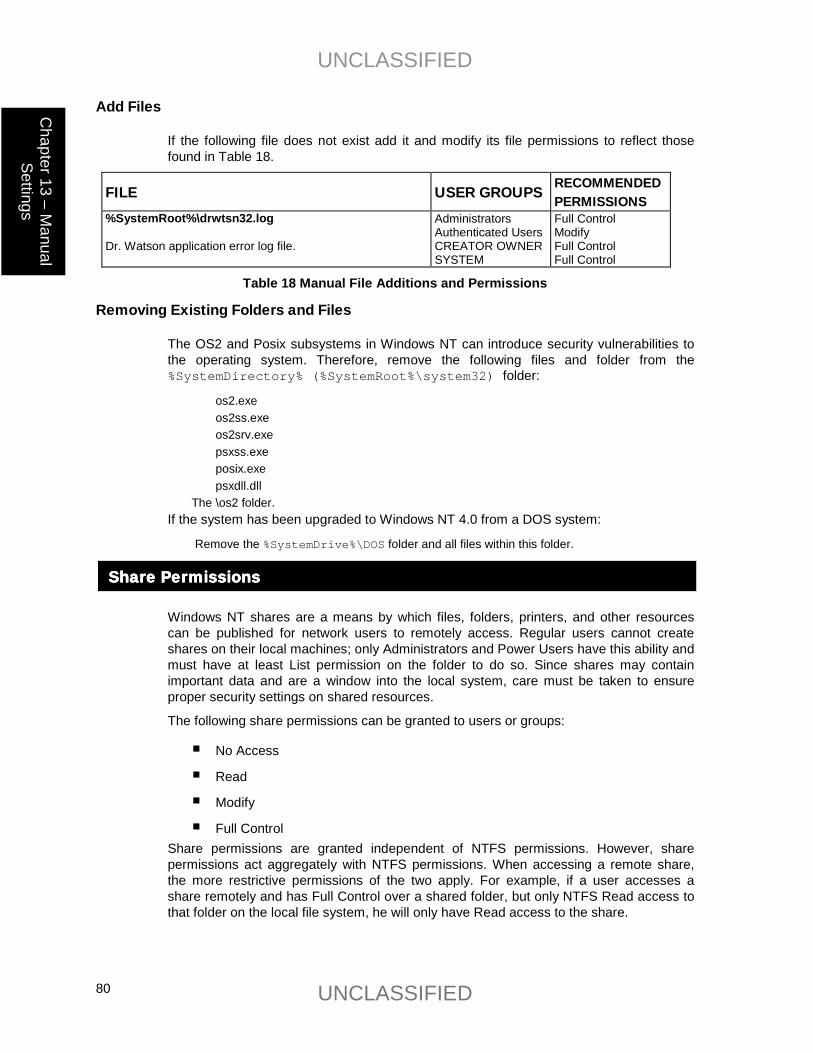
UNCLASSIFIED
UNCLASSIFIED 80
Chapter 13 – M
anual Settings
Add Files
If the following file does not exist add it and modify its file permissions to reflect those found in Table 18.
FILE USER GROUPS RECOMMENDED PERMISSIONS
%SystemRoot%\drwtsn32.log Dr. Watson application error log file.
Administrators Authenticated Users CREATOR OWNER SYSTEM
Full Control Modify Full Control Full Control
Table 18 Manual File Additions and Permissions
Removing Existing Folders and Files
The OS2 and Posix subsystems in Windows NT can introduce security vulnerabilities to the operating system. Therefore, remove the following files and folder from the %SystemDirectory% (%SystemRoot%\system32) folder:
� os2.exe � os2ss.exe � os2srv.exe � psxss.exe � posix.exe � psxdll.dll
� The \os2 folder. If the system has been upgraded to Windows NT 4.0 from a DOS system:
� Remove the %SystemDrive%\DOS folder and all files within this folder.
Share PermissionsShare PermissionsShare PermissionsShare Permissions
Windows NT shares are a means by which files, folders, printers, and other resources can be published for network users to remotely access. Regular users cannot create shares on their local machines; only Administrators and Power Users have this ability and must have at least List permission on the folder to do so. Since shares may contain important data and are a window into the local system, care must be taken to ensure proper security settings on shared resources.
The following share permissions can be granted to users or groups:
� No Access
� Read
� Modify
� Full Control Share permissions are granted independent of NTFS permissions. However, share permissions act aggregately with NTFS permissions. When accessing a remote share, the more restrictive permissions of the two apply. For example, if a user accesses a share remotely and has Full Control over a shared folder, but only NTFS Read access to that folder on the local file system, he will only have Read access to the share.
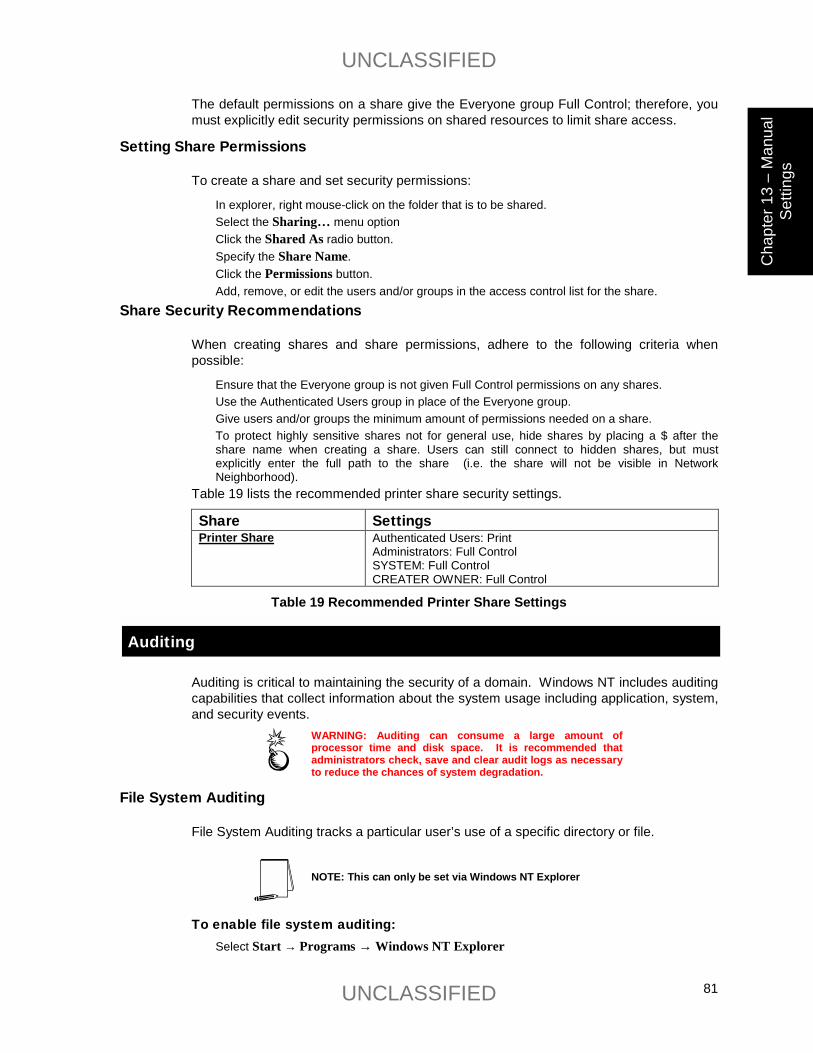
UNCLASSIFIED
UNCLASSIFIED 81
Cha
pter
13
– M
anua
l Se
tting
s
The default permissions on a share give the Everyone group Full Control; therefore, you must explicitly edit security permissions on shared resources to limit share access.
Setting Share Permissions
To create a share and set security permissions:
� In explorer, right mouse-click on the folder that is to be shared. � Select the Sharing… menu option � Click the Shared As radio button. � Specify the Share Name. � Click the Permissions button. � Add, remove, or edit the users and/or groups in the access control list for the share.
Share Security Recommendations
When creating shares and share permissions, adhere to the following criteria when possible:
� Ensure that the Everyone group is not given Full Control permissions on any shares. � Use the Authenticated Users group in place of the Everyone group. � Give users and/or groups the minimum amount of permissions needed on a share. � To protect highly sensitive shares not for general use, hide shares by placing a $ after the
share name when creating a share. Users can still connect to hidden shares, but must explicitly enter the full path to the share (i.e. the share will not be visible in Network Neighborhood).
Table 19 lists the recommended printer share security settings.
Share Settings Printer Share Authenticated Users: Print
Administrators: Full Control SYSTEM: Full Control CREATER OWNER: Full Control
Table 19 Recommended Printer Share Settings
Auditing
Auditing is critical to maintaining the security of a domain. Windows NT includes auditing capabilities that collect information about the system usage including application, system, and security events.
WARNING: Auditing can consume a large amount of processor time and disk space. It is recommended that administrators check, save and clear audit logs as necessary to reduce the chances of system degradation.
File System Auditing
File System Auditing tracks a particular user’s use of a specific directory or file.
NOTE: This can only be set via Windows NT Explorer
To enable file system auditing: � Select Start → Programs → Windows NT Explorer
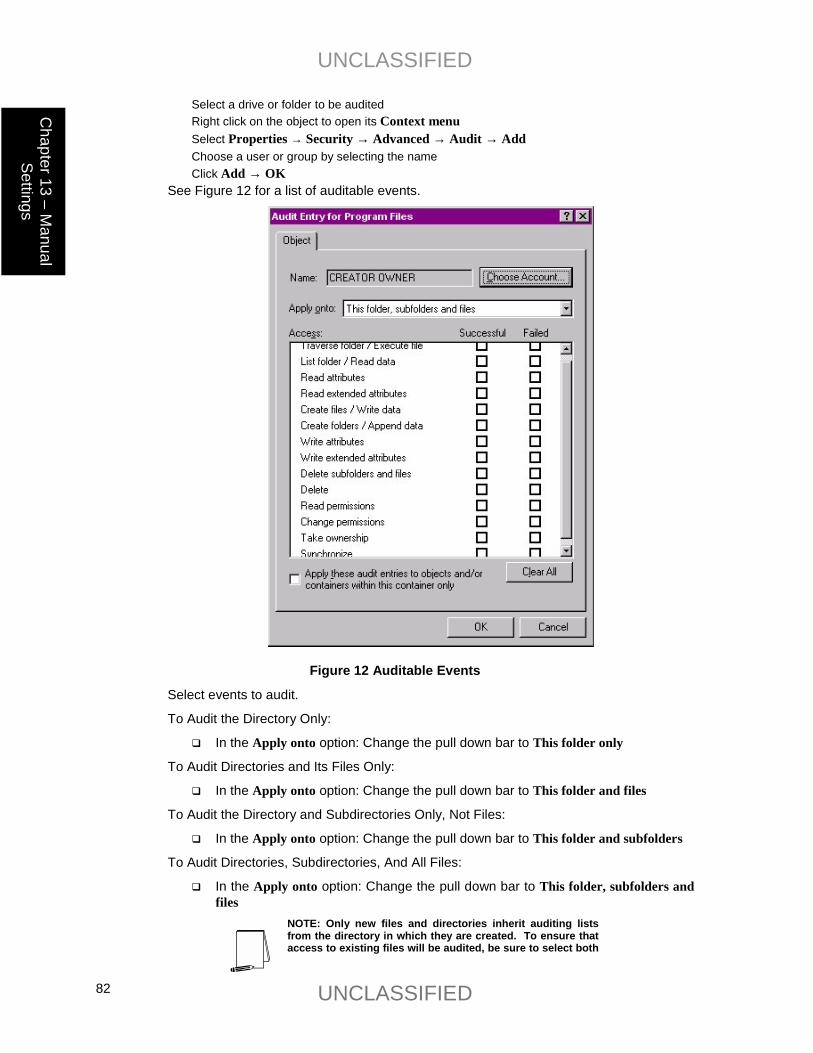
UNCLASSIFIED
UNCLASSIFIED 82
Chapter 13 – M
anual Settings
� Select a drive or folder to be audited � Right click on the object to open its Context menu � Select Properties → Security → Advanced → Audit → Add � Choose a user or group by selecting the name � Click Add → OK See Figure 12 for a list of auditable events.
Figure 12 Auditable Events
Select events to audit.
To Audit the Directory Only:
� In the Apply onto option: Change the pull down bar to This folder only
To Audit Directories and Its Files Only:
� In the Apply onto option: Change the pull down bar to This folder and files
To Audit the Directory and Subdirectories Only, Not Files:
� In the Apply onto option: Change the pull down bar to This folder and subfolders
To Audit Directories, Subdirectories, And All Files:
� In the Apply onto option: Change the pull down bar to This folder, subfolders and files
NOTE: Only new files and directories inherit auditing lists from the directory in which they are created. To ensure that access to existing files will be audited, be sure to select both
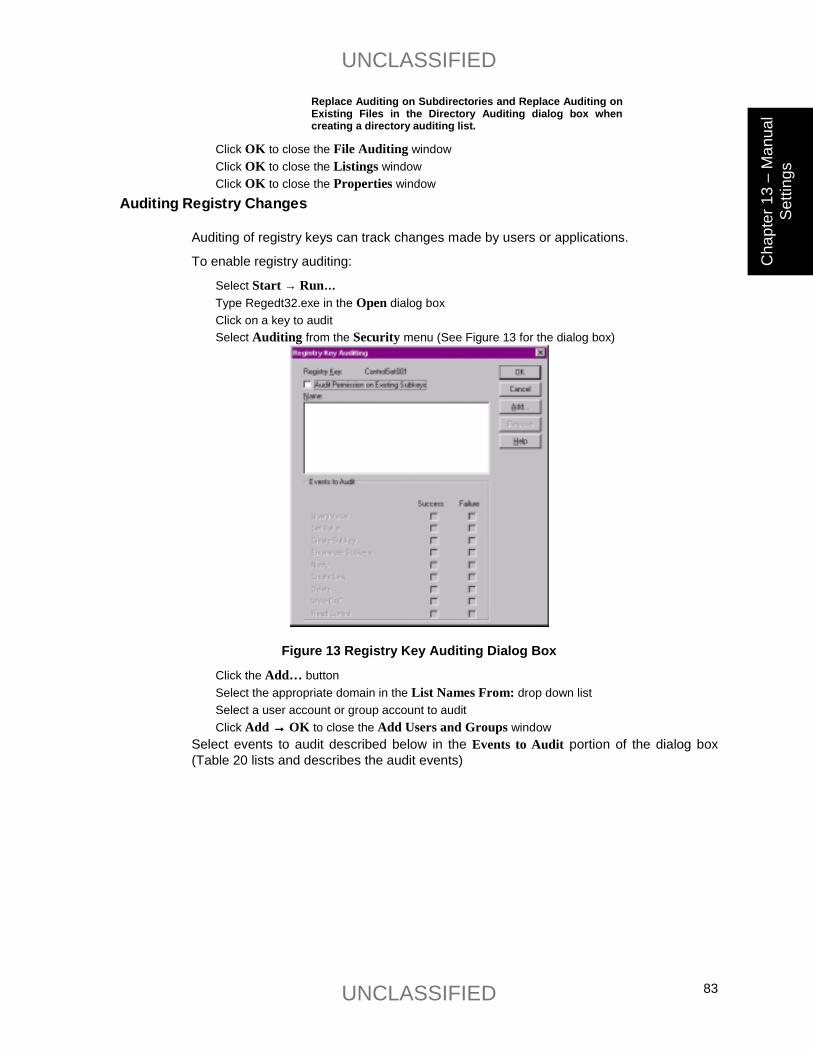
UNCLASSIFIED
UNCLASSIFIED 83
Cha
pter
13
– M
anua
l Se
tting
s
Replace Auditing on Subdirectories and Replace Auditing on Existing Files in the Directory Auditing dialog box when creating a directory auditing list.
� Click OK to close the File Auditing window � Click OK to close the Listings window � Click OK to close the Properties window
Auditing Registry Changes
Auditing of registry keys can track changes made by users or applications.
To enable registry auditing:
� Select Start → Run…� Type Regedt32.exe in the Open dialog box � Click on a key to audit � Select Auditing from the Security menu (See Figure 13 for the dialog box)
Figure 13 Registry Key Auditing Dialog Box
� Click the Add… button � Select the appropriate domain in the List Names From: drop down list � Select a user account or group account to audit � Click Add →→→→ OK to close the Add Users and Groups window Select events to audit described below in the Events to Audit portion of the dialog box (Table 20 lists and describes the audit events)
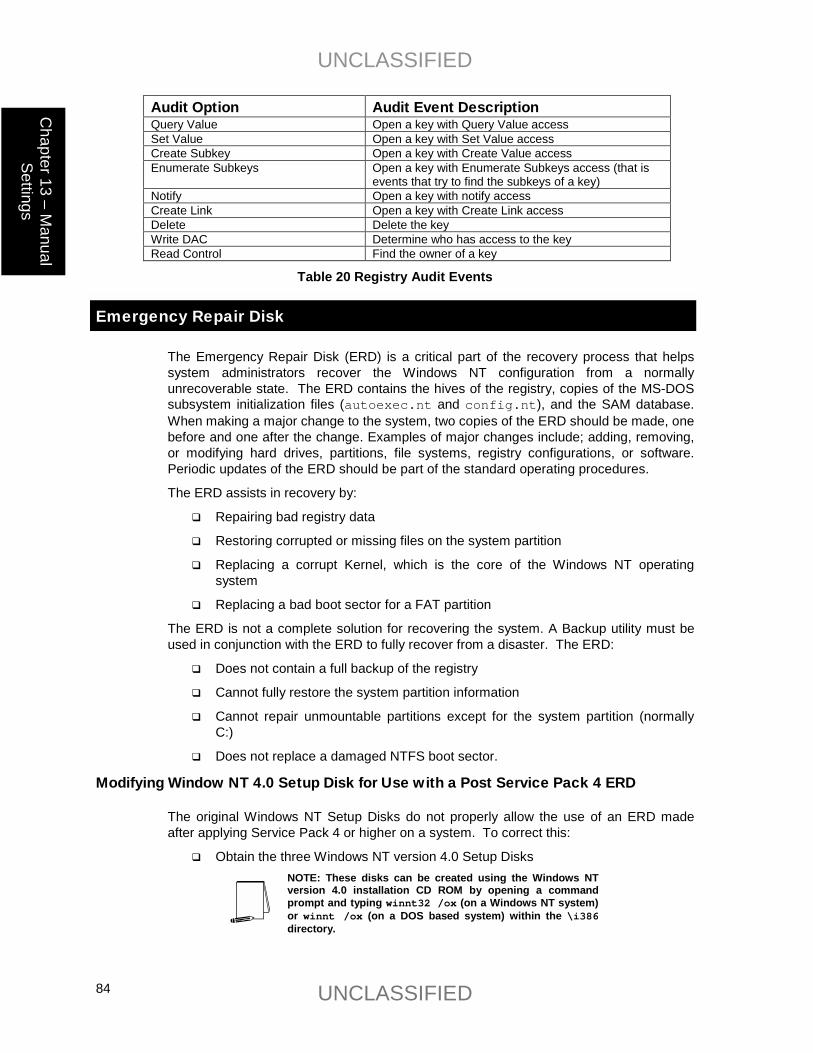
UNCLASSIFIED
UNCLASSIFIED 84
Chapter 13 – M
anual Settings
Audit Option Audit Event Description Query Value Open a key with Query Value access Set Value Open a key with Set Value access Create Subkey Open a key with Create Value access Enumerate Subkeys Open a key with Enumerate Subkeys access (that is
events that try to find the subkeys of a key) Notify Open a key with notify access Create Link Open a key with Create Link access Delete Delete the key Write DAC Determine who has access to the key Read Control Find the owner of a key
Table 20 Registry Audit Events
Emergency Repair Disk The Emergency Repair Disk (ERD) is a critical part of the recovery process that helps system administrators recover the Windows NT configuration from a normally unrecoverable state. The ERD contains the hives of the registry, copies of the MS-DOS subsystem initialization files (autoexec.nt and config.nt), and the SAM database. When making a major change to the system, two copies of the ERD should be made, one before and one after the change. Examples of major changes include; adding, removing, or modifying hard drives, partitions, file systems, registry configurations, or software. Periodic updates of the ERD should be part of the standard operating procedures.
The ERD assists in recovery by:
� Repairing bad registry data
� Restoring corrupted or missing files on the system partition
� Replacing a corrupt Kernel, which is the core of the Windows NT operating system
� Replacing a bad boot sector for a FAT partition
The ERD is not a complete solution for recovering the system. A Backup utility must be used in conjunction with the ERD to fully recover from a disaster. The ERD:
� Does not contain a full backup of the registry
� Cannot fully restore the system partition information
� Cannot repair unmountable partitions except for the system partition (normally C:)
� Does not replace a damaged NTFS boot sector.
Modifying Window NT 4.0 Setup Disk for Use with a Post Service Pack 4 ERD
The original Windows NT Setup Disks do not properly allow the use of an ERD made after applying Service Pack 4 or higher on a system. To correct this:
� Obtain the three Windows NT version 4.0 Setup Disks NOTE: These disks can be created using the Windows NT version 4.0 installation CD ROM by opening a command prompt and typing winnt32 /ox (on a Windows NT system) or winnt /ox (on a DOS based system) within the \i386 directory.
UNCLASSIFIED
UNCLASSIFIED 85
Cha
pter
13
– M
anua
l Se
tting
s
� Copy Setupdd.sys from Service Pack 4 or higher service pack to the Windows NT version 4.0 Setup Disk 2
WARNING: This file must be copied for successful recovery using an ERD. For more information see Microsoft Knowledge Base article Q168015.
Creating an Emergency Repair Disk
A blank diskette is required when creating an ERD (Rdisk.exe, always formats the floppy disk). To create the ERD:
� Insert a 3.5 inch, 1.44 MB floppy disk into the A: drive
� Select Start → Run…
� Type rdisk /s in the Open dialog box NOTE: The /s option saves all of the current configuration settings including user accounts and file permissions. The saved repair info is saved in the \%SystemRoot%\repair directory.
� Click OK to continue
� Click Yes
� Click OK in the following Setup window
� After the ERD has successfully been created, the following screen will appear
� Click OK
� Store the disk in a safe and secure place
Recovering the System Using an Emergency Repair Disk
The recovery process uses both the ERD and the original files from the Window NT installation CD ROM. Consequently, Service Pack 6a and all the previously installed hot fixes must be reinstalled after recovering with the ERD. For further information on using the ERD, see the Microsoft Knowledge Base "Repairing Windows NT After the Application of Service Pack 3" at http://support.microsoft.com//support/kb/articles/Q146/8/87.ASP.
NOTE: To use the Emergency Repair Disk utility, you must have the updated version of Setupdd.sys. The updated version is contained in SP4 and higher service packs. To update your version of Setupdd.sys, copy Setupdd.sys from the Service Pack to your Windows NT 4.0 Setup Disk 2 from the original product media. This will replace the older version of Setupdd.sys with the updated version. For more information, consult the Knowledge Base at http://support.microsoft.com/support/ and search for KB article Q158423.
� Insert the Windows NT Setup Disk 1 into the A: floppy drive
� Reboot system
� Press R To repair a damaged Windows NT version 4.0 installation
� Ensure all tasks are marked with an X
� Press Enter to continue (perform selected tasks)
� Specify all mass storage devices in the system
UNCLASSIFIED
UNCLASSIFIED 86
Chapter 13 – M
anual Settings
� Press Enter to continue
� Press Enter to confirm that the ERD is available
� Place the ERD in the A: floppy drive when prompted
� Press Enter to continue
� Select all registry files with an X
� Press Enter to continue (perform selected tasks)
� Press A to replace the non-original files
� Follow the remaining on screen instructions
� After repair is complete, reapply Service Pack 6a and all previously installed hotfixes as described in Chapter 3
Application Problems
The settings described in the guide are designed for programs installed on a separate partition from the %systemroot%\ directory. However, if applications stop working as a result of locking down the system according to the guide, use the following troubleshooting checklists.
General Application Troubleshooting
� Make sure the administrator is installing the application and the administrator can run the application successfully
� Check permissions on the directories the applications are installed in. The permissions should allow Authenticated Users read and execute permissions.
� Check permissions on the following directories and any files that the installation program added to these directories:
� \%SystemRoot%\system32\
� \%SystemRoot%\system\
� \%SystemRoot%\
� Ensure that the appropriate files in these directories allow Authenticated Users read and execute permissions
� Check the permissions on the icons that were made by the setup program. They should also have the read and execute permissions.
� If the program is still not working, check the permissions in the registry keys for the application found in HKEY_LOCAL_MACHINE\SOFTWARE
Domain Backup Policy
To protect both the operating system and data, it is critical to perform regular backups of the operating system, application files, and user data. Back up privileges should be limited to Administrators and Backup operators—people who can be trusted with read and write access on all files. There are five types of backup that can be performed on either the server or the workstation: normal, incremental, differential, copy and daily.
UNCLASSIFIED
UNCLASSIFIED 87
Cha
pter
13
– M
anua
l Se
tting
s
� Normal backup: Archives all selected files and marks each as having been backed up. This method of backup allows for the fastest restoration because it has the most recent files on it.
� Incremental backup: Archives only those files created or changed since the last normal backup. It also unsets the archive attribute. This method saves time during the subsequent incremental backups, but makes the restoration more complex. When restoring, a combination of normal and incremental backups must be used. The normal backup must first be restored, then all incremental backups in the proper order.
� Differential backup: Archives only those files that have been created or changed since the last normal backup. This method does not mark the files as backed up; it relies on the integrity of the last normal backup records. If using differential backups, the normal backup must first be restored, then only the most recent differential backup.
� Copy backup: Archives all selected files, but does not mark the files as having been backed up. A copy backup is particularly useful when backing up files between a scheduled incremental backup and the last normal backup. By not marking the files, it allows the normal markings of an incremental backup to remain valid.
� Daily backup: Archives all of the selected files that have been modified on that day, but it does not mark the files as being backed up.
Security Implications
Although Administrators have full privileges, they do not, by default, have access to all files. Rather, they have the ability to take ownership of all files; once this takes place, they may grant themselves rights to the files.
The right to perform backups, identified by users in the Backup Operators group, is one of the most powerful rights that administrators can assign. Backup operators are able to read and write to any file in the system, regardless of the rights assigned to it. Backup and restore rights permit users to circumvent the file access restrictions present on Windows NT NTFS disk drives for the purpose of backup and restore. This right should be granted only when there is a clear need for it; even then, it should be limited to only a few trusted users. Although users with backup rights cannot read the files they back-up directly, they can restore these files on another system.
Several things to consider when preparing a backup policy:
� Secure the backup.log file by placing permission restrictions on it
� When restoring from a backup, ensure that the NTFS permissions remain intact
� If possible, copy the backup.log file to another system or to removable media
� Members of the Backup Operators group should have special logon accounts, not regular user accounts
� Set restrictions on the backup account, such as forcing the user to log on from a particular system only during appropriate hours
� Determine the data and systems to be backed up
� Determine the frequency of scheduled backups
UNCLASSIFIED
UNCLASSIFIED 88
Chapter 13 – M
anual Settings
Account Policy
Remove group accounts Group accounts are user accounts to which more than one person has the password. With group accounts, it is impossible to maintain individual accountability since there is no differentiation between the users logging into the account. It is recommended that no group accounts exist on the domain.
Set a password for the renamed Guest account Even after renaming the Guest account, it is recommended to have a long (preferably 14 characters), complex password set on the account. This recommendation ensures that if the account is inadvertently enabled, it is adequately password protected.
Create a decoy “administrator” account After renaming the built-in administrator account, it is recommended that a decoy account called “administrator” be added. This account should be a member of the Guests or Domain Guests group, be disabled, and have a long, complex password (preferably 14 characters). This account can then be audited to track any attempts from would-be attackers to gain access to the “administrator” account.
Administrators should have two accounts Administrators should have two accounts: one for administering the network, and one for everyday tasks, such as surfing the web. This separation of duties is to ensure that an administrator doesn’t fall prey to an executable content attack over the Internet. Such an attack would run under the security context of the logged-on user. If the user is an administrator, the attack would do more damage and be able to execute more commands than if run under a regular user’s context.
Dormant accounts should be removed User accounts belonging to individuals no longer needing access to systems should be removed. Dormant accounts pose a security threat in that passwords are often kept the same for long periods of time and access to the accounts are not monitored or checked by someone who regularly logs onto them.
Local users should not exist on workstations in a domain To minimize potential points of attack, local users, other than the built-in administrator and Guest accounts, should not exist on a workstation within a domain. Users should always log onto workstations via their domain and domain account.
Strong SAM encryption The Security Accounts Manager (SAM) contains the user and computer account database. This database contains passwords and other critical information of a system and domain. The SAM can be copied in its present state when the system is operating in non-NTFS mode. Passwords can then be extracted and cracked by a dictionary or brute force attack off line. By using the strong (128 bit) encryption available in Service Pack 3 and higher, the SAM can be further encrypted to prevent against a physical attack using a utility called SYSKEY. By using SYSKEY, a floppy disk or the SAM password must be presented upon system boot up.
UNCLASSIFIED
UNCLASSIFIED 89
Cha
pter
13
– M
anua
l Se
tting
s
If appropriate, implement SAM encryption on all domain controllers. If systems are part of a workgroup environment, these systems will hold their own SAM, and SAM encryption should be implemented on each system. For more information, refer to Microsoft Knowledge Base Article "Windows NT System Key Permits Strong Encryption of the SAM" at http://support.microsoft.com/support/kb/articles/q143/4/75.asp.
WARNING: Once implemented, SYSKEY is irreversible. If the SYSKEY password is lost, the SAM cannot be recovered. Please carefully read the Knowledge Base article mentioned above before deciding to implement SYSKEY.
Enabling Strong Password Functionality with ENPASFLT.DLL
Windows NT 4.0 Service Pack 3 introduced a new DLL file (Passfilt.dll) that lets you enforce stronger password requirements for users. Passfilt.dll provides a stronger password policy than the User Manager’s Account Policy. Included in this release of the NT Guide, is an Enhanced PASSFILT.DLL (ENPASFLT.DLL) that implements a stronger password policy then original Microsoft PASSFILT.DLL. The enhanced rules set includes a minimum password length of eight (8) characters, contains at least one character from each class of characters (see below), can not contain User Account Name or Full Name.
NOTE: By design, Windows NT only applies the Password Filter when non-administrators change the password remotely. See knowledge base article Q174075.
NSA’s ENPASFLT.DLL (enhanced Passfilt.dll) implements the following password policy:
1. Passwords must be at least eight (8) characters long.
2. Passwords must contain characters from all four (4) of the following classes:
English upper case letters A, B, C, ... Z English lower case letters a, b, c, ... z Westernized Arabic numerals 0, 1, 2, ... 9 Non-alphanumeric ("special characters") such as punctuation symbols Cannot contain User Account Name Cannot include Full Name
Microsoft’s PASSFILT.DLL implements the following password policy:
1. Passwords must be at least six (6) characters long.
2. Passwords must contain characters from at least three (3) of the following classes:
English upper case letters A, B, C, ... Z English lower case letters a, b, c, ... z Westernized Arabic numerals 0, 1, 2, ... 9 Non-alphanumeric ("special characters") such as punctuation symbols
Where to Install ENPASFLT.DLL
To ensure this enhanced strong password functionality occurs throughout your domain structure, make the following changes on all Primary Domain Controllers, Backup Domain Controllers and Standalone servers. (Should be installed on all BDCs because they can be promoted to PDC. If a BDC without ENPASFLT.DLL is promoted to PDC, then strong password enforcement will be lost but there will be no other adverse effects.).
UNCLASSIFIED
UNCLASSIFIED 90
Chapter 13 – M
anual Settings
Included with the ENPASFLT.DLL are PASSFILTTEST.EXE, INSTALL_ENPASFLT.EXE and Readme.txt files.
WARNING: Implementing the ENPASFLT.DLL and then requiring all users to change their password at next logon can cause performance problems on larger networks. It is recommended that required password changes be limited to 500 user accounts per day.
Installation of the ENPASFLT.DLL via SETUP.EXE:
Setup.exe:
� Copies the filter to the system32 directory
� Sets the corresponding registry key
Password Filter Test Program (PASSFILTTEST.EXE):
The password filter test program (PASSFILTTEST.EXE) requires Windows NT 4.0 or Windows 2000. It permits one to load a filter DLL and test its rule set with various passwords without actually installing/registering the DLL.
Manual Installation Procedures for installing ENPASFLT.DLL
1. Copy Passfilt.dll to the %SYSTEMROOT%\SYSTEM32 folder.
2. Use Registry Editor (Regedt32.exe) to add the value "Notification Packages", of type REG_MULTI_SZ, under the LSA key HKEY_LOCAL_MACHINE\SYSTEM\CurrentControlSet\Control\Lsa
3. Double-click the "Notification Packages" key and ENTER the following value: ENPASFLT.DLL
4. Click OK and then exit Registry Editor.
5. Shut down and restart the computer running Windows NT Server.
For additional information, see the following articles in the Microsoft Knowledge Base:
ARTICLE-ID: Q151082 http://support.microsoft.com/support/kb/articles/Q151/0/82.ASP TITLE: Password Change Filtering & Notification in Windows NT ARTICLE-ID: Q174075 http://support.microsoft.com//support/kb/articles/Q174/0/75.ASP TITLE: Strong Passwords With Passfilt.dll Are Not Enforced ARTICLE-ID: Q174076 http://support.microsoft.com//support/kb/articles/Q174/0/76.ASP TITLE: Invalid Password Message When Strong Passwords Are Required
UNCLASSIFIED
UNCLASSIFIED 91
Cha
pter
13
– M
anua
l Se
tting
s
This Page Intentionally Left Blank
UNCLASSIFIED
UNCLASSIFIED 92
Chapter 14 –
Netw
ork Security
After installing Windows NT Server or Workstation, it is imperative to minimize the security risk to your network domain. The security implications of Domain Name System (DNS), Windows Internet Name Service (WINS), Dynamic Host Configuration Protocol (DHCP), Terminal Emulation Protocol (Telnet), and File Transfer Protocol (FTP) servers will be discussed.
Default Network Protocols
Microsoft provides native support for three protocols to perform local or wide area networking. These protocols are NetBIOS Extended User Interface (NetBEUI), NWLink/IPX, and TCP/IP.
NetBEUI is Microsoft’s own network protocol and is designed for small networks. NetBEUI is non-routable, broadcast-based, and is sometimes used as a legacy protocol for networking between LAN Manager, LAN Server, and Windows for Workgroups.
NWLink/IPX is Microsoft’s implementation of Novell’s IPX/SPX protocol. It is designed to provide interconnectivity between Novell NetWare Servers and Clients and Windows NT/Windows 95. NWLink/IPX is fully routable and provides for efficient data transfers over both local and wide area networks. This protocol should be used only if there are Novell Servers or Clients within the domain.
TCP/IP is the standard and primary protocol of the Internet. It is fully routable and supports communications between multiple operating systems such as Unix, Windows NT, and Windows 95. TCP/IP is a directed protocol that eliminates most of the broadcast traffic associated with the NetBEUI and NWLink/IPX protocols. Windows NT supports more traditional TCP/IP services, such as FTP and Telnet.
Implementation of only the TCP/IP protocol is recommended in order to support compatibility when connecting to other heterogeneous domains while minimizing the number of active network protocols.
Configuring Network Components
Adding Workstations/Servers to the Domain
� Select Start → Settings → Control Panel
� Double click the Network Icon
� Ensure the Identification tab is selected
� Click the Change… button
� Verify that the computer name is listed in the Computer Name: field
� Ensure the Domain radio button is selected
Chapter
14 Network Security
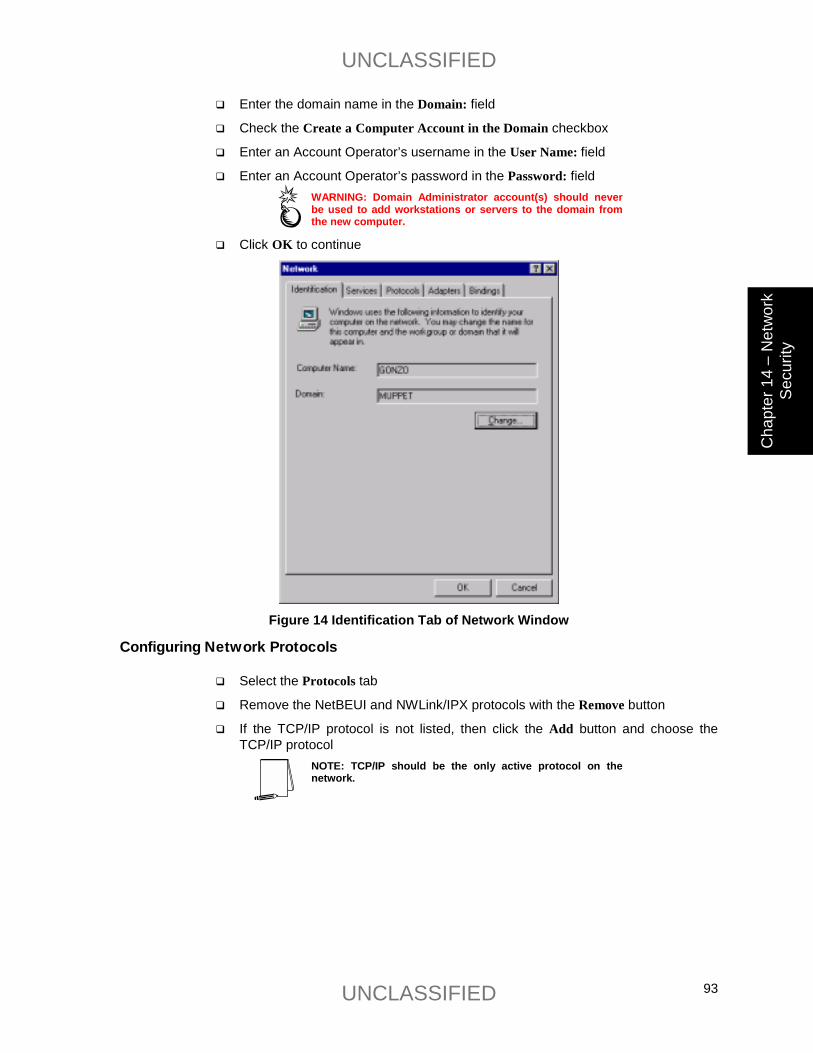
UNCLASSIFIED
UNCLASSIFIED 93
Cha
pter
14
– N
etw
ork
Secu
rity
� Enter the domain name in the Domain: field
� Check the Create a Computer Account in the Domain checkbox
� Enter an Account Operator’s username in the User Name: field
� Enter an Account Operator’s password in the Password: field WARNING: Domain Administrator account(s) should never be used to add workstations or servers to the domain from the new computer.
� Click OK to continue
Figure 14 Identification Tab of Network Window
Configuring Network Protocols
� Select the Protocols tab
� Remove the NetBEUI and NWLink/IPX protocols with the Remove button
� If the TCP/IP protocol is not listed, then click the Add button and choose the TCP/IP protocol
NOTE: TCP/IP should be the only active protocol on the network.
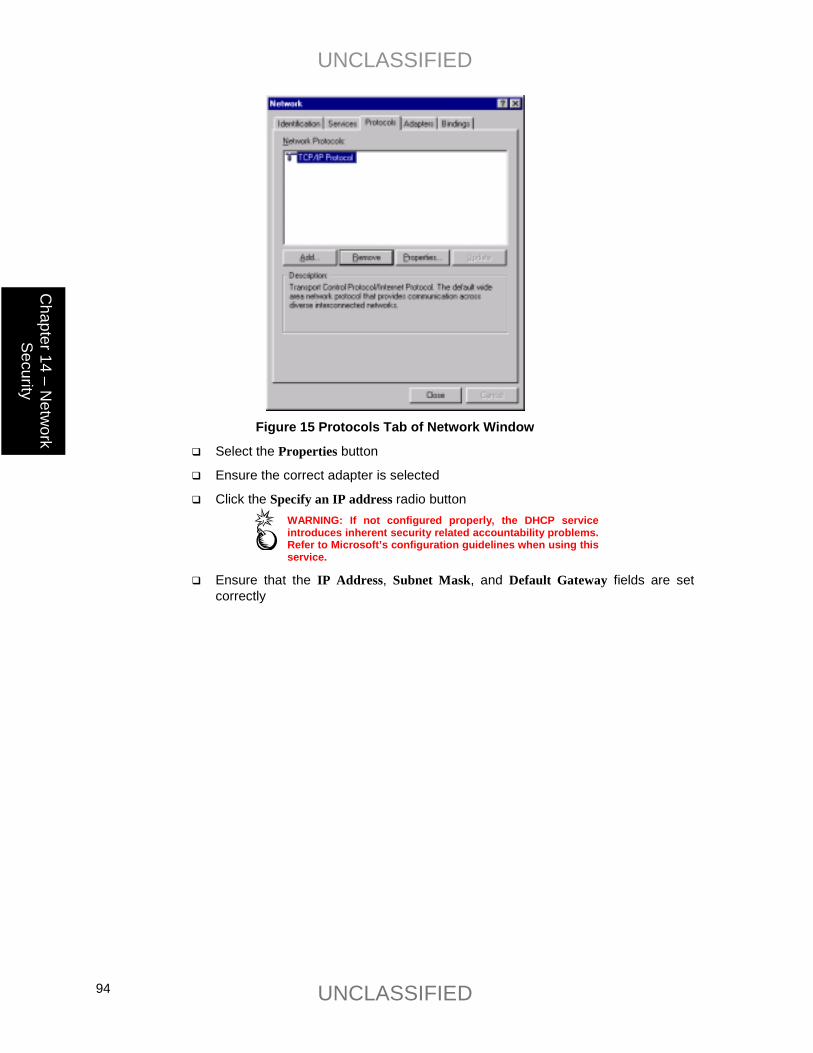
UNCLASSIFIED
UNCLASSIFIED 94
Chapter 14 –
Netw
ork Security
Figure 15 Protocols Tab of Network Window
� Select the Properties button
� Ensure the correct adapter is selected
� Click the Specify an IP address radio button WARNING: If not configured properly, the DHCP service introduces inherent security related accountability problems. Refer to Microsoft’s configuration guidelines when using this service.
� Ensure that the IP Address, Subnet Mask, and Default Gateway fields are set correctly
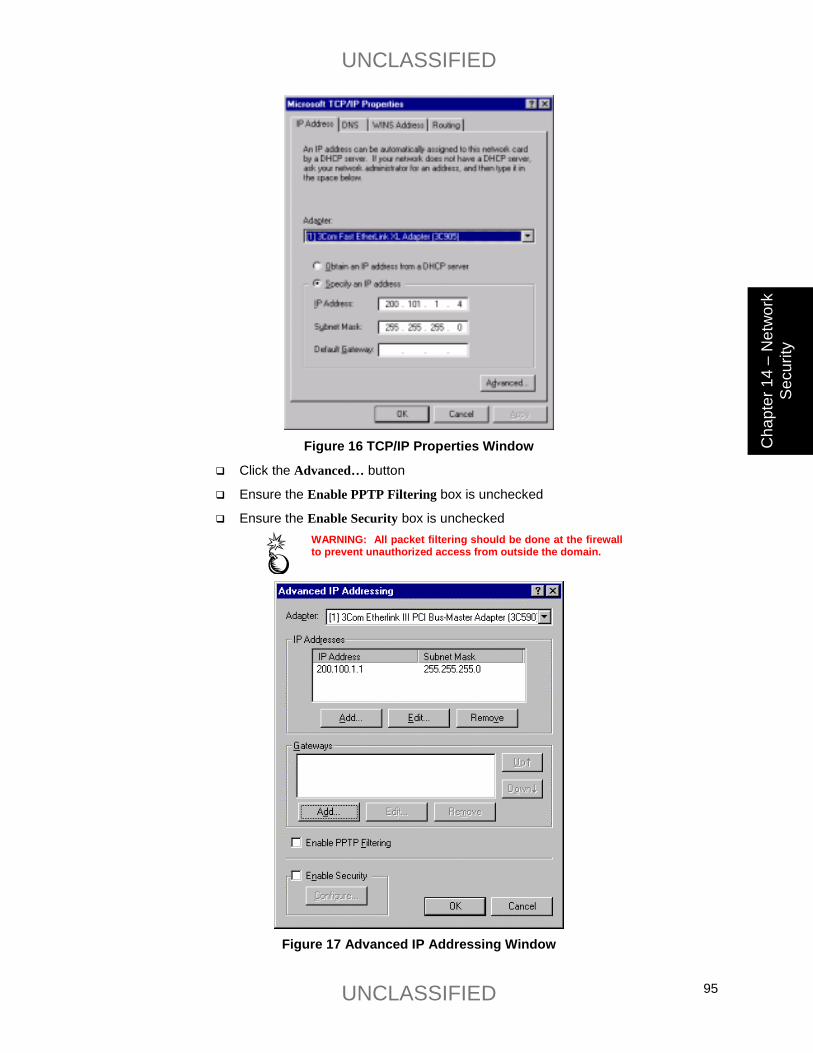
UNCLASSIFIED
UNCLASSIFIED 95
Cha
pter
14
– N
etw
ork
Secu
rity
Figure 16 TCP/IP Properties Window
� Click the Advanced… button
� Ensure the Enable PPTP Filtering box is unchecked
� Ensure the Enable Security box is unchecked WARNING: All packet filtering should be done at the firewall to prevent unauthorized access from outside the domain.
Figure 17 Advanced IP Addressing Window
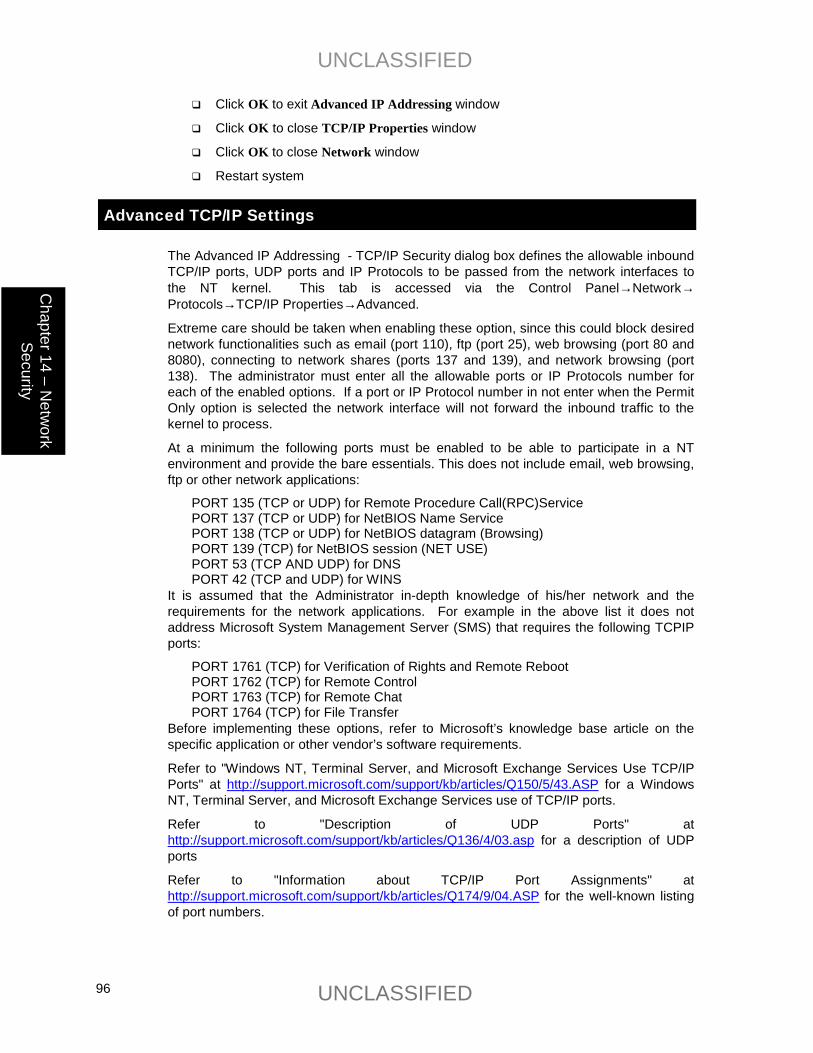
UNCLASSIFIED
UNCLASSIFIED 96
Chapter 14 –
Netw
ork Security
� Click OK to exit Advanced IP Addressing window
� Click OK to close TCP/IP Properties window
� Click OK to close Network window
� Restart system
Advanced TCP/IP Settings
The Advanced IP Addressing - TCP/IP Security dialog box defines the allowable inbound TCP/IP ports, UDP ports and IP Protocols to be passed from the network interfaces to the NT kernel. This tab is accessed via the Control Panel→Network→ Protocols→TCP/IP Properties→Advanced.
Extreme care should be taken when enabling these option, since this could block desired network functionalities such as email (port 110), ftp (port 25), web browsing (port 80 and 8080), connecting to network shares (ports 137 and 139), and network browsing (port 138). The administrator must enter all the allowable ports or IP Protocols number for each of the enabled options. If a port or IP Protocol number in not enter when the Permit Only option is selected the network interface will not forward the inbound traffic to the kernel to process.
At a minimum the following ports must be enabled to be able to participate in a NT environment and provide the bare essentials. This does not include email, web browsing, ftp or other network applications:
PORT 135 (TCP or UDP) for Remote Procedure Call(RPC)Service PORT 137 (TCP or UDP) for NetBIOS Name Service PORT 138 (TCP or UDP) for NetBIOS datagram (Browsing) PORT 139 (TCP) for NetBIOS session (NET USE) PORT 53 (TCP AND UDP) for DNS PORT 42 (TCP and UDP) for WINS
It is assumed that the Administrator in-depth knowledge of his/her network and the requirements for the network applications. For example in the above list it does not address Microsoft System Management Server (SMS) that requires the following TCPIP ports:
PORT 1761 (TCP) for Verification of Rights and Remote Reboot PORT 1762 (TCP) for Remote Control PORT 1763 (TCP) for Remote Chat PORT 1764 (TCP) for File Transfer
Before implementing these options, refer to Microsoft’s knowledge base article on the specific application or other vendor’s software requirements.
Refer to "Windows NT, Terminal Server, and Microsoft Exchange Services Use TCP/IP Ports" at http://support.microsoft.com/support/kb/articles/Q150/5/43.ASP for a Windows NT, Terminal Server, and Microsoft Exchange Services use of TCP/IP ports.
Refer to "Description of UDP Ports" at http://support.microsoft.com/support/kb/articles/Q136/4/03.asp for a description of UDP ports
Refer to "Information about TCP/IP Port Assignments" at http://support.microsoft.com/support/kb/articles/Q174/9/04.ASP for the well-known listing of port numbers.

UNCLASSIFIED
UNCLASSIFIED 97
Cha
pter
14
– N
etw
ork
Secu
rity
Disabling the Server Services and Computer Browser Service where Disabling the Server Services and Computer Browser Service where Disabling the Server Services and Computer Browser Service where Disabling the Server Services and Computer Browser Service where appropriateappropriateappropriateappropriate.
The Workstation and Server Services are main system drivers to the Windows NT networking File System. The Server service accepts the I/O request from the network and responds to the requests by routing the requested resource (such as a file) across the network to the requesting networked computer. This provides Remote Procedure Call (RPC) support for file, print and named pipes sharing.
The Workstation (Redirector) service redirects I/O request from the local Windows NT machine to the appropriate service on another network computer or “Shares”. In other words it provides the network connectivity to other Microsoft hosts. Starting with Service Pack 6a Net Logon runs a dependency of Workstation Service, do not DISABLE Workstation Service. If you have disabled Workstation prior to installing Service Pack 6a, enable the Workstation Service before installing Service Pack 6. Failure to not enabling the Workstation Service will disable the user the ability to logon to the network since NET Logon is depends on Workstation Server being started.
Warning: Disabling the Workstation Service will disable the user the ability to logon to the network. Disabling the Server service could affect the Remote administration of the Windows NT machine.
The Computer Browser service provides the network service of maintaining a browse list of network resources and broadcasting which network resources are available on the local machine to the Master Browser and Domain Browser.
A method for strengthening the security for critical or selected Windows NT servers and workstations on the network is to disable the Server service and the Computer Browser service where appropriate. To limit the view of network resources, which can be viewed via the Network Neighborhood, disable Computer Browser on the PDC, BDCs and Workstations. For example, if workstations in the network are sharing resources such as files, printers or other services, disabling the Server Service will stop the system from responding to RPC requests. Therefore, these resources on the local host will not be accessible from the network. Disabling the Computer Browser Service will limit the ability for a network host to view the local host. Since the host is not available on the network it is impossible to access any of the resources on that host using the Netbios name.
The following suggests strategies of disabling the Server and Computer Browser services for strengthening security in your network:
� Disable both the Server and Computer Browser services for the PDC and BDC(s) where only NT authentication and SAM replication occur and there are no other network resources provided by this Windows NT OS, such as network “Shares” and network printers. This will limit the system’s network footprint and what can be accessed from the network, while still allowing user authentication (user logon verification) and SAM replication. Warning: No Folders, Drives or Printers will be shared from this Windows NT server.
� Disable both the Server and Computer Browser services when the only use is browsing the Internet and/or accessing email. This could also apply to other workstations where a user application providing connectivity service such as a SNA terminal interface or other terminal interfaces.
� Disable Server service and Computer Browser service on the workstation when there is no need for the workstation to provide shares network resources (such as file
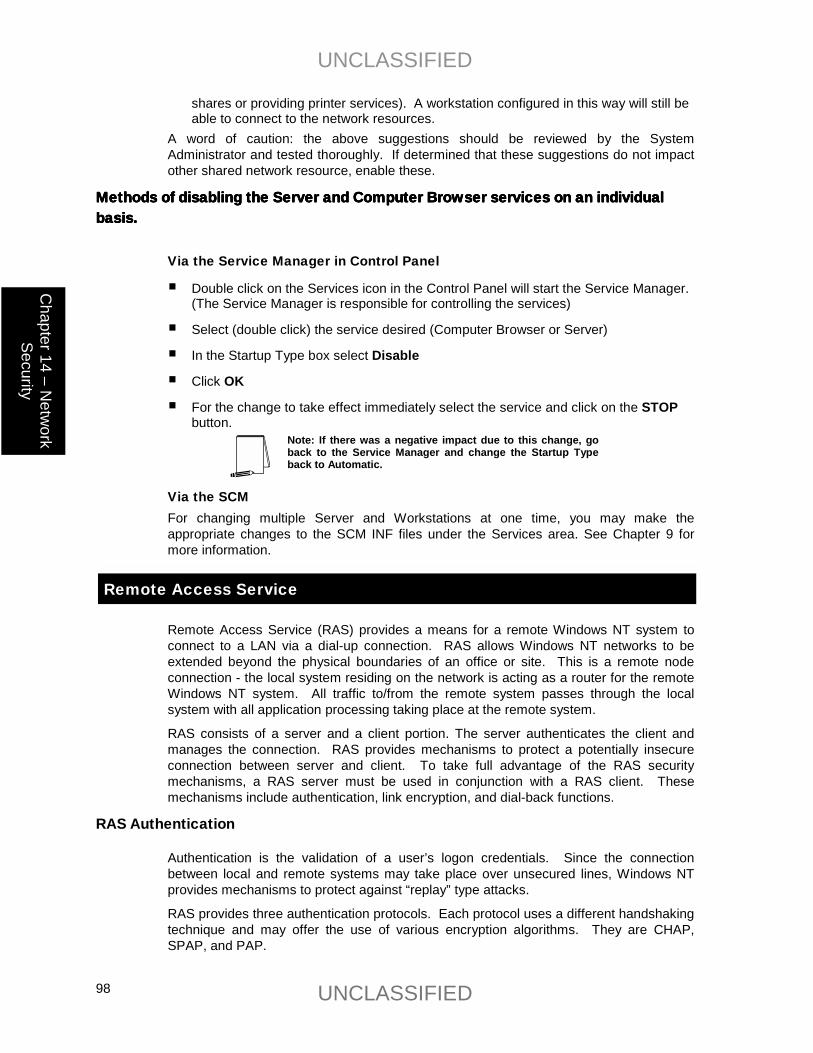
UNCLASSIFIED
UNCLASSIFIED 98
Chapter 14 –
Netw
ork Security
shares or providing printer services). A workstation configured in this way will still be able to connect to the network resources.
A word of caution: the above suggestions should be reviewed by the System Administrator and tested thoroughly. If determined that these suggestions do not impact other shared network resource, enable these.
Methods of disabling the Server and Computer Browser services on an individual Methods of disabling the Server and Computer Browser services on an individual Methods of disabling the Server and Computer Browser services on an individual Methods of disabling the Server and Computer Browser services on an individual basis.basis.basis.basis.
Via the Service Manager in Control Panel
� Double click on the Services icon in the Control Panel will start the Service Manager. (The Service Manager is responsible for controlling the services)
� Select (double click) the service desired (Computer Browser or Server)
� In the Startup Type box select Disable
� Click OK
� For the change to take effect immediately select the service and click on the STOP button.
Note: If there was a negative impact due to this change, go back to the Service Manager and change the Startup Type back to Automatic.
Via the SCM For changing multiple Server and Workstations at one time, you may make the appropriate changes to the SCM INF files under the Services area. See Chapter 9 for more information.
Remote Access Service
Remote Access Service (RAS) provides a means for a remote Windows NT system to connect to a LAN via a dial-up connection. RAS allows Windows NT networks to be extended beyond the physical boundaries of an office or site. This is a remote node connection - the local system residing on the network is acting as a router for the remote Windows NT system. All traffic to/from the remote system passes through the local system with all application processing taking place at the remote system.
RAS consists of a server and a client portion. The server authenticates the client and manages the connection. RAS provides mechanisms to protect a potentially insecure connection between server and client. To take full advantage of the RAS security mechanisms, a RAS server must be used in conjunction with a RAS client. These mechanisms include authentication, link encryption, and dial-back functions.
RAS Authentication
Authentication is the validation of a user’s logon credentials. Since the connection between local and remote systems may take place over unsecured lines, Windows NT provides mechanisms to protect against “replay” type attacks.
RAS provides three authentication protocols. Each protocol uses a different handshaking technique and may offer the use of various encryption algorithms. They are CHAP, SPAP, and PAP.
UNCLASSIFIED
UNCLASSIFIED 99
Cha
pter
14
– N
etw
ork
Secu
rity
� CHAP (Challenge Handshake Authentication Protocol) is considered to be the most secure of the three RAS authentication protocols. One of two encryption algorithms can be chosen when using CHAP: DES or MD5. Although DES is the default option used by CHAP, MD5 is the recommended encryption algorithm.
� SPAP (Shiva Password Authentication Protocol) is a proprietary secure authentication scheme developed by Shiva Corporation.
� PAP (Password Authentication Protocol) should not be used. There is no encryption of the authentication process under PAP. It is primarily used when a client is not able to use one of the other more secure methods.
A Windows NT RAS server can be configured to prevent local access to remote RAS systems not using CHAP or SPAP. This option is available in the Remote Access Setup dialog box.
The authentication process can be made even more secure by requiring the addition of token-based authentication devices such as: challenge-response units, time-synchronization systems, smart cards, and biometric devices. These devices are available from third-party vendors.
RAS Link Encryption
Windows NT provides protection against data capture through link-based encryption. Link-based encryption will encrypt all network packets that are bound for a RAS link and decrypt all packets that have been received from RAS links. The algorithm used for providing link-based encryption in Windows NT is RSA Data Security's RC4.
RAS Dial-Back
Windows NT provides a built-in alternative to dial-back modems. RAS permits administrators to enable dial-back functions. The modem is not required to support dial-back functionality. Rather, the Windows NT RAS server authenticates the user, terminates the connection, and calls back the user at a prearranged number.
Secure Configuration of RAS
Before installing and configuring Windows NT RAS, considerations should be made as to which servers require the use of RAS. RAS should only be installed on servers that require dial-up support.
Each Windows NT server can support 256 active RAS sessions, so centralization of modems is both feasible and cost-effective. More importantly, centralization provides the administrator with greater control over system security.
Installing the RAS server on a Windows NT server will not automatically permit all users to use RAS. The right to use the RAS must be explicitly assigned by an administrator to individual users.
WARNING: Service Pack 6a and all recommended hotfixes, as described in Chapter 3, must be reapplied when RAS installation is complete.
� Select Start → Settings → Control Panel
� Double click the Network icon
� Select the Services tab
� Highlight Remote Access Service
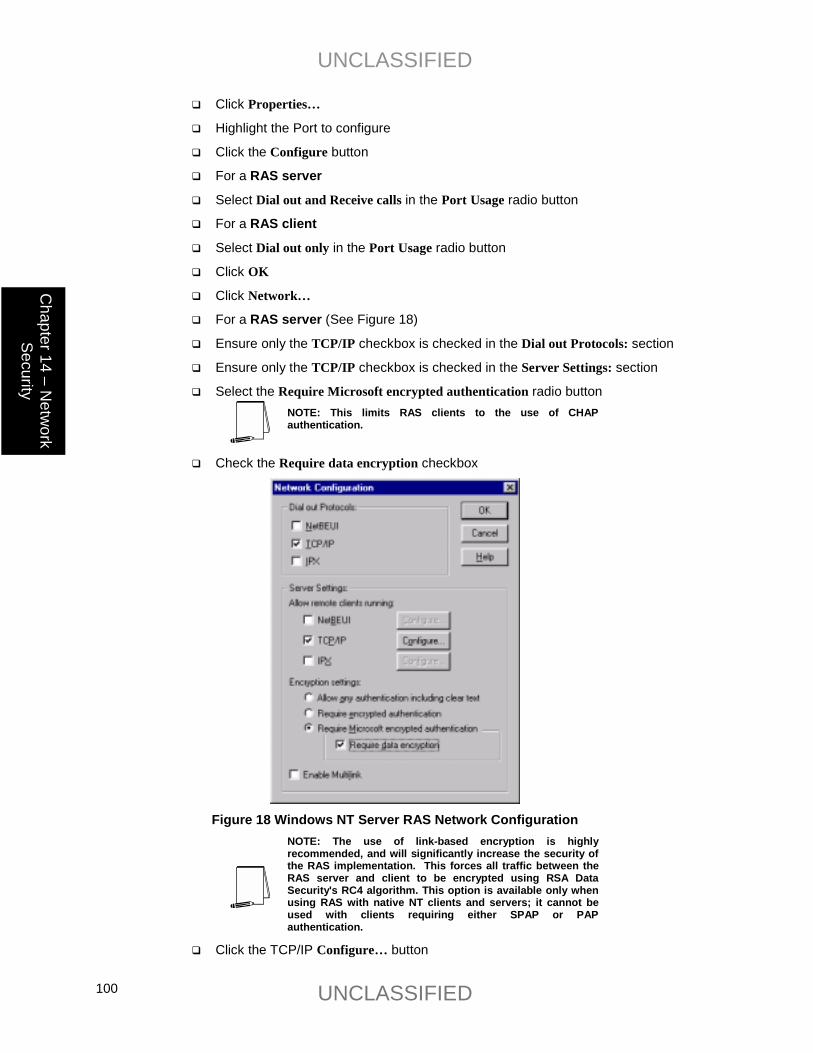
UNCLASSIFIED
UNCLASSIFIED 100
Chapter 14 –
Netw
ork Security
� Click Properties…
� Highlight the Port to configure
� Click the Configure button
� For a RAS server
� Select Dial out and Receive calls in the Port Usage radio button
� For a RAS client
� Select Dial out only in the Port Usage radio button
� Click OK
� Click Network…
� For a RAS server (See Figure 18)
� Ensure only the TCP/IP checkbox is checked in the Dial out Protocols: section
� Ensure only the TCP/IP checkbox is checked in the Server Settings: section
� Select the Require Microsoft encrypted authentication radio button NOTE: This limits RAS clients to the use of CHAP authentication.
� Check the Require data encryption checkbox
Figure 18 Windows NT Server RAS Network Configuration
NOTE: The use of link-based encryption is highly recommended, and will significantly increase the security of the RAS implementation. This forces all traffic between the RAS server and client to be encrypted using RSA Data Security's RC4 algorithm. This option is available only when using RAS with native NT clients and servers; it cannot be used with clients requiring either SPAP or PAP authentication.
� Click the TCP/IP Configure… button
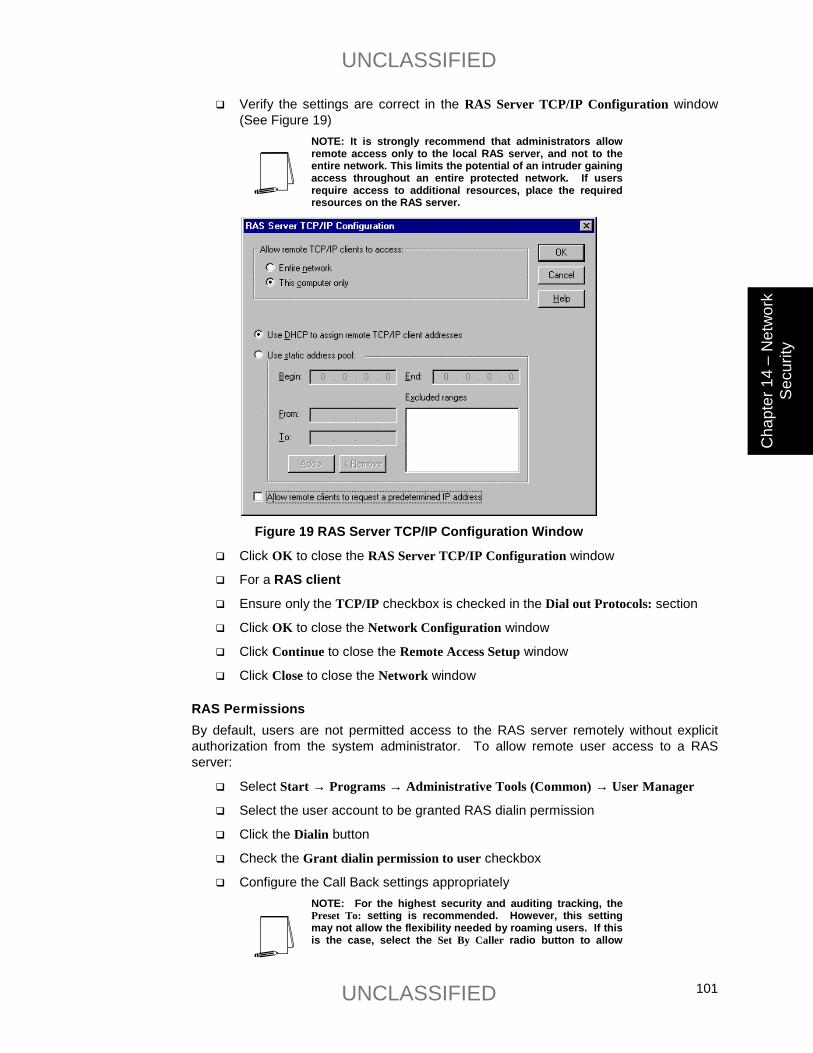
UNCLASSIFIED
UNCLASSIFIED 101
Cha
pter
14
– N
etw
ork
Secu
rity
� Verify the settings are correct in the RAS Server TCP/IP Configuration window (See Figure 19)
NOTE: It is strongly recommend that administrators allow remote access only to the local RAS server, and not to the entire network. This limits the potential of an intruder gaining access throughout an entire protected network. If users require access to additional resources, place the required resources on the RAS server.
Figure 19 RAS Server TCP/IP Configuration Window
� Click OK to close the RAS Server TCP/IP Configuration window
� For a RAS client
� Ensure only the TCP/IP checkbox is checked in the Dial out Protocols: section
� Click OK to close the Network Configuration window
� Click Continue to close the Remote Access Setup window
� Click Close to close the Network window
RAS Permissions By default, users are not permitted access to the RAS server remotely without explicit authorization from the system administrator. To allow remote user access to a RAS server:
� Select Start → Programs → Administrative Tools (Common) → User Manager
� Select the user account to be granted RAS dialin permission
� Click the Dialin button
� Check the Grant dialin permission to user checkbox
� Configure the Call Back settings appropriately NOTE: For the highest security and auditing tracking, the Preset To: setting is recommended. However, this setting may not allow the flexibility needed by roaming users. If this is the case, select the Set By Caller radio button to allow
UNCLASSIFIED
UNCLASSIFIED 102
Chapter 14 –
Netw
ork Security
roaming users the ability to use remote access. This also allows the administrator the ability to audit the phone number being used to call into the domain.
WARNING: It is recommended that user accounts that have dial-in access NOT have Administrator privileges. User accounts with Administrator privileges will have the ability to remotely modify the RAS Server – including the ability to change the restricted access to the local RAS Server and gain access to the entire network.
Point-to-Point Tunneling Protocol Windows NT includes the ability to create encrypted tunnels using the Point-to-Point Tunneling Protocol (PPTP). PPTP permits RAS to easily create and remove encrypted tunnels while connected to a RAS server. PPTP is an extension of Point-to-Point Protocol (PPP) which is currently supported by Windows 3.x, Windows 9x, Windows NT, Unix, and NetWare. PPTP creates a secure channel by tunneling, or encapsulating normal data in an encrypted envelope, thus creating a Virtual Private Network.
NOTE: PPTP is usually not recommended unless all participants in the communication path have routers equipped to handle PPTP.
To enable PPTP:
� Right-click on the Network Neighborhood icon
� Select Properties
� Select the Protocols tab
� Select the TCP/IP protocol
� Click the Properties… button
� Click the Advanced… button
� Check the Enable PPTP Filtering checkbox
� Click OK to close the Advanced IP Addressing window
� Click OK to close the Microsoft TCP/IP Properties window
� Click OK to close the Network window
RAS Auditing RAS can be enabled to generate records in the audit logs that indicate a number of activities, including normal connections, successful disconnection, successful callbacks, disconnects due to idle lines, timed-out authentication, and line errors. Excessive failed connections may indicate that someone is trying to break into an account. Administrators should make use of the logging and auditing facilities available. Setting a parameter in the Registry enables RAS auditing.
The registry key value to enable this feature is:
Hive: HKEY_LOCAL_MACHINE
Key: \System\CurrentControlSet\Services\RemoteAccess\Parameters
Name: Enable Audit
Type: REG_DWORD
Value: 1
UNCLASSIFIED
UNCLASSIFIED 103
Cha
pter
14
– N
etw
ork
Secu
rity
� Select Start → Run…
� Type Regedt32.exe in the Open dialog box
� Select the HKEY_LOCAL_MACHINE on Local Machine window
� Navigate down the \System\CurrentControlSet\Services\RemoteAccess\Parameters path, double clicking along the way
� Double-click the Enable Audit key in the right pane
� Ensure the value in Data: field is 1
� Click OK to close the DWORD Editor
� Exit the Registry Editor
Other Network Security Concerns
FTP Server Service
The FTP Server Service allows users to access specific directories and files remotely. It is recommended that the FTP Server Service not be started on domain servers or workstations. Regular domain users should not be granted FTP access since there is already access via the shared domain directories through the Network Neighborhood icon. Files can still be transferred to and from non-Windows NT systems using the Windows NT FTP client.
If required, configure a stand-alone FTP Server with the following recommendations:
� Create FTP accounts for each user
� Designate one physical disk as the FTP home directory WARNING: FTP does not encrypt passwords. If users are allowed to FTP into the domain, user account names and passwords will be transmitted in the clear. Keep in mind that anonymous users are difficult to audit.
DNS Server Service
DNS Server Service enables name resolution for systems outside the domain. DNS Server Service is not normally configured during a typical installation. Starting the DNS Server Service is not recommended. Enabling this service with its default configuration can potentially render the server vulnerable. Service Pack 6a must be reapplied after installing this service. See Chapter 3 for proper installation procedures of Service Pack 6a and related hotfixes.
Telnet Server Service
By default, a Telnet Server Service is not included with Windows NT Workstation or Server. Third-party products are available to implement a Telnet Server Service. Starting any Telnet Server Service is not recommended.
WARNING: Telnet does not encrypt passwords. If users are allowed to Telnet into the domain, user account names and passwords will be transmitted in the clear.
UNCLASSIFIED
UNCLASSIFIED 104
Chapter 14 –
Netw
ork Security
Controlling Network Access
Use network intrusion detection systems as an early warning for unauthorized access attempts. Always use secure routers and firewalls to filter traffic and block ports.
WARNING: Ports 135, 137, 138, and 139 should be blocked at the premise router.
NOTE: Windows NT uses Ports 135, 137, 138, and 139 when NetBIOS over TCP/IP is enabled. Their functions are: Port 135 – (TCP) RPC location service, Port 137 – (UDP) NetBIOS name resolution request, Port 138 – (UDP) NetBIOS authentication, name registration, and browsing services, Port 139 – (TCP) NetBIOS Session for Server Message Blocks (SMBs) that perform file transfers and print jobs.
UNCLASSIFIED
UNCLASSIFIED 105
Cha
pter
14
– N
etw
ork
Secu
rity
This Page Intentionally Left Blank
UNCLASSIFIED
UNCLASSIFIED 106
Appendix A –M
icrosoft W
indows 95/98 C
lients
Appendix
A Securing Microsoft Windows 95/98 Client
Windows 95/98 can be configured to restrict network access. Since Windows 95/98 use FAT and not NTFS, a person with physical access to the computer can easily access data stored on the client. This appendix contains recommendations for securing the client during system boot, network authentication options, and System Policy editor settings.
NOTE: Critical data files should be stored on file servers. Microsoft Windows NT Workstation is recommended if files have to be stored locally.
Microsoft releases many patches for their products. All hotfixes and patches can be downloaded from http://www.microsoft.com/downloads/default.asp.
System Boot Precautions
Since there is no local data security it is extremely important that physical access to Windows 95/98 clients is limited. To do this, follow the Physical Security Settings found in Chapter 2 of this guide.
It is possible to bypass Windows 95/98 security by disrupting the boot sequence of the operating system. The MSDOS.SYS file must be edited to secure this vulnerability. This file is a read-only, system file located in the root directory of the hard drive. The following steps show how to edit this file:
� Open Windows Explorer (Start→Programs→Windows Explorer)
� Select the drive containing the system files (Normally C:)
� If MSDOS.SYS is not listed in the right pane you must select View Hidden Files in the Windows Explorer Options
� Right click on MSDOS.SYS and select Properties
� Uncheck Read-only and Hidden
� Click OK
� Open Notepad (Start→Programs→Accessories→Notepad)
� Select File→Open
� Select the drive containing MSDOS.SYS
� Select MSDOS.SYS and click Open
� In the [Options] section set the following:
� Bootkeys=0
� BootSafe=0
UNCLASSIFIED
UNCLASSIFIED 107
Appe
ndix
A –
Mic
roso
ft W
indo
ws
95/9
8 C
lient
s
� Select File→Save
� Close Notepad
� In Windows Explorer right click MSDOS.SYS and select Properties
� Check Read-Only and Hidden
� Select OK WARNING: Editing critical system files can cause unexpected results. Test all settings in a lab environment before implementing on an operational network.
WARNING: These settings disable the ability to enter safe mode for Windows 95/98.
Authentication
Windows NT supports three variants of challenge/response authentication for network logons:
� LAN Manager (LM) challenge/response
� Windows NT challenge/response (also known as NTLM challenge/response)
� Windows NT challenge/response Version 2 (NTLM Version 2) Previously, because Windows 95/98 clients did not support NTLM or NTLMv2, Windows NT Servers could not use the highest level of security, NTLMv2. However, with the introduction of Windows 2000 and the Directory Service Client available on the Windows 2000 CD-ROM, Windows 95/98 can now support NTLMv2 authentication. Chapter 6 describes how to modify the Windows NT registry to accept only NTLMv2 authentication by configuring the HKEY_LOCAL_MACHINE\System\CurrentControlSet\Control\LSA key in the registry.
For information on enabling NTLMv2 on Windows clients, see “How to Enable NTLM 2 Authentication for Windows 95/98 Clients” at http://support.microsoft.com/support/kb/articles/Q239/8/69.ASP.
NOTE: The LMCompatibility level for Windows 95/98 clients must be set to 3 in order to enable NTLMv2 authentication. For additional information see the above article on How to Enable NTLM 2 Authentication for Windows 95/98 Clients.
The System Policy Editor
The System Policy editor is available for Windows 95/98. It provides the administrator with a graphical interface that can be used to enforce system policies. Settings can be applied at a User or Computer level. The Enable User Profiles setting must be enabled in the System Policy Editor. In Windows 95 this setting is located in Local Computer→System→Enable User Profiles. In Windows 98 this setting is located in Default Computer→System→Enable User Profiles.
To use the System Policy Editor (Poledit.exe) for Windows 95, you must install it, It is available in the Admin\Apptools\Poledit folder on the Windows 95 CD-ROM. The System Policy Editor for Windows 98 is in the Tools\Reskit\Netadmin\Poledit folder on
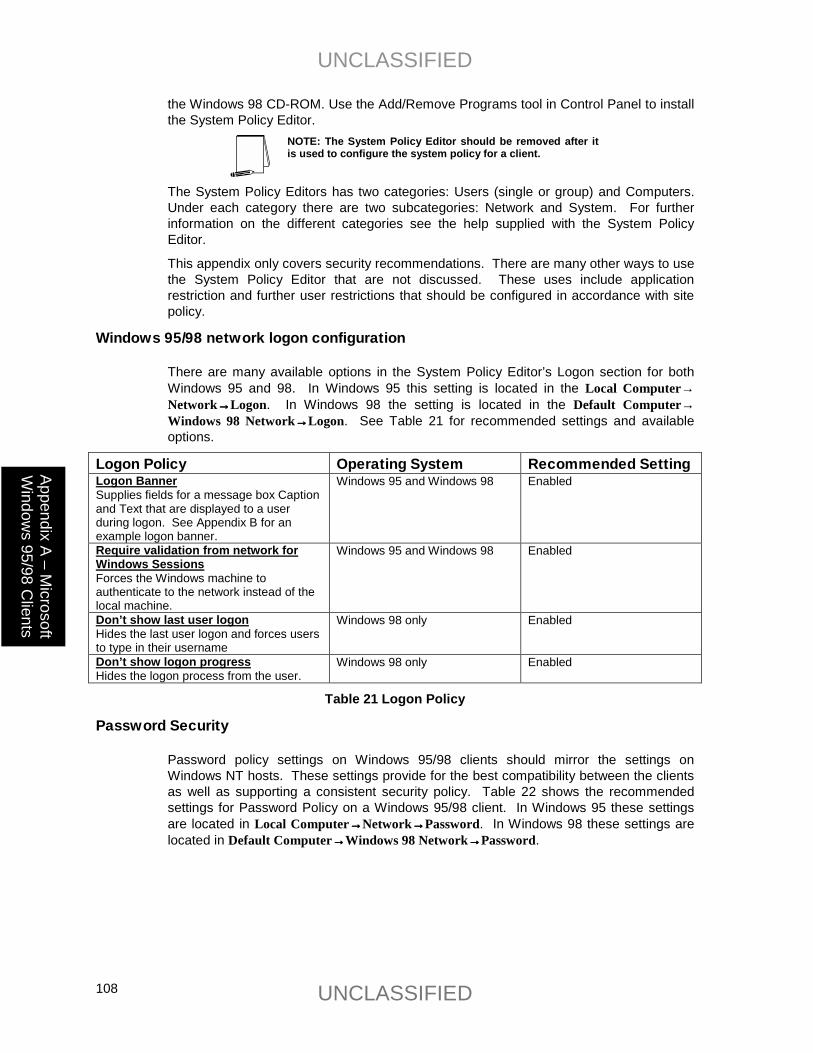
UNCLASSIFIED
UNCLASSIFIED 108
Appendix A –M
icrosoft W
indows 95/98 C
lients
the Windows 98 CD-ROM. Use the Add/Remove Programs tool in Control Panel to install the System Policy Editor.
NOTE: The System Policy Editor should be removed after it is used to configure the system policy for a client.
The System Policy Editors has two categories: Users (single or group) and Computers. Under each category there are two subcategories: Network and System. For further information on the different categories see the help supplied with the System Policy Editor.
This appendix only covers security recommendations. There are many other ways to use the System Policy Editor that are not discussed. These uses include application restriction and further user restrictions that should be configured in accordance with site policy.
Windows 95/98 network logon configuration
There are many available options in the System Policy Editor’s Logon section for both Windows 95 and 98. In Windows 95 this setting is located in the Local Computer→ Network→→→→Logon. In Windows 98 the setting is located in the Default Computer→ Windows 98 Network→→→→Logon. See Table 21 for recommended settings and available options.
Logon Policy Operating System Recommended Setting Logon Banner Supplies fields for a message box Caption and Text that are displayed to a user during logon. See Appendix B for an example logon banner.
Windows 95 and Windows 98 Enabled
Require validation from network for Windows Sessions Forces the Windows machine to authenticate to the network instead of the local machine.
Windows 95 and Windows 98 Enabled
Don’t show last user logon Hides the last user logon and forces users to type in their username
Windows 98 only Enabled
Don’t show logon progress Hides the logon process from the user.
Windows 98 only Enabled
Table 21 Logon Policy
Password Security
Password policy settings on Windows 95/98 clients should mirror the settings on Windows NT hosts. These settings provide for the best compatibility between the clients as well as supporting a consistent security policy. Table 22 shows the recommended settings for Password Policy on a Windows 95/98 client. In Windows 95 these settings are located in Local Computer→→→→Network→→→→Password. In Windows 98 these settings are located in Default Computer→→→→Windows 98 Network→→→→Password.
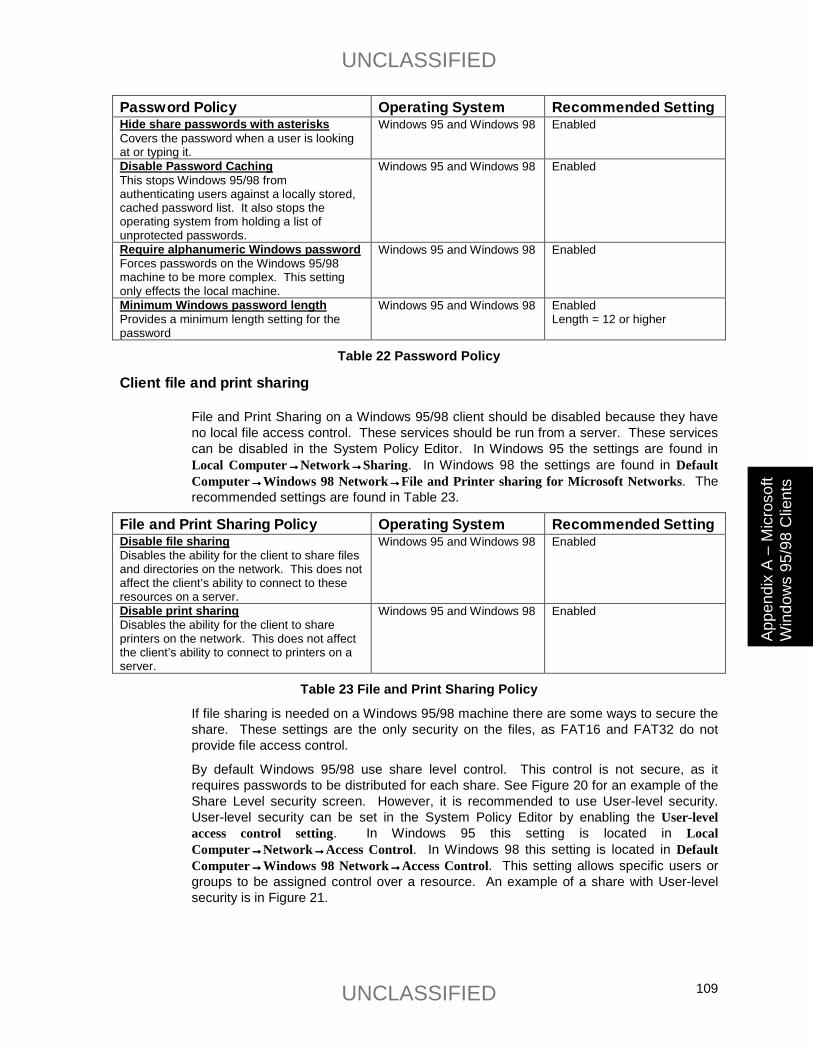
UNCLASSIFIED
UNCLASSIFIED 109
Appe
ndix
A –
Mic
roso
ft W
indo
ws
95/9
8 C
lient
s
Password Policy Operating System Recommended Setting Hide share passwords with asterisks Covers the password when a user is looking at or typing it.
Windows 95 and Windows 98 Enabled
Disable Password Caching This stops Windows 95/98 from authenticating users against a locally stored, cached password list. It also stops the operating system from holding a list of unprotected passwords.
Windows 95 and Windows 98 Enabled
Require alphanumeric Windows password Forces passwords on the Windows 95/98 machine to be more complex. This setting only effects the local machine.
Windows 95 and Windows 98 Enabled
Minimum Windows password length Provides a minimum length setting for the password
Windows 95 and Windows 98 Enabled Length = 12 or higher
Table 22 Password Policy
Client file and print sharing
File and Print Sharing on a Windows 95/98 client should be disabled because they have no local file access control. These services should be run from a server. These services can be disabled in the System Policy Editor. In Windows 95 the settings are found in Local Computer→→→→Network→→→→Sharing. In Windows 98 the settings are found in Default Computer→→→→Windows 98 Network→→→→File and Printer sharing for Microsoft Networks. The recommended settings are found in Table 23.
File and Print Sharing Policy Operating System Recommended Setting Disable file sharing Disables the ability for the client to share files and directories on the network. This does not affect the client’s ability to connect to these resources on a server.
Windows 95 and Windows 98 Enabled
Disable print sharing Disables the ability for the client to share printers on the network. This does not affect the client’s ability to connect to printers on a server.
Windows 95 and Windows 98 Enabled
Table 23 File and Print Sharing Policy
If file sharing is needed on a Windows 95/98 machine there are some ways to secure the share. These settings are the only security on the files, as FAT16 and FAT32 do not provide file access control.
By default Windows 95/98 use share level control. This control is not secure, as it requires passwords to be distributed for each share. See Figure 20 for an example of the Share Level security screen. However, it is recommended to use User-level security. User-level security can be set in the System Policy Editor by enabling the User-level access control setting. In Windows 95 this setting is located in Local Computer→→→→Network→→→→Access Control. In Windows 98 this setting is located in Default Computer→→→→Windows 98 Network→→→→Access Control. This setting allows specific users or groups to be assigned control over a resource. An example of a share with User-level security is in Figure 21.
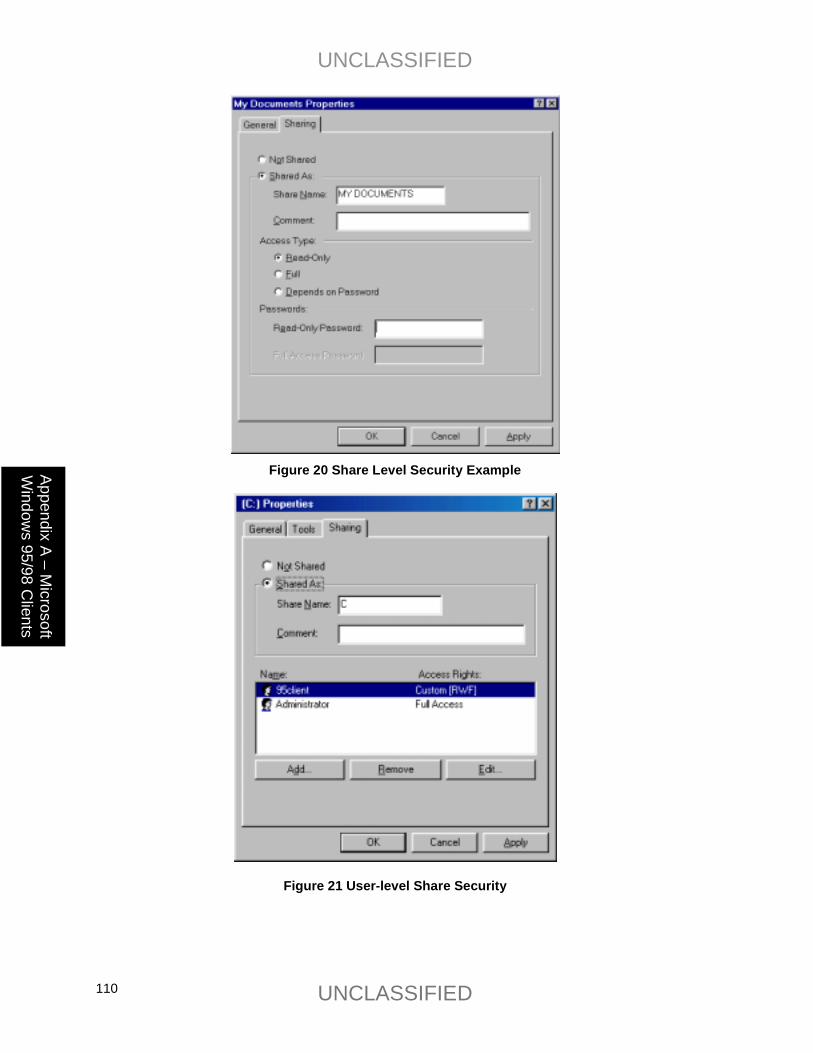
UNCLASSIFIED
UNCLASSIFIED 110
Appendix A –M
icrosoft W
indows 95/98 C
lients
Figure 20 Share Level Security Example
Figure 21 User-level Share Security
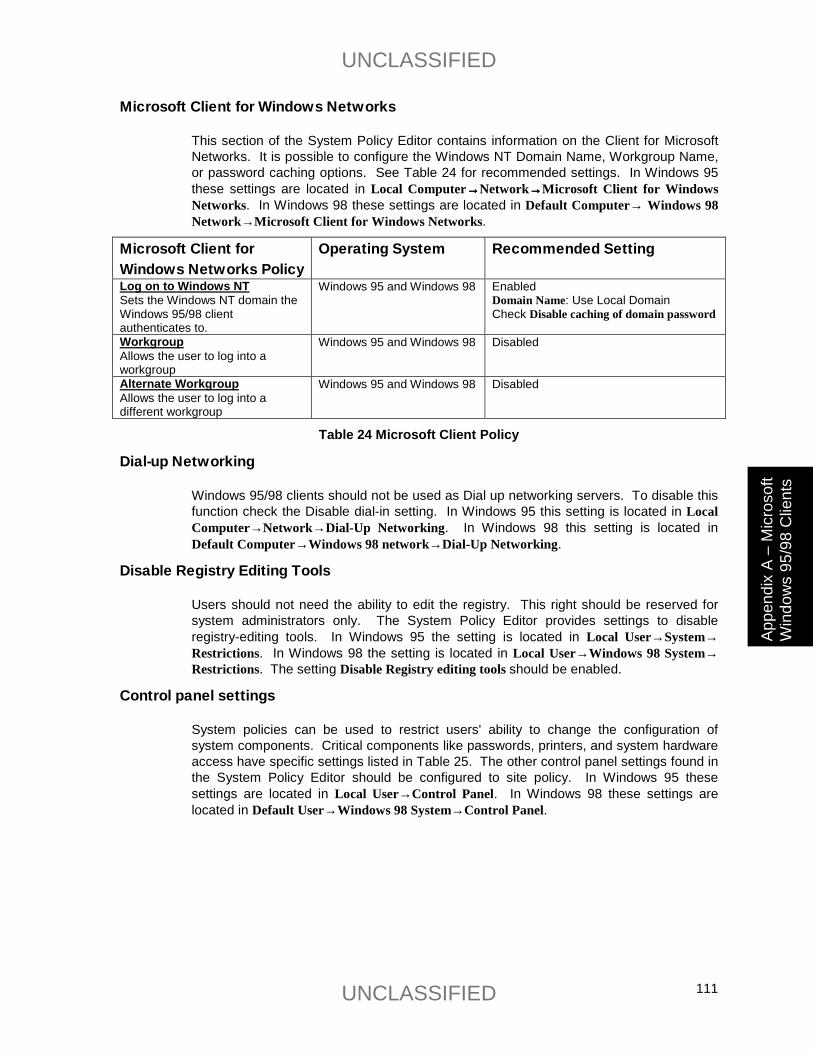
UNCLASSIFIED
UNCLASSIFIED 111
Appe
ndix
A –
Mic
roso
ft W
indo
ws
95/9
8 C
lient
s
Microsoft Client for Windows Networks
This section of the System Policy Editor contains information on the Client for Microsoft Networks. It is possible to configure the Windows NT Domain Name, Workgroup Name, or password caching options. See Table 24 for recommended settings. In Windows 95 these settings are located in Local Computer→→→→Network→→→→Microsoft Client for Windows Networks. In Windows 98 these settings are located in Default Computer→ Windows 98 Network→Microsoft Client for Windows Networks.
Microsoft Client for Windows Networks Policy
Operating System Recommended Setting
Log on to Windows NT Sets the Windows NT domain the Windows 95/98 client authenticates to.
Windows 95 and Windows 98 Enabled Domain Name: Use Local Domain Check Disable caching of domain password
Workgroup Allows the user to log into a workgroup
Windows 95 and Windows 98 Disabled
Alternate Workgroup Allows the user to log into a different workgroup
Windows 95 and Windows 98 Disabled
Table 24 Microsoft Client Policy
Dial-up Networking
Windows 95/98 clients should not be used as Dial up networking servers. To disable this function check the Disable dial-in setting. In Windows 95 this setting is located in Local Computer→Network→Dial-Up Networking. In Windows 98 this setting is located in Default Computer→Windows 98 network→Dial-Up Networking.
Disable Registry Editing Tools
Users should not need the ability to edit the registry. This right should be reserved for system administrators only. The System Policy Editor provides settings to disable registry-editing tools. In Windows 95 the setting is located in Local User→System→ Restrictions. In Windows 98 the setting is located in Local User→Windows 98 System→ Restrictions. The setting Disable Registry editing tools should be enabled.
Control panel settings
System policies can be used to restrict users' ability to change the configuration of system components. Critical components like passwords, printers, and system hardware access have specific settings listed in Table 25. The other control panel settings found in the System Policy Editor should be configured to site policy. In Windows 95 these settings are located in Local User→Control Panel. In Windows 98 these settings are located in Default User→Windows 98 System→Control Panel.
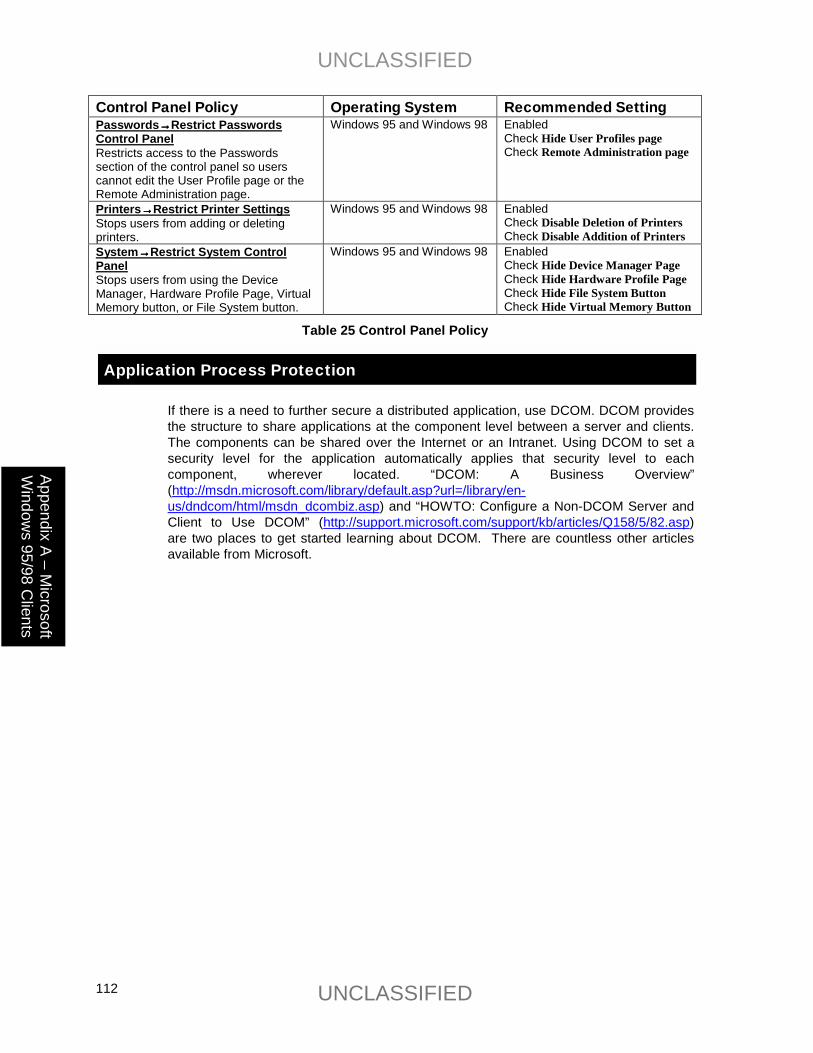
UNCLASSIFIED
UNCLASSIFIED 112
Appendix A –M
icrosoft W
indows 95/98 C
lients
Control Panel Policy Operating System Recommended Setting Passwords→→→→Restrict Passwords Control Panel Restricts access to the Passwords section of the control panel so users cannot edit the User Profile page or the Remote Administration page.
Windows 95 and Windows 98 Enabled Check Hide User Profiles page Check Remote Administration page
Printers→→→→Restrict Printer Settings Stops users from adding or deleting printers.
Windows 95 and Windows 98 Enabled Check Disable Deletion of Printers Check Disable Addition of Printers
System→→→→Restrict System Control Panel Stops users from using the Device Manager, Hardware Profile Page, Virtual Memory button, or File System button.
Windows 95 and Windows 98 Enabled Check Hide Device Manager Page Check Hide Hardware Profile Page Check Hide File System Button Check Hide Virtual Memory Button
Table 25 Control Panel Policy
Application Process Protection
If there is a need to further secure a distributed application, use DCOM. DCOM provides the structure to share applications at the component level between a server and clients. The components can be shared over the Internet or an Intranet. Using DCOM to set a security level for the application automatically applies that security level to each component, wherever located. “DCOM: A Business Overview” (http://msdn.microsoft.com/library/default.asp?url=/library/en-us/dndcom/html/msdn_dcombiz.asp) and “HOWTO: Configure a Non-DCOM Server and Client to Use DCOM” (http://support.microsoft.com/support/kb/articles/Q158/5/82.asp) are two places to get started learning about DCOM. There are countless other articles available from Microsoft.

UNCLASSIFIED
UNCLASSIFIED 113
Appe
ndix
A –
Mic
roso
ft W
indo
ws
95/9
8 C
lient
s
This Page Intentionally Left Blank
UNCLASSIFIED
UNCLASSIFIED 114
Example Logon Banner The DoD uses a standard warning banner that can be downloaded from the United States Navy INFOSEC Web Information Service at http://infosec.nosc.mil/infosec.html. Select the text under the United States Department of Defense Warning Statement and copy it to the clipboard. This banner should resemble the following message:
"This is a Department of Defense computer system. This computer system, including all related equipment, networks and network devices (specifically including Internet access), are provided only for authorized U. S. Government use. DoD computer systems may be monitored for all lawful purposes, including to ensure that their use is authorized, for management of the system, to facilitate protection against unauthorized access, and to verify security procedures, survivability and operational security. Monitoring includes active attacks by authorized DoD entities to test or verify the security of this system. During monitoring, information may be examined, recorded, copied and used for authorized purposes. All information, including personal information, placed on or sent over this system may be monitored. Use of this DoD computer system, authorized or unauthorized, constitutes consent to monitoring of this system. Unauthorized use may subject you to criminal prosecution. Evidence of unauthorized use collected during monitoring may be used for administrative, criminal or adverse action. Use of this system constitutes consent to monitoring for these purposes."
Windows NT displays a message box with a caption and text that can be configured before a user logs on to the machine. The DoD requires organizations to use this message box to display a warning that notifies users that they can be held legally liable if they attempt to log on without authorization to use the computer. The absence of such a notice could be construed as an invitation, without restriction, to log on to the machine and browse the system.
Appendix
B

UNCLASSIFIED
UNCLASSIFIED 115 Appe
ndix
B –
Sam
ple
Logo
n Ba
nner
This Page Intentionally Left Blank
UNCLASSIFIED
UNCLASSIFIED 116
Appendix C – H
otfix Inform
ation
Appendix
C Windows NT 4.0 Post Service Pack 6a Hotfix Information
Below is a list of post Service Pack 6a hotfixes, along with the software versions containing or affected by the problem, the date of the hotfix, where to download the fix, the size of the compressed executable, and a Microsoft Knowledge Base article number to find out more information about the hotfix. In addition to implementing the recommendations in this guide, it is imperative to keep hotfixes current.
NOTE: Several hotfixes supercede older fixes. When this occurs, the superceded fixes are mentioned within the newer fix, but do not have their own entry in the list below.
Security Rollup Package
Microsoft has provided the Security Rollup Package (SRP) as a mechanism for managing the rollout of security related fixes. The SRP includes the functionality from all security patches released for Windows NT 4.0 since the release of Service Pack 6a.
Problems corrected by the SRP
The SRP includes post-SP6a fixes that were delivered via Microsoft security bulletins as well as a small number of fixes that were not addresses through this forum. For a complete listing of all fixes in the SRP, refer to Microsoft Knowledge Base Article (Q299444), “Post-Windows NT 4.0 Service Pack 6a Security Rollup Package (SRP)” at http://support.microsoft.com/support/kb/articles/q299/4/44.asp.
Fixes not included in the SRP
The fixes for the following vulnerabilities affecting Windows NT 4.0 systems are not included in the SRP. To determine if these fixes should be applied consult the associated security bulletin.
Core OS
MS01-022 http://www.microsoft.com/technet/security/bulletin/MS01-022.asp - WebDAV Service Provider Can Allow Scripts to Levy Requests as User (Q296441 http://support.microsoft.com/support/misc/kblookup.asp?id=296441&sd=tech)
Front Page Server Extensions
MS01-035 - FrontPage Server Extension Sub-Component Contains Unchecked Buffer (Q300477 http://support.microsoft.com/support/misc/kblookup.asp?id=300477&sd=tech)
UNCLASSIFIED
UNCLASSIFIED 117
Appe
ndix
C –
Hot
fix
Info
rmat
ion
Java Virtual Machine
MS00-081 http://www.microsoft.com/technet/security/bulletin/MS00-081.asp - New Variant of VM File Reading Vulnerability (Q277014 http://support.microsoft.com/support/misc/kblookup.asp?id=277014&sd=tech) which includes patches for:
MS99-031 http://www.microsoft.com/technet/security/bulletin/MS99-031.asp : Virtual Machine Sandbox Vulnerability MS99-045 http://www.microsoft.com/technet/security/bulletin/MS99-045.asp : Virtual Machine Verifier Vulnerability MS00-011 http://www.microsoft.com/technet/security/bulletin/MS99-011.asp : VM File Reading Vulnerability MS00-059 http://www.microsoft.com/technet/security/bulletin/MS99-059.asp : Java VM Applet Vulnerability
SRP Download Information
The following file is available for download from the Microsoft Download Center. Click the file name below to download the file:
� http://www.microsoft.com/ntserver/nts/downloads/critical/q299444/default.asp
NOTE: The Security Rollup Package can only be installed if you are running Windows NT 4.0 with Service Pack 6a.
Compaq Array Controller Users If you have installed the Compaq Array Controller Driver (CPQARRAY.SYS) from the Compaq Web Site, Compaq FTP Site or Compaq SmartStart, then please see the following article in the Microsoft Knowledge Base regarding Compaq Array Controllers and the Windows NT 4.0 Security Rollup Package (SRP): Q305228 - STOP 0xA Occurs After Applying Windows NT 4.0 Security Rollup Package http://support.microsoft.com/support/misc/kblookup.asp?ID=305228.
Additional Required Hotfixes
At the time of this writing the following Microsoft Security Bulletin and Knowledge Base Qs were not included in the SRP.
Problems with WINLOGON Service (Q245148)
When you try to log off your computer by clicking Close all programs and log on as a different user in the Shut Down Windows dialog box after you install Windows NT 4.0 Service Pack 6, the screen may appear gray, and your computer may appear to stop
UNCLASSIFIED
UNCLASSIFIED 118
Appendix C – H
otfix Inform
ation
responding (hang). Also, your mouse pointer may appear as an hourglass, indicating your computer is busy. This problem occurs because of a change in the WINLOGON service in Windows NT 4.0 Service Pack 6. When you log off your computer, programs may prompt you to save data. If you click Cancel, the logoff sequence is stopped, and control is returned to the program so you can continue working. If you then click Start to log off, you receive the behavior noted earlier in this article.
The following files are available for download from the Microsoft Download Center or Microsoft's FTP site. Click the file names below to download the appropriate file:
x86: Microsoft Download Center: http://download.microsoft.com/download/winntsp/patch/winlogon/nt4/en-us/q245148i.exe or FTP: ftp://ftp.microsoft.com/bussys/winnt/winnt-public/fixes/usa/nt40/hotfixes-postsp6a/winlogon-fix/Q245148i.exe
Alpha: Microsoft Download Center: http://download.microsoft.com/download/winntsp/patch/winlogon/alpha/en-us/q245148a.exe or FTP: ftp://ftp.microsoft.com/bussys/winnt/winnt-public/fixes/usa/nt40/hotfixes-postsp6a/winlogon-fix/Q245148a.exe
Enhanced Security Level Hotfix
When changing the domain password with the C2 security registry entry enabled a “Stop 0x1E” error message may occur. The problem occurs if you have Service Pack 6a (SP6a) installed and the following registry entry is set:
Key: HKEY_LOCAL_MACHINE\SYSTEM\CurrentControlSet\Control\Session Manager Value: EnhancedSecurityLevel (REG_DWORD) Data: 1
This key ensures that Object Manager can change the attributes of a kernel object in the Object table for the current process if the previous mode of the caller is kernel mode. When you attempt to change the password after setting this registry value, you receive the following error message:
Stop 0x0000001e (0xc0000005, 0x8019bb12, 0x00000000, 0x0000022c)
Enhanced Security Level Hotfix Download Information
UNCLASSIFIED
UNCLASSIFIED 119
Appe
ndix
C –
Hot
fix
Info
rmat
ion
A supported fix that corrects this problem is now available from Microsoft, but it has not been fully regression tested and should be applied only to systems experiencing this specific problem. If you are not severely affected by this specific problem, Microsoft recommends that you wait for the next Windows NT 4.0 service pack that contains this fix. To resolve this problem immediately, contact Microsoft Product Support Services to obtain the fix. This hotfix is also available on the Companion CD. For a complete list of Microsoft Product Support Services phone numbers and information on support costs, please go to the following address on the World Wide Web:
http://support.microsoft.com/directory/overview.asp
Microsoft Security Bulletin MS01-043
(Applies only if using NNTP (Network News Transport Protocol) service)The NNTP (Network News Transport Protocol) service in Windows NT 4.0, Windows 2000, and Exchange 2000 contains a memory leak in a routine that processes news postings. Each time such a posting is processed that contains a particular construction, the memory leak causes a small amount of memory to no longer be available for use. If an attacker sent a large number of posts, the server memory could be depleted to the point at which normal service would be disrupted. An affected server could be restored to normal service by stopping and starting the IISAdmin service. Exchange 5.5 contains an NNTP service, but it is not affected by the vulnerability. Exchange 2000 does not ship a separate NNTP service; instead, if NNTP is enabled, the native Windows 2000 NNTP service is used. As a result, Exchange 2000 servers that offer NNTP services should have the Windows 2000 patch applied to them. Vulnerability identifier: CAN-2001-0543 http://www.cve.mitre.org/cgi-bin/cvename.cgi?name=CAN-2001-0543
Download locations for Microsoft Security Bulletin MS01-043
Windows NT 4.0 Server and Server, Enterprise Edition: http://www.microsoft.com/Downloads/Release.asp?ReleaseID=31955
UNCLASSIFIED
UNCLASSIFIED 120
Appendix D–C
onfiguration C
hecklist
The following is a comprehensive checklist of the suggested configuration settings as outlined in this document. This list can be used as a quick reference guide for experienced system administrators who are already intimately familiar with Windows NT and how to perform these tasks using the Microsoft supplied tool set. For additional information on a specific recommendation, refer to the chapter designator at the end of that item.
WARNING: This list does not address site-specific issues and every setting in this book should be tested on a non-operational network.
� Read this guide in its entirety. Subsequent chapters build on information and settings discussed in prior chapters. Omitting or deleting steps can potentially lead to an unstable network that will require reconfiguration and reinstallation of software.
� Perform pre-configuration recommendations:
� Implement appropriate domain model for your site. (Chapter 1)
� Formulate and implement a Physical Security Policy throughout the organization. (Chapter 2)
� Convert all FAT volumes to NTFS partitions, if necessary, and restart your system. (Chapter 2)
� Perform a full backup of your system, if this is not a new installation, including system registry files. A full backup is the only way to restore your system to a previous working installation. (Chapter 13)
� Update the emergency repair disk (ERD) using the rdisk /s parameter to get the Security and SAM registry hives updated on the disk. (Chapter 13)
� Perform a full system restart and check the Event Viewer for errors. Resolve any issues before installing SP6a.
� Copy your previous uninstall directory to a safe location. By default, this directory is located in %SystemRoot%\$NTServicePackUninstall$.
� Run Srvinfo.exe from the Windows NT 4.0 Resource Kit and document existing hotfix information.
� Disable any non-essential third-party drivers and services not required for starting the system. Contact the manufacturers about updated versions.
� Verify available disk space. The installation of SP6a requires 60 MB to 120 MB of drive space for the installation, depending on whether the Uninstall option is chosen.
� Close all active debugging sessions or remote control sessions before starting the installation.
Appendix
D Windows NT Configuration Checklist
UNCLASSIFIED
UNCLASSIFIED 121
Appe
ndix
D–C
onfig
urat
ion
Che
cklis
t
� Identify any third party software and verify the software is compatible with Service Pack 6a.
� Read the Service Pack 6a Readme.txt file for installation instructions, descriptions of Service Pack 6a fixes and added functionality, and software/hardware incompatibilities. (Companion CD)
� Delete each hotfix uninstall folder in %SystemRoot% (usually C:\winnt). (Chapter 3)
� Install the 128-bit version of Service Pack 6a using the update.exe program. (Chapter 3)
NOTE: The 128-bit version is restricted to U.S. and Canadian sites.
� Create an uninstall directory when prompted by the install program. (Chapter 3)
� Install post Service Pack 6a hotfixes using either the manual or automatic installation procedures based on your specific needs. (Chapter 3)
� Install the command line and Graphical User Interface versions of the Security Configuration Manager (SCM), and the Microsoft Management Console (MMC) if required. (Chapter 3)
� Load the MMC snap-in for the SCM. (Chapter 4)
� Make required changes to the Security Configuration Files contained on the companion CD. (Chapters 5 - 11)
� Load a specific configuration file that requires modification into the SCM. (Chapter 4)
� Review the security configuration file and identify any changes required to Account Policies, Local Policies, Event Logging, Restricted Groups, System Services, Registry Settings, and File System Settings based on your specific site’s architecture.
� Customize the security settings for your environment and save changes to this file. (Chapters 5 – 11)
� Test all changes before installing them on an operational network.
� Repeat this process for each additional configuration file that requires modification.
� Configure your system(s) using the appropriate Security Configuration File(s) contained on the Companion CD or the ones previously modified for your site. (Chapter 12)
� Open an existing or new database using the SCM.
� Import the specific configuration file required for the system.
� Perform a security analysis against the existing configuration to identify any discrepancies.
� Re-configure the system, if necessary, and reboot the computer.
� Modify the system boot time to 0 to prevent a user from booting into a different operating system configuration than is allowed. (Chapter 13)
� Make the following manual registry changes: (Chapter 13)
UNCLASSIFIED
UNCLASSIFIED 122
Appendix D–C
onfiguration C
hecklist
WARNING: Incorrect registry modifications can severely impair or disable a Windows NT system. Currently, there is no Undo command for deletions within the registry. The registry editors prompt for confirmation of deletions if Confirm On Delete is selected from the Options menu. When deleting a key, the message does not include the name of the key being deleted. Therefore, check the selection carefully before proceeding.
� Modify the following registry key value to disable the CDROM autorun feature.
Hive: HKEY_LOCAL_MACHINE Key: \System\CurrentControlSet\Services\Cdrom Name: Autorun Type: REG_DWORD Value: 0
� Add the following registry key value to secure additional Base Named Objects.
Hive: HKEY_LOCAL_MACHINE Key: \System\CurrentControlSet\Control\Session Manager Name: AdditionalBaseNamedObjectsProtectionMode Type: REG_DWORD Value: 1
� Add the following registry key value to restrict task scheduling.
Hive: HKEY_LOCAL_MACHINE Key: \System\CurrentControlSet\Control\Lsa Name: Submit Control Type: REG_DWORD Value: 0 (Administrators only – recommended)
1 (Administrators and Server Operators only)
� Add the following registry key and key value to restrict print driver installation.
Hive: HKEY_LOCAL_MACHINE Key: \System\CurrentControlSet\Control\Print\Providers\LanMan Print
Services\Servers Name: AddPrintDrivers Type: REG_DWORD Value: 1
� Add and/or set the following key value to disable auto-generation of 8.3 filenames.
Hive: HKEY_LOCAL_MACHINE Key: \System\CurrentControlSet\Control\FileSystem Name: NtfsDisable8dot3NameCreation Type: REG_DWORD Value: 1
WARNING: Setting this registry value may break 16-bit applications or other applications requiring the use of 8.3 names.
� Add the following registry key value to protect kernel object attributes.
UNCLASSIFIED
UNCLASSIFIED 123
Appe
ndix
D–C
onfig
urat
ion
Che
cklis
t
Hive: HKEY_LOCAL_MACHINE Key: \System\CurrentControlSet\Control\Session Manager Name: EnhancedSecurityLevel Type: REG_DWORD Value: 1
� Add the following registry key value to enable NetBT to open TCP and UDP ports exclusively.
Hive: HKEY_LOCAL_MACHINE Key: \System\CurrentControlSet\Services\NetBT\Parameters Name: EnablePortLocking Type: REG_DWORD Value: 1
NOTE: The Post-Service Pack 6a hotfix "C2 Update" must be installed to ensure that the registry key value is effective.
� Modify the following registry key value, if it exists, to disable the capability for the system to automatically logon as administrator.
Hive: HKEY_LOCAL_MACHINE Key: \Software\Microsoft\Windows NT\Current Version\Winlogon Name: AutoAdminLogon Type: REG_DWORD Value: 0
If the AutoAdminLogon value exists, the DefaultPassword value will probably also exist. This value contains the administrator password in plain text and should be deleted.
� Delete the following registry key values to fully remove the OS/2 and POSIX subsystems
Hive: HKEY_LOCAL_MACHINE Key: \System\CurrentControlSet\Control\Session Manager\Environment Name: Os2LibPath Entry: Delete entry
Hive: HKEY_LOCAL_MACHINE Key: \System\CurrentControlSet\Control\Session Manager\Subsystems Name: Optional Entry: Delete entry
Hive: HKEY_LOCAL_MACHINE Key: \System\CurrentControlSet\Control\Session Manager\SubSystems Name: OS2 and POSIX Entry: Delete entries for both OS2 and POSIX
� Delete the following registry key entry to remove the Netware DLL.
Hive: HKEY_LOCAL_MACHINE Key: \System\CurrentControlSet\Control\Lsa Name: Notification Packages Type: REG_MULTI_SZ Value: Delete FPNWCLNT
NOTE: Only remove the FPNWCLNT entry; leave other entries such as PASSFILT.DLL.
UNCLASSIFIED
UNCLASSIFIED 124
Appendix D–C
onfiguration C
hecklist
� Delete old hotfix registry entries if previous hotfixes were installed.
Hive: HKEY_LOCAL_MACHINE Key: \Software\Microsoft\Windows NT\CurrentVersion\Hotfix
Entry: Delete entries
� Make the following manual folder and file permission changes: (Chapter 13)
� Change %SystemRoot%\$NtUninstall* (folder, subfolders, and files) Administrators Full Control SYSTEM Full Control
� Change %SystemRoot%\Profiles (folder only) Administrators Full Control Authenticated Users Read, Execute CREATOR OWNER Full Control SYSTEM Full Control
� Change %SystemRoot%\Profiles\Administrator or profile of renamed Administrator account (folder, subfolders, and files )
Administrators Full Control SYSTEM Full Control
� Change %SystemRoot%\Profiles\All Users (folder, subfolders, and files) Administrators Full Control Authenticated Users Read, Execute SYSTEM Full Control
� Change %SystemRoot%\Profiles\Default User (folder, subfolders, and files )
Administrators Full Control Authenticated Users Read, Execute SYSTEM Full Control
� Remove the following files and folder from the %SystemDirectory% (%SystemRoot%\system32) folder:
os2.exe os2ss.exe os2srv.exe psxss.exe posix.exe psxdll.dll The \os2 folder
� Remove the %SystemDrive%\DOS folder and all files within this folder if the system has been upgraded to Windows NT 4.0 from a DOS system:
� Configure share permissions to adhere to the following criteria if possible. (Chapter 13)
� Ensure that the Everyone group is not given Full Control permissions on any shares.
� Use the Authenticated Users group in place of the Everyone group.
� Give users and/or groups the minimum amount of permissions needed on a share.
� Hide highly sensitive shares not for general use by placing a $ after the share name when creating the share. Users can still connect to hidden
UNCLASSIFIED
UNCLASSIFIED 125
Appe
ndix
D–C
onfig
urat
ion
Che
cklis
t
shares, but must explicitly enter the full path to the share (i.e. the share will not be visible in Network Neighborhood).
� Configure share permissions to include printer shares. Printer Share Authenticated Users: Print
Administrators: Full Control SYSTEM: Full Control CREATER OWNER: Full Control
� Implement file and registry auditing. (Chapter 13)
� Implement the following additional account policy changes when possible. (Chapter 13)
� Remove group accounts.
� Set a password for the renamed Guest account.
� Create a decoy “administrator” account.
� Administrators should have two accounts.
� Remove dormant accounts.
� Local user accounts should not exist on workstations in a domain.
� Further encrypt the SAM database using the SYSKEY utility. WARNING: Once implemented, SYSKEY is irreversible. If the SYSKEY password is lost, the SAM cannot be recovered.
� Disable the Computer Browser Service and Server Services where appropriate.
WARNING: Disabling the Server service could affect the Remote administration of the Windows NT machine.
� Implement the following security recommendations for network protocols and
services where appropriate. (Chapter 14)
� Remove the NetBEUI and NWLink/IPX protocols if not required for your network implementation. TCP/IP should be the only active protocol on the network.
� Implement Advanced TCP/IP Security Settings if desired.
� Implement Remote Access Service (RAS) security recommendations.
� Install service only on servers that require dial-up support.
� Permit Dial out only for a RAS client.
� Require Microsoft encrypted authentication.
� Require data encryption.
� Allow remote client access only to this computer.
� Assign the right to use RAS only to users who require the service.
� Set the following registry key to enable RAS auditing
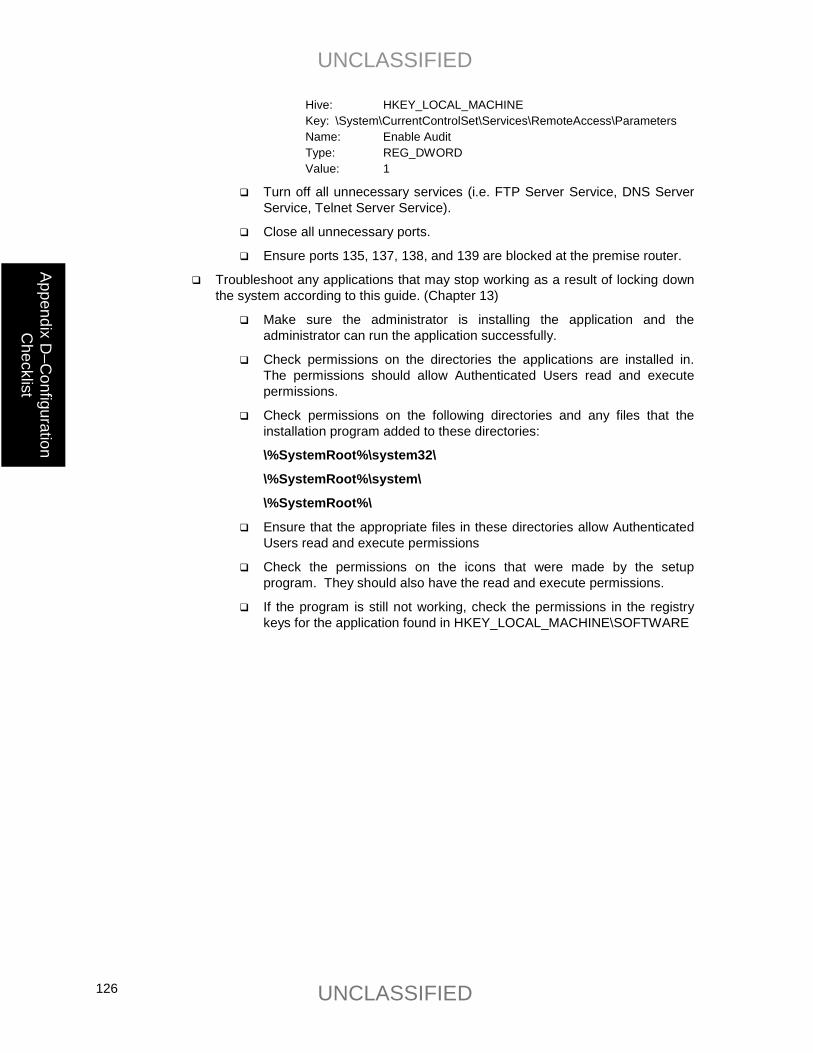
UNCLASSIFIED
UNCLASSIFIED 126
Appendix D–C
onfiguration C
hecklist
Hive: HKEY_LOCAL_MACHINE Key: \System\CurrentControlSet\Services\RemoteAccess\Parameters Name: Enable Audit Type: REG_DWORD Value: 1
� Turn off all unnecessary services (i.e. FTP Server Service, DNS Server Service, Telnet Server Service).
� Close all unnecessary ports.
� Ensure ports 135, 137, 138, and 139 are blocked at the premise router.
� Troubleshoot any applications that may stop working as a result of locking down the system according to this guide. (Chapter 13)
� Make sure the administrator is installing the application and the administrator can run the application successfully.
� Check permissions on the directories the applications are installed in. The permissions should allow Authenticated Users read and execute permissions.
� Check permissions on the following directories and any files that the installation program added to these directories:
\%SystemRoot%\system32\
\%SystemRoot%\system\
\%SystemRoot%\
� Ensure that the appropriate files in these directories allow Authenticated Users read and execute permissions
� Check the permissions on the icons that were made by the setup program. They should also have the read and execute permissions.
� If the program is still not working, check the permissions in the registry keys for the application found in HKEY_LOCAL_MACHINE\SOFTWARE

UNCLASSIFIED
UNCLASSIFIED 127
Appe
ndix
D–C
onfig
urat
ion
Che
cklis
t
This Page Intentionally Left Blank
UNCLASSIFIED
UNCLASSIFIED 128
Appendix E–Further Inform
ation Sources
Further Information Sources Microsoft's web page
http://www.microsoft.com/
Windows NT 4.0 Server Downloads
http://www.microsoft.com/ntserver/nts/downloads/recommended/
Service Pack 6a Readme
http://www.microsoft.com/ntserver/nts/downloads/recommended/sp6/readme.asp
Uninstalling Hotfix Folders
http://support.microsoft.com/support/kb/articles/Q194/3/34.ASP
Service Pack 6a Recommended Downloads
http://www.microsoft.com/ntserver/nts/downloads/recommended/sp6/
Microsoft Support
http://support.microsoft.com/support
Windows NT Service Packs
http://support.microsoft.com/Support/NTServer/Content/ServicePacks/Default.asp
Microsoft FTP (SCM Download)
ftp://ftp.microsoft.com/bussys/winnt/winnt-public/tools/scm/
"Installing Security Configuration Manager from SP4 Changes Windows NT 4.0 ACL Editor"
http://support.microsoft.com/support/kb/articles/q195/5/09.asp
MS Security Configuration Manager for Windows NT 4
http://www.microsoft.com/ntserver/techresources/security/securconfig.asp
"Windows NT System Key Permits Strong Encryption of the SAM"
http://support.microsoft.com/support/kb/articles/q143/4/75.asp
Q151082
http://support.microsoft.com/support/kb/articles/Q151/0/82.ASP
Q174075
http://support.microsoft.com//support/kb/articles/Q174/0/75.ASP
Q174076
http://support.microsoft.com//support/kb/articles/Q174/0/76.ASP
Appendix
E
UNCLASSIFIED
UNCLASSIFIED 129
Appe
ndix
E–F
urth
er
Info
rmat
ion
Sour
ces
"Windows NT, Terminal Server, and Microsoft Exchange Services Use TCP/IP Ports"
http://support.microsoft.com/support/kb/articles/Q150/5/43.ASP
"Description of UDP Ports"
http://support.microsoft.com/support/kb/articles/Q136/4/03.asp
"Information about TCP/IP Port Assignments"
http://support.microsoft.com/support/kb/articles/Q174/9/04.ASP
Microsoft’s web site
http://www.microsoft.com/downloads/default.asp
How to Enable NTLM 2 Authentication for Windows 95/98 Clients
http://support.microsoft.com/support/kb/articles/Q239/8/69.ASP
DCOM: A Business Overview
http://msdn.microsoft.com/library/default.asp?url=/library/en-us/dndcom/html/msdn_dcombiz.asp
HOWTO: Configure a Non-DCOM Server and Client to Use DCOM
http://support.microsoft.com/support/kb/articles/Q158/5/82.asp
"Enabling NetBT to Open TCP and UDP Ports Exclusively"
http://support.microsoft.com/support/kb/articles/Q241/0/41.ASP
“Device Drivers Create Their Corresponding DeviceObject with FILE_DEVICE_SECURE_OPEN DeviceCharacteristics”
http://support.microsoft.com/support/kb/articles/Q243/4/05.ASP
“ACLs Associated with Events and Semaphores Created by JET500.DLL”
http://support.microsoft.com/support/kb/articles/Q243/4/04.ASP
Post Service Pack 6a section of their ftp server
ftp://ftp.microsoft.com/bussys/winnt/winnt-public/fixes/usa/nt40/hotfixes-postsp6a/
C2 Update Hotfix for Intel (HTTP)
http://download.microsoft.com/download/winntsp/Patch/SP6a_C2/NT4/EN-US/Q244599i.exe
C2 Update Hotfix for Intel (FTP)
ftp://ftp.microsoft.com/bussys/winnt/winnt-public/fixes/usa/nt40/hotfixes-postsp6a/c2-fix/Q244599i.exe
C2 Update Hotfix for Alpha (HTTP)
http://download.microsoft.com/download/winntsp/Patch/SP6a_C2/ALPHA/EN-US/Q244599a.exe
C2 Update Hotfix for Alpha (FTP)
ftp://ftp.microsoft.com/bussys/winnt/winnt-public/fixes/usa/nt40/hotfixes-postsp6a/c2-fix/Q244599a.exe
UNCLASSIFIED
UNCLASSIFIED 130
Appendix E–Further Inform
ation Sources
WinLogon Hotfix for Intel (FTP)
ftp://ftp.microsoft.com/bussys/winnt/winnt-public/fixes/usa/nt40/hotfixes-postsp6a/winlogon-fix/q245148i.exe
Winlogon Hotfix for Alpha (FTP)
ftp://ftp.microsoft.com/bussys/winnt/winnt-public/fixes/usa/nt40/hotfixes-postsp6a/winlogon-fix/q245148a.exe
PPPConn Hotfix for Intel (FTP)
ftp://ftp.microsoft.com/bussys/winnt/winnt-public/fixes/usa/nt40/hotfixes-postsp6a/pppconn-fix/q246467i.exe
PPPConn Hotfix for Alpha (FTP) ftp://ftp.microsoft.com/bussys/winnt/winnt-public/fixes/usa/nt40/hotfixes-postsp6a/pppconn-fix/q246467a.exe "Repairing Windows NT After the Application of Service Pack 3" http://support.microsoft.com//support/kb/articles/Q146/8/87.ASP The United States Navy INFOSEC Web Information Service http://infosec.nosc.mil/infosec.html

UNCLASSIFIED
UNCLASSIFIED 131
Appe
ndix
E–F
urth
er
Info
rmat
ion
Sour
ces
This Page Intentionally Left Blank
UNCLASSIFIED
UNCLASSIFIED 132
Appendix F – References
Coopers & Lybrand L.L.P., Microsoft Windows NT Server: Security Features and Future Direction, July, 1997.
Dalton, Wayne, et. al., Windows NT Server 4: Security, Troubleshooting and Optimization, Indianapolis, IN: New Riders Publishing, 1996.
Microsoft TechNet, December 1999 Microsoft’s Web Page http://www.microsoft.com/ National Computer Security Center, Microsoft Windows NT Version 3.5 Final Evaluation Report, June 1995.Russel, Charlie and Sharon Crawford, Running Microsoft Windows NT Server 4.0, Redmond,
Washington: Microsoft Press, 1997. Rutstein, Charles B., Windows NT Security: A Practical Guide to Securing Windows NT Servers &
Workstations, New York: McGraw-Hill, 1997. Sheldon, Tom, Windows NT Security Handbook: Everything You Need to Know to Protect Your
Network, Berkely, California: McGraw-Hill, 1997 Stuple, Stuart J., ed., Microsoft Windows NT Workstation Resource Kit: Comprehensive Resource
Guide and Utilities for Windows NT Workstation Version 4.0, Redmond, Washington: Microsoft Press, 1996.
Stuple, Stuart J., ed., Microsoft Windows NT Server Networking Guide: Technical Information and Tools for the Support Professional, Redmond, Washington: Microsoft Press, 1996.
Stuple, Stuart J., ed., Microsoft Windows NT Server Resource Guide: Technical Information and Tools for the Support Professional, Redmond, Washington: Microsoft Press, 1996.
Thomas, Steven B., Windows NT 4.0 Registry: A Professional Reference, New York: McGraw-Hill, 1998
Appendix
F References