GUIDE TO PCMARS FOR WINDOWS Set Up Booklet PC Mars Set Up Book… · FOR WINDOWS . Set Up Booklet ....
19
GUIDE TO PCMARS FOR WINDOWS Set Up Booklet Iowa Farm Business Association
Transcript of GUIDE TO PCMARS FOR WINDOWS Set Up Booklet PC Mars Set Up Book… · FOR WINDOWS . Set Up Booklet ....

GUIDE TO PCMARS
FOR WINDOWS Set Up Booklet
Iowa Farm Business
Association
2
Table of Contents
Introduction .... ........... ........... ........... ........... ........... ........... ........... ........... ........... ........... ........... 3 Internet Accessibility . ........... ........... ........... ........... ........... ........... ........... ........... ........... ........... 4 Create a New Set of Books .... ........... ........... ........... ........... ........... ........... ........... ........... ........... 4 Opening a Set of Books ......... ........... ........... ........... ........... ........... ........... ........... ........... ........... 5 Set Up Business Information . ........... ........... ........... ........... ........... ........... ........... ........... ........... 6-7 Selecting Account Codes ....... ........... ........... ........... ........... ........... ........... ........... ........... ........... 8 Select Bank/Asset Accounts .. ........... ........... ........... ........... ........... ........... ........... ........... ........... 9 Select Enterprise Codes ......... ........... ........... ........... ........... ........... ........... ........... ........... ........... 10 Adding Vendors ......... ........... ........... ........... ........... ........... ........... ........... ........... ........... ........... 11 Adding Loan Vendors ........... ........... ........... ........... ........... ........... ........... ........... ........... ........... 12 Adding Descriptions .. ........... ........... ........... ........... ........... ........... ........... ........... ........... ........... 13 Adding Profit Centers ........... ........... ........... ........... ........... ........... ........... ........... ........... ........... 13 Entering a Check/Deposit ...... ........... ........... ........... ........... ........... ........... ........... ........... ........... 14-16 Editing and Deleting Transactions ..... ........... ........... ........... ........... ........... ........... ........... ........... 17 Backing Up Your Data .......... ........... ........... ........... ........... ........... ........... ........... ........... ........... 18 Test Backup Option ... ........... ........... ........... ........... ........... ........... ........... ........... ........... ........... 18 Conclusion ..... ........... ........... ........... ........... ........... ........... ........... ........... ........... ........... ........... 19 Software Support ....... ........... ........... ........... ........... ........... ........... ........... ........... ........... ........... 19
3
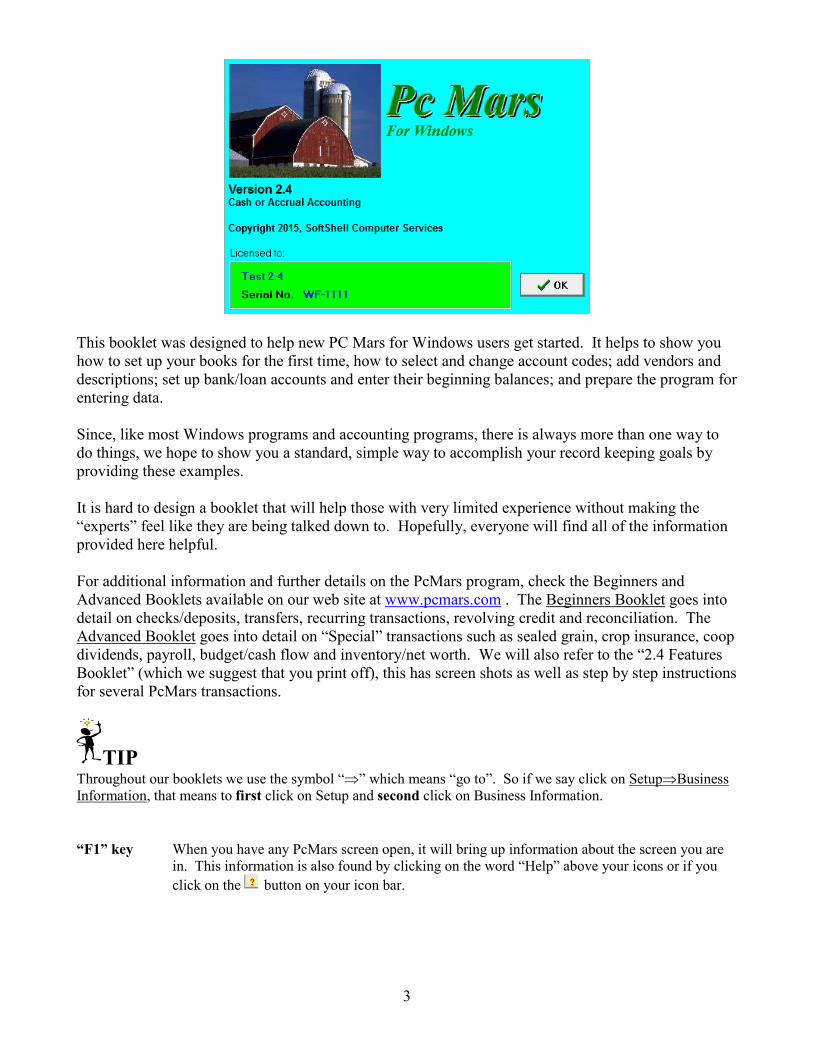
This booklet was designed to help new PC Mars for Windows users get started. It helps to show you how to set up your books for the first time, how to select and change account codes; add vendors and descriptions; set up bank/loan accounts and enter their beginning balances; and prepare the program for entering data. Since, like most Windows programs and accounting programs, there is always more than one way to do things, we hope to show you a standard, simple way to accomplish your record keeping goals by providing these examples. It is hard to design a booklet that will help those with very limited experience without making the “experts” feel like they are being talked down to. Hopefully, everyone will find all of the information provided here helpful. For additional information and further details on the PcMars program, check the Beginners and Advanced Booklets available on our web site at www.pcmars.com . The Beginners Booklet goes into detail on checks/deposits, transfers, recurring transactions, revolving credit and reconciliation. The Advanced Booklet goes into detail on “Special” transactions such as sealed grain, crop insurance, coop dividends, payroll, budget/cash flow and inventory/net worth. We will also refer to the “2.4 Features Booklet” (which we suggest that you print off), this has screen shots as well as step by step instructions for several PcMars transactions.
TIP Throughout our booklets we use the symbol “⇒” which means “go to”. So if we say click on Setup⇒Business Information, that means to first click on Setup and second click on Business Information.
“F1” key When you have any PcMars screen open, it will bring up information about the screen you are
in. This information is also found by clicking on the word “Help” above your icons or if you click on the button on your icon bar.
4
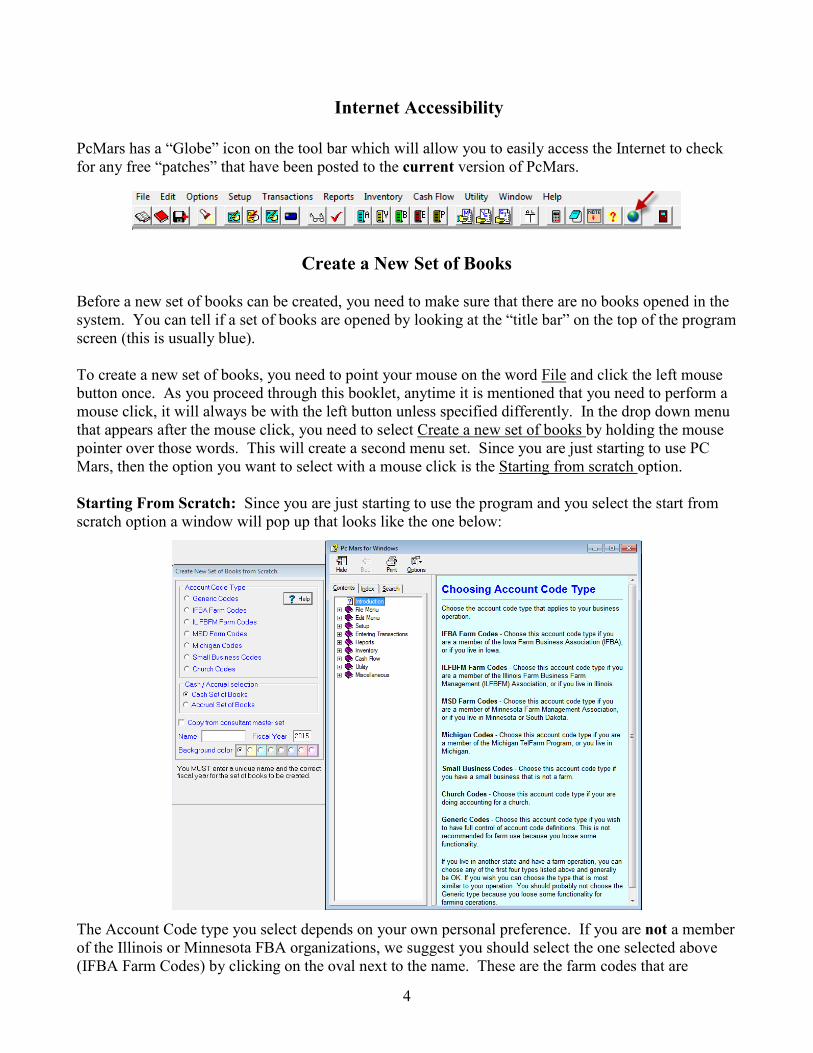
Internet Accessibility
PcMars has a “Globe” icon on the tool bar which will allow you to easily access the Internet to check for any free “patches” that have been posted to the current version of PcMars.
Create a New Set of Books Before a new set of books can be created, you need to make sure that there are no books opened in the system. You can tell if a set of books are opened by looking at the “title bar” on the top of the program screen (this is usually blue). To create a new set of books, you need to point your mouse on the word File and click the left mouse button once. As you proceed through this booklet, anytime it is mentioned that you need to perform a mouse click, it will always be with the left button unless specified differently. In the drop down menu that appears after the mouse click, you need to select Create a new set of books by holding the mouse pointer over those words. This will create a second menu set. Since you are just starting to use PC Mars, then the option you want to select with a mouse click is the Starting from scratch option. Starting From Scratch: Since you are just starting to use the program and you select the start from scratch option a window will pop up that looks like the one below:
The Account Code type you select depends on your own personal preference. If you are not a member of the Illinois or Minnesota FBA organizations, we suggest you should select the one selected above (IFBA Farm Codes) by clicking on the oval next to the name. These are the farm codes that are
5
already set up for farmers. If you have any questions on which code type to choose, you can click on the “help” button and an explanation of each will pop up. After you have selected the type of “account code”, you need to click in the box next to “Name” and type in a specific name for your farm records (this is limited to eight characters). The last step is to specify what year you will be working in by clicking in the box next to “Year”. The program should automatically “default” to the current year. (The background color defaults to light gray.) Once you have made your selections, clicking the OK button will start the procedure to create the files for your new books. There will always be a confirmation window that pops up before the creation just to verify that what you have entered is exactly how you want things to be. If you need to make changes, a simple click on the NO button will bring you back to the original screen to make your changes.
Opening a Set of Books
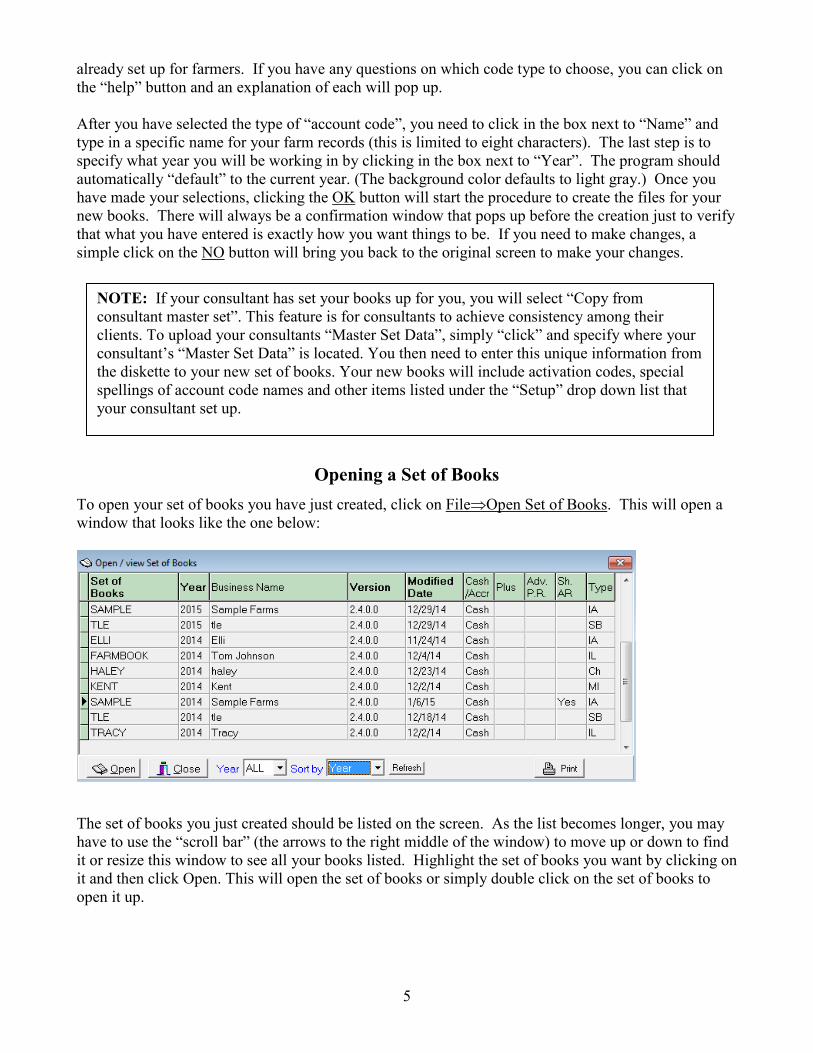
To open your set of books you have just created, click on File⇒Open Set of Books. This will open a window that looks like the one below:
The set of books you just created should be listed on the screen. As the list becomes longer, you may have to use the “scroll bar” (the arrows to the right middle of the window) to move up or down to find it or resize this window to see all your books listed. Highlight the set of books you want by clicking on it and then click Open. This will open the set of books or simply double click on the set of books to open it up.
NOTE: If your consultant has set your books up for you, you will select “Copy from consultant master set”. This feature is for consultants to achieve consistency among their clients. To upload your consultants “Master Set Data”, simply “click” and specify where your consultant’s “Master Set Data” is located. You then need to enter this unique information from the diskette to your new set of books. Your new books will include activation codes, special spellings of account code names and other items listed under the “Setup” drop down list that your consultant set up.
6
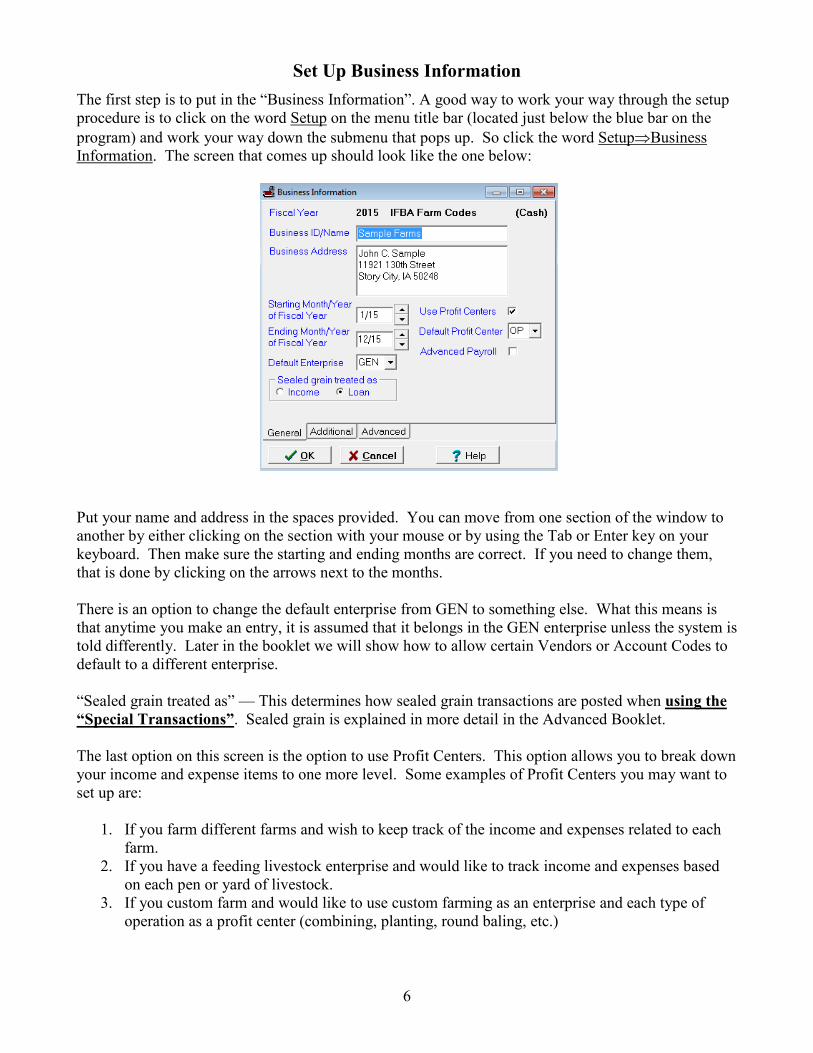
Set Up Business Information
The first step is to put in the “Business Information”. A good way to work your way through the setup procedure is to click on the word Setup on the menu title bar (located just below the blue bar on the program) and work your way down the submenu that pops up. So click the word Setup⇒Business Information. The screen that comes up should look like the one below:
Put your name and address in the spaces provided. You can move from one section of the window to another by either clicking on the section with your mouse or by using the Tab or Enter key on your keyboard. Then make sure the starting and ending months are correct. If you need to change them, that is done by clicking on the arrows next to the months. There is an option to change the default enterprise from GEN to something else. What this means is that anytime you make an entry, it is assumed that it belongs in the GEN enterprise unless the system is told differently. Later in the booklet we will show how to allow certain Vendors or Account Codes to default to a different enterprise. “Sealed grain treated as” — This determines how sealed grain transactions are posted when using the “Special Transactions”. Sealed grain is explained in more detail in the Advanced Booklet. The last option on this screen is the option to use Profit Centers. This option allows you to break down your income and expense items to one more level. Some examples of Profit Centers you may want to set up are:
1. If you farm different farms and wish to keep track of the income and expenses related to each farm.
2. If you have a feeding livestock enterprise and would like to track income and expenses based on each pen or yard of livestock.
3. If you custom farm and would like to use custom farming as an enterprise and each type of operation as a profit center (combining, planting, round baling, etc.)
7
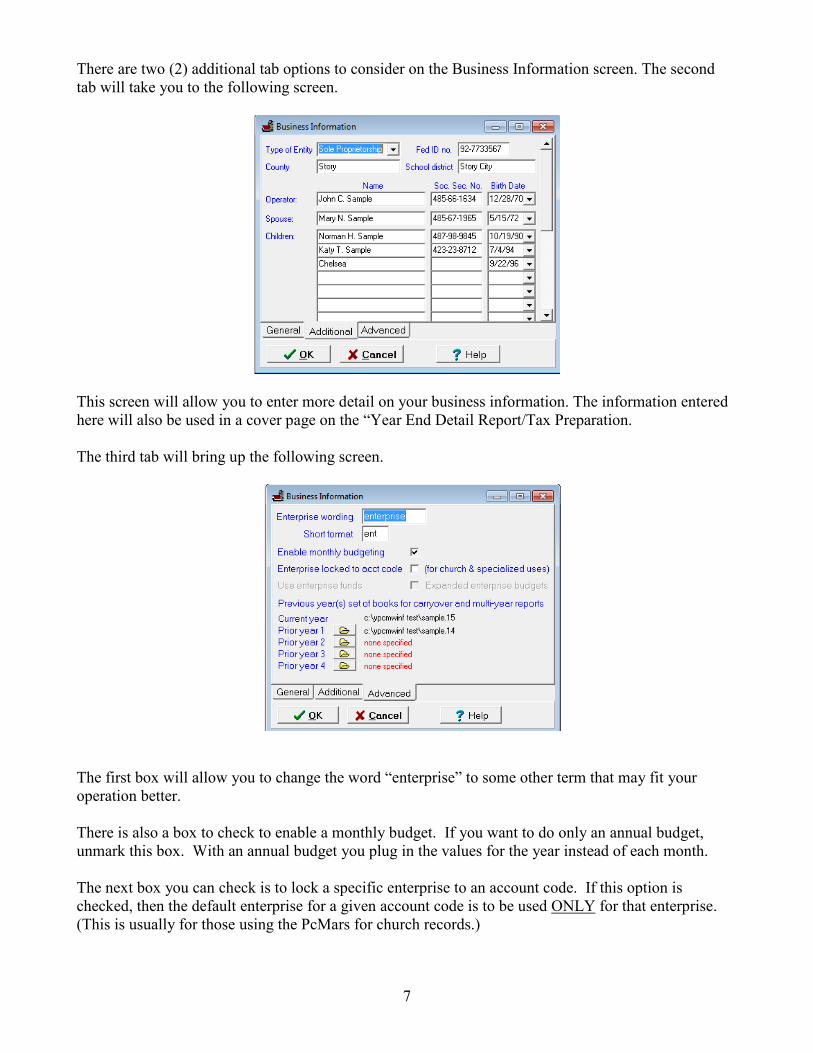
There are two (2) additional tab options to consider on the Business Information screen. The second tab will take you to the following screen.
This screen will allow you to enter more detail on your business information. The information entered here will also be used in a cover page on the “Year End Detail Report/Tax Preparation. The third tab will bring up the following screen.
The first box will allow you to change the word “enterprise” to some other term that may fit your operation better. There is also a box to check to enable a monthly budget. If you want to do only an annual budget, unmark this box. With an annual budget you plug in the values for the year instead of each month. The next box you can check is to lock a specific enterprise to an account code. If this option is checked, then the default enterprise for a given account code is to be used ONLY for that enterprise. (This is usually for those using the PcMars for church records.)
8
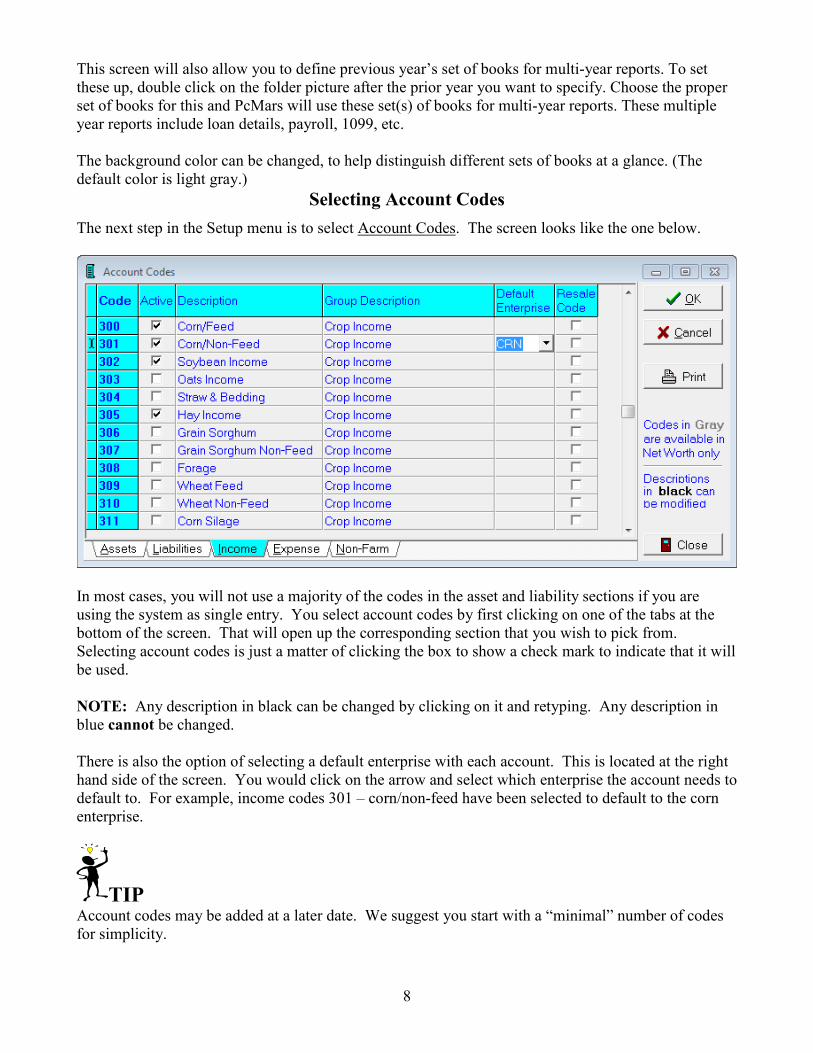
This screen will also allow you to define previous year’s set of books for multi-year reports. To set these up, double click on the folder picture after the prior year you want to specify. Choose the proper set of books for this and PcMars will use these set(s) of books for multi-year reports. These multiple year reports include loan details, payroll, 1099, etc. The background color can be changed, to help distinguish different sets of books at a glance. (The default color is light gray.)
Selecting Account Codes
The next step in the Setup menu is to select Account Codes. The screen looks like the one below.
In most cases, you will not use a majority of the codes in the asset and liability sections if you are using the system as single entry. You select account codes by first clicking on one of the tabs at the bottom of the screen. That will open up the corresponding section that you wish to pick from. Selecting account codes is just a matter of clicking the box to show a check mark to indicate that it will be used. NOTE: Any description in black can be changed by clicking on it and retyping. Any description in blue cannot be changed. There is also the option of selecting a default enterprise with each account. This is located at the right hand side of the screen. You would click on the arrow and select which enterprise the account needs to default to. For example, income codes 301 – corn/non-feed have been selected to default to the corn enterprise.
TIP Account codes may be added at a later date. We suggest you start with a “minimal” number of codes for simplicity.
9
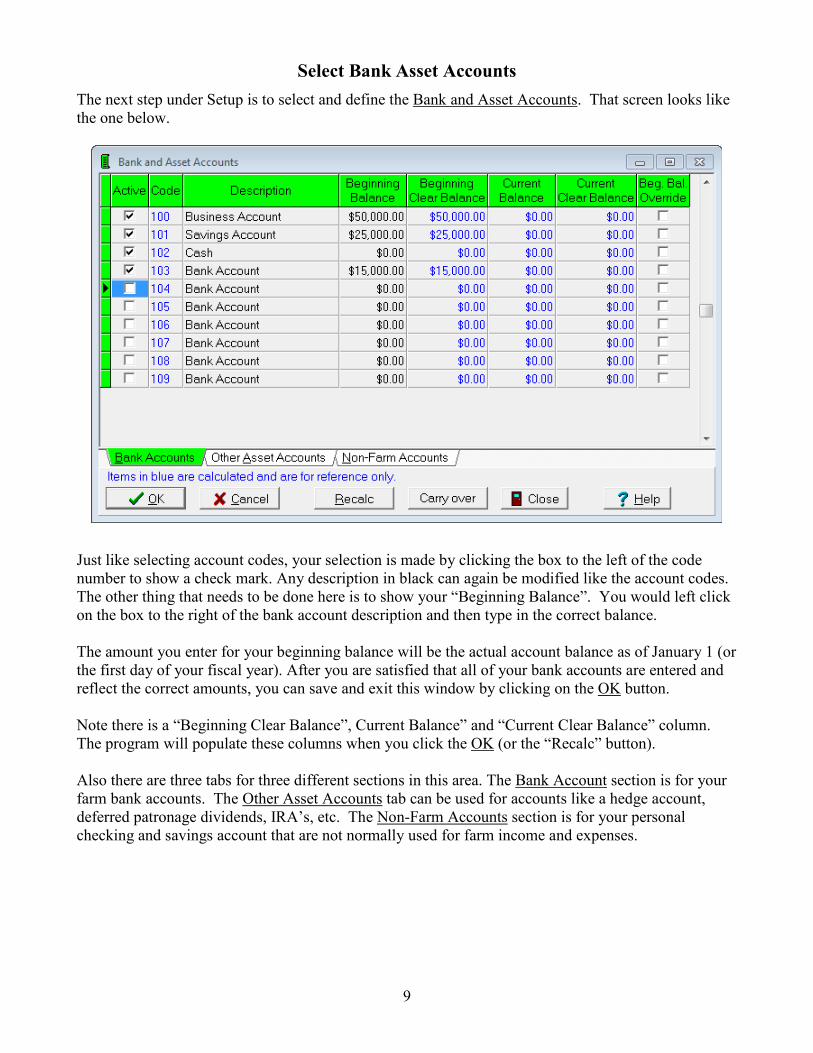
Select Bank Asset Accounts
The next step under Setup is to select and define the Bank and Asset Accounts. That screen looks like the one below.
Just like selecting account codes, your selection is made by clicking the box to the left of the code number to show a check mark. Any description in black can again be modified like the account codes. The other thing that needs to be done here is to show your “Beginning Balance”. You would left click on the box to the right of the bank account description and then type in the correct balance. The amount you enter for your beginning balance will be the actual account balance as of January 1 (or the first day of your fiscal year). After you are satisfied that all of your bank accounts are entered and reflect the correct amounts, you can save and exit this window by clicking on the OK button. Note there is a “Beginning Clear Balance”, Current Balance” and “Current Clear Balance” column. The program will populate these columns when you click the OK (or the “Recalc” button). Also there are three tabs for three different sections in this area. The Bank Account section is for your farm bank accounts. The Other Asset Accounts tab can be used for accounts like a hedge account, deferred patronage dividends, IRA’s, etc. The Non-Farm Accounts section is for your personal checking and savings account that are not normally used for farm income and expenses.

10
Select Enterprise Codes
The next step in the Setup process is selecting Enterprises. You use these to help determine which phase of your operation caused the expense or made the income. These selections are similar to the account code selections. Just click on the box next to the code you want to use and it will show a check mark to indicate that you are using it. If you prefer not to use an enterprise that is checked already, you click on the box to remove the check mark. By clicking on the Add new button, you can type in a new “three-character” enterprise code and description that isn’t already set up.

11
Adding Vendors
What are Vendors? They are people or businesses that you deal with most frequently or repeatedly in your farming operation. You can always add vendors at any time during your accounting year. To add a vendor you would select Setup⇒Vendor List. The window will look like the one below.
To add a new Vendor, you first need to click on the Add new button located at the bottom of the window. Then you fill in the information needed, using the Tab or Enter key or your mouse to maneuver from area to area. The type box gives you three options—Regular, Loan or CCC. (You can find information about using the CCC Loan option in the Beginners & Advanced Booklet.) The address and phone number areas are optional entries. If you enter a Default Account Code, it will allow the Account Code to automatically pop up when you select this vendor while entering a check or deposit. There is also an email address line with a hot link that can be used to email that vendor using the default email program within Windows. You would click the box next to Flag for 1099 if this vendor needs to receive a form 1099 from you at the end of the year. There is a report that will print out and total all transactions that 1099 vendors were used in. A default description can be entered at this time, however it is optional. When you are done filling out the information, clicking on the Save F10 button will record your information and you are then ready to add another vendor. Clicking on the Close button will save your information and close the window. Again, remember that vendors can be added throughout the year, so don’t worry about this list not having every vendor on it. You are limited only to the number you wish to enter.
12
Adding Loan Vendors
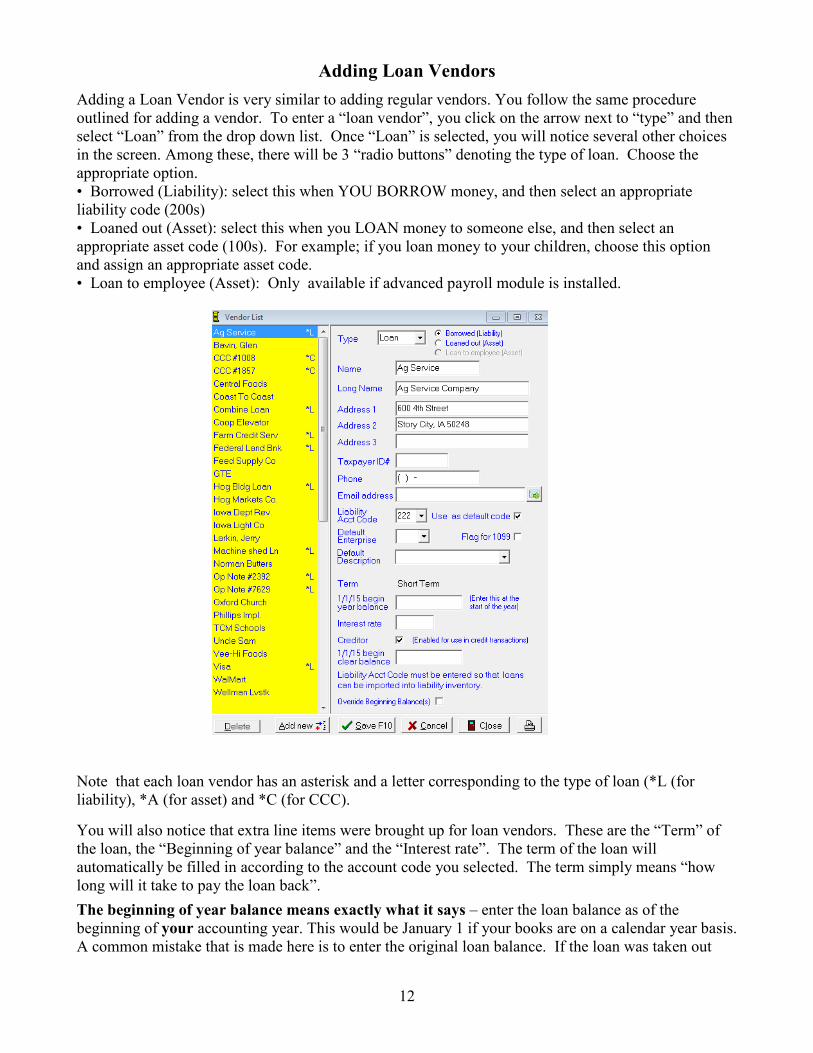
Adding a Loan Vendor is very similar to adding regular vendors. You follow the same procedure outlined for adding a vendor. To enter a “loan vendor”, you click on the arrow next to “type” and then select “Loan” from the drop down list. Once “Loan” is selected, you will notice several other choices in the screen. Among these, there will be 3 “radio buttons” denoting the type of loan. Choose the appropriate option. • Borrowed (Liability): select this when YOU BORROW money, and then select an appropriate liability code (200s) • Loaned out (Asset): select this when you LOAN money to someone else, and then select an appropriate asset code (100s). For example; if you loan money to your children, choose this option and assign an appropriate asset code. • Loan to employee (Asset): Only available if advanced payroll module is installed.
Note that each loan vendor has an asterisk and a letter corresponding to the type of loan (*L (for liability), *A (for asset) and *C (for CCC). You will also notice that extra line items were brought up for loan vendors. These are the “Term” of the loan, the “Beginning of year balance” and the “Interest rate”. The term of the loan will automatically be filled in according to the account code you selected. The term simply means “how long will it take to pay the loan back”.
The beginning of year balance means exactly what it says – enter the loan balance as of the beginning of your accounting year. This would be January 1 if your books are on a calendar year basis. A common mistake that is made here is to enter the original loan balance. If the loan was taken out
13
during the year, then the beginning of year balance needs to be zero. The balance of the loan will show up on reports when the original loan deposit is made.
The interest rate is where you would insert the rate applied to your loan. (This is not calculated anywhere in the program—it is just for reference purposes and is optional). There is also an “Override Beginning Balance” option. Beginning Year Balance and Beginning Cleared Balances are carried over from the previous year and are calculated (read-only) blue values. You can, however, override this and enter both the Beginning Year Balance and the Beginning Cleared Balance by checking this check box. You should only consider doing this as a last resort. If you choose this option, the reconcile feature and check register report will always start from the Beginning Cleared Balance value that you manually enter. The reconcile feature cannot reconcile or report on transactions from the previous year.
Adding Descriptions
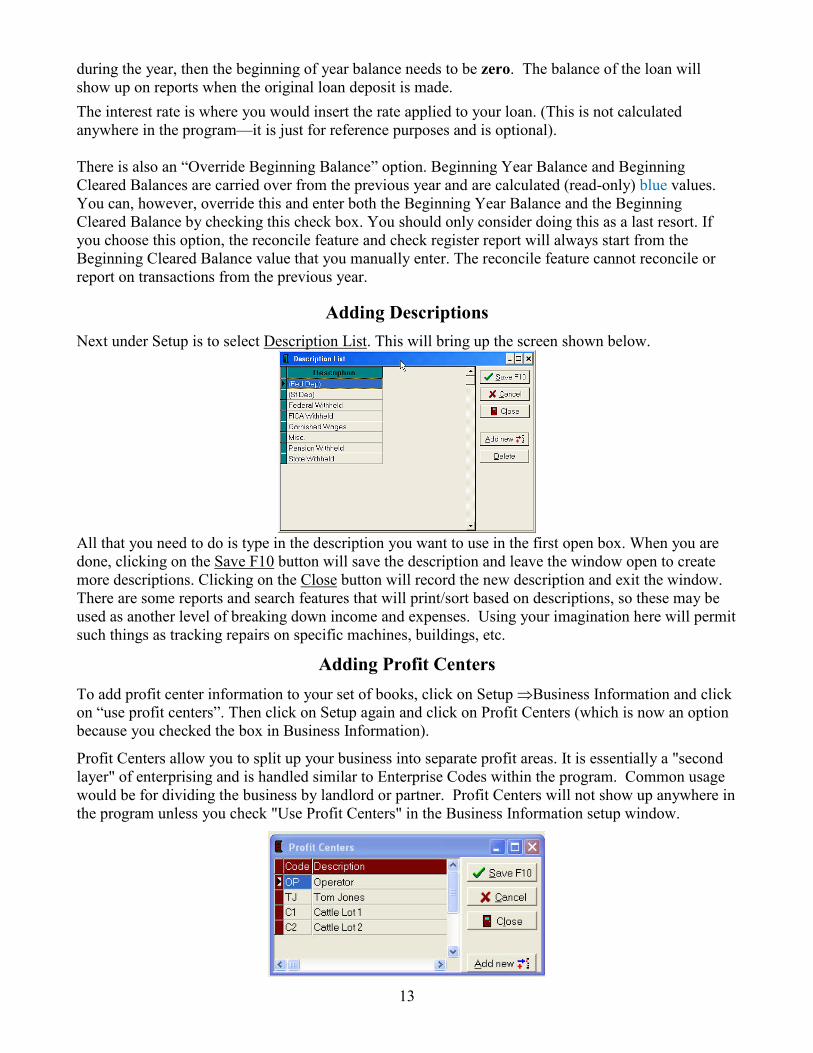
Next under Setup is to select Description List. This will bring up the screen shown below.
All that you need to do is type in the description you want to use in the first open box. When you are done, clicking on the Save F10 button will save the description and leave the window open to create more descriptions. Clicking on the Close button will record the new description and exit the window. There are some reports and search features that will print/sort based on descriptions, so these may be used as another level of breaking down income and expenses. Using your imagination here will permit such things as tracking repairs on specific machines, buildings, etc.
Adding Profit Centers
To add profit center information to your set of books, click on Setup ⇒Business Information and click on “use profit centers”. Then click on Setup again and click on Profit Centers (which is now an option because you checked the box in Business Information).
Profit Centers allow you to split up your business into separate profit areas. It is essentially a "second layer" of enterprising and is handled similar to Enterprise Codes within the program. Common usage would be for dividing the business by landlord or partner. Profit Centers will not show up anywhere in the program unless you check "Use Profit Centers" in the Business Information setup window.
14
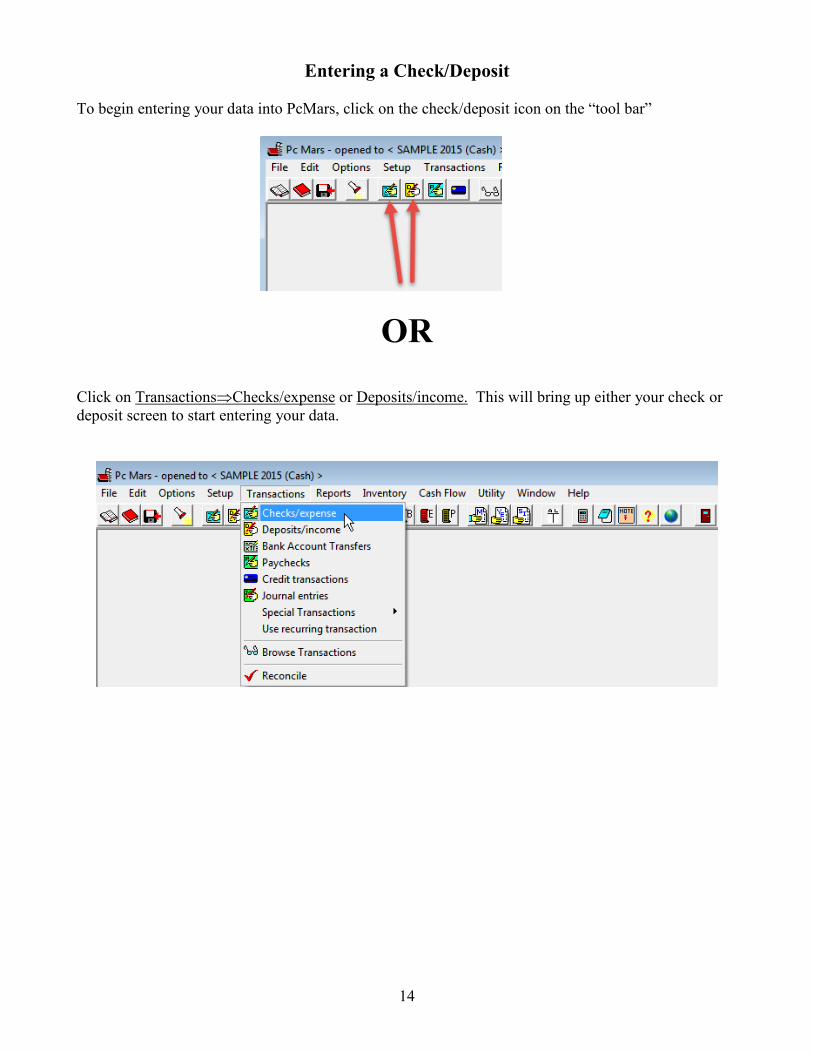
Entering a Check/Deposit
To begin entering your data into PcMars, click on the check/deposit icon on the “tool bar”
OR Click on Transactions⇒Checks/expense or Deposits/income. This will bring up either your check or deposit screen to start entering your data.
15
Entering a Check
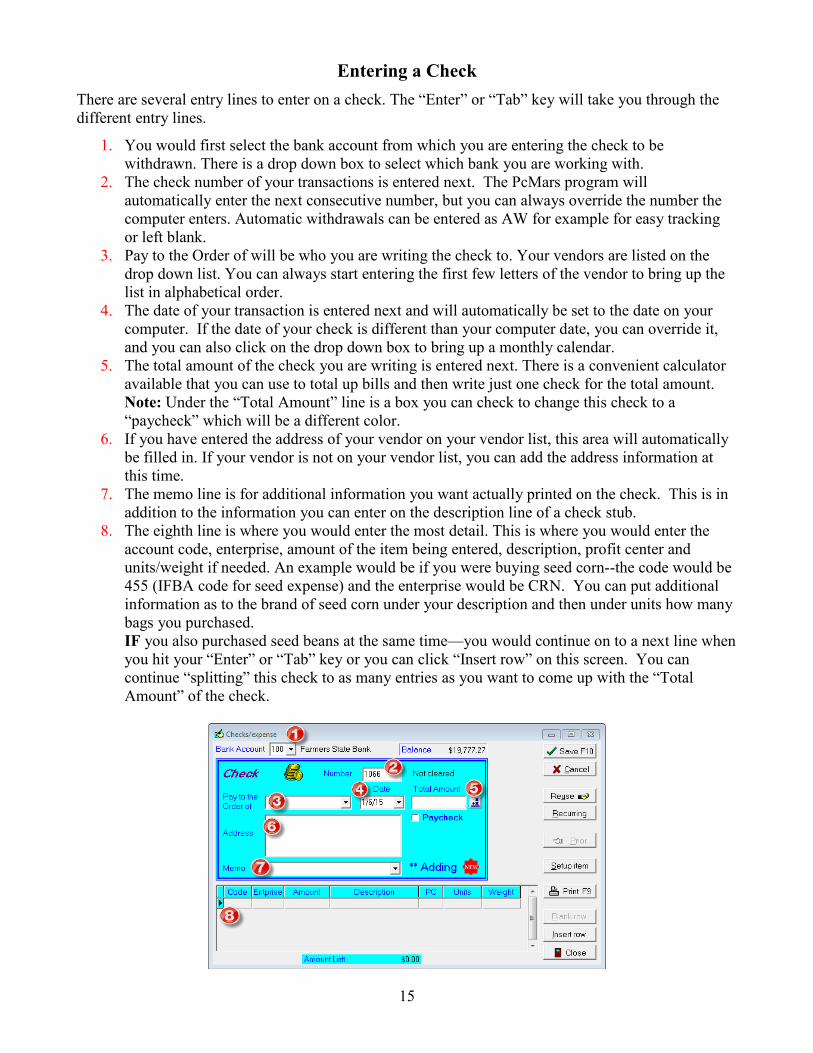
There are several entry lines to enter on a check. The “Enter” or “Tab” key will take you through the different entry lines.
1. You would first select the bank account from which you are entering the check to be withdrawn. There is a drop down box to select which bank you are working with.
2. The check number of your transactions is entered next. The PcMars program will automatically enter the next consecutive number, but you can always override the number the computer enters. Automatic withdrawals can be entered as AW for example for easy tracking or left blank.
3. Pay to the Order of will be who you are writing the check to. Your vendors are listed on the drop down list. You can always start entering the first few letters of the vendor to bring up the list in alphabetical order.
4. The date of your transaction is entered next and will automatically be set to the date on your computer. If the date of your check is different than your computer date, you can override it, and you can also click on the drop down box to bring up a monthly calendar.
5. The total amount of the check you are writing is entered next. There is a convenient calculator available that you can use to total up bills and then write just one check for the total amount. Note: Under the “Total Amount” line is a box you can check to change this check to a “paycheck” which will be a different color.
6. If you have entered the address of your vendor on your vendor list, this area will automatically be filled in. If your vendor is not on your vendor list, you can add the address information at this time.
7. The memo line is for additional information you want actually printed on the check. This is in addition to the information you can enter on the description line of a check stub.
8. The eighth line is where you would enter the most detail. This is where you would enter the account code, enterprise, amount of the item being entered, description, profit center and units/weight if needed. An example would be if you were buying seed corn--the code would be 455 (IFBA code for seed expense) and the enterprise would be CRN. You can put additional information as to the brand of seed corn under your description and then under units how many bags you purchased. IF you also purchased seed beans at the same time—you would continue on to a next line when you hit your “Enter” or “Tab” key or you can click “Insert row” on this screen. You can continue “splitting” this check to as many entries as you want to come up with the “Total Amount” of the check.
16
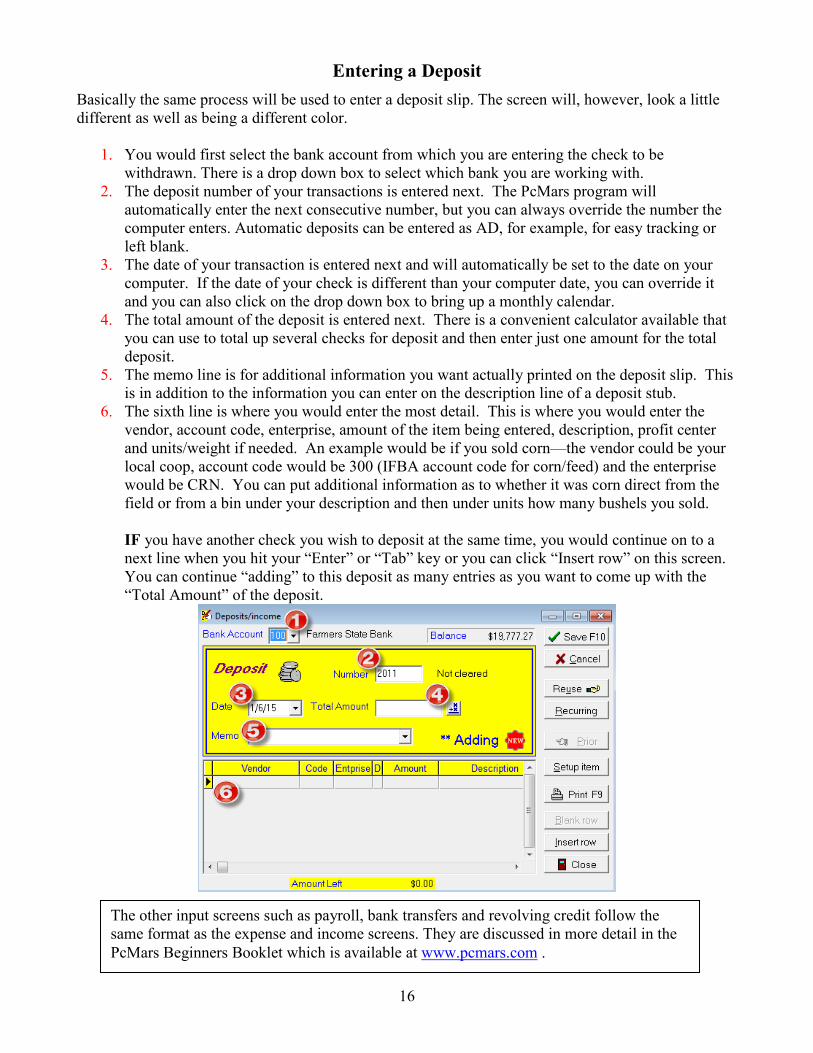
Entering a Deposit
Basically the same process will be used to enter a deposit slip. The screen will, however, look a little different as well as being a different color.
1. You would first select the bank account from which you are entering the check to be withdrawn. There is a drop down box to select which bank you are working with.
2. The deposit number of your transactions is entered next. The PcMars program will automatically enter the next consecutive number, but you can always override the number the computer enters. Automatic deposits can be entered as AD, for example, for easy tracking or left blank.
3. The date of your transaction is entered next and will automatically be set to the date on your computer. If the date of your check is different than your computer date, you can override it and you can also click on the drop down box to bring up a monthly calendar.
4. The total amount of the deposit is entered next. There is a convenient calculator available that you can use to total up several checks for deposit and then enter just one amount for the total deposit.
5. The memo line is for additional information you want actually printed on the deposit slip. This is in addition to the information you can enter on the description line of a deposit stub.
6. The sixth line is where you would enter the most detail. This is where you would enter the vendor, account code, enterprise, amount of the item being entered, description, profit center and units/weight if needed. An example would be if you sold corn—the vendor could be your local coop, account code would be 300 (IFBA account code for corn/feed) and the enterprise would be CRN. You can put additional information as to whether it was corn direct from the field or from a bin under your description and then under units how many bushels you sold. IF you have another check you wish to deposit at the same time, you would continue on to a next line when you hit your “Enter” or “Tab” key or you can click “Insert row” on this screen. You can continue “adding” to this deposit as many entries as you want to come up with the “Total Amount” of the deposit.
The other input screens such as payroll, bank transfers and revolving credit follow the
same format as the expense and income screens. They are discussed in more detail in the PcMars Beginners Booklet which is available at www.pcmars.com .
17
Editing and Deleting Transactions
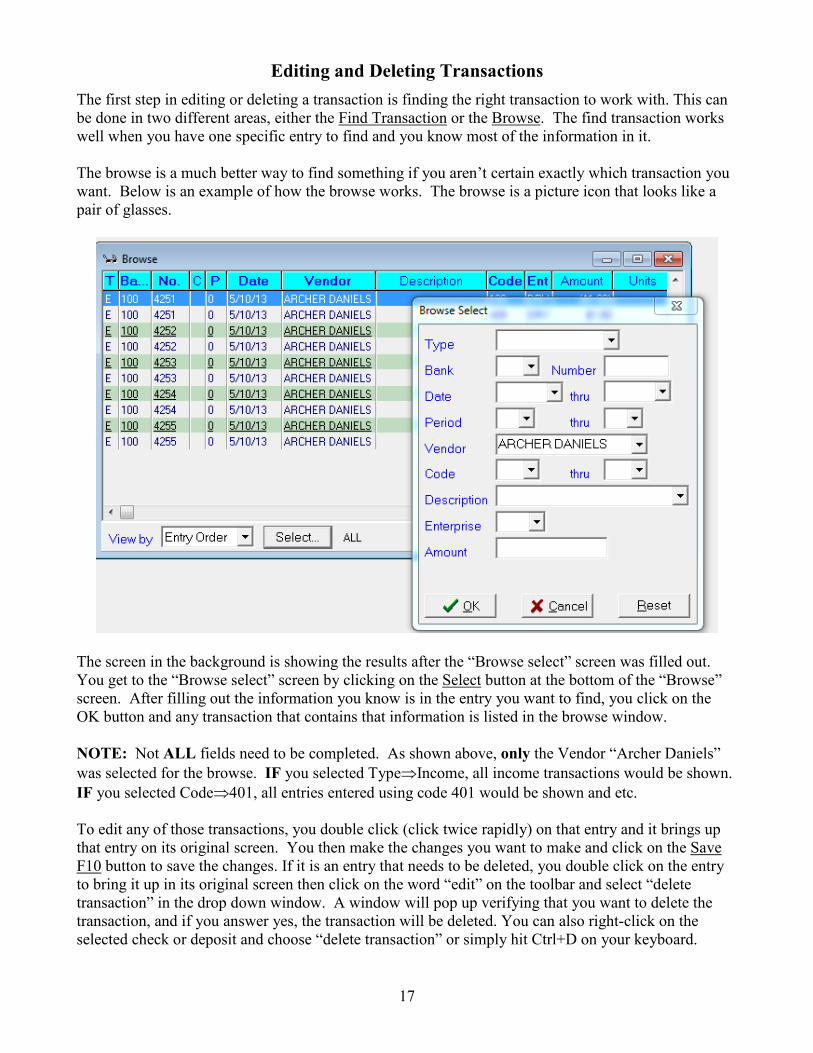
The first step in editing or deleting a transaction is finding the right transaction to work with. This can be done in two different areas, either the Find Transaction or the Browse. The find transaction works well when you have one specific entry to find and you know most of the information in it. The browse is a much better way to find something if you aren’t certain exactly which transaction you want. Below is an example of how the browse works. The browse is a picture icon that looks like a pair of glasses.
The screen in the background is showing the results after the “Browse select” screen was filled out. You get to the “Browse select” screen by clicking on the Select button at the bottom of the “Browse” screen. After filling out the information you know is in the entry you want to find, you click on the OK button and any transaction that contains that information is listed in the browse window. NOTE: Not ALL fields need to be completed. As shown above, only the Vendor “Archer Daniels” was selected for the browse. IF you selected Type⇒Income, all income transactions would be shown. IF you selected Code⇒401, all entries entered using code 401 would be shown and etc. To edit any of those transactions, you double click (click twice rapidly) on that entry and it brings up that entry on its original screen. You then make the changes you want to make and click on the Save F10 button to save the changes. If it is an entry that needs to be deleted, you double click on the entry to bring it up in its original screen then click on the word “edit” on the toolbar and select “delete transaction” in the drop down window. A window will pop up verifying that you want to delete the transaction, and if you answer yes, the transaction will be deleted. You can also right-click on the selected check or deposit and choose “delete transaction” or simply hit Ctrl+D on your keyboard.
18
Backing Up Your Data
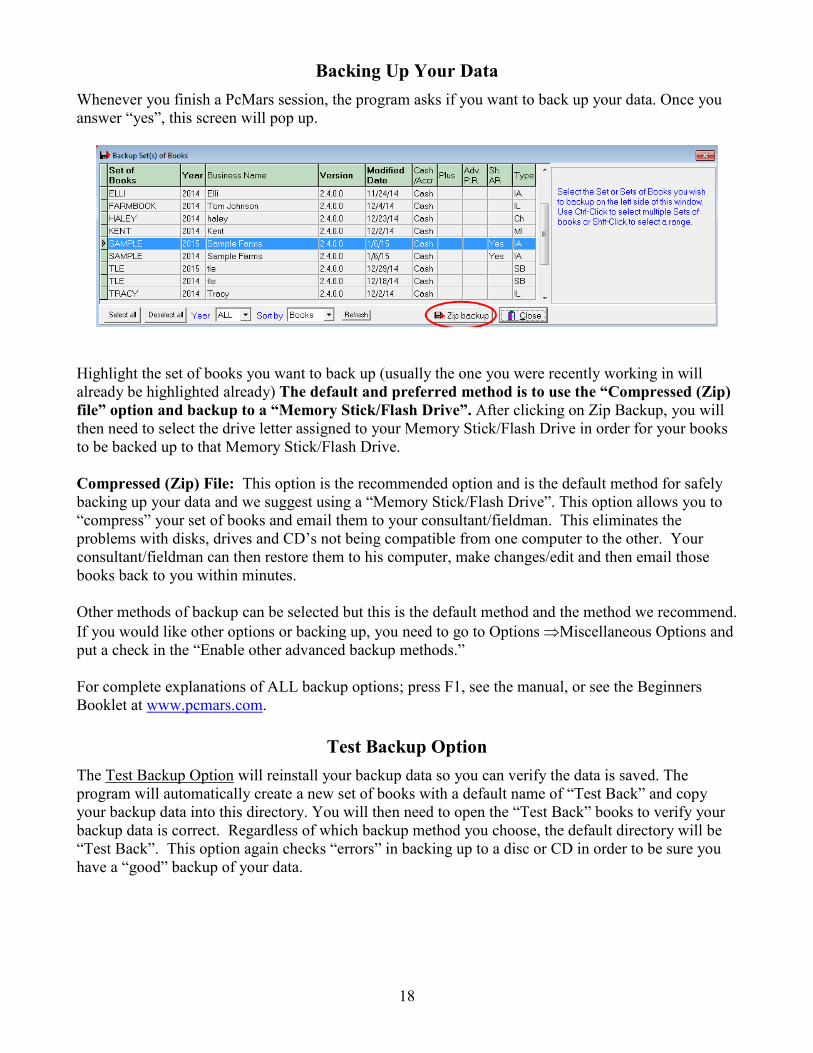
Whenever you finish a PcMars session, the program asks if you want to back up your data. Once you answer “yes”, this screen will pop up.
Highlight the set of books you want to back up (usually the one you were recently working in will already be highlighted already) The default and preferred method is to use the “Compressed (Zip) file” option and backup to a “Memory Stick/Flash Drive”. After clicking on Zip Backup, you will then need to select the drive letter assigned to your Memory Stick/Flash Drive in order for your books to be backed up to that Memory Stick/Flash Drive. Compressed (Zip) File: This option is the recommended option and is the default method for safely backing up your data and we suggest using a “Memory Stick/Flash Drive”. This option allows you to “compress” your set of books and email them to your consultant/fieldman. This eliminates the problems with disks, drives and CD’s not being compatible from one computer to the other. Your consultant/fieldman can then restore them to his computer, make changes/edit and then email those books back to you within minutes. Other methods of backup can be selected but this is the default method and the method we recommend. If you would like other options or backing up, you need to go to Options ⇒Miscellaneous Options and put a check in the “Enable other advanced backup methods.” For complete explanations of ALL backup options; press F1, see the manual, or see the Beginners Booklet at www.pcmars.com.
Test Backup Option
The Test Backup Option will reinstall your backup data so you can verify the data is saved. The program will automatically create a new set of books with a default name of “Test Back” and copy your backup data into this directory. You will then need to open the “Test Back” books to verify your backup data is correct. Regardless of which backup method you choose, the default directory will be “Test Back”. This option again checks “errors” in backing up to a disc or CD in order to be sure you have a “good” backup of your data.
19
Conclusion
We hope that this booklet was informative enough for you on how to set up your books. To get more detailed information on how to handle some more of the difficult entries, see the Beginners and Advanced Booklets. Keep in mind that when it comes to Windows programs, there is always more than one way to get the job done. We have tried to help standardize some of these techniques to make it easier for everyone. Please don’t hesitate to take advantage of our technical support areas if you ever find that you need extra help. Here are the technical support areas available to you.
Software Support
Iowa Farm Business Accounting, Inc. will offer support to users who are utilizing the most current version of PcMars. There are three options where you can receive support information:
1. Internet Support — available at iowafarmbusiness.org or pcmars.com. 2. E-mail Support — available at [email protected]. 3. Phone Support — available at 515-233-5802 (IFBA State Office).
The e-mail or phone support will connect you with the Iowa Farm Business Association State Office. This will guarantee you an answer to your questions from an employee that has experience with the program. Our PcMars Support Policy can be viewed at http://www.iowafarmbusiness.org/PcMars/PcMars%20Support%20Policy.pdf
Closing Tips: Right Mouse Click If you “right” mouse click on a screen, it will bring up many short cut keys plus several
other options to choose from depending on which screen you are in at the time. TRY IT!