Installation Guide for Informatica PowerCenter Users Release 7.9.6.3
Informatica® Big Data Management(Version 10.1.1)
Installation and Configuration Guide

Informatica Big Data Management Installation and Configuration Guide
Version 10.1.1December 2016
© Copyright Informatica LLC 2014, 2017
This software and documentation are provided only under a separate license agreement containing restrictions on use and disclosure. No part of this document may be reproduced or transmitted in any form, by any means (electronic, photocopying, recording or otherwise) without prior consent of Informatica LLC.
Informatica, the Informatica logo, PowerExchange, and Big Data Management are trademarks or registered trademarks of Informatica LLC in the United States and many jurisdictions throughout the world. A current list of Informatica trademarks is available on the web at https://www.informatica.com/trademarks.html. Other company and product names may be trade names or trademarks of their respective owners.
Portions of this software and/or documentation are subject to copyright held by third parties, including without limitation: Copyright DataDirect Technologies. All rights reserved. Copyright © Sun Microsystems. All rights reserved. Copyright © RSA Security Inc. All Rights Reserved. Copyright © Ordinal Technology Corp. All rights reserved. Copyright © Aandacht c.v. All rights reserved. Copyright Genivia, Inc. All rights reserved. Copyright Isomorphic Software. All rights reserved. Copyright © Meta Integration Technology, Inc. All rights reserved. Copyright © Intalio. All rights reserved. Copyright © Oracle. All rights reserved. Copyright © Adobe Systems Incorporated. All rights reserved. Copyright © DataArt, Inc. All rights reserved. Copyright © ComponentSource. All rights reserved. Copyright © Microsoft Corporation. All rights reserved. Copyright © Rogue Wave Software, Inc. All rights reserved. Copyright © Teradata Corporation. All rights reserved. Copyright © Yahoo! Inc. All rights reserved. Copyright © Glyph & Cog, LLC. All rights reserved. Copyright © Thinkmap, Inc. All rights reserved. Copyright © Clearpace Software Limited. All rights reserved. Copyright © Information Builders, Inc. All rights reserved. Copyright © OSS Nokalva, Inc. All rights reserved. Copyright Edifecs, Inc. All rights reserved. Copyright Cleo Communications, Inc. All rights reserved. Copyright © International Organization for Standardization 1986. All rights reserved. Copyright © ej-technologies GmbH. All rights reserved. Copyright © Jaspersoft Corporation. All rights reserved. Copyright © International Business Machines Corporation. All rights reserved. Copyright © yWorks GmbH. All rights reserved. Copyright © Lucent Technologies. All rights reserved. Copyright © University of Toronto. All rights reserved. Copyright © Daniel Veillard. All rights reserved. Copyright © Unicode, Inc. Copyright IBM Corp. All rights reserved. Copyright © MicroQuill Software Publishing, Inc. All rights reserved. Copyright © PassMark Software Pty Ltd. All rights reserved. Copyright © LogiXML, Inc. All rights reserved. Copyright © 2003-2010 Lorenzi Davide, All rights reserved. Copyright © Red Hat, Inc. All rights reserved. Copyright © The Board of Trustees of the Leland Stanford Junior University. All rights reserved. Copyright © EMC Corporation. All rights reserved. Copyright © Flexera Software. All rights reserved. Copyright © Jinfonet Software. All rights reserved. Copyright © Apple Inc. All rights reserved. Copyright © Telerik Inc. All rights reserved. Copyright © BEA Systems. All rights reserved. Copyright © PDFlib GmbH. All rights reserved. Copyright © Orientation in Objects GmbH. All rights reserved. Copyright © Tanuki Software, Ltd. All rights reserved. Copyright © Ricebridge. All rights reserved. Copyright © Sencha, Inc. All rights reserved. Copyright © Scalable Systems, Inc. All rights reserved. Copyright © jQWidgets. All rights reserved. Copyright © Tableau Software, Inc. All rights reserved. Copyright© MaxMind, Inc. All Rights Reserved. Copyright © TMate Software s.r.o. All rights reserved. Copyright © MapR Technologies Inc. All rights reserved. Copyright © Amazon Corporate LLC. All rights reserved. Copyright © Highsoft. All rights reserved. Copyright © Python Software Foundation. All rights reserved. Copyright © BeOpen.com. All rights reserved. Copyright © CNRI. All rights reserved.
This product includes software developed by the Apache Software Foundation (http://www.apache.org/), and/or other software which is licensed under various versions of the Apache License (the "License"). You may obtain a copy of these Licenses at http://www.apache.org/licenses/. Unless required by applicable law or agreed to in writing, software distributed under these Licenses is distributed on an "AS IS" BASIS, WITHOUT WARRANTIES OR CONDITIONS OF ANY KIND, either express or implied. See the Licenses for the specific language governing permissions and limitations under the Licenses.
This product includes software which was developed by Mozilla (http://www.mozilla.org/), software copyright The JBoss Group, LLC, all rights reserved; software copyright © 1999-2006 by Bruno Lowagie and Paulo Soares and other software which is licensed under various versions of the GNU Lesser General Public License Agreement, which may be found at http:// www.gnu.org/licenses/lgpl.html. The materials are provided free of charge by Informatica, "as-is", without warranty of any kind, either express or implied, including but not limited to the implied warranties of merchantability and fitness for a particular purpose.
The product includes ACE(TM) and TAO(TM) software copyrighted by Douglas C. Schmidt and his research group at Washington University, University of California, Irvine, and Vanderbilt University, Copyright (©) 1993-2006, all rights reserved.
This product includes software developed by the OpenSSL Project for use in the OpenSSL Toolkit (copyright The OpenSSL Project. All Rights Reserved) and redistribution of this software is subject to terms available at http://www.openssl.org and http://www.openssl.org/source/license.html.
This product includes Curl software which is Copyright 1996-2013, Daniel Stenberg, <[email protected]>. All Rights Reserved. Permissions and limitations regarding this software are subject to terms available at http://curl.haxx.se/docs/copyright.html. Permission to use, copy, modify, and distribute this software for any purpose with or without fee is hereby granted, provided that the above copyright notice and this permission notice appear in all copies.
The product includes software copyright 2001-2005 (©) MetaStuff, Ltd. All Rights Reserved. Permissions and limitations regarding this software are subject to terms available at http://www.dom4j.org/ license.html.
The product includes software copyright © 2004-2007, The Dojo Foundation. All Rights Reserved. Permissions and limitations regarding this software are subject to terms available at http://dojotoolkit.org/license.
This product includes ICU software which is copyright International Business Machines Corporation and others. All rights reserved. Permissions and limitations regarding this software are subject to terms available at http://source.icu-project.org/repos/icu/icu/trunk/license.html.
This product includes software copyright © 1996-2006 Per Bothner. All rights reserved. Your right to use such materials is set forth in the license which may be found at http:// www.gnu.org/software/ kawa/Software-License.html.
This product includes OSSP UUID software which is Copyright © 2002 Ralf S. Engelschall, Copyright © 2002 The OSSP Project Copyright © 2002 Cable & Wireless Deutschland. Permissions and limitations regarding this software are subject to terms available at http://www.opensource.org/licenses/mit-license.php.
This product includes software developed by Boost (http://www.boost.org/) or under the Boost software license. Permissions and limitations regarding this software are subject to terms available at http:/ /www.boost.org/LICENSE_1_0.txt.
This product includes software copyright © 1997-2007 University of Cambridge. Permissions and limitations regarding this software are subject to terms available at http:// www.pcre.org/license.txt.
This product includes software copyright © 2007 The Eclipse Foundation. All Rights Reserved. Permissions and limitations regarding this software are subject to terms available at http:// www.eclipse.org/org/documents/epl-v10.php and at http://www.eclipse.org/org/documents/edl-v10.php.
This product includes software licensed under the terms at http://www.tcl.tk/software/tcltk/license.html, http://www.bosrup.com/web/overlib/?License, http://www.stlport.org/doc/ license.html, http://asm.ow2.org/license.html, http://www.cryptix.org/LICENSE.TXT, http://hsqldb.org/web/hsqlLicense.html, http://httpunit.sourceforge.net/doc/ license.html, http://jung.sourceforge.net/license.txt , http://www.gzip.org/zlib/zlib_license.html, http://www.openldap.org/software/release/license.html, http://www.libssh2.org, http://slf4j.org/license.html, http://www.sente.ch/software/OpenSourceLicense.html, http://fusesource.com/downloads/license-agreements/fuse-message-broker-v-5-3- license-agreement; http://antlr.org/license.html; http://aopalliance.sourceforge.net/; http://www.bouncycastle.org/licence.html; http://www.jgraph.com/jgraphdownload.html; http://www.jcraft.com/jsch/LICENSE.txt; http://jotm.objectweb.org/bsd_license.html; . http://www.w3.org/Consortium/Legal/2002/copyright-software-20021231; http://www.slf4j.org/license.html; http://nanoxml.sourceforge.net/orig/copyright.html; http://www.json.org/license.html; http://forge.ow2.org/projects/javaservice/, http://www.postgresql.org/about/licence.html, http://www.sqlite.org/copyright.html, http://www.tcl.tk/software/tcltk/license.html, http://www.jaxen.org/faq.html, http://www.jdom.org/docs/faq.html, http://www.slf4j.org/license.html; http://www.iodbc.org/dataspace/iodbc/wiki/iODBC/License; http://www.keplerproject.org/md5/license.html; http://www.toedter.com/en/jcalendar/license.html; http://www.edankert.com/bounce/index.html; http://www.net-snmp.org/about/

license.html; http://www.openmdx.org/#FAQ; http://www.php.net/license/3_01.txt; http://srp.stanford.edu/license.txt; http://www.schneier.com/blowfish.html; http://www.jmock.org/license.html; http://xsom.java.net; http://benalman.com/about/license/; https://github.com/CreateJS/EaselJS/blob/master/src/easeljs/display/Bitmap.js; http://www.h2database.com/html/license.html#summary; http://jsoncpp.sourceforge.net/LICENSE; http://jdbc.postgresql.org/license.html; http://protobuf.googlecode.com/svn/trunk/src/google/protobuf/descriptor.proto; https://github.com/rantav/hector/blob/master/LICENSE; http://web.mit.edu/Kerberos/krb5-current/doc/mitK5license.html; http://jibx.sourceforge.net/jibx-license.html; https://github.com/lyokato/libgeohash/blob/master/LICENSE; https://github.com/hjiang/jsonxx/blob/master/LICENSE; https://code.google.com/p/lz4/; https://github.com/jedisct1/libsodium/blob/master/LICENSE; http://one-jar.sourceforge.net/index.php?page=documents&file=license; https://github.com/EsotericSoftware/kryo/blob/master/license.txt; http://www.scala-lang.org/license.html; https://github.com/tinkerpop/blueprints/blob/master/LICENSE.txt; http://gee.cs.oswego.edu/dl/classes/EDU/oswego/cs/dl/util/concurrent/intro.html; https://aws.amazon.com/asl/; https://github.com/twbs/bootstrap/blob/master/LICENSE; https://sourceforge.net/p/xmlunit/code/HEAD/tree/trunk/LICENSE.txt; https://github.com/documentcloud/underscore-contrib/blob/master/LICENSE, and https://github.com/apache/hbase/blob/master/LICENSE.txt.
This product includes software licensed under the Academic Free License (http://www.opensource.org/licenses/afl-3.0.php), the Common Development and Distribution License (http://www.opensource.org/licenses/cddl1.php) the Common Public License (http://www.opensource.org/licenses/cpl1.0.php), the Sun Binary Code License Agreement Supplemental License Terms, the BSD License (http:// www.opensource.org/licenses/bsd-license.php), the new BSD License (http://opensource.org/licenses/BSD-3-Clause), the MIT License (http://www.opensource.org/licenses/mit-license.php), the Artistic License (http://www.opensource.org/licenses/artistic-license-1.0) and the Initial Developer’s Public License Version 1.0 (http://www.firebirdsql.org/en/initial-developer-s-public-license-version-1-0/).
This product includes software copyright © 2003-2006 Joe WaInes, 2006-2007 XStream Committers. All rights reserved. Permissions and limitations regarding this software are subject to terms available at http://xstream.codehaus.org/license.html. This product includes software developed by the Indiana University Extreme! Lab. For further information please visit http://www.extreme.indiana.edu/.
This product includes software Copyright (c) 2013 Frank Balluffi and Markus Moeller. All rights reserved. Permissions and limitations regarding this software are subject to terms of the MIT license.
See patents at https://www.informatica.com/legal/patents.html.
DISCLAIMER: Informatica LLC provides this documentation "as is" without warranty of any kind, either express or implied, including, but not limited to, the implied warranties of noninfringement, merchantability, or use for a particular purpose. Informatica LLC does not warrant that this software or documentation is error free. The information provided in this software or documentation may include technical inaccuracies or typographical errors. The information in this software and documentation is subject to change at any time without notice.
NOTICES
This Informatica product (the "Software") includes certain drivers (the "DataDirect Drivers") from DataDirect Technologies, an operating company of Progress Software Corporation ("DataDirect") which are subject to the following terms and conditions:
1.THE DATADIRECT DRIVERS ARE PROVIDED "AS IS" WITHOUT WARRANTY OF ANY KIND, EITHER EXPRESSED OR IMPLIED, INCLUDING BUT NOT LIMITED TO, THE IMPLIED WARRANTIES OF MERCHANTABILITY, FITNESS FOR A PARTICULAR PURPOSE AND NON-INFRINGEMENT.
2. IN NO EVENT WILL DATADIRECT OR ITS THIRD PARTY SUPPLIERS BE LIABLE TO THE END-USER CUSTOMER FOR ANY DIRECT, INDIRECT, INCIDENTAL, SPECIAL, CONSEQUENTIAL OR OTHER DAMAGES ARISING OUT OF THE USE OF THE ODBC DRIVERS, WHETHER OR NOT INFORMED OF THE POSSIBILITIES OF DAMAGES IN ADVANCE. THESE LIMITATIONS APPLY TO ALL CAUSES OF ACTION, INCLUDING, WITHOUT LIMITATION, BREACH OF CONTRACT, BREACH OF WARRANTY, NEGLIGENCE, STRICT LIABILITY, MISREPRESENTATION AND OTHER TORTS.
The information in this documentation is subject to change without notice. If you find any problems in this documentation, please report them to us in writing at Informatica LLC 2100 Seaport Blvd. Redwood City, CA 94063.
INFORMATICA LLC PROVIDES THE INFORMATION IN THIS DOCUMENT "AS IS" WITHOUT WARRANTY OF ANY KIND, EXPRESS OR IMPLIED, INCLUDING WITHOUT ANY WARRANTIES OF MERCHANTABILITY, FITNESS FOR A PARTICULAR PURPOSE AND ANY WARRANTY OR CONDITION OF NON-INFRINGEMENT.
Publication Date: 2017-05-04
Table of Contents
Preface . . . . . . . . . . . . . . . . . . . . . . . . . . . . . . . . . . . . . . . . . . . . . . . . . . . . . . . . . . . . . . . . . . . . . . . 8Informatica Resources. . . . . . . . . . . . . . . . . . . . . . . . . . . . . . . . . . . . . . . . . . . . . . . . . . . 8
Informatica Network. . . . . . . . . . . . . . . . . . . . . . . . . . . . . . . . . . . . . . . . . . . . . . . . . . 8
Informatica Knowledge Base. . . . . . . . . . . . . . . . . . . . . . . . . . . . . . . . . . . . . . . . . . . . 8
Informatica Documentation. . . . . . . . . . . . . . . . . . . . . . . . . . . . . . . . . . . . . . . . . . . . . 8
Informatica Product Availability Matrixes. . . . . . . . . . . . . . . . . . . . . . . . . . . . . . . . . . . . . 9
Informatica Velocity. . . . . . . . . . . . . . . . . . . . . . . . . . . . . . . . . . . . . . . . . . . . . . . . . . 9
Informatica Marketplace. . . . . . . . . . . . . . . . . . . . . . . . . . . . . . . . . . . . . . . . . . . . . . . 9
Informatica Global Customer Support. . . . . . . . . . . . . . . . . . . . . . . . . . . . . . . . . . . . . . 9
Chapter 1: Installing Big Data Management. . . . . . . . . . . . . . . . . . . . . . . . . . . . . . . . . . . 10Installation Overview. . . . . . . . . . . . . . . . . . . . . . . . . . . . . . . . . . . . . . . . . . . . . . . . . . . 10
Informatica Big Data Management Installation Process. . . . . . . . . . . . . . . . . . . . . . . . . . 11
Before You Begin. . . . . . . . . . . . . . . . . . . . . . . . . . . . . . . . . . . . . . . . . . . . . . . . . . . . . 11
Install and Configure the Informatica Domain and Clients. . . . . . . . . . . . . . . . . . . . . . . . . 11
Install and Configure PowerExchange Adapters. . . . . . . . . . . . . . . . . . . . . . . . . . . . . . . 11
Install and Configure Data Replication. . . . . . . . . . . . . . . . . . . . . . . . . . . . . . . . . . . . . 12
Pre-Installation Tasks for a Single Node Environment. . . . . . . . . . . . . . . . . . . . . . . . . . . 12
Pre-Installation Tasks for a Cluster Environment. . . . . . . . . . . . . . . . . . . . . . . . . . . . . . . 12
Big Data Management Installation from an RPM Package. . . . . . . . . . . . . . . . . . . . . . . . . . . . 13
Download the Distribution Package. . . . . . . . . . . . . . . . . . . . . . . . . . . . . . . . . . . . . . . 13
Installing in a Single Node Environment. . . . . . . . . . . . . . . . . . . . . . . . . . . . . . . . . . . . 14
Installing in a Cluster Environment from the Primary Name Node Using SCP Protocol. . . . . . 14
Installing Big Data Management Using NFS. . . . . . . . . . . . . . . . . . . . . . . . . . . . . . . . . . 15
Installing in a Cluster Environment from a Non-Name Node Machine. . . . . . . . . . . . . . . . . . 16
Create a Cluster on Amazon EMR and Install Big Data Management. . . . . . . . . . . . . . . . . 16
Big Data Management Installation to an Ambari Stack. . . . . . . . . . . . . . . . . . . . . . . . . . . . . . 18
Prerequisites. . . . . . . . . . . . . . . . . . . . . . . . . . . . . . . . . . . . . . . . . . . . . . . . . . . . . 19
Preparing to Install to an Ambari Stack. . . . . . . . . . . . . . . . . . . . . . . . . . . . . . . . . . . . . 19
Installing Big Data Management in an Ambari Stack. . . . . . . . . . . . . . . . . . . . . . . . . . . . 20
Troubleshooting Ambari Stack Installation. . . . . . . . . . . . . . . . . . . . . . . . . . . . . . . . . . . 23
Big Data Management Installation from a Debian Package. . . . . . . . . . . . . . . . . . . . . . . . . . . 23
Download the Debian Package. . . . . . . . . . . . . . . . . . . . . . . . . . . . . . . . . . . . . . . . . . 23
Installing Big Data Management in a Single Node Environment. . . . . . . . . . . . . . . . . . . . . 24
Installing Big Data Management Using the SCP Protocol. . . . . . . . . . . . . . . . . . . . . . . . . 24
Installing Big Data Management Using NFS. . . . . . . . . . . . . . . . . . . . . . . . . . . . . . . . . . 24
Installing Big Data Management in a Cluster Environment. . . . . . . . . . . . . . . . . . . . . . . . 25
Big Data Management Installation from a Cloudera Parcel Package . . . . . . . . . . . . . . . . . . . . . 25
Installing Big Data Management Using Cloudera Manager. . . . . . . . . . . . . . . . . . . . . . . . 25
4 Table of Contents
Chapter 2: Hadoop Configuration Manager. . . . . . . . . . . . . . . . . . . . . . . . . . . . . . . . . . . . 27Big Data Management Configuration Overview. . . . . . . . . . . . . . . . . . . . . . . . . . . . . . . . . . . 27
Before You Configure. . . . . . . . . . . . . . . . . . . . . . . . . . . . . . . . . . . . . . . . . . . . . . . . . . . 27
Prerequisites. . . . . . . . . . . . . . . . . . . . . . . . . . . . . . . . . . . . . . . . . . . . . . . . . . . . . 27
Populate the HDFS File System. . . . . . . . . . . . . . . . . . . . . . . . . . . . . . . . . . . . . . . . . 28
Run the Configuration Manager in Console Mode. . . . . . . . . . . . . . . . . . . . . . . . . . . . . . . . . 30
Configure Big Data Management for the Cloudera CDH Cluster. . . . . . . . . . . . . . . . . . . . . 31
Configure Big Data Management for the Azure HDInsight, IBM BigInsights, or the Hortonworks HDP Cluster. . . . . . . . . . . . . . . . . . . . . . . . . . . . . . . . . . . . . . . . . . . . . 33
Use SSH. . . . . . . . . . . . . . . . . . . . . . . . . . . . . . . . . . . . . . . . . . . . . . . . . . . . . . . . 36
Configure Big Data Management using the Configuration Manager in Silent Mode. . . . . . . . . . . . 38
Specify the values for the Properties File. . . . . . . . . . . . . . . . . . . . . . . . . . . . . . . . . . . 38
Run the Configuration Manager in Silent Mode. . . . . . . . . . . . . . . . . . . . . . . . . . . . . . . . 42
Chapter 3: Configuring Big Data Management for Amazon EMR. . . . . . . . . . . . . . . . 44Configuring Big Data Management for Amazon EMR. . . . . . . . . . . . . . . . . . . . . . . . . . . . . . . 44
Domain Configuration Tasks for an On-Premise Implementation. . . . . . . . . . . . . . . . . . . . . . . 44
Configure yarn-site.xml for the Data Integration Service. . . . . . . . . . . . . . . . . . . . . . . . . . 45
Configure the Hadoop Pushdown Properties for the Data Integration Service. . . . . . . . . . . . 45
List Cluster Nodes in the /etc/hosts File. . . . . . . . . . . . . . . . . . . . . . . . . . . . . . . . . . . . 45
Edit Informatica Developer Files and Variables. . . . . . . . . . . . . . . . . . . . . . . . . . . . . . . . 46
Cluster Configuration Tasks for an On-Premise Implementation. . . . . . . . . . . . . . . . . . . . . . . . 46
Verify Data Integration Service User Permissions. . . . . . . . . . . . . . . . . . . . . . . . . . . . . . 46
Create Blaze Directory and Grant User Permissions. . . . . . . . . . . . . . . . . . . . . . . . . . . . 46
Open Ports on the Hadoop Cluster. . . . . . . . . . . . . . . . . . . . . . . . . . . . . . . . . . . . . . . 46
Configure the Hadoop Cluster for Hive Tables on Amazon S3. . . . . . . . . . . . . . . . . . . . . . 47
Chapter 4: Configuring Big Data Management to Run Mappings in Hadoop Environments. . . . . . . . . . . . . . . . . . . . . . . . . . . . . . . . . . . . . . . . . . . . . . . . . . . . . . . . . . . . . . . . 49Mappings on Hadoop Distributions Overview. . . . . . . . . . . . . . . . . . . . . . . . . . . . . . . . . . . . 49
Create a Staging Directory on HDFS. . . . . . . . . . . . . . . . . . . . . . . . . . . . . . . . . . . . . . . . . 49
Update Configuration Files for the Developer Tool. . . . . . . . . . . . . . . . . . . . . . . . . . . . . . . . 50
Add Hadoop Environment Variable Properties. . . . . . . . . . . . . . . . . . . . . . . . . . . . . . . . . . . 51
Enable Support for Lookup Transformations with Teradata Data Objects. . . . . . . . . . . . . . . . . . 51
Perform Sqoop Configuration Tasks. . . . . . . . . . . . . . . . . . . . . . . . . . . . . . . . . . . . . . . . . . 52
Download the JDBC Driver JAR Files for Sqoop Connectivity. . . . . . . . . . . . . . . . . . . . . . 52
Configure the HADOOP_NODE_JDK_HOME property in the hadoopEnv.properties File. . . . . 53
Configure the mapred-site.xml File for Cloudera Clusters. . . . . . . . . . . . . . . . . . . . . . . . . 53
Configure the yarn-site.xml File for Cloudera Kerberos Clusters. . . . . . . . . . . . . . . . . . . . . 54
Configure the mapred-site.xml File for Cloudera Kerberos non-HA Clusters. . . . . . . . . . . . . 54
Configure the core-site.xml File for Ambari-based non-Kerberos Clusters. . . . . . . . . . . . . . . 55
Reference Data Requirements. . . . . . . . . . . . . . . . . . . . . . . . . . . . . . . . . . . . . . . . . . . . . 55
Table of Contents 5
Reference Data for Address Validation. . . . . . . . . . . . . . . . . . . . . . . . . . . . . . . . . . . . . 56
Installing the Address Reference Data Files. . . . . . . . . . . . . . . . . . . . . . . . . . . . . . . . . . 56
Chapter 5: Configure Run-Time Engines. . . . . . . . . . . . . . . . . . . . . . . . . . . . . . . . . . . . . . 58Configure Run-time Engines. . . . . . . . . . . . . . . . . . . . . . . . . . . . . . . . . . . . . . . . . . . . . . 58
Blaze Engine Configuration. . . . . . . . . . . . . . . . . . . . . . . . . . . . . . . . . . . . . . . . . . . . . . . 59
Configure Blaze Engine Log and Work Directories. . . . . . . . . . . . . . . . . . . . . . . . . . . . . 59
Reset System Settings to Allow More Processes and Files. . . . . . . . . . . . . . . . . . . . . . . . 59
Open the Required Ports for the Blaze Engine. . . . . . . . . . . . . . . . . . . . . . . . . . . . . . . . 60
Blaze Engine Console. . . . . . . . . . . . . . . . . . . . . . . . . . . . . . . . . . . . . . . . . . . . . . . 60
Grant Permission on the Source Database. . . . . . . . . . . . . . . . . . . . . . . . . . . . . . . . . . 61
Allocate Cluster Resources for Blaze. . . . . . . . . . . . . . . . . . . . . . . . . . . . . . . . . . . . . . 61
Configure Virtual Memory Limits. . . . . . . . . . . . . . . . . . . . . . . . . . . . . . . . . . . . . . . . . 62
Spark Engine Configuration. . . . . . . . . . . . . . . . . . . . . . . . . . . . . . . . . . . . . . . . . . . . . . . 62
Reset System Settings to Allow More Processes and Files. . . . . . . . . . . . . . . . . . . . . . . . 62
Configure Dynamic Resource Allocation for Spark. . . . . . . . . . . . . . . . . . . . . . . . . . . . . 63
Configure Performance Properties. . . . . . . . . . . . . . . . . . . . . . . . . . . . . . . . . . . . . . . . 67
Hive Engine Configuration. . . . . . . . . . . . . . . . . . . . . . . . . . . . . . . . . . . . . . . . . . . . . . . . 68
Chapter 6: High Availability. . . . . . . . . . . . . . . . . . . . . . . . . . . . . . . . . . . . . . . . . . . . . . . . . . 69Configuring High Availability. . . . . . . . . . . . . . . . . . . . . . . . . . . . . . . . . . . . . . . . . . . . . . . 69
Configuring the Developer Tool for a Highly Available Hadoop Cluster . . . . . . . . . . . . . . . . . . . 69
Configuring Connections Properties to Run Mappings on a Highly Available Hadoop Cluster. . . . . 70
Chapter 7: Upgrade Big Data Management. . . . . . . . . . . . . . . . . . . . . . . . . . . . . . . . . . . . 72Upgrading Big Data Management. . . . . . . . . . . . . . . . . . . . . . . . . . . . . . . . . . . . . . . . . . . 72
Configuring the Connections After Upgrade. . . . . . . . . . . . . . . . . . . . . . . . . . . . . . . . . . . . . 72
Chapter 8: Big Data Management Uninstallation. . . . . . . . . . . . . . . . . . . . . . . . . . . . . . . 74Informatica Big Data Management Uninstallation. . . . . . . . . . . . . . . . . . . . . . . . . . . . . . . . . 74
Uninstalling Big Data Management. . . . . . . . . . . . . . . . . . . . . . . . . . . . . . . . . . . . . . . 74
Uninstalling Big Data Management on Cloudera. . . . . . . . . . . . . . . . . . . . . . . . . . . . . . . 75
Uninstalling Big Data Management in An Ambari Stack. . . . . . . . . . . . . . . . . . . . . . . . . . 75
Appendix A: Configure Ports for Big Data Management. . . . . . . . . . . . . . . . . . . . . . . . 77Informatica Domain and Application Services. . . . . . . . . . . . . . . . . . . . . . . . . . . . . . . . . . . . 77
Application Services and Ports. . . . . . . . . . . . . . . . . . . . . . . . . . . . . . . . . . . . . . . . . . 77
Big Data Management Ports. . . . . . . . . . . . . . . . . . . . . . . . . . . . . . . . . . . . . . . . . . . . . . 80
Ports for the Blaze Engine. . . . . . . . . . . . . . . . . . . . . . . . . . . . . . . . . . . . . . . . . . . . . 84
Informatica Developer Ports. . . . . . . . . . . . . . . . . . . . . . . . . . . . . . . . . . . . . . . . . . . . 84
Appendix B: Connections. . . . . . . . . . . . . . . . . . . . . . . . . . . . . . . . . . . . . . . . . . . . . . . . . . . . 85Hadoop Connection Properties. . . . . . . . . . . . . . . . . . . . . . . . . . . . . . . . . . . . . . . . . . . . . 85
6 Table of Contents

HDFS Connection Properties. . . . . . . . . . . . . . . . . . . . . . . . . . . . . . . . . . . . . . . . . . . . . . 94
HBase Connection Properties. . . . . . . . . . . . . . . . . . . . . . . . . . . . . . . . . . . . . . . . . . . . . . 95
Hive Connection Properties. . . . . . . . . . . . . . . . . . . . . . . . . . . . . . . . . . . . . . . . . . . . . . . 96
JDBC Connection Properties. . . . . . . . . . . . . . . . . . . . . . . . . . . . . . . . . . . . . . . . . . . . . 102
Index. . . . . . . . . . . . . . . . . . . . . . . . . . . . . . . . . . . . . . . . . . . . . . . . . . . . . . . . . . . 105
Table of Contents 7
PrefaceThe Informatica Big Data Management™ Installation and Configuration Guide is written for the system administrator who is responsible for installing Informatica Big Data Management. This guide assumes you have knowledge of operating systems, relational database concepts, and the database engines, flat files, or mainframe systems in your environment. This guide also assumes you are familiar with the interface requirements for the Hadoop environment.
Informatica Resources
Informatica NetworkInformatica Network hosts Informatica Global Customer Support, the Informatica Knowledge Base, and other product resources. To access Informatica Network, visit https://network.informatica.com.
As a member, you can:
• Access all of your Informatica resources in one place.
• Search the Knowledge Base for product resources, including documentation, FAQs, and best practices.
• View product availability information.
• Review your support cases.
• Find your local Informatica User Group Network and collaborate with your peers.
Informatica Knowledge BaseUse the Informatica Knowledge Base to search Informatica Network for product resources such as documentation, how-to articles, best practices, and PAMs.
To access the Knowledge Base, visit https://kb.informatica.com. If you have questions, comments, or ideas about the Knowledge Base, contact the Informatica Knowledge Base team at [email protected].
Informatica DocumentationTo get the latest documentation for your product, browse the Informatica Knowledge Base at https://kb.informatica.com/_layouts/ProductDocumentation/Page/ProductDocumentSearch.aspx.
If you have questions, comments, or ideas about this documentation, contact the Informatica Documentation team through email at [email protected].
8
Informatica Product Availability MatrixesProduct Availability Matrixes (PAMs) indicate the versions of operating systems, databases, and other types of data sources and targets that a product release supports. If you are an Informatica Network member, you can access PAMs at https://network.informatica.com/community/informatica-network/product-availability-matrices.
Informatica VelocityInformatica Velocity is a collection of tips and best practices developed by Informatica Professional Services. Developed from the real-world experience of hundreds of data management projects, Informatica Velocity represents the collective knowledge of our consultants who have worked with organizations from around the world to plan, develop, deploy, and maintain successful data management solutions.
If you are an Informatica Network member, you can access Informatica Velocity resources at http://velocity.informatica.com.
If you have questions, comments, or ideas about Informatica Velocity, contact Informatica Professional Services at [email protected].
Informatica MarketplaceThe Informatica Marketplace is a forum where you can find solutions that augment, extend, or enhance your Informatica implementations. By leveraging any of the hundreds of solutions from Informatica developers and partners, you can improve your productivity and speed up time to implementation on your projects. You can access Informatica Marketplace at https://marketplace.informatica.com.
Informatica Global Customer SupportYou can contact a Global Support Center by telephone or through Online Support on Informatica Network.
To find your local Informatica Global Customer Support telephone number, visit the Informatica website at the following link: http://www.informatica.com/us/services-and-training/support-services/global-support-centers.
If you are an Informatica Network member, you can use Online Support at http://network.informatica.com.
Preface 9
C H A P T E R 1
Installing Big Data ManagementThis chapter includes the following topics:
• Installation Overview, 10
• Before You Begin, 11
• Big Data Management Installation from an RPM Package, 13
• Big Data Management Installation to an Ambari Stack, 18
• Big Data Management Installation from a Debian Package, 23
• Big Data Management Installation from a Cloudera Parcel Package , 25
Installation OverviewWhen you install Big Data Management, you install Informatica binaries on the Hadoop cluster. You download an installation package based on the distribution in the Hadoop environment.
The following table lists the Hadoop distributions and the associated package types that you use to install Big Data Management:
Hadoop Distribution Installation Package Description
Amazon EMR The tar.gz file includes an RPM package and the binary files that you need to run the Big Data Management installation.
Azure HDInsight The tar.gz file includes a Debian package and the binary files that you need to run the Big Data Management installation.
Cloudera CDH The parcel.tar file includes a Cloudera parcel package and the binary files that you need to run the Big Data Management installation.
Hortonworks HDP The archive file includes Big Data Management libraries that are compatible with Ambari stack installation.
IBM BigInsights The tar.gz file includes an RPM package and the binary files that you need to run the Big Data Management installation.
After you complete the installation, you configure the Informatica domain and the Hadoop cluster to enable Informatica mappings to run on the Hadoop cluster.
10
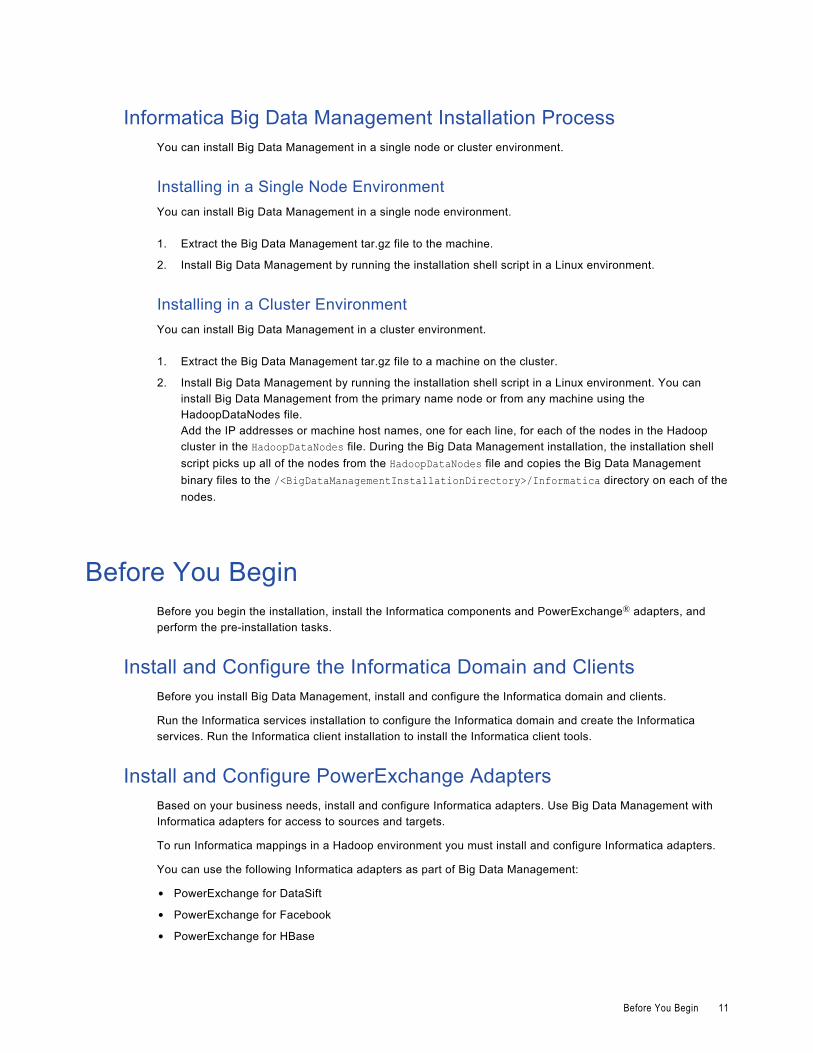
Informatica Big Data Management Installation ProcessYou can install Big Data Management in a single node or cluster environment.
Installing in a Single Node EnvironmentYou can install Big Data Management in a single node environment.
1. Extract the Big Data Management tar.gz file to the machine.
2. Install Big Data Management by running the installation shell script in a Linux environment.
Installing in a Cluster EnvironmentYou can install Big Data Management in a cluster environment.
1. Extract the Big Data Management tar.gz file to a machine on the cluster.
2. Install Big Data Management by running the installation shell script in a Linux environment. You can install Big Data Management from the primary name node or from any machine using the HadoopDataNodes file.Add the IP addresses or machine host names, one for each line, for each of the nodes in the Hadoop cluster in the HadoopDataNodes file. During the Big Data Management installation, the installation shell script picks up all of the nodes from the HadoopDataNodes file and copies the Big Data Management binary files to the /<BigDataManagementInstallationDirectory>/Informatica directory on each of the nodes.
Before You BeginBefore you begin the installation, install the Informatica components and PowerExchange® adapters, and perform the pre-installation tasks.
Install and Configure the Informatica Domain and ClientsBefore you install Big Data Management, install and configure the Informatica domain and clients.
Run the Informatica services installation to configure the Informatica domain and create the Informatica services. Run the Informatica client installation to install the Informatica client tools.
Install and Configure PowerExchange AdaptersBased on your business needs, install and configure Informatica adapters. Use Big Data Management with Informatica adapters for access to sources and targets.
To run Informatica mappings in a Hadoop environment you must install and configure Informatica adapters.
You can use the following Informatica adapters as part of Big Data Management:
• PowerExchange for DataSift
• PowerExchange for Facebook
• PowerExchange for HBase
Before You Begin 11
• PowerExchange for HDFS
• PowerExchange for Hive
• PowerExchange for LinkedIn
• PowerExchange for Teradata Parallel Transporter API
• PowerExchange for Twitter
• PowerExchange for Web Content-Kapow Katalyst
For more information, see the PowerExchange adapter documentation.
Install and Configure Data ReplicationTo migrate data with minimal downtime and perform auditing and operational reporting functions, install and configure Data Replication. For information, see the Informatica Data Replication User Guide.
Pre-Installation Tasks for a Single Node EnvironmentBefore you begin the Big Data Management installation in a single node environment, perform the following pre-installation tasks.
• Verify that Hadoop is installed with Hadoop File System (HDFS) and MapReduce. The Hadoop installation should include a Hive data warehouse that is configured to use a non-embedded database as the MetaStore. For more information, see the Apache website here: http://hadoop.apache.org.
• To perform both read and write operations in native mode, install the required third-party client software. For example, install the Oracle client to connect to the Oracle database.
• Verify that the Big Data Management administrator user can run sudo commands or have user root privileges.
• Verify that the temporary folder on the local node has at least 2 GB of disk space.
• Verify that the destination directory for Informatica binary files is empty. The presence of files left over from previous installations can cause conflicts between files, leading to mapping run failures.
Pre-Installation Tasks for a Cluster EnvironmentBefore you begin the Big Data Management installation in a cluster environment, perform the following tasks:
• Install third-party software.
• Verify system requirements.
• Verify connection requirements.
Install Third-Party SoftwareVerify that the following third-party software is installed:Hadoop with Hadoop Distributed File System (HDFS) and MapReduce
Hadoop must be installed on every node within the cluster. The Hadoop installation must include a Hive data warehouse that is configured to use a MySQL database as the MetaStore. You can configure Hive to use a local or remote MetaStore server. For more information, see the Apache website here: http://hadoop.apache.org/.
Note: Informatica does not support embedded MetaStore server setups.
12 Chapter 1: Installing Big Data Management
Database client software to perform read and write operations in native mode
Install the client software for the database. Informatica requires the client software to run MapReduce jobs. For example, install the Oracle client to connect to the Oracle database.
Verify System RequirementsVerify the following system requirements:
• The Big Data Management administrator can run sudo commands or has root user privileges.
• The temporary folder in each of the nodes on which Big Data Management will be installed has at least 2 GB of disk space.
• The destination directory for Informatica binary files is empty. The presence of files left over from previous installations can cause conflicts between files, leading to mapping run failures.
Verify Connection RequirementsVerify the connection to the Hadoop cluster nodes.
Big Data Management requires a Secure Shell (SSH) connection without a password between the machine where you want to run the Big Data Management installation and all the nodes in the Hadoop cluster. Configure passwordless SSH for the root user.Note: For security reasons, consider removing the passwordless SSH configuration for the root user when Big Data Management installation and configuration are complete.
Big Data Management Installation from an RPM Package
To install Big Data Management on Amazon EMR or IBM BigInsights, download the tar.gz file that includes an RPM package and the binary files that you need.
You can install Big Data Management in a single node environment. You can also install Big Data Management in a cluster environment from the primary name node or from any machine.
Choose one of the following modes to install Big Data Management on Amazon EMR or IBM BigInsights:
• Install in a single node environment.
• Install in a cluster environment from the primary name node using SCP protocol.
• Install in a cluster environment from the primary name node using NFS protocol.
• Install in a cluster environment from a non-name node machine.
• Create a cluster on Amazon EMR and install Big Data Management.
Download the Distribution Package1. Download the following file to a temporary folder: InformaticaHadoop-<version>.<platform>-
x64.tar.gz.
Note: The distribution package must be stored on a local disk and not on HDFS.
2. Extract the file to the machine from where you want to distribute the package and run the Big Data Management installation.
Big Data Management Installation from an RPM Package 13
Installing in a Single Node EnvironmentYou can install Big Data Management in a single node environment.
1. Log in to the machine.
2. Run the following command from the Big Data Management root directory to start the installation in console mode:
bash InformaticaHadoopInstall.sh3. Press y to accept the Big Data Management terms of agreement.
4. Press Enter.
5. Press 1 to install Big Data Management in a single node environment.
6. Press Enter.
7. Type the absolute path for the Big Data Management installation directory and press Enter.
Start the path with a slash. The directory names in the path must not contain spaces or the following special characters: { } ! @ # $ % ^ & * ( ) : ; | ' ` < > , ? + [ ] \
If you type a directory path that does not exist, the installer creates the entire directory path on the node during the installation. Default is /opt.
8. Press Enter.
The installer creates the /<BigDataManagementInstallationDirectory>/Informatica directory and populates all of the file systems with the contents of the RPM package.
To get more information about the tasks performed by the installer, you can view the informatica-hadoop-install.<DateTimeStamp>.log installation log file.
Installing in a Cluster Environment from the Primary Name Node Using SCP Protocol
You can install Big Data Management in a cluster environment from the primary name node using SCP.
1. Log in to the primary name node.
2. Run the following command to start the Big Data Management installation in console mode: bash InformaticaHadoopInstall.sh
3. Press y to accept the Big Data Management terms of agreement.
4. Press Enter.
5. Press 2 to install Big Data Management in a cluster environment.
6. Press Enter.
7. Type the absolute path for the Big Data Management installation directory.
Start the path with a slash. The directory names in the path must not contain spaces or the following special characters: { } ! @ # $ % ^ & * ( ) : ; | ' ` < > , ? + [ ] \
If you type a directory path that does not exist, the installer creates the entire directory path on each of the nodes during the installation. Default is /opt.
8. Press Enter.
9. Press 1 to install Big Data Management from the primary name node.
10. Press Enter.
11. Type the absolute path for the Hadoop installation directory. Start the path with a slash.
14 Chapter 1: Installing Big Data Management
12. Press Enter.
13. Type y.
14. Press Enter.
The installer retrieves a list of DataNodes from the $HADOOP_HOME/conf/slaves file. On each of the DataNodes, the installer creates the Informatica directory and populates all of the file systems with the contents of the RPM package. The Informatica directory is located here: /<BigDataManagementInstallationDirectory>/Informatica
You can view the informatica-hadoop-install.<DateTimeStamp>.log installation log file to get more information about the tasks performed by the installer.
Installing Big Data Management Using NFSYou can install Big Data Management in a cluster environment from the primary name node using NFS protocol.
1. Log in to the primary name node.
2. Run the following command to start the Big Data Management installation in console mode: bash InformaticaHadoopInstall.sh
3. Press y to accept the Big Data Management terms of agreement.
4. Press Enter.
5. Press 2 to install Big Data Management in a cluster environment.
6. Press Enter.
7. Type the absolute path for the Big Data Management installation directory.
Start the path with a slash. The directory names in the path must not contain spaces or the following special characters: { } ! @ # $ % ^ & * ( ) : ; | ' ` < > , ? + [ ] \
If you type a directory path that does not exist, the installer creates the entire directory path on each of the nodes during the installation. Default is /opt.
8. Press Enter.
9. Press 1 to install Big Data Management from the primary name node.
10. Press Enter.
11. Type the absolute path for the Hadoop installation directory. Start the path with a slash.
12. Press Enter.
13. Type n.
14. Press Enter.
15. Type y.
16. Press Enter.
The installer retrieves a list of DataNodes from the $HADOOP_HOME/conf/slaves file. On each of the DataNodes, the installer creates the /<BigDataManagementInstallationDirectory>/Informatica directory and populates all of the file systems with the contents of the RPM package.
You can view the informatica-hadoop-install.<DateTimeStamp>.log installation log file to get more information about the tasks performed by the installer.
Big Data Management Installation from an RPM Package 15
Installing in a Cluster Environment from a Non-Name Node Machine
You can install Big Data Management in a cluster environment from any machine in the cluster that is not a name node.
1. Verify that the Big Data Management administrator has user root privileges on the node that will be running the Big Data Management installation.
2. Log in to the machine as the root user.
3. In the HadoopDataNodes file, add the IP addresses or machine host names of the nodes in the Hadoop cluster on which you want to install Big Data Management. The HadoopDataNodes file is located on the node from where you want to launch the Big Data Management installation. You must add one IP addresses or machine host names of the nodes in the Hadoop cluster for each line in the file.
4. Run the following command to start the Big Data Management installation in console mode: bash InformaticaHadoopInstall.sh
5. Press y to accept the Big Data Management terms of agreement.
6. Press Enter.
7. Press 2 to install Big Data Management in a cluster environment.
8. Press Enter.
9. Type the absolute path for the Big Data Management installation directory and press Enter. Start the path with a slash. Default is /opt.
10. Press Enter.
11. Press 2 to install Big Data Management using the HadoopDataNodes file.
12. Press Enter.
The installer creates the /<BigDataManagementInstallationDirectory>/Informatica directory and populates all of the file systems with the contents of the RPM package on the first node that appears in the HadoopDataNodes file. The installer repeats the process for each node in the HadoopDataNodes file.
Create a Cluster on Amazon EMR and Install Big Data Management
If you choose not to use one of the standard installation procedures described above, you can create a cluster on Amazon EMR and install Big Data Management.
You upload the RPM package to an S3 bucket, and prepare and upload a bootstrap script. Use the cluster creation wizard to create an Amazon EMR cluster. The cluster creation wizard uses values in the bootstrap script to download the RPM package from the Amazon S3 bucket and extract the package. Then the wizard creates a cluster, where it installs Big Data Management.
Perform the following steps to create a cluster on Amazon EMR and install Big Data Management:
1. Upload the Big Data Management RPM package.
2. Prepare the bootstrap script.
3. Run the cluster creation wizard to create and configure the Amazon EMR cluster and execute the script.
16 Chapter 1: Installing Big Data Management
Upload the RPM PackageThe tar.gz file includes an RPM package and the binary files that you need to run the Big Data Management installation.
Upload the RPM package .tar file to a bucket on S3. Note the location so you can supply it during cluster creation steps.
Prepare the Bootstrap ScriptYou can use a bootstrap script to install Big Data Management on the cluster.
Use the cluster creation wizard to create an Amazon EMR cluster. The cluster creation wizard uses values in the bootstrap script to download the RPM package from the Amazon S3 bucket and extract the package. Then the wizard creates a cluster, where it installs Big Data Management.
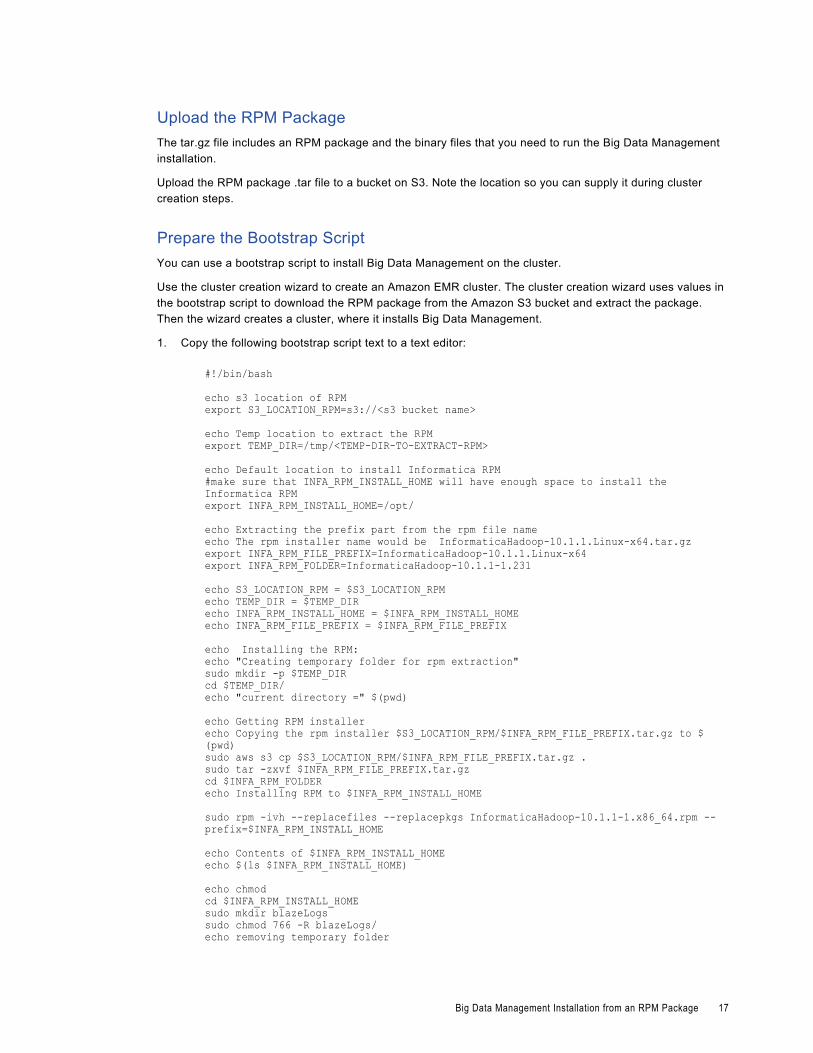
1. Copy the following bootstrap script text to a text editor:
#!/bin/bash
echo s3 location of RPM export S3_LOCATION_RPM=s3://<s3 bucket name>
echo Temp location to extract the RPMexport TEMP_DIR=/tmp/<TEMP-DIR-TO-EXTRACT-RPM>
echo Default location to install Informatica RPM#make sure that INFA_RPM_INSTALL_HOME will have enough space to install the Informatica RPM export INFA_RPM_INSTALL_HOME=/opt/
echo Extracting the prefix part from the rpm file nameecho The rpm installer name would be InformaticaHadoop-10.1.1.Linux-x64.tar.gzexport INFA_RPM_FILE_PREFIX=InformaticaHadoop-10.1.1.Linux-x64export INFA_RPM_FOLDER=InformaticaHadoop-10.1.1-1.231
echo S3_LOCATION_RPM = $S3_LOCATION_RPMecho TEMP_DIR = $TEMP_DIRecho INFA_RPM_INSTALL_HOME = $INFA_RPM_INSTALL_HOMEecho INFA_RPM_FILE_PREFIX = $INFA_RPM_FILE_PREFIX
echo Installing the RPM:echo "Creating temporary folder for rpm extraction"sudo mkdir -p $TEMP_DIRcd $TEMP_DIR/echo "current directory =" $(pwd)
echo Getting RPM installerecho Copying the rpm installer $S3_LOCATION_RPM/$INFA_RPM_FILE_PREFIX.tar.gz to $(pwd)sudo aws s3 cp $S3_LOCATION_RPM/$INFA_RPM_FILE_PREFIX.tar.gz .sudo tar -zxvf $INFA_RPM_FILE_PREFIX.tar.gzcd $INFA_RPM_FOLDERecho Installing RPM to $INFA_RPM_INSTALL_HOME
sudo rpm -ivh --replacefiles --replacepkgs InformaticaHadoop-10.1.1-1.x86_64.rpm --prefix=$INFA_RPM_INSTALL_HOME
echo Contents of $INFA_RPM_INSTALL_HOMEecho $(ls $INFA_RPM_INSTALL_HOME)
echo chmodcd $INFA_RPM_INSTALL_HOMEsudo mkdir blazeLogssudo chmod 766 -R blazeLogs/echo removing temporary folder
Big Data Management Installation from an RPM Package 17
sudo rm -rf $TEMP_DIR/
echo done2. Edit the bootstrap script to supply values for the following variables:
<s3-bucket-name>
Name of the Amazon S3 bucket that contains the RPM .tar file.
<TEMP-DIR-TO-EXTRACT-RPM>
Temporary directory location to extract the RPM package to.
<build_number>
RC build number.
3. Save the script file with the suffix .bash in the file name.
4. Upload the edited script file to the S3 bucket.
Run the Configuration Wizard1. Launch the cluster configuration wizard.
2. In Step 1 of the configuration wizard, under Edit software settings (optional), select Enter configuration.
3. In the text pane, paste the following set of properties and values to configure the cluster for the Blaze run-time engine:
classification=yarn-site,properties=[yarn.scheduler.minimum-allocation- mb=256,yarn.nodemanager.resource.memory-mb=14000,yarn.nodemanager.resource.cpu- vcores=15,yarn.scheduler.maximum-allocation-mb=8192,yarn.nodemanager.vmem-check- enabled=false, yarn.nodemanager.vmem-pmem-ratio=12]
Note: The values specified in the sample above are the minimum values required. You can use greater values if your cluster requires them.
4. In Step 3, General Cluster Settings, provide the S3 location of the bootstrap script.
5. Click Create Cluster.
The cluster creation wizard uses values in the bootstrap script to download the RPM package from the Amazon S3 bucket and extract the package. Then the wizard creates a cluster, where it installs Big Data Management.
Informatica Big Data Management is installed on the cluster.
Big Data Management Installation to an Ambari Stack
You can install Big Data Management to an Ambari stack on HortonWorks.
An Ambari stack is a cluster, containing a set of services from Apache and other vendors, that you administer and monitor using the Ambari management console. When you install Big Data Management to an Ambari stack, the stack integrates it with the other services in the stack and with client nodes that are registered to the stack.
Because the Ambari configuration manager automatically performs several installation tasks, installing Big Data Management in an Ambari stack is simpler and faster than manually installing from an RPM archive to a head node and client nodes.
18 Chapter 1: Installing Big Data Management
PrerequisitesBefore you install Big Data Management in an Ambari stack, verify the following prerequisites:
• The cluster uses the HortonWorks Hadoop distribution.
• The cluster has an existing Ambari stack, using Ambari v. 2.4.0.1 or later.
• The name node has at least two client cluster nodes where Big Data Management can be deployed.
Preparing to Install to an Ambari StackBefore you launch the process to install Big Data Management as a service in an Ambari stack, perform the following preliminary steps:
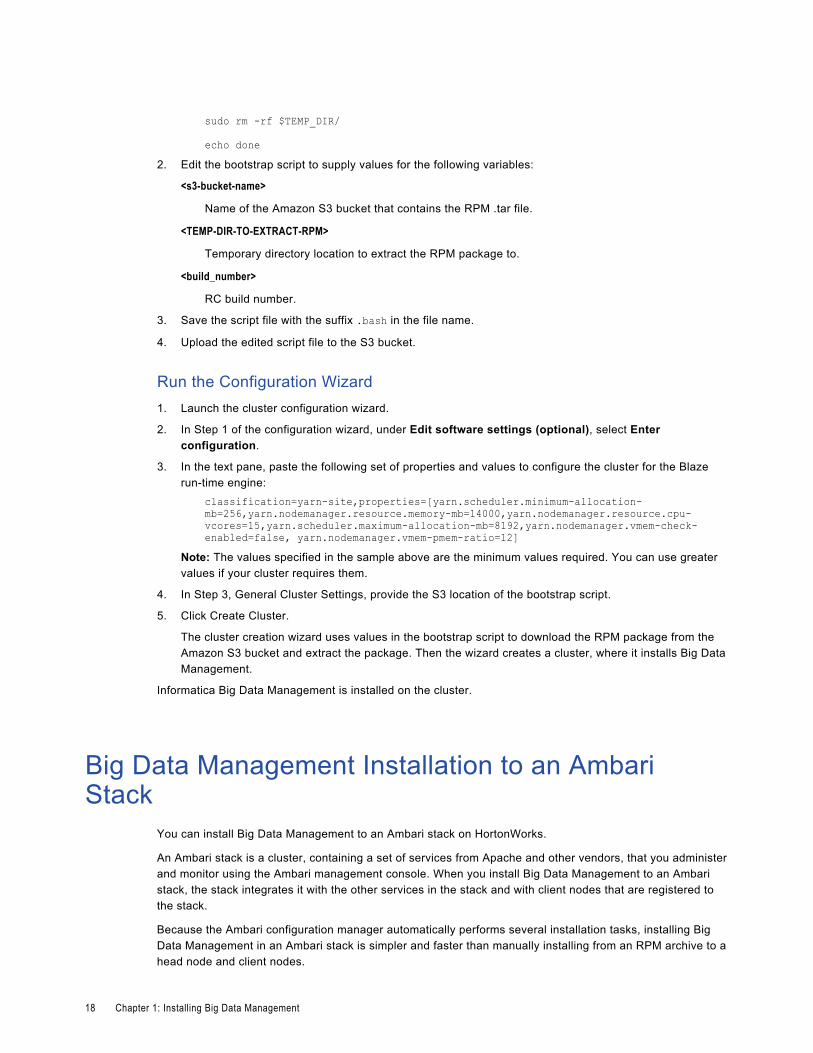
1. Verify that the following symbolic links have been created.
On the cluster name node, verify the following symbolic links in the file /usr/lib/python<version>/site-packages:
Link Path
resource_management /usr/lib/ambari-server/lib/resource_management
ambari_commons /usr/lib/ambari-server/lib/ambari_commons
ambari_jina2 /usr/lib/ambari-server/lib/ambari_jinja2
ambari_simplejson /usr/lib/ambari-server/lib/ambari_simplejson
On each client node, verify the following symbolic links in the file /usr/lib/python<version>/site-packages:
Link Path
resource_management /usr/lib/ambari-agent/lib/resource_management
ambari_commons /usr/lib/ambari-agent/lib/ambari_commons
ambari_jina2 /usr/lib/ambari-agent/lib/ambari_jinja2
ambari_simplejson /usr/lib/ambari-agent/lib/ambari_simplejson
2. Download the Big Data Management archive file InformaticaAmbariService-<version>.<platform>-x64.tar.gz to a location on the head node machine, and uncompress the archive.
The archive file contains a folder named INFORMATICABDM. This folder contains Big Data Management binaries. It also contains configuration files that Ambari uses to deploy the software.
3. Copy the INFORMATICABDM folder to the following location on the name node: /var/lib/ambari-server/resources/stacks/<Hadoop_distribution>/<version>/services/
4. Restart the Ambari server.
When Ambari restarts, it registers the presence of the Big Data Management package and makes it available to install as a service in the stack.
Big Data Management Installation to an Ambari Stack 19
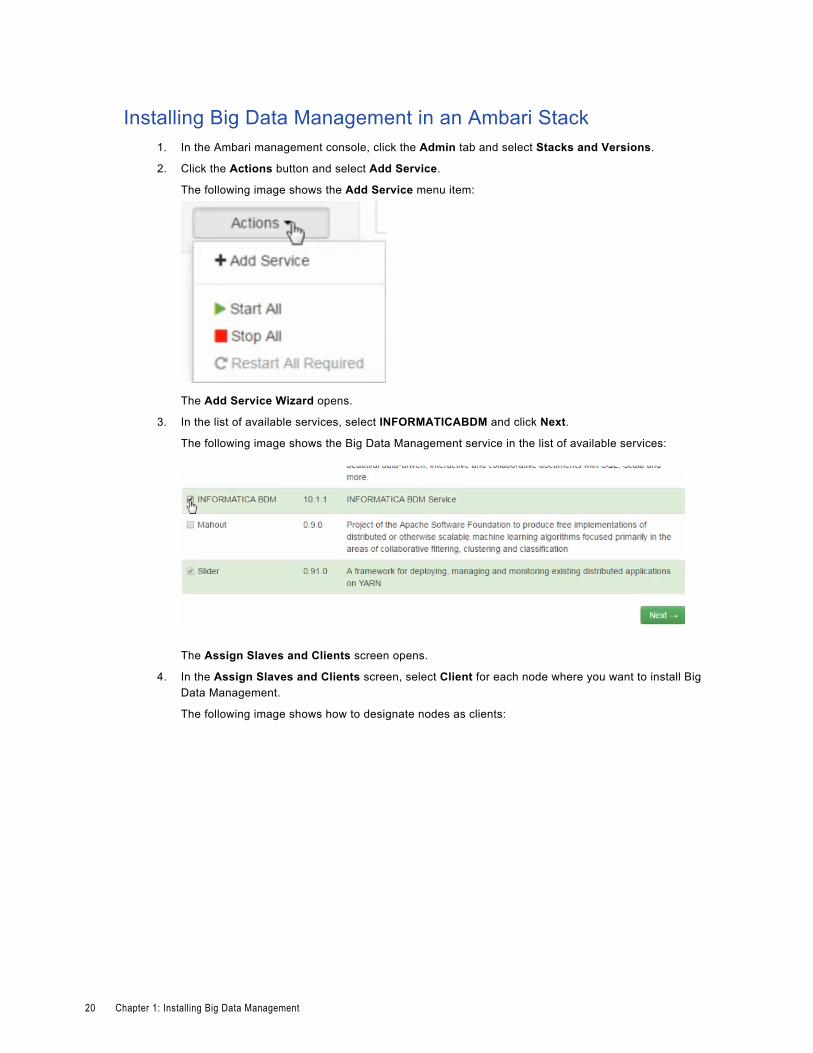
Installing Big Data Management in an Ambari Stack1. In the Ambari management console, click the Admin tab and select Stacks and Versions.
2. Click the Actions button and select Add Service.
The following image shows the Add Service menu item:
The Add Service Wizard opens.
3. In the list of available services, select INFORMATICABDM and click Next.
The following image shows the Big Data Management service in the list of available services:
The Assign Slaves and Clients screen opens.
4. In the Assign Slaves and Clients screen, select Client for each node where you want to install Big Data Management.
The following image shows how to designate nodes as clients:
20 Chapter 1: Installing Big Data Management
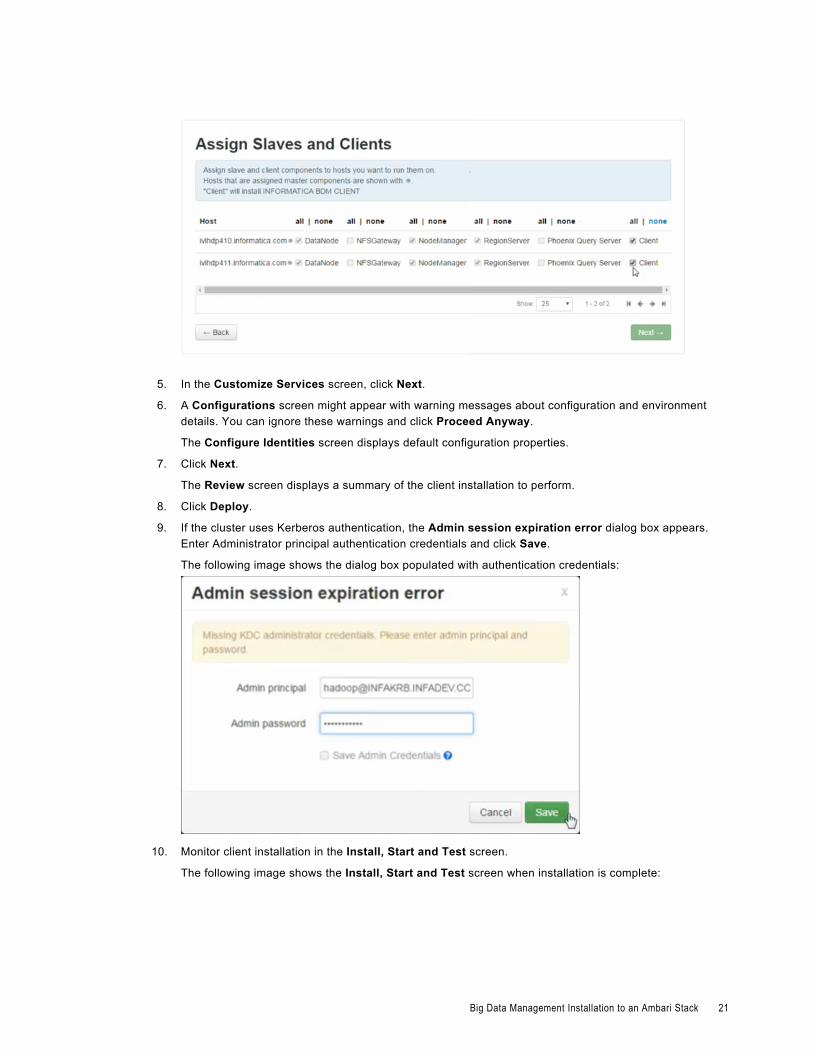
5. In the Customize Services screen, click Next.
6. A Configurations screen might appear with warning messages about configuration and environment details. You can ignore these warnings and click Proceed Anyway.
The Configure Identities screen displays default configuration properties.
7. Click Next.
The Review screen displays a summary of the client installation to perform.
8. Click Deploy.
9. If the cluster uses Kerberos authentication, the Admin session expiration error dialog box appears. Enter Administrator principal authentication credentials and click Save.
The following image shows the dialog box populated with authentication credentials:
10. Monitor client installation in the Install, Start and Test screen.
The following image shows the Install, Start and Test screen when installation is complete:
Big Data Management Installation to an Ambari Stack 21
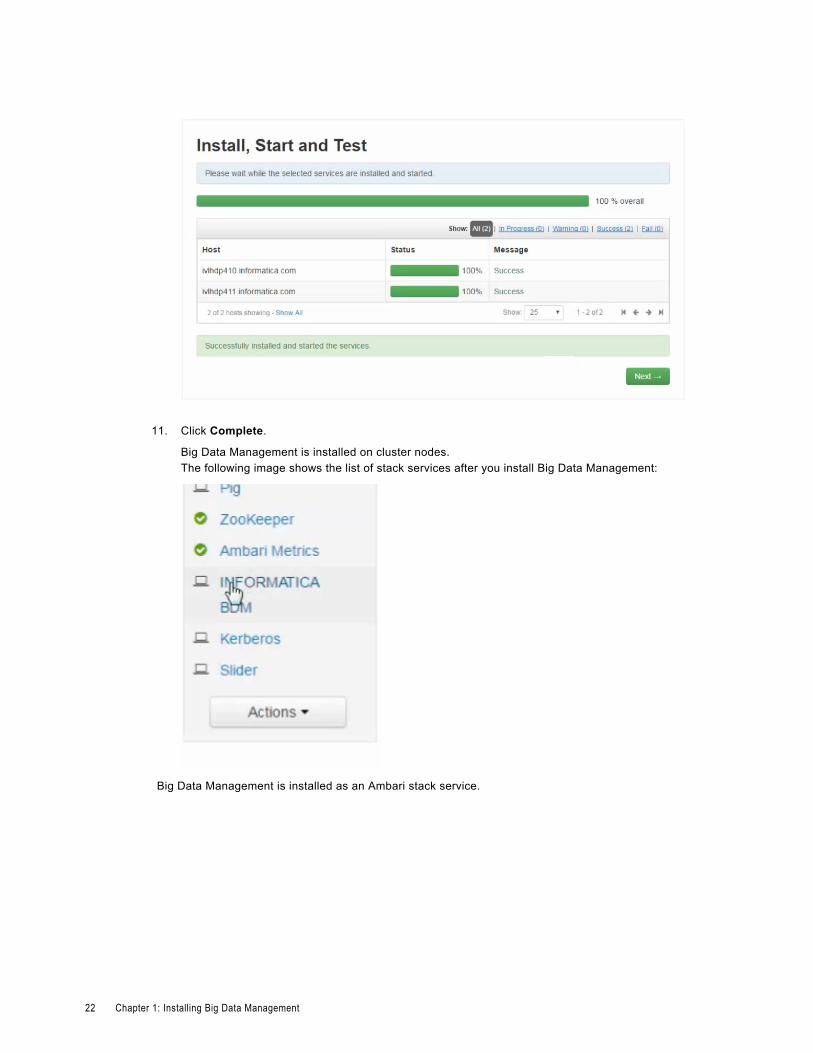
11. Click Complete.
Big Data Management is installed on cluster nodes.The following image shows the list of stack services after you install Big Data Management:
Big Data Management is installed as an Ambari stack service.
22 Chapter 1: Installing Big Data Management
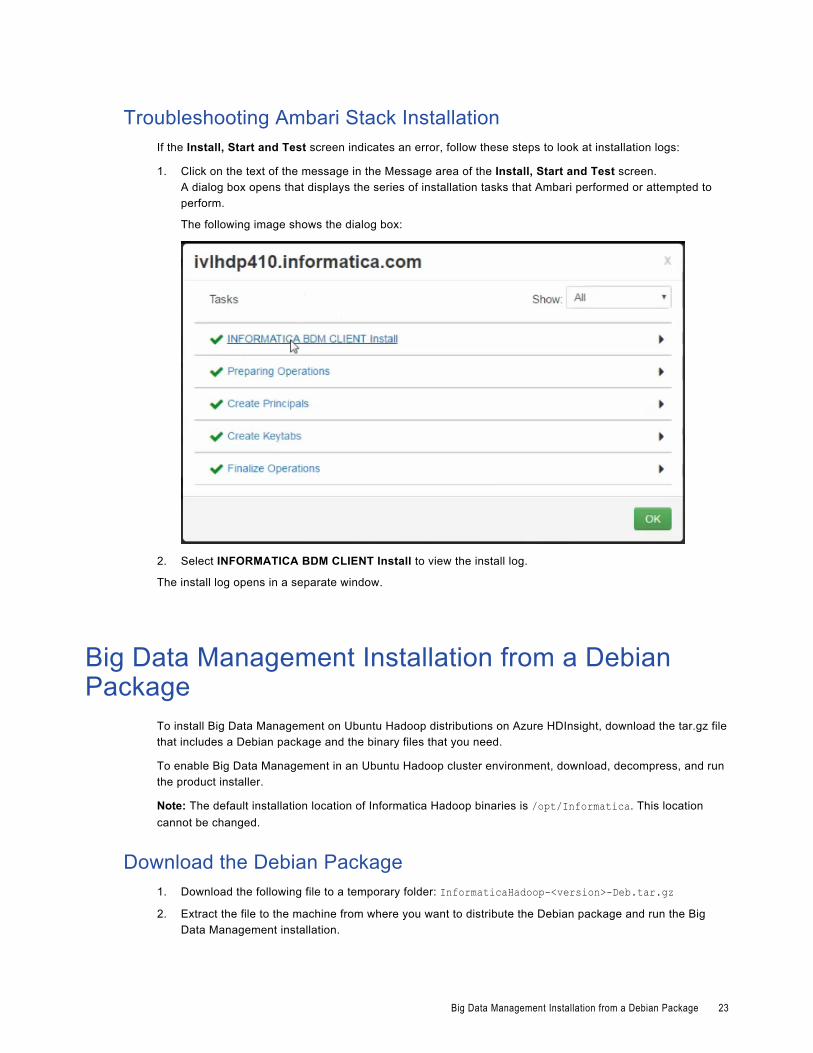
Troubleshooting Ambari Stack InstallationIf the Install, Start and Test screen indicates an error, follow these steps to look at installation logs:
1. Click on the text of the message in the Message area of the Install, Start and Test screen.A dialog box opens that displays the series of installation tasks that Ambari performed or attempted to perform.
The following image shows the dialog box:
2. Select INFORMATICA BDM CLIENT Install to view the install log.
The install log opens in a separate window.
Big Data Management Installation from a Debian Package
To install Big Data Management on Ubuntu Hadoop distributions on Azure HDInsight, download the tar.gz file that includes a Debian package and the binary files that you need.
To enable Big Data Management in an Ubuntu Hadoop cluster environment, download, decompress, and run the product installer.
Note: The default installation location of Informatica Hadoop binaries is /opt/Informatica. This location cannot be changed.
Download the Debian Package1. Download the following file to a temporary folder: InformaticaHadoop-<version>-Deb.tar.gz 2. Extract the file to the machine from where you want to distribute the Debian package and run the Big
Data Management installation.
Big Data Management Installation from a Debian Package 23

Installing Big Data Management in a Single Node EnvironmentYou can install Big Data Management in a single node environment.
1. Log in to the machine.
2. Run the following command from the Big Data Management root directory to start the installation in console mode:
sudo bash InformaticaHadoopInstall.sh3. Press y to accept the Big Data Management terms of agreement.
4. Press Enter.
5. Press 1 to install Big Data Management in a single node environment.
6. Press Enter.
To get more information about the tasks performed by the installer, you can view the informatica-hadoop-install.<DateTimeStamp>.log installation log file.
Installing Big Data Management Using the SCP ProtocolYou can install Big Data Management in a cluster environment from the primary namenode using the SCP protocol.
1. Log in to the primary namenode.
2. Run the following command to start the Big Data Management installation in console mode: sudo bash InformaticaHadoopInstall.sh
3. Press y to accept the Big Data Management terms of agreement.
4. Press Enter.
5. Press 2 to install Big Data Management in a cluster environment.
6. Press Enter.
7. Press 1 to install Big Data Management from the primary namenode.
8. Press Enter.
The installer installs Big Data Management in the HDInsight Hadoop cluster. The SCP utility copies the product binaries to every node on the cluster in the following directory: /opt/Informatica.
You can view the informatica-hadoop-install.<DateTimeStamp>.log installation log file to get more information about the tasks performed by the installer.
Installing Big Data Management Using NFSYou can install Big Data Management in a cluster environment from the primary NameNode using the NFS protocol.
1. Log in to the primary NameNode.
2. Run the following command to start the Big Data Management installation in console mode: sudo bash InformaticaHadoopInstall.sh
3. Press y to accept the Big Data Management terms of agreement.
4. Press Enter.
5. Press 2 to install Big Data Management in a cluster environment.
24 Chapter 1: Installing Big Data Management
6. Press Enter.
7. Press 1 to install Big Data Management from the primary NameNode.
8. Press Enter.
You can view the informatica-hadoop-install.<DateTimeStamp>.log installation log file to get more information about the tasks performed by the installer.
Installing Big Data Management in a Cluster EnvironmentYou can install Big Data Management in a cluster environment from any machine in the cluster that is not a name node.
1. Verify that the Big Data Management administrator has user root privileges on the node that will be running the Big Data Management installation.
2. Log in to the machine as the root user.
3. In the HadoopDataNodes file, add the IP addresses or machine host names of the nodes in the Hadoop cluster on which you want to install Big Data Management.
You must add one IP addresses or machine host names of the nodes in the Hadoop cluster for each line in the file.
Note: The HadoopDataNodes file is located on the node from where you want to launch the Big Data Management installation.
4. Run the following command to start the Big Data Management installation in console mode: sudo bash InformaticaHadoopInstall.sh
5. Press y to accept the Big Data Management terms of agreement.
6. Press Enter.
7. Press 2 to install Big Data Management in a cluster environment.
8. Press Enter.
Big Data Management Installation from a Cloudera Parcel Package
To install Big Data Management on Hadoop distributions on Cloudera, the parcel.tar file includes a Cloudera Parcel package and the binary files that you need to run the Big Data Management installation.
To enable Big Data Management in a Cloudera Hadoop cluster environment, download, decompress, and run the product installer.
Note: The default installation location of Informatica Hadoop binaries is /opt/cloudera/parcels/INFORMATICA. This location cannot be changed.
Installing Big Data Management Using Cloudera ManagerYou can install Big Data Management on a Cloudera CDH cluster using Cloudera Manager.
Perform the following steps:
1. Download the following file: INFORMATICA-<version>-informatica-<version>.parcel.tar.
Big Data Management Installation from a Cloudera Parcel Package 25

2. Extract manifest.json and the parcels from the .tar file.
3. Verify the location of your Local Parcel Repository.
In Cloudera Manager, click Administration > Settings > Parcels
4. Create a SHA file with the parcel name and hash listed in manifest.json that corresponds with your Hadoop cluster. For example, use the following parcel name for Hadoop cluster nodes that run Red Hat Enterprise Linux 6.4 64-bit:
INFORMATICA-<version>informatica-<version>-el6.parcelUse the following hash listed for Red Hat Enterprise Linux 6.4 64-bit: 8e904e949a11c4c16eb737f02ce4e36ffc03854f
To create a SHA file, run the following command:echo <hash> > <ParcelName> .sha
For example, run the following command:echo “8e904e949a11c4c16eb737f02ce4e36ffc03854f” > INFORMATICA-9.6.1-1.informatica9.6.1.1.p0.1203-el6.parcel.sha
5. Transfer the parcel and SHA file to the Local Parcel Repository with FTP.
6. Check for new parcels with Cloudera Manager.
To check for new parcels, click Hosts > Parcels.
7. Distribute the Big Data Management parcels.
8. Activate the Big Data Management parcels.
26 Chapter 1: Installing Big Data Management
C H A P T E R 2
Hadoop Configuration ManagerThis chapter includes the following topics:
• Big Data Management Configuration Overview, 27
• Before You Configure, 27
• Run the Configuration Manager in Console Mode, 30
• Configure Big Data Management using the Configuration Manager in Silent Mode, 38
Big Data Management Configuration OverviewAfter you install Big Data Management in the cluster environment, you configure Big Data Management on the Informatica domain.
Configure Big Data Management using the Hadoop Configuration Manager. The configuration manager gets information from the Hadoop cluster and populates the Hadoop environment properties on the Informatica domain to enable the domain and the Hadoop cluster to communicate.
You can run the configuration manager in console or silent mode.
Note: You cannot use the Hadoop Configuration Manager for an Amazon EMR cluster. You must manually configure Big Data Management for an Amazon EMR cluster.
After running the configuration manager, you must perform some additional configuration tasks.
Before You ConfigureBefore you configure using the Hadoop Configuration Manager, verify prerequisites. If you are configuring Big Data Management for the Azure HDInsight cluster, you must verify additional prerequisites.
PrerequisitesBefore you configure the domain for Big Data Management using the Hadoop Configuration Manager, verify the following prerequisites:
• The Data Integration Service is created and configured in the Informatica domain.
• You must have administrator privileges to log in to the Administrator tool.
27
• If the Hadoop cluster uses the Kerberos authentication, copy the krb5.conf file from the /etc/krb5.conf cluster to the following directories on the Data Integration Service machine:
<Informatica home directory>/services/shared/security<Informatica home directory>/java/jre/lib/security
• You must have read permissions for the above directories.
• You have the details of the Hadoop service principal name and the keytab file. Contact your Hadoop administrator or the Kerberos administrator to get the details.
Additional Prerequisites for HDInsightIf you are configuring Big Data Management for HDInsight, compete the following additional prerequisites before using the Hadoop Configuration Manager:
• You have an instance of HDInsight in a supported Linux cluster running on the Azure environment.For information about product requirements and platform compatibility, see the Product Availability Matrix on the Informatica Network.
• You have permission to access and administer the HDInsight instance.
• You have noted the names and addresses of cluster resources and other information from cluster configuration pages.
• To ensure that Informatica can access the HDInsight cluster, add the IP addresses or host names of all cluster nodes in the /etc/hosts file on the domain.Enter the following information for each data node on the cluster:
• IP address
•DNS name
•DNS short name. Use headnodehost to identify the host as the cluster headnode host.
For example:10.75.169.19 hn0-rndhdi.qrg2yxlb0aouniiuvfp3betl3d.ix.internal.cloudapp.net headnodehost
Before you run Big Data Management for HDInsight, you must also populate the HDFS file system before running the Hadoop Configuration Manager.
Populate the HDFS File SystemAfter you install Big Data Management for HDInsight, populate the HDFS file system.
Informatica reads and writes data from the HDFS location, but the default environment has a local HDFS location that is empty, and a wasb location that is populated with files. To read and write data, you must populate HDFS with the files from the wasb location.
You can choose from these methods:
• Populate the HDFS using a script.
• Populate the HDFS manually.
Populate the HDFS File System Using a ScriptWhen you use a script to populate the file system, the script copies the following directories from wasb location to the HDFS location:
• /apps
• /hbase
28 Chapter 2: Hadoop Configuration Manager
• /hive
• /mr-history
• /user
• /hdp
• /atshistory
Note: If you do not configure the cluster for HBase, the directories /apps and /hbase will not be present in the wasb location. In this case, you can ignore the errors generated by the script.
Perform the following steps:
1. On a name node host, browse to a directory from which you want to run the script.For example, suppose this is a directory named /homeDirectory.
2. Create a tempDir in that directory.For example, you now have /homeDirectory/tempDir.
3. Set read and write permission on the tempDir directory.
4. From /homeDirectory, execute the script shown below .Notice that a template for the command is in the second line of the script. The command requires you to supply two arguments:wasb File System URI
Source of the files in the wasb location. This location is the same as the value of the fs.defaultFS property in the cluster's HDFS configuration console.
HDFS File System URI
HDFS destination for the files to copy from the wasb location. This location is the same as the value of the nameservices property in the cluster's HDFS configuration console.
#!/bin/bash#Invoking the script: ./FileCopyFromWasbToHdfs.sh [WASB File System URI] [HDFS File System URI]#The following directories are to be copied from WASB to HDFS File System :-# /apps, /hbase, /hive, mr-history, /user, /hdp /atshistory#The script assumes that /tempDir is created and permissions are set to read and write from above mentioned directories in respective file systems and /tempDir directory in local file system
declare -a dirs=('hdp' 'apps' 'hbase' 'hive' 'mr-history' 'user' 'atshistory')wasbFsUri=$1hdfsFsUri=$2set -xfor dir in "${dirs[@]}"do echo "copying /"$dir "folder from WASB to Local file system..." if hadoop fs -copyToLocal $wasbFsUri/$dir/ ./tempDir/; then echo "successfully copied /"$dir "folder from WASB to Local file system." else echo "ERROR: failure in copying /"$dir "folder from WASB to Local file system. Check if the directory is already present in the target or if the user has read/write access to the directories." echo "Aborting script..." exit 1 fi
echo "moving /"$dir "folder from Local file system to HDFS..." if hadoop fs -moveFromLocal ./tempDir/$dir/ $hdfsFsUri/; then echo "successfully copied /"$dir "folder from Local to HDFS file system." else echo "ERROR: failure in copying /"$dir "folder from Local to HDFS file system. Check if the directory is already present in the target or if the user has
Before You Configure 29
read/write access to the directories" echo "Aborting script..." exit 1 fidone
The HDFS location is populated.
Populating the HDFS File System ManuallyPerform the following steps to manually copy files from the wasb location to the local HDFS location:
1. Run the hadoop fs -copyToLocal <wasbURL> <LocalDir> command to copy the following directories from the wasb location to the local directory:
• /apps
• /hbase
• /hive
• /mr-history
• /user
• /hdp
• /atshistory
2. Run the hadoop fs -copyFromLocal <LocalDir> <HDFSDir> command to copy the directories from the local directory to the HDFS location.
Run the Configuration Manager in Console ModeYou can use the Hadoop Configuration Manager to automate part of the configuration for Big Data Management.
The Hadoop Configuration Manager assists with the following tasks:
• Creates configuration files on the machine where the Data Integration Service runs.
• Creates connections between the cluster and the Data Integration Service.
• Updates Data Integration Service properties in preparation for running mappings on the cluster.
To configure the Informatica domain for Big Data Management, perform the following steps:
1. On the machine where the Data Integration Service runs, open the command line.
2. Go to the following directory: <Informatica installation directory>/tools/BDMUtil.
3. Run BDMConfig.sh.
4. Press Enter.
30 Chapter 2: Hadoop Configuration Manager
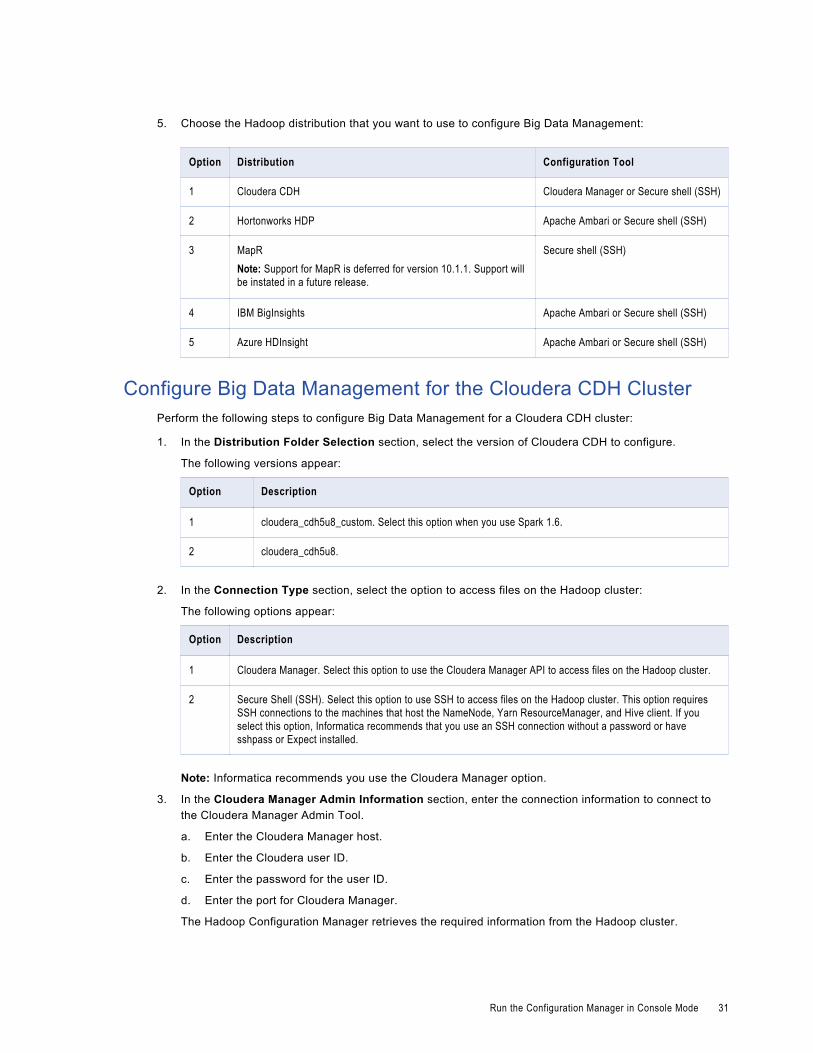
5. Choose the Hadoop distribution that you want to use to configure Big Data Management:
Option Distribution Configuration Tool
1 Cloudera CDH Cloudera Manager or Secure shell (SSH)
2 Hortonworks HDP Apache Ambari or Secure shell (SSH)
3 MapRNote: Support for MapR is deferred for version 10.1.1. Support will be instated in a future release.
Secure shell (SSH)
4 IBM BigInsights Apache Ambari or Secure shell (SSH)
5 Azure HDInsight Apache Ambari or Secure shell (SSH)
Configure Big Data Management for the Cloudera CDH ClusterPerform the following steps to configure Big Data Management for a Cloudera CDH cluster:
1. In the Distribution Folder Selection section, select the version of Cloudera CDH to configure.
The following versions appear:
Option Description
1 cloudera_cdh5u8_custom. Select this option when you use Spark 1.6.
2 cloudera_cdh5u8.
2. In the Connection Type section, select the option to access files on the Hadoop cluster:
The following options appear:
Option Description
1 Cloudera Manager. Select this option to use the Cloudera Manager API to access files on the Hadoop cluster.
2 Secure Shell (SSH). Select this option to use SSH to access files on the Hadoop cluster. This option requires SSH connections to the machines that host the NameNode, Yarn ResourceManager, and Hive client. If you select this option, Informatica recommends that you use an SSH connection without a password or have sshpass or Expect installed.
Note: Informatica recommends you use the Cloudera Manager option.
3. In the Cloudera Manager Admin Information section, enter the connection information to connect to the Cloudera Manager Admin Tool.
a. Enter the Cloudera Manager host.
b. Enter the Cloudera user ID.
c. Enter the password for the user ID.
d. Enter the port for Cloudera Manager.
The Hadoop Configuration Manager retrieves the required information from the Hadoop cluster.
Run the Configuration Manager in Console Mode 31
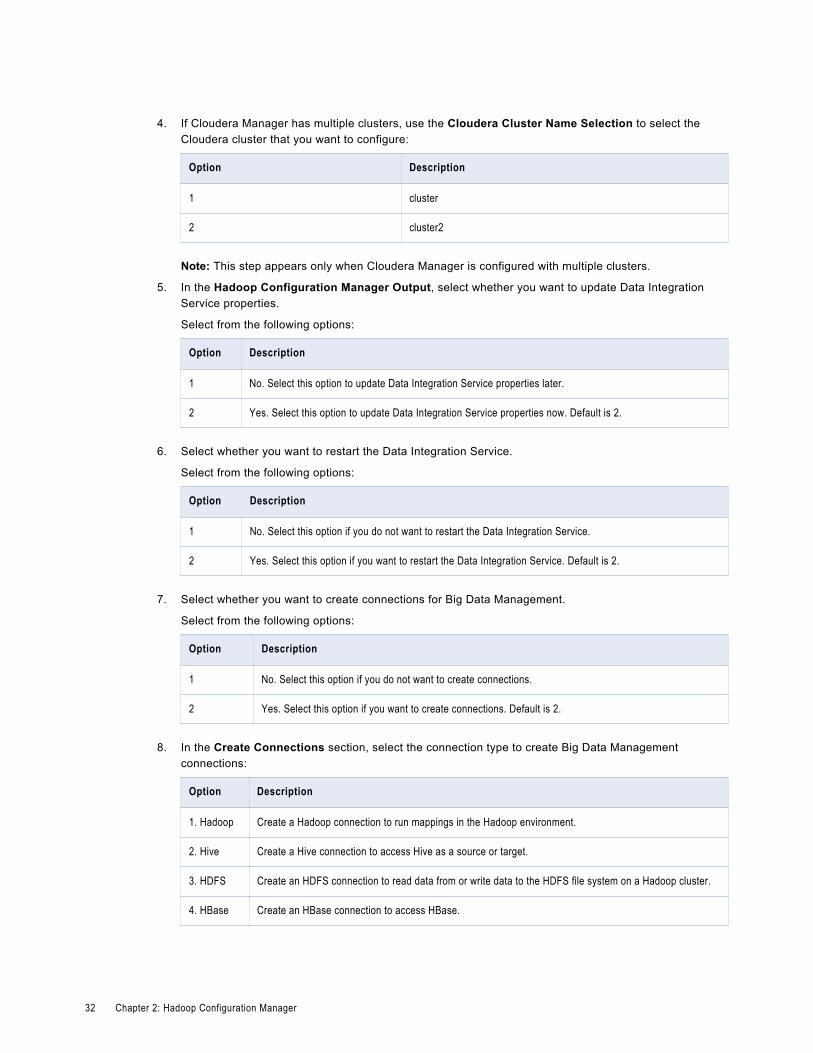
4. If Cloudera Manager has multiple clusters, use the Cloudera Cluster Name Selection to select the Cloudera cluster that you want to configure:
Option Description
1 cluster
2 cluster2
Note: This step appears only when Cloudera Manager is configured with multiple clusters.
5. In the Hadoop Configuration Manager Output, select whether you want to update Data Integration Service properties.
Select from the following options:
Option Description
1 No. Select this option to update Data Integration Service properties later.
2 Yes. Select this option to update Data Integration Service properties now. Default is 2.
6. Select whether you want to restart the Data Integration Service.
Select from the following options:
Option Description
1 No. Select this option if you do not want to restart the Data Integration Service.
2 Yes. Select this option if you want to restart the Data Integration Service. Default is 2.
7. Select whether you want to create connections for Big Data Management.
Select from the following options:
Option Description
1 No. Select this option if you do not want to create connections.
2 Yes. Select this option if you want to create connections. Default is 2.
8. In the Create Connections section, select the connection type to create Big Data Management connections:
Option Description
1. Hadoop Create a Hadoop connection to run mappings in the Hadoop environment.
2. Hive Create a Hive connection to access Hive as a source or target.
3. HDFS Create an HDFS connection to read data from or write data to the HDFS file system on a Hadoop cluster.
4. HBase Create an HBase connection to access HBase.
32 Chapter 2: Hadoop Configuration Manager
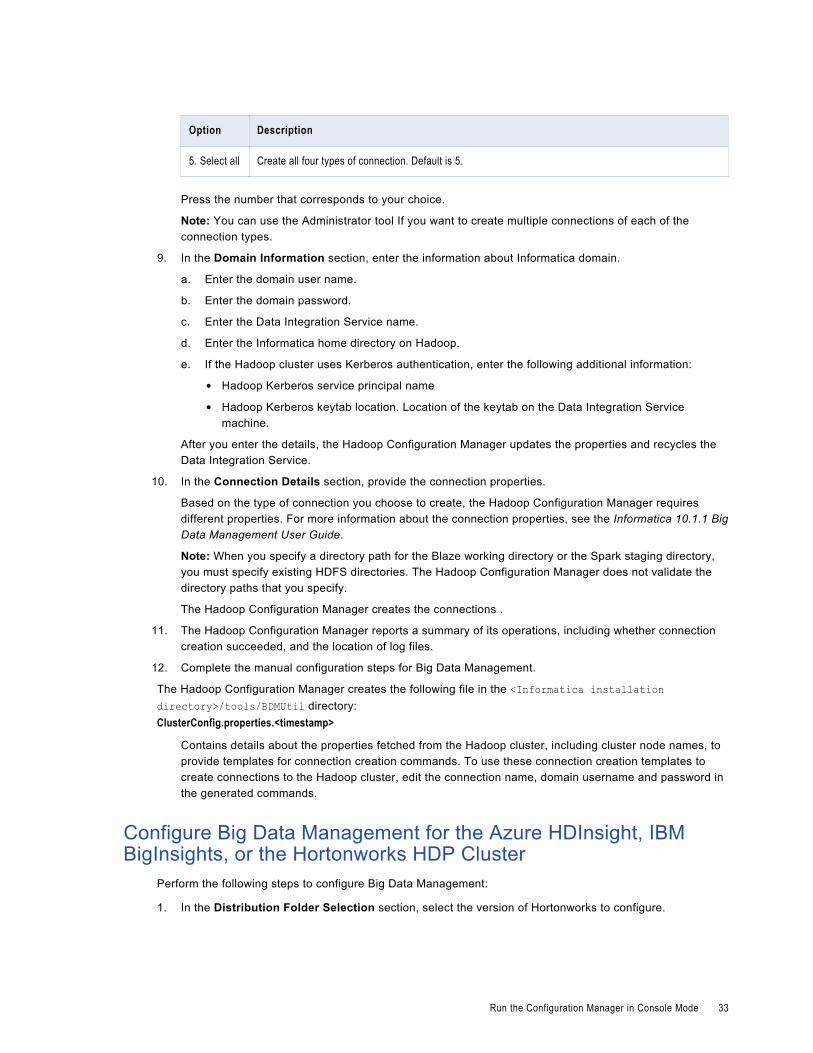
Option Description
5. Select all Create all four types of connection. Default is 5.
Press the number that corresponds to your choice.
Note: You can use the Administrator tool If you want to create multiple connections of each of the connection types.
9. In the Domain Information section, enter the information about Informatica domain.
a. Enter the domain user name.
b. Enter the domain password.
c. Enter the Data Integration Service name.
d. Enter the Informatica home directory on Hadoop.
e. If the Hadoop cluster uses Kerberos authentication, enter the following additional information:
• Hadoop Kerberos service principal name
• Hadoop Kerberos keytab location. Location of the keytab on the Data Integration Service machine.
After you enter the details, the Hadoop Configuration Manager updates the properties and recycles the Data Integration Service.
10. In the Connection Details section, provide the connection properties.
Based on the type of connection you choose to create, the Hadoop Configuration Manager requires different properties. For more information about the connection properties, see the Informatica 10.1.1 Big Data Management User Guide.
Note: When you specify a directory path for the Blaze working directory or the Spark staging directory, you must specify existing HDFS directories. The Hadoop Configuration Manager does not validate the directory paths that you specify.
The Hadoop Configuration Manager creates the connections .
11. The Hadoop Configuration Manager reports a summary of its operations, including whether connection creation succeeded, and the location of log files.
12. Complete the manual configuration steps for Big Data Management.
The Hadoop Configuration Manager creates the following file in the <Informatica installation directory>/tools/BDMUtil directory:ClusterConfig.properties.<timestamp>
Contains details about the properties fetched from the Hadoop cluster, including cluster node names, to provide templates for connection creation commands. To use these connection creation templates to create connections to the Hadoop cluster, edit the connection name, domain username and password in the generated commands.
Configure Big Data Management for the Azure HDInsight, IBM BigInsights, or the Hortonworks HDP Cluster
Perform the following steps to configure Big Data Management:
1. In the Distribution Folder Selection section, select the version of Hortonworks to configure.
Run the Configuration Manager in Console Mode 33
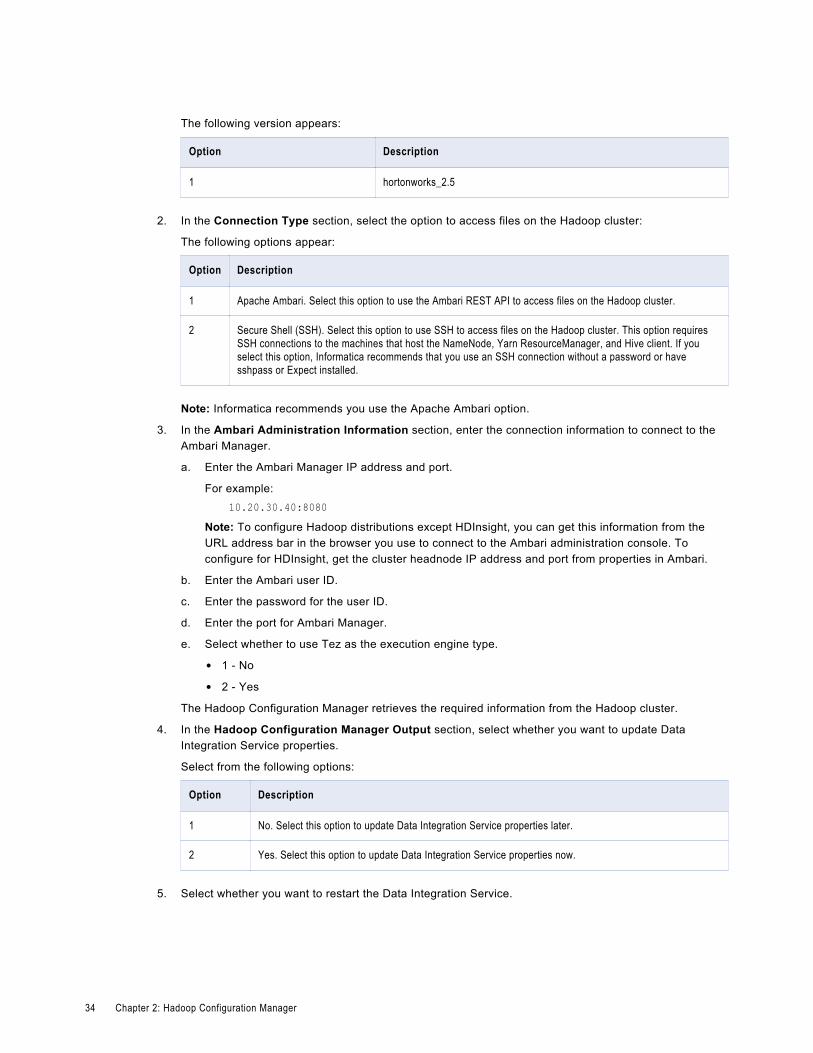
The following version appears:
Option Description
1 hortonworks_2.5
2. In the Connection Type section, select the option to access files on the Hadoop cluster:
The following options appear:
Option Description
1 Apache Ambari. Select this option to use the Ambari REST API to access files on the Hadoop cluster.
2 Secure Shell (SSH). Select this option to use SSH to access files on the Hadoop cluster. This option requires SSH connections to the machines that host the NameNode, Yarn ResourceManager, and Hive client. If you select this option, Informatica recommends that you use an SSH connection without a password or have sshpass or Expect installed.
Note: Informatica recommends you use the Apache Ambari option.
3. In the Ambari Administration Information section, enter the connection information to connect to the Ambari Manager.
a. Enter the Ambari Manager IP address and port.
For example:10.20.30.40:8080
Note: To configure Hadoop distributions except HDInsight, you can get this information from the URL address bar in the browser you use to connect to the Ambari administration console. To configure for HDInsight, get the cluster headnode IP address and port from properties in Ambari.
b. Enter the Ambari user ID.
c. Enter the password for the user ID.
d. Enter the port for Ambari Manager.
e. Select whether to use Tez as the execution engine type.
• 1 - No
• 2 - Yes
The Hadoop Configuration Manager retrieves the required information from the Hadoop cluster.
4. In the Hadoop Configuration Manager Output section, select whether you want to update Data Integration Service properties.
Select from the following options:
Option Description
1 No. Select this option to update Data Integration Service properties later.
2 Yes. Select this option to update Data Integration Service properties now.
5. Select whether you want to restart the Data Integration Service.
34 Chapter 2: Hadoop Configuration Manager
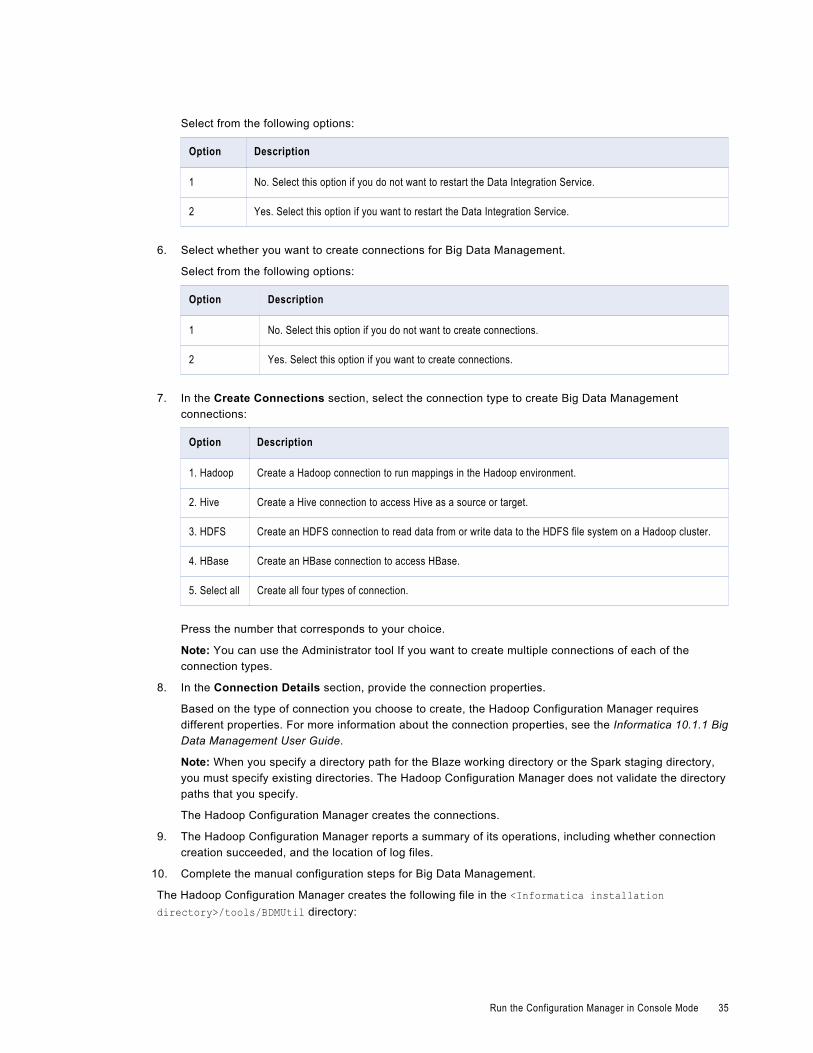
Select from the following options:
Option Description
1 No. Select this option if you do not want to restart the Data Integration Service.
2 Yes. Select this option if you want to restart the Data Integration Service.
6. Select whether you want to create connections for Big Data Management.
Select from the following options:
Option Description
1 No. Select this option if you do not want to create connections.
2 Yes. Select this option if you want to create connections.
7. In the Create Connections section, select the connection type to create Big Data Management connections:
Option Description
1. Hadoop Create a Hadoop connection to run mappings in the Hadoop environment.
2. Hive Create a Hive connection to access Hive as a source or target.
3. HDFS Create an HDFS connection to read data from or write data to the HDFS file system on a Hadoop cluster.
4. HBase Create an HBase connection to access HBase.
5. Select all Create all four types of connection.
Press the number that corresponds to your choice.
Note: You can use the Administrator tool If you want to create multiple connections of each of the connection types.
8. In the Connection Details section, provide the connection properties.
Based on the type of connection you choose to create, the Hadoop Configuration Manager requires different properties. For more information about the connection properties, see the Informatica 10.1.1 Big Data Management User Guide.
Note: When you specify a directory path for the Blaze working directory or the Spark staging directory, you must specify existing directories. The Hadoop Configuration Manager does not validate the directory paths that you specify.
The Hadoop Configuration Manager creates the connections.
9. The Hadoop Configuration Manager reports a summary of its operations, including whether connection creation succeeded, and the location of log files.
10. Complete the manual configuration steps for Big Data Management.
The Hadoop Configuration Manager creates the following file in the <Informatica installation directory>/tools/BDMUtil directory:
Run the Configuration Manager in Console Mode 35
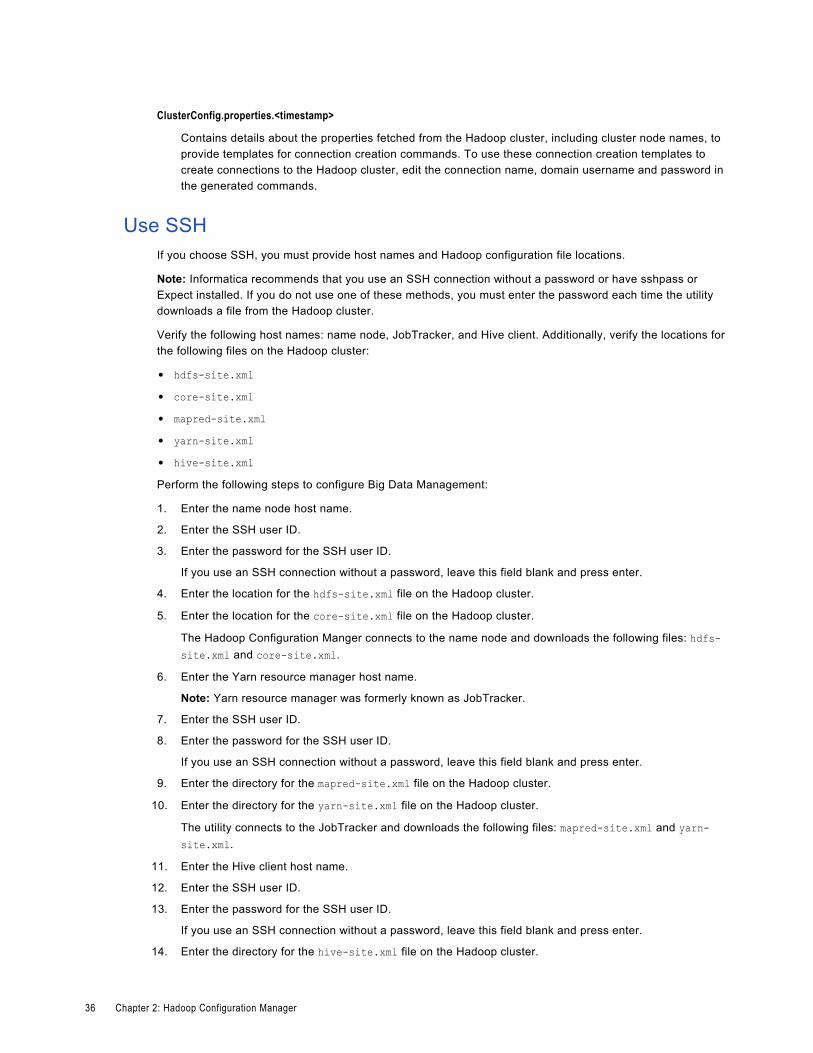
ClusterConfig.properties.<timestamp>
Contains details about the properties fetched from the Hadoop cluster, including cluster node names, to provide templates for connection creation commands. To use these connection creation templates to create connections to the Hadoop cluster, edit the connection name, domain username and password in the generated commands.
Use SSHIf you choose SSH, you must provide host names and Hadoop configuration file locations.
Note: Informatica recommends that you use an SSH connection without a password or have sshpass or Expect installed. If you do not use one of these methods, you must enter the password each time the utility downloads a file from the Hadoop cluster.
Verify the following host names: name node, JobTracker, and Hive client. Additionally, verify the locations for the following files on the Hadoop cluster:
• hdfs-site.xml• core-site.xml• mapred-site.xml• yarn-site.xml• hive-site.xmlPerform the following steps to configure Big Data Management:
1. Enter the name node host name.
2. Enter the SSH user ID.
3. Enter the password for the SSH user ID.
If you use an SSH connection without a password, leave this field blank and press enter.
4. Enter the location for the hdfs-site.xml file on the Hadoop cluster.
5. Enter the location for the core-site.xml file on the Hadoop cluster.
The Hadoop Configuration Manger connects to the name node and downloads the following files: hdfs-site.xml and core-site.xml.
6. Enter the Yarn resource manager host name.
Note: Yarn resource manager was formerly known as JobTracker.
7. Enter the SSH user ID.
8. Enter the password for the SSH user ID.
If you use an SSH connection without a password, leave this field blank and press enter.
9. Enter the directory for the mapred-site.xml file on the Hadoop cluster.
10. Enter the directory for the yarn-site.xml file on the Hadoop cluster.
The utility connects to the JobTracker and downloads the following files: mapred-site.xml and yarn-site.xml.
11. Enter the Hive client host name.
12. Enter the SSH user ID.
13. Enter the password for the SSH user ID.
If you use an SSH connection without a password, leave this field blank and press enter.
14. Enter the directory for the hive-site.xml file on the Hadoop cluster.
36 Chapter 2: Hadoop Configuration Manager
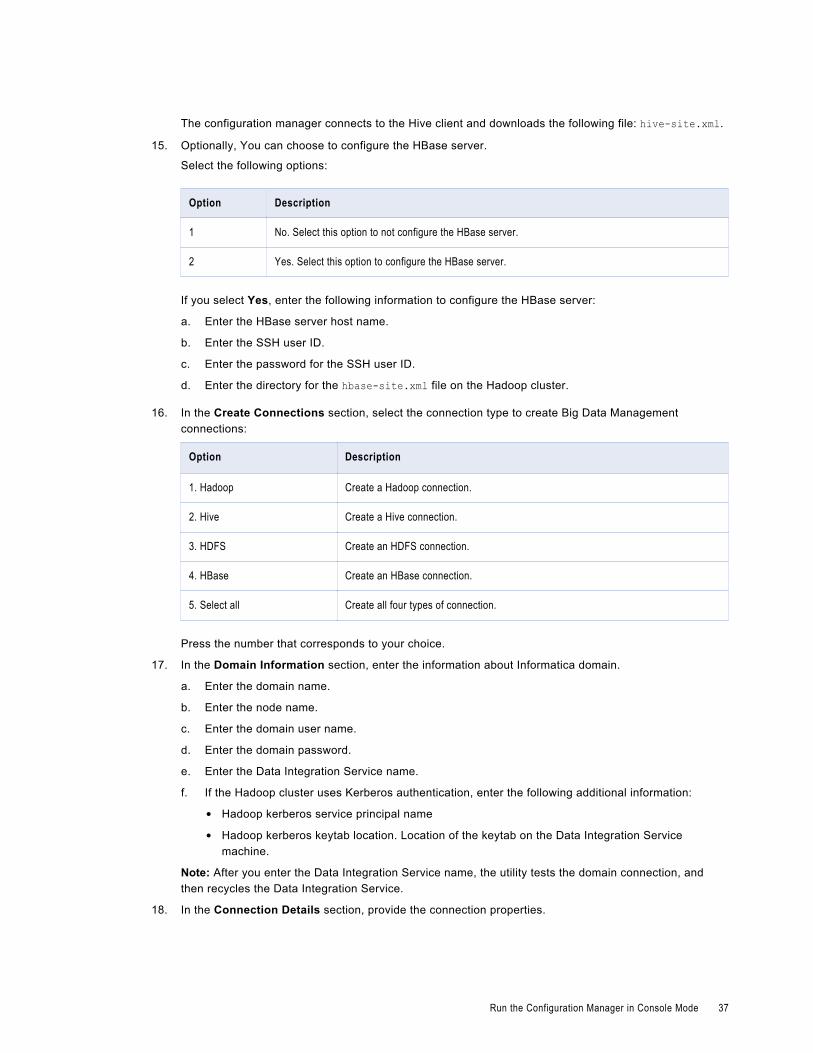
The configuration manager connects to the Hive client and downloads the following file: hive-site.xml.
15. Optionally, You can choose to configure the HBase server.
Select the following options:
Option Description
1 No. Select this option to not configure the HBase server.
2 Yes. Select this option to configure the HBase server.
If you select Yes, enter the following information to configure the HBase server:
a. Enter the HBase server host name.
b. Enter the SSH user ID.
c. Enter the password for the SSH user ID.
d. Enter the directory for the hbase-site.xml file on the Hadoop cluster.
16. In the Create Connections section, select the connection type to create Big Data Management connections:
Option Description
1. Hadoop Create a Hadoop connection.
2. Hive Create a Hive connection.
3. HDFS Create an HDFS connection.
4. HBase Create an HBase connection.
5. Select all Create all four types of connection.
Press the number that corresponds to your choice.
17. In the Domain Information section, enter the information about Informatica domain.
a. Enter the domain name.
b. Enter the node name.
c. Enter the domain user name.
d. Enter the domain password.
e. Enter the Data Integration Service name.
f. If the Hadoop cluster uses Kerberos authentication, enter the following additional information:
• Hadoop kerberos service principal name
• Hadoop kerberos keytab location. Location of the keytab on the Data Integration Service machine.
Note: After you enter the Data Integration Service name, the utility tests the domain connection, and then recycles the Data Integration Service.
18. In the Connection Details section, provide the connection properties.
Run the Configuration Manager in Console Mode 37
Based on the type of connection you choose to create, the utility requires different properties. For more information about the connection properties, see the Informatica 10.1.1 Big Data Management User Guide.
Note: When you specify a directory path for the Blaze working directory or the Spark staging directory, you must specify existing directories. The Hadoop Configuration Manager does not validate the directory paths that you specify.
The Hadoop Configuration Manager creates the connections.
19. The Hadoop Configuration Manager reports a summary of its operations, including whether connection creation succeeded, and the location of log files.
20. Complete the manual configuration steps for Big Data Management.
The Hadoop Configuration Manager creates the following file in the <Informatica installation directory>/tools/BDMUtil directory:ClusterConfig.properties.<timestamp>
Contains details about the properties fetched from the Hadoop cluster, including cluster node names, to provide templates for connection creation commands. To use these connection creation templates to create connections to the Hadoop cluster, edit the connection name, domain username and password in the generated commands.
Configure Big Data Management using the Configuration Manager in Silent Mode
To configure the Big Data Management without user interaction in silent mode, run the Hadoop Configuration Manager in silent mode. Use the SilentInput.properties file to specify the configuration options. The Configuration manager reads the file to determine the configuration options.
To configure the Big Data Management using the Hadoop Configuration Manager in silent mode, perform the following tasks:
1. Specify the values for the properties in the SilentInput.properties file.
2. Run the configuration manager with the SilentInput.properties file .
Specify the values for the Properties FileInformatica provides the SilentInput.properties file in the following location: <Informatica installation directory>/tools/BDMUtil. The SilentInput.properties file includes the properties that are required by the configuration manger. You can customize the sample properties file to specify the options for your configuration and then run the silent configuration.
1. Locate the sample SilentInput.properties file.
2. Create a backup copy of the SilentInput.properties file.
3. Use a text editor to open the file and modify the values of the configuration properties.
38 Chapter 2: Hadoop Configuration Manager
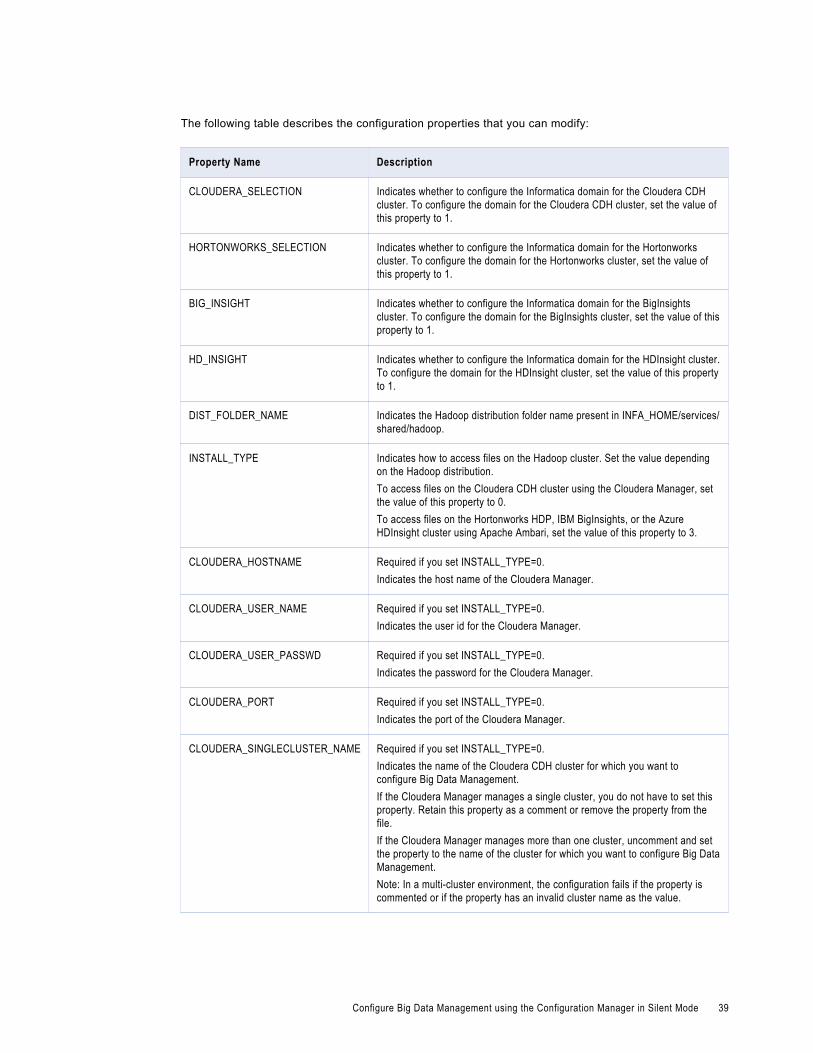
The following table describes the configuration properties that you can modify:
Property Name Description
CLOUDERA_SELECTION Indicates whether to configure the Informatica domain for the Cloudera CDH cluster. To configure the domain for the Cloudera CDH cluster, set the value of this property to 1.
HORTONWORKS_SELECTION Indicates whether to configure the Informatica domain for the Hortonworks cluster. To configure the domain for the Hortonworks cluster, set the value of this property to 1.
BIG_INSIGHT Indicates whether to configure the Informatica domain for the BigInsights cluster. To configure the domain for the BigInsights cluster, set the value of this property to 1.
HD_INSIGHT Indicates whether to configure the Informatica domain for the HDInsight cluster. To configure the domain for the HDInsight cluster, set the value of this property to 1.
DIST_FOLDER_NAME Indicates the Hadoop distribution folder name present in INFA_HOME/services/shared/hadoop.
INSTALL_TYPE Indicates how to access files on the Hadoop cluster. Set the value depending on the Hadoop distribution.To access files on the Cloudera CDH cluster using the Cloudera Manager, set the value of this property to 0.To access files on the Hortonworks HDP, IBM BigInsights, or the Azure HDInsight cluster using Apache Ambari, set the value of this property to 3.
CLOUDERA_HOSTNAME Required if you set INSTALL_TYPE=0.Indicates the host name of the Cloudera Manager.
CLOUDERA_USER_NAME Required if you set INSTALL_TYPE=0.Indicates the user id for the Cloudera Manager.
CLOUDERA_USER_PASSWD Required if you set INSTALL_TYPE=0.Indicates the password for the Cloudera Manager.
CLOUDERA_PORT Required if you set INSTALL_TYPE=0.Indicates the port of the Cloudera Manager.
CLOUDERA_SINGLECLUSTER_NAME Required if you set INSTALL_TYPE=0.Indicates the name of the Cloudera CDH cluster for which you want to configure Big Data Management.If the Cloudera Manager manages a single cluster, you do not have to set this property. Retain this property as a comment or remove the property from the file.If the Cloudera Manager manages more than one cluster, uncomment and set the property to the name of the cluster for which you want to configure Big Data Management.Note: In a multi-cluster environment, the configuration fails if the property is commented or if the property has an invalid cluster name as the value.
Configure Big Data Management using the Configuration Manager in Silent Mode 39
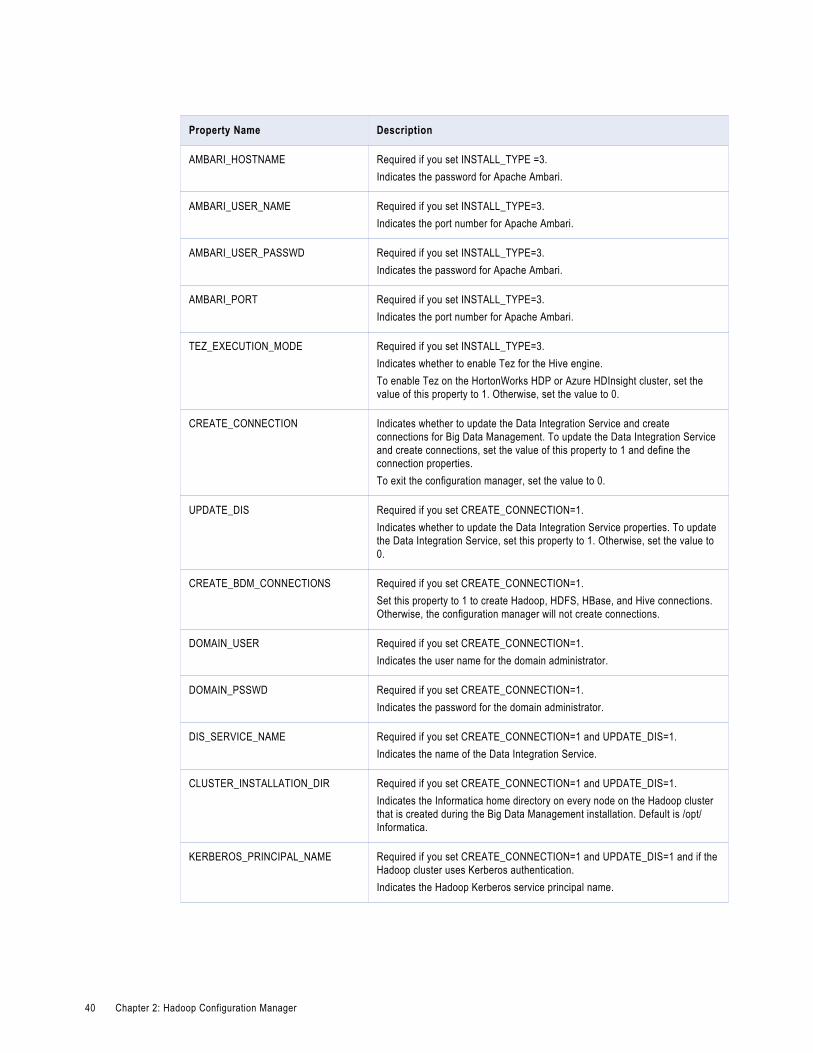
Property Name Description
AMBARI_HOSTNAME Required if you set INSTALL_TYPE =3.Indicates the password for Apache Ambari.
AMBARI_USER_NAME Required if you set INSTALL_TYPE=3.Indicates the port number for Apache Ambari.
AMBARI_USER_PASSWD Required if you set INSTALL_TYPE=3.Indicates the password for Apache Ambari.
AMBARI_PORT Required if you set INSTALL_TYPE=3.Indicates the port number for Apache Ambari.
TEZ_EXECUTION_MODE Required if you set INSTALL_TYPE=3.Indicates whether to enable Tez for the Hive engine.To enable Tez on the HortonWorks HDP or Azure HDInsight cluster, set the value of this property to 1. Otherwise, set the value to 0.
CREATE_CONNECTION Indicates whether to update the Data Integration Service and create connections for Big Data Management. To update the Data Integration Service and create connections, set the value of this property to 1 and define the connection properties.To exit the configuration manager, set the value to 0.
UPDATE_DIS Required if you set CREATE_CONNECTION=1.Indicates whether to update the Data Integration Service properties. To update the Data Integration Service, set this property to 1. Otherwise, set the value to 0.
CREATE_BDM_CONNECTIONS Required if you set CREATE_CONNECTION=1.Set this property to 1 to create Hadoop, HDFS, HBase, and Hive connections. Otherwise, the configuration manager will not create connections.
DOMAIN_USER Required if you set CREATE_CONNECTION=1.Indicates the user name for the domain administrator.
DOMAIN_PSSWD Required if you set CREATE_CONNECTION=1.Indicates the password for the domain administrator.
DIS_SERVICE_NAME Required if you set CREATE_CONNECTION=1 and UPDATE_DIS=1.Indicates the name of the Data Integration Service.
CLUSTER_INSTALLATION_DIR Required if you set CREATE_CONNECTION=1 and UPDATE_DIS=1.Indicates the Informatica home directory on every node on the Hadoop cluster that is created during the Big Data Management installation. Default is /opt/Informatica.
KERBEROS_PRINCIPAL_NAME Required if you set CREATE_CONNECTION=1 and UPDATE_DIS=1 and if the Hadoop cluster uses Kerberos authentication.Indicates the Hadoop Kerberos service principal name.
40 Chapter 2: Hadoop Configuration Manager
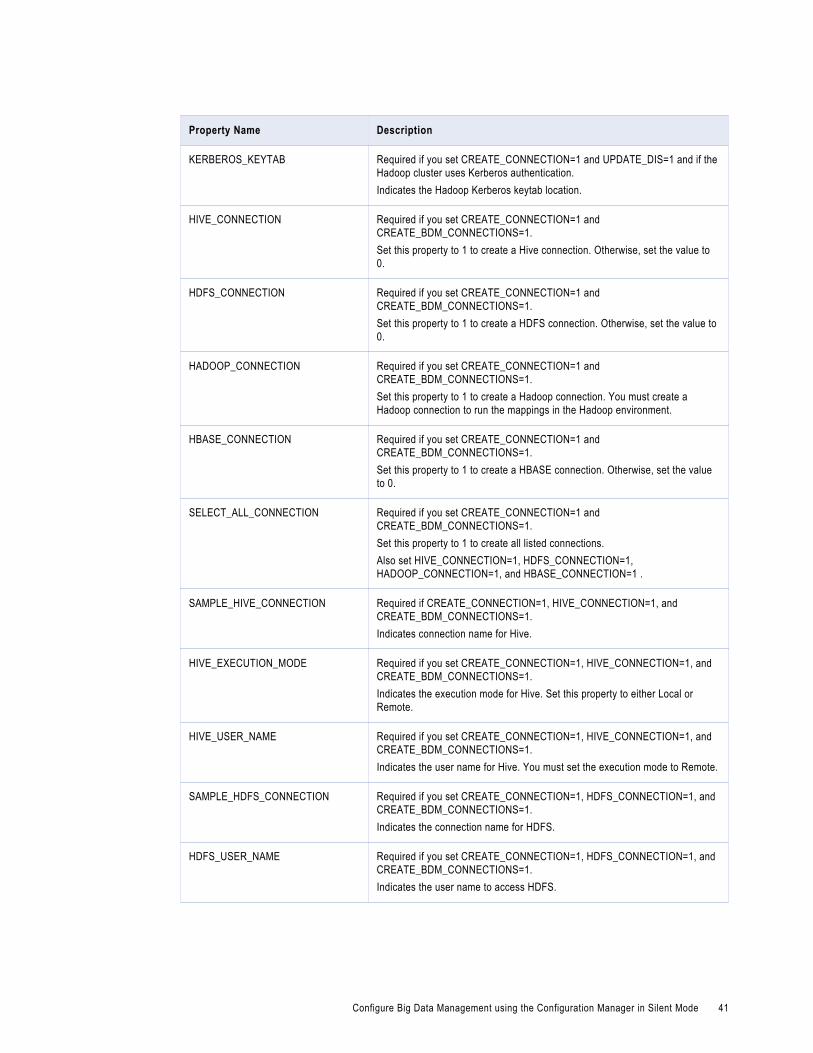
Property Name Description
KERBEROS_KEYTAB Required if you set CREATE_CONNECTION=1 and UPDATE_DIS=1 and if the Hadoop cluster uses Kerberos authentication.Indicates the Hadoop Kerberos keytab location.
HIVE_CONNECTION Required if you set CREATE_CONNECTION=1 and CREATE_BDM_CONNECTIONS=1.Set this property to 1 to create a Hive connection. Otherwise, set the value to 0.
HDFS_CONNECTION Required if you set CREATE_CONNECTION=1 and CREATE_BDM_CONNECTIONS=1.Set this property to 1 to create a HDFS connection. Otherwise, set the value to 0.
HADOOP_CONNECTION Required if you set CREATE_CONNECTION=1 and CREATE_BDM_CONNECTIONS=1.Set this property to 1 to create a Hadoop connection. You must create a Hadoop connection to run the mappings in the Hadoop environment.
HBASE_CONNECTION Required if you set CREATE_CONNECTION=1 and CREATE_BDM_CONNECTIONS=1.Set this property to 1 to create a HBASE connection. Otherwise, set the value to 0.
SELECT_ALL_CONNECTION Required if you set CREATE_CONNECTION=1 and CREATE_BDM_CONNECTIONS=1.Set this property to 1 to create all listed connections.Also set HIVE_CONNECTION=1, HDFS_CONNECTION=1, HADOOP_CONNECTION=1, and HBASE_CONNECTION=1 .
SAMPLE_HIVE_CONNECTION Required if CREATE_CONNECTION=1, HIVE_CONNECTION=1, and CREATE_BDM_CONNECTIONS=1.Indicates connection name for Hive.
HIVE_EXECUTION_MODE Required if you set CREATE_CONNECTION=1, HIVE_CONNECTION=1, and CREATE_BDM_CONNECTIONS=1.Indicates the execution mode for Hive. Set this property to either Local or Remote.
HIVE_USER_NAME Required if you set CREATE_CONNECTION=1, HIVE_CONNECTION=1, and CREATE_BDM_CONNECTIONS=1.Indicates the user name for Hive. You must set the execution mode to Remote.
SAMPLE_HDFS_CONNECTION Required if you set CREATE_CONNECTION=1, HDFS_CONNECTION=1, and CREATE_BDM_CONNECTIONS=1.Indicates the connection name for HDFS.
HDFS_USER_NAME Required if you set CREATE_CONNECTION=1, HDFS_CONNECTION=1, and CREATE_BDM_CONNECTIONS=1.Indicates the user name to access HDFS.
Configure Big Data Management using the Configuration Manager in Silent Mode 41
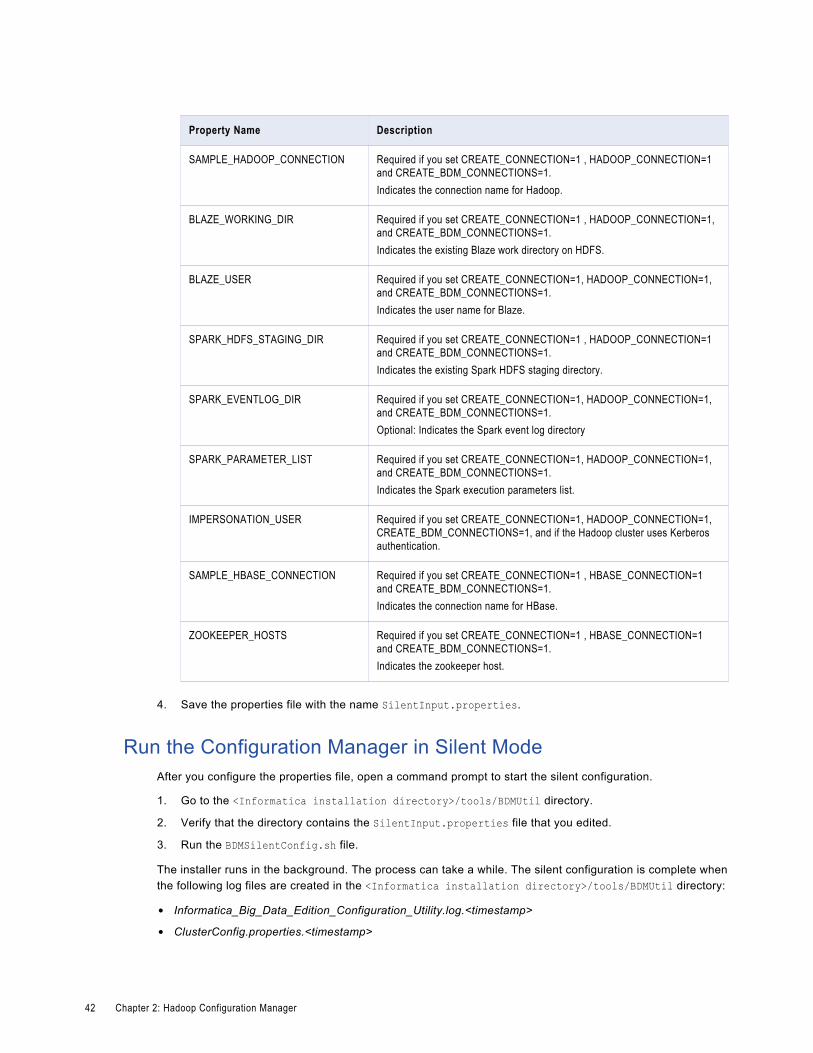
Property Name Description
SAMPLE_HADOOP_CONNECTION Required if you set CREATE_CONNECTION=1 , HADOOP_CONNECTION=1 and CREATE_BDM_CONNECTIONS=1.Indicates the connection name for Hadoop.
BLAZE_WORKING_DIR Required if you set CREATE_CONNECTION=1 , HADOOP_CONNECTION=1, and CREATE_BDM_CONNECTIONS=1.Indicates the existing Blaze work directory on HDFS.
BLAZE_USER Required if you set CREATE_CONNECTION=1, HADOOP_CONNECTION=1, and CREATE_BDM_CONNECTIONS=1.Indicates the user name for Blaze.
SPARK_HDFS_STAGING_DIR Required if you set CREATE_CONNECTION=1 , HADOOP_CONNECTION=1 and CREATE_BDM_CONNECTIONS=1.Indicates the existing Spark HDFS staging directory.
SPARK_EVENTLOG_DIR Required if you set CREATE_CONNECTION=1, HADOOP_CONNECTION=1, and CREATE_BDM_CONNECTIONS=1.Optional: Indicates the Spark event log directory
SPARK_PARAMETER_LIST Required if you set CREATE_CONNECTION=1, HADOOP_CONNECTION=1, and CREATE_BDM_CONNECTIONS=1.Indicates the Spark execution parameters list.
IMPERSONATION_USER Required if you set CREATE_CONNECTION=1, HADOOP_CONNECTION=1, CREATE_BDM_CONNECTIONS=1, and if the Hadoop cluster uses Kerberos authentication.
SAMPLE_HBASE_CONNECTION Required if you set CREATE_CONNECTION=1 , HBASE_CONNECTION=1 and CREATE_BDM_CONNECTIONS=1.Indicates the connection name for HBase.
ZOOKEEPER_HOSTS Required if you set CREATE_CONNECTION=1 , HBASE_CONNECTION=1 and CREATE_BDM_CONNECTIONS=1.Indicates the zookeeper host.
4. Save the properties file with the name SilentInput.properties.
Run the Configuration Manager in Silent ModeAfter you configure the properties file, open a command prompt to start the silent configuration.
1. Go to the <Informatica installation directory>/tools/BDMUtil directory.
2. Verify that the directory contains the SilentInput.properties file that you edited.
3. Run the BDMSilentConfig.sh file.
The installer runs in the background. The process can take a while. The silent configuration is complete when the following log files are created in the <Informatica installation directory>/tools/BDMUtil directory:
• Informatica_Big_Data_Edition_Configuration_Utility.log.<timestamp>
• ClusterConfig.properties.<timestamp>
42 Chapter 2: Hadoop Configuration Manager

The silent configuration fails if you incorrectly configure the properties file or if the installation directory is not accessible. The silenterror.log file is created in the home directory of the UNIX user that runs the configuration manager in silent mode. Correct the errors and then run the silent configuration again.
Configure Big Data Management using the Configuration Manager in Silent Mode 43

C H A P T E R 3
Configuring Big Data Management for Amazon EMR
This chapter includes the following topics:
• Configuring Big Data Management for Amazon EMR, 44
• Domain Configuration Tasks for an On-Premise Implementation, 44
• Cluster Configuration Tasks for an On-Premise Implementation, 46
Configuring Big Data Management for Amazon EMRYou can configure Big Data Management to run mappings on an Amazon EMR cluster.
For a standard implementation, perform the following steps:
• Configure the Informatica domain to communicate with the cluster.When you configure the Informatica domain, you configure settings on the Data Integration Service and in Hadoop distribution directories that contain configuration files. The domain might be installed on premise or in a cloud environment.
• Configure the cluster for Big Data Management.
Domain Configuration Tasks for an On-Premise Implementation
To update the Informatica domain to enable mappings to run in an on-premise Amazon EMR environment, perform the following tasks:
1. Configure yarn-site.xml for the Data Integration Service.
2. Configure the Hadoop pushdown properties for the Data Integration Service.
3. List cluster nodes in the /etc/hosts file.
4. Edit Informatica Developer files and variables.
44
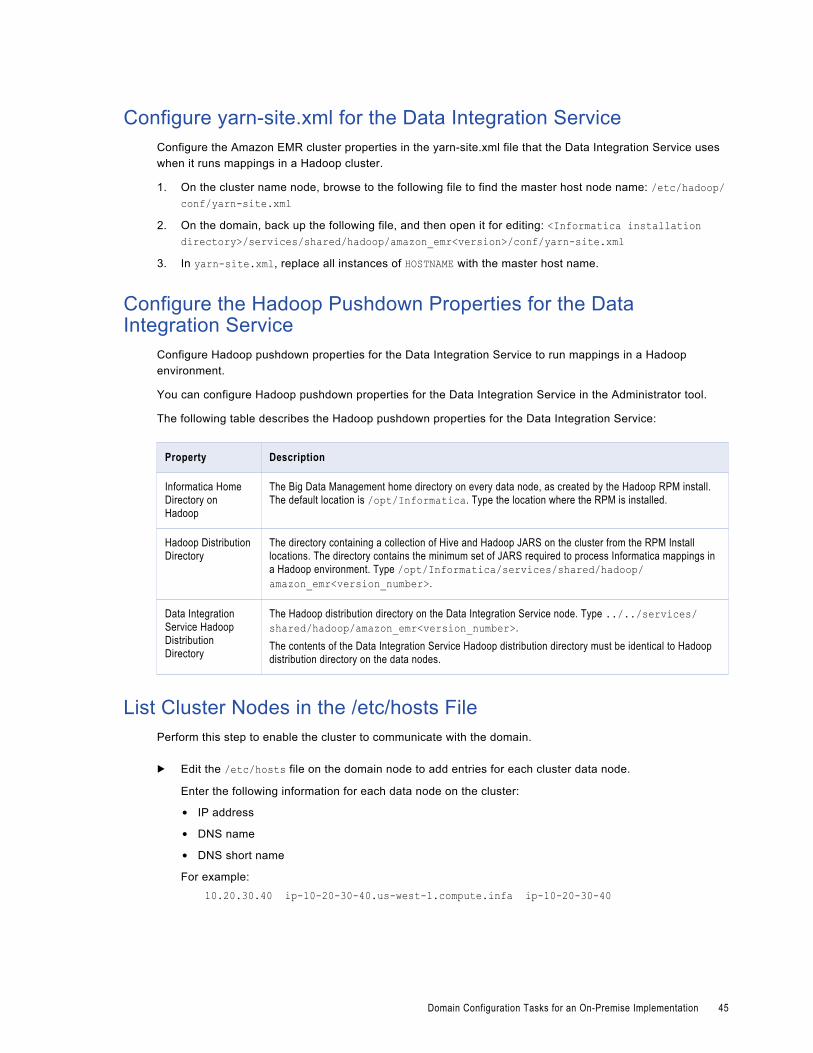
Configure yarn-site.xml for the Data Integration ServiceConfigure the Amazon EMR cluster properties in the yarn-site.xml file that the Data Integration Service uses when it runs mappings in a Hadoop cluster.
1. On the cluster name node, browse to the following file to find the master host node name: /etc/hadoop/conf/yarn-site.xml
2. On the domain, back up the following file, and then open it for editing: <Informatica installation directory>/services/shared/hadoop/amazon_emr<version>/conf/yarn-site.xml
3. In yarn-site.xml, replace all instances of HOSTNAME with the master host name.
Configure the Hadoop Pushdown Properties for the Data Integration Service
Configure Hadoop pushdown properties for the Data Integration Service to run mappings in a Hadoop environment.
You can configure Hadoop pushdown properties for the Data Integration Service in the Administrator tool.
The following table describes the Hadoop pushdown properties for the Data Integration Service:
Property Description
Informatica Home Directory on Hadoop
The Big Data Management home directory on every data node, as created by the Hadoop RPM install. The default location is /opt/Informatica. Type the location where the RPM is installed.
Hadoop Distribution Directory
The directory containing a collection of Hive and Hadoop JARS on the cluster from the RPM Install locations. The directory contains the minimum set of JARS required to process Informatica mappings in a Hadoop environment. Type /opt/Informatica/services/shared/hadoop/amazon_emr<version_number>.
Data Integration Service Hadoop Distribution Directory
The Hadoop distribution directory on the Data Integration Service node. Type ../../services/shared/hadoop/amazon_emr<version_number>.The contents of the Data Integration Service Hadoop distribution directory must be identical to Hadoop distribution directory on the data nodes.
List Cluster Nodes in the /etc/hosts FilePerform this step to enable the cluster to communicate with the domain.
u Edit the /etc/hosts file on the domain node to add entries for each cluster data node.
Enter the following information for each data node on the cluster:
• IP address
• DNS name
• DNS short name
For example:10.20.30.40 ip-10-20-30-40.us-west-1.compute.infa ip-10-20-30-40
Domain Configuration Tasks for an On-Premise Implementation 45

Edit Informatica Developer Files and VariablesEdit developerCore.ini to enable the Developer tool to communicate with the Hadoop cluster on a particular Hadoop distribution. After you edit the file, you must click run.bat to launch the Developer tool again.
developerCore.ini is located in the following directory: <Informatica installation directory>\clients\DeveloperClient
Add the following property to developerCore.ini-DINFA_HADOOP_DIST_DIR=hadoop\amazon_emr_<version_number>
Cluster Configuration Tasks for an On-Premise Implementation
To update the Hadoop cluster to enable mappings to run in an on-premise Amazon EMR environment, perform the following tasks:
1. Verify Data Integration Service user permissions.
2. Create a Blaze directory and grant user permissions.
3. Open ports on the Hadoop cluster.
4. Optionally configure the Hadoop cluster for Hive Tables on Amazon S3.
Verify Data Integration Service User PermissionsTo run mappings using the Hive engine, verify that the Data Integration Service user has permissions for the Hive warehouse directory.
For example, if the warehouse directory is /user/hive/warehouse, run the following command to grant the user permissions for the directory:
hadoop fs –chmod –R 777 /user/hive/warehouse
Create Blaze Directory and Grant User PermissionsTo run mappings using the Blaze engine, create a directory and set permissions for it.
1. To create a Blaze directory on HDFS, run the following command:hadoop fs mkdir -p /blaze/workdir
2. To specify permissions on the directory, run the following command:hadoop fs –chmod –R 777 /blaze
Open Ports on the Hadoop ClusterOpen a range of ports to enable the Informatica domain to communicate with the Hadoop cluster.
Note: Perform this task when the Informatica domain is hosted on premise. When the domain is hosted in a cluster node, this task is not necessary.
Open the following ports:
• 8020
46 Chapter 3: Configuring Big Data Management for Amazon EMR
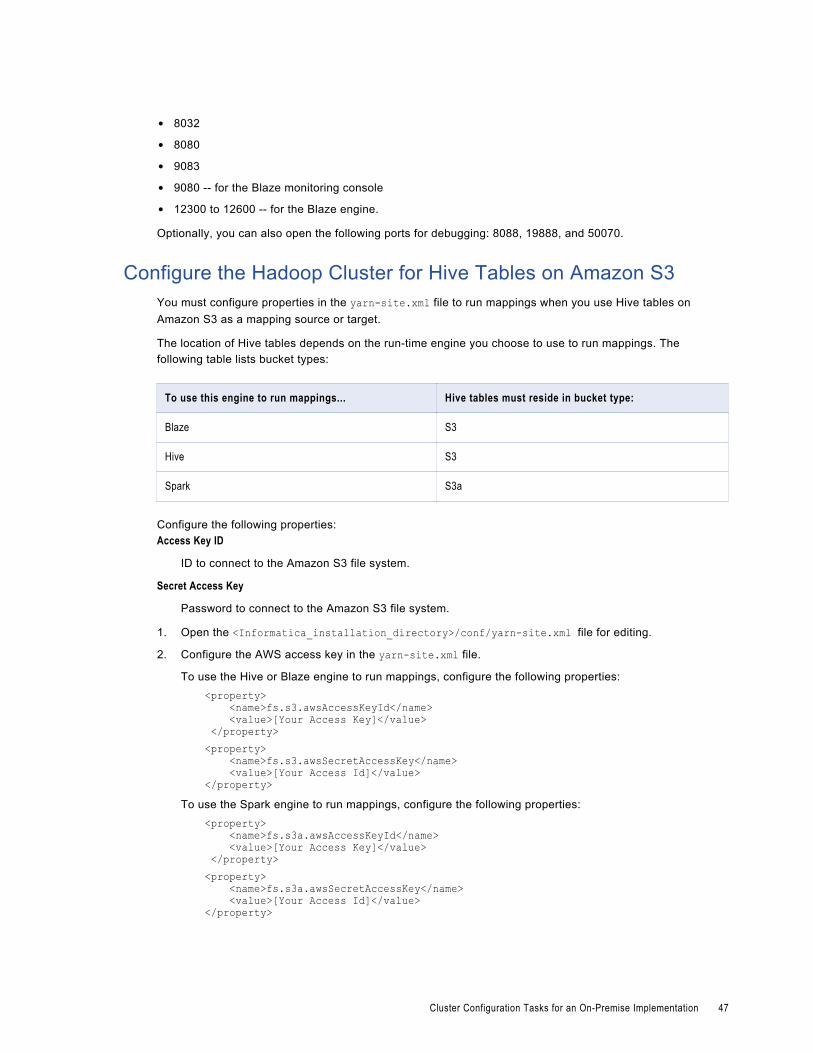
• 8032
• 8080
• 9083
• 9080 -- for the Blaze monitoring console
• 12300 to 12600 -- for the Blaze engine.
Optionally, you can also open the following ports for debugging: 8088, 19888, and 50070.
Configure the Hadoop Cluster for Hive Tables on Amazon S3You must configure properties in the yarn-site.xml file to run mappings when you use Hive tables on Amazon S3 as a mapping source or target.
The location of Hive tables depends on the run-time engine you choose to use to run mappings. The following table lists bucket types:
To use this engine to run mappings... Hive tables must reside in bucket type:
Blaze S3
Hive S3
Spark S3a
Configure the following properties:Access Key ID
ID to connect to the Amazon S3 file system.
Secret Access Key
Password to connect to the Amazon S3 file system.
1. Open the <Informatica_installation_directory>/conf/yarn-site.xml file for editing.
2. Configure the AWS access key in the yarn-site.xml file.
To use the Hive or Blaze engine to run mappings, configure the following properties:<property> <name>fs.s3.awsAccessKeyId</name> <value>[Your Access Key]</value> </property><property> <name>fs.s3.awsSecretAccessKey</name> <value>[Your Access Id]</value></property>
To use the Spark engine to run mappings, configure the following properties:<property> <name>fs.s3a.awsAccessKeyId</name> <value>[Your Access Key]</value> </property><property> <name>fs.s3a.awsSecretAccessKey</name> <value>[Your Access Id]</value></property>
Cluster Configuration Tasks for an On-Premise Implementation 47
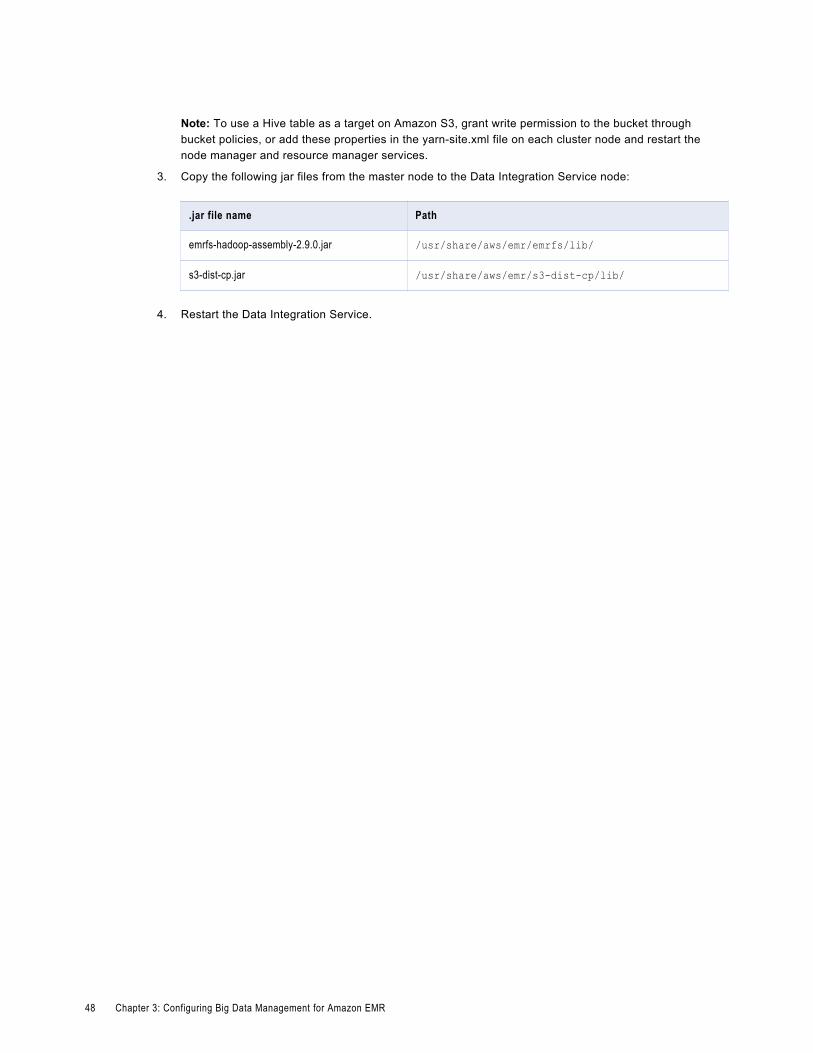
Note: To use a Hive table as a target on Amazon S3, grant write permission to the bucket through bucket policies, or add these properties in the yarn-site.xml file on each cluster node and restart the node manager and resource manager services.
3. Copy the following jar files from the master node to the Data Integration Service node:
.jar file name Path
emrfs-hadoop-assembly-2.9.0.jar /usr/share/aws/emr/emrfs/lib/
s3-dist-cp.jar /usr/share/aws/emr/s3-dist-cp/lib/
4. Restart the Data Integration Service.
48 Chapter 3: Configuring Big Data Management for Amazon EMR

C H A P T E R 4
Configuring Big Data Management to Run Mappings in Hadoop Environments
This chapter includes the following topics:
• Mappings on Hadoop Distributions Overview, 49
• Create a Staging Directory on HDFS, 49
• Update Configuration Files for the Developer Tool, 50
• Add Hadoop Environment Variable Properties, 51
• Enable Support for Lookup Transformations with Teradata Data Objects, 51
• Perform Sqoop Configuration Tasks, 52
• Reference Data Requirements, 55
Mappings on Hadoop Distributions OverviewAfter you configure the Informatica domain to communicate with the cluster, you must complete additional configuration tasks to run mappings in the Hadoop environment.
To run mappings on the Hadoop cluster from the Developer tool, you enable the Developer tool to communicate with the Hadoop cluster. You run a big data mapping in the native environment or the Hadoop environment. To run the mapping in the Hadoop environment, you must configure the Blaze engine, the Spark engine, or the Hive engine. Depending on your Hadoop ecosystem and the Big Data Management tasks you want to perform, you might have additional configuration tasks to complete.
Create a Staging Directory on HDFSIf the Cloudera cluster uses Hive, you must grant the anonymous user the Execute permission on the staging directory or you must create another staging directory on HDFS.
By default, a staging directory already exists on HDFS. You must grant the anonymous user the Execute permission on the staging directory. If you cannot grant the anonymous user the Execute permission on this
49
directory, you must enter a valid user name for the user in the Hive connection. If you use the default staging directory on HDFS, you do not have to configure mapred-site.xml or hive-site.xml.
If you want to create another staging directory to store mapreduce jobs, you must create a directory on HDFS. After you create the staging directory, you must add it to mapred-site.xml and hive-site.xml.
To create another staging directory on HDFS, run the following commands from the command line of the machine that runs the Hadoop cluster:
hadoop fs –mkdir /staginghadoop fs –chmod –R 0777 /staging
Add the staging directory to mapred-site.xml.
mapred-site.xml is located in the following directory on the Hadoop cluster: /etc/hadoop/conf/mapred-site.xml
For example, mapred-site.xml, add the following entry to mapred-site.xml:
<property> <name>yarn.app.mapreduce.am.staging-dir</name> <value>/staging</value></property>
Add the staging directory to hive-site.xml on the machine where the Data Integration Service runs.
hive-site.xml is located in the following directory on the machine where the Data Integration Service runs: <Informatica installation directory>/services/shared/adhoop/cloudera_<version>/conf.
In hive-site.xml, add the yarn.app.mapreduce.am.staging-dir property. Use the value that you specified in mapred-site.xml.
For example, add the following entry to hive-site.xml:
<property> <name>yarn.app.mapreduce.am.staging-dir</name> <value>/staging</value></property>
Update Configuration Files for the Developer ToolEdit the Developer Tool configuration file to enable the Developer Tool to communicate with the Hadoop cluster.
developerCore.iniEdit developerCore.ini to enable communication between the Developer tool and the Hadoop cluster. You can find developerCore.ini in the following directory: <Informatica installation directory>\clients\DeveloperClient
Add the following property:
-DINFA_HADOOP_DIST_DIR=hadoop\<distribution><version>The change takes effect when you restart the Developer tool.
50 Chapter 4: Configuring Big Data Management to Run Mappings in Hadoop Environments
Add Hadoop Environment Variable PropertiesYou can optionally add third-party environment variables or extend the existing PATH environment variable in the Hadoop environment properties file, hadoopEnv.properties.
1. Go to the following location: <Informatica Installation Directory>/services/shared/hadoop/<Hadoop_distribution_name>_<version_number>/infaConf
2. Find the file named hadoopEnv.properties.
3. Back up the file before you modify it.
4. Use a text editor to open the file and modify the properties for third-party environment variables.The entries depend on the third-party resources in your environment. The following example shows entries for Oracle and Teradata databases:
infapdo.env.entry.oracle_home=ORACLE_HOME=/databases/oracleinfapdo.env.entry.tns_admin=TNS_ADMIN=/bdmqa/OCAAutomation/CLOUDERA/TNSORAinfapdo.env.entry.db2_home=DB2_HOME=/databases/db2infapdo.env.entry.db2instance=DB2INSTANCE=OCA_DB2INSTANCEinfapdo.env.entry.db2codepage=DB2CODEPAGE="1208"infapdo.env.entry.odbchome=ODBCHOME=$HADOOP_NODE_INFA_HOME/ODBC7.1infapdo.env.entry.odbcini=ODBCINI=/bdmqa/OCAAutomation/CLOUDERA/ODBCINI/odbc.iniinfapdo.env.entry.home=HOME=/opt/thirdpartyinfapdo.env.entry.gphome_loaders=GPHOME_LOADERS=/databases/greenpluminfapdo.env.entry.pythonpath=PYTHONPATH=$GPHOME_LOADERS/bin/extinfapdo.env.entry.nz_home=NZ_HOME=/databases/netezzainfapdo.env.entry.nz_odbc_ini_path=NZ_ODBC_INI_PATH=/bdmqa/OCAAutomation/CLOUDERA/ODBCINIinfapdo.env.entry.ld_library_path=LD_LIBRARY_PATH=$HADOOP_NODE_INFA_HOME/services/shared/bin:$HADOOP_NODE_INFA_HOME/DataTransformation/bin:$HADOOP_NODE_HADOOP_DIST/lib/native:$HADOOP_NODE_INFA_HOME/ODBC7.1/lib:$HADOOP_NODE_INFA_HOME/jre/lib/amd64:$HADOOP_NODE_INFA_HOME/jre/lib/amd64/server:$HADOOP_NODE_INFA_HOME/java/jre/lib/amd64:$HADOOP_NODE_INFA_HOME/java/jre/lib/amd64/server:/databases/oracle/lib:/databases/db2/lib64:$LD_LIBRARY_PATHinfapdo.env.entry.path=PATH=$HADOOP_NODE_HADOOP_DIST/scripts:$HADOOP_NODE_INFA_HOME/services/shared/bin:$HADOOP_NODE_INFA_HOME/jre/bin:$HADOOP_NODE_INFA_HOME/java/jre/bin:$HADOOP_NODE_INFA_HOME/ODBC7.1/bin:/databases/oracle/bin:/databases/db2/bin:$PATH#teradatainfapdo.env.entry.twb_root=TWB_ROOT=/databases/teradata/tbuildinfapdo.env.entry.manpath=MANPATH=/databases/teradata/odbc_64:/databases/teradata/odbc_64infapdo.env.entry.nlspath=NLSPATH=/databases/teradata/odbc_64/msg/%N:/databases/teradata/msg/%Ninfapdo.env.entry.pwd=PWD=/databases/teradata/odbc_64/samples/C
5. Save the properties file with the name hadoopEnv.properties.
Enable Support for Lookup Transformations with Teradata Data Objects
To use Lookup transformations with a Teradata data object in Hadoop pushdown mode, you must copy the Teradata JDBC drivers to the Informatica installation directory.
You can download the Teradata JDBC drivers from Teradata. For more information about the drivers, see the following Teradata website: http://downloads.teradata.com/download/connectivity/jdbc-driver.
The software available for download at the referenced links belongs to a third party or third parties, not Informatica LLC. The download links are subject to the possibility of errors, omissions or change. Informatica assumes no responsibility for such links and/or such software, disclaims all warranties, either express or
Add Hadoop Environment Variable Properties 51
implied, including but not limited to, implied warranties of merchantability, fitness for a particular purpose, title and non-infringement, and disclaims all liability relating thereto.
Copy the tdgssconfig.jar and terajdbc4.jar files from the Teradata JDBC drivers to the following directory on the machine where the Data Integration runs and every node in the Hadoop cluster: <Informatica installation directory>/externaljdbcjars
Additionally, you must copy the tdgssconfig.jar and terajdbc4.jar files to the following directory on the machine where the Developer tool runs: <Informatica installation directory>\clients\externaljdbcjars.
Perform Sqoop Configuration TasksBefore you run Sqoop mappings, you must perform the following configuration tasks:
1. Download the JDBC driver JAR files for Sqoop connectivity.
2. Configure the HADOOP_NODE_JDK_HOME property in the hadoopEnv.properties file.
3. Configure the mapred-site.xml file for Cloudera clusters.
4. Configure the yarn-site.xml file for Cloudera Kerberos clusters.
5. Configure the mapred-site.xml file for Cloudera Kerberos non-HA clusters.
6. Configure the core-site.xml file for Ambari-based non-Kerberos clusters.
Download the JDBC Driver JAR Files for Sqoop ConnectivityTo configure Sqoop connectivity for relational databases, you must download the relevant JDBC driver jar files and copy the jar files to the node where the Data Integration Service runs. At run time, the Data Integration Service copies the jar files to the Hadoop distribution cache so that the jar files are accessible to all nodes in the Hadoop cluster.
You can use any Type 4 JDBC driver that the database vendor recommends for Sqoop connectivity.
Note: The DataDirect JDBC drivers that Informatica ships are not licensed for Sqoop connectivity.
If you use the Cloudera Connector Powered by Teradata or Hortonworks Connector for Teradata, you must download the corresponding package. You can use the following URLs to download the packages:
• http://www.cloudera.com/downloads.html
• http://hortonworks.com/downloads/#addons
The Cloudera Connector Powered by Teradata package is named as sqoop-connector-teradata-<version>.tar.gz and the Hortonworks Connector for Teradata package is named as hdp-connector-for-teradata-<version>-distro.tar.gz.
The packages contain multiple jar files. You must copy all the jar files in the packages to the node where the Data Integration Service runs.
To use the Hortonworks Connector for Teradata, you must also download the avro-mapred-1.7.4-hadoop2.jar file and copy it to the node where the Data Integration Service runs.
1. Download the JDBC driver jar files for the database that you want to connect to.
2. On the node where the Data Integration Service runs, copy the jar files to the following directory:
<Informatica installation directory>\externaljdbcjars
52 Chapter 4: Configuring Big Data Management to Run Mappings in Hadoop Environments
Configure the HADOOP_NODE_JDK_HOME property in the hadoopEnv.properties File
Before you run Sqoop mappings, you must configure the HADOOP_NODE_JDK_HOME property in the hadoopEnv.properties file on the Data Integration Service node. Configure the HADOOP_NODE_JDK_HOME property to point to the JDK version that the cluster nodes use. You must use JDK version 1.7 or later.
1. Go to the following location:
<Informatica installation directory>/services/shared/hadoop/<Hadoop_distribution_name>_<version_number>/infaConf
2. Find the file named hadoopEnv.properties.
3. Back up the file before you update it.
4. Use a text editor to open the file.
5. Define the HADOOP_NODE_JDK_HOME property as follows:
infapdo.env.entry.hadoop_node_jdk_home=HADOOP_NODE_JDK_HOME=<cluster_JDK_home>/jdk<version>For example, infapdo.env.entry.hadoop_node_jdk_home=HADOOP_NODE_JDK_HOME=/usr/java/default
6. Save the properties file with the name hadoopEnv.properties.
Configure the mapred-site.xml File for Cloudera ClustersBefore you run Sqoop mappings on Cloudera clusters, you must configure MapReduce properties in the mapred-site.xml file on the Hadoop cluster, and restart Hadoop services and the cluster.
1. Open the Yarn Configuration in Cloudera Manager.
2. Find the property named NodeManager Advanced Configuration Snippet (Safety Valve) for mapred-site.xml.
3. Click + and configure the following properties:
Property Value
mapreduce.application.classpath $HADOOP_MAPRED_HOME/,$HADOOP_MAPRED_HOME/lib/,$MR2_CLASSPATH,$CDH_MR2_HOME
mapreduce.jobhistory.intermediate-done-dir
<Directory where the map-reduce jobs write history files>
4. Select the Final check box.
5. Redeploy the client configurations.
6. Restart Hadoop services and the cluster.
Perform Sqoop Configuration Tasks 53
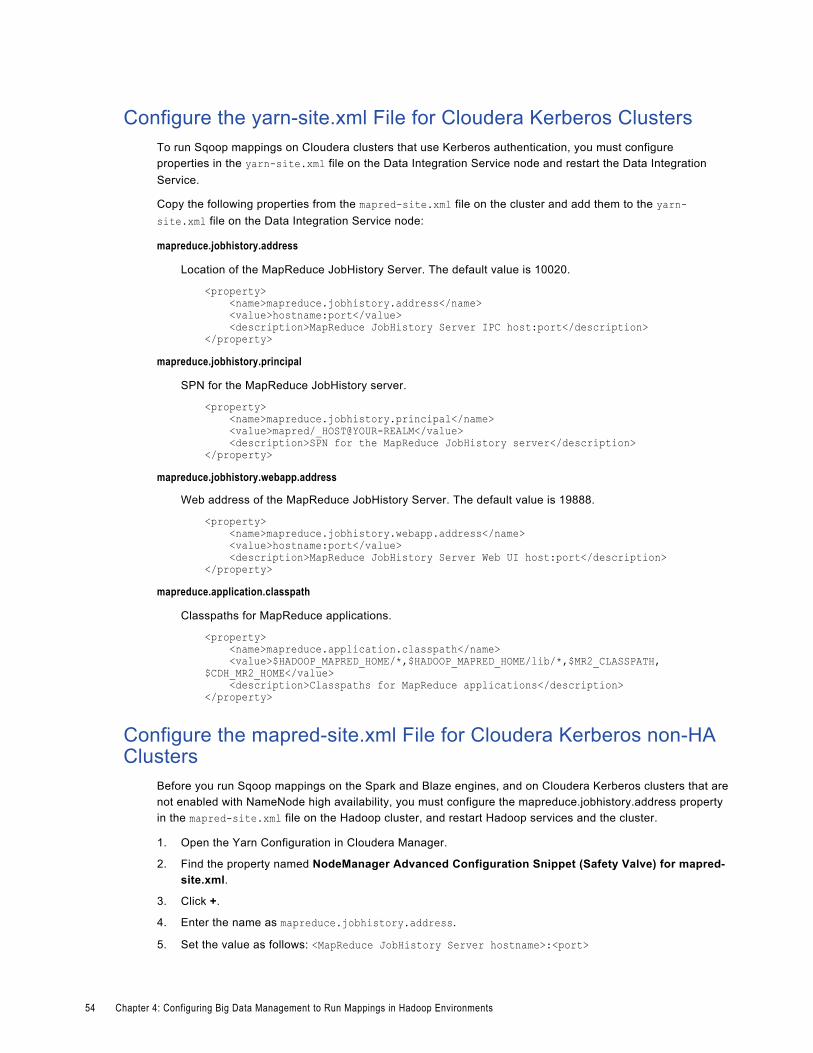
Configure the yarn-site.xml File for Cloudera Kerberos ClustersTo run Sqoop mappings on Cloudera clusters that use Kerberos authentication, you must configure properties in the yarn-site.xml file on the Data Integration Service node and restart the Data Integration Service.
Copy the following properties from the mapred-site.xml file on the cluster and add them to the yarn-site.xml file on the Data Integration Service node:
mapreduce.jobhistory.address
Location of the MapReduce JobHistory Server. The default value is 10020.
<property> <name>mapreduce.jobhistory.address</name> <value>hostname:port</value> <description>MapReduce JobHistory Server IPC host:port</description></property>
mapreduce.jobhistory.principal
SPN for the MapReduce JobHistory server.
<property> <name>mapreduce.jobhistory.principal</name> <value>mapred/_HOST@YOUR-REALM</value> <description>SPN for the MapReduce JobHistory server</description></property>
mapreduce.jobhistory.webapp.address
Web address of the MapReduce JobHistory Server. The default value is 19888.
<property> <name>mapreduce.jobhistory.webapp.address</name> <value>hostname:port</value> <description>MapReduce JobHistory Server Web UI host:port</description></property>
mapreduce.application.classpath
Classpaths for MapReduce applications.
<property> <name>mapreduce.application.classpath</name> <value>$HADOOP_MAPRED_HOME/*,$HADOOP_MAPRED_HOME/lib/*,$MR2_CLASSPATH,$CDH_MR2_HOME</value> <description>Classpaths for MapReduce applications</description></property>
Configure the mapred-site.xml File for Cloudera Kerberos non-HA Clusters
Before you run Sqoop mappings on the Spark and Blaze engines, and on Cloudera Kerberos clusters that are not enabled with NameNode high availability, you must configure the mapreduce.jobhistory.address property in the mapred-site.xml file on the Hadoop cluster, and restart Hadoop services and the cluster.
1. Open the Yarn Configuration in Cloudera Manager.
2. Find the property named NodeManager Advanced Configuration Snippet (Safety Valve) for mapred-site.xml.
3. Click +.
4. Enter the name as mapreduce.jobhistory.address.
5. Set the value as follows: <MapReduce JobHistory Server hostname>:<port>
54 Chapter 4: Configuring Big Data Management to Run Mappings in Hadoop Environments
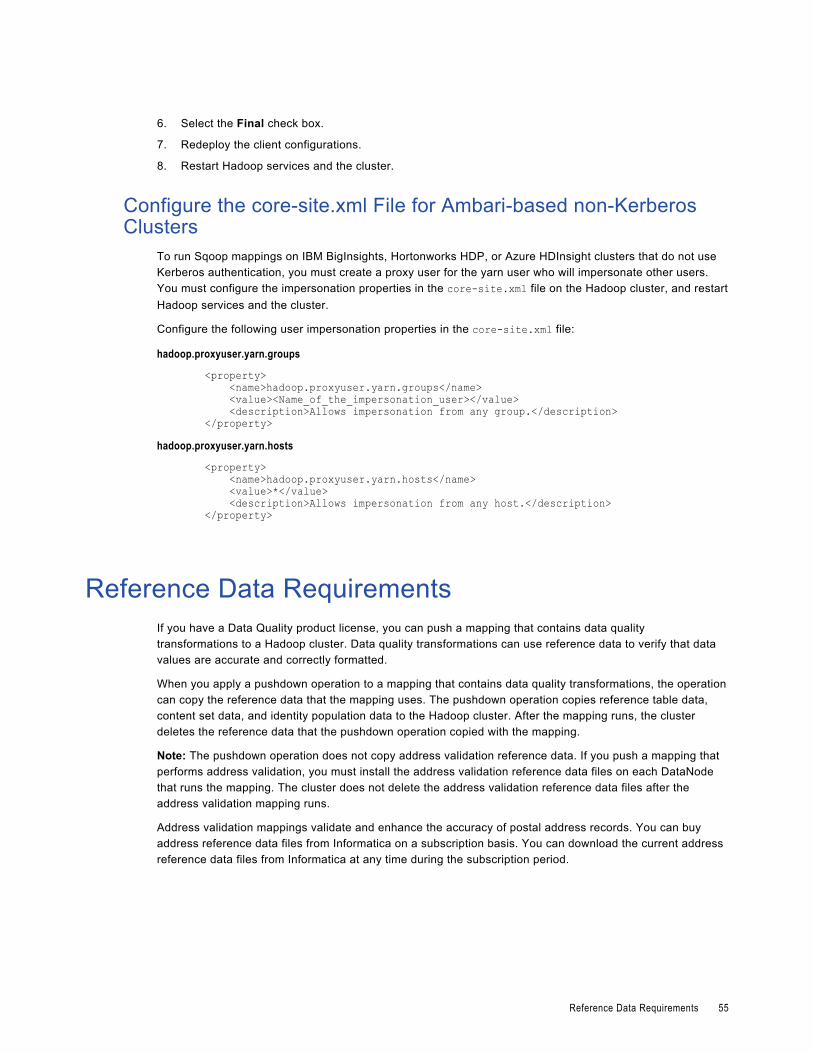
6. Select the Final check box.
7. Redeploy the client configurations.
8. Restart Hadoop services and the cluster.
Configure the core-site.xml File for Ambari-based non-Kerberos Clusters
To run Sqoop mappings on IBM BigInsights, Hortonworks HDP, or Azure HDInsight clusters that do not use Kerberos authentication, you must create a proxy user for the yarn user who will impersonate other users. You must configure the impersonation properties in the core-site.xml file on the Hadoop cluster, and restart Hadoop services and the cluster.
Configure the following user impersonation properties in the core-site.xml file:
hadoop.proxyuser.yarn.groups
<property> <name>hadoop.proxyuser.yarn.groups</name> <value><Name_of_the_impersonation_user></value> <description>Allows impersonation from any group.</description></property>
hadoop.proxyuser.yarn.hosts
<property> <name>hadoop.proxyuser.yarn.hosts</name> <value>*</value> <description>Allows impersonation from any host.</description></property>
Reference Data RequirementsIf you have a Data Quality product license, you can push a mapping that contains data quality transformations to a Hadoop cluster. Data quality transformations can use reference data to verify that data values are accurate and correctly formatted.
When you apply a pushdown operation to a mapping that contains data quality transformations, the operation can copy the reference data that the mapping uses. The pushdown operation copies reference table data, content set data, and identity population data to the Hadoop cluster. After the mapping runs, the cluster deletes the reference data that the pushdown operation copied with the mapping.
Note: The pushdown operation does not copy address validation reference data. If you push a mapping that performs address validation, you must install the address validation reference data files on each DataNode that runs the mapping. The cluster does not delete the address validation reference data files after the address validation mapping runs.
Address validation mappings validate and enhance the accuracy of postal address records. You can buy address reference data files from Informatica on a subscription basis. You can download the current address reference data files from Informatica at any time during the subscription period.
Reference Data Requirements 55
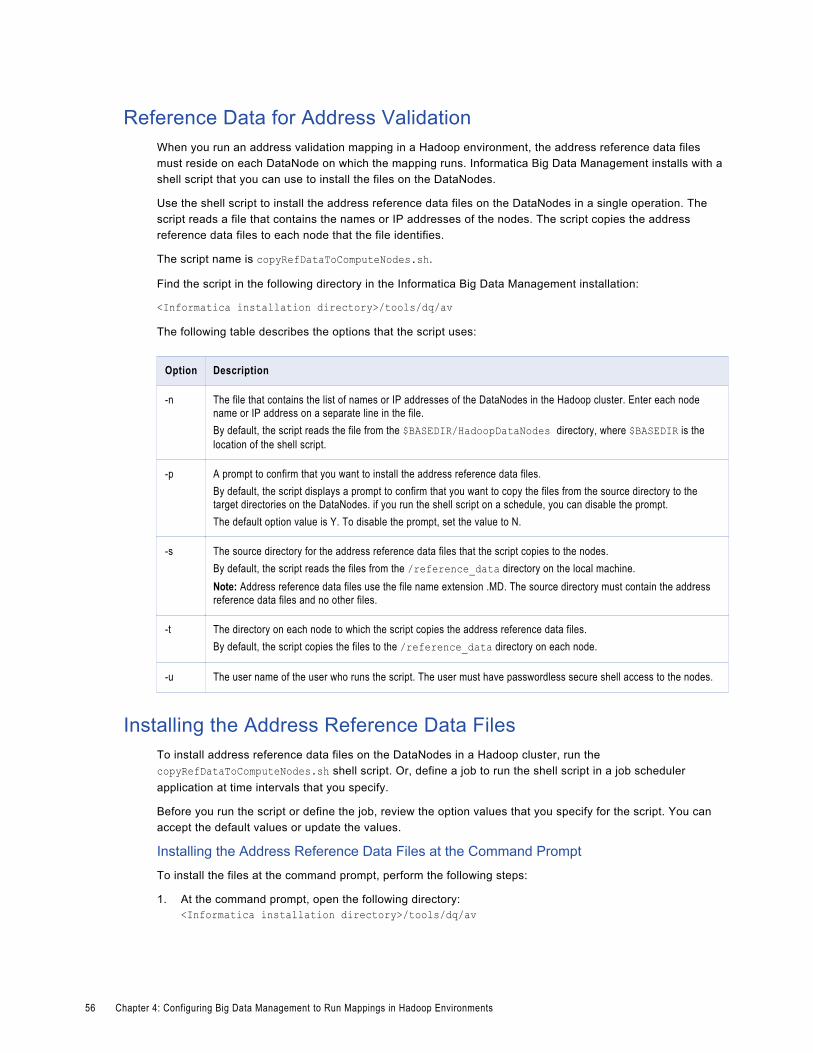
Reference Data for Address ValidationWhen you run an address validation mapping in a Hadoop environment, the address reference data files must reside on each DataNode on which the mapping runs. Informatica Big Data Management installs with a shell script that you can use to install the files on the DataNodes.
Use the shell script to install the address reference data files on the DataNodes in a single operation. The script reads a file that contains the names or IP addresses of the nodes. The script copies the address reference data files to each node that the file identifies.
The script name is copyRefDataToComputeNodes.sh.
Find the script in the following directory in the Informatica Big Data Management installation:
<Informatica installation directory>/tools/dq/av
The following table describes the options that the script uses:
Option Description
-n The file that contains the list of names or IP addresses of the DataNodes in the Hadoop cluster. Enter each node name or IP address on a separate line in the file.By default, the script reads the file from the $BASEDIR/HadoopDataNodes directory, where $BASEDIR is the location of the shell script.
-p A prompt to confirm that you want to install the address reference data files.By default, the script displays a prompt to confirm that you want to copy the files from the source directory to the target directories on the DataNodes. if you run the shell script on a schedule, you can disable the prompt.The default option value is Y. To disable the prompt, set the value to N.
-s The source directory for the address reference data files that the script copies to the nodes.By default, the script reads the files from the /reference_data directory on the local machine.Note: Address reference data files use the file name extension .MD. The source directory must contain the address reference data files and no other files.
-t The directory on each node to which the script copies the address reference data files.By default, the script copies the files to the /reference_data directory on each node.
-u The user name of the user who runs the script. The user must have passwordless secure shell access to the nodes.
Installing the Address Reference Data FilesTo install address reference data files on the DataNodes in a Hadoop cluster, run the copyRefDataToComputeNodes.sh shell script. Or, define a job to run the shell script in a job scheduler application at time intervals that you specify.
Before you run the script or define the job, review the option values that you specify for the script. You can accept the default values or update the values.
Installing the Address Reference Data Files at the Command PromptTo install the files at the command prompt, perform the following steps:
1. At the command prompt, open the following directory:<Informatica installation directory>/tools/dq/av
56 Chapter 4: Configuring Big Data Management to Run Mappings in Hadoop Environments
2. Run copyRefDataToComputeNodes.sh.Optionally, enter one or more values for the script options. If you do not enter a value for an option, the script runs with the default value for the option.
By default, the script prompts you to confirm the installation of the files. To install the files, enter Y.
Installing the Address Reference Data Files with a Scheduled JobYou can define a job to run the shell script at time intervals that you specify. Add the job to a job scheduler application. If you define a job to install the files, you must disable the prompt to confirm installation.
To disable the prompt, set the following option on the shell script:
-p n
Reference Data Requirements 57
C H A P T E R 5
Configure Run-Time EnginesThis chapter includes the following topics:
• Configure Run-time Engines, 58
• Blaze Engine Configuration, 59
• Spark Engine Configuration, 62
• Hive Engine Configuration, 68
Configure Run-time EnginesYou can run mappings in the Informatica native environment or the Hadoop environment. You must choose a run-time engine to run mappings in the Hadoop environment.
When you choose the native environment, Big Data Management uses the Data Integration to run mappings on the Informatica domain. When you choose the Hadoop environment, the Data Integration Service pushes the mapping to the cluster.
When you want to run mappings in the Hadoop environment, you choose from the following run-time engines:
Blaze engine
The Blaze engine is an Informatica software component that can run mappings on the Hadoop cluster.
Spark engine
Spark is an Apache project that provides a run-time engine that can run mappings on the Hadoop cluster.
Hive engine
The Hive engine uses the Hive driver mode to run mappings on the Hadoop cluster.
Informatica recommends that you select all engines to run mappings in the Hadoop environment. The Data Integration Service uses a proprietary rule-based methodology to determine the best engine to run the mapping. The rule-based methodology evaluates the mapping sources and the mapping logic to determine the engine.
Note: Effective in version 10.1.1, the Hive engine no longer supports the HiveServer2 mode to run the mappings. If you install Big Data Management 10.1.1 or upgrade to version 10.1.1, you can continue to use the Hive engine in the Hive driver mode.
58
Blaze Engine ConfigurationYou can use the Blaze runtime engine to run mappings in the Hadoop environment.
Perform the following configuration tasks in the Big Data Management installation:
1. Configure Blaze on Kerberos-enabled clusters.
2. Configure Blaze engine log directories.
3. Reset system settings to allow more processes and files.
4. Perform administration tasks.
5. Allocate cluster resources for Blaze.
Depending on the Hadoop environment, you perform additional steps in the Hadoop cluster to allow Big Data Management to use the Blaze engine to run mappings. See " Chapter 4, “Configuring Big Data Management to Run Mappings in Hadoop Environments” on page 49."
Configure Blaze Engine Log and Work DirectoriesThe hadoopEnv.properties file lists the log and work directories that the Blaze engine uses on the node and on HDFS. You must grant write permission on these directories for the user account that starts the Blaze engine.
Grant write permission for these directories on the user account that starts the Blaze engine in the following cluster properties:
• infagrid.node.local.root.log.dir
• infacal.hadoop.logs.directory
For more information about user accounts for the Blaze engine, see the Informatica Big Data Management Security Guide.
Reset System Settings to Allow More Processes and FilesInformatica service processes can use a large number of files. If you want to use Blaze to run mappings on the Hadoop cluster, and prevent errors that result from the large number of files and processes, increase operating system settings on the machine that hosts the Data Integration Service. When you increase settings, you allow more user processes and files.
You can change system settings with the limit command if you use a C shell, or the ulimit command if you use a Bash shell.
1. Review the present operating system settings.
Run the following command:C Shell
limitBash Shell
ulimit -a2. Optionally reset the file descriptor limit.
Informatica service processes can use a large number of files. Set the file descriptor limit per process to 16,000 or higher. The recommended limit is 32,000 file descriptors per process.
Blaze Engine Configuration 59
To change system settings, run the limit or ulimit command with the pertinent flag and value. For example, to set the file descriptor limit, run the following command:C Shell
limit -h filesize <value>Bash Shell
ulimit -n <value>3. Optionally adjust the max user processes.
Informatica services use a large number of user processes. Use the ulimit -u command to adjust the max user processes setting to a level that is high enough to account for all the processes required by Blaze. Depending on the number of mappings and transformations that might run concurrently, adjust the setting from the default value of 1024 to at least 4096.
Run the following command to set the max user processes setting:C Shell
limit -u processes <value>Bash Shell
ulimit -u <value>
Open the Required Ports for the Blaze EngineWhen you create the Hadoop connection, specify the minimum and maximum port range that the Blaze engine can use. Then open the ports on the cluster for the Blaze engine to use to communicate with the Informatica domain.
Note: If the Hadoop cluster is behind a firewall, work with your network administrator to open the range of ports that the Blaze engine uses.
Blaze Engine ConsoleYou can run mappings using the native, Blaze, or Spark runtime engines.
The Blaze engine console is enabled by default.
If you choose never to use Blaze to run mappings, you must disable the Blaze Engine Console.
Disable the Blaze Engine Console1. Browse to the following location: <InformaticaInstallationDir>/services/shared/hadoop/
<Hadoop_distribution_name>_<version_number>/infaConf 2. Find the file named hadoopEnv.properties.
3. Back up the file before you modify it, then open the file for editing.
4. Locate the property infagrid.blaze.console.enabled.
5. If necessary, remove the # (hash) character to uncomment the line, and then change the value of the infagrid.blaze.console.enabled property to FALSE.
6. Save and close the hadoopEnv.properties file.
60 Chapter 5: Configure Run-Time Engines
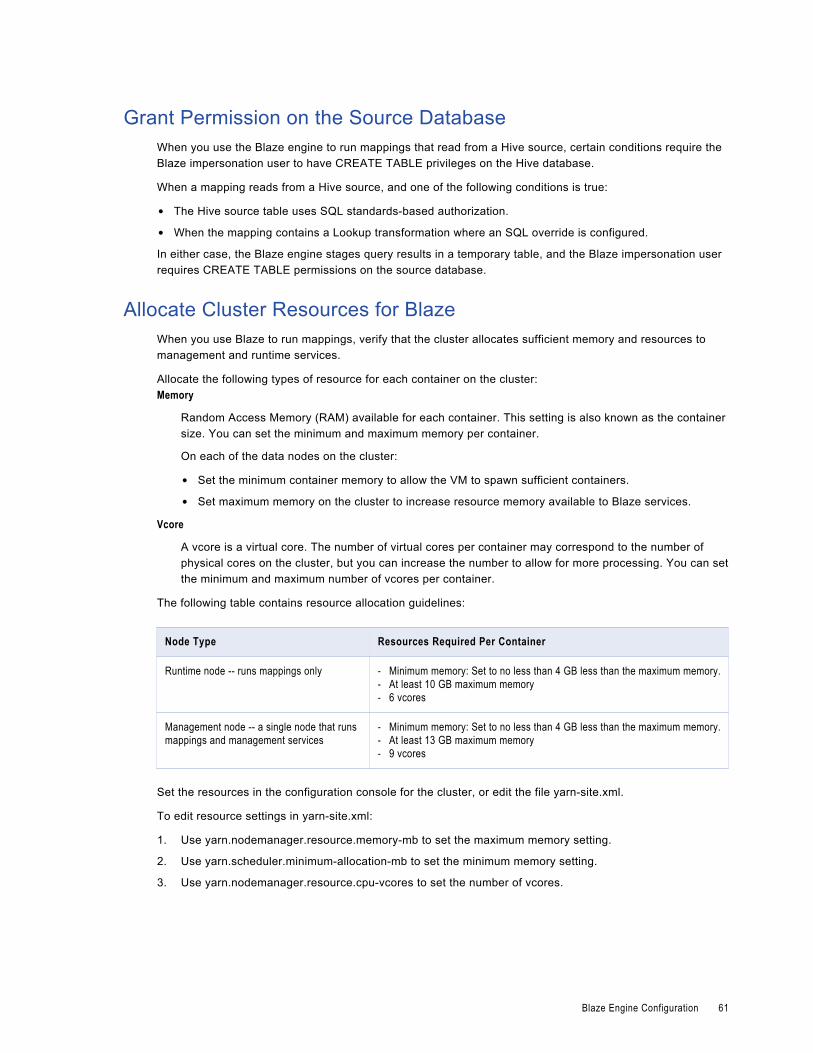
Grant Permission on the Source DatabaseWhen you use the Blaze engine to run mappings that read from a Hive source, certain conditions require the Blaze impersonation user to have CREATE TABLE privileges on the Hive database.
When a mapping reads from a Hive source, and one of the following conditions is true:
• The Hive source table uses SQL standards-based authorization.
• When the mapping contains a Lookup transformation where an SQL override is configured.
In either case, the Blaze engine stages query results in a temporary table, and the Blaze impersonation user requires CREATE TABLE permissions on the source database.
Allocate Cluster Resources for BlazeWhen you use Blaze to run mappings, verify that the cluster allocates sufficient memory and resources to management and runtime services.
Allocate the following types of resource for each container on the cluster:Memory
Random Access Memory (RAM) available for each container. This setting is also known as the container size. You can set the minimum and maximum memory per container.
On each of the data nodes on the cluster:
• Set the minimum container memory to allow the VM to spawn sufficient containers.
• Set maximum memory on the cluster to increase resource memory available to Blaze services.
Vcore
A vcore is a virtual core. The number of virtual cores per container may correspond to the number of physical cores on the cluster, but you can increase the number to allow for more processing. You can set the minimum and maximum number of vcores per container.
The following table contains resource allocation guidelines:
Node Type Resources Required Per Container
Runtime node -- runs mappings only - Minimum memory: Set to no less than 4 GB less than the maximum memory.- At least 10 GB maximum memory- 6 vcores
Management node -- a single node that runs mappings and management services
- Minimum memory: Set to no less than 4 GB less than the maximum memory.- At least 13 GB maximum memory- 9 vcores
Set the resources in the configuration console for the cluster, or edit the file yarn-site.xml.
To edit resource settings in yarn-site.xml:
1. Use yarn.nodemanager.resource.memory-mb to set the maximum memory setting.
2. Use yarn.scheduler.minimum-allocation-mb to set the minimum memory setting.
3. Use yarn.nodemanager.resource.cpu-vcores to set the number of vcores.
Blaze Engine Configuration 61
Configure Virtual Memory LimitsConfigure the virtual memory limits in yarn-site.xml for every node in the Hadoop cluster. After you configure virtual memory limits you must restart the Hadoop cluster.
yarn-site.xml is located in the following directory on every node in the Hadoop cluster:
/etc/hadoop/conf/yarn-site.xml
In yarn-site.xml, configure the following property:yarn.nodemanager.vmem-check-enabled
Determines virtual memory limits.
The following example describes the property you can configure in yarn-site.xml:
<property> <name>yarn.nodemanager.vmem-check-enabled</name> <value>false</value> <description>Enforces virtual memory limits for containers.</description></property>
Spark Engine ConfigurationIf you want to use the Spark runtime engine to run mappings in the Hadoop environment, perform the following configuration tasks in the Big Data Management installation.
1. Reset system settings to allow more processes and files.
2. Enable dynamic allocation.
3. Enable the Spark shuffle service.
The Spark engine can run mappings on all Hadoop distributions.
Reset System Settings to Allow More Processes and FilesIf you want to use Spark to run mappings on the Hadoop cluster, increase operating system settings on the machine that hosts the Data Integration Service to allow more user processes and files.
To get a list of the operating system settings, including the file descriptor limit, run the following command:C Shell
limitBash Shell
ulimit -a
Informatica service processes can use a large number of files. Set the file descriptor limit per process to 16,000 or higher. The recommended limit is 32,000 file descriptors per process.
To change system settings, run the limit or ulimit command with the pertinent flag and value. For example, to set the file descriptor limit, run the following command:C Shell
limit -h filesize <value>Bash Shell
ulimit -n <value>
62 Chapter 5: Configure Run-Time Engines
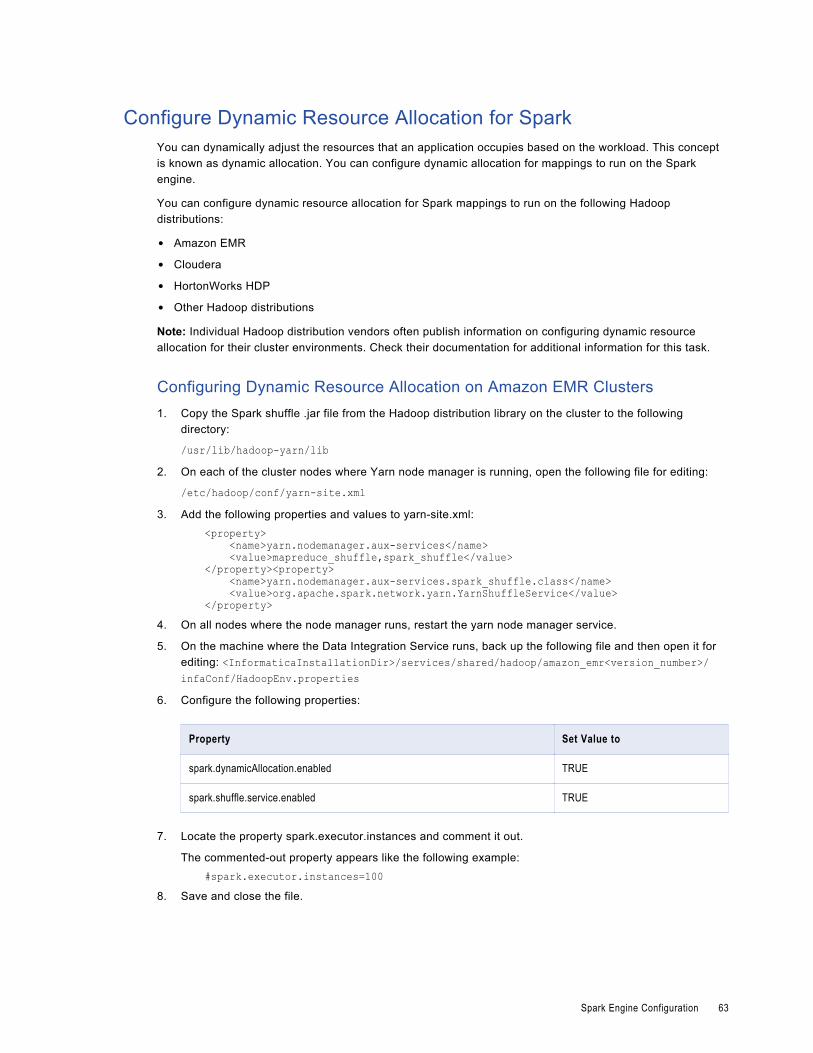
Configure Dynamic Resource Allocation for SparkYou can dynamically adjust the resources that an application occupies based on the workload. This concept is known as dynamic allocation. You can configure dynamic allocation for mappings to run on the Spark engine.
You can configure dynamic resource allocation for Spark mappings to run on the following Hadoop distributions:
• Amazon EMR
• Cloudera
• HortonWorks HDP
• Other Hadoop distributions
Note: Individual Hadoop distribution vendors often publish information on configuring dynamic resource allocation for their cluster environments. Check their documentation for additional information for this task.
Configuring Dynamic Resource Allocation on Amazon EMR Clusters1. Copy the Spark shuffle .jar file from the Hadoop distribution library on the cluster to the following
directory:
/usr/lib/hadoop-yarn/lib2. On each of the cluster nodes where Yarn node manager is running, open the following file for editing:
/etc/hadoop/conf/yarn-site.xml3. Add the following properties and values to yarn-site.xml:
<property> <name>yarn.nodemanager.aux-services</name> <value>mapreduce_shuffle,spark_shuffle</value></property><property> <name>yarn.nodemanager.aux-services.spark_shuffle.class</name> <value>org.apache.spark.network.yarn.YarnShuffleService</value></property>
4. On all nodes where the node manager runs, restart the yarn node manager service.
5. On the machine where the Data Integration Service runs, back up the following file and then open it for editing: <InformaticaInstallationDir>/services/shared/hadoop/amazon_emr<version_number>/infaConf/HadoopEnv.properties
6. Configure the following properties:
Property Set Value to
spark.dynamicAllocation.enabled TRUE
spark.shuffle.service.enabled TRUE
7. Locate the property spark.executor.instances and comment it out.
The commented-out property appears like the following example:#spark.executor.instances=100
8. Save and close the file.
Spark Engine Configuration 63
Dynamic allocation is configured for mappings to run on the Spark engine. You can see a message like this in the application log:
ExecutorAllocationManager: Requesting 2 new executors because tasks are backlogged (new desired total will be 3)
Configuring Dynamic Resource Allocation on Cloudera Clusters1. On the machine where the Data Integration Service runs, back up the following file and then open it for
editing: <InformaticaInstallationDir>/services/shared/hadoop/cloudera_cdh<version_number>/infaConf/HadoopEnv.properties
2. Configure the following properties:
Property Set Value to
spark.dynamicAllocation.enabled TRUE
spark.shuffle.service.enabled TRUE
3. Locate the property spark.executor.instances and comment it out.
The commented-out property appears like the following example:#spark.executor.instances=100
4. On the cluster name node, use a command window to browse to the following directory: /opt/cloudera/parcels/CDH-<version>/lib/hadoop-yarn/lib/. Make sure one of the following .jar files is present:
• spark-1.6.0-cdh<version_number>-yarn-shuffle.jar• spark-yarn-shuffle.jar If the file is not present, or if an older version is present, use the .jar file bundled with the Informatica Big Data Management download. To access this file, use the Ambari or Cloudera cluster configuration browser to update the yarn.application.classpath property to include one of the following values, depending on your version of Spark:
• For Spark 1.6x:/opt/Informatica/services/shared/hadoop/cloudera_cdh5u8_custom/spark/lib/spark-1.6.0-cdh5.8.0-yarn-shuffle.jar
• For Spark 2.0x:/opt/Informatica/services/shared/spark/lib_spark_2.0.1_hadoop_2.6.0/yarn/spark-2.0.1-yarn-shuffle.jar
5. In the cluster configuration manager interface, browse to the following configuration screen: YARN Service Advance Configuration Snippet (Safety Valve) for yarn-site.xml. Add the following properties:
Name Value
yarn.nodemanager.aux-services mapreduce_shuffle,spark_shuffle
yarn.nodemanager.aux-services.spark_shuffle.class org.apache.spark.network.yarn.YarnShuffleService
64 Chapter 5: Configure Run-Time Engines
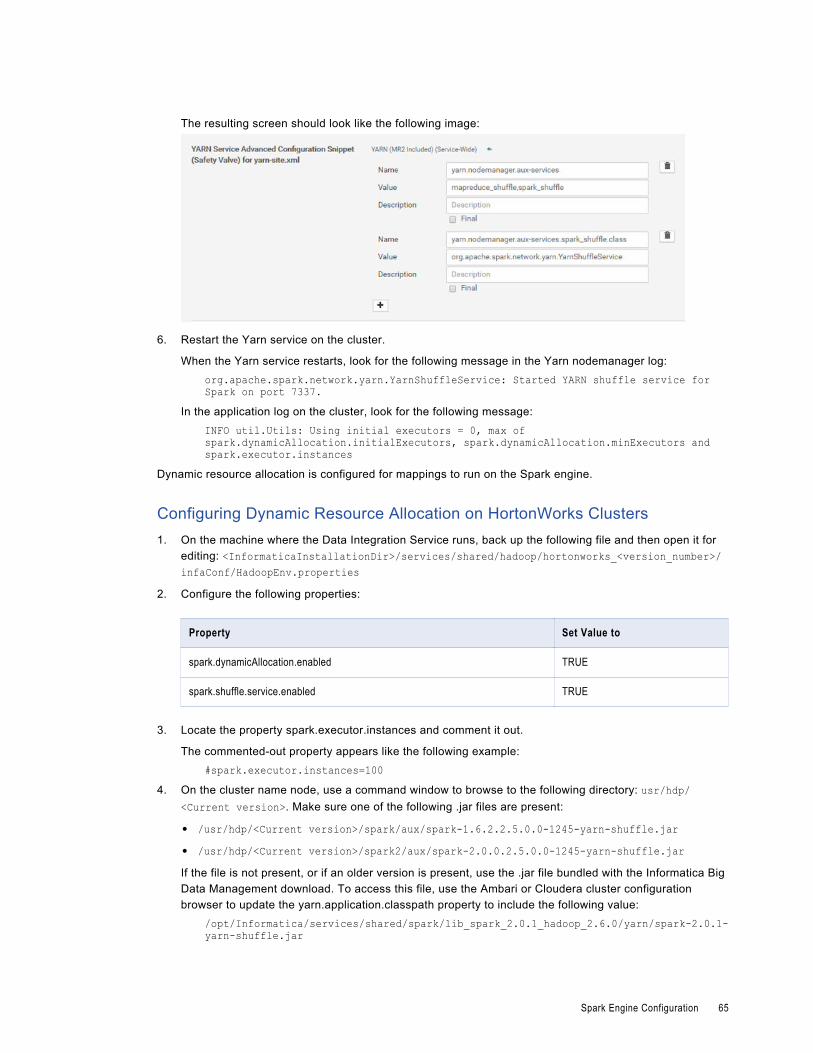
The resulting screen should look like the following image:
6. Restart the Yarn service on the cluster.
When the Yarn service restarts, look for the following message in the Yarn nodemanager log:org.apache.spark.network.yarn.YarnShuffleService: Started YARN shuffle service for Spark on port 7337.
In the application log on the cluster, look for the following message:INFO util.Utils: Using initial executors = 0, max of spark.dynamicAllocation.initialExecutors, spark.dynamicAllocation.minExecutors and spark.executor.instances
Dynamic resource allocation is configured for mappings to run on the Spark engine.
Configuring Dynamic Resource Allocation on HortonWorks Clusters1. On the machine where the Data Integration Service runs, back up the following file and then open it for
editing: <InformaticaInstallationDir>/services/shared/hadoop/hortonworks_<version_number>/infaConf/HadoopEnv.properties
2. Configure the following properties:
Property Set Value to
spark.dynamicAllocation.enabled TRUE
spark.shuffle.service.enabled TRUE
3. Locate the property spark.executor.instances and comment it out.
The commented-out property appears like the following example:#spark.executor.instances=100
4. On the cluster name node, use a command window to browse to the following directory: usr/hdp/<Current version>. Make sure one of the following .jar files are present:
• /usr/hdp/<Current version>/spark/aux/spark-1.6.2.2.5.0.0-1245-yarn-shuffle.jar• /usr/hdp/<Current version>/spark2/aux/spark-2.0.0.2.5.0.0-1245-yarn-shuffle.jar If the file is not present, or if an older version is present, use the .jar file bundled with the Informatica Big Data Management download. To access this file, use the Ambari or Cloudera cluster configuration browser to update the yarn.application.classpath property to include the following value:
/opt/Informatica/services/shared/spark/lib_spark_2.0.1_hadoop_2.6.0/yarn/spark-2.0.1-yarn-shuffle.jar
Spark Engine Configuration 65

5. In the Ambari cluster configuration browser, select the YARN service and click the Advanced tab. Add the following properties if they do not exist.
Add the following properties in the Node Manager section:
Property Value
yarn.nodemanager.aux-services mapreduce_shuffle,spark_shuffle,spark2_shuffle
Add the following properties in the Advanced yarn-site section:
Property Value
yarn.nodemanager.aux-services.spark_shuffle.classpath {stack_root}}/${hdp.version}/spark/aux/*
yarn.nodemanager.aux-services.spark_shuffle.class org.apache.spark.network.yarn.YarnShuffleService
6. Restart the Yarn service on the cluster.
When the Yarn service restarts, look for the following message in the cluster console:org.apache.spark.network.yarn.YarnShuffleService: Started YARN shuffle service for Spark on port <number>.
In the application log on the cluster, look for the following message:Using initial executors = 0, max of spark.dynamicAllocation.initialExecutors, spark.dynamicAllocation.minExecutors and spark.executor.instances
Dynamic resource allocation is configured for mappings to run on the Spark engine.
Configure Dynamic Resource Allocation on Azure HDInsight and IBM Big Insights1. On the machine where the Data Integration Service runs, back up the following file and then open it for
editing: <InformaticaInstallationDir>/services/shared/hadoop/hortonworks_<version_number>/infaConf/HadoopEnv.properties
2. Configure the following properties:
Property Set Value to
spark.dynamicAllocation.enabled TRUE
spark.shuffle.service.enabled TRUE
3. Locate the property spark.executor.instances and comment it out.
The commented-out property appears like the following example:#spark.executor.instances=100
4. Locate the Spark shuffle .jar file and note the location. The file is located in the following path: /opt/Informatica/services/shared/spark/lib_spark_2.0.1_hadoop_2.6.0/spark-network-shuffle_2.11-2.0.1.jar.
5. Add the Spark shuffle .jar file location to the classpath of each cluster node manager.
6. Edit the yarn-site.xml file in each cluster node manager.
66 Chapter 5: Configure Run-Time Engines
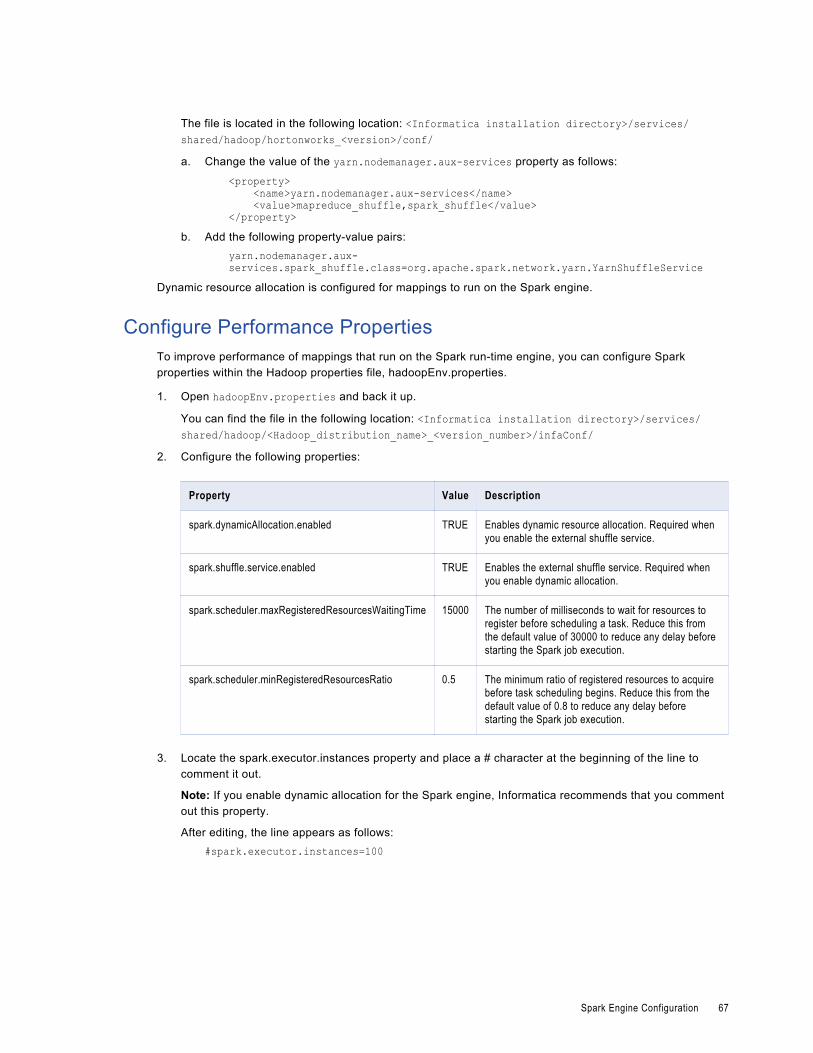
The file is located in the following location: <Informatica installation directory>/services/shared/hadoop/hortonworks_<version>/conf/a. Change the value of the yarn.nodemanager.aux-services property as follows:
<property> <name>yarn.nodemanager.aux-services</name> <value>mapreduce_shuffle,spark_shuffle</value></property>
b. Add the following property-value pairs: yarn.nodemanager.aux-services.spark_shuffle.class=org.apache.spark.network.yarn.YarnShuffleService
Dynamic resource allocation is configured for mappings to run on the Spark engine.
Configure Performance PropertiesTo improve performance of mappings that run on the Spark run-time engine, you can configure Spark properties within the Hadoop properties file, hadoopEnv.properties.
1. Open hadoopEnv.properties and back it up.
You can find the file in the following location: <Informatica installation directory>/services/shared/hadoop/<Hadoop_distribution_name>_<version_number>/infaConf/
2. Configure the following properties:
Property Value Description
spark.dynamicAllocation.enabled TRUE Enables dynamic resource allocation. Required when you enable the external shuffle service.
spark.shuffle.service.enabled TRUE Enables the external shuffle service. Required when you enable dynamic allocation.
spark.scheduler.maxRegisteredResourcesWaitingTime 15000 The number of milliseconds to wait for resources to register before scheduling a task. Reduce this from the default value of 30000 to reduce any delay before starting the Spark job execution.
spark.scheduler.minRegisteredResourcesRatio 0.5 The minimum ratio of registered resources to acquire before task scheduling begins. Reduce this from the default value of 0.8 to reduce any delay before starting the Spark job execution.
3. Locate the spark.executor.instances property and place a # character at the beginning of the line to comment it out.
Note: If you enable dynamic allocation for the Spark engine, Informatica recommends that you comment out this property.
After editing, the line appears as follows:#spark.executor.instances=100
Spark Engine Configuration 67

Hive Engine ConfigurationThe Hive run-time engine uses the Hive driver mode to run mappings in the Hadoop environment.
If the mappings that you run on the Hive engine use Hive dynamic partitioned tables, configure dynamic partition variables in the hive-site.xml file. The following table describes the variables to set:
Variable Name Value Description
hive.exec.dynamic.partition TRUE Enables dynamic partitioned tables.
hive.exec.dynamic.partition.mode nonrestrict Allows all partitions to be dynamic.
The hive-site.xml file is in the following location: /<Big Data Management installation directory>/Informatica/services/shared/hadoop/<Hadoop_distribution_name>/conf
68 Chapter 5: Configure Run-Time Engines
C H A P T E R 6
High AvailabilityThis chapter includes the following topics:
• Configuring High Availability, 69
• Configuring the Developer Tool for a Highly Available Hadoop Cluster , 69
• Configuring Connections Properties to Run Mappings on a Highly Available Hadoop Cluster, 70
Configuring High AvailabilityWhen you use the Hadoop Configuration Manager to configure Big Data Management, it enables Big Data Management to read from and write to a highly available Hadoop cluster.
A highly available Hadoop cluster can provide uninterrupted access to the JobTracker, name node, and ResourceManager in the cluster. The JobTracker is the service within Hadoop that assigns MapReduce jobs on the cluster. The name node tracks file data across the cluster. The ResourceManager tracks resources and schedules applications in the cluster.
The Hadoop Configuration Manager configures the Data Integration Service to read from and write to a highly available cluster on the following distributions:
• Azure HDInsight
• Cloudera CDH
• Hortonworks HDP
• IBM BigInsights
Configuring the Developer Tool for a Highly Available Hadoop Cluster
You can configure the Data Integration Service and the Developer tool to read from and write to a highly available cluster. The cluster provides a highly available name node and ResourceManager.
Copy Configuration FilesCopy some configuration files to the machine that hosts the Developer tool.
1. Go to the following location on the name node of the cluster: /etc/hadoop/conf
69

2. Locate the following files:
• If you use the Cloudera or HortonWorks Hadoop distributions, find hdfs-site.xml and yarn-site.xml.
• If you use the IBM BigInsights Hadoop distribution, find hdfs-site.xml and core-site.xml.
3. Copy the files to the following location on the machine that hosts the Developer tool: <Informatica installation directory>/clients/DeveloperClient/Hadoop/<Hadoop distribution><version>/conf
yarn-site.xmlIf you use the Cloudera or HortonWorks Hadoop distributions, configure the following property in the yarn-site.xml file:yarn.application.classpath
Sets the classpath for YARN applications and enables the Developer tool to read from and write to a highly available cluster.
To identify the classpath, run the yarn classpath command. The following sample text shows a sample classpath entry:
<property><name>yarn.application.classpath</name><value>/etc/hadoop/conf:/opt/cloudera/parcels/CDH-5.4.0-1.cdh5.4.0.p0.27/lib/hadoop/libexec/../../hadoop/lib/*:/opt/cloudera/parcels/CDH-5.4.0-1.cdh5.4.0.p0.27/lib/hadoop/libexec/../../hadoop/.//*:/opt/cloudera/parcels/CDH-5.4.0-1.cdh5.4.0.p0.27/lib/hadoop/libexec/../../hadoop-hdfs/./:/opt/cloudera/parcels/CDH-5.4.0-1.cdh5.4.0.p0.27/lib/hadoop/libexec/../../hadoop-hdfs/lib/*:/opt/cloudera/parcels/CDH-5.4.0-1.cdh5.4.0.p0.27/lib/hadoop/libexec/../../hadoophdfs/.//*:/opt/cloudera/parcels/CDH-5.4.0-1.cdh5.4.0.p0.27/lib/hadoop/libexec/../../hadoop-yarn/lib/*:/opt/cloudera/parcels/CDH-5.4.0-1.cdh5.4.0.p0.27/lib/hadoop/libexec/../../hadoop-yarn/.//*:/opt/cloudera/parcels/CDH/lib/hadoopmapreduce/lib/*:/opt/cloudera/parcels/CDH/lib/hadoop-mapreduce/.//*:/opt/cloudera/parcels/CDH-5.4.0-1.cdh5.4.0.p0.27/lib/hadoop/libexec/../../hadoop-yarn/.//*:/opt/cloudera/parcels/CDH-5.4.0-1.cdh5.4.0.p0.27/lib/hadoop/libexec/../../hadoopyarn/lib/*</value></property>
Configuring Connections Properties to Run Mappings on a Highly Available Hadoop Cluster
To run mappings on a highly available Hadoop cluster, configure connection properties.
1. Open the Developer tool.
2. Click Window > Preferences.
3. Select Informatica > Connections.
4. Expand the domain.
5. Expand Databases and select the Hive connection.
6. Edit the Hive connection and configure the following properties in the Properties to Run Mappings in Hadoop Cluster tab:
70 Chapter 6: High Availability
Job tracker/Yarn Resource Manager URI
For Cloudera and HortonWorks clusters, enter any value in the following format: <string>:<port>. For example, enter dummy:12435.
For IBM BigInsights clusters, enter the following value: <cluster_namenode>:9001.Default FS URI
For Cloudera and HortonWorks clusters, use the value from the dfs.nameservices property in hdfs-site.xml.
For IBM BigInsights clusters, use the value from the fs.defaultFS property in core-site.xml.
7. Expand File Systems and select the HDFS connection.
8. For Cloudera and HortonWorks clusters, edit the HDFS connection and configure the following property in the Details tab:
Name Node URI
Use the value from the dfs.nameservices property in hdfs-site.xml.
Configuring Connections Properties to Run Mappings on a Highly Available Hadoop Cluster 71

C H A P T E R 7
Upgrade Big Data ManagementThis chapter includes the following topics:
• Upgrading Big Data Management, 72
• Configuring the Connections After Upgrade, 72
Upgrading Big Data ManagementBefore you upgrade, back up the configuration files. Complete the following steps to upgrade Big Data Management:
1. Upgrade the Informatica domain and client tools.
See the Informatica Upgrade Guides.
2. Uninstall the Big Data Management package from the Hadoop cluster.
For more information about how to uninstall Big Data Management, see Chapter 8, “Big Data Management Uninstallation” on page 74.
3. Install Big Data Management 10.1.1 package on the Hadoop cluster.
For more information about how to install Big Data Management, see “Installation Overview” on page 10.
4. Configure Big Data Management.
Complete the tasks in “Big Data Management Configuration Overview” on page 27 and “Mappings on Hadoop Distributions Overview” on page 49 for your Hadoop distribution.
5. Enable Developer tool communication with the cluster.
For more information, see “Update Configuration Files for the Developer Tool” on page 50.
6. Optionally, configure Big Data Management to connect to a highly available Hadoop cluster.
For more information, see “Configuring High Availability” on page 69.
Configuring the Connections After UpgradeEffective in version 10.0, Big Data Management requires a Hadoop connection to run mappings on the Hadoop cluster. If you upgraded from 9.6.1 or 9.6.1 Hot Fix releases, generate Hadoop connections from
72
Hive connections that are enabled to run mappings. If you upgraded or changed the Hadoop cluster, manually replace the Hadoop connection to run mappings on the Hadoop cluster.
After you upgrade to 10.1.1, perform the following steps:
1. To generate a Hadoop connection from the Hive connection, run the following command:
infacmd generateHadoopConnectionFromHiveConnectionIf you do not specify the Hive connection name, the command generates a Hadoop connection from each Hive connection that is enabled to run mappings on the Hadoop cluster.
For more information, see the Informatica Command Reference.
If the Hive connection name is too long to generate a Hadoop connection, manually replace the connection.
2. If the Hive connection enabled to run mappings is parameterized, update the connection name in the parameter file with the Hadoop connection that you generated.
If the same parameterized Hive connection is used to run mappings and to connect to Hive sources targets, update the parameter file with the correct Hive connection to connect to Hive sources and targets.
3. To manually replace the Hadoop connection, run the following commands:
• For mappings deployed in applications, run the infacmd dis replaceMappingHadoopRuntimeConnections command.
• For mappings run in the Developer tool, run the infacmd mrs replaceMappingHadoopRuntimeConnections command.
For more information, see the Informatica Command Reference.
Configuring the Connections After Upgrade 73
C H A P T E R 8
Big Data Management Uninstallation
This chapter includes the following topic:
• Informatica Big Data Management Uninstallation, 74
Informatica Big Data Management UninstallationThe Big Data Management uninstallation deletes the Big Data Management binary files from all of the DataNodes within the Hadoop cluster. Uninstall Big Data Management from a shell command.
Uninstalling Big Data ManagementRun the Big Data Management uninstaller to uninstall Big Data Management in a single node or cluster environment.
To uninstall Big Data Management on Cloudera, see “Uninstalling Big Data Management on Cloudera” on page 75.
1. Verify that the Big Data Management administrator can run sudo commands.
2. If you are uninstalling Big Data Management in a cluster environment, configure the root user to use a passwordless Secure Shell (SSH) connection between the machine where you want to run the Big Data Management uninstall and all of the nodes where Big Data Management is installed.
3. If you are uninstalling Big Data Management in a cluster environment using the HadoopDataNodes file, verify that the HadoopDataNodes file contains the IP addresses or machine host names of each of the nodes in the Hadoop cluster from which you want to uninstall Big Data Management. The HadoopDataNodes file is located on the node from where you want to launch the Big Data Management installation. You must add one IP addresses or machine host names of the nodes in the Hadoop cluster for each line in the file.
4. Log in to the machine. The machine you log into depends on the Big Data Management environment and uninstallation method:
• If you are uninstalling Big Data Management in a single node environment, log in to the machine on which Big Data Management is installed.
• If you are uninstalling Big Data Management in a cluster environment using the HADOOP_HOME environment variable, log in to the primary name node.
74
• If you are uninstalling Big Data Management in a cluster environment using the HadoopDataNodes file, log in to any node.
5. Run the following command to start the Big Data Management uninstallation in console mode: bash InformaticaHadoopInstall.sh
6. Press y to accept the Big Data Management terms of agreement.
7. Press Enter.
8. Select 3 to uninstall Big Data Management.
9. Press Enter.
10. Select the uninstallation option, depending on the Big Data Management environment:
• Select 1 to uninstall Big Data Management in a single node environment.
• Select 2 to uninstall Big Data Management in a cluster environment.
11. Press Enter.
12. If you are uninstalling Big Data Management in a cluster environment, select the uninstallation option, depending on the uninstallation method:
• Select 1 to uninstall Big Data Management from the primary name node.
• Select 2 to uninstall Big Data Management using the HadoopDataNodes file.
13. Press Enter.
14. If you are uninstalling Big Data Management in a cluster environment from the primary name node, type the absolute path for the Hadoop installation directory. Start the path with a slash.
The uninstaller deletes all of the Big Data Management binary files from the /<BigDataManagementInstallationDirectory>/Informatica directory. In a cluster environment, the uninstaller delete the binary files from all of the nodes within the Hadoop cluster.
Uninstalling Big Data Management on ClouderaUninstall Big Data Management on Cloudera from the Cloudera Manager.
1. In Cloudera Manager, browse to Hosts > Parcels > Informatica.
2. Select Deactivate.
Cloudera Manager stops the Informatica Big Data Management instance.
3. Select Remove.
The cluster uninstalls Informatica Big Data Manager.
Uninstalling Big Data Management in An Ambari StackTo uninstall the stack deployment of Big Data Management, you use the Ambari configuration manager to stop and deregister the Big Data Management service, and then perform manual removal of Informatica files from the cluster.
1. In the Ambari configuration manager, select INFORMATICA BDM from the list of services.
2. Click the Service Actions dropdown menu and select Delete Service.
The following image shows the option in the Service Actions dropdown menu:
Informatica Big Data Management Uninstallation 75
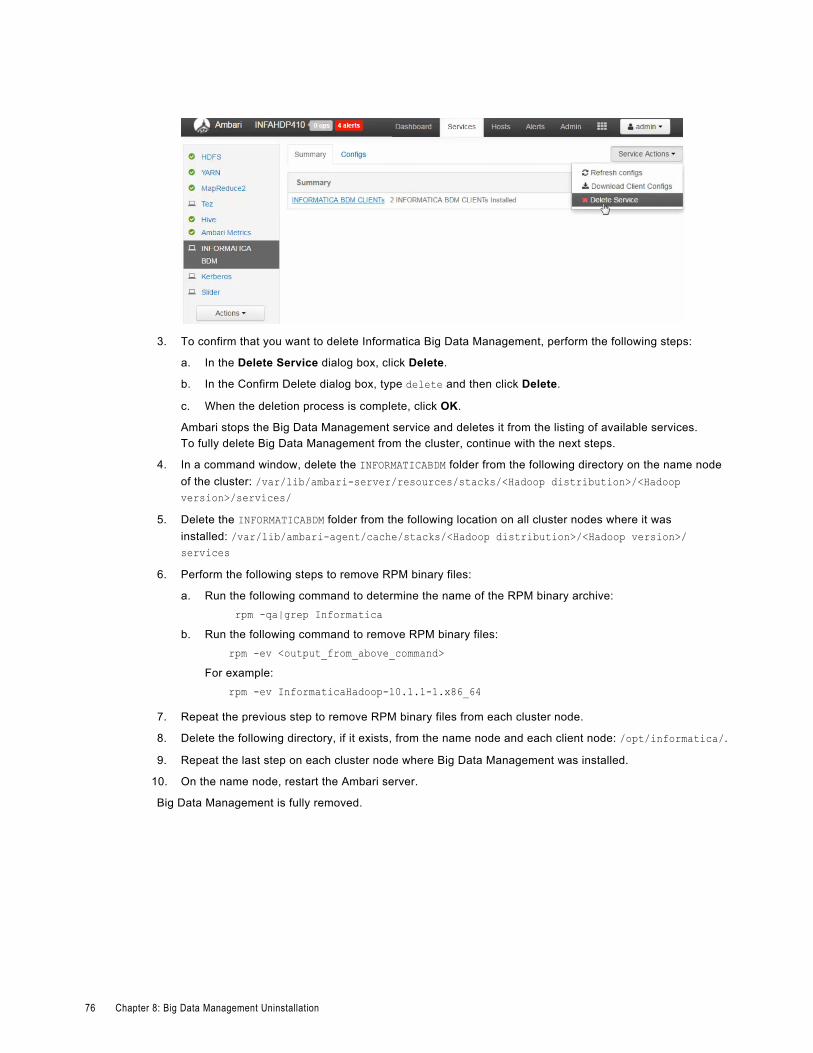
3. To confirm that you want to delete Informatica Big Data Management, perform the following steps:
a. In the Delete Service dialog box, click Delete.
b. In the Confirm Delete dialog box, type delete and then click Delete.
c. When the deletion process is complete, click OK.
Ambari stops the Big Data Management service and deletes it from the listing of available services.To fully delete Big Data Management from the cluster, continue with the next steps.
4. In a command window, delete the INFORMATICABDM folder from the following directory on the name node of the cluster: /var/lib/ambari-server/resources/stacks/<Hadoop distribution>/<Hadoop version>/services/
5. Delete the INFORMATICABDM folder from the following location on all cluster nodes where it was installed: /var/lib/ambari-agent/cache/stacks/<Hadoop distribution>/<Hadoop version>/services
6. Perform the following steps to remove RPM binary files:
a. Run the following command to determine the name of the RPM binary archive: rpm -qa|grep Informatica
b. Run the following command to remove RPM binary files: rpm -ev <output_from_above_command>
For example:rpm -ev InformaticaHadoop-10.1.1-1.x86_64
7. Repeat the previous step to remove RPM binary files from each cluster node.
8. Delete the following directory, if it exists, from the name node and each client node: /opt/informatica/.
9. Repeat the last step on each cluster node where Big Data Management was installed.
10. On the name node, restart the Ambari server.
Big Data Management is fully removed.
76 Chapter 8: Big Data Management Uninstallation
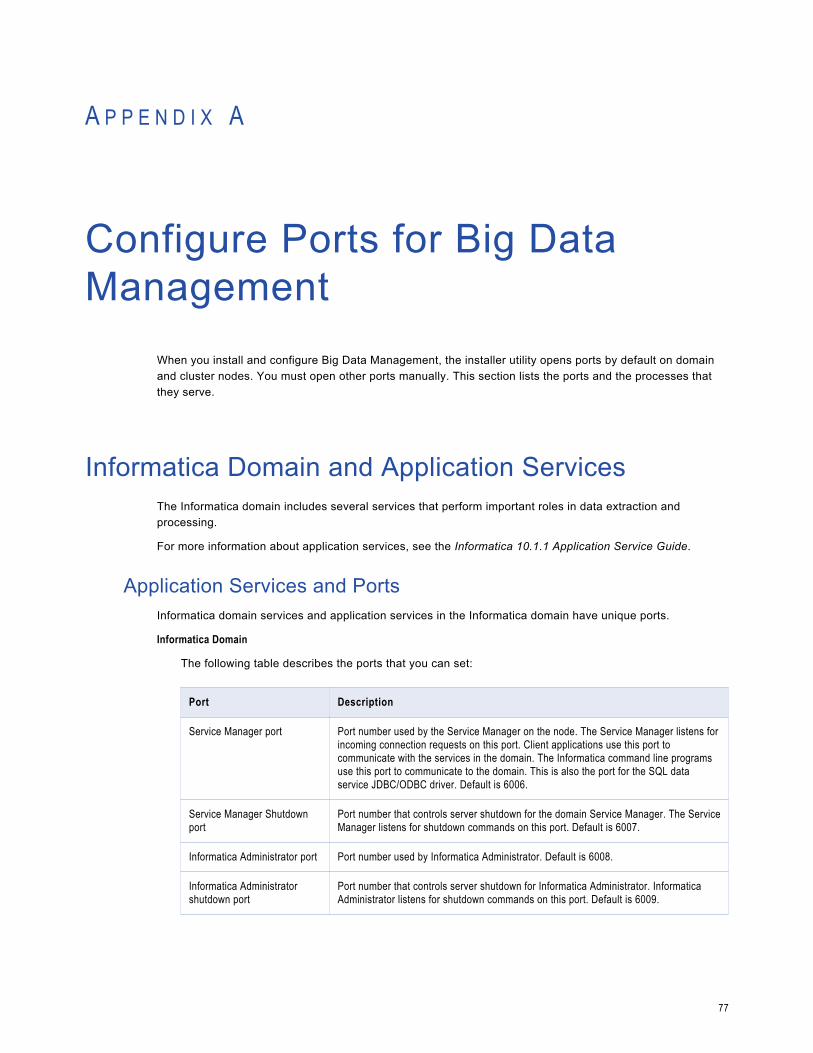
A P P E N D I X A
Configure Ports for Big Data Management
When you install and configure Big Data Management, the installer utility opens ports by default on domain and cluster nodes. You must open other ports manually. This section lists the ports and the processes that they serve.
Informatica Domain and Application ServicesThe Informatica domain includes several services that perform important roles in data extraction and processing.
For more information about application services, see the Informatica 10.1.1 Application Service Guide.
Application Services and PortsInformatica domain services and application services in the Informatica domain have unique ports.
Informatica Domain
The following table describes the ports that you can set:
Port Description
Service Manager port Port number used by the Service Manager on the node. The Service Manager listens for incoming connection requests on this port. Client applications use this port to communicate with the services in the domain. The Informatica command line programs use this port to communicate to the domain. This is also the port for the SQL data service JDBC/ODBC driver. Default is 6006.
Service Manager Shutdown port
Port number that controls server shutdown for the domain Service Manager. The Service Manager listens for shutdown commands on this port. Default is 6007.
Informatica Administrator port Port number used by Informatica Administrator. Default is 6008.
Informatica Administrator shutdown port
Port number that controls server shutdown for Informatica Administrator. Informatica Administrator listens for shutdown commands on this port. Default is 6009.
77
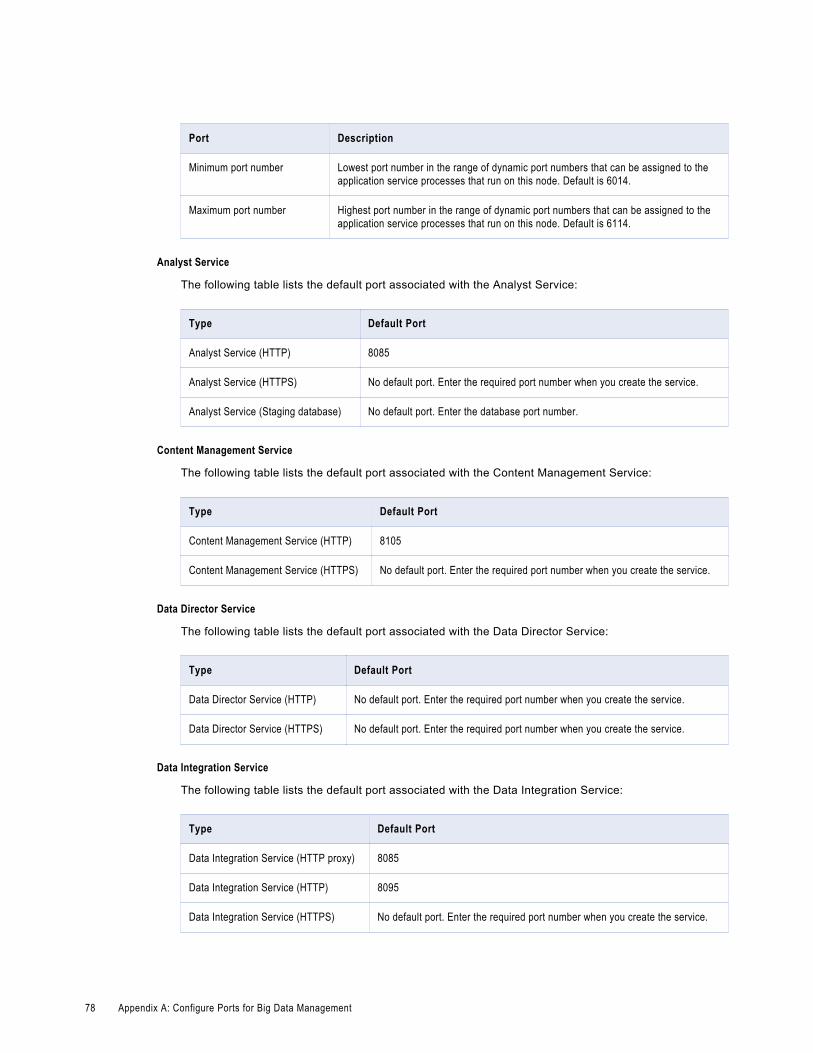
Port Description
Minimum port number Lowest port number in the range of dynamic port numbers that can be assigned to the application service processes that run on this node. Default is 6014.
Maximum port number Highest port number in the range of dynamic port numbers that can be assigned to the application service processes that run on this node. Default is 6114.
Analyst Service
The following table lists the default port associated with the Analyst Service:
Type Default Port
Analyst Service (HTTP) 8085
Analyst Service (HTTPS) No default port. Enter the required port number when you create the service.
Analyst Service (Staging database) No default port. Enter the database port number.
Content Management Service
The following table lists the default port associated with the Content Management Service:
Type Default Port
Content Management Service (HTTP) 8105
Content Management Service (HTTPS) No default port. Enter the required port number when you create the service.
Data Director Service
The following table lists the default port associated with the Data Director Service:
Type Default Port
Data Director Service (HTTP) No default port. Enter the required port number when you create the service.
Data Director Service (HTTPS) No default port. Enter the required port number when you create the service.
Data Integration Service
The following table lists the default port associated with the Data Integration Service:
Type Default Port
Data Integration Service (HTTP proxy) 8085
Data Integration Service (HTTP) 8095
Data Integration Service (HTTPS) No default port. Enter the required port number when you create the service.
78 Appendix A: Configure Ports for Big Data Management
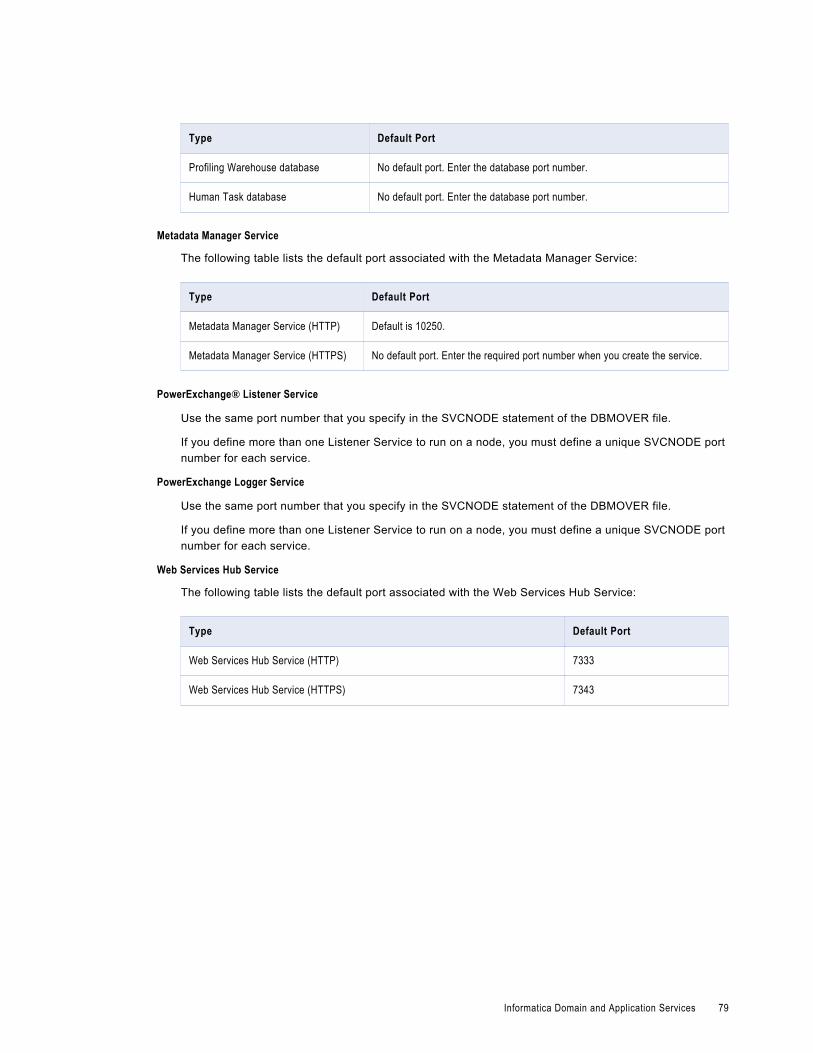
Type Default Port
Profiling Warehouse database No default port. Enter the database port number.
Human Task database No default port. Enter the database port number.
Metadata Manager Service
The following table lists the default port associated with the Metadata Manager Service:
Type Default Port
Metadata Manager Service (HTTP) Default is 10250.
Metadata Manager Service (HTTPS) No default port. Enter the required port number when you create the service.
PowerExchange® Listener Service
Use the same port number that you specify in the SVCNODE statement of the DBMOVER file.
If you define more than one Listener Service to run on a node, you must define a unique SVCNODE port number for each service.
PowerExchange Logger Service
Use the same port number that you specify in the SVCNODE statement of the DBMOVER file.
If you define more than one Listener Service to run on a node, you must define a unique SVCNODE port number for each service.
Web Services Hub Service
The following table lists the default port associated with the Web Services Hub Service:
Type Default Port
Web Services Hub Service (HTTP) 7333
Web Services Hub Service (HTTPS) 7343
Informatica Domain and Application Services 79
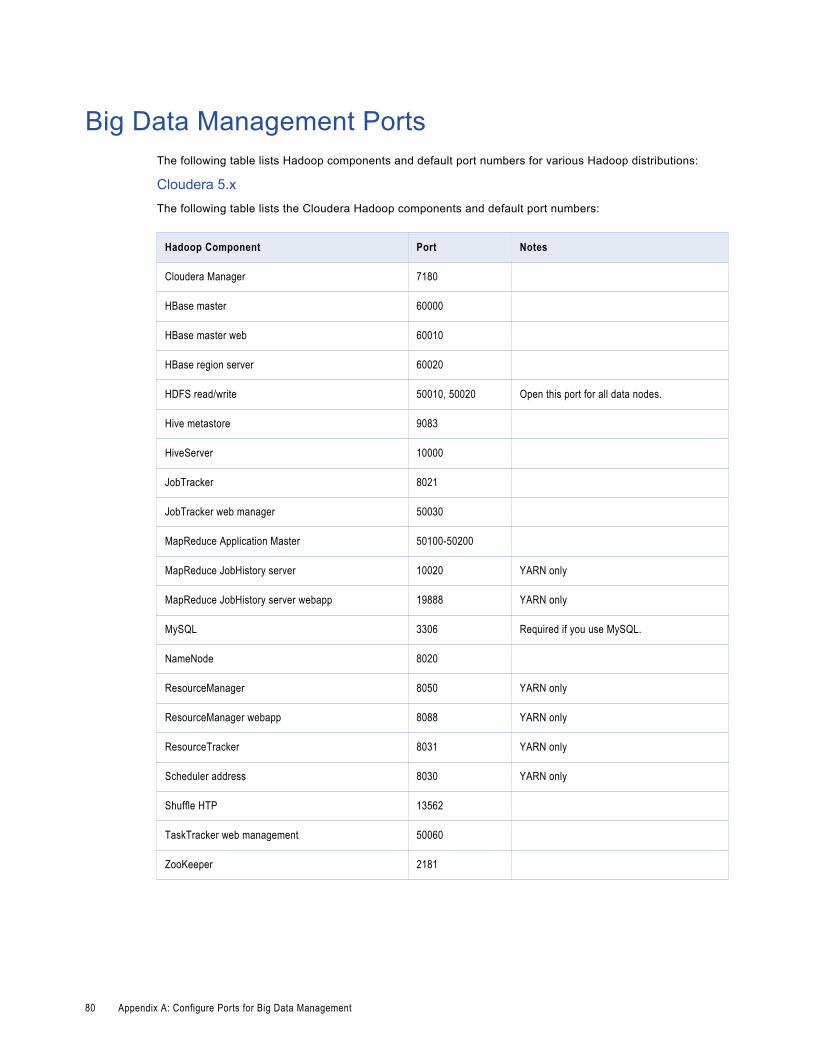
Big Data Management PortsThe following table lists Hadoop components and default port numbers for various Hadoop distributions:
Cloudera 5.xThe following table lists the Cloudera Hadoop components and default port numbers:
Hadoop Component Port Notes
Cloudera Manager 7180
HBase master 60000
HBase master web 60010
HBase region server 60020
HDFS read/write 50010, 50020 Open this port for all data nodes.
Hive metastore 9083
HiveServer 10000
JobTracker 8021
JobTracker web manager 50030
MapReduce Application Master 50100-50200
MapReduce JobHistory server 10020 YARN only
MapReduce JobHistory server webapp 19888 YARN only
MySQL 3306 Required if you use MySQL.
NameNode 8020
ResourceManager 8050 YARN only
ResourceManager webapp 8088 YARN only
ResourceTracker 8031 YARN only
Scheduler address 8030 YARN only
Shuffle HTP 13562
TaskTracker web management 50060
ZooKeeper 2181
80 Appendix A: Configure Ports for Big Data Management
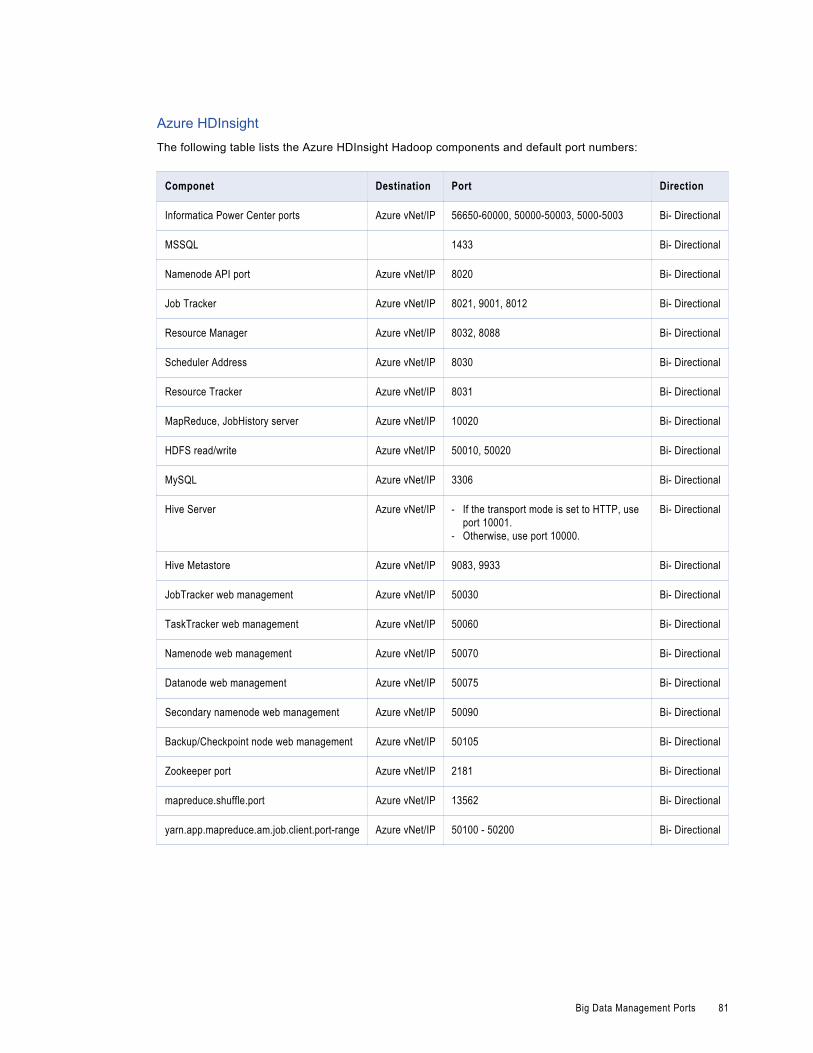
Azure HDInsightThe following table lists the Azure HDInsight Hadoop components and default port numbers:
Componet Destination Port Direction
Informatica Power Center ports Azure vNet/IP 56650-60000, 50000-50003, 5000-5003 Bi- Directional
MSSQL 1433 Bi- Directional
Namenode API port Azure vNet/IP 8020 Bi- Directional
Job Tracker Azure vNet/IP 8021, 9001, 8012 Bi- Directional
Resource Manager Azure vNet/IP 8032, 8088 Bi- Directional
Scheduler Address Azure vNet/IP 8030 Bi- Directional
Resource Tracker Azure vNet/IP 8031 Bi- Directional
MapReduce, JobHistory server Azure vNet/IP 10020 Bi- Directional
HDFS read/write Azure vNet/IP 50010, 50020 Bi- Directional
MySQL Azure vNet/IP 3306 Bi- Directional
Hive Server Azure vNet/IP - If the transport mode is set to HTTP, use port 10001.
- Otherwise, use port 10000.
Bi- Directional
Hive Metastore Azure vNet/IP 9083, 9933 Bi- Directional
JobTracker web management Azure vNet/IP 50030 Bi- Directional
TaskTracker web management Azure vNet/IP 50060 Bi- Directional
Namenode web management Azure vNet/IP 50070 Bi- Directional
Datanode web management Azure vNet/IP 50075 Bi- Directional
Secondary namenode web management Azure vNet/IP 50090 Bi- Directional
Backup/Checkpoint node web management Azure vNet/IP 50105 Bi- Directional
Zookeeper port Azure vNet/IP 2181 Bi- Directional
mapreduce.shuffle.port Azure vNet/IP 13562 Bi- Directional
yarn.app.mapreduce.am.job.client.port-range Azure vNet/IP 50100 - 50200 Bi- Directional
Big Data Management Ports 81
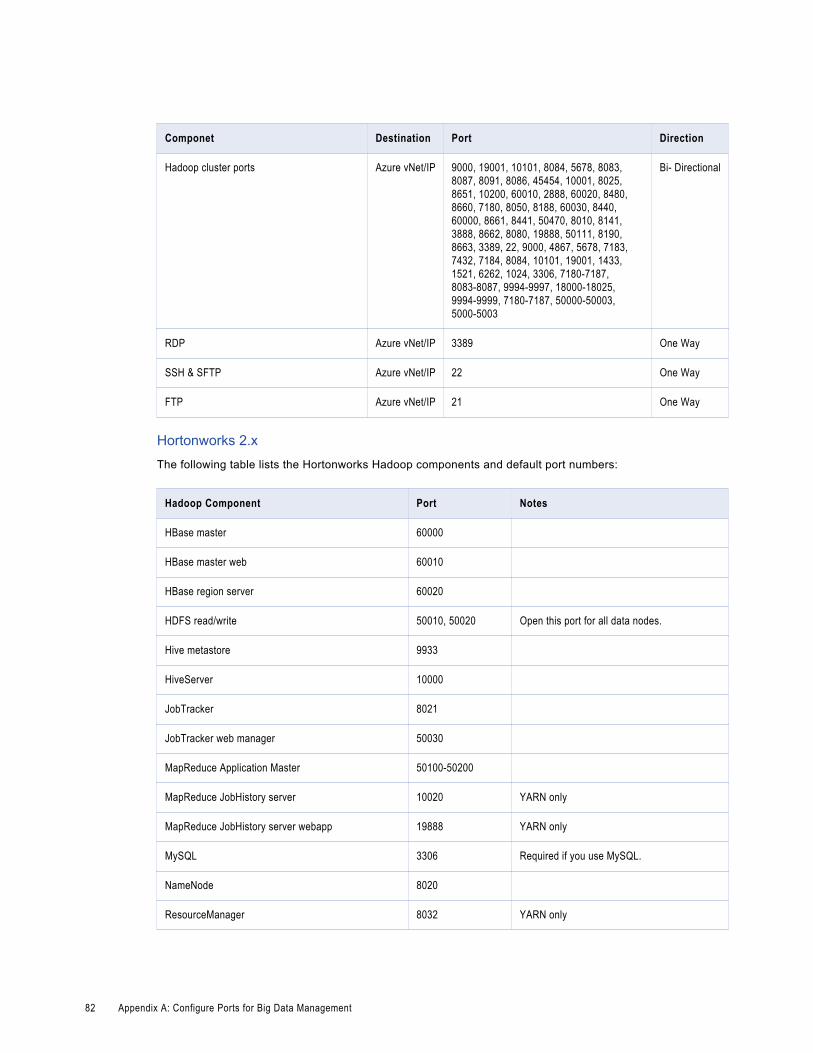
Componet Destination Port Direction
Hadoop cluster ports Azure vNet/IP 9000, 19001, 10101, 8084, 5678, 8083, 8087, 8091, 8086, 45454, 10001, 8025, 8651, 10200, 60010, 2888, 60020, 8480, 8660, 7180, 8050, 8188, 60030, 8440, 60000, 8661, 8441, 50470, 8010, 8141, 3888, 8662, 8080, 19888, 50111, 8190, 8663, 3389, 22, 9000, 4867, 5678, 7183, 7432, 7184, 8084, 10101, 19001, 1433, 1521, 6262, 1024, 3306, 7180-7187, 8083-8087, 9994-9997, 18000-18025, 9994-9999, 7180-7187, 50000-50003, 5000-5003
Bi- Directional
RDP Azure vNet/IP 3389 One Way
SSH & SFTP Azure vNet/IP 22 One Way
FTP Azure vNet/IP 21 One Way
Hortonworks 2.xThe following table lists the Hortonworks Hadoop components and default port numbers:
Hadoop Component Port Notes
HBase master 60000
HBase master web 60010
HBase region server 60020
HDFS read/write 50010, 50020 Open this port for all data nodes.
Hive metastore 9933
HiveServer 10000
JobTracker 8021
JobTracker web manager 50030
MapReduce Application Master 50100-50200
MapReduce JobHistory server 10020 YARN only
MapReduce JobHistory server webapp 19888 YARN only
MySQL 3306 Required if you use MySQL.
NameNode 8020
ResourceManager 8032 YARN only
82 Appendix A: Configure Ports for Big Data Management

Hadoop Component Port Notes
ResourceManager webapp 8088 YARN only
ResourceTracker 8031 YARN only
Scheduler address 8030 YARN only
Shuffle HTP 13562
TaskTracker web management 50060
ZooKeeper 2181
IBM BigInsights 3.xThe following table lists the Big Insights Hadoop components and default port numbers:
Hadoop Component Port Notes
HBase master 60000
HBase master web 60010
HBase region server 60020
HDFS read/write 50010, 50020 Open this port for all data nodes.
Hive metastore 9933
HiveServer 10000
JobTracker 9001
JobTracker web manager 50030
MapReduce Application Master 50100-50200
MapReduce JobHistory server 10020 YARN only
MapReduce JobHistory server webapp 19888 YARN only
MySQL 3306 Required if you use MySQL.
NameNode 9000
ResourceManager 8032 YARN only
ResourceManager webapp 8088 YARN only
ResourceTracker 8031 YARN only
Scheduler address 8030 YARN only
Big Data Management Ports 83
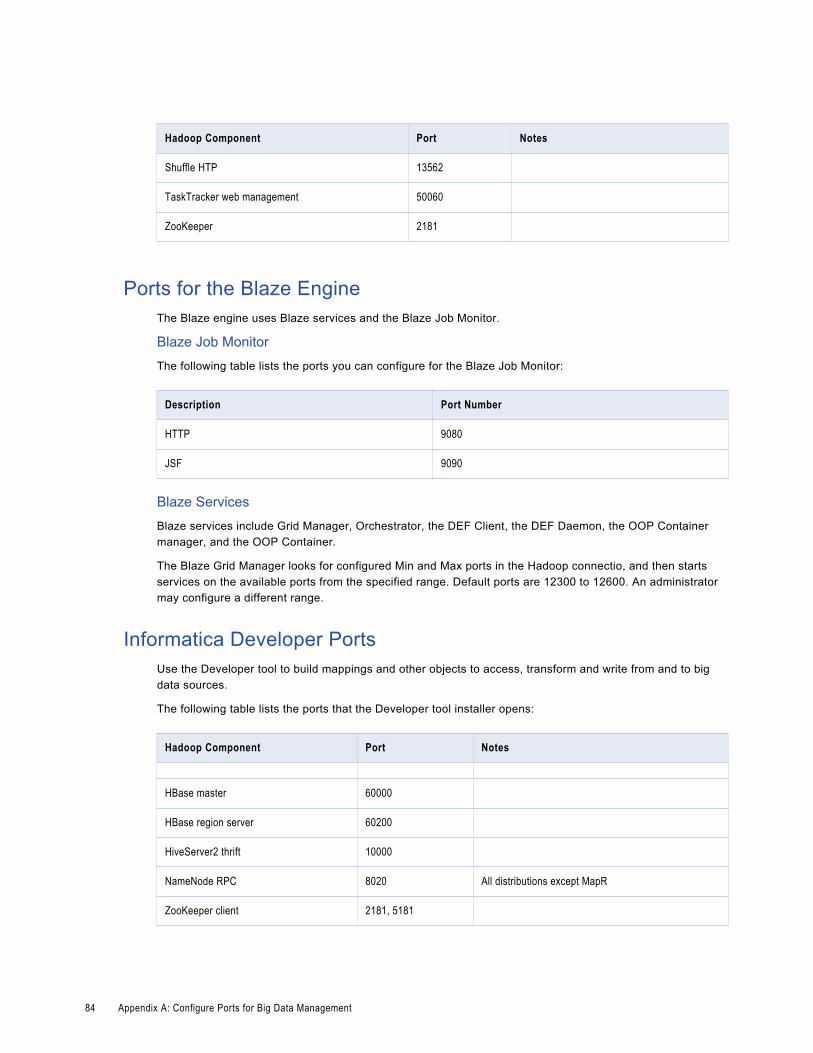
Hadoop Component Port Notes
Shuffle HTP 13562
TaskTracker web management 50060
ZooKeeper 2181
Ports for the Blaze EngineThe Blaze engine uses Blaze services and the Blaze Job Monitor.
Blaze Job MonitorThe following table lists the ports you can configure for the Blaze Job Monitor:
Description Port Number
HTTP 9080
JSF 9090
Blaze ServicesBlaze services include Grid Manager, Orchestrator, the DEF Client, the DEF Daemon, the OOP Container manager, and the OOP Container.
The Blaze Grid Manager looks for configured Min and Max ports in the Hadoop connectio, and then starts services on the available ports from the specified range. Default ports are 12300 to 12600. An administrator may configure a different range.
Informatica Developer PortsUse the Developer tool to build mappings and other objects to access, transform and write from and to big data sources.
The following table lists the ports that the Developer tool installer opens:
Hadoop Component Port Notes
HBase master 60000
HBase region server 60200
HiveServer2 thrift 10000
NameNode RPC 8020 All distributions except MapR
ZooKeeper client 2181, 5181
84 Appendix A: Configure Ports for Big Data Management
A P P E N D I X B
ConnectionsDefine a Hadoop connection to run a mapping in the Hadoop environment. Depending on the sources and targets, define connections to access data in HBase, HDFS, Hive, or relational databases. You can create the connections using the Developer tool, Administrator tool, and infacmd.
You can create the following types of connections:Hadoop connection
Create a Hadoop connection to run mappings in the Hadoop environment. If you select the mapping validation environment or the execution environment as Hadoop, select the Hadoop connection. Before you run mappings in the Hadoop environment, review the information in this guide about rules and guidelines for mappings that you can run in the Hadoop environment.
HBase connection
Create an HBase connection to access HBase. The HBase connection is a NoSQL connection.
HDFS connection
Create an HDFS connection to read data from or write data to the HDFS file system on a Hadoop cluster.
Hive connection
Create a Hive connection to access Hive as a source or target. You can access Hive as a source if the mapping is enabled for the native or Hadoop environment. You can access Hive as a target if the mapping runs on the Blaze or Hive engine.
JDBC connection
Create a JDBC connection and configure Sqoop properties in the connection to import and export relational data through Sqoop.
Note: For information about creating connections to other sources or targets such as social media web sites or Teradata, see the respective PowerExchange adapter user guide for information.
Hadoop Connection PropertiesUse the Hadoop connection to configure mappings to run on a Hadoop cluster. A Hadoop connection is a cluster type connection. You can create and manage a Hadoop connection in the Administrator tool or the Developer tool. You can use infacmd to create a Hadoop connection. Hadoop connection properties are case sensitive unless otherwise noted.
85
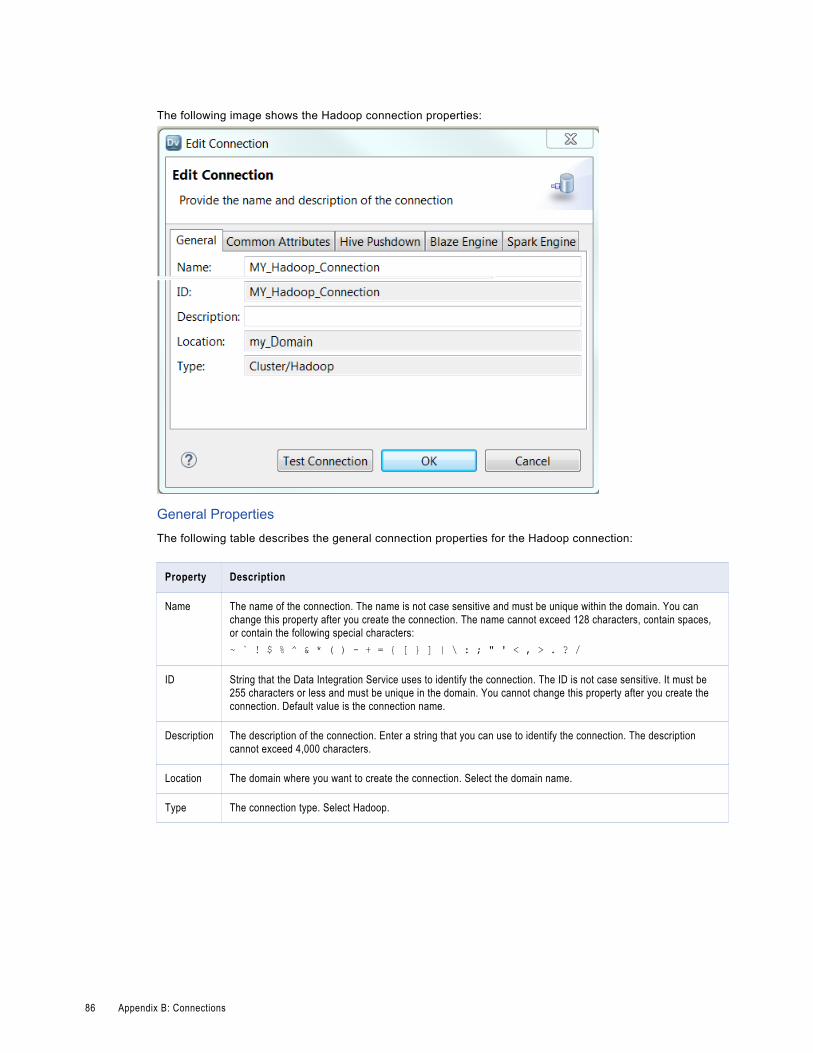
The following image shows the Hadoop connection properties:
General PropertiesThe following table describes the general connection properties for the Hadoop connection:
Property Description
Name The name of the connection. The name is not case sensitive and must be unique within the domain. You can change this property after you create the connection. The name cannot exceed 128 characters, contain spaces, or contain the following special characters:~ ` ! $ % ^ & * ( ) - + = { [ } ] | \ : ; " ' < , > . ? /
ID String that the Data Integration Service uses to identify the connection. The ID is not case sensitive. It must be 255 characters or less and must be unique in the domain. You cannot change this property after you create the connection. Default value is the connection name.
Description The description of the connection. Enter a string that you can use to identify the connection. The description cannot exceed 4,000 characters.
Location The domain where you want to create the connection. Select the domain name.
Type The connection type. Select Hadoop.
86 Appendix B: Connections
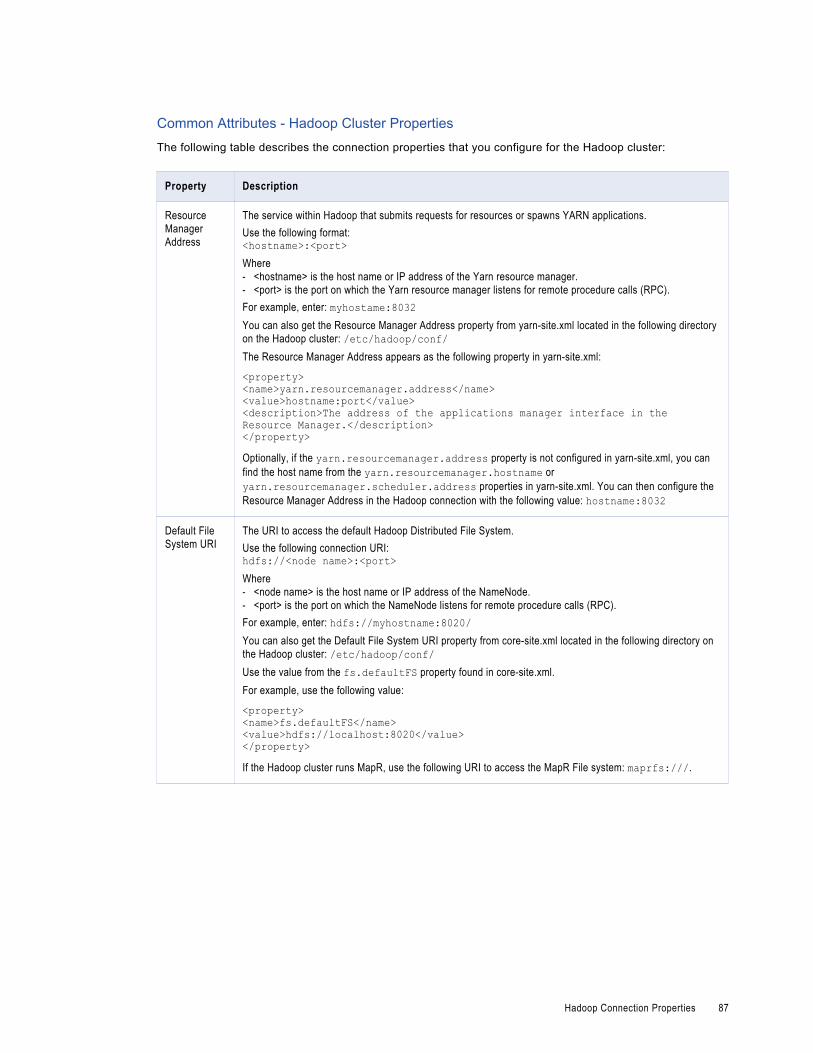
Common Attributes - Hadoop Cluster PropertiesThe following table describes the connection properties that you configure for the Hadoop cluster:
Property Description
Resource Manager Address
The service within Hadoop that submits requests for resources or spawns YARN applications.Use the following format:<hostname>:<port>Where- <hostname> is the host name or IP address of the Yarn resource manager.- <port> is the port on which the Yarn resource manager listens for remote procedure calls (RPC).For example, enter: myhostame:8032 You can also get the Resource Manager Address property from yarn-site.xml located in the following directory on the Hadoop cluster: /etc/hadoop/conf/The Resource Manager Address appears as the following property in yarn-site.xml:
<property> <name>yarn.resourcemanager.address</name> <value>hostname:port</value> <description>The address of the applications manager interface in the Resource Manager.</description></property>Optionally, if the yarn.resourcemanager.address property is not configured in yarn-site.xml, you can find the host name from the yarn.resourcemanager.hostname or yarn.resourcemanager.scheduler.address properties in yarn-site.xml. You can then configure the Resource Manager Address in the Hadoop connection with the following value: hostname:8032
Default File System URI
The URI to access the default Hadoop Distributed File System.Use the following connection URI:hdfs://<node name>:<port>Where- <node name> is the host name or IP address of the NameNode.- <port> is the port on which the NameNode listens for remote procedure calls (RPC).For example, enter: hdfs://myhostname:8020/You can also get the Default File System URI property from core-site.xml located in the following directory on the Hadoop cluster: /etc/hadoop/conf/Use the value from the fs.defaultFS property found in core-site.xml.For example, use the following value:
<property><name>fs.defaultFS</name><value>hdfs://localhost:8020</value></property> If the Hadoop cluster runs MapR, use the following URI to access the MapR File system: maprfs:///.
Hadoop Connection Properties 87
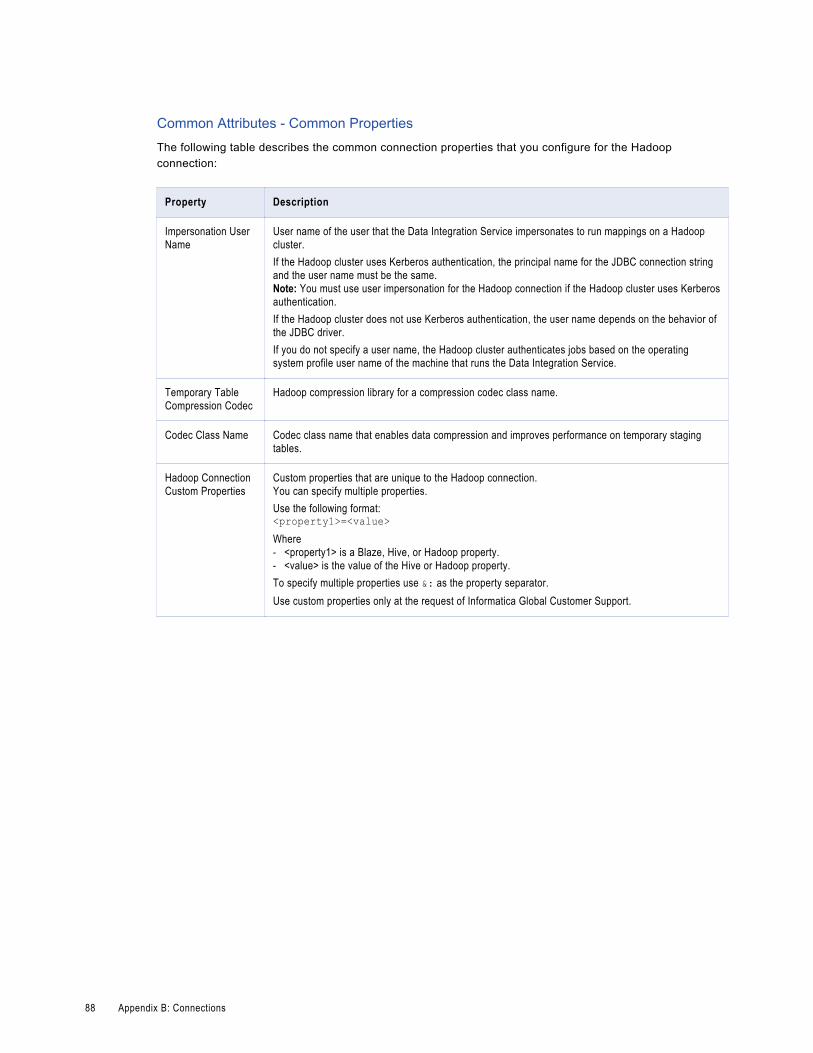
Common Attributes - Common PropertiesThe following table describes the common connection properties that you configure for the Hadoop connection:
Property Description
Impersonation User Name
User name of the user that the Data Integration Service impersonates to run mappings on a Hadoop cluster.If the Hadoop cluster uses Kerberos authentication, the principal name for the JDBC connection string and the user name must be the same.Note: You must use user impersonation for the Hadoop connection if the Hadoop cluster uses Kerberos authentication.If the Hadoop cluster does not use Kerberos authentication, the user name depends on the behavior of the JDBC driver.If you do not specify a user name, the Hadoop cluster authenticates jobs based on the operating system profile user name of the machine that runs the Data Integration Service.
Temporary Table Compression Codec
Hadoop compression library for a compression codec class name.
Codec Class Name Codec class name that enables data compression and improves performance on temporary staging tables.
Hadoop Connection Custom Properties
Custom properties that are unique to the Hadoop connection.You can specify multiple properties.Use the following format:<property1>=<value>Where- <property1> is a Blaze, Hive, or Hadoop property.- <value> is the value of the Hive or Hadoop property.To specify multiple properties use &: as the property separator.Use custom properties only at the request of Informatica Global Customer Support.
88 Appendix B: Connections
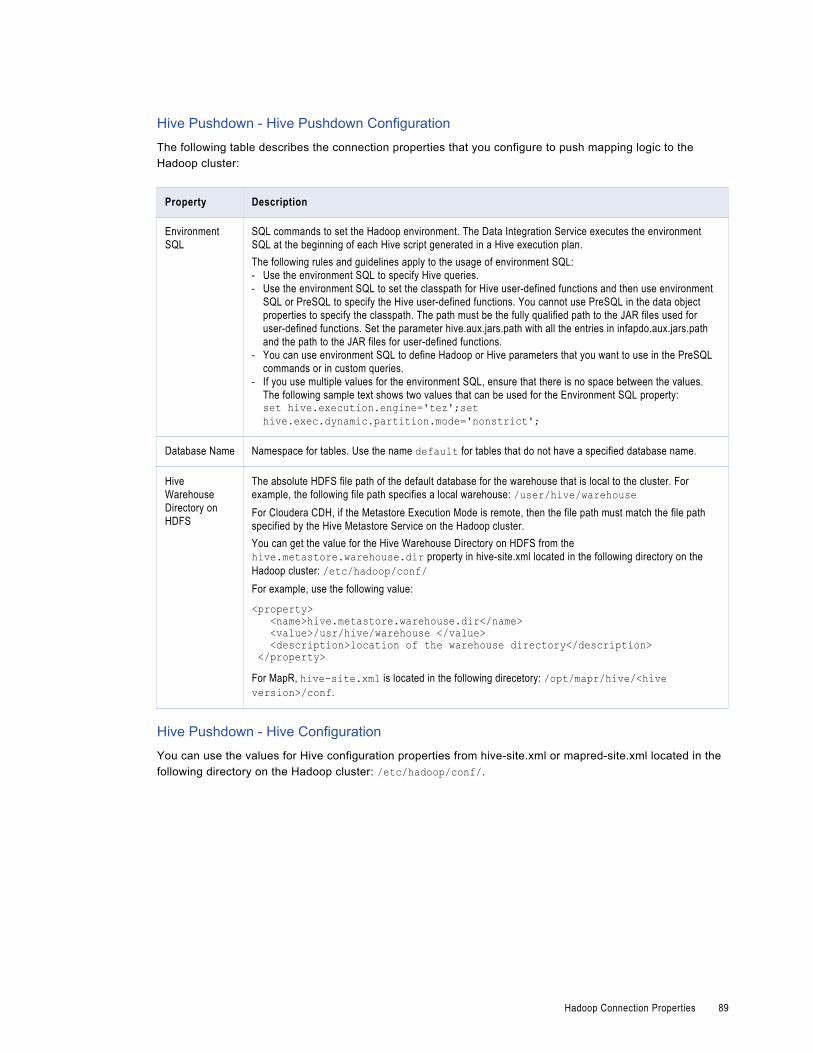
Hive Pushdown - Hive Pushdown ConfigurationThe following table describes the connection properties that you configure to push mapping logic to the Hadoop cluster:
Property Description
Environment SQL
SQL commands to set the Hadoop environment. The Data Integration Service executes the environment SQL at the beginning of each Hive script generated in a Hive execution plan.The following rules and guidelines apply to the usage of environment SQL:- Use the environment SQL to specify Hive queries.- Use the environment SQL to set the classpath for Hive user-defined functions and then use environment
SQL or PreSQL to specify the Hive user-defined functions. You cannot use PreSQL in the data object properties to specify the classpath. The path must be the fully qualified path to the JAR files used for user-defined functions. Set the parameter hive.aux.jars.path with all the entries in infapdo.aux.jars.path and the path to the JAR files for user-defined functions.
- You can use environment SQL to define Hadoop or Hive parameters that you want to use in the PreSQL commands or in custom queries.
- If you use multiple values for the environment SQL, ensure that there is no space between the values. The following sample text shows two values that can be used for the Environment SQL property:set hive.execution.engine='tez';set hive.exec.dynamic.partition.mode='nonstrict';
Database Name Namespace for tables. Use the name default for tables that do not have a specified database name.
Hive Warehouse Directory on HDFS
The absolute HDFS file path of the default database for the warehouse that is local to the cluster. For example, the following file path specifies a local warehouse: /user/hive/warehouseFor Cloudera CDH, if the Metastore Execution Mode is remote, then the file path must match the file path specified by the Hive Metastore Service on the Hadoop cluster.You can get the value for the Hive Warehouse Directory on HDFS from the hive.metastore.warehouse.dir property in hive-site.xml located in the following directory on the Hadoop cluster: /etc/hadoop/conf/For example, use the following value:
<property> <name>hive.metastore.warehouse.dir</name> <value>/usr/hive/warehouse </value> <description>location of the warehouse directory</description> </property>For MapR, hive-site.xml is located in the following direcetory: /opt/mapr/hive/<hive version>/conf.
Hive Pushdown - Hive ConfigurationYou can use the values for Hive configuration properties from hive-site.xml or mapred-site.xml located in the following directory on the Hadoop cluster: /etc/hadoop/conf/.
Hadoop Connection Properties 89
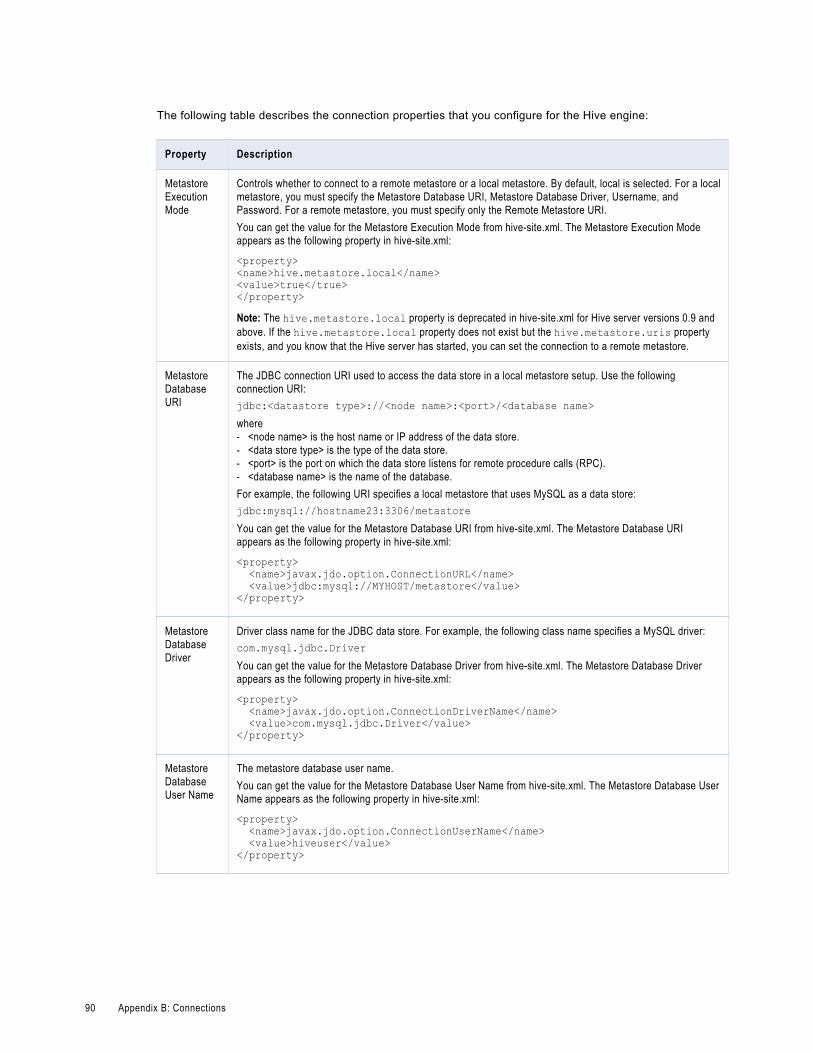
The following table describes the connection properties that you configure for the Hive engine:
Property Description
Metastore Execution Mode
Controls whether to connect to a remote metastore or a local metastore. By default, local is selected. For a local metastore, you must specify the Metastore Database URI, Metastore Database Driver, Username, and Password. For a remote metastore, you must specify only the Remote Metastore URI.You can get the value for the Metastore Execution Mode from hive-site.xml. The Metastore Execution Mode appears as the following property in hive-site.xml:
<property><name>hive.metastore.local</name><value>true</true></property>Note: The hive.metastore.local property is deprecated in hive-site.xml for Hive server versions 0.9 and above. If the hive.metastore.local property does not exist but the hive.metastore.uris property exists, and you know that the Hive server has started, you can set the connection to a remote metastore.
Metastore Database URI
The JDBC connection URI used to access the data store in a local metastore setup. Use the following connection URI:jdbc:<datastore type>://<node name>:<port>/<database name>where- <node name> is the host name or IP address of the data store.- <data store type> is the type of the data store.- <port> is the port on which the data store listens for remote procedure calls (RPC).- <database name> is the name of the database.For example, the following URI specifies a local metastore that uses MySQL as a data store:jdbc:mysql://hostname23:3306/metastoreYou can get the value for the Metastore Database URI from hive-site.xml. The Metastore Database URI appears as the following property in hive-site.xml:
<property> <name>javax.jdo.option.ConnectionURL</name> <value>jdbc:mysql://MYHOST/metastore</value></property>
Metastore Database Driver
Driver class name for the JDBC data store. For example, the following class name specifies a MySQL driver:com.mysql.jdbc.DriverYou can get the value for the Metastore Database Driver from hive-site.xml. The Metastore Database Driver appears as the following property in hive-site.xml:
<property> <name>javax.jdo.option.ConnectionDriverName</name> <value>com.mysql.jdbc.Driver</value></property>
Metastore Database User Name
The metastore database user name.You can get the value for the Metastore Database User Name from hive-site.xml. The Metastore Database User Name appears as the following property in hive-site.xml:
<property> <name>javax.jdo.option.ConnectionUserName</name> <value>hiveuser</value></property>
90 Appendix B: Connections
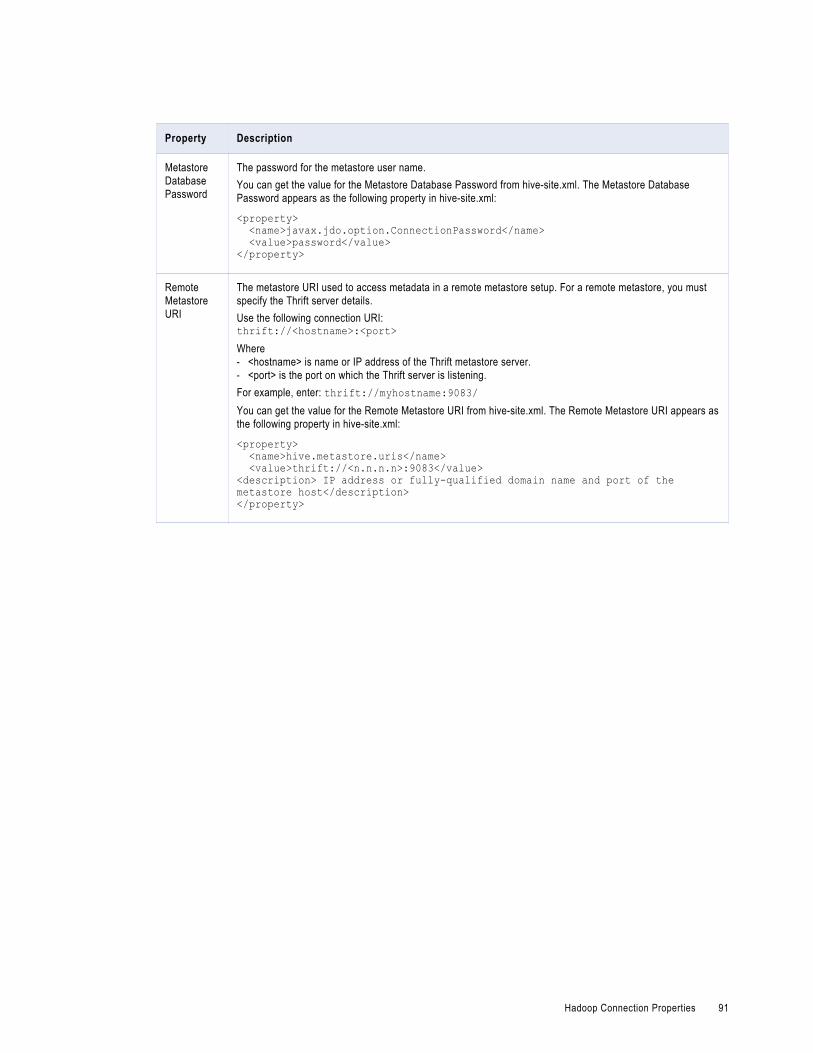
Property Description
Metastore Database Password
The password for the metastore user name.You can get the value for the Metastore Database Password from hive-site.xml. The Metastore Database Password appears as the following property in hive-site.xml:
<property> <name>javax.jdo.option.ConnectionPassword</name> <value>password</value></property>
Remote Metastore URI
The metastore URI used to access metadata in a remote metastore setup. For a remote metastore, you must specify the Thrift server details.Use the following connection URI:thrift://<hostname>:<port>Where- <hostname> is name or IP address of the Thrift metastore server.- <port> is the port on which the Thrift server is listening.For example, enter: thrift://myhostname:9083/You can get the value for the Remote Metastore URI from hive-site.xml. The Remote Metastore URI appears as the following property in hive-site.xml:
<property> <name>hive.metastore.uris</name> <value>thrift://<n.n.n.n>:9083</value><description> IP address or fully-qualified domain name and port of the metastore host</description></property>
Hadoop Connection Properties 91

Property Description
Engine Type The engine that the Hadoop environment uses to run a mapping on the Hadoop cluster. Select a value from the drop down list.For example select: MRv2To set the engine type in the Hadoop connection, you must get the value for the mapreduce.framework.name property from mapred-site.xml located in the following directory on the Hadoop cluster: /etc/hadoop/conf/If the value for mapreduce.framework.name is classic, select mrv1 as the engine type in the Hadoop connection.If the value for mapreduce.framework.name is yarn, you can select the mrv2 or tez as the engine type in the Hadoop connection. Do not select Tez if Tez is not configured for the Hadoop cluster.You can also set the value for the engine type in hive-site.xml. The engine type appears as the following property in hive-site.xml:
<property> <name>hive.execution.engine</name> <value>tez</value> <description>Chooses execution engine. Options are: mr (MapReduce, default) or tez (Hadoop 2 only)</description></property>
Job Monitoring URL
The URL for the MapReduce JobHistory server. You can use the URL for the JobTracker URI if you use MapReduce version 1.Use the following format:<hostname>:<port>Where- <hostname> is the host name or IP address of the JobHistory server.- <port> is the port on which the JobHistory server listens for remote procedure calls (RPC).For example, enter: myhostname:8021You can get the value for the Job Monitoring URL from mapred-site.xml. The Job Monitoring URL appears as the following property in mapred-site.xml:
<property><name>mapred.job.tracker</name><value>myhostname:8021 </value><description>The host and port that the MapReduce job tracker runs at.</description></property>
Blaze EngineThe following table describes the connection properties that you configure for the Blaze engine:
Property Description
Temporary Working Directory on HDFS
The HDFS file path of the directory that the Blaze engine uses to store temporary files. Verify that the directory exists. The YARN user, Blaze engine user, and mapping impersonation user must have write permission on this directory.For example, enter: /blaze/workdir
Blaze Service User Name
The operating system profile user name for the Blaze engine.
Minimum Port The minimum value for the port number range for the Blaze engine.For example, enter: 12300
92 Appendix B: Connections
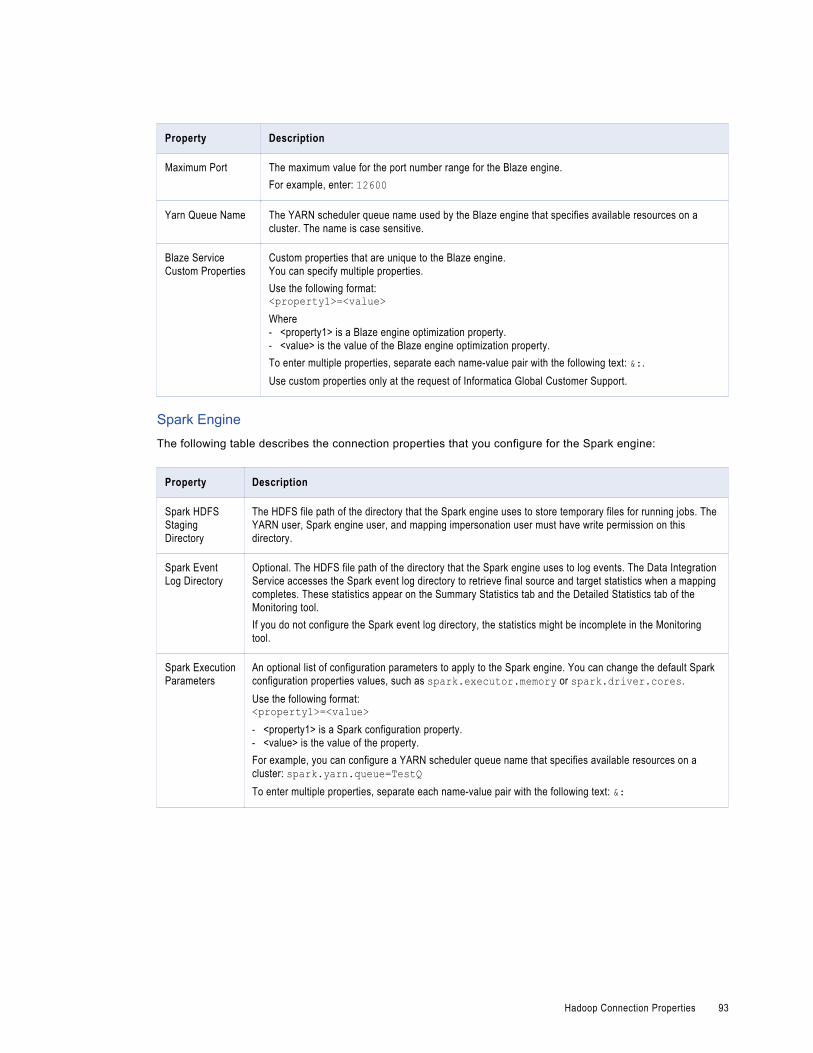
Property Description
Maximum Port The maximum value for the port number range for the Blaze engine.For example, enter: 12600
Yarn Queue Name The YARN scheduler queue name used by the Blaze engine that specifies available resources on a cluster. The name is case sensitive.
Blaze Service Custom Properties
Custom properties that are unique to the Blaze engine.You can specify multiple properties.Use the following format:<property1>=<value>Where- <property1> is a Blaze engine optimization property.- <value> is the value of the Blaze engine optimization property.To enter multiple properties, separate each name-value pair with the following text: &:.Use custom properties only at the request of Informatica Global Customer Support.
Spark EngineThe following table describes the connection properties that you configure for the Spark engine:
Property Description
Spark HDFS Staging Directory
The HDFS file path of the directory that the Spark engine uses to store temporary files for running jobs. The YARN user, Spark engine user, and mapping impersonation user must have write permission on this directory.
Spark Event Log Directory
Optional. The HDFS file path of the directory that the Spark engine uses to log events. The Data Integration Service accesses the Spark event log directory to retrieve final source and target statistics when a mapping completes. These statistics appear on the Summary Statistics tab and the Detailed Statistics tab of the Monitoring tool.If you do not configure the Spark event log directory, the statistics might be incomplete in the Monitoring tool.
Spark Execution Parameters
An optional list of configuration parameters to apply to the Spark engine. You can change the default Spark configuration properties values, such as spark.executor.memory or spark.driver.cores.Use the following format:<property1>=<value>- <property1> is a Spark configuration property.- <value> is the value of the property.For example, you can configure a YARN scheduler queue name that specifies available resources on a cluster: spark.yarn.queue=TestQTo enter multiple properties, separate each name-value pair with the following text: &:
Hadoop Connection Properties 93
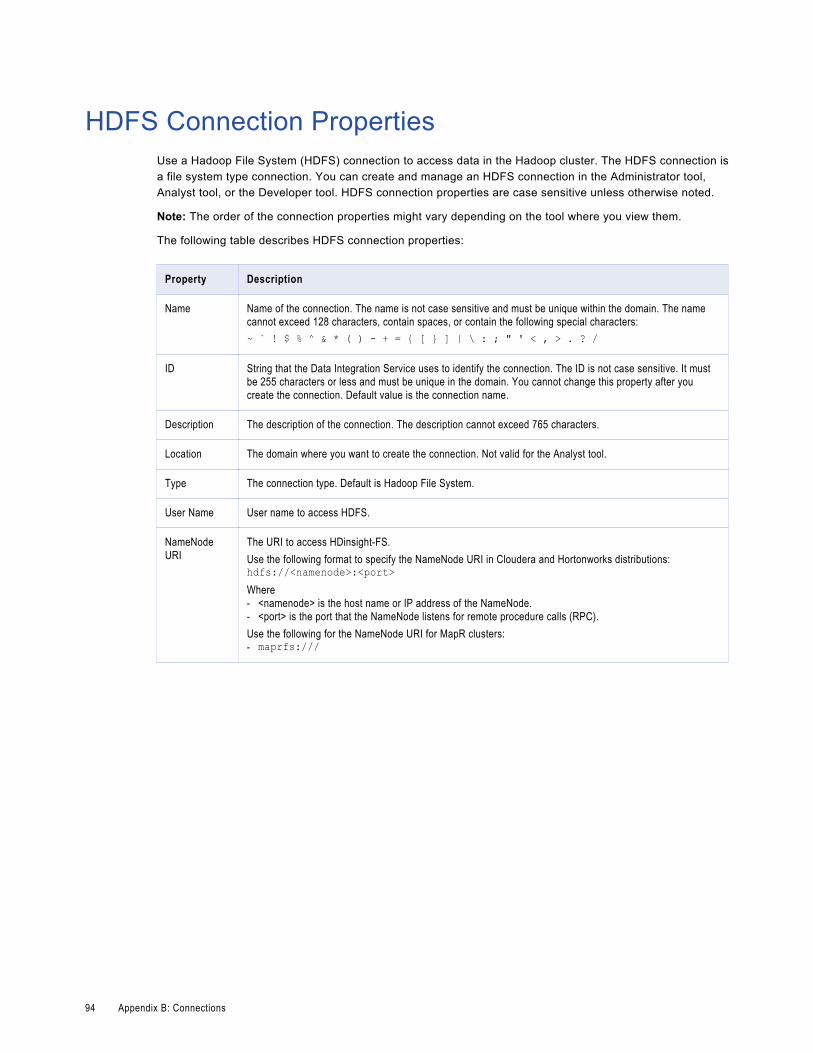
HDFS Connection PropertiesUse a Hadoop File System (HDFS) connection to access data in the Hadoop cluster. The HDFS connection is a file system type connection. You can create and manage an HDFS connection in the Administrator tool, Analyst tool, or the Developer tool. HDFS connection properties are case sensitive unless otherwise noted.
Note: The order of the connection properties might vary depending on the tool where you view them.
The following table describes HDFS connection properties:
Property Description
Name Name of the connection. The name is not case sensitive and must be unique within the domain. The name cannot exceed 128 characters, contain spaces, or contain the following special characters:~ ` ! $ % ^ & * ( ) - + = { [ } ] | \ : ; " ' < , > . ? /
ID String that the Data Integration Service uses to identify the connection. The ID is not case sensitive. It must be 255 characters or less and must be unique in the domain. You cannot change this property after you create the connection. Default value is the connection name.
Description The description of the connection. The description cannot exceed 765 characters.
Location The domain where you want to create the connection. Not valid for the Analyst tool.
Type The connection type. Default is Hadoop File System.
User Name User name to access HDFS.
NameNode URI
The URI to access HDinsight-FS.Use the following format to specify the NameNode URI in Cloudera and Hortonworks distributions:hdfs://<namenode>:<port>Where- <namenode> is the host name or IP address of the NameNode.- <port> is the port that the NameNode listens for remote procedure calls (RPC).Use the following for the NameNode URI for MapR clusters:- maprfs:///
94 Appendix B: Connections
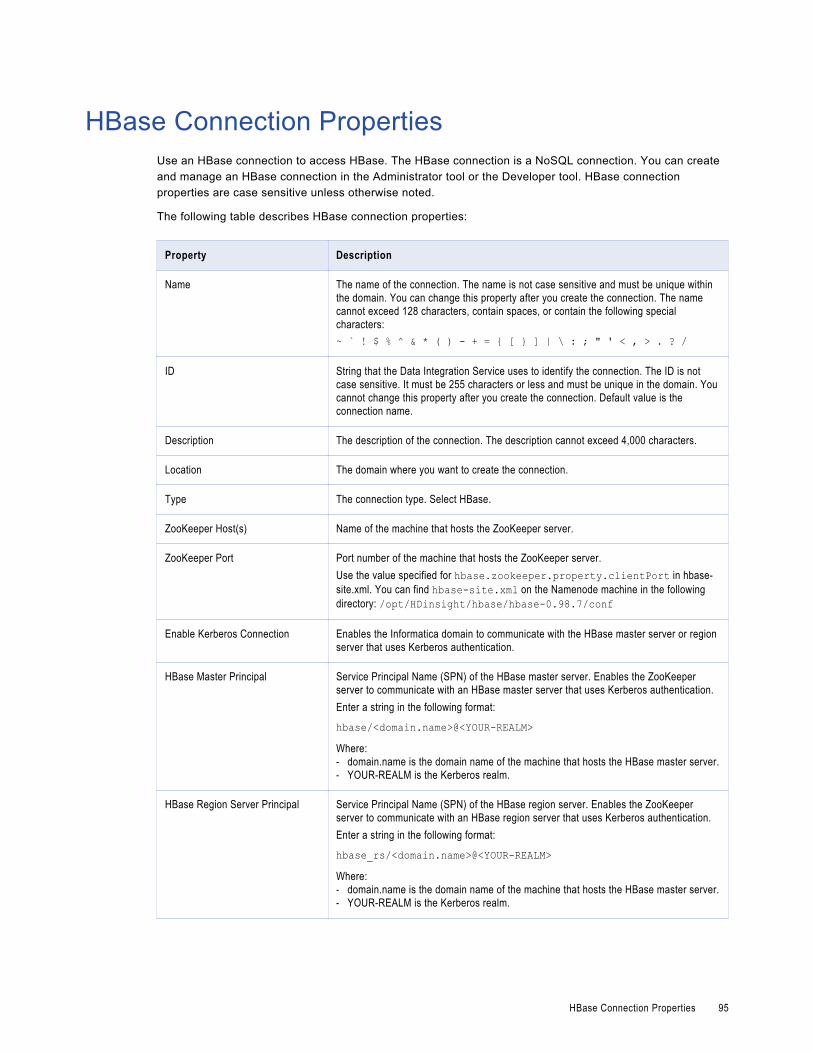
HBase Connection PropertiesUse an HBase connection to access HBase. The HBase connection is a NoSQL connection. You can create and manage an HBase connection in the Administrator tool or the Developer tool. HBase connection properties are case sensitive unless otherwise noted.
The following table describes HBase connection properties:
Property Description
Name The name of the connection. The name is not case sensitive and must be unique within the domain. You can change this property after you create the connection. The name cannot exceed 128 characters, contain spaces, or contain the following special characters:~ ` ! $ % ^ & * ( ) - + = { [ } ] | \ : ; " ' < , > . ? /
ID String that the Data Integration Service uses to identify the connection. The ID is not case sensitive. It must be 255 characters or less and must be unique in the domain. You cannot change this property after you create the connection. Default value is the connection name.
Description The description of the connection. The description cannot exceed 4,000 characters.
Location The domain where you want to create the connection.
Type The connection type. Select HBase.
ZooKeeper Host(s) Name of the machine that hosts the ZooKeeper server.
ZooKeeper Port Port number of the machine that hosts the ZooKeeper server.Use the value specified for hbase.zookeeper.property.clientPort in hbase-site.xml. You can find hbase-site.xml on the Namenode machine in the following directory: /opt/HDinsight/hbase/hbase-0.98.7/conf
Enable Kerberos Connection Enables the Informatica domain to communicate with the HBase master server or region server that uses Kerberos authentication.
HBase Master Principal Service Principal Name (SPN) of the HBase master server. Enables the ZooKeeper server to communicate with an HBase master server that uses Kerberos authentication.Enter a string in the following format:
hbase/<domain.name>@<YOUR-REALM>Where:- domain.name is the domain name of the machine that hosts the HBase master server.- YOUR-REALM is the Kerberos realm.
HBase Region Server Principal Service Principal Name (SPN) of the HBase region server. Enables the ZooKeeper server to communicate with an HBase region server that uses Kerberos authentication.Enter a string in the following format:
hbase_rs/<domain.name>@<YOUR-REALM>Where:- domain.name is the domain name of the machine that hosts the HBase master server.- YOUR-REALM is the Kerberos realm.
HBase Connection Properties 95
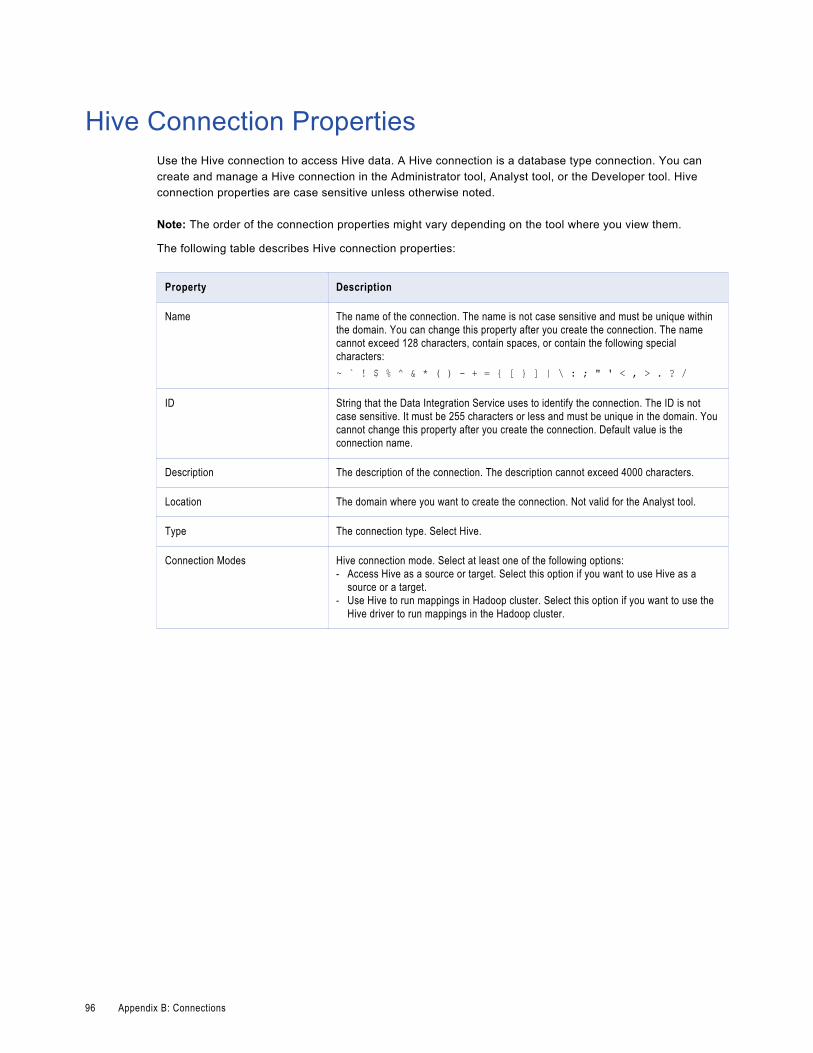
Hive Connection PropertiesUse the Hive connection to access Hive data. A Hive connection is a database type connection. You can create and manage a Hive connection in the Administrator tool, Analyst tool, or the Developer tool. Hive connection properties are case sensitive unless otherwise noted.
Note: The order of the connection properties might vary depending on the tool where you view them.
The following table describes Hive connection properties:
Property Description
Name The name of the connection. The name is not case sensitive and must be unique within the domain. You can change this property after you create the connection. The name cannot exceed 128 characters, contain spaces, or contain the following special characters:~ ` ! $ % ^ & * ( ) - + = { [ } ] | \ : ; " ' < , > . ? /
ID String that the Data Integration Service uses to identify the connection. The ID is not case sensitive. It must be 255 characters or less and must be unique in the domain. You cannot change this property after you create the connection. Default value is the connection name.
Description The description of the connection. The description cannot exceed 4000 characters.
Location The domain where you want to create the connection. Not valid for the Analyst tool.
Type The connection type. Select Hive.
Connection Modes Hive connection mode. Select at least one of the following options:- Access Hive as a source or target. Select this option if you want to use Hive as a
source or a target.- Use Hive to run mappings in Hadoop cluster. Select this option if you want to use the
Hive driver to run mappings in the Hadoop cluster.
96 Appendix B: Connections
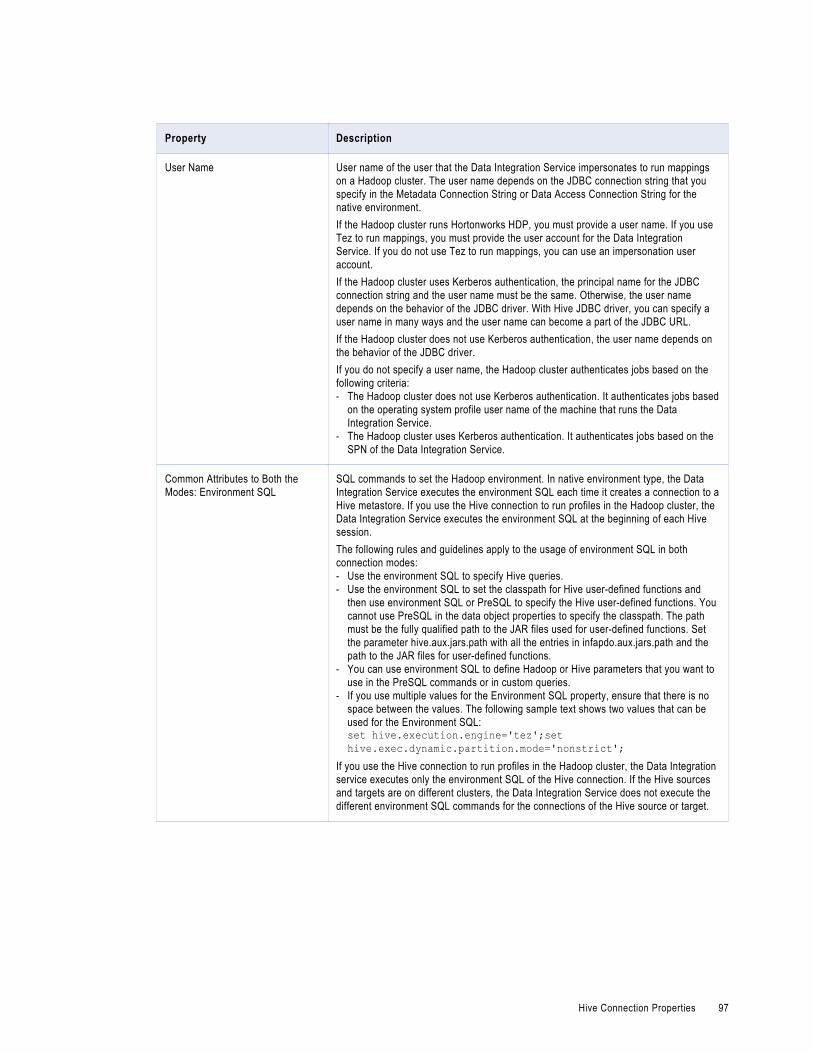
Property Description
User Name User name of the user that the Data Integration Service impersonates to run mappings on a Hadoop cluster. The user name depends on the JDBC connection string that you specify in the Metadata Connection String or Data Access Connection String for the native environment.If the Hadoop cluster runs Hortonworks HDP, you must provide a user name. If you use Tez to run mappings, you must provide the user account for the Data Integration Service. If you do not use Tez to run mappings, you can use an impersonation user account.If the Hadoop cluster uses Kerberos authentication, the principal name for the JDBC connection string and the user name must be the same. Otherwise, the user name depends on the behavior of the JDBC driver. With Hive JDBC driver, you can specify a user name in many ways and the user name can become a part of the JDBC URL.If the Hadoop cluster does not use Kerberos authentication, the user name depends on the behavior of the JDBC driver.If you do not specify a user name, the Hadoop cluster authenticates jobs based on the following criteria:- The Hadoop cluster does not use Kerberos authentication. It authenticates jobs based
on the operating system profile user name of the machine that runs the Data Integration Service.
- The Hadoop cluster uses Kerberos authentication. It authenticates jobs based on the SPN of the Data Integration Service.
Common Attributes to Both the Modes: Environment SQL
SQL commands to set the Hadoop environment. In native environment type, the Data Integration Service executes the environment SQL each time it creates a connection to a Hive metastore. If you use the Hive connection to run profiles in the Hadoop cluster, the Data Integration Service executes the environment SQL at the beginning of each Hive session.The following rules and guidelines apply to the usage of environment SQL in both connection modes:- Use the environment SQL to specify Hive queries.- Use the environment SQL to set the classpath for Hive user-defined functions and
then use environment SQL or PreSQL to specify the Hive user-defined functions. You cannot use PreSQL in the data object properties to specify the classpath. The path must be the fully qualified path to the JAR files used for user-defined functions. Set the parameter hive.aux.jars.path with all the entries in infapdo.aux.jars.path and the path to the JAR files for user-defined functions.
- You can use environment SQL to define Hadoop or Hive parameters that you want to use in the PreSQL commands or in custom queries.
- If you use multiple values for the Environment SQL property, ensure that there is no space between the values. The following sample text shows two values that can be used for the Environment SQL:set hive.execution.engine='tez';set hive.exec.dynamic.partition.mode='nonstrict';
If you use the Hive connection to run profiles in the Hadoop cluster, the Data Integration service executes only the environment SQL of the Hive connection. If the Hive sources and targets are on different clusters, the Data Integration Service does not execute the different environment SQL commands for the connections of the Hive source or target.
Hive Connection Properties 97
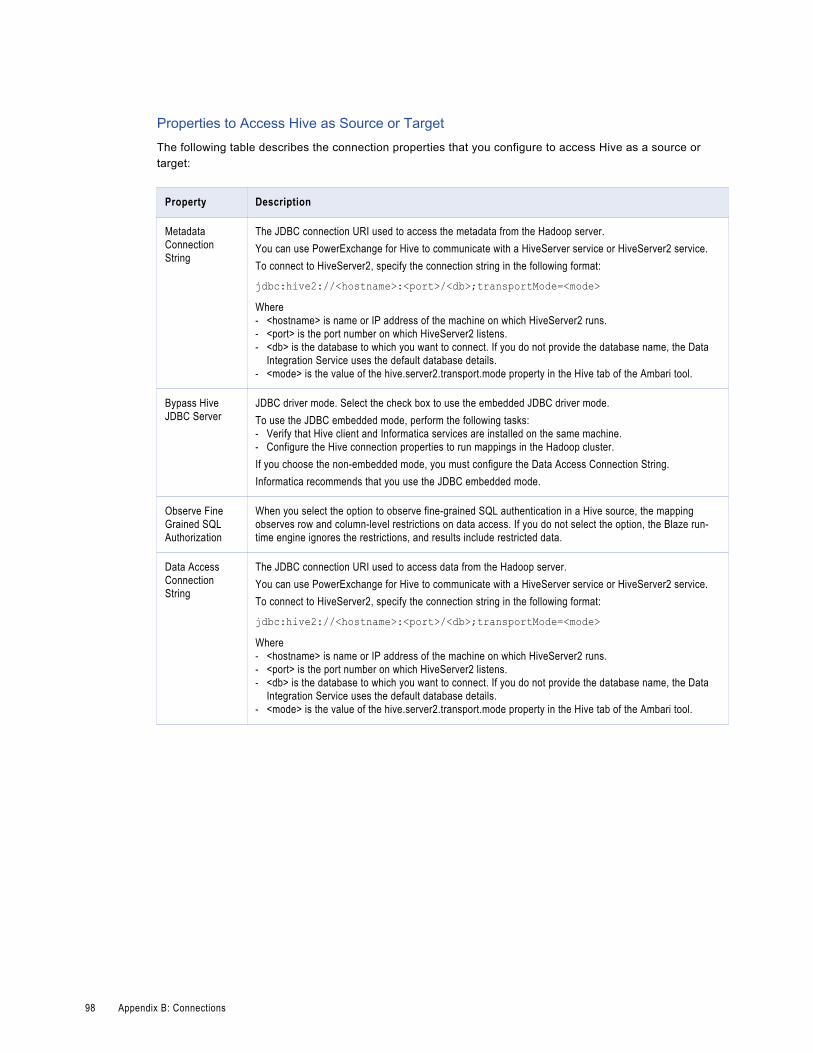
Properties to Access Hive as Source or TargetThe following table describes the connection properties that you configure to access Hive as a source or target:
Property Description
Metadata Connection String
The JDBC connection URI used to access the metadata from the Hadoop server.You can use PowerExchange for Hive to communicate with a HiveServer service or HiveServer2 service.To connect to HiveServer2, specify the connection string in the following format:
jdbc:hive2://<hostname>:<port>/<db>;transportMode=<mode>Where- <hostname> is name or IP address of the machine on which HiveServer2 runs.- <port> is the port number on which HiveServer2 listens.- <db> is the database to which you want to connect. If you do not provide the database name, the Data
Integration Service uses the default database details.- <mode> is the value of the hive.server2.transport.mode property in the Hive tab of the Ambari tool.
Bypass Hive JDBC Server
JDBC driver mode. Select the check box to use the embedded JDBC driver mode.To use the JDBC embedded mode, perform the following tasks:- Verify that Hive client and Informatica services are installed on the same machine.- Configure the Hive connection properties to run mappings in the Hadoop cluster.If you choose the non-embedded mode, you must configure the Data Access Connection String.Informatica recommends that you use the JDBC embedded mode.
Observe Fine Grained SQL Authorization
When you select the option to observe fine-grained SQL authentication in a Hive source, the mapping observes row and column-level restrictions on data access. If you do not select the option, the Blaze run-time engine ignores the restrictions, and results include restricted data.
Data Access Connection String
The JDBC connection URI used to access data from the Hadoop server.You can use PowerExchange for Hive to communicate with a HiveServer service or HiveServer2 service.To connect to HiveServer2, specify the connection string in the following format:
jdbc:hive2://<hostname>:<port>/<db>;transportMode=<mode>Where- <hostname> is name or IP address of the machine on which HiveServer2 runs.- <port> is the port number on which HiveServer2 listens.- <db> is the database to which you want to connect. If you do not provide the database name, the Data
Integration Service uses the default database details.- <mode> is the value of the hive.server2.transport.mode property in the Hive tab of the Ambari tool.
98 Appendix B: Connections
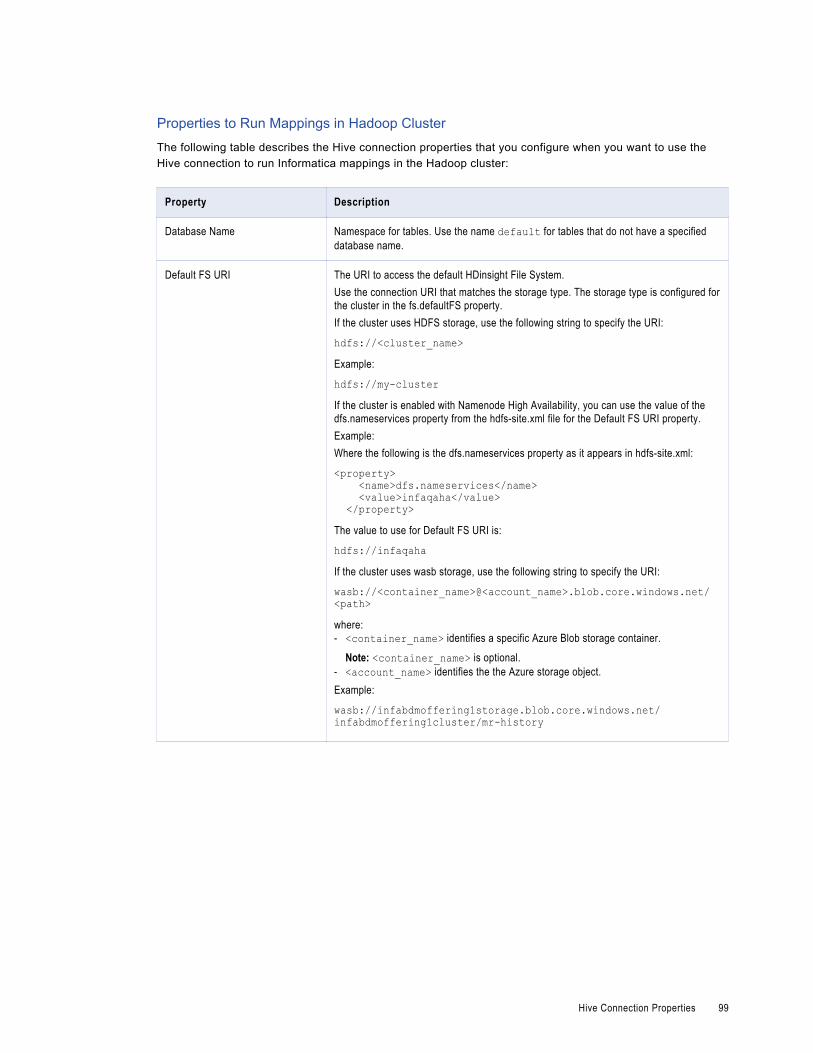
Properties to Run Mappings in Hadoop ClusterThe following table describes the Hive connection properties that you configure when you want to use the Hive connection to run Informatica mappings in the Hadoop cluster:
Property Description
Database Name Namespace for tables. Use the name default for tables that do not have a specified database name.
Default FS URI The URI to access the default HDinsight File System.Use the connection URI that matches the storage type. The storage type is configured for the cluster in the fs.defaultFS property.If the cluster uses HDFS storage, use the following string to specify the URI:
hdfs://<cluster_name>Example:
hdfs://my-clusterIf the cluster is enabled with Namenode High Availability, you can use the value of the dfs.nameservices property from the hdfs-site.xml file for the Default FS URI property.Example:Where the following is the dfs.nameservices property as it appears in hdfs-site.xml:
<property> <name>dfs.nameservices</name> <value>infaqaha</value> </property>The value to use for Default FS URI is:
hdfs://infaqahaIf the cluster uses wasb storage, use the following string to specify the URI:
wasb://<container_name>@<account_name>.blob.core.windows.net/<path>where:- <container_name> identifies a specific Azure Blob storage container.
Note: <container_name> is optional.- <account_name> identifies the the Azure storage object.Example:
wasb://infabdmoffering1storage.blob.core.windows.net/infabdmoffering1cluster/mr-history
Hive Connection Properties 99
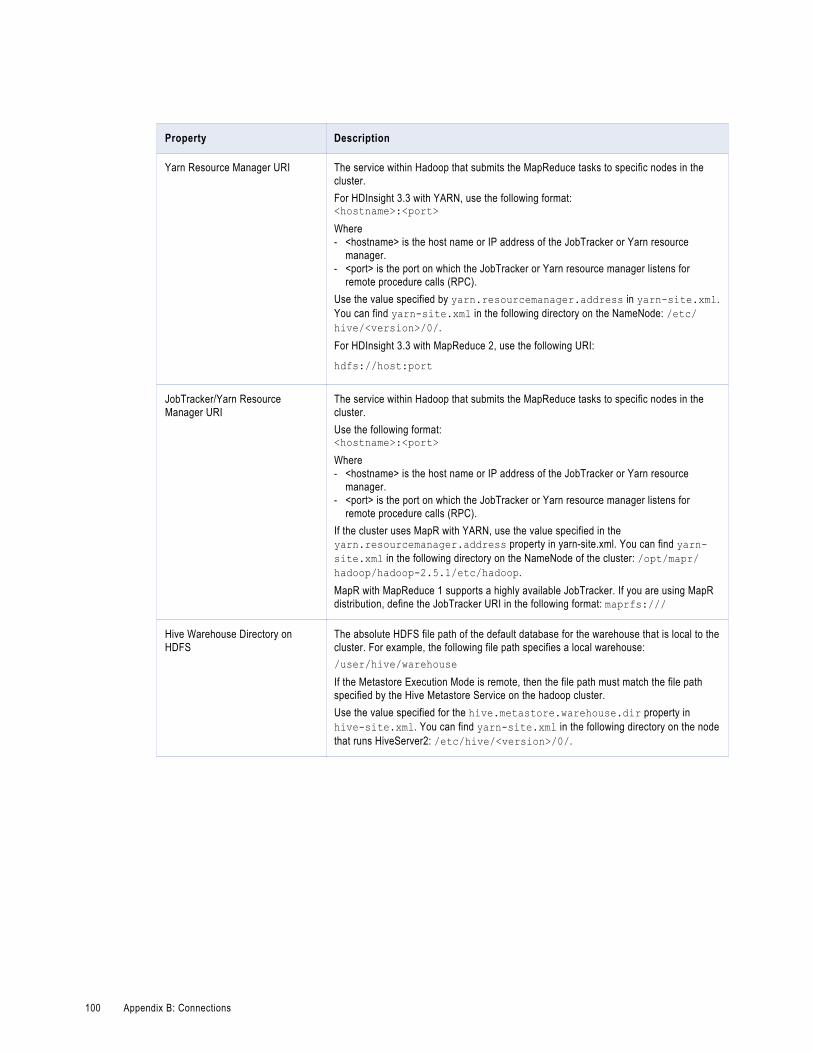
Property Description
Yarn Resource Manager URI The service within Hadoop that submits the MapReduce tasks to specific nodes in the cluster.For HDInsight 3.3 with YARN, use the following format:<hostname>:<port>Where- <hostname> is the host name or IP address of the JobTracker or Yarn resource
manager.- <port> is the port on which the JobTracker or Yarn resource manager listens for
remote procedure calls (RPC).Use the value specified by yarn.resourcemanager.address in yarn-site.xml. You can find yarn-site.xml in the following directory on the NameNode: /etc/hive/<version>/0/.For HDInsight 3.3 with MapReduce 2, use the following URI:
hdfs://host:port
JobTracker/Yarn Resource Manager URI
The service within Hadoop that submits the MapReduce tasks to specific nodes in the cluster.Use the following format:<hostname>:<port>Where- <hostname> is the host name or IP address of the JobTracker or Yarn resource
manager.- <port> is the port on which the JobTracker or Yarn resource manager listens for
remote procedure calls (RPC).If the cluster uses MapR with YARN, use the value specified in the yarn.resourcemanager.address property in yarn-site.xml. You can find yarn-site.xml in the following directory on the NameNode of the cluster: /opt/mapr/hadoop/hadoop-2.5.1/etc/hadoop.MapR with MapReduce 1 supports a highly available JobTracker. If you are using MapR distribution, define the JobTracker URI in the following format: maprfs:///
Hive Warehouse Directory on HDFS
The absolute HDFS file path of the default database for the warehouse that is local to the cluster. For example, the following file path specifies a local warehouse:/user/hive/warehouseIf the Metastore Execution Mode is remote, then the file path must match the file path specified by the Hive Metastore Service on the hadoop cluster.Use the value specified for the hive.metastore.warehouse.dir property in hive-site.xml. You can find yarn-site.xml in the following directory on the node that runs HiveServer2: /etc/hive/<version>/0/.
100 Appendix B: Connections
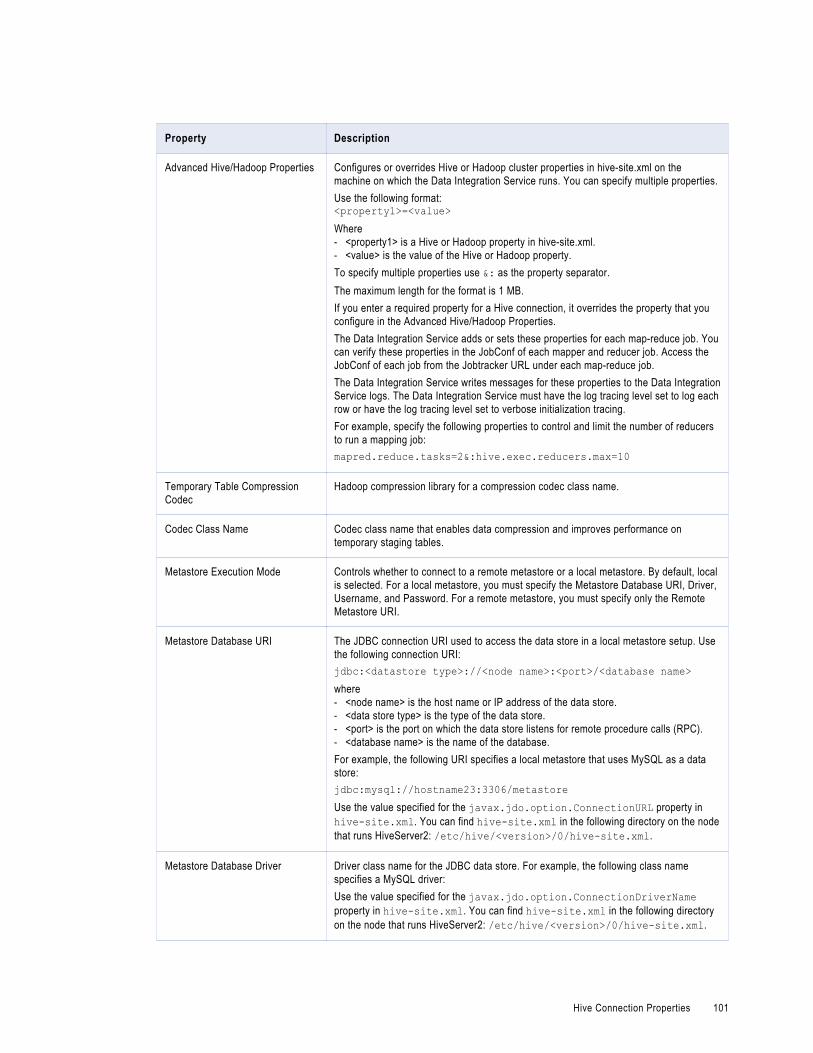
Property Description
Advanced Hive/Hadoop Properties Configures or overrides Hive or Hadoop cluster properties in hive-site.xml on the machine on which the Data Integration Service runs. You can specify multiple properties.Use the following format:<property1>=<value>Where- <property1> is a Hive or Hadoop property in hive-site.xml.- <value> is the value of the Hive or Hadoop property.To specify multiple properties use &: as the property separator.The maximum length for the format is 1 MB.If you enter a required property for a Hive connection, it overrides the property that you configure in the Advanced Hive/Hadoop Properties.The Data Integration Service adds or sets these properties for each map-reduce job. You can verify these properties in the JobConf of each mapper and reducer job. Access the JobConf of each job from the Jobtracker URL under each map-reduce job.The Data Integration Service writes messages for these properties to the Data Integration Service logs. The Data Integration Service must have the log tracing level set to log each row or have the log tracing level set to verbose initialization tracing.For example, specify the following properties to control and limit the number of reducers to run a mapping job:mapred.reduce.tasks=2&:hive.exec.reducers.max=10
Temporary Table Compression Codec
Hadoop compression library for a compression codec class name.
Codec Class Name Codec class name that enables data compression and improves performance on temporary staging tables.
Metastore Execution Mode Controls whether to connect to a remote metastore or a local metastore. By default, local is selected. For a local metastore, you must specify the Metastore Database URI, Driver, Username, and Password. For a remote metastore, you must specify only the Remote Metastore URI.
Metastore Database URI The JDBC connection URI used to access the data store in a local metastore setup. Use the following connection URI:jdbc:<datastore type>://<node name>:<port>/<database name>where- <node name> is the host name or IP address of the data store.- <data store type> is the type of the data store.- <port> is the port on which the data store listens for remote procedure calls (RPC).- <database name> is the name of the database.For example, the following URI specifies a local metastore that uses MySQL as a data store:jdbc:mysql://hostname23:3306/metastoreUse the value specified for the javax.jdo.option.ConnectionURL property in hive-site.xml. You can find hive-site.xml in the following directory on the node that runs HiveServer2: /etc/hive/<version>/0/hive-site.xml.
Metastore Database Driver Driver class name for the JDBC data store. For example, the following class name specifies a MySQL driver:Use the value specified for the javax.jdo.option.ConnectionDriverName property in hive-site.xml. You can find hive-site.xml in the following directory on the node that runs HiveServer2: /etc/hive/<version>/0/hive-site.xml.
Hive Connection Properties 101
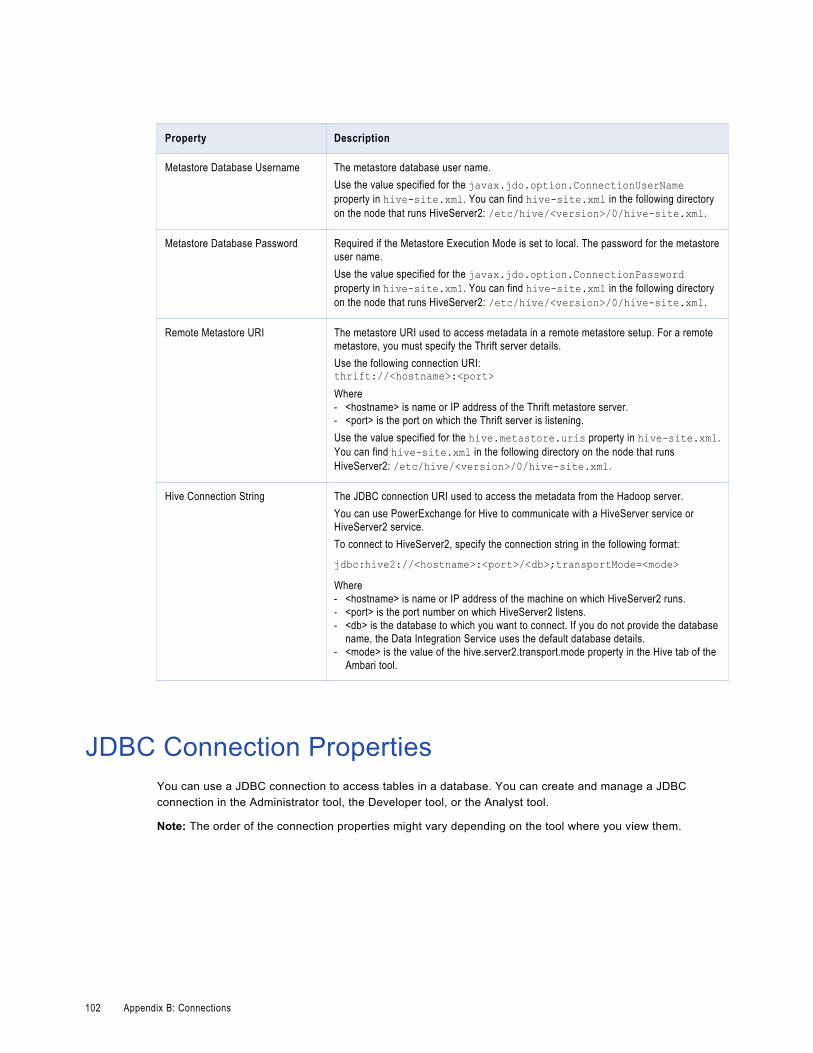
Property Description
Metastore Database Username The metastore database user name.Use the value specified for the javax.jdo.option.ConnectionUserName property in hive-site.xml. You can find hive-site.xml in the following directory on the node that runs HiveServer2: /etc/hive/<version>/0/hive-site.xml.
Metastore Database Password Required if the Metastore Execution Mode is set to local. The password for the metastore user name.Use the value specified for the javax.jdo.option.ConnectionPassword property in hive-site.xml. You can find hive-site.xml in the following directory on the node that runs HiveServer2: /etc/hive/<version>/0/hive-site.xml.
Remote Metastore URI The metastore URI used to access metadata in a remote metastore setup. For a remote metastore, you must specify the Thrift server details.Use the following connection URI:thrift://<hostname>:<port>Where- <hostname> is name or IP address of the Thrift metastore server.- <port> is the port on which the Thrift server is listening.Use the value specified for the hive.metastore.uris property in hive-site.xml. You can find hive-site.xml in the following directory on the node that runs HiveServer2: /etc/hive/<version>/0/hive-site.xml.
Hive Connection String The JDBC connection URI used to access the metadata from the Hadoop server.You can use PowerExchange for Hive to communicate with a HiveServer service or HiveServer2 service.To connect to HiveServer2, specify the connection string in the following format:
jdbc:hive2://<hostname>:<port>/<db>;transportMode=<mode>Where- <hostname> is name or IP address of the machine on which HiveServer2 runs.- <port> is the port number on which HiveServer2 listens.- <db> is the database to which you want to connect. If you do not provide the database
name, the Data Integration Service uses the default database details.- <mode> is the value of the hive.server2.transport.mode property in the Hive tab of the
Ambari tool.
JDBC Connection PropertiesYou can use a JDBC connection to access tables in a database. You can create and manage a JDBC connection in the Administrator tool, the Developer tool, or the Analyst tool.
Note: The order of the connection properties might vary depending on the tool where you view them.
102 Appendix B: Connections
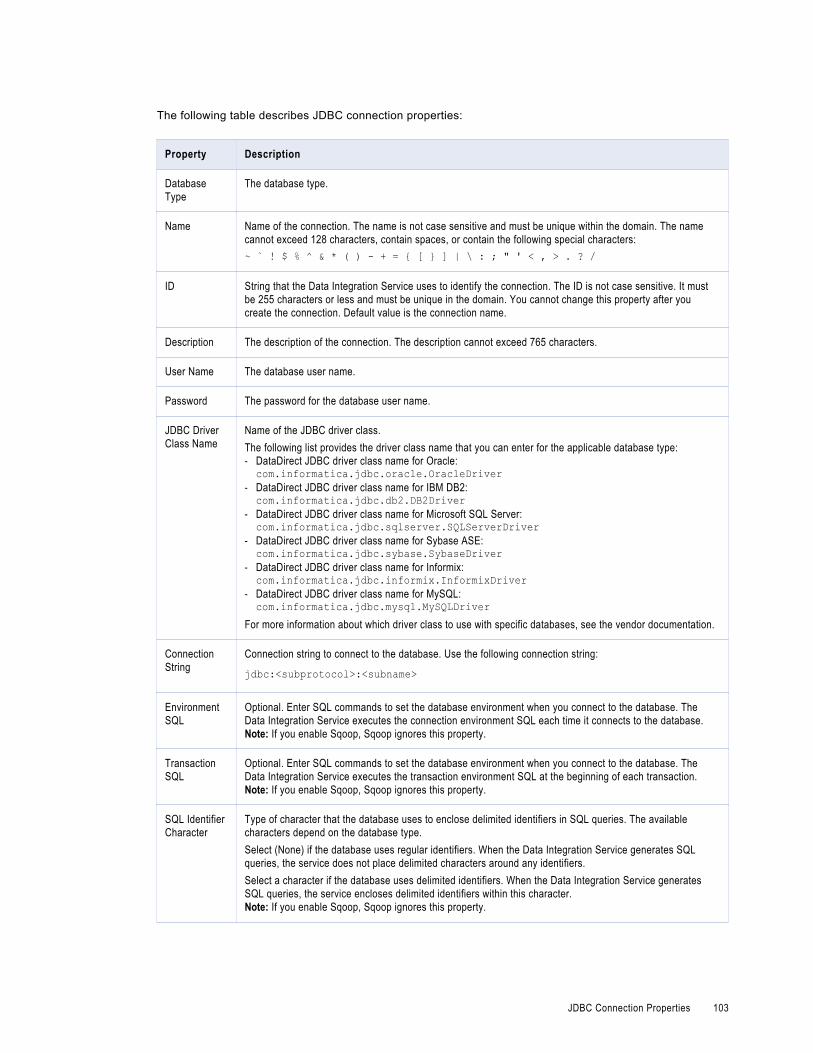
The following table describes JDBC connection properties:
Property Description
Database Type
The database type.
Name Name of the connection. The name is not case sensitive and must be unique within the domain. The name cannot exceed 128 characters, contain spaces, or contain the following special characters:~ ` ! $ % ^ & * ( ) - + = { [ } ] | \ : ; " ' < , > . ? /
ID String that the Data Integration Service uses to identify the connection. The ID is not case sensitive. It must be 255 characters or less and must be unique in the domain. You cannot change this property after you create the connection. Default value is the connection name.
Description The description of the connection. The description cannot exceed 765 characters.
User Name The database user name.
Password The password for the database user name.
JDBC Driver Class Name
Name of the JDBC driver class.The following list provides the driver class name that you can enter for the applicable database type:- DataDirect JDBC driver class name for Oracle:com.informatica.jdbc.oracle.OracleDriver
- DataDirect JDBC driver class name for IBM DB2:com.informatica.jdbc.db2.DB2Driver
- DataDirect JDBC driver class name for Microsoft SQL Server:com.informatica.jdbc.sqlserver.SQLServerDriver
- DataDirect JDBC driver class name for Sybase ASE:com.informatica.jdbc.sybase.SybaseDriver
- DataDirect JDBC driver class name for Informix:com.informatica.jdbc.informix.InformixDriver
- DataDirect JDBC driver class name for MySQL:com.informatica.jdbc.mysql.MySQLDriver
For more information about which driver class to use with specific databases, see the vendor documentation.
Connection String
Connection string to connect to the database. Use the following connection string:
jdbc:<subprotocol>:<subname>
Environment SQL
Optional. Enter SQL commands to set the database environment when you connect to the database. The Data Integration Service executes the connection environment SQL each time it connects to the database.Note: If you enable Sqoop, Sqoop ignores this property.
Transaction SQL
Optional. Enter SQL commands to set the database environment when you connect to the database. The Data Integration Service executes the transaction environment SQL at the beginning of each transaction.Note: If you enable Sqoop, Sqoop ignores this property.
SQL Identifier Character
Type of character that the database uses to enclose delimited identifiers in SQL queries. The available characters depend on the database type.Select (None) if the database uses regular identifiers. When the Data Integration Service generates SQL queries, the service does not place delimited characters around any identifiers.Select a character if the database uses delimited identifiers. When the Data Integration Service generates SQL queries, the service encloses delimited identifiers within this character.Note: If you enable Sqoop, Sqoop ignores this property.
JDBC Connection Properties 103
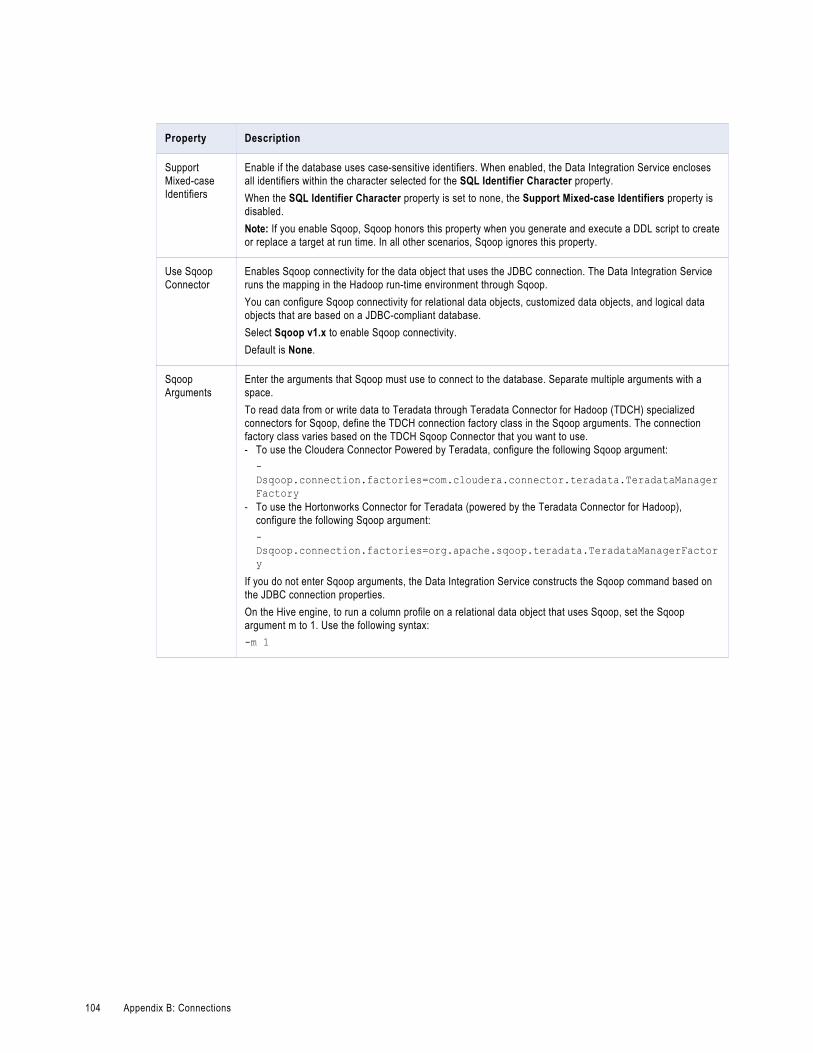
Property Description
Support Mixed-case Identifiers
Enable if the database uses case-sensitive identifiers. When enabled, the Data Integration Service encloses all identifiers within the character selected for the SQL Identifier Character property.When the SQL Identifier Character property is set to none, the Support Mixed-case Identifiers property is disabled.Note: If you enable Sqoop, Sqoop honors this property when you generate and execute a DDL script to create or replace a target at run time. In all other scenarios, Sqoop ignores this property.
Use Sqoop Connector
Enables Sqoop connectivity for the data object that uses the JDBC connection. The Data Integration Service runs the mapping in the Hadoop run-time environment through Sqoop.You can configure Sqoop connectivity for relational data objects, customized data objects, and logical data objects that are based on a JDBC-compliant database.Select Sqoop v1.x to enable Sqoop connectivity.Default is None.
Sqoop Arguments
Enter the arguments that Sqoop must use to connect to the database. Separate multiple arguments with a space.To read data from or write data to Teradata through Teradata Connector for Hadoop (TDCH) specialized connectors for Sqoop, define the TDCH connection factory class in the Sqoop arguments. The connection factory class varies based on the TDCH Sqoop Connector that you want to use.- To use the Cloudera Connector Powered by Teradata, configure the following Sqoop argument:-Dsqoop.connection.factories=com.cloudera.connector.teradata.TeradataManagerFactory
- To use the Hortonworks Connector for Teradata (powered by the Teradata Connector for Hadoop), configure the following Sqoop argument:-Dsqoop.connection.factories=org.apache.sqoop.teradata.TeradataManagerFactory
If you do not enter Sqoop arguments, the Data Integration Service constructs the Sqoop command based on the JDBC connection properties.On the Hive engine, to run a column profile on a relational data object that uses Sqoop, set the Sqoop argument m to 1. Use the following syntax:-m 1
104 Appendix B: Connections

Index
AAmazon EMR
configuring mappings 44
BBig Data Management
Blaze configuration 61
cluster installation 11, 14, 24cluster pre-installation tasks 12Data Quality 55single node installation 11, 14, 24single node pre-installation tasks 12
Blaze engine connection properties 85
CCloudera
creating a staging directory on HDFS 49cluster installation
any machine 16, 25primary NameNode 14, 24
connections HBase 85HDFS 85Hive 85JDBC 85
Connections Highly available cluster 70
DData Quality
address reference data files 56installing address reference data files 56reference data 55
Data Replication installation and configuration 12
developerCore.ini updating 50
HHadoop 85Hadoop connections
properties 85Hadoop distributions
Amazon EMR 44configuration tasks 49
Hadoop distributions (continued)configuring virtual memory limits 62Developer tool file 46staging directory on HDFS 49
HBase connections properties 95
HDFS connections properties 94
high availability NameNode 69ResourceManager 69
Highly available cluster Connection properties 70
Hive connections properties 96
Hive pushdown connection properties 85
IInformatica adapters
installation and configuration 11Informatica clients
installation and configuration 11Informatica services
installation and configuration 11
JJDBC connections
properties 102Sqoop configuration 102
NNameNode
high availability 69
Pprimary NameNode
NFS protocol 15, 24SCP protocol 14, 24
RResourceManager
high availability 69
105

SSpark deploy mode
Hadoop connection properties 85Spark engine
connection properties 85Spark Event Log directory
Hadoop connection properties 85Spark execution parameters
Hadoop connection properties 85
Spark HDFS staging directory Hadoop connection properties 85
Sqoop configuration copying JDBC driver jar files 52
Vvcore 61
106 Index