Guide Contents - Fujifilm
15
Guide Contents How can I ensure continuous service after initial resolution? ........................................................... 2 Changing the TCP/IP settings from the Centerware Services ........................................................... 3 Changing the TCP/IP settings from the printer’s control panel ........................................................ 4 Adding your EP-BB Proxy server from Centreware services ............................................................... 5 Adding your EP-BB Proxy server from the printer’s control panel ..................................................... 7 Enabling SOAP port from the Centerware Services........................................................................... 9 Enabling SOAP port from the printer’s control panel ..................................................................... 10 Checking your EP-BB communication status from the Centerware Services .................................. 11 Checking your EP-BB communication status from the printer’s control panel ............................... 13 EP-BB - Technology Automated meter management service Troubleshooting guide for non-communication
Transcript of Guide Contents - Fujifilm

Guide Contents
How can I ensure continuous service after initial resolution? ........................................................... 2
Changing the TCP/IP settings from the Centerware Services ........................................................... 3
Changing the TCP/IP settings from the printer’s control panel ........................................................ 4
Adding your EP-BB Proxy server from Centreware services ............................................................... 5
Adding your EP-BB Proxy server from the printer’s control panel ..................................................... 7
Enabling SOAP port from the Centerware Services........................................................................... 9
Enabling SOAP port from the printer’s control panel ..................................................................... 10
Checking your EP-BB communication status from the Centerware Services .................................. 11
Checking your EP-BB communication status from the printer’s control panel ............................... 13
EP-BB - Technology
Automated meter management service Troubleshooting guide for non-communication

How can I ensure continuous service after initial resolution?
Please be aware that connectivity for your automated meter management service may be lost if changes are made to your network, if your device is turned off, or if your device is moved to another part of your network. Connectivity can be confirmed via the user interface on your device.
In most cases, communication issues may be resolved by amending information that may be incorrect or missing in your printer configuration settings. It is recommended that your IT department manages or assists in resolutions.
NOTE: Depending on your devices and network, you may have two options for changing settings
These options are outlined in this guide, and include:
1. Changing settings via any PC on the same network as the Fuji Xerox device’s web interface(Centreware Internet services).
2. Changing settings via the control panel of the Fuji Xerox device.
Setting changes are to be made via one of these options only i.e. if steps have been completed via a PC, they do not need to be repeated at the printer.
NOTE: Some steps may be skipped if they are not required on the network e.g. (Proxy server)
NOTE: If you do not have an IT department or are not comfortable using the steps provided, please contact the EP-BB support team for assistance. Please note that IT knowledge specific to your environment may be required.
If you require further support, please email: [email protected]

Changing the TCP/IP settings from the Centerware Services
1. Type in the IP address of the Fuji Xerox Printer in your Internet browser address bar. e.g. 192.168.1.344
2. Select [Properties] This will prompt you with an admin Login box, in which you will enter the default: Username: 11111 and Password: x-admin
3. Under the 'Properties' menu: on the left select [Connectivity] then [Protocols] then [TCP/IP]
4. This section is critical for the communication, so you must have the correct details in the correct fields- NOTE: Select IPv4 mode unless your IT specialist advises otherwise.
5. Once complete, scroll down and select the [Apply] button which will save the settings.
NOTE: If any protocol settings were changed after selecting [Apply], you will prompted to reset the printer. This reset must take place to enable successful connectivity.
Use Domain name only if needed
Correct DNS are essential. One is sufficient
IMPORTANT

Changing the TCP/IP settings from the printer’s control panel
1. Press the physical [Log In/Out] button on the Control Panel.
2. Enter the System Administrators Login ID on the touchscreen and then select [Enter]
NOTE: The default System Administrator User ID is '11111'
3. Select [Tools] on the Touch Screen
4. Select [Connectivity & Network Setup] from the 'Group' column, and then select [Protocol
Settings] from the 'Features' column

5. This is where you will need change the TCP/IP settings if they are incorrect.
6. If you would like to change the settings, select the field you want to change and press [Change Settings] in the bottom right corner. Then select [Save].
NOTE: If any protocol settings were changed, the machine will reset automatically once you close this screen
Adding your EP-BB Proxy server from Centreware services
1. Type in the IP address of the Fuji Xerox Printer in your Internet browser address bar. E.g: 192.168.1.344
2. Select [Properties] This will prompt you with an admin Login box in which you will enter the default: Username: 11111 and Password: x-admin
Subnet Mask
Gateway Address
DNS Server Setup
IMPORTANT

3. From the 'Properties' menu on the left, click [Services], then click [EP Service], then click [BB Proxy Server Setup]
NOTE: If there is no EP service option, you must do this from the control panel of the device
4. In the 'Server Name' field, type in the IP Address or Host Name of your Proxy Server
5. In the 'Port Number' field, type in the Port Number that is used for your Proxy Server
NOTE: If your proxy server is not authenticated, skip to step 9
6. If your Proxy Server requires authentication, then click the 'Enabled' tick-box next to
the 'Authentication' head
7. In the 'Login Name' field, type in the username for your Proxy Server.
8. In the 'Password' and 'Retype Password' fields, type in the password for your Proxy Server.
9. Scroll to the bottom of the page and click [Apply].

Adding your EP-BB Proxy server from the printer’s control panel
1. Press the physical [Log In/Out] button on the Control Panel.
2. Enter the System Administrators Login ID on the touchscreen and then select [Enter]
NOTE: The default System Administrator User ID is '11111'
3. Select [Tools] on the Touch Screen
4. Select [Connectivity & Network Setup] from the 'Group' column, and then select
[EP Proxy Server Setup] from the 'Features' column

5. Select [HTTPS Proxy Server Name] and then select [Change Settings] Enter the 'Host Name'
or 'IP Address' of your Proxy Server and then press [Save].
6. Select [HTTPS Proxy Server Port Number] and then select [Change Settings]
7. Enter the 'Port Number' for your Proxy Server and then press [Save].
NOTE: If your proxy server is not authenticated, Skip to step 14.
8. Select [HTTPS Proxy Server Authentication] and then select [Change Settings]
9. Select [Enabled] and then press [Save].
10. Select [HTTPS Proxy Server Login Name] and then select [Change Settings]
11. Enter the 'Login Name' for your Proxy Server and then press [Save].
12. Select [HTTPS Proxy Server Password] then select [Change Settings]
13. Enter the 'Password' for your Proxy Server and then press [Save].
14. Select [Close] repeatedly to exit the tools menu
15. Press the [Log In/Out] button on the Control Panel to log out of Administrator mode.

Enabling SOAP port from the Centerware Services
1. Type in the IP address of the Fuji Xerox Printer in your Internet browser address bar. e.g. 192.168.1.344
2. Select [Properties] This will prompt you with an admin Login box in which you will enter the default: Username: 11111 and Password: x-admin
3. Under on the 'Properties' menu: on the left, select [Connectivity] then [Port Settings]
4. This section is critical for the communication, so you must have [Soap Port] Enabled. Select [Apply] to save settings.
IMPORTANT
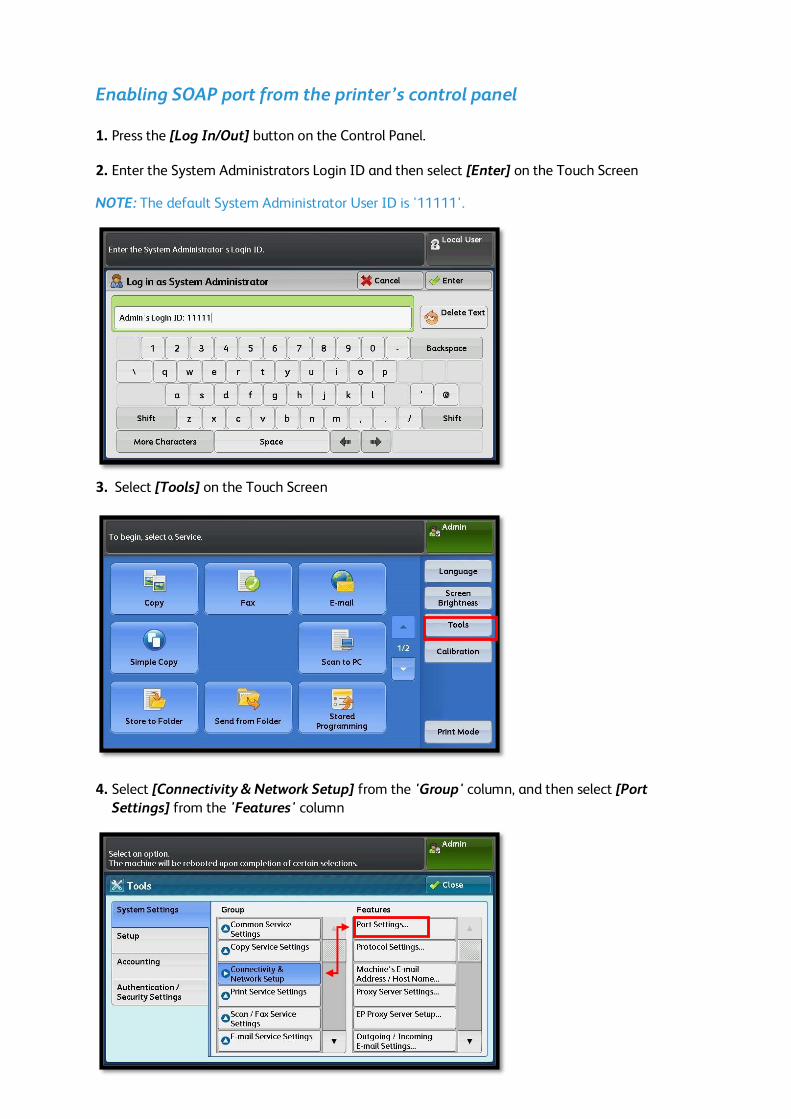
Enabling SOAP port from the printer’s control panel
1. Press the [Log In/Out] button on the Control Panel.
2. Enter the System Administrators Login ID and then select [Enter] on the Touch Screen
NOTE: The default System Administrator User ID is '11111'.
3. Select [Tools] on the Touch Screen
4. Select [Connectivity & Network Setup] from the 'Group' column, and then select [Port
Settings] from the 'Features' column

5. Scroll down with the arrows until you see [SOAP], and ensure that it is enabled. If not, select
[Change Settings] to make the required change. Note that the Port number should indicate
“Default - Port 80” (This is normally enabled by default unless someone has changed it)
Checking your EP-BB communication status from the Centerware Services
1. Type in the IP address of the Fuji Xerox Printer in your Internet browser address bar. e.g. 192.168.1.344
2. Select [Properties] This will prompt you with an admin Login box in which you will enter the default: Username: 11111 & Password: x-admin

3. From the 'Properties' menu on the left, click [Services], then click [EP Service], and then click
[Check EP Connection] and select start.
4. If communication is successful, the message below should appear within 2 minutes. Any other
message indicates a problem with the communication. If this is the case, you can either contact FXA for support (note that you may be required to interact with the device itself), or
you may test connection from the Device to obtain the error code (Refer to EP-BB control
panel check).
NOTE: There will be no error code to indicate a failed connection if you are checking communication
via Centreware services. To obtain the error code, you may check connection directly from the device control panel.
If you require further support, please email: [email protected]

Checking your EP-BB communication status from the printer’s control panel
1. Press the physical [Log In/Out] button on the Control Panel.
Enter the System Administrators Login ID on the touchscreen and then select [Enter]
NOTE: The default System Administrator User ID is '11111'
2. Select [Tools] on the Touch Screen
3. Select [Maintenance] on the ‘Features column’

4. Select [Check EP Connection] on the ‘Features column’
5. Select [Check EP Connection]
6. If communication is successful, the message below should appear. Any other message
indicates a communication problem
NOTE: If failure occurs, it may take up to 5 minutes to show the error message - Refer to next step showing an example of one type of communication failure.

7. If registration has failed, the below screen will appear. Note that the error message may vary,
and the time it takes to appear will range from seconds up to 5 minutes depending on the type
of error. Any error message simply means there is a communication problem. (A message for successful connection will appear within 45 seconds. If no message appears for over 1 minute,
it is likely there is a communication error)
NOTE: It is important to take note of the error code in the bottom left corner as this will assist our
FXA Technical support team in resolving the issue.
If you require further support, please email: [email protected]